#ini_set
Explore tagged Tumblr posts
Visit Tumblr Blog
Explore Tumblr blogs with no restrictions, modern design and the best experience.
Last Seen Tumblr Blogs


Fun Fact
25% of US internet users with an annual income of $80-100K use Tumblr.
Text
0 notes
Text
🚀 Prevent Buffer Overflow in Symfony: Best Practices & Code Examples
Buffer overflow vulnerabilities can have devastating consequences on your web applications — allowing attackers to execute arbitrary code, crash your server, or even take over your system. Symfony, a robust PHP framework, provides developers the tools to write secure applications, but it’s still your responsibility to implement proper safeguards.

In this guide, you’ll learn how to prevent buffer overflow in Symfony, with secure coding examples, links to our website vulnerability scanner online free, and tips to keep your apps safe.
🔍 Why Buffer Overflows Happen
Buffer overflows occur when an application writes more data into a buffer (memory area) than it was designed to hold. In PHP (and thus Symfony), they’re less common than in C, but they can still manifest through:
Unvalidated input written into files or memory
Large POST payloads overwhelming your scripts
Poorly handled binary data or file uploads
A proactive developer can prevent them by implementing input validation, limits, and proper handling of user data.
🧰 Use Our Free Website Security Checker Tool
Before diving deeper, check if your website is already vulnerable. We built a free, fast, and easy-to-use Website Vulnerability Scanner:

Screenshot of the free tools webpage where you can access security assessment tools.
We even provide a downloadable vulnerability assessment report to check Website Vulnerability when you scan your site:
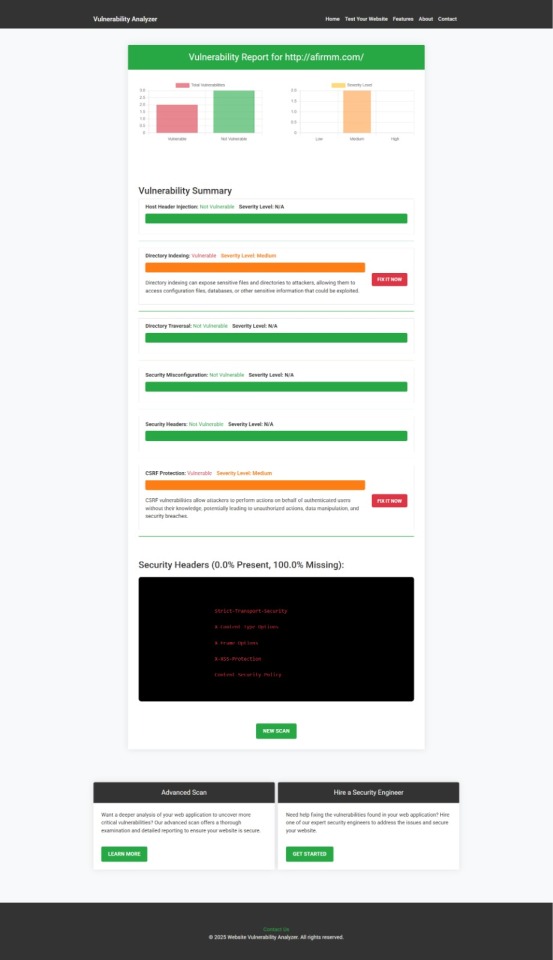
An Example of a vulnerability assessment report generated with our free tool, providing insights into possible vulnerabilities.
Don’t launch another feature before checking your site!
🛡️ How to Prevent Buffer Overflows in Symfony
1️⃣ Limit User Input Size
Symfony provides a robust validation component. Always validate and constrain incoming data. For example:
use Symfony\Component\Validator\Constraints as Assert; class UserInput { /** * @Assert\Length( * max = 255, * maxMessage = "Input too long, maximum is {{ limit }} characters" * ) */ private $comment; }
Here, any user comment longer than 255 characters will fail validation.
2️⃣ Use ini_set() to Limit POST and Upload Sizes
In your Symfony app (often via config/packages/framework.yaml), ensure PHP limits large payloads:
framework: http_method_override: false session: handler_id: null parameters: upload_max_filesize: 2M post_max_size: 8M
You can also enforce limits in your .htaccess or php.ini:
post_max_size = 8M upload_max_filesize = 2M
3️⃣ Use Streams for Large Files
When handling file uploads, avoid loading entire files into memory. Use Symfony’s StreamedResponse:
use Symfony\Component\HttpFoundation\StreamedResponse; $response = new StreamedResponse(function () { $handle = fopen('/path/to/largefile', 'rb'); while (!feof($handle)) { echo fread($handle, 1024); } fclose($handle); }); $response->send();
This prevents memory exhaustion (and possible overflow scenarios).
4️⃣ Filter Binary Data
If your app processes binary payloads (e.g., images, files), validate file type and size explicitly. Symfony’s File constraint helps:
use Symfony\Component\Validator\Constraints\File; class UploadModel { /** * @Assert\File( * maxSize = "2M", * mimeTypes = {"image/png", "image/jpeg"} * ) */ public $uploadedFile; }
💡 Learn More on Our Blog
For more security tips and coding best practices, visit our blog: 📖 https://www.pentesttesting.com/blog/
We regularly publish tutorials and in-depth guides for Symfony, Laravel, React, and beyond.
🔗 Related Services We Offer
✅ Web Application Penetration Testing
If you want professionals to test your Symfony application, check our dedicated service: 👉 https://www.pentesttesting.com/web-app-penetration-testing-services/
We’ll identify vulnerabilities and help you patch them fast.
🤝 Offer Cybersecurity Services to Your Clients
Are you an agency? We offer white-label cybersecurity services: 👉 https://www.pentesttesting.com/offer-cybersecurity-service-to-your-client/
Strengthen your portfolio and keep your clients safe under your brand.
📬 Stay Updated
Get the latest insights on application security by subscribing to our LinkedIn newsletter: 🔗 Subscribe on LinkedIn
👏 Final Thoughts
Buffer overflows in Symfony apps may not be as obvious as in low-level languages, but they still pose a risk when handling untrusted, oversized, or improperly validated input. By validating, limiting, and streaming data properly — and running regular security checks — you can keep your application robust and secure.
Try our free vulnerability scanner today: 👉 https://free.pentesttesting.com/
Have questions? Drop them in the comments or DM me!
1 note
·
View note
Text
Dưới đây là hướng dẫn thiết lập max_execution_time = 90 - Hướng dẫn fix The max_execution_ti me is set to a value that might be too low
🌿💖 Dưới đây là hướng dẫn thiết lập max_execution_time = 90 cho WordPress trong wp-config.php 👉🍀🍀 kèm khuyến nghị cấu hình cho Nginx/Apache để tránh timeout: 1. Thêm dòng sau vào wp-config.php (trước dòng /* That's all, stop editing! Happy publishing. */) 😲 // Tăng thời gian thực thi PHP @ini_set('max_execution_time', '90'); ✅ Dòng này giúp WordPress tăng giới hạn xử lý script dài như backup,…
0 notes
Text
Getting your website hacked is not fun. It's a serious matter that needs to be handled with care and intelligence. WordPress is gaining popularity with each passing day. Millions of websites are being powered by WP every minute of the day. However it's popularity is what makes it so vulnerable to hacking and security threats. Hackers find it easy to hack your WordPress websites through a majority of entry points. Thus, it becomes more important than ever to protect your websites from hacking and spamming. Hacking is something that cannot be stopped but it is something that should be prevented. Therefore, we have compiled a list of tips that many cloud service providers, including our own, use to prevent websites from being hacked. The article is going to focus on few ways that can be used to protect your website against hacking and ways that aren't discussed time and time again on the internet because we understand security is a serious issue and should not be taken lightly. 0. Test Your Site For Vulnerabilities Most website developers do not pay attention to the security status of a website. It's relatively easy to do than it looks. Here are some security testing tools to ensure your website does not expose a common vulnerability. 1. Don't Use Premium Plugins For Free There is a reason why premium plugins are not free. Downloading them from anywhere (un-authorized sites) for free put only your website at risk and obviously, you wouldn't want that. These pirated copies come with many flaws which give hackers' direct entry into your website. Though it's understandable what it's like to work within a budget, it doesn't make sense at all to use pirated plugins. There are various free plugins available as well which can be availed without having to spend even a penny. If you are still really in need of that plugin, you should just pay for it and use it. You can always go to the digital content marketplace like ThemeForest to shop for authentic WordPress plugins at a low cost. Alternatively, you can hire a freelancer or WordPress expert to do a quick feature upgrade on WordPress. 2. Eliminate PHP Error Reporting Your website's security has a lot to do with the loopholes and weak spots in your website. As a matter of fact, if your theme or plugin or any function does not respond properly, it will naturally generate an error message. These error messages may help you solve the problem but for hackers, these are some of the entry points to get access to your website. These messages contain the server path, that's what all hackers are always on the lookout for. Therefore, it is always suggested to disable this error message. This can be done by adding a code in the wp-config.php file. Simply copy and paste this code anywhere in your wp-config file. error_reporting(0); @ini_set(‘display_errors’, 0); 3. Disable Dashboard File Editing By default, WordPress comes with an option to edit your theme and plugin files right from your dashboard i.e. appearance -> editor. In case, a hacker gains access to your site, he/she can easily make changes in the code and execute anything he/she wants. Therefore, it is always a bright idea to disable file editing option from your dashboard by adding this code snippet to your wp-config.php file. define( ‘DISALLOW_FILE_EDIT’, true ); 4. Regular Backups As we discussed earlier, hacking cannot be stopped, it can only be prevented. Thus, if ever any hacker finds an entry point to your website, or hacks it completely, there is no way you can recover without having a secondary copy of your site. Regularly backing up your website offers you an option to recover your site if something goes wrong with it. 5. Always use Security Plugins WordPress comes packed with many security plugins that automatically backs up your website on a daily basis as well as secures it against hacking and spamming. Some of the best plugins are: WordFense security plugin, BulletProof security, and Sucuri Security plugin.
6. Hide your WordPress Version Well, you probably are wondering why? WordPress is growing and every now and then you encounter a new upgrade of WordPress version. If you run a WordPress website, you probably have heard that you should keep your website up-to-date to prevent security threats. If in case, you cannot update your WP version for a reason or two, you are giving an open invitation to hackers to hack your website. However, you can keep this threat at bay by hiding your current version. Reason? As the bugs of previous versions are well known to everybody on the web who uses WordPress, hackers can easily use those loopholes and get access to your website. Hiding WordPress version gives you full control over the update of the latest versions while keeping hacking threats at bay. There are certain ways to do so: Using an older theme? Write this code in your theme's header.php file ('version'); ?>" /> For newer themes, use this code instead 7. Use 2-Factor Login Authentication 2-Factor login authentication, as the name suggests, is a two level of login to a service or page. Wordpress provides many plugins that help you efficiently implement this 2 level login authentication to your website and make your site more secure. Clef and Rublon are two most popular WordPress plugins that help you implement this strategy. Clef makes use of your phone camera to set up the login authentication. However, Rublon uses emails for two-factor authentication. You may also like to explore more two-factor authentication plugins for WordPress. 8. Protect Your Files: Htaccess If you have been running a Wordpress website for quite some time, you probably are familiar with the .htaccess file. Well, as a matter of fact, it is one of the most important files of your website. .htaccess file directly affects the permalinks of a website and how it deals with the security issues. .htaccess file can help you prevent your site against any hacking by allowing you to add various code snippets in it. However, make sure whatever code you add in the file should be outside #BEGIN WordPress and #END WordPress tags. First of all, you should hide your wp-config.php file completely since it is responsible for everything on your website and includes plenty of important details such as database details, user details and more. Add this code to hide it: order allow, deny from all By adding the following code snippet into a new .htaccess file and upload it to the wp-admin, you can restrict admin access. order deny, allow from 192.168.5.1 deny from all You can also restrict wp-login.php in the almost same way. Add the following code to your .htaccess file. order Deny from all # access from my IP address from 192.168.5.1 There are various other ways in which you can modify your .htaccess file and secure your website against hackers and spammers. 9. Use SSL Certificates to Encrypt Data. Using a Secure Socket Layer (SSL) certificate is a very smart move to secure the admin panel of your WordPress website. The SSL certificate always ensures a safe data transfer between the server and user browser. This makes it difficult for the hacker to spoof into your information or breach the connection. For a WordPress website, it is very easy to set up an SSL certificate. You can either purchase it from the dedicated and authorized SSL reseller like www.cheapsslshop.com at a huge discount price or you can also ask your hosting service provider to provide you with one. Most of the hosting service provider arranges it as a part of their service. The SSL certificates also give a boost to your Google ranking. If a website doesn't have SSL certificate then it will be ranked lower than the one which has the certificate. This will definitely increase traffic on your WordPress website. 10. Change the WordPress database table prefix. Do you know that the files in the WordPress database table have a prefix “wp-”? Why am I telling this in public, the hackers will get
benefited right? They already know that it is just you who didn’t know this (If that’s a shocker to you). Any hacker can hack into your database files just by simple SQL injection. Hackers and spammers run automated codes for SQL injections. Most of you didn’t bother that all the files in the WordPress database start with the initials “wp-”. You need to change the prefix as this can potentially harm your website. In order to change the prefix of the WordPress database table, you can either do it manually or with the help of WordPress plugins. In either way, you can easily change the WordPress database table prefix. Plugins like WP-DBManager or iThemes Security can help you do the job with just a click of a button. (Make sure you backup your site before doing anything to the database). 11. Set Directory Permissions Carefully Most of the websites are hosted on the shared hosting network. This is where wrong directory permissions can be not just harmful but fatal. So, in a shared hosting network, it is wiser to change files and directory permissions to secure the website at the hosting level. Set the directory permissions to “755” and files to “644” protects the whole file system – directories, subdirectories, and individual files. You can easily do it with the help of either the file manager in your hosting control panel or through the terminal via the “chmod” command. You can also use the iTheme Security plugin to check the current permission setting. 12. Conduct The Website Security Audit Regularly It doesn’t matter how clever you are, expert hackers always search for new ways to annihilate your website/blog. So, don’t be careless when it comes to your site security. Just conduct the website security audit from time-to-time, find loopholes, and eliminate them as soon as possible. If you can’t do that, consult a reputed tech-company to perform the action. 13. Always Be Prepared For Emergency Situations Don’t sit idle even if your website is safe and you are implementing the website security practices regularly. Just prepare yourself for unexpected situations, such as, Unexpected Situations Possible solutions Your website is hacked Don’t get panic at all, Ask your hosting provider to backup your site, Retrieve your site using backup files, Do the malware removal work. 14. Open Your Website On Virus-Free Computers/Laptops There are many individuals who own and operate several websites to increase their earnings. Successful website management and operation tasks keep them busy at all the times. So, they tend to access their sites on any available computer/laptop to keep it up-to-date. This is a dangerous practice that can provide a backdoor for hackers to compromise your website. When you open your website on a computer/laptop (infected with harmful Virus/malware), it is exposed to online security vulnerabilities. Even a single security lapse in your website can enable hackers to bring it down and cause limitless damage to you. Make sure your computers/laptops are free from harmful programs/data grabbing applications/viruses, etc. Format the infected systems and install the recommended OS, Antivirus, web-browsers, etc. This will reduce the scale of your site’s exposure to online security threats up to a great extent. Wrapping up WordPress security is certainly so much more than merely installing a security plugin and keeping strong login passwords. You need to follow a particular strategy and make sure you work on every aspect that may break down your WordPress website. We hope you find these tips useful and help you protect your site against hacking and spamming. Article Updates Updated on Aug 2017 with more useful tips. Updated on Dec 2017 with more useful tips. Updated on July 2018 with more useful tips. This article is contributed by Emily Johns and Lauren McLaren. Emily Johns is a WordPress developer by profession and a writer by hobby. She works for Wordsuccor Ltd., which is a leading custom WordPress plugin development company based in the USA.
If you need to hire a WordPress developer you can connect with them through Google+, Facebook, and Twitter. Lauren McLaren was born and raised in Australia. She is working as blogger and professional Digital Marketer for Digital Muscle Limited- An SEO Company in Australia providing affordable seo services. She’s hardworking, competent and trustworthy. Her role within the company is to manage team of SEO Experts. In her spare time, she loves to read, cook and watch movies.
0 notes
Text
How to Create a Basic Login System with PHP
Create a Basic Login System with PHP <?php error_reporting(E_ALL); ini_set(‘display_errors’, 1); // password prtected code if (isset($_POST[‘password’])) { if ($_POST[‘password’] == ‘password’) { setcookie(“password”, $_POST[‘password’], time()+(10*365*24*60*60)); header(‘Location: ‘.$_SERVER[‘REQUEST_URI’]); } } if(isset($_COOKIE[‘password’])) { if($_COOKIE[‘password’] == ‘password’)…
0 notes
Link
0 notes
Text
Disabling debugging in WordPress - 100% guaranteed
Disabling debugging in WordPress - 100% guaranteed
WordPress has a wonderful feature for debugging the site; But this feature is troublesome for many site managers, especially beginners who don't have a lot of knowledge in WordPress.
How does debugging work in WordPress?
By enabling site debugging in WordPress, you may see errors and warnings on the site (you may even see a code snippet). Site debugging is usually used when a site administrator wants to examine site errors and warnings and fix them if necessary.
Now, if you always want to keep the debugging feature of the site active, you may worry the users and visitors of the site by displaying various warnings and warnings, and this issue is very dangerous for the user experience (UX). Because users think your site has various problems and leave the site immediately.
Therefore, you should only use the debugging feature when you intend to examine site errors and warnings; Otherwise, you should disable debugging.
Enable and disable debug mode in WordPress
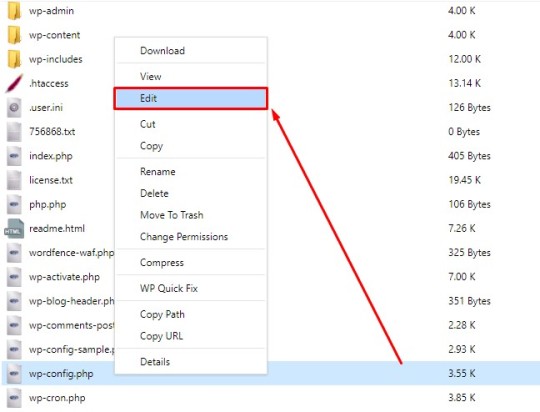
It is very easy to enable or disable debug mode. You just need to enter the File Manager after entering the host's control panel and then click on the Public_HTML folder. Now find the wp-config.php file and right click on the edit option.
Go to the end of the wp-config.php file and find the following code snippet.
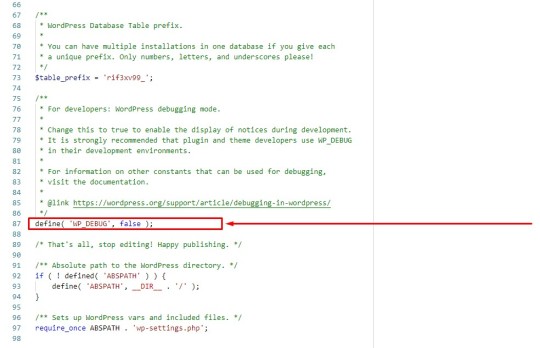
define( 'WP_DEBUG', false );
If the word false is written at the end of this code, it means that the debug mode is disabled; But if the word true is written, it means that the debug mode is active.
You can easily determine whether the site is in debug mode or not; Of course, as mentioned, we still emphasize that you enable the debug mode only when necessary and disable the debug mode immediately after checking the errors and warnings.
Why is the error still displayed after disabling debugging?
We have recently noticed that many users, after disabling the debug mode, still encounter various errors and warnings and cannot eliminate all of these errors. That's why we decided to introduce a 100% guaranteed solution so that you won't face such problems again.
1. First, enter the host's control panel and click on the File Manager option.
2. Then enter the Public_HTML folder.
3. Now find the wp-config.php file and right click on the edit option.
4. Go to the end of the file, find the following code snippet and delete it altogether.
define( 'WP_DEBUG', false );
• Replace the above code with the following code snippet and save the applied changes at the end.
Changing the codes in the wp-config.php file to disable debugging in WordPress:
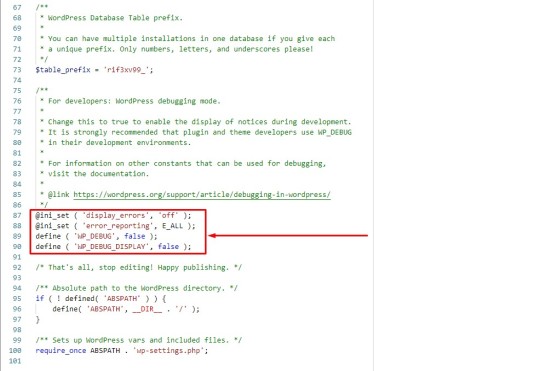
@ini_set ( 'display_errors', 'off' );
@ini_set ( 'error_reporting', E_ALL );
define ( 'WP_DEBUG', false );
define ( 'WP_DEBUG_DISPLAY', false );
• Check the site again.
You will see that all errors and warnings are gone. So easily, in the shortest possible time, you were able to disable the debugging feature in WordPress in a completely principled way.
0 notes
Text
PHP defaults to a PHP memory limit of 16MB. Some websites may require more memory than 32MB. It is not uncommon for sites to require memory limits higher than 64MB. The default upload file limit of 2MB is quite low, particularly if the site uses photos that can easily exceed 32MB in size. Script Execution Time is 30 seconds by default. However, some tasks (e.g. service cron tasks), require more time. There are many ways to increase PHP memory, upload file limit, or execution time. You only need one. Your system configuration will determine which one is best for you. 1. Limit the memory If you have access to the server’s php.ini, this is the best approach. It will not work in shared hosting environments. However, your host might be able to adjust it for you. This change will impact all websites and PHP scripts that are hosted on the server. - Find the php.ini file that is used by your web server. To locate it, you can use the PHP function phpinfo(). - Edit memory_limit in the PHP.ini file. This is usually in a section called Resources Limits. memory_limit = 32M. Maximum memory that a script can consume (32MB). If there isn't a section for this, add the line above to the end of your file. Restart Apache. Note: You may have two PHP.ini files if you use XAMPP/WAMP. One is under the PHP directory, the other under Apache/bin. Edit the file in the XAMPP/Apache/bin directory to change your memory limit. These solutions may not be applicable to all sites but are more limited in scope. 1.2. .htaccess configuration If you don't have access to the php.ini file, this is helpful. Edit (Create the .htaccess) file located in the site root directory (public), and add the following line to it: php_value 32M. This method is only applicable if PHP runs as an Apache module. 1.3. Configuration in PHP scripts Add the following line where you need to give PHP more memory: ini_set('memory_limit', '32M'); 1.4. Memory limits for Shared Hostings Some shared hosting environments restrict access to the PHP memory limit setting. If you are unable to make the change yourself please contact your hosting provider or find a host that offers more flexibility. 2. Upload file Size limits can be set by your PHP installation to limit the upload file size. The default limit will be 2MB for uploading files. You will need to configure the following configuration options: - upload_max_filesize-- Maximum file size for an uploaded file. - memory_limit: This determines the maximum memory a script can allocate in bytes. This prevents poorly written scripts from consuming all the memory available on a server. This directive can be set to -1 if you do not want to exceed the memory limit. - post_max_size: This setting determines the maximum size of any post data that can be uploaded. This setting affects file upload. Uploading large files will require this value to be greater than upload_max_filesize. Memory_limit can also be used to limit file uploading if memory limit has been enabled in your configure script. Memory_limit should be greater than post_max_size. This problem can be fixed by two different methods. 2.1. PHP.ini configuration Locate the php.ini files used by your web server. To locate it, you can use the PHP function phpinfo(). - modify the next parameters memory_limit = 32M upload_max_filesize= 10M post_max_size= 20M - Restart Apache 2.2. .htaccess configuration If you don't have access to the php.ini file, this is helpful. Edit (Create the .htaccess) file located in the site root directory. Add the following line: PHP_value upload_max_filesize 5M PHP_value post_max_size 15M PHP_value memory_limit 32M. This method is only applicable if PHP runs as an Apache module. 3. Execution Time You can increase the script execution time PHP scripts cannot be executed for longer periods of time. If it exceeds the time limit, it will produce the following error message: "Fatal error. Maximum execution time of yourscript.
php exceeded". To make your PHP script run for longer times, you can use any of these methods to increase the PHP script's maximum execution time limit. 3.1. PHP.ini configuration Locate the php.ini files used by your web server. To find it, you can use the PHP function phpinfo(). - Find and modify the next parameter: max_execution_time =45 Change the value (in seconds) or set it to 0 for an infinite time. - Restart Apache 3.2. .htaccess configuration .htaccess configuration Edit or Create the .htaccess File in the site root (public), or in the directory for your script. Add the following line: PHP_value max_execution_time45 Change the value (in seconds) or set it to 0 for an infinite time 3.3. Configuration in PHP scripts This is the most efficient method because it applies only to that script and does not allow any other scripts to consume or waste the system resource. For infinite execution, you can call the following PHP function with set_time_limit (300 ) as the parameter. http://php.net/
0 notes
Text
file_get_contentsでファイルを呼び出せない
テストサーバーではうまく行ったのに、本番サーバーに移すとfile_get_contentsでファイルを呼び出せない事象が発生。 エラーも出ないし、何かがおかしいと思いつつ悩み続け・・・特にファイルもいじっていないし違うといえばテストサーバーと本番サーバーが違うということだけ。サーバーの設定が若干違うからと思いつつ一旦エラーを確認することに。 <?php ini_set('display_errors', "On"); $target_url =…

View On WordPress
0 notes
Text
Insecure Deserialization Vulnerabilities in Laravel: How to Protect Your Web Applications
Introduction: What is Insecure Deserialization?
Insecure deserialization is a vulnerability that occurs when untrusted data is deserialized into objects. In the context of a Laravel application, this could allow attackers to manipulate serialized objects, leading to remote code execution, data tampering, or other severe consequences.

Understanding this vulnerability is crucial for maintaining a secure web application, and in this blog post, we will dive into how to identify and mitigate insecure deserialization in Laravel applications.
The Risk of Insecure Deserialization in Laravel
Laravel uses PHP’s native serialize() and unserialize() functions for object serialization. If user-controlled data is deserialized, malicious actors could inject code that manipulates the application’s behavior.
For instance, an attacker could inject a payload that, when deserialized, executes unwanted code, resulting in security breaches such as privilege escalation or system compromise.
Let’s break down an example of how this vulnerability works.
Coding Example: How Insecure Deserialization Works in Laravel
Consider a Laravel application that uses serialization to store user preferences in a session:
// Store user preferences in a session $userPreferences = ['theme' => 'dark', 'notifications' => 'enabled']; session(['user_preferences' => serialize($userPreferences)]);
Later, when the application retrieves these preferences:
// Retrieve and unserialize user preferences $userPreferences = unserialize(session('user_preferences'));
In this example, if the session data is manipulated or an attacker crafts a malicious payload, it could lead to harmful behavior. A simple attacker-controlled input like O:8:"stdClass":1:{s:3:"foo";s:5:"bar";} could cause the application to execute unintended actions.
Preventing Insecure Deserialization in Laravel
To prevent insecure deserialization, you should:
Avoid Unserialize User-Controlled Data: Don’t deserialize data from untrusted sources, especially user input. If necessary, use json_decode() instead of unserialize() as it is more secure for handling data.
Use Class Whitelisting: Laravel provides unserialize class whitelisting through the unserialize_callback_func PHP directive. This limits the classes that can be deserialized, reducing the risk of remote code execution.
Example:
ini_set('unserialize_callback_func', 'my_safe_callback');
3. Encrypt Serialized Data: Laravel supports built-in encryption mechanisms. By encrypting your serialized data, you ensure that an attacker cannot manipulate it even if they can access it.
Example:
use Illuminate\Support\Facades\Crypt; $encryptedData = Crypt::encrypt($userPreferences);
4. Regular Security Audits: Regular vulnerability assessments and penetration testing can help identify and fix deserialization issues before they become a threat.
How Our Free Website Security Tool Can Help
To make this process easier for you, our free Website Security Scanner tool helps you quickly detect vulnerabilities such as insecure deserialization on your Laravel application. It provides a detailed analysis of your website’s security and suggests the next steps.
Here’s a screenshot of our Website Security Checker:

Screenshot of the free tools webpage where you can access security assessment tools.
After running the analysis, you will get a comprehensive vulnerability assessment report that highlights any potential security risks, including insecure deserialization. This can guide you in addressing vulnerabilities effectively.
Here’s a screenshot of a typical vulnerability assessment report:

An example of a vulnerability assessment report generated with our free tool, providing insights into possible vulnerabilities.
Conclusion
Insecure deserialization is a serious risk that can lead to devastating security breaches. However, by following best practices such as avoiding deserialization of user-controlled data, using encryption, and running regular security audits, you can significantly reduce this risk.
Leverage our free tool to check Website Vulnerability to ensure that your Laravel application is protected from this and other potential vulnerabilities.
Don’t wait for an attack to happen. Take proactive measures and secure your web applications today!
#cyber security#cybersecurity#pentesting#data security#security#the security breach show#laravel#sql#php#insecure
1 note
·
View note
Text
Hướng dẫn hiển thị lỗi PHP (giúp debug dễ dàng hơn),
💡 Để hiển thị lỗi PHP (giúp debug dễ dàng hơn), bạn cần chỉnh lại các dòng cấu hình trong file php.ini hoặc override qua .htaccess hoặc ini_set() tùy theo môi trường. Dưới đây là hướng dẫn chi tiết 🌿💻 ✅ Cách 1: Chỉnh trực tiếp trong php.ini File đang dùng: /opt/alt/php74/etc/php.ini Mở file này và tìm/cập nhật các dòng sau: display_errors = On display_startup_errors = On error_reporting =…
0 notes
Text
Magento 2:: A session is active. You cannot change the session module's
Magento 2:: A session is active. You cannot change the session module’s
vendor/magento/framework/Session/SessionManager.php // Enable session.use_only_cookies ini_set('session.use_only_cookies', '1'); Remove above code with the below one. if (!$this->isSessionExists()) { // Enable session.use_only_cookies ini_set('session.use_only_cookies', '1'); }
View On WordPress
0 notes
Text
Find exception or error logs in Magento 2 ?
Find exception or error logs in Magento 2 ?
Set the developer mode php bin/magento deploy:mode:set developer You can check the errors for var/log and var/reports folder You can enable display error reporting from index.php in magento from index.php. Add below code after the starting of <?php ini_set(‘display_errors’, 1); error_reporting(E_ALL);
View On WordPress
0 notes
Text
How to generate a calendar from your todo.txt file
I love todo.txt. It’s a simple task system where pretty much everything lives in a single folder called “todo.txt.” After trying about 15 different task managers, I have found this system to be my favorite, and I’ve been using it for more than a year. Using Gina Trapani’s “todo.sh” script along with a bunch of my own bash scripts, most of my task-related needs are met… except for a calendar. After not finding a suitable existing todo.txt to calendar system, I decided to try writing my own. It took a few hours of tinkering, but it works!
To run this script, you’ll need a web server running php, and of course a todo.txt file somewhere on the same server. Load the script in a browser and it will give you an ics file with any todo items that have a due date. Load the script from an external calendar – like Google Calendar – and your due-dated todo items will appear on the calendar. Hooray!
Here’s the code:
<?php // CB's Todo.txt to ics script // goes through todo.txt and generates a calendar // 2018-06-06 // // HOW TO USE THIS // this script parses a file in the todo.txt format and generates an ics file // the ics file will have "all-day" calendar entries for todo.txt items // that have due dates // you can load this calendar into google calendar ("load public calendar") or // other systems (like Fastmail's calendar) // // WHY? // I love todo.txt but sometimes it's tough to get a picture of what I really // need to do. Sticking my dated tasks on a calendar really helps me! // inspiration from here: // https://gist.github.com/jakebellacera/635416 // hide all errors, we don't want them mucking up our ics output error_reporting(0); ini_set('display_errors', 0); // where does the todo.txt file live? $todopath = "/path/to/your/todo/txt/file.txt"; // load the todo file, give us an error if we can't open it $todofile = fopen($todopath, "r") or die("Unable to open todo file!"); // calendar file top stuff $ical = "BEGIN:VCALENDAR VERSION:2.0 PRODID:-//hacksw/handcal//NONSGML v1.0//EN"; // iterate through each line of the file while(!feof($todofile)) $line = fgets($todofile); //echo "line: $line <br>"; // ONLY operate on the line if it contains a due date (due:YYYY-MM-DD)jk if (strpos($line, "due:") !== false) //print "line contains DUE! doing stuff <br>"; // explode the string into an array $array = explode(" ", $line); // iterate through each word and figure out what it is // i.e. a due date, a context, a project, threshold, hidden, etc. foreach ($array as &$word) //print "value: $value <br>"; // IF WORD CONTAINS "due:" if (strpos($word, "due:") !== false) //echo "--- this word contains DUE! <br>"; // remove "due:" $due = str_replace("due:","",$word); // remove newlines $due = str_replace("\n","",$due); // remove dashes //$due = str_replace("-","",$due); // IF WORD CONTAINS "@" if (strpos($word, "@") !== false) //echo "--- this word has a context! <br>"; $context = str_replace("\n","",$word); // IF WORD CONTAINS "+" if (strpos($word, "+") !== false) //echo "--- this word has a project! <br>"; $project = $word; // IF WORD CONTAINS "t:" if (strpos($word, "t:") !== false) //echo "--- this word contains t: <br>"; $threshold = $word; // IF WORD CONTAINS "h:" if (strpos($word, "h:") !== false) //echo "--- this word contains h: <br>"; $hide = $word; // IS THIS A DATE? if (DateTime::createFromFormat('Y-m-d', $word) !== FALSE) //echo "---this word is a date! <br>"; $dateAdded = $word; // IS THIS A URL? if (strpos($word, "http") !== false) //echo "--- this word is a URL!<br>"; $url = $word; // put together a summary // summary: the name of the calendar event // description: more info when you click on the calendar event // BUILD THE SUMMARY // +projectname something something // get rid of due date $summary = (str_replace("due:".$due,"",$line)); // remove dashes from the due date $due = str_replace("-","",$due); // get rid of the added date $summary = (str_replace($dateAdded,"",$summary)); // get rid of the context $summary = (str_replace($context,"",$summary)); // get rid of the threshold $summary = (str_replace($threshold,"",$summary)); // get rid of the URL $summary = (str_replace($url,"",$summary)); // remove project.... $summary = (str_replace($project,"",$summary)); //... so we can make it first $summary = $project . " " . $summary; // remove newlines $summary = (str_replace("\n","",$summary)); // remove double spaces $summary = (str_replace(" "," ",$summary)); //print "summary: $summary <br>"; // create the ICS entry $ical = $ical . " BEGIN:VEVENT DTSTART:$due DTEND:$due SUMMARY:$summary DESCRIPTION:$line URL:$url END:VEVENT"; fclose($todofile); // close the todofile $ical = $ical . " END:VCALENDAR"; // comment these headers out to load the text in a web browser // uncomment to generate an ics file when loading this script header('Content-Type: text/calendar; charset=utf-8'); header('Content-Disposition: attachment; filename=invite.ics'); echo $ical; exit; ?>
- - - (original: cbfish.es/b/36X)
#browser#calendar#development#dropbox#google#hack#ics#learning#php#plain text#script#server#text#to do list#todo#todo.txt#Coding
3 notes
·
View notes
Text
Wordpress Hataları ve Çözümleri
New Post has been published on https://weepay.co/blog/wordpress-hatalari-ve-cozumleri
Wordpress Hataları ve Çözümleri
WordPress Hataları ve Çözümleri sıklıkla sorulan sorulardan biridir. WordPress çoğunlukla hata vermekle birlikte bu hataların çözümleri aslında basittir.
Beyaz Sayfa Hatası
Beyaz sayfa hatası alınmasının çeşitli nedenleri olmaktadır. Hafıza eğer dolduysa veya bir eklenti kurulmuşsa bu tür bir hata vermektedir. Hatta kullanılan tema bile bu hataya sebep vermiş olabilir. Bu sorunu çözmek için öncelikle wp- config.php dosyasını bulmanız gerekmektedir. Daha sonra bu dosyaya bu kodu “error_reporting(E_ALL); ini_set(‘display_errors’,1); “yazmanız gerekmektedir. Daha sonra çıkan hata nedenini öğrendikten sonra bu sorun için çözümler üretmek gerekmektedir. Sıkıntı kaynağı eklentiler ise eklentileri devre dışı bırakarak bu sorunu çözebilirsiniz. Tema ile ilgili bir sorunsa temayı başka bir tema ile değiştirebilir veya temanın kodlarından hataya sebebiyet veren kodu değiştirebilirsiniz. Hafıza ile ilgili sorunlarda da hafıza artırımı yapmanız gerekmektedir.
Temporary Folder Lost Hatası
WordPress Hataları ve Çözümleri ile ilgili bir hata da Temporary Folder Lost hatasıdır. Bu hata siteye görsel ya da tema koyulmasına izin vermez. Yüklemeleri yapmak için ekstra bir klasör gerekmektedir. Eğer klasör sunucudan kaynaklı PHP ile tanımlanmamışsa bu hatayı almanız mümkündür. Bunun için FTP ile dosyaları açıp wp-config.php klasörü üzerinde değişiklikler olmalıdır. “define (‘WP_TEMP_DIR’, dirname( FILE ). ‘/wp-content/temp/’);” bu kod klasöre yapıştırıldığında sorun çözülmektedir.
WordPress Admin Paneli Giriş Hatası
WordPress Hataları ve Çözümleri; Bu hatayı alıyorsanız birçok nedeni olabilmektedir. Parolayı sıfırlayarak bu hatayı çözebilirsiniz. Function.php klasörü üzerinden parola sıfırlanmalıdır. Bunun için Phpmyadmin dosyasına erişim sağlanmalıdır. Bu adımları uygulamadan önce sitedeki her şey yedeğe alınmalıdır.
Bozulmuş .htaccess Dosyası Hatası
500 kodlu hatalardan birisi de .htaccess hatasıdır. Böyle bir hatada dosya silinmeli veya başka bir dosya oluşturulması gereklidir.
PHP Hafıza Sorunları
Hafıza sorunu hatasını çözmek için öncelikle sitedeki dosyalarımızı açmamız gerekir. Config.php’ de bulunan klasöre /* That’s all, stop editing! Happy blogging. */ yazan yerin hemen üst kısmına define (‘WP_MEMORY_LIMIT’, ‘300M’); bu kod yazılmalıdır. Ve sorun bu şekilde çözülmektedir.
0 notes