#pinhead tutorial
Explore tagged Tumblr posts
Visit Tumblr Blog
Explore Tumblr blogs with no restrictions, modern design and the best experience.
Last Seen Tumblr Blogs


Fun Fact
Tumblr Inc. has $15.1M in annual revenue.
Text
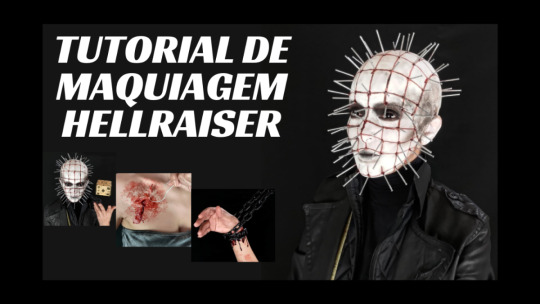
Tutorial de Maquiagem - PINHEAD - Hellraiser + acessórios
Fala comigo Brasil! Hoje é dia de tutorial de maquiagem! E o de hoje, inspirado no filme HELLRAISER! Vou mostrar pra vocês como fazer: A touca de pregos do Pinhead – Hellraiser A maquiagem do Pinhead – Hellraiser O cubo /portal do universo do filme Hellraiser 3 ferimentos fakes usados na gravação do challenge inspirados no filme. E nesse link aqui, você tem uma make de zumbi, com a receita da…

View On WordPress
#Dicas da Maia#Dicas de Make#hellraiser#hellraiser makeup#hellraiser maquiagem#hellraiser tutorial#lista de produtos para make artística#maia makeup#Makeup#Maquiagem#maquiagem artística#maquiagem artística produtos#maquiagem tutorial#pinhead#pinhead make up#pinhead maquiagem#pinhead tutorial#Tutorial#Tutorial de maquiagem
1 note
·
View note
Text
🔋📌MECH-PIN SHIMEJI/DESKTOP BUDDY!!!📌🔋
been working on this for a bit, it is the default shimeji but with the amazing pinhead!

📌DOWNLOAD HERE!📌
or here aswell⬇️
⬇️!!TUTORIAL + EXTRAS UNDER CUT!!⬇️
In order for the shimeji to work, you need to have JAVA and the ORIGINAL SHIMEJI downloaded!
-make sure u extract the zip file or it wont work :c

go into the img folder, you should then find a folder called "Shimeji".
then, replace all of the default pngs with the silly pin!!!
ALSO!! if ur having issues with getting pin to interact with ur windows(i had that same issue too :c ),, look at this goated reddit post
PLAYLIST incase if ur still confused with installing :3


enjoyyy :D
#bfdi#bfdia#bfdi pin#bfdia pin#pin bfdi#pin bfdia#pin#osc#osc art#osc community#shimeji#desktop buddy#leadart#the pinlings are now in my puter!!!
49 notes
·
View notes
Text
Embroidery Mounting Tutorial
Things you will need:
-foam core/board (acid free if possible, this will prevent yellowing as the piece ages)
-mat board (also acid free, optional for smaller pieces) -mat cutter or utility knife & ruler
-straight pins (you want the kind with flat metal heads, not the round plastic ones)
Start by cutting a piece of foamcore larger than your embroidery design, but smaller than the piece of fabric it's on. If you want it to fit exactly in a frame, cut it slightly smaller than the frame to accommodate the fabric thickness/pinheads.
-for larger pieces or thicker fabric the foamcore might bend, so cut a piece of mat board the same size and put it on top. Stick them together with double sided tape.

Lay your piece on top and do your best to center it. Put a pin in the middle of each side through the fabric into the foamcore. (make sure the pins aren't angled to stick out the back or you might poke yourself.)

Now start to add more pins around the edge, stretching the fabric and squaring it off. Don't push them in all the way as you may need to reposition them.

Add as many pins as you need to pull the fabric tight. If you're stretching a cross-stitch done on Aida cloth, make sure to put the pins at the intersection of the fibers, as the pin heads may slip through the holes in the fabric.

Once you're satisfied that your piece is nice and flat and even, you can push all the pins in so the heads are flat along the side. (a ruler or an old credit card can spare your fingers and let you push a bunch of them in at once.)

You're finished and ready for framing!
You can either trim the excess fabric (make sure to leave about an inch/a few cm around the edge to account for fraying) or you can tape it down to the back.

0 notes
Text
youtube
How To Draw Pinhead | Hellraiser 2022 Sketch Tutorial Support this channel by becoming a member: https://www.youtube.com/channel/UC-biucJWhM8HwjsQ96uoIUw/join You ... via YouTube https://www.youtube.com/watch?v=V-BvYk5n0lk
#how to draw#drawing#tutorial#sketch#illustration#How To Draw Pinhead | Hellraiser 2022 Sketch Tutorial#Youtube
3 notes
·
View notes
Text

Hellraiser Spray paint art
*
#hellraiser#spraypaint#spraypaintart#gothique#goth#horror#box office#graffiti#urban#pinhead#canvas art#canvaspainting#acrylic on canvas#tutorial#artists on tumblr#artist#art#painting
1 note
·
View note
Note
Hi! How do you paint the beak/fur of your furbies? I've been looking to add freckles similar to yours on the beak and fur around my furby and I haven't been able to find a tutorial for it. Sorry if there's a post already on your blog! Thanks so much!
Hi there! I’m so sorry you had to wait so long for this reply! 🙏
I use a homemade dotting tool to make freckles on my Furbys’ plastic beaks 😊 and I just use a regular old pin to make freckles on the rubber beak of my 2005 Furby.
My homemade dotting tool is just a sewing pin stuck into the eraser of a regular ‘ole pencil


Just take a sewing pin and jam the pointy end into the eraser, then dip the pinhead end into paint and that’s it! You can control the size of the freckles by how deeply you press into the beak! One size fits all ✨
For rubber beaks it’s even easier: just use the pointy end of another sewing pin. Load the end of the pin with a generous amount of paint, like a blob, and then poke the pin into your Furby’s beak. This may look a bit painful for the Furb tho! And don’t worry about damage to the beak because any hole made by the pin with immediately fill up with the applied paint. Use smaller, more delicate “pinpricks” to make smaller freckles, and hopefully it will be quick and painless for your Furb!
Hope this helps!
🌈🌄
12 notes
·
View notes
Text
I wanted a part two, so... Sorry
Bo Sinclair
Umm... No,, u lied to me
Feels betrayed. He legit felt sad for his mom
🙄 Get a hold of this guy
"Why are you so greasy? "
"Don't talk to me or my sister ever again "
Klaus won't open himself to Bo ever
Butter face (no context)
Can and will sucker punch him
His usual instinct is to flight danger. But will def fight Bo
Calls him a bitch boy
Later feels very bad about it but fuck Bo.
Vincent Sinclair
"Nice mask (not sarcastic) "
"You look very... Metal... Hehe"
"U good with art yeah? That's so dope"
Will ask for a easy tutorial on how to art (like a very easy one )
Gets frustrated, surprisingly good at carving
No looking the wax statues in the face under any circumstances. They give him the chills.
Will not stay in the house of wax, probably won't go inside.
Klaus'd ask to braid Vinny hair. He isn't great at braiding but will try his best
The end result def look pretty!
Lester
U have a dog??!M
Can i pet it??
Will absolutely love Lester
Will try and likely be successful in getting his pants off
Can I drive?
Can't drive very well
The either end up as fuckbuddies or an ONS.
His favorite Sinclair
Pinhead
"Can I ask u a question, please? u on bdsm or something? Sorry if I'm being pushy ..."
"Are you a Dom or a sub" (he's a switch)
"Mmmm... Can u... Like, let me go?"
"I didn't even touch your little box"
Klaus'd try running (it doesn't work)
"What? you want me to? Haha JK"
Geez... Light up a little,,
Ultimately, scared of them. Will not try to befriend nor to fuck them.
Would ask if their pins fall off their head.
Survives by dumb luck alone and when asked about it will shrug it off.
#slashers x reader#slasher oc#my oc#Crappy headcanons#Pinhead#Bo Sinclair#Lester sinclair#my love#vincent sinclair
22 notes
·
View notes
Text
Me: stares at Pinhead make up tutorials....don’t do it queen....don’t do it.....-my hand shakes as I put a bald cap in my cart-
#clarice rambles#honestly all these pinhead cosplayers are so rad like holy shit that make up is incredible#I desperately want to do a lady pinhead look but also I know I'm signing myself up for a world of pain lmao
4 notes
·
View notes
Text
I’m watching a Hellraiser SFX makeup video because I don’t know and I find this interesting and stuff but I literally yell every time they pronounce “Chatterer” as “Shatterer” because that’s a thing they;re doing
#this has been a self related post#I was already going to watch their other videos but I now want to see how if at all they're going to fuck up Pinhead's and Angelique's names#bc those are the other two charactesr they have tutorials for#why don't I have a Hellraiser tag
4 notes
·
View notes
Text
Tutorial de Maquiagem - PINHEAD - Hellraiser + acessórios
Hoje é dia de tutorial de maquiagem e a make escolhida é a do PinHead do filme Hellraiser. Assista ao vídeo e confira a lista de produtos com marca, nome, cor etc., usados para fazer essa makeup, além dos acessórios usados no look completo.
Fala comigo Brasil! Hoje é dia de tutorial de maquiagem! E o de hoje, inspirado no filme HELLRAISER! Vou mostrar pra vocês como fazer: A touca de pregos do Pinhead – Hellraiser A maquiagem do Pinhead – Hellraiser O cubo /portal do universo do filme Hellraiser 3 ferimentos fakes usados na gravação do challenge inspirados no filme. E nesse link aqui, você tem uma make de zumbi, com a receita da…
View On WordPress
#Dicas da Maia#Dicas de Make#hellraiser#hellraiser makeup#hellraiser maquiagem#hellraiser tutorial#lista de produtos para make artística#maia makeup#Makeup#Maquiagem#maquiagem artística#maquiagem artística produtos#maquiagem tutorial#pinhead#pinhead make up#pinhead maquiagem#pinhead tutorial#Tutorial#Tutorial de maquiagem
0 notes
Photo

No, I just used my basic knowledge of objects and clothes, etc. in Milkshape and simPE.
BIG TUTORIAL under the cut. With pictures:
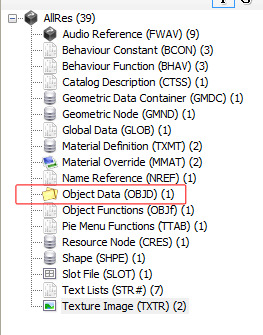
Prep work: Go into Bodyshop extract skin, hair, clothes, make-up, eyebrows, facial hair, etc. Anything you might need in there. You can also extract them in simPE if they are CC.
Step 1: Extracting clothes and hair in simPE.

Click the “create new package” icon.
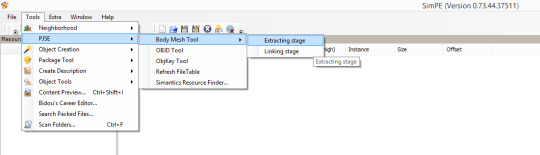
Go to Tools -> PJSE -> Body Mesh Tool -> Extracting Stage. Select the mesh you want your doll to wear. This means if you use a base game mesh, like I am, you’ll have to extract it from Bodyshop first (or go through the game files to find it) or if you just want to use a custom mesh, select it.
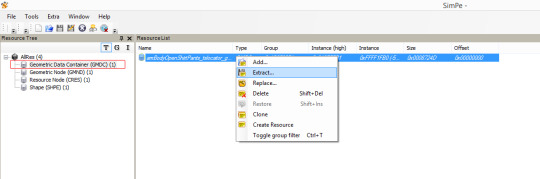
Click the “Geometric Data Container (GMDC), right click on the file and select extract. Name this something you’ll remember in a location somewhere you can easily find it.

For custom meshes you can open them in simPE and export the textures or extract them in Bodyshop. Either way will work.
Step 2: Extract the sim face:
If you have a sim in mind whose face you want to use, you can open them in simPE. If you already have them extracted through bodyshop you can skip this simPE part and just open the Saved Sim file. If not:

We always start the same by creating a new package.

Go to Tools -> Neighborhood -> Neighborhood Browser, select the neighborhood in which your sim resides and load it.

After it loads go to Tools -> Neighborhood -> Sims Surgery.
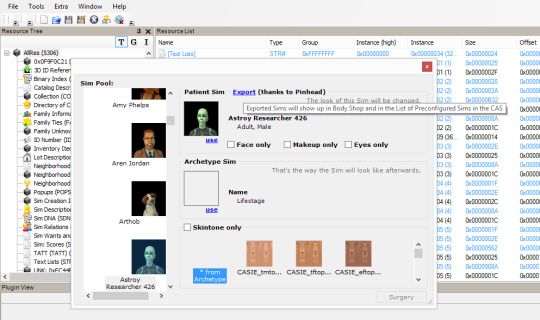
Find your sim, click “Use” in the Patient Sim, then Export (thanks to Pinhead). Save somewhere you can easily find it. I believe it is default set to Saved Sims folder in the game.

Open your exported sim and select the Geometric Data Container (GMDC). Look for “age3″ in the files’ names. Usually it is the one without the OLOD.
That’s your sim’s face. Extract it and save it wherever you’ve been saving all these files.
Step 3: Bring everything into Milkshape.

Import -> Sims2 UniMesh Import.
Import the clothes, hair, and face.


(Yes, if you want fat or preg dolls and just delete the body styles you don’t want)

You will have to click these for every mesh you import.
Step 4: After bringing everything into Milkshape, you should have three groups. Three groups won’t work for object meshes. You’ll need two so that means combining meshes, which also means combining textures.

If you want alpha hair meshes...it is going to be difficult and honestly, too much work so I am not going to do that. One of the reasons is because the size of the texture files if you go that route. I combine the hair and face, or head, which means these two groups will be apart of the same texture group.
I leave the body to itself as it is usually already a bigger texture size.
Editing this requires some knowledge on milkshape texture editor and photoshop (or whatever photo editing program you use).

So here is a combined texture file of the face (top) and hair (bottom) that I made in photoshop. This is a 512X1024 pixel picture that I saved as a BMP. Add facial hair and eyebrows, make-up, etc. as you want.

So in Milkshape, select groups that will be apart of this texture:

In Materials, click New.

Then the first <none> and select the texture.

Hit assign.
Your model will look crazy. Ignore that.

Go to Window -> Texture Coordinate Editor.
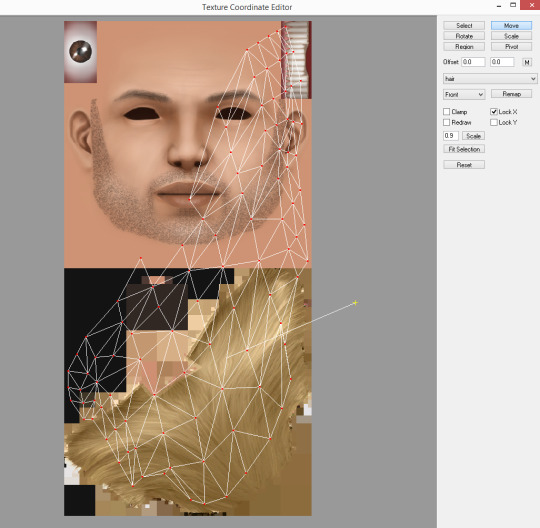
So something like this will show up. You will need to adjust the hair down to the hair and the face to the face. This can take some time of fiddling with the “Scale” and “Move” buttons.

Since we only need to shrink it vertically, check mark the “Lock X.” That will make sure the horizontal stays the same. Scale .5 in both options and hit S. That will reduce it half the size, which is what we need since a single group is taking up 1024 pixels instead of 512. Sometimes it will not snap it in place so you’ll have to “move” it into place. Make sure Lock X is still check marked for this too.
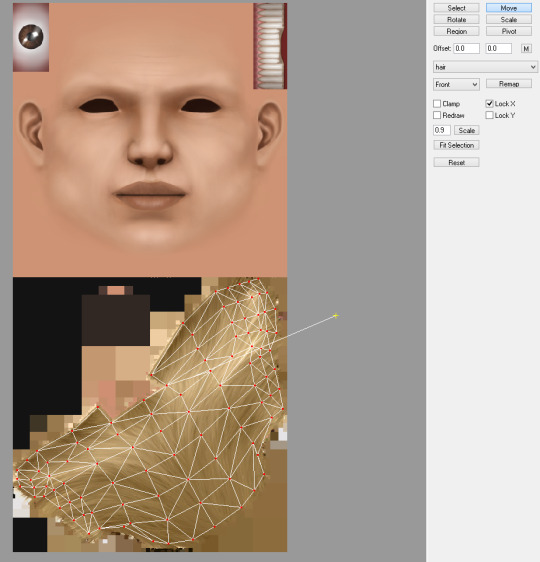
Wala! Repeat for face.

Wala X2! For the body, you will not have to do this.
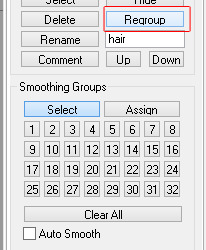
Go back to the Groups TAB and select face and hair again (if not already still selected). Hit Regroup. We always do this after because now the textures will share the same group.

WALA X3!
Step 5: the body. We don’t have to move any of the texture files here, but you can go ahead and combine your outfit texture and skintone just to see the complete look. You must do this with your photo editing software.


Just repeat the top of Step 4 to add the materials so you can view it on your model.
So now Step 6: Let’s make sure our neck and body stay together.

So in the Groups TAB if we reselect our Regroup we can see where the neck and body go together. If you have some shoe-swapping or clothes mesh edit skills, this will come in handy. All we are going to do is make sure this stays secure for when we pose our model.
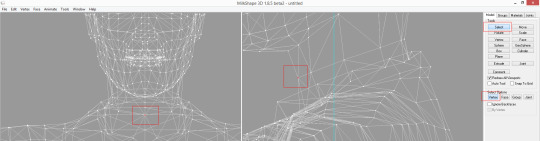
So in the Model TAB we click Select and make sure it is set to Vertex. We select the individual dots, or vertices.

When a vertice is select, go to Vertex -> Sims2 UniMesh Vertex Data Merge then Vertex -> Sims2 UniMesh Normal Data Merge. Repeat this for each vertice.
Step 7: We are ready to pose.

Go to the Joints TAB and check Show Skeleton.
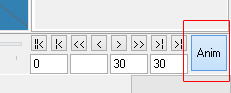
At the bottom right, click Anim.

Go to Model TAB click Select then Joint. Now click on the model where the dots for joints are, it should highlight like so.

Use Rotate set on these options and just rotate your models appendages around. Check out other posing tutorials if you want more info on this. I am not a pose box maker, so I am not the best source.
Step 8:

Once you are set on the pose, go to Animate -> RotateAll.
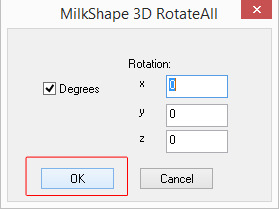
Leave it set to 0 and hit OK.

Go Click Anim on the bottom right again and the blue skeleton should fall back into T-position, but the model should stay posed. If you did not do this step right, the model will too fall back into T-position.

Export your completed posed model/doll as Wavefront OBJ.
Step 9: Now for some people they can just go through simPE and make their object, but I have never been able to get an item to show up in the game this way. I have to turn it into a .simpe item first. So perhaps this is the long way. If you want to know that way, look it up. If not, here we go.
Open simPE:
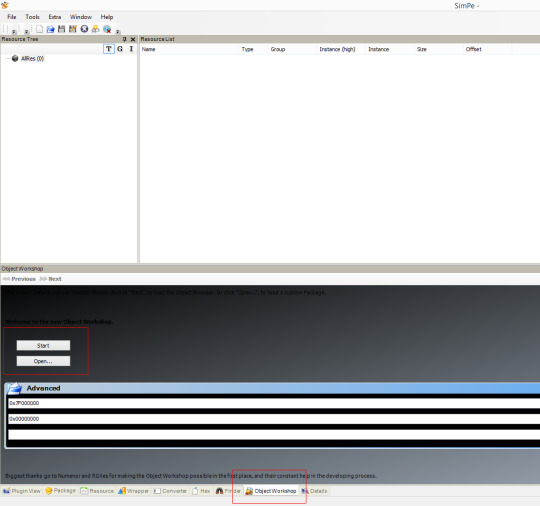
Go to the Object Workshop tab.
Selecting Start means to use an object from the game. Selecting Open means using CC. Either way works. I use CC since it has an edited material definition to make the object not shiny, but for giggles, I will select Start.
Wait for it to load completely.

Select an item. For this, I am selecting a decorative item that I know that has two textures.
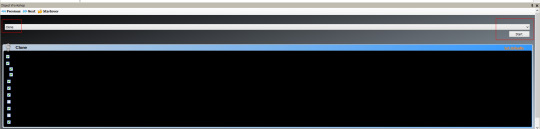
Select Clone then hit Next. Anytime you feel like you are messing up, you can always select Startover.
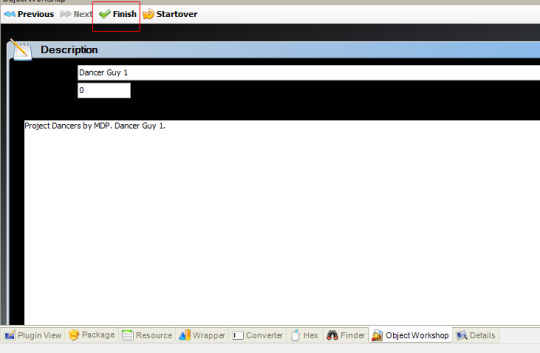
Important, name it something and give a description. Please call it something simple and with your name in there somewhere. Easiest way for people to find something of yours, especially for WCIFs. You can always change or add to this any time afterwards.

Name part 2. I always use the same thing I will use as the package’s actual name. Hit update then OK.

Save.

So go to the Geometric Date Container (GMDC) and extract the file and save it in our easy to find area.
Step 10: Back to Milkshape.
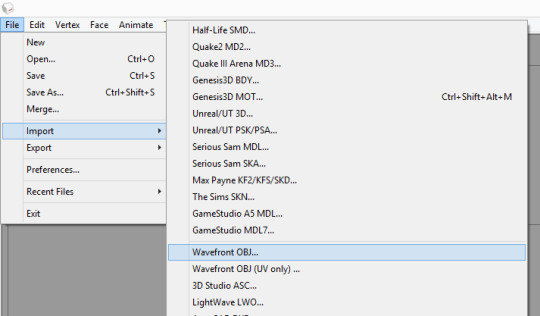
Let’s export our OBJ file we made at the end of Step 8. The reason why we exported it as an OBJ is to get rid of the skeleton.

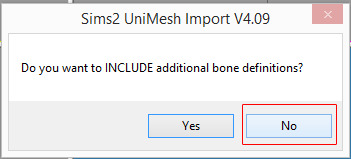
Import -> Sims2 UniMesh Import the deco item we just extracted from simPE.


So in the Groups TAB we have this. Delete the groundshadow as we will not use it. Again if you want one, look up a tutorial for it. I will not cover that in this.
We just imported in the deco vase and flowers for their names and comments. Rename body to vase and Regroup to flowers.

So, before we delete the deco vase and flower groups let’s steal their comments.
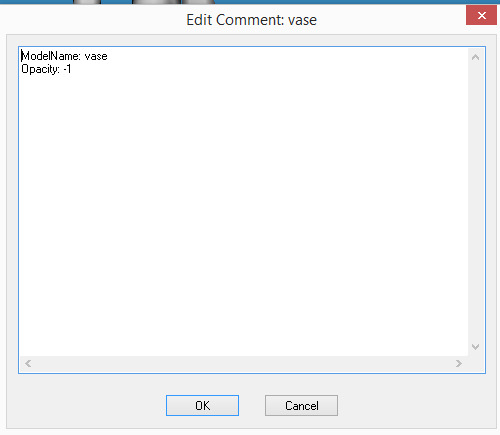
Select this and copy it, paste it into the respected “vase” and “flowers” of our model/doll.
Delete the deco vase and flowers. We don’t need them anymore.

Export as Sims2 Unimesh Export.
Step 11: Back to simPE
The file we exported from just a minute ago, should still be open in simPE. Select the Object Data (OBJD)

Check update all MMATs then select “get GUID.”
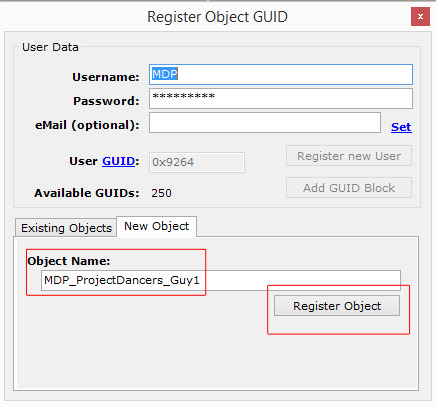
Name and Register Object.
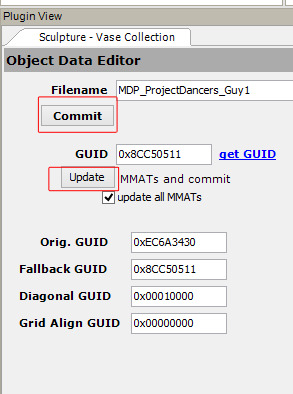

Update then Commit and Save.
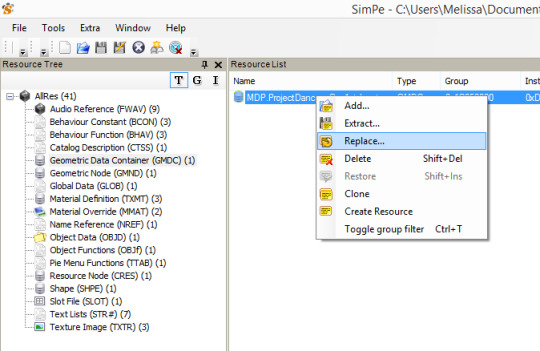
Go to Geometric Date Container (GMDC), right click, hit Replace. Select the model we exported at the end of Step 10.

Let’s update our textures.

I have already deleted the groundshadow. So these are our two textures. Blue is the vase. Lily is the flowers.

Click on blue. Right click on the picture. Build DXT.

Open Image. Select the texture. Set format and such as shown then hit Build.

Click commit and then OK.
Repeat for Lily/flowers.
Save.
Step 12: Fixing the shine.
Throwing this in here because the item we cloned from does make our model appear shiny or just weird with lighting.

Go to the Material Definition. These two choices are our vase and flowers. (If there is the option of the groundshadow, just right click and delete it)
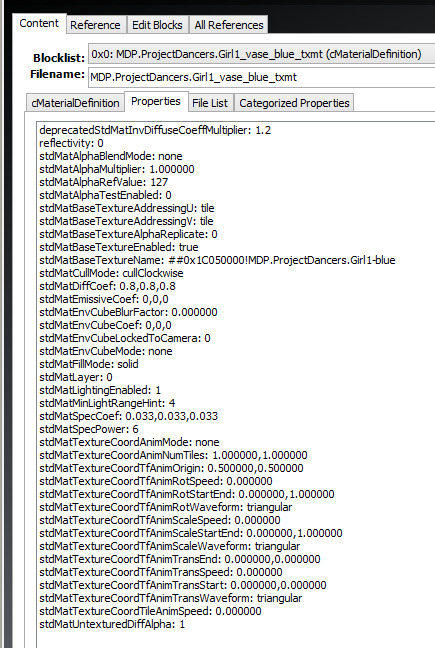
This is what the list should look like so it does not appear shiny.
Commit both times when changing then save.
Step 13: Load the game and test:


53 notes
·
View notes
Photo


September 29, 2019
I haven't accomplished much as of late. I broke up with my boyfriend last month because of, well, so many very good reasons that have been so hard to keep sight of in my emotional state. As a result, I haven't been terribly motivated. The only thing I could really motivate myself to do was grid for a HAED as it was looming over me and the depressing prospect of that kept me going even though I just wanted to sit there and stare at the tv.
This last stretch I've been accomplishing more. I discovered two HAEDS. One is a poem that is not full coverage - just letters! Still confetti, though. And I'm not sure what to do with that as the tutorial for the pinhead stitch on 25 ct...well, what can I say. I don't have a lot of faith in it. The second you stitch next to it, part of it is going to come undone. But I really want to accomplish a HAED (and hopefully all my HAEDS at some point) so *then* I found an 8 colour HAED that is almost entirely 310 and B5200. Any confetti seems much more manageable in a chart like this. So that will be one of my 'change of scene' projects while I work to complete Crystal Symphony and Stunning Stallion.
I've put aside the magpies I was stitching for his parents. I'll return to them, but I'll be stitching them for my mom and I as we love magpies. I started a Wrendale chart (another 'change of scene'). I'm not sure exactly just what sort of creature it's supposed to be, but it's adorable. :)
#cross stitch#xstitch#haed#heaven and earth designs#magpie#elf#art nouveau#mirabilia#nora corbett#crystal symphony#stallion#horse#wrendale#bothy threads#the diet starts tomorrow
2 notes
·
View notes
Photo

Credit to @ashleybrookecosplay : “I have such sights to show you” ⛓A little throwback to Pinhead from my Halloween series. Full cosplay of this will happen at some point! Tutorial by @courtneylittlemua was so helpful in creating this look!! CPA ▫️ www.cosplayawesome.com ▫️ http://bit.ly/2CCmiBe
9 notes
·
View notes
Note
Do you take horror themed commissions like Dead by Daylight conversions? Im looking for all or most of the Cenobites for my Hellraiser themed sims 4 house. I already have pinhead just need the others. I tried following tutorials to convert but im not tech savvy so they never work out for me.
hi!! sorry for the lateish reply
i'd be down for it, provided they are pre existing model conversions ^^ unfortunately i think my personal modeling-texturing is a bit too soft and cutesey though to pull off a horror themed custom though ASDFGHJ
#txt#people who can detail creepy/bloody textures withoutit looking like edgy 12 yr old on deviantart have my highest respect#bc i am the figurative edgy deviantart kid in this scenario ASDFGH
0 notes
Text
GTA V Online and Money Generator Tool

How To Make Money Rapid In Grand Theft Auto Online In 2020?
They both require you to have an Office building and warehouses, which can be considerable outgoings; however, if you focus on these two facets, you’ll make your investment back reasonably rapidly. From that point on, you merely consistently export a leading variety automobile and also source an additional one, all set to be shipped when the timer enables. Again the news isn’t ample we’re scared if you’re looking for a method to get free GTA Online money from gta5moneygen tool. Rockstar has developed themselves a massive earnings stream through their GTA Online Shark Card sales, and also have made sure that this is the only way you can quickly obtain a large sum of GTA$ to spend in the game. There are loads of techniques to generate income in the video game that is not listed here, such as racing, deathmatches, goals, as well as numerous other game settings.
Today, we’ll have a look at GTA 5 online precisely how to earn money rapidly - one of the most critical aspects of the multiplayer mode. The cheapest apartment or condo to include a break-in area is Del Perro Levels, which is $200,000, easily covered by the free money talented by Rockstar with this version of the video game. Again, to host a heist, you require to be rank 12 or higher. It’s not a flawed concept for all gamers involved to a minimum of reach rank 12, to ensure everyone depends on the difficulty of these broad objectives. Jobs are short missions that you can try solo yet are typically much better with a team considering that you make more money at a more significant difficulty degree.
GTA 5 is just one of the most significant installations of the Grand Theft Auto series to be released by Rockstar Games. The 2013 action-adventure video game got global movie critic praise for its stunning graphics, in-depth story, and most importantly, impressive gameplay.
youtube
Doing work and generally helping fellow players makes you a “Great Sporting activity” and will undoubtedly earn you Representative and benefit money. So, paradoxical though it might sound considering you’re playing one of the most terrible video games around, withstand the lure to run about like a pinhead, shooting everybody you see. Some gamers fast to geek craze, and also if they do, give up out of the group and avoid obtaining drawn right into their rubbish. By tapping into among the things that the players like to buy, Rockstar transformed cars right into among the most significant ways to make money in the video game.
If you got the GTA 5 Premium Edition free on Impressive Gamings Store during their giveaway, then congratulation, you’ve currently had $10,00,000 to start with. Otherwise, right here are the methods you can grind for some money in the early game without many tools.
Be prepared to see a lot of gamers driving around customized Truffade Adders as well as Truffade Z-Types, the two most expensive cars to acquire in GTA Online.
These goals are relatively simple, as well as require you locating details vehicles, taking them, and after that bringing them back to his store.
You can burglarize financial institutions, sell taken cars, pick-up player bounties, and also do goals which all bolster your savings account.
Well, we’ll provide you with a lot of possibilities to earn by sending you on plans to swipe premium deluxe cars and trucks.
Marketing and also lifting cars Them Among the techniques to make a significant chunk of money opens early for new gamers in GTA Online.
Rockstar has done a pretty good task of using players a ton of approaches to make money every which way.
How To Spending GTA 5 Money
The game additionally comes with GTA Online, an important, stretching online city that allows you to cut loose via its streets, participating in missions, races, sophisticated heists as well as a wide variety of various other criminal activities. Packed with lorries to hoard, you can construct your realm, running prohibited services, using other gamers and living big in private yachts as well as mansions. Generating income in GTA Online is both the key objective of the video game as well as additionally notoriously tough. The costs of high-end or even mid-range items are relatively darn high in connection with the payouts players receive upon finishing any one of the missions. A lot of updates often tend to include much more expensive stuff to the video game, rather than increase the alternatives for players with a limited digital budget.
Additionally, you can only market a stolen vehicle once daily, so take a note on that particular. After completing the first objective in Grand Theft Auto 5 and the online tutorial, you can currently join other players on GTA 5 online web servers. The beginning of the video game might make perhaps the hardest for newbies. It serves as a system to identify generally your future in San Andreas. For that reason, getting hold of a significant amount of cash will certainly go the fantastic length.
There is no singular, tried and tested approach for making use of Jobs to cash in rapidly, nonetheless. Also, when GTA Online players uncover a Job that’s relatively easy to run and offers high GTA$ payments, Rockstar seems to find the technique and sterilize it continually.

Contact missions resemble common GTA goals, yet they separate you from the various other gamers in a free stroll session. This suggests you can concentrate on the purpose without worrying about some arbitrary asshole killing you with a jet. Call goals can be an enjoyable means to generate income, as they pay added cash for new gamers. These two approaches have the possible to internet the solo player one of the most money per hour whilst doing various other jobs in between work.
1 note
·
View note
Photo

Long, fine pins with heads...... ONLY FOR #SEWING!!!!!!! Never for #draping!!!!! Using the right tools or the wrong tools makes ALL THE DIFFERENCE. Draping With ling, fine pins that crumple like tinfoil while you are trying to work out your art, is totally frustrating. Plus, all of those pinheads distract from the form you are looking at. After teaching draping , #patternmaking and sewing for years at @parsonsschoolofdesign and working in #fashiondesign and #costume design, I’ve clarified pinning techniques for different circumstances and it makes all of the difference!!! You can learn them@in my course PATTERNMAKING DEMYSTIFIED, open this week for registration. Linked here and in my bio too, and there are free tutorials on the sales page! PS it begins with draping tutorials for bodice, skirt, and sleeve. #vlisco @vlisco BLISS #waxprint #facemask #pleating #makersmovement #createurs #pins #pinning https://www.instagram.com/p/B_7pEH8ApxL/?igshid=19041pz2fa1ul
#sewing#draping#patternmaking#fashiondesign#costume#vlisco#waxprint#facemask#pleating#makersmovement#createurs#pins#pinning
0 notes