#pixelshading
Photo

Art by @domizai Bubble gum #digitalart #glsl #creativecoding #swirl #ink #webgl #opengl #marbling #javascript #genart #generativeart #abstractart #generative #procedural #normalmap #newmediaart #pixelshader #shader #bubblegum #fragmentshader #mathart https://www.instagram.com/p/ClUDrH-r7s4/?igshid=NGJjMDIxMWI=
#digitalart#glsl#creativecoding#swirl#ink#webgl#opengl#marbling#javascript#genart#generativeart#abstractart#generative#procedural#normalmap#newmediaart#pixelshader#shader#bubblegum#fragmentshader#mathart
2 notes
·
View notes
Text
youtube
0 notes
Photo
This beauty decided she wanted to go a little bolder at her perfecting session and the results are stunning! Ombré Pixel Blade n' Shade Combo Brow. This manual technique gives a natural soft powdery feel to the individual hair stroke as well as the shading. -------------------------- 📳Call 603-233-6544 📨Email [email protected] 🌐Website divineproportiontattoo.com 💋Divine Proportion Cosmetic Tattoo Located inside Twist Tattoo 38c East Hollis St. Nashua, NH. 03060 . . . #ombrebrows #combobrows #hybridbrows #bladenshade #hairstrokeseyebrows #microblade #manualtechnique #pixelbrows #pixelblade #pixelshading #powderbrow #browsonfleek #browsfordays #browtattoo #pmu #pmuartist #tattooedbrows #cosmetictattooing #permanentmakeup #brows #eyebrows #micropigmentation #spcp #nashuanh #localartist #i❤️ink #tinadaviesgals #nhtattooartist #smallbusiness #divineproportioncosmetictattoo (at Divine Proportion Cosmetic Tattooing) https://www.instagram.com/p/B9VFCCon0ch/?igshid=pspdvek2dtld
#ombrebrows#combobrows#hybridbrows#bladenshade#hairstrokeseyebrows#microblade#manualtechnique#pixelbrows#pixelblade#pixelshading#powderbrow#browsonfleek#browsfordays#browtattoo#pmu#pmuartist#tattooedbrows#cosmetictattooing#permanentmakeup#brows#eyebrows#micropigmentation#spcp#nashuanh#localartist#i❤️ink#tinadaviesgals#nhtattooartist#smallbusiness#divineproportioncosmetictattoo
0 notes
Text
Medical spa/spa
Website : https://complexionsvancouvermedspa.com/
Address : 7639 MacArthur Blvd, Vancouver, Wa 98607
Phone : +1 360-328-1808
Complexions Vancouver MedSpa, we are trained with the most advanced and effective techniques. We
are fully certified and well-aware of advancements in products, equipment, and services. It is
our goal to stay up-to-date and provide the best care and experience to our clients!
1 note
·
View note
Text
BACK TO WEB ~1.0 WE GO [PART 2]


As you might have guessed, I got much bookmarks and content curated for us all to refer back to.
But why make your very own website(s)?
Also there is a wonderful chain on Tumblr that also exists to explain the why (still seeking it, will update when I find it) and overall the joys of being in control of content of your very own too, unlike on most social media.
Also some more fellow Tumblr blogs before I go to pixel dolls, scrollers and all the multimedia fancy.
@graphics-cafe , @glitterizer-png , @oldwww , @themothgalaxy , @glittertextisgroovy & way way more.
More to come
10 notes
·
View notes
Text
MME Laughing Man FX READING: a translation by ryuu
The following tutorial is an English translation of the original one in Japanese by Dance Intervention P.
Disclaimer: coding isn’t my area, not even close to my actual career and job (writing/health). I have little idea of what’s going on here and I’m relying on my IT friends to help me with this one.
Content index:
Introduction
Overall Flow
Parameter Declaration
Billboard Drawing
Final Notes
1. INTRODUCTION
This documentation shows how to edit the Laughing Man effect and read its HLSL coding. Everything in this tutorial will try to stay as faithful as possible to the original one in Japanese
It was translated from Japanese to English by ryuu. As I don’t know how to contact Dance Intervention P for permission to translate and publish it here, the original author is free to request me to take it down. The translation was done with the aid of the online translator DeepL and my friends’ help. This documentation has no intention in replacing the original author’s.
Any coding line starting with “// [Japanese text]” is the author’s comments. If the coding isn’t properly formatted on Tumblr, you can visit the original document to check it. The original titles of each section were added for ease of use.
2. OVERALL FLOW (全体の流れ)
Prepare a flat polygon that faces the screen (-Z axis) direction.
Perform world rotation and view rotation inversion on objects.
Convert coordinates as usual.
World rotation and view rotation components cancel each other out and always face the screen.
3. PARAMETER DECLARATION (パラメータ宣言)
4 // site-specific transformation matrix
5 float4x4 WorldViewProjMatrix : WORLDVIEWPROJECTION;
6 float4x4 WorldViewMatrixInverse : WORLDVIEWINVERSE;
7
• WorldViewProjMatrix: a matrix that can transform vertices in local coordinates to projective coordinates with the camera as the viewpoint in a single step.
• WorldViewMatrixInverse: the inverse of a matrix that can transform vertices in local coordinates to view coordinates with the camera as the viewpoint in a single step.
• Inverse matrix: when E is the unit matrix for a matrix A whose determinant is non-zero, the matrix B that satisfies AB=BA=E is called the inverse of A and is denoted by A-1 . Because of this property, it’s used to cancel the transformation matrix.
• Unit matrix: asquare matrix whose diagonal component is 1 and the others are 0. When used as a transformation matrix, it means that the coordinates of the vertices are multiplied by 1. In other words:
8 texture MaskTex : ANIMATEDTEXTURE <
9 string ResourceName = "laughing_man.png";
10 >;
• ANIMATEDTEXTURE: textures that animate in response to frame time. Animated GIF and animated PNG (APNG) are supported.
• APNG: Mozilla Corporation's own specified animation format that is backward compatible with PNG. I hacked libpng to support it, but it was rejected by the PNG group because the specification isn’t aesthetically pleasing.
11 sampler Mask = sampler_state {
12 texture = <MaskTex>;
13 MinFilter = LINEAR;
14 MagFilter = LINEAR;
15 MipFilter = NONE;
16 AddressU = CLAMP;
17 AddressV = CLAMP;
18 };
• MinFilter: methods used for the reduction filter.
• MagFilter: methods used for the expansion filter.
• MipFilter: methods used for MIPMAP.
• AdressU: method used to resolve u-texture coordinates that are outside the 0-1 range.
• AdressV: method used to resolve v-texture coordinates that are outside the 0-1 range.
• LINEAR: bilinear interpolation filtering. Uses a weighted average region of 2×2 texels inscribed in the pixel of interest.
• NONE: disable MIPMAP and use the expansion filter.
• CLAMP: texture coordinates outside the range [0.0, 1.0] will have a texture color of 0.0 or 1.0, respectively.
• MIPMAP: a set of images that have been precomputed and optimized to complement the main texture image. Switch between images depending on the level of detail.
21 static float3x3 BillboardMatrix = {
22 normalize(WorldViewMatrixInverse[0].xyz),
23 normalize(WorldViewMatrixInverse[1].xyz),
24 normalize(WorldViewMatrixInverse[2].xyz),
25 };
Obtain the rotation scaling component xyz of the inverse matrix, normalize it by using normalize, and extract the rotation component. Do this for each row.
The 4x4 inverse matrix contains a translation component in the fourth row, so it’s cut off and made into a 3x3 matrix.
The logical meaning of the matrix hasn’t been investigated yet.
Without normalization, the size of the display accessory is 1/10, which suggests that the world expansion matrix component is used as the unit matrix.
Also, each row corresponds to an x,y,z scale.
29 struct VS_OUTPUT
30 {
31 float4 Pos : POSITION; // projective transformation coordinates
32 float2 Tex : TEXCOORD0; // texture coordinates
33 };
A structure for passing multiple return values between shader stages.
4. BILLBOARD DRAWING (ビルボード描画)
35 // vertex shader
36 VS_OUTPUT Mask_VS(float4 Pos : POSITION, float2 Tex : TEXCOORD0)
37 {
38 VS_OUTPUT Out;
39
40 // billboard
41 Pos.xyz = mul( Pos.xyz, BillboardMatrix );
BillboardMatrix is a 3x3 rotation matrix, so multiply it by the xyz3 component of Pos.
If the object is fixed in the world and doesn’t rotate, then Pos.xyz = mul(Pos.xyz, (float3x3)ViewInverseMatrix); or Pos.xyz = mul(Pos.xyz, (float3x3)ViewTransposeMatrix); cancels the screen rotation.
Since the rotation matrix is an orthogonal matrix, the transpose and inverse matrices are equal.
42 // world-view projection transformation of camera viewpoint.
43 Out.Pos = mul( Pos, WorldViewProjMatrix );
44
45 // texture coordinates
46 Out.Tex = Tex;
47
48 return Out;
49 }
Perform world-view projection transformation and return the structure as usual.
51 // pixel shader
52 float4 Mask_PS( float2 Tex :TEXCOORD0 ) : COLOR0
53 {
54 return tex2D( Mask, Tex );
55 }
Return the color of the texture retrieved from the sampler.
57 technique MainTec < string MMDPass = "object"; > {
58 pass DrawObject {
59 ZENABLE = false;
60 VertexShader = compile vs_1_1 Mask_VS();
61 PixelShader = compile ps_2_0 Mask_PS();
62 }
63 }
Self-shadow disabled? (technique is ignored by object_ss when enabled), run without depth information.
• ZENABLE: enable seismic intensity information (Z buffer) when drawing pixels and make drawing decisions.
5. FINAL NOTES
For further reading on HLSL coding, please visit Microsoft’s official English reference documentation.
3 notes
·
View notes
Text
Edius 8 Pro Crack
When an editor has to wait for technology, creativity suffers. That doesn’t happen with EDIUS Pro 8. EDIUS Pro 8 means more formats and more resolutions in real time for the ability to Edit Anything, Fast. EDIUS Pro 8 is the perfect finishing tool for professional productions, including documentary and 4K theatrical productions. With more creative options and real-time, no-render editing of all popular SD, HD and even 4K formats, EDIUS Pro 8 is THE most versatile and fastest nonlinear editing software available. And EDIUS Pro 8 comes with GV Browser source management to prepare content for subsequent editing in EDIUS.
Best of all, with EDIUS Pro 8, there are no subscription fees — you buy it, you keep it — with a permanent license with free updates throughout the life of EDIUS Pro 8.x.
Need workgroup editing? The ability to edit growing files? Maybe a Dolby Plus/Professional license? Then have a look at
EDIUS Workgroup 8
.
EDIUS end credits logos and videos are now available from Grass Valley.
Click here to download the zip file
.
Key Features
Superior 4K workflow, including support for Blackmagic Design’s DeckLink 4K Extreme, Ultra Studio 4K, AJA KONA 3G (preview only) and EDL or AAF import/export with Grass Valley HQX with DaVinci Resolve 11* Supports third-party I/O hardware from Blackmagic Design, Matrox and AJA
Edit media files with different resolutions — from 24x24 to 4Kx2K
Real-time conversion of frame rates on the same timeline delivers more efficient editing into the hands of editors
Fast, flexible user interface, including unlimited video, audio, title and graphics tracks
Support for the latest file formats — Sony/Canon RAW, Sony XAVC (Intra/Long GOP)/XAVC S, Panasonic AVC-Ultra/AVC-Intra 422, AVC-Intra LT/LT 2K and Canon XF-AVC (import only)
Work natively with many different video formats, including Sony XDCAM, Panasonic P2, Ikegami GF, RED, Canon XF and EOS movie formats
Fastest AVCHD editing on the market (up to 3+ streams in real time)
Multicam editing of up to 16 different sources simultaneously, with video output support
Improved MPEG decoder and encoder
Improved H.264/AVC decoder and encoder (for fast encoding of 4K XAVC)
Accelerated 4K H.264 playback
Optimized for fourth-generation Intel Core i architecture
New GUI design for faster workflows
64-bit native processing with maximum memory access for streamlined real-time editing
Proxy mode workflow for legacy computers helps extend their usability and increase ROI
Supports Intel Quick Sync Video for extremely fast H.264 export (for Blu-ray Disc burning)
Fast handling of large quantities of still image files (JPG, TGA, DPX and others)
Primary color correction (RGB) LOG file support
Primary color correction (RGB) Custom LUT file import
Primary color correction (RGB) HLG and PQ gamma support
RAW decode (Sony/Canon)
3-way color correction (YUV)
Motion tracking
High quality slow-motion (optical flow)
Built-in image stabilization
Direct to Blu-ray Disc and DVD timeline export
OFX support for Magic Bullet and Sapphire plug-ins
Ability to save a current project as a template in order to re-use preferred track settings, screen layout, etc.
H.265/HEVC decoding support
Support for high resolution displays
Specifications Minimum System Requirements (standalone):
OS: Windows 7 64-bit (Service Pack 1 or later), Windows 8/8.1/10 64-bit
Note: See Memory section below for physical memory limits of each OS.
CPU: Any Intel Core 2 or Core iX CPU. Intel or AMD single core CPU with a 3 GHz processor speed or faster (multiple CPUs and/or multicore CPUs are recommended). SSSE3 (Supplementary SSE3) instruction set support required.
Memory:
4 GB RAM minimum
Requirements for RAM and video memory vary depending on the project format. For SD/HD projects: 4 GB or more RAM recommended. For 4K projects: 8 GB or more RAM recommended
Maximum amount of RAM is based on the physical memory limits of each OS.
Windows 10, Enterprise and Pro, 64-bit: 512 GB
Windows 8/8.1, Enterprise and Pro, 64-bit: 512 GB
Windows 8/8.1, 64-bit: 128 GB
Windows 7, Ultimate, Enterprise, and Professional, 64-bit: 192 GB
Windows 7, Home Premium, 64-bit: 16 GB (not recommended for complex 4K projects)
Windows 7, Home Basic, 64-bit: 8 GB (not recommended for projects above HD resolution)
Project FormatRAM MemoryVideo Memory
ResolutionDepthMinimumRecommendedMinimumRecommended
SD and below8-bit1 GB2 GB256 MB512 MB
10-bit2 GB4 GB512 MB1 GB
HD8-bit4 GB4 GB512 MB1 GB
10-bit4 GB4 GB1 GB2 GB
Over HD (including 4K)8-bit8 GB16 GB or more2 GB2 GB or more
10-bit8 GB16 GB or more2 GB2 GB or more
Graphics Card
Supporting higher resolution than 1024x768 32-bit. Direct3D 9.0c or later and PixelShader Model 3.0 or later is required
Requirements for video memory size when using GPUfx will vary depending on the project format. For 10-bit SD projects: 1 GB or more recommended, for HD/4K projects 2 GB or more recommended
Note: Requirements for video memory vary depending on the project format. See Memory section above for details.
Hard Disk
6 GB of hard disk space is required for installation
Drive with SATA/7,200 RPM or faster is required for video storage:
Available hard drive disc space should be twice the size of the file to be edited
RAID-0 is recommended for HD and above resolution editing
Hardware Support
EDIUS 8 supports the following Grass Valley hardware:
STORM 3G Elite
STORM 3G
STORM Pro
STORM Mobile
HDSPARK Pro
HDSPARK
Optical Drive
Blu-ray Disc writer is required when creating Blu-ray Discs
DVD-R/RW or DVD+R/RW drive is required when creating DVDs
Sound Card
Sound card with WDM driver support is required.
Network
Internet connection required for software license activation; thereafter Internet connection is required once per month to maintain usage.
Service and Support
90-day limited warranty.
Click here to Download
1 note
·
View note
Text
Boris Red 5 For Edius 6 Free Download 64 Bit

Boris Red 5 For Edius 6 Free Download 64 Bit Full
Boris Red 5 For Edius 6 Free Download 64 Bit 64
Download Grass Valley EDIUS Pro 9 Full Version is the most versatile and fastest nonlinear editing software. EDIUS Pro 9 gives you real-time edits of multiple formats and frame rates all on the same timeline. This means you can edit faster… and take the time to be more creative.
Grass Valley EDIUS Pro 9 provides native support for almost all commonly used file formats, such as XAVC / XAVC S and AVC-Ultra / Intra.
The EDIUS Pro 9 program is designed as a 64-bit application for Windows operating systems, and takes advantage of the system memory for media intensive operations such as layering, 3D stereoscopic, multicam, and 4K multi-track editing.
Boris FX product download page for all the latest versions of Continuum, Sapphire, and Mocha.
Boris RED is an integrated 3D titling and visual effects software that launches an easy to use custom interface as a host plug-in, or as standalone software application.
Indian wedding png free download 3d EDIUS Pro 9.30 Crack Full + Keygen Full Version Latest Download, edius 9 free. download full version with crack, edius 9 patch.with edit professionally HD, 3D, 4K, 5K, 8K Video with “Edius. Boris Red 5.08 (x32) Eng + Seial Key for Edius 6 (media fire link) in Eduis - on 7:46 PM - 1 comment Boris RED 5 is an integrated application for 3D-compositing and effects creation Titley, and provides unparalleled performance plug into the video editors from Adobe, Apple, Avid, Grass Valley, Media 100, and Sony.
EDIUS Pro 9 supports many formats and is adapted to work in real time. EDIUS Pro is the ideal tool for making professional edits, including documentaries and 4K industrial creations. Working in real time, with all the popular SD, HD and even 4K formats, EDIUS Pro is the most versatile and fastest solution for nonlinear editing. So just download Grass Valley EDIUS Pro 9 Windows full crack for free below.
Latest Grass Valley EDIUS Pro 9 Features
Superior 4K HDR workflow, including support for Blackmagic Design/AJA hardware (preview only) and EDL or AAF import/export
Edit media files with different resolutions — from 24×24 to 4Kx2K
Real-time conversion of frame rates on the same timeline delivers more efficient editing into the hands of editors
Fast, flexible user interface, including unlimited video, audio, title and graphics tracks
Fastest AVCHD editing on the market
Accelerated 4K H.264/H.265 playback using Intel Quick Sync Video
Proxy mode workflow for legacy computers helps extend their usability and increase ROI
Supports Intel Quick Sync Video for extremely fast H.264 (for Blu-ray Disc burning) and H.265 export
Ability to mix SDR and HDR material on the same project, and output results in either color space
New video scope supporting HDR
Color space list editing
Closed Caption view
60/50p timecode display
RED RAW decode GPU support
Improvement of high-quality slow-motion (advanced matching)
Marker color function
Improved default exporter function
Product Information
Files Name : Grass Valley EDIUS Pro 9.20.3340 x64
Created by : Grass Valley
Version : 9.20.3340
License Type : Full_version
Release date : May 11th, 2019
Languages : Multilingual
System Requirements And Technical Details
Supported OS: Windows 7/8/8.1/10
Processor: Intel Core 2 or Core iX CPU
RAM: 4 GB RAM
Free Hard Disk Space: 6 GB of hard disk space is required for installation
Graphics Card : Supporting higher resolution than 1024×768 32-bit. Direct3D 9.0c or later and PixelShader Model 3.0 or later is required
Grass Valley EDIUS Pro 9 Full Crack Free Download
Setup Installer (1GB) | GoogleDrive | GoogleDrive
Password : cahdroid.com
Rate this post
Boris RED 5.6.0.296 64-bit
Category: Graphics and Publishing
Boris RED is an integrated 3D titling and visual effects software that launches an easy to use custom interface as a host plug-in, or as standalone software application.... see full description
Boris Red 5 For Edius 6 Free Download 64 Bit Full
BUY CHEAP DOWNLOAD
* FAST HTTP DOWNLOAD, NO TORRENTS
Platform: Windows (NEED MACOS VERSION?)
Boris RED is an integrated 3D titling and visual effects software that launches an easy to use custom interface as a host plug-in, or as standalone software application.
Official site
Platform WindowsCategoryGraphics and PublishingCompanyBorisPermanent linkhttp://down.cd/16697/buy-Boris-RED-5.6.0.296-64-bit-downloadTags
Antivirus and Security
Business
CD/DVD Tools
Graphics and Publishing
Internet
Mobile
Multimedia and Entertainment
Music Software
Network Tools
Office tools
Operation Systems
PC Diagnostics
Programming and Development
Science / CAD
Server Software
Software plugins
System tools
Training software
Other
$32Adobe Acrobat Pro DC 2020 2020.013.20074 for macOS
$12Adobe Bridge 2021 11.0 for macOS
$17Adobe InCopy 2021 16.0.1 for macOS
$12Adobe Media Encoder 2020 14.7 for macOS
$22Adobe Photoshop Elements 2021 for macOS
$22Adobe Photoshop Lightroom Classic 2021 10.1 for macOS
$17Adobe Premiere Rush 2021 1.5.40 for macOS
$27ANSYS Products 2020 R2 64-bit
$22FileMaker Pro 19.2.1.14 for macOS
$17Luxion KeyShot Pro 10.0198 for macOS
$22Roxio Creator NXT Pro 6 + Content 19.0.55.0
$17TechSmith Camtasia 2020 Studio 2020.0.12 for macOS
$12Xilisoft iPhone Magic Platinum 5.7.33.20201019
$72Adobe CC Creative Suite Master Collection 2018 64-bit 32-bi...
$37Adobe Photoshop CS6 Extended 13.0
$12Alsoft DiskWarrior Standalone + Bootable 5.1 for macOS
$32Autodesk Revit Multilanguage 2020 R1 64-bit
$17EaseUS Data Recovery Wizard Technician + WinPE 13.2
$17IK Multimedia T-RackS 5 Complete AU VST VST3 AAX 5.3.2 for...
Thank you!!! On a scale of 1 to 10, 10 being best, .... Your 100!!!
Boris Red 5 For Edius 6 Free Download 64 Bit 64
Richard Davis
0 notes
Text
Pixel Shaders in Windows Terminal
https://github.com/microsoft/terminal/tree/main/samples/PixelShaders
Comments
0 notes
Photo

Art by @domizai Fragmentation #digitalart #glsl #creativecoding #webgl #opengl #javascript #genart #generativeart #abstractart #generative #procedural #newmediaart #rotation #pixelshader #shader #fragmentshader #mathart #recursive #recursion https://www.instagram.com/p/CoPWfq0LRYy/?igshid=NGJjMDIxMWI=
#digitalart#glsl#creativecoding#webgl#opengl#javascript#genart#generativeart#abstractart#generative#procedural#newmediaart#rotation#pixelshader#shader#fragmentshader#mathart#recursive#recursion
0 notes
Photo


I needed a christmas-y icon for my OC server on discord so I did this.
Honestly I draw characters doing fingerguns too much it’s ridiculous, also Rico why with the Pixelshades-
#original character#oc#snowflakes#christmas#winter#digital art#pixel shades#yeee boi#my art#if you could see the file names tho I'm fucking dead#also I accidentally made him do the lenny face like rico no that's not appropriate for christmas damnit
7 notes
·
View notes
Photo


meonmeonさんのブログで素敵なENBのカスタムLUTが配布されていたので、カスタム枠の追加方法を紹介
SnapDragonENB ver4.2での追加方法です。他のバージョンや他のENBでは使えないかもしれないので気を付けてください
編集前には忘れずにバックアップを取っておきましょう
間違った記述をするとゲームが起動せずに即CTDすることもありえます
enbeffect.fxをテキストエディタで開いて末尾に以下のコードを追加します
// additional lut** texture2D lutnametex** <string ResourceName= "xxxxxx.bmp" ; >; sampler2D lutname** = sampler_state { Texture = < lutnametex** >; MinFilter = LINEAR; MagFilter = LINEAR; MipFilter = NONE; // LINEAR; AddressU = Clamp; AddressV = Clamp; SRGBTexture=FALSE; MaxMipLevel=0; MipMapLodBias=0; }; technique PASSNAME** <string UIName= "Your LUT name" ;> { pass p0 { VertexShader = compile vs_3_0 VS_Quad(); PixelShader = compile ps_3_0 PS_D6EC7DD1( lutname** ); ColorWriteEnable=ALPHA|RED|GREEN|BLUE; ZEnable=FALSE; ZWriteEnable=FALSE; CullMode=NONE; AlphaTestEnable=FALSE; AlphaBlendEnable=FALSE; SRGBWRITEENABLE=FALSE; } }
**部分には他のLUTと被らない数字を記述します。他のLUTの設定から続く連番がいいかと。数字を記述するところは6か所あります
xxxxxx.bmpと書かれているところには使いたいLUTのファイル名、Your LUT nameのところはENBのメニュー内で表示させたい文字に置き換えてください。引用符でくくるのを忘れずに
これでLUT枠が1つ追加されます
保存してからゲームを起動し、正しく追加されているか確認してください
同様のコードを追加していけば更に追加することもできます
-------------------------------------
使用例
// additional lut30 texture2D lutnametex30 <string ResourceName= "./LUT/AetherSuite_LUT3.bmp" ; >; sampler2D lutname30 = sampler_state { Texture = < lutnametex30 >; MinFilter = LINEAR; MagFilter = LINEAR; MipFilter = NONE; // LINEAR; AddressU = Clamp; AddressV = Clamp; SRGBTexture=FALSE; MaxMipLevel=0; MipMapLodBias=0; }; technique PASSNAME30 <string UIName= "AetherSuite 3" ;> { pass p0 { VertexShader = compile vs_3_0 VS_Quad(); PixelShader = compile ps_3_0 PS_D6EC7DD1( lutname30 ); ColorWriteEnable=ALPHA|RED|GREEN|BLUE; ZEnable=FALSE; ZWriteEnable=FALSE; CullMode=NONE; AlphaTestEnable=FALSE; AlphaBlendEnable=FALSE; SRGBWRITEENABLE=FALSE; } }
98 notes
·
View notes
Photo

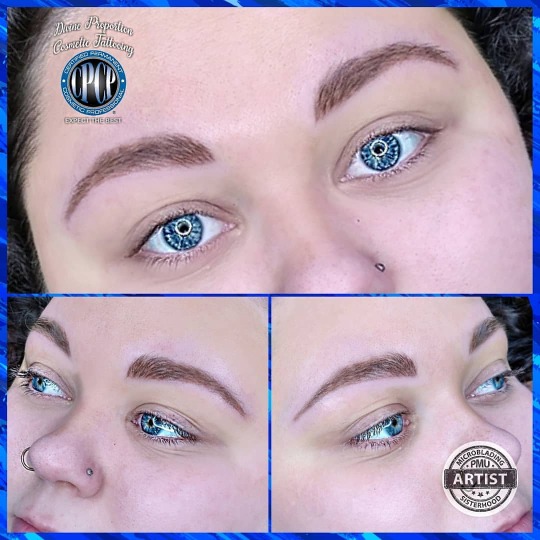
Wake up with make up.... This beautiful client loves no longer having to apply brow makeup every morning! Pixel Blade n' Shade, This manual technique gives a natural soft powdery feel to the individual hair stroke as well as the shading. -------------------------- 📳Call 603-233-6544 📨Email [email protected] 🌐Website divineproportiontattoo.com 💋Divine Proportion Cosmetic Tattoo Located inside Twist Tattoo 38c East Hollis St. Nashua, NH. 03060 . . . #bladenshade #microbladedbrows #hairstrokeseyebrows #microblade #manualtechnique #pixelbrows #pixelblade #pixelshading #pixelblading #ombrebrows #powderbrow #browsonfleek #browsfordays #browtattoo #pmu #pmuartist #tattooedbrows #cosmetictattooing #permanentmakeup #brows #eyebrows #micropigmentation #spcp #nashuanh #localartist #i❤️ink #tinadaviesgals #nhtattooartist #smallbusiness #divineproportioncosmetictattoo (at Divine Proportion Cosmetic Tattooing) https://www.instagram.com/p/B7rvjtEHPvx/?igshid=tas7ixbr2dhm
#bladenshade#microbladedbrows#hairstrokeseyebrows#microblade#manualtechnique#pixelbrows#pixelblade#pixelshading#pixelblading#ombrebrows#powderbrow#browsonfleek#browsfordays#browtattoo#pmu#pmuartist#tattooedbrows#cosmetictattooing#permanentmakeup#brows#eyebrows#micropigmentation#spcp#nashuanh#localartist#i❤️ink#tinadaviesgals#nhtattooartist#smallbusiness#divineproportioncosmetictattoo
0 notes
Photo


LUTを切り替えて使うメモ(自己流)
前置き※Do at your own risk.
LUTはそれぞれのENBのプリセットの仕上げに使う色加工として用いられるので、専用に作られたLUTテクスチャを、別の調整が成されているENBに持ってきて馴染むかどうかの保証はどこにもありません。使っているENBプリセットに合ったモノを使うか自分で作るのが一番(*´д`*)
これはfloat?何それクリームなのおいしいの?という素人な自分でも、LUTをゲーム内のGUIで選べる用にする為のNote、備忘録です。同じような方の手助けになれば幸いです┏○ペコ
素の状態ではLUT切り替えができないENB向けです。(やってることはRampage ENBの真似っ子ですが)
参考にさせて頂いたもの
ENB Series Forum - [HLSL CODE] 3D LUT
http://enbseries.enbdev.com/forum/viewtopic.php?f=7&t=4394
Skyrimshot - ENBでLUTを使う
http://skyrimshot.blog.fc2.com/blog-entry-78.html
Snapdragon Prime ENB
http://www.nexusmods.com/skyrim/mods/70451/?
Rampage ENB
http://www.nexusmods.com/skyrim/mods/67483/?


ここではセピア調を目指して_(:3 」∠)_自作したLUTを使ってみます。分かりやすいようにsepia.pngとでもして、enbeffext.fxがあるフォルダに一緒に放り込んでおきます。
ディレクトリ構造はこんな感じです。
%Skyrim%\enbseries\enbeffect.fx
%Skyrim%\enbseries\enbeffect.fxbak // バックアップファイル
%Skyrim%\enbseries\sepia.png
%Skyrim%\enbseries\enbpalette.bmp // 無ければどこかから頂戴する
※記述を間違えるとCTDするかpaletteが機能しなくなります
※なので編集前に必ずenbeffect.fxを複製します(失敗した時に戻せるようにです)
編集の大まかな流れは
PS_D6EV7DD1()にLUTファイルを受けとる引数と、3DLUTか否かで分岐するIf文で使う引数を加える
#ifdef E_CC_PALETTE 以下に3DLUTを描画に反映させる処理を書き加える
texture2DでLUTテクスチャのファイルパスを指定して
sampler2Dで下ごしらえして
technique ******* でGUIに表示させて選択する部分を作る。1で増やした引数の値はここのcompile ps_3_0 PS_D6EC7DD1() から渡す
3~5は使うLUT毎に追加します。
長くなるので実際のコードは折り畳みました。read more
0.) open enbeffect.fx
1.) replace
float4 PS_D6EC7DD1(VS_OUTPUT_POST IN, float2 vPos : VPOS) : COLOR
with
float4 PS_D6EC7DD1(VS_OUTPUT_POST IN, float2 vPos : VPOS, uniform sampler2D LUTtex, uniform bool enable_3Dlut) : COLOR
2.) find ‘ E_CC_PALETTE ‘
replace
//pallete texture (0.082+ version feature) #ifdef E_CC_PALETTE color.rgb=saturate(color.rgb); float3 brightness=Adaptation.xyz;//tex2D(_s4, 0.5);//adaptation luminance // brightness=saturate(brightness);//old version from ldr games brightness=(brightness/(brightness+1.0));//new version brightness=max(brightness.x, max(brightness.y, brightness.z));//new version float3 palette; float4 uvsrc=0.0; uvsrc.y=brightness.r; uvsrc.x=color.r; palette.r=tex2Dlod(_s7, uvsrc).r; uvsrc.x=color.g; uvsrc.y=brightness.g; palette.g=tex2Dlod(_s7, uvsrc).g; uvsrc.x=color.b; uvsrc.y=brightness.b; palette.b=tex2Dlod(_s7, uvsrc).b; color.rgb=palette.rgb; #endif //E_CC_PALETTE
with
// Original Code by kingeric1992 http://enbseries.enbdev.com/forum/viewtopic.php?f=7&t=4394 #ifdef E_CC_PALETTE if(enable_3Dlut) // for 3DLUT { float2 CLut_pSize = float2(0.00390625, 0.0625);// 1 / float2(256, 16); color.rgb = saturate(color.rgb); color.b *= 15; float4 CLut_UV = 0; CLut_UV.w = floor(color.b); CLut_UV.xy = color.rg * 15 * CLut_pSize + 0.5 * CLut_pSize ; CLut_UV.x += CLut_UV.w * CLut_pSize.y; color.rgb = lerp( tex2Dlod(LUTtex, CLut_UV.xyzz).rgb, tex2Dlod(LUTtex, CLut_UV.xyzz + float4(CLut_pSize.y, 0, 0, 0)).rgb, color.b - CLut_UV.w);//_s7→LUTTex } else // for 256x256pixel palette { color.rgb=saturate(color.rgb); float3 brightness=Adaptation.xyz;//tex2D(_s4, 0.5);//adaptation luminance // brightness=saturate(brightness);//old version from ldr games brightness=(brightness/(brightness+1.0));//new version brightness=max(brightness.x, max(brightness.y, brightness.z));//new version float3 palette; float4 uvsrc=0.0; uvsrc.y=brightness.r; uvsrc.x=color.r; palette.r=tex2Dlod(LUTtex, uvsrc).r;//_s7→LUTTex uvsrc.x=color.g; uvsrc.y=brightness.g; palette.g=tex2Dlod(LUTtex, uvsrc).g;//_s7→LUTTex uvsrc.x=color.b; uvsrc.y=brightness.b; palette.b=tex2Dlod(LUTtex, uvsrc).b;//_s7→LUTTex color.rgb=palette.rgb; } #endif //E_CC_PALETTE
3.) find ‘ texture2D texs7 ‘
add to the bottom
texture2D lut01 <string ResourceName="sepia.png";> ;//3DLUT01:Sepia
ex)
texture2D texs0;//color texture2D texs1;//bloom skyrim texture2D texs2;//adaptation skyrim texture2D texs3;//bloom enb texture2D texs4;//adaptation enb texture2D texs7;//palette enb // add lut01 // texture2D *lutname* <string ResourceName="*filepath*";> ; texture2D lut01 <string ResourceName="sepia.png";> ;//3DLUT01:Sepia
4.) find ‘ sampler2D _s7 = sampler_state ‘
add to the bottom
sampler2D _lut01 = sampler_state { Texture = <lut01>; MinFilter = LINEAR; MagFilter = LINEAR; MipFilter = NONE; AddressU = Clamp; AddressV = Clamp; SRGBTexture=FALSE; MaxMipLevel=0; MipMapLodBias=0; };
ex)
sampler2D _s7 = sampler_state { Texture = <texs7>; MinFilter = LINEAR; MagFilter = LINEAR; MipFilter = NONE; AddressU = Clamp; AddressV = Clamp; SRGBTexture=FALSE; MaxMipLevel=0; MipMapLodBias=0; }; //add _lut01 //sampler2D _*lutname* = sampler_state // Texture = <*lutname*>; sampler2D _lut01 = sampler_state { Texture = <lut01>; MinFilter = LINEAR; MagFilter = LINEAR; MipFilter = NONE; AddressU = Clamp; AddressV = Clamp; SRGBTexture=FALSE; MaxMipLevel=0; MipMapLodBias=0; };
5.) find ‘ technique Shader_D6EC7DD1 ‘
replace
technique Shader_D6EC7DD1 <string UIName="ENBSeries";> { pass p0 { VertexShader = compile vs_3_0 VS_Quad(); PixelShader = compile ps_3_0 PS_D6EC7DD1(); ColorWriteEnable=ALPHA|RED|GREEN|BLUE; ZEnable=FALSE; ZWriteEnable=FALSE; CullMode=NONE; AlphaTestEnable=FALSE; AlphaBlendEnable=FALSE; SRGBWRITEENABLE=FALSE; } }
with
technique Shader_D6EC7DD1 <string UIName="ENBSeries";> // enbpalette.bmp { pass p0 { VertexShader = compile vs_3_0 VS_Quad(); PixelShader = compile ps_3_0 PS_D6EC7DD1( _s7, true ); // if use 256x256pixel palette, ture→false ColorWriteEnable=ALPHA|RED|GREEN|BLUE; ZEnable=FALSE; ZWriteEnable=FALSE; CullMode=NONE; AlphaTestEnable=FALSE; AlphaBlendEnable=FALSE; SRGBWRITEENABLE=FALSE; } } // add _lut01 // technique *PASSNAME*, *LUT*, *Color*...etc // pixelShader = compile ps_3_0 PS_D6EC7DD1( _*lutname*, true ); technique PASSNAME01 <string UIName="Sepia";> { pass p0 { VertexShader = compile vs_3_0 VS_Quad(); PixelShader = compile ps_3_0 PS_D6EC7DD1( _lut01, true ); // if use 256x256pixel palette, ture→false ColorWriteEnable=ALPHA|RED|GREEN|BLUE; ZEnable=FALSE; ZWriteEnable=FALSE; CullMode=NONE; AlphaTestEnable=FALSE; AlphaBlendEnable=FALSE; SRGBWRITEENABLE=FALSE; } }
これで Snapdragon Prime ENB のようにGUIからLUTを選択できるようになる筈です。enbseries.ini の UsePaletteTexture を true にしておくのも忘れずに‥!GUIから UsePaletteTexture のチェックを入れた場合はSAVE CONFIGRATION してからAPPLY CHANGES で変更を反映させます。

ここではKwanon ENB 0315.8を使ってテストしました。デフォでは素直な画ですが、色温度の調節やシネマっぽくするフィルター等がGUIから簡単に調節できるようになってます‥これだけでかなり渋い画にもできます。
補足‥初期に使われていた256pxの正方形のenbpaletteを使う場合はLUTと同じように3,4,5の手順を踏んだ後に5の technique PASSNAME##~~の部分の PixelShader の部分を下記のように書き換えます。
before
PixelShader = compile ps_3_0 PS_D6EC7DD1( _lut01, true );
after
PixelShader = compile ps_3_0 PS_D6EC7DD1( _lut01, false );
長いわ!ヽ(`Д´#)ノ
皆様素敵なスカイリムLifeを( ˘ω˘)スヤァ
24 notes
·
View notes
Photo

messing with pixelshaders, work in progress
0 notes
Text
MMD FX file reading for shaders: a translation by ryuu
The following tutorial is an English translation of the original one in Japanese by Dance Intervention P.
This English documentation was requested by Chestnutscoop on DeviantArt, as it’ll be useful to the MME modding community and help MMD become open-source for updates. It’s going to be an extensive one, so take it easy.
Disclaimer: coding isn’t my area, not even close to my actual career and job (writing/health). I have little idea of what’s going on here and I’m relying on my IT friends to help me with this one.
Content Index:
Introduction
Overall Flow
Parameter Declaration
Outline Drawing
Non-Self-shadow Rendering
Drawing Objects When Self-shadow is Disabled
Z-value Plot For Self-shadow Determination
Drawing Objects in Self-shadowing
Final Notes
1. INTRODUCTION
This documentation contains the roots of .fx file reading for MME as well as information on DirectX and programmable shaders while reading full.fx version 1.3. In other words, how to use HLSL for MMD shaders. Everything in this tutorial will try to stay as faithful as possible to the original text in Japanese.
It was translated from Japanese to English by ryuu. As I don’t know how to contact Dance Intervention P for permission to translate and publish it here, the original author is free to request me to take it down. The translation was done with the aid of the online translator DeepL and my friends’ help. This documentation has no intention in replacing the original author’s.
Any coding line starting with “// [Japanese text]” is the author’s comments. If the coding isn’t properly formatted on Tumblr, you can visit the original document to check it. The original titles of each section were added for ease of use.
2. OVERALL FLOW (全体の流れ)
Applicable technique → pass → VertexShader → PixelShader
• Technique: processing of annotations that fall under <>.
• Pass: processing unit.
• VertexShader: convert vertices in local coordinates to projective coordinates.
• PixelShader: sets the color of a vertex.
3. PARAMETER DECLARATION (パラメータ宣言)
9 // site-specific transformation matrix
10 float4x4 WorldViewProjMatrix : WORLDVIEWPROJECTION;
11 float4x4 WorldMatrix : WORLD;
12 float4x4 ViewMatrix : VIEW;
13 float4x4 LightWorldViewProjMatrix : WORLDVIEWPROJECTION < string Object = “Light”; >;
• Float4x4: 32-bit floating point with 4 rows and 4 columns.
• WorldViewProjMatrix: a matrix that can transform vertices in local coordinates to projective coordinates with the camera as the viewpoint in a single step.
• WorldMatrix: a matrix that can transform vertices in local coordinates into world coordinates with the camera as the viewpoint.
• ViewMatrix: a matrix that can convert world coordinate vertices to view coordinates with the camera as the viewpoint.
• LightWorldViewProjMatrix: a matrix that can transform vertices in local coordinates to projective coordinates with the light as a viewpoint in a single step.
• Local coordinate system: coordinates to represent the positional relationship of vertices in the model.
• World coordinate: coordinates to show the positional relationship between models.
• View coordinate: coordinates to represent the positional relationship with the camera.
• Projection Coordinates: coordinates used to represent the depth in the camera. There are two types: perspective projection and orthographic projection.
• Perspective projection: distant objects are shown smaller and nearby objects are shown larger.
• Orthographic projection: the size of the image does not change with depth.
15 float3 LightDirection : DIRECTION < string Object = “Light”; >;
16 float3 CameraPosition : POSITION < string Object = “Camera”; >;
• LightDirection: light direction vector.
• CameraPosition: world coordinates of the camera.
18 // material color
19 float4 MaterialDiffuse : DIFFUSE < string Object = “Geometry”; >;
20 float3 MaterialAmbient : AMBIENT < string Object = “Geometry”; >;
21 float3 MaterialEmmisive : EMISSIVE < string Object = “Geometry”; >;
22 float3 MaterialSpecular : SPECULAR < string Object = “Geometry”; >;
23 float SpecularPower : SPECULARPOWER < string Object = “Geometry”; >;
24 float3 MaterialToon : TOONCOLOR;
25 float4 EdgeColor : EDGECOLOR;
• float3: no alpha value.
• MaterialDiffuse: diffuse light color of material, Diffuse+A (alpha value) in PMD.
• MaterialAmbient: ambient light color of the material; Diffuse of PMD?
• MaterialEmmisive: light emitting color of the material, Ambient in PMD.
• MaterialSpecular: specular light color of the material; PMD’s Specular.
• SpecularPower: specular strength. PMD Shininess.
• MaterialToon: shade toon color of the material, lower left corner of the one specified by the PMD toon texture.
• EdgeColor: putline color, as specified by MMD’s edge color.
26 // light color
27 float3 LightDiffuse : DIFFUSE < string Object = “Light”; >;
28 float3 LightAmbient : AMBIENT < string Object = “Light”; >;
29 float3 LightSpecular : SPECULAR < string Object = “Light”; >;
30 static float4 DiffuseColor = MaterialDiffuse * float4(LightDiffuse, 1.0f);
31 static float3 AmbientColor = saturate(MaterialAmbient * LightAmbient + MaterialEmmisive);
32 static float3 SpecularColor = MaterialSpecular * LightSpecular;
• LightDiffuse: black (floa3(0,0,0))?
• LightAmbient: MMD lighting operation values.
• LightSpecular: MMD lighting operation values.
• DiffuseColor: black by multiplication in LightDiffuse?
• AmbientColor: does the common color of Diffuse in PMD become a little stronger in the value of lighting manipulation in MMD?
• SpecularColor: does it feel like PMD’s Specular is a little stronger than MMD’s Lighting Manipulation value?
34 bool parthf; // perspective flags
35 bool transp; // semi-transparent flag
36 bool spadd; // sphere map additive synthesis flag
37 #define SKII1 1500
38 #define SKII2 8000
39 #define Toon 3
• parthf: true for self-shadow distance setting mode2.
• transp: true for self-shadow distance setting mode2.
• spadd: true in sphere file .spa.
• SKII1:self-shadow A constant used in mode1. The larger the value, the weirder the shadow will be, and the smaller the value, the weaker the shadow will be.
• SKII2: self-shadow A constant used in mode2. If it is too large, the self-shadow will have a strange shadow, and if it is too small, it will be too thin.
• Toon: weaken the shade in the direction of the light with a close range shade toon.
41 // object textures
42 texture ObjectTexture: MATERIALTEXTURE;
43 sampler ObjTexSampler = sampler_state {
44 texture = <ObjectTexture>;
45 MINFILTER = LINEAR;
46 MAGFILTER = LINEAR;
47 };
48
• ObjectTexture: texture set in the material.
• ObjTexSampler: setting the conditions for acquiring material textures.
• MINIFILTER: conditions for shrinking textures.
• MAGFILTER: conditions for enlarging a texture.
• LINEAR: interpolate to linear.
49 // sphere map textures
50 texture ObjectSphereMap: MATERIALSPHEREMAP;
51 sampler ObjSphareSampler = sampler_state {
52 texture = <ObjectSphereMap>;
53 MINFILTER = LINEAR;
54 MAGFILTER = LINEAR;
55 };
• ObjectSphereMap: sphere map texture set in the material.
• ObjSphareSampler: setting the conditions for obtaining a sphere map texture.
57 // this is a description to avoid overwriting the original MMD sampler. Cannot be deleted.
58 sampler MMDSamp0 : register(s0);
59 sampler MMDSamp1 : register(s1);
60 sampler MMDSamp2 : register(s2);
• register: assign shader variables to specific registers.
• s0: sampler type register 0.
4. OUTLINE DRAWING (輪郭描画)
Model contours used for drawing, no accessories.
65 // vertex shader
66 float4 ColorRender_VS(float4 Pos : POSITION) : POSITION
67 {
68 // world-view projection transformation of camera viewpoint.
69 return mul( Pos, WorldViewProjMatrix );
70 }
Return the vertex coordinates of the camera viewpoint after the world view projection transformation.
Parameters
• Pos: local coordinates of the vertex.
• POSITION (input): semantic indicating the vertex position in the object space.
• POSITION (output): semantic indicating the position of a vertex in a homogeneous space.
• mul (x,y): perform matrix multiplication of x and y.
Return value
Vertex coordinates in projective space; compute screen coordinate position by dividing by w.
• Semantics: communicating information about the intended use of parameters.
72 // pixel shader
73 float4 ColorRender_PS() : COLOR
74 {
75 // fill with outline color
76 return EdgeColor;
77 }
Returns the contour color of the corresponding input vertex.
Return value
Output color
• COLOR: output color semantic.
79 // contouring techniques
80 technique EdgeTec < string MMDPass = "edge"; > {
81 pass DrawEdge {
82 AlphaBlendEnable = FALSE;
83 AlphaTestEnable = FALSE;
84
85 VertexShader = compile vs_2_0 ColorRender_VS();
86 PixelShader = compile ps_2_0 ColorRender_PS();
87 }
88 }
Processing for contour drawing.
• MMDPASS: specify the drawing target to apply.
• “edge”: contours of the PMD model.
• AlphaBlendEnable: set the value to enable alpha blending transparency. Blend surface colors, materials, and textures with transparency information to overlay on another surface.
• AlphaTestEnable: per-pixel alpha test setting. If passed, the pixel will be processed by the framebuffer. Otherwise, all framebuffer processing of pixels will be skipped.
• VertexShader: shader variable representing the compiled vertex shader.
• PixelShader: shader variable representing the compiled pixel shader.
• vs_2_0: vertex shader profile for shader model 2.
• ps_2_0: pixel shader profile for shader model 2.
• Frame buffer: memory that holds the data for one frame until it is displayed on the screen.
5. NON-SELF-SHADOW SHADOW RENDERING (非セルフシャドウ影描画)
Drawing shadows falling on the ground in MMD, switching between showing and hiding them in MMD's ground shadow display.
94 // vertex shader
95 float4 Shadow_VS(float4 Pos : POSITION) : POSITION
96 {
97 // world-view projection transformation of camera viewpoint.
98 return mul( Pos, WorldViewProjMatrix );
99 }
Returns the vertex coordinates of the source vertex of the shadow display after the world-view projection transformation of the camera viewpoint.
Parameters
• Pos: local coordinates of the vertex from which the shadow will be displayed.
Return value
Vertex coordinates in projective space.
101 // pixel shader
102 float4 Shadow_PS() : COLOR
103 {
104 // fill with ambient color
105 return float4(AmbientColor.rgb, 0.65f);
106 }
Returns the shadow color to be drawn. The alpha value will be reflected when MMD's display shadow color transparency is enabled.
Return value
Output color
108 // techniques for shadow drawing
109 technique ShadowTec < string MMDPass = "shadow"; > {
110 pass DrawShadow {
111 VertexShader = compile vs_2_0 Shadow_VS();
112 PixelShader = compile ps_2_0 Shadow_PS();
113 }
114 }
Processing for non-self-shadow shadow drawing.
• “shadow”: simple ground shadow.
6. DRAWING OBJECTS WHEN SELF-SHADOW IS DISABLED (セルフシャドウ無効時オブジェクト描画)
Drawing objects when self-shadowing is disabled. Also used when editing model values.
120 struct VS_OUTPUT {
121 float4 Pos : POSITION; // projective transformation coordinates
122 float2 Tex : TEXCOORD1; // texture
123 float3 Normal : TEXCOORD2; // normal vector
124 float3 Eye : TEXCOORD3; // position relative to camera
125 float2 SpTex : TEXCOORD4; // sphere map texture coordinates
126 float4 Color : COLOR0; // diffuse color
127 };
A structure for passing multiple return values between shader stages. The final data to be passed must specify semantics.
Parameters
• Pos:stores the position of a vertex in projective coordinates as a homogeneous spatial coordinate vertex shader output semantic.
• Tex: stores the UV coordinates of the vertex as the first texture coordinate vertex shader output semantic.
• Normal: stores the vertex normal vector as the second texture coordinate vertex shader output semantic.
• Eye: (opposite?) stores the eye vector as a #3 texture coordinate vertex shader output semantic.
• SpTex: stores the UV coordinates of the vertex as the number 4 texture coordinate vertex shader output semantic.
• Color: stores the diffuse light color of a vertex as the 0th color vertex shader output semantic.
129 // vertex shader
130 VS_OUTPUT Basic_VS(float4 Pos : POSITION, float3 Normal : NORMAL, float2 Tex : TEXCOORD0, uniform bool useTexture, uniform bool useSphereMap, uniform bool useToon)
131 {
Converts local coordinates of vertices to projective coordinates. Sets the value to pass to the pixel shader, which returns the VS_OUTPUT structure.
Parameters
• Pos: local coordinates of the vertex.
• Normal: normals in local coordinates of vertices.
• Tex: UV coordinates of the vertices.
• useTexture: determination of texture usage, given by pass.
• useSphereMap: determination of sphere map usage, given by pass.
• useToon: determination of toon usage. Given by pass in the case of model data.
• uniform: marks variables with data that are always constant during shader execution.
Return value
VS_OUTPUT, a structure passed to the pixel shader.
132 VS_OUTPUT Out = (VS_OUTPUT)0;
133
Initialize structure members with 0. Error if return member is undefined.
134 // world-view projection transformation of camera viewpoint.
135 Out.Pos = mul( Pos, WorldViewProjMatrix );
136
Convert local coordinates of vertices to projective coordinates.
137 // position relative to camera
138 Out.Eye = CameraPosition - mul( Pos, WorldMatrix );
The opposite vector of eye? Calculate.
139 // vertex normal
140 Out.Normal = normalize( mul( Normal, (float3x3)WorldMatrix ) );
141
Compute normalized normal vectors in the vertex world space.
• normalize (x): normalize a floating-point vector based on x/length(x).
• length (x): returns the length of a floating-point number vector.
142 // Diffuse color + Ambient color calculation
143 Out.Color.rgb = AmbientColor;
144 if ( !useToon ) {
145 Out.Color.rgb += max(0,dot( Out.Normal, -LightDirection )) * DiffuseColor.rgb;
By the inner product of the vertex normal and the backward vector of the light, the influence of the light (0-1) is calculated, and the diffuse light color calculated from the influence is added to the ambient light color. DiffuseColor is black because LightDifuse is black, and AmbientColor is the diffuse light of the material. Confirmation required.
• dot (x,y): return the inner value of the x and y vectors.
• max (x,y): choose the value of x or y, whichever is greater.
146 }
147 Out.Color.a = DiffuseColor.a;
148 Out.Color = saturate( Out.Color );
149
• saturate (x): clamp x to the range 0-1. 0>x, 1>x truncated?
150 // texture coordinates
151 Out.Tex = Tex;
152
153 if ( useSphereMap ) {
154 // sphere map texture coordinates
155 float2 NormalWV = mul( Out.Normal, (float3x3)ViewMatrix );
X and Y coordinates of vertex normals in view space.
156 Out.SpTex.x = NormalWV.x * 0.5f + 0.5f;
157 Out.SpTex.y = NormalWV.y * -0.5f + 0.5f;
158 }
159
Converts view coordinate values of vertex normals to texture coordinate values. Idiomatic.
160 return Out;
161 }
Return the structure you set.
163 // pixel shader
164 float4 Basic_PS(VS_OUTPUT IN, uniform bool useTexture, uniform bool useSphereMap, uniform bool useToon) : COLOR0
165 {
Specify the color of pixels to be displayed on the screen.
Parameters
• IN: VS_OUTPUT structure received from the vertex shader.
• useTexture: determination of texture usage, given by pass.
• useSphereMap: determination of using sphere map, given by pass.
• useToon: determination of toon usage. Given by pass in the case of model data.
Output value
Output color
166 // specular color calculation
167 float3 HalfVector = normalize( normalize(IN.Eye) + -LightDirection );
Find the half vector from the inverse vector of the line of sight and the inverse vector of the light.
• Half vector: a vector that is the middle (addition) of two vectors. Used instead of calculating the reflection vector.
168 float3 Specular = pow( max(0,dot( HalfVector, normalize(IN.Normal) )), SpecularPower ) * SpecularColor;
169
From the half-vector and vertex normals, find the influence of reflection. Multiply the influence by the specular intensity, and multiply by the specular light color to get the specular.
• pow (x,y): multiply x by the exponent y.
170 float4 Color = IN.Color;
171 if ( useTexture ) {
172 // apply texture
173 Color *= tex2D( ObjTexSampler, IN.Tex );
174 }
If a texture is set, extract the color of the texture coordinates and multiply it by the base color.
• tex2D (sampler, tex): extract the color of the tex coordinates from the 2D texture in the sampler settings.
175 if ( useSphereMap ) {
176 // apply sphere map
177 if(spadd) Color += tex2D(ObjSphareSampler,IN.SpTex);
178 else Color *= tex2D(ObjSphareSampler,IN.SpTex);
179 }
180
If a sphere map is set, extract the color of the sphere map texture coordinates and add it to the base color if it is an additive sphere map file, otherwise multiply it.
181 if ( useToon ) {
182 // toon application
183 float LightNormal = dot( IN.Normal, -LightDirection );
184 Color.rgb *= lerp(MaterialToon, float3(1,1,1), saturate(LightNormal * 16 + 0.5));
185 }
In the case of the PMD model, determine the influence of the light from the normal vector of the vertex and the inverse vector of the light. Correct the influence level to 0.5-1, and darken the base color for lower influence levels.
• lerp (x,y,s): linear interpolation based on x + s(y - x). 0=x, 1=y.
186
187 // specular application
188 Color.rgb += Specular;
189
190 return Color;
191 }
Add the obtained specular to the base color and return the output color.
195 technique MainTec0 < string MMDPass = "object"; bool UseTexture = false; bool UseSphereMap = false; bool UseToon = false; > {
196 pass DrawObject {
197 VertexShader = compile vs_2_0 Basic_VS(false, false, false);
198 PixelShader = compile ps_2_0 Basic_PS(false, false, false);
199 }
200 }
Technique performed on a subset of accessories (materials) that don’t use texture or sphere maps when self-shadow is disabled.
• “object”: object when self-shadow is disabled.
• UseTexture: true for texture usage subset.
• UseSphereMap: true for sphere map usage subset.
• UseToon: true for PMD model.
7. Z-VALUE PLOT FOR SELF-SHADOW DETERMINATION (セルフシャドウ判定用Z値プロット)
Create a boundary value to be used for determining the self-shadow.
256 struct VS_ZValuePlot_OUTPUT {
257 float4 Pos : POSITION; // projective transformation coordinates
258 float4 ShadowMapTex : TEXCOORD0; // z-buffer texture
259 };
A structure for passing multiple return values between shader stages.
Parameters
• Pos: stores the position of a vertex in projective coordinates as a homogeneous spatial coordinate vertex shader output semantic.
• ShadowMapTex: stores texture coordinates for hardware calculation of z and w interpolation values as 0 texture coordinate vertex shader output semantics.
• w: scaling factor of the visual cone (which expands as you go deeper) in projective space.
261 // vertex shader
262 VS_ZValuePlot_OUTPUT ZValuePlot_VS( float4 Pos : POSITION )
263 {
264 VS_ZValuePlot_OUTPUT Out = (VS_ZValuePlot_OUTPUT)0;
265
266 // do a world-view projection transformation with the eyes of the light.
267 Out.Pos = mul( Pos, LightWorldViewProjMatrix );
268
Conversion of local coordinates of a vertex to projective coordinates with respect to a light.
269 // align texture coordinates to vertices.
270 Out.ShadowMapTex = Out.Pos;
271
272 return Out;
273 }
Assign to texture coordinates to let the hardware calculate z, w interpolation values for vertex coordinates, and return the structure.
275 // pixel shader
276 float4 ZValuePlot_PS( float4 ShadowMapTex : TEXCOORD0 ) : COLOR
277 {
278 // record z-values for R color components
279 return float4(ShadowMapTex.z/ShadowMapTex.w,0,0,1);
280 }
Divide the z-value in projective space by the magnification factor w, calculate the z-value in screen coordinates, assign to r-value and return (internal MMD processing?).
282 // techniques for Z-value mapping
283 technique ZplotTec < string MMDPass = "zplot"; > {
284 pass ZValuePlot {
285 AlphaBlendEnable = FALSE;
286 VertexShader = compile vs_2_0 ZValuePlot_VS();
287 PixelShader = compile ps_2_0 ZValuePlot_PS();
288 }
289 }
Technique to be performed when calculating the z-value for self-shadow determination.
• “zplot”: Z-value plot for self-shadow.
8. DRAWING OBJECTS IN SELF-SHADOWING (セルフシャドウ時オブジェクト描画)
Drawing an object with self-shadow.
295 // sampler for the shadow buffer. “register(s0)" because MMD uses s0
296 sampler DefSampler : register(s0);
297
Assign sampler register 0 to DefSampler. Not sure when it’s swapped with MMDSamp0 earlier. Not replaceable.
298 struct BufferShadow_OUTPUT {
299 float4 Pos : POSITION; // projective transformation coordinates
300 float4 ZCalcTex : TEXCOORD0; // z value
301 float2 Tex : TEXCOORD1; // texture
302 float3 Normal : TEXCOORD2; // normal vector
303 float3 Eye : TEXCOORD3; // position relative to camera
304 float2 SpTex : TEXCOORD4; // sphere map texture coordinates
305 float4 Color : COLOR0; // diffuse color
306 };
VS_OUTPUT with ZCalcTex added.
• ZCalcTex: stores the texture coordinates for calculating the interpolation values of Z and w for vertices in screen coordinates as the 0 texture coordinate vertex shader output semantic.
308 // vertex shader
309 BufferShadow_OUTPUT BufferShadow_VS(float4 Pos : POSITION, float3 Normal : NORMAL, float2 Tex : TEXCOORD0, uniform bool useTexture, uniform bool useSphereMap, uniform bool useToon)
310 {
Converts local coordinates of vertices to projective coordinates. Set the value to pass to the pixel shader, returning the BufferShadow_OUTPUT structure.
Parameters
• Pos: local coordinates of the vertex.
• Normal: normals in local coordinates of vertices.
• Tex: UV coordinates of the vertices.
• useTexture: determination of texture usage, given by pass.
• useSphereMap: determination of sphere map usage, given by pass.
• useToon: determination of toon usage. Given by pass in the case of model data.
Return value
BufferShadow_OUTPUT.
311 BufferShadow_OUTPUT Out = (BufferShadow_OUTPUT)0;
312
Initializing the structure.
313 // world-view projection transformation of camera viewpoint.
314 Out.Pos = mul( Pos, WorldViewProjMatrix );
315
Convert local coordinates of vertices to projective coordinates.
316 // position relative to camera
317 Out.Eye = CameraPosition - mul( Pos, WorldMatrix );
Calculate the inverse vector of the line of sight.
318 // vertex normal
319 Out.Normal = normalize( mul( Normal, (float3x3)WorldMatrix ) );
Compute normalized normal vectors in the vertex world space.
320 // world View Projection Transformation with Light Perspective
321 Out.ZCalcTex = mul( Pos, LightWorldViewProjMatrix );
Convert local coordinates of vertices to projective coordinates with respect to the light, and let the hardware calculate z and w interpolation values.
323 // Diffuse color + Ambient color Calculation
324 Out.Color.rgb = AmbientColor;
325 if ( !useToon ) {
326 �� Out.Color.rgb += max(0,dot( Out.Normal, -LightDirection )) * DiffuseColor.rgb;
327 }
328 Out.Color.a = DiffuseColor.a;
329 Out.Color = saturate( Out.Color );
Set the base color. For accessories, add a diffuse color to the base color based on the light influence, and set each component to 0-1.
331 // texture coordinates
332 Out.Tex = Tex;
Assign the UV coordinates of the vertex as they are.
334 if ( useSphereMap ) {
335 // sphere map texture coordinates
336 float2 NormalWV = mul( Out.Normal, (float3x3)ViewMatrix );
Convert vertex normal vectors to x and y components in view space coordinates when using sphere maps.
337 Out.SpTex.x = NormalWV.x * 0.5f + 0.5f;
338 Out.SpTex.y = NormalWV.y * -0.5f + 0.5f;
339 }
340
341 return Out;
342 }
Convert view space coordinates to texture coordinates and put the structure back.
344 // pixel shader
345 float4 BufferShadow_PS(BufferShadow_OUTPUT IN, uniform bool useTexture, uniform bool useSphereMap, uniform bool useToon) : COLOR
346 {
Specify the color of pixels to be displayed on the screen.
Parameters
• IN: BufferShadow_OUTPUT structure received from vertex shader.
• useTexture: determination of texture usage, given by pass.
• useSphereMap: determination of sphere map usage, given by pass.
• useToon: determination of toon usage. Given by pass in the case of model data.
Output value
Output color
347 // specular color calculation
348 float3 HalfVector = normalize( normalize(IN.Eye) + -LightDirection );
349 float3 Specular = pow( max(0,dot( HalfVector, normalize(IN.Normal) )), SpecularPower ) * SpecularColor;
350
Same specular calculation as Basic_PS.
351 float4 Color = IN.Color;
352 float4 ShadowColor = float4(AmbientColor, Color.a); // shadow’s color
Base color and self-shadow base color.
353 if ( useTexture ) {
354 // apply texture
355 float4 TexColor = tex2D( ObjTexSampler, IN.Tex );
356 Color *= TexColor;
357 ShadowColor *= TexColor;
358 }
When using a texture, extract the color of the texture coordinates from the set texture and multiply it by the base color and self-shadow color respectively.
359 if ( useSphereMap ) {
360 // apply sphere map
361 float4 TexColor = tex2D(ObjSphareSampler,IN.SpTex);
362 if(spadd) {
363 Color += TexColor;
364 ShadowColor += TexColor;
365 } else {
366 Color *= TexColor;
367 ShadowColor *= TexColor;
368 }
369 }
As with Basic_PS, when using a sphere map, add or multiply the corresponding colors.
370 // specular application
371 Color.rgb += Specular;
372
Apply specular to the base color.
373 // convert to texture coordinates
374 IN.ZCalcTex /= IN.ZCalcTex.w;
Divide the z-value in projective space by the scaling factor w and convert to screen coordinates.
375 float2 TransTexCoord;
376 TransTexCoord.x = (1.0f + IN.ZCalcTex.x)*0.5f;
377 TransTexCoord.y = (1.0f - IN.ZCalcTex.y)*0.5f;
378
Convert screen coordinates to texture coordinates.
379 if( any( saturate(TransTexCoord) != TransTexCoord ) ) {
380 // external shadow buffer
381 return Color;
Return the base color if the vertex coordinates aren’t in the 0-1 range of the texture coordinates.
382 } else {
383 float comp;
384 if(parthf) {
385 // self-shadow mode2
386 comp=1-saturate(max(IN.ZCalcTex.z-tex2D(DefSampler,TransTexCoord).r , 0.0f)*SKII2*TransTexCoord.y-0.3f);
In self-shadow mode2, take the Z value from the shadow buffer sampler and compare it with the Z value of the vertex, if the Z of the vertex is small, it isn't a shadow. If the difference is small (close to the beginning of the shadow), the shadow is heavily corrected. (Weak correction in the upward direction of the screen?) Weakly corrects the base color.
387 } else {
388 // self-shadow mode1
389 comp=1-saturate(max(IN.ZCalcTex.z-tex2D(DefSampler,TransTexCoord).r , 0.0f)*SKII1-0.3f);
390 }
Do the same for self-shadow mode1.
391 if ( useToon ) {
392 // toon application
393 comp = min(saturate(dot(IN.Normal,-LightDirection)*Toon),comp);
In the case of MMD models, compare the degree of influence of the shade caused by the light with the degree of influence caused by the self-shadow, and choose the smaller one as the degree of influence of the shadow.
• min (x,y): select the smaller value of x and y.
394 ShadowColor.rgb *= MaterialToon;
395 }
396
Multiply the self-shadow color by the toon shadow color.
397 float4 ans = lerp(ShadowColor, Color, comp);
Linearly interpolate between the self-shadow color and the base color depending on the influence of the shadow.
398 if( transp ) ans.a = 0.5f;
399 return ans;
400 }
401 }
If translucency is enabled, set the transparency of the display color to 50% and restore the composite color.
403 // techniques for drawing objects (for accessories)
404 technique MainTecBS0 < string MMDPass = "object_ss"; bool UseTexture = false; bool UseSphereMap = false; bool UseToon = false; > {
405 pass DrawObject {
406 VertexShader = compile vs_3_0 BufferShadow_VS(false, false, false);
407 PixelShader = compile ps_3_0 BufferShadow_PS(false, false, false);
408 }
409 }
Technique performed on a subset of accessories (materials) that don’t use a texture or sphere map during self-shadowing.
• “object-ss”: object when self-shadow is disabled.
• UseTexture: true for texture usage subset.
• UseSphereMap: true for sphere map usage subset.
• UseToon: true for PMD model.
9. FINAL NOTES
For further reading on HLSL coding, please visit Microsoft’s official English reference documentation.
5 notes
·
View notes
Last Seen Blogs

dinanaji22
https://gofund.me/f3e7e3c2

dailyxqc
rolled and smoked


especiallymadeforgyul
♥ ✿ Gyultiful Paradise ✿ ♥

chastityandheels
To Serve a Queen