#plotter a5
Explore tagged Tumblr posts
Visit Tumblr Blog
Explore Tumblr blogs with no restrictions, modern design and the best experience.
Last Seen Tumblr Blogs


Fun Fact
The total number of visits Tumblr.com received during January 2021 is 327 million.
Text
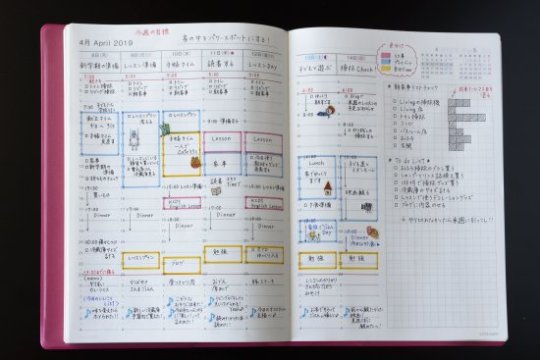
Fountain PenPal writing in my Plotter A5. ✒️
#plotter#plotter a5#a5 rings#ring planner#penpal#stationery#eggbunni#handwriting#fountain pen#fountain pens#Pilot custom 742 fa
37 notes
·
View notes
Text
"The Mushroom Mine" sign by @shantismurf, with assistance from @tickles-ivory
As part of the celebration of the one year anniversary of the Bagginshield Book Club, we asked the lovely @chrononautintraining a few questions about this wonderful work.
June 2024 Author Q&A with Chrononautical
Q1. What name would you like us to use and what are your pronouns?
A1. Chrononautical or Chrono, She/Her
Q2. How many years have you been writing?
A2. Most of my life, but posting publicly for about 15 years.
Q3. What do you think of as your writing style - are you a plotter or pantster?
A3. Pantster, primarily, though I've learned my lessons and do like to know where a story is going to end when I start it these days so I try to plot.
Q4. What’s your favorite genre/trope to write?
A4. Speculative fiction: stories about magic or science fiction, primarily.
Q5. Is there a genre/trope you haven't written as much of yet that you're excited about for future writing?
A5. I'd like to do more comedy.
Q6. Was there an idea or scene that inspired A Passion for Mushrooms?
A6. Passion for Mushrooms is one hundred percent inspired by the quote I used for an epigraph: "Hobbits have a passion for mushrooms, surpassing even the greediest likings of Big People." - The Fellowship of the Ring, J.R.R. Tolkien.
When I decided to write it, the fandom already had more than a few stories about Bilbo planting gardens and deciding to stay in Erebor with a miraculously alive Thorin. I was completely here for all of that, of course, but I wanted a story where the garden wasn't special because of gold or rare plants bought with gold. I wanted there to be a treasure that Bilbo could appreciate with the Baggins half of his heart, as well as the Tookish bit. And I know next to nothing about mountains, but I do know mushrooms do okay in caves, so...
Q7. Did you do any special research before writing the work?
A7. If you're asking this because I go deep on How To Pluck A Chicken In A Medieval Kitchen during the cooking scenes, you're right and you should say it. I am a middling cook, but all of my ingredients come from grocery stores. I had to do a fair bit of research on the cooking aspects of the story that were furthest from my own experience. Fortunately, the professor already put tomatoes and potatoes in Middle-earth, so I didn't have to go Full Historical.
Q8. Did the story change from how you originally envisioned it? Were there scenes or plot elements you had to cut out?
A8. It absolutely did. Because I am, as previously said, a pantster. I wanted a bigger bang for the ending of the story than I was set up to get. I could have stopped with Bilbo and Thorin getting together and had some simple falling action, but that didn't perfectly tie the subplot of Dis and Tauriel back to the main pairing, which I knew I wanted. Having Doron try to poison Bilbo was actually a late in the game choice. If I'd planned that from the start, I would have threaded him into more of the middle sections of the novel.
As for cutting things out, the additional stories in the series started as deleted scenes/reader requests that I couldn't find use for. So most of what I cut didn't end up in the rubbish bin. Anything that wound up there really wasn't worth posting.
Q9. Do you have a favorite moment from the entire series?
A9. I still really like "A Spy In The Shire" a lot. I know it's so self-indulgent to say that about a story focusing on an OC, but if the point of the Battle of Five Armies is to reclaim Erebor for the dwarves, then I want that to mean something. I want the average dwarf to be in a bad place. I want the average dwarf to need Erebor the way Thorin needs Erebor, to be willing to do anything to get back to the Lonely Mountain. Because if that's the case, then all the sacrifice means something. When I talk about this one luckless dwarf on the world's silliest quest to figure out how to help the king hook up with a hobbit, I'm talking about hope for the future. I'm talking about all the people who long for and dream of the home that Thorin was willing to die to reclaim. I think about them going back there and living better lives. It brings me peace.
#bagginshield#the hobbit#the hobbit fanfiction#thilbo#thorin x bilbo#bilbo baggins#thorin oakenshield#fanfic#tolkien#bagginshield book club#Chrononautical#A Passion for Mushrooms#The Mushroom Mine#Author Q&A
49 notes
·
View notes
Text
A belated mid-year(ish) techo kaigi
As this tumblr is new, I thought it would be good to start with the classic conversation about my journals - the techno kaigi. It's an incredibly useful part of a journaling practice. I'll walk you through mine and you'll get a feel for how much it helped me develop things this year.
What is a techo kaigi?
A techo kaigi is a conversation (normally with yourself, or in this case, with the internet) about your journals. Its a review of where you are now. Typically you see these at mid-year and end-of year. At the mid-year its done just before the new journal announcements happen. Its your baseline to make decisions for next year. At the end of the year its more of a New Year's style review - how did it go, what are my goals for next year.
How has 2024 been treating me?
It's been a more difficult year than 2023. In 2023 my journals made it all the way through the year. I may have tweaked the layouts a bit, but I was using the same books at the end of the year, with the exception the A6 Hobonichi I brought for work (A6 doesn't work for me).
Enter 2024 and I had a plan. The plan looked a bit like this:
My journal would be a Hobonichi Cousin
My writing journal would be an A5 Hobonichi Hon
My project/commonplace would be an A5 Sterling Ink Common Planner (2 book system)
My everyday carry would be a separate A5 Sterling Ink Common Planner (2 book system)
My work journal would continue to be the undated A5 Sterling Ink Common Planner I had landed on after abandoning the A5
My health journal would be an N2 (Weeks) Sterling Ink Common Planner
A learning journal in an A5 Sterling Ink notebook
An overflow journal in an A5 Midori Codex (carried over from last year)
Did this plan survive the year? It did not. Did it survive January? It did not. I had the wrong books, was my first thought, so I rotated them round a bit. The Hon became the everyday carry (the Common Planner was too floppy for an everyday carry). The Common Planner became the work journal. The undated Common Planner went into storage and the N2 got replaced with an A6 because the columns were too small for me to write the detail I needed into the vertical weeklies. To keep track, at this point I am down to 7 journals.
And I tried to carry on that way for a while. But gradually, things continued to evolve. It turns out A5 is also too big for an everyday carry, so I didn't have one for a while and the Hon became more of a desk planner. At the end of March I went to Japan and added an A5 Plotter which sort of became my EDC. This takes me back up to 8.
And then, the mid-year approached and I sat down and really thought about what I wanted.
And the journals started to fall.
First to go was the learning journal. Because I don't like Midori paper, I made that book my overflow journal instead. This was really useful when I started prototyping later in the year. (That's down to 7).
Then the separate health journal went. I incorporated that into my planners (now 6).
I stopped using the Plotter, and then I put the overflow journal away because I now had overflow space in my existing journals (we're down to 4). I then go excited about the idea of 'companion' journals for specific subjects because I do not learn (back up to 6). I cut those again pretty quickly, though the companion concept is going to remain.
This left me with the following 4 journals:
The Hobonichi journal
An A5 Hon as a daily planner
An A5 Common Planner as a project planner/health journal
An A5 Common Planner for work
And no everyday carry. So I replaced my Hon with a Traveller's Notebook with blank booklets to create what I am calling my three (plus one) system.
Three (plus one)?
The three parts of this system are as follows:
Plan - an everyday carry/forward planner
Progress - a working book
Ponder - a tracker/journal
+1. A work journal, kept separately, to be discarded later.
This evolved out of the discovery that I don't like to be doing the same thing in multiple journals. If I'm going to be managing a to do list, I want one to do list. I can't fit what I am doing in a single book, and so I focused on the purposes of the books and let that guide my choices.
This came out of my reflections in preparation for 2025, and that is really what a mid-year techo kaigi has become. It's why I included reflecting on what was and was not working in my 10 steps to choosing a planner for 2025. Planner season is so early in the year, that what you are feeling at the mid-point will heavily influence what you decide to go with next year. But its also a chance to experiment. I implemented this new approach pretty much immediately (using things I already had for the most part) and that has let me evolve it a bit before making my final 2025 purchase decisions.
If you've never done a techo kaigi, I encourage everyone to pick this up as a key part of their practice. Making changes is hard, but its a key part of finding something that really works for you, rather than carrying on because you brought the planner and now you're stuck with it. Every time I put a journal away it was hard, but also freeing. I now feel excited to use my journals. Which is how it should be.
2 notes
·
View notes
Text
Hochgenauer Temperatursensor Si7021 am Arduino

In diesem Beitrag möchte ich dir den hochgenauen Temperatursensor Si7021 vorstellen und zeigen, wie du diesen am Arduino programmierst.
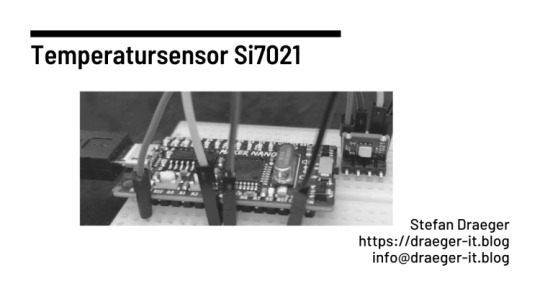
Temperatursensor Si7021 am Arduino Nano
Bezug des Temperatursensor Si7021
Den mir vorliegenden Sensor habe ich günstig über aliexpress.com für 1,48 € zzgl. Versandkosten erstanden. Du bekommst diesen Temperatursensor aber auch auf ebay.de für bereits 5,95 € inkl. Versandkosten erstehen und hast diesen nach wenigen Tagen in deinen Briefkasten.
Technische Daten des Temperatursensor Si7021
Zunächst zu den technischen Daten des hochempfindlichen Temperatursensors Si7021: - Betriebsspannung 3 V bis 5 V, - Stromaufnahme max. 150 mA, - rel. Luftfeuchtigkeit- Messbereich 0 % bis 80 % - Genauigkeit ± 3 % - Temperatur- Messbereich -40 °C bis 125 °C - Genauigkeit ± 0,4 °C - Abmaße (L x B) 1 cm x 0,8 cm
Anschluss an den Arduino
Der Temperatursensor Si7021 verfügt über eine I2C Schnittstelle und somit ergibt sich der Anschluss über die analogen Pins A4 (für SDA) und A5 (für SCL). Temperatursensor Si7021ArduinoVCC3.3VSCLanaloger Pin A5SDAanaloger Pin A4GNDGND

Hochempfindlicher Temperatursensor Si7021 am Arduino Nano V3 In diesem Beitrag verwende ich den MAKER Nano, dieser ist dem Arduino Nano recht gleich, hat aber ein paar nette Features, welche beim Programmieren nützlich sein können (siehe Beitrag Vorstellung des Maker Nano von Cytron).

Temperatursensor Si7021 am MAKER Nano
Programmieren des Temperatursensors am Arduino
Um den Sensor am Arduino zu programmieren, benötigen wir eine Bibliothek, diese macht die Programmierung recht einfach. Im Bibliotheksverwalter der Arduino IDE suchen wir nach, mit dem Schlagwort "Si7021" (1) nach "Adafruit Si7021 Library by Adafruit" und betätigen dort die Schaltfläche "Installieren" (2).
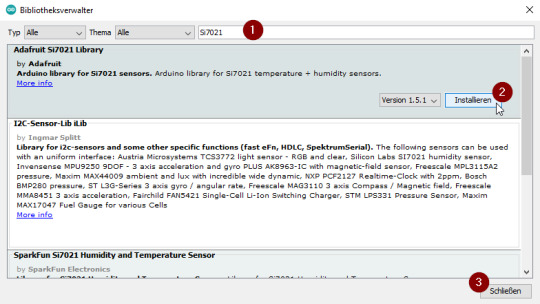
Wenn diese Bibliothek installiert wurde, dann kann der Dialog über die Schaltfläche "Schließen" (3) geschlossen werden und wir können mit der Programmierung beginnen. Beispiel - auslesen der Temperatur & der rel. Luftfeuchtigkeit Der zuvor installierten Bibliothek von Adafruit, liegt ein Beispiel bei welches die Temperatur sowie die rel. Luftfeuchtigkeit auf der seriellen Schnittstelle ausgibt.
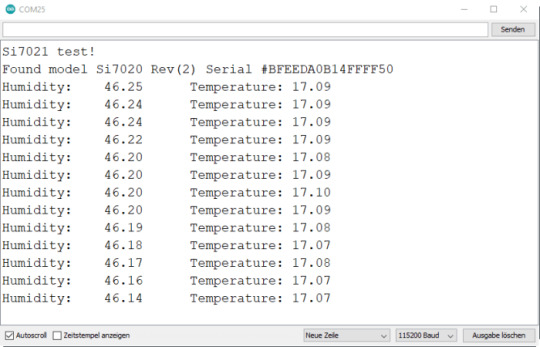
Ausgabe auf der Temperatur & rel. Luftfeuchtigkeit vom Sensor Si7021 Die Arduino IDE verfügt über einen seriellen Plotter, welcher Zahlen in einem Liniendiagramm anzeigen kann und wir somit diese Daten visualisieren können. Den seriellen Plotter habe ich dir bereits im Beitrag neue Funktionen der Arduino IDE Version 1.8.10 (Release Sept. 2019) vorgestellt und gezeigt, wie man mehrere Werte in diesem darstellen kann. #include "Adafruit_Si7021.h" Adafruit_Si7021 sensor = Adafruit_Si7021(); void setup() { Serial.begin(115200); if (!sensor.begin()) { Serial.println("Did not find Si7021 sensor!"); while (true) ; } } void loop() { float humidityValue = sensor.readHumidity(); float tempValue = sensor.readTemperature(); String line1 = "rel.Luftfeuchtigkeit Temperatur"; //umwandeln der Zufallszahlen in Strings und zusammenfügen //hier darf auch das Leerzeichen nicht vergessen werden! String line2 = String(humidityValue, DEC) + " " + String(tempValue, DEC); //Ausgeben der Spaltenköpfe als Bezeichnungsfelder für die Linien Serial.println(line1); //Ausgeben der Werte Serial.println(line2); delay(25); } Beispiel - anzeigen der Daten auf einem OLED Display Im zweiten Beispiel möchte ich dir kurz zeigen wie du die Daten des Temperatursensors auch auf einem kleinen OLED Display anzeigen lassen kannst. Das hier verwendete OLED Display mit der Auflösung von 0,91 Zoll & 128 x 32 Pixel findest du auf ebay.de für ca. 5 € inkl. Versandkosten. Der Anschluss des Displays erfolgt wie beim Sensor per I²C Schnittstelle. Ein großer Vorteil der I²C Schnittstelle ist es, dass mehrere Sensoren / Aktoren angeschlossen werden können, dabei hat jedes dieser Geräte eine eigene eindeutige Adresse.

Wie man ein solches OLED Display programmiert, habe ich dir ausführlich im Beitrag Arduino Lektion 76: 0,91 Zoll OLED Display gezeigt. #include "Adafruit_Si7021.h" #include #include //Bibliotheken für den betrieb des Displays #include #include Adafruit_Si7021 sensor = Adafruit_Si7021(); #define OLED_RESET 4 Adafruit_SSD1306 display(OLED_RESET); void setup() { Serial.begin(115200); if (!sensor.begin()) { Serial.println("Did not find Si7021 sensor!"); while (true) ; } display.begin(SSD1306_SWITCHCAPVCC, 0x3C); display.display(); delay(1000); display.clearDisplay(); } void loop() { display.setTextSize(1); display.setTextColor(WHITE); display.setCursor(0, 0); display.println("Temp.:" + String(sensor.readTemperature(), 2) + " C"); display.setCursor(0, 10); display.println("rel. Luftf.:" + String(sensor.readHumidity(), 2) + " %"); display.display(); display.clearDisplay(); delay(1000); } Auf dem Display kann man in der Schriftgröße 1 drei Zeilen mit Text darstellen. Da mich nur die ersten zwei Nachkommastellen interessieren, schneide ich diese ab.

Read the full article
0 notes
Photo
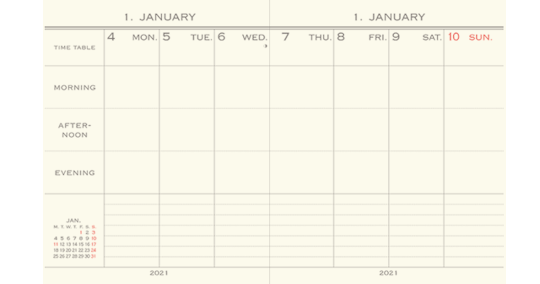


まだまだ気になっている2021年手帳・ダイアリー一覧
フォーマットが面白そうな手帳編
スクエアバーチカル(ハイタイド)
1日を大きく3つに区切っただけの「ざっくりバーチカル」。何時からと決まっていないけど、「出勤前にやっておこう」「午後にやる」といったざっくりした予定をざっくりしたまま記入できるのが良い。
コンパクトでかわいい。
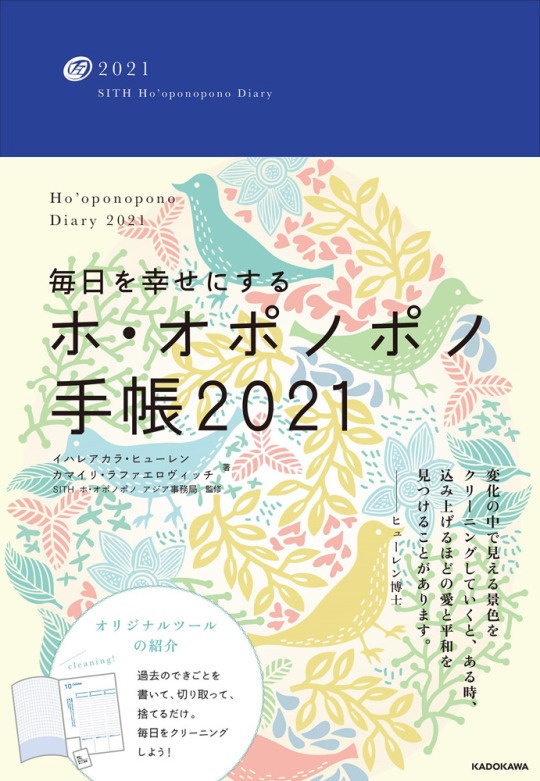
ホ・オポノポノ手帳2021(株式会社KADOKAWA)
バーチカルだけどメモもたっぷり書き込める独特なフォーマット
見開きの左ページはメモ、右ページがバーチカル式のスケジュール欄
スピリチュアル系の手帳だが、関心がなくても使いやすい人がいそう
SUNNY SCHEDULE BOOK(いろは出版株式会社)
クリーム色のページ、スタイリッシュなフォント、すっきりしたレイアウト
スケジュール欄だけでなくタスクリストにもしやすいセミバーチカル
区切り線入りで、ノートページの使い勝手が良さそう。
4月スタートのフォーマットも発売予定だそう。危険。
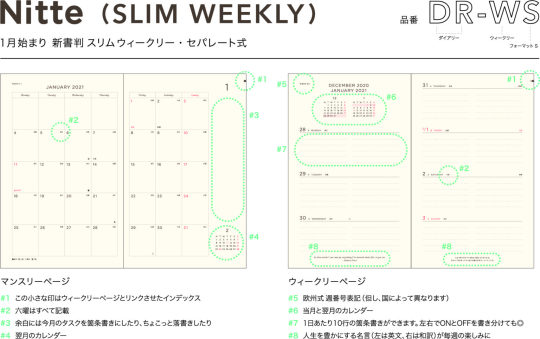
Nitte(有限会社エルコミューン)
持ち運びやすさも筆記面の広さも確保した絶妙な新書サイズ
週間セパレート型だが、時間軸はないため日記にもスケジュール管理にも使える使い勝手の良いフォーマット
表紙が可愛い
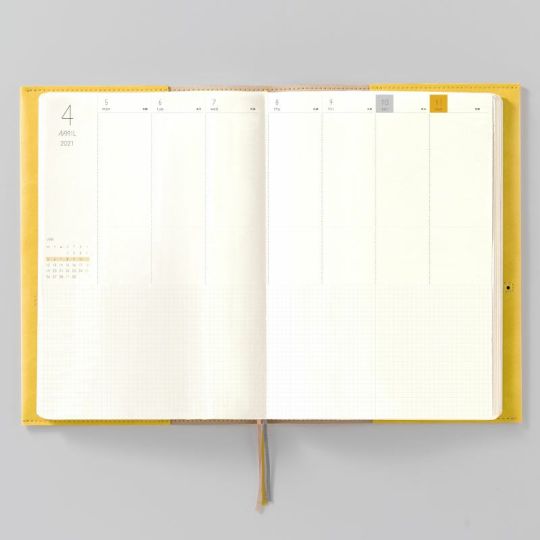
A5スリム ウィークリー 見開き2週間バーチカルダイアリー(株式会社アートプリントジャパン)
バーチカルで2週間の予定を管理できる、初めて見るフォーマット。記入欄の狭さを感じない。
バーチカルなのに薄く、A5スリムサイズでかさばらない。
形状やサイズが面白そうな手帳編
CITTA手帳2021B6サイズ
使い勝手の良さそうな24時間バーチカル手帳にB6サイズが新登場。売り切れ続出らしい。
TETEFU(テテフ)(伊藤手帳株式会社)
上下2段に分かれた手帳「セパレートダイアリー」のメーカーが開発した、A6サイズに折り畳める手帳。
フラットダイアリー<A5>(株式会社デザインフィル)
硬いカバーにダイアリーを差し込んで使う。カバーにはちょっとした書類やA5サイズノート等も挟めて、使い勝手がよさそう。
薄くて軽い。
M5サイズシステム手帳
雑誌「システム手帳スタイル Vol.5」でも大きく取り上げられ、各社から様々なリフィル が新たに販売されている注目のサイズ
アシュフォードさんが特に注力している?KNOXのPlotterにもこのサイズが登場し、各所で売り切れ続出だとか。
HB×WA5サイズシステム手帳
バイブルサイズだと筆記面が足りない、でもA5じゃかさばりすぎる、という悩みを解消するサイズ。バイブルサイズのリフィル を挟めるのも良い。
マークスのバインダーがかわいい
1 note
·
View note
Photo

Always been a sucker for pink! Metallic pink doubly so. I need to make more of these A5 and A4 plots, I'm running out of wall space to stick framed A3 plots up. Sometimes small is better. 🧾👇 ⏳ 18m 12s 📏 19.7m 🖋 Sakura Gelly Roll 🎨 Sakura Gelly Roll Metallic Pink (519) 📄 A5 Fabriano Black Black 300gsm hot pressed 📷 FujiFilm X100F #fujifilm+x100f 🤖 AxiDraw V3/A3 pen plotter 💻 Javascript SVG @revdancatt 🔗👇 💸 [Buy plots from the shop](shop.revdancatt.com) 🤖 [Penplot SVG tools](revdancatt.com/penplotter) 📸 [Instagram](instagram.com/revdancatt) 👍 [Facebook](facebook.com/revdancatt) 🐦 [Twitter](twitter.com/revdancatt) 🥰 [Pinterest](pinterest.co.uk/revdancatt) 🏷👇 #geometrydesign #opticalart #algorithmicart #shropshireartist #abstractgeometry #artxcode #databending #art #shapeart #penplotterlove #revdancatt
0 notes
Photo
Alizarin dark inkjet heat transfer paper for light and dark cotton tshirt use , A5 ,A4 ,A3 size for choose .use Normal printer ,dye ink or pigment ink printing is ok you can make at home by house iron on ironing or use heat press machine heat transfer . you can use cutting plotter cutting or by sissors cutting the image. 165degree , 25seconds on piece of tshirt will finish .Easy and quicky #ironon #irononpaper #heattransfers #transferpaper #transfer #cuttingplotter #plotter #ironing #heatpress#heatpressmachine #diy #diycrafts #tshirtprinting #tshirtsdesign #tshirtprint #custom #custommade #customized #tshirts #tshirt #printer#diy #inkjetprinter #epson #dye #pigment #dyeink #sublimation#heattransferpaper #inkjet #heatpressmachine#printer #cameo#cricut#cricutcraft#inkjetheattransferpaper#textileprinting#epson#epsonprinter#sublimationink #sublimationpaper https://www.instagram.com/p/CFBIgijl3t3/?igshid=2fy2zxlq9xtm
#ironon#irononpaper#heattransfers#transferpaper#transfer#cuttingplotter#plotter#ironing#heatpress#heatpressmachine#diy#diycrafts#tshirtprinting#tshirtsdesign#tshirtprint#custom#custommade#customized#tshirts#tshirt#printer#inkjetprinter#epson#dye#pigment#dyeink#sublimation#heattransferpaper#inkjet#cameo
0 notes
Text
שרי החוץ של בריטניה צרפת וגרמניה שוחחו בנוגע למעצר המכלית במצרי הורמוז
New Post has been published on https://newsprofixpro.com/theeyesofthe/2019/07/22/%d7%a9%d7%a8%d7%99-%d7%94%d7%97%d7%95%d7%a5-%d7%a9%d7%9c-%d7%91%d7%a8%d7%99%d7%98%d7%a0%d7%99%d7%94-%d7%a6%d7%a8%d7%a4%d7%aa-%d7%95%d7%92%d7%a8%d7%9e%d7%a0%d7%99%d7%94-%d7%a9%d7%95%d7%97%d7%97%d7%95/
שרי החוץ של בריטניה צרפת וגרמניה שוחחו בנוגע למעצר המכלית במצרי הורמוז

שרי החוץ של בריטניה צרפת וגרמניה שוחחו בנוגע למעצר המכלית במצרי הורמוז Read More
Buy Now


Price: $302.90
Item specifics
Condition:
New: A brand-new, unused, unopened, undamaged item in its original packaging (where packaging is
Model:
16VCT001-34IN
Power Supply: 45W Product: Plotter Power: 110-240V AC 50/60Hz Auto-switching Custom Bundle: No Temperature: 32-95¨H MPN:
16VCT00134IN
Max Cutting Width: 34″ Memory: 4M Brand:
Yescom
UPC:
640671069496
About this product
Product Identifiers Brand Yescom MPN 16VCT00134IN Ean 0640671069496 GTIN 0640671069496 UPC 0640671069496 Model 16VCT001-34IN eBay Product ID (ePID) 6030522297 Product Key Features Product Plotter Custom Bundle No


$302.90 End Date: Monday Aug-5-2019 3:50:34 PDT Buy It Now for only: $302.90 Buy It Now | Add to watch list
0 notes
Photo

New Post has been published on https://toldnews.com/hindi/%e0%a4%85%e0%a4%ae%e0%a5%87%e0%a4%b0%e0%a4%bf%e0%a4%95%e0%a4%be-%e0%a4%b8%e0%a5%87-%e0%a4%9c%e0%a4%b2%e0%a5%8d%e0%a4%a6-%e0%a4%ad%e0%a4%be%e0%a4%b0%e0%a4%a4-%e0%a4%b2%e0%a4%be%e0%a4%af%e0%a4%be/
अमेरिका से जल्द भारत लाया जाएगा मुंबई हमले में शामिल आतंकी तहव्वुर राणा - Tahawwur rana mumbai attack plotter extradition to india

मुंबई हमले की साजिश रचने के मामले में अमेरिका की जेल में 14 साल की सजा काट रहे आतंकी तहव्वुर राणा को जल्द ही भारत लाया जा सकता है. भारत सरकार ने आतंकी राणा के प्रत्यर्पण के लिए जरूरी कागजी कार्रवाई को पूरा कर लिया है और अब ट्रंप प्रशासन के सहयोग से पाकिस्तानी कनाडाई नागरिक को भारत लाया जा सकता है. इस आतंकी की सजा दिसंबर, 2021 में पूरी हो रही है.
साल 2008 के मुंबई आतंकी हमले की साजिश के मामले में राणा को 2009 में गिरफ्तार किया गया था. पाकिस्तान स्थित लश्कर-ए-तैयबा (LeT) के 10 आतंकियों की तरफ से किए इस हमले में अमेरिकी नागरिकों सहित करीब 166 लोगों की जान गई थी. सुरक्षाबलों ने 9 आतंकियों को मौके पर मार गिराया था और जिंदा गिरफ्तार किए गए आतंकी अजमल कसाब को बाद में फांसी दी गई थी.
लश्कर आतंकी तहव्वुर राणा को इस मामले में 14 साल की सजा सुनाई गई थी. अमेरिकी अधिकारियों के मुताबिक उसे दिसंबर, 2021 में रिहा किया जाएगा. मामले की जानकारी रखने वाले एक सूत्र ने एजेंसी भाषा से कहा, ‘यहां सजा पूरी होने पर राणा को भारत भेजे जाने की प्रबल संभावना है.’ सूत्र ने कहा कि इस दौरान जरूरी कागजी कार्रवाई और जटिल प्रक्रिया को पूरा करना एक चुनौती है.
भारत के विदेश मंत्रालय, गृह मंत्रालय, कानून मंत्रालय और अमेरिकी विदेश मंत्रालय, न्याय मंत्रालय सभी की अपनी-अपनी प्रत्यर्पण प्रक्रिया है. उसने कहा कि जब प्रत्यर्पण की बात आती है तो वे अपनी प्रक्रिया को न धीमा करना चाहते हैं और न ही तेज करना चाहते हैं. राष्ट्रीय जांच एजेंसी (NIA) प्रक्रिया की समय-सीमा और नौकरशाही संबंधी औपचारिकताओं को कम करने के लिए अपने अमेरिकी समकक्षों से सीधे संपर्क कर सकती है.
अमेरिकी अधिकारियों के मुताबिक तहव्वुर राणा का प्रत्यर्पण दोनों देशों के बीच रिश्ते मजबूत करेगा, आतंकवाद विरोधी सहयोग को बढ़ावा देगा और भारतीयों के बीच अमेरिका की छवि को बेहतर बनाने का भी काम करेगी. ट्रंप प्रशासन ने नवंबर 2018 को 26/11 की 10वीं बरसी पर हमले में शामिल लोगों को न्याय के दायरे में लाने का अपना संकल्प दोहराया था. अमेरिकी उप राष्ट्रपति माइक पेंस ने नवंबर में प्रधानमंत्री नरेंद्र मोदी के साथ बातचीत के दौरान भी इस मामले को उठाया था.
अमेरिका में आंशिक रूप से ठप पड़े सरकारी कामकाज का हवाला देते हुए विदेश मंत्रालय और न्याय मंत्रालय ने राणा के प्रत्यर्पण के सवाल पर प्रतिक्रिया देने में अपनी असमर्थता जाहिर की है. भारतीय दूतावास और तहव्वुर राणा के वकील ने भी इस पर कोई टिप्पणी नहीं की है.
पाएं आजतक की ताज़ा खबरें! news लिखकर 52424 पर SMS करें. एयरटेल, वोडाफ़ोन और आइडिया यूज़र्स. शर्तें लागू
आजतक के नए ऐप से अपने फोन पर पाएं रियल टाइम अलर्ट और सभी खबरें. डाउनलोड करें

Great)
0 notes
Text
Give me some feedback!

To improve my robot arm's accuracy, I wanted to add an absolute position feedback mechanism. Aside from it's accuracy, it would also prevent the need for end stops. But most importantly, it would give me a reason to play with a AS5600 12-bit on-axis magnetic rotary position sensor.
With the AS5600 I'm able to get 12 bit information about the joint's current position. This means I have an accuracy of 4096 steps. Because the AS5600 is able to configure a start and stop position, these 4096 steps can be measured within a custom defined range of motion.
The AS5600 uses I²C communication, and therefor I needed to add 4 wires to the convenient breakout board I bought on eBay: VCC (it supports both 5v and 3v3), GND, SDA (Data) and SCL (Clock).

After adding the wires, it's time to mount it onto the joint. Since the AS5600 IC needs to be positioned above the main shaft of the joint, I 3D-printed a mount to easily mount it on the correct position.

Because the AS5600 does it's measurements based on a magnetic field, a small neodymium magnet is mounted onto the shaft.

To improve the sensor's reading, it's recommended to mount the magnet in the exact center of the shaft. A simple 3D-printed hex nut with magnet slot makes this easy as π ... as pie.

With the magnet in place, it's time to screw the sensor onto the joint.

Of course, the controller board i'm currently using for testing hasn't got the necessary connections for this sensor. But that's nothing I can't solve with my hot and steamy soldering iron.
To use I²C on an Arduino Nano, you need to use pins A4 and A5. The necessary power is also provided by the Arduino.

With all the hardware in place, it's time for some coding. The creators of the AS5600, AMS, are awesome enough to share some example code, making it pretty convenient to use the sensor within an Arduino project. Check out the example project here.
And with the provided library, it's pretty easy to read out the sensor:
#include <Arduino.h> #include <Wire.h> // Support for I2C encoder #include <AMS_5600.h> // Available via the AMS website: // http://ams.com/eng/content/view/download/381996 // Create a sensor instance. AMS_5600 ams; void setup() { // Start I2C. Wire.begin(); // Start the serial Connection. Serial.begin(9600); } void loop() { // Retrieve the angle from the sensor. word angle = ams.getRawAngle(); // Print the angle to the serial buffer. Serial.println(angle); delay(50); }
As you can see in the following video, this works pretty well. (I used the Arduino IDE's plotter to show the data as a graph.)
youtube
So we're good to go, right? Wrong! It turns out I²C isn't fast enough to be used in sync with the motor running smoothly. This means I could only read out the data from the sensor while the motor is stopped. Which defeats the whole purpose of the sensor!
Of course I could spend days trying to solve this. I could try out other types of encoders. But honestly, It isn't really important. I don't expect my robot arm to perform an open heart surgery anyway. So for now I just take for granted what I've learned about the AS5600 and continue with the project without a feedback sensor.
If you have any ideas for a good solution, let me know in the comments down below!
Next up, the joint covers! And of course, a nice solution for the end stops ... which do need to be implemented now.
#robot#joint#engineering#as5600#sensor#magnetic#ams#programming#electronics#3dprinting#arduino#nano#i2c
7 notes
·
View notes
Text
So... I’ve set off designs to print for testing with my plotter and some POSCA pens. For now I’ve ordered 30 x A5 prints just to test with some pens and make sure the designs come out right and everything works properly together.
I’m picking them up from shades of colour tomorrow. Today I’m just going to work hard on my website. I’m going to make a scrolling website with a static landing page where users can go through the process of picking the size of their print, the pen colour and their “secret” message. This website will hopefully broaden the project and give it legs after the exhibition period.
0 notes
Text
The advantages of heat transfer printing of laser heat transfer paper
Inkjet heat transfer paper according to the use and use are divided into: ordinary transfer paper (ordinary color spray paper), special heat transfer paper (coated paper), special heat transfer paper (T-shirt paper). Ordinary thermal transfer paper and special heat transfer paper in the use of the same method is the use of thermal transfer ink, the latter transfer effect is more obvious, but the paper is relatively high cost. Special heat transfer paper according to the use of light-colored T-shirt paper and dark T-shirt paper.
1. Laser heat transfer paper has the advantage of thermal transfer printing
Multi-species, the production of small quantities. No need to plate directly print output, making the product beautifully. Simple process, short process, save time and effort. With color retention and multiple washing. Can be printed T-shirts, hats, sportswear, sweaters, bags, mouse pads and so on.
2. Laser thermal transfer equipment:
OKI5600 color laser printer, shaking his head heat press machine, positioning cutting plotter, scissors or cutting knife.
4. Use laser to print heat transfer paper .
Printer: OKI5600n, 5900n and so on. Transfer paper: dark laser heat transfer paper TWL-300. Silver laser heat transfer paper TSL-300-Metallic
5. Laser printing heat transfer paper specifications.
A5, A4, A3, A2, etc., other sizes can be customized.
6. Laser printing heat transfer paper can produce products:
Cultural shirt, cotton cloth, travel cap, sweater. Children's clothing and so on.
7. Laser printing heat transfer paper thermal transfer program features:
A. Minimize investment and make use of existing equipment. B. Simple operation, quick start. C. To meet the general requirements of taking. D. To meet the small batch, multi-species production.
Heat transfer ink is digital printing of blood
0 notes
Photo

Alizarin dark inkjet heat transfer paper for light and dark cotton tshirt use , A5 ,A4, A3 size for your choose . Use Normal printer ,dye ink or pigment ink printing you can make clothes at home by house iron on ironing or heat press machine heat transfer . use cutting plotter cutting or by sissors cutting the image. 165degrees, 25seconds on piece of tshirt will finish .Easy and quicky #ironon #irononpaper #heattransfers #transferpaper #transfer #cuttingplotter #plotter #ironing #heatpress#heatpressmachine #diy #diycrafts #tshirtprinting #tshirtsdesign #tshirtprint #custom #custommade #customized #tshirts #tshirt #printer#diy #inkjetprinter #epson #dye #pigment #dyeink #sublimation#heattransferpaper #inkjet #heatpressmachine#printer #cameo#textileprinting #sublimationink #sublimationpaper #epson #epsonprinter #cricut #cricutcrafts #inkjetpaper #inkjetink #inkjetheattransferpaper https://www.instagram.com/p/CE8zgBEBr7c/?igshid=xx00k6zhe70i
#ironon#irononpaper#heattransfers#transferpaper#transfer#cuttingplotter#plotter#ironing#heatpress#heatpressmachine#diy#diycrafts#tshirtprinting#tshirtsdesign#tshirtprint#custom#custommade#customized#tshirts#tshirt#printer#inkjetprinter#epson#dye#pigment#dyeink#sublimation#heattransferpaper#inkjet#cameo
0 notes
Photo
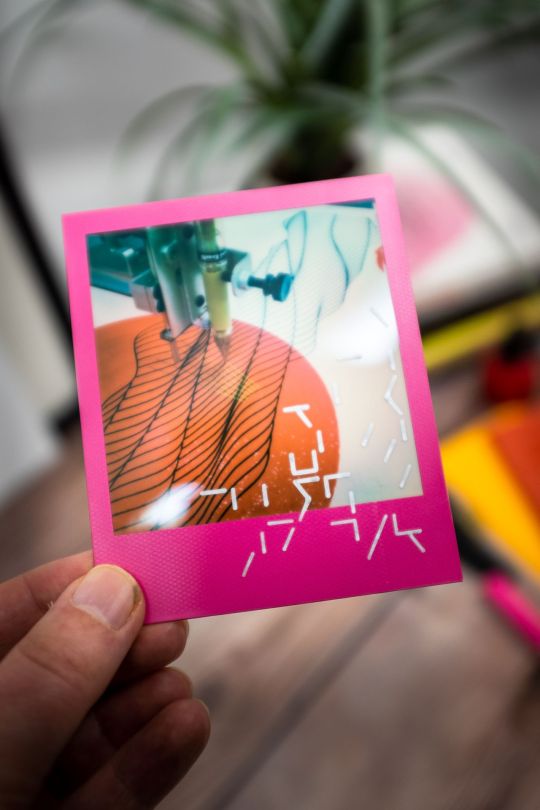
Love this Polaroid that was sent off the other week, it was the first one to get some Alien Glyphs. I see a lot more #Polaroid shenanigans in the future. 🧾👇 ⏳ 1m 24s 📏 38cm 🖋 Uni Posca PC-1MR 0.7mm 🎨 Uni Posca Metallic Silver 📄 A5 Polaroid 📷 FujiFilm X100F #fujifilm+x100f 💻 Javascript SVG @revdancatt #geometryart #algorithmic #shropshireartist #plotter #artxcode #shrewsburyartist #shapeart #geometrydesign #generative #databending
0 notes
Photo

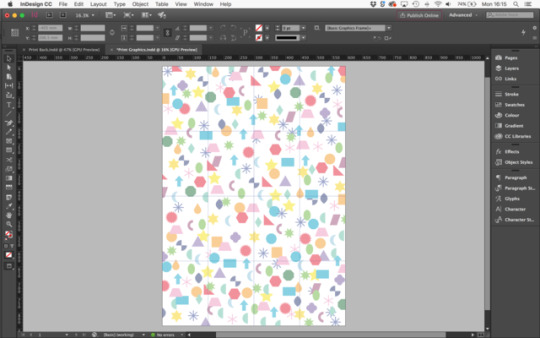
Working on the print graphics for the project, which I’ve now decided to call OBSCURA.
The first screenshot is the reverse side of the A5 prints, which show my contact details and the project name.
The second screenshot is the front of the print which features faded shapes from my typeface which will lie underneath the live outline drawings made by my plotter.
0 notes