#quiltblogger
Text
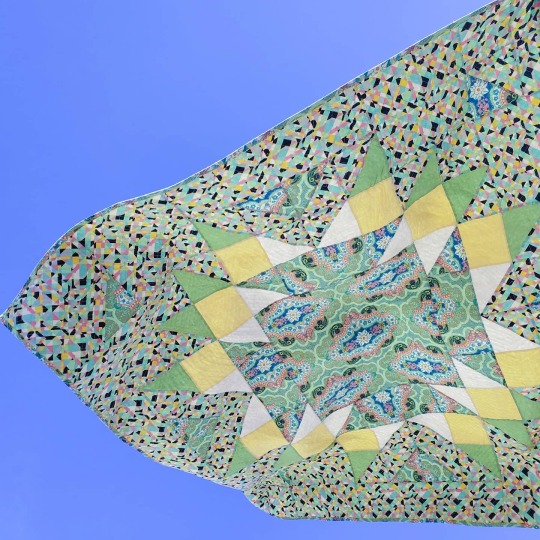
Am I mad? Maybe, but that is not the point of this story. I am writing about all the background colours I’ve chosen for my Dear Jane sampler quilt as an opportunity to discuss fabric and colour choice in quilting.

The original quilt made by Jane Stickle
The Dear Jane is a sampler quilt, meaning consisting of many different patterns, made by Jane Stickle. Brenda Papadakis was inspired by Jane’s original quilt and turned all the blocks into a pattern. Now many quilters all over the world are making the quilt to test their skills, determination and to become better at quilting. I am one of those quilters. Samplers are suitable to learn new skills because they use many different techniques.
Red is the background colour of this post. It is one of the four background colours of the middle squares together with white, green and blue. I use bold colours and combinations both because I think those make exciting quilts, but also to show people how crazy you can get with colours and still make a fantastic quilt. So far, I’ve also written a post about the blue background colour
The Dear Jane quilt: feeling blue

Dear Jane quilt blocks
The red background fabric is the only one I actually bought for this quilt. Usually, I use whatever is available. My mom is one of those quilters with more fabric than she can handle, so she always lets me use hers. I was set on red though, so buying I did. My knowledge of suitable fabrics was not very big when I bought it, so the fabric is not ideal and it frays very easily. Maybe it is woven too loosely? I am not sure. It sews nicely though so I’ll keep using it.
Dear Jane quilt block M-9: Fan dance
Dear Jane quilt block M-9: fan dance
Oh, this was a fun block. It reminds me of Spiderman, a maze and kinds of fun goodness. Also, I like the combination of pink and red. It is a bit unconventional, but it will look very good in the finished quilt. There are a lot of unexpected colour combinations in this post, as you will see. If you take care to have some recurring colour elements in your quilt some unexpected colours will give the overall piece some interest. Recurring themes could be background colours or sashing. I talk more about that in this post where I explain the colour choices of my Dear Jane quilt:
How I design: colours of the Dear Jane
This block is made with the patchwork technique. With a lot of pins that technique always works to get a neat block.
Dear Jane quilt block L-4: St. George’s cross
Dear Jane quilt block L-4: St. George’s cross
This was another fun block! I loved the small red strips and how they are not extended in one line throughout the whole block. It gives the block an interesting look. As you can see, the quilt block is a bit wonky. That is because the light green fabric is too thin and stretches a lot. I used it anyway because I had already cut the pieces. When I’ll sew the sashing or borders on this block I have to be extra careful not to stretch the block. When you pin a lot and take care when sewing you can use almost all the fabric you want to, no matter what other people tell you.
Dear Jane quilt block E-1: Aunt Exie’s phlox
Dear Jane quilt block E-1: Aunt Exie’s phlox
First I did not know what ‘phlox’ was -Google tells me it’s some kind of flower. How nice that the Dear Jane quilt has learned us something new non-quilting related.
Now it annoys me that this block has only four petals since the phlox clearly has five petals. I remain that the pattern of this quilt block should look something like this:

Phlox design with five colours
A block like looks less symmetrical though, so maybe that’s why Jane went for four petals. The nature theme is nice. There are many of those in the Dear Jane, I even wrote a post about it:
Nature in the Dear Jane sampler quilt.
I used the needle-point technique for this block. It is one of the first times I’ve tried it and I’m not sure if I like it or not. Needlepoint applique where you sew the pieces on top of the background fabric seems more difficult than reverse applique where you sew the pieces behind the background to me to get neat pieces. Time and more practice will tell. That keeps being the conclusion when I do applique:
Dear Jane quilt: the quilting techniques you hate, or why practice is paramount
Dear Jane quilt block A-9: cabin fever

Dear Jane quilt block: A-9 cabin fever
The title of this block is clever. The design with the square on its side with all the little pieces inside of it gives it a claustrophobic sense explaining the name. This quilt block came out neat because I used the foundation piecing technique where you sew the patchwork pieces on a background fabric. Read more about that here:
Quilting techniques 101: Foundation piecing
This is another block with an unconventional colour combination. I would not advice doing a whole quilt in orange and red, and I am not sure whether the block works on its own, but, in the bigger quilt, it will look great.
Concluding remarks
This is the end of the post. With a bit of luck it gave you some daring to use bold colour combinations yourself. Now, some questions to get to know you:
Do you like sampler quilts?
How bold do you dare to go with colours?
Which block of the Dear Jane quilt is your favourite?
Next week I will talk about the first (mini-)quilt I send in for an exhibition!
Do you want to know more?
The Dear Jane quilt sampler introduction
I’m not ashamed: humble Dear Jane quilt blocks
The magic reverse applique quilting trick
A milestone of my Dear Jane quilt! Halfway the middle squares
The nearly insane quilt: a machine quilting sampler
See my DeviantArt or Instagram (username: bella.g.bear.art) for more artwork and WIPs. You can also follow my blog by clicking on the button on the left or by filling in your email address. There will be a monthly update at the end of every month and a new blogpost every Sunday or Monday.
The Dear Jane quilt: seeing red, am I mad? Am I mad? Maybe, but that is not the point of this story. I am writing about all the background colours I've chosen for my Dear Jane sampler quilt as an opportunity to discuss fabric and colour choice in quilting.
#artisan#baby jane#brenda papadakis#creative#creativeblogger#dear jane#Dear Jane quilt#hand piecing#hand quilting#Jane Stickle#janiac#patchwork#quilt#quiltblogger#sampler quilt
2 notes
·
View notes
Photo

This is the Nebraska Windmill Block and we did a post about it on our blog, which you may find at www.bluebearquilts.com. #quilter #quilting #bluebearquilts #quiltblock #quiltblogger https://www.instagram.com/p/Bzy2tYwHBus/?igshid=18ow6p3gkefn5
0 notes
Photo

Yes! Anyone else need some sunshine? This quilt would help! #quiltsofinstagram #Repost @robertkaufman ・・・ Anyone else missing summer?! 🍉☀️ #konacotton deliciousness! · · #Repost @sliceofpilife ・・・ Shout out to my wonderful husband who puts up with my shenanigans. He's great. How about that 💙 wall too?! 😍 This was just a practice photo shoot for the future pattern cover for my new Sliced quilt. Once the weather cooperates, I'll get the real photo there. Until then, you can get the pattern (with a temporary cover photo 😊) in my #etsyshop and on #craftsy. More photos on the blog (#linkinprofile). ☀🍉🐜 #slicedquilt #sliceofpiquilts #quiltsofinstagram #ihavethisthingwithquilts #igquiltcommuity #makemodern #modernquilt #modernquilting #quilt #quilts #quilting #sewing #blog #blogger #blogging #quiltblogger #ontheblog #kona #konasolids #robertkaufman @robertkaufman #etsy #newquiltpattern #quiltpattern
#quilt#blogger#quiltsofinstagram#makemodern#newquiltpattern#modernquilting#quiltblogger#modernquilt#quiltpattern#linkinprofile#blog#sliceofpiquilts#kona#quilts#ihavethisthingwithquilts#quilting#robertkaufman#sewing#etsy#blogging#etsyshop#ontheblog#konasolids#igquiltcommuity#craftsy#konacotton#slicedquilt#repost
31 notes
·
View notes
Photo
I finally finished the binding on my @sarahjeanmakes #LandsEndQuilt and took it out for a photoshoot. It was nice and warm today here with Temps near 80, but was super windy. I'll take it over what we had lazy week. The pattern is on sale through Monday. There's more photos and info on my blog - link in bio. . . . #quilttester #quiltersofinstagram #quiltersgonnaquilt #quilter #createeveryday #makersgonnamake #collectivelycreate #collaboration #quiltbinding #launchday #newquiltpattern #quiltpattern #quiltpatterncommunity #quiltpatterntesting #quiltedthrow #easyquilt #dallascreatives #dfwsewing #chronicallysewn #madebyhandswithra #sewincolour #sewingfun #dallassewist #sewist #modernquilter #quilter #quiltlove #quiltingismytherapy #sewingblogger #quiltblogger — view on Instagram https://ift.tt/3bCURcd
1 note
·
View note
Video
instagram
Oh, boy, it's actually happening. After months of trying to figure this all out, I'm finally debuting the very first episode of Boy Meets Quilt: The YouTube Channel!!! https://youtu.be/AB_Oho8FFQI • •My guest for this episode is @knittingchick who tells us a little about her various crafting pursuits. We had so much fun that I decided to split this into two videos. Part 2 will be posted next week. Please subscribe if you want to see more, and I'd really love to hear your comments and questions so we can all share in our love of crafting and all things creative together!! • • I'm working on a zero dollar budget, folks, so keep that in mind when judging the production values! 😬 I'm also still playing with the overall format of this series, which is why this episode cuts off rather abruptly. #boymeetsquilt #quiltblog #quiltblogger #quilts #quilting #creativeprocess (at Clinton Hill, Brooklyn) https://www.instagram.com/p/B5VtMzQH20n/?igshid=14k2pnas1z07c
0 notes
Photo

March challenge as an Island Batik Ambassador is to try a technique we have never done before. Had to search hard to find something! Ended up doing a Dresden Plate quilt. First part on my blog gatewayquiltsnstuff.blogspot.com or see my profile for a link. Second part next week. #islandbatik #islandbatikambassador #islandbatikambassadors #iheartislandbatik #tryatechnique #dresdenplate #batik @island_batik #gatewayquiltsnstuff #blogspot #bloglovin #quiltblog #quiltblogger
#dresdenplate#islandbatik#islandbatikambassador#quiltblogger#batik#tryatechnique#islandbatikambassadors#gatewayquiltsnstuff#bloglovin#blogspot#iheartislandbatik#quiltblog
0 notes
Photo

New old post up on the blog. Lol. I made this way back in 2012 before I learned how to machine quilt! But it’s still a fav at our house! Kids don’t judge my quilting skills. They just care that it is snuggly enough! . #christmasquilt #2012 #newskills #growing #snuggly #sherbertcafe #quiltersofinstagram #quiltingmama #decorating #christmasdecor #star #ispyquilt #ispy #hst #halfsquaretriangle #flannel #cuddleme #iseesanta #quiltblogger #thesantaclause #timallen #hotchocolate #soyummy #christmascheer #projectdone #unumdesign #lighttheworld @unumdesign #unumfam
#timallen#quiltblogger#unumdesign#growing#flannel#cuddleme#ispyquilt#ispy#lighttheworld#quiltersofinstagram#christmascheer#iseesanta#unumfam#thesantaclause#christmasquilt#projectdone#sherbertcafe#decorating#quiltingmama#star#2012#snuggly#soyummy#halfsquaretriangle#christmasdecor#hotchocolate#newskills#hst
0 notes
Video
instagram
Fabric Paperclip Bookmark Tutorial ☝️in link above. For use with your favorite planner or book. ❤️ I used @amysinibaldi Palyground Fabric Collection with Art Gallery Fabrics. Looking forward to Amy's new collections of Les Petits and Charleston Collections released in March! 👏 Such a simple quick easy DIY project to make!! Nothing better than to use your favorite fabrics to motivate you to open up to your next page to stay on top of it all!! 📝 Full tutorial on Stitches Quilting blog in link ☝️ above. Can't wait to see what you make. Be sure to tag me. ❓ Do you think this Bookmark might be something you would enjoy? Would your favorite fabrics like this tease you to get cracking at what you really want to do? Don't you love a simple easy project? ❤️ ❌⭕❌⭕, Deanna . . #amysinibaldi #playgroundfabrics #artgalleryfabrics #wearefabrics #qpbestyearever2017 #quiltersplanner #quiltersplanner2017 #quiltersofinstagram #fabricbookmark #plannerlove #quiltingismytherapy #quilting #diy #tutorial #blogger #quiltblogger #quiltingblogger #quiltswap #quiltproject #quiltalong #sewingproject #sewing #quiltlove #quiltshop #quiltstore #fabric #fabricstore #fabriclove #fabrics #bookmark
#quiltswap#blogger#quiltshop#artgalleryfabrics#quiltingblogger#quiltstore#tutorial#quiltblogger#quiltersofinstagram#fabric#playgroundfabrics#quiltalong#quiltingismytherapy#plannerlove#fabricstore#quilting#sewing#quiltlove#amysinibaldi#wearefabrics#fabricbookmark#qpbestyearever2017#fabrics#sewingproject#quiltersplanner2017#fabriclove#bookmark#quiltersplanner#diy#quiltproject
0 notes
Text
A few weeks ago I published part 1 of a tutorial on how to make your own awesome patchwork star. Well, here is part 2! This tutorial will teach you how to turn the patchwork quilt block into a potholder. Potholders are ideal as a present: Everyone uses them and they are small so don’t take too much time and materials to make.
Quilt tutorial: how to make a patchwork star
This article is published before during the artisan craft week at projecteducate. I promise you a never-ending sense of pride and accomplishment when you’re holding your first finished quilt.
In this article, I will discuss the following techniques:
Basting of a quilt
Quilting a quilt
How to sew a border around your quilt
Binding a quilt
If you want to know a bit more about the separate part of a quilt or how to make a quilt, see the following articles:
A lesson in the basic elements of a quilt
How to make a scrap quilt with many pieces in 4 steps
Which materials do you need?
18 x 19.5 cm of fabric for the border.
18 x 18 cm fabric for the back
18 x 18 cm fabric batting; either a piece of a fleece blanket or you can buy it in a quilt or craft shop
Quilting thread (quilting thread is best, but embroidery thread or any other thread you have is also fine)
Standard sewing notions (scissors, pins, needle etc…)
Fabric choices: I used the fabrics I also used for the star. You can choose any you want though! A contrasting border fabric will look very good as well.
Step 1: Basting your quilt
What is it?
A quilt consists of three layers: the top, a back and batting. When you bast a quilt you temporarily sew the pieces together with big stitches so the layers won’t move when you start to quilt.
How do you do it?
1. Put the three layers together. The batting goes in the middle. The ‘right’ side of the backing and quilt block face the batting. The right side is the front of your fabric which will be visible when the quilt is finished.

2. Cut off the excess batting and background fabric. Leave a border of around 2 centimetres.
3. There are two ways to bast a quilt: with pins and with thread. Normally I would not bother with thread for a piece this small, but I will show you both techniques.
Basting with thread: For this, you can use any leftover thread you have because you will remove it from the piece when it’s finished.

Basting with pins: This follows the same principle as basting with thread and is quicker. This technique is not suitable if the quilting will take a long time or when you’re quilting a big quilt. The needles will either fall out or prick you when you’re handling a lot of fabric.

Step 2: The quilting
What is it?
The term ‘quilting’ or ‘quilt’ is confusing because they are both used for the finished object, a verb and for the process we’re going to do now. Quilting means sewing through the three layers of a quilt. This is both to keep the layers in place, but also has ornamental value. Small stitches used to be the norm, but it is more important to create stitches of a consistent length. Quilting can be done to exaggerate the original pattern or to create a new kind of pattern. You see an example of both below.
How do you do it?
1. Thread a needle. Tie a knot at the end. Start with the first stitch where you gently pull the knot through one layer of fabric. This will secure the thread into the fabric.
2. Quilt in any pattern you want. I decided to quilt around the star shape, but you can also draw X-es in boxes, stripes, circles, whatever strikes your fancy! The middle block is ideal for some initials as you see in my finished piece.
3. If your thread is almost gone, tie a knot near the fabric and finish in the same way you started by pulling the knot through one layer of fabric.
4. Keep repeating this process until you’re satisfied with the quilting.

Step 3: Putting a border on your quilt
What is it?
To speak in the words of the brilliant Beyonce: ‘if you like it, then you should put a ring on it’. And that is what we are going to do with this quilt! A border is like a ring around a quilt which finishes the raw edges.
How do you do it?
1. Cut your block to the right size. About half a centimetre from the points of the star.
2. Cut four border strips of 19.5 by 4.5 cm
3. Pin the border strips with the pretty side to the block and sew as you see in the picture. Use pins on the star points inserting them at 90 degrees from the line you’ll sew. This will make the quilt look neater. Also, make sure an equal piece of the border fabric sticks out at either side of the block. That’s why the border strips are longer than the block. You’ll need that length later. When sewing the second set of borders don’t sew over the borders already attached (as shown in the picture).

3. Now fold over the border fabric at the back and pin it down. You have to fold twice so the edge of the fabric is secured inside the border. The corner is always fiddly, the pictures show how I usually do it but stick to any way that works for you.
4. Sew the border to the back as shown in the picture, With this stitch, the stitches are nearly invisible.

Step 4: Finishing your quilt
1. This part is always a lot of fun: removing the basting thread.
2. If you haven’t done that already, you can sew your initials in the middle block to make this quilt your own.
3. If you make many of these blocks and sew them together you get a big quilt!
I added two pictures of the finished result so you can see the initials I embroidered onto the quilt.

And now your first quilt is finished. Congratulations!
If you have any questions about this tutorial or suggestions leave a comment or sent me an email at [email protected]! I am always open to help people to get into this quilting obsession.
I would love to see what you make with this tutorial, so please leave a link in the comments section once you do!
May this first quilt be the first of many more to come!
See my DeviantArt, Facebook page or Instagram (username: bella.g.bear.art) for more artwork and WIPs. You can also follow my blog by clicking on the button on the left or by filling in your email address. There will be a monthly update at the end of every month and a new blog post every Sunday or Monday.
A few weeks ago I published part 1 of a tutorial on how to make your own awesome patchwork star. Well, here is part 2! This tutorial will teach you how to turn the patchwork quilt block into a potholder. Potholders are ideal as a present: Everyone uses them and they are small so don't take too much time and materials to make. A few weeks ago I published part 1 of a tutorial on how to make your own awesome patchwork star.
#creative tutorial#handmade#handmade gifts#how to quilt#patchwork#patchwork star#potholder#quilt#quilt tutorial#quiltblogger#quilter potholder#quiltlove#tutorial
0 notes
Text
The Dear Jane quilt: green with envy
The Dear Jane quilt: green with envy

Part three in this series where I write about the background colours of my Dear Jane sampler quilt. All the quilt blocks in the Dear Jane consist of 2 colours: one background colour and another one. For the background colours, I use red, green, white and blue. Each colour gets a post, in which I talk about some blocks made with this colour and what I learned about the fabric and colour use. See…
View On WordPress
#baby jane#brenda papadakis#dear jane#Dear Jane quilt#foundation piecing#Jane Stickle#janiac#patchwork#pinning#quilt#quiltblogger#quilter#sampler quilt#spiderman
0 notes
Text
It was my birthday on the 10th of November! – Happy birthday to me – Last year I wrote a post reflecting on the year that had gone by creative wise. I thought that’s a good habit to keep so here is my post for this year. The post is a bit delayed because I was on a holiday with my family and too busy laying in the ocean and too occupied relaxing to write. I’m sure you’ll all understand.
It’s my birthday and wow what a year was 2018
What kind of year did I have?
This year I spend most of my time in Kenya. First to finish my master studies and later because of love and to settle down in Kenya. I came back to Kenya for love, research and adventure. Read more about why I decided to come back here:
Kenya has my heart in more than one way.
The settling down has gone very fast because I’ve been in Kenya for three months, and we already have nine chickens and I’m working on a baby quilt for a friend.
My quilts of 2019
The first exhibition: Look Behind the Lines mini quilt
This year one of my quilts participated in a Dutch quilting exhibition. I’m very proud of the quilt I send in because it is one of my first pieces with a meaning behind it. Also, the process of exhibiting the quilt and visiting to see my quilt and those of my quilting friends made me reflect about sharing your own work. I wrote a blog post to honour the occasion:
‘Look behind the lines’ miniature quilt and a quilt exhibition
Look behind the lines mini quilt
Picknick blanket scrap quilt
One of the quilts I finished this year. I have some people in mind who should get this quilt, but it will be a while before I can get it to then. Until then, it will adorn my parents’ living room. So many scraps were used in this quilt, as I explain in the post below. The quilting is done by hand with glow-in-the-dark thread. However, it is unfortunately not visible in the dark. Does anyone have experience using glow-in-the-dark thread successfully?
Picknick blanket scrap quilt
The Kenyan Quilt
This is the quilt I started the first time I moved to Kenya. It is made completely out of fabrics I got there. Now I am back I am in the process of hand quilting this piece to finish it. It is a nice way to tie both my Kenya journeys together.
The Kenyan Quilt top is finished!
The Kenyan Quilt: quilt blocks showcase
Why would you hand quilt: The HQAL and my Kenyan quilt
Kenyan quilt block finished
The piece below shows what you can do with leftover blocks from your quilt! This is going to be a small blanket or scarf once it’s quilted.
Crazy quilt blanket
Nearly Insane Machine Sampler Quilt
This quilt is designed by Liz Lois based on Salinda Rupp’s original quilt. In between my two stays in Kenya, I worked a lot on this quilt. And although I didn’t finish this quilt I did make a lot of progress! The motivation to finish this quilt grew especially when I started putting the blocks together using the Quilt-as-You-Go method. This quilting technique allows you to put blocks together as soon as you finish a block instead of having to wait until all the blocks are done. I hope to finish this quilt when I visit the Netherlands sometime.
Introduction Nearly Insane Sampler Quilt
The Nearly insane quilt blocks showcase
A Nearly Insane quilter quilting QAYG?
The Dear Jane Hand Quilting Sampler Quilt
This is by far the biggest quilting project in my life so far. Dear Jane is a sampler quilt based on an original quilt made by Jane Stickle during the Civil War. Brenda Papadakis made patterns out of the more than 200 blocks of the quilt. Now, Dear Jane is seen as the ultimate proof of skill upon completion by quilters. Therefore, I started this quilt to teach myself to quilt by hand. My reasoning is that once I have completed this Dear Jane quilt I can call myself a skilled hand quilter. By now, I have finished almost half of the blocks and assembled a part of them. You can follow my progress by reading one of the many blog posts I have written about this quilt so far.
The Dear Jane hand sampler introduction
I’m not ashamed: humble Dear Jane quilt blocks
The Dear Jane quilt: white with shock
Click this link to see all the Dear Jane related posts:
Dear Jane quilt blog posts
Tutorial: How to make your own awesome star quilt
One of my goals is to one day become a quilting teacher. To get there, I am writing this blog and I also enjoy writing tutorials. This year I finished a tutorial to make your own star quilt.
Part 1: Quilt tutorial: How to make a patchwork star
Part 2: Quilt tutorial: How to finish your star quilt
Lastly: new beginnings with Kitenge and Kenyan fabric quilts
Here are some examples of other quilting projects I am working on made with Kenyan fabrics.
Embroidery and Cross Stitch of 2019
Death of Discworld cross stitch
This cross stitch is for an art trade. I made this cross stitch and get awesome crochet dragon gloves in return.
Bukowski Biscornu Cross Stitch
This was made for a competition where the prompt was to make something embodying positivity to you. I didn’t win, unfortunately, but I am very proud of the result nonetheless.
The cross stitch design is based on and inspired by this poem:
youtube
Crewel embroidery landscape
One of my goals this year was to learn how to make crewel embroidery. I bought a pattern by Sol Y Mano study to practice and the result is below. It turns out that crewel embroidery is tricky, especially to remember all the different stitches. However, I really love complicated embroidery pieces so I will keep on practising and developing this skill. Embroidery is like painting with thread and I love that idea.
Coat of Many Colours embroidery patch
The piece below is one of those places I’m developing my embroidery skills. This is going to be a patch for my man who is an MC and artist. He has a special connection with the Dolly Parton song ‘Coat of Many Colours’ on which this design is based. To keep true to the idea of a patchwork coat I am using leftover floss from previous embroidery projects.
Any one colour running cross stitch design
This piece was finished more than a year ago for another competition. However, I wrote a post about it this year so it fits in this post. In the post, I talk about my design process from idea to drawing to the finished piece.
How to turn a drawing into a cross stitch piece: The any one colour design
Other projects of mine
Other topics I wrote about
These stories fall under the category Artisan Life on my website.
Why would you hand quilt: The HQAL and my Kenyan quilt
When and how to quit a quilt
How to get good materials for quilting and embroidery creatively and cheap
Other websites of mine
I started a writing website to share my experiences of living abroad and to show-case my short stories.
Bella G. Bear Writes
Another website I am working on is focused on music, especially sharing music from all over the world. More about that project later.
Conclusion: plans for the new year
How am I doing?
Better and better! The past year I’ve been doing a lot of soul searching and looking at how my life has been functioning so far. I realized that I spend a lot of my time feeling stressed and anxious. Not for any particular reason, but more because of insecurity and worrying about other people’s opinion. This stress has stopped me from doing a lot of things I wanted to or should have done. Projects I didn’t dare to execute, people I didn’t have the confidence to befriend or people I didn’t help because I thought I was somehow wrong about what to do. The past year I’ve started the process of calming down and focusing more on my own life and goals, and I’ve noticed the more I focus on my own goals and values the calmer and more confident I feel! I wrote a bit more about this process in one of my Monthly Updates:
Monthly Sewing Update Oktober 2019
Goals for this new year:
Worry less and grow confidence.
Focus on my own projects and building a life that suits me.
Continue to learn embroidery and crewelwork.
Make and sell bags with Kenyan fabric.
Now to end this post with some questions for you:
Do you set periodical goals for yourself? If you, would you like to share some of them?
What is your proudest achievement this year?
What are the methods you use to feel calm and secure in life?
What kind of posts of mine do you like most and would you like to see more of?
Next week’s post: HQAL update with the Dear Jane Quilt! (big finishes)
See my DeviantArt or Instagram (username: bella.g.bear.art) for more artwork and WIPs. You can also follow my blog by clicking on the button on the left or by filling in your email address. There will be a monthly update at the end of every month and a new blog post every Sunday or Monday.
My birthday or wow what a year 2.0, 2019 It was my birthday on the 10th of November! - Happy birthday to me - Last year I wrote a post reflecting on the year that had gone by creative wise.
#artisan#birthday#biscornu#creative blogger#crewel embroidery#cross stitch#Dear Jane quilt#death of discworld#Embroidery#Nearly insane quilt#patchwork#pattern design#quilt#quilt tutorial#quilt writer#quiltblogger#quilter#yearly update
0 notes
Photo

Complete Tutorial for paperclip bookmark on blog. I used the lovely @amysinibaldi Playground Fabric Collection with Art Gallery Fabrics! ❤️ Love these simple to make Planner bookmarks that are quick to make. Isn't it a great way to celebrate our favorite fabric collections? 👊 Wouldn't it be motivating to carry around these fabric bookmarks to motivate you to get working on your next quilt or sewing project? 😒 I'm not doing very many bees 🐝 or swaps so far in 2017. What do you suggest? 🤔 I have never done a swap before online. I only did a couple years ago in a local quilt guild. What do you suggest? ❓ So what do you think about the bookmarks? I'm sure enjoying them seeing the gorgeous fabric popping out telling me to open to that important page! 👏 Thank Amy Sinabaldi for making such lovely collections. Can't wait to get some of your Les Petits and Charleston collections available in March!!! ❌⭕️❌⭕️, Deanna . . #amysinibaldi #playgroundfabrics #artgalleryfabrics #wearefabrics #qpbestyearever2017 #quiltersplanner #quiltersplanner2017 #quiltersofinstagram #fabricbookmark #plannerlove #quiltingismytherapy #quilting #diy #steadler #blogger #quiltblogger #quiltingblogger #quiltswap #quiltproject #quiltalong #sewingproject #sewing #quiltlove #quiltshop #quiltstore #fabric #fabricstore #fabriclove #fabrics
#quiltswap#blogger#quiltshop#artgalleryfabrics#quiltingblogger#quiltstore#quiltblogger#quiltersofinstagram#fabric#playgroundfabrics#quiltalong#quiltingismytherapy#plannerlove#fabricstore#quilting#sewing#quiltlove#amysinibaldi#wearefabrics#fabricbookmark#qpbestyearever2017#fabrics#sewingproject#quiltersplanner2017#fabriclove#steadler#quiltersplanner#diy#quiltproject
0 notes
Photo

Here is my #LandsEndQuilt by @sarahjeanmakes using fabrics I received from @minervadotcom The center piece and background are both @artgalleryfabrics and I love how it came out. I was going to wait until this weekend to post, but couldn't wait to share. ❤ . . . #SarahJeanMakes #quilttop #finishedquilttop #dallascreatives #dfwsewing #chronicallysewn #madebyhandswithra #sewincolour #sewingfun #dallassewist #collectivelycreate #createeveryday #collaboration #modernquilter #quilter #quiltpatterncommunity #sewcialsquad #quiltpattern #artgalleryfabrics #peacock #peacockfeather #patternmatching #minerva #minervamakers #minervaambassador #sewingblogger #quiltblogger — view on Instagram https://ift.tt/2PFvcst
0 notes
Photo

I finished up the top of the #LandsEndQuilt by @sarahjeanmakes using this fun peacock feather @artgalleryfabrics I received from @minervadotcom I took a lot of time to make sure I had all my feathers pointing up and this almost pattern match gave me a smile. I'll have photos this weekend to share and my post up on Minerva. . . . #SarahJeanMakes #quilttop #finishedquilttop #dallascreatives #dfwsewing #chronicallysewn #madebyhandswithra #sewincolour #sewingfun #dallassewist #collectivelycreate #createeveryday #collaboration #modernquilter #quilter #quiltpatterncommunity #sewcialsquad #quiltpattern #artgalleryfabrics #peacock #peacockfeather #patternmatching #minerva #minervamakers #minervaambassador #sewingblogger #quiltblogger — view on Instagram https://ift.tt/3uvvFvV
0 notes
Photo

I put my new design wall into use for the first time today. I'm making the #LandsEndQuilt by @sarahjeanmakes using some fun peacock fabrics by @artgalleryfabrics provided to me by @minervadotcom in exchange for a blog post. I wanted to make sure I got all the peacock feather pieces going in the right direction.. This pattern is so easy and quick that I will probably have the top pieced before the end of the day. This is the throw size. . . . #minerva #quiltersofinstagram #quiltersgonnaquilt #quilter #createeveryday #makersgonnamake #collectivelycreate #collaboration #minervamakers #minervaambassador #newquiltpattern #quiltpattern #quiltpatterncommunity #easyquilt #dallascreatives #dfwsewing #chronicallysewn #madebyhandswithra #sewincolour #sewingfun #dallassewist #sewist #modernquilter #quilter #quiltlove #quiltingismytherapy #sewingblogger #quiltblogger — view on Instagram https://ift.tt/39HoKrt
0 notes
Photo

Today is the last day to grab the #LandsEndQuilt on sale by @sarahjeanmakes This pattern is so easy and quick. It has instructions for multiple sizes - I made the throw size. I have so many more photos and musings about making this quilt on my blog - link in bio. . . . #quilttester #quiltersofinstagram #quiltersgonnaquilt #quilter #createeveryday #makersgonnamake #collectivelycreate #collaboration #quiltbinding #launchday #newquiltpattern #quiltpattern #quiltpatterncommunity #quiltpatterntesting #quiltedthrow #easyquilt #dallascreatives #dfwsewing #chronicallysewn #madebyhandswithra #sewincolour #sewingfun #dallassewist #sewist #modernquilter #quilter #quiltlove #quiltingismytherapy #sewingblogger #quiltblogger — view on Instagram https://ift.tt/3bIrcOD
0 notes
Last Seen Blogs

philosophicalvegan-blog
ashley.
i-hope-you-dont-mind-awkward
I Hope You Don't Mind Awkward

kartana
SAAB King
larry-no-existe
larry is fake

caeazko
skrrt skrrt