#relativelayout
Explore tagged Tumblr posts
Visit Tumblr Blog
Explore Tumblr blogs with no restrictions, modern design and the best experience.
Last Seen Tumblr Blogs


Fun Fact
In February 2021, Tumblr had 518.6 million blog accounts.
Text
How Can You Optimize Performance in Android App Development?
Today, users expect mobile apps to be fast, responsive, and seamless in the fast-paced online landscape. Therefore, a very important thing to do with Android device apps is to perform a thorough optimization in its performance. Factors such as sluggishness, crashing, and an abnormal battery-drain rate can cause an app to be uninstalled, despite being extremely innovative in its features.
So how, then, do developers ascertain that their Android applications are optimally operating? This blog sheds light on some of the most essential approaches towards speeding up the app, maintaining its reliability, and providing a pleasurable experience to the user.
1. Efficient Memory Management
Memory leaks and undue background processes slow down the app or even cause it to crash! The very first step of performance optimization relates to efficient memory management.
Avoid memory leaks: Use weak references when necessary, or release unused resources.
Use appropriate data structures: Choose the right collection classes (such as ArrayMap or SparseArray) instead of generic HashMap for better memory handling.
Avoid holding Contexts unnecessarily: Contexts held onto with static variables are a common cause for memory leaks. So, use getApplicationContext() if you intend to hold onto a reference for a longer duration.
Keep an eye on memory usage with Android Profiler; this helps identify issues early.
2. Optimize Layout Hierarchies
UI is one of the big factors affecting app performance. Benefiting a complex, deeply nested layout would be an extremely slow rendering and response time.
Use ConstraintLayout: This layout will reduce the depth of your view hierarchy for better performance compared to deeply nested LinearLayouts or RelativeLayouts.
Avoid overdraws: Overdraw occurs when the system draws the same pixel multiple times. You can fix overdraw by choosing the Show GPU Overdraw option from the Developer Setting.
Use ViewStub or include layout tags: helps with loading views only when necessary, thus improving load time.
Accept previewing of UI performance on different screen sizes and densities for consistency.
3. Efficient Networking and Data Handling
Apps usually make network calls on APIs or databases for their functioning. Wrongly managed network requests or bulky payloads of data might severely damage the user experience.
Use background threads :All networking work must be done off the main UI thread, something that you can very well do with Retrofit or Volley plus Kotlin Coroutines or AsyncTask.
Implement caching: Caching of images or API responses occurs to help reduce loading time and boost performance.
Paginate large data sets: Do you have huge lists to display? Consider pagination and lazy loading instead of loading them all upfront.
You may also want to make sure there is offline functionality built in and consider network latency as well to make your app highly resilient.
4. Battery and Resource Optimization
Any app that drains a battery or slows down the device quite promptly gets uninstalled. Android apps should really take into consideration their activities operating in the background plus those that interfere with location access and sensor usage.
Reduce wake locks: Restrict their use only when absolutely necessary and make sure they get released properly.
Limit background services: Use JobScheduler or WorkManager instead of long-running background services to align task execution with system conditions.
Optimise location usage: When exact accuracy isn't necessary, employ low-power location techniques. If at all possible, think about batching location requests.
In addition to making users happy, energy-efficient apps are given preferential treatment by the Play Store rankings and Android's Adaptive Battery feature.
5. Use Tools to Monitor and Optimize
Android Studio provides a number of tools for tracking the performance of apps:
CPU Profiler: Find heavy computations and method traces.
Memory Profiler: Monitor allocation trends, GC events, and memory leaks.
Network Profiler: Show data usage and network activity in real time.
Lint checks: Examine your project for coding best practices and performance snags.
Finding problems prior to deployment can also be aided by automated testing tools such as Espresso and UI Automator.
Conclusion: Partner with the Right Experts in Android App Development in Ernakulam
Working with seasoned experts guarantees consistent performance optimization throughout the app's lifecycle, even though best practices in coding and design are crucial. Selecting the best development partner is essential for companies trying to create scalable, high-performing apps.
Globosoft, a trusted name in Android App Development in Ernakulam, distinguishes itself with its proficiency in creating effective, user-focused Android apps. Performance, security, and usability are given top priority during the development process, guaranteeing that every app functions flawlessly on all Android devices. With extensive knowledge of Java, Kotlin, and the newest Android frameworks, Globosoft turns concepts into applications that have a tangible impact.
Are you looking to advance your mobile application? Find out how Globosoft can assist you in developing Android apps that are optimised for your company's requirements.
#Mobile App Development in Kochi#IOS App Development in Kochi#Android App Development in Kochi#Mobile App Development in Cochin#IOS App Development in Cochin#Mobile App Development in Ernakulam#IOS App Development in Ernakulam#Android App Development in Ernakulam
0 notes
Text
Mastering ConstraintLayout Chains for Android UI Design
Okay, so I need to write a comprehensive technical tutorial on “Mastering ConstraintLayout Chains for Complex Android UIs.” Let’s break this down step by step. First, the introduction. I should start by explaining what ConstraintLayout is and why it’s important. I should mention that it’s a powerful layout tool by Google, which replaced older layouts like RelativeLayout and LinearLayout. The…
0 notes
Text
Must-Know Tips for Achieving Greater Android App Performance
In Android application development it is highly important for the responsiveness of the application. Intensive programs slow the machine down and even when they respond their response time is slow, which contributes to high uninstall rates and user turnover.
Hence, it is crucial to know how to enhance Android App performance. For instance, if you are an Android development expert, or you contracted Android App Development Company Florida, it is crucial to learn more about the appropriate measures of boosting the application’s performance.
Optimize Layouts and Views
Among the significant factors influencing the performance of the Android application, are the optimized layouts and views in the first place. Complicated designs always result in more time taken to load a page than simple ones given the low-capable devices present in the market today.
In order to highly optimize layouts one should not nest layouts unless it is extremely necessary. Still, you are recommended to use ConstraintLayout and RelativeLayout as these layouts help to minimize the view hierarchy depth and, consequently, maximize performance.
Efficient Resource Management
This paper seeks to establish that, resource management is a critical factor that defines Android App Performance. When an app has high resource utilization it implies that your CPU, memory, or battery will be consumed thus the performance will drop, battery will drain faster.
Because the background processes and services consume battery life and if not managed properly might cause the app to become unresponsive, limit the background processes and services that your app launches. Use Android’s JobScheduler/ WorkManager to handle background operations more efficiently.
Implement Lazy Loading
This is a method of loading images or processes which where they are only loaded when required. The immediate loading of all data causes a greater load on system resources, hence, by only loading content as the user scrolls, utilizes system resources sparingly making the app more responsive with less initial loading time.
For instance, when using list view instead of loading the entire list it is possible to load only the current list and other lists as the user scrolls through the list.
Minimize Main Thread Operations
The thread that truly is in charge of the application, or the 'main thread,' is responsible for processing anything having to do with the user interface and updating view elements. If many heavy requests (network requests, complex mathematical calculations, and big file processing) are initiated in the main thread, the app hangs or freezes.
, AsyncTask, HandlerThread, and modern Kotlin Coroutines are some of the ways that can be used to perform other tasks in the background while making the UI thread remain unblocked.
Leverage Caching
Here, it is also important to take a look at Caching as an important measure of enhancing the performance of Android apps. Since the data that is frequently used can be temporarily stored in it, there are less frequent requests for the network or database.
Use DiskLruCache, SharedPreferences, or SQLite for data caching locally, although it is recommended that you combine DiskLruCache and SharedPreferences or SQLite. This not only increases the object's loading and speed but also decreases the probability of network traffic saturation.
For images, there are libraries called Glide and Picasso that will actually cache images so that the time is also saved on getting images from the network.
Optimize Network Requests
Network requests are one of the most troublesome sources of performance problems in the case of apps employing them. Another way is to think about how to decrease the number of requests sent to minimize the impact of the network latency By combining a number of requests to 'batch', or using a multiplexed TCP connection such as HTTP/2.
When it comes to such requests as network, the reader is advised to use Retrofit or OkHttp for request handling and you can also try using GZIP for the size of data.
Monitor and Reduce App Startup Time
The time taken by an application to start is among the few crucial factors that define user satisfaction. Long startup times also mean that users are discouraged from even launching your application in the first place. To enhance the Android App Performance, one should aim at reducing the work that is to be done during the initialization phase.
This means that one can delay certain operations until the time when the essential elements have been loaded to the app's main screen. To manage time in loading only the most important components and do it with the help of Android's Startup Library.
Reduce APK Size
The size of your app is heavily important because a bigger size may affect the download and installation time and after that the loading time of the overall application. This is important to the user who’ll be downloading the APK on slow networks or limited space on their devices.
There are three ways of reducing APK size these include, elimination of any resource that is not wanted, optimization of images, and finally shrinking and obfuscation of the code through the use of Proguard or R8.
Adopt Modern Android Development Tools
If the Android App Performance has to be optimized then techniques of modern development tools available help in doing this job much more efficiently. There are several other tools available that can be used to monitor the real time performances of an Android application.
These include the Android Profiler and LeakCanary for memory, CPU, and other usage metrics. They assist you to diagnose and eliminate performance issues promptly. You can also check top app development platform.
Regularly Test and Monitor Performance
Last but not least often it is pertinent to examine and assess Android App Performance on a frequent basis in the Development Cycle. Firebase has features such as Performance Monitoring, through which you can monitor how the application performs on real devices. Especially when the network connection is slow or non-existent and the device is not fully capable of meeting your application demands.
Android App Performance Optimization is one of the most important factors that dictate how an app will perform in order to enhance the interactive lifestyle of the user. If you follow the above guidelines — getting layouts right, managing resources to adopting the use of brand-new development tools, your app will perform well.
For any firm that is interested in enhancing the performance of the app, or any organization that requires the services, it is advisable to hire the services of the best Android App Development Company Florida.
0 notes
Text
App development off bangladesh
Android app development involves several key components. Here's a basic overview to get you started:
Programming Languages: Java: Historically, Java has been the primary language for Android development. Kotlin: In recent years, Kotlin has gained popularity and is now officially supported by Google. Many developers prefer Kotlin due to its concise syntax and enhanced features.
Integrated Development Environment (IDE): Android Studio: This is the official IDE for Android development. It provides a rich and powerful environment for building Android apps. Android Studio supports both Java and Kotlin.
User Interface (UI) Design: XML: Android uses XML for designing the layout of app screens. You can define the UI elements and their properties in XML files. Android XML Layouts: RelativeLayout, LinearLayout, ConstraintLayout, etc., are layout types used to arrange UI elements.
Activity: An Activity represents a single screen with a user interface. It's the entry point of an app, and each activity is defined in the AndroidManifest.xml file.
Intent: Intents are messages that are used to request an action from another app component. They can be explicit (targeting a specific component) or implicit (system selects the component).
Persistence: SQLite Database: For local storage, Android often uses SQLite, a lightweight relational database. Shared Preferences: For storing small amounts of data in key-value pairs.
Networking: HTTPURLConnection, Retrofit, Volley: These are libraries used for making network requests in Android apps.
Version Control: Git: Version control is crucial for collaborative development. Git is widely used, and platforms like GitHub provide hosting for Git repositories.
Testing: JUnit, Espresso: Unit testing and UI testing are essential. JUnit is used for unit testing, and Espresso is used for UI testing.
Deployment: Android apps are typically distributed through the Google Play Store. You'll need to sign your app with a keystore and follow the guidelines for submission.
Security: Pay attention to secure coding practices, especially if your app involves sensitive user data. Use HTTPS for network communications and follow best practices for secure storage.
Documentation: Maintain clear and comprehensive documentation for your code. This is crucial, especially if others will be working on the project.
Continuous Learning: Stay updated on the latest Android development trends, tools, and best practices. The Android ecosystem evolves, and keeping your skills current is essential.
Community and Resources: Join the Android developer community. Websites like Stack Overflow, GitHub, and the official Android developer documentation are excellent resources for problem-solving and learning. This is a broad overview, and there's much more to each of these points. Depending on your specific needs, you might dive deeper into certain areas. Feel free to ask if you have more specific questions!
0 notes
Text
Android Training in Chandigarh: Unlock Your Career in Mobile App Development
In today’s digital world, mobile applications have become an integral part of our daily lives. With billions of smartphone users globally, Android stands out as the dominant platform powering over 70% of mobile devices worldwide. This massive reach has created an enormous demand for skilled Android developers who can design, develop, and maintain robust mobile apps.
If you are in Chandigarh or planning to move here, pursuing Android training in Chandigarh is an excellent step toward building a rewarding career in mobile app development. This article explores everything you need to know about Android training in Chandigarh—from why it’s important to what you should look for in a training institute.
Why Choose Android Development?
Android is an open-source platform developed by Google. Its flexibility and wide adoption have made it the preferred choice for developers and businesses alike. Here are some reasons to consider a career in Android development:
Huge Market Demand: With millions of Android apps on the Google Play Store, companies are constantly looking for developers to create innovative applications.
High Salary Prospects: Skilled Android developers are well-compensated due to their specialized knowledge.
Versatility: Android development skills open doors to work in startups, IT companies, freelance projects, and even launch your own apps.
Constant Innovation: Android regularly updates with new features, keeping developers challenged and engaged.
Global Reach: Apps developed on Android reach a worldwide audience, providing a global career scope.
Why Chandigarh for Android Training?
Chandigarh, known as "The City Beautiful," is a growing hub for IT and software development. The city offers numerous benefits for tech learners:
Proximity to IT Companies: Chandigarh and the surrounding tri-city area (Mohali, Panchkula) host many IT firms that regularly hire Android developers.
Educational Infrastructure: The city has excellent institutes offering cutting-edge training programs.
Affordable Cost of Living: Compared to metro cities like Delhi or Bangalore, Chandigarh offers affordable living and training costs.
Supportive Learning Environment: Chandigarh’s student-friendly atmosphere and availability of resources create a positive environment for tech education.
What Does Android Training in Chandigarh Include?
A comprehensive Android training program covers the core concepts and practical skills required to build professional Android applications. Key topics usually include:
1. Java/Kotlin Programming
Basics of Java or Kotlin (Kotlin is now the preferred language recommended by Google)
Object-oriented programming concepts
Exception handling and data structures
2. Android Studio and SDK
Installing and configuring Android Studio (official IDE)
Using Android SDK tools and emulator setup
Project creation and management
3. User Interface Design
Layouts (LinearLayout, RelativeLayout, ConstraintLayout)
Views and widgets (Buttons, TextView, RecyclerView)
Material design principles for creating intuitive UI
4. Activity and Fragment Lifecycle
Understanding the activity lifecycle
Managing fragments for modular UI components
Handling user interactions
5. Data Storage and Management
Shared Preferences
SQLite databases
Room persistence library
Working with JSON and APIs for data exchange
6. Networking and APIs
Connecting apps to RESTful APIs
Parsing JSON/XML data
Using libraries like Retrofit and Volley
7. Advanced Topics
Firebase integration (Authentication, Realtime Database, Cloud Messaging)
Push notifications
Background services and Broadcast receivers
Google Maps integration
Working with sensors and cameras
8. Testing and Debugging
Unit testing Android apps
Debugging tools and best practices
Performance optimization
9. Publishing and Maintenance
Preparing apps for release
Play Store guidelines and submission process
App updates and maintenance strategies
Benefits of Android Training in Chandigarh
Hands-On Learning: Chandigarh’s institutes emphasize project-based learning, allowing students to build real-world applications.
Expert Trainers: Experienced trainers with industry exposure guide students through concepts and practical challenges.
Placement Assistance: Many training centers provide placement support with tie-ups to IT companies in and around Chandigarh.
Certification: Accredited certifications help validate your skills to potential employers.
Networking Opportunities: Training institutes often facilitate interaction with professionals and organize seminars, workshops, and hackathons.
How to Choose the Right Android Training Institute in Chandigarh?
With many options available, choosing the right Android training institute can be overwhelming. Here are some factors to consider:
1. Curriculum Quality
Ensure the syllabus covers the latest Android versions, languages (Kotlin), and includes both basic and advanced topics.
2. Trainer Expertise
Look for trainers who have industry experience and a solid track record of successful student placements.
3. Practical Exposure
Check if the institute offers project-based learning and opportunities to work on live projects.
4. Placement Support
Verify if the institute provides interview preparation, resume building, and job placement assistance.
5. Reviews and Testimonials
Read student feedback and reviews online to gauge the reputation of the training center.
6. Infrastructure and Tools
Modern computer labs with the latest software and high-speed internet are essential for effective learning.
7. Flexibility and Support
Look for flexible batches (weekend/weekday/online), study materials, doubt clearing sessions, and mentorship.
Top Android Training Institutes in Chandigarh
Here are some reputed names known for Android training (you may want to verify current details):
Tech Shiksha Chandigarh: Known for in-depth Android courses and placement support.
SEED Infotech: Offers industry-oriented training with hands-on projects.
APTRON Solutions: Good for comprehensive mobile app development training.
CBitss Technologies: Experienced faculty and live project experience.
Nettechnocrats: Focuses on practical knowledge with live projects and interview preparation.
Tips to Succeed in Android Training
Practice Regularly: Coding is a skill honed by continuous practice. Build small apps on your own.
Understand Concepts, Don’t Just Memorize: Focus on the ‘why’ behind each Android component and lifecycle.
Explore Official Documentation: Google’s Android developer site is a treasure trove of information.
Stay Updated: Android platform evolves frequently. Keep learning new features and APIs.
Work on Projects: Try building apps that solve real problems or automate tasks.
Join Developer Communities: Participate in forums like Stack Overflow, Reddit Android Dev, and GitHub.
Career Opportunities After Android Training
Completing Android training can open multiple career paths such as:
Android Developer: Design and develop apps for smartphones and tablets.
Mobile UI/UX Designer: Focus on the user experience and interface.
Mobile App Tester: Test apps for functionality and bugs.
Freelancer: Build apps for clients independently.
Entrepreneur: Launch your own startup with innovative Android applications.
Backend Developer: Combine Android skills with backend technologies for full-stack mobile development.
Final Thoughts
Android training in Chandigarh offers a promising gateway to the booming mobile app development industry. With the right training institute, a solid curriculum, and dedicated effort, you can master Android development and secure lucrative job roles in the IT sector.
Whether you are a student, a working professional aiming for a career switch, or a freelancer wanting to sharpen your skills, investing in Android training in Chandigarh is a wise choice. The city’s supportive learning environment, affordable training options, and growing IT market make it an ideal destination for your Android development journey.
Start today, stay curious, and build the apps that shape tomorrow!
0 notes
Text
Android Layouts and Views : JWV Development LLC
The creation of Android apps requires the use of Android App Development. In Saint Paul, Minnesota, use these crucial elements to produce aesthetically pleasing and intuitive applications. Android Views contain individual UI elements like buttons, text fields, and images while Android Layouts specify the organisation and structure of UI elements. Developers may create flexible and responsive designs using a range of layout types, including ConstraintLayout, LinearLayout, and RelativeLayout. Views manage user interactions and present data, improving the usefulness of the programme. For developers in Saint Paul, Minnesota, learning Layouts and Views is still crucial in order to produce top-notch mobile experiences as Android develops.
0 notes
Text
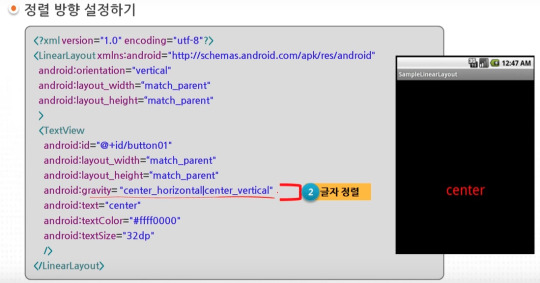
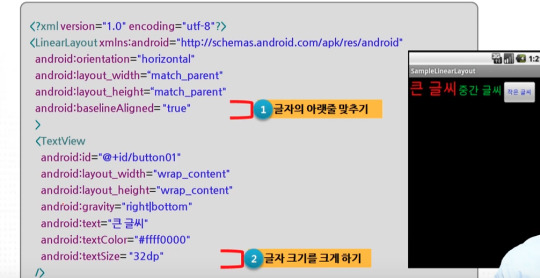
android 초급 9강 Layout 1 tacademy
original source : https://youtu.be/eRJ3SiexglY

=========================================================
.
.

=========================================================
.
.


=========================================================
.
.


=========================================================
.
.
=========================================================
.
.
=========================================================
.
.

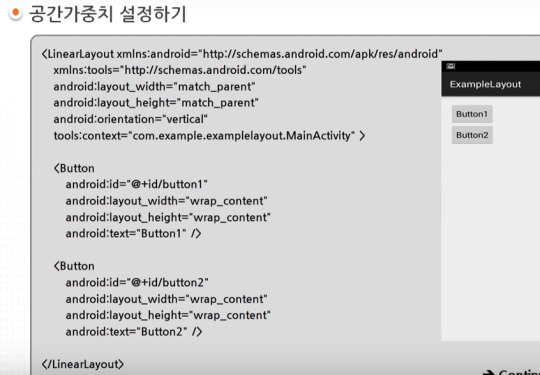
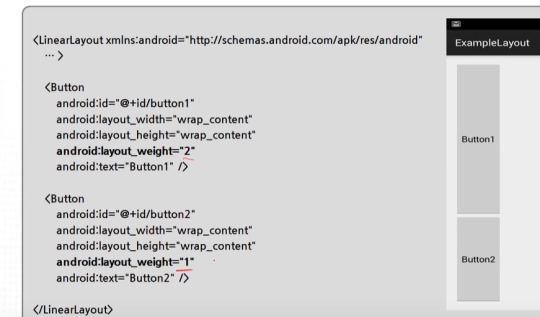

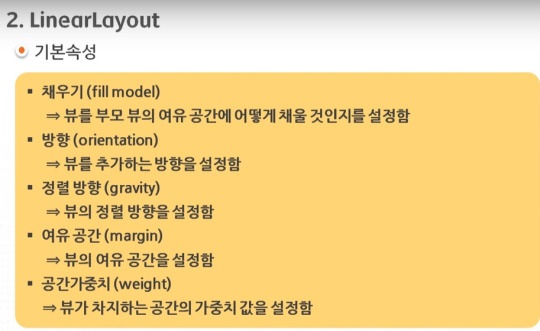
layout_weight은 남은 여백을 어떤 비율로 나눌것인가에 대한 값이다. 실제 view의 크기 비율을 조절하고 싶다면 view의 크기값을 0으로 준다.
=========================================================
.
.


=========================================================
.
.


0 notes
Text
Linear Layout ve Relative Layout
Linear Layout ve Relative Layout
Linear Layout ve Relative Layout örneklerine geçmeden önce bu iki Layout hakkında kısa bir bilgi verelim. Linear Layout tüm nesneleri tek bir yönde kullanmamızı sağlar.Linear Layout sayesinde android:orientation özelliği ile tamamen yatay veya dikey olarak konumlandırabiliriz. Relative Layout ise içine eklenen görsel öğeyi bir diğer öğe veya öğeleri referans alarak dizer. Yeni eklediğimiz öğeye…
View On WordPress
0 notes
Text
What is FrameLayout: The Ultimate Guide
FrameLayout is an Android layout that has been in use since the start of Android. It has been around since the first Android release way back in 2007. It's been around since the days of the Motorola Droid, HTC Dream and Samsung GALAXY S. It has been around since the initial Android release and will continue to exist for years to be. FrameLayout is one of the top layouts ever since it was mentioned in the Android SDK.
The 5 Best CCNA Certification Books for 2022
1. What is FrameLayout?
FrameLayout is a layout library that helps you design custom layouts for your Android app. The layout library allows users to design layouts that include a footer and header and display them in both landscape and portrait mode. The layout library can be excellent for when you need to design a layout that is different when displayed in the landscape view.
CCNA Routing And Switching All In One Study Guide BOOK
2. What is the process behind FrameLayout function?
FrameLayout is a layout manager for Android and Java application. It's very similar to LinearLayout , and RelativeLayout however it was made to function as the layout manager of default in applications. It works as a wrapper for FrameLayout, the default layout manager for Android. It allows developers to create layouts that aren't limited to the screen size of their application.
Cisco Packet Tracer Tutorial - 4 Router Basic Configuration
3. How to use FrameLayout
FrameLayout has been created to increase the speed of websites on devices that are mobile gadgets. It's a brand new layout that is not just simply a viewport. This layout has been designed with an idea of a viewport, and has been optimized especially for use on smartphones. The layout was designed to ensure that the content is readable and visible even on smartphones. To make the most of this layout, it is recommended to put the most important content on the top and the top. Also, you should ensure that the layout is not too large. This will ensure that it's very easy for you to browse. Also, ensure that you've got a title tag and a meta description.
How To Configure Default Routing On 4 Routers In Cisco Packet Tracer
4. Conclusion.
Once you've acquired a basic understanding of what FrameLayout is, you'll be able use it to your advantage for your next project. FrameLayout is a layout that allows the creation of a frame around an element of your project. This is useful for projects with a lot of information and you need to build a frame around it. It is also helpful when you're trying to create an outline of your project in just few lines of code. There are many other different uses of FrameLayout, which you can read about within the manual. It's an excellent layout to understand and experiment with.
Basic Cisco Router Configuration | Cisco Packet Tracer Tutorial
0 notes
Text
Github sistem administrasi sekolah dasar

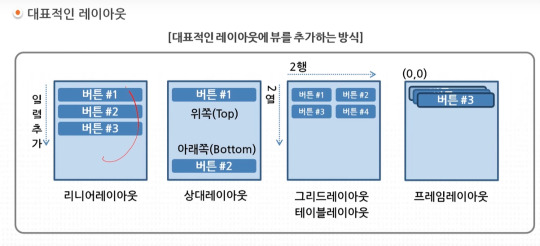
For LinearLayout, see the LinearLayout Guide, class LinearLayout and its source code, and class LinearLayout.LayoutParams and its source code. The attributes for the children of each type of layout are listed in the LayoutParams classes. Figure 1.7Relative Layout model 1 Modul Praktikum MOBILE PROGRAMMING 4ĩ Figure 1.8Relative Layout model 2 See the UI Overview and Layouts Guide. Figure 1.6Horizontal Lineae Layout: Leftover Width Modul Praktikum MOBILE PROGRAMMING 3Ĩ Relative Layout A RelativeLayout can positiona child relative to therelativelayout. Figure 1.5Horizontal Linear Layout: Equal Width Horizontal Lineae Layout: Leftover Width A horizontal LinearLayout cangive one of its children all theleftover width. Figure 1.4Vertical Linear Layout: Leftover High Modul Praktikum MOBILE PROGRAMMING 2ħ Horizontal Linear Layout: Equal Width A horizontal LinearLayout cangive all of its children equal width. Figure 1.3Vertical Linear Layout: Equal High Vertical Linear Layout: Leftover High A vertical LinearLayout can giveone of its children all the leftoverheight. Figure 1.2 Horizontal Linear Layout Modul Praktikum MOBILE PROGRAMMING 1Ħ Vertical Linear Layout: Equal High A vertical LinearLayout can giveall of its children equal height. Figure 1.1 Vertical Linear Layout Horizontal Linear Layout A horizontal LinearLayoutarranges its children in a row. LINEAR LAYOUT Vertical Linear Layout A vertical LinearLayout arrangesits children in a colum. iv MODUL 1 LAYOUT MODUL 2 WIDGET MODUL 3 VIEW MODUL 4 MAPS MODUL 5 DATABASE MODUL 6 API MODUL 7 Database SQLite MODUL 8 Database Real Time Using Firebase MODUL 9 FIREBASE AUTHENTICATION MODUL 10 AdMob MODUL 11 PUBLISH APPS MODUL 12 ios ivĥ MODUL 1 LAYOUT 1. Malang, 8 Juli 2018 Penyusun iiiĤ DAFTAR ISI JUDUL. Harapan penulis semoga buku panduan praktikum Praktikum Mobile Programming data ini dapat bermanfaat bagi penyusun khususnya, dan para mahasiswa pada umumnya. dan semoga mendapatkan balasan yang setimpal dari-nya. Akhirnya semoga karya ini diterima di sisi Allah SWT. Oleh karena itu, penulis mengharapkan kritik dan saran yang membangun guna perbaikan ke depan. Penulis mengakui bahwa buku praktikum Praktikum Mobile Programming ini masih banyak kekurangan, kelemahan, dan masih jauh dari kesempurnaan. yang membawa cahaya kebenaran, sehingga mengeluarkan umat manusia dari zaman kegelapan ke masa yang terang benerang agama Islam. Shalawat serta salam semoga tetap tercurahkan kepada Nabi Muhammad saw. Mari kita panjatkan puji syukur ke hadirat Allah SWT., yang telah melimpahkan rahmat, taufiq serta inayah-nya sehingga penulis mampu menyelesaikan modul Praktikum Mobile Programming bagai salah satu buku panduan praktikum jurusan Teknik Informatika Universitas Islam Negeri Malang sesuai dengan waktu yang telah ditentukan. 50 Malang (65144) Telp :, Faks : iģ KATA PENGANTAR Dengan menyebut asma Allah Yang Maha Pengasih lagi Maha Penyayang. 1 MODUL PRAKTIKUM MOBILE PROGRAMMING JURUSAN TEKNIK INFORMATIKA FAKULTAS SAINS DAN TEKNOLOGI UNIVERSITAS ISLAM NEGERI MAULANA MALIKIBRAHIM MALANG Jl.
0 notes
Text
Which of the following layout in android aligns all children either vertically or horizontally?
a)RelativeLayout
b)Linearlayout
c)ConstraintLayout
d)FrameLayout
Post your answers in comments..
Enroll now for an Online/Offline interactive sessions with experts!
To know more details about the courses Srishti Campus, visit our website https://srishticampus.com / www.srishticampus.in or call us to +91 97786 39922 To join our whatsapp group- https://chat.whatsapp.com/J6yx5GI1H7TLMyS2XMuvbP
0 notes
Text
The Layout File
16 September 2020
The activity_main.xml is a layout file available in res/layout directory, that is referenced by your application when building its interface. You will modify this file very frequently to change the layout of your application. For your "Hello World!" application, this file will have following content related to default layout −
<RelativeLayout xmlns:android="http://schemas.android.com/apk/res/android" xmlns:tools="http://schemas.android.com/tools" android:layout_width="match_parent" android:layout_height="match_parent" > <TextView android:layout_width="wrap_content" android:layout_height="wrap_content" android:layout_centerHorizontal="true" android:layout_centerVertical="true" android:padding="@dimen/padding_medium" android:text="@string/hello_world" tools:context=".MainActivity" /> </RelativeLayout>
This is an example of simple RelativeLayout which we will study in a separate chapter. The TextView is an Android control used to build the GUI and it have various attributes like android:layout_width, android:layout_height etc which are being used to set its width and height etc.. The @string refers to the strings.xml file located in the res/values folder. Hence, @string/hello_world refers to the hello string defined in the strings.xml file, which is "Hello World!".
0 notes
Text
Tùy chỉnh button sử dụng XML Styles trong Android
Bước 1 - Tạo một dự án mới trong Android Studio, đi tới Tệp ⇒ Dự án Mới và điền tất cả các chi tiết cần thiết để tạo một dự án mới.
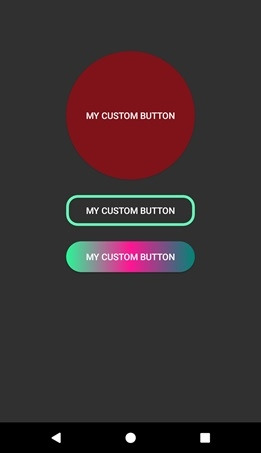
Bước 2 - Thêm code sau vào res / layout / activity_main.xml.
<?xml version="1.0" encoding="utf-8"?> <RelativeLayout xmlns:android="http://schemas.android.com/apk/res/android" xmlns:tools="http://schemas.android.com/tools" android:layout_width="match_parent" android:layout_height="match_parent" tools:context=".MainActivity"> <Button android:id="@+id/customButton" android:layout_width="200dp" android:layout_height="wrap_content" android:layout_centerInParent="true" android:background="@drawable/custom_button" android:text="My Custom button"/> <Button android:id="@+id/customButton2" android:layout_width="200dp" android:layout_height="wrap_content" android:layout_centerInParent="true" android:layout_below="@id/customButton" android:layout_marginTop="24sp" android:background="@drawable/custom_button2" android:text="My Custom button"/> <Button android:id="@+id/customButton3" android:layout_width="200dp" android:layout_height="200dp" android:layout_centerInParent="true" android:layout_above="@id/customButton" android:layout_marginBottom="24sp" android:layout_marginTop="24sp" android:background="@drawable/custom_button3" android:text="My Custom button"/> </RelativeLayout>
Bước 3 - Nhấp chuột phải vào res / drawable, Chọn mới → tệp tài nguyên có thể vẽ và thêm code sau vào custom_dialog.xml
<?xml version="1.0" encoding="utf-8"?> <shape xmlns:android="http://schemas.android.com/apk/res/android" android:shape="rectangle"> <stroke android:color="#66F9B9" android:width="4dp"/> <corners android:radius="16sp"/> </shape>
Bước 4 - Nhấp chuột phải vào res / drawable, Chọn tệp tài nguyên mới → Drawable và thêm code vào custom_dialog2.xml
<?xml version="1.0" encoding="utf-8"?> <shape xmlns:android="http://schemas.android.com/apk/res/android" android:shape="rectangle"> <gradient android:startColor="#2AF598" android:centerColor="#ff1493" android:endColor="@color/colorPrimary"/> <corners android:radius="50dp"/> </shape>
Bước 5 - Nhấp chuột phải vào res / drawable, Chọn tệp tài nguyên mới → Drawable và thêm code sau vào custom_dialog3.xml
<?xml version="1.0" encoding="utf-8"?> <shape xmlns:android="http://schemas.android.com/apk/res/android" android:shape="rectangle"> <solid android:color="#80121a" /> <corners android:radius="999dp"/> </shape>
Bước 6 - Thêm code sau vào src / MainActivity.java
package app.com.sample; import android.support.v7.app.AppCompatActivity; import android.os.Bundle; public class MainActivity extends AppCompatActivity { @Override protected void onCreate(Bundle savedInstanceState) { super.onCreate(savedInstanceState); setContentView(R.layout.activity_main); } }
Bước 7 - Thêm code sau vào androidManifest.xml
<?xml version="1.0" encoding="utf-8"?> <manifest xmlns:android="http://schemas.android.com/apk/res/android" package="app.com.sample"> <application android:allowBackup="true" android:icon="@mipmap/ic_launcher" android:label="@string/app_name" android:roundIcon="@mipmap/ic_launcher_round" android:supportsRtl="true" android:theme="@style/AppTheme"> <activity android:name=".MainActivity"> <intent-filter> <action android:name="android.intent.action.MAIN" /> <category android:name="android.intent.category.LAUNCHER" /> </intent-filter> </activity> </application> </manifest>
Hãy thử chạy ứng dụng của bạn.
0 notes
Text
Tutorial How To Create Custom Android Code Templates
Mobile App Development: Tutorial How To Create Custom Android Code Templates
(No Ratings Yet) Loading...
Introduction
This tutorial will show you how to create custom Android code templates of your own. Most Android developers would have used Android code templates at least once to start projects. But have you tried creating your own Android code templates? In this tutorial, we will show you how to create a template that can be used to generate a Android project from Android Studio IDE that contains Google Analytics configuration. (Google Analytics v4 for Android)
Tung Dao Xuan, [email protected], is the author of this article and he contributes to RobustTechHouse Blog
Video & Source Code
Source Code
You can download the source code at GoogleAnalyticApplication-2015-05-31.
Step by Step Video
[vc_video title=”Video Tutorial How To Create Custom Android Code Template” link=”https://www.youtube.com/watch?v=rhsBrBcgMkQ”]
High Level View of Code Generation Process
If you are not familiar with the code generation process, please also check out the documentation of the full process here.
Steps To Create Custom Android Code Templates For Google Analytics
To build your own template, please ensure that:
You understand the code generation process described above at a high level.
You have some knowledge about FreeMarker
You have some knowledge about Android IDE Template Format and you can see the documentation here.
Step 1: Create Google Analytic Application Folder
This is for the template directory you need. On Windows, place it in: path-to-your-installation-android-studio-folder\plugins\android\lib\templates\activities. Please change your path appropriately on Linux, Mac OS etc.
Then, create the root folder and other files inside your GoogleAnalyticApplication folder.
Step 2: Create template.xml file
Each template directory must contain a template.xml file. This XML file contains the metadata about the template, including the name, description, category and user-visible parameters that the IDE will present as options to the user. The XML file also indicates the name of the recipe XML file which gets processed by FreeMarker, and the global variables XML file if there are global variables besides the template parameter values that should be visible to all FreeMarker-processed files (.ftl files).
<?xml version="1.0"?> <template format="3" revision="4" name="Google Analytics Application" minApi="7" minBuildApi="14" description="Creates a new application that has already Google Analytics configuration."> <category value="Activity" /> <formfactor value="Mobile" /> <parameter id="activityClass" name="Activity Name" type="string" constraints="class|unique|nonempty" suggest="${layoutToActivity(layoutName)}" default="MainActivity" help="The name of the activity class to create" /> <parameter id="layoutName" name="Layout Name" type="string" constraints="layout|unique|nonempty" suggest="${activityToLayout(activityClass)}" default="activity_main" help="The name of the layout to create for the activity" /> <parameter id="classApplication" name="Class extends Application" type="string" constraints="nonempty|class" help="The name of class that extends from Application" /> <parameter constraints="nonempty|string" id="googleAnalyticID" name="Google Analytic ID" type="string" help="Id of Google Analytic" /> <parameter id="dispatchPeriod" name="Dispatch Period" help="Frequency of automatic dispatch in seconds. Defaults to 30 minutes (1800 seconds)." type="string" default="1800"/> <parameter id="autoActivityTracking" name="Auto Activity Tracking" help="If true, views (Activities) will be tracked automatically. false by default." type="boolean" default="false"/> <!-- 128x128 thumbnails relative to template.xml --> <thumbs> <!-- default thumbnail is required --> <thumb>template_google_analytics.png</thumb> </thumbs> <globals file="globals.xml.ftl" /> <execute file="recipe.xml.ftl" /> </template>
There are parameters: activityClass, layoutName, classApplication, googleAnalyticID, dispatchPeriod, autoActivityTracking which will be shown in popups when you create a project.
Step 3: Create globals.xml.ftl file
The optional globals XML file contains global variable definitions, for use in all FreeMarker processing jobs for this template.
<?xml version="1.0"?> <globals> <global id="manifestOut" value="${manifestDir}" /> <global id="srcOut" value="${srcDir}/${slashedPackageName(packageName)}" /> <global id="resOut" value="${resDir}" /> </globals>
Step 4: Create folder & files inside root folder
The root folder contains template source code & template resource to generate.
4a. Create AndroidManifest.xml.ftl
<?xml version="1.0" encoding="utf-8"?> <manifest xmlns:android="http://schemas.android.com/apk/res/android" package="${packageName}"> <application android:name="${packageName}.${classApplication}" android:allowBackup="true" android:icon="@drawable/ic_launcher" android:label="@string/app_name" android:theme="@style/AppTheme"> <meta-data android:name="com.google.android.gms.version" android:value="@integer/google_play_services_version" /> <meta-data android:name="com.google.android.gms.analytics.globalConfigResource" android:resource="@xml/analytics_global_config" /> <activity android:name=".activities.MainActivity" android:label="@string/app_name"> <intent-filter> <action android:name="android.intent.action.MAIN" /> <category android:name="android.intent.category.LAUNCHER" /> </intent-filter> </activity> </application> </manifest>
There are parameters: packageName & classApplication that are declared in template.xml file above.
4b. Create Application.java.ftl
package ${packageName}; import android.app.Application; import com.google.android.gms.analytics.GoogleAnalytics; import com.google.android.gms.analytics.Tracker; /** * Created by TungDX on 5/29/2015. */ public class ${classApplication} extends Application { private static GoogleAnalytics analytics; private static Tracker tracker; @Override public void onCreate() { analytics = GoogleAnalytics.getInstance(this); tracker = analytics.newTracker("${googleAnalyticID}"); } public static GoogleAnalytics getGoogleAnalytics() { return analytics; } public static Tracker getTracker() { return tracker; } }
There are parameters: packageName & googleAnalyticID which are parameters declared in template.xml file above.
4c. Create MainActivity.java.ftl
package ${packageName}.activities; import android.os.Bundle; import android.support.v7.app.ActionBarActivity; import ${packageName}.${classApplication}; import ${packageName}.R; public class MainActivity extends ActionBarActivity { @Override protected void onCreate(Bundle savedInstanceState) { super.onCreate(savedInstanceState); setContentView(R.layout.activity_main); } @Override protected void onStart() { super.onStart(); ${classApplication}.getGoogleAnalytics().reportActivityStart(this); } @Override protected void onStop() { super.onStop(); ${classApplication}.getGoogleAnalytics().reportActivityStop(this); } }
There are parameters: packageName & classApplication which are parameters declared in template.xml file above.
4d. Create activity_main.xml.ftl
<RelativeLayout xmlns:android="http://schemas.android.com/apk/res/android" xmlns:tools="http://schemas.android.com/tools" android:layout_width="match_parent" android:layout_height="match_parent" android:paddingLeft="@dimen/activity_horizontal_margin" android:paddingRight="@dimen/activity_horizontal_margin" android:paddingTop="@dimen/activity_vertical_margin" android:paddingBottom="@dimen/activity_vertical_margin"> <TextView android:text="@string/ready" android:layout_width="wrap_content" android:layout_height="wrap_content" /> </RelativeLayout>
4e. Create strings.xml.ftl
<resources> <#if !isNewProject> <string name="title_${activityToLayout(activityClass)}">${escapeXmlString(activityTitle)}</string> </#if> <string name="ready">Google Analytic is ready!</string> </resources>
4f. Create dimens.xml
<resources> <!-- Default screen margins, per the Android Design guidelines. --> <dimen name="activity_horizontal_margin">16dp</dimen> <dimen name="activity_vertical_margin">16dp</dimen> </resources>
4g. Create recipe.xml.ftl file
The recipe XML file contains the individual instructions that should be executed when generating code from this template. For example, you can copy certain files or directories (the copy instruction), optionally run the source files through FreeMarker (the instantiate instruction), and ask the IDE to open a file after the code has been generated (the open instruction).
<?xml version="1.0"?> <recipe> <dependency mavenUrl="com.android.support:support-v4:${targetApi}.+" /> <dependency mavenUrl="com.android.support:appcompat-v7:${targetApi}.+"/> <dependency mavenUrl="com.google.android.gms:play-services:6+" /> <instantiate from="AndroidManifest.xml.ftl" to="${escapeXmlAttribute(manifestOut)}/AndroidManifest.xml" /> <instantiate from="src/app_package/Application.java.ftl" to="${escapeXmlAttribute(srcOut)}/${classApplication}.java"/> <instantiate from="src/app_package/activities/MainActivity.java.ftl" to="${escapeXmlAttribute(srcOut)}/activities/${activityClass}.java"/> <instantiate from="res/xml/analytics_global_config.xml.ftl" to="${escapeXmlAttribute(resOut)}/xml/analytics_global_config.xml"/> <instantiate from="res/layout/activity_main.xml.ftl" to="${escapeXmlAttribute(resOut)}/layout/${layoutName}.xml"/> <copy from="res/values/dimens.xml" to="${escapeXmlAttribute(resOut)}/values/dimens.xml"/> <merge from="res/values/strings.xml.ftl" to="${escapeXmlAttribute(resOut)}/values/strings.xml" /> <open file="${escapeXmlAttribute(srcOut)}/activities/${activityClass}.java" /> <open file="${escapeXmlAttribute(resOut)}/layout/${layoutName}.xml" /> </recipe>
4h. Check Dependencies
4i. Check AndroidManifest.xml.ftl
<instantiate from="AndroidManifest.xml.ftl" to="${escapeXmlAttribute(manifestOut)}/AndroidManifest.xml" />
4j. Check Application.java.ftl
<instantiate from="src/app_package/Application.java.ftl" to="${escapeXmlAttribute(srcOut)}/${classApplication}.java"/>https://robusttechhouse.com/wp-admin/post.php?post=6937&action=edit&message=10#
4k. Check MainActivity.java.ftl
<instantiate from="src/app_package/activities/MainActivity.java.ftl" to="${escapeXmlAttribute(srcOut)}/activities/${activityClass}.java"/>
4l. Check analytics_global_config.xml.ftl
<instantiate from="res/xml/analytics_global_config.xml.ftl" to="${escapeXmlAttribute(resOut)}/xml/analytics_global_config.xml"/>
4m. Generate files: activity_main.xml, dimens.xml, strings.xml from template to project.
<instantiate from="res/layout/activity_main.xml.ftl" to="${escapeXmlAttribute(resOut)}/layout/${layoutName}.xml"/> <copy from="res/values/dimens.xml" to="${escapeXmlAttribute(resOut)}/values/dimens.xml"/> <merge from="res/values/strings.xml.ftl" to="${escapeXmlAttribute(resOut)}/values/strings.xml" />
4n. Open files after the project is generated.
<open file="${escapeXmlAttribute(srcOut)}/activities/${activityClass}.java" /> <open file="${escapeXmlAttribute(resOut)}/layout/${layoutName}.xml" />
Try Generating A Project For Your Own Template
If your Android Studio IDE is running, please restart it to see your own template as shown in following image.
If you encounter this error when you are generating a project from the template:
AssertionError: Wrong line separators: ‘…plication;\r\n\r\nimport…’ at offset 29:
Please check your line separators in all your files in the template. Please ensure that you use the correct line separators for your computer’s OS. Eg Window uses LF, Linux or MAC OS use CRLF.
Conclusion
And that’s it. It isn’t that difficult to create custom Android code templates and you will benefit from it in the long-term because you would adhere to the DRY (Don’t Repeat Yourself) principle and save yourself some time. Have fun coding!
RobustTechHouse is a leading tech company focusing on mobile app development, ECommerce, Mobile-Commerce and Financial Technology (FinTech) in Singapore. If you are interested to engage RobustTechHouse on your projects in Singapore, you can contact us here.
References
Video showing the steps
Source code can be downloaded at GoogleAnalyticApplication-2015-05-31
Custom Android Code Templates Slides
GoogleSource Templates
ADT Template Format Documentation by Roman Nurik
Tutorial How To Create Custom Android Code Templates was originally published on RobustTechHouse - Mobile App Development Singapore
0 notes
Link
original source : https://stackoverflow.com/questions/4905370/what-are-the-differences-between-linearlayout-relativelayout-and-absolutelayou
LinearLayout means you can align views one by one (vertically/ horizontally).
RelativeLayout means based on relation of views from its parents and other views.
ConstraintLayout is similar to a RelativeLayout in that it uses relations to position and size widgets, but has additional flexibility and is easier to use in the Layout Editor.
WebView to load html, static or dynamic pages.
FrameLayout to load child one above another, like cards inside a frame, we can place one above another or anywhere inside the frame.
deprecated - AbsoluteLayout means you have to give exact position where the view should be.
For more information, please check this address http://developer.android.com/guide/topics/ui/layout-objects.html
0 notes
Link
バッテリー
計測は未給電状態でやる
給電中はデバイスの振る舞いが変わるため
電力消費量
バッテリーの放電容量(mAh)を消費電流(mA)で割ると、何時間その機能を使い続けられるかを出せる
フラッシュを点灯させ続けた場合
2300/540≒4.2
電流消費量を知る
frameworks-res.apk の中にある res/xml/power_profile.xml に書いてある
dumpsys batterystats
dumpsys batterystats
電池の情報を参照できる
dumpsys batterystats --charged
1% ごとのバッテリー消費の推移・状態の内訳
日々のサマリー
前回のチャージからのサマリー
現状の消費電力予想
アプリごと(フォアグラウンド状態が何秒か、CPUを何秒使っていたか)
Battery Historian
Go で作られた Web App
ローカル環境でサーバーを立ち上げてブラウザーで見る
バックグラウンドでのバッテリー消費
Android は消費電力の5割から7割をアイドル時に消費する傾向がある
バッテリーに優しいバックグラウンド処理
JobScheduler……スケジューリング実行API、Android 5.0から
GCM Network Manager……JobScheduler の代替
Doze Framework……Androidの省電力について考える を参照のこと
UI
時間と利用者の反応
遅延時間 利用者の反応 0-100ms Instant 100-300ms Feel sluggish 300ms-1s Machine is working... 1s+ Mental context switch 10s+ I'll come back later...
Jank を避ける(減らす)
60fps の描画の場合、16-17msに1回で描画される
レンダリングが間に合わない場合はフレームをスキップ……これがJank
リストのカタつきなど
View のレンダリング
Measure -> Layout -> Draw の3段階 Hierarchy Viewer で可視化が可能 レイアウト構造、特に RelativeLayout や LinearLayout がネストされていると Remeasure が発生する。
通信
アプリでの最適化は難しい
ライブラリーやプロトコルを最新にしていくのが最善
メモリ
アプリでの最適化は難しい
GC による Pause はスルーしていい
メモリーリークを LeakCanary で見るのが最善
onTrimMemory
OS がメモリーを trim すべきタイミングでコールされる
API レベル14で追加
Systrace
https://developer.android.com/studio/profile/systrace
Trepn Power Profiler
Qualcomm 製プロセッサーでのみ使える。
0 notes