#roleplay tutorials
Explore tagged Tumblr posts
Visit Tumblr Blog
Explore Tumblr blogs with no restrictions, modern design and the best experience.
Last Seen Tumblr Blogs


Fun Fact
Post activity is at the highest at 4:00 pm EDT; notes peak at 10:00 pm EDT.
Note
Hola, quería preguntarte si sabes hacer links para ig de este estilo: http://creep!ng_0nly**4~you((darl!ng. y en caso de que sí, si podías hacer tuto 🥺 por favor.
holis!! aquí hice un tuto super rapidito en video :3
igual lo explico x aquí :3
primero tienes que tener la frasesita para tu link ya lista, la escribes jugando con las letras, números y símbolos para que se vea bien y hasta que te guste, luego para terminar el link solo debes de poner el puntito al final del link, le das a listo y tu link ya quedó.
(acabo de cachar que me equivoqué escribiendo y puse 3e siendo q solo era el tres jwbwjbfkwb pero se entiende igual, eso no afecta en na al link solo q quedas como tonoto)

‼️tengo entendido que los links de este estilo pueden hacerse directo en ig solo en iphone y si es que tienes android puedes hacerlo en unicode TT, si es que tienes android xfis avísame y yo no tengo ningún problema en explicarte mejor como hacerlo en android 😭
178 notes
·
View notes
Text
MY GO-TO'S FOR EDITING.
I’ve decided to put together a masterlist of the resources I use, since I get asked about them pretty often. If you're somebody who can’t commission resource makers or you’re just wanting to get into editing or creating commissions yourself, I hope this helps.
pinterest. IMPORTANT NOTICE IF YOU UTILIZE THIS: avoid usings people's art; if you can get permission from an artist to use a piece, that's another discussion. Be warned there may also be ai mixed in, which I've personally got a good eye for spotting; i prefer to go by images i've seen long before the ai craze, since i've been on there for a while. your best bet is looking through miscellenous character boards. From there, you can choose images to blend or even make pngs out of, to give unique flare to your edits.
remove.bg + photokit. if you're looking to save time or don't have a way to cutout images manually ( i sometimes like to use my art tablet if I want to be really precise ), these are good ways to make pngs out of images you find, as opposed to png sites. i prefer this because ive caught adware on png sites before, plus there's also a lot of ai on those as well.
for screencaps, i use google images or youtube, since the quality is higher than anything on pinterest...though, psds are what normally cover up quality issues, from what i've learned. then again, it might depend on the psd. IMPORTANT NOTE IF YOU UTILIZE THIS: If you’re using google Images, searching for actual screencaps might lead you to blogs or websites dedicated to capping—many of which ask for credit if you use their content. Also, avoid reposting people's edits or gifs, since those will inevitably show up when searching faceclaim names and similar tags. on the off chance you find free-to-use faceclaim content, be sure to credit if/when asked !
photopea. it's a great alternative for those of us who can't be assed to learn adope, nor can afford it .
I know it doesn't look like much, but this is genuinely my go-to formula. I don't think there's any need for anything over the top. That said, if you guys have better alternatives or anything to add, feel free—this is just based on my own experience.
ADDITIONAL EDITING TIPS: If you find yourself stumped creatively or unsure how to approach using these, I’d recommend breaking down the character or setting you’re working with in terms of aesthetic. What are some keywords or imagery you associate with that muse ? Take a character like h/arry p/otter, for example—focus on individual visuals, important symbols, and signature colors. For him, I’d think of round glasses, lightning bolts, owls, candles, spell books, brooms, etc. Then, take each of those elements and explore them individually. I’d maybe start by looking up “owls” on Pinterest; from there, I might find images that can be turned into pngs. Repeat that process with every vibe or detail that comes to mind. You don’t have to limit yourself to making pngs either—feel free to experiment by blending different images together and building a look from there.
ADDITIONAL UPDATES/RECOMMENDATIONS:
Screencapped ( * will need an account )
VLC Media Player ( * good for screencaps / things you've downloaded from youtube )
#re: editing resources#free to reblog!#for the other anon i got#roleplay help#roleplay resources#roleplay community#rp graphics#rp resources#editing resources#editing tutorial#ish
81 notes
·
View notes
Note
resident evil banners?
[REQUESTED] Resident Evil Banners


#carrd moodboard#carrd graphics#carrd inspo#carrd stuff#discord chat#discord roleplay#design tutorial#banner design#tumblr banner#banners#carrd resources#discord server discord chat discord roleplay aesthetic#resident evil#leon kennedy#ada wong#ethan winters#discord server discord chat discord roleplay aesthetic banners tumblr banner banner design template aethstetic black and white#design#diy#digital art#blinkies
100 notes
·
View notes
Text


hiii i’ve been seeing these really cute edits ↑↑↑ all over my pinterest and i really wanna start making them too but i have no clue how to do it (。•́︿•̀。) i don’t know where to get the pngs or what app to even use and how to do everything on there, there’s literally no tutorials anywhere,,, can anyone help me please (ᵕ̣̣̣̣̣﹏ᵕ̣̣̣̣̣) i’m not the best with written instructions so if anyone is willing to help, is it okay if you could send videos doing a step by step tutorial or something? i’d really really appreciate it (˶ᵔ ᵕ ᵔ˶) ♡ please dm me if you can help, i have discord and everything !! i think the style is called fakeland or something like that, i’m really new and wanna understand it ༎ຶ‿༎ຶ i’m super interested and i really wanna learn more about what it is and how I could be apart of the community ♡ if you know any spaces or communities where people share or make edits like these (cuz I have no idea what it is) , please please share them with me
꒰。•ᴗ•。꒱ thank uu sm!! ♡
creds:
@eunpuertoamor on pinterest
@igaridoll on pinterest
@tiernocafe on pinterest
@besitosweb on pinterest
#editing help#pinterest#kpop#pngs#aesthetic edit#editing tutorial#png pack#dollcore#kawaii#pink#soft edit#ibispaint#coquette core#couqette#soft aesthetic#le sserafim#njz#triples#miss tada#kpop moodboard#kpop icons#soft moodboard#kpop layouts#kpop roleplay#fakeland
41 notes
·
View notes
Text
a quick guide on how to plot in a rp group
Hello friends. As I journeyed through different groups I noticed a trend in interactions with writers and trying to plot with them for their characters. It seemed like there was a disconnect on what plotting means and that was making answering plot calls really difficult and frustrating. I wanted to whip together a quick guide with actionable items to help with plotting! However, I think it's important to also note that plotting doesn't have to be deep — they can something simple that leaves a lot up to chemistry. Even "random" interactions can be used for plotting purposes for people that really work well off of chem. Everyone is different, and both plots and chem are great ways to write together!
plots vs connections
One of the biggest mistakes that I've seen with plotting is that people mistake plots for connections and vice versa. A Plot is an actionable item that you can use to write the characters doing something. It can be a broad character arc, or several points of conflict or interaction that generates threads. True plots make it easy to generate a thread from some context to what we think will start the interaction between the two characters.
examples: one character took another character's coffee order. one character caught another character from falling. one character likes art and the other doesn't and they went to a museum.
A Connection is how the characters know each other. This can be familial relationships, platonic relationships, romantic relationships, and so on.
examples: they met at a coffee shop. they went to the same festival. they are exes. they're cousins.
Often, connections are a great place to start, as the plot can be built off from the connection. However, if it's left at just the connection (such as, they're cousins!) it can be hard to create a thread or interaction from the connection. If the characters are cousins, or they did meet at a coffee shop, what's their relationship like? How did that first coffee interaction go? Or do you want to write that coffee interaction based off chemistry? Either way, those questions help you plot!
tips on ways to maximize plotting
Read the other character's bio or about. If you don't have one for your character, make one so that people can use these content pieces as a way to start to think about their character in context to yours. Most people are pretty good at figuring out a connection, but have an issue taking it to the actionable idea. Think about general interactions you have had with people in your life, or something you've witnessed, one of those could be starting point for a thread!
Create a wanted plots page that has some simple interactions you'd like to explore. People might not read it, but then you've at least got ideas for people who might be struggling as well to think of how to plot with your character.
Check out the wanted plots tags, there's tons of great ideas for unique plots that you could use and adapt for other plots.
Think about what parts of your character that excites you. What quirks or strengths do they have that make for interesting interactions with people? I find that starting here often helps to build threads I am excited for — chemistry based ones!
Use the yes, and or the no, but methods to build in conversations with other writers. Meaning that if someone comes up with something you think could work, agree with it and then build off of it. If the idea doesn't work, however, come up with something else that is more in character that could work.
Don't be afraid to send something off the wall, and don't be afraid to turn something down that doesn't work, just be willing to build off those ideas!
If you're into chemistry over plotting, think of places a starter or thread could be at and what the two characters could be doing. This could be in addition to a connection you've selected.
I hope these tips have helped, and I wish you the very best on your rp plotting adventures!
83 notes
·
View notes
Text
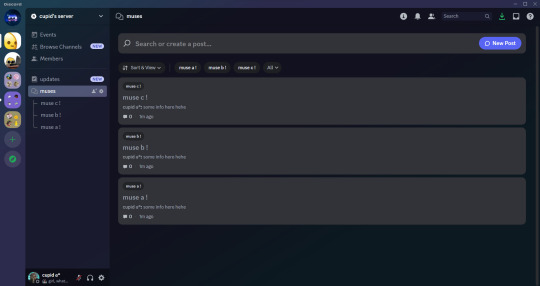
˚꒰ 🏹 DISCORD FORUMS TUTORIAL♡
i'm not sure if people have seen or tested out the forums on discord but i thought i'd make a tutorial on how i use it for roleplaying since i found it super fun and helpful for organization purposes!
so what are forums? discord describes it as "a space for organized discussions". much like threads, the discussions can be contained in one post which makes it easy to keep your topics in order. the part that i find most useful is that you can organize your post by tags and filter through them! now in order to get forums in your server, you will have to enable 'Community' on your server. so let's start!

♡ . ) first thing you'll do is open your server setting. there will be an 'Enable Community' that you can click on and it will take you to a page like this
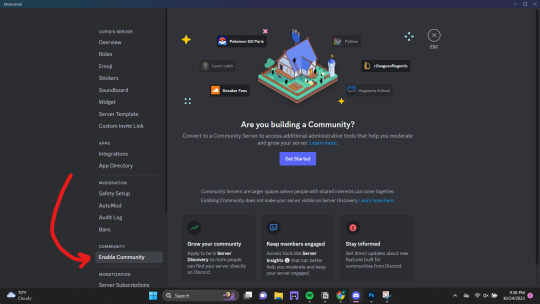
♡ . ) once you click 'Get Started' it will take you through a series of questions and system settings. you will need at least one "default channel" where discord will send automated updates. this channel is necessary if you want to use forums.

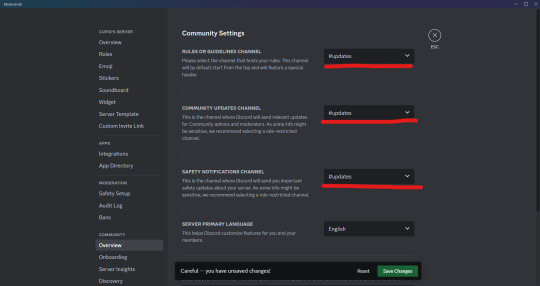
if you continue with the default settings, discord will automatically create two channels for you: one titled 'rules' and another titled 'moderators-only'. the announcements made whenever there's an update as mentioned above will be sent to the latter.
NOTE FROM CUPID ! i personally like to make a single channel titled something like 'updates' and keep it locked. this can be done before or after enabling community, you will just need to change the settings to go to the new channel first.
♡ . ) once you have community enable, you're free to make all the forums you want! when you go to create a new channel, 'forums' will show up as an option like this

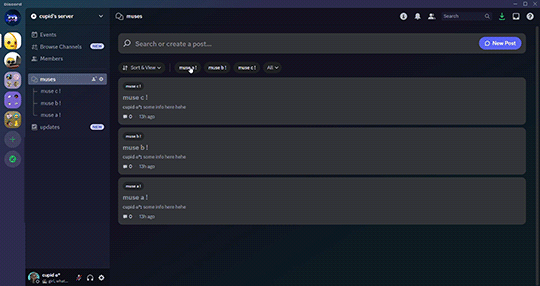
for this example, i'm going to show how i set up my muses' profiles for 1x1 writing server like a roster, but you can also do this for single muse / threads / sms / etc.
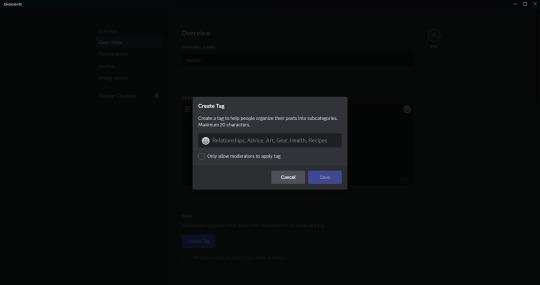
♡ . ) when you click into the forums channel you created, you will see a landing page like this. there are instructions on how to navigate the channel as well so feel free to read those as well! the first thing i like to do is create tags. you can open that setting by clicking either of these buttons.
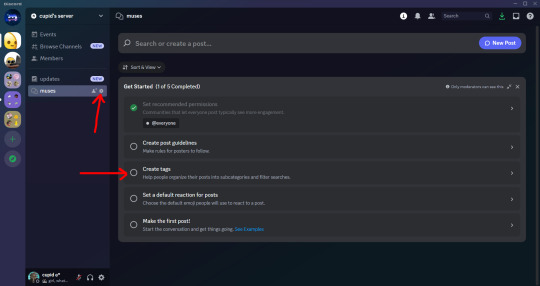
(navigate to the 'Tags' section and click 'Create Tag' if you need to) it will open a popup box like this. i like to create a tag for every muse that i want to add to my roster and you're able to add 20 tags!
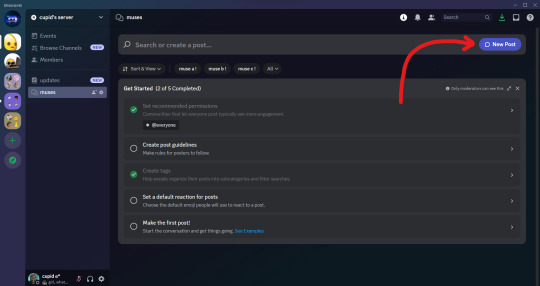
when you're finished, they will be listed as you see below. there are other options in forums settings that you can play around with including a 'default reaction' emoji, 'slowmode', layout and sorting option, age restriction and 'hide after inactivity'. all these are based on preference!

♡ . ) once you've saved your setting changes, you can leave this page and are now able to make your posts by clicking 'New Post' on the upper right hand corner.
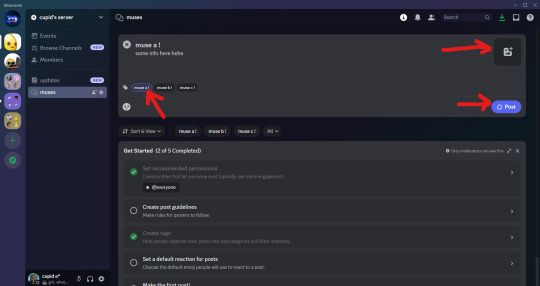
this is where you're pretty much able to do whatever suits your style including formatting how you like and adding photos, all you need to make sure to do is add the corresponding tag to the post! once you're finished making it look how you want, you can click 'Post'
they will appear in the channel like this!
♡ . ) and by clicking on a post, you will be able to open it in a side view like this. if you want to see the post in full view, you will click the three dots in the upper right hand corner of the side view and then choose 'Open in Full View'.
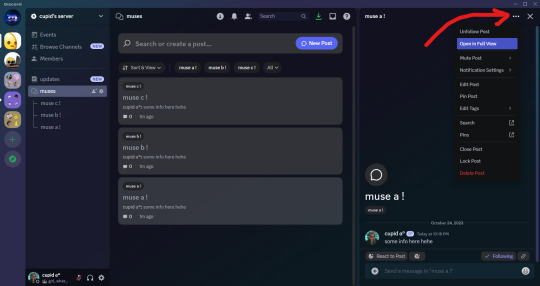
you're now able to add more messages within the post! for me, i like to add stats of my muses and headcanons that may be useful when i thread.
NOTE FROM CUPID ! one set back i found is that you are not able to use threads within a forum post so it may get a bit cluttered depending on what you send in a forum post. so if you are wanting multiple different sections for one topic, i suggest creating a forum instead. for example, if you are wanting to add musings, faceclaim pics, headcanons and stats all for one muse, i would create a single forum post just for that muse instead to avoid having important info getting lost!
and that pretty much covers how i use forums for discord rp! i encourage you to play around with it to find a style and format that best works for you. and if you have any questions, you're more than welcome to send it to my inbox. happy writing everyone♡♡♡
232 notes
·
View notes
Note
Fun fact
Most if the sword wileders are probably possesed by those sins you fought, like hatred, greed, fear, the 4th one
Those guys, you'll probably have to find out which one is which, your definitely the 4th one thoufh
[ ...How do they know about this? You're not sure if you like these 'anons' anymore... ]
" Dude that's our FIRST anon. What are they talking about though? What's the fourth one?? "
[ Terry is better off not knowing. ]
" WOW. OKAY. Won't even tell me what this person is talking about. "
#block tales#block tales roleplay#player block tales#block tales askblog#tutorial terry block tales#tutorial terry#asks#roleplay#askblog#blocktales
33 notes
·
View notes
Text
Muse Mixup Madness!
What is it? Are there rules? How can you get involved?
Written 5/1/2025
What is it?
Muse Mixup Madness (MMM) refers to an optional monthly Rotomblr community-wide roleplay prompt! The concept is to explore the idea of “Your character, but different for a day!”
On the first day of each month, there’s an unspecified phenomenon in-universe that swaps your character (also called a “muse”) with an alternate universe version of them self. These alternate universe (AU) differences can be anything as small as a universe where your character has green hair instead of blue to as dramatic as a universe where they’re an alien from space looking to conquer the galaxy!
Sometimes people post prompts for other people to try, and sometimes people come up with what they’d like to do themselves.
Are there rules?
Remember, Muse Mixup Madness itself is simply a prompt. It’s optional. And there are some common themes, but no hard rules.
The common themes of MMM are as follows:
Happens on the 1st of the month and runs from midnight to midnight
Is an alternate version of your character taking the place of the canon character for a day
The common themes are simply to make what you’re doing easily recognizable to others visiting your blog, and to give MMM some structure. There’s nothing stopping you from deviating from them, but it could be helpful to note somewhere out of character that this is your interpretation of MMM.
For example, sometimes instead of an alternate version of their muse, people have a different character entirely take over the blog. Sometimes people participate in MMM on a day other than the 1st of the month. And some people play their MMM for more than one day because they want more time to explore their prompt!
Remember to tag posts you do for MMM as #Muse Mixup Madness to make it easy for people to recognize and react accordingly to what you’re doing when their favorite character is suddenly behaving strangely!
Some people love MMM posts, and some people don’t want to interact with MMM posts at all, so this is also a quick and easy way to communicate ooc what you’re doing so everyone can have fun.
How do I get involved?
You can look or ask around to see if anyone has posted prompts that you might like to try, or you can come up with something you’d like to explore! Then you can wait until the 1st of the month (or a different day if the 1st doesn’t work for you), then start posting about your mixed up muse!
Depending on how immersive you want the experience to be, you can even write a new temporary intro post introducing this AU character, and talk about the prompt you’re exploring in the ooc section.
Does it have to be on my blog?
Nope! You can play your mixed up muse in a Gliscord server if you’re in one and you’d prefer that, or you can just talk about them with people without actually playing them at all if that’s as much as you want to do. It’s up to you how you engage with MMM!
Sounds great! I need prompt ideas NOW!
Okay! Here are some prompts to get you started!
The Worst Ending/The Best Ending- An alternate telling of your character’s story up until now, except they either got the WORST or BEST possible outcome in their universe. Maybe they lost everything they cared for, or they managed to save everything and live happily ever after. How has this shaped your character’s personality and outlook on their life?
Genre Change - Take your character and change their genre! In this AU, your character who usually lives a cozy little slice of life is actually the protagonist who’s responsible for saving the world! Your big bad villain runs a sweet little tea shop. Or your isekai’d protagonist type is now surviving in a horror story. What’s going on in this universe? What are your character’s main concerns here? How do they feel about the character they’ve swapped places with? Are they jealous, or are they thankful to have their life instead of this one?
Act Your Best - Your character! Except they’re actually just an actor playing out the character’s life for the screen. What are they like knowing the character’s story from a script instead of first hand experience? What do they think of their alternate self who REALLY experienced it? Do they have the same pokemon team, or are those pokemon fellow actors as well? Do they even have pokemon back home, or are they CGI?
Get Pokemon’d - Your character from a world similar to the world of Pokemon Mystery Dungeon where society is all pokemon and humans are mere myth. What kind of pokemon are they? What are they like and what do they do in poke-society, and how do they feel about learning they have a human counterpart in this universe?
Monster-verse - What if there’s a world out there where your character is a vampire? What about a werewolf? Or a zombie? A mermaid? Is everyone a monster back home, or are they unique? How has this affected them, and how do they feel about their human counterpart?
What do you think? Will you mix up your muse?
13 notes
·
View notes
Text
Anyone know how to un-bolt a bolted shut door?
60 notes
·
View notes
Text
icon border, divider, & banner dimension pro-tip!
hi everyone!
i'm hopping on here to make a helpful little post because, as i'm sure we're all aware, tumblr dimensions are so, so, incredibly finicky, and i know it's frustrating working so hard on a graphic only to upload it and see that it turns out blurry on the dash.
this applies to all banners as well! your promo graphics, pinned posts, answered banners, headcanon banners, etc.
tumblr post-width is at 540px. so, you're going to want the width of your canvas for all dash-graphics (iconics, dividers, any banner) to also be 540px. this is going to prevent it from being blurry on the dash. i'm sure we've noticed that it appears less blurry when you click to enlarge, but when the canvas width is 540px, it'll still be just as crisp on the dash!
500px unfortunately will still blur your graphics. it's easier to fix for borders/dividers, since you can just pop them back into photoshop (or other alternatives) and increase the canvas width, but hopefully this helps people who may not know!
40 notes
·
View notes
Note
Hola, ¿Cómo haces los links en ig? Si es en Android mejor
holis!! los links para ig los hago con la app unicodepad que solo está disponible para android y las fonts yo las hago con messletters (aquí el link) pero las mismas de messletters las pueden encontrar en stylish text :3

estas son las apps (la calidad cmo las weas kfbsj)
ahora voy a hacer un link así simplon e intentaré explicar lo mejor que pueda TT
para empezar debes de tener claro que es lo que quieres poner en el link y que vaya acorde con la temática de tu perfil :3
en este caso yo voy a usar esta frase: ͏𝑙𝑒𝑛𝑔𝑢𝑎𝑗𝑒 ﹙ ❤︎ ﹚ 𝑑𝑒𝑙 𝑎𝑙𝑚𝑎
aquí tu tienes que copiar y pegar la frase en unicode y borrar los espacios para reemplazarlos por este
tienes que fijarte bien que si escribes algo con la font normal del teclado tiene que ser exclusivamente con las letras de unicode (a menos que las pegues de otro lado, lo mismo para los emojis y los símbolos.
cuando termines toda la estructura de tu link tienes que poner un punto (del mismo unicode) y luego ir al principio del link a poner http:// o https:// (como prefieras).
http://𝑙𝑒𝑛𝑔𝑢𝑎𝑗𝑒⠀⠀❨❤︎❩⠀⠀𝑑𝑒𝑙⠀𝑎𝑙𝑚𝑎.⠀⠀
y así es como queda el link puesto en una cuenta

TIP: a mi a veces cuando estoy haciendo links me arroja error en ig cuando los quiero poner, entonces para arreglarlo vuelvo a unicode y agrego dos espacios más del mismo de la foto y ahí si me deja ponerlo.
espero haber explicado bien y que te haya servido esta mini y super rapidita guía para hacer links :3
aclarar que este tipo de links solo se puede hacer en android (por el tema de unicode) y para ponerlo en ig también tienes que tener android !!
96 notes
·
View notes
Text
PHOTOPEA TUTORIAL / PHOTO FILTER FOR SKIN TONES:
a tutorial on HOW TO BRING OUT SKIN TONES if an image is 'too gray' (faded) or has too much of one (likely over saturated) color! this technique can easily be applied to icons that already have a border ! just put your focus on the base image / icon ! this works on relatively anything, including poc and non-poc. WHAT YOU WILL NEED: photopea...and your desired your base image(for example, i'll be showcasing inconsistent or otherwise dark/faded scene lighting, like twilight and saw). DISCLAIMER: not all lighting/images are the same, nor are psd colorings. while some colorings may be designed to bring out reds/yellows(which is the filters we'll be using in this specific example), others may mute them and you may have to improvise with whatever color the psd you're using is designed to focus on. this is just a general idea, you will have to explore as you see fit. it's all going to depend on your personal taste !
by the end of this, you should be able to manage results like this !

cool, huh?....anyway, on with the mechanics !
EXAMPLES:

[ BEFORE PSD ] [ SYNOPSIS ]
#01 / LEFT IMAGE ABOVE: too much green, becomes muted with psd and doesn't show variety. #02 / RIGHT IMAGE ABOVE: the colors are very faded in this scene, and the pink focused psd in question made the image seem gray. we will start with EXAMPLE #01. i will be using the same PSD on both, a custom psd i made and focuses on reds/pinks.

as you'll see above the PSD has now been applied...but now it's kinda boring :// (there's nothing wrong if you don't mind how it is above, everyone's got their aesthetic choice—HOWEVER, we're aiming to add skin tone...)
once you have your image open, you'll want to go to image>adjustments>photo filter; i went ahead highlighted it in yellow for easy finding !

since this psd DOESN'T mute reds/yellows, (and those are usually the base of most/general skin tone combinations) i applied both a yellow and red filter. now, these colors i'll be using in this example, because they're in my default colors on the photo filter option—you can totally choose lighter or darker variants of these colors, or like i said, a different color altogether based on how the PSD you're using works. the toggle setting doesn't have to be exact to this example either—this is just what worked best on this image combined with the chosen PSD ! // RIGHT IMAGE IS THE FINAL RESULT AFTER APPLYING THE RED FILTER AFTER THE YELLOW.


repetition on a different example . . .


this scene in particular is very faded, and the red feels a little blotchy/over saturated here...so i'll show you an EXTRA STEP you can use ! in saying this, you don't have to do exactly this; you can even choose to go ahead with selective color to fix your image, without doing the filters, if you find that suitable. but i'll be showing you the magic of selective color to balance out the red toned overlay.

same concept as before, just a different selection: image>adjustments>selective color. think of selective colors as "balancing" the colors. it does have a toggle selection for each color, which is super helpful, including diminishing or adding white highlights. given the PSD colors, naturally, i'll be focusing on yellow and red.


it's now got a general skin tone and red is not as blotchy !
[ FINAL RESULTS / CONSISTENCY WITH PSD APPLIED ]

this is a great hack i use quite a bit, it's great for maintaining consistency in your icons when the lighting is working against you...hope this was comprehensible and helpful, happy editing !
#* RE - RELEASE#* MY TUTORIALS.#sorry i didnt realize i forgot to reupload this one!#long post /#FREE TO REBLOG !#rp community#icon tutorial#rp icon tutorial#psd tutorial#roleplay coloring#roleplay help#roleplay resources#roleplay community#roleplay graphics#coloring psd#psds#icon psd#psd#roleplay psd#rp graphics#rp psd#rp resources#tutorial#editing tutorial#rpc tutorial#editing resources#psd coloring
254 notes
·
View notes
Text
Some blue banners

#discord server discord chat discord roleplay aesthetic banners tumblr banner banner design template aethstetic black and white#tumblr banner#banner design#banners#discord server discord chat discord roleplay aesthetic banners#design#design tutorial#carrd stuff#carrd moodboard#carrd graphics#carrd resources#carrd inspo#blue#blue aesthetic#aethestic
84 notes
·
View notes
Text
youtube
Lo prometido es deuda! Ya inicié con el proyecto de los tutoriales, y he decidido hacerlo en formato canal para que sea más práctico para quienes lo vean (y en caso de que se me olvide explicar algo siempre quedará puesto en el video). Ya iré subiendo más cositas ;)
#render#rendering#photoshop#photoshopediting#photoshoptutorial#tutorial#design#designer#PamperTuto#rolplayer#roleplay#Rolescrito#RolLiterario#rpgforum#fororpg#Youtube
22 notes
·
View notes
Text
Les Miserables adventure video game. Is this anything.
#okay it will be a mix of genres#numerous flight scenes. sneakimg around#making the baricade#baricade fighting#gavroche will show the tutorial#interacting with the citizens of paris#shifting pov characters#les mis#the brick#Fantine ressource management game where you always end up loosing#Marius roleplaying game where all the dialogue options are all some version of awkward or pathetic Disco Elisyium style
9 notes
·
View notes
Note
terry, i may or may not have found the biblically accurate version of you
" The WHAT??????? What the hell are you talking about?? "
#block tales#tutorial terry#askblog#block tales askblog#blocktales#roleplay#block tales roleplay#asks#tutorial terry block tales
23 notes
·
View notes