#design tutorial
Text
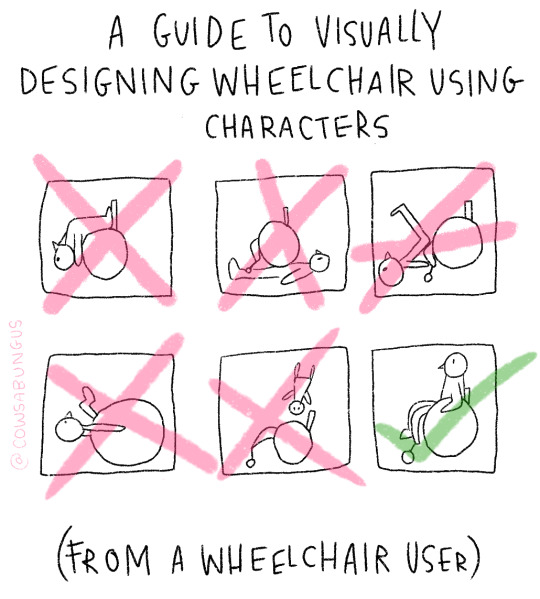


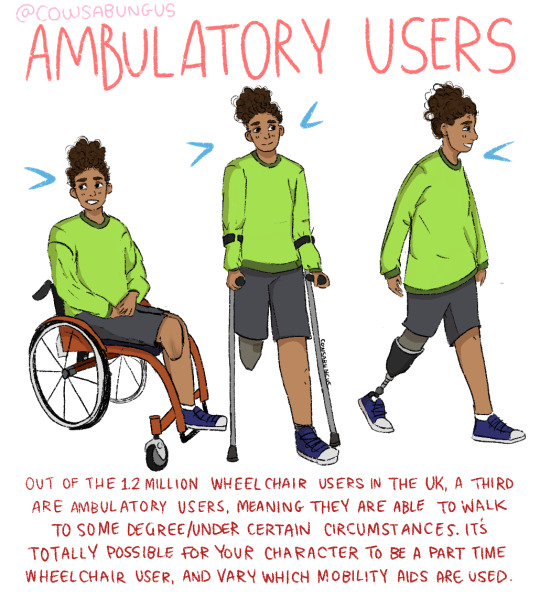
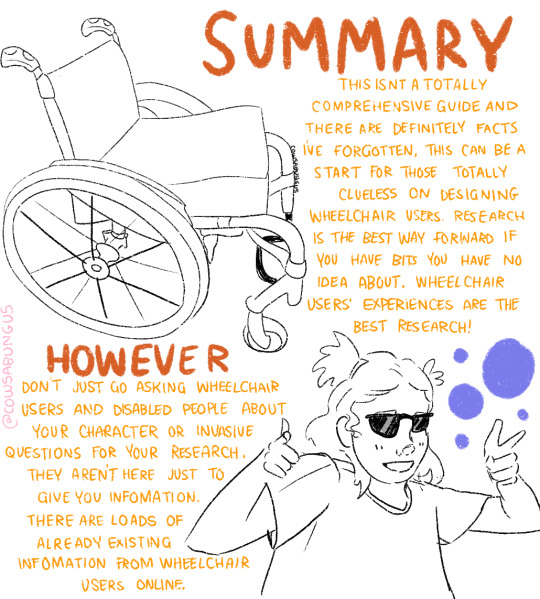
A guide to designing wheelchair using characters!
I hope this helps anyone who's trying to design their oc using a wheelchair, it's not a complete guide but I tried my best! deffo do more research if you're writing them as a character
#art#original art#artist#oc art#original character#queer#disabled#disabled rights#disability#disability pride month#tutorial#art tutorial#disabled character#design tutorial#drawing tutorial#Tumblr tutorial#character design#character illustration#concept art
89K notes
·
View notes
Note
Your reindeer designs give me such childish joy I can't wait to see the rest. What's your process (aka any advice) for designing from scratch with something like just a name or concept?
Redbubble (buy reindeer swag) || Patreon (see all early!) || Ko-fi
See more free tutorials!
You can see my process unfold in real time by joining any tier of my patreon discord. Which doesn't even have to go through patreon! If you want, you can just pay me $20 and let you in for a year (and then lose track and probably keep you anyway)
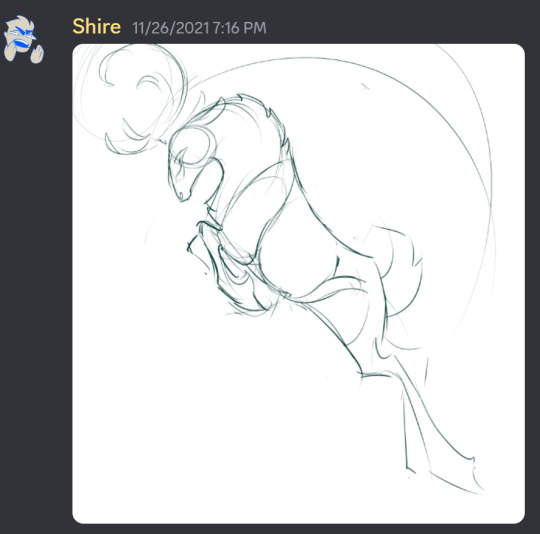
Here's a preview using comet! (nevermind the preview thing I wrote you a whole lecture lol)
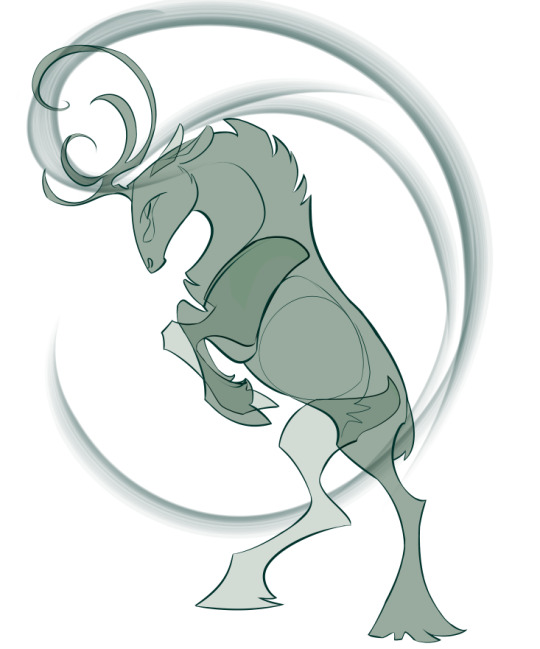
initial sketches in 2021:

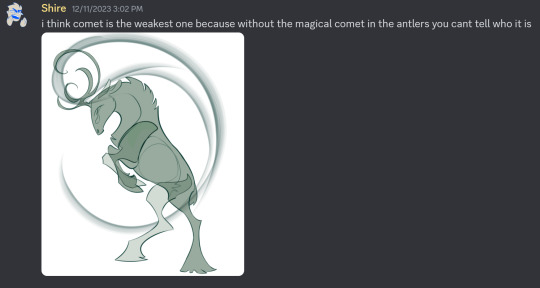
Revisited in 2022 and 2023
I was constantly asking which design was the weakest, why, and how to fix it. Whenever I tested without the magical comet behind it, people could only guess who comet was by process of elimination.
I didn't want to rely on throwing icons into the design. I wanted each one to communicate through shape and silhouette alone. It would be like drawing a little cherub with a bow and arrow floating along with cupid. If you have to include a nametag to communicate, your design can be improved.
So I tried a few different strategies to say "comet" before I realized I could twist the antlers into any shape I wanted. I was worried I would have to discard the drawing and restart from scratch! Which is what I did for rudolph about 6 times before I had a breakthrough.
Then I gave my patrons a brief lesson in antlers to explain where and why I was placing the tines. When I stray from the caribou structure, I do so knowingly in order to achieve something that cannot be achieved within the caribou shape, like dancer's tutu. Know the rules before you break them. My goal is to make animal nerds (myself chief among them) happy when they see species-specific anatomy instead of cop outs.


I tried a few things before figuring out antlers could become comet


Another thing that often caribou have is an unsymmetrical "spork" that comes forward off only one antler. I figured this out by looking at hundreds of reindeer pictures and saving them to my reference folder. A few of my designs have this, that's what the little spiral is in the final comet antler design.
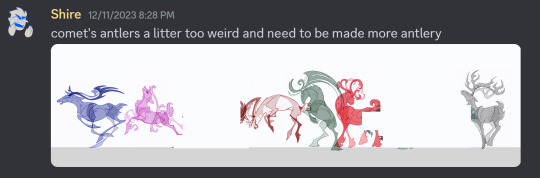
When I put comet in my lineup, I realized that the antlers I drew were way more stylized, chunky, and "tribal" than the others. I had already changed the proportions on one of my designs to match, so then I had to hack away at the basic comet rack to make it look natural.


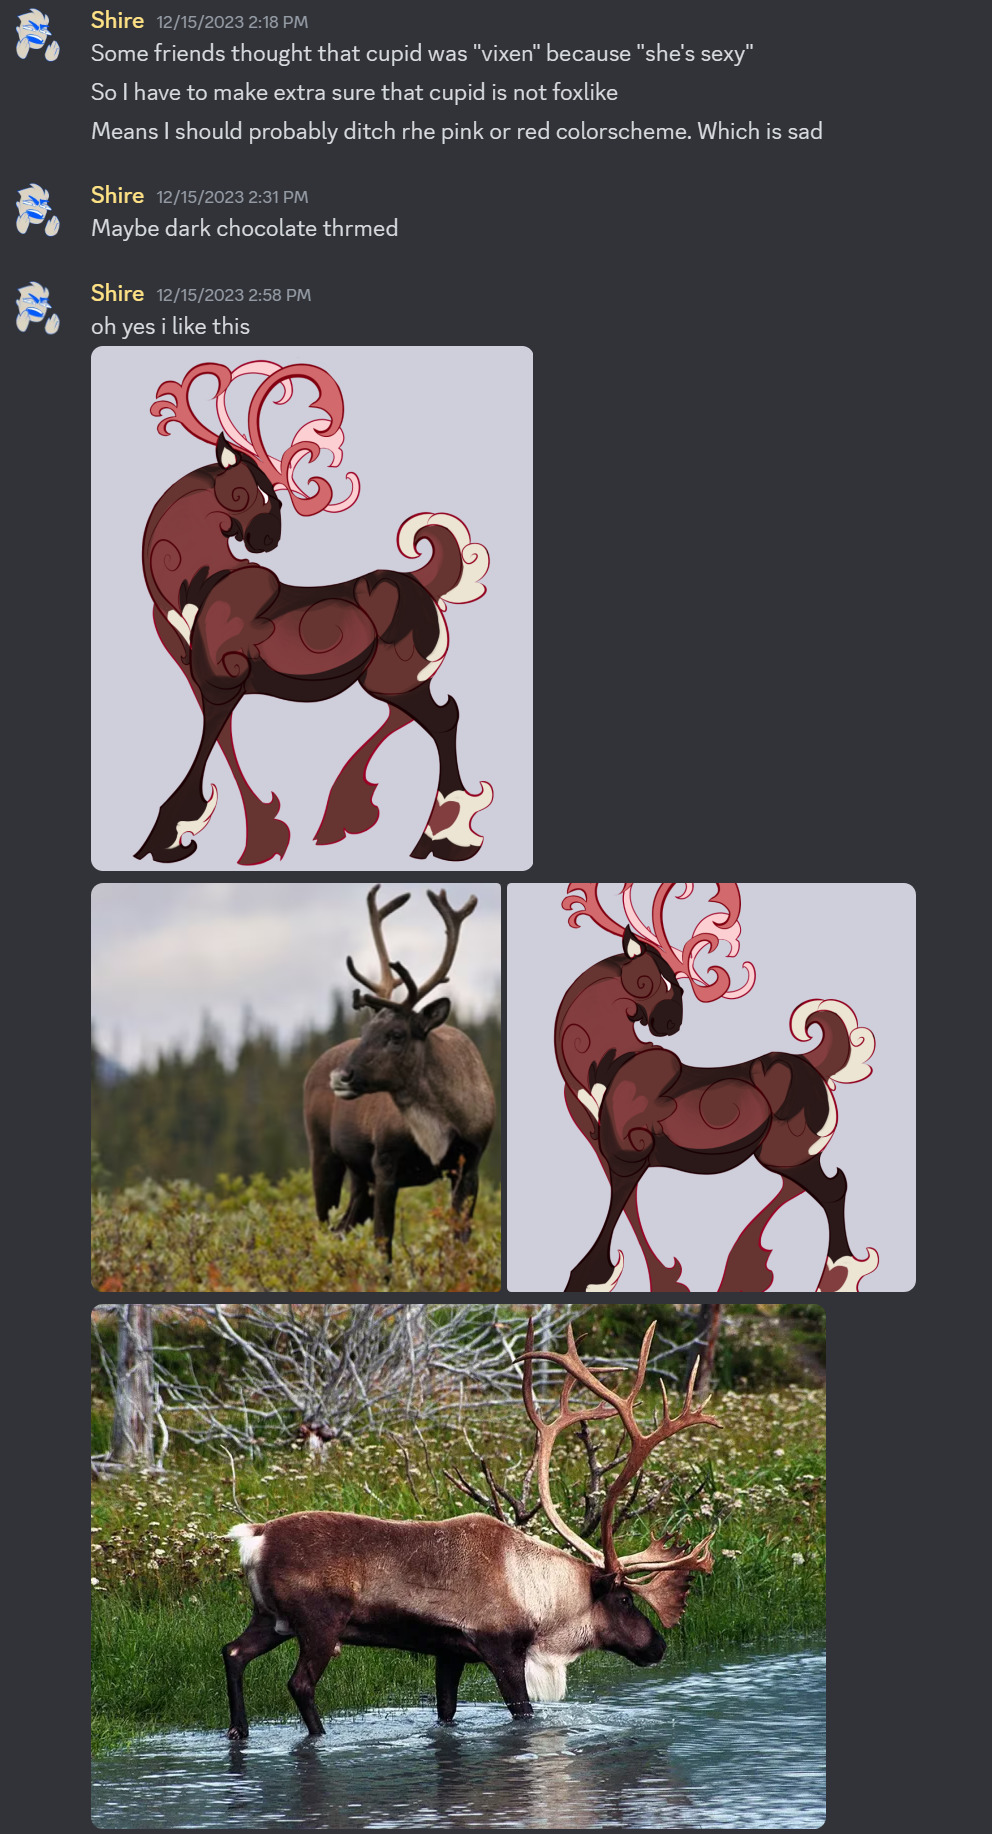
I already knew that comet's colors would be easy because a basic reindeer already Has the big comet on the shoulder. But here's a peak at all the reindeer images I posted for my patrons to look at.
As you can see below, I chose reindeer markings for all my designs instead of other deer or animals. Even vixen is tied to actually possible reindeer patterns rather than copy-pasting a fox. Almost all of my designs have light-colored anklets on dark colored legs, which is very common with caribou of any color. This is the sort of thing no one tells you; you have to observe it yourself.


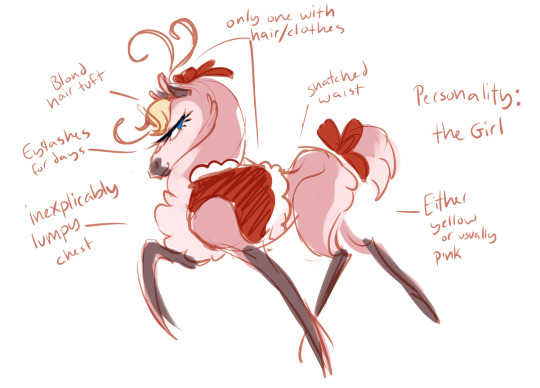
Ft cupid's early design! I was continually testing out my reindeer silhouettes and colors on new people, taking their feedback, and fixing what wasn't clicking.
I know I could have made vixen sexy and curvy to play into a recognizable trope, but I really wanted them to be scary and fox-like. Sometimes you gotta do what you want and not what you think will appeal to audiences. Reindeer Days is a purposeful exercise in audience resonance. Most of my art is 100% me and what I feel like doing with no regards to anyone else. So it was a fun challenge!
My patrons also got to see me making fun of corporate designs for recognizably/cliches at the expense of literally anything good
One of these is going to get a lot more "that must be vixen!" results from people who aren't constantly thinking about animal colors, markings, hunting strategies, and teeth.
And one rocks.
Vixen changed the least from the initial 2021 concept!
A Vixen is a female fox. In english slang, it means a cunning, fierce human woman, and sometimes sexually attractive or promiscuous. Quite often an insult to someone because she won't date you!
But to me, a vixen is an animal. A predator.
When designing to reference something, I like to hit it at multiple angles, referencing obscure trivia about something to delight and educate. This is done by researching a topic deeply, far below surface level and beyond what you think you need to make your design. Or in my case its just knowing a bunch of animal trivia already.
After researching/dredging your knowledge, sit there and Think. Don't draw anything. Come up with several ideas and then throw them all in at once for the ultimate trivia design.
Trivia about red foxes:
They have Long bushy tails
They have teeth that include large sharp canines, flat incisors, triangular premolars, and chunky molars with points on them that slide scissor-like with the molars above to cut meat via chewing
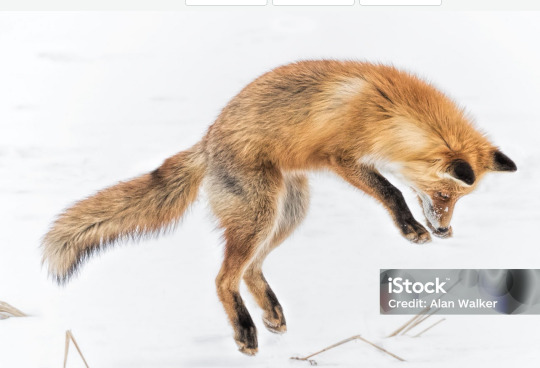
They hunt rodents in burrows under the snow by jumping into the air, arcing, and slamming down with their face through the snow
They are orange
They have a dark vertical stripe on their snout
They have black legs, with the backs and bottoms being orange


Translated into the design:
Pose based on a fox jumping, about to land in the snow
Antlers twisted to resemble teeth
Long (for a reindeer) bushy tail
black mark on snout

Some adjustment to the pose to be at the top of the arc and flow better.
Tinkering with the design to make it recognizable but not 100% copypasta fox
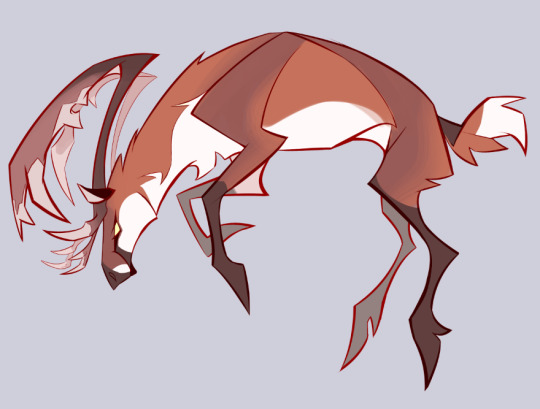

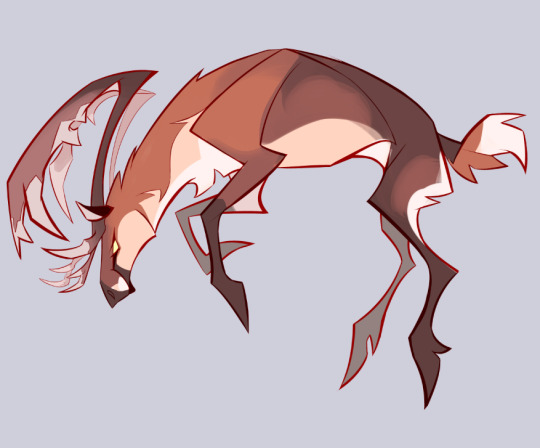

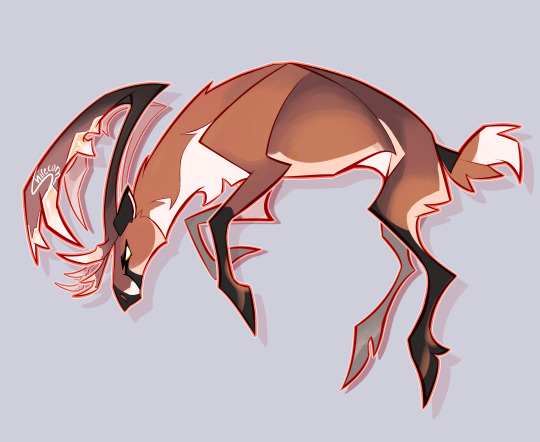
I was finally happy with a design that absolutely showed "fox" while still being creative and plausibly caribou shaped. This would absolutely communicate who it is! I thought!
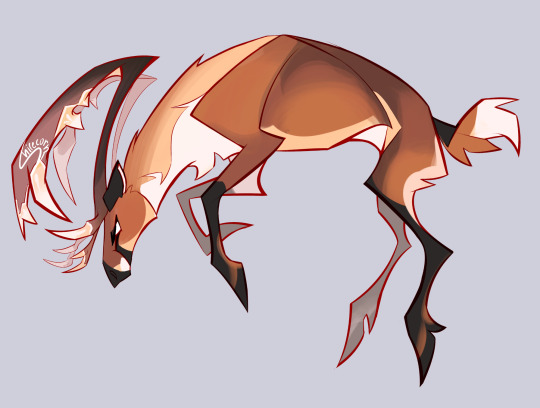
The most obvious one of the bunch! After all, everyone knows what a vixen is!

Nope! No they do not
Want to be part of the design process, help me with WIPs months before everyone else, see exclusive doodles every day, and join a funky little community?
(you also get to see photos of my dog)
Connect your discord to your patreon and join any tier to automatically get added to the server. Not a fan of patreon or monthly subscriptions? message me here, on ko-fi, or via email (shirecorn.art@ gmail.com) and ask if you can pay $20 to get put in the server for at least a year and longer if we work it out later!
This was supposed to be a preview to get you to pay me but instead I wrote an entire lecture for free because I can't help myself.
Want to thank me for the free info? Tag me when you use what you learned! Comment and give feedback! If I could pay rent with attention I would never need anything else in life.
You can also thank me by tipping my ko-fi! I use it to buy pens since I die if I have caffeine. But could you imagine??
#shire screams#shire draws#art tips#art tutorial#character design#character design tutorial#tutorial#behind the scenes#design tutorial#design tips#reindeer days#ask#ramble machine
227 notes
·
View notes
Text
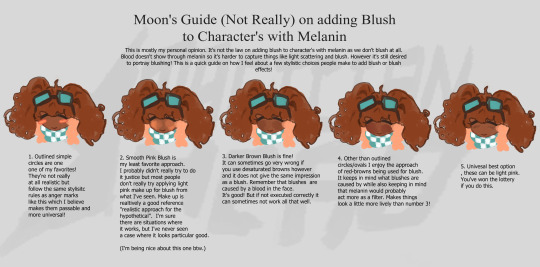
There's a bit of a disucssion on how to add blush to characters with melanin on twitter and I kinda lowkey got tired of people pretending there's only two options. Of course my guide doesn't capture all of them but here are the ones I actually can formulate opinions on!
Here's the alt text:
This is mostly my personal opinion. It's not the law on adding blush to character's with melanin as we don't blush at all.
Blood doesn't show through melanin so it's harder to capture things like light scattering and blush. However it's still desired
to portray blushing! This is a quick guide on how I feel about a few stylistic choices people make to add blush or blush
effects!
Outlined simple
circles are one
one of my favorites!
They're not really
at all realistic but
follow the same stylisitc
rules as anger marks
like this which I believe
makes them passable and
more universal!
Smooth Pink Blush is
my least favorite approach.
I probably didn't really try to do
it justice but most people
don't really try applying light
pink make up for blush from
what I've seen. Make up is
realtively a good reference
"realistic approach for the
hypothetical". I'm sure
there are situations where
it works, but I've never seen
a case where it looks particular good.
(I'm being nice about this one btw.)
Darker Brown Blush is fine!
It can sometimes go very wrong if
you use desaturated browns however
and it does not give the same impression
as a blush. Remember that blushes are
caused by a blood in the face.
It's good! But if not executed correctly it
can sometimes not work all that well.
Other than outlined
circles/ovals I enjoy the approach
of red-browns being used for blush.
It keeps in mind what blushes are
caused by while also keeping in mind
that melanin would probably
act more as a filter. Makes things
look a little more lively than number 3!
Univesal best option
, these can be light pink.
You've won the lottery
if you do this.
(Blushes made with slash marks since I didn't give a descriptor)
#art tutorial#art#turtorial#tutorial on dark skin#tutorial art#drawing tutorial#character design#design tutorial#character design tutorial#hero tutorials#moon tutorials#this isn't really a guide or tutorial though its more so my opinion. all of these are “okay” but some have more objective thought
25 notes
·
View notes
Note
hi bestie- any starting points on how to make an album redesign?
Hey, yes! Under the cut
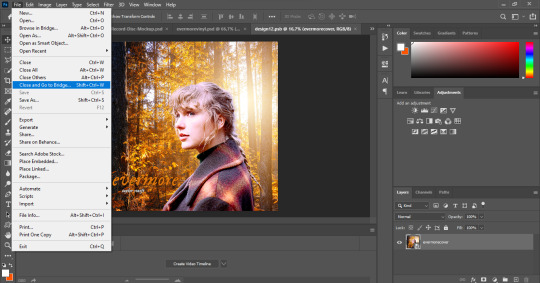
So, firstly, you’ll need to decide the images you want to use for your cover. Always use an HD image, for Taylor stuff I recommend getting one from taylorpictures.net, and if you want to make a more elaborate cover and add a different background, I recommend getting background images from pexels.com, which are copyright-free. Avoid Pinterest because most images are reposted and copyrighted, and the quality is bad. I’m assuming you know the basics of making a cover (resizing, sharpening, removing the background), so I’ll briefly describe my process, but if you want something more visual on how to make the cover, let me know. After you’ve chosen your images, make the cover as you usually would. For the Evermore cover, I started by removing the background on the Taylor photo, then resizing it (the dimensions used on both pictures were 540px x 540px), sharpening and coloring it. After that, I dragged the Taylor photo on the autumn background and added text and for the back cover, I added a logo of Republic Records. The most important part is done, after that, you’ll need a CD or vinyl template. I've used these in the past and they're pretty good. I'm gonna show you how to put the cover on the template. Open the template on Photoshop/photopea, go to the album cover folder and right click on the tumbnail circled in red (apologies for the bad circle)
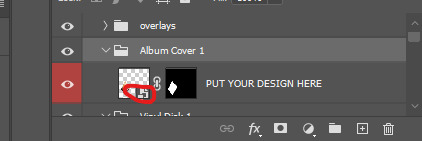
Another tab should open, then you just put your design there using place embedded, that way you can adjust the size a bit without having to resize it.
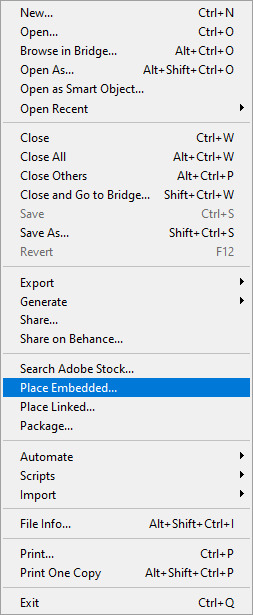
After you've put your design there and adjusted it to your liking, click on file > close and go to bridge so it will show up on the template.
Repeat this process for the disc and back cover until you're done

When you're done, just save your design as a png file and you should be good to go! If you need anything else, my inbox is always open <3
4 notes
·
View notes
Video
youtube
Creating Stunning Like, Share, and Subscribe Button Animation for YouTub...
#youtube#canva#canva tutorial#canva tips#Canva design#youtube video#Youtube Video animation#Likeshareandsubscribe#graphic design#design tutorial#animation#subscribe animation#subscribe button#YouTube subscribe button#Canva designer#Tutorial#Tutorials#Canva animation#Canva Youtube#Canva for youtube
2 notes
·
View notes
Video
youtube
How to make a vintage collage in Photoshop
3 notes
·
View notes
Video
youtube
Adobe Illustrator Tutorial | How To Create Mesh Gradient With Adobe Illu...
2 notes
·
View notes
Text
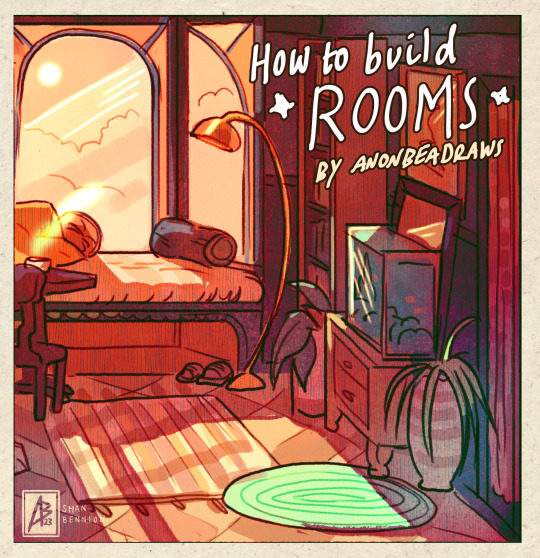
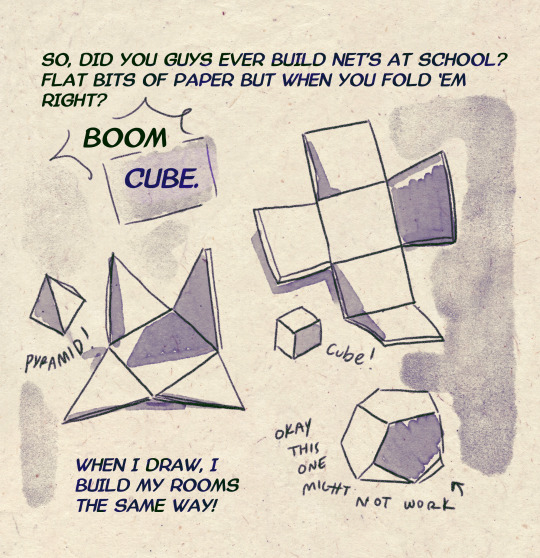
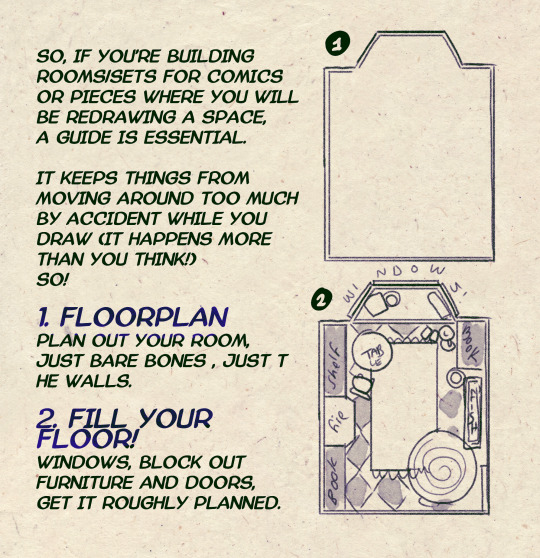
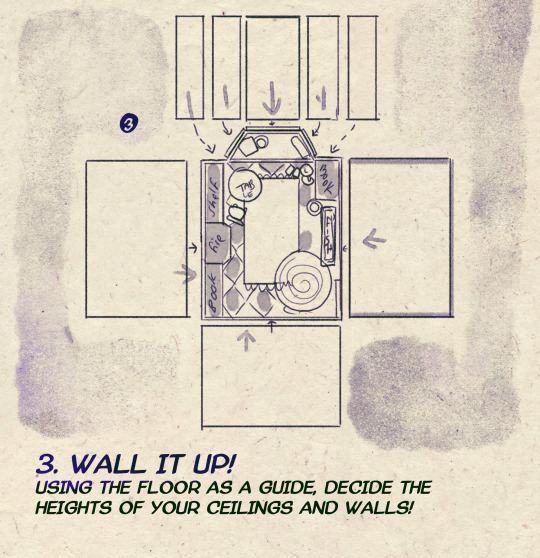


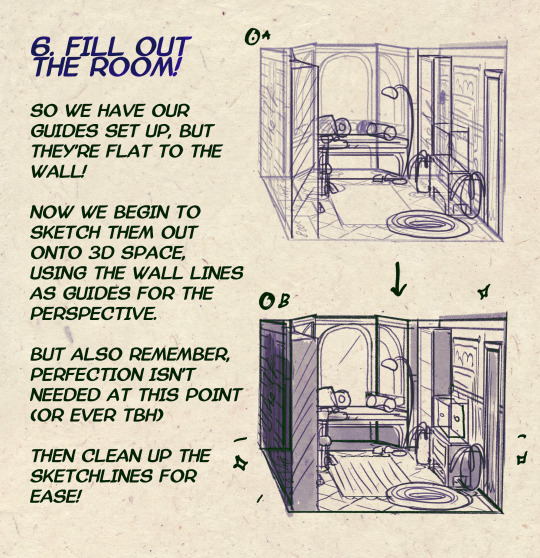

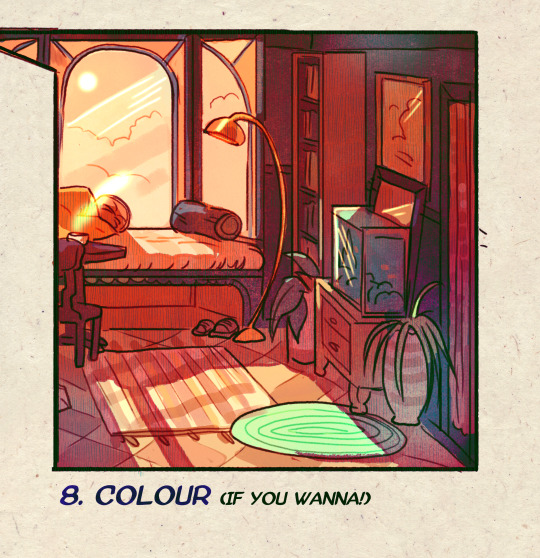
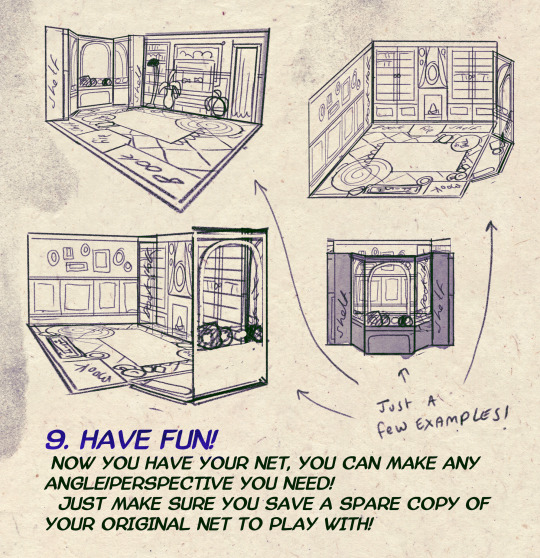
I made a Room Building tutorial! Lemme know if it helps! 🧡
Tip me here| Commission info here!
#anonbeadraws#digital#art tutorial#tutorial#room building#room design#illustration#gif#digital art#digital tutorial#art help#art resource#let me know if it helps!#tried to make it as simple as I could
35K notes
·
View notes
Text
Happy November 1st! I am excited to try out another platform and would love any input or tips people may have!

1 note
·
View note
Video
youtube
Wall Calendar Design Inspiration | Happy New Year | Calendar Design
#calendar#wall calendar#2024#happy new year#thirty first night#calendar design#design tutorial#design inspiration#design idea#free#graphic design#print design
1 note
·
View note
Text
Unlock Your Creative Genius with Inverted Text Masks in Adobe Illustrator!
Ready to take your design game to the next level? Watch our latest tutorial to discover how to effortlessly create jaw-dropping inverted text masks in Adobe Illustrator. 🚀
With this game-changing technique, you'll have the power to seamlessly cut out text from any shape or even raster images, making your brochures and newsletter covers truly POP! 🌟
In this tutorial, we'll guide you through the magic of Clipping Masks, the precision of Pathfinder, and the versatility of Compound Paths in Adobe Illustrator. 🧙♂️✨
Whether you're a beginner or a design pro, this tutorial is your key to unlocking unlimited creativity! 🗝️🎨
Watch now and let your imagination run wild:
Watch Tutorial Now
#Adobe Illustrator#Text Mask#Inverted Text#Graphic Design#Clipping Mask#Pathfinder#Compound Path#Design Tutorial#Creative Design#Brochure Design#Newsletter Covers#Graphic Design Tutorial#Design Inspiration#Learn Design#Illustrator Tips#Design Skills#DIY Design#Digital Art#Illustration Tutorial#Tutorial Video
1 note
·
View note
Text
In SketchUp, 3D objects are created geometrically, including architectural models, scale models, interior design pieces, and functional items. SketchUp is your ideal program for simplicity and quality. The program has an easy-to-use interface and a low learning curve. After completing this introductory guide to SketchUp, you will know how to create your models in SketchUp by using the tips and tricks that were provided. Here are some basic steps you can take to learn 3D modeling.
It can be downloaded from the SketchUp website. It is then necessary to create a free Trimble account to download SketchUp.
Download SketchUp
Creating Your Own Workspace
As soon as you open SketchUp, a window appears where you can select your workspace. Three tabs are displayed: Learn, License, and Template. There are different presets to choose from on the Template tab. Depending on what kind of model you are going to do.
You will need to click on the template and then on ?Start using SketchUp? in the lower right corner. Please check the Always show on the startup box on the lower left so that you can choose any template each time you open the application.
SketchUp Toolbar
The features of SketchUp are many. The upper part of your screen will have your default SketchUp toolbars. You may now select View > Toolbars.
A toolbar list will appear in a new window. The Large Tool Set will be used in this tutorial. You can create 3D models with the tools available in this toolbar. Take a look at the Large Tool Set. For your convenience, I recommend un-checking the other toolbars.
Read more
0 notes
Text
As promised, we’re the most professional website designing company....
𝐆𝐞𝐭 𝐢𝐧 𝐭𝐨𝐮𝐜𝐡 𝐰𝐢𝐭𝐡 𝐮𝐬 𝐟𝐨𝐫:
Interactive, User Friendly, Secure, Business Driven App Solutions and Satisfaction
Call at: +91 9540041043
Visit at: www.attractivewebsolutions.co.in
#webdesign#webdevelopment#business#seo#ecommerce#marketing#design#website#digitalmarketing#branding#web#web developers#webdesigning#webdesigner#website design trends#design tutorial#design ideas#design thinking#graphic design#creative#design & build#design baju korporat terkini#interior decor#minimalist#logo#logo design#graphicdesigner#designinspiration#graphicdesign#webdeveloper
1 note
·
View note
Text
One subscription, endless possibilities: Envato Elements fuel your creative journey in design
In the digital age, where creative content is in high demand, professionals and enthusiasts alike are constantly seeking high-quality assets to enhance their projects. Envato Elements emerges as a valuable resource, providing a vast library of creative assets and tools for individuals, teams, and organizations. In this article, we will explore the features, benefits, and versatility of Envato Elements, empowering you to unlock your creative potential
Get the best software for Unlimited creative assets, affordable subscription!!!
1. An All-In-One Creative Subscription:
Envato Elements offers a comprehensive subscription model that revolutionizes the way creatives access digital assets. With a single subscription, users gain unlimited access to millions of creative resources, including graphics, videos, photos, music tracks, web templates, and more. This all-in-one approach ensures that users have everything they need to bring their ideas to life without the hassle of multiple subscriptions or purchases.
2. Unlimited Downloads, Limitless Possibilities:
One of the standout features of Envato Elements is the ability to download assets without any limitations. This means you can explore and experiment with a wide range of creative materials, giving you the freedom to try new styles and techniques. Whether you're a designer, marketer, content creator, or developer, the unlimited downloads offered by Envato Elements enable you to push your creative boundaries and fuel your imagination.
3. Simple Commercial Licensing:
Gone are the days of complex licensing agreements. Envato Elements simplifies the licensing process by providing a single commercial license for all downloaded assets. This license grants users the freedom to use the resources in both personal and commercial projects without worrying about additional fees or legal complications. The straightforward licensing terms ensure that you can focus on creating remarkable content without any unnecessary obstacles.
4. Flexibility and Affordability:
Envato Elements offers flexible subscription options to cater to individual needs. The individual subscription, starting at just $16.50 per month, provides a cost-effective solution for freelancers and solo creators. Additionally, students can benefit from a 30% discount on Envato Elements subscriptions, making it an even more accessible resource for educational purposes. For teams and organizations, Envato Elements offers competitive pricing, with the ability to add members and adjust the team size as required.
5. High-Quality Curated Content:
Envato Elements prides itself on maintaining a collection of high-quality creative assets. Every item in the library undergoes a meticulous review process by a team of specialists, ensuring that only the best resources make it to the platform. With over 5 million photos, 240,000+ graphic templates, 4.4 million videos, 83,000+ video templates, and a vast selection of audio, fonts, graphics, and 3D models, Envato Elements covers a wide spectrum of creative needs.
6. User-Friendly Platform and Support:
Navigating the Envato Elements platform is a seamless experience. The intuitive interface allows users to quickly search, preview, and download assets based on their specific requirements. Should you encounter any difficulties or have questions, Envato Elements provides comprehensive support through its dedicated help center. Whether it's troubleshooting, licensing inquiries, or general assistance, the support team is readily available to ensure a smooth and productive user experience.
7. Continuous Growth and Expansion:
Envato Elements is committed to staying at the forefront of the creative industry. The platform regularly updates its library, adding fresh and innovative content to keep up with the evolving trends and demands. This ongoing growth ensures that users always have access to the latest design elements, styles, and creative inspiration, empowering them to create cutting-edge projects that captivate their audiences.
Conclusion:
Envato Elements stands as a game-changer in the realm of creative resources, providing a comprehensive and affordable solution for individuals, teams, and organizations. With its unlimited downloads, simple licensing, and high-quality content, Envato Elements equips creatives with the tools they need to bring their ideas to life. Whether you're a graphic designer, video editor, photographer, or web developer, Envato Elements empowers you to explore your creativity, elevate your projects, and achieve remarkable results. Unlock your creative potential today with Envato Elements.
1 note
·
View note
Video
youtube
Create Kawaii Vegetables in Canva part 2 | Step-by-Step Tutorial for Ado...
#youtube#canva#canva tips#Canva tutorial#Canva tipsandtricks#kawaii#kawaii style#kawaii vegetables#Canva design#Canva love#Character design#cute#cute vegetables#graphic design#design tutorial
2 notes
·
View notes
Text
Level up your design game with this hassle-free 3D mockup tutorial! 🎮✨ Explore the world of digital art and learn how to make stunning mockups with ease. 🖌️💡 #3DMockupTutorial #DigitalArt #DesignInspo
#3D mockup#tutorial#design#digital art#creative process#inspiration#digital design#graphic design#art tutorial#design tutorial
0 notes
Last Seen Blogs

sichengs-world
jae.
highprogressive
highprogressive

slotloader
Slot Loader
b-thepain
Dark V
pandamallow5
TWSTD Panda