#scratchbuild model making
Explore tagged Tumblr posts
Visit Tumblr Blog
Explore Tumblr blogs with no restrictions, modern design and the best experience.
Last Seen Tumblr Blogs


Fun Fact
Tumblr is available in 18 languages.
Text


1984 Dune Spice Scout
This was my very quick scratchbuild of one of the barely seen vehicles in the 1984 film Dune. A small ribbed plastic tree ornament, some scrap plastic shapes, and a plastic clothing hanger trimmed to length.
#spaceship model#scratchbuild model making#sci-fi model#Dune 1984#Spice Scout#plastic model#model scratchbuild#scratchbuild#scratchbuilt#kitbash#model making#scale model#spaceship#art#artwork
10 notes
·
View notes
Note
Are you still a fan of Warhammer? I hope it’s been long enough that you aren’t scared of this restarting anything but like, I’m a fan myself and everyone I know is also one, and your article gave me some uncomfortable feelings of “what’s the woke way to enjoy this” lol
Hello! Thank you for the delightful question and thank you also for allowing me to be part of the authentic Tumblr experience of receiving an inbox message from a questionable username.
So I guess I think the question about whether there's a "woke way" to enjoy Warhammer is an unhelpful way to think about it (or about anything). It's okay to enjoy a pretend game about silly clanking armoured men just in the same way it's okay to enjoy a pretend video game where you drive a car over the speed limit.
I think a lot of leftists get caught up in ethical hand-wringing and sort of paralysed by how to move forward with something but the reality of participation in a capitalist system is that while you can be conscientious about your choices, at the end of the day you still have to, you know, make those choices. There isn't a perfect way to do it - there is no ethical consumption under capitalism!
One of the great things about the Warhammer hobby - hell, just about all tabletop gaming hobbies - is that the companies who make the products simply cannot stop you from buying them, building them, and playing with them in the way that you want. The fact that Warhammer (hell, D&D too, etc) is essentially imagination layered on top of painted bits of plastic means that the barrier to entry, and the conditions under which a corporation can control your entry, are astonishingly low.
But of course this means that a huge chunk of potential profit is going missing. One of the big ways that Games Workshop - hell, just about all tabletop gaming companies, really - has tried to maximise their profits in recent years has been to attempt to normalise the idea that to "play Warhammer" is to engage in brand loyalty rather than personal creativity - in other words, to own as much of your potential hobby ecosystem as possible.
Purchase your official Warhammer model from the official Warhammer store (good luck getting a pre-order from a local games store which has been deliberately understocked!), clip it from the sprue using official Citadel clippers, glue it with Citadel plastic glue while you're watching the official Warhammer Plus "loremasters" show, basecoat it with Citadel spray, make sure to play it using the new rules we released 3 months ago and which we will update in another book in 3 months time (which you will need to buy, you don't want to miss out!) etc, etc, etc. Deeply tiresome shit.
(Illustrative side note: Recently I saw a post on Facebook marketplace with someone saying "Can someone sell me a pair of Citadel clippers, my last ones broke!" Someone immediately responded to recommend going to buy a pair at Bunnings for $5, and the person legitimately had to be convinced that they were the same product and weren't going to, in some way, "hurt" the models.)
Of course while GW has a long history of trying to trick baffled Christmas aunties into buying spray paint from their stores for $30 instead of from Bunnings for $10, when I got into Warhammer in 1997 DIY creativity was explicitly encouraged and that was pretty much the whole point - Games Workshop literally published books telling you to go to construction sites to find basing sand, to repurpose old cardboard boxes to make buildings and walls, to use guitar strings to make power cables, to write your own missions, to invent your own Chapters (with rules to do so), to build your own characters and leaders, etc, etc. And I did! And it kicked ass.
The old codexes are full of examples of people scratchbuilding whole terrain sets, converting up models for characters that GW couldn't be arsed to provide - that sort of "make it your own! exercise your creativity!" ethos was baked into the very DNA of the hobby, and it has always stuck with me, even as GW has tried to backpedal away from it and focus on "how well can YOU paint OUR kits?"
So now for me I look at Warhammer the same way I might look at an art supply store. Yes I can buy one particular brand of paint or one particular brand of canvas when looking at doing up a new watercolour, but ultimately it's about picking what I think is going to allow me to exercise my creativity the most, or what I enjoy working with.
And when I do throw dice (I am a busy full-time employee with a mortgage and now mostly play small scale Kill Team skirmish games) I play against extremely chill people who have straight-up 3D printed accessories or whole models, or play in my local games club on old Malifaux terrain on a third party game mat, or whatever.
I buy all my models second hand online or purchase out-of-production things at swap meets. I use third-party paints and brushes, and 3D print up conversion parts that I need which I purchase online. I engage with the hobby on my terms and look at it as a way to express my own creativity, or as a series of building blocks to assemble in whichever way I see fit, because that's what makes me happy. Ultimately Games Workshop's colour schemes, lore, etc are (and only ever can be) suggestions - the only difference is that they used to explicitly tell you as much and encourage you to play around, and now they strongly encourage the opposite.
This isn't to cast shade on anyone who just buys GW models and paints them with GW paints or whatever. Doing that isn't somehow a fascist act or a one way ticket to Cancel Jail. They make some nice fucking models! And tbqh their Contrast paints are the best in class for that sort of thing (Army Builder "Speed Paint" ones suck ass).
Buying little toy dolls from companies (at least companies which aren't openly funding genocide) is only a problem if we do so uncritically or treat those little toy dolls as sacred idols and allow them to consume our personalities. That's when you end up with weird right-wing 40K Lore Youtubers with aquila tattoos.
7 notes
·
View notes
Text
they envy me for being able to make decent art constantly in a short amount of time, i’m the master of backgrounds i’m the master of foregrounds i’m the master of character design i can actually draw mecha i can 3d model and scratchbuild i can paint i can make comics (even though i don’t really show them) and i can make fanart for my friends
#to be honest idk how i do it and i don’t want to jinx myself by saying this aloud but man i just b speakin my thoughts#this is my blog i can do whatever i want forever#speaking of which i need to make a website soon it would be so cool
2 notes
·
View notes
Text
please don't read this if you have any respect for me
In 2015, I read ever-popular visual novel "Tsukihime" because the girl I liked was into, among other things, the combined works of doujin circle/now meteorically popular creator group Type-Moon.
And then, by and large, I forgot about it. Sure, I played a whole lot of FGO, I saw Neco-Arc all over the place, I made jokes about Melty Blood's reputation of being played at Denny's. But I wasn't like, actively thinking about the non-Fate stuff for a while.
Then, this year, in 2024, the long-awaited (ten years! plus a little extra for it to come overseas) Tsukihime Remake came out. It took a while to read through it (with that same girl that I liked, who is now my wife, but that's besides the point) because I am, unfortunately, an adult with a mortgage and a career. It was good! I was enjoying myself a normal amount!
It's difficult to pin down exactly when it started. What day, what scene, when it happened in real life. Sometime between the start and the 20th of September, for sure. Regardless! At least a month ago now, I (re?)developed a crush on Ciel, Tsukihime's secondary heroine.
I definitely remember liking her in the original game! But again, then I forgot about it. Regardless of how I felt before, now, I can safely, confidently say, that this is the strongest I've ever felt about a fictional character. And I was not a stranger to having crushes on anime babes before this! But this has made every other one before this feel like a passing fancy. I am actively obsessed. I think I'm still coming to terms with how down bad I am.
In just this last month and change, I have:
: actively skipped out on work to finish reading Tsukihime Remake. Which, I work remotely, some days it can be pretty easy to skip out and check Microsoft Teams every half hour. But I was taking more risks than usual the few times I did this.
: gotten better at fighting games than I ever have been in my life before. I wouldn't say I'm like, great or anything, but I have absolutely improved at playing as Ciel in the latest version of Melty Blood. I actually know what all the different systems do! I have all my inputs down! As soon as I stop projecting my actions so much, I'll be golden.
: scoured Twitter to the fullest extent possible for cute fanart of her. I found a lot of good stuff! She is a lastingly popular character. I also saw a lot of things I would rather not have, to be honest, but that's just how it goes. I also realized that I can follow artists on my pixiv account that's probably old enough to drive, get some mileage out of that.
: actively deleted most of the other fanart of characters I like that I had saved on my hard drive. Mostly because, again, every other character I liked before now feels almost insignificant. But it also saved me the trouble of sorting through all of it.
: planned made to create a plush of her because the official one I really like was sold at exactly one event a year ago. Hoping to do that tomorrow, I should finally have some spare time, I have all the materials I should need.
: decided on mostly looking for merchandise of her when I leave for Japan in a week. She has a figma that was -supposed- to be released this month, that's probably getting pushed back, which, that was one of the main things I wanted to keep an eye out for. There's a model kit or two I want to keep my eye out for, but she is, my #1 priority.
: thought of -multiple- customs and ideas I want to try out. I could make Ciel in all sorts of cute outfits with a few 30 Minute Sisters customization sets and a little scratchbuilding! My usual hobby supplier also put up preorders on 1/12 scale nun costumes for your action figures, which felt, extremely targeted.
: for the first time in my life, wrote fanfiction that I fully intend on finishing and putting online somewhere. I've done a little fanfic writing before, but never more than a few paragraphs between friends or such. And I've definitely never put it out for a larger audience. I have so many ideas! I have a workable outline and even a possible deadline I want to hit! And it's fun! I think this is the part that I've been struggling the most with is that somehow, despite everything, a part of me goes Wow, Fanfic? Kinda Cringe. But it's gotten easier as I go. If I don't get one set of ideas out, I can't make room for the next part I want to work on.
Anyway, tl:dr: I am like, actually in love with an anime nun from an early 2000s eroge who hangs out with that dumb fuckin' cat you've seen on Pilk memes, and I needed to write this out just to document how deranged (but like, in a fun way) I feel.
1 note
·
View note
Text
Kitbashing/scratchbuilding
youtube
youtube
Kitbashing is when you take lots of components from a bunch of different model kits and use them to make something else entirely. It's very similar to scratchbuilding, or junk building, which is when you take things like used boxes, packaging or broken toys and repurpose them for a model.
The video on Howl's moving castle uses a mixture of the two, for example, he repeatedly uses pieces from old Gundam models for different purposes throughout the castle whereas the robot is just a bunch of scrap pieces put together.
I've done a little bit of kitbashing with a friend in my previous project and sometimes it was quite easy and others I had some parts that I wanted to use but didn't know how.
This was the finished result. Aside from the wool, you can see that we mostly used computer parts for the robot.
0 notes
Text
Trollhunters Amulet

Trollhunters amulet from scratch.
I made a pattern in illustrator, you can download the pattern for free here: Trollhunters amulet blueprint
Made the basic shape out of Sintra and the details with two part epoxy putty.

For this part I used mostly two part epoxy putty to be able to sculpt detail runes all the way round.


This is a two part mold, and the castings will be roto-casted

This will be a one part mold and I added tooth picks to the end of the horns and fangs to help air escape.

For the smaller parts I made a box mold, however casting parts in this is pretty difficult because they are so small. For the next time I think I’ll make a mold where I can injection cast these parts.

Casted and cleaned up parts.

What I did for the center part is that I drew a pattern with illustrator based on some references to be able to replicate the graphics in the center part, then I laser engraved them in a 1.5mm acrylic. In this photo the acrylic still has the protective sheet (blue).


This is my first attempt on wiring something, It took me about an hour to put this together but I finally got it.

Starting to put this together and see how it looks.

#amulet#cast#props#cosplay#cosplay props#trollhunters#merlins amulet#scratch build#scratchbuild#modelkit#model making#modelmaking#resin#sintra#epoxyputty#wip
46 notes
·
View notes
Text
So, before work, I tried making the model for my Steel Drake’s chapter master, Remudes, out of the old special Forge World model, the Ultramarines Legion Herald.
Bit of a bust.
The guy is the size of a Primaris marine! He’s far too big for the guy, and he has too much detail too.. So I guess I’ll need to scratchbuild and kitbash a model of Remudes in the new year.
6 notes
·
View notes
Photo

🚀⛽️🧽 The Rocket Station’s detailed pictures. This is my last planet model. As usual I used a very small scale for this scratch build, about 1:160. There is a lot of 💡 in this one, 9 precisely! I think this my model with the most Led at the square centimeters I’ve ever done🤯. The crane, the roof lighting brand and the washmatic are articulated for stop motions. Can’t wait to make animated stuffs on it!! This little one is an important piece witch will connect all other planets I’ve made before in the shorts I’m working on. Because to go on galaxie tour, you need fuel ;) • • • #stopmotion #handmade #stopmotionset #scratchbuild #planet #fuelstation #tiny #galaxies #rocketstation #miniatureartist #atmospheres #scifi #sf #tinyworlds #modelmaking #imaginaryworld #miniature (à Opaz Ateliers Partagés - art & artisanat - Aubervilliers) https://www.instagram.com/p/CAsoCBnDSc8/?igshid=1a7nzjh8s66ej
#stopmotion#handmade#stopmotionset#scratchbuild#planet#fuelstation#tiny#galaxies#rocketstation#miniatureartist#atmospheres#scifi#sf#tinyworlds#modelmaking#imaginaryworld#miniature
3 notes
·
View notes
Photo


Shadow-Captain Branwen, Defender of Terra
Finally finished a project that’s been many moons in the making. Just in time for @40kartweek ‘s Imperial Week, too! I wanted to do a model to represent Branwen in the later stages of the Horus Heresy, and as the name implies, during the Siege of Terra. Her armor’s undergone some significant modifications and I wanted to reflect that - especially the raven-skull breastplate that’s been featured in a lot of the art of her.
The build was mainly done with the Forge World Shadow-Captain Korvydae miniature. The thunder hammer and hands were swapped out for her signature Paragon Blade and wrist-bolter (Sword and Angelus Boltgun from the Sanguinary Guard kit). As Korvydae’s head was a separate piece, swapping it out for a Statuesque Miniatures head was a pretty simple undertaking. The Jump Pack (More Sanguinary Guard) is magnetized, and can be swapped out for a (wip) Mk6 Power Pack stolen from a spare Mor Deythan.
Also her base features some of the rubble from the Garviel Loken mini - as it adds to the height and makes her a little more scenic (Sorry, Garvi. I promise your base will be a nice scratchbuild).
Ready to apply boot to traitor butt!
#40kArtWeek #40kImperialWeek
#warhammer 30k#horus heresy#Siege of Terra#legiones astartes#Raven Guard#xix legion#Shadow-Captain Branwen#Female Space Marines#40kArtWeek#40kImperialWeek
71 notes
·
View notes
Text
Depends on the size and kind.
The cheapest filament printers will likely cost you around $240 but will be very limited.
Until few years ago the STL printers (resin print aka photo-solidifying printers) were quite expensive and easily costing you 10 times more than filament printer.
Now there are cheaper units - their price likely starts around $700. Maybe a bit more than that. Still - I wouldn’t invest in the absolute cheapest option and rather pay a bit more for something that gets good reviews. Thus we’re likely talking no less than $1k for the STL printer.
Why do I focus on STL so much?
Because it’s in general better in terms of details.
There likely are some amazing filament printers but they’re likely even more expensive.
So yeah.
I have a friend with two printers and he’ll likely print some stuff for me if I ask him. In fact he did so before - just not for Warhammer.
The thing is - I need a blueprint for the stuff that I want and I’m not going to burden him with designing something. Thus my options are limited.
On the other hand - I am trying my hand at scratchbuilding. Like - FOR SOME REASON Venerable Dreadnought comes without missile launcher arm - which is in fact said unit’s wargear option. I’ll just make my own using foam pvc, styrene sheets and some leftover parts from model plane I’ve assembled.
Oh. And if you want to calculate the price - Something I’ve discovered is that retail sells GW stuff cheaper than GW itself. Up to 20% cheaper normally and they can also have discounts.
3D printing is not supporting the hobby.
Your minis may be cheaper (After a ludicrous set up cost) but they are not tourney legal.
So what is the point?
716 notes
·
View notes
Text
Scratchbuilding an Animated Water Tower
Part 2: Spout and Mechanism
In this post, I'll be covering how I built the mechanism for these water towers and some of the detailing. Each step was done on both water tower models at the same time.
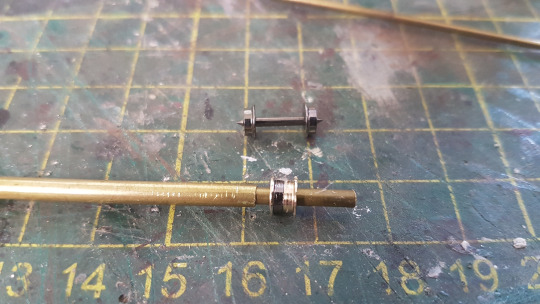
My design called for a servo to be installed inside the tank itself, which would raise and lower the spout via a thread attached to it. To allow the thread to move smoothly, the first thing I had to do was construct a pulley for it. I had some N scale wheelsets handy, so I used the wheels from those. They were taken off the axle and drilled out to fit over a brass rod, then glued face-to-face. This rod would then fit within some brass tubing that allowed it to rotate freely.

While these were drying, I added the cross-bracing to the water tower legs. This was formed from 1mm copper wire. I drilled holes into the wood legs at the correct angle, then passed the wire through. Once the wires were in place, I soldered them together where they crossed over and filed it to shape. I've tried using glue on copper wire before, and that's never really worked for me.

My next step was to put in the counterweight and support for the pulley. I decided to model it as though it were an enclosed counterweight, as I couldn't figure out a way to make the counterweight move with the spout. Also, this helped to disguise the fact that the thread was going into the tank itself, rather than being attached to a counterweight. To prevent the thread wearing down the wood and cardboard, I added a small section of brass tube. This runs into the tank itself.
Once this was in place, I added the boards to support the pulley. These had holes drilled out to accommodate the brass tube that would hold the pulley.

While waiting for this to dry, I started working on the servos. They needed to be mounted high in the tank, so I cut supports for them out of plywood. I used the mounting screws that came with them to hold them in place.

Once the support boards were dry, I added some detailing around the counterweight. To represent a cover plate over the brass tubing, some strip styrene was used. I added two NBW castings to it, drilled a hole for the tubing and painted it with the 'faded red' I use for weathering. When it was dry, I glued it over the brass tubing and painted the tubing the same colour. I also weathered it at this point, as I wouldn't be able to do so after the pulley was in place.
With that finished, I installed the pulley. I painte the brass tubing before installing it, and pushed it through from each side. Before gluing it in place, I turned the pulley by hand to ensure it moved freely.

Now that the pulley was in place, the next thing was to install the spout. In order to allow it to move, I filed it flat at the end and glued a length of brass tubing over it. This was just wide enough to fit over 0.8mm copper wire. To provide the support, I used the same wire in the same tubing. The support tubing was glued into the wood, then the wire passed through it and the spout tube. The wire was then glued in place at each end. When it was dry, I checked each spout and found that they moved freely.

This isn't the first time I've tried to animate a water tower. Back when I was in HOn3, I took a D&RGW water tower kit and tried to animate it in a similar fashion. However, it didn't work, for two main reasons. The first was that the spout casting was plastic, and the second was that I used fishing line to control it. The fishing line had been coiled up, and didn't uncoil properly. With the spout being plastic, it didn't have enough weight to pull the fishing line down.
As such, I made sure to use a whitemetal casting for these water towers, as well as thread instead of fishing line.

Each servo came with several attachments, to allow various connections. My plan was for an 'arm' to come off the servo, which would be attached to the string. It would be in a horizontal position for the spout being lowered. To raise the spout, it would rotate downwards through 90 degrees, pulling the thread with it.
I cut some square brass tubing to length, then filed down the servo attachment and glued the tubing over it.

Once they'd dried, I drilled a hole 3mm in from each end. These were to accommodate the brass screw to which the thread would be attached. I then attached the arms to the servos.
Before installing them, I tested them with an Arduino and my computer, to determine how they behaved and how I would need to program them. I discovered that due to the way I'd oriented the servos, they had to start at an angle of 0 and increase the angle to move the arm down.

With the servos sorted, I turned my attention back to the water towers. The spout castings included the pipes they attach to. I cut these to length and painted them, then glued them in place between the first two support beams.


I then glued the servo mounts in place, making sure to leave the hole in the floor clear. I then attached thread to the spouts, and ran it through the brass tubing into the tank. It was cut so that there was no slack with the spout in the 'down' position.
With this in place, I tested the mechanism again, with my computer and an Arduino. I found that having the arm go down 90 degrees was too far, and that 75 degrees was enough to raise the spout to a suitable 'up' position.
That's it for part 2. In my next post, I'll cover the final detailing, as well as the Arduino code that makes the animation work.
1 note
·
View note
Photo

Work-in-progress photo of my Star Wars inspired “macrobinoculars” prop build. Not sure if I could call this a kitbash or a scratchbuild, but it’s definitely a lot of found parts. Includes a Scotch tape roll, scale model parts, and copious amounts of glue. Almost done with it, I think. Maybe one or two more parts, then I can start priming and painting. I have to be careful not to glue bits all over it, not to make it too busy looking, or to put parts where your hands go when holding it.
0 notes
Photo

This scratch build project has been significantly more work than I had anticipated. There was so much cutting and shaping in the early part of the week. It was exciting to get to the hydraulic inspired legs today. . Exploring the various fax machine parts felt like when I was a kid digging through my lego bins and looking for that perfect part. This really has been one of the most fun projects I have had in my career. . I just love all the little details like the wiring and various circuit board parts. Some of the panels I found cone with the best sci-fi indentations built right in. The little tiny robots really make me smile! . Thanks for following and I hope you enjoy this build. . #thepxsmith #joshaweston #scratchbuild #modeler #upcycledcrafts #repurposedart #repurposedcrafting #crafting (at Pixel Smith - Josh A. Weston) https://www.instagram.com/p/B_YY7KUD-Cj/?igshid=1d8lfbj98gd38
#thepxsmith#joshaweston#scratchbuild#modeler#upcycledcrafts#repurposedart#repurposedcrafting#crafting
0 notes
Photo

Experimenting with small hull, unfortunately, it is too small for making it RC for the lake. But it is like all my other self-build boats in 1 72 scale. It will be a beautiful model for decoration at home. #scheepsmodelbouw #scratchbuild #ship #modellbau #modelbuilding #modelship #modelshipbuilding #kutter #kotter #kuter #motorkotter #fish #fishingkotter #viskotter #kuterrybacki #fishingboat #fishingvessel #scratchbuild #boat #modelboat #172scale https://www.instagram.com/p/BxS1v-RJqtB/?igshid=cvsgtr8y1rbm
#scheepsmodelbouw#scratchbuild#ship#modellbau#modelbuilding#modelship#modelshipbuilding#kutter#kotter#kuter#motorkotter#fish#fishingkotter#viskotter#kuterrybacki#fishingboat#fishingvessel#boat#modelboat#172scale
0 notes
Text
Monday 14th January: Scratchbuilding Part 2
Now the base model was complete, I set about painting and finishing the model. It was always the plan to have the model in “Varnished teak” as researched before, and thanks to Simon A.C. Marin, I now knew how.

I started with a base of yellow primer, coating all the model in one colour and giving the varnish something to grip to.

Next I painted the first coat of varnish. I use Ronseal Teak indoor varnish. Its supposed to be for wood but works well on primed surfaces.

Then I applied the second coat, giving the varnish a deeper finish and looking more rich in colour. I only need 2 coat of varnish on a model otherwise the finish becomes too dark.

After that had dried I painted details such as the engine and the inside of the chimney. These stated black but the furnace was painted more afterwards.

Lastly I gave the whole model a light weathering using thinned back paint to make a wash. This covered any areas where the varnish didn't stick or where it didn't dry fully. I also painted the furnace a dark silvery grey.
All in all I'm very happy with the finish of the model as its quite unique. Most of my fellow peers work is grey, white or metal and mine really stands out, which is exactly what I wanted happen.
0 notes
Text
Rey’s Blaster ( WIP )

For this project I want to scratch build Rey’s Gun in a smaller scale ( 3/4 ), I’m using the blueprints created by Punished Props since they are free, you can get them here.
Started by creating the hand grip base by cutting out some styrene and syntra and make a sandwich of them to get the shape and thickness of it. I also made an adjustment since I noticed that the section that protects the trigger is a full connected section, I added an insert and now I have to fill in the gaps.

Also started creating the grips and for this ones I will fill them up and shape them with a lot of elbow grease.
#star wars#starwars#styrene#cosplay props#props#rey#blaster#force awakens#model making#modelkit#scratchbuild#wip
0 notes