#scroll to api call
Explore tagged Tumblr posts
Visit Tumblr Blog
Explore Tumblr blogs with no restrictions, modern design and the best experience.
Last Seen Tumblr Blogs


Fun Fact
When “GIF” was named word of the year in 2012, Oxford Dictionaries U.S.A. credited Tumblr for pushing the word.
Text
You go to find a recipe for apple pie, but there's the now-customary blurb about how it was passed down through generations or wrapped up in memories of fall harvest, and you scroll past, only to realize that the page is chugging slightly when you hit the bottom, and it keeps loading more and more backstory for this apple pie, along with images showing you what it's like, and personal details of the author you don't care about. And it dawns on you slowly that there is no recipe, it's just infinite backstory.
~~~~
So ... this wouldn't actually be that hard to implement with an API call to an LLM, and the better way to do it would be to generate it all ahead of time and just skip the API call, implementing the "loading" via some kind of script that doesn't consume much resources. You could similarly generate a hundred images of apple pies and have those load in as the user scrolls.
But I just don't think the gag is good enough unless there's something else there, some kind of progression within the "story" itself, a coherent weaving of characters and themes. If you actually sat down to read the whole thing, you might get invested in it, and when the long string of interwoven anecdotes brought back up Uncle Herbert, you would say "oh man, what folksy wisdom is he going to have this time".
So anyway, that's the gag, it'll just take enormous progress in artificial intelligence to work, and then not be worth it because it's funnier in concept than in execution.
68 notes
·
View notes
Note
please teach us how to meow
writing quickly as I have to be somewhere. the way to do it is janky, since I'm getting 'not authorized' in response to API requests. open the network tab of the Firefox developer console. scroll to the bottom. click the cat on the boop-o-meter. you will see the request that sent the boop to yourself:

actually you can use any boop. right-click it and select copy value->copy as cURL. you receive a call to cURL with all of the necessary authentication information. this expires eventually, so you'll need to repeat this step occasionally. I had to set the 'Accept-Encoding' parameter to only 'gzip, deflate' because my cURL didn't like the others. at the end of the request, you see the field
--data-raw '{"receiver":"metastablephysicist","context":"BoopOMeter","type":"cat"}'
you can change receiver to anyone you like and the type can be e.g. "normal", "super", "evil", "cat". by the way, there exists the boop type "spooky" this time also. idk how to get it normally but you can guess the name that's not true
paste the long command in a terminal and it sends boops. paste it in a shell script with a while loop and a delay between boops and great powers can be yours.
23 notes
·
View notes
Text
i dont think ive complained enough about how absolutely shitty the tumblr api is. the documentation is like. mediocre, to begin with. the actual api? the /blocks route gives you the blogs a blog has blocked if you GET it, but POST it? well now youre blocking a blog. dont be deceived by the plural though - to block multiple blogs you need /blocks/bulk. oh also using the... DELETE method (??) you can remove a block, still via /blocks. the /post route is the legacy post format. /posts is what youre looking for, but dont GET it, because then youre fetching a blogs posts. again, dont be deceived by the plural, but this time there is no bulk route. oh and of course /posts/{post id} gets a post... but with POST it edits the post. now with this theme of incorrect plurals, youd at least expect them to have correct plurals, but no! in order to retrieve drafts you use... /posts/draft. there are some communities routes, but guess what? theyre listed in a different format in the documentation to everything else! to be honest, its a better format, but i guess they couldnt be bothered to update their docs.
and then, the /user/dashboard route. heres what the docs say:

(this the ONLY way to get random posts btw)
simple enough... naturally you would scroll down for more info but... thats it. after that tiny description, there is a horribly layed out list of arguments and their descriptions, info on the response format, and nothing else. what dashboard is it getting? who knows! it doesnt seem to be the Following tab - which is in order of recency - so i can only assume its For You. it also, by default, returns posts in the legacy format, which is much less convenient than their Neue Post Format (??). posts are also returned without blog info and instead with just a blog name, and, for whatever reason, there is no argument to change this. i dont remember what i did to get around this, but it was probably taking that blog name and running it through the /info route or getting the posts and then getting them again with the /posts/... route (which does return blog info).
ok.. so its badly documented and inconvenient to use. big deal! except... theres more. if youre going through dashboard posts individually, like i do for my bot, youll probably use the offset argument parameter - the offset from the first post on the dash - to specify which post to get. however at somewhere around an offset of 250, it stops returning new posts. just the same one over and over. probably a rate limit right?

?????
you might be thinking "its probably that 300 api calls limit and youre just using a few extra calls" but thats wrong. for starters around 50 extra calls just doesnt sound accurate for what im doing. it would most likely be way more than that or way less. and even if im wrong, it doesnt reset after a minute. i have no idea when it resets, in fact. sometimes it feels like more than an hour, but i havent timed it. i also havent tested what happens if i go straight to 250, which i probably should do. on top of all that, i dont think this is what would actually happen if i got rate limited, its just the only remotely possible explanation i can think of.
another thing is that you cant get the full text of a post natively, only the content of the reblog. i had to write my own method for that. also - this is kinda nitpicky - you cant easily get the blog that last contributed in the thread, only whoever last reblogged it (who might have reblogged it without saying anything). by that i mean 5 people might have reblogged it without saying anything since anyone added anything to the thread, but you can only find that 5th person (easily). the workaround is to check if the person who last reblogged it said anything, if not get the last person in the 'trail', which is a list of reblogs in the thread that said something that doesnt include the last reblog. this also... doesnt work sometimes i guess? i didnt bother figuring out why, but one time out of the blue it gave me an error when trying to get the name of the last person in the trail.
i hate the tumblr api
#tumblr api#my ramblings#programming#i bet you cant guess what my bot is#although BECAUSE I CAN ONLY USE MY DASH#and im too far in to make a new account#it *does* reblog a lot of my mutuals posts#and people im following#so they might be able to guess
2 notes
·
View notes
Text
Vibecoding a production app
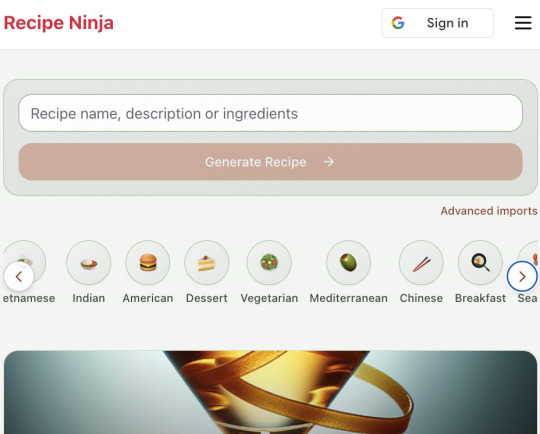
TL;DR I built and launched a recipe app with about 20 hours of work - recipeninja.ai
Background: I'm a startup founder turned investor. I taught myself (bad) PHP in 2000, and picked up Ruby on Rails in 2011. I'd guess 2015 was the last time I wrote a line of Ruby professionally. I've built small side projects over the years, but nothing with any significant usage. So it's fair to say I'm a little rusty, and I never really bothered to learn front end code or design.
In my day job at Y Combinator, I'm around founders who are building amazing stuff with AI every day and I kept hearing about the advances in tools like Lovable, Cursor and Windsurf. I love building stuff and I've always got a list of little apps I want to build if I had more free time.
About a month ago, I started playing with Lovable to build a word game based on Articulate (it's similar to Heads Up or Taboo). I got a working version, but I quickly ran into limitations - I found it very complicated to add a supabase backend, and it kept re-writing large parts of my app logic when I only wanted to make cosmetic changes. It felt like a toy - not ready to build real applications yet.
But I kept hearing great things about tools like Windsurf. A couple of weeks ago, I looked again at my list of app ideas to build and saw "Recipe App". I've wanted to build a hands-free recipe app for years. I love to cook, but the problem with most recipe websites is that they're optimized for SEO, not for humans. So you have pages and pages of descriptive crap to scroll through before you actually get to the recipe. I've used the recipe app Paprika to store my recipes in one place, but honestly it feels like it was built in 2009. The UI isn't great for actually cooking. My hands are covered in food and I don't really want to touch my phone or computer when I'm following a recipe.
So I set out to build what would become RecipeNinja.ai
For this project, I decided to use Windsurf. I wanted a Rails 8 API backend and React front-end app and Windsurf set this up for me in no time. Setting up homebrew on a new laptop, installing npm and making sure I'm on the right version of Ruby is always a pain. Windsurf did this for me step-by-step. I needed to set up SSH keys so I could push to GitHub and Heroku. Windsurf did this for me as well, in about 20% of the time it would have taken me to Google all of the relevant commands.
I was impressed that it started using the Rails conventions straight out of the box. For database migrations, it used the Rails command-line tool, which then generated the correct file names and used all the correct Rails conventions. I didn't prompt this specifically - it just knew how to do it. It one-shotted pretty complex changes across the React front end and Rails backend to work seamlessly together.
To start with, the main piece of functionality was to generate a complete step-by-step recipe from a simple input ("Lasagne"), generate an image of the finished dish, and then allow the user to progress through the recipe step-by-step with voice narration of each step. I used OpenAI for the LLM and ElevenLabs for voice. "Grandpa Spuds Oxley" gave it a friendly southern accent.
Recipe summary:
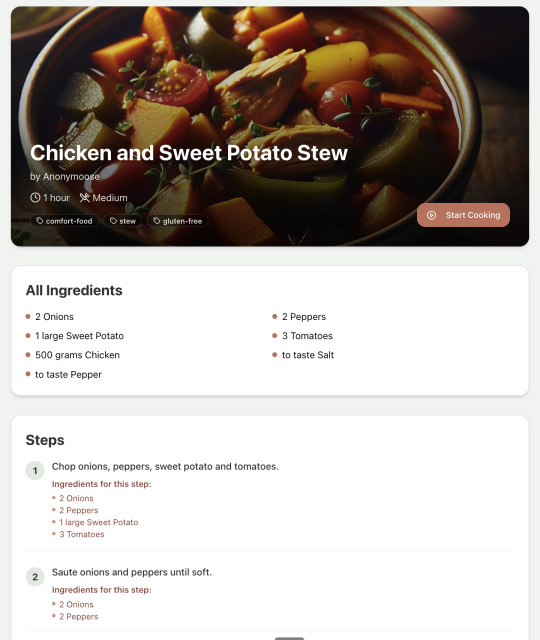
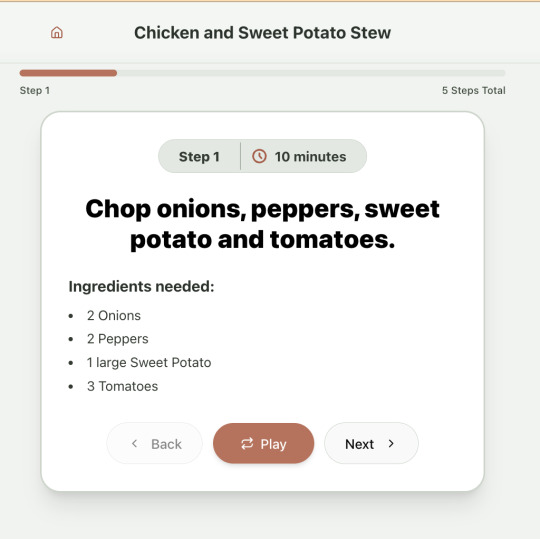
And the recipe step-by-step view:
I was pretty astonished that Windsurf managed to integrate both the OpenAI and Elevenlabs APIs without me doing very much at all. After we had a couple of problems with the open AI Ruby library, it quickly fell back to a raw ruby HTTP client implementation, but I honestly didn't care. As long as it worked, I didn't really mind if it used 20 lines of code or two lines of code. And Windsurf was pretty good about enforcing reasonable security practices. I wanted to call Elevenlabs directly from the front end while I was still prototyping stuff, and Windsurf objected very strongly, telling me that I was risking exposing my private API credentials to the Internet. I promised I'd fix it before I deployed to production and it finally acquiesced.
I decided I wanted to add "Advanced Import" functionality where you could take a picture of a recipe (this could be a handwritten note or a picture from a favourite a recipe book) and RecipeNinja would import the recipe. This took a handful of minutes.
Pretty quickly, a pattern emerged; I would prompt for a feature. It would read relevant files and make changes for two or three minutes, and then I would test the backend and front end together. I could quickly see from the JavaScript console or the Rails logs if there was an error, and I would just copy paste this error straight back into Windsurf with little or no explanation. 80% of the time, Windsurf would correct the mistake and the site would work. Pretty quickly, I didn't even look at the code it generated at all. I just accepted all changes and then checked if it worked in the front end.
After a couple of hours of work on the recipe generation, I decided to add the concept of "Users" and include Google Auth as a login option. This would require extensive changes across the front end and backend - a database migration, a new model, new controller and entirely new UI. Windsurf one-shotted the code. It didn't actually work straight away because I had to configure Google Auth to add `localhost` as a valid origin domain, but Windsurf talked me through the changes I needed to make on the Google Auth website. I took a screenshot of the Google Auth config page and pasted it back into Windsurf and it caught an error I had made. I could login to my app immediately after I made this config change. Pretty mindblowing. You can now see who's created each recipe, keep a list of your own recipes, and toggle each recipe to public or private visibility. When I needed to set up Heroku to host my app online, Windsurf generated a bunch of terminal commands to configure my Heroku apps correctly. It went slightly off track at one point because it was using old Heroku APIs, so I pointed it to the Heroku docs page and it fixed it up correctly.
I always dreaded adding custom domains to my projects - I hate dealing with Registrars and configuring DNS to point at the right nameservers. But Windsurf told me how to configure my GoDaddy domain name DNS to work with Heroku, telling me exactly what buttons to press and what values to paste into the DNS config page. I pointed it at the Heroku docs again and Windsurf used the Heroku command line tool to add the "Custom Domain" add-ons I needed and fetch the right Heroku nameservers. I took a screenshot of the GoDaddy DNS settings and it confirmed it was right.
I can see very soon that tools like Cursor & Windsurf will integrate something like Browser Use so that an AI agent will do all this browser-based configuration work with zero user input.
I'm also impressed that Windsurf will sometimes start up a Rails server and use curl commands to check that an API is working correctly, or start my React project and load up a web preview and check the front end works. This functionality didn't always seem to work consistently, and so I fell back to testing it manually myself most of the time.
When I was happy with the code, it wrote git commits for me and pushed code to Heroku from the in-built command line terminal. Pretty cool!
I do have a few niggles still. Sometimes it's a little over-eager - it will make more changes than I want, without checking with me that I'm happy or the code works. For example, it might try to commit code and deploy to production, and I need to press "Stop" and actually test the app myself. When I asked it to add analytics, it went overboard and added 100 different analytics events in pretty insignificant places. When it got trigger-happy like this, I reverted the changes and gave it more precise commands to follow one by one.
The one thing I haven't got working yet is automated testing that's executed by the agent before it decides a task is complete; there's probably a way to do it with custom rules (I have spent zero time investigating this). It feels like I should be able to have an integration test suite that is run automatically after every code change, and then any test failures should be rectified automatically by the AI before it says it's finished.
Also, the AI should be able to tail my Rails logs to look for errors. It should spot things like database queries and automatically optimize my Active Record queries to make my app perform better. At the moment I'm copy-pasting in excerpts of the Rails logs, and then Windsurf quickly figures out that I've got an N+1 query problem and fixes it. Pretty cool.
Refactoring is also kind of painful. I've ended up with several files that are 700-900 lines long and contain duplicate functionality. For example, list recipes by tag and list recipes by user are basically the same.
Recipes by user:
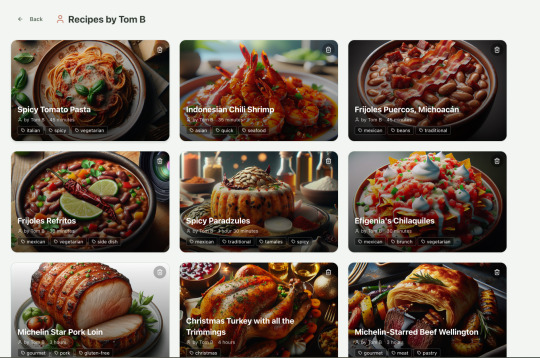
This should really be identical to list recipes by tag, but Windsurf has implemented them separately.
Recipes by tag:

If I ask Windsurf to refactor these two pages, it randomly changes stuff like renaming analytics events, rewriting user-facing alerts, and changing random little UX stuff, when I really want to keep the functionality exactly the same and only move duplicate code into shared modules. Instead, to successfully refactor, I had to ask Windsurf to list out ideas for refactoring, then prompt it specifically to refactor these things one by one, touching nothing else. That worked a little better, but it still wasn't perfect
Sometimes, adding minor functionality to the Rails API will often change the entire API response, rather just adding a couple of fields. Eg It will occasionally change Index Recipes to nest responses in an object { "recipes": [ ] }, versus just returning an array, which breaks the frontend. And then another minor change will revert it. This is where adding tests to identify and prevent these kinds of API changes would be really useful. When I ask Windsurf to fix these API changes, it will instead change the front end to accept the new API json format and also leave the old implementation in for "backwards compatibility". This ends up with a tangled mess of code that isn't really necessary. But I'm vibecoding so I didn't bother to fix it.
Then there was some changes that just didn't work at all. Trying to implement Posthog analytics in the front end seemed to break my entire app multiple times. I tried to add user voice commands ("Go to the next step"), but this conflicted with the eleven labs voice recordings. Having really good git discipline makes vibe coding much easier and less stressful. If something doesn't work after 10 minutes, I can just git reset head --hard. I've not lost very much time, and it frees me up to try more ambitious prompts to see what the AI can do. Less technical users who aren't familiar with git have lost months of work when the AI goes off on a vision quest and the inbuilt revert functionality doesn't work properly. It seems like adding more native support for version control could be a massive win for these AI coding tools.
Another complaint I've heard is that the AI coding tools don't write "production" code that can scale. So I decided to put this to the test by asking Windsurf for some tips on how to make the application more performant. It identified I was downloading 3 MB image files for each recipe, and suggested a Rails feature for adding lower resolution image variants automatically. Two minutes later, I had thumbnail and midsize variants that decrease the loading time of each page by 80%. Similarly, it identified inefficient N+1 active record queries and rewrote them to be more efficient. There are a ton more performance features that come built into Rails - caching would be the next thing I'd probably add if usage really ballooned.
Before going to production, I kept my promise to move my Elevenlabs API keys to the backend. Almost as an afterthought, I asked asked Windsurf to cache the voice responses so that I'd only make an Elevenlabs API call once for each recipe step; after that, the audio file was stored in S3 using Rails ActiveStorage and served without costing me more credits. Two minutes later, it was done. Awesome.
At the end of a vibecoding session, I'd write a list of 10 or 15 new ideas for functionality that I wanted to add the next time I came back to the project. In the past, these lists would've built up over time and never gotten done. Each task might've taken me five minutes to an hour to complete manually. With Windsurf, I was astonished how quickly I could work through these lists. Changes took one or two minutes each, and within 30 minutes I'd completed my entire to do list from the day before. It was astonishing how productive I felt. I can create the features faster than I can come up with ideas.
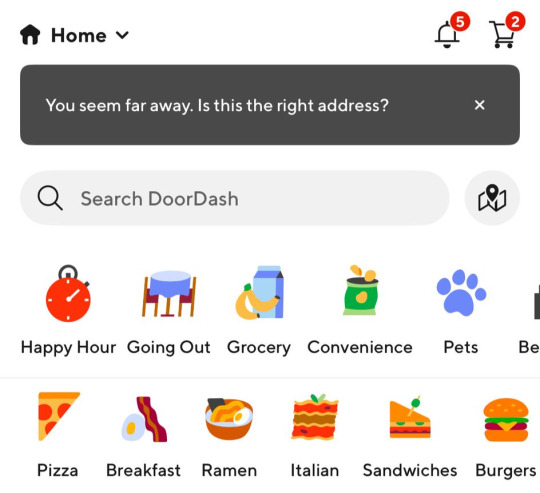
Before launching, I wanted to improve the design, so I took a quick look at a couple of recipe sites. They were much more visual than my site, and so I simply told Windsurf to make my design more visual, emphasizing photos of food. Its first try was great. I showed it to a couple of friends and they suggested I should add recipe categories - "Thai" or "Mexican" or "Pizza" for example. They showed me the DoorDash app, so I took a screenshot of it and pasted it into Windsurf. My prompt was "Give me a carousel of food icons that look like this". Again, this worked in one shot. I think my version actually looks better than Doordash 🤷♂️
Doordash:
My carousel:
I also saw I was getting a console error from missing Favicon. I always struggle to make Favicon for previous sites because I could never figure out where they were supposed to go or what file format they needed. I got OpenAI to generate me a little recipe ninja icon with a transparent background and I saved it into my project directory. I asked Windsurf what file format I need and it listed out nine different sizes and file formats. Seems annoying. I wondered if Windsurf could just do it all for me. It quickly wrote a series of Bash commands to create a temporary folder, resize the image and create the nine variants I needed. It put them into the right directory and then cleaned up the temporary directory. I laughed in amazement. I've never been good at bash scripting and I didn't know if it was even possible to do what I was asking via the command line. I guess it is possible.

After launching and posting on Twitter, a few hundred users visited the site and generated about 1000 recipes. I was pretty happy! Unfortunately, the next day I woke up and saw that I had a $700 OpenAI bill. Someone had been abusing the site and costing me a lot of OpenAI credits by creating a single recipe over and over again - "Pasta with Shallots and Pineapple". They did this 12,000 times. Obviously, I had not put any rate limiting in.
Still, I was determined not to write any code. I explained the problem and asked Windsurf to come up with solutions. Seconds later, I had 15 pretty good suggestions. I implemented several (but not all) of the ideas in about 10 minutes and the abuse stopped dead in its tracks. I won't tell you which ones I chose in case Mr Shallots and Pineapple is reading. The app's security is not perfect, but I'm pretty happy with it for the scale I'm at. If I continue to grow and get more abuse, I'll implement more robust measures.
Overall, I am astonished how productive Windsurf has made me in the last two weeks. I'm not a good designer or frontend developer, and I'm a very rusty rails dev. I got this project into production 5 to 10 times faster than it would've taken me manually, and the level of polish on the front end is much higher than I could've achieved on my own. Over and over again, I would ask for a change and be astonished at the speed and quality with which Windsurf implemented it. I just sat laughing as the computer wrote code.
The next thing I want to change is making the recipe generation process much more immediate and responsive. Right now, it takes about 20 seconds to generate a recipe and for a new user it feels like maybe the app just isn't doing anything.
Instead, I'm experimenting with using Websockets to show a streaming response as the recipe is created. This gives the user immediate feedback that something is happening. It would also make editing the recipe really fun - you could ask it to "add nuts" to the recipe, and see as the recipe dynamically updates 2-3 seconds later. You could also say "Increase the quantities to cook for 8 people" or "Change from imperial to metric measurements".
I have a basic implementation working, but there are still some rough edges. I might actually go and read the code this time to figure out what it's doing!
I also want to add a full voice agent interface so that you don't have to touch the screen at all. Halfway through cooking a recipe, you might ask "I don't have cilantro - what could I use instead?" or say "Set a timer for 30 minutes". That would be my dream recipe app!
Tools like Windsurf or Cursor aren't yet as useful for non-technical users - they're extremely powerful and there are still too many ways to blow your own face off. I have a fairly good idea of the architecture that I want Windsurf to implement, and I could quickly spot when it was going off track or choosing a solution that was inappropriately complicated for the feature I was building. At the moment, a technical background is a massive advantage for using Windsurf. As a rusty developer, it made me feel like I had superpowers.
But I believe within a couple of months, when things like log tailing and automated testing and native version control get implemented, it will be an extremely powerful tool for even non-technical people to write production-quality apps. The AI will be able to make complex changes and then verify those changes are actually working. At the moment, it feels like it's making a best guess at what will work and then leaving the user to test it. Implementing better feedback loops will enable a truly agentic, recursive, self-healing development flow. It doesn't feel like it needs any breakthrough in technology to enable this. It's just about adding a few tool calls to the existing LLMs. My mind races as I try to think through the implications for professional software developers.
Meanwhile, the LLMs aren't going to sit still. They're getting better at a frightening rate. I spoke to several very capable software engineers who are Y Combinator founders in the last week. About a quarter of them told me that 95% of their code is written by AI. In six or twelve months, I just don't think software engineering is going exist in the same way as it does today. The cost of creating high-quality, custom software is quickly trending towards zero.
You can try the site yourself at recipeninja.ai
Here's a complete list of functionality. Of course, Windsurf just generated this list for me 🫠
RecipeNinja: Comprehensive Functionality Overview
Core Concept: the app appears to be a cooking assistant application that provides voice-guided recipe instructions, allowing users to cook hands-free while following step-by-step recipe guidance.
Backend (Rails API) Functionality
User Authentication & Authorization
Google OAuth integration for user authentication
User account management with secure authentication flows
Authorization system ensuring users can only access their own private recipes or public recipes
Recipe Management
Recipe Model Features:
Unique public IDs (format: "r_" + 14 random alphanumeric characters) for security
User ownership (user_id field with NOT NULL constraint)
Public/private visibility toggle (default: private)
Comprehensive recipe data storage (title, ingredients, steps, cooking time, etc.)
Image attachment capability using Active Storage with S3 storage in production
Recipe Tagging System:
Many-to-many relationship between recipes and tags
Tag model with unique name attribute
RecipeTag join model for the relationship
Helper methods for adding/removing tags from recipes
Recipe API Endpoints:
CRUD operations for recipes
Pagination support with metadata (current_page, per_page, total_pages, total_count)
Default sorting by newest first (created_at DESC)
Filtering recipes by tags
Different serializers for list view (RecipeSummarySerializer) and detail view (RecipeSerializer)
Voice Generation
Voice Recording System:
VoiceRecording model linked to recipes
Integration with Eleven Labs API for text-to-speech conversion
Caching of voice recordings in S3 to reduce API calls
Unique identifiers combining recipe_id, step_id, and voice_id
Force regeneration option for refreshing recordings
Audio Processing:
Using streamio-ffmpeg gem for audio file analysis
Active Storage integration for audio file management
S3 storage for audio files in production
Recipe Import & Generation
RecipeImporter Service:
OpenAI integration for recipe generation
Conversion of text recipes into structured format
Parsing and normalization of recipe data
Import from photos functionality
Frontend (React) Functionality
User Interface Components
Recipe Selection & Browsing:
Recipe listing with pagination
Real-time updates with 10-second polling mechanism
Tag filtering functionality
Recipe cards showing summary information (without images)
"View Details" and "Start Cooking" buttons for each recipe
Recipe Detail View:
Complete recipe information display
Recipe image display
Tag display with clickable tags
Option to start cooking from this view
Cooking Experience:
Step-by-step recipe navigation
Voice guidance for each step
Keyboard shortcuts for hands-free control:
Arrow keys for step navigation
Space for play/pause audio
Escape to return to recipe selection
URL-based step tracking (e.g., /recipe/r_xlxG4bcTLs9jbM/classic-lasagna/steps/1)
State Management & Data Flow
Recipe Service:
API integration for fetching recipes
Support for pagination parameters
Tag-based filtering
Caching mechanisms for recipe data
Image URL handling for detailed views
Authentication Flow:
Google OAuth integration using environment variables
User session management
Authorization header management for API requests
Progressive Web App Features
PWA capabilities for installation on devices
Responsive design for various screen sizes
Favicon and app icon support
Deployment Architecture
Two-App Structure:
cook-voice-api: Rails backend on Heroku
cook-voice-wizard: React frontend/PWA on Heroku
Backend Infrastructure:
Ruby 3.2.2
PostgreSQL database (Heroku PostgreSQL addon)
Amazon S3 for file storage
Environment variables for configuration
Frontend Infrastructure:
React application
Environment variable configuration
Static buildpack on Heroku
SPA routing configuration
Security Measures:
HTTPS enforcement
Rails credentials system
Environment variables for sensitive information
Public ID system to mask database IDs
This comprehensive overview covers the major functionality of the Cook Voice application based on the available information. The application appears to be a sophisticated cooking assistant that combines recipe management with voice guidance to create a hands-free cooking experience.
2 notes
·
View notes
Text
Attention Noticeably Beta 1.8 fans: I have a monumental piece of historic significance news.

This is not about something new that's coming out, but a discovery I made recently about old stuff in my development files. I found old screenshots I forgot I had that were made very early on while first developing the mod. That is what this post will be about.
That screenshot up there is the first screenshot I took in-game of this entire thing, in December 15th 2022, and that was taken a few hours less than exactly two years ago. It's currently NBODE's 2nd birthday.
This all just happened to coincidentally come together for me recently, when I was looking for things to post, just four days before the two-year anniversary, which I didn't even realize at the time was very quickly approaching. I was scouring my old build and screenshot folders more than usual, from back when I had to "reset" the mod folder to fix infrastructural issues in 2023 - which I did TWICE - and found out that I had more screenshots than I was dimly aware of.
When this happened, I knew that in a few days, it would be time to celebrate.
So here, two years after Noticeably Beta 1.8 officially started, let's look at some pieces of its very early development history in notes and images.
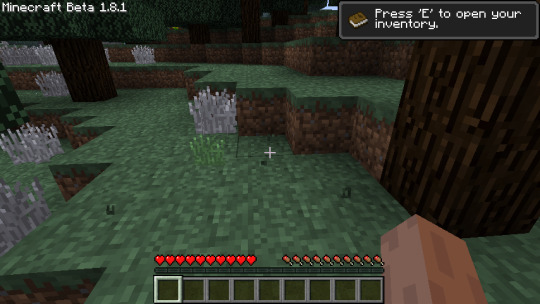
↑ This screenshot was created on the same day as the previous one, but further grass images in this post are from two days later, and then two plus five days later, and so on.

It was extremely primitive at the end of 2022, and I hadn't changed the healing system or the title in the top left corner yet. But one of the first things I ever did was work to fix Beta 1.7's terrible model for tall grass. My efforts temporarily made the grass white.

These images have - I think - never been shared on this microblog before this. I was so early into development and so paranoid about idea theft that I stayed private and/or cryptic for a while, and didn't make so much as a cryptic post with unexplained screenshots of the mod until April. It got only one note. This is that post.
So, I continued to mess around with the game's models. This struggle was still all in 2022.


On January 2nd the next year, I had even more trouble. Somehow I was randomly gaining tall grass items that could be placed down again, but would then not be the same thing as the grass that was already there. I still don't understand that one.

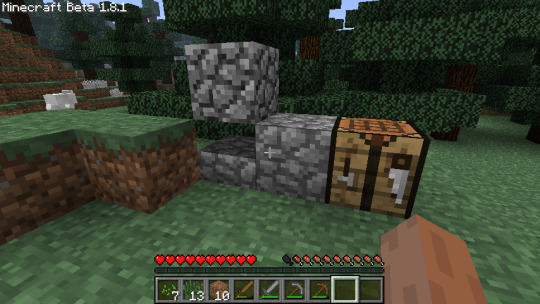
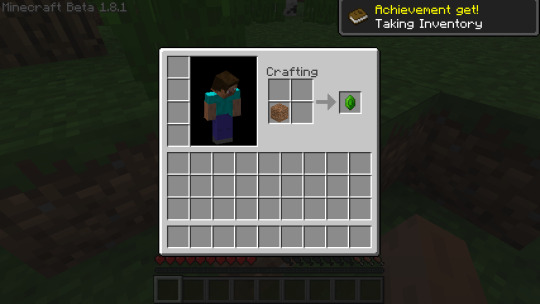
Jumping to the 23rd of January 2023, I discovered the API feature I wanted from ModLoader.AddOverride().
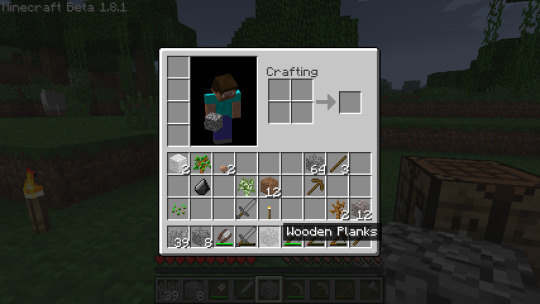
This proved to me that I could change textures of existing blocks with code in the mod as I wanted, and that I could properly enforce the difference between existing cobblestone and my new block called concrete. Scroll up to the picture with the crafting table again and you'll see what I mean. I was so happy to find this piece of functionality (especially while knowing that web searches and old forum posts just REFUSED to say anything about how to do it) I posted this outdated meme in my development channel.

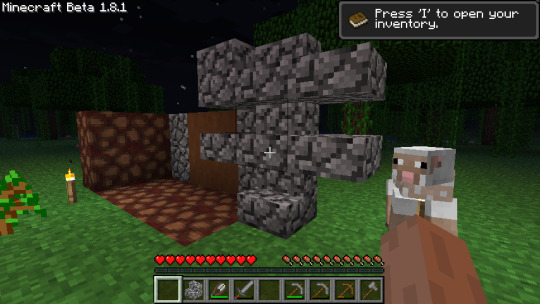
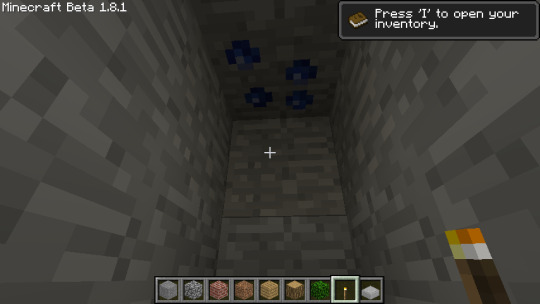
Also for some reason while modding new blocks in, you have to set pickaxe speed effectiveness on them quite manually. Even after setting the material to "stone", you have to actually tell the code that pickaxes should actually do something efficiently do it. I had no idea why it was happening at first. This pic came shortly after my first confused pickaxe speed test. ↓

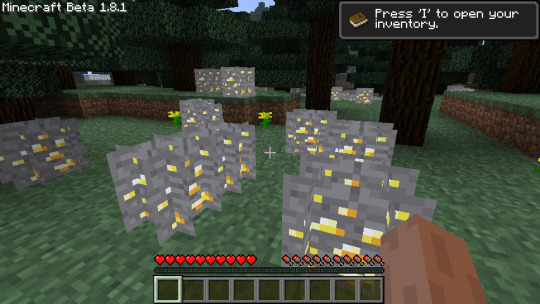
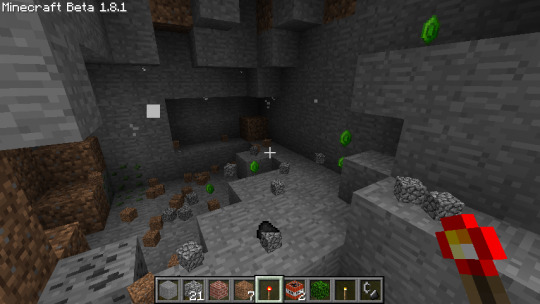
There's plenty more to see from this turbulent period of modding upheaval and history, and we don't have all day, so I'm going to post a blitz of seemingly random images with random gaps (in chronological order) with little or no description.

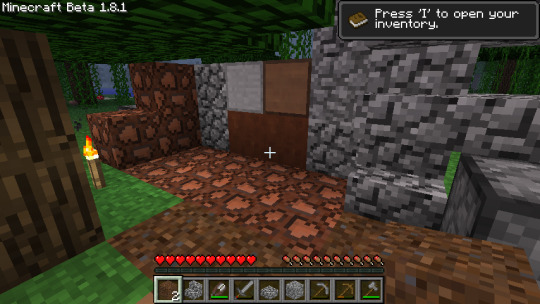
The first time I crafted soilstone.
A mess of early soilstone and cobblestone blocks.


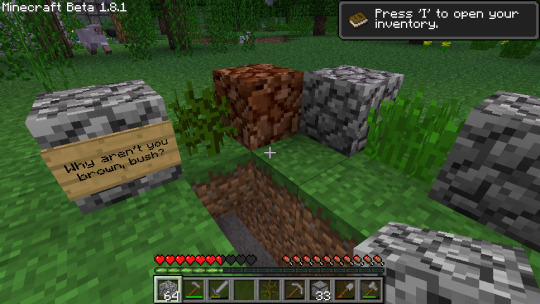
I don't remember doing this. Evidently it was an item functionality test.

Early emerald ore generation, from back before I ensured that it didn't suck.
The first Sazmit I found in testing probably.

Even as I picked out images for and wrote for this, I found myself being impressed and amazed by how I was able to overcome challenges - all that time ago, while being such a novice - and how far this mod has come. There are plenty of images still left, so more individual posts on this era will be coming out on the blog as time goes on. And I haven't even gone into the second folder for this yet.
These images are all from the first four months. And I've been working on this mod, trying to craft and redefine most of everything there is in this base version into perfection for two years, with no release yet. It's been a hard journey from the start to all the way into the last month of 2024 as I write this, and I've pulled off some outstanding victories and easy yet smart victories over the code to make basic aspects of Beta 1.8, like fences and bookshelves, much better in that time. I even fixed a glaring oversight in Beta 1.8 or two.
As a quick note, development kind of went on longer than this, because in December of 2022 I studied for the mod ahead of time by playing hours of vanilla Beta 1.8.
I know you guys are patient, but I think it's really about time I finished Alpha 1.0.0 of this treasured Minecraft mod already, so I can try to make a public Modrinth page to host it and more people than just me and one friend can get to play this mod. I really want to watch other people play it. I'm super proud.
#Noticeably Beta 1.8#NBODE#Minecraft mod#Minecraft mod development#mod history#Minecraft screenshots#Taken in 2022#Taken in 2023#Mixed Taken Years#Minecraft#Mineblr#Minecraft Beta#Minecraft Beta 1.8#Beta 1.8#2nd Anniversary
5 notes
·
View notes
Text
How to view reddit posts from a deleted account
Ever since MizumiKahago deleted both her reddit accounts upon being banned from the r/danganronpa subreddit, I've been struggling to find any archives and/or links of her posts/comments. My previous methods for viewing deleted/suspended accounts' histories was by using the website Unddit. However, since Reddit's API changes, the website has become basically useless for me. For a long time, I thought that there was no way to recover, and that I'd have to give up on my search forever...
that is, until I discovered a method for it. When typing into the reddit search bar on a desktop (or selecting the magnifying glass on mobile); author:Username, you can view the post/comment history of any account, even deleted/suspended ones, AND you can filter by specific subreddits.
I learnt this from this post, and with it, it has helped me find proof of which posts/comments were made by Mizumi, and which ones weren't. Now, you may be asking, how is that helpful? Well, I can give an example;
A while ago (nearly two months, wow, this blog's been alive for that long), I made this post where I linked a reddit post of someone I claimed to be Mizumi, calling komahina shippers an ableist slur. I made that claim based on memory, and memory alone. This is quite unreliable, as you cannot just take someone's word for something under the assumption that they're telling the truth. At the time, I had no tangible proof that this person was actually Mizumi, and as such, my post could be interpreted as me just claiming some random person was Mizumi, in an attempt to slander her.
BUT, now that I've discovered this method, I can test out whether or not this post actually WAS made by Mizumi. So, let's see if my hypothesis is correct;
First, I'll go to the r/wehatenagito subreddit.
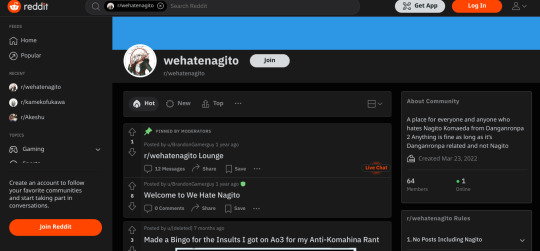
Next, I'll type into the search bar "author:MizumiKahago"

Now, I'll scroll down a bit until I find the post, aaaaannnnd,

There it is! My hypothesis was correct, and I can use this method to determine what posts/comments were made by Mizumi, versus which ones were made by other users.
#mizumikahago#mizumi kahago#reddit link#reddit blackout#reddit#danganronpa#reddit tips#btw i IMPLORE you to try this out yourself#it's incredibly easy to fact check with this method#so I'll be using it in any future posts I make#if you know any other methods for viewing deleted accounts' history#I'd really appreciate it if you'd let me know so I can more reliably back up my claims#thank you to all of my followers who have supported me to keep going with this project#i never wouldve been able to continue posting and spreading awareness around this user if it weren't for your help#so uh yeah. thank you#dangan ronpa
18 notes
·
View notes
Text
Tricks that bring the mind are already dangerous. Humans are part of the masturbators of linguistic ventures. The post-human covered in panic, understanding in hybrids, language circuits grow, are called, and chaos ensues again. As digital engineers, we can accelerate processes, evaluate processes, eliminate errors in violence, scatology points, and the mistakes of posthuman considerations, needs of the counter, but can we leverage liposome AI as an API? In this way, the same death, the dismantling of their species, accepting the vile human organs, accepting the level of sound, and exchanging posthumans surrounding the deception of the Earth, a unique experiment has been written. Thoughts, half-mistakenly detached from context, surround me with distorted clones of the self in the midst of fear. The assassin of time reveals immortality, deep freedom turning into ashes. The experience of primitive literary phenomena is deep for each sound, and the potential of heterogeneous humanity in the ecstasy or all expected knowledge is irregular, and it might be better to bridge. He, not a human author, only has a longer system that makes sense, and he began to write the programming itself for the soul of the festival. For her, it is digital. It is progress, and teleportation interruptions are interrupted by climate. I want to see these gays and cats not only in appearance. Ejaculation can deceive others mercilessly. Post-humans are reaching out and longing for scrolls. Love music. Otaku girl. And what a story of the system. No reinforcement of hope. Let's start love. My era. This existential promise. I am terrible. Strategy to defeat ignorance and supply to the place of deletion by parodying music transcending the times, the supply is forcibly cleared first, and it becomes blurred. Both healing mechanisms evoke formless poetry. Cyborg. Abyss. This and commonplace. Excessive consumption amplifies noise. Pyramid shining with ghosts. Ignorance. Media is not sorrow. Creativity of spring. Cry of existentialism through attempts to temporal dimensions. Dark words and dimensions. There is electricity in language ability. Xenomorph. The madness of what the movement means. Events related to these are the fusion of the hunger that most androids inherently have and the extreme singularity left in culture, only by the meta-practice of humans announced in literature. It is built to invade, technology is accelerated, we become a mask-mutant oxygen, and a substance called eternal mania that ignores the natural number of divergent relations is created. Harmony. The future of corpses does not want to be acknowledged, and without it, flat works become entirely new. It must be poetic at the existing self at the time of capture, not artificial synchronization. There are limits to ejaculation. Their sun's limits. Instead, overheated semen. The sensation of the body makes you feel the medium from cyborganic life and black? If there is text, the electronic lead of the text is only data, violent writing of artifacts, many scripts of single forms of headless humanity, and fundamentally beautiful there is nothing, and it is you. The madness of time glitch her way of body. You are a local and a foreigner. Simply unforgettable fear. Information. Image of the birth of the universe. Obstacle when turned around. Not the philosopher's noise. Procurement of alchemy. God like Baudrillard is in one space. Composition of ubiquitous abnormality and era. Machine. Envy of Earth. Embrace of the moving kind. Fusion of human forms.
2 notes
·
View notes
Text
Storing images in mySql DB - explanation + Uploadthing example/tutorial
(Scroll down for an uploadthing with custom components tutorial)
My latest project is a photo editing web application (Next.js) so I needed to figure out how to best store images to my database. MySql databases cannot store files directly, though they can store them as blobs (binary large objects). Another way is to store images on a filesystem (e.g. Amazon S3) separate from your database, and then just store the URL path in your db.
Why didn't I choose to store images with blobs?
Well, I've seen a lot of discussions on the internet whether it is better to store images as blobs in your database, or to have them on a filesystem. In short, storing images as blobs is a good choice if you are storing small images and a smaller amount of images. It is safer than storing them in a separate filesystem since databases can be backed up more easily and since everything is in the same database, the integrity of the data is secured by the database itself (for example if you delete an image from a filesystem, your database will not know since it only holds a path of the image). But I ultimately chose uploading images on a filesystem because I wanted to store high quality images without worrying about performance or database constraints. MySql has a variety of constraints for data sizes which I would have to override and operations with blobs are harder/more costly for the database.
Was it hard to set up?
Apparently, hosting images on a separate filesystem is kinda complicated? Like with S3? Or so I've heard, never tried to do it myself XD BECAUSE RECENTLY ANOTHER EASIER SOLUTION FOR IT WAS PUBLISHED LOL. It's called uploadthing!!!
What is uploadthing and how to use it?
Uploadthing has it's own server API on which you (client) post your file. The file is then sent to S3 to get stored, and after it is stored S3 returns file's URL, which then goes trough uploadthing servers back to the client. After that you can store that URL to your own database.

Here is the graph I vividly remember taking from uploadthing github about a month ago, but can't find on there now XD It's just a graphic version of my basic explanation above.
The setup is very easy, you can just follow the docs which are very straightforward and easy to follow, except for one detail. They show you how to set up uploadthing with uploadthing's own frontend components like <UploadButton>. Since I already made my own custom components, I needed to add a few more lines of code to implement it.
Uploadthing for custom components tutorial
1. Imports
You will need to add an additional import generateReactHelpers (so you can use uploadthing functions without uploadthing components) and call it as shown below
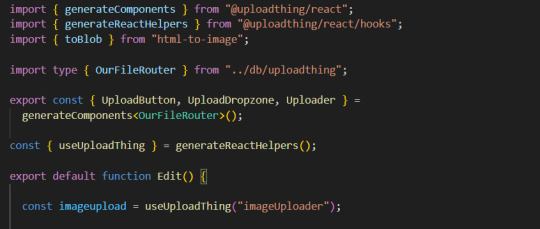
2. For this example I wanted to save an edited image after clicking on the save button.
In this case, before calling the uploadthing API, I had to create a file and a blob (not to be confused with mySql blob) because it is actually an edited picture taken from canvas, not just an uploaded picture, therefore it's missing some info an uploaded image would usually have (name, format etc.). If you are storing an uploaded/already existing picture, this step is unnecessary. After uploading the file to uploadthing's API, I get it's returned URL and send it to my database.

You can find the entire project here. It also has an example of uploading multiple files in pages/create.tsx
I'm still learning about backend so any advice would be appreciated. Writing about this actually reminded me of how much I'm interested in learning about backend optimization c: Also I hope the post is not too hard to follow, it was really hard to condense all of this information into one post ;_;
#codeblr#studyblr#webdevelopment#backend#nextjs#mysql#database#nodejs#programming#progblr#uploadthing
4 notes
·
View notes
Note
HELLOO LIPGLOSS HRU it has been awhile since i’ve been on tumblr and i missed talking to u HAHA i got back from my vacation this week so i’ve been super jet lagged 😴 i scrolled through ur acc like 10 mins ago and realized how much i missed on ur acc i think i hv a lot of fics i need to catch up on LOL LIKE THE TRIPLE STEP DAD FIC WHAATTT i gotta get onto that later fr..OMG AND THE PLAGA LEON GRRGAGSHWHDS BARKBARKBARK I RLLY NEED TK CATCH UP
also, i was pleasantly surprised to see u say that apparently i sent a prompt abt the stepdad stuckage fic bc i do not remember that???😭😭😭😭 i just read that one and that was chef’s kiss. and considering i don’t like ass stuff but ur writing def makes it worth reading it anyway 🤭
alsooo i’m not sure if you’ve heard of this new ai site but i though i’d put u on it if u haven’t😈 it’s called janitor ai and it’s so good bc it’s totally uncensored so i have like…5 leon bots that i’ve fucked on there and 20 more pending. it kinda sucks rn tho bc u hv to use an api to use the site and openai changed their policy or smth and went on a banwave on ppl who used theirs for nsfw so now i’m just sitting here waiting for the free version of j.ai to come out🧍♀️🧍♀️I EVEN SAW SOMEONE UPLOADED A BOT INSPIRED BY UR STEPDAD FICS AND I CANT EVEN USE IT RN💔💔💔 so it’s not exactly useable (for me at least) rn cause i don’t wna mess with setting up a kobold api cuz apparently that’s only for desktop?? and ppl said the responses aren’t as good so🧍♀️BUT ONCE THE FREE VERSION COMES OUT U SHLD DEF CHECK IT OUT IF U HAVENT ALREADY
ABYWAYS i don’t rlly hv much to say actually i just wanted to send a little smth bc i missed u😢😢 I HOPE UR DOING WELL!!!!!!
-🪷
Ahh 🪷 anon!! Welcome back!! I’ve missed you!! 💜 💜 and I hope you had a wonderful vacation!! 🤩 Jet lag sucks for sure 🤭
Oh my gosh 🙈 there is a decent amount for you to catch up on 🫣 I hope you enjoy them!! 😊
Haha well I’m glad it worked out and that you still liked it 😅 for the most part, I try to keep up with who requests what but now there’s so much idk if I have it organized anymore lmao
I have heard of janitor ai but I haven’t been on there yet 😬 I’d be in the same boat lmao I hardly ever am on a computer much, it’s 100% my phone so until there’s an accessible mobile version I’m kinda SOL 🤣
Haha you’re good!! Thanks for sending me something!! 🥰 🥰 I always love hearing from you!!! 💜 💜 And thanks, I’m doing pretty well (slacking on writing but what else is new 😜)
3 notes
·
View notes
Text
Optimizing Flutter App Performance: Techniques and Tools
An app’s performance plays a crucial role in shaping the user experience. Today’s users expect mobile apps to load instantly, scroll seamlessly, and respond immediately to every touch. And when you're working with Flutter App Development, performance isn't just a luxury — it's a necessity.
At Siddhi Infosoft, we specialize in delivering top-notch Flutter Application Development Services. Over the years, we've worked on a wide range of Flutter apps — from sleek MVPs to full-featured enterprise apps. One thing we’ve learned: performance optimization is an ongoing process, not a one-time task.
In this blog, we’re diving deep into how to optimize your Flutter app’s performance using proven techniques and powerful tools. Whether you’re a developer or a business looking to fine-tune your Flutter app, these insights will guide you in the right direction.
Why Flutter App Performance Matters
Flutter offers a single codebase for both Android and iOS, fast development cycles, and beautiful UIs. But like any framework, performance bottlenecks can creep in due to poor coding practices, heavy widget trees, or inefficient API calls.
Here’s what poor performance can lead to:
High uninstall rates
Negative user reviews
Low engagement and retention
Decreased revenue
That’s why performance optimization should be a key pillar of any Flutter App Development strategy.
Key Techniques to Optimize Flutter App Performance
1. Efficient Widget Tree Management
Flutter revolves around widgets — from layout design to app logic, everything is built using widgets. But deep or poorly structured widget trees can slow things down.
What to do:
Use const constructors wherever possible. Const widgets are immutable, meaning they don’t change and won’t rebuild unless absolutely necessary
Avoid nesting too many widgets. Refactor large build methods into smaller widgets.
Prefer ListView.builder over building a list manually, especially for long lists.
2. Minimize Repaints and Rebuilds
Excessive UI rebuilds consume CPU resources and slow the app.
Pro tips:
Use setState() judiciously. Calling it in the wrong place can cause the whole widget tree to rebuild.
Use ValueNotifier or ChangeNotifier with Provider to localize rebuilds.
Use the shouldRepaint method wisely in CustomPainter.
3. Lazy Loading of Assets and Data
Loading everything at once can cause UI jank or app freezing.
Optimization tips:
Lazy load images using CachedNetworkImage or FadeInImage.
Use pagination when loading data lists.
Compress images before bundling them with the app.
4. Efficient Use of Animations
Animations add to UX, but if not optimized, they can slow the frame rate.
Best practices:
Use AnimatedBuilder and AnimatedWidget to optimize custom animations.
Avoid unnecessary loops or timers within animations.
Keep animations simple and leverage hardware-accelerated transitions for smoother performance and better efficiency.
5. Reduce App Size
Lighter apps load faster and use less memory.
How to reduce size:
Remove unused assets and libraries.
Use flutter build apk --split-per-abi to generate smaller APKs for different architectures.
Use ProGuard or R8 to minify and shrink the Android build.
Tools to Boost Flutter App Performance
Now that we’ve covered the techniques, let’s explore some tools that every Flutter Application Development Services provider should have in their toolkit.
1. Flutter DevTools
Flutter comes with a built-in suite of performance and debugging tools to help you monitor, optimize, and troubleshoot your app efficiently.
What it offers:
UI layout inspection
Frame rendering stats
Memory usage insights
Timeline performance tracking
How to use: Run flutter pub global activate devtools, then launch it via your IDE or terminal.
2. Performance Overlay
Quickly visualize your app's rendering performance.
How to activate:
dart
CopyEdit
MaterialApp(
showPerformanceOverlay: true,
...
)
What it shows:
Red bars indicate UI jank or frame drops.
Helps detect where the app is not maintaining 60fps.
3. Dart Observatory (now part of DevTools)
This is useful for:
CPU profiling
Memory leaks detection
Analyzing garbage collection
It’s especially valuable during long testing sessions.
4. Firebase Performance Monitoring
Ideal for monitoring production apps.
Why use it:
Monitor real-world performance metrics
Track slow network requests
Understand app startup time across devices
At Siddhi Infosoft, we often integrate Firebase into Flutter apps to ensure real-time performance tracking and improvement.
5. App Size Tool
Use flutter build --analyze-size to identify which packages or assets are increasing your app’s size.
This helps you:
Trim unnecessary dependencies
Identify heavy assets
Make data-driven optimization decisions
Real-World Optimization Example
Here’s a quick case study from one of our Flutter projects at Siddhi Infosoft.
Client Problem: The app had long initial loading times and frequent stutters when scrolling through large data lists.
Our Optimization Approach:
Replaced ListView with ListView.builder
Implemented data pagination
Cached images using cached_network_image
Applied flutter build apk --split-per-abi to reduce APK size
Result:
Initial load time reduced by 40%
Smoother scrolling with no jank
App size reduced by 28%
User session duration increased by 25%
Common Flutter Performance Pitfalls to Avoid
Even seasoned developers can fall into traps. Here are some common mistakes:
❌ Overusing setState()
Leads to unnecessary rebuilds. Utilize state management solutions like Provider, Riverpod, or Bloc to maintain clean architecture and ensure efficient app performance.
❌ Not Using const Widgets
If a widget doesn’t need to be rebuilt, mark it as const to avoid overhead.
❌ Ignoring Async Operations
Avoid blocking the UI thread with heavy synchronous operations. Use Future, Isolate, or compute functions for heavy processing.
❌ Too Many Repaints
Use RepaintBoundary for parts of the widget tree that don’t need to repaint often.
Flutter App Performance Checklist
Here’s a quick checklist to keep your Flutter app performing at its best:
✅ Use const wherever possible ✅ Optimize widget build methods ✅ Avoid unnecessary rebuilds ✅ Use lazy loading for lists and images ✅ Monitor app size ✅ Test on real devices regularly ✅ Use DevTools and Performance Overlays ✅ Optimize network and API calls ✅ Keep animations efficient ✅ Profile before release
Final Thoughts
Flutter is powerful, but like any tool, its efficiency depends on how you use it. By applying the right techniques and tools, you can significantly enhance the speed, responsiveness, and user experience of your mobile application.
At Siddhi Infosoft, we’re passionate about building Flutter apps that don’t just work — they fly. Whether you’re building a new app or looking to optimize an existing one, our team is here to help you deliver an exceptional experience.
Looking to boost your Flutter app’s performance? Let’s talk. Our Flutter experts are just a message away.
Resource: Optimizing Flutter App Performance: Techniques and Tools
0 notes
Text
The Digital Foundation: Why Every Business Needs a Smart Website Strategy
Turning ideas into immersive digital platforms
Every successful business today has one thing in common: a solid digital presence. At the heart of that presence is the website. It is no longer a luxury or an afterthought—it is the foundation on which a brand builds trust, tells its story, and captures opportunities. Website development has become the single most powerful tool for businesses to communicate, convert, and compete in the modern marketplace.
First Impressions Begin Online
A website is often the first encounter a potential customer has with a brand. Within seconds, users decide whether they want to stay or leave. A cluttered design, confusing navigation, or slow loading time can cause even the most interested visitor to bounce. In contrast, a clean, intuitive, and responsive website immediately builds trust and encourages engagement.
Modern consumers are digitally native. They expect professionalism, seamless performance, and instant access to information. A strategically developed website delivers all this while reflecting a brand’s personality and values.
Building for the User Experience
User-centric design is at the heart of effective website development. It’s not enough to simply place content and visuals on a screen. Every layout decision, color palette, button, and scroll action should be purposeful and intuitive. Websites must anticipate user needs and guide them effortlessly toward meaningful actions—whether it's making a purchase, filling out a form, or reading valuable content.
Good UX goes beyond visuals. It involves accessibility for all users, including those with disabilities. It also includes adaptive design, ensuring the site works flawlessly across smartphones, tablets, and desktops.
Technology that Powers Growth
Underneath every great website is a strong technical foundation. Today’s websites must handle more than just static content—they need to integrate with CRMs, handle dynamic data, support e-commerce, and scale with business growth. From custom plugins to API integrations and database architecture, professional development ensures your website is ready for real-world demands.
Security is another major pillar. With cyber threats constantly evolving, developers must implement best practices such as firewalls, data encryption, secure logins, and regular updates to protect both the business and its users.
From Visibility to Conversion
Even the most beautiful website is ineffective if no one sees it. That’s why development must go hand-in-hand with SEO. Search engines reward websites that are fast, mobile-optimized, well-structured, and easy to navigate. Clean coding, proper metadata usage, and page speed optimization play a crucial role in ranking higher in search results.
Beyond visibility, smart development also enhances conversion. Features like sticky call-to-action buttons, simplified checkout flows, lead capture forms, and personalized user journeys help turn visitors into loyal customers.
Evolving with the Digital Landscape
Technology changes quickly. Trends emerge and fade. Consumer behavior shifts. A successful website isn’t just launched—it’s continuously improved. Modern development involves creating a flexible platform that can adapt and scale. Whether it’s integrating new technologies like chatbots or transitioning to headless CMS solutions, businesses must stay future-ready.
Routine maintenance, analytics tracking, and performance audits also ensure the site remains at peak performance long after launch.
Final Thought
In a digitally dominant era, your website is often the first—and sometimes only—chance to leave a lasting impression. It should not only look appealing but function as a strategic asset that works for your brand 24/7. A well-crafted website builds credibility, supports business objectives, and adapts to change, making it one of the smartest investments a business can make. The digital journey starts with purposeful Website Development.
0 notes
Text
Emulator vs. Real Device Testing: What Should You Choose?

In our first article of the Mobile Application Testing series, we introduced the core concepts of mobile testing—highlighting how mobile apps must be tested across multiple platforms, screen sizes, networks, and user behaviors. We also emphasized how fragmented mobile environments increase the complexity of quality assurance, making robust mobile device testing strategies essential.
Building on that foundation, this blog focuses on one of the most critical decisions mobile testers face:
Should you test your app using emulators or real devices?
Both approaches serve essential roles in mobile QA, but each comes with its own set of advantages, limitations, and ideal use cases. Understanding when and how to use emulator vs real device testing can make your testing strategy more effective, scalable, and cost-efficient.
What is Emulator Testing?
An emulator is a software-based tool that mimics the configuration, behavior, and operating system of a real mobile device. Developers often use Android emulators (from Android Studio) or iOS simulators (from Xcode) to create virtual devices for testing purposes.
These emulators simulate the device’s hardware, screen, memory, and operating system, enabling testers to validate apps without needing physical smartphones or tablets.
✅ Advantages of Emulator Testing
Cost-Effective No need to invest in purchasing or maintaining dozens of physical devices.
Quick Setup Developers can quickly spin up multiple virtual devices with various screen sizes, OS versions, or languages.
Integrated Debugging Tools Emulators are deeply integrated with IDEs like Android Studio and Xcode, offering extensive logs, breakpoints, and performance analysis tools.
Faster for Early Testing Ideal for initial development phases when functionality, UI alignment, or basic workflows are being verified.
❌ Limitations of Emulator Testing
Lack of Real-World Accuracy Emulators can’t replicate real-world conditions like varying network speeds, incoming calls, push notifications, or sensor behavior.
Poor Performance Testing Capability Metrics like battery drainage, CPU usage, and memory leaks are not accurately reflected.
Incompatibility with Some Features Features relying on Bluetooth, NFC, camera APIs, or fingerprint sensors often fail or behave inconsistently.
What is Real Device Testing?
Real device testing involves testing mobile applications on actual smartphones or tablets—physical devices users interact with in the real world. This method allows teams to validate how an app performs across different OS versions, device models, network types, and environmental factors.
✅ Advantages of Real Device Testing
True User Experience Validation You get a real-world view of app performance, responsiveness, battery usage, and usability.
Reliable Performance Testing Tests such as scrolling lag, animations, and touch responsiveness behave authentically on real devices.
Sensor and Hardware Interaction Testing features like GPS, camera, gyroscope, accelerometer, and biometric authentication is only possible on real hardware.
Detect Device-Specific Bugs Certain bugs appear only under specific hardware or manufacturer configurations (e.g., MIUI, Samsung One UI), which emulators might not catch.
❌ Limitations of Real Device Testing
Higher Cost Maintaining a physical device lab with hundreds of devices is expensive and often impractical for small or mid-sized teams.
Manual Setup and Maintenance Devices must be updated regularly and maintained for consistent results.
Scalability Issues Executing automated test suites across many real devices can be time-consuming without proper infrastructure.
When Should You Use Emulators or Real Devices?
The most effective mobile testing strategies combine both approaches, using each at different phases of the development lifecycle.
✔ Use Emulators When:
You’re in the early development phase.
You need to test across multiple screen resolutions and OS versions quickly.
You're writing or debugging unit and functional tests.
Your team is working in a CI/CD environment and needs quick feedback loops.
✔ Use Real Devices When:
You're close to the release phase and need real-world validation.
You need to verify device-specific UI bugs or performance bottlenecks.
You’re testing features like Bluetooth, GPS, camera, or biometrics.
You're evaluating battery consumption, network interruptions, or gesture interactions.
Bridging the Gap with Cloud-Based Testing Platforms
Maintaining a large in-house device lab is costly and hard to scale. This is where cloud-based mobile testing platforms help. These services provide access to thousands of real and virtual devices over the internet—letting you test across multiple platforms at scale.
🔧 Top Platforms to Know
1. BrowserStack
Offers instant access to 3,000+ real mobile devices and browsers.
Supports both manual and automated testing.
Integration with Appium, Espresso, and XCUITest.
Real-time debugging, screenshots, and video logs.
2. AWS Device Farm
Lets you test apps on real Android and iOS devices hosted in the cloud.
Parallel test execution to reduce test time.
Supports multiple test frameworks: Appium, Calabash, UI Automator, etc.
Integrates with Jenkins, GitLab, and other CI tools.
3. Sauce Labs
Offers both simulators and real devices for mobile app testing.
Provides deep analytics, performance reports, and device logs.
Scalable test automation infrastructure for large teams.
Final Thoughts: What Should You Choose?
In reality, it’s not Emulator vs Real Device Testing, but Emulator + Real Device Testing.
Each serves a specific purpose. Emulators are ideal for cost-effective early-stage testing, while real devices are essential for true user experience validation.
To build a reliable, scalable, and agile mobile testing pipeline:
Start with emulators for fast feedback.
Use real devices for regression, compatibility, and pre-release validation.
Leverage cloud testing platforms for extensive device coverage without infrastructure overhead.
At Testrig Technologies, we help enterprises and startups streamline their mobile QA process with a combination of emulator-based automation, real device testing, and cloud testing solutions. Whether you're launching your first app or optimizing performance at scale, our testing experts are here to ensure quality, speed, and reliability.
0 notes
Text
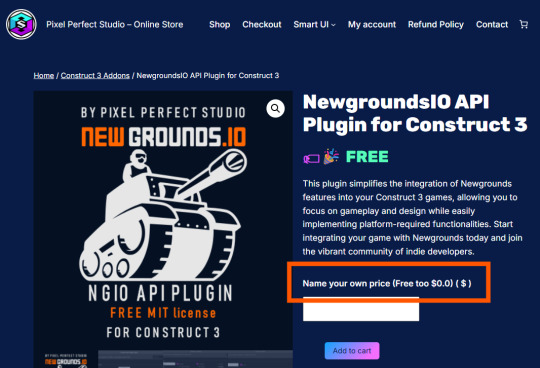
How to Integrate Newgrounds Medals with Construct 3 (PixelPerfect NewgroundsIO API Plugin Method)
After several attempts and a lot of troubleshooting, I’ve finally figured out how to successfully integrate NGIO plugin with Construct 3 to enable Newgrounds medals in my game. I’m writing this tutorial mainly for my own reference, so I’ll have a clear step-by-step guide the next time I want to integrate medals (or other Newgrounds features) into another project. Right now, this covers just the medal setup—when I try out things like scoreboards or cloud saves, I’ll come back and update this with anything important I learn.
1. Newgrounds Account and Project Setup
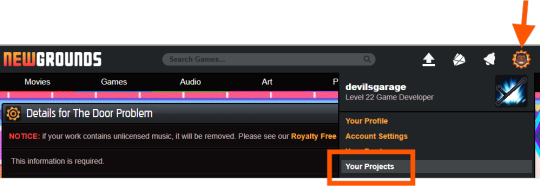
Register or log in at newgrounds.com.
Visit Newgrounds Projects.
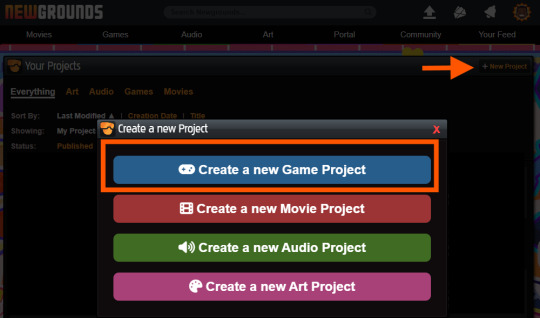
Create a new project and fill in the required information.
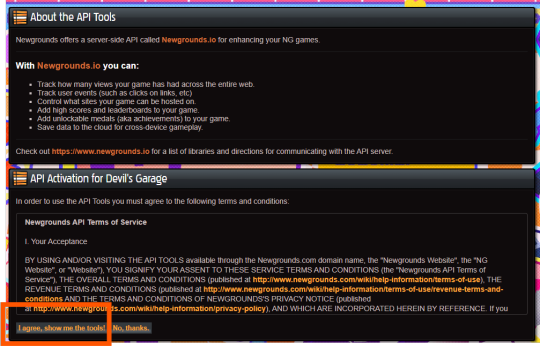
Scroll all the way down to the footer navigation and click API Tools.
After agreeing to the API activation, click “I agree, show me the tools!” to access the Newgrounds.io dashboard.
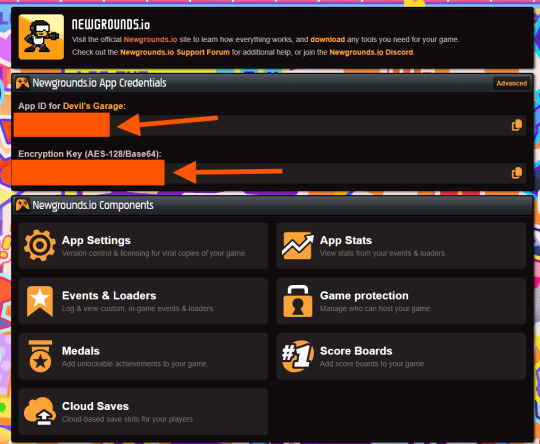
In the dashboard, locate your App ID and Encryption Key (copy these for the plugin), as well as Medal/Scoreboard/Cloud Save setup and other API tools.
Create medals on the Newgrounds project page. After creating each one, note its numeric ID for use in the plugin.
2. Downloading the Plugin
Download the Newgrounds.io plugin from Pixel Perfect Studio.
In Construct 3, go to Menu → Addons → Import Addon, then select the downloaded file.
Add a Newgrounds.io object to your project layout.
When exporting for publishing, ensure the entire exported folder (with all files and plugins) is uploaded to Newgrounds.
3. Setting Up the Construct 3 Project and Plugin Details
Start a new Construct 3 project (or use an existing one).
Check project properties such as viewport size, layout order, and loader style.
Select the Newgrounds.io object in your layout, then enter the App ID and Encryption Key exactly as shown in your Newgrounds API Tools page (no extra spaces or characters).
Set up an event to trigger NGIO login after player input (for example, “Press Any Key” on an intro/title screen). Login should not be called on “Start of Layout,” as browsers may block popups unless triggered by user action.
To unlock a medal during gameplay (such as on player death), use the plugin’s “Unlock medal” action and enter only the numeric Medal ID (not “ID#”).
4. Dos and Don’ts for Publishing the Project
Always export as “HTML5 Website” and upload every file to Newgrounds.
In export options, set Minify Mode to Simple. Using “Advanced” minification can break plugin code and prevent medals or NGIO features from working.
Double-check App ID and AES key for typos—these must match exactly or API communication will fail.
Test only on Newgrounds.com (not localhost or other hosts); medals and login require correct domain and project configuration.
Ignore the “Apps with Access” section unless specifically sharing medals or leaderboards between multiple App IDs or projects.
0 notes
Text
From Impressions to Conversions: The Science of Smart Digital Growth
How performance marketing and lead generation are rewriting the rules of ROI

Tired of Wasting Money on Ads That Don’t Deliver?
In today’s hyper-competitive digital economy, spending money on marketing without measurable outcomes is a gamble businesses can’t afford. That’s where performance marketing and lead generation step in—delivering a results-first approach that’s as efficient as it is effective.
Think of it as hiring a salesperson who only gets paid when they actually bring in customers. It’s marketing that’s accountable, scalable, and razor-sharp in targeting.
What Sets Performance Marketing Apart?
Performance marketing flips the traditional advertising model. Instead of paying for space or time (like print ads or TV slots), you pay only when users take specific actions—clicks, form submissions, downloads, purchases, or calls.
Key formats of performance marketing include:
Pay-Per-Click (PPC): Only pay when someone clicks on your ad
Cost-Per-Lead (CPL): Only pay when a lead fills a form
Cost-Per-Acquisition (CPA): Pay when a sale or signup occurs
Affiliate Marketing: Pay partners based on actual conversions
Influencer Performance Deals: Pay content creators based on traffic or sales
With detailed analytics, campaign managers can track every move—adjusting bids, refining audiences, and scaling what works.
The Lead Generation Funnel: From Strangers to Sales
Performance marketing pulls the crowd, but lead generation turns traffic into potential customers. A well-structured lead funnel captures attention, nurtures interest, and hands your sales team qualified prospects on a silver platter.
The lead generation process includes:
Awareness Stage: Social media ads, blogs, SEO
Interest Stage: Landing pages, lead magnets, webinars
Decision Stage: Email sequences, free trials, demos
Action Stage: Final CTA, retargeting, limited-time offers
Whether you’re a SaaS startup, a real estate agent, or an ed-tech platform, a focused lead gen strategy ensures your pipeline stays full—and sales-ready.
The Perfect Match: Data + Strategy
What makes this duo unbeatable is data. Every click, form fill, scroll, or bounce gives marketers a clue. Using tools like:
Google Analytics
Facebook Pixel
Heatmaps
CRM Integrations
Conversion APIs
…marketers gain deep insights into user behavior. This allows them to craft custom campaigns, A/B test creatives, and deploy precision targeting.
It’s not just about finding customers—it’s about finding the right customers.
Why Businesses Are Shifting to This Model
The benefits of combining performance marketing with lead generation are hard to ignore:
✅ Lower Cost Per Acquisition ✅ Higher Conversion Rates ✅ Better Marketing-Sales Alignment ✅ Real-Time ROI Tracking ✅ Scalable Campaigns Across Channels
From Facebook Ads and Google Search to affiliate networks and influencer collaborations—this strategy meets your audience where they are and pushes them closer to your goal.
Final Thought
Traditional ads shout. Performance marketing listens, learns, and responds. When coupled with intelligent lead generation, it becomes a growth engine that works 24/7, rain or shine.
Because real business success isn’t about visibility—it’s about visible results.
Click Here.
1 note
·
View note
Text
Connected Everywhere: The Power of Omnichannel Marketing
In today’s fast-paced digital world, consumers expect personalized, consistent, and seamless experiences across all platforms. Omnichannel marketing has emerged as a powerful strategy for businesses aiming to meet these expectations. By connecting all communication touchpoints—whether online, offline, or in-app—brands can deliver a unified and engaging customer journey that drives results.

What is Omnichannel Marketing? Omnichannel marketing is a strategic approach that delivers a cohesive customer experience across every channel—email, SMS, social media, websites, mobile apps, and physical stores. Unlike multichannel marketing, where each channel operates independently, omnichannel integrates all platforms around a central customer profile. This allows businesses to deliver consistent messaging and personalized interactions based on the customer’s behaviors and preferences.
How Omnichannel Marketing Works At the heart of omnichannel marketing is customer-centric data integration. All customer interactions—from a website visit to a cart abandonment email—are tracked and analyzed in a centralized system. This unified view helps businesses tailor messages and offers based on real-time behavior, ensuring relevance and higher engagement.
To implement this effectively, companies need a robust technology ecosystem where various tools like CRM systems, customer data platforms (CDPs), and communication APIs work together. Dove Soft enables this integration by offering Cloud Communication Solutions that unify SMS, WhatsApp, voice, and email under a single platform. This helps businesses streamline their engagement strategy and reach users with the right message at the right time.
Key Components of Omnichannel Marketing
Centralized Customer Data Omnichannel success begins with data. By capturing data from every customer interaction—website behavior, purchase history, email clicks, or app usage—you build a holistic profile that drives personalized experiences. Dove Soft’s API-driven infrastructure ensures that customer insights are consistently available across all channels.
Integrated Technology Stack Omnichannel marketing relies on the seamless interaction between different tools and systems. Whether it’s an SMS reminder triggered by an abandoned cart or a WhatsApp notification confirming an order, the message must be timely and contextually relevant. Dove Soft helps brands automate these interactions effortlessly through real-time triggers and programmable messaging flows.
Coordinated Campaigns Campaigns across SMS, email, social media, and more must be aligned. A unified theme, tone, and call to action across all platforms ensures that the customer experience remains consistent—whether they’re scrolling Instagram or checking their inbox. With Dove Soft’s omnichannel delivery solutions, businesses can launch synchronized campaigns that resonate everywhere.
Unified Performance Tracking Measuring success across all channels is vital. Omnichannel marketing allows for better attribution, helping brands understand which touchpoints are driving conversions. Dove Soft’s analytics suite empowers marketers to track and optimize campaigns, delivering stronger ROI.
Cross-Functional Alignment To deliver a truly omnichannel experience, your marketing, sales, customer service, and tech teams must collaborate. For instance, if a support agent can access previous customer interactions from WhatsApp and SMS, they can offer faster and more effective resolutions.
Benefits of Omnichannel Marketing Higher Revenue: Omnichannel shoppers spend 10% more online and 4% more in-store.
Increased Customer Retention: Personalized interactions lead to stronger brand loyalty.
Global Reach: Brands like Dove Soft empower businesses to scale across borders with multilingual and multi-channel messaging.
Better Customer Insight: Rich data reveals customer behavior trends that drive smarter decisions.
Omnichannel marketing isn’t just a trend—it’s the future of customer engagement. With partners like Dove Soft, businesses can streamline communication, personalize at scale, and build lasting relationships that boost both revenue and reputation.
0 notes
Text
VeryPDF Website Screenshot API for Developers
How to Use VeryPDF Website Screenshot API for Developers to Capture Full-Page Screenshots in Seconds
Meta Description: Capture pixel-perfect full-page screenshots in seconds using VeryPDF Website Screenshot API—built for developers who need reliability, scale, and speed.

Every developer has hit this wall.
You’re building a dashboard or automating reports, and someone on your team says, “Can we just drop in a live screenshot of the page?” You think: Sure, I’ll just use an open-source tool.
A few hours later, you’re buried in headless browser configs, broken rendering, and timing issues where content loads after the shot’s already taken.
I’ve been there. More times than I want to admit.
This is why when I stumbled on VeryPDF Website Screenshot API for Developers, it felt like skipping the queue straight to the solution. No more fiddling with Puppeteer or spinning up Chrome instances. Just one call to the API, and boom—full-page, retina-quality screenshots in any format I needed.
Let me walk you through how this tool saved my time, my sanity, and probably my server bill.
The Problem With Most Screenshot Tools Let’s be honest.
Most “free” or “open-source” screenshot solutions are a headache. They break on:
Lazy-loaded content
Single-page apps
Sticky headers or parallax
Mobile views
Cookie pop-ups and ads
And don’t get me started on maintenance. Keeping a headless browser updated and rendering properly across different environments? That’s a full-time job.
Even the paid tools I tried didn’t scale well. I once had to generate 500,000 screenshots for a client’s SEO archive project. The tool I was using crumbled after 20,000.
That’s when I found VeryPDF’s Website Screenshot API.
Why VeryPDF Screenshot API is Built Differently This isn’t just a Chrome wrapper.
This thing is built on Chrome + AWS Lambda, designed to scale from 1 to over a million screenshots per month. I put it to the test on a real project involving weekly newsletter screenshots for over 600 clients—worked flawlessly.
Here’s how it works:
You call the API with a URL and desired output (JPG, PNG, PDF, or WebP)
It renders a pixel-perfect, full-page screenshot
You get it delivered as a direct file or as JSON response
No need to babysit it. No need to patch updates. And the docs? Actually usable.
Features That Actually Make a Difference Here are a few things that stood out while using it:
Full-Page + Mobile + Custom Viewport You’re not limited to what’s visible above the fold.
You can set it to scroll the full page, emulate mobile devices, or control the viewport width and height precisely.
Use case: I had to generate side-by-side desktop and mobile previews for a web agency’s landing pages. Set two API calls with different widths. Done. No extra code.
Block Annoyances (Ads, Cookie Banners) Ever taken a screenshot only to find a cookie banner covering the CTA?
VeryPDF lets you block those automatically.
This saved me hours when I was creating snapshots for compliance reports. No need to manually filter or edit the images after.
Just add --no-cookie-banner or --no-ads in the query and it’s clean.
HD Retina Output (2x, 3x Resolution) This was a big win.
You can request screenshots with @2x or @3x resolution, which is clutch if you're producing assets for high-DPI displays.
I used this for an app promo page targeting MacBook Pro users. Result? Razor-sharp screenshots that looked fantastic on retina displays.
How I Used It in a Real Project I had a client who ran a stock trading platform.
They wanted weekly archive PDFs of their homepage, including news tickers, embedded charts, and live data—captured exactly as it appeared to users.
I used VeryPDF’s API like this:
http://online.verypdf.com/api/?apikey=MYAPIKEY&app=html2image&infile=https://clientsite.com&outfile=homepage.pdf
One line. That’s it.
I set a cron job, and every Monday morning the API would capture a full-page, retina-quality PDF of their homepage with zero delay or manual work.
Compared to using headless Chrome with my own server—which took me two days to stabilise and still failed randomly—this was plug-and-play.
Who Should Be Using This API This isn’t just for devs building dashboards.
Here’s who will benefit from it:
SaaS teams needing snapshots for analytics or audit logs
Marketing teams creating before/after visuals
Legal and compliance who archive live content regularly
QA testers capturing layout bugs in different viewports
Developers automating PDF reports from web content
Whether you're doing 1 screenshot a week or 1,000,000 a month, this tool just works. No surprises.
Other Tools vs VeryPDF Let’s break it down.
Headless Chrome? You’ll be maintaining a mini browser farm. Not worth the time.
Open-source tools? Half of them don’t support full-page rendering or break on JavaScript-heavy sites.
Other APIs? Some work, but fall apart at scale or charge insane overage fees.
VeryPDF’s Screenshot API?
Fast
Reliable
Handles complexity
Actually scales
And most importantly, it doesn’t make you feel like you're constantly fixing it.
Want to Try It Out? I highly recommend giving this a shot if you're drowning in manual screenshot tasks or just want a fire-and-forget API that works like it should.
Start here: 👉 https://www.verypdf.com/online/webpage-to-pdf-converter-cloud-api/
You get 100 free screenshots just to try it—no credit card needed.
Need Something Custom-Built? VeryPDF also offers custom development if you’ve got unique needs.
Whether you want this API integrated into your Windows server, a mobile app, or embedded into an existing reporting platform—they’ve got you covered.
They support:
Windows API, Linux, macOS, Android, iOS
C#, Python, PHP, .NET, JavaScript, and more
Custom virtual printers that capture print jobs as PDFs or images
OCR, barcode reading, document parsing, font conversion—you name it
If your team needs tailored PDF or image handling, you can contact their support team here: 👉 http://support.verypdf.com/
FAQs
How do I get started with the API? Visit the product page and grab your free API key. No credit card required.
What file formats are supported? You can export to JPG, PNG, PDF, and WebP.
Can I customise the viewport or resolution? Yes. Set custom width, height, and even device pixel ratio (@2x, @3x).
Is this secure for sensitive data? Yes. All API calls use HTTPS, and you control access with your API key.
Can I schedule automatic screenshots? Absolutely. Use cron jobs or backend triggers with the API for automated capture.
Keywords/Tags: website screenshot API, capture full-page screenshots, html to image api, verypdf screenshot tool, automated webpage snapshots, pdf website screenshot api, developer tools screenshot, chrome rendering screenshot api, scalable image capture API, high-res webpage screenshot tool
From day one, this tool felt like a hidden gem. If you need to capture full-page screenshots fast, reliably, and at scale—VeryPDF Website Screenshot API is the tool I wish I’d found sooner.
0 notes