#sketch file to HTML
Explore tagged Tumblr posts
Visit Tumblr Blog
Explore Tumblr blogs with no restrictions, modern design and the best experience.
Last Seen Tumblr Blogs


Fun Fact
70% of Tumblr users say the Dashboard is their favorite place to spend time online.
Text
in trying out different stuff w this comic, i'm reminding myself of an old 2014-era comic i drew based on a zombie au AH fic. went back and looked, sure enough, i never posted it anywhere. this.... both surprises and doesn't surprise me. on one hand, i like to have everything documented nicely, and on the other hand, i think part of my brain then couldn't wrap around like the fact that i was drawing this stuff that, while fiction, was based on Very Real People
idk, but tbh i am quite fond of that comic, simply because i tried something new and different with it and i think the things i tried worked out very well! i then proceeded to never try that with any comic ever again until now lkdshgls
anyway ig i'm wondering if it'd even be worth it to post it bc on one hand, documentation, i like to have all my art stuff collected together in a gallery of sorts to be able to see everything. on the other hand, it's ten years old at this point, so extremely out of order, and also it's. achievement hunter. which. 😬 i kinda don't wanna touch anything rooster teeth at all.
#rambles#delete later#one day i will have a website where everything will be organized by year#and it won't matter if i'm posting stuff ten years after it's drawn bc it can still be filed under the appropriate year with everything els#lies down#one of these days......#i just need to like.#y'know#learn html#and css#;;;;;;;;;;;;;#tell you what tho this is making me even go back to the first page sketch i posted and messing around w the paneling#i'd like to try to experiment a bit with this i think
1 note
·
View note
Text
Anyone who's like woah leaking the patreon stuff is too far be so for real right now. People like me funded Kittycorn while she was being deceptive about the nature of her work behind the scenes. Additionally, Kittycorn is literally associated with at least 3 pedophiles (one of which is pro irl incest and abused their sibling who Kittycorn attempted to silence).
I will never get the time I spent in regards to Sparklecare, nor my money back. Neither will anyone else who was mislead in regards to the kind of person Kittycorn was. Minors were also at a point staff on this comic who had no idea the shit Kittycorn was brewing.
It has been incredibly disappointing to further see Kittycorn go back on what she once presented (see the FAQ in regards to what fans can draw/any ask on the main tumblr in regards to the matter), and to see her further deflect refusing to take accountability. There are a lot of vulnerable people in her audience including other survivors. When a safe space of trust is cultivated with a creator who is straight up talking about how to lie to their audience... How do you think it feels for those survivors who kinned or related to Sly only to find out the creator wanted to make them a creepy incestuous rapist stalker. Or Doom who is now a groomer attracted to their goddamn child. How do you think it feels for those survivors to know the creator they looked up to and sought comfort in the work of is buddy buddy with the exact same kind of people who groomed and traumatized them.
If any of the former ZCP wants to do everyone a favour, leak the entire Sparklecare story (and whatever else). At this point I want everything to be scorched earth and hope nothing grows in its place. I hope Kittycorn leaves and doesn't come back to hurt more people.
I encourage anyone to save any of the stuff I've posted / share the archive link.
To be able to see the conclusion of what people cared about is the very least the fans have have been burned deserve.
Other leakers of Sparklecare stuff aside from myself: @doesspchcharacterdie @sparkletrolling @tfemsly @hemeruni @whatever-lions-blog @thesparchives @leakburner @ooblegoodle
Internet archive download links of my Sparklecare and Karmageddon leaks:
Also the callout doc in PDF form in case the OG gets deleted (it is the latest version as of 12/03/2025 but only goes up to page 33 of 44 due to internet archive's file replacement system):
#sparklecare#sparklecare fanart#sparklecare hospital#barry ill#uni cornelius#nurse doom#sch#sparklecritic#sparklecriticism#sparklecare criticism#sparklecrit#sparklecrit community#cometcare#cometcare au#slite li ill#eve ill#cometcriticism#cometcrit#nightstars au#nightstars#darkermatters au#sparklecare au#darkermatters#furry#sparklefur#sparklecare art#cometcare fanart#darkermatters fanart#karmageddon
112 notes
·
View notes
Note
your oc website is SO SO SO SO INCREDIBLY COOL how the hell do you even start learning how to do this ?? if you learned how to do this by yourself online, are there any tutorials or resources you can share with us? was making this website free??
omg THANK YOU SO SOOOOOO MUCH!!! It makes me so happy to hear that folks like my little site. I code my site with Phoenix Code (for the live viewer and number dials) and I host my site on Neocities - it is all free. Phoenix can be used in browser or on desktop, but I like having it on desktop more for big projects in case my files get deleted. I use the browser version when I just want to test something quickly.
The 2 videos I use and can not recommend enough to anyone who asks me are this HTML tutorial and this CSS tutorial. They are simple and easy to understand, but I recommend watching it the first go, and then following along the next few watches until you get the flow of basic parts to a website, how they're organized, and what order they go in. At this point, I've memorized exactly where everything goes, and it is all thanks to these 2 videos.
If I am being honest, I learned how to code by myself, not quite even with online tutorials but just from being stupid and messing around myself (1, because I was a kid, and 2, because I didn't understand English very well to know what tutorials are saying.) I used to do html coding for Neopet pages when I was a kid with too much online time, first by just editing the default petpages and adding info and images, and then just doing trial and error with the html. I'll just try something and then if it doesn't turn out the way I want it, I try to find out why it didn't work and also get inspiration from other similar sites to figure out where things go or how they coded (with this nifty thing called right click > inspect page or right click > view page source). And BOOM, working webpage.
It was rudimentary, white blank background without any boxes or anything, you just scrolled down the page and sections were separated by a horizontal bar. OH and every text was centered! I had no idea how to make scrolling boxes or fancy assets, but damn I still had so much fun working on it every weekend. When you find authentic selfmade sites from the 90s and 2000s, most of them aren't super fancy either unlike what modern nostalgia makes you think. So I hope you don't feel discouraged if you begin making a website and feel it isn't "fancy", you're already doing a first big step which is making a webpage and learned your first set of html code!
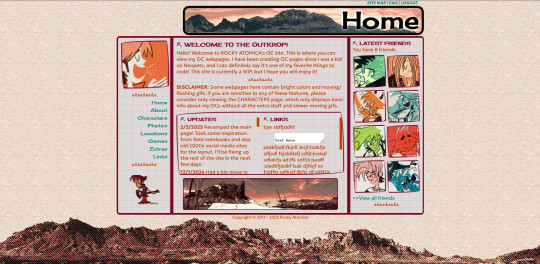
It was over a decade later before I coded webpages with html again. I've gotten lazy and started relying on site builders, but nothing was quite as versatile as html. I wanted to try coding my own OC site again, so that was when I started working on OutKrop (the site I posted). Until I started coding again, I had literally no idea what CSS even is (and let me tell you, it's a game changer!)
Personally, I work best when I can do things hands on. I don't read through tutorials, I code first then go back and read through coding help sites like w3schools when I find myself stuck and unable to figure something out. Sometimes I grab existing codes and play around with them to see what changes and what I can do with it, cuz having visual context is what helps me a lot.
I can also share my process:
Once I gather up some ideas, I make a sketch, including what boxes (divs in css) should approximately go. It is very rough, but shows me exactly what I need to know.
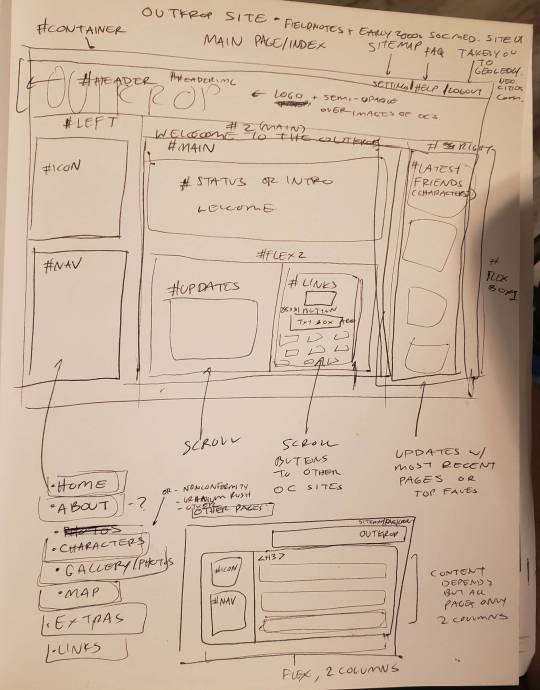
Next I load up my coding app (Phoenix Code in my case) and "sketch" the layout. Nothing fancy going on here, just putting things where they need to be, and fixing size of boxes and margins if needed. I give my boxes all a background color so I can easily see how big they are and where they are located.

After some adjustments like moving stuff around and adding assets like backgrounds and images, and changing colors of the boxes, rounding off corners, etc., we get this!
so recap + additional useful sites I use:
Coding app: Phoenix Code
Site hosted on: Neocities
Video tutorials: HTML and CSS
Sites for learning code: w3schools, also lissa explains is a great site that is written for kids to learn html so it's easy to understand. Finally, sadgrl has a lot of great resources for coding as well!
I recommend looking through these sites AFTER you tried taking a spin at coding - it doesn't have to be anything fancy just follow the HTML video tutorial I linked!
Thanks for the ask, and I hope this helps you and many others out there who are interested in building a site with html/css! Don't be afraid to get things "wrong" or have an "un-fancy" site. This is how you learn to code, and it'll become so easy once you get the hang of it.
Anyone is always more than welcome to reach out for coding help and advice :-]
58 notes
·
View notes
Text
STAGHUNTERS NEOCITIES WEEE
Figured I should make a new post at this point because the other one is getting too long to keep reblogging. I've been tinkering away at the site and it is shaping up! Here's a lil page by page tour under the cut
you can view the site here!

Splash screen!
It's a little bumper so the css can load without it scrabling the home page. It looks alright, but to add some more text to the image, I have to make a new one in the death screen generator, which is not ideal.
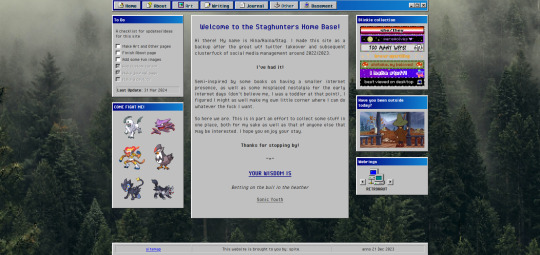
The home page!
I've changed the middle window so it fits in better with the rest. Not very visually exciting there in terms of color, but it is for now the best look imo. Text there is aligned justified, I've condensed it a bit more and added the randomized quote section underneath it instead of it being a seperate window on the side.
To do list needs an update but is still accurate. The team is still there, but on the other side, I have set the blinkies to be a bit larger. The music player has been removed because I couldn't find a way to add songs to it that weren't included on the source site. Snufkin is here now. The webrings will need some more. Retronaut is there, but not functioning as it should. it just forwards you to random sites in the ring instead of where it should be, but I can't find what exactly I'm doing wrong with the code.
Another thing that is not working on neocities itself is the "last updated" part. For some reason it doesn't display there what it does display on my local html. Maybe a bug at neo.
And icons at the top on the nav par! Adds some more flair to the place. The footer has also received a minor update: it now has a sitemap link instead of another back-to-home url.
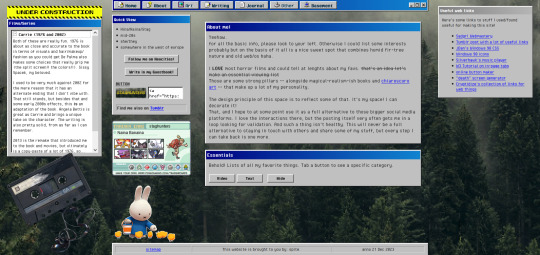
About!
I'm thinking of moving the small window with the short info to the right, but it is here for now. Links that are web-building related are on the right, also for my own referencing. The essentials lists on the left are hidden on load, but can be revealed by tapping the puttons. The lists are in tree-view and the window shouldn't expand over the cassette image once the construction sign is removed. Speaking of, the cassette has a lil playlist.
I might expand on the info a bit more, but that is for me to ponder. I liked including links to tumblr, the guestbook, and a button in case anyone wants to link my site on theirs.

Writing!
Hasn't really changed much. I've been looking at moving the sidebar info to be in the main section upon load, but idk if that would just make things more complicated. Right now it loads to an empty section there, stuff appears once you click a button. PDF support is only available once I'm a supporter of neocities, which i do wanna do but isn't a priority atm just for getting this part running. The links to ao3 will do just fine for now.
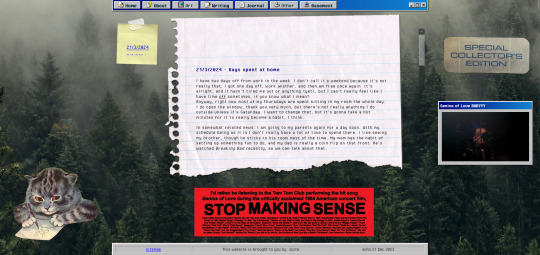
Journal!
The space for my rambling. It can be browsed by entry through the post-it, and all that seems to be functioning alright. Added a kitty and a sticker for decoration. The Stop Making Sense bumper sticker will now load a local video of the performance, but once again I won't be able to add this to the site until I get a supporter thing going. It plays/pauses on click, hehe.

Basement!
Decided to add a page for it. Basic info, schedule, link to the room, my letterboxd, and an overview of past movies. It's a nice spot on the site that is also the most cramped, but I like how it turned out.

BLUE SCREEN OF DEATH
In case any page/url error happens, you can send a movie recommendation to B (their askbox is linked when you open on desktop)


UNDER HEAVY CONSTRUCTION
The art and other pages are very much works in progress. Art can be up and running once I upload art to the site, but I'm not sure if I want to post full pieces here. Maybe I'll make it a space for sketch stuff that I'd otherwise discard.
As for the other page: I might be filing it under the writing page as a section, since the only thing here is WvW atm. It's cool that it has it's own thing, but I'm not sure if something that is basically a fanfic warrants such a space. That, or I keep it and drop all my other-media stuff in here so there's more to look at.
That's it for now! I got some ideas on how to continue, but they're not super-duper set in stone.
#stagcities#it's so much fun ough#takes time out of my other activities but certainly isn't a bore#neocities#web development
9 notes
·
View notes
Note
How's the comic going along? have anything fancy or little secrets planned? Looking forward to more :D
ps I like the sketch style pps what art thing do you use ppps smorestuck -> 🍞🍫⚪🍞 🏠
ghfdjkgdfgjkhg didn't get any work done last week as i was busy with commission stuff~
come monday i'm gonna get back to work on it (and try to balance it with the remaining comms as best i can, so update mightttt be the week after that? art hard </3)
also eheehehehe you have NO idea how many secrets i got planned >:)
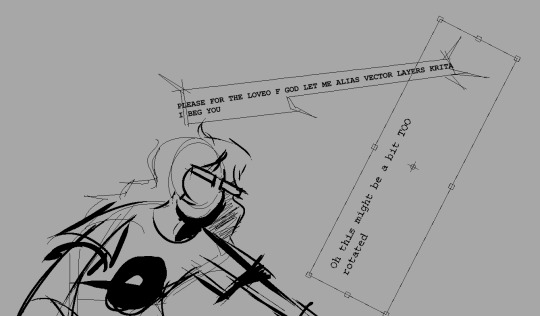
the art thing i use is krita!! i like the way that program works + it has good animation tools which helps with some stuff~
i use a modified version of krita's pixel brush, (i hit f5 to open the brush editor and set the shape to square instead of circle)
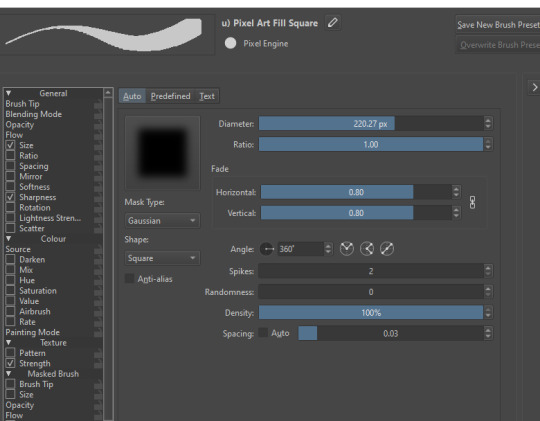

my process is mostly trying to get as much done as i can in as few layers as possible?
a LOT of my panels are just first draft rough sketches (this is to help me get pages out at something resembling a reasonable rate, because i have the constitution of a poor victorian orphan chimney sweep)
i generally just have a colour/value layer, a rough sketch layer, and then another layer for dialogue/text/what have you. (though i'll often end up using more if it's just convenient for other stuff to have it's own layer, or if i'm having trouble drawing something specific and just wanna keep trying at it without effecting the stuff around it)
oh and i do huge swathes of the comic in just one file because i'm insane
(though for pages with animation i tend to just copy and paste the page's layer group into it's own new file and do the animation there because i severely doubt krita can handle BOTH animation, AND like a hundred fucking layers at the same time)
OH and i do all my typesetting in GIMP because krita doesn't let me do non-antialiased text for some reason
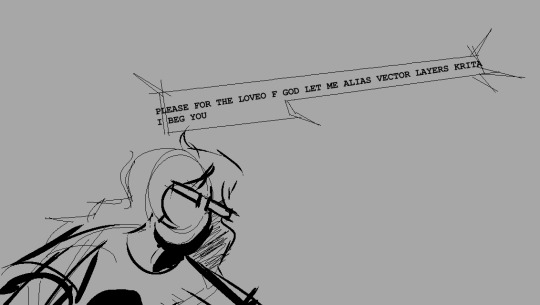
for this i just type it out in gimp, 14pt courier new as our god homestuck intended

(and depending on what i'm using it for i'll probably scale it up an integer amount)
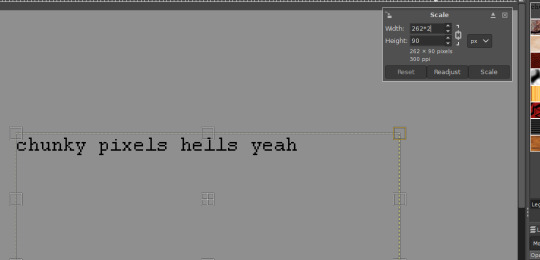
and then i paste it into my image and usually rotate or transform it a bit (with nearest neighbour scaling <3)
small peak into my artistic process, this doesn't cover dissonance logs and such but that's like a whole different thing, messy messy spaghetti code and html~
i realise you didn't ask for most of this but i felt like sharing anyway lmao
also om nom smore stuck
#asks#itemised-unreality#comic stuff#watch as i perform my own tracheotomy (working title)#my art#juney.png#juney.txt
22 notes
·
View notes
Text
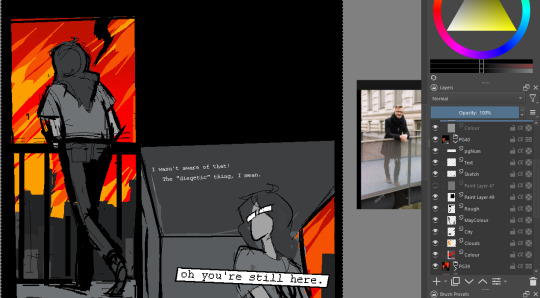
today in questionable development decisions,
i have finished a site entirely* in godot, and it's now live right where my questionable web decisions have always been!
(*it's still hosted via JS bc apparently there's some really jank shit going on with godot 4 html exports and i am too attached to the features to backport it all to 3 (i tried))
anyway! this is the product probably a year of overthinking > cutting the scope down > overthinking again loop, as well as how i finally got out of creative block, so i'm pretty darn happy with it even with the bugs (like how it doesn't like to resize and i currently dunno how to send keyboard shortcuts like f5 and f12 to the browser when focused on the game area)
might still end up porting it over to JS if maintaining it becomes problematic, since i believe currently there's a file size issue specifically with the shared array buffer in firefox, my beloved browser, and if it can't work in that then what's the point?
either way, i kinda despise prototyping that goes from a sketch or static graphic straight to code, so even if i do jump right to JS for future builds (which is conveniently very easy since i am using the same node based implementation from before), i know exactly what i'm happy with and only need to make it work in JS.
#web dev#arguably#feel free to reblog telling me how the page wont resize or any other number of bugs that a website should expect to not have in current yea#i really hope godot does improve their web deploy capabilities in 4 bc i do love the program#is just a royal pain to get live in its current state and the fixes might not hold#which is why i'm looking at JS again right after getting this to work#but oh well at least i had fun
4 notes
·
View notes
Text
One Year Diploma Courses with Govt Jobs सरकारी नौकरी दिलाने वाले डिप्लोमा कोर्स
One Year Diploma Course – Short Duration, Long-Term Benefits
Aaj ke fast-paced दौर में, one year diploma course एक smart career choice बन गया है.
Instead of opting for long-term degrees, कई students अब short and skill-based courses चुनते हैं.
These diploma courses help students quickly gain job-ready skills and start earning early.
What is a One Year Diploma Course? – एक साल का डिप्लोमा क्या होता है?
One year diploma course ek ऐसा professional program होता है जो theoretical aur practical knowledge देता है.
In just 12 months, students kisi specific skill में mastery हासिल कर सकते हैं.
Whether you’re a 12th pass student या graduate, यह diploma आपके career को boost करता है.
Advantages of One Year Diploma Courses – कम समय में ज्यादा फायदे
Short duration diploma courses कई तरीकों से useful होते हैं.
Chaliye जानते हैं इसके top benefits:
Career-Focused Curriculum – Practical Knowledge ka Zor
Most one year diploma courses industry-oriented hote hain, theory se ज्यादा practical sikhate hain.
Yeh real-world scenarios में काम करने की training देते हैं, जिससे job मिलना आसान हो जाता है.
Time-Saving Option – जल्दी शुरू करें करियर
Instead of spending 3-4 years in a degree, ek साल में आप job-ready हो सकते हैं.
Early start से आप जल्दी experience aur salary gain कर सकते हैं.
Affordable Education – Budget में मिले बेहतरीन स्किल
Generally, one year diploma course ka fee structure affordable होता है.
यह students के लिए काफी accessible होता है, खासकर middle-income families के लिए.
Popular Streams for One Year Diploma Courses – Courses Jo Career Banayein
India में कई streams में एक साल के डिप्लोमा courses available हैं. नीचे दिए गए हैं कुछ popular options:
Diploma in Computer Applications (DCA) – कंप्यूटर स्किल्स के लिए बेस्ट
DCA ek popular one year diploma course है जो MS Office, Internet Tools, और Tally जैसे skills सिखाता है.
यह course data entry operators, office assistants, और junior accountants के लिए ideal है.
Diploma in Financial Accounting – अकाउंटिंग की दुनिया में पहला कदम
यह course accounting software जैसे Tally, GST filing, और payroll systems में proficiency develop करता है.
Commerce background वाले students के लिए ये perfect course है.
Diploma in Digital Marketing – Online Dunia Ka Superstar Course
SEO, Social Media, PPC, और Content Marketing जैसी skills इस course में सिखाई जाती हैं.
ये course students को freelancing aur full-time jobs दोनों के लिए prepare करता है.
Diploma in Web Designing – Creativity और Coding का Combo
Photoshop, HTML, CSS, और JavaScript जैसे tools इस diploma में सिखाए जाते हैं.
It’s perfect for those who love design aur web development field में career बनाना चाहते हैं.
Diploma in Fashion Designing – Style Ko Career Mein Badle
Fashion designing ka one year diploma fashion sketching, fabric study, और designing techniques सिखाता है.
यह course fashion lovers को professional बनने का मौका देता है.
Admission Process – Entry Kaise Paayein Diploma Courses Mein?
Zyadatar one year diploma courses का admission process direct होता है.
Entrance exams की जरूरत नहीं होती – bas eligibility fulfill करनी होती है.
H3: Eligibility Criteria – कौन कर सकता है Apply?
Most diploma programs के लिए 10th या 12th pass होना जरूरी होता है.
Kuch specialized programs graduation भी मांगते हैं, jaise financial accounting.
Required Documents – जरूरी Papers क्या-क्या चाहिए?
10th/12th Marksheet
ID Proof (Aadhar Card)
Passport size photos
Address Proof
Course Fee and Duration – कितना Time और Paisa लगेगा?
Ek typical one year diploma course की duration 6 months to 1 year होती है.
Fee structure course aur institute के अनुसार vary करता है – average ₹10,000 to ₹50,000 तक होता है.
Best Institutes Offering One Year Diploma Courses – कहां से करें कोर्स?
कुछ reputed institutes diploma courses offer करते हैं:
The Institute of Professional Accountants (TIPA), Delhi
NIIT
Arena Animation
Aptech Computer Education
YMCA Institute, Delhi
Always institute को check करें for accreditation, placement support, और reviews.
Placement and Job Opportunities – Job Milegi Ya Nahi?
One year diploma courses ke baad job milना काफी आसान हो जाता है – especially skill-based sectors में.
Career options include:
Computer Operator
Digital Marketer
Junior Accountant
Web Designer
Fashion Coordinator
Salary Expectations – कितनी हो सकती है Starting Salary?
Salary depends करती है skill aur city पर.
Generally, freshers को ₹10,000 to ₹25,000 per month मिल जाता है.
Experience के साथ यह ₹50,000+ तक भी पहुंच सकती है.
Online vs Offline Diploma Courses – कौन सा Mode बेहतर है?
Aaj kal online diploma courses भी popular हो रहे हैं.
Flexibility, affordability, aur location-independence इनकी खासियत है.
However, offline courses offer hands-on training aur peer interaction.
Best choice depends करता है आपकी learning style और resources पर.
Who Should Choose One Year Diploma Course – आपके लिए सही है या नहीं?
Yeh diploma unke लिए best है:
Jo जल्दी job करना चाहते हैं
Jo specific skill सीखना चाहते हैं
Jo graduation या 12th ke baad confused हैं
यह course beginners के लिए भी helpful है और working professionals के लिए भी upskilling का मौका देता है.
Tips for Choosing the Right Diploma Course – सही चुनाव कैसे करें?
अपने interest और career goal को समझें
Market demand को research करें
Certified aur reputed institute को select करें
Syllabus aur practical training को ध्यान से देखें
Conclusion: One Year Diploma Course – Ek Saal Ka Solid Investment
Aaj ke time में, ek one year diploma course se aap apne career ki शुरुआत तेज़ी से कर सकते हैं.
It is cost-effective, job-oriented, और real-world skill-based learning का best option है.
अगर आप सही course चुनते हैं, to one year से ज़्यादा fruitful aur कुछ नहीं हो सकता.
Aap bhi आज ही ek skill choose करें aur अपने सपनों की job की तरफ पहला कदम बढ़ाएं!
Meta Title: One Year Diploma Course in India – Fast-Track Career After 12th Meta Description: Discover top one year diploma courses in India. Explore duration, fee, syllabus, job opportunities, and best institutes. Slug: one-year-diploma-course-india
Accounting Course ,
Diploma in Taxation Course,
courses after 12th Commerce ,
Courses after b com ,
Diploma in financial accounting ,
SAP fico course ,
Accounting and Taxation Course ,
GST Course ,
Computer Course in Delhi ,
Payroll Management Course,
Tally Course in Delhi ,
One year course ,
Advanced Excel Course ,
Computer ADCA Course in Delhi
Data Entry Operator Course fee,
diploma in banking finance ,
Stock market Course,
six months diploma course in accounting
Income Tax
Accounting
Tally
Career

0 notes
Text
0 notes
Text
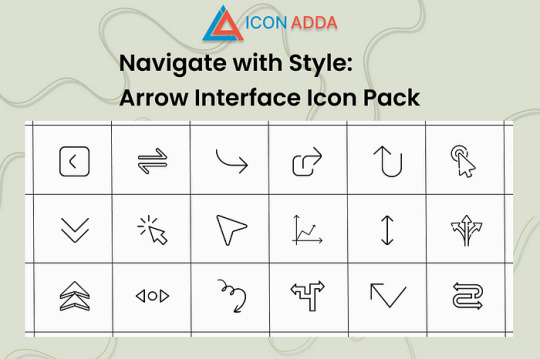
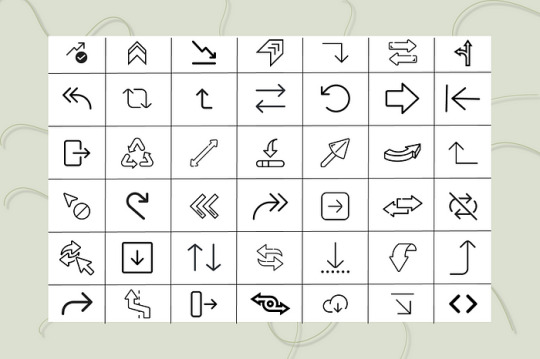
🚀 Arrow Interface Icon Pack — Elevate Your UI with Free Icons from Iconadda
Make it easier to navigate. Enhance the experience. Make wisely. We understand in Iconadda how little pieces like icons could make a great difference to the user experience. We are glad to introduce the pilgrimage section package with pilikon intended for contemporary digital interfaces, a free, condition -art and user -friendly collection.
Regardless of whether you are a front-end developer, Ui/UX designer or creative agency, these icons are suitable for the purpose of the project and clarity enhancement.
🎯Arrow Interface Icon Pack: What’s included? This free icon set contains numerous various poil designs that suit any application: 🔙 Backward and front arrows 🔼 Arrow to scroll up and down 🔄 Update and load again 🧭 icon for direction navigation ➡ Bold, outline and minimum styles 🔲 Extension, collapse and minimize the icon
This icon pack is perfect for web and mobile applications since both are pixel perfate and fully scalable.
✨ Key advantages of arrow interface ✅ No cost to use: It does not have any charges or license issues while downloading and utilizing it. ✅ Supports Adobe XD, Photoshop, Illustrator, Figma and Sketch among other big design tools. ✅ SVG, PNG, ICO and PDF are some of the numerous available file forms. ✅ Shift: You are able to easily alter the width, color and form of the stroke. ✅ Web ready: Optimize the performance by reducing the file size. ✅ Regular updates — all packages at Iconadda are kept up to date and enhanced on an ongoing basis.
Response to common questions Is it gratis using these pil icons for business? Actual! Only free icons are included in Arrow interconnection packages that can be used for personal or business use. Though appreciated, it is not required.
Can I resize and colorize? Yes! Since the package is SVG based, you may adjust stroke, color and shape in your editor or code.
What do I need to register for iconadda download? No registration is required. Simply visit iconadda.com , Finn Arrow Interface Icon Packs and click the download.
Can I use this package with my design tool? Yes! These icons can also be used directly in HTML/CSS or React components -i Figma, Adobe XD, illustrator and Sketch.
📥How to download the Arrow Squeeze Package Visit iconadda.com . Visit the section with a free icon package. Arrow connection packages, search or scroll and find. Tap “Download” and head over to work design!
🧲More iconadda freebies Don’t just stay with the arrow! Dozens of and icon packs including animated icons, filled and outline sets, e-commerce icons and social network icons are available gratis.
Be creative. Propose. Your design arsenal is always stocked when working with Iconadda .
Final comments Pure and simple design bloated user is more important in a world filled with interface and dull loading sites than ever. You only get free pil icons when using Iconadda’s Arrow Interface Icon Pack; You also get design power on your fingers.
👉 Get it now to search for a more elegant, smart and intelligent way to guide.
#ArrowIcons#InterfaceIcons#UIIcons#ArrowPack#NavigationIcons#ArrowDesign#MinimalIcons#WebIcons#LineIcons#FlatIcons#UserInterfaceAssets#DirectionIcons#UXDesignAssets#IconSet#ArrowVectorPack
0 notes
Text
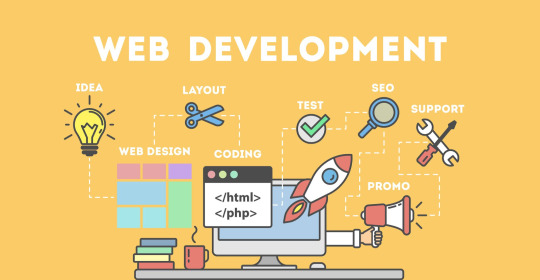
Tools Every Freelance Web Developer Should Know
Introduction
Being a freelance web developer isn’t just about writing code—it's about managing projects, clients, and your own time efficiently. To succeed in today’s competitive market, developers must equip themselves with the right tools. From code editors to project management platforms, each tool helps streamline different aspects of freelance work. Having a well-stocked digital toolbox can boost productivity, improve client satisfaction, and lead to higher earnings. The tools listed below are essential for developers looking to stay ahead in the freelance world. Whether you're a beginner or a seasoned pro, there's something here for everyone. Let’s dive into the essential tools that make a difference in a freelancer’s workflow.
1. Code Editors: The Developer’s Core Companion
A high-performance code editor is the most vital tool for any freelance web developer. Editors like Visual Studio Code, Sublime Text, or Atom offer robust functionality with extensive plugin support. VS Code stands out with its IntelliSense, Git integration, and built-in terminal. These editors improve speed and efficiency when writing HTML, CSS, JavaScript, and backend code. Customizable themes and extensions help create a personalized workflow. Freelancers benefit from tools that reduce bugs and save time. A quality editor can even support multiple languages. Choose one that aligns with your development stack and preferences.
2. Version Control: Git & GitHub
Understanding and using Git is non-negotiable for serious freelancers. Git tracks changes, manages code branches, and helps you revert back when things go wrong. GitHub acts as the online hub for your projects, offering version control in the cloud. It enables collaboration with other developers and easy sharing with clients. Freelancers can show progress and push updates seamlessly. It also serves as a portfolio to display work. Learning Git commands boosts professional credibility. GitHub Actions adds automation for testing and deployment workflows.
3. Design & Prototyping Tools
Before development starts, clients often want to see a prototype. Tools like Figma, Adobe XD, and Sketch are perfect for wireframing and UI design. Figma is a favorite due to its real-time collaboration features. These platforms allow developers to turn ideas into visual representations. You can gather feedback early, saving time in revisions later. Freelance web developers benefit from clearly defined interfaces. These tools also bridge the gap between designer and developer roles. Use them to align your vision with the client's expectations.
4. Task & Project Management Tools
Managing deadlines and deliverables is crucial in freelancing. Tools like Trello, Asana, or ClickUp help developers stay on track. Freelance web developer often juggle multiple clients and need clear organization. These tools allow you to break down tasks, assign due dates, and prioritize workloads. Notifications and dashboards make it easy to track progress. Time-blocking features ensure work is spaced out efficiently. They also help manage feedback and revisions. With visual boards, project workflows become less chaotic and more predictable.
5. Communication Platforms
Effective communication builds lasting client relationships. Slack, Zoom, and Google Meet are essential tools for keeping in touch. Freelance developers need to clearly discuss requirements, timelines, and updates. Slack allows instant messaging, file sharing, and integrates with other tools. Zoom and Google Meet make video calls seamless, especially for client walkthroughs. Using professional channels instead of casual messaging builds credibility. Communication tools also help with team collaboration in multi-developer projects. Strong communication leads to better project outcomes and higher client satisfaction.
6. Browser DevTools
All modern browsers come equipped with powerful development tools. Chrome DevTools is one of the most popular among freelance web developers. It allows inspection of HTML, CSS, and JavaScript in real time. You can debug issues, test responsiveness, and monitor performance. DevTools also include features like network activity logging and lighthouse audits. These help optimize websites for speed and SEO. For freelancers, faster diagnostics mean faster delivery. Mastering browser tools can help catch bugs before clients do. They are indispensable for frontend developers.
7. Website Performance & SEO Auditing Tools
Speed and visibility matter in web development. Tools like Google PageSpeed Insights, GTmetrix, and Lighthouse assess performance. These platforms identify what’s slowing a site down and how to fix it. Freelance web developers can use them to deliver SEO-friendly, fast-loading sites. Lighthouse also gives accessibility and PWA (Progressive Web App) reports. These insights help meet modern web standards and improve rankings. Providing audit reports boosts your value as a developer. Use them regularly to maintain top-notch quality in your work.
8. Hosting & Deployment Services
Getting the site live is the final step—and you need the right tools. Netlify, Vercel, and GitHub Pages make deployment a breeze. These platforms allow one-click deployments from Git repositories. They’re perfect for static and JAMstack websites, popular in modern development. Freelance developers save time and impress clients with instant previews. Netlify offers forms, serverless functions, and global CDN. Vercel integrates tightly with Next.js and supports custom domains. Choose based on project size, performance needs, and tech stack. Smooth deployment ensures client satisfaction.
9. Payment & Invoicing Tools
Getting paid smoothly is just as important as coding well. Tools like PayPal, Stripe, and Bonsai simplify invoicing for freelancers. These platforms allow you to send professional invoices and receive global payments. Freelance web developers can track payments, set due dates, and manage contracts. Bonsai also offers contract templates and time tracking features. Payment tools reduce friction in business transactions. They give you legal backing and a reputation for professionalism. Never let poor billing processes hinder your freelance success.
Conclusion
Being a successful freelance web developer requires more than just technical skills—it takes organization, communication, and business savvy. The right tools streamline your workflow, reduce errors, and help deliver better results for your clients. From coding and collaboration to design and invoicing, each category serves a vital role. Investing time in learning these tools can make you faster, more efficient, and more professional. As technology evolves, staying updated with the latest tools will set you apart from the competition. Build your freelance toolkit wisely, and you’ll be better equipped to thrive in the digital world.
FAQs
What is the best code editor for freelance web developers? Visual Studio Code is widely recommended due to its features, speed, and customization options.
Do I need Git as a solo freelance web developer? Yes, Git is essential even for solo projects—it helps manage versions and track your progress efficiently.
Which tool is best for website performance audits? Google PageSpeed Insights and Lighthouse are reliable for testing speed and providing improvement tips.
How do freelance developers communicate with clients? Most use platforms like Slack, Zoom, or Google Meet to hold meetings and send updates professionally.
Are invoicing tools really necessary for freelancers? Yes, they ensure you get paid properly and on time, and present a more professional front to clients.
#Freelance web designer#Freelance web developer#Outsource web design#wordpress virtual assistant#Web design virtual assistant
0 notes
Link
#animazione#boxysvg#creazionesitiweb#DesigneUX#fotografia#HTMLeCSS#progettazionedell'interfacciautente#telaeSVG
0 notes
Text
Beginner to Pro: Top UI/UX Design Tricks You Need to Know

Introduction
UI/UX design plays a crucial role in crafting user-friendly digital experiences. Whether you're starting your journey in UI/UX or aiming to enhance your skills, mastering the right tricks can set you apart. In this blog, we'll explore essential UI/UX design tips that can help you transition from a beginner to a pro.
1. Understand Your Users
Before you start designing, it's essential to know your users. Research their preferences, behavior, and pain points. Conduct user testing and surveys to gather insights. A strong understanding of user needs leads to a more intuitive design.
2. Keep It Simple and Intuitive
A cluttered interface confuses users. Stick to minimal design principles by using whitespace effectively and ensuring that navigation is easy. A well-structured UI makes interactions smooth, improving user satisfaction.
3. Master Typography and Color Theory
Typography and color are powerful tools in UI/UX design. Use fonts that are readable and align with the brand personality. Colors should be strategically chosen to evoke emotions and improve usability. Contrast is key for accessibility.
4. Mobile-First Approach
With a significant number of users accessing websites and applications through mobile devices, designing with a mobile-first approach is essential. Ensure that the interface is responsive and adapts seamlessly across different screen sizes.
5. Focus on Microinteractions
Microinteractions, such as button animations, hover effects, and subtle transitions, enhance user experience by making interactions feel engaging and natural. They provide feedback and guide users through the interface effortlessly.
6. Prioritize Loading Speed
Slow-loading websites and applications drive users away. Optimize images, use compressed files, and implement caching techniques to improve performance. A fast-loading UI keeps users engaged and enhances usability.
7. Utilize UI/UX Design Tools
Leverage powerful design tools like Figma, Adobe XD, and Sketch to create wireframes and prototypes. These tools allow designers to visualize ideas and collaborate efficiently.
8. Stay Updated with UI/UX Trends
UI/UX is an ever-evolving field, and keeping up with trends is vital. Follow industry experts, take up courses, and experiment with new design patterns to stay ahead of the competition.
9. Get Certified and Build a Portfolio
Enrolling in a UI UX design certification in Yamuna Vihar or UX UI design training in Yamuna Vihar helps solidify your expertise. A strong portfolio showcasing your work can significantly boost your career prospects.
10. Learn Web Development Basics
A solid understanding of Web Designing Training in Yamuna Vihar or Web Development Training Institute in Yamuna Vihar can complement your UI/UX skills. Knowing HTML, CSS, and JavaScript helps designers create functional prototypes and work efficiently with developers.
Conclusion
UI/UX design is an exciting and dynamic field that requires continuous learning and creativity. By implementing these strategies, you can refine your skills and deliver exceptional user experiences. If you're looking to enhance your expertise, consider enrolling in a UI and UX design course in Yamuna Vihar or Full Stack Web Development Training in Uttam Nagar to gain hands-on knowledge and industry exposure.
Start your journey today and transform into a professional UI/UX designer. Visit Us.
Suggested Links
Oracle Database Administration
MY SQL Training
PHP Development
#ui ux design#html training#css tips#java programming language#full stack development#web design#web development
0 notes
Text
Also known as diagrams, user flow or UX flow defines a complete user journey or path when availing a service or product; all the way from the beginning. Each and every step a user takes is then mapped to the point of final integration based on all possibilities and challenges that may come across. All that said, a user flow is important to transactions or conversions with a complete process based on communication technology or platform that can be a website, mobile app, or any other. Because user flow has a direct impact on the overall experience, having a high-end, premium and authentic design is extremely important. Now that we have a basic understanding of user flow, let’s explore some of 2021’s best tools to help you out with the entire process that is also used by leading web design Dubai agencies. Wondershare Mockitt With a full suite of handy flowchart, design, and prototyping tools, Wondershare Mockitt takes the lead when it comes to super amazing user flows that may fall anywhere between simple to sophisticated and extreme pro-level. The platform also supports sharing the data with project managers as well as real-time implementation in the design of prototypes. This way, testing, and development can take place instantly to get the job done in a smooth and swift manner. Important Features A wide range of creative assets library including flowchart elements, connectors, and hundreds of supporting components. Editable user flow and flowchart templates. Drag-and-drop functions for quick and clean user flows Support Sketch design and prototype import for better user interaction Easy downloading as HTML packages and online sharing Weje With free infinite online whiteboards from Weje anyone can cope with framing user flows: from a sole entrepreneur or novice marketer to a salted salesman or creator. Design a user flow of varying complexity, either on your own or with the help of a team. Weje offers much for collaboration, including shareable canvases, named cursors, and chat. You can set connections between different elements with arrows or use a mind map-making tool - to comfort the process. Also, you can copy & paste media or figures right onto the board and after - edit and group these, as needed. Important Features Templates library and a built-in mind map maker. Online sticky notes, checklists, and a drawing tool that ease simultaneous editing. A convenient drag and drop tool for effortless work with text and images. An option to download the outcome or share it via email or socials. Figma Another famous design and prototyping platform as well as an effective user flow creating tool. When comparing cost with many other design tools, Figma is a bit expensive but totally worth it. With a large community of designers, creative agencies, and third-party users, Figma lets them contribute outstanding content in terms of a design system, plugins, UI kits, and much more. Plus, you can also import Sketch and Adobe XD files and prototype them. Important Features Massive asset repository that also includes third-party UI kits and user flows. Ready to deploy templates and components with the Flowchart Maker. A greater number of tools for developing creative designs, prototypes, and user flows. The convenience of Autoflow plugin for user flow creation. Additional option to embed flowcharts in Dropbox Paper. Miro Taking design to a whole new level is Miro; a digital whiteboard with ready-to-use diagramming and mapping tools, allowing you to brainstorm and proceed to create outstanding user flows, customer journey, flow charts, and much more. It’s quite a handy tool to let you collaborate on design flows with users, share each other's work, edit and implement in real-time as well as offline. Important Features Ready-to-use widgets and components. Frameworks and templates for a quick start. A complete package of commenting and annotation tools. Integrates with many other design tools such as Sketch, Slack, and more.
Overflow Claiming itself as the world's first user flow and diagramming tools customized specifically for product designs. It works differently from many other digital design tools in a way that lets you work and sync even in offline mode. Overflow also offers integration with many other design platforms letting you merge your designs with the least effort. Important Features Customized and comprehensive flowchart elements. Also, link design layers with app screens. Allow style editing for balancing fonts, text size, and other features with design. Different device skins. Able to split primary user flow into its subcomponents and further divide them into the individual artboard. Lucidchart Holding true to specifically being a flowcharting and workflow tool, Lucidchart lets you conveniently draw the shapes and style them the way you like as per the branding guidelines. With this, the tool also lets viewers follow the entire process for a more immersive and real-time presentation. Lucidchart comes with premium enterprise-grade features like converting CSV to the org chart, import OmniGraffle, Visio, and many others for easy enterprise and user management. Important Features Various style options for consistency between designs and user flows. For neat and clean diagrams, there’s an option for smart lines. For larger canvas, there’s an option to go full-screen. Handy containers for task management and separating them. Real-time annotation and commenting features to let you and others add notes. Wireflow As an online and open-source tool, Wireflow lets you create user flows without any Photoshop skills for maximum ease. In addition, it also offers users above a hundred built-in customized graphics. Like many other tools, Wireflow also allows real-time collaboration with users and friends to double up the speed and effort of creating and sharing amazing user flows in real-time. Important Features Allow designing project rooms/virtual chambers for better project management. The simple and user-friendly tool with high-end essential features to ensure a sure win user flow design. Timblee Works perfectly on both desktop devices as well as mobile, Timblee assists in developing user flow diagrams in the early stages of product development while eliminating the hassle of complex tools in between. On subscription, you’ll get a 14-day trial period. Many website design companies in Dubai, as well as worldwide, are using Timblee so that adds to the must-have factor. Important Features Convenient designing of the sitemaps. Excellent for beginners because of the drag-and-drop canvas. Real-time feedback on work without any restriction to have a Timblee account. There’re many different UX tools and more are expected to surface as we move ahead in the year. For now, you can try out any of the tools listed above to create amazing user flows and take the winning.
0 notes
Text
How to Build a Website from Scratch: A Beginner's Guide

Building a website from scratch might seem like a daunting task, but with the right guidance and tools, it’s entirely achievable even for beginners. In this guide, we’ll walk you through the step-by-step process to create your own website.
Step 1: Define Your Purpose and Goals
Before you start building your website, it’s crucial to determine its purpose. Are you creating a personal blog, a portfolio, an e-commerce store, or a business website? Clearly defined goals will help you make better design and content decisions.
Step 2: Choose a Domain Name
Your domain name is your website’s address on the internet (e.g., www.yourwebsite.com). Choose a name that is:
Memorable: Easy to spell and pronounce.
Relevant: Reflects your brand or the website’s purpose.
Short: Avoid overly long names.
You can register your domain through providers like GoDaddy, Namecheap, or Google Domains.
Step 3: Select a Web Hosting Service
Web hosting is where your website’s files are stored and accessed. Popular hosting providers include:
Shared Hosting: Affordable and suitable for small websites (e.g., Bluehost, HostGator).
VPS Hosting: More control and scalability for growing websites.
Dedicated Hosting: Ideal for high-traffic websites requiring full control.
Choose a hosting plan based on your website’s expected traffic and technical needs.
Step 4: Plan Your Website’s Structure
Sketch out a sitemap to organize your content. A basic website typically includes:
Home Page: Your main landing page.
About Page: Information about you or your business.
Services/Products Page: Details about what you offer.
Contact Page: Ways for visitors to reach you.
Blog (Optional): A section for sharing updates or articles.
Step 5: Design Your Website
You have two main options for website design:
Website Builders
Tools like Wix, Squarespace, and Weebly offer drag-and-drop interfaces, making them beginner-friendly.
Ideal for non-technical users.
Custom Design with Code
Use HTML, CSS, and JavaScript to build a unique design.
Requires more time and technical skills but offers full customization.
For more control without coding, you can use platforms like WordPress and pair them with customizable themes.
Step 6: Add Content
Content is the heart of your website. Ensure your text, images, and videos align with your goals and target audience. Follow these tips:
Clarity: Write concise and clear content.
Visuals: Use high-quality images and videos to engage visitors.
SEO: Optimize your content for search engines to improve visibility.
Step 7: Test and Launch Your Website
Before making your website live, thoroughly test its functionality:
Check links, forms, and interactive elements.
Ensure your website is responsive and looks good on mobile devices.
Test loading speed using tools like Google PageSpeed Insights.
Once everything is in place, publish your website through your hosting platform.
Step 8: Maintain and Update Your Website
Launching your website is just the beginning. Regular updates are essential to keep your content fresh and relevant. Monitor performance using analytics tools like Google Analytics, and ensure your website remains secure by updating software and plugins regularly.
Final Thoughts
Building a website from scratch requires time and effort, but it’s an incredibly rewarding experience. Whether you use a website builder or dive into coding, remember that clarity, simplicity, and usability are key to creating a successful website. Start small, and as you gain confidence, you can expand and improve your site over time.
0 notes
Text
What is the first task of a web development?
Embarking on a web development journey can be exciting yet overwhelming, especially if you're new to the process. Websites are the foundation of online presence, whether for businesses, personal branding, or non-profits. However, creating a website is not just about writing code or choosing a template—it begins much earlier with a fundamental task that sets the tone for the entire project.
So, what is the first task of web development? It’s all about planning and defining objectives. Before diving into coding or designing, you must lay the groundwork to ensure the final product meets the intended purpose. Let’s explore this first task in detail and why it’s so crucial.
Defining the Purpose and Goals The very first step in web development is to determine the purpose of the website. Ask yourself:
Why is this website being created? What goals should it achieve? Who is the target audience? For example:
If you’re building an e-commerce site, the goal might be to increase sales and provide a seamless shopping experience. For a personal portfolio, the focus might be to showcase your work and attract potential employers. For a blog, the goal could be to share valuable insights and build a community. By clearly defining the purpose and goals, you establish a strong foundation for the rest of the development process.
Research and Competitor Analysis Once the purpose is clear, the next task involves researching the industry and analyzing competitors. This step helps you identify:
What similar websites look like and how they function. Features and design elements that work well (and those that don’t). Gaps in the market that your website can fill. Competitor analysis provides inspiration and ensures your website has unique value propositions to stand out.
Identifying the Target Audience Your website’s design, features, and content depend heavily on the preferences of its intended audience. Understanding your target users helps you make informed decisions about:
User Experience (UX): Navigation, accessibility, and ease of use. Design: Color schemes, typography, and layout that appeal to the audience. Content Strategy: Tone, messaging, and type of content (e.g., blogs, videos, or product descriptions). For instance, a website targeting young adults may favor a modern, dynamic design, while a website for senior users might prioritize larger fonts and simpler navigation.
Creating a Site Map and Wireframes Before jumping into coding or design, you need a clear plan of how the website will be structured. This involves:
Site Map: A hierarchical representation of the website’s pages and their relationships (e.g., Homepage > About Us > Services > Contact Us). This provides a clear blueprint of the website’s navigation.
Wireframes: Simple, visual sketches of the website’s layout and design. Wireframes help developers and designers visualize how the site will look and function before creating the actual design.
Both tools ensure clarity and help avoid costly changes during the later stages of development.
Choosing the Right Technology Stack Another critical part of the first task is selecting the tools and technologies for your project. This includes:
Front-End Technologies: HTML, CSS, JavaScript, or frameworks like React or Angular. Back-End Technologies: PHP, Python, Node.js, or Ruby on Rails. CMS Platforms: WordPress, Drupal, or custom CMS solutions. Hosting Providers: Determining where your website will be hosted. The choice depends on factors like the website’s complexity, budget, and future scalability needs.
Gathering Content and Assets A website is only as good as the content it delivers. At this stage, you should start gathering:
Text for the website (e.g., product descriptions, blog posts, or business details). Visual assets such as images, videos, or logos. Additional resources like downloadable files or user manuals (if applicable). Having this material ready early ensures a smoother development process and avoids delays.
Establishing a Project Timeline To keep the project on track, setting a realistic timeline is essential. Break down the web development process into phases, such as:
Planning and wireframing. Designing the website. Developing front-end and back-end features. Testing and debugging. Launching the website. A clear timeline helps developers and stakeholders stay aligned and ensures the project progresses efficiently.
The first task of web development is all about laying the groundwork. By defining the website’s purpose, understanding the audience, conducting research, and creating a clear plan, you set yourself up for success. Skipping this crucial step can lead to miscommunication, wasted resources, and a website that fails to meet its objectives.
Remember, a great website isn’t just built—it’s strategically planned. Take the time to establish a solid foundation, and the rest of the development process will be much smoother and more rewarding.
0 notes
Text
Web Designer vs. Web Developer: Understanding the Difference

Introduction
The terms web designer and web developer are often used interchangeably, but they represent two distinct roles within the web development process. Understanding the difference between these roles is crucial for anyone looking to build a website or start a career in the field of web design and development. Let’s explore what sets these professions apart.
What is a Web Designer?
A web designer is responsible for the visual and user experience (UX) aspects of a website. They focus on how a website looks and feels, ensuring that it is aesthetically pleasing, user-friendly, and aligned with the brand’s identity.
Key Responsibilities:
Designing layouts and wireframes.
Choosing color schemes, typography, and imagery.
Creating user-friendly navigation structures.
Ensuring a responsive design for different devices.
Using tools like Adobe XD, Figma, or Sketch.
Required Skills:
Proficiency in graphic design tools.
Understanding of UX/UI principles.
Basic knowledge of HTML and CSS (optional but beneficial).
Strong creative and artistic abilities.
Output:
A web designer provides mockups, prototypes, or design files that guide the development phase.
MORE INFO:- https://webbirdinstitute.in/courses/
What is a Web Developer?
A web developer takes the designs created by web designers and turns them into functional websites. They focus on the technical aspects, ensuring that the website performs efficiently and reliably.
Key Responsibilities:
Coding websites using languages like HTML, CSS, and JavaScript.
Building the front-end and back-end functionalities.
Integrating APIs and databases.
Ensuring website security and performance optimization.
Debugging and maintaining existing websites.
Types of Web Developers:
Front-End Developer: Focuses on the user-facing parts of a website, implementing designs using code.
Back-End Developer: Manages server-side tasks, databases, and application logic.
Full-Stack Developer: Combines front-end and back-end development skills.
Required Skills:
Proficiency in programming languages (HTML, CSS, JavaScript, etc.).
Knowledge of frameworks (e.g., React, Angular, Django).
Familiarity with databases and server management.
Problem-solving and logical thinking abilities.
Key Differences Between Web Designers and Web Developers
Aspect Web Designer Web Developer Focus Aesthetics and user experience Functionality and technical implementation Tools Design tools like Figma, Sketch, Photoshop Coding tools and IDEs like VS Code, Git Output Wireframes, mockups, and design concepts Fully functional websites Skills Creative and artistic skills Technical and coding skills
Collaboration Between Web Designers and Developers
For a successful website project, web designers and developers must work closely together. The designer ensures that the website is visually appealing and intuitive, while the developer ensures it is functional and performant. Clear communication and collaboration are key to merging design and functionality seamlessly.
VISIT HERE:- https://webbirdinstitute.in/
Conclusion
While web designers and web developers have distinct roles, they are equally essential in the web development process. Designers bring creativity and user-focused thinking, while developers ensure the technical backbone of a website is robust. Understanding their differences helps businesses hire the right professionals and allows aspiring professionals to choose the path that aligns with their interests and skills.
#WebDesign#WebDevelopment#UXDesign#FrontendDevelopment#BackendDevelopment#FullStackDeveloper#WebDesignTrends#WebDevelopmentTools#UIUX#ResponsiveDesign
1 note
·
View note