#css tips
Explore tagged Tumblr posts
Visit Tumblr Blog
Explore Tumblr blogs with no restrictions, modern design and the best experience.
Last Seen Tumblr Blogs


Fun Fact
Kazakhstan’s Minister of Communications and Informatics has blocked the Tumblr site because it contained 60 sites of terrorism, extremism, and pornography in 2015.
Text
✧・゚: Customize your highlight color! :・゚✧
I recently came across a blog where when I went to highlight some text I noticed it was a unique color!!! (」°ロ°)」
AND IT'S SO SIMPLE TO DO
all you do is go to your css file and add this:
::selection { background: <hexcolor> }
Enjoy!! ♡⸜(˶˃ ᵕ ˂˶)⸝♡
#codeblr#progblr#programming#tech#coding#resources#frontend#studyblr#aesthetic#css#html#these little details make me so very happy#css tips
2K notes
·
View notes
Text
I learnt the 'vw' unit in CSS~!
% and rem/em units weren't working properly for the responsiveness so I search online for other units I could use and I came across vw and now I'm satisfied! Scales semi-smoothly~! 😏
Using vw means the font size is directly proportional to the width of the viewport.
You don't need to worry as much about setting breakpoints for different screen sizes. The font size adjusts automatically based on the viewport.
Hope this helps other people learning CSS and working on making their site responsive! I used the vw unit on the font-size, padding height and width of the elements! Might need to add it to the box-shadow property too? 🤔💭
#codeblr#coding#progblr#programming#studyblr#studying#computer science#tech#css#css tips#comp sci#programmer
86 notes
·
View notes
Text

Unlock your future with JESA Academy – the premier CSS Academy in Lahore! Whether you're beginning your journey or preparing for your final attempt, JESA Academy provides expert guidance, structured courses, and personalized mentorship to help you succeed. Join hundreds of aspirants who’ve trusted JESA Academy to make their CSS dreams a reality. 🌟 📍 Located in Lahore 🎓 Expert Faculty 📚 Comprehensive Study Plans 🔗 Enroll Now: https://jesaacademy.com Your CSS success story begins here. Let’s build it together!
#CSS Academy in Lahore#JESA Academy#CSS preparation#CSS Lahore#Lahore education#Pakistani students#CSS 2025#CSS tips#Study in Lahore#CSS exams#Government jobs Pakistan#Tumblr education#Study motivation#Academy in Lahore
0 notes
Text

4 Key Concepts Every Computer Science Student Should Master Early
Building a strong foundation in computer science starts with mastering the right concepts. This infographic highlights 4 fundamental topics that every computer science student should understand early in their learning journey. These concepts not only support academic success but also prepare learners for real-world applications in software development, data structures, algorithms, and system design.
Whether you're pursuing a career in programming, IT, or software engineering, grasping these core ideas is crucial to long-term success in the tech industry. Ideal for beginners, this visual guide simplifies complex topics into easily digestible insights.
Stay ahead by reinforcing your basics and unlocking better learning outcomes in computer science.
📚 Learn Computer science: Attitude Academy
📍 Visit Us: Yamuna Vihar | Uttam Nagar
📞 Call: +91 9654382235
🌐 Website: www.attitudetallyacademy.com
📩 Email: [email protected]
#computer science#computer technology#java programming language#html training#css tips#pythonprogramming#skills development
0 notes
Text
Introduction To HTML
[Note: You need a text editor to do this. You can use Notepad or Text Edit. But it's so much better to download VS Code / Visual Studio Code. Save it with an extension of .html]
HTML stands for Hyper Text Markup Language
It is used to create webpages/websites.
It has a bunch of tags within angular brackets <....>
There are opening and closing tags for every element.
Opening tags look like this <......>
Closing tags look like this
The HTML code is within HTML tags. ( // code)
Here's the basic HTML code:
<!DOCTYPE html> <html> <head> <title> My First Webpage </title> </head> <body> <h1> Hello World </h1> <p> Sometimes even I have no idea <br> what in the world I am doing </p> </body> </html>
Line By Line Explanation :
<!DOCTYPE html> : Tells the browser it's an HTML document.
<html> </html> : All code resides inside these brackets.
<head> </head> : The tags within these don't appear on the webpage. It provides the information about the webpage.
<title> </title> : The title of webpage (It's not seen on the webpage. It will be seen on the address bar)
<body> </body> : Everything that appears on the webpage lies within these tags.
<h1> </h1> : It's basically a heading tag. It's the biggest heading.
Heading Tags are from <h1> to <h6>. H1 are the biggest. H6 are the smallest.
<p> </p> : This is the paragraph tag and everything that you want to write goes between this.
<br> : This is used for line breaks. There is no closing tag for this.
-------
Now, we'll cover some <Meta> tags.
Meta tags = Notes to the browser and search engines.
They don’t appear on the page.
They reside within the head tag
<head> <meta charset="UTF-8"> <meta name="viewport" content="width=device-width, initial-scale=1.0"> <meta name="description" content="Website Description"> <meta name="Author" content="Your Name"> <meta name="keywords" content="Websites Keywords"> </head>
Line By Line Explanation:
<meta charset="UTF-8"> : Makes sure all letters, symbols, and emojis show correctly.
<meta name="viewport" content="width=device-width, initial-scale=1.0"> : Makes your site look good on phones and tablets.
<meta name="description" content="Website Description"> : Describes your page to Google and helps people find it.
<meta name="author" content="Your Name"> : Says who created the page.
<meta name="keywords" content="Website's Keywords"> : Adds a few words to help search engines understand your topic.
_____
This is my first post in this topic. I'll be focusing on the practical side more than the actual theory, really. You will just have some short bullet points for most of these posts. The first 10 posts would be fully HTML. I'll continue with CSS later. And by 20th post, we'll build the first website. So, I hope it will be helpful :)
If I keep a coding post spree for like 2 weeks, would anyone be interested? o-o
#code#codeblr#css#html#javascript#python#studyblr#progblr#programming#comp sci#web design#web developers#web development#website design#webdev#website#tech#html css#learn to code#school#study motivation#study aesthetic#study blog#student#high school#studying#study tips#studyspo#website development#coding
87 notes
·
View notes
Text

33 notes
·
View notes
Text
Manipuler les couleurs en CSS avec color-mix()
Quand on potasse le design de nos forums, on a souvent besoin de trouze mille couleurs pour faire quelque chose d'à peu près joli. Parfois, on aurait juste besoin de variantes "plus claire", "plus sombre", "semi-transparente" de notre couleur de base. En temps normal, on va donc devoir définir chacune de nos couleurs une par une, chacune son code hexadécimal péniblement pioché sur une palette.
Mais en CSS moderne, il existe maintenant color-mix(), une fonction qui est prise en charge par la plupart des navigateurs modernes.
La fonction prend trois valeurs, séparées par des virgules :
L'espace de couleurs : Je n'ai pas les connaissances en colorimétrie pour expliquer ça, mais c'est apparemment utilisé pour définir quelle formule mathématique est utilisée pour mélanger les couleurs. Il y a plusieurs valeurs disponibles, j'ai vu beaucoup de gens conseiller oklab, mais je ne saurais pas trop expliquer pourquoi. On écrira donc in oklab, pour dire qu'on utilise l'espace de couleurs oklab.
Une première couleur, dans n'importe quel format (rgb, hsl, hexadécimal, etc...), suivie ou non d'un pourcentage
Une deuxième couleur, dans n'importe quel format, suivie ou non d'un pourcentage
En ce qui concerne les pourcentages facultatifs :
Si on ne définit aucun pourcentage, par défaut, ça sera un mélange 50/50 entre les deux couleurs
Si on définit seulement le pourcentage d'une seule des couleurs, par exemple 30%, alors la somme des deux fera automatiquement 100%, donc par exemple 30/70
Si le total fait moins de 100%, le résultat final sera partiellement transparent.
Donc, si nous souhaitons utiliser la couleur #663399, mais juste légèrement transparente, par exemple pour la mettre par-dessus une image, on l'écrira comme ça :
color-mix(in srgb, #663399, transparent 25%)
Et vous pouvez parfaitement utiliser une propriété customisée (variable CSS) à la place des couleurs, ce qui vous facilitera d'autant plus le travail !

--color-primary: #663399; --color-primary-light: color-mix(in oklab, var(--color-primary) 60%, white); --color-primary-black: color-mix(in oklab, var(--color-primary) 60%, black);
(Tumblr gère mal le code, comme d'habitude, donc je rajoute une image)
Pour rappel, les propriétés customisées CSS sont précédées de deux tirets -- et peuvent être utilisées avec var().
On peut faire des tas de choses avec cette fonction color-mix(), et je vous recommande d'aller jeter un coup d'œil aux vidéos de Kevin Powell pour vous faire une idée. Même si l'anglais ne vous parle pas, le visuel devrait vous aider à comprendre à quel point c'est cool !
Pour en savoir plus :
Vidéo de Kevin Powell - A deep dive into CSS color-mix()
Vidéo de Kevin Powell - Using currentColor with color-mix()
Article francophone du MDN sur color-mix()
Article anglophone (et plus complet) du MDN sur color-mix()
23 notes
·
View notes
Text
Convert HTML to Image: A Step-by-Step Guide ✨

Do you want to turn some HTML code you've made that's on your website and have a way to convert it into an image for you to save?
Well, look no further! I too wanted to do the same thing but funny enough, there weren't any straightforward tutorials out there that could show you how! After hours of searching, I finally discovered the solution~!
This is an old tutorial I made 🐼

💛 Set your environment
Before we dive into the conversion process, I'll assume you already have your HTML code ready. What you want to learn is how to turn it into an image file. You should have a good grasp of HTML and JavaScript. For this tutorial, we'll use the following HTML code example:

We won't include the CSS code, as it doesn't affect this tutorial. The JavaScript file (script.js) at the bottom of the body element is where we'll add the functionality for the conversion.
Your page should resemble the following:

As you can see, the "Click me" button will handle the conversion. We aim to convert everything within the div.info-div into an image.
💛 Using the html2canvas JavaScript Library
The html2canvas library allows you to take screenshots of webpages and target specific elements on a screen. Here are the steps to include the library in your project:
The steps to put the library in your project:
Visit the html2canvas website for more information.
Copy the CDN link from here

and include it in a script tag in your project's head tag in the HTML file:

That's it for including the library on the HTML side. Now, let's move on to the JavaScript code.
💛 JavaScript Functionality
Here's the JavaScript code to handle the conversion:

In this code, I want to turn the whole div.info-div into an image, I put it into a variable in const div = document.querySelector(".info-div");.
I also put the button into a variable in const button = document.querySelector("button");
I added a click event listener to the button so when the user clicks the button, it will follow the code inside of the event listener!
You can find similar code like this in the documentation of the html2canvas library:

What is happening here is:
We add the div (or what the element we want to take an image of) into the html2canvas([element]).then((canvas)
Added the image file type url to a variable = const imageDataURL = canvas.toDataURL("image/png"); - You can replace the png to other image file types such as jpg, jpeg etc
Created an anchor/link tag, added the href attribute to imageDataURL
The download attribute is where we will give the default name to the image file, I added "dog.png"
Perform the click() function to the anchor tag so it starts to download the image we created
And that's it!
💛 The End
And that's it! You've successfully learned how to turn your HTML into an image. It's a great way to save and share your web content in a unique format.

If you have any questions or need further clarification, please comfortable to ask. Enjoy converting your HTML into images! 💖🐼
#my resources#coding#codeblr#programming#progblr#studying#studyblr#programmer#html#html css#javascript#neocities#coding tips#html5 tutorial#html tutorial
155 notes
·
View notes
Text
Build a Strong Backend: Why Web Developers Should Focus on MySQL Early
Mastering the backend is essential for building powerful and scalable web applications — and it all starts with MySQL. As one of the most widely-used relational database systems, MySQL plays a critical role in data management, performance optimization, and secure backend architecture.
Whether you're an aspiring web developer or looking to level up your programming skills in Yamuna Vihar or Uttam Nagar, starting with MySQL early gives you a solid foundation in backend development. From storing user data and managing queries to building dynamic websites, MySQL knowledge is a must-have in today’s job market.
Take the first step towards becoming a full-stack developer by learning MySQL along with HTML, CSS, JavaScript, PHP, and other essential programming tools. Gain practical experience and boost your backend development skills to stay ahead in the competitive tech industry.
📚 Learn Web development: Attitude Academy
📍 Visit Us: Yamuna Vihar | Uttam Nagar
📞 Call: +91 9654382235
🌐 Website: www.attitudetallyacademy.com
📩 Email: [email protected]
0 notes
Text
Day 6 [Forms In HTML]
Introduction To HTML
Day 2 [Multimedia Elements In HTML]
Day 3 [Table in HTML]
Day 4 [Link Tag In HTML]
Day 5 [Lists In HTML]
Forms are basically used for collecting user information. And they are really important to learn. Here's a simple form in HTML:
Code:


Line By Line Explanation:
<form>: Used for creating forms. All the form elements go in this tag. Action: When submitted, data is sent to this file or URL [index.html] Method="post": Sends data
<label> : This describes the input tag for="___": Connects the label to the input with id="name" id : gives a unique identification to the tag <input>: It's used to make the form elements
<input> Type Elements :
type="text" : A simple text box is created.
type="email" : A box to input email.
type="checkbox" : A small square that users can tick. Can select multiple options using this.
type="radio" : A small circle, you can only select one option.
type="submit" : A button that submits the data to the server.
<textarea>: Accepts multiple lines of text. rows="4": It creates 4 lines cols="30": It creates 30 characters
<select> : Creates a drop-down list <option>: Creates an item in the dropdown. value="colorname": This is the data sent to the server if chosen.
Output For The Code:

_______________________
Hope This Helps !!
#code#codeblr#css#html#javascript#python#studyblr#progblr#programming#comp sci#web design#web developers#web development#website design#webdev#website#tech#html css#learn to code#school#study motivation#study aesthetic#study blog#student#high school#studying#study tips#studyspo#website development#coding
31 notes
·
View notes
Text
How To Get Multiple Colors in a Text
warning this is might be long due to my over-explanation!!!
Some time ago I got a comment on my post asking how I got the color fading effect in my text and used non-default text colors, like the title above. I also got a few messages about this.
I swear wanted to respond sooner, but I completely forgot. When I finally got the time to reply, I noticed my response turned into an essay! So, I decided it would be easier to make a post instead, and if you're like me and are a visual learner don't worry I included images!
Also, I have ADHD and over-explain things. I realized that while drafting my reply, it came across as patronizing. So if I sound that way in this post, I assure you it's not my intention; I just tend to explain things in detail because I prefer having things explained to me like that with the smallest details addressed. I tried to make it super simple for those who are new to Tumblr.
Here is the website I used: https://patorjk.com/text-color-fader/
If you got how it works congrats, If not, and you're confused, feel free to read the steps I take when using it!

HOW TO GET THE CODE!
1.) The first step is to enter your text which is done here!

2.) Choose the number of colors you want your text to have. At least 2 colors are needed for your text to have a fade effect. For using just one color without fading, refer to 3.c.

3.a) Choose your colors from the presets which btw automatically change the number of colors used but you could simply change it.

3.b) If you would like to choose your own colors, ignore the presets and simply click on the color to edit the Hex code. Keep in mind that the order of the colors, as shown above, is the same order in which they will appear in the text when the code is generated.

3.c) To use a single color without any fade effect, set the color amount to 2, which is the minimum allowed. Then edit the two colors to have an identical hex code.

4.a) You can choose your Fade type using the below options. For this post, I will be using the horizontal fade type, as it's the one I prefer. I haven't explored the other options much, so feel free to experiment and choose whatever you like!

4.b) For the output code ALWAYS KEEP IT AS HTML when using it on Tumblr. Unless something changes with the website, HTML is the default, so you don't need to worry about making any changes.

5.a) Click the generate button at the bottom of the page to create the code.

5.b) This is how the results will appear with multiple colors and just one color. By default, the background color is set to black, but you can change it to white or another color to test how your text will look. This option can be found at the lower right side of the results, titled "View Against Background." (NOTE: The background color does not affect the code and is not included in the code itself.)


5.c) If you want to edit something, simply press the "create new fade" button at the bottom. Don’t worry; it won't reset anything; it will just take you back to the previous page!

6.) When you are okay with the results copy the code. To do this press the select all at the bottom right of the code. This will just highlight the code so you will need to either press ctrl c, ⌘ c, or whatever you do to copy text on your device!

NOW, HOW TO PUT THE CODE INTO TUMBLR!
7.a) Head over to Tumblr and create a post! Make sure you're editing using HTML by pressing the little setting button on the upper right side of your post.

7.b) Scroll down to the text editor. The default should be rich text. Press the dropdown and choose HTML.


7.c) Paste the code in the HTML editor. Then save it as a draft to make sure it looks good before posting.

8.) Here's how it should look. Be aware that the HTML editor does mess up your image placements a bit when editing, but that's an easy fix. You just edit the draft and drag the images back to where you wanted them, and it won't mess with the code.

POTENTIAL PROBLEM YOU MIGHT FACE

You might get a warning like this when using bulky paragraphs with color-fading text on Tumblr, as it wrongfully considers them to exceed the character limit. This warning doesn't appear for single-colored text. When I switched to a single color, the warning disappeared, allowing me to save my draft. When this warning appears, you will not be able to save your draft at all, which puts you at risk of losing all your work. What I usually do when I get this warning and am unable to save the draft is change the text editor, use HTML, and save the draft from there.
Please be aware of two minor issues with this hack: First, HTML can interfere with your images. If your images are stacked, that's fine; however, if they are side by side, HTML will change them to a stacked format. Second, the "read more" link will be deleted by HTML. While both issues can often be resolved using the rich text editor, you won't be able to fix them in this scenario because the rich text editor won't let you save the draft or post due to incorrectly seeing the character limit.
To work around this issue, I sometimes save the draft as HTML on my computer to bypass character limits. Then, I use the Tumblr app on my phone to adjust the image placement and re-add the “read more” link. This may not always work so just be aware of these potential issues!
That's it! If you have any questions, feel free to comment or message me, I'm kind of new at this too so bear with me!
PS, @angel-dustspo I’m so sorry for the late reply!!
#html css#html#code#chaotic academia#tips and tricks#for reference#text post#moodboard#studyblr#academia aesthetic#useful#study blog#writing#instructions#productivity#tumblr stuff#colorful#aesthetic#girlblogger#pinterest girl#student#studying#studyspo#student life
15 notes
·
View notes
Text
Gérer conditionnellement le dernier enfant en CSS
Aujourd'hui, on va parler de CSS conditionnel !
Petite mise en situation : Vous avez un forum, et vous voudriez que les sous-forums soient affichés sur deux colonnes. Pour ça, vous choisissez d'utiliser les grilles CSS, parce que grid c'est la vie.
Mais voilà, parfois, dans vos catégories, il y a un nombre pair de forums, et tout va bien, et parfois il y a un nombre impair, et vous n'aimez pas du tout le rendu que ça donne.

Vous pourriez vous arranger pour avoir un nombre pair de sous-forums dans chacune des sections et sous-sections de votre forum. Ou bien vous pourriez traquer tous les cas particuliers pour personnaliser l'apparence de ce dernier sous-forum qui fait tâche. Mais à titre personnel, je vous proposerais plutôt d'utiliser la magie du CSS pour faire une petite modification conditionnelle du rendu de vos forums.

Je vous retrouve après le bouton "afficher davantage", parce que pavé César, tout ça, tout ça.
Du CSS conditionnel ? Keskecé ?
C'est du CSS normal, en vrai. Lorsque vous écrivez une règle CSS, son effet ne s'appliquera que si l'élément ciblé par le sélecteur existe. Nous allons donc écrire un sélecteur qui ciblera le dernier élément enfant d'un conteneur, mais seulement s'il est à une position impaire.
Si vous n'êtes pas au point sur ce qu'est un sélecteur CSS, faites un tour sur l'article du MDN sur la syntaxe CSS et l'article sur les sélecteurs. L'important à en retenir pour le moment, c'est qu'on peut combiner des sélecteurs.
Et nous avons deux sélecteurs en particulier qui vont nous intéresser :
:last-child va sélectionner le dernier élément enfant d'un conteneur
:nth-child(odd) va sélectionner tous les éléments enfants à une position impaire (le 1er, le 3ième, le 5ième, etc)
Pour ceux qui ont du mal avec la terminologie, les "enfants" d'un conteneur, c'est basiquement les éléments que vous y mettez. Donc si on prend cet exemple très simple :
<div class="demo"> <div>1</div> <div>2</div> <div>3</div> <div>4</div> <div>5</div> </div>
L'élément conteneur, celui qui a la classe demo, contient cinq éléments div qui sont ses enfants (des descendants directs). Si les div contenaient aussi d'autres éléments, ceux-là seraient plutôt des descendants (tout court) de notre conteneur.
Pour en revenir au sujet, on aimerait donc bien que dans cet exemple, ce cinquième élément, qui est le dernier enfant de la liste, et qui a le malheur d'être en position impaire, soit affiché de manière à occuper deux colonnes plutôt qu'une seule.
Pour ça, nous allons écrire un sélecteur qui va cibler les éléments div qui sont les enfants directs du conteneur de classe demo, ce qui va s'écrire .demo > div. Mais comme on veut spécifiquement cibler un div qui est le dernier de la liste ET qui est impair, on va lui coller les deux sélecteurs mentionnés plus haut, et notre sélecteur devient : .demo > div:last-child:nth-child(odd).
Et on en fait quoi maintenant ?
Cette fois, on va avoir besoin de nos connaissances en CSS grid, mais si on part d'une configuration simple d'affichage en deux colonnes, on va juste indiquer à l'élément div sélectionné qu'il devra prendre deux colonnes de large plutôt qu'une, avec la propriété grid-column.
Ce qui donnera le CSS suivant :
.demo { display:grid; grid-template-columns: repeat(2, 1fr); } .demo > div:last-child:nth-child(odd) { grid-column: span 2; }
Désormais, avec ce code, que notre conteneur de classe demo ait 3, 7, 13 ou 379 enfants, le dernier s'affichera toujours sur deux colonnes !
Plus qu'à appliquer ça à vos forums maintenant ;p
Si vous voulez plus de détails, ou si vous voudriez bien savoir comment on s'en sortirait si on avait trois colonnes plutôt que deux, j'ai écrit un tutoriel plus détaillé sur le forum de support du Blank Theme, n'hésitez pas à aller le lire !
12 notes
·
View notes
Text

Code Your Future: 5 Smart Ways to Start Learning Computer Science
Kickstart your journey into the world of technology with this visually engaging infographic that outlines 5 effective methods to learn Computer Science—ideal for beginners and aspiring tech professionals. From online courses and coding bootcamps to self-paced projects, peer learning, and open-source contributions, each method is explained to help learners find the best path based on their goals and learning style.
Whether you're looking to become a software developer, data analyst, or IT professional, understanding these learning strategies can shape your future in tech. Perfect for students, career changers, or anyone passionate about coding and digital skills.
Explore the smartest ways to build a strong foundation in computer science and stay competitive in today’s digital era.
📚 Learn Computer science: Attitude Academy
📍 Visit Us: Yamuna Vihar | Uttam Nagar
📞 Call: +91 9654382235
🌐 Website: www.attitudetallyacademy.com
📩 Email: [email protected]
#computer science#computer science education#computer science technology#computer science course#computer science programs#javaprogramming#html training#css tips
0 notes
Text
Day 7 [Semantics In HTML]
Introduction To HTML
Day 2 [Multimedia Elements In HTML]
Day 3 [Table in HTML]
Day 4 [Link Tag In HTML]
Day 5 [Lists In HTML]
Day 6 [Forms In HTML]
Code:

Line By Line Explanation:
Semantic Tags in HTML give clear meaning to the code. These are tags like:
<header>: Used for the title of the page.
<nav>: Contains navigation links of the website.
<main>: The main part of the page.
<section>: A group of content that is similar.
<article>: A group of content that is an independent piece.
<aside>: Extra info, like side notes.
<footer>: The bottom of the page that contains the copy rights and additional info.
Navigation Tag:
The navigation tag must be within an unordered list tag. And each item of that list must contain the link tag that should have the URL of that specific page.
Comments In HTML:
It is a note in your code that the browser ignores.
It’s just for you to read.
You can use it to explain your code or temporarily hide some code.
Syntax Of A Comment:
<!-- This Is A Comment -- >
Output Of The Code:

Notes: The arrows and the words in red are something I included. It is not included in the code!
______________
Hope This Helps :)
#code#codeblr#css#html#javascript#python#studyblr#progblr#programming#comp sci#web design#web developers#web development#website design#webdev#website#tech#html css#learn to code#school#study motivation#study aesthetic#study blog#student#high school#studying#study tips#studyspo#website development#coding
21 notes
·
View notes
Text

Scrollbar-width property
To define scrollbar thickness or to hide it, a good alternative to ::-webkit-scrollbar
Documentation
Compatibility
16 notes
·
View notes
Text
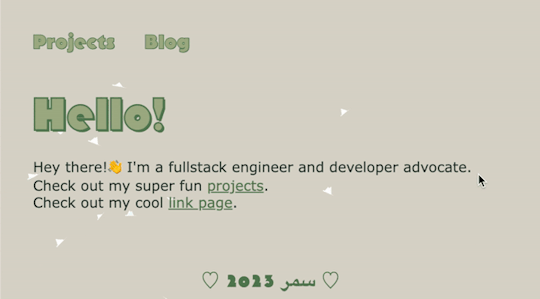
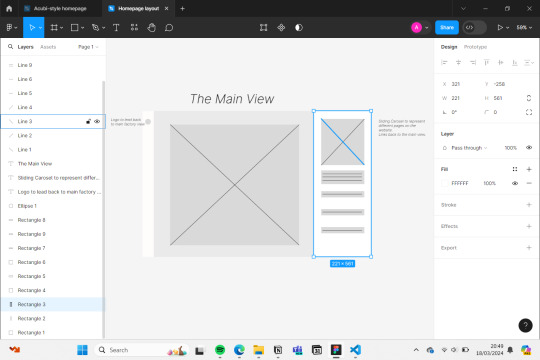
18.03.2024
Today was a decently normal Monday. My teachers informed me today that I might be getting an essay I completed a while ago and getting my science test results back soon.
After school, I tried to start the home page of the website I'm currently building Project.Spider and I would like to say that thanks to the help of Bing AI, ChatGPT and Visual Studio Code, I could finish one part.

🎧- Shut up my mom's calling - Hotel Ugly
🌲- 3hrs
#aesthetic#studying#books#bookish#bookworm#book community#booknerd#currently reading#bookstagram#student life#coding#python#programming#engineering#developer#html#html css#css#figma#figmadesign#figma to html#studyblr community#productivity#productivity challenge#productivityboost#study#study motivation#study notes#study tips#study with me
8 notes
·
View notes