#software testing manual testing manual testing tutorial software testing course
Explore tagged Tumblr posts
Visit Tumblr Blog
Explore Tumblr blogs with no restrictions, modern design and the best experience.
Last Seen Tumblr Blogs


Fun Fact
Tumblr is used by 21% of adults online aged 18-29 years.
Text


Neural Filters Tutorial for Gifmakers by @antoniosvivaldi
Hi everyone! In light of my blog’s 10th birthday, I’m delighted to reveal my highly anticipated gifmaking tutorial using Neural Filters - a very powerful collection of filters that really broadened my scope in gifmaking over the past 12 months.
Before I get into this tutorial, I want to thank @laurabenanti, @maines , @cobbbvanth, and @cal-kestis for their unconditional support over the course of my journey of investigating the Neural Filters & their valuable inputs on the rendering performance!
In this tutorial, I will outline what the Photoshop Neural Filters do and how I use them in my workflow - multiple examples will be provided for better clarity. Finally, I will talk about some known performance issues with the filters & some feasible workarounds.
Tutorial Structure:
Meet the Neural Filters: What they are and what they do
Why I use Neural Filters? How I use Neural Filters in my giffing workflow
Getting started: The giffing workflow in a nutshell and installing the Neural Filters
Applying Neural Filters onto your gif: Making use of the Neural Filters settings; with multiple examples
Testing your system: recommended if you’re using Neural Filters for the first time
Rendering performance: Common Neural Filters performance issues & workarounds
For quick reference, here are the examples that I will show in this tutorial:
Example 1: Image Enhancement | improving the image quality of gifs prepared from highly compressed video files
Example 2: Facial Enhancement | enhancing an individual's facial features
Example 3: Colour Manipulation | colourising B&W gifs for a colourful gifset
Example 4: Artistic effects | transforming landscapes & adding artistic effects onto your gifs
Example 5: Putting it all together | my usual giffing workflow using Neural Filters
What you need & need to know:
Software: Photoshop 2021 or later (recommended: 2023 or later)*
Hardware: 8GB of RAM; having a supported GPU is highly recommended*
Difficulty: Advanced (requires a lot of patience); knowledge in gifmaking and using video timeline assumed
Key concepts: Smart Layer / Smart Filters
Benchmarking your system: Neural Filters test files**
Supplementary materials: Tutorial Resources / Detailed findings on rendering gifs with Neural Filters + known issues***
*I primarily gif on an M2 Max MacBook Pro that's running Photoshop 2024, but I also have experiences gifmaking on few other Mac models from 2012 ~ 2023.
**Using Neural Filters can be resource intensive, so it’s helpful to run the test files yourself. I’ll outline some known performance issues with Neural Filters and workarounds later in the tutorial.
***This supplementary page contains additional Neural Filters benchmark tests and instructions, as well as more information on the rendering performance (for Apple Silicon-based devices) when subject to heavy Neural Filters gifmaking workflows
Tutorial under the cut. Like / Reblog this post if you find this tutorial helpful. Linking this post as an inspo link will also be greatly appreciated!
1. Meet the Neural Filters!
Neural Filters are powered by Adobe's machine learning engine known as Adobe Sensei. It is a non-destructive method to help streamline workflows that would've been difficult and/or tedious to do manually.
Here are the Neural Filters available in Photoshop 2024:


Skin Smoothing: Removes blemishes on the skin
Smart Portrait: This a cloud-based filter that allows you to change the mood, facial age, hair, etc using the sliders+
Makeup Transfer: Applies the makeup (from a reference image) to the eyes & mouth area of your image
Landscape Mixer: Transforms the landscape of your image (e.g. seasons & time of the day, etc), based on the landscape features of a reference image
Style Transfer: Applies artistic styles e.g. texturings (from a reference image) onto your image
Harmonisation: Applies the colour balance of your image based on the lighting of the background image+
Colour Transfer: Applies the colour scheme (of a reference image) onto your image
Colourise: Adds colours onto a B&W image
Super Zoom: Zoom / crop an image without losing resolution+
Depth Blur: Blurs the background of the image
JPEG Artefacts Removal: Removes artefacts caused by JPEG compression
Photo Restoration: Enhances image quality & facial details
+These three filters aren't used in my giffing workflow. The cloud-based nature of Smart Portrait leads to disjointed looking frames. For Harmonisation, applying this on a gif causes Neural Filter timeout error. Finally, Super Zoom does not currently support output as a Smart Filter
If you're running Photoshop 2021 or earlier version of Photoshop 2022, you will see a smaller selection of Neural Filters:


Things to be aware of:
You can apply up to six Neural Filters at the same time
Filters where you can use your own reference images: Makeup Transfer (portraits only), Landscape Mixer, Style Transfer (not available in Photoshop 2021), and Colour Transfer
Later iterations of Photoshop 2023 & newer: The first three default presets for Landscape Mixer and Colour Transfer are currently broken.
2. Why I use Neural Filters?
Here are my four main Neural Filters use cases in my gifmaking process. In each use case I'll list out the filters that I use:

Enhancing Image Quality:
Common wisdom is to find the highest quality video to gif from for a media release & avoid YouTube whenever possible. However for smaller / niche media (e.g. new & upcoming musical artists), prepping gifs from highly compressed YouTube videos is inevitable.
So how do I get around with this? I have found Neural Filters pretty handy when it comes to both correcting issues from video compression & enhancing details in gifs prepared from these highly compressed video files.
Filters used: JPEG Artefacts Removal / Photo Restoration
Facial Enhancement:
When I prepare gifs from highly compressed videos, something I like to do is to enhance the facial features. This is again useful when I make gifsets from compressed videos & want to fill up my final panel with a close-up shot.
Filters used: Skin Smoothing / Makeup Transfer / Photo Restoration (Facial Enhancement slider)
Colour Manipulation:
Neural Filters is a powerful way to do advanced colour manipulation - whether I want to quickly transform the colour scheme of a gif or transform a B&W clip into something colourful.
Filters used: Colourise / Colour Transfer
Artistic Effects:
This is one of my favourite things to do with Neural Filters! I enjoy using the filters to create artistic effects by feeding textures that I've downloaded as reference images. I also enjoy using these filters to transform the overall the atmosphere of my composite gifs. The gifsets where I've leveraged Neural Filters for artistic effects could be found under this tag on usergif.
Filters used: Landscape Mixer / Style Transfer / Depth Blur
How I use Neural Filters over different stages of my gifmaking workflow:
I want to outline how I use different Neural Filters throughout my gifmaking process. This can be roughly divided into two stages:
Stage I: Enhancement and/or Colourising | Takes place early in my gifmaking process. I process a large amount of component gifs by applying Neural Filters for enhancement purposes and adding some base colourings.++
Stage II: Artistic Effects & more Colour Manipulation | Takes place when I'm assembling my component gifs in the big PSD / PSB composition file that will be my final gif panel.
I will walk through this in more detail later in the tutorial.
++I personally like to keep the size of the component gifs in their original resolution (a mixture of 1080p & 4K), to get best possible results from the Neural Filters and have more flexibility later on in my workflow. I resize & sharpen these gifs after they're placed into my final PSD composition files in Tumblr dimensions.
3. Getting started
The essence is to output Neural Filters as a Smart Filter on the smart object when working with the Video Timeline interface. Your workflow will contain the following steps:
Prepare your gif
In the frame animation interface, set the frame delay to 0.03s and convert your gif to the Video Timeline
In the Video Timeline interface, go to Filter > Neural Filters and output to a Smart Filter
Flatten or render your gif (either approach is fine). To flatten your gif, play the "flatten" action from the gif prep action pack. To render your gif as a .mov file, go to File > Export > Render Video & use the following settings.

Setting up:
o.) To get started, prepare your gifs the usual way - whether you screencap or clip videos. You should see your prepared gif in the frame animation interface as follows:

Note: As mentioned earlier, I keep the gifs in their original resolution right now because working with a larger dimension document allows more flexibility later on in my workflow. I have also found that I get higher quality results working with more pixels. I eventually do my final sharpening & resizing when I fit all of my component gifs to a main PSD composition file (that's of Tumblr dimension).
i.) To use Smart Filters, convert your gif to a Smart Video Layer.
As an aside, I like to work with everything in 0.03s until I finish everything (then correct the frame delay to 0.05s when I upload my panels onto Tumblr).
For convenience, I use my own action pack to first set the frame delay to 0.03s (highlighted in yellow) and then convert to timeline (highlighted in red) to access the Video Timeline interface. To play an action, press the play button highlighted in green.

Once you've converted this gif to a Smart Video Layer, you'll see the Video Timeline interface as follows:

ii.) Select your gif (now as a Smart Layer) and go to Filter > Neural Filters

Installing Neural Filters:
Install the individual Neural Filters that you want to use. If the filter isn't installed, it will show a cloud symbol (highlighted in yellow). If the filter is already installed, it will show a toggle button (highlighted in green)

When you toggle this button, the Neural Filters preview window will look like this (where the toggle button next to the filter that you use turns blue)

4. Using Neural Filters
Once you have installed the Neural Filters that you want to use in your gif, you can toggle on a filter and play around with the sliders until you're satisfied. Here I'll walkthrough multiple concrete examples of how I use Neural Filters in my giffing process.
Example 1: Image enhancement | sample gifset
This is my typical Stage I Neural Filters gifmaking workflow. When giffing older or more niche media releases, my main concern is the video compression that leads to a lot of artefacts in the screencapped / video clipped gifs.
To fix the artefacts from compression, I go to Filter > Neural Filters, and toggle JPEG Artefacts Removal filter. Then I choose the strength of the filter (boxed in green), output this as a Smart Filter (boxed in yellow), and press OK (boxed in red).
Note: The filter has to be fully processed before you could press the OK button!

After applying the Neural Filters, you'll see "Neural Filters" under the Smart Filters property of the smart layer

Flatten / render your gif
Example 2: Facial enhancement | sample gifset
This is my routine use case during my Stage I Neural Filters gifmaking workflow. For musical artists (e.g. Maisie Peters), YouTube is often the only place where I'm able to find some videos to prepare gifs from. However even the highest resolution video available on YouTube is highly compressed.
Go to Filter > Neural Filters and toggle on Photo Restoration. If Photoshop recognises faces in the image, there will be a "Facial Enhancement" slider under the filter settings.

Play around with the Photo Enhancement & Facial Enhancement sliders. You can also expand the "Adjustment" menu make additional adjustments e.g. remove noises and reducing different types of artefacts.

Once you're happy with the results, press OK and then flatten / render your gif.
Example 3: Colour Manipulation | sample gifset
Want to make a colourful gifset but the source video is in B&W? This is where Colourise from Neural Filters comes in handy! This same colourising approach is also very helpful for colouring poor-lit scenes as detailed in this tutorial.
Here's a B&W gif that we want to colourise:

Highly recommended: add some adjustment layers onto the B&W gif to improve the contrast & depth. This will give you higher quality results when you colourise your gif.
Go to Filter > Neural Filters and toggle on Colourise.

Make sure "Auto colour image" is enabled.
Play around with further adjustments e.g. colour balance, until you're satisfied then press OK.
Important: When you colourise a gif, you need to double check that the resulting skin tone is accurate to real life. I personally go to Google Images and search up photoshoots of the individual / character that I'm giffing for quick reference.
Add additional adjustment layers until you're happy with the colouring of the skin tone.

Once you're happy with the additional adjustments, flatten / render your gif. And voila!

Note: For Colour Manipulation, I use Colourise in my Stage I workflow and Colour Transfer in my Stage II workflow to do other types of colour manipulations (e.g. transforming the colour scheme of the component gifs)
Example 4: Artistic Effects | sample gifset
This is where I use Neural Filters for the bulk of my Stage II workflow: the most enjoyable stage in my editing process!
Normally I would be working with my big composition files with multiple component gifs inside it. To begin the fun, drag a component gif (in PSD file) to the main PSD composition file.
Resize this gif in the composition file until you're happy with the placement

Duplicate this gif. Sharpen the bottom layer (highlighted in yellow), and then select the top layer (highlighted in green) & go to Filter > Neural Filters

I like to use Style Transfer and Landscape Mixer to create artistic effects from Neural Filters. In this particular example, I've chosen Landscape Mixer
Select a preset or feed a custom image to the filter (here I chose a texture that I've on my computer)

Play around with the different sliders e.g. time of the day / seasons
Important: uncheck "Harmonise Subject" & "Preserve Subject" - these two settings are known to cause performance issues when you render a multiframe smart object (e.g. for a gif)

Once you're happy with the artistic effect, press OK
To ensure you preserve the actual subject you want to gif (bc Preserve Subject is unchecked), add a layer mask onto the top layer (with Neural Filters) and mask out the facial region. You might need to play around with the Layer Mask Position keyframes or Rotoscope your subject in the process.
After you're happy with the masking, flatten / render this composition file and voila!

Example 5: Putting it all together | sample gifset
Let's recap on the Neural Filters gifmaking workflow and where Stage I and Stage II fit in my gifmaking process:
i. Preparing & enhancing the component gifs
Prepare all component gifs and convert them to smart layers
Stage I: Add base colourings & apply Photo Restoration / JPEG Artefacts Removal to enhance the gif's image quality
Flatten all of these component gifs and convert them back to Smart Video Layers (this process can take a lot of time)
Some of these enhanced gifs will be Rotoscoped so this is done before adding the gifs to the big PSD composition file
ii. Setting up the big PSD composition file
Make a separate PSD composition file (Ctrl / Cmmd + N) that's of Tumblr dimension (e.g. 540px in width)
Drag all of the component gifs used into this PSD composition file
Enable Video Timeline and trim the work area
In the composition file, resize / move the component gifs until you're happy with the placement & sharpen these gifs if you haven't already done so
Duplicate the layers that you want to use Neural Filters on
iii. Working with Neural Filters in the PSD composition file
Stage II: Neural Filters to create artistic effects / more colour manipulations!
Mask the smart layers with Neural Filters to both preserve the subject and avoid colouring issues from the filters
Flatten / render the PSD composition file: the more component gifs in your composition file, the longer the exporting will take. (I prefer to render the composition file into a .mov clip to prevent overriding a file that I've spent effort putting together.)
Note: In some of my layout gifsets (where I've heavily used Neural Filters in Stage II), the rendering time for the panel took more than 20 minutes. This is one of the rare instances where I was maxing out my computer's memory.
Useful things to take note of:
Important: If you're using Neural Filters for Colour Manipulation or Artistic Effects, you need to take a lot of care ensuring that the skin tone of nonwhite characters / individuals is accurately coloured
Use the Facial Enhancement slider from Photo Restoration in moderation, if you max out the slider value you risk oversharpening your gif later on in your gifmaking workflow
You will get higher quality results from Neural Filters by working with larger image dimensions: This gives Neural Filters more pixels to work with. You also get better quality results by feeding higher resolution reference images to the Neural Filters.
Makeup Transfer is more stable when the person / character has minimal motion in your gif
You might get unexpected results from Landscape Mixer if you feed a reference image that don't feature a distinctive landscape. This is not always a bad thing: for instance, I have used this texture as a reference image for Landscape Mixer, to create the shimmery effects as seen in this gifset
5. Testing your system
If this is the first time you're applying Neural Filters directly onto a gif, it will be helpful to test out your system yourself. This will help:
Gauge the expected rendering time that you'll need to wait for your gif to export, given specific Neural Filters that you've used
Identify potential performance issues when you render the gif: this is important and will determine whether you will need to fully playback your gif before flattening / rendering the file.
Understand how your system's resources are being utilised: Inputs from Windows PC users & Mac users alike are welcome!
About the Neural Filters test files:
Contains six distinct files, each using different Neural Filters
Two sizes of test files: one copy in full HD (1080p) and another copy downsized to 540px
One folder containing the flattened / rendered test files
How to use the Neural Filters test files:
What you need:
Photoshop 2022 or newer (recommended: 2023 or later)
Install the following Neural Filters: Landscape Mixer / Style Transfer / Colour Transfer / Colourise / Photo Restoration / Depth Blur
Recommended for some Apple Silicon-based MacBook Pro models: Enable High Power Mode
How to use the test files:
For optimal performance, close all background apps
Open a test file
Flatten the test file into frames (load this action pack & play the “flatten” action)
Take note of the time it takes until you’re directed to the frame animation interface
Compare the rendered frames to the expected results in this folder: check that all of the frames look the same. If they don't, you will need to fully playback the test file in full before flattening the file.†
Re-run the test file without the Neural Filters and take note of how long it takes before you're directed to the frame animation interface
Recommended: Take note of how your system is utilised during the rendering process (more info here for MacOS users)
†This is a performance issue known as flickering that I will discuss in the next section. If you come across this, you'll have to playback a gif where you've used Neural Filters (on the video timeline) in full, prior to flattening / rendering it.
Factors that could affect the rendering performance / time (more info):
The number of frames, dimension, and colour bit depth of your gif
If you use Neural Filters with facial recognition features, the rendering time will be affected by the number of characters / individuals in your gif
Most resource intensive filters (powered by largest machine learning models): Landscape Mixer / Photo Restoration (with Facial Enhancement) / and JPEG Artefacts Removal
Least resource intensive filters (smallest machine learning models): Colour Transfer / Colourise
The number of Neural Filters that you apply at once / The number of component gifs with Neural Filters in your PSD file
Your system: system memory, the GPU, and the architecture of the system's CPU+++
+++ Rendering a gif with Neural Filters demands a lot of system memory & GPU horsepower. Rendering will be faster & more reliable on newer computers, as these systems have CPU & GPU with more modern instruction sets that are geared towards machine learning-based tasks.
Additionally, the unified memory architecture of Apple Silicon M-series chips are found to be quite efficient at processing Neural Filters.
6. Performance issues & workarounds
Common Performance issues:
I will discuss several common issues related to rendering or exporting a multi-frame smart object (e.g. your composite gif) that uses Neural Filters below. This is commonly caused by insufficient system memory and/or the GPU.
Flickering frames: in the flattened / rendered file, Neural Filters aren't applied to some of the frames+-+
Scrambled frames: the frames in the flattened / rendered file isn't in order
Neural Filters exceeded the timeout limit error: this is normally a software related issue
Long export / rendering time: long rendering time is expected in heavy workflows
Laggy Photoshop / system interface: having to wait quite a long time to preview the next frame on the timeline
Issues with Landscape Mixer: Using the filter gives ill-defined defined results (Common in older systems)--
Workarounds:
Workarounds that could reduce unreliable rendering performance & long rendering time:
Close other apps running in the background
Work with smaller colour bit depth (i.e. 8-bit rather than 16-bit)
Downsize your gif before converting to the video timeline-+-
Try to keep the number of frames as low as possible
Avoid stacking multiple Neural Filters at once. Try applying & rendering the filters that you want one by one
Specific workarounds for specific issues:
How to resolve flickering frames: If you come across flickering, you will need to playback your gif on the video timeline in full to find the frames where the filter isn't applied. You will need to select all of the frames to allow Photoshop to reprocess these, before you render your gif.+-+
What to do if you come across Neural Filters timeout error? This is caused by several incompatible Neural Filters e.g. Harmonisation (both the filter itself and as a setting in Landscape Mixer), Scratch Reduction in Photo Restoration, and trying to stack multiple Neural Filters with facial recognition features.
If the timeout error is caused by stacking multiple filters, a feasible workaround is to apply the Neural Filters that you want to use one by one over multiple rendering sessions, rather all of them in one go.
+-+This is a very common issue for Apple Silicon-based Macs. Flickering happens when a gif with Neural Filters is rendered without being previously played back in the timeline.
This issue is likely related to the memory bandwidth & the GPU cores of the chips, because not all Apple Silicon-based Macs exhibit this behaviour (i.e. devices equipped with Max / Ultra M-series chips are mostly unaffected).
-- As mentioned in the supplementary page, Landscape Mixer requires a lot of GPU horsepower to be fully rendered. For older systems (pre-2017 builds), there are no workarounds other than to avoid using this filter.
-+- For smaller dimensions, the size of the machine learning models powering the filters play an outsized role in the rendering time (i.e. marginal reduction in rendering time when downsizing 1080p file to Tumblr dimensions). If you use filters powered by larger models e.g. Landscape Mixer and Photo Restoration, you will need to be very patient when exporting your gif.
7. More useful resources on using Neural Filters
Creating animations with Neural Filters effects | Max Novak
Using Neural Filters to colour correct by @edteachs
I hope this is helpful! If you have any questions or need any help related to the tutorial, feel free to send me an ask 💖
#photoshop tutorial#gif tutorial#dearindies#usernik#useryoshi#usershreyu#userisaiah#userroza#userrobin#userraffa#usercats#userriel#useralien#userjoeys#usertj#alielook#swearphil#*#my resources#my tutorials
538 notes
·
View notes
Text
youtube
Tribute AMV for Dr. Underfang and Mrs. Natalie Nice/Nautilus.
From TyrannoMax and the Warriors of the Core, everyone's favorite Buzby-Spurlock animated series.
After all, who doesn't love a good bad guy, especially when they come in pairs?
Process/Tutorial Under the Fold.
This is, of course, a part of my TyrannoMax unreality project, with most of these video clips coming from vidu, taking advantage of their multi-entity consistency feature (more on that later). This is going to be part of a larger villain showcase video, but this section is going to be its own youtube short, so its an video on its own.
The animation here is intentionally less smooth than the original, as I'm going for a 1980s animated series look, and even in the well-animated episodes you were typically getting 12 FPS (animating 'on twos'), with 8 (on threes) being way more common. As I get access to better animation software to rework these (currently just fuddling along with PS) I'm going to start using this to my advantage by selectively dropping blurry intermediate frames.
I went with 12 since most of these clips are, in the meta-lore, from the opening couple of episodes and the opening credits, where most of the money for a series went back in the day.
Underfang's transformation sequence was my testing for several of my techniques for making larger TyrannoMax videos. Among those was selectively dropping some of the warped frames as I mentioned above, though for a few shots I had to wind up re-painting sections.
Multi-entity consistency can keep difficult dinosaur characters stable on their own, but it wasn't up to the task of keeping the time-temple accurate enough for my use, as you can see here with the all-t-rex- and-some-moving-statues, verses the multi-species effort I had planned:


The answer was simple, chroma-key.


Most of the Underfang transformation shots were done this way. The foot-stomp was too good to leave just because he sprouted some extra toes, so that was worth repainting a few frames of in post.


Vidu kind of over-did the texturing on a few shots (and magenta was a poor choice of key-color) so I had to go in and manually purple-ize the background frame by frame for the spin-shot.
This is on top of the normal cropping, scaling, color-correcting, etc that goes into any editing job of this type.

It's like I say: nearly all AI you see is edited, most of it curated, even the stuff that's awful and obvious (never forget: enragement is engagement)
Multi-Entity Consistency:

Vidu's big advantage is reference-to-video. For those who have been following the blog for awhile, R2V is sort of like Midjourney's --cref character reference feature. A lot of video AIs have start-end frame functionality, but being able to give the robot a model sheet and effectively have it run with it is a darn nice feature for narrative.
Unlike the current version of Midjourney's --cref feature, however, you can reference multiple concepts with multiple images.
It is super-helpful when you need to get multiple characters to interact, because without it, they tend to blend into each other conceptually.
I also use it to add locations, mainly to keep them looking appropriately background-painting rather than a 3d background or something that looks like a modded photo like a lot of modern animation does.
The potential here for using this tech as a force multiplier for small animation projects really shines through, and I really hope I'm just one of several attempting to use it for that purpose.
Music:
The song is "The Boys Have a Second Lead Pipe", one of my Suno creations. I was thinking of using Dinowave (Let's Dance To) but I'm saving that for a music video of live-action dinosovians.
Prompting:
You can tell by the screenshot above that my prompts have gotten... robust. Vidu's prompting system seems to understand things better when given tighter reigns (some AIs have the opposite effect), and takes information with time-codes semi-regularly, so my prompts are now more like:
low-angle shot, closeup, of a green tyrannosaurus-mad-scientist wearing a blue shirt and purple tie with white lab coat and a lavender octopus-woman with tentacles growing from her head, wearing a teal blouse, purple skirt, purple-gray pantyhose. they stand close to each other, arms crossed, laughing evilly. POV shot of them looming over the viewer menacingly. The background is a city, in the style of animation background images. 1986 vintage cel-shaded cartoon clip, a dinosaur-anthro wearing a lab coat, shirt and tie reaches into his coat with his right hand and pulls out a laser gun, he takes aim, points the laser gun at the camera and fires. The laser effect is short streaks of white energy with a purple glow. The whole clip has the look and feel of vintage 1986 action adventure cel-animated cartoons. The animation quality is high, with flawless motion and anatomy. animated by Tokyo Movie Shinsha, studio Ghibli, don bluth. BluRay remaster.
While others approach the scripted with time-code callouts for individual actions.
#Youtube#tyrannomax and the warriors of the core#unreality#tyrannomax#fauxstalgia#Dr. Underfang#Mrs. Nautilus#Mrs. Nice#80s cartoons#animation#ai assisted art#my OC#vidu#vidu ai#viduchallenge#MultiEntityConsistency#ai video#ai tutorial
23 notes
·
View notes
Text
How to install and use IrfanView in Linux - Tutorial
How to install and use IrfanView in Linux - Tutorial
Updated: May 30, 2022
My Windows to Linux migration saga continues. We're still a long way off from finishing it, but it has begun, and I've also outlined a basic list of different programs I will need to try and test in Linux, to make sure when the final switch cometh that I have the required functionality. You can find a fresh bouquet of detailed tutorials on how to get SketchUp, Kerkythea, KompoZer, as well as Notepad++ running in Linux, all of them using WINE and successfully too, in my Linux category.
Today, my focus will be on IrfanView, a small, elegant image viewer for Windows, which I've been using with delight for decades now. It's got everything one needs, and often more than the competitors, hence this bold foray of using it in Linux despite the fact there are tons of native programs available. But let's proceed slowly and not get too far ahead of ourselves. After me.
As I said, it's majestic. A tiny program that does everything. It's fast and extremely efficient. When I posted my software checklist article, a lot of Linux folks said, well, you should try XnView instead. And I did, honest, several times, including just recently, which we will talk about in a separate article, but the endeavor reminded me of why I'd chosen IrfanView all those years back. And those reasons remain.
Then, I did play with pretty much every Linux image viewer out there. None is as good as IrfanView. It comes down to small but important things. For instance, in IrfanView, S will save a file, O will trigger the open dialog. Esc quits the program. Very fast. Most other programs use Ctrl + or Shift + modifiers, and that simply means more actions. I did once try to make GwenView use the full range of Irfan's shortcuts, but then I hit a problem of an ambiguous shortcut, wut. I really don't like the fact that hitting Esc takes you to a thumbnail overview mode. But that's what most programs do.
WINE configuration
The first step is to have WINE installed on your system. I am going to use the exact same method outlined in the SketchUp Make 2017 tutorial. I have the WINE repositories added, and I installed the 6.X branch on my system (at the time of writing).
IrfanView installation
Download the desired 32/64-bit version of the program and then install it. The process should be fast and straightforward. You will be asked to make file type association. You can do this, or simply skip the step, because it doesn't make any difference. You need to associate IrfanView as the default image viewer, if this is your choice, through your distros' file type management utility, whatever it may be.
And the program now works! In Plasma, on top of that, you can also easily pin the icon to the task manager.
Plugins and existing configuration(s)
Much like with Notepad++, you can import your existing workspace from a Windows machine. You can copy plugins into the plugins folder, and the IrfanView INI files into the AppData/Roaming folder. If you don't have any plugins, but you'd like to use some, then you will need to download the IrfanView plugins bundle, extract it, and then selectively, manually copy the plugins into the WINE installation folder. For instance, for the 64-bit version of the program, this is the path:
~/.wine/drive_c/Program Files/IrfanView/Plugins
As a crude example, you may want to make IrfanView be able to open WebP files. In that case, you will need to copy the WebP.dll file into the folder above, and relaunch the program. Or you can copy the entire set of IrfanView plugins. Your choice, of course.
Conclusion
And thus, IrfanView is now part of our growing awesome collection of dependable tools that will make the Windows to Linux migration easier. I am quite sure the Linux purists will be angry by this article, as well as the other tutorials. But the real solution is to develop programs with equivalent if not superior functionality, and then, there will be no reason for any WINE hacks.
If you're an IrfanView user, and you're pondering a move to Linux, then you should be happy with this guide. It shows how to get the program running, and even import old settings and plugins. I've been using IrfanView in Linux for many years, and there have been no problems. That doesn't say anything about the future, of course, but then, if you look at what Windows was 10 years ago, and what it is now, it doesn't really matter. Well, that's the end of our mini-project for today. See you around. More tutorials on the way!
Cheers.
3 notes
·
View notes
Text

Econometrics Demystified: The Ultimate Compilation of Top 10 Study Aids
Welcome to the world of econometrics, where economic theories meet statistical methods to analyze and interpret data. If you're a student navigating through the complexities of econometrics, you know how challenging it can be to grasp the intricacies of this field. Fear not! This blog is your ultimate guide to the top 10 study aids that will demystify econometrics and make your academic journey smoother.
Economicshomeworkhelper.com – Your Go-To Destination
Let's kick off our list with the go-to destination for all your econometrics homework and exam needs – https://www.economicshomeworkhelper.com/. With a team of experienced experts, this website is dedicated to providing high-quality assistance tailored to your specific requirements. Whether you're struggling with regression analysis or hypothesis testing, the experts at Economicshomeworkhelper.com have got you covered. When in doubt, remember to visit the website and say, "Write My Econometrics Homework."
Econometrics Homework Help: Unraveling the Basics
Before delving into the intricacies, it's crucial to build a strong foundation in the basics of econometrics. Websites offering econometrics homework help, such as Khan Academy and Coursera, provide comprehensive video tutorials and interactive lessons to help you grasp fundamental concepts like linear regression, correlation, and statistical inference.
The Econometrics Academy: Online Courses for In-Depth Learning
For those seeking a more immersive learning experience, The Econometrics Academy offers online courses that cover a wide range of econometrics topics. These courses, often led by seasoned professors, provide in-depth insights into advanced econometric methods, ensuring you gain a deeper understanding of the subject.
"Mastering Metrics" by Joshua D. Angrist and Jörn-Steffen Pischke
No compilation of study aids would be complete without mentioning authoritative books, and "Mastering Metrics" is a must-read for econometrics enthusiasts. Authored by two renowned economists, Joshua D. Angrist and Jörn-Steffen Pischke, this book breaks down complex concepts into digestible chapters, making it an invaluable resource for both beginners and advanced learners.
Econometrics Forums: Join the Conversation
Engaging in discussions with fellow econometrics students and professionals can enhance your understanding of the subject. Platforms like Econometrics Stack Exchange and Reddit's econometrics community provide a space for asking questions, sharing insights, and gaining valuable perspectives. Don't hesitate to join the conversation and expand your econometrics network.
Gretl: Your Free Econometrics Software
Practical application is key in econometrics, and Gretl is the perfect tool for hands-on learning. This free and open-source software allows you to perform a wide range of econometric analyses, from simple regressions to advanced time-series modeling. Download Gretl and take your econometrics skills to the next level.
Econometrics Journal Articles: Stay Updated
Staying abreast of the latest developments in econometrics is essential for academic success. Explore journals such as the "Journal of Econometrics" and "Econometrica" to access cutting-edge research and gain insights from scholars in the field. Reading journal articles not only enriches your knowledge but also equips you with the latest methodologies and approaches.
Econometrics Bloggers: Learn from the Pros
Numerous econometrics bloggers share their expertise and experiences online, offering valuable insights and practical tips. Follow blogs like "The Unassuming Economist" and "Econometrics by Simulation" to benefit from the expertise of professionals who simplify complex econometric concepts through real-world examples and applications.
Econometrics Software Manuals: Master the Tools
While software like STATA, R, and Python are indispensable for econometric analysis, navigating through them can be challenging. Refer to comprehensive manuals and documentation provided by these software platforms to master their functionalities. Understanding the tools at your disposal will empower you to apply econometric techniques with confidence.
Econometrics Webinars and Workshops: Continuous Learning
Finally, take advantage of webinars and workshops hosted by academic institutions and industry experts. These events provide opportunities to deepen your knowledge, ask questions, and engage with professionals in the field. Check out platforms like Econometric Society and DataCamp for upcoming events tailored to econometrics enthusiasts.
Conclusion
Embarking on your econometrics journey doesn't have to be daunting. With the right study aids, you can demystify the complexities of this field and excel in your academic pursuits. Remember to leverage online resources, engage with the econometrics community, and seek assistance when needed. And when the workload becomes overwhelming, don't hesitate to visit Economicshomeworkhelper.com and say, "Write My Econometrics Homework" – your trusted partner in mastering econometrics. Happy studying!
13 notes
·
View notes
Text
Week 11: Progress of the Manuscript and Consultation on System Development
by Sittie Janimah A. Disimban
Feedback. Documentation. Details.
This was packed with important milestones as we focused on completing Activity 3 for our Software Design and Engineering course. This activity involved creating a detailed tutorial video that demonstrates how to navigate the user manual and brochure of our developed system. The goal is to provide clear instructions on how users can interact with the system effectively. This is a key component of the user functional and usability testing process, as it allows us to gather feedback from users on the system’s ease of use and functionality. The tutorial video, along with a copy of the user manual, will be shared with our testers to guide them through the process and ensure they can make the most of the system’s features.
youtube
Additionally, this week, we had another consultation session with our instructor. The session was incredibly valuable as we discussed the overall progress of our system development, with a focus on refining the processes involved. We also went over the manuscript paper we’re working on, receiving feedback and suggestions to improve the quality of our work. This consultation allowed us to clarify any questions about Activity 3, and we were able to align our efforts with the expectations of the project.
Through this week’s activities, we gained a deeper understanding of how to effectively present our work to users and testers, ensuring that the system we’ve developed is user-friendly and functional. The consultations and the preparation for testing have set us on the right path for the next phase of the project, and we’re excited to move forward. This week has been essential for solidifying the documentation and preparing for the crucial testing phase, and we’re looking forward to seeing how our users will interact with the system.
2 notes
·
View notes
Text
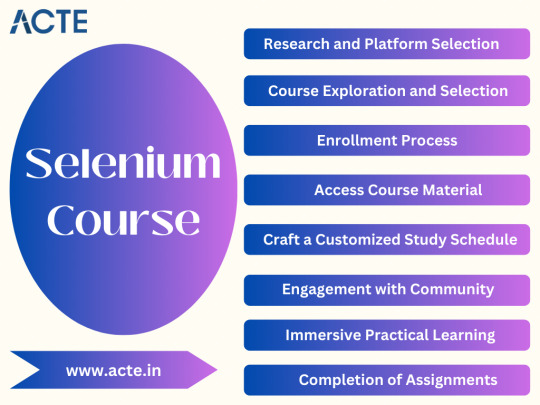
Level Up Your Selenium Skills: The Ultimate Course for Test Automation
Are you looking to enhance your test automation skills and become a proficient Selenium user? Look no further! In this article, we will introduce you to the ultimate course that can help you level up your Selenium skills and take your test automation abilities to new heights. Whether you are a beginner or have some prior experience with Selenium, this course is designed to cater to all skill levels. So, let's dive into the details and explore the exciting journey of becoming a Selenium pro!

Why Test Automation Education Matters
In today's rapidly evolving IT industry, staying ahead of the curve is crucial for success. With software systems becoming increasingly complex, manual testing alone cannot keep up with the pace of development. Test automation has become a necessity to ensure the efficiency, accuracy, and scalability of testing processes.
By investing in test automation education, you empower yourself with the knowledge and skills required to excel in the competitive job market. Test automation specialists are in high demand, and having expertise in Selenium can open numerous career opportunities. Furthermore, by leveraging Selenium, you can save time, reduce effort, and deliver reliable results, making it an indispensable tool for any software tester.
The Power of Selenium in Test Automation
Selenium is a powerful open-source framework that has revolutionized the world of test automation. It provides robust capabilities for automating web browsers and enables testers to perform cross-browser testing effortlessly. With Selenium, you can write automation scripts in various programming languages like Java, Python, C#, and more. Its vast ecosystem of plugins and frameworks further extends its potential, making it the go-to choice for many automation professionals.
Key Features of Selenium
Selenium boasts a rich set of features that make it highly suitable for test automation. Some of the notable features include:
Cross-Browser Compatibility: Selenium allows you to test web applications across multiple browsers, ensuring your website functions flawlessly regardless of the platform.
Multi-Language Support: Selenium supports multiple programming languages, enabling you to choose your preferred language based on your comfort and project requirements.
Fast and Reliable: Selenium empowers you to execute tests swiftly and consistently, providing accurate results while maintaining the integrity of your automation suite.
Flexible and Extensible: Selenium's architecture allows you to integrate it with various frameworks and tools, providing flexibility in designing automation solutions that fit your specific needs.
Parallel Execution: Selenium allows you to run tests in parallel, significantly reducing execution time and enhancing productivity.
Community Support: Selenium enjoys a vast user community, providing ample resources, tutorials, and support when encountering challenges during automation implementation.
The Ultimate Course for Leveling Up Your Selenium Skills
Now that you understand the significance of Selenium in test automation, let's explore the ultimate course that can skyrocket your skills in this domain. This comprehensive course is designed by industry experts with extensive experience in test automation using Selenium. It covers everything from the fundamentals to advanced topics, ensuring a comprehensive and well-rounded learning experience.
Course Curriculum Highlights
Here's a glimpse of what you can expect to learn from this ultimate Selenium course:
Introduction to Selenium and its various components
Understanding Selenium WebDriver and its core functionalities
Hands-on exercises to master Selenium IDE and Selenium Grid
In-depth exploration of best practices for test automation using Selenium
Utilizing TestNG for efficient test case management and optimization
Advanced techniques for handling dynamic elements, AJAX, and other challenging scenarios
Integrating Selenium with frameworks like JUnit and Cucumber for improved test reporting and maintenance
Leveraging Selenium with Continuous Integration tools like Jenkins for seamless integration into the development pipeline
Exploring Selenium's compatibility with cloud platforms for distributed test execution
Target Audience and Prerequisites
Whether you are a beginner stepping into the world of test automation or a seasoned professional aiming to enhance your Selenium skills, this course caters to all skill levels. However, having a basic understanding of programming concepts and web technologies will be beneficial in grasping the core concepts effectively.
In conclusion, if you are looking to take your test automation skills to the next level, investing in the ultimate Selenium course at ACTE Technologies is the perfect choice. With Selenium's powerful capabilities and the comprehensive curriculum of this course, you will acquire the knowledge and expertise needed to excel in the field of test automation. So, why wait? Embark on this exciting journey and empower yourself with the skills that will set you apart in the competitive IT industry. Level up your Selenium skills and unlock endless opportunities!
8 notes
·
View notes
Text
Do You Need a Course for a QA Tester to Start a QA Career?
Introduction:
In the digital age, software products must be flawless, user-friendly, and secure. This expectation has made Quality Assurance (QA) testing a crucial profession in the tech world. If you’ve ever thought about a career in IT but felt intimidated by programming or engineering roles, QA might seem like an attractive entry point. But a big question remains: do you need a dedicated QA tester course to launch a QA career, or can you start without one?
The short answer is: a course can open doors, but it’s not the only path. However, understanding how the QA industry works, what employers look for, and the skills needed to succeed will help you decide if a formal QA software testing course is right for you.
Let’s explore everything you need to know about starting a QA career with or without a course.
What Does a QA Tester Do?
Before we dive into education options, let’s clarify what QA testers actually do:
Design and Execute Tests: QA testers plan, create, and run test cases to evaluate software functionality, usability, and security.
Find and Document Bugs: They identify software issues and document them for the development team to fix.
Collaborate with Developers: QA testers work closely with programmers, business analysts, and product owners to ensure the software meets requirements.
Regression Testing: They verify that changes or new features haven’t broken existing functionalities.
Automation: Many QA testers learn automation tools to speed up repetitive testing tasks.
The role requires attention to detail, logical thinking, communication, and technical acumen. But do you need a formal course to learn these skills?
QA Career Entry Points: Degree, Course, or Self-Learning?
There are three main routes to a QA career:
1. Formal Education (Degree or Diploma)
Some QA professionals come from computer science, engineering, or IT backgrounds. These degrees may cover QA basics, but are not strictly required for entry-level QA jobs.
2. QA Tester Courses (Certification or Bootcamp)
These range from intensive bootcamps and online courses to formal certifications like ISTQB (International Software Testing Qualifications Board). Such courses focus directly on QA concepts, practical tools, and testing methodologies.
3. Self-Learning and On-the-Job Training
Many QA professionals start with free online resources, YouTube tutorials, blogs, and hands-on practice using open-source tools. They learn as they go, sometimes starting as interns or in junior roles.
So, is a course mandatory? The industry does not require a QA tester course, but the value of such training cannot be overstated.
What Employers Look For in Entry-Level QA Testers
Hiring managers look for:
Fundamental Understanding of Testing: Knowledge of software testing life cycle (STLC), defect life cycle, and basic testing types (manual, automated, functional, regression, performance).
Practical Skills: Ability to write test cases, use bug tracking tools like JIRA, and understand at least one automation tool (e.g., Selenium).
Attention to Detail: The ability to spot issues others might miss.
Communication Skills: Clear documentation and effective teamwork.
Adaptability and Curiosity: Eagerness to learn new technologies and adapt to different domains.
Certifications or completed courses often give you an edge, especially if you lack a technical degree or previous IT experience.
Benefits of Taking a QA Tester Course
Let’s break down what you gain by enrolling in a QA tester course:
1. Structured Learning
A well-designed course offers a logical progression from basic to advanced topics. You learn the testing fundamentals, software development life cycle (SDLC), methodologies (Agile, Waterfall), test planning, test case design, and reporting.
2. Hands-On Practice
Most QA courses include real-world scenarios, lab exercises, or even project work using industry tools. This hands-on experience is vital for developing practical skills.
3. Exposure to Automation
Modern QA is not just about manual testing. Courses often introduce automation tools like Selenium, QTP, or TestComplete, giving you a head start in the most in-demand area of QA.
4. Industry-Recognized Certifications
Certifications (e.g., ISTQB, CSTE) signal to employers that you’ve achieved a recognized level of competency. Many courses prepare you for these certifications.
5. Networking and Mentoring
Courses provide access to experienced instructors, peers, and sometimes even job placement support.
6. Resume Booster
Listing a QA course or certification on your resume can help you stand out, especially if you are making a career switch or are new to the IT industry.
Can You Start a QA Career Without a Formal Course?
Yes, it’s possible, but with caveats.
If you’re self-motivated, you can learn the basics of QA testing through:
Free online tutorials and blogs
YouTube channels dedicated to software testing
Downloading and practicing with open-source tools
Participating in forums or open-source projects
However, the lack of structure can be challenging. Without a curriculum, you may miss essential concepts or fail to develop job-ready skills. You’ll need strong discipline and the ability to build your own portfolio through projects or internships.
When Is a QA Tester Course Most Useful?
A course is especially valuable if:
You have no IT background: It will teach you the terminology, concepts, and practical skills needed for interviews and on-the-job success.
You want to switch careers: A course shows recruiters your commitment and helps fill the gap between your current experience and the QA role.
You want to move quickly: Bootcamps and intensive courses can accelerate your entry into the job market.
You want to prepare for certification: Structured courses are the best way to prepare for exams like ISTQB.
You’re aiming for automation roles: Learning automation testing tools is easier in a guided course environment.
Industry Insights: The Rising Demand for QA Testers
The demand for skilled QA testers continues to grow as businesses prioritize user experience and data security. According to a 2023 LinkedIn Jobs Report, QA tester roles were among the top ten most in-demand tech jobs globally. Employers report that candidates with hands-on training or certification are more likely to be shortlisted, especially for roles that require knowledge of automation, agile methodologies, or specialized testing (e.g., mobile, API, or security testing).
In summary: While a degree is not a prerequisite, and a course is not “required by law,” QA training is highly recommended if you want to stand out and advance quickly.
What to Expect from a Good QA Tester Course
Typical Course Curriculum
Introduction to Software Testing: SDLC, STLC, QA vs. QC, manual testing principles
Types of Testing: Functional, non-functional, regression, smoke, sanity, UAT, integration, system, acceptance
Test Documentation: Writing test plans, test cases, test scripts, and bug reports
Bug Tracking Tools: JIRA, Bugzilla, Mantis
Test Automation Basics: Selenium, QTP/UFT, scripting with Python or Java basics
Agile and DevOps: Agile testing, Scrum, Kanban, continuous integration
Soft Skills: Communication, teamwork, reporting, analytical thinking
Hands-On Practice
Expect mock projects, assignments, and exposure to popular testing tools. Many reputable QA courses also offer access to real-world case studies and mentoring.
Real-World Example: Career Path of a QA Tester
Meet Priya: Priya was a commerce graduate with no formal IT experience. She took a three-month online QA tester course, which included hands-on labs, a final project, and ISTQB exam prep. With her new certification and portfolio project, she landed a junior QA position at a software company. Within two years, Priya advanced to a QA automation role, doubling her salary and working on global projects.
Key Takeaway: Courses not only accelerate your entry but also broaden your long-term career prospects.
Common Myths About QA Tester Courses
Myth 1: “You can only start a QA career with a degree in computer science.”
Fact: Many successful testers come from non-technical backgrounds.
Myth 2: “Courses are too expensive and not worth it.”
Fact: Many affordable and even free online options exist. The investment can lead to faster job placement and better salaries.
Myth 3: “Testing is just about clicking buttons.”
Fact: Modern QA involves analysis, automation, domain expertise, and communication.
How to Choose the Right QA Tester Course
Accreditation: Is the course recognized by industry bodies, or prepares you for certification?
Curriculum: Does it cover both manual and automation testing?
Hands-On Labs: Are there practical assignments or projects?
Job Support: Does the provider offer resume reviews, mock interviews, or placement support?
Reviews: What do past students say?
Can You Start with Free Resources First?
Absolutely. If you’re undecided, start with free materials to gauge your interest. Practice writing test cases, participate in open-source projects, and join QA communities. If you find yourself enjoying the work and wanting more structure or credentials, then invest in a formal course.
Conclusion:
While it’s possible to become a QA tester through self-learning and practical experience alone, a Software quality assurance courses offers a structured, comprehensive, and industry-aligned pathway into the field. It’s particularly valuable for career switchers, fresh graduates, and anyone looking to build a strong foundation or advance quickly.
If you’re serious about a QA career, a course is a smart investment in your future. It can help you develop essential skills, gain confidence, prepare for certification, and land that all-important first job. But remember, success in QA is about continuous learning, curiosity, and a commitment to quality, whether you start with a course or blaze your own trail.
Key Takeaways:
QA tester courses are not mandatory, but highly beneficial for beginners.
Formal training provides structure, practical skills, and industry recognition.
You can start with free resources, but you will benefit from guided learning.
Certification and hands-on practice accelerate job readiness and career growth.
The best path is the one that matches your learning style, career goals, and resources.
Ready to start your QA journey? Explore beginner-friendly QA tester courses, connect with professionals, and dive into hands-on testing today. Your tech career is just a step away!
0 notes
Text
An Overview of Burp Suite: Acquisition, Features, Utilisation, Community Engagement, and Alternatives.
Introduction:
Burp Suite is one of the strongest web application security testing software tools used by cybersecurity experts, as well as ethical hackers. PortSwigger created Burp Suite, which provides potent scanning, crawling, and exploiting tools for web application vulnerabilities.
What is Burp Suite?
Burp Suite is one of the tools to conduct security testing of web applications. It assists security testers in detecting vulnerabilities and weaknesses like SQL injections, XSS, CSRF, etc.
Steps in Obtaining Burp Suite
Burp Suite is available for download on the PortSwigger official website. It is available in three versions:
Community Edition (Free)
Professional Edition (Subscription-Based)
Enterprise Edition (For Organisations)
Important Tools in Burp Suite
Proxy – Captures browser traffic
Spider – Crawls web application content
Scanner – Scans automatically for vulnerabilities (Pro only)
Intruder – Performs automated attack activities.
Repeater – Manually send requests.
Decoder – Translates encoded data.
Comparer – Compares HTTP requests/responses
Extender – Allows extensions through the BApp Store
How to Use Burp Suite
Set your browser to use Burp Proxy.
Capture and manipulate HTTP/S requests.
Utilise tools such as Repeater and Intruder for testing.
Scan server responses for risks.
Export reports for audit purposes.
Burp Suite Community
Burp Suite has a highly engaged worldwide user base of security experts. PortSwigger Forum and GitHub repositories have discussions, plugins, and tutorials. Many experts are contributing through YouTube, blogs, and courses.
Alternatives to Burp Suite
If you're searching for alternatives, then look at:
OWASP ZAP (Open Source)
Acunetix
Netsparker
Nikto
Wfuzz
Conclusion:
Burp Suite is widely used for web application security testing. Mastery of Burp Suite is one step towards web application security for both novice and professional ethical hackers.

#BurpSuite#CyberSecurity#EthicalHacking#PenTesting#BugBounty#InfoSec#WebSecurity#SecurityTools#AppSec#OWASP#HackingTools#TechTools#WhiteHatHacker#CyberTools#BurpSuiteCommunity#NetworkSecurity#PortSwigger#WebAppTesting#SecurityScanner#CyberAwareness
0 notes
Text
How to Create an Automation Rule in Jira Cloud
Let’s now walk through the process of creating a basic automation rule in Jira Cloud.
Step 1: Navigate to Project Settings
Open your Jira project.
On the left-hand sidebar, click on “Project settings.”
Scroll down and click on “Automation.”
This will open the automation dashboard for your specific project. You can also manage global automation from Jira settings > System > Global automation if you have site admin permissions.
Step 2: Click on “Create Rule”
Once inside the automation interface:
Click “Create rule.”
You’ll now see a visual builder where you define:
Trigger: What starts the rule (e.g., issue created, status changed)
Condition: Criteria to evaluate (e.g., issue type is “Bug”)
Action: What should happen (e.g., assign issue, send email)
Step 3: Choose a Trigger
Click on “New Trigger” and select one that fits your scenario. For example:
Issue Created: Starts the rule when a new issue is created.
Field Value Changed: Useful for tracking status changes.
Scheduled: Run tasks on a daily, weekly, or custom interval.
Let’s go with Issue Created for this example.
Step 4: Add Conditions (Optional)
Next, add a condition to refine when the rule should run. Examples:
Issue Fields Condition: Only run if issue type = Bug.
User Condition: Only trigger if the reporter is a specific user.
JQL Condition: Use Jira Query Language to define advanced filters.
This helps prevent the rule from running unnecessarily.
Step 5: Define an Action
Now choose an action that should be taken when the rule is triggered.
Example actions:
Assign issue to user
Add comment to issue
Send Slack/email notification
Transition issue to another status
Create sub-task
For example, you might choose to assign the issue to a specific team member when a bug is reported.
Step 6: Test and Turn On the Rule
Once your rule is configured, click “Save”.
You can test it by triggering the event manually (e.g., creating a new issue).
If all looks good, toggle the rule to “Enabled.”
Congrats! You’ve created your first automation in Jira Cloud.
Example Use Cases for Automation
Auto-assigning Bugs: Assign all new bugs to a QA lead automatically.
Daily Standup Summary: Send a list of all unresolved tasks to the team via email every morning.
SLA Monitoring: Automatically escalate issues that are open for more than 48 hours.
Linked Issues Tracking: Transition all sub-tasks to “Done” when the parent issue is completed.
Automation can scale with your needs, from simple quality-of-life improvements to complex business logic.
Recommended Learning Resources
If you’re looking to go deeper, here are two excellent resources:
1. Ravi Sagar – Jira Automation Tutorials
Ravi Sagar is a Jira expert and Atlassian consultant with years of experience. His website, RaviSagar.in, is packed with:
In-depth video tutorials
Real-life use cases
Guides on advanced topics like smart values, webhooks, and Jira REST API
If you’re trying to automate complex scenarios in Jira Cloud, Ravi’s blog is a goldmine.
2. Sparxsys – Jira Training Programs
Sparxsys offers professional Jira training for individuals and teams. Their courses include:
Live and recorded sessions
Interactive labs to practice automation
Coverage of Jira Software, Jira Service Management, and Jira Work Management
Specialized topics like Automation for Admins and Advanced Scripting
Their team also offers personalized support for corporate clients, making them a top choice for team-level Jira adoption.
Final Thoughts
Automation in Jira Cloud is more than just a convenience—it's a necessity for high-performing teams. By eliminating manual steps and enforcing consistency, automation allows your team to focus on what really matters: delivering great products.
Whether you’re new to Jira or a seasoned admin, tools like Sparxsys and RaviSagar.in provide the guidance you need to master automation at every level.
Start small, experiment, and let automation work for you.
0 notes
Text
Best Programming Languages for Automation Testing Beginners
Stepping into the world of automation testing can feel overwhelming at first—especially when it comes to choosing the right programming language. The good news? You don’t need to be a software developer to learn automation testing. What you do need is a solid grasp of one programming language that aligns well with testing tools and frameworks.
If you're planning to enroll in Automation Testing Classes in Pune, you’ll likely start by learning one of these beginner-friendly languages. Let’s explore the best options to begin your journey in test automation.
1. Java – The Most Popular Choice
Java is one of the most widely used languages in automation testing, especially with Selenium WebDriver. Its strong community support, abundance of learning resources, and wide adoption by companies make it a top choice for beginners.
Why Java?
Seamless integration with Selenium, TestNG, Appium, and other tools
Strong object-oriented structure, which helps in building reusable frameworks
Tons of tutorials and documentation available for self-study
If you're attending structured Automation Testing Classes in Pune, chances are you'll be introduced to Java early in the course.
2. Python – Simple and Readable
Python is becoming increasingly popular among new testers due to its simple syntax and clean code structure. It’s beginner-friendly and versatile, making it ideal for those who are intimidated by traditional programming languages.
Why Python?
Shorter learning curve for non-coders
Compatible with testing tools like PyTest, Selenium, and Robot Framework
Growing use in API and AI-based testing
Python is an excellent starting point if you're looking to transition from manual to automation testing without getting bogged down by complex code.
3. JavaScript – For Web-Focused Testers
If your focus is web testing or front-end automation, JavaScript is a strong contender. Modern tools like Cypress and Playwright use JavaScript or TypeScript and offer powerful features for end-to-end testing.
Why JavaScript?
Great for full-stack testers or those working in JavaScript-heavy environments
Tools like Cypress and Playwright are quick, modern, and developer-friendly
Ideal for testers who work closely with frontend development teams
Enrolling in Automation Testing Classes in Pune that include modern web automation tools will often expose you to JavaScript-based frameworks.
4. C# – A Strong Option for .NET Environments
C# is widely used in organizations that rely on Microsoft technologies. Paired with Selenium and NUnit, it provides robust support for automation in Windows-based systems.
Why C#?
Well-suited for testers working in .NET development environments
Clean syntax and strong performance
Easy integration with Visual Studio and Azure DevOps
While not as commonly taught in beginner courses as Java or Python, C# is worth considering if you're targeting .NET companies.
Final Thoughts: Choose One and Go Deep
It’s easy to get distracted by all the options, but remember: you don’t need to learn every language. Start with one that aligns with your course or career goals and go deep. Java and Python are often recommended for beginners due to their simplicity, popularity, and wide tool compatibility.
If you're still unsure, joining a structured program like the Automation Testing Classes in Pune offered by trusted institutes can guide your choice based on current industry demand and job market trends.
About Skillio
Skillio (formerly Testing Shastra) is Pune’s trusted name in software testing education. Known for its job-focused curriculum, Skillio trains students in top automation tools and programming languages, helping them build real-world skills from day one. Whether you’re starting fresh or upskilling, Skillio’s expert-led Automation Testing Classes in Pune are designed to get you job-ready fast.
To get more information about such IT courses from Skillio,
Contact details —
Website: https://helloskillio.com/
Address: 504, Ganeesham E, Pimple Saudagar, Pune.
Email: [email protected]
Get directions
0 notes
Text
The Advantages of Python: A Comprehensive Overview
Python has gained immense popularity in the programming world due to its simplicity, flexibility, and powerful capabilities. Considering the kind support of Python Course in Chennai Whatever your level of experience or reason for switching from another programming language, learning Python gets much more fun.

Whether you are a beginner stepping into coding or an experienced developer working on complex projects, Python offers numerous advantages that make it a preferred choice across various industries.
Easy to Learn and Use
Python is known for its clean and readable syntax, making it an excellent choice for beginners. Unlike other programming languages that require complex syntax, Python allows developers to write fewer lines of code while maintaining efficiency. Its simplicity ensures that even those without prior programming experience can quickly grasp the fundamentals and start coding.
Versatile Across Multiple Fields
One of Python’s biggest strengths is its versatility. It is used in web development, data science, artificial intelligence, machine learning, automation, game development, and even cybersecurity. This flexibility allows developers to transition between different domains without having to learn a new language.
Extensive Library and Framework Support
Python offers a vast collection of libraries and frameworks that simplify development tasks. Libraries like NumPy and Pandas are used for data analysis, TensorFlow and PyTorch for machine learning, Flask and Django for web development, and Selenium for automation. These libraries reduce the time and effort needed to build applications, allowing developers to focus on problem-solving.
Strong Community and Learning Resources
Python has a large and active global community that continuously contributes to its growth. Whether you need help debugging code, finding tutorials, or exploring best practices, numerous forums, documentation, and free learning platforms provide valuable support. This makes Python an ideal language for both self-learners and professionals. With the aid of Best Online Training & Placement Programs, which offer comprehensive training and job placement support to anyone looking to develop their talents, it’s easier to learn this tool and advance your career.

Cross-Platform Compatibility
Python is a cross-platform language, meaning it runs smoothly on Windows, macOS, and Linux without requiring major modifications. This feature enables developers to write code once and deploy it across different operating systems, saving time and effort.
Ideal for Automation and Scripting
Python is widely used for automating repetitive tasks, such as web scraping, file management, and system administration. Businesses leverage Python’s scripting capabilities to improve efficiency and reduce manual workloads. Many developers also use it to automate testing processes, making software development more streamlined.
High Demand in the Job Market
Python is one of the most sought-after programming languages in the job market. Companies across industries, including tech giants like Google, Amazon, and Microsoft, rely on Python for various applications. The demand for Python developers continues to grow, making it a valuable skill for those seeking career advancement.
Integration with Other Technologies
Python seamlessly integrates with other programming languages like C, C++, and Java, making it highly adaptable for different projects. This allows developers to enhance existing applications, optimize performance, and work efficiently with multiple technologies.
Conclusion
Python’s ease of use, versatility, and strong community support make it one of the best programming languages for both beginners and experienced developers. Whether you are interested in software development, data science, artificial intelligence, or automation, Python provides the tools and resources needed to succeed. With its continuous evolution and growing adoption, Python remains a powerful choice for modern programming needs.
#python course#python training#python#technology#tech#python online training#python programming#python online course#python online classes#python certification
0 notes
Text
PowerApps AI Builder: Automate Workflows with AI Models
In today's fast-paced digital landscape, businesses must leverage artificial intelligence (AI) to stay competitive. PowerApps AI Builder is a powerful tool that enables organizations to integrate AI models into their workflows seamlessly. Whether you want to extract data from documents, analyze sentiment, or automate repetitive tasks, this tool provides a user-friendly interface for AI-powered workflow automation.

What is PowerApps AI Builder?
PowerApps AI Builder is a low-code AI solution within the Microsoft Power Platform. It allows users to create, train, and deploy AI models without extensive coding knowledge. By integrating AI capabilities into PowerApps, businesses can enhance efficiency and automate manual processes effortlessly.
Benefits of PowerApps AI Builder
Simplified AI Implementation – No need for complex programming; the drag-and-drop interface makes AI accessible to non-developers.
Improved Efficiency – Automate tedious manual tasks to save time and focus on strategic activities.
Seamless Integration – Works smoothly with Microsoft 365, Dynamics 365, and other business applications.
Scalability – Deploy AI solutions across various business processes and departments.
Cost-Effective AI Adoption – Reduces the need for expensive AI development and implementation.
PowerApps AI Builder Use Cases
Businesses across industries are leveraging Microsoft PowerApps AI models to optimize their operations. Here are some practical applications:
Document Processing – Automate data extraction from invoices, receipts, and forms.
Customer Sentiment Analysis – Understand customer feedback and improve service quality.
Image and Object Recognition – Identify objects in images for inventory management.
Predictive Analytics – Forecast trends based on historical data.
Chatbots and Virtual Assistants – Enhance customer support with AI-driven chatbots.
How to Use PowerApps AI Builder: Step-by-Step Tutorial
If you’re new to AI in PowerApps, follow this PowerApps AI Builder tutorial (demo video) to get started:
Step 1: Access AI Builder
Sign in to PowerApps and navigate to AI Builder.
Click on "Build" to explore available AI models.
Step 2: Choose an AI Model
Select a prebuilt model (e.g., sentiment analysis, object detection) or create a custom one.
If creating a custom model, define the data inputs and train the AI.
Step 3: Train and Test the Model
Upload sample data and let the AI model learn patterns.
Validate the model's accuracy by testing different inputs.
Step 4: Integrate AI into Workflows
Use PowerApps automation to connect AI models with apps and workflows.
Automate repetitive tasks such as data entry, approvals, and reporting.
Step 5: Deploy and Monitor
Deploy the AI-powered model within your business application.
Monitor its performance and make adjustments for better efficiency.
Why Businesses Need AI-Powered Workflow Automation
With growing workloads, businesses need AI workflow automation to stay productive. Manual processes can be time-consuming and prone to errors. By integrating AI Builder PowerApps, organizations can streamline operations, reduce costs, and improve decision-making.
Conclusion
AI is transforming the way businesses operate, and PowerApps AI Builder is at the forefront of this revolution. From automating workflows to enhancing efficiency, this tool empowers organizations with AI-driven capabilities. Whether you're new to AI or looking to enhance your existing automation strategies, PowerApps AI Builder is the ideal solution for business success.
By leveraging AI-powered workflow automation, businesses can eliminate repetitive tasks, improve productivity, and stay ahead in the competitive market. Start exploring PowerApps AI Builder today and unlock the potential of AI-driven automation!
Trending Courses: Generative AI, Prompt Engineering, Microsoft Dynamics 365 Business Central
Visualpath stands out as the leading and best institute for software online training in Hyderabad. We provide PowerApps and Power Automate Training. You will get the best course at an affordable cost.
Call/What’s App – +91-7032290546
Visit: https://visualpath.in/online-powerapps-training.html
#PowerApps Training#Power Automate Online Training#PowerApps Training in Hyderabad#PowerApps Online Training#Power Apps Course#PowerApps and Power Automate Training#Microsoft PowerApps Training Courses#PowerApps Online Training Course#PowerApps Training in Chennai#PowerApps Training in Bangalore#PowerApps Training in India#PowerApps Course In Ameerpet
1 note
·
View note
Text
What is the Best Automated Testing with Selenium Training?
In today's fast-paced software industry, automation testing has become a necessity. Selenium, the most popular automation testing tool, empowers testers to automate web applications effectively. If you are looking for the best Selenium training online, this guide will help you understand what makes a Selenium certification course valuable and how you can enhance your software testing skills.
Why Learn Selenium?
In today’s fast-paced software development world, automation testing has become a crucial element to ensure the quality and performance of applications. Among various automation testing tools, Selenium stands out as one of the most popular and widely used frameworks. But why should you learn Selenium, and what makes it the go-to choice for both beginners and experienced QA professionals? Let’s dive deeper into the reasons why mastering Selenium can be a game-changer for your career.
1. Industry Demand and High Employability
Selenium skills are highly sought after in the IT industry. With an increasing emphasis on agile practices and continuous integration/continuous deployment (CI/CD) pipelines, organizations are on the lookout for professionals who can automate testing efficiently. By learning Selenium, you become eligible for roles like Automation Tester, QA Engineer, and Test Lead, giving your career a significant boost.
2. Open-Source and Cost-Effective
One of the biggest advantages of Selenium is that it’s open-source and free to use. There are no licensing costs involved, making it accessible to individual testers and large enterprises alike. This cost-effective nature has made Selenium the top choice for automation across diverse industries, from finance to healthcare and e-commerce.
3. Cross-Browser and Cross-Platform Compatibility
Selenium supports multiple browsers (Chrome, Firefox, Safari, Internet Explorer, Edge) and platforms (Windows, Mac, Linux). This flexibility ensures that your automated tests can be executed across a wide range of environments, providing robust testing coverage for web applications.
4. Supports Multiple Programming Languages
Unlike many other automation tools, Selenium supports a variety of programming languages including:
Java
Python
C#
Ruby
JavaScript
Kotlin
This versatility allows testers to work with the language they are most comfortable with or the one most suitable for a given project.
5. Integration with Other Tools
Selenium seamlessly integrates with popular CI/CD tools such as Jenkins, Maven, and Docker. It also supports test management and reporting tools like TestNG and JUnit, making it an integral part of the DevOps ecosystem. Such integrations make Selenium indispensable for building robust and automated testing frameworks.
6. Rich Community Support
The vast community of Selenium developers and testers means that you will never be alone when facing challenges. Whether you need solutions to problems, tutorials, or updates on the latest features, the Selenium community provides ample support through forums, blogs, and open-source projects.
7. Real-World Applications and Hands-On Practice
Selenium is used by top companies worldwide, including Google, Facebook, Netflix, and Amazon, for automating web application testing. This means that mastering Selenium gives you practical skills that are directly applicable in real-world scenarios, increasing your value in the job market.
8. Career Growth and Salary Potential
Professionals skilled in Selenium often command impressive salaries. According to industry reports, Selenium testers with advanced skills and experience can earn significantly more than manual testers. The demand for automation testing continues to grow, making Selenium expertise a lucrative career investment.
9. Flexibility and Customization
Selenium’s architecture allows you to build customized frameworks and create robust test scripts tailored to specific project needs. You can write scripts to handle complex web elements, perform cross-browser testing, and even automate repetitive manual testing tasks.
10. Future-Proof Your Career
With the software industry moving increasingly towards automation and CI/CD practices, learning Selenium ensures that your skills stay relevant in the evolving IT landscape. Staying updated with the latest Selenium features and advancements will keep you ahead of the curve.
What to Look for in the Best Selenium Training Course?
Finding the right Selenium course training is crucial to mastering automation testing. Here’s what to consider:
1. Comprehensive Curriculum
A good Selenium course online should cover:
Selenium WebDriver basics and advanced concepts
Test automation frameworks (Hybrid, Data-Driven, Keyword-Driven, and POM)
Integration with CI/CD tools
Real-time project experience
Hands-on coding exercises
2. Hands-On Learning Approach
A practical Selenium certification training should include:
Live coding sessions
Step-by-step implementation of test cases
Real-world scenarios for better understanding
3. Expert Instructors
The best Selenium certification course should be led by industry experts with real-time automation testing experience. This ensures that learners gain insights into industry best practices.
4. Job-Oriented Training
A selenium software testing course should focus on industry-relevant skills, including:
Resume preparation and interview guidance
Real-world projects and use cases
Job placement assistance
5. Certification for Career Growth
A recognized Selenium certification course boosts your credentials and enhances job opportunities.
Key Components of the Best Selenium Course
1. Introduction to Selenium
Overview of Selenium and automation testing
Benefits and scope of Selenium in the industry
2. Selenium WebDriver
Setting up WebDriver
Locating elements using XPath, CSS Selectors
Handling different browser elements (buttons, dropdowns, alerts, popups)
3. Advanced Selenium Features
Handling multiple windows and tabs
Working with dynamic elements
File uploads and downloads
4. Test Automation Frameworks
Data-driven testing using Excel
Hybrid and keyword-driven frameworks
Page Object Model (POM) implementation
5. Continuous Integration & Deployment
Integrating Selenium with Jenkins
Running tests in parallel using Selenium Grid
Cross-browser testing
6. Real-Time Projects and Case Studies
Working on live applications
Debugging and reporting using industry tools
Industry Demand and Career Opportunities
According to job market analysis, the demand for Selenium automation testers is increasing. Companies across industries require skilled professionals in selenium software testing for continuous integration and deployment in Agile environments.
Job Roles for Selenium Professionals
Automation Test Engineer
QA Analyst
Software Developer in Test (SDET)
Test Architect
Salary Insights
Entry-level: $60,000 - $80,000 per year
Mid-level: $80,000 - $100,000 per year
Senior-level: $100,000+ per year
Conclusion
Mastering Selenium automation testing opens doors to lucrative career opportunities. Enroll in H2K Infosys' Selenium training online for hands-on experience, expert guidance, and career growth.
#Selenium Training#Selenium Training online#Selenium certification#Selenium certification training#Selenium certification course#Selenium course#Selenium course online#Selenium course training#selenium automation testing#selenium software testing
0 notes
Text
What Are the Best Platforms to Take an Online QA Course?
Introduction
In today's technology-driven world, software quality assurance (QA) has become an essential part of the software development lifecycle. With businesses striving to deliver high-quality software products, the demand for skilled QA professionals continues to rise. If you're looking to build a career in software testing or enhance your existing skills, taking an Online QA Course is a great option.
But with so many platforms offering quality assurance testing courses, how do you choose the best one? In this guide, we'll explore the key factors to consider when selecting an online software testing course and highlight some of the best options available. Whether you are a beginner or an experienced tester, this article will help you make an informed decision.
Why Take a QA Testing Course Online?
1. Flexible Learning
One of the biggest advantages of taking QA courses online is flexibility. Unlike traditional classroom-based training, online QA testing courses allow learners to study at their own pace and schedule.
2. Industry-Relevant Curriculum
Many online platforms offer courses designed by industry experts, ensuring that learners acquire practical and up-to-date skills in quality assurance software testing training.
3. Hands-On Learning Experience
The best QA courses online provide hands-on experience with tools like Selenium, JIRA, TestNG, and more. Real-world projects and case studies help learners gain practical exposure.
4. Cost-Effective Option
Online software testing courses are often more affordable than traditional classroom training, making them accessible to a wider audience.
Key Features to Look for in a QA Testing Course
1. Comprehensive Curriculum
A good QA testing course should cover the fundamentals of manual testing, automation testing, performance testing, and security testing.
2. Certification Availability
Many employers prefer candidates with certifications. A course that offers a recognized certification upon completion adds value to your resume.
3. Hands-On Training with Real Projects
Look for a course that includes practical projects and exercises. This ensures that you gain real-world experience in quality assurance software testing training.
4. Access to Instructors and Mentorship
Support from instructors and mentors can help clarify doubts and provide guidance throughout your learning journey.
5. Community Support and Networking Opportunities
Joining a course with an active learner community helps in knowledge sharing and career networking.
Best Platforms for Online QA Testing Courses
1. H2KInfosys
H2K Infosys is one of the best platforms offering QA courses online. It provides extensive quality assurance software testing training, covering both manual and automation testing. The course includes live instructor-led sessions, real-time projects, and hands-on training with tools like Selenium and JIRA. Many learners have successfully transitioned into QA roles after completing their training at H2K Infosys.
2. Platforms Offering Interactive Learning
Some platforms specialize in interactive learning experiences where students can practice testing concepts in real-world scenarios. These courses provide coding challenges, quizzes, and guided projects to enhance understanding.
3. Comprehensive Bootcamp Programs
QA bootcamps are structured training programs that focus on practical learning. These intensive courses cover everything from test planning to automation frameworks.
4. Self-Paced Learning Platforms
For those who prefer learning at their own pace, some platforms provide pre-recorded video tutorials with lifetime access. These courses allow learners to revisit concepts anytime and progress at their convenience.
Topics Covered in a Good Online Software Testing Course
1. Fundamentals of Software Testing
Importance of software testing
Types of testing: Functional vs. Non-functional
Testing methodologies: Agile, Waterfall, and DevOps testing
2. Manual Testing
Test case design and execution
Bug tracking and reporting
Test management tools
3. Automation Testing
Introduction to Selenium, Appium, and JMeter
Writing test scripts using Python or Java
Test automation frameworks
4. Performance Testing
Load testing and stress testing
Tools: JMeter and LoadRunner
5. API Testing
REST API testing using Postman
Writing test cases for APIs
6. Security Testing
Basics of security testing
Common vulnerabilities and security measures
Career Opportunities After Completing a QA Course
After completing an online software testing course, various career opportunities become available, such as:
QA Engineer – Focuses on manual and automated testing of applications.
Automation Tester – Specializes in writing scripts and setting up automation frameworks.
Performance Tester – Works on load and stress testing of applications.
Test Manager – Manages QA teams and testing strategies.
QA Analyst – Ensures software quality through analysis and reporting.
How to Choose the Right QA Testing Course for You
1. Define Your Learning Goals
Are you a beginner looking to start a career in QA? Or are you an experienced tester aiming to upgrade your skills? Identifying your goals will help you choose the right course.
2. Check Course Content and Curriculum
Ensure that the course covers essential topics like manual testing, automation testing, and test management tools.
3. Look for Hands-On Projects
Courses that include real-world projects will give you practical experience, making you job-ready.
4. Read Reviews and Testimonials
Checking reviews from past learners can give insights into the course quality and effectiveness.
5. Verify Instructor Credentials
Learning from experienced instructors with industry knowledge is crucial for gaining valuable insights.
Conclusion
Enrolling in a quality assurance software testing training course can open doors to numerous career opportunities. Whether you prefer interactive learning, instructor-led training, or self-paced courses, there are many options available. Platforms like H2K Infosys provide comprehensive training to help learners master QA skills effectively. Start your learning journey today and take a step closer to a rewarding career in software testing!
Key Takeaways
Online QA testing courses offer flexibility, hands-on learning, and cost-effective training.
Look for courses with a comprehensive curriculum, hands-on projects, and certification options.
QA career opportunities include roles such as QA Engineer, Automation Tester, and Test Manager.
H2K Infosys is a great choice for in-depth QA training with live instructor-led sessions and practical projects.
youtube
Ready to start your QA journey? Enroll in a quality assurance testing course today and take the first step toward a successful career!
0 notes
Text
The Usefulness of Selenium: Key Benefits and Applications
Selenium is one of the most trusted and widely-used automation tools in the software testing world. It’s especially popular for web application testing, and its flexibility, open-source nature, and community support have made it a favorite among QA professionals and developers alike. Embracing Selenium’s capabilities becomes even more accessible and impactful with Selenium Certification Training.

Let's explore what makes Selenium so useful and how it's applied in real-world scenarios.
Cross-Browser and Cross-Platform Testing
Selenium allows testers to run automated tests on multiple browsers like Chrome, Firefox, Safari, Edge, and Internet Explorer. This ensures your web application behaves consistently across different environments. It also supports various operating systems, including Windows, macOS, and Linux, making it highly versatile.
Supports Multiple Programming Languages
One of Selenium’s biggest strengths is its support for several programming languages. Whether you're comfortable with Java, Python, C#, Ruby, or JavaScript, Selenium lets you write your test scripts in the language you know best. This lowers the learning curve and makes it easier to integrate into existing projects.
Integration with Modern Development Workflows
Selenium fits perfectly into today’s DevOps and Agile environments. It integrates easily with CI/CD tools like Jenkins, GitLab, Docker, and Maven, enabling faster development cycles and automated regression testing. This streamlines the delivery of high-quality software products. With the aid of Best Online Training & Placement Programs, which offer comprehensive training and job placement support to anyone looking to develop their talents, it’s easier to learn this tool and advance your career.

Open-Source and Community-Driven
Selenium is free and open-source, which removes cost barriers and makes it accessible for individuals and teams of all sizes. Plus, it has a large, active community that regularly contributes updates, plugins, tutorials, and support, making it easy to find solutions and stay up to date.
Extensive Testing Capabilities
Selenium isn’t limited to simple tasks like clicking buttons or filling out forms. It’s powerful enough to automate complex user scenarios, including dynamic content, AJAX calls, drag-and-drop interactions, and more. Selenium WebDriver, in particular, allows fine-grained control over browser interactions.
Parallel and Remote Test Execution
Using Selenium Grid, testers can run tests in parallel across multiple machines and browsers. This significantly speeds up the testing process and is especially helpful for large-scale applications that require extensive coverage and faster feedback loops.
Real-World Applications
E-commerce websites use Selenium to test customer journeys, payment processes, and product filtering.
Banking apps rely on Selenium for validating secure login, transactions, and dashboards.
Healthcare platforms test appointment systems, patient records, and data integrity.
Educational portals use it for automating course enrollment, content access, and assessments.
Conclusion
Selenium continues to lead the way in web automation testing thanks to its flexibility, community support, and integration capabilities. It helps organizations ensure quality, save time, and release products faster—all while reducing manual effort. Whether you're a beginner tester or part of an enterprise QA team, Selenium is a valuable tool worth mastering.
0 notes
Text
Subba Raju Sir QA Videos, hosted by QA Training Hub, offer a comprehensive and in-depth learning experience for individuals aspiring to build a successful career in Quality Assurance (QA) and software testing. Known for his extensive industry knowledge and clear teaching style, Subba Raju Sir has become a trusted name in QA training, helping countless students and professionals master the essential concepts and skills required in this field. His video tutorials are designed to cater to both beginners and experienced testers, ensuring a learning path that is accessible, relevant, and effective.

QA Training Hub, as a leading platform for quality assurance education, provides an array of resources to help learners gain a solid foundation in QA principles, techniques, and tools. The videos by Subba Raju Sir are central to this platform’s offerings, delivering high-quality, step-by-step instructions on various aspects of QA and software testing. These videos cover a wide range of topics, from the basics of manual testing to advanced automated testing frameworks, ensuring that learners gain a well-rounded understanding of the QA process.
One of the key strengths of Subba Raju Sir's QA videos is the clarity with which complex topics are explained. With years of experience in the industry and a deep understanding of the challenges faced by testers, Subba Raju Sir breaks down intricate concepts into simple, digestible lessons. His teaching approach is hands-on, involving real-time examples and practical demonstrations that help learners grasp the application of theoretical knowledge in real-world scenarios. This practical orientation is particularly beneficial for those who are preparing for job interviews or looking to enhance their skills for career advancement.
Furthermore, Subba Raju Sir emphasizes the importance of industry-relevant tools and technologies in his training sessions. His videos cover popular QA tools such as Selenium, JIRA, QTP, and LoadRunner, providing learners with the skills needed to navigate today’s dynamic software development environment. By focusing on these tools, Subba Raju Sir ensures that his students are well-equipped to handle the demands of the job market, making them more competitive candidates in the field of software testing.
In addition to technical skills, the videos also impart valuable insights into the best practices of QA management, defect life cycle, test planning, and agile methodologies. Subba Raju Sir's holistic approach to QA training goes beyond the basics, preparing learners to think critically, troubleshoot effectively, and collaborate efficiently in a team environment.
With Subba Raju Sir's QA Videos at QA Training Hub, learners are not just trained but empowered to excel in their careers.Visit us at https://qatraininghub.com/ and contact us at 918977262627.His commitment to quality education and his passion for teaching make these videos an invaluable resource for anyone looking to become proficient in Quality Assurance.
0 notes