#storagebucket
Explore tagged Tumblr posts
Visit Tumblr Blog
Explore Tumblr blogs with no restrictions, modern design and the best experience.
Last Seen Tumblr Blogs


Fun Fact
China blocked Tumblr because of pornography and censorship problems in 2013.
Text
CMEK: GCP Customer Managed Encryption Keys In Cloud

Google Cloud CMEK
Encrypting your resources quickly and effectively is possible with the help of New Cloud KMS Autokey.
Data security, sovereignty, and privacy in the cloud are all fundamentally regulated by encryption. Though many businesses desire more control over the encryption keys that restrict access to their data, Google Cloud offers default encryption for customer data that is stored in the cloud.
What is CMEK?
The creation, rotation, usage recording, and storage of cryptographic keys can all be made more flexible with Customer-Managed Encryption Keys (CMEK).Although many organisations demand greater control, CMEK offers it, but utilising it involves manual processes that take time and effort to guarantee that the required configurations and controls are applied.
Cloud KMS
Today, Google is happy to announce the debut of Cloud KMS Autokey in preview, which will help to improve the efficiency of CMEK setup. For CMEK, key control procedures are automated by Cloud KMS Autokey. As a result, developers can finish their work more quickly. It includes best practices that can drastically lessen the labour involved in maintaining your own encryption keys.
You generate Cloud KMS keys, which are controlled by the client. An integration of CMEK is deemed to exist for Google services that utilise your keys. Either directly or via Cloud KMS Autokey, you can handle these CMEKs.
GCP Customer Managed Encryption Keys
Google-owned and Google-managed keys are used for default encryption
Google uses the same robust key management mechanisms for its own encrypted data that are used to encrypt all data stored in Google Cloud when it is not in use. User data is encrypted using the AES-256 encryption standard while these key management solutions offer stringent audits and key access controls. The encryption keys used to protect your data are owned and managed by Google. Key usage logs cannot be viewed, managed, or examined. An encryption key (KEK) that is shared by data from several clients may be used. It does not need to be setup, configured, or managed.
SSL keys that are managed by the customer (CMEK)
The encryption keys that are handled by you, the customer, are yours. This feature gives you more control over the keys that are used to encrypt data when it’s at rest within Google Cloud services that support it, as well as creating a cryptographic wall around it. Cloud KMS offers direct CMEK management, as well as the option to use Cloud KMS Autokey to automate provisioning and assignment.
CMEK integrations are available for services that support CMEK. The default encryption provided by Google can be substituted with server-side encryption via CMEK integration. Following the configuration of CMEK, the resource service agent manages the encryption and decryption of resources.
Transparency and end-user effort are eliminated during encryption and decryption since CMEK-integrated services manage resource access. It’s like utilising Google’s default encryption to access the resources. Refer to What a CMEK-integrated service offers for additional details regarding CMEK integration.
Key creation is done automatically with Cloud KMS Autokey. At the same time that resources are created, keyrings and keys are automatically generated, and the IAM roles required for encryption and decryption are allocated. Along with lowering complexity and labor-intensive manual selection, Autokey also streamlines the process by automatically selecting the best type of key for each resource.
Here’s how it operates
BigQuery CMEK
Imagine you are assigned a project that calls for the creation of a BigQuery dataset, Compute Engine instances with persistent discs, and a Google Cloud storage bucket. With a key that you manage, the data in every one of these services must be encrypted. Now that encryption is configured for these resources, you can choose “Cloud KMS with Autokey” from the control panel.
If a key ring hasn’t previously been made for that project and location when you request your key, Cloud KMS Autokey will generate one with your new encryption key in the same spot as your resource.
Three essential aims of CMEK implementation are assisted when creating encryption keys using Cloud KMS Autokey:
Maintaining standardised procedures: The suggestions incorporated inside Cloud KMS Autokey are used by the Cloud KMS Autokey service account to automatically create keys upon request.
Making fine-grained cryptographic keys: To enable or remove a key without compromising numerous protected resources, you can do operations like crypto-shredding with more control because a new key is generated with a granularity suitable for each type of resource.
Getting more done in less time: Instead of having to wait for a developer to request fresh keys from another team, you may immediately generate CMEK-protected resources.
At the level of the resource folder, Cloud KMS Autokey is enabled. The Autokey feature will be available to developers working on projects in that directory. No pre-planning or key creation will be required for those projects by the KMS Administrator.
Within the Cloud KMS Autokey service account, authorised users can request a cryptographic key directly and maintain duty separation. By removing the requirement for elevated key-creation privileges, Terraform and other infrastructure-as-code processes can operate with a smaller attack surface as authorised users. Rather than using the returned key to protect the resource, the Terraform function generates a key handle.
Once it’s configured, Cloud KMS Autokey functions as a helper for managing keys.
Should one not already exist, make a key ring specifically for the site.
Using the guidelines included in Cloud KMS Autokey, create a key with the right location and granularity for the type of resource, if one doesn’t already exist.
If the project where the encrypted resources are to be located does not already have a service agent, create one now.
Assign authority on the key to the service agent to encrypt and decrypt data.
Read more on govindhtech.com
#cmek#gcp#Customermanaged#Encryption#Googlecloud#Cloudkms#BigQuery#dataset#storagebucket#kms#technology#technews#news#govindhtech
0 notes
Text
How can you develop a Banking App that balances security with UX?
While all other industries are leveraging the capability of mobile apps to streamline operations and enhance end-user experiences, the banking sector is no exception. Today, banking applications have become part and parcel of personal finance management, offering convenience and accessibility to users. Banking app development requires a blend of robust security measures and seamless UX to meet industry standards and end-user expectations. The entire process involves several key aspects including secure user authentication, data encryption, and user-friendly design.
Developing a banking app that balances security with user experience is challenging but achievable. This post provides you with step-by-step guidance on how to create a simple banking app (MVP) with basic functionalities like user authentication, secure data communication, and balance checking.
Banking App Development: An example
Prerequisites
Tech Stack: React Native for mobile app development, Firebase for backend services, and AES for data encryption.
Tools: Firebase Authentication, React Navigation, Axios for API calls.
Key Development Steps
Step 1: Set Up Firebase Authentication
Firebase Authentication will handle user sign-up, sign-in, and multi-factor authentication (MFA).
Install Firebase
npm install firebase
Then, create a Firebase configuration file (firebaseConfig.js):
import firebase from "firebase/app";
import "firebase/auth";
const firebaseConfig = {
apiKey: "YOUR_API_KEY",
authDomain: "YOUR_AUTH_DOMAIN",
projectId: "YOUR_PROJECT_ID",
storageBucket: "YOUR_STORAGE_BUCKET",
messagingSenderId: "YOUR_MESSAGING_SENDER_ID",
appId: "YOUR_APP_ID",
};
if (!firebase.apps.length) {
firebase.initializeApp(firebaseConfig);
} else {
firebase.app();
}
export default firebase;
Create the sign-up and login functions in the banking application
import firebase from './firebaseConfig';
export const signUp = async (email, password) => {
try {
await firebase.auth().createUserWithEmailAndPassword(email, password);
} catch (error) {
console.error(error.message);
}
};
export const login = async (email, password) => {
try {
await firebase.auth().signInWithEmailAndPassword(email, password);
} catch (error) {
console.error(error.message);
}
};
Step 2: Implement Data Encryption with AES
Data encryption is essential for securing user data. AES (Advanced Encryption Standard) will be used to encrypt and decrypt sensitive information.
Install the crypto library for AES encryption:
npm install crypto-js
How to encrypt and decrypt sensitive data?
import CryptoJS from 'crypto-js';
// Encryption function
export const encryptData = (data, secretKey) => {
return CryptoJS.AES.encrypt(data, secretKey).toString();
};
// Decryption function
export const decryptData = (encryptedData, secretKey) => {
const bytes = CryptoJS.AES.decrypt(encryptedData, secretKey);
return bytes.toString(CryptoJS.enc.Utf8);
};
Step 3: Fetch User Balance Using Axios
Let’s assume you have a backend API that returns the user's balance. Here, Axios can be used to fetch the data securely.
Install Axios
npm install axios
Then, fetch the User balance from an API
import axios from 'axios';
export const getBalance = async (userId) => {
try {
const response = await axios.get(`https://api.example.com/balance/${userId}`, {
headers: {
'Authorization': `Bearer ${userToken}`, // Use token from Firebase
},
});
return response.data.balance;
} catch (error) {
console.error(error.message);
}
};
Step 4: User Interface to Display Balance
Create a simple interface for displaying the user's balance.
import React, { useState, useEffect } from 'react';
import { Text, View, Button } from 'react-native';
import { getBalance } from './api';
const BalanceScreen = () => {
const [balance, setBalance] = useState(null);
const userId = "USER_ID"; // Replace with the actual user ID
useEffect(() => {
const fetchBalance = async () => {
const userBalance = await getBalance(userId);
setBalance(userBalance);
};
fetchBalance();
}, []);
return (
<View>
<Text>Your Current Balance: {balance}</Text>
<Button title="Refresh Balance" onPress={() => fetchBalance()} />
</View>
);
};
export default BalanceScreen;
Step 5: Secure the API Requests
Make sure that your API endpoints use HTTPS (SSL/TLS) to establish secure communication. If you're developing the backend yourself, you can use libraries like Express and Helmet to enforce HTTPS and security headers.
How to set up secure headers in Express?
npm install express helmet
const express = require('express');
const helmet = require('helmet');
const app = express();
// Use Helmet to secure HTTP headers
app.use(helmet());
app.get('/balance/:userId', (req, res) => {
// Endpoint logic to return user balance
res.json({ balance: '1000.00' });
});
app.listen(3000, () => {
console.log('Server running on port 3000');
});
Summing it Up
By adopting these best practices—secure authentication, data encryption, and secure API communication—you can craft a banking app that protects user data while delivering an intuitive, engaging experience. This example provides the basic steps to get started with developing a secure and user-friendly banking app. You can build upon this foundation by adding advanced features such as transaction history, real-time notifications, and more advanced security measures such as two-factor authentication depending upon your specific needs.
0 notes
Photo

【Kawaii Pink Mini Heart Iron Bucket Receive Adornment】 Hollow Out Heart:6cm*4cm*4cm/2.36"*1.57"*1.57" Shiny Side Pink:5.5cm*7.7cm*9cm/2.16"*3.03"*3.54" 💕Cute and practical, you can use it as a storage box or as a decoration💗.
0 notes
Text
Angular 13 - Create a Firebase login with Facebook

I'll teach you how to use Angular 13 to set up a Firebase login with Facebook. As we all know, Firebase has a plethora of features for user authentication. This robust real-time database is quick, dependable, and safe. With Angular's latest version, you can quickly install the Firebase Facebook login authentication service to allow your users to authenticate with Facebook API. For this example, I'll be utilizing the AngularFire2 library from the node package manager (NPM) and the most recent Angular version.
Setup an Angular App to Create a Facebook Login
ng new firebaseproject After that, use the following command to access the project folder and set up your basic project. cd firebaseproject To avoid strict type warnings or errors, put "strict": false in the tsconfig.json file's compilerOptions parameter.
Setup AngularFire2 Library
In your Angular project, enable Firebase (AngularFire2 library). npm install firebase @angular/fire --save Make the connection between your Firebase account and your Angular app once you've finished setting up this library. Go to the src/environments/environment.ts file in the environments folder of your project. Then, as shown below, add the firebase configuration to the environment file. export const environment = { production: false, firebase: { apiKey: "xxxxxxxx-xxxxxxxx", authDomain: "xxxxxxxxxxxxxxxxxxxxxxxx", databaseURL: "xxxxxxxxxxxxxxxxxxxxxxxx", projectId: "xxxxxxxx", storageBucket: "xxxxxxxx", messagingSenderId: "xxxxxx", appId: "xxxxx", measurementId: "xxxxxxxxxxxxxxxx" } };
Enable Facebook Auth Provider Service
Go to your Firebase account, then click the Authenticate button in the sidebar navigation menu, followed by a click in front of the Facebook link. Fill in your App ID name and App secret, then hit the save button. This method will activate your Firebase Facebook auth provider service.
Create an authentication service and a sign-in component.
Create the core file auth.service.ts, which will contain our main logic. ng generate service auth Create a signature in the template ng generate component signin
Create a Facebook Login Auth Provider Service in Firebase.
Now, in your Angular project, build the auth.service.ts file, which will contain the fundamental logic for logging in with Facebook in Angular using Firebase. import { Injectable } from '@angular/core'; import { FacebookAuthProvider } from 'firebase/auth'; import { AngularFireAuth } from '@angular/fire/compat/auth'; @Injectable({ providedIn: 'root', }) export class AuthService { constructor( public afAuth: AngularFireAuth // Inject Firebase auth service ) {} // Sign in with Facebook FacebookAuth() { return this.AuthLogin(new FacebookAuthProvider()); } // Auth logic to run auth providers AuthLogin(provider) { return this.afAuth .signInWithPopup(provider) .then((result) => { console.log('You have been successfully logged in!'); }) .catch((error) => { console.log(error); }); } } Go to your signin.component.ts template. import { Component, OnInit } from '@angular/core'; import { AuthService } from '../auth.service'; @Component({ selector: 'app-signin', templateUrl: './signin.component.html', styleUrls: , }) export class SigninComponent implements OnInit { constructor(public authService: AuthService) {} ngOnInit() {} }
Implement Facebook Login
In the signin.component.html template, add a Firebase Facebook login auth provider. Log in with Facebook Viewing the app.module.ts file will provide you with the reference for the final app module class. import { NgModule } from '@angular/core'; import { BrowserModule } from '@angular/platform-browser'; import { AppComponent } from './app.component'; import { AuthService } from './auth.service'; import { environment } from '../environments/environment'; import { AngularFireModule } from '@angular/fire/compat'; import { AngularFireAuthModule } from '@angular/fire/compat/auth'; import { SigninComponent } from './signin/signin.component'; @NgModule({ declarations: , imports: , providers: , bootstrap: , }) export class AppModule {} Ensure that the auth components are invoked by adding the appropriate tags to the app.component.ts file. We're all set to use the browser to view the application. ng serve --open I hope you will like the content and it will help you to learn Angular 13 - Create a Firebase login with Facebook If you like this content, do share. Read the full article
0 notes
Video
tumblr
Storage buckets to fit in anything, anywhere! Marco's easy-to-clean, storage buckets, available in different colors to keep your essentials intact and your house colorful. Contact us at +919435594444 for information. . . . #StorageBuckets #EasyToClean #AvailableInColours #Dustpan #Chair #Table #DinningTable #Bucket #Dustbin #Stool #PlasticChairs #PlasticTable #PlasticBucket #PlasticStool #PlasticTubs #PlasticLovers #PlasticProducts #Plastic #EssentialProducts #Essentials #EssentialItems #HomeDesign #HouselholdItems #HouselholdEssentials #MarcoMiracle #Miracle #Marco #MiracleChairs #Guwahati #Assam
0 notes
Text
Database: Firebase configuration & Usage
-------------------------------------------------------------------------
Firebase Configuration
Steps:
1. Install the firebase JS client:
a. npm i firebase (or: yarn add firebase)
2. Install @react-firebase/auth:
b. npm i @react-firebase/auth (or: yarn add @react-firebase/auth)
3. Get the Firebase config:
c. Project Settings -> General -> copy the config (var firebaseConfig) which should look like this:
const config = {
apiKey: "API_KEY",
projectId: "PROJECT_ID",
databaseURL: "DATABASE_URL",
authDomain: "AUTH_DOMAIN",
OPTIONAL
storageBucket: "STORAGE_BUCKET",
messagingSenderId: "MESSAGING_SENDER_ID"
};
-------------------------------------------------------------------
Usage
Steps:
import firebase and firebase/auth:
import firebase from "firebase/app";
import "firebase/auth";
------------------------------------------------------------------
My app
In my firebase.js file:
import firebase from "firebase";
const firebaseApp = firebase.initializeApp( {
apiKey: "AIzaSyDSFZgGCYmardbCZa2tWVJ-mY-cEJOeTg8",
authDomain: "myapp-d6650.firebaseapp.com",
projectId: "myapp-d6650",
storageBucket: "myappd6650.appspot.com",
messagingSenderId: "622958031115",
appId: "1:622958031115:web:514053efb5abde7fc5b20e"
});
const db = firebaseApp.firestore();
const auth = firebase.auth();
const storage = firebase.storage();
export { db, auth, storage };
0 notes
Text
Uploading images to Firebase - issues and debugging steps
The goal of the project was to upload images to Firebase database and then display it on Glitch.
Things I tested so far:
1. Sending timestamp for database
I tried sending humidity sensor initially. The sensor didn’t work but I eventually send the timestamp to Firebase Realtime Database. See the previous post.
let gpio = require("onoff").Gpio; let firebase = require('firebase'); let app = firebase.initializeApp({ databaseURL: "https://daylight-analysis.firebaseio.com/" }) let humtemp = new gpio(4, 'in'); let n = 0; // console.log(humtemp) // console.log(humtemp._readBuffer.toString()) let database = app.database(); setInterval(() => { database.ref(Date.now()).set({ temperature: n }) console.log(n) n++ }, 2000)
2. Sending images to database storage using Node
This took sometime to resolve. Firebase has multiple products. I had to send two types of data: image and timestamp. I assumed, partly due to how all the Firebase apps are branded, that I can use Realtime Database.
I spoke to Stuti, who used Firebase. She told me to use Storage for data and Realtime Database for the metadata. Firebase is good for for running apps but not images or videos. After a long weekend trying to debug why I couldn’t post an image to Storage, here is the following I figured out:
1. No support for Node: Based on the link ↓↓↓

2. Firebase Storage uses Google cloud as a dependent ↓↓↓

Code that I used based on Firebase Get Started >> Web >> Node along with Firebase Storage >> Web >> Node:
//Initialize on Cloud Functions // The Cloud Functions for Firebase SDK to create Cloud Functions and setup triggers.
const functions = require('firebase-functions');
// The Firebase Admin SDK to access Cloud Firestore. const admin = require('firebase-admin');
admin.initializeApp({
credential: admin.credential.cert(serviceAccount), apiKey: "<INSERT>", authDomain: "<INSERT>", databaseURL: "https://<INSERT>.com", projectId: "<INSERT>", storageBucket: "<INSERT>", messagingSenderId: "<INSERT>", appId: "<INSERT>", measurementId: "<INSERT>" });
// Initialize Firebase // firebase.initializeApp(firebaseConfig); // firebase.analytics();
var storage = firebase.storage(); var storageRef = storage.ref(); var imagesRef = storageRef.child('images'); var database = firebase.database();
//admin.initializeApp();
//nodejs as a FileServer for CRUD //read a file from path and provide standard output //If encoding is specified then this function returns a string. Otherwise it returns a buffer. //ref: https://nodejs.org/en/knowledge/file-system/how-to-read-files-in-nodejs/ fs = require('fs') fs.readFile('/solarlapse/cam.jpg', function (err,data) { if (err) { return console.log(err); } else { console.log(data); let fileName = '1'+'abc'+'.jpg' let mountainsRef = storageRef.child(fileName); let file = data; ref.put(file) .then(function(snapshot) { console.log('Uploaded a blob or file!',snapshot); //snapshot might contain the link to the image //might be a json ---> figure out which filed contains the url // store it in url variable // let url = snapshot.url;
});
***
There might be some code issues since it’s been updated a few times but you will get the gist.
The following image show some of the errors like “firebase storage is not a function” etc.
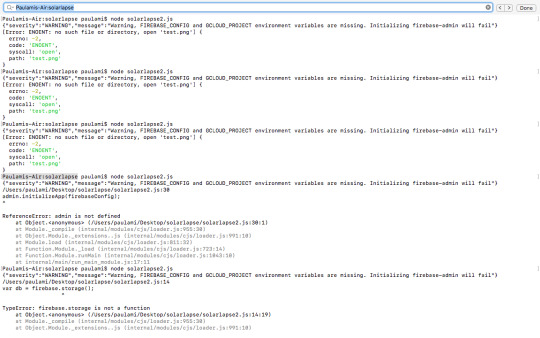
I went over the Firebase documentation once again and noticed the notes that mentioned about Node support or lack of it.
Next step:
So we thought a bit more and thought that it might help to use Mongo Atlas. More on that in the upcoming post.
Contributor:
I had Jason, Tushar, Atharva, Arghya help me with debugging.
0 notes
Photo

How to Create a Reddit Clone Using React and Firebase
React is a fantastic front-end library for building user interfaces. When picking a back end to use alongside it, you can’t go far wrong with Firebase, a Backend-as-a-Service (Baas) that makes it easy to add data persistence (and much more besides) to your React app.
In this tutorial, we’ll be using Firebase along with Create React App to build an application that will function similarly to Reddit. It will allow the user to submit a new post that can then be voted on. I’ll also demonstrate how to deploy our Reddit clone to Vercel.
Once you’ve finished reading, you’ll understand how to set up Firebase, how to connect it to your React app and how to deploy the result.
Why Firebase?
One of Firebase’s strengths is that it makes it very easy for us to show real-time data to the user. Once a user votes on a link, the feedback will be instantaneous. Firebase’s Realtime Database will help us in developing this feature. Also, it will help us to understand how to bootstrap a React application with Firebase.
Why React?
React is particularly known for creating user interfaces using a component architecture. Each component can contain internal state or be passed data as props. State and props are the two most important concepts in React. These two things help us determine the state of our application at any point in time. If you’re not familiar with these terms, please head over to the React docs first.
Note: you can also use a state container like Redux or MobX, but for the sake of simplicity, we won’t be using one for this tutorial.
Here’s a live demo of what we’ll be building. The code for this application is available on GitHub.
Setting up the Project
To follow along, you’ll need to have Node and npm installed on your machine. If you haven’t, head to the Node.js download page and grab the latest version for your system (npm comes bundled with Node). Alternatively, you can consult our tutorial on installing Node using a version manager.
Let’s walk through the steps to set up our project structure and any necessary dependencies.
Bootstrapping a React App
We can create a new React application with the help of Create React App using the following command:
npx create-react-app reddit-clone
This will scaffold a new create-react-app project inside the reddit-clone directory. Our directory structure should be as follows:

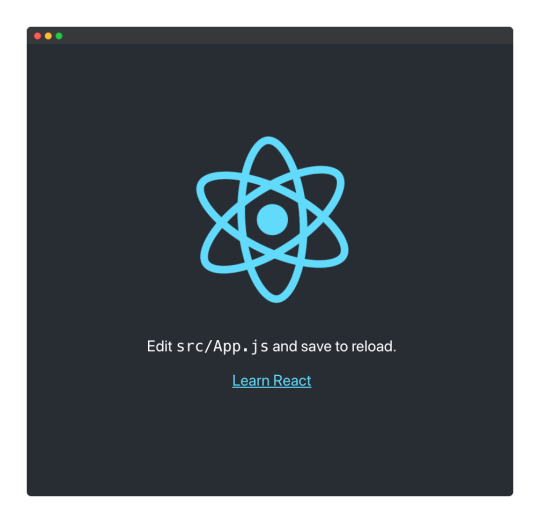
Once the bootstrapping is done, we can enter the reddit-clone directory and fire up the development server:
cd reddit-clone && npm start
At this point, we can visit http://localhost:3000/ and see our application up and running.
Structuring the App
It’s always a good practice to remove all the files that we don’t need after bootstrapping any application. There are a few files generated by Create React App that we won’t need, so we’ll remove them.
We can remove the following files:
src/App.css
src/App.test.js
src/index.css
src/logo.svg
src/serviceWorker.js
src/setupTests.js
We can also remove the following dependencies from our package.json file:
@testing-library/jest-dom
@testing-library/react
@testing-library/user-event
We can also remove the test script from our package.json file. This is because we won’t be writing any tests for our application. If testing a React app is something you’d like to look into, please consult our tutorial, “How to Test React Components Using Jest”.
Our src/index.js file should contain the following:
import React from "react"; import ReactDOM from "react-dom"; import App from "./app"; ReactDOM.render( <React.StrictMode> <App /> </React.StrictMode>, document.getElementById("root") );
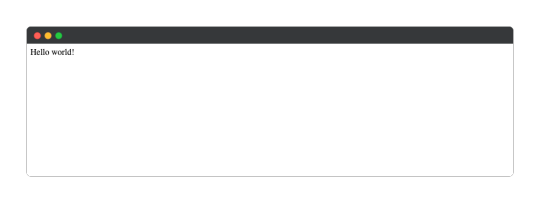
We’ll rename our src/App.js to src/app.js. Alter it to contain the following:
import React from "react"; function App() { return <div>Hello world!</div>; } export default App;
Now, we can restart our development server using the following command from our root directory:
npm start
Our development server should be up and running on http://localhost:3000/ and it should look like the following:
Creating a New Firebase Project
In this section, we’ll be installing and integrating Firebase with our application.
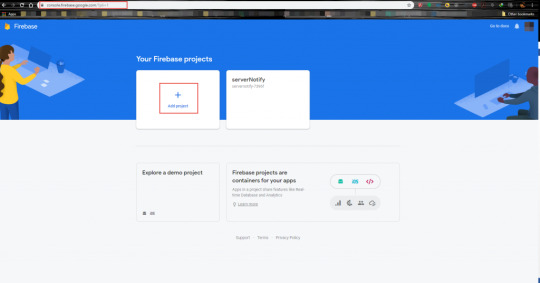
If you don’t have a Firebase account, you can create one free account now by visiting their website. After you’re done creating a new account, log in to your account and go to the console page and click on Create a project.
Enter the name of your project (I’ll call mine reddit-clone), accept the terms and conditions, and click on the Continue button.

In the next step, you should choose whether to enable Google Analytics for the project, then click on the Continue button.

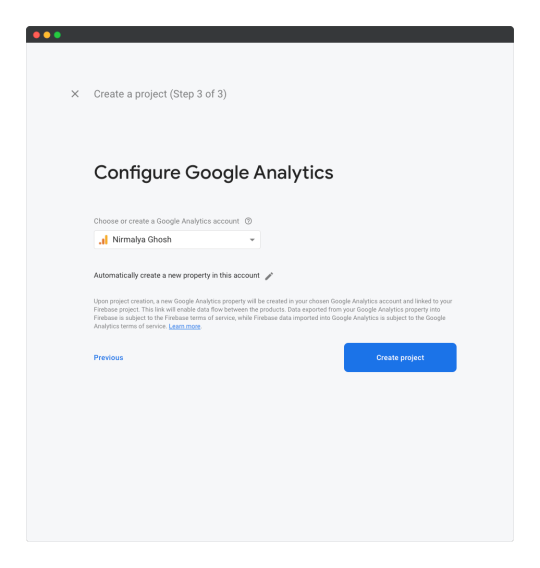
In step three, we should select a Google Analytics account and then click on the Create project button:
After a short while, you’ll see a notice that your new project is ready. Click Continue to exit the wizard.
Creating a New App in the Firebase Project
In this section, we’ll be creating a new Firebase app from the Firebase console. We can create a Web app by selecting the web option.

Next, we’ll need to enter the name of the project and click on the Register app button, leaving the Also set up Firebase Hosting checkbox unchecked.
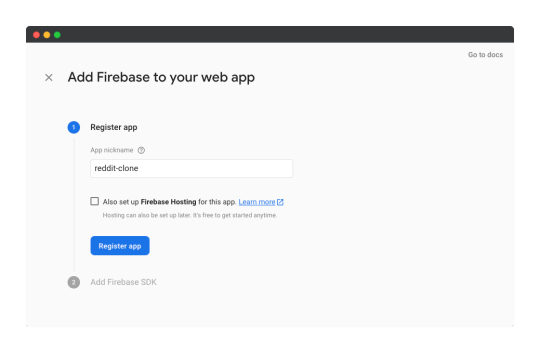
Now you’ll see all the credentials for our new Firebase web app.
Make a note of these credentials and click Continue to console.
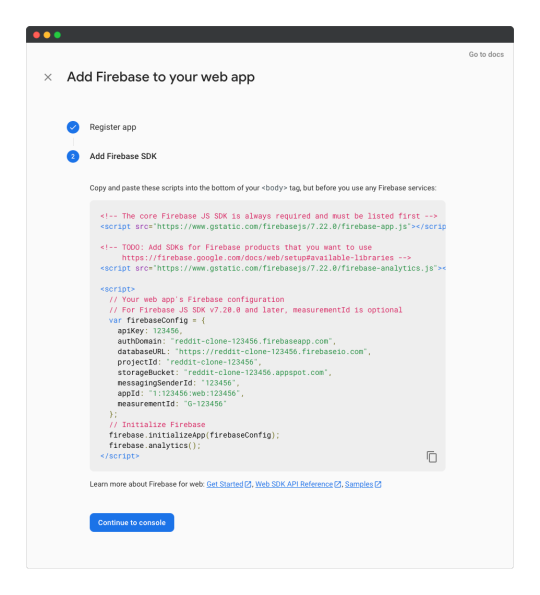
We can now add our app’s credentials to an environment file:
// .env REACT_APP_FIREBASE_API_KEY="123456" REACT_APP_FIREBASE_AUTH_DOMAIN="reddit-clone-123456.firebaseapp.com" REACT_APP_FIREBASE_PROJECT_ID="reddit-clone-123456" REACT_APP_FIREBASE_STORAGE_BUCKET="reddit-clone-123456.appspot.com" REACT_APP_FIREBASE_MESSAGING_SENDER_ID="123456" REACT_APP_FIREBASE_APP_ID="1:123456:web:123456" REACT_APP_FIREBASE_MEASUREMENT_ID="G-123456"
Note: it’s always a good idea to store all credentials in an environment file and add that file to .gitignore so that the credentials are never leaked into the source code.
Next, we can create a new file src/lib/firebase.js where we’ll store all our Firebase credentials:
import firebase from "firebase"; const firebaseConfig = { apiKey: process.env.REACT_APP_FIREBASE_API_KEY, authDomain: process.env.REACT_APP_FIREBASE_AUTH_DOMAIN, projectId: process.env.REACT_APP_FIREBASE_PROJECT_ID, storageBucket: process.env.REACT_APP_FIREBASE_STORAGE_BUCKET, messagingSenderId: process.env.REACT_APP_FIREBASE_MESSAGING_SENDER_ID, appId: process.env.REACT_APP_FIREBASE_APP_ID, measurementId: process.env.REACT_APP_FIREBASE_MEASUREMENT_ID, }; const initFirebase = firebase.initializeApp(firebaseConfig); const db = initFirebase.firestore(); export default db;
Finally, we’ll need to install the firebase package so that we can interact with our database:
npm install firebase
Continue reading How to Create a Reddit Clone Using React and Firebase on SitePoint.
by Nirmalya Ghosh via SitePoint https://ift.tt/3jhD7og
0 notes
Text
VueJS & Firebase Cloud Firestore Stripped-Back - Tutorial Part 2
In this tutorial series we are using a stripped-back approach to getting started with Vuejs & Firebase Cloud Firestore to build full-stack web applications. No CLIs or build tools just a HTML page.
Putting the ‘C’ in CRUD
Welcome back to our Vue and Firebase stripped back tutorial. If you skipped part 1 of this tutorial you can get it here.
Let’s start straightaway from where we left off in part 1 and start looking at how we can develop our employee tracker app, EmployeeMagic, to let the user add records to their employee database. This represents the C in CRUD (Create, Read, Update, Delete).
We’ll start by adding some input boxes to our template for the user to be able to add employees. The fields we want are first and last names, job title, department and age.
Let’s start by adding a First Name field.
<body>
<div id=“app”>
<div v-bind:style=“mainStyle”>
<h1>{{ appTitle }}</h1>
<label>First Name</label> <input type=“text” v-model=“firstName”>
</div>
</div>
</body>
Notice the input element, we’ve added a Vue directive to it called v-model and we’ve assigned it a value of firstName. For AngularJS devs this will seem very familiar. v-model is a data binding directive that binds the input element to a variable in our view model (the data in the Vue Instance Object). Therefore whatever value the user keys into the input box will be automatically assigned to a variable in your Vue Instance Object. Now we don’t presently have a firstName variable in data in our Instance Object so we need to add it and assign it an initial value, in this case an empty string.
<script> var app = new Vue({ el : '#app’, data : { appTitle : ‘EmployeeMagic’, mainStyle : { ‘margin’ : ’20px’ }, firstName : ‘’ } }) </script>
Just to prove that our data-binding in Vue is working and is in fact working in both directions (from the template to the Instance Object and from the Instance Object to the template), also called two-way data binding, we’ll stick a double-curly on the end of the input box eg
<input type=“text” v-model=“firstName”>{{ firstName }}
Save the file and refresh the page in your browser. As you begin to type in the First Name box, the name is displayed at the side of it. The input is assigning it to the firstName variable (via the v-model directive) and Vue is watching for changes in the firstName variable and when it detects one it changes anywhere in the page where firstName has a binding, in this case via the double-curly.
OK, enough of the fun and games, let’s add our other fields to the template and create their corresponding variables in the data section. As we’re grouping several fields together to form an employee we’ll change it to put them all in their own object called employee and change the template to bind the input boxes to the relevant properties on the employee object instead. We’ve proved our point with the two-way data binding for now so we’ll remove our double curly.
<body>
<div id=“app”>
<div v-bind:style=“mainStyle”>
<h1>{{ appTitle }}</h1>
<label>First Name</label> <input type=“text” v-model=“employee.firstName”></br>
<label>Last Name</label> <input type=“text” v-model=“employee.lastName”></br>
<label>Job Title</label> <input type=“text” v-model=“employee.jobTitle”></br>
<label>Dept.</label> <input type=“text” v-model=“employee.dept”></br>
<label>Age</label> <input type=“number” v-model:number=“employee.age”></br>
</div>
</div>
</body>
Notice that on the Age input we’ve added an extra command to the v-model directive, :number. This is very useful in Vue as, although the type of the input is set to number so the user cannot input anything other than valid numbers, by default when the value is converted by the binding to Vue data properties, it is converted as a string. As we want the age property to remain a number type, the v-model:number directive is required. <script> var app = new Vue({ el : '#app’, data : { appTitle : ‘EmployeeMagic’, mainStyle : { ‘margin’ : ’20px’ }, employee : {firstName : ‘’, lastName : ‘’, jobTitle : ‘’, dept : ‘’, age : 0 } } }) </script> We’ll next add a Save button which will write the entered employee to the database. To carry out the task of saving when the user clicks the Save button we need to hook the button into our Vue Instance Object and call a function that’s run to save our new employee record. To do this we need to use another Vue directive called v-on:click
<label>Age</label> <input type=“number” v-model:number=“employee.age”></br>
<button v-on:click=“saveEmployee()”>Save</button>
</div>
</div>
</body>
v-on is used to handle events and the :click is the specific event to be triggered on. We then assign the function that we want to run once the event (click) is triggered, in this case saveEmployee().
If you remember, in part 1 of this tutorial we mentioned that when using the v-bind directive along with a colon-command that you could use shorthand instead by dropping the v-bind eg v-bind:style could be entered as just :style for short. The same applies to the v-on directive however as it’s an event, rather than using the colon, you must use a @ instead. Therefore instead of using v-on:click you could use the shorthand version which is @click. Ultimately it’s a matter of preference and usually I would use the shorthand but to provide full explanations in these tutorials we’ll stick to using the verbose style.
We now need to write our saveEmployee() click handler function. This involves declaring functions or methods in our Vue Instance Object which you can do by declaring a new first-level object on the Instance Object called methods. All of your logic for our app will live in functions declared in Vue’s methods object. <script> var app = new Vue({ el : '#app’, data : { appTitle : ‘EmployeeMagic’, mainStyle : { ‘margin’ : ’20px’ }, employee : {firstName : ‘’, lastName : ‘’, jobTitle : ‘’, dept : ‘’, age : 0 } }, methods : { saveEmployee : function() { alert(‘You have saved ‘ + this.employee.firstName + ‘ ‘ + this.employee.lastName) } } }) </script> So, you can see that we’ve declared a saveEmployee function within the top-level methods object. In the above we’re not saving anything, we’re just going to display a standard alert message which includes displaying the last name and first name of the employee we’re saving. Notice that we’re using this to refer to our employee properties. Any variable declared in the data object of our Instance Object that we want to reference in our methods must be referenced using this, otherwise Vue won’t recognise it. As anyone who has worked with Javascript for any length of time knows, using this can be problematic as what it points to can change depending on the context from where it was called. There are ways around using this which we’ll discuss later but we’ll just stick with it as it is for now. Save the file, refresh your browser and enter the details of an employee, click Save and you should see the alert message appear. We’re now at the point of needing to be able to physically save our new employee to our Firebase Cloud Firestore. To get started with this you just need a bog-standard Google account. If you’ve got a gmail account or use any of Google’s products where you need to log-in then you’ve got a Google account. If not then you’ll need to create one which you can do on the Firebase site. To get started go to the Firebase web-site (https://firebase.com) and click Go To Console. If you’re not signed in to your Google account or you don’t have one you’ll then be taken to the usual sign-in/sign-up pages to get going, otherwise you’ll be taken to the Firebase console. Click Add Project and enter a project name and select your region. Once in the main console click the Database option on the left. You’ll be given the option of Realtime Database or Cloud Firestore. Make sure you select Cloud Firestore. You’ll also be asked how you want the security level to be setup, make sure you select Development/Test mode otherwise you’ll have to start setting up security rules manually which are a whole other subject altogether. Your Cloud Firestore will then be setup, which might take a short while. Once your database is setup we don’t need to do anything else in the database console however we do need to grab the code and libraries for getting Firebase into our app. To do this click the Project Overview option on the left. In the Get Started page click on the option for Add Firebase to your web app. In the window that pops up you’ll see a code snippet, just click the Copy button. Go back to your editor and paste the code snippet below the closing </body> tag and above the VueJS CDN script tag as shown below : </body>
<script src="https://www.gstatic.com/firebasejs/4.9.1/firebase.js"></script> <script> // Initialize Firebase var config = { apiKey: "AIzaSyA0KlHuISpQL1F0XMWv1FfmtbaJQmPKwqQ", authDomain: "vuefire-da3bf.firebaseapp.com", databaseURL: "https://vuefire-da3bf.firebaseio.com", projectId: "vuefire-da3bf", storageBucket: "vuefire-da3bf.appspot.com", messagingSenderId: "1094070580435" }; firebase.initializeApp(config); </script> <script src="https://cdn.jsdelivr.net/npm/vue"></script><script> var app = new Vue({ The version of the Firebase CDN link above (4.9.1) is current at the time of writing (Feb 2018) but is likely to be different by the time you are reading this, always use the link copied from the Firebase page. This details in the config object are specific to my account and project and yours will certainly be different, make sure you keep the code exactly the same as the code snippet copied from your Firebase project. The code snippet from Firebase however doesn’t include a CDN for Cloud Firestore, this may well be due to it still being officially in beta at the time of writing and may well be included in the standard code snippet by the time you’re reading this so it’s worth checking. At this point in time however, we’ll need to add it manually and the best way to do it is just to copy the line for the firebase CDN link for firebase.js, paste it below it and change the new line from firebase.js to firebase-firestore.js as below : <script src="https://www.gstatic.com/firebasejs/4.9.1/firebase.js"></script> <script src="https://www.gstatic.com/firebasejs/4.9.1/firebase-firestore.js"></script> Save the page and refresh in Chrome with the Console open and make sure there are no errors displayed before proceeding and if there are check you have followed everything above correctly. We’ve now got our libraries for Cloud Firestore and the code snippet will initialise Firebase to enable you to utilise your newly created database. Now we have to let our Vue app know about it. What we need to do is to create a Firestore object within our Vue app when it first runs so it’s available to us throughout our app. To ensure that our Firestore object is created at the beginning during initialisation of our app, we need to utilise a lifecycle hook that Vue provides, called created. Lifecycle hooks are effectively events that occur during Vue’s internal processing of our Instance Object. Vue exposes these events to us so we can hook into them and carry out some tasks at that specific point in our Vue Instance Object’s processing lifecycle. With the created hook, we can attach the tasks we want to carry out when the Vue Instance Object is first created, which is exactly what we need to do to generate a Firestore object to ensure we can access the database throughout the app. We’ll first initialise an object in our data section called db that we’ll use to access Firestore. We’ll then include a created hook which is a function containing our initialisation code. In this case we just want to assign an object from Firestore that we can use :
<script> var app = new Vue({ el : ’#app’, data : { appTitle : ‘EmployeeMagic’, mainStyle : { ‘margin’ : ’20px’ }, employee : {firstName : ‘’, lastName : ‘’, jobTitle : ‘’, dept : ‘’, age : 0 }, db : {} }, methods : { saveEmployee : function() { alert(‘You have saved ‘ + this.employee.firstName + ‘ ‘ + this.employee.lastName) } }, created : function() { this.db = firebase.firestore() } }) </script> We’re now plugged into our Firestore through our db object. It’s now fairly straightforward to save our data to Firestore. We use Firestore’s add() function to save our employee object which, as we covered earlier, is automatically populated through data binding when the user enters the information into the input boxes. To call add() we must tell Firestore which Collection to save the new object to. Collections in Firestore represent a formal declaration of the documents or objects we’re going to save. This makes it much more like the Tables and Records we’re used to in relational databases, where tables are collections and records are documents. In this case we’ll save it to a collection called Employees - note that we didn’t explicitly setup the Employees collection previously, it will be automatically created for us by Firestore if it doesn’t already exist. We’ll remove the alert from our saveEmployee function and replace it with the line to save the new employee. methods : { saveEmployee : function() { this.db.collection(‘Employees’).add(this.employee); } }, Again notice that we’re referencing db using this, as we are with employee (and all of our data properties). We’ll review this shortly but it’s important to note it for now. Save the file in your code editor and refresh it in Chrome. Enter the details of an employee and click Save. Nothing will appear to happen on the page, however open your Firebase console, select Database and you’ll see your new record under the Employees collection. Notice that the record has a strange looking unique Id automatically assigned to it, we’ll be utilising this in another part of the tutorial. Let’s tidy up the saving process. Firstly we want to make sure it doesn’t save unless something is entered into both the First and Last Name fields. Secondly we want some visual indication that you have saved to the database, specifically the input boxes are cleared ready for another new employee. In order to clear the employee inputs we’ll implement a separate function called clearEmployee() so we’re not cluttering up our save function. methods : { saveEmployee : function() { if ((this.employee.firstName) && (this.employee.lastName)) { this.db.collection(‘Employees’).add(this.employee) clearEmployee() } else alert(‘You must enter both a first and last name to save.’) }, clearEmployee : function() { this.employee = { firstName : ‘’, lastName : ‘’, jobTitle : ‘’, dept : ‘’, age : 0 } } }, Note 2-way data binding, changing the properties in the view model reflects in the input boxes that they’re bound to. It’s important to note that Firestore’s add() function is asynchronous so any code that comes after it, such as clearing the input fields, will be executed before it can be determined if the employee was saved correctly. Therefore rather than simply call the clearEmployee() function immediately after add() as we have done above, we’ll need to utilise the promise which Firestore’s add() function returns and put any code we want to execute after it’s successfully saved into the returned promise’s then(). saveEmployee : function() { if ((this.employee.firstName) && (this.employee.lastName)) this.db.collection(‘Employees’).add(this.employee) .then(function() { this.clearEmployee() }) .catch(function() { console.log(‘Error saving employee ‘ + this.employee.firstName + ‘ ‘ + this.employee.lastName) }) else alert(‘You must enter both a first and last name to save.’) }, Here we’ve chained a then() to the add() function call and passed in a function which calls the clearEmployee() to clear the properties for the input boxes only after we’re sure of a successful save. We’ve also chained a catch() so any saving errors are logged to the console.
A brief explain of Promises
If you’re not familiar with promises, they’re simply a way to handle asynchronous code. Asynchronous functions are just standard functions which carry out some processing but return control back to the caller before completing it’s process (to avoid blocking the app’s execution). Async functions usually return a promise object which enables the code which called the function to implement any tasks that needs to execute only after the async function has fully completed it’s process. In this instance we only want to clear the input boxes once we know that the employee has definitely saved. To do this we call then() which is a function on the returned promise object. then() accepts a function as a parameter which we use to execute any code we want after we know the save has completed, in this case to clear the employee properties and inputs. As we’ve done above you can also chain a call to the promise’s catch() function to execute any code should the async function not succeed. With all of that said, the new changes we’ve just made WILL NOT WORK!! And they will not work because of the this issue that was foretold. The reference to this changes depending on the context in which it was called. Therefore when we come to execute the code that is passed to the then() or catch() functions, this points to something else other than our Instance Object data and we’ll get errors! There are a couple of ways around this. The traditional way is to simply assign this at the beginning of a function to another variable, usually called that, and then reference that instead of this throughout the function to be sure that you’ll always reference the desired object. This works but it means you’re always having to remember to implement it at the beginning of every method. The other way is to reference the Instance Object explicitly where you know this won’t work for you. In this tutorial we declared a variable to contain our Vue Instance Object called app eg var app = new Vue({. You can therefore call app.clearEmployee() instead of this.clearEmployee() in the then() function and it would work. The problem is that context again gets in the way and you cannot use an explicit reference to the Instance Object in it’s own context so saying app.db.collection(‘Employees’).add(app.employee) in the main saveEmployee() function won’t work either, so you’d end up using this in some places and app in others.
The ideal solution would enable us to use one way throughout to refer to the properties and methods on your Instance Object to ensure consistency but without additional workload that you would need to remember to implement on each method. Fortunately ES6/ES2015 introduced arrow functions which help us resolve this problem. With arrow functions we can use an explicit reference to the Instance Object in every context throughout our methods. Arrow functions, from a declarative standpoint, simply change a function declaration from : function() { }
to () => { } So let’s change our saveEmployee() function from a standard function declaration to an arrow function and do the same with the then() and catch() functions. Then replace every reference of this to app. saveEmployee : () => { if ((app.employee.firstName) && (app.employee.lastName)) app.db.collection(‘Employees’).add(app.employee) .then(() => { app.clearEmployee() }) .catch(() => { console.log(‘Error saving employee ‘ + app.employee.firstName + ‘ ‘ + app.employee.lastName) }) else alert(‘You must enter both a first and last name to save.’) }, For consistency purposes we should also change our clearEmployee() method as well clearEmployee : () => { app.employee = { firstName : ‘’, lastName : ‘’, jobTitle : ‘’, dept : ‘’, age : 0 } } The only exception to this rule is the created lifestyle hook function where the VueJS docs expressly recommends not declaring it as an arrow function so we’ll leave it as a standard function declaration (including referencing this rather than app). Like with Promises, arrow functions are a fairly new addition to JS so you must be using an evergreen browser, like Chrome, which implements them natively otherwise you’ll need to use a transpiler such as Babel. We’ve now completed the Create task from our CRUD list. In this tutorial we’ve added input boxes and bound them to properties on our view model to create 2-way data binding. We’ve added events and methods to our Instance Object, created a Firebase Cloud Firestore project and hooked it into our app, covered Vue’s lifecycle hooks to initialise a reference to our database and then covered how to save employees to our Cloud Firestore. Finally we covered the issues with using this and how arrow functions can help us overcome these problems. In the next part of the tutorial we’ll cover the R in CRUD, Reading (or Retrieving) employees from our database. We’ll cover getting data back from our Firestore and explain how to implement realtime updates. I hope you’ll join me.
You can download the completed code for this part of the tutorial on Github using the repo below and select the part2 folder. https://github.com/MancDev/VueFire
1 note
·
View note
Text
Google Cloud Cost Attribution Solution For Smarter FinOps

Cost Attribution
Managing and comprehending your cloud expenses can get more difficult as your Google Cloud usage grows. Determining precisely which teams, projects, or services are driving your spending is crucial as you promote cloud FinOps adoption in your company.
Google Cloud presents the Google Cloud Cost Attribution Solution for this reason. By enhancing your cost metadata and labeling governance procedures, this extensive set of tools and best practices will help you make data-driven decisions and eventually maximize your cloud spending. The solution offers resources and tools to assist you, regardless of how long you have been using Google Cloud or how new you are.
Harness the power of labels
The Cost Attribution Solution makes use of labels, a basic Google Cloud capability that is sometimes overlooked. You can add these straightforward but very effective key-value combinations to your Google Cloud resources as metadata tags. Consider them as modifiable names for your databases, storage buckets, virtual machines, and more. Labels can be applied strategically to reveal a multitude of cost insights:
Granular cost breakdowns
See the precise amount you spend on particular services, apps, environments such as development, testing, and production, or even teams inside your company with granular cost breakdowns.
Data-driven decision-making
Ensure that you are well-informed when making decisions on the allocation of resources, the optimization of expenses, and the justification of future investments.
Customize reports to match company needs
Do you require a department-by-department cost breakdown? or by stage of the project? It is made feasible by labels.
These insights are now accessible with the Cost Attribution Solution.
Proactive and reactive strategies for label governance
It is aware that each Google Cloud environment is distinct, with varying degrees of resource management and cloud adoption maturity. For this reason, the Cost Attribution Solution provides labels with both proactive and reactive governance methods:
Proactive governance (enforcement): Enforcing correct and consistent labeling from the time you provision new resources is a good way to start with proactive governance (enforcement). By integrating with existing infrastructure-as-code processes, Terraform Policy Validation helps guarantee that all new resources are appropriately tagged in accordance with your company’s labeling guidelines. This enhances data accuracy right away and avoids gaps in expense tracking.
Image credit to Google cloud
Reactive governance: which includes reconciliation, alerting, and reporting: They provide a two-pronged strategy for current resources:
Reporting: By helping you find unlabeled resources, solutions give you a clear picture of any areas where your cost visibility may be lacking, down to the specific projects and resources involved.
Alerting: Get notifications almost instantly when resources are produced or changed without the appropriate labels, allowing you to address any problems right away and keep tabs on your cloud expenses.
Reconciliation: Actively enforce your labeling policies on ongoing projects to go beyond simple reporting. This gives you the ability to automatically apply the appropriate labels to resources that are either unlabeled or incorrectly labeled, ensuring complete cost visibility and accurate data throughout your Google Cloud environment.
Beginning
Are you prepared to start your path to cost transparency? Your starting point is a GitHub repository and the label best practices documentation. A multitude of resources are available to you, such as:
Best practices: A manual for creating and carrying out a successful labeling plan that fits the objectives and structure of your company.
Solution architectures: Comprehensive illustrations and descriptions on how to set up the various components of the Cost Attribution Solution in your Google Cloud environment.
Code lessons and samples: Practical examples to get you going fast.
This Looker Studio dashboard offers dynamic cost visualization along with extra tools to help you manage costs more effectively.
Additionally, its Google Cloud Consulting FinOps specialists may evaluate your requirements and create a plan to completely integrate the cost attribution solution throughout your Google Cloud-based company right now.
Embrace cost transparency
The Google Cloud Cost Attribution Solution gives you detailed insight into how much you spend on the cloud. Use labels to optimize resource utilization, obtain detailed cost breakdowns, and make data-driven decisions that support your company’s objectives. Support for tags will soon be added to the solution, providing a strong means of allocating resources among projects and enabling IAM conditions for fine-grained access control. You may better understand your expenses, improve security, and optimize operations with this extra layer of resource management.
Read more on Govindhtech.com
#CostAttributionSolution#FinOps#metadata#databases#storagebuckets#virtualmachines#cloudcomputing#News#Technews#Technology#Technologynews#Technologytrends#govindhtech
0 notes
Text
A FireBase Js By Sagar Jaybhay
New Post has been published on https://is.gd/qI6Sf8
A FireBase Js By Sagar Jaybhay
Firebase Js:
Firebase is a backend platform it is for building web, android, and IOS applications. What firebase offers it offers real-time database with different API’s with multiple authentication types and hosting platform.
Mainly firebase is developed for front end people who don’t want more back-end tasks and easily done his job. In nutshell, it mainly for presentation layer stuff you can store, google provide a database which is firebase and you can access that database by using their APIs.
Main Features of Firebase:
It’s a real-time database
Authentication
Hosting
Advantages Of FireBase
It’s simple and easy to use and is user-friendly means there is no need for complicated configuration
Data is real-time means what? It means suppose you insert any record in database and 100 different are connected to that database. Then without requesting the latest data, they will get the latest data by automatic update it means real-time data synchronization in short.
It is having a very simple dashboard
You can find many useful services to choose from.
You can find the pricing of the firebase plan https://firebase.google.com/pricing on this link and what it offers in the free plan.
How to setup firebase in your JavaScript project?
Below is an official link to set-up firebase https://firebase.google.com/docs/web/setup
But in Nutshell, I will explain here how to do this.
Step 1:
Create a firebase project
Step 2:
Register your project
In this goto, https://console.firebase.google.com/?pli=1 add project
In your Html or index file add below script tag
<script src = "https://cdn.firebase.com/js/client/2.4.2/firebase.js"></script>
This firebase js CDN use this https://cdn.firebase.com/js/client/2.4.2/firebase.js
Also, we can use npm or bower to install firebase command for this is below
npm install firebase --save bower install firebase
Step 4:
Add firebase SDKs and Initialize Firebase
You can add any supported firebase product to your app as per your requirement. When you need to add Firebase SDK to your app is solely depends on you how you configure means whether you have chosen use firebase hosting or Node npm or Module Bundlers.
Load Firebase SDK from Hosting
When you load Firebase SDKs from reserved URLs in our site means in our site beginning with /_ _. This reserved namespace makes firebase easier to host other firebase products.
If you want to include only analytics products to your code you can do this like the below code.
<body> <!-- Insert these scripts at the bottom of the HTML, but before you use any Firebase services --> <!-- Firebase App (the core Firebase SDK) is always required and must be listed first --> <script src="/__/firebase/7.3.0/firebase-app.js"></script> <!-- If you enabled Analytics in your project, add the Firebase SDK for Analytics --> <script src="/__/firebase/7.3.0/firebase-analytics.js"></script> </body>
The above code includes the entire firebase SDK rather than individual SDKs.
In this step, there is no need for a firebase configure object because we use reserved hosting URLs. But if need you can see below a sample of firebase configure object.
<body> <!-- Previously loaded Firebase SDKs --> <!-- Initialize Firebase --> <script src="/__/firebase/init.js"></script> </body>
var firebaseConfig = apiKey: "api-key", authDomain: "project-id.firebaseapp.com", databaseURL: "https://project-id.firebaseio.com", projectId: "project-id", storageBucket: "project-id.appspot.com", messagingSenderId: "sender-id", appId: "app-id", measurementId: "G-measurement-id", ;
Firebase Javascript SDK Supporting product:

Image From Official Google Site
Firebase-Data
The firebase data is represented as a JSON object.
How to Write Data In Firebase Database?
In firebase we have Set method for write or replace data on specific path.
var Person = firebase.database().ref("Persons/"); Person.set ( John: Address:’India’ number: 1, age: 30 , Amanda: Address:’USA’, number: 2, age: 20 );
The above method creates a collection of persons and added their 2 names.
How to Update Firebase Collection?
For this we can use update method provided by firebase js and code looks like below
var johnRef = firebase.database().ref("Persons/John"); johnRef.update ( "number": 10 );
How to read firebase data?
For retrieving firebase data we can use on() method. This method takes event type as value and then it will retrieve the snapshot of data. After that use the val() method to get javascript representation of that.
var ref = firebase.database().ref(); ref.on("value", function(snapshot) console.log(snapshot.val()); , function (error) console.log("Error: " + error.code); );
For firebase hosting use this link:- https://firebase.google.com/docs/hosting
Pricing For FireBase:-https://firebase.google.com/pricing
0 notes
Text
How To Create A Mobile App In Expo And Firebase (For iOS And Android)
About The Author
Chafik Gharbi is an engineer and passionate mobile and web apps developer interested in everything related to JavaScript and cross-platform solutions. More about Chafik …
In this article, based on my experience with creating a GPS and navigation application, I will show you how to create a mobile app using Expo and Firebase services such as Firestore, Firebase functions and Expo push notifications.
Maybe you’ve heard of or worked with React, the JavaScript framework developed by Facebook. The social media company took it even further by releasing React Native, which quickly became the most popular framework for building mobile apps with JavaScript. Many companies embraced the idea and started building their apps with it.
In this article, we’ll get an idea of how to develop an application for Android and iOS using Expo and Firebase, based on my own experience of creating an application with these technologies. If you haven’t worked with Firebase before, please look at its guide to JavaScript projects before we dive in.
If you are new to JavaScript, make sure you’re clear on the basics of ECMAScript 6’s features, such as class importing and arrow functions. You can learn React Native from the official documentation, which has a section on React fundamentals, in case you haven’t worked with React. Don’t worry about how to build an app with Android Studio or Xcode, because we will be using the Expo framework.
Recommended reading on SmashingMag:
Brief Description of Project
We can describe our project as an on-demand transporter — you could say Uber for merchandise transportation. The user will choose transportation information, such as the type of vehicle and loading and unloading locations, and then nearby transportation vehicles will appear on the map. The user confirms their request, and the drivers receive notifications one by one. Each driver’s notification is active for 25 seconds. If they ignore or decline the request, the system selects another driver, and so on. When a driver accepts the request, the user can monitor the entire transportation process on the map, including via the web application.
Expo Installation And Configuration
First, we need to install the command line interface (CLI) for Expo, which will help us test to the app in a simulator or on real devices and to build our app in the cloud.
npm install -g expo-cli
Let’s create our Expo project.
expo init
The cool part is that all of your app’s configurations can be done in a single JSON file, app.json. Below are some tips I learned that could increase your chances of being accepted in the App Store and Google Play and to help you avoid some common problems.
If you are using Google Maps in your app, be sure to provide the API in the app.json configuration file, in order to make it work properly. Google won’t charge you for native map rendering unless you’re rendering directions or using other paid API services.
... "ios": { ... "config": { "GoogleMapsApiKey": "YOUR_API_KEY" }}, "android": { ... "config": { "GoogleMaps": { "apiKey": "YOUR_API_KEY" } }}
To make location updates, or any other background tasks, work in the background in iOS, add the following keys under ios.infoPlist:
... "ios": { ... "infoPlist": { ... "UIBackgroundModes": [ "location", "fetch" ] }}
If you don’t define which permissions your app will use, then Expo’s generated app will use all available authorizations by default. As a result, Google Play will reject your app. So, specify your required permissions.
... "android": { ... "permissions": [...], }
Apple requires you to provide a message that tells the user why the app is requesting this access, or else you will be rejected.
... "ios": { ... "infoPlist": { ... "NSCameraUsageDescription": "Why are you requesting access to the device’s camera?", "NSLocationWhenInUseUsageDescription": "Why are you requesting access to the device’s camera?" }}
Make sure to increment the android.versionCode key before you publish a new version to Google Play.
All updates can be done with Expo over the air, without passing by Google Play or the App Store, unless you make the following changes:
upgrade the Expo SDK version;
change anything under the ios, android, or notification keys;
change the app’s splash;
change the app’s icon;
change the app’s name;
change the app’s owner;
change the app’s scheme;
change the FacebookScheme;
change your bundled assets under assetBundlePatterns.
I prefer not to interpret the user experience by setting fallbackToCacheTimeout to 0 under the updates key. This will allow your app to start immediately with a cached bundle, while downloading a newer one in the background for future use.
And here is a complete example of the configuration in app.json:
{ "expo": { "name": "Transportili", "slug": "transportili", "scheme": "transportili", "privacy": "public", "sdkVersion": "36.0.0", "notification": { "icon": "./assets/notification-icon.png", "androidMode": "default" }, "platforms": [ "ios", "android", "web" ], "version": "0.3.2", "orientation": "portrait", "icon": "./assets/icon.png", "splash": { "image": "./assets/splash.png", "resizeMode": "contain", "backgroundColor": "#ffffff" }, "updates": { "fallbackToCacheTimeout": 0 }, "assetBundlePatterns": [ "\**/\*" ], "ios": { "bundleIdentifier": "com.transportili.driver", "supportsTablet": false, "infoPlist": { "UIBackgroundModes": [ "location", "fetch" ], "LSApplicationQueriesSchemes": [ "transportili" ], "NSCameraUsageDescription": "L’application utilise l’appareil photo pour prendre une photo ou numériser vos documents.", "NSLocationWhenInUseUsageDescription": "L’application utilise votre position pour aider les chauffeurs ou les transporteurs à vous trouver sur la carte." }, "config": { "GoogleMapsApiKey": "AIzaSyA8Wcik6dTUXBKolLSm5ONBvXNz8Z0T-6c" } }, "android": { "GoogleServicesFile": "./Google-services.json", "package": "com.transportili.driver", "versionCode": 6, "permissions": [ "ACCESS_COARSE_LOCATION", "ACCESS_FINE_LOCATION" ], "config": { "GoogleMaps": { "apiKey": "AIzaSyA8Wcik6dTUXBKolLSm5ONBvXNz8Z0T-6c" } } }, "description": "", "githubUrl": "https://github.com/chafikgharbi/transportili-native.git" }}
Let’s move on to installing Firebase, using the following command:
expo install firebase
I prefer to create a firebase.js file in the app’s root folder that contains all Firebase configurations. In this case, I’m using only the Firestore and Storage services.
const firebaseConfig = { apiKey: "api-key", authDomain: "project-id.firebaseapp.com", databaseURL: "https://project-id.firebaseio.com", projectId: "project-id", storageBucket: "project-id.appspot.com", messagingSenderId: "sender-id", appId: "app-id", measurementId: "G-measurement-id"};
Now, whenever we want to use Firebase, we just import this file, as follows:
import { firebase, firestore, storage } from "./firebase";
The documentation has a more detailed explanation of using Firebase with Expo.
The Application’s Database
You can store your data directly in the cloud using Firebase, which offers two types of databases. One is the real-time database, and the other is Firestore, which is considered to be the improved version of the real-time database, with more advanced functionality. Both are NoSQL databases with data sync and instant changes listeners. They have different mechanisms: The real-time database stores data as a JSON object, whereas Firestore stores data as documents in collections. They also calculate usage and cost differently: The former is based on the quantity of data exchanged, and the latter is based on the number of operations in the documents (reads, writes, and deletes).
In my case, I used the Firestore database to store users, requests, vehicles, and other application data. (I was trying to be smart by putting all of my data in one document to decrease operation usage, but then I discovered that each document can store only 1 MB.)
In addition to storing strings, numbers, objects, and so on in Firebase, you can also store a geoPoint, which is an object that contains the coordinates of geographic points (latitude and longitude). Despite this, unfortunately, you cannot make geographic queries, such as retrieving nearby users.
To do that, we can use GeoFirestore. But we have to take into account that this package restricts the document structure of the user to this:
User: {d: {all user data here}g: (location geohash)l: {firstore location geopoint}}
So, if you’re going to implement it directly in your user collection, like I did, then you’ll need to put all of the user’s data in the d key.
Last but not least, don’t forget to optimize your code to avoid unexpected operations:
Use offline persistence. On the web, offline persistence is disabled; be sure to enable it.
Use cursor pagination in Firestore queries. Don’t get all data at once.
Always unsubscribe listeners, when done, or unmounted components.
The Application’s Back End
You can manage the Firestore database, send notifications with Expo, and perform certain operations directly from the front end or the mobile application, but there are other operations that we cannot do without a back end and a server. This is why Firebase offers functions — a cloud back end that allows you to execute Node.js code on a scalable server. I’ve used the Firebase functions for the following:
Send notifications (see example below) To send notifications, we will use push notifications, a tool that helps an app’s owner send messages to their users. It appear in the notifications section of the device, even if the application is not active. We don’t want this process to be stopped by a sudden interruption in connectivity, so we’ll have to use a server.
Run cron jobs Using cron jobs helps me to manage scheduled requests and notifications.
Sanitize the database This includes removing useless and ignored requests.
Run sensitive, expensive, or continuous tasks This includes registering, retrieving users, and scheduling orders. All of these are sensitive operations. If you make them directly from your app or front end, there is a risk of security vulnerability and broken tasks.
Joaquin Cid’s article “How to Build a Role-based API With Firebase Authentication” will give you details on how to get started with Firebase functions and how to create a back-end API using Express. It uses TypeScript, but converting TypeScript to JavaScript is not hard.
Push Notifications
Expo sends a notification to the user’s device from its servers. It identifies the user’s device with a token. When someone uses the application, the app would execute code to obtain the device’s token, and then store this token on the server. I’ve used Firestore as usual to store the token and compare incoming tokens to check whether the user has logged in from another device.
Data to be stored for subsequent push-notification requests. (Large preview)
We get our token using the following function:
token = await Notifications.getExpoPushTokenAsync();
Don’t forget to request permission to push notifications. The documentation has example usage.
Whenever you want to send a notification to this user, you would make a request to Expo’s server, which contains the user’s device token already stored on your server.
curl -H "Content-Type: application/json" -X POST "https://exp.host/--/api/v2/push/send" -d '{ "to": "ExponentPushToken[xxxxxxxxxxxxxxxxxxxxxx]", "title":"hello", "body": "world" }'
The following is a simple example that sends notifications to all users using Firebase functions. This example is not secure. If you want to implement authorization and authentication, please follow Cid’s article mentioned above.
After initializing our project using the Firebase CLI, let’s install the Express framework to handle our API.
npm install express
We need to support CORS and add JSON body-parser middleware. This way, we can make requests from any URL and parse JSON-formatted requests.
npm install --save cors body-parsernpm install --save-dev @types/cors
This is the main index.js file of our functions directory:
const express = require("express");const cors = require("cors");const bodyParser = require("body-parser");const admin = require("firebase-admin");const functions = require("firebase-functions"); // Initialize the firebase-admin SDK moduleadmin.initializeApp(functions.config().firebase); // Set the Express appconst app = express();app.use(bodyParser.json());app.use(cors({ origin: true })); // Handle push notifications requestapp.post("/pushNotifications", require("./controllers/pushNotifications")); // Handle another request// app.post("/anotherRoute", require("./controllers/anotherController")); // Export the https endpoint API handled by the Express appexport const api = functions.https.onRequest(app);
And this is the pushNotifications.js controller, located in the controllers folder.
const admin = require("firebase-admin");const axios = require("axios");const chunkArray = require("./chunkArray");const firestore = admin.firestore(); async function pushNotifications(req, res) { try { const data = req.body; // Get users from Firestore, then build notifications array await firestore .collection("users").get() .then((querySnapshot) => { if (querySnapshot.size) { // This array will contain each user’s notification let notificationsArray = []; querySnapshot.forEach((doc) => { let docData = doc.data(); if (docData && docData.d) { let userData = docData.d; // The pushNotificationsToken retrieved from the app and stored in Firestore if (userData.pushNotificationsToken) { notificationsArray.push({ to: userData.pushNotificationsToken, ...data, }); } } }); // Send notifications to 100 users at a time (the maximum number that one Expo push request supports) let notificationsChunks = chunkArray(notificationsArray, 100); notificationsChunks.map((chunk) => { axios({ method: "post", url: "https://exp.host/--/api/v2/push/send", data: chunk, headers: { "Content-Type": "application/json", }, }); }); return res.status(200).send({ message: "Notifications sent!" }); } else { return res.status(404).send({ message: "No users found" }); } }) .catch((error) => { return res .status(500) .send({ message: `${error.code} - ${error.message}` }); }); } catch (error) { return res .status(500) .send({ message: `${error.code} - ${error.message}` }); }} module.exports = pushNotifications;
In the controller above, we got all of the app’s users from Firestore. Each user has a push token. We divided this list into sets of 100 users, because a single request to Expo can hold only 100 notifications. Then, we sent these notifications using Axios.
The following is the chunkArray function:
function chunkArray(myArray, chunk_size) { var index = 0; var arrayLength = myArray.length; var tempArray = []; for (index = 0; index
This is an example of how to send notifications via our API using Axios.
axios({ method: "post", url: "https://...cloudfunctions.net/api/pushNotifications", data: { title: "Notification title", body: "Notification body", },});
Maps and Geolocation
Render Native Google Maps in React Native
To render Google Maps in the mobile application, I used react-native-maps, and to render directions, I used the react-native-maps-directions package. For a web application, I would use pure JavaScript.
npm install react-native-maps react-native-maps-directions
Then, import these packages:
import MapView, { Marker, PROVIDER_Google } from "react-native-maps";import MapViewDirections from "react-native-maps-directions";
We’ll render the map with markers and directions:
<MapView style={mapStyle} // Reference is useful for controlling the map like mapView.fitToCoordinates(...) ref={(ref) => (mapView = ref)} // For better performance, avoid using default map on iOS provider={PROVIDER_Google} // Show the blue dot that represents the current location on the map showsUserLocation={true} initialRegion= /* * Watch region change when the user moves the map * for example, to get the address with reverse geocoding. \*/ onRegionChangeComplete={(region) => { console.log( `Map center: latitude: ${region.latitude}${region.latitude} longitude: ${region.latitude}${region.longitude}` ); }} // Map edge paddings mapPadding=>{/* Render marker with custom icon \*/} {this.state.marker && ( <Marker title={this.state.marker.title} coordinate= > <MaterialIcons name="place" size={40} color="green" /> </Marker> )} {/* Render multiple markers \*/} {this.state.markers.map((marker, index) => { return ( <Marker key={index} title={marker.address} coordinate= > <MaterialIcons name="place" size={40} color="green" /> </Marker> ); })} {/* Render directions from array of points \*/} {this.state.directions.length >= 2 && ( <MapViewDirections origin={this.state.directions[0]} destination={ this.state.directions[this.state.directions.length - 1] } waypoints={ this.state.directions.length > 2 ? this.state.directions.slice(1, -1) : null } optimizeWaypoints={true} apikey={Google_MAPS_APIKEY} strokeWidth={5} strokeColor="green" onReady={(result) => { console.log( `Distance "${result.distance} km", "${result.duration} min"` ); }} onError={(errorMessage) => { console.log(errorMessage); }} /> )}</MapView>
Watch User’s Location in Foreground and Background
The Expo framework supports background location updates, I want to use this feature to get the user’s position. Even if the app is not in the foreground or the phone is locked, the application should always send the location to the server.
import * as Location from "expo-location";import * as TaskManager from "expo-task-manager";import geohash from "ngeohash";import { firebase, firestore } from "../firebase"; let USER_ID = null;let LOCATION_TASK = "background-location"; let updateLocation = (location) => { if (USER_ID) { firestore .collection("users") .doc(USER_ID) .update({ "d.location": new firebase.firestore.GeoPoint( location.latitude, location.longitude ), g: geohash.encode(location.latitude, location.longitude, 10), l: new firebase.firestore.GeoPoint( location.latitude, location.longitude ), }); }}; TaskManager.defineTask(LOCATION_TASK, ({ data, error }) => { if (error) { // Error occurred - check `error.message` for more details. return; } if (data) { const { locations } = data; // Current position with latitude and longitude currentLocation = { latitude: locations[0].coords.latitude, longitude: locations[0].coords.longitude, }; updateLocation(currentLocation); }}); export default async function watchPosition(userid) { // Set user ID USER_ID = userid; // Ask permissions for using GPS const { status } = await Location.requestPermissionsAsync(); if (status === "granted") { // watch position in background await Location.startLocationUpdatesAsync(LOCATION_TASK, { accuracy: Location.Accuracy.BestForNavigation, distanceInterval: 10, showsBackgroundLocationIndicator: true, foregroundService: { notificationTitle: "Title", notificationBody: "Explanation", notificationColor: "#FF650D", }, }); // Watch position in foreground await Location.watchPositionAsync( { accuracy: Location.Accuracy.BestForNavigation, distanceInterval: 10, }, (location) => { let currentLocation = { latitude: location.coords.latitude, longitude: location.coords.longitude, }; updateLocation(currentLocation); } ); } else { // Location permission denied }}
If you’ll notice, I’ve used different structures when updating the location to Firestore. That’s because I’m using the GeoFirestore package to query nearby users.
Using WebView in React Native
The application is not only for mobile users, but also for desktop users. So, let’s not spend time developing another application that shares much of the same functionality, such as login and registration, profiles and settings, and orders history.
On the app website, we check whether the user came from a desktop browser or the mobile application. We then redirect them to the corresponding application.
For a mobile application, we have to implement some sort of communication between the native app and WebView app, thanks to the JavaScript injection of postMessage and onMessage in WebView. But be careful when and how you use it:
Security Warning: Currently, onMessage and postMessage do not allow specifying an origin. This can lead to cross-site scripting attacks if an unexpected document is loaded within a WebView instance. Please refer to the MDN documentation for Window.postMessage() for more details on the security implications of this.
— React Native documentation
We’ll send data from web JavaScript to React Native. Here is an example of sending a user ID:
window.ReactNativeWebView.postMessage( JSON.stringify({ action: "setUserID", data: user.uid }));
We’ll listen to data coming from the web in WebView.
<WebView ref={(reference) => (webview = reference)} onMessage={(event) => { let message = JSON.parse(event.nativeEvent.data); switch (message.action) { case "setUserID": let id = message.data; break; case "anotherAction": // break; } }}/>;
Let’s send data from React Native to the web. The following example sends a location retrieved from React Native.
let location = JSON.stringify({ latitude: 36.742022, longitude: 3.103771 });webview.injectJavaScript(` window.injectData({ action: "setLocation", data: JSON.stringify(${location}) })\`);
We’ll read the location on the web:
window.injectData = (message) => { switch (message.action) { case "setLocation": let location = JSON.parse(message.data); break; case "anotherAction": // break; }};
The Web Application and Website
All web-related parts, from the website to the web application, were made with Next.js and hosted on Netlify for three main raisons:
cost-effectiveness There is no server to maintain, and Netlify’s free plan is more than enough for my needs. Unlimited private repositories are now free on GitHub, so nothing to worry about there.
effortless development Commit, push, and let Netlify do the rest. Is anything simpler than that?
speed The websites are static and all hosted on a content delivery network (CDN). When a user requests these websites, the CDN directs them to the nearest copy in order to minimize latency. So, the websites are extremely fast.
Limitations of Expo
There are two approaches to building an app with Expo: the managed workflow, where you write only JavaScript, and Expo tools and services do the rest for you, and the bare workflow, where you have full control over all aspects of the native project, and where Expo tools can’t help as much. If you plan to follow the first approach, then consider Expo’s limitations, because some functionality that exists in major apps, such as Spotify (for example, music playing in the background) and Messenger (call notifications), cannot be done yet.
Conclusion
Expo is an excellent choice if you are not familiar with native development and you want to avoid all of the headaches associated with creating and regularly deploying an application. Firebase can save you a lot of time and work, because of its scalability and variety of services. However, both are third-party services, over which you have no control, and Firestore is not designed for complex queries and data relationships.
Thanks for your attention. I hope you’ve enjoyed this article and learned something new.
(ra, yk, il, al)
Website Design & SEO Delray Beach by DBL07.co
Delray Beach SEO
Via http://www.scpie.org/how-to-create-a-mobile-app-in-expo-and-firebase-for-ios-and-android/
source https://scpie.weebly.com/blog/how-to-create-a-mobile-app-in-expo-and-firebase-for-ios-and-android
0 notes
Text
Angular 13 Firebase - Create a user with an Email address and Password
Good day, everyone! In this article, we'll learn how to create a user in Firebase with an email address and a password using the Angular 13 framework. You may utilise Firebase Authentication to allow your users log in to Firebase using their email addresses and passwords, as well as manage the password-based accounts in your app. With Firebase's huge API collection, you can develop a fast and secure authentication system. The process of creating a user in Firebase is simple and straightforward. You can utilise Firebase's AngularFire2 library in your Angular application to take advantage of its amazing capabilities. For this example, I'll be utilising the AngularFire2 library from the node package manager (NPM) and the most recent Angular version.
Setup Angular App
ng new angularfirebaseproject After that, remember to enter into the project directory by running the following command. cd angularfirebaseproject Let's make some components for our Angular application. ng g c sign-in ng g c sign-up Set "strict": false in the compilerOptions field of the tsconfig.json file to disable strict type warnings or errors.
Setup AngularFire2 Library in Angular
Now, in your Angular project, enable Firebase (AngularFire2 library). npm install firebase @angular/fire --save Make the connection between your Firebase account and your Angular app once you've finished setting up this library. Go to the src/environments/enviorment.ts file in the enviornments folder of your project. Then, in the environment file, enter the firebase configuration details. export const environment = { production: false, firebase: { apiKey: "xxxxxxxx-xxxxxxxx", authDomain: "xxxxxxxxxxxxxxxxxxxxxxxx", databaseURL: "xxxxxxxxxxxxxxxxxxxxxxxx", projectId: "xxxxxxxx", storageBucket: "xxxxxxxx", messagingSenderId: "xxxxxx", appId: "xxxxx", measurementId: "xxxxxxxxxxxxxxxx" } }; Create Auth Service authentication.service.ts ng generate service shared/services/authentication Open the file app.module.ts and register the service there. import { NgModule } from '@angular/core'; import { BrowserModule } from '@angular/platform-browser'; import { AppComponent } from './app.component'; import { AuthenticationService } from './shared/services/authentication.service'; import { SignInComponent } from './sign-in/sign-in.component'; import { SignUpComponent } from './sign-up/sign-up.component'; import { environment } from '../environments/environment'; import { AngularFireModule } from '@angular/fire/compat'; import { AngularFireAuthModule } from '@angular/fire/compat/auth'; @NgModule({ declarations: , imports: , providers: , bootstrap: , }) export class AppModule {}
Generate Authentication Service Core File
Open the authentication.service.ts file and paste the code below into it. import { Injectable } from '@angular/core'; import { AngularFireAuth } from '@angular/fire/compat/auth'; @Injectable({ providedIn: 'root', }) export class AuthenticationService { constructor( public afAuth: AngularFireAuth // Inject Firebase auth service ) {} // Sign up with email/password SignUp(email, password) { return this.afAuth .createUserWithEmailAndPassword(email, password) .then((result) => { window.alert('You have been successfully registered!'); console.log(result.user); }) .catch((error) => { window.alert(error.message); }); } // Sign in with email/password SignIn(email, password) { return this.afAuth .signInWithEmailAndPassword(email, password) .then((result) => { console.log(result); }) .catch((error) => { window.alert(error.message); }); } } The authentication.service.ts file was successfully built. I used the FirebasecreateUserWithEmailAndPassword(email, password) and signInWithEmailAndPassword(email, password) APIs to create two methods. - SignUp(email, password): Using the Firebase API with Angular, this method creates a new user with an email address and a password. - SignIn(email, password): This technique allows a user to sign in using only his or her email address and password.
Set Up Auth Components
We're going to use our own API to sign up. Add the following code to your signup.component.ts file. import { Component } from '@angular/core'; import { AuthenticationService } from '../shared/services/authentication.service'; @Component({ selector: 'app-sign-up', template: ` Sign Up `, }) export class SignUpComponent { constructor(public authenticationService: AuthenticationService) {} } We're going to use our own API to log in. Add the following code to your signin.component.ts file. import { Component } from '@angular/core'; import { AuthenticationService } from '../shared/services/authentication.service'; @Component({ selector: 'app-sign-in', template: ` Sign Up `, }) export class SignInComponent { constructor(public authenticationService: AuthenticationService) {} } Ensure that the auth components are invoked by adding the appropriate tags to the app.component.ts file. I hope you will like the content and it will help you to learn Angular 13 Firebase - Create a user with an Email address and Password If you like this content, do share. Read the full article
0 notes
Text
How To Create A Mobile App In Expo And Firebase (For iOS And Android)
About The Author
Chafik Gharbi is an engineer and passionate mobile and web apps developer interested in everything related to JavaScript and cross-platform solutions. More about Chafik …
In this article, based on my experience with creating a GPS and navigation application, I will show you how to create a mobile app using Expo and Firebase services such as Firestore, Firebase functions and Expo push notifications.
Maybe you’ve heard of or worked with React, the JavaScript framework developed by Facebook. The social media company took it even further by releasing React Native, which quickly became the most popular framework for building mobile apps with JavaScript. Many companies embraced the idea and started building their apps with it.
In this article, we’ll get an idea of how to develop an application for Android and iOS using Expo and Firebase, based on my own experience of creating an application with these technologies. If you haven’t worked with Firebase before, please look at its guide to JavaScript projects before we dive in.
If you are new to JavaScript, make sure you’re clear on the basics of ECMAScript 6’s features, such as class importing and arrow functions. You can learn React Native from the official documentation, which has a section on React fundamentals, in case you haven’t worked with React. Don’t worry about how to build an app with Android Studio or Xcode, because we will be using the Expo framework.
Recommended reading on SmashingMag:
Brief Description of Project
We can describe our project as an on-demand transporter — you could say Uber for merchandise transportation. The user will choose transportation information, such as the type of vehicle and loading and unloading locations, and then nearby transportation vehicles will appear on the map. The user confirms their request, and the drivers receive notifications one by one. Each driver’s notification is active for 25 seconds. If they ignore or decline the request, the system selects another driver, and so on. When a driver accepts the request, the user can monitor the entire transportation process on the map, including via the web application.
Expo Installation And Configuration
First, we need to install the command line interface (CLI) for Expo, which will help us test to the app in a simulator or on real devices and to build our app in the cloud.
npm install -g expo-cli
Let’s create our Expo project.
expo init
The cool part is that all of your app’s configurations can be done in a single JSON file, app.json. Below are some tips I learned that could increase your chances of being accepted in the App Store and Google Play and to help you avoid some common problems.
If you are using Google Maps in your app, be sure to provide the API in the app.json configuration file, in order to make it work properly. Google won’t charge you for native map rendering unless you’re rendering directions or using other paid API services.
... "ios": { ... "config": { "GoogleMapsApiKey": "YOUR_API_KEY" } }, "android": { ... "config": { "GoogleMaps": { "apiKey": "YOUR_API_KEY" } } }
To make location updates, or any other background tasks, work in the background in iOS, add the following keys under ios.infoPlist:
... "ios": { ... "infoPlist": { ... "UIBackgroundModes": [ "location", "fetch" ] } }
If you don’t define which permissions your app will use, then Expo’s generated app will use all available authorizations by default. As a result, Google Play will reject your app. So, specify your required permissions.
... "android": { ... "permissions": [...], }
Apple requires you to provide a message that tells the user why the app is requesting this access, or else you will be rejected.
... "ios": { ... "infoPlist": { ... "NSCameraUsageDescription": "Why are you requesting access to the device’s camera?", "NSLocationWhenInUseUsageDescription": "Why are you requesting access to the device’s camera?" } }
Make sure to increment the android.versionCode key before you publish a new version to Google Play.
All updates can be done with Expo over the air, without passing by Google Play or the App Store, unless you make the following changes:
upgrade the Expo SDK version;
change anything under the ios, android, or notification keys;
change the app’s splash;
change the app’s icon;
change the app’s name;
change the app’s owner;
change the app’s scheme;
change the FacebookScheme;
change your bundled assets under assetBundlePatterns.
I prefer not to interpret the user experience by setting fallbackToCacheTimeout to 0 under the updates key. This will allow your app to start immediately with a cached bundle, while downloading a newer one in the background for future use.
And here is a complete example of the configuration in app.json:
{ "expo": { "name": "Transportili", "slug": "transportili", "scheme": "transportili", "privacy": "public", "sdkVersion": "36.0.0", "notification": { "icon": "./assets/notification-icon.png", "androidMode": "default" }, "platforms": [ "ios", "android", "web" ], "version": "0.3.2", "orientation": "portrait", "icon": "./assets/icon.png", "splash": { "image": "./assets/splash.png", "resizeMode": "contain", "backgroundColor": "#ffffff" }, "updates": { "fallbackToCacheTimeout": 0 }, "assetBundlePatterns": [ "\**/\*" ], "ios": { "bundleIdentifier": "com.transportili.driver", "supportsTablet": false, "infoPlist": { "UIBackgroundModes": [ "location", "fetch" ], "LSApplicationQueriesSchemes": [ "transportili" ], "NSCameraUsageDescription": "L’application utilise l’appareil photo pour prendre une photo ou numériser vos documents.", "NSLocationWhenInUseUsageDescription": "L’application utilise votre position pour aider les chauffeurs ou les transporteurs à vous trouver sur la carte." }, "config": { "GoogleMapsApiKey": "AIzaSyA8Wcik6dTUXBKolLSm5ONBvXNz8Z0T-6c" } }, "android": { "GoogleServicesFile": "./Google-services.json", "package": "com.transportili.driver", "versionCode": 6, "permissions": [ "ACCESS_COARSE_LOCATION", "ACCESS_FINE_LOCATION" ], "config": { "GoogleMaps": { "apiKey": "AIzaSyA8Wcik6dTUXBKolLSm5ONBvXNz8Z0T-6c" } } }, "description": "", "githubUrl": "https://github.com/chafikgharbi/transportili-native.git" } }
Let’s move on to installing Firebase, using the following command:
expo install firebase
I prefer to create a firebase.js file in the app’s root folder that contains all Firebase configurations. In this case, I’m using only the Firestore and Storage services.
const firebaseConfig = { apiKey: "api-key", authDomain: "project-id.firebaseapp.com", databaseURL: "https://project-id.firebaseio.com", projectId: "project-id", storageBucket: "project-id.appspot.com", messagingSenderId: "sender-id", appId: "app-id", measurementId: "G-measurement-id" };
Now, whenever we want to use Firebase, we just import this file, as follows:
import { firebase, firestore, storage } from "./firebase";
The documentation has a more detailed explanation of using Firebase with Expo.
The Application’s Database
You can store your data directly in the cloud using Firebase, which offers two types of databases. One is the real-time database, and the other is Firestore, which is considered to be the improved version of the real-time database, with more advanced functionality. Both are NoSQL databases with data sync and instant changes listeners. They have different mechanisms: The real-time database stores data as a JSON object, whereas Firestore stores data as documents in collections. They also calculate usage and cost differently: The former is based on the quantity of data exchanged, and the latter is based on the number of operations in the documents (reads, writes, and deletes).
In my case, I used the Firestore database to store users, requests, vehicles, and other application data. (I was trying to be smart by putting all of my data in one document to decrease operation usage, but then I discovered that each document can store only 1 MB.)
In addition to storing strings, numbers, objects, and so on in Firebase, you can also store a geoPoint, which is an object that contains the coordinates of geographic points (latitude and longitude). Despite this, unfortunately, you cannot make geographic queries, such as retrieving nearby users.
To do that, we can use GeoFirestore. But we have to take into account that this package restricts the document structure of the user to this:
User: { d: {all user data here} g: (location geohash) l: {firstore location geopoint} }
So, if you’re going to implement it directly in your user collection, like I did, then you’ll need to put all of the user’s data in the d key.
Last but not least, don’t forget to optimize your code to avoid unexpected operations:
Use offline persistence. On the web, offline persistence is disabled; be sure to enable it.
Use cursor pagination in Firestore queries. Don’t get all data at once.
Always unsubscribe listeners, when done, or unmounted components.
The Application’s Back End
You can manage the Firestore database, send notifications with Expo, and perform certain operations directly from the front end or the mobile application, but there are other operations that we cannot do without a back end and a server. This is why Firebase offers functions — a cloud back end that allows you to execute Node.js code on a scalable server. I’ve used the Firebase functions for the following:
Send notifications (see example below) To send notifications, we will use push notifications, a tool that helps an app’s owner send messages to their users. It appear in the notifications section of the device, even if the application is not active. We don’t want this process to be stopped by a sudden interruption in connectivity, so we’ll have to use a server.
Run cron jobs Using cron jobs helps me to manage scheduled requests and notifications.
Sanitize the database This includes removing useless and ignored requests.
Run sensitive, expensive, or continuous tasks This includes registering, retrieving users, and scheduling orders. All of these are sensitive operations. If you make them directly from your app or front end, there is a risk of security vulnerability and broken tasks.
Joaquin Cid’s article “How to Build a Role-based API With Firebase Authentication” will give you details on how to get started with Firebase functions and how to create a back-end API using Express. It uses TypeScript, but converting TypeScript to JavaScript is not hard.
Push Notifications
Expo sends a notification to the user’s device from its servers. It identifies the user’s device with a token. When someone uses the application, the app would execute code to obtain the device’s token, and then store this token on the server. I’ve used Firestore as usual to store the token and compare incoming tokens to check whether the user has logged in from another device.
Data to be stored for subsequent push-notification requests. (Large preview)
We get our token using the following function:
token = await Notifications.getExpoPushTokenAsync();
Don’t forget to request permission to push notifications. The documentation has example usage.
Whenever you want to send a notification to this user, you would make a request to Expo’s server, which contains the user’s device token already stored on your server.
curl -H "Content-Type: application/json" -X POST "https://exp.host/--/api/v2/push/send" -d '{ "to": "ExponentPushToken[xxxxxxxxxxxxxxxxxxxxxx]", "title":"hello", "body": "world" }'
The following is a simple example that sends notifications to all users using Firebase functions. This example is not secure. If you want to implement authorization and authentication, please follow Cid’s article mentioned above.
After initializing our project using the Firebase CLI, let’s install the Express framework to handle our API.
npm install express
We need to support CORS and add JSON body-parser middleware. This way, we can make requests from any URL and parse JSON-formatted requests.
npm install --save cors body-parser npm install --save-dev @types/cors
This is the main index.js file of our functions directory:
const express = require("express"); const cors = require("cors"); const bodyParser = require("body-parser"); const admin = require("firebase-admin"); const functions = require("firebase-functions"); // Initialize the firebase-admin SDK module admin.initializeApp(functions.config().firebase); // Set the Express app const app = express(); app.use(bodyParser.json()); app.use(cors({ origin: true })); // Handle push notifications request app.post("/pushNotifications", require("./controllers/pushNotifications")); // Handle another request // app.post("/anotherRoute", require("./controllers/anotherController")); // Export the https endpoint API handled by the Express app export const api = functions.https.onRequest(app);
And this is the pushNotifications.js controller, located in the controllers folder.
const admin = require("firebase-admin"); const axios = require("axios"); const chunkArray = require("./chunkArray"); const firestore = admin.firestore(); async function pushNotifications(req, res) { try { const data = req.body; // Get users from Firestore, then build notifications array await firestore .collection("users").get() .then((querySnapshot) => { if (querySnapshot.size) { // This array will contain each user’s notification let notificationsArray = []; querySnapshot.forEach((doc) => { let docData = doc.data(); if (docData && docData.d) { let userData = docData.d; // The pushNotificationsToken retrieved from the app and stored in Firestore if (userData.pushNotificationsToken) { notificationsArray.push({ to: userData.pushNotificationsToken, ...data, }); } } }); // Send notifications to 100 users at a time (the maximum number that one Expo push request supports) let notificationsChunks = chunkArray(notificationsArray, 100); notificationsChunks.map((chunk) => { axios({ method: "post", url: "https://exp.host/--/api/v2/push/send", data: chunk, headers: { "Content-Type": "application/json", }, }); }); return res.status(200).send({ message: "Notifications sent!" }); } else { return res.status(404).send({ message: "No users found" }); } }) .catch((error) => { return res .status(500) .send({ message: `${error.code} - ${error.message}` }); }); } catch (error) { return res .status(500) .send({ message: `${error.code} - ${error.message}` }); } } module.exports = pushNotifications;
In the controller above, we got all of the app’s users from Firestore. Each user has a push token. We divided this list into sets of 100 users, because a single request to Expo can hold only 100 notifications. Then, we sent these notifications using Axios.
The following is the chunkArray function:
function chunkArray(myArray, chunk_size) { var index = 0; var arrayLength = myArray.length; var tempArray = []; for (index = 0; index
This is an example of how to send notifications via our API using Axios.
axios({ method: "post", url: "https://...cloudfunctions.net/api/pushNotifications", data: { title: "Notification title", body: "Notification body", }, });
Maps and Geolocation
Render Native Google Maps in React Native
To render Google Maps in the mobile application, I used react-native-maps, and to render directions, I used the react-native-maps-directions package. For a web application, I would use pure JavaScript.
npm install react-native-maps react-native-maps-directions
Then, import these packages:
import MapView, { Marker, PROVIDER_Google } from "react-native-maps"; import MapViewDirections from "react-native-maps-directions";
We’ll render the map with markers and directions:
<MapView style={mapStyle} // Reference is useful for controlling the map like mapView.fitToCoordinates(...) ref={(ref) => (mapView = ref)} // For better performance, avoid using default map on iOS provider={PROVIDER_Google} // Show the blue dot that represents the current location on the map showsUserLocation={true} initialRegion= /* * Watch region change when the user moves the map * for example, to get the address with reverse geocoding. \*/ onRegionChangeComplete={(region) => { console.log( `Map center: latitude: ${region.latitude}${region.latitude} longitude: ${region.latitude}${region.longitude}` ); }} // Map edge paddings mapPadding= > {/* Render marker with custom icon \*/} {this.state.marker && ( <Marker title={this.state.marker.title} coordinate= > <MaterialIcons name="place" size={40} color="green" /> </Marker> )} {/* Render multiple markers \*/} {this.state.markers.map((marker, index) => { return ( <Marker key={index} title={marker.address} coordinate= > <MaterialIcons name="place" size={40} color="green" /> </Marker> ); })} {/* Render directions from array of points \*/} {this.state.directions.length >= 2 && ( <MapViewDirections origin={this.state.directions[0]} destination={ this.state.directions[this.state.directions.length - 1] } waypoints={ this.state.directions.length > 2 ? this.state.directions.slice(1, -1) : null } optimizeWaypoints={true} apikey={Google_MAPS_APIKEY} strokeWidth={5} strokeColor="green" onReady={(result) => { console.log( `Distance "${result.distance} km", "${result.duration} min"` ); }} onError={(errorMessage) => { console.log(errorMessage); }} /> )} </MapView>
Watch User’s Location in Foreground and Background
The Expo framework supports background location updates, I want to use this feature to get the user’s position. Even if the app is not in the foreground or the phone is locked, the application should always send the location to the server.
import * as Location from "expo-location"; import * as TaskManager from "expo-task-manager"; import geohash from "ngeohash"; import { firebase, firestore } from "../firebase"; let USER_ID = null; let LOCATION_TASK = "background-location"; let updateLocation = (location) => { if (USER_ID) { firestore .collection("users") .doc(USER_ID) .update({ "d.location": new firebase.firestore.GeoPoint( location.latitude, location.longitude ), g: geohash.encode(location.latitude, location.longitude, 10), l: new firebase.firestore.GeoPoint( location.latitude, location.longitude ), }); } }; TaskManager.defineTask(LOCATION_TASK, ({ data, error }) => { if (error) { // Error occurred - check `error.message` for more details. return; } if (data) { const { locations } = data; // Current position with latitude and longitude currentLocation = { latitude: locations[0].coords.latitude, longitude: locations[0].coords.longitude, }; updateLocation(currentLocation); } }); export default async function watchPosition(userid) { // Set user ID USER_ID = userid; // Ask permissions for using GPS const { status } = await Location.requestPermissionsAsync(); if (status === "granted") { // watch position in background await Location.startLocationUpdatesAsync(LOCATION_TASK, { accuracy: Location.Accuracy.BestForNavigation, distanceInterval: 10, showsBackgroundLocationIndicator: true, foregroundService: { notificationTitle: "Title", notificationBody: "Explanation", notificationColor: "#FF650D", }, }); // Watch position in foreground await Location.watchPositionAsync( { accuracy: Location.Accuracy.BestForNavigation, distanceInterval: 10, }, (location) => { let currentLocation = { latitude: location.coords.latitude, longitude: location.coords.longitude, }; updateLocation(currentLocation); } ); } else { // Location permission denied } }
If you’ll notice, I’ve used different structures when updating the location to Firestore. That’s because I’m using the GeoFirestore package to query nearby users.
Using WebView in React Native
The application is not only for mobile users, but also for desktop users. So, let’s not spend time developing another application that shares much of the same functionality, such as login and registration, profiles and settings, and orders history.
On the app website, we check whether the user came from a desktop browser or the mobile application. We then redirect them to the corresponding application.
For a mobile application, we have to implement some sort of communication between the native app and WebView app, thanks to the JavaScript injection of postMessage and onMessage in WebView. But be careful when and how you use it:
Security Warning: Currently, onMessage and postMessage do not allow specifying an origin. This can lead to cross-site scripting attacks if an unexpected document is loaded within a WebView instance. Please refer to the MDN documentation for Window.postMessage() for more details on the security implications of this.
— React Native documentation
We’ll send data from web JavaScript to React Native. Here is an example of sending a user ID:
window.ReactNativeWebView.postMessage( JSON.stringify({ action: "setUserID", data: user.uid }) );
We’ll listen to data coming from the web in WebView.
<WebView ref={(reference) => (webview = reference)} onMessage={(event) => { let message = JSON.parse(event.nativeEvent.data); switch (message.action) { case "setUserID": let id = message.data; break; case "anotherAction": // break; } }} />;
Let’s send data from React Native to the web. The following example sends a location retrieved from React Native.
let location = JSON.stringify({ latitude: 36.742022, longitude: 3.103771 }); webview.injectJavaScript(` window.injectData({ action: "setLocation", data: JSON.stringify(${location}) }) \`);
We’ll read the location on the web:
window.injectData = (message) => { switch (message.action) { case "setLocation": let location = JSON.parse(message.data); break; case "anotherAction": // break; } };
The Web Application and Website
All web-related parts, from the website to the web application, were made with Next.js and hosted on Netlify for three main raisons:
cost-effectiveness There is no server to maintain, and Netlify’s free plan is more than enough for my needs. Unlimited private repositories are now free on GitHub, so nothing to worry about there.
effortless development Commit, push, and let Netlify do the rest. Is anything simpler than that?
speed The websites are static and all hosted on a content delivery network (CDN). When a user requests these websites, the CDN directs them to the nearest copy in order to minimize latency. So, the websites are extremely fast.
Limitations of Expo
There are two approaches to building an app with Expo: the managed workflow, where you write only JavaScript, and Expo tools and services do the rest for you, and the bare workflow, where you have full control over all aspects of the native project, and where Expo tools can’t help as much. If you plan to follow the first approach, then consider Expo’s limitations, because some functionality that exists in major apps, such as Spotify (for example, music playing in the background) and Messenger (call notifications), cannot be done yet.
Conclusion
Expo is an excellent choice if you are not familiar with native development and you want to avoid all of the headaches associated with creating and regularly deploying an application. Firebase can save you a lot of time and work, because of its scalability and variety of services. However, both are third-party services, over which you have no control, and Firestore is not designed for complex queries and data relationships.
Thanks for your attention. I hope you’ve enjoyed this article and learned something new.
(ra, yk, il, al)
Website Design & SEO Delray Beach by DBL07.co
Delray Beach SEO
source http://www.scpie.org/how-to-create-a-mobile-app-in-expo-and-firebase-for-ios-and-android/ source https://scpie1.blogspot.com/2020/05/how-to-create-mobile-app-in-expo-and.html
0 notes
Text
How To Create A Mobile App In Expo And Firebase (For iOS And Android)
About The Author
Chafik Gharbi is an engineer and passionate mobile and web apps developer interested in everything related to JavaScript and cross-platform solutions. More about Chafik …
In this article, based on my experience with creating a GPS and navigation application, I will show you how to create a mobile app using Expo and Firebase services such as Firestore, Firebase functions and Expo push notifications.
Maybe you’ve heard of or worked with React, the JavaScript framework developed by Facebook. The social media company took it even further by releasing React Native, which quickly became the most popular framework for building mobile apps with JavaScript. Many companies embraced the idea and started building their apps with it.
In this article, we’ll get an idea of how to develop an application for Android and iOS using Expo and Firebase, based on my own experience of creating an application with these technologies. If you haven’t worked with Firebase before, please look at its guide to JavaScript projects before we dive in.
If you are new to JavaScript, make sure you’re clear on the basics of ECMAScript 6’s features, such as class importing and arrow functions. You can learn React Native from the official documentation, which has a section on React fundamentals, in case you haven’t worked with React. Don’t worry about how to build an app with Android Studio or Xcode, because we will be using the Expo framework.
Recommended reading on SmashingMag:
Brief Description of Project
We can describe our project as an on-demand transporter — you could say Uber for merchandise transportation. The user will choose transportation information, such as the type of vehicle and loading and unloading locations, and then nearby transportation vehicles will appear on the map. The user confirms their request, and the drivers receive notifications one by one. Each driver’s notification is active for 25 seconds. If they ignore or decline the request, the system selects another driver, and so on. When a driver accepts the request, the user can monitor the entire transportation process on the map, including via the web application.
Expo Installation And Configuration
First, we need to install the command line interface (CLI) for Expo, which will help us test to the app in a simulator or on real devices and to build our app in the cloud.
npm install -g expo-cli
Let’s create our Expo project.
expo init
The cool part is that all of your app’s configurations can be done in a single JSON file, app.json. Below are some tips I learned that could increase your chances of being accepted in the App Store and Google Play and to help you avoid some common problems.
If you are using Google Maps in your app, be sure to provide the API in the app.json configuration file, in order to make it work properly. Google won’t charge you for native map rendering unless you’re rendering directions or using other paid API services.
... "ios": { ... "config": { "GoogleMapsApiKey": "YOUR_API_KEY" } }, "android": { ... "config": { "GoogleMaps": { "apiKey": "YOUR_API_KEY" } } }
To make location updates, or any other background tasks, work in the background in iOS, add the following keys under ios.infoPlist:
... "ios": { ... "infoPlist": { ... "UIBackgroundModes": [ "location", "fetch" ] } }
If you don’t define which permissions your app will use, then Expo’s generated app will use all available authorizations by default. As a result, Google Play will reject your app. So, specify your required permissions.
... "android": { ... "permissions": [...], }
Apple requires you to provide a message that tells the user why the app is requesting this access, or else you will be rejected.
... "ios": { ... "infoPlist": { ... "NSCameraUsageDescription": "Why are you requesting access to the device’s camera?", "NSLocationWhenInUseUsageDescription": "Why are you requesting access to the device’s camera?" } }
Make sure to increment the android.versionCode key before you publish a new version to Google Play.
All updates can be done with Expo over the air, without passing by Google Play or the App Store, unless you make the following changes:
upgrade the Expo SDK version;
change anything under the ios, android, or notification keys;
change the app’s splash;
change the app’s icon;
change the app’s name;
change the app’s owner;
change the app’s scheme;
change the FacebookScheme;
change your bundled assets under assetBundlePatterns.
I prefer not to interpret the user experience by setting fallbackToCacheTimeout to 0 under the updates key. This will allow your app to start immediately with a cached bundle, while downloading a newer one in the background for future use.
And here is a complete example of the configuration in app.json:
{ "expo": { "name": "Transportili", "slug": "transportili", "scheme": "transportili", "privacy": "public", "sdkVersion": "36.0.0", "notification": { "icon": "./assets/notification-icon.png", "androidMode": "default" }, "platforms": [ "ios", "android", "web" ], "version": "0.3.2", "orientation": "portrait", "icon": "./assets/icon.png", "splash": { "image": "./assets/splash.png", "resizeMode": "contain", "backgroundColor": "#ffffff" }, "updates": { "fallbackToCacheTimeout": 0 }, "assetBundlePatterns": [ "\**/\*" ], "ios": { "bundleIdentifier": "com.transportili.driver", "supportsTablet": false, "infoPlist": { "UIBackgroundModes": [ "location", "fetch" ], "LSApplicationQueriesSchemes": [ "transportili" ], "NSCameraUsageDescription": "L’application utilise l’appareil photo pour prendre une photo ou numériser vos documents.", "NSLocationWhenInUseUsageDescription": "L’application utilise votre position pour aider les chauffeurs ou les transporteurs à vous trouver sur la carte." }, "config": { "GoogleMapsApiKey": "AIzaSyA8Wcik6dTUXBKolLSm5ONBvXNz8Z0T-6c" } }, "android": { "GoogleServicesFile": "./Google-services.json", "package": "com.transportili.driver", "versionCode": 6, "permissions": [ "ACCESS_COARSE_LOCATION", "ACCESS_FINE_LOCATION" ], "config": { "GoogleMaps": { "apiKey": "AIzaSyA8Wcik6dTUXBKolLSm5ONBvXNz8Z0T-6c" } } }, "description": "", "githubUrl": "https://github.com/chafikgharbi/transportili-native.git" } }
Let’s move on to installing Firebase, using the following command:
expo install firebase
I prefer to create a firebase.js file in the app’s root folder that contains all Firebase configurations. In this case, I’m using only the Firestore and Storage services.
const firebaseConfig = { apiKey: "api-key", authDomain: "project-id.firebaseapp.com", databaseURL: "https://project-id.firebaseio.com", projectId: "project-id", storageBucket: "project-id.appspot.com", messagingSenderId: "sender-id", appId: "app-id", measurementId: "G-measurement-id" };
Now, whenever we want to use Firebase, we just import this file, as follows:
import { firebase, firestore, storage } from "./firebase";
The documentation has a more detailed explanation of using Firebase with Expo.
The Application’s Database
You can store your data directly in the cloud using Firebase, which offers two types of databases. One is the real-time database, and the other is Firestore, which is considered to be the improved version of the real-time database, with more advanced functionality. Both are NoSQL databases with data sync and instant changes listeners. They have different mechanisms: The real-time database stores data as a JSON object, whereas Firestore stores data as documents in collections. They also calculate usage and cost differently: The former is based on the quantity of data exchanged, and the latter is based on the number of operations in the documents (reads, writes, and deletes).
In my case, I used the Firestore database to store users, requests, vehicles, and other application data. (I was trying to be smart by putting all of my data in one document to decrease operation usage, but then I discovered that each document can store only 1 MB.)
In addition to storing strings, numbers, objects, and so on in Firebase, you can also store a geoPoint, which is an object that contains the coordinates of geographic points (latitude and longitude). Despite this, unfortunately, you cannot make geographic queries, such as retrieving nearby users.
To do that, we can use GeoFirestore. But we have to take into account that this package restricts the document structure of the user to this:
User: { d: {all user data here} g: (location geohash) l: {firstore location geopoint} }
So, if you’re going to implement it directly in your user collection, like I did, then you’ll need to put all of the user’s data in the d key.
Last but not least, don’t forget to optimize your code to avoid unexpected operations:
Use offline persistence. On the web, offline persistence is disabled; be sure to enable it.
Use cursor pagination in Firestore queries. Don’t get all data at once.
Always unsubscribe listeners, when done, or unmounted components.
The Application’s Back End
You can manage the Firestore database, send notifications with Expo, and perform certain operations directly from the front end or the mobile application, but there are other operations that we cannot do without a back end and a server. This is why Firebase offers functions — a cloud back end that allows you to execute Node.js code on a scalable server. I’ve used the Firebase functions for the following:
Send notifications (see example below) To send notifications, we will use push notifications, a tool that helps an app’s owner send messages to their users. It appear in the notifications section of the device, even if the application is not active. We don’t want this process to be stopped by a sudden interruption in connectivity, so we’ll have to use a server.
Run cron jobs Using cron jobs helps me to manage scheduled requests and notifications.
Sanitize the database This includes removing useless and ignored requests.
Run sensitive, expensive, or continuous tasks This includes registering, retrieving users, and scheduling orders. All of these are sensitive operations. If you make them directly from your app or front end, there is a risk of security vulnerability and broken tasks.
Joaquin Cid’s article “How to Build a Role-based API With Firebase Authentication” will give you details on how to get started with Firebase functions and how to create a back-end API using Express. It uses TypeScript, but converting TypeScript to JavaScript is not hard.
Push Notifications
Expo sends a notification to the user’s device from its servers. It identifies the user’s device with a token. When someone uses the application, the app would execute code to obtain the device’s token, and then store this token on the server. I’ve used Firestore as usual to store the token and compare incoming tokens to check whether the user has logged in from another device.
Data to be stored for subsequent push-notification requests. (Large preview)
We get our token using the following function:
token = await Notifications.getExpoPushTokenAsync();
Don’t forget to request permission to push notifications. The documentation has example usage.
Whenever you want to send a notification to this user, you would make a request to Expo’s server, which contains the user’s device token already stored on your server.
curl -H "Content-Type: application/json" -X POST "https://exp.host/--/api/v2/push/send" -d '{ "to": "ExponentPushToken[xxxxxxxxxxxxxxxxxxxxxx]", "title":"hello", "body": "world" }'
The following is a simple example that sends notifications to all users using Firebase functions. This example is not secure. If you want to implement authorization and authentication, please follow Cid’s article mentioned above.
After initializing our project using the Firebase CLI, let’s install the Express framework to handle our API.
npm install express
We need to support CORS and add JSON body-parser middleware. This way, we can make requests from any URL and parse JSON-formatted requests.
npm install --save cors body-parser npm install --save-dev @types/cors
This is the main index.js file of our functions directory:
const express = require("express"); const cors = require("cors"); const bodyParser = require("body-parser"); const admin = require("firebase-admin"); const functions = require("firebase-functions"); // Initialize the firebase-admin SDK module admin.initializeApp(functions.config().firebase); // Set the Express app const app = express(); app.use(bodyParser.json()); app.use(cors({ origin: true })); // Handle push notifications request app.post("/pushNotifications", require("./controllers/pushNotifications")); // Handle another request // app.post("/anotherRoute", require("./controllers/anotherController")); // Export the https endpoint API handled by the Express app export const api = functions.https.onRequest(app);
And this is the pushNotifications.js controller, located in the controllers folder.
const admin = require("firebase-admin"); const axios = require("axios"); const chunkArray = require("./chunkArray"); const firestore = admin.firestore(); async function pushNotifications(req, res) { try { const data = req.body; // Get users from Firestore, then build notifications array await firestore .collection("users").get() .then((querySnapshot) => { if (querySnapshot.size) { // This array will contain each user’s notification let notificationsArray = []; querySnapshot.forEach((doc) => { let docData = doc.data(); if (docData && docData.d) { let userData = docData.d; // The pushNotificationsToken retrieved from the app and stored in Firestore if (userData.pushNotificationsToken) { notificationsArray.push({ to: userData.pushNotificationsToken, ...data, }); } } }); // Send notifications to 100 users at a time (the maximum number that one Expo push request supports) let notificationsChunks = chunkArray(notificationsArray, 100); notificationsChunks.map((chunk) => { axios({ method: "post", url: "https://exp.host/--/api/v2/push/send", data: chunk, headers: { "Content-Type": "application/json", }, }); }); return res.status(200).send({ message: "Notifications sent!" }); } else { return res.status(404).send({ message: "No users found" }); } }) .catch((error) => { return res .status(500) .send({ message: `${error.code} - ${error.message}` }); }); } catch (error) { return res .status(500) .send({ message: `${error.code} - ${error.message}` }); } } module.exports = pushNotifications;
In the controller above, we got all of the app’s users from Firestore. Each user has a push token. We divided this list into sets of 100 users, because a single request to Expo can hold only 100 notifications. Then, we sent these notifications using Axios.
The following is the chunkArray function:
function chunkArray(myArray, chunk_size) { var index = 0; var arrayLength = myArray.length; var tempArray = []; for (index = 0; index
This is an example of how to send notifications via our API using Axios.
axios({ method: "post", url: "https://...cloudfunctions.net/api/pushNotifications", data: { title: "Notification title", body: "Notification body", }, });
Maps and Geolocation
Render Native Google Maps in React Native
To render Google Maps in the mobile application, I used react-native-maps, and to render directions, I used the react-native-maps-directions package. For a web application, I would use pure JavaScript.
npm install react-native-maps react-native-maps-directions
Then, import these packages:
import MapView, { Marker, PROVIDER_Google } from "react-native-maps"; import MapViewDirections from "react-native-maps-directions";
We’ll render the map with markers and directions:
<MapView style={mapStyle} // Reference is useful for controlling the map like mapView.fitToCoordinates(...) ref={(ref) => (mapView = ref)} // For better performance, avoid using default map on iOS provider={PROVIDER_Google} // Show the blue dot that represents the current location on the map showsUserLocation={true} initialRegion= /* * Watch region change when the user moves the map * for example, to get the address with reverse geocoding. \*/ onRegionChangeComplete={(region) => { console.log( `Map center: latitude: ${region.latitude}${region.latitude} longitude: ${region.latitude}${region.longitude}` ); }} // Map edge paddings mapPadding= > {/* Render marker with custom icon \*/} {this.state.marker && ( <Marker title={this.state.marker.title} coordinate= > <MaterialIcons name="place" size={40} color="green" /> </Marker> )} {/* Render multiple markers \*/} {this.state.markers.map((marker, index) => { return ( <Marker key={index} title={marker.address} coordinate= > <MaterialIcons name="place" size={40} color="green" /> </Marker> ); })} {/* Render directions from array of points \*/} {this.state.directions.length >= 2 && ( <MapViewDirections origin={this.state.directions[0]} destination={ this.state.directions[this.state.directions.length - 1] } waypoints={ this.state.directions.length > 2 ? this.state.directions.slice(1, -1) : null } optimizeWaypoints={true} apikey={Google_MAPS_APIKEY} strokeWidth={5} strokeColor="green" onReady={(result) => { console.log( `Distance "${result.distance} km", "${result.duration} min"` ); }} onError={(errorMessage) => { console.log(errorMessage); }} /> )} </MapView>
Watch User’s Location in Foreground and Background
The Expo framework supports background location updates, I want to use this feature to get the user’s position. Even if the app is not in the foreground or the phone is locked, the application should always send the location to the server.
import * as Location from "expo-location"; import * as TaskManager from "expo-task-manager"; import geohash from "ngeohash"; import { firebase, firestore } from "../firebase"; let USER_ID = null; let LOCATION_TASK = "background-location"; let updateLocation = (location) => { if (USER_ID) { firestore .collection("users") .doc(USER_ID) .update({ "d.location": new firebase.firestore.GeoPoint( location.latitude, location.longitude ), g: geohash.encode(location.latitude, location.longitude, 10), l: new firebase.firestore.GeoPoint( location.latitude, location.longitude ), }); } }; TaskManager.defineTask(LOCATION_TASK, ({ data, error }) => { if (error) { // Error occurred - check `error.message` for more details. return; } if (data) { const { locations } = data; // Current position with latitude and longitude currentLocation = { latitude: locations[0].coords.latitude, longitude: locations[0].coords.longitude, }; updateLocation(currentLocation); } }); export default async function watchPosition(userid) { // Set user ID USER_ID = userid; // Ask permissions for using GPS const { status } = await Location.requestPermissionsAsync(); if (status === "granted") { // watch position in background await Location.startLocationUpdatesAsync(LOCATION_TASK, { accuracy: Location.Accuracy.BestForNavigation, distanceInterval: 10, showsBackgroundLocationIndicator: true, foregroundService: { notificationTitle: "Title", notificationBody: "Explanation", notificationColor: "#FF650D", }, }); // Watch position in foreground await Location.watchPositionAsync( { accuracy: Location.Accuracy.BestForNavigation, distanceInterval: 10, }, (location) => { let currentLocation = { latitude: location.coords.latitude, longitude: location.coords.longitude, }; updateLocation(currentLocation); } ); } else { // Location permission denied } }
If you’ll notice, I’ve used different structures when updating the location to Firestore. That’s because I’m using the GeoFirestore package to query nearby users.
Using WebView in React Native
The application is not only for mobile users, but also for desktop users. So, let’s not spend time developing another application that shares much of the same functionality, such as login and registration, profiles and settings, and orders history.
On the app website, we check whether the user came from a desktop browser or the mobile application. We then redirect them to the corresponding application.
For a mobile application, we have to implement some sort of communication between the native app and WebView app, thanks to the JavaScript injection of postMessage and onMessage in WebView. But be careful when and how you use it:
Security Warning: Currently, onMessage and postMessage do not allow specifying an origin. This can lead to cross-site scripting attacks if an unexpected document is loaded within a WebView instance. Please refer to the MDN documentation for Window.postMessage() for more details on the security implications of this.
— React Native documentation
We’ll send data from web JavaScript to React Native. Here is an example of sending a user ID:
window.ReactNativeWebView.postMessage( JSON.stringify({ action: "setUserID", data: user.uid }) );
We’ll listen to data coming from the web in WebView.
<WebView ref={(reference) => (webview = reference)} onMessage={(event) => { let message = JSON.parse(event.nativeEvent.data); switch (message.action) { case "setUserID": let id = message.data; break; case "anotherAction": // break; } }} />;
Let’s send data from React Native to the web. The following example sends a location retrieved from React Native.
let location = JSON.stringify({ latitude: 36.742022, longitude: 3.103771 }); webview.injectJavaScript(` window.injectData({ action: "setLocation", data: JSON.stringify(${location}) }) \`);
We’ll read the location on the web:
window.injectData = (message) => { switch (message.action) { case "setLocation": let location = JSON.parse(message.data); break; case "anotherAction": // break; } };
The Web Application and Website
All web-related parts, from the website to the web application, were made with Next.js and hosted on Netlify for three main raisons:
cost-effectiveness There is no server to maintain, and Netlify’s free plan is more than enough for my needs. Unlimited private repositories are now free on GitHub, so nothing to worry about there.
effortless development Commit, push, and let Netlify do the rest. Is anything simpler than that?
speed The websites are static and all hosted on a content delivery network (CDN). When a user requests these websites, the CDN directs them to the nearest copy in order to minimize latency. So, the websites are extremely fast.
Limitations of Expo
There are two approaches to building an app with Expo: the managed workflow, where you write only JavaScript, and Expo tools and services do the rest for you, and the bare workflow, where you have full control over all aspects of the native project, and where Expo tools can’t help as much. If you plan to follow the first approach, then consider Expo’s limitations, because some functionality that exists in major apps, such as Spotify (for example, music playing in the background) and Messenger (call notifications), cannot be done yet.
Conclusion
Expo is an excellent choice if you are not familiar with native development and you want to avoid all of the headaches associated with creating and regularly deploying an application. Firebase can save you a lot of time and work, because of its scalability and variety of services. However, both are third-party services, over which you have no control, and Firestore is not designed for complex queries and data relationships.
Thanks for your attention. I hope you’ve enjoyed this article and learned something new.
(ra, yk, il, al)
Website Design & SEO Delray Beach by DBL07.co
Delray Beach SEO
source http://www.scpie.org/how-to-create-a-mobile-app-in-expo-and-firebase-for-ios-and-android/ source https://scpie.tumblr.com/post/618523519371853824
0 notes
Text
Building Ionic Apps with Firestore

This is a guest post from Jorge Vegara. Jorge writes frequently on Javebratt about Ionic and Firebase, be sure to check it out.
Firestore is a fully managed NoSQL document-based database for mobile and web. It’s designed to store and sync app data easily. Today, we’ll go over how to manage data from an Ionic app, using Firestore.
What is a Document-oriented database?
Before we jump into things, we need to know how to use it and how it differs from the real-time database.
FireStore is a NoSQL document-oriented database. It’s a big difference from the Real-time database (referred to as RTDB from now on) which is also NoSQL. The RTDB is a gigantic JSON tree where anything goes, and you can set up the information however you want. Simply put, the RTDB let’s developers put what ever data they want, where ever they want.
Firestore, however, is a document-oriented database that offers much more structure than the RTDB. All of your data is stored in objects called documents and these documents can have any number of entries inside (booleans, strings, or even other objects). When grouped together, documents are referred to as collections.
For example, let’s imagine we want to store user information in the database: We would create a collection called users. Inside the collection we’d find objects that hold the information to each user’s profile. Those user profiles are the documents in our database.
A crucial thing to note is that documents can’t have other documents stored inside of them. For example, the user javebratt can’t have a user of booya as one of its properties. But documents can store other sub-collections inside. For example, the user javebratt can have a collection of tasks as one of its properties, and that sub-collection can hold all of the tasks documents.
Setup and Configuration
Now that we have some more insight as to what Firestore is, let’s install it into our Ionic app. The first thing we’ll need to do is install the Firebase SDK. We could install just the Firebase JS SDK, but since we’re using Angular, we’ll install AngularFire2 as it gives us a nice Observable-based API to work with.
Open your terminal, navigate to your app’s directory and run:
$ npm install angularfire2 firebase --save
After installed, we need to initialize Firebase. For that go to src/app/app.module.ts and import everything we’ll need:
import { AngularFireModule } from 'angularfire2'; import { AngularFirestoreModule } from 'angularfire2/firestore'; import { firebaseConfig } from './credentials';
The AngularFire modules are so that we can access firestore, and the firebaseConfig module is a file we’re using to keep our credentials out of source control.
All you need to do is create the file src/app/credentials.ts and populate it with:
export const firebaseConfig = { apiKey: 'Your Firebase Credentials Here', authDomain: 'Your Firebase Credentials Here', databaseURL: 'Your Firebase Credentials Here', projectId: 'Your Firebase Credentials Here', storageBucket: 'Your Firebase Credentials Here', messagingSenderId: 'Your Firebase Credentials Here' };
These credentials are available inside your Firebase Console.
By the way, while you’re in the Firebase Console, go into the Database Tab and select Cloud Firestore. Tell it to allow read/write since we’re going to be in development. Keep in mind that you need to set up proper security rules before going to production.
Once we import everything, add it to the imports array inside the @NgModule declaration:
@NgModule({ declarations: [...], imports: [ BrowserModule, IonicModule.forRoot(MyApp), AngularFireModule.initializeApp(firebaseConfig), AngularFirestoreModule ], bootstrap: [...], entryComponents: [...], providers: [...] })
Now that we got the setup work done, we can access our database inside the app.
Reading Data from FireStore
To read data from the database, we have two options: We can either (1) get a collection of items (think of it as an array of object), or (2) get a specific document from the database (a single object).
To read an object from the database, all you need to do is to create a reference pointing to that document:
constructor(private fireStore: AngularFirestore) { this.userDoc = fireStore.doc<any>('userProfile/we45tfgy8ij'); }
Then in our HTML:
<ion-content> <pre></pre> </ion-content>
The async pipe here is a special pipe in Angular that will automatically handle subscribing and unsubscribing from an observable when the component is created and destroyed.
In our example, we’re pointing to the document with the ID of we45tfgy8ij inside the userProfile collection. If you want to fetch the entire user collection, we could do:
constructor(private fireStore: AngularFirestore) { this.userProfileCollection = fireStore.collection<any>('userProfile'); }
You can also query users based on specific properties. Let’s say our users have a property called teamAdmin and we want to fetch the profiles of all the users who are admins of a team.
constructor(private fireStore: AngularFirestore) { this.teamAdminCollection = fireStore.collection<any>('userProfile', ref => ref.where('teamAdmin', '==', true)); }
Adding data to FireStore
We are however getting a little be ahead of ourselves, as we first need data in database before we can read. To push objects to the database we have two main options.
If we want to have a specific ID for the documented we can do:
constructor(private fireStore: AngularFirestore) { this.userDoc = fireStore.doc<any>('userProfile/we45tfgy8ij'); this.userDoc.set({ name: 'Jorge Vergara', email: '[email protected]', // Other info you want to add here }) }
If we don’t care about ID, we can just push the documents to the collection and let Firebase auto-generate the ID for us.
constructor(private fireStore: AngularFirestore) { this.userProfileCollection = fireStore.collection<any>('userProfile'); this.userProfileCollection.push({ name: 'Jorge Vergara', email: '[email protected]', // Other info you want to add here }); }
Updating data from FireStore
So far we’ve seen that the database API is fairly approachable for new devs and seasoned pros. To read data, we grab a reference to a collection or document. To write data, we call set() and pass the data we want to write. Now can you guess what the method is going to be called to update existing data?
… Dramatic Silence …
Correct, it’s .update()!
Let’s say a user update some piece of information, we’d first want to grab a reference to that user document, then we’d want to call update() and make any changes needed.
constructor(private fireStore: AngularFirestore) { this.userDoc = fireStore.doc<any>('userProfile/we45tfgy8ij'); this.userDoc.update({ name: 'Jorge Vergara', email: '[email protected]', // Other info you want to add here }) }
Remove data from FireStore
For removing data, we have a few different options:
Removing a specific document (an object).
Removing a property or field from a document.
Removing an entire collection.
For example, I deleted a user from FirebaseAuth, and now I want to remove the user profile from the database:
constructor(private fireStore: AngularFirestore) { fireStore.doc<any>('userProfile/we45tfgy8ij').delete(); }
Or let’s say we don’t want to delete our user, just one field in their document. In that case, we would fetch the user and call delete on field we want to remove:
constructor(private fireStore: AngularFirestore) { fireStore.doc<any>('userProfile/we45tfgy8ij') .update({ age: firebase.firestore.FieldValue.delete() }); }
Deleting entire collections however, is a bit trickier. Currently, there’s no way to remove an entire collection in bulk as a safety precaution.
This is because if we were to delete a large amount of data, the Firestore instance would block any other operations until it is completed. Because of this, the Firebase team recommends recursively finding and deleting documents in groups.
There is a “work around” for this, but it’s not recommended as the operation cannot be undone. However, if you need to you can use the Firebase CLI:
$ firebase firestore:delete [options] path...
It will work fine for when you’re removing a bunch of test data, but my advice would be to avoid it when you’re working with production data.
Next Steps
This is a quick overview of how you can use Firestore in your Ionic app. For a more detailed guide, I’ve written a post that will take you through a real-life example explaining everything while we build a Master/Detail view using Ionic for our front-end and Firebase/Firestore for our backend.
You can check that post out here! Thanks!
via The Official Ionic Blog https://ift.tt/2JBgq1s
0 notes