#t: tutorial
Explore tagged Tumblr posts
Visit Tumblr Blog
Explore Tumblr blogs with no restrictions, modern design and the best experience.
Last Seen Tumblr Blogs


Fun Fact
Tumblr posted its first advertisements in May 2012 and subsequently earned $13M in revenue.
Text
Video Game Track Bracket Round 2
Battle! (Brendan / May) from Pokémon Omega Ruby/Alpha Sapphire
youtube
vs.
Tutorial from Great Ghoul Duel
youtube
Propaganda under the cut. If you want your propaganda reblogged and added to future polls, please tag it as propaganda or otherwise indicate this!
Tutorial:
Best Google doodle game ever, I had so much fun playing it and the music is pretty good too!
#tournament poll#f: pokémon#s: pokémon#g: pokémon omega ruby/alpha sapphire#g: great ghoul duel#pokemon#google ghost game#pokemon music#the great ghoul duel#pokémon#google doodle#pokemon battle music#pokemon oras#pokémon oras#round 2#t: battle! (brendan / may)#t: tutorial
10 notes
·
View notes
Text
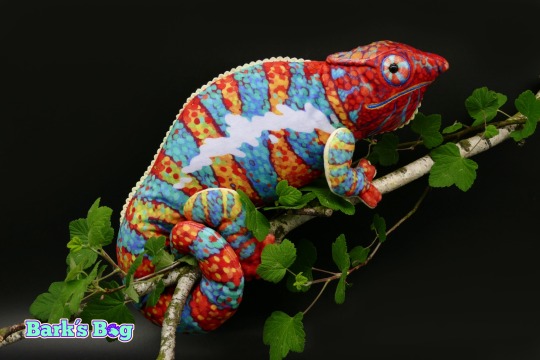
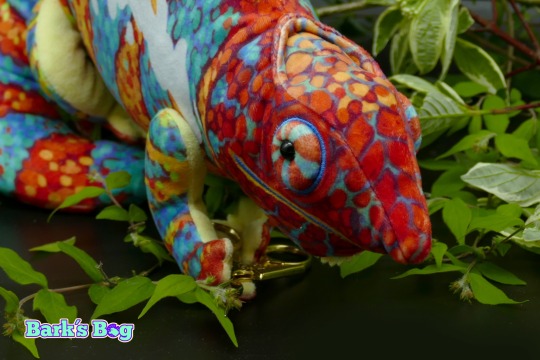

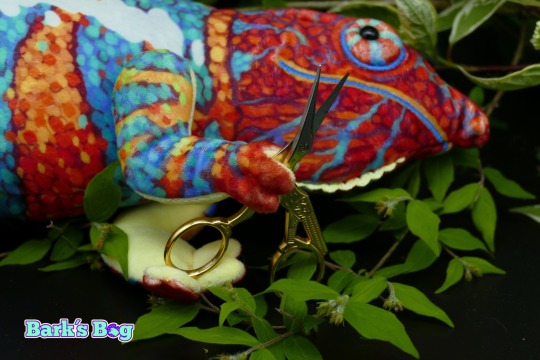
panther chameleon plushies!!!
based on the Amilobe locality of Furcifer pardalis
magnetic little hands for to grab things
soft
funny eyes
doesn´t need high humidty or complex care!
teddy joints for to move their little legs
---
adopt one from my bog
barks-bog.com
#i´m honestly really proud of these#the eyes are quite complex and i didn´t think i could pull them off but i did!!! i will post a quick tutorial later how they are done#also thanks to palaeoplushies for letting me steal her idea of using trim for little spikes#the paint job is one the more complex ones i´ve done and i hope people like it because i would love to do more like this#plush#plushies#plushblr#chameleon#panther chameleon#furcifer pardalis amilobe#handmade
4K notes
·
View notes
Text

~hide build/buy lot outlines with reshade~
do I need to explain more? 😁
⚠️ this is not a mod to put inside your mods folder ⚠️
Instead, this utilizes a Reshade/Gshade add-on to remove the lot outlines and being able to do so whenever you want with just a shortcut. Requires Reshade/Gshade and the Shader Toggler add-on. Works on both DX9 and DX11.

Download the latest update on the main tumblr post below:
Patreon post here
#sims 4#ts4 resources#ts4 reshade#t: shader toggler#t: reshade add-ons#hide cas ui#vyx.resources#reshade tutorial#1 hour later... in a true me fashion 😂#just had to double triple check everything works fine
435 notes
·
View notes
Text
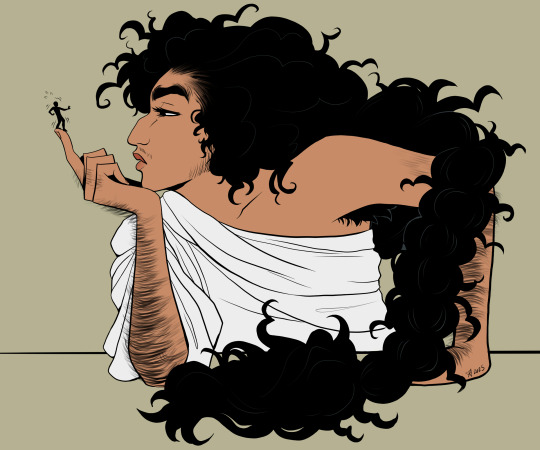
Just a pretty giant lady <3
#sfw giantess#arm hair is harder to draw than I remember#gotta find a tutorial on how to draw body hair#sfw giant/tiny#sfw g/t#g/t art#plaidartist draws
159 notes
·
View notes
Text


Throwing all drawings notes I made for myself, maybe it'll be useful?
#art tutorial#art tips#no t really tutorials#I try to learn as I can#so explaining stuff as I would to people helps me a lot to actually understand or#realize I still have no idea of what I'm doing XD
124 notes
·
View notes
Text
old old old Also another Repost from Twitter Here's my Skip the tutorial design.amoeba Booouy amoeba booooy
29 notes
·
View notes
Text

day 73 They need a divorce arc
Also Chat is this toxic yaoi⁉️
32 notes
·
View notes
Text
hi guys apparently i have acquired new brainrot

63 notes
·
View notes
Text


DIR EN GREY - TOUR23 PHALARIS -Vol II-
GRIEF
↳ How to pedagogically engage with your audience: singing vs signing the lyrics
#kaoru#kyo#die#toshiya#dir en grey#y: 2023#s: TOUR23 PHALARIS#v: TOUR22-23 PHALARIS DVD#t: GRIEF#g: purple jzh#b: esp d tt [trick star]#b: striped#g: ESP D-DR#g: red mesh#stb gifs#pic: sourced#that was a helpful tutorial by diru senior members
75 notes
·
View notes
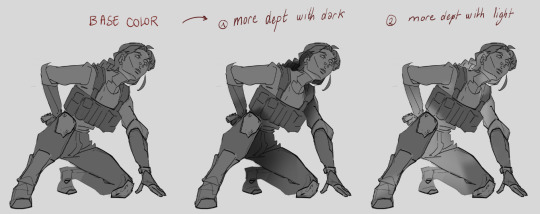
Text

And Violà- tis done.
Still struggling to get the hang of how I like to color/do lighting but it's coming along slowly. I might try to focus on much more simple coloring/shading until I get a little better at understanding how light works.
Anyways- here's Tamius having a not so great time.
#if anyone has some nice coloring tutorials pls send em my way#poor tamius#lil guy is struggling#g/t#giant/tiny#g/t art#g/t artist#entodraws#g/t fearplay#TamiusOc#FS#RoseOc#finding strength#borrowers
218 notes
·
View notes
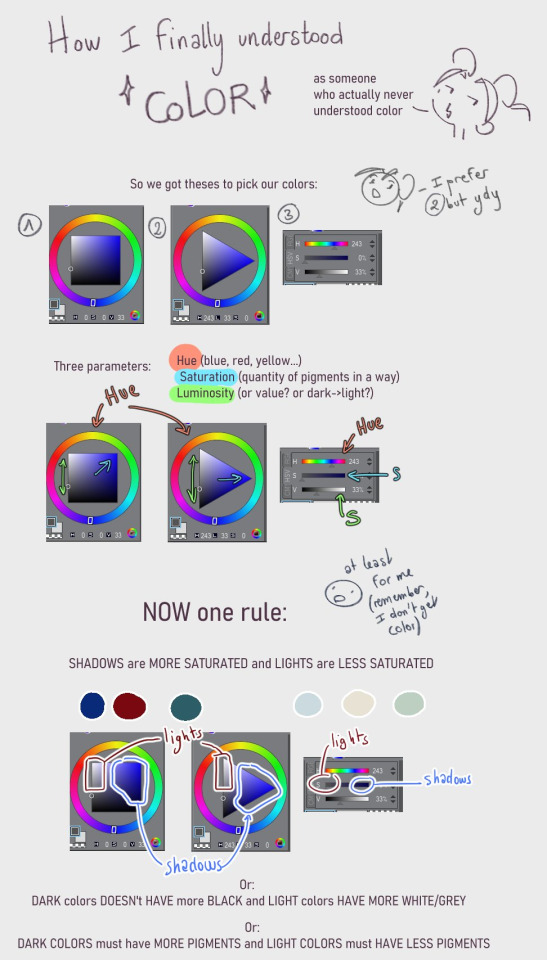
Text

Barks Quick "Turing patterns in CSP" tutorial
you need some pixels to start with, either just grab the spray bottle tool or go to Filter>Render>Perlin Noise
Filter> Gausian Blur> value: 6
Filter> Sharpen> unsharp mask> Radius: 22, Strenght: 255, Threshold: 0
----
you need to repeat step 2+3 over and over. to make that easier you can go to:
Auto Action> create new auto action set
hit record in the bottom left of the auto action window
perform step 2+3
stop recording
right click the actions in the set and duplicate them
make sure they are sorted correctly and hit play a few times
-----
before you color your pattern or do anything with it go to
Edit> tonal correction> binarization
to get rid of any odd colored pixels
#this isn´t the cleanest tutorial and i just figured it out too but i couldn´t find any tutorials for csp so throwing this one out here#clip studio paint#turing pattern#or as the sailfin lizard paper would call it Vermiculation#get vermiculating my friends
1K notes
·
View notes
Text
[Reshade add-on] Clean UI for DX11
After so so sooooo many crashes later, I finally managed to create a working setting for this add-on for DX11 games by using an older REST version 🫠
You can read the whole post on Patreon here, or below the cut for those who can't access the site.

As using REST 1.2.0 and above cause crashes whenever I create a setting or attempt to use it for a brief amount of time, I decided to use a much older version of REST (1.1.0), which turns out to be more stable to configure and use. While this means being able to use the add-on for the DX11 game, it has its own set of problems, which may/may not be a dealbreaker for some.
I decided to make a new post since the original one is quite lengthy and I want to keep DX9 and DX11 versions separate due to the different information each version has.
➡️ For the DX9 version, find it here. And here for the Patreon post.
In short, with the help of REST (an add-on for reshade/gshade), you can block/prevent shaders from affecting the UI.
// Things to know if using this version ⚠️
Some shaders will not work properly and will cause some gamma issues. If your preset look different than how it normally is (a lot darker/brighter), enable/disable your active shaders and see which one is causing it. It's easily fixed by using an alternative shader that achieve a similar look.
Shaders affected (ones I've known so far): SMAA & MartysMods_SMAA (FMAA is not affected, use this instead), FilmicAnamorphSharpen, ArcaneBloom & NeoBloom, Glamarye_Fast_Effects, MagicHDR, CRT_Lotte.
You will not be able to change your window resolution, either via graphic settings or by using SRWE. This will cause your game to stop and eventually having to force stop it with the task manager. It is recommended that you have your game in Windowed Fullscreen to avoid issues and have the add-on disabled if you want to change the resolution in-game.
// Required Files
REST add-on v 1.1.0 (testing)
REST config for v 1.1.0 (simfileshare only)
// Installation
Have ReShade with full add-on support installed for this to work.
Download the REST_ x64_1.1.0 add-on from the github linked in the requirements section as well as the config.
Extract the ReshadeEffectShaderToggler.addon file into the game's \Bin folder where your TS4_64.exe is (where you had also installed ReShade).
If you use GShade: place the .addon file in the gshade-addons folder.
Still in the \Bin folder, drop the x.x_ReshadeEffectShaderToggler_DX11.ini file you downloaded.
If you use GShade: place the .ini file in the gshade-addons folder along with the .addon file. If my config doesn't show up in the add-on menu, move it back to the \Bin folder.
Rename the file and remove the prefix and suffix. Both .addon and .ini file should share the same name for the add-on to recognize my settings = [ ReshadeEffectShaderToggler.ini ]
Open up your game. If you see the same menu as below then you’ve successfully installed the add-on & settings! Restart if needed.
I've set the shortcuts for Clear UI to match with my Effect toggle key, which is Ctrl + F2. If yours are set differently, match the shortcut of this toggle group with your effect toggle key:
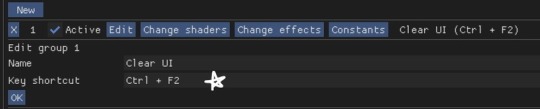
Reason being, having the toggle group active will prevent you from enabling/disabling your preset. Changing the shortcut will allow you to disable & enable your preset and toggle group at the same time.
To avoid the add-on from not working, make sure to do the following:
Enable post processing effects
Disable laptop mode & edge smoothing
Set 3d scene resolution to high
As long as all of the above are met, you should not encounter any problems. This has been tested to work on all graphics settings from low to ultra. External modifications (like Simp4Settings) may/may not have an effect, but from the testing I've done it has shown no problems so far.
215 notes
·
View notes
Text
How does Rover blink?
#i tried reaally hard t export the animation but maybe im too stupid to understand the tutorials#so yeah Im still recording with my phone 🗿#opm#opm fanart#opm rover#silly lil goober I love him so much
112 notes
·
View notes
Text
Mini character guide for my fellow McSpirk fanartists!
I feel like I finally have a satisfying level of muscle memory down for how I draw each of our guys in a recognizable way! My portrayals of Kirk, Spock and Bones aren't usually drawn with a reference, and they definitely don't look all that realistic, but I figure at least one of you out there might like to have a peak into what I do to try and make them recognizable!
Before I show the specific lines I always like to use, I would like to shoutout all the artists out there with same face syndrome. I had very bad same face syndrome before I started drawing Star Trek fanart, the variety of characters in Star Trek REALLY helped me draw better characterizations of people! BUT, if same face syndrome is something you currently struggle with do NOT let it deter you from posting your beautiful art!
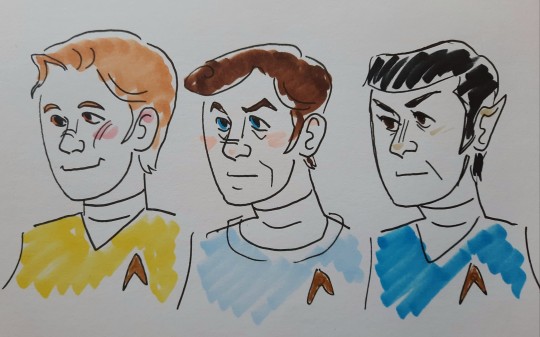
Even when drawn with the same basic face structure like I did here, it's still very easy to tell who's who, just with the use of colors, hairstyles and facial lines!
Now, for anyone who is wanting to pinpoint what I try to keep consistent in my drawings of the boys, I highlighted the lines I find most important in my drawings of each of them. I try to keep my style slightly cartoony, so I like to exaggerate!
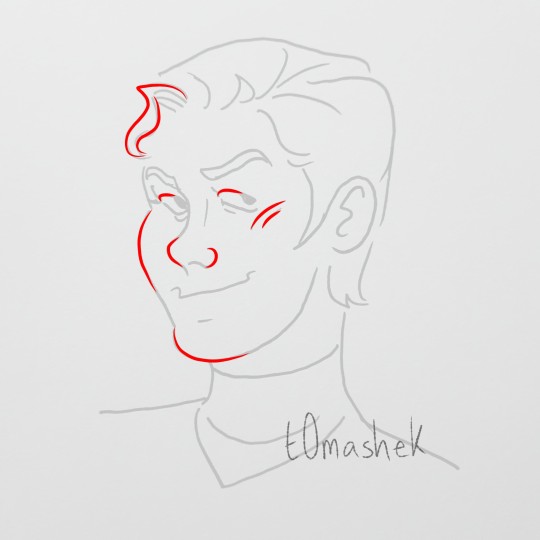
The roundness of Jim's face is what I always try to make the most pronounced in all of my art of him. The contrast to the harsher angles of the faces of Spock and McCoy is one of my favorite things to include in my art. He has a button nose in combination with those apple cheeks, they're my favorite thing about Jim to overexaggerate!
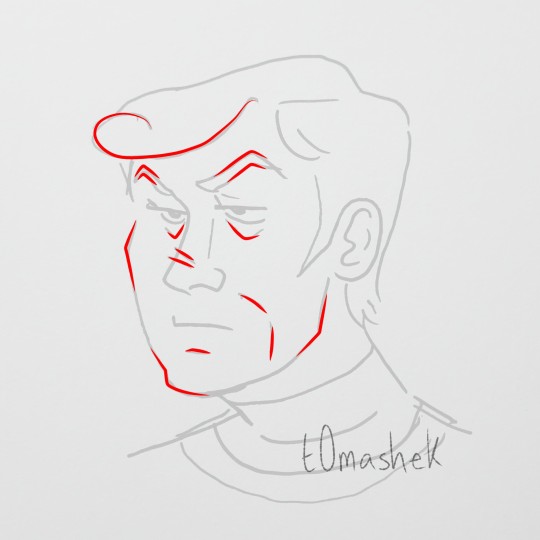
McCoy on the other hand? Give him his TRIANGLES. I try to go for a much more square face when drawing Bones, but for the lines and features within his face we love our good old friend the triangle. That man's eyebrows are pointy, and I love to give him his mouth lines. I like to balance out the sharper lines I draw on his face with the round lines of his hair.
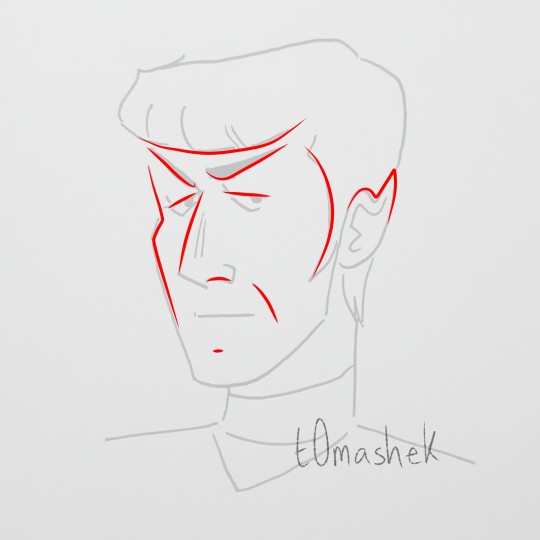
Spock has the bangs, ears and eyebrows that play a great advantage to us, no other bro serves like Spock. While I love the pointy sideburns on all of the boys, Spocks sideburns help me play into the length of his face. He's got a straighter face and straighter nose compared to his human boyfriends. And while he and Bones both have those handsome mouth lines, you can differentiate the shape of the crease to fit their faces! When I'm drawing McCoy's mouth lines, there's more of an angle, I draw Spock's lines straighter, similar to his face and nose.
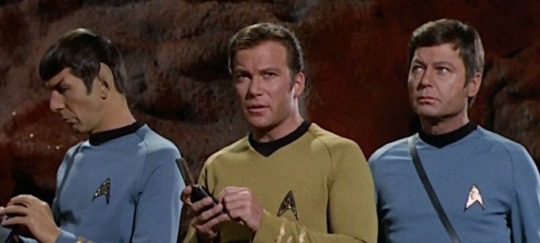
I hope this might help some of my fanartist brethren out there! Or at the very least give you a little peak into my art process! If anyone finds this helpful and uses it to draw some art, I'd love to see it! The variety of styles and character potrayals I see in all of the Star Trek fanart I browse on here never fails to warm my heart. These goofy little guys never fail to stand out from one another, no matter how they're drawn, and that is just so special to me.
Live long and draw fanart, little gay people in my computer!!! 💛🩵💙🖖
#my art#art guide#art tutorial#star trek art#star trek fanart#star trek tos#star trek#star trek the original series#captain kirk#captain james kirk#james kirk#james t kirk#bones mccoy#leonard mccoy#leonard bones mccoy#doctor bones mccoy#jim kirk#s'chn t'gai spock#spock#mr spock#mcspirk fanart#mcspirk#triumvirate#space gays
100 notes
·
View notes
Text
📚
21 notes
·
View notes
Note
Hi! I really love your art! It’s been a huge inspiration to me and a motivation to finally sit down and learn to draw. Care to spare any tips for a beginner? 🥹
What would you describe your art style as? And what’s your usual process? Any favorite brushes?
I hope one day I’ll be able to be as good at drawing as you are ❤️
AAAAAAAAAAAAAAAA FIRST OF IM SO HAPPY YOU STARTED!!!!😭😭😭😭 AND IM SO HONORED TOO???!!!!!


(I'm sorry it took me a while to properly answer!!! I wanted to give the best advice I could sooo…there's a lot of stuff in here, so everything is under the cut + some links)
1. style
I usually describe my style as semi realistic, though I felt like I've been stylizing a little bit more lately (mostly in hair). But it is usually a normal thing to happen! Since you starting, Im going to assume you are looking for your artstyle too! Honestly is really easy to get catch up on that, but keep you options open!!!


aidairo yuto sano demianasche
These are some of my main style references, (I tried to keep some akin like poses to show the difference).
Each of them is on a part of the “stylized - semi realistic - realism” specter, and even though the later still is very close to semi realism, you can see that they differ a lot from each other.
If I can say anything about an “artstyle”, is that is just how you like to draw some stuff. Once you're studying art, some things will come off naturally as more appealing than others! That's how you end up with your very own style.
(I like A LOT this video of Shay (sketches of shay) on this topic, is basically everything I could say and a little bit more💜)
But to resume a bit: LEARN THE FUNDAMENTALS!!!! You will develop your style naturally once you understan how shapes, forms and linework connect
2. my process
I had to film a timelapse for this cause I keep turning it off to save space yay!
I cannot stress this enough but ALWAYS HAVE A REFERENCE!!!!!! REFERENCES ARE FRIENDS AND FOOD. EAT THEM UP. U BRAIN WILL THANK U LATER.
I usually keep them on a pop up window or on the left corner of my screen, so I can always reference back and forth while I draw.
(Some good tips on reference here and here)
If i could resume my process it would be references < sketching < clean up < coloring < detailing.
I don't usually do line art, just clean and refine my sketch on its own layer. Much like you would do on paper, except if I'm working on commissions, but that's another thing.
Also, my painting changed a lot over the months, but I centered my studies around this and this. I like using a base color (either beige or purple) so the colors blend more easily, it really depends on the vibe I'm going for the colors, for example, if I'm doing a darker art, I'm going for a grayish blue, if I'm going for a sunny environment I put the base under a warm beige. It goes a little bit into color theory (I learned it on a "for dummies" video so I can't explain it fully, I'm sorry)
I like to keep my layers as minimal as possible, but that's just a personal preference. When I started, I used to do a layer for everything until I gained some confidence in my brushstrokes but I think that's something that goes from artist to artist so work on what's better for you!!!
3. brushes


I also keep them as simple as I can. To sketch I like using brushes that have a pencil like texture? Anything with a little noise is a go-to for me. Also for rendering i mainly use the basic ones that come with most programs, except the one called “yeeee” that I downloaded somewhere (I can't remember it for nothing, but it's just a round brush with less opacity in the corners), and the “THE render brush” from clip studio that I use to blend here and there. The one marked with * is the one I use whenever I'm going crazy on rendering the hair with is from a really old sakimichan brush pack but is still very handy (tho I think anything with a slight "hair" texture would do the job too).
I recommend u AGAIN to found what's the best for you. What I think is the most important is to not depend 100% upon some brush.
I think is this 🥺
If there's anything specific you want me to tell don't be shy to ask!!! I will so my best to answer!
AND DON'T GIVE UP!!!!! ART IS A KNOWLEDGE THAT TAKES TIME AND PRACTICE!!!!!! YOURE DOING GREAT AS LONG AS YOU KEEP GOING!
18 notes
·
View notes