#that tiny tiny bit of bobbin thread left
Explore tagged Tumblr posts
Visit Tumblr Blog
Explore Tumblr blogs with no restrictions, modern design and the best experience.
Last Seen Tumblr Blogs


Fun Fact
Tumblr has a low social media market share in South America.
Text

The one time in my life I’ve won bobbin chicken
13 notes
·
View notes
Note
Do you carry any other fun and whimsical things in your purse besides the brass measuring tools? can we see them??
"What do I carry in my purse" is actually a really long answer! Not very whimsical though.

I don't carry a very large purse but it is actually jam-packed with stuff. Obviously the usual—credit cards, ID, badge, money, car keys.
But the rest is taken up by a tidy little lineup of things that are useless 99% of the time and crucial 1% of the time. Some of it (most of the top row) floats loose in my purse; most of the bottom row packs into the little bag there. My sketchbook du jour is usually carried separately.

So: top row:
Sketchbook and the little brass drafting tools, which I carry inside the sketchbook, and also a little metal ruler that has honestly become redundant.
Then, a bunch of pens and marking tools: A ballpoint, some pencils, paint pen, permanent marker, white gel pens, white paint pen, white mechanical pencil, and eraser. This varies depending on what I'm working on and what I've absently left in the wrong place.
Some lip gloss, hand sanitizer, concealer, chapstick, nail polish, and heavy lotion (clay dries your hands out SO hard) and a hair pin. Usually there are several sword shaped hair pins also; I took them out while working on a project and they'll migrate back when I'm done.
Headphones, a couple knives, and a tiny foldable gerber multitool. A little flat card multitool, with a heavy needed shoved into its case also, and a pack of clear sticky notes.
A two-port USB brick; I usually also carry a power bank but it's charging in the car right now.
My change purse and my wallet, which is just the IDs; my actual cards are in a pocket in the purse that also has a little nail kit. My car keys, which have a bottle opener and a combined window breaker-seatbelt cutter, a 64 gig USB key, and keys to my studio, house, garage, and the courthouse.

The bag itself is metal mesh, which means it’s durable but also somewhat see-thru.
That little tin is a tiny first aid kit, which probably I should have unpacked, but it's got bandaids, bandages, skin tape, blistex; antiseptic, itch, and burn cream; eyedrops; several small packets of common meds (tylenol, advil, etc) and a little folded chart for meds, since I’m terrible at remembering which can be taken with which; a breath mask. There's also a razor and some safety pins tucked in there. It's held shut with a hair tie.
There's some single-use earplugs and some zip ties, some more eye drops, and a tiny vial of liquid breath mint.
A deck of mini playing cards.
A tiny sewing kit--needles, pins, earring backs and pin backs, some heavy black thread on a bobbin, a measuring tape, and some foldable scissors. There's a couple glasses screws in there from before I had Lasik.
Another little multitool, some binder clips, a tiny level, a 120 gig USB, and some bobby pins.
Matches and a lighter, a flat pen, and coils of 20 lb fishing line, picture wire, and monofilament, as well as two short USB cords.
A tide pen and a glasses screwdriver.
The bag contains cardboard strips with several yards of tape: Electrical, packing, scotch, duct, gaff, and skin tape. Superglue. A spare piece of heavy cardboard to use as a cutting surface if needed.
An Xacto knife with the blade reversed (learned my lesson after jamming my hand into my bag and taking a chunk out of a finger when a springloaded switchblade opened itself) and spare blades.
Some more clear sticky notes and a tiny lined notebook for when I just need scratch paper.


My car actually includes two slightly different emergency bags—one for regular roadside emergencies (including emergencies in blizzard weather) and one for camping emergencies, and a bit more of an extensive first aid kit.
2K notes
·
View notes
Note
OMFG WHAT THE BAND DUST LORE IS CRAZY- LIKE THATS SO COOL!!! the more i hear about the band au the more i love
!! <3 <3 thank you! im going to take this as a 'i want more' and continue from where i left off on the other post! <3
running away from his home after his parents murder/suicide with baby Ash in his amrs, Dust walks for a VERY long time - nowerdays he wouldnt be able to tell you how far he went, because he cant remember where he came FROM in the first place, but he did it over a long time, barefoot, until he reached a city, where he found an alleyway, which he huddled up in with Ash for the night, because it had started raining.
at this point, Dust cannot speak english - his parents always wanted his primary language to be korean, and the plan was for him to learn english as he went to school - that never happened.
Dust became attuned to his new life quickly - he found out very quickly where to look for food, where to get cloth from, how to feed a baby - all sorts. he learned to tie his waist length bright blue hair up without a band to keep it away, he found out where to get free clean water from, and he just got on with it.
he never even found out that his parents had been found dead in their home by police, and that those police had found evidence of children living in the house. after such a long time searching for those kids, the officers couldnt fine any sign of them, and so, Ash and Dustin Calvateyla were presumed dead - murdered by their mother and their bodies disposed of somewhere - a monument was put up, with fake gravestones for them, in a row with their parents.
One day, Cross, as we will come to know him, runs away from home, sneaking out his bedroom window after a big fight with his father. it was surprisingly easy for the small 5 year old; one of the staff around the house were watching him at that moment, and his father was too busy in his study, so, out the window he went, and started wandering the streets while crying.
Until he walks down an alleyway, after hearing some song in some language he doesnt know, and finds a boy.
Cross grew up very sheltered, and in fact, hed never seen an asian person before, so, he was a little confused, but to this day, he can remember seeing Dust, holding Ash as hes drifting to sleep, singing in korean, and catching his, very scared and wary eye, and thinking he look SO DAMN COOL.
Likewise, Dust had never seen someone with albinism before, and he thought at first Cross was a ghost. which is why he was so scared.
Cross tries to talk to him - theres a small comic panel of this meeting somewhere! - and it doesnt go well, as he realises this boy doesnt know any english or spanish, so, he tries to communicate with him as best as he can.
After a bit, Cross' stomach rumbles, becuase hes been out for a while by now, and Dusts eyes light up, before he rushes of to this little bowl of what can only be described as warm, mushed up stuff, that Cross is pretty sure is NOT food, and shoves it under his new friends nose.
In Dusts mind, Cross is in the same position he is, hes out in the cold all alone, and hes hungry. Dust has food, and sharing food has always been a THING in his family, so, logically, he tries to share it. he doesnt know Cross has a home, that theres food waiting for him there, all he knows is Cross is ungry. and he doesnt stop trying to force it down his throat until Cross has taken a few sips of the 'stew'.
Cross also realises that hes ripped his shorts slightly in the alleyway, that theres a tiny hole in his clothing, and starts FREAKING out, becuse his father will see and get mad, he'll hurt him, he'll know he left the house, he'll-!
Dust doesnt know what hes saying, but he knows that Cross is upset about the hole, so, he pulls out a small needle and thread, its a sewing machines bobbin wheel, from what Cross can see, but thats not impostant, and without a word, he leands over and starts sewing the holw back up. its nowhere near perfect, but as long as youre not looking for imperfections, its not noticable.
Its at this point Cross decides Dust is him new best friend, and that hes going to sneak out all the time to see him. hes going to teach him english, hes going to bring food, and theyre gonna be friends. and thats exactly what happened.
im gonna stop here again this time, like i said, LONGGG story hehe <3
#undertale au#undertale#band its#band au#band au lore#character lore#frend asks#band Cross#Band Dust#tw homelessness#tw childhood trauma#tw child abuse#tw child neglect#tw food issues
18 notes
·
View notes
Text
Yesterday I got through multiple steps for my next sewing project, which I'm calling my Batuu Vest since I'll be wearing it to Batuu for my birthday near the end of February. After a couple of weeks of thinking through what I want this vest to look like, yesterday I started with drafting a new pattern and cutting out all 5 paper pieces. The front of the vest has an asymmetric diagonal overlap, so I drafted each of the center front panels separately (far left of the pic below). The other three pieces are a variation on my basic princess-seam pattern, more or less the same I used for my winter fleece dress and my Rhaenyra cosplay.
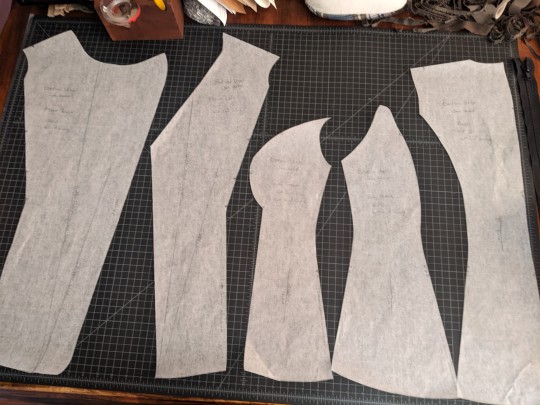
The other influence for this pattern is one I drafted back in 2014 for the vest for The Moment cosplay I did that summer. Having that vest on hand to compare for fit has been really nice in helping me figure out what changes I want to make, where the style lines need to move or the fit needs to be adjusted.
After I drafted the new pattern, I kept the center front piece of the old pattern out to compare (far left in the below pic). Other than playing up the asymmetry, I also raised the neckline of the piece that will be on the outside when the vest is closed up (center in the pic below) and added 2" to the overlap edge so I have something to cover over the zipper with. I also lengthened the lower edge by about 1", so that I have more options for hemming than the teeny tiny rolled hem I had to make do with on my Moment vest.
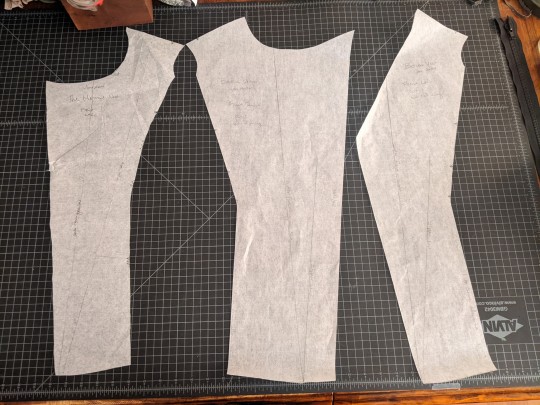
The other three pattern pieces got a similar lengthening along the bottom edge, and I updated the side front panel to have more room in the bust, using that winter fleece dress pattern, which itself is a descendant of my Rhaenyra pattern. The vest from 2014 just barely zips up through the bust, which is a combination of my measurements changing over the last decade, as well as the way I originally drafted the pattern -- for The Moment, I wear the vest open, so I wanted it to fit but I also didn't want to have extra folds of fabric I didn't actually need. Besides that bust adjustment, the rest of the pieces are very similar to The Moment vest.
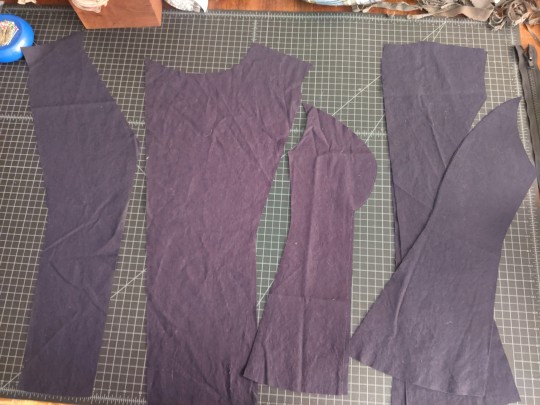
Once I had the new pattern drafted, I ironed all my blue linen scraps and kept a particular eye out for pieces that would be big enough to cut one or more vest panels. I originally bought the linen in autumn 2016 to make a wrap-back princess-seam dress, where each of the 11 skirt panels is a full 90 degrees. It was an absolute fabric hog, so I bought extra when I was planning the project.
Because of the shape of the skirt panels, and the ~44" width of the fabric, I ended up with a bunch of scrap pieces that have the selvage edge and 8"-14" of width from there. Not enough to get another dress out of, but plenty for something like this vest that's all narrow panels. After ironing it all and taking stock of what I have, I decided that I've got enough to make both a lining and an exterior out of this fabric, so that I can nicely finish the inside and have better pockets than The Moment vest has. Doubling up on the linen will also give it more structure, since the original was made out of heavy canvas.
After the drafting and ironing, I figured I'd go ahead and get the pieces for the lining cut out yesterday, too. I'll use that as a test-fit for the exterior, and make any changes to the pattern before cutting out the rest of the pieces. The lining panels photographed a bit oddly -- the wrinkles that didn't quite iron out are showing up a lot more than they do in person, and there's a weird red-ish tint in the middle of the photo -- but I'm really quite happy with how they look so far.
The thread and zipper for this project arrived earlier today, so I was able to wind a bobbin and start pinning the panels together, then move right into sewing. The back came together quickly and easily:

But the front is being a little bit more fiddly, sigh.

Like I said earlier, the bust seam is based on the pattern I drafted for my Rhaenyra dress about a year ago, and I'm finding that easing the side front and center front together is either quick and easy or a bit of a nightmare, all depending on the fabric. Both silk fabrics I used for my Rhaenyra dress were wiggly enough that they had no problem stretching for that curve, and the knit fleece fabric I made my Solstice dress out of last month similarly glided right through that stage of construction.
But I remember the cotton muslin for the Rhaenyra mock-up being difficult with exactly this step, and here of course this fairly crisp heavy linen is just refusing to ease. The snip-and-spread technique for making the center front panels fit the extreme curve of the side front panels does seem to work, it's just fiddly and slow-going compared to the rest of the seams, and I've had to pick out this section three or four times now. I'll get there, it's just frustrating.
So, naturally, I decided to step away from the sewing project (which is an oft-repeated bit of wisdom in my family, lol) and go through the pictures I'd taken yesterday and today and write this post instead. I am by no means a quick sewist, so it's nice to take a moment to be proud of all the progress I've made on this project so far. I still need to finish hand-sewing the pleat panels for Jack's jacket, but my plan is to alternate between that project and this one as my energy, pain levels, and hand strength allow. There's officially less than 4 weeks to go until our Batuu outing, but once I get the jacket and this vest done, it'll be all details after that.
But now I should probably get back to wrestling that bust seam into submission. Wish me luck.
3 notes
·
View notes
Text


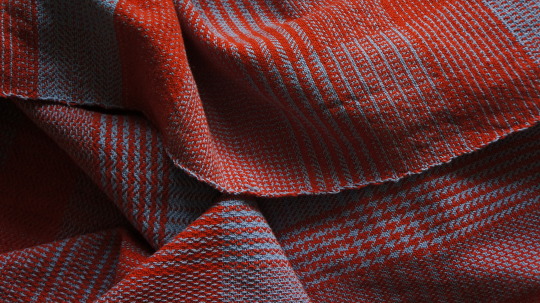
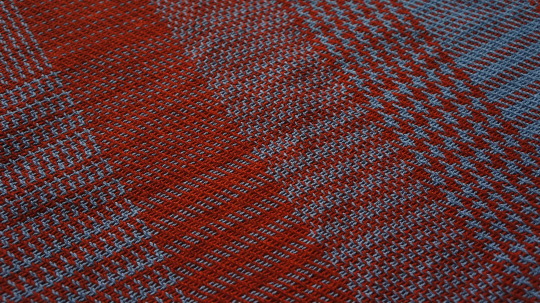

washed and finished. this is the main bit in twill and the main reason i was weaving this piece. bottom left is fresh off the loom, all other pictures are of the finished cloth.
originally the goal was to weave a pattern sampler, both to see what i can do with my table loom both in terms of weave structures and with two colours. i also just wanted to plan and weave a fabric that felt right from a yarn i liked. i then remembered i didn't like the feeling of weaving on the table loom, sold it and readjusted the plans for my floor loom.
augh, it's so special to me for so many reasons so i want to put something here. this is a milestone. i'm just going to list up the most important bits for future reference as briefly as possible :)
specs:
started planning 3.11.2021 finished 9.1.2023 warp length 8m, prepared in 3 parts 8 ends per cm, 378 ends total 7 colour sequences in both warp and weft per weave structure 4 plain weave variations, 7 twills in the main bit plus some extra experimentation based on a book** as well as a tiny double weave bit 52 picks per colour sequence for the plain weave, 48 for the twills so 539 squares (rectangles really) in total and no two the same! (343 twill, 196 plain weave) mostly listing this because those are some nice numbers c:
first time:
winding a warp with this many ends
planning for a structurally sound fabric based on a specific yarn
beaming a warp on my floor loom
keeping notes this complete and updating them when i changed things
planning and mapping out a draft using weavepoint demo version
using floating selvages (poorly)
weaving twills on the floor loom*
learned:
*yes, you can weave unbalanced twills on an old-school counter-balance loom. no, you probably don't want to. balanced twills however 👌 no problem
keeping a roll of paper on the weaving to take notes is inconvenient but comes in handy when you need to vent your frustration. i probably won't bother again except for when sampling though.
measuring instead of counting threads to know when to switch = golden
switching colour sequence mid weave pattern and keeping the weave pattern going is a no-no i will never plan for this again, i don't care if it disrupts the order of things, change the plan, don't do it, it is so unbelievably annoying, please
also maybe scale it down next time? or don't. but uh, it was a lot of firsts on a fairly long warp, changing something every ten minutes of weaving. maybe next time try being more compassionate with future self.
in case i do another pattern sampler, i'd add a third color to border and define the different areas in both warp and weft. i will not make it 8 meters long.
**the book is amazing. however, i only understand what she was writing about when/after weaving it, so i have no choice but to work through anything i want to learn
mis-matching the beat of colour sequence and weave sequence is both irritating and fun. what i mean by this is e.g. having a colour repeat of four steps and a weave repeat of six.
loom is set-up for finer yarns, because the beautiful heddles are fixed on the shafts, you need to put some thought and effort into spacing out the warp.
mistakes/issues:
the weavepoint demo version only letting you save as jpeg is fucking frustrating but understandable since their 60 day free trial period turned out to be a forever free trial period
selvages are a complete mess
the beginning is very slanted, must've had major tension issues without noticing
sides still bubbling up, despite best efforts
just. resist. the temptation of overfilling your fucking bobbins i beg you. resist! (set up a permanent bobbin winding station)
ropes holding peitschenstäbe cut into beams - should switch to cloth
need to make/find a glossary for german, swiss-german, french and english translations of weaving terms
should've weighed yarn cones in beginning and now so i could get an estimate of what's doable with the rest. oh well.
wind warp in even number of sections next time to make beaming easier
also (this is embarrassing) the raddle opens you fool.
so far so good!
#weaving#pattern sampler#so glad it is done#hahaha#what next????????????????????????#moving :((((((((((((((((((((((((((((((
14 notes
·
View notes
Text
sewing stuff I definitely recommend
While I love adorable sewing gear, I use efficient sewing gear. So here are a few of my favorites, most of them cheap or easy to find. I would definitely recommend giving them a try if you sew, or getting them for someone you know who sews, whether they're a beginner or have been sewing for a while.

This is an ergonomic rotary cutter. So much easier on the wrist than the straight ones, and it lets you put more force behind your cut, with less wobble. Mine is specifically for lefties. You can't hold it with the wrong hand, so it's not as versatile as the straight one if you want to share with your friends, and it doesn't pack as neatly, but I feel like it's worth it.
If someone already has a good cutter or a cutter is out of your price range, fresh blades are always, always welcome. Rulers and mats are a bit more specific, and people usually have all they need, so really, just buy fresh blades.

This little folding stitchripper is worth its weight in gold. Every stitchripper I have ever had died when the cap split. You know what I'm talking about. The cap inevitably splits from being forcefully jammed on the end to use as a handle. Even the expensive ones split. This one just folds open like a pen knife. It has outlasted every other stitchripper, and as a bonus it doesn't roll away when you put it down.

So, opinions on thimbles vary widely. Either you love them or you hate them. But if you love them, you need a good one. This is a quilting thimble. It's brass, with deep dimples and a rim around the top. It stains my finger green, but it fits perfectly and can never be punched through like the cheaper nickel or rubber thimbles. God, the horror of punching through a thimble.
You can't really buy a thimble for another person, sight unseen. They come in different sizes like rings, and people have strong opinions about them. Still, you can definitely take someone out to get a thimble. Mine was a present.

Magnetic pincushions are the best. You just have to toss a pin in its general direction, and it snaps it right up. Better than a dish, which pins bounce out of, or a pincushion you have to stab. And you can just sweep it over the floor to pick up strays. I've had mine for a few years, and the plastic is scuffed, but it still works perfectly.

Every sewing room needs three kinds of scissors: the sacrificial paper scissors so you aren't tempted to use sewing scissors on unsuitable things, the big bad metal shears, and the little snips. I inherited those shears from my grandma, who was thankfully also a lefty, and they just needed a sharpening and a coat of paint on the handle. Those are big ticket items, though, so let's focus on the others.
The little embroidery snips have the shortest lifespan, because you can drop them or damage them trying to cut through something too thick. You can pick up a pair of tiny nail scissors anywhere. The heron shaped ones are cute, but a bit hard on the hands. Find something that opens and closes effortlessly and doesn't dig into your fingers.
If you are a lefty, consider getting a pair of lefty paper scissors. The universal grip ones still have the blades arranged for righties. You ought to be able to hold something in front of you and not have your view of the line you're cutting obscured by the top blade coming down. Really, it’s life changing. (Sadly, mine are not lefty scissors.)

Glass headed pins, my favorites. I never have to worry about what happens if I put a hot iron on them, unlike plastic ones. Also, they just feel nice. Glass pins are pretty cheap, and get bent often enough that replacements are always welcome.

I'm gonna blow your mind here. I know everyone loves those needle wheels, and uses their favorite sizes first and then just grimly uses up the strays until they get a new wheel. But you can actually just get a whole pack of your favorite kind. I like embroidery needles, which have a much bigger eye - see the two needles I'm holding? The eye is like three times the size, but the needle isn't any bigger. Much easier to thread. Also consider a needle threader if you have difficulties with the eyes of needles. Those things die or disappear really fast, so a replacement is always welcome.
The pack on the left is a range of regular embroidery needles that are pretty big, and the ones on the right are all small and can be used for regular sewing. Don't worry about brand names, and don't be afraid to replace a needle that doesn't feel perfectly smooth. Needles are cheap.

Pipe cleaners are vital tools for getting lint out of sewing machines. They should be replaced when disgracefully grubby, gnarled, and bald. I bought a large pack because they were really cheap, and I will have pipe cleaners until the sun burns out.

Everyone has their own way of storing bobbins, but this is a pretty good box. But more to the point, you see all those empty bobbins? I'm living the dream here. I don't ever have to worry about using up the thread on bobbins before winding one up with a new color. Figure out what kind of bobbin their machine takes, and buy them a pack.
Consider a pack of fresh machine needles while you're at it. Nobody ever changes their needles often enough.

Everyone who sews with a machine will need to attack it with a screwdriver sooner or later. That little flat one in the lower left came with my machine, but is incredibly easy to misplace. I keep a short screwdriver with a normal sized tip to take up the faceplate and get to my bobbin compartment, and a cheapo reversible screwdriver just because there are a bewildering variety of screws in the depths of the machine and long screwdrivers are easier to use.

This is probably some sort of paper folding tool. It's great for folding cloth, too, even after my cat chewed on it. Gives you a good sharp crease when you're pressing seams open without an iron. Way better than trying to use your fingernail. The term you should use to find something like this is Hera, wooden iron, or bone folder.

Pretty little mint tins are always useful for storing random snaps, pins, eyelets, buttons, buckles, and other little hardware. Definitely save them up for sewing purposes. Heck, ugly tins work too, especially if you have a lot of them the same size.

Tracing paper is so useful for getting patterns out of books without having to photocopy them, and very handy for making changes to patterns you're drafting. This is the thickest stuff I use - a bit murky, but doesn't curl up and waft away on the breeze. One pad lasts forever.
Of course, there are always more little tools and accessories someone could need for sewing, but I feel these supplies would be useful to a broad range of projects, are usually in need of replacing, and many of them have a bit of an edge over more common sewing supplies.
41 notes
·
View notes
Text
I’m really enjoying it. It’s super easy and perfect for Netflix watching or for a craft and chat. You just need a bit of practice to figure out making the picots even (Mine have gotten a lot better than they were before) and tensioning the thread with your left hand in order to make the knot flip onto it. It sounds tricky but anyone who has ever crocheted or knitted continental or even threaded eyebrows before will be able to figure it out without thinking since it’s a similar sort of idea and anyone else will be fine.
You just need a ball of crochet cotton (Almost all of mine were acquired in op shops) and a shuttle. And maybe a tiny crochet hook. If you don’t have a shuttle you can make one from some milk bottle plastic. It is super portable too. Please note that the reason I have a yarn bobbin is because my ball of thread started falling apart so I put it on the bobbin instead, it’s not needed.
Here is a series of youtube instructions on how to tat. I am also told the Craftsy course is very good. I also have The Complete Book of Tatting by Rebecca Jones which I can recommend.
I have now finished my edging and I need to sew it to my hankie. I don’t use hankies so I don’t know what I will do with it. Maybe save it for when I know I’m gonna have a big sobbing cry. Also, I think tatting is the perfect thing to do on a Victorian fainting couch.

I have started a little thing.
229 notes
·
View notes
Text
Stiltskin Family Bonding - Chapter 11: Spinning
Fandom: OUAT
Relationships: Rumple & Henry, Charming & Henry, Sheep Boys
Rating: N/R
Summary: The Stiltskin boys bond in a variety of ways. Sometimes it goes well, other times...not so much.
AO3
Chapter 11: Spinning
Prompted by ghostwriter107: Would love to see David's reaction to walking into the shop and finding Rumpel teaching Henry how to spin. I got the feeling that the heroes thought only they had something useful to pass to their grandson.
David winced a little as the bell over the shop door gave a jaunty jingle. He didn’t have anything against Rumplestiltskin anymore, but his memories - cursed and otherwise - of this shop weren’t exactly pleasant. He avoided coming here when he could, but Henry was late getting home and Snow had been busy trying to convince Emma to at least consider a royal wedding in Storybrooke, and David was more than happy to leave that conversation behind.
Henry had been spending more and more time at the shop lately, and David supposed that was only natural. Before Neverland, the boy had rarely seen his father and other grandparents, and they were, after all family. That wasn’t as hard to swallow for David as it was for Snow, but it was still strange to think of the Dark One as a part of his family. Henry was always reminding them about the Golds, pointing out when they’d been left off guest lists (or inviting them himself if time was running short), and they all felt a little guilty about it, but Belle and Rumplestiltskin were...odd, to say the least, and David would be lying if he said he wasn’t occasionally concerned about what the old warlock could be teaching him - magic, dealmaking, duplicity, and any number of questionable skills. No one could deny that Rumplestiltskin was one of the cleverest people in town, but...
When no one responded to the sound of the bell, David walked slowly around the shop and marveled at how neat and organized everything seemed. Before, there’d been no rhyme or reason that he could see, but since Belle’s arrival (and especially since Henry and Neal had begun working in the shop) it seemed Rumplestiltskin was being forced into a semblance of order. For years the Dark One had answered to no man or woman, but his tiny librarian wife and his son and grandson held him in thrall as if they had magic never before seen.
Where was everyone, anyway? Rumplestiltskin wasn’t usually this lax about customers in his shop. A low sound caught his ear and he walked closer to the doorway of the back room, frowning when he realized that he could hear voices. If they were here, why weren’t they coming out to the front?
He peeked around the edge of the curtain and his eyes widened. Henry was seated on the bench of a spinning wheel, his expression fierce with concentration as he slowly fed wool into the orifice. Rumplestiltskin stood just behind him, and as David watched, he put one hand on Henry’s shoulder and pressed down lightly.
“Relax your shoulders, m’boy,” he said quietly. “You’ll be in an awful lot of pain if you stay so tense.”
Henry took a deep breath and let it out slowly, his shoulders slumping ever so slightly as he followed his grandfather's advice. A moment later, he swore under his breath when a large lump appeared in the yarn on the bobbin. “This is impossible,” he grumbled.
“You were doing well until you lost focus,” Rumplestiltskin said. “Everyone has a difficult time at first.”
“Did you?”
“Of course. This time, relax your right hand a bit and allow the wool to come out smoothly.”
Henry was silent for a little while, concentrating on the slide of wool and the whir of the wheel. Rumplestiltskin appeared to watch the wheel as well, his dark eyes serious and sad. “Can Dad spin?” Henry asked suddenly.
“Ah...no. Your father never learned.”
“Oh.”
Silence reigned in the back room once more, and David considering announcing his presence, but then Henry spoke up again. “Dad said you used to make his clothes.”
“Aye.”
“Could you make me something? Or maybe something for the new baby?”
David glanced up and saw that Rumplestiltskin was wrestling with some very strong emotions. “I - well, I do have something, but...”
“Wait, you made me something? Really?” Henry dropped the carding and jumped to his feet. “Can I see?”
Rumplestiltskin looked as if he didn’t quite know what to do. When Henry raised his eyebrows and asked again, the sorcerer shook his head and approached a trunk near the back of the shop. He pulled something out and approached his grandson, his face wary and uncertain. “You’re a bit old for such things, I’m afraid,” he said, holding out a small bundle of shimmering fabric.
Henry took it and shook it out, and David swallowed against a sudden lump in his throat. It was a blanket, white as snow and shining with golden threads, Henry’s name embroidered in black on one corner.
“ Wow ,” Henry said. “Is that - did you spin the gold?”
“I did.”
“This is amazing.” Henry folded the blanket. “Thanks, Grandpa.”
Rumplestiltskin’s mouth quirked up at the corners. “You’re welcome.”
David stepped back from the curtain, aware that his hands were shaking slightly and his eyes were a little damp. As quietly as he could he strode back across the store and stood by the door; he took a deep breath, swiped at his eyes with one hand, and then opened the door and closed it forcefully. “Gold?” he called. “You here?”
Rumplestiltskin walked out from the back room and raised his eyebrows. “Shepherd,” he said dryly. “Here to rescue the young prince from the lair of the beast?”
David fought the urge to roll his eyes. “Just checking in. It’s almost dinner time and we haven’t seen Henry all day.”
“Ah, yes. I’m afraid the time did rather slip away from us.”
Henry appeared, the blanket tucked under one arm, and grinned at him. “Hi, Grandpa. Wait ‘til you see what Grandpa Gold’s been teaching me!”
“You’ll have to show me later,” David said. “We need to get moving or your grandmother’s going to send out a search party.”
“Okay.” Henry turned to Rumplestiltskin. “Thanks again, Gramps.”
Rumplestiltskin nodded, and Henry darted around David and out the door. David turned to follow him, but his conscience pricked at him and he turned back to the sorcerer, who was still watching him with slightly wary eyes. “You, uh...do you and Belle have plans this evening?”
Rumplestiltskin raised his eyebrows.
“Well, it’s just...we haven’t had you guys over for a...a, uh, family dinner yet, and…”
The Dark One’s eyebrows were now approaching his hairline.
"I mean...if you would like to come over for dinner, that would be…we’d love to have you.”
Rumplestiltskin smirked. “Does her Majesty know you’ve extended this invitation?”
“No,” David admitted.
“Ah. Then I most certainly decline”
“Some other time?” David could feel his face reddening under Rumplestiltskin’s unfathomable stare.
“Perhaps.”
David could feel the tips of his ears burning as he ducked out the door, but he knew he’d done the right thing. He only had to glance at the blanket under Henry’s arm, the golden threads glinting in the sunlight, to remember that.
20 notes
·
View notes
Text
best adjustable sewing table
You possibly can find the best sewing table and display colorful thread in an attention-grabbing approach on the cabinet doors which open up for extra storage. Build a tower, so you possibly can watch folks as they discover their approach by way of the maze. Simple to assemble. Many sewing cabinets require self assembly which may be irritating and difficult at the better of instances. Many sewing tables also have a inbuilt storage space specifically designed for keeping a sewing machine. Lengthier tables will price more money than smaller ones, however don’t overlook the additional room you acquire by making your buy. It provides sewing tables of a wide range of heights, designs, colours and cost. With its multiple constructed-in stitch settings, computerized needle threading, LCD screen show, oversized table, and the spectacular maximum sewing pace at 850 stitches per minute, you may simply get by way of a wide range of initiatives quickly. It'll make an easy for stitching with the help of the LCD show. The heavy gauge steel construction and the 5/eight-inch thick prime make this sewing table very durable. Be sure you get a sewing table that is elbow height and keeps your wrists straight when you are working. It has most of its controls totally automated and may be simply accessed whereas sewing.
Coupled with the ability to choose the fabric being sewn, most sewing tasks could be tackled with confidence, even by novices. It’s easy sufficient for anybody to use, even someone who has by no means quilted or sewn before, however sturdy enough that everyone is going to love the outcomes. Folks who've been unlucky to expertise their machine breaking down found repair companies to be quite costly. I have lots of plans for my future sewing room. I have quite just a few new gadgets in for purses, including some new patterns and kits. Typically talking, the very best place to mount the sunshine is on the LEFT finish of the machine. The parents at the Sewing Machine shop had been SO useful in getting me on a 12-month payment plan. InSinger Quantum Stylist 9960 evaluation, I'll showcase in brief the assorted features of this machine that makes it finest sewing machine for newbies.That is small sewing machine as examine to different sewing machines.
Nevertheless, there are some sewing machines as well that need a customise bobbin, with this, you may search for an computerized winding the best sewing table features which might be unbiased of the actual machine. This extra small floor would also work well for ironing. This Sunbeam machine is finest used for hemming, mending and really fundamental sewing tasks. In case you best sewing table 2019 intend to put up a sewing enterprise, that is the sewing machine table to go for. If you are prepared to choose the next-finish sewing desk and to pay a bit further, go for the pneumatic carry function because this may bring your sewing machine up from its stowaway location with the push of a button. The presser foot must elevate up enough to accommodate thick quilting supplies, too. But first, check your knowledge about machine quilting in the quiz under. In this information, we’ll introduce you to our picks particularly for quilting. These machines are extra expensive than manual and electronic sewing machines. There are also a whopping 37 constructed-in stitches!
As well as, its double thread system ensures extra durable stitches. It comes with the automated threading system. A excessive-pace system has the aptitude to present up to a thousand stitches per minute. It sews like butter, so clean, and the stitches are essentially the most even I’ve seen. Their love is selfless and so they proceed to bless their children, even when they are not there. Vinyl sheets can be found in most crafting shops. Are you with me? If you're in search of a sewing machine that has all the anticipated comforts you’d expect from a trendy piece of technology, with out the added additional options, then the Brother XL2600I is ideal for you. Click on here to take a look at pricing on Amazon and purchase now on the Brother 1034D Serger Machine. Right here we are going to focus on on the professionals and cons of each sewing machine. Get more info about the desk right here. Through the use of the seam width marker on your machine, you will get constant, neat seams. Sewing Table For The Sewing Fanatic My wonderful sixth grade daughter decided that she planned to sew an outfit on her behalf sixth grade promotion. Bless her heart, she chose probably the most difficult sewing patterns that I have seen. Mind you, I am not a seamstress by any stretch from the imagination. I have sewn blankets, pillow cases, simple skirts, or even a grilling apron for my partner (which I think proved pretty nice), but anything beyond these projects is actually away from my realm. When I asked my daughter why she selected a complicated dress rather than a simple skirt her reply was, "Mom, perhaps you have known me to be simple??" I guess not... like mother like daughter. 1. H: universal, all-purpose, general sewing (Singer regular point style 2020) 2. HS: stretch fabrics (Singer ball point style 2045) 3. HSUY: heavy stretch fabrics, elastics 4. HJ: denim (Singer style 2026)

5. HM: delicates, silks, microfibers 6. N: topstitching, novelty threads 7. HE: embroidery, novelty threads (Singer chromium regular point style 2001) 8. HQ: quilting, also piecing 9. RH: basting, long stitches 10. HLL: leather (Singer wedge-point needle style 2032) Singer offers excellent service and support support to everyone sewing machines purchased online or in-store. If you buy the most popular Featherweight II 117, you will receive a lot of free accessories and different stitches. This tiny machine has a built-in carrying handle, built-in accessory storage, snap-on presser feet, and universal presser foot pressure. If you don't have lots of room in your house, the Singer Featherweight II 117 is a good choice. This highly portable machine enjoys tremendous popularity worldwide. Despite its good deal and reduced size, it has a good amount of features that will satisfy both beginners and experienced sewers. The Singer Featherweight II 117 is suitable for patchworkers too. It features four-step buttonholes, zipper foot, straight-stitch foot, button sewing foot, overcasting foot, feed cover plate, horizontal rotary shuttle, buttonhole openers, and screwdrivers. In addition to these convenient features, your machine includes a 25-year limited warranty. Working on the Singer 66 can be a unique experience. The stitches are beautiful and sturdy. The machine doesn't always have a built-in lamp, there is however a good amount of space to incorporate one to the workspace. Most sewers agree that not one other machine occasion to be able to math the intricate attractiveness of the stitches created on these machines. Singer 66 was designed to last, stays put, and may sew gorgeous stitches for generations on a large selection of fabrics.
0 notes
Text
Best Mini Sewing Machines – Top Picks for Cheap, Small Sewing Machines
Mini sewing machines are small lightweight sewing machines that are usually under 5 lbs. and pretty inexpensive. These sewing machines are cheap and very small, which makes them easily portable. Keep in mind that these are meant for very light and simple sewing – we’re talking just a couple layers of fabric. They are not going to be used for any kind of heavy-duty sewing or thick fabrics. Most people use for traveling or just to have a simple machine at home for basic sewing. These might be a good option for a kids sewing machine if you have a child who is interested and you don’t want to spend a lot of money on something they may lose interest in.
Because of the size and cost, a mini sewing machine is not going to have most of the high tech convenience features that a full-size machine will have, though a couple of the machines featured here have a few bells and whistles.
With that said let’s take a look at some top selling mini sewing machines. amzn_assoc_placement = "adunit0"; amzn_assoc_search_bar = "true"; amzn_assoc_tracking_id = "quoforterlif-20"; amzn_assoc_ad_mode = "manual"; amzn_assoc_ad_type = "smart"; amzn_assoc_marketplace = "amazon"; amzn_assoc_region = "US"; amzn_assoc_title = "Top Mini Sewing Machines"; amzn_assoc_linkid = "219e6638f9b1e48adedc878dabb0b8ad"; amzn_assoc_asins = "B06Y2CJMWD,B0151DMY1S,B0021L9322,B00EA08LBG";
Amado Portable Sewing Double Speed Mini Sewing Machine
This mini machine weighs less than 2 pounds so it is definitely tiny. It is the smallest and cheapest of the machines reviewed here and definitely the most simple.
Owners of this machine were pleasantly surprised at the quality of the Amado Portable Sewing Machine and said it does a very good job when sewing even a few layers of fabric.
Features:
Can be run on batteries of plugged into a way.
There is a foot pedal so you can control it manually.
Variable speed options – high and low speed
Comes with an easy-to-read and well laid out manual
Overall this little machine is a great option if you truly want something small and portable yet strong enough to actually do some real sewing. You’re getting a simple machine that does a simple straight stitch.
Michley LSS-505 Lil’ Sew & Sew Multi-Purpose Sewing Machine
This machine weighs a couple pounds more than the previous machine and looks more like a mini small version of a traditional sewing machine. The Michley LSS-505 mini machine has some nice features and costs less than $50.
Features:
8 built-in stitch patterns
Variable speed control
Automatic thread rewind
Includes 2 thread spools, 2 bobbins, needle, threader, foot pedal, and AC adaptor
Like most mini sewing machines this is recommended for basic fabrics and lightweight sewing. If you need to sew thicker fabrics like denim or draperies, or if you need a heavy-duty sewing machine, then this is not a good choice for your needs. It is a good choice if you are truly a beginner and want to try out sewing.
My only concern with this machine is this quality. Many reviewers expressed frustration with the short life of this machine and some wished they had spent just a bit more to get something better.
NEX Sewing Machine Free-Arm Crafting Mending Machine
This mini sewing machine is definitely cute with its white and pink color scheme and it weighs just under 5 lbs. It has some nice features like built-in stitches, a thread cutter, and this is the first of the mini sewing machines in this article that has an automatic buttonhole feature.
Features:
12 built-in stitch patterns
One 4-step automatic buttonhole
Foot pedal and variable speed control
Built-in handle for easy portability
Can be operated of 4 AA batteries
Adjustable stitch length and zigzag width
One reviewer bought this machine when she was looking for a lightweight machine that could be taken on trips and was capable of handling all the normal tasks of clothing construction and be operated with batteries on camping trips. She said she was surprised at how well this machine worked considering its size and weight.
Overall another good choice for an inexpensive basic and small machine. Keep in mind that if you think you might outgrow this machine over time, with just a slightly bigger budget you could still stay under $100 and get a better sewing machine that will last for years as you expand your sewing skills.
Janome Turbo Teal Basic Sewing Machine
This is the first of our mini sewing machines by a well-known major brand. Janome is known for its quality and cutting-edge technology and has machines that can cost over $1,000. This mini sewing machine has the most features of the ones reviewed here and costs the most out of the four, but still respectively under $70.
Features:
Ten stitch options.
Straight, ZigZag, Multi-Stitch ZigZag, Crescent / Scallop Stitches.
Top loading bobbin system with clear cover.
Presser foot with finger guard (perfect for kids)
Left and center needle position.
Adjustable tension.
Reverse lever.
Free arm.
Extra-high presser foot lift.
Push-pull bobbin winder system.
Weighing in at only 5 lbs the Janome Turbo Basic Sewing Machine is easily portable and perfect for sewing on the go. It is pictured here in teal but this model actually comes in over a dozen fun colors, which is also why I reviewed it as a perfect kids sewing machine, but also great for adults who want something in a bright color.
Final Word on Mini Sewing Machines
Overall mini sewing machines are great depending on your need – f you want a simple inexpensive machine to have around the house for mending or other lightweight projects; or if you need something portable that can be operated on batteries; or if you are truly a beginner and want to spend a small amount of money to try sewing.
If you think you’ll be using this often and will outgrow it, you may want to consider spending just a little bit more – even another $30 to $50 would get you a higher quality machine with more features and will last for years. See my reviews for sewing machines under $100 for more information and comparison.
from Sewing Machine Savvy – Best Reviews and Comparisons http://www.sewingmachinesavvy.com/best-mini-sewing-machines-top-picks-for-cheap-small-sewing-machines/
0 notes