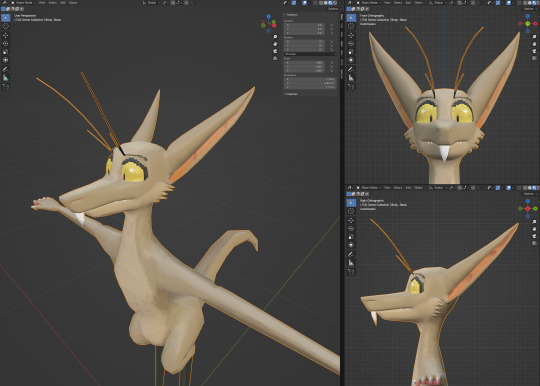
#the animation is using a shape key/blendshape
Explore tagged Tumblr posts
Text
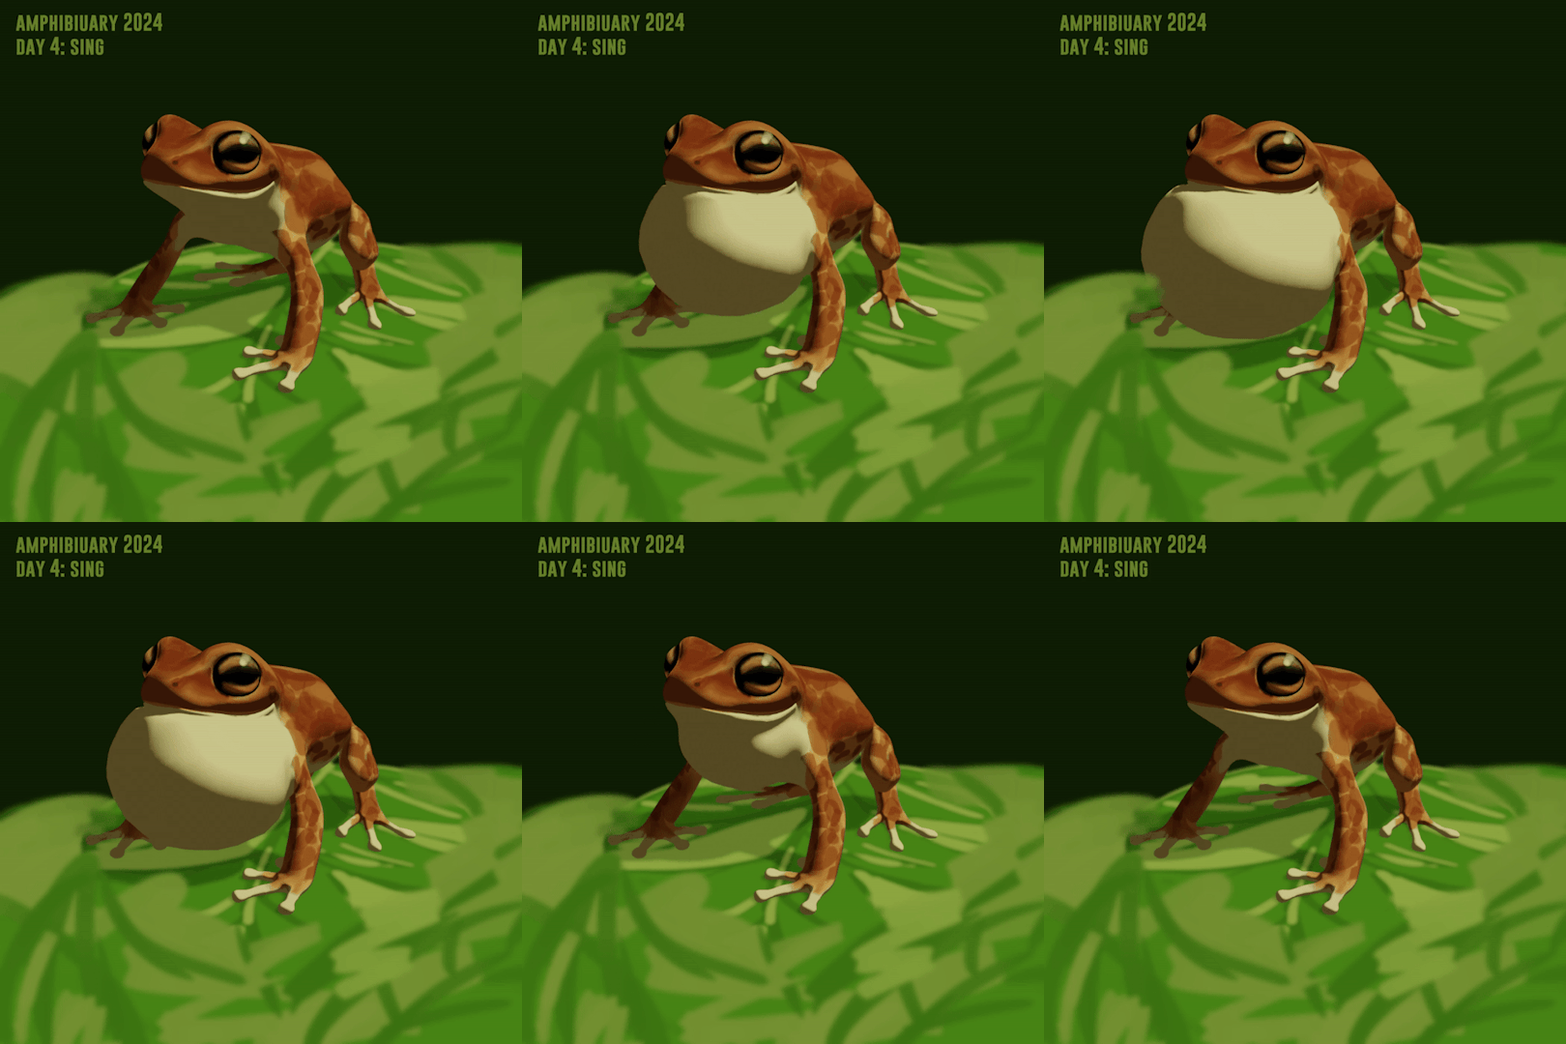
day 1547 and day 4 of amphibiuary prompt list
#amphibian#frog#amphibiuary2024#3d model#moving#animated#video#i tried to post it as a video but i THINK tumblr just ate it so#if you see the exact same post but a video that's why#anyway copying the tags from memory#this was supposed to be a coqui but not sure how succesful it is#thought id do a quick one by just modifying an existing model but nope it's an hour past my bedtime already. drawing would have been faster#the model is from the poison proimpt from last year except i tweaked the proportions a bit#and obviously a new texture#the animation is using a shape key/blendshape#this is blender again mostly because it's way more convenient to texture paint and do materials and render
258 notes
·
View notes
Note
do you have any pointers about how you used 2d textures for blinking/lip sync/expressions in vseeface? i've been trying to find a tutorial for exactly that but i'm having a hard time wording it to get any good searches going. did you make the blendshapes animate over a sprite sheet or something?
Here's a quick run down of what I did:
Add 2 planes in front of the head, one for the eyes and one for the mouth (for extra control you can add a separate plane for each eye too if you'd like). Use a shrinkwrap modifier to make sure they conform to the head as much as possible.

For each mouth and eye texture, duplicate this plane, add the proper textures to them, then move the planes inside the face to hide them.

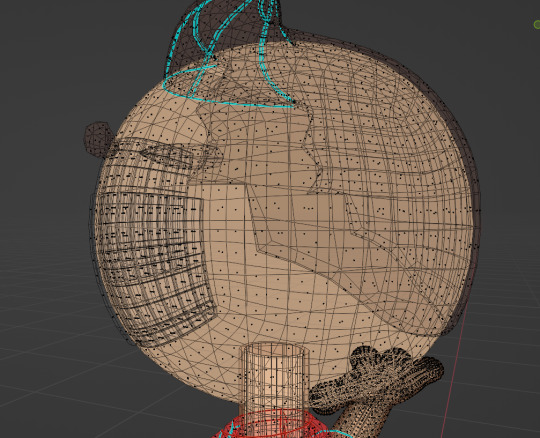
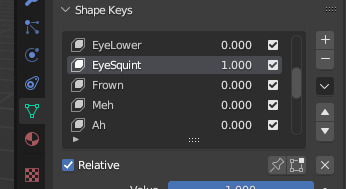
Make a shape key for each individual texture you have (Frown, blink, half lidded eyes, all the lip sync shapes). For the shape key, move the proper plane forward above the face.
For keys like Blink, make sure to move each individual eye texture back further into the head for that key, as it'll help the blink key effect those eye shapes when they're active. Same with the lip sync shapes, move all the closed mouth shapes further back in the head.
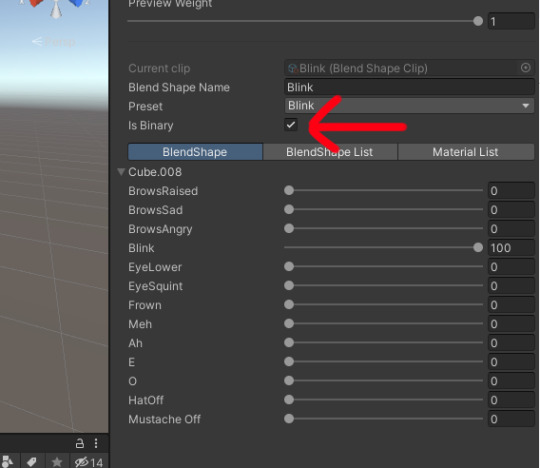
In unity, when setting up the blend shapes, if you want the shape key to SNAP immediately to the new texture without any in between, make sure this checkbox is enabled.
You can also turn down the smoothing for expression in the veesee settings for the avatar.

25 notes
·
View notes
Text
Roadmap post for Pixel Yinglets v0.98
Arr! It's been a couple of weeks, here's a Pixel Yinglets blog post. It can be viewed on my Gumroad page, or after the break.
An important reminder, also! Pixel Yinglets is currently in Early Access pricing, which will raise from $30 to $40 when it hits 1.0. There are two version number updates (each of which are slated to add features) between now and then, so you've got time if you'd like to see how it pans out -- but if you'd prefer not to wait, it can be purchased here.
Hello, everyone! I've been hard at work on a few things, one of which is an update to the model. It'll be a few weeks before 0.98 releases, but I'm committed to working on it routinely until then: I want to get this in its absolute best possible shape before Furality Umbra, and that requires a few additions to the model to make it look and feel a bit more yinglety.
The above screenshot is from the first steps of 0.98's remodeling push: as this is going to be the update that'll also be going on FurHub and VRCArena, the focus here is going to be on model aspects the player's going to see first: the hands, head, and face. What you're seeing here are two important changes: first, nostrils that aren't just a painted-on cluster of pixels, and second, ears that have concave geometry lining up with what you find in the yinglets of Val Salia. This is particularly important, as the previous attempt to articulate the form of the ears through a pixel texture is one of the messiest aspects of the model to date. I still need to make sure this new look plays nice with the customization blendshapes, but I'm very proud of how this looks so far.
I have very charitably been sent a set of three Vive 3.0 trackers, which has brought to the forefront an incentive to recreate more aspects of the Yinglet Experience. Here are a few things I anticipate putting in 0.98:
Remodeled ears, snout, hands, and feet. Already mentioned, bears mentioning again.
Toggleable shirt, dress, shorts, and skirt. Technically the main feature of this update; also bears repeating. Shirt will have a spot for front and back graphics, easily replaceable in the texture.
Cleaned-up pixel texture. I keep noticing minor tweaks I could make, and I'm gonna make 'em! Just you watch!
Toggleable first-person snout. I've tried this out in a different model and it's now a top priority.
Ears (and possibly whiskers) animating to facial expressions. The Out-of-Placers comic has gone into exceptional detail describing and depicting how this is meant to work, and I want to make good on that.
Puppetable tail. I anticipate it being a circle menu option where you can position it with a thumbstick and set it in place. I might not be able to get this fully working for 0.98, but I want players to be able to have their tail lay as flat on the floor as their back, for the noodle-like nature of the yinglet body to be made obvious in that pose. Ideally, when you lay on your side, you should have the ability to see your body from the chest down to tailtip without interruption.
Texture map resize from 512x512 to 4096x4096. Oh, an eye-popping figure! This is not to add fidelity to the pixel aspects, but to instead give myself more room to work. More on this further down in this post.
Elimination of gap between bottoms of tearducts and top of snout. Finally! UGH!
I want to take this opportunity to highlight one of the key traits of where I've always wanted to take this model: I started on this with the intent of having it replace the original yinglet model I used for myself, and for there to be no reason for me to want to switch back to my former main. We're not only not there yet, we're still quite a ways off -- and one of the reasons for that is because of a difference in direction between Pixel Yinglets and the original. For comparison, here's the original in its current state:

Pixel Yinglets is currently more advanced than this, even when you only consider the eyes alone. The original's eye proportions look 'off' (they're spherical compared to the current model's oval shapes), and they're basically headlights with how emissive they are; I'm glad to have improved over those, and those traits won't be changing. The original's eyes do, however, have animating eyelids that move fluidly, as well as the wispy slit-pupil characteristic of a yinglet's eyes. This would be difficult to accomplish with the yinglet model's eyes in their pixelated state, which has me strongly considering for 0.99 making the "pixel" aspect of this either a toggle or a separately uploadable version (maintaining feature parity, that's important) rather than a given aspect of the model: to allow players to swap between pixelated and non-pixelated pupil and eyelid geometry sets, and to in turn also make a version of the body/clothing textures that's in a resolution you expect to see in any other VRChat model. In short: As of the eventual 0.99 update, in addition to Pixel Yinglets, you'll also have access to a featureset and aesthetic look equivalent to if the model package was just called "Yinglets", without any upgrade fees or anything like that.
Anyway, that's where I'm at at the moment. Thanks for your support, everyone! Any thoughts on this, let me know.
7 notes
·
View notes
Text
How to get MMD Lip Sync to work in VRChat
Getting MMD animations to work in vrc is pretty simple but requires you know a few things!
(MMD here is Love ! Snow ! Real Magic, motion by hino and camera by Siva)
First, you need to add MMD shape keys/blendshapes. I use this chart to add them (you do not need everything here! just duplicate your models existing keys and rename them for MMD) You want to make sure you do NOT add an MMD blink (まばたき) if your blink key is already named Blink! It'll just double up the blink

After that, make sure your main mesh with the shape keys is named Body and your armature is named Armature

Onto Unity!
In your rig configuration, to get iris movement you need to have the eye bones assigned

Finally in your FX controller, you need to make sure that every state below your hands layer is Write Defaults On (to be safe, you could just make every state write defaults on)
Most tutorials / avatars already do this but it doesn't hurt to check! You click on the animation boxes and it'll tell you if write defaults is on or off
Changing the write defaults of a state does have a potential to change how your avatars animations behave, be careful!


Now you can go check out MMD worlds and see your lil guy sing and dance :D iy MMD World is the highest quality one, all of the dances have face animations as well. Make sure you always credit the motion creators if you post recordings online and don't use them commercially! They work really hard animating and its a jerk move to not credit. (more people don't credit = more animators request MMD worlds to remove their motions!)
50 notes
·
View notes
Text
Before I worry about character modeling, I might need to experiment with avatar locomotion. So far I've only worked with avatar bases where everything has already been set up for me. The modeling, the bones, the weight painting, the blendshapes. After that I don't know what happens to the avatar. I know if you import it in and copy components over and match import settings with the creator's everything works. Because the animator has already been setup. Sometimes the other layers are set up too, not just using the vrchat humanoid defaults. Kepler kept it simple. But I've seen what those animation trees look like. Mayu's is uniquely complex. Khnfucat is more average I feel, at least for a derived avatar. And then there's the humble kepler that is very easy to breakdown or set up from scratch.
Again I've never messed with full body yet. I don't know what breaks it. I don't know why some avatars work better for fullbody than others. Facetracking it's easy to throw on a vrcft prefab on an avatar that already has all those blendshapes, and if I studied the expressions and was crafty with setting up the shape keys myself, that is completely doable. There are still certain things I don't understand animator wise, like how to disable visemes when running an animation state that affects the face. But I imagine the answer is pretty simple or easy to find with the bases at my disposal.
But legs. Why is it that some avatars completely break when using fbt? What's the difference between an avatar that reverts to crawl animation every time you move an inch vs one that maintains your posture even while moving? What do I need to take into consideration when I rig my own avatar? When would I need to start making changes to the humanoid avatar unity rig. There are parts of the process that is either sitting right in front of me, or I know absolutely nothing about yet because I haven't done it from start to finish yet.
I almost want to test that by either using my existing kepler fbx and building a completely fresh animator with my own animation clips by hand, or taking random non-vrchat model from online somewhere and making it into a vrc avatar so I can study the build up process. It'll be a pain to set up mmd blendshapes, but everything else should still be something I can take care of. I know there aren't too many components that go into a barebones avatar like the varg or kepler. And the kepler only had one animation layer, which was the fx one. With what I know now could I completely rebuild those layers, parameters, menu/params, and animation state trees myself and personalize it?
The more I work on these different parts of the avatar, the more it feels like I'm observing avatar creation under a microscope, and seeing all the finer details of the process even fellow retexture artists like zeno might miss. I'm 70-80% of the way there it feels like to doing things like azuki and cyan does. But I also know their level of expertise is master level in the scope of vrchat. Not only can they build their own base or derive one, they've added all these extra things on top of it and keep producing clothing and other assets too. And I'm right at the tip of the iceberg. Azuki in particular building out these massive blendtrees that are difficult to read if you haven't used blend trees much. Which means any little mistake I've made will be obvious to them and fixable for them like with my kepler tail or the lack of sound delay. If I want to impress or at least be respected in the same breath as them, I have to be able to cover everything. Make every part that is janky right now professional and nice looking.
I'm no longer competing with Zeno and OkamiiYuki. I'm competing with giants. The scope of avatar customization by retexture artists is insanely limited. You can get by knowing very little but being good with substance painter and photoshop programs. The further down the rabbit hole you go the more you see, the more basic everything you were doing just a second before feels like. Because your understanding of the process has expanded. You build more and more of a bird's eye view of the entire process from start to finish. One could easily get by and find respect just doing retextures commissions for people and other basic avatar related unity work for them that's relatively easy for someone who knows vrcfury and a bit of mecanim. But why stop there when you are halfway on the roadmap to see everything.
0 notes
Text
Hello my friends,
Some people have been interested in how I did the 3D Avatar. So this is not a full tutorial but more or less a more detailed explanation.
Ay, let's go! °^°~
I always wanted to do creative stuff with the models from the Detective Conan Wii game. However I have no knowledge on how you rip assets from games. That's why I searched the internet in hope somebody had already done that with this game.
Ripping assets from games means that you take all the stuff that's used inside a game and turn it into a raw file so you can use it outside of the actually game. You can do that with All the 3D-models, pictures, music, different datasets and much more.
While doing my research, I found this site called The Video Game Resource. They have a lot of assets ripped directly from popular games.
After downloading the 3D-Conan file I imported it into a computer program called Blender. Blender is Open Source (free) and you can use it to create awsome stuff in 3D an 2.5 D.
This is how that looks.
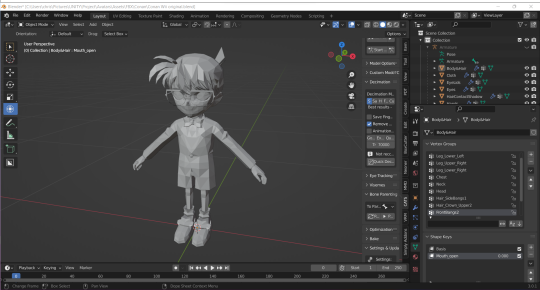
I created the materials and put the original textures on it and boom Conan looks very colorful now!
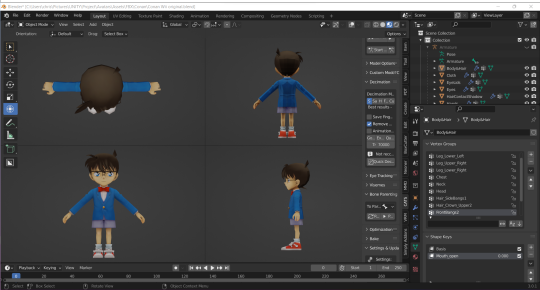
I think he looks great from all the sites!
To make the smol brat move later on, he needs an armature with bones. So I need to rig it.
The model already came with an armature and it was fully rigged. However the avatar format that is used here has a specific standard for 3D-model armatures. Since this wasn't the case here I needed to rig the character from scratch.
It took a while but now it looks like this.
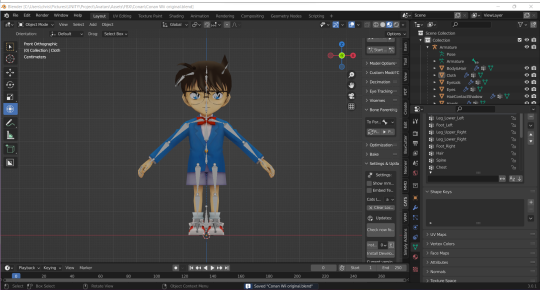
I also upgraded Conans emotionless face by using Shape Keys / Bendshapes just as much as necessary so it keeps the original charm.
Smol baby Conan can now be turned into a 3D-avatar. But wait! This can not be done in Blender, therefore we need a nother computer program the Unity GameEngine!
I created a new project and imported the edited model.
I put the materials with the textures on it and Conan looks all colorful in unity too!

Next is the UniVRM Add-on.
It's a quick install.
Now the Avatar can be exported. After exporting the avatar I needed to be reimported it so I can tweak to my desire. Therefore a VRM have Blendshape Clips. This is mostly used for face animations and props.

Said it, done it! Everything is now tweaked to my desire, so I exported the Avatar again.
Its always good to test the model while working on it. For face tracking with a webcam in desktop mode I use a program called VSeeFace.

To track my hand movements I use a device called Leap Motion Controller.
Now for the best part. VSeeFace has an intern avatar format that extends the vrm Avatar. So I went back to unity and installed the VSF-SDK.
I put some animations on Conan and now he is ready to be exported as a VSF-Avatar.
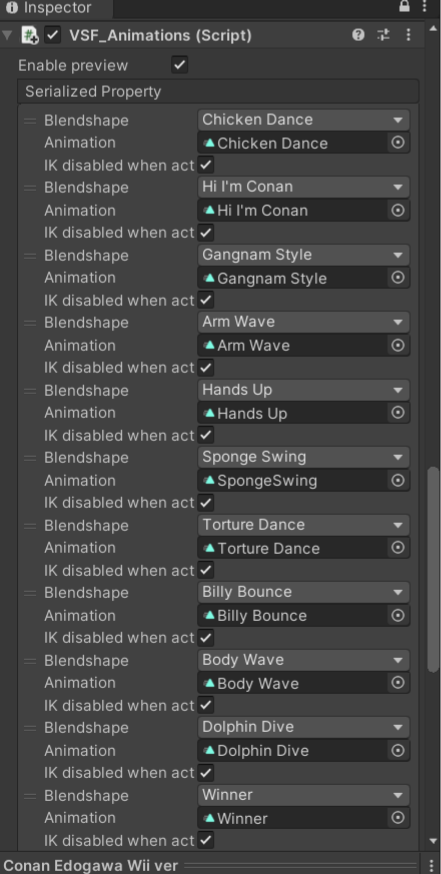
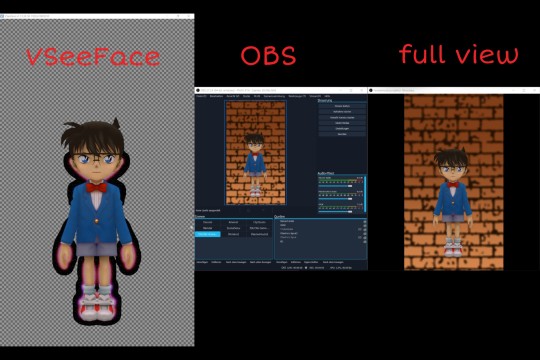
Conan inside the tracking programme is now ready to be used for all kinds of different stuff. Maybe recording some clips with the Open Broadcast Studio (OBS), it can be also used for live streams.
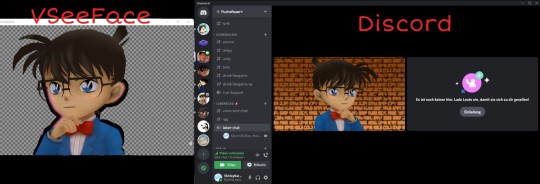
Maybe join a Discord call with your friends.
There is so much you can do with Avatars like this. It's honestly to much to explain everything here. °A•
Thank you for ready this post, I hope it was interesting. If you've got questions I'm happy to answer them! >3<
#名探偵コナン#detective conan#case closed#dcmk#dcmk fanart#fanart#detective conan video games#vtuber#vtube model#vr avatar#dcmk3d
25 notes
·
View notes
Note
Hello! I just found out about your work through sketchfab and I am loving every bit of it, the colors and smooth animations are my favorite part. If you're ok with sharing, could you talk a bit more about how you managed to get the alpaca character's poncho to behave in Unity? I am facing a similar issue with my own character but I've hit a wall because Unity doesn't support blend shapes apparently. Any tips or terminology that will send me on my way would be much appreciated!
Hey so sorry for the late reply, thanks so much for the lovely comment! Its really strange that your blendshapes aren’t working as Unity definitely should allow them to be imported with your animations (I believe it’s supported them since Unity version 4 or something?)
The poncho does indeed use blend shapes, 40 different ones. I tried a few different rigging solutions for the poncho before settling on blends as the most appropriate for the look I wanted to achieve.
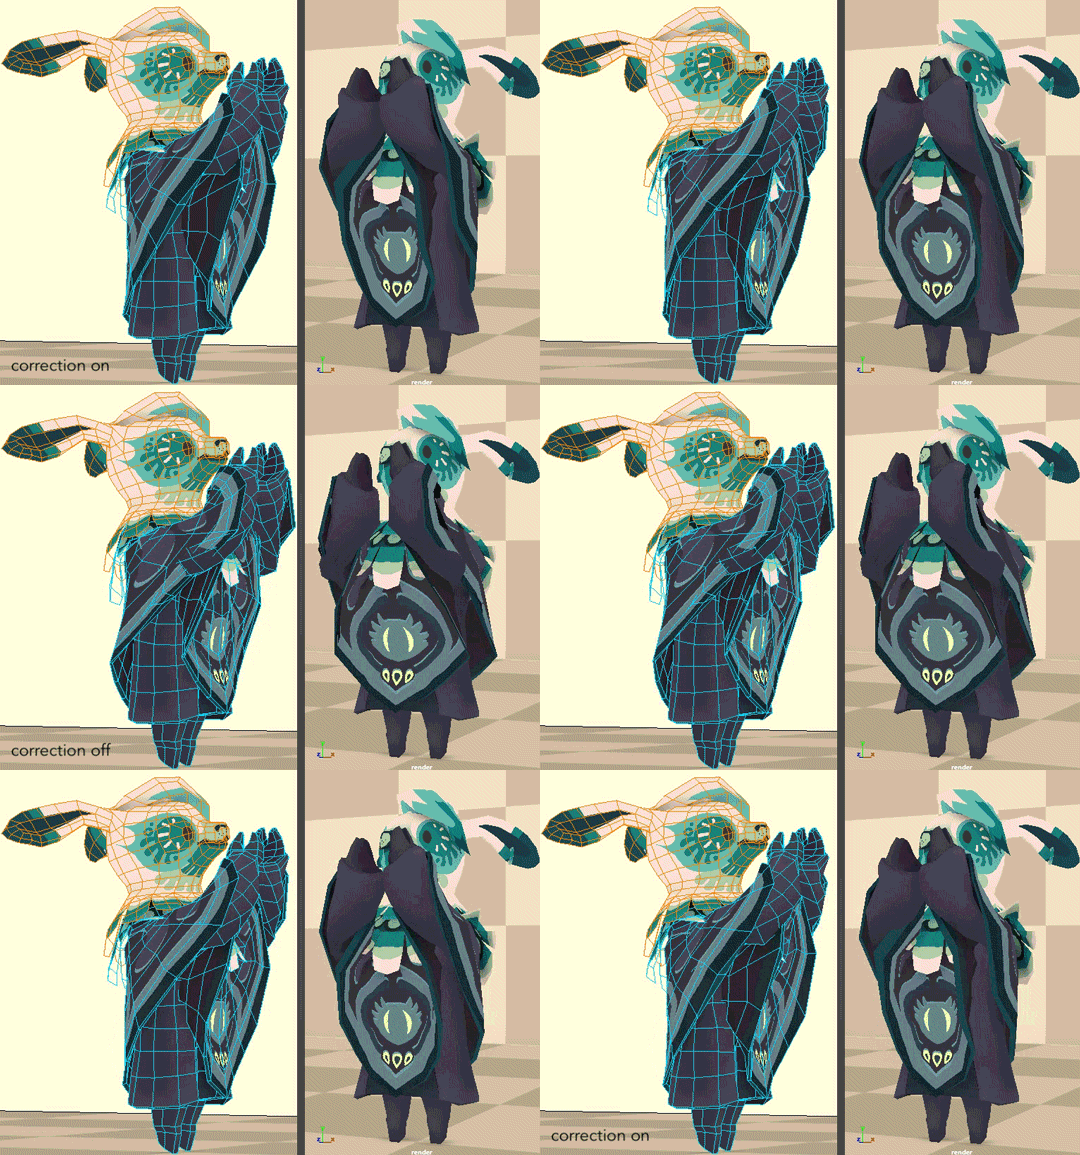
They should work well with your game assets both on their own or in combination with skinned joints. I haven’t exported anything for an engine in a long time so forgive my rustiness but I’ll try to recall how it worked.
If you aren’t handling the blends directly from code you’ll be wanting to making sure they’re actually keyed on top of your animations, or keyed (from 0 to 1, or whatever sections of them you intend on using) on their own.
I’m not sure which software you’re using but there should usually be some sort of option for including blend shapes in the FBX export dialog itself.
I swear there used to be something like that in Maya but I can’t for the life of me find it anymore. While digging around trying to find it I found there’s a new “Game Exporter” under the file menu. Gave it a quick test, so far is way easier to work with compared to the old FBX exporting, I’m totally glad for that!
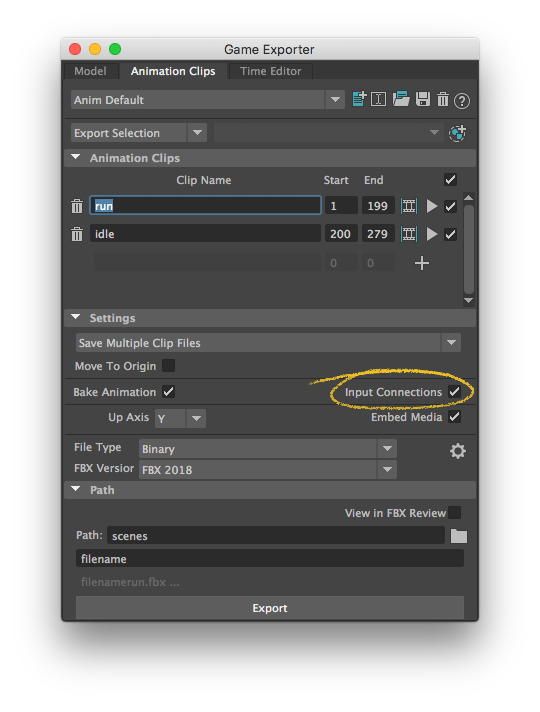
When exporting your animation clips, other than the default settings (which includes having bake animation turned on, I recommend keeping it on) and adding the details for your animation clips, I found that turning on input connections was what I needed to get the blend shapes to successfully export.
From there you can simply drag your .fbx’s into Unity and your blends should work right away as animations without any extra hassle (the "import blends" option was turned on by default in the model import setup window the last time I remember using the engine).
The one other thing I can think of that may be preventing your animations from working with Unity correctly is if you are importing seperate files for your different animations? From memory I think I figured out through trial and error that they all had to be contained within the same file as the model import and split up in the animation section of the asset’s import options within Unity? In testing out the Game Exporter though, that seems to no longer be an issue, hooray!
197 notes
·
View notes
Text
Best Platforms To Create NFT Game

The gaming industry has openly welcomed NFTs. It offers various benefits in the form of proof of ownership, a steady source of income for players, interoperability, value for scarcity, and immutability. A huge user base can be tapped by launching Play-to-Earn (P2E) games. Do you wish to grab this multi-billion dollar opportunity? NFTICALLY, a white-label NFT marketplace solution provider takes a sneak peek at the best platforms to create NFT game.
Unity
It offers a variety of tools to develop NFT games. Later, the games can be deployed to different platforms like mobile, console, desktop, and AR/VR devices. Unity provides 3 subscription plans, Plus, Pro, and Enterprise. The different features include splash screen customization, in-app purchases, cloud diagnostics, on-demand training resources, and round-the-clock technical support. Hence, Unity covers all stages of game development (from concept to commercialization).
Unreal Engine
It is an advanced 3D creation tool. Recently, Unreal Engine 5 was unveiled. It includes Lumen (an illumination solution to create scenes), Nanite (create experiences with geometric detail), and Virtual Shadow Maps. Unreal Engine 5 also offers built-in character and animation tools, UV editing, and a procedural audio engine.
Unreal Engine ticks the right boxes in terms of cross-platform compatibility, freely downloadable, access to the source code, multiplayer framework, and tools to create MetaHumans.
CryEngine
It is a popular game development platform. CryEngine offers an immersive experience for players. The different features available are in-class visuals, AI-based characters, image-based lighting, a multi-layer navigation mesh, audio occlusion, and physical simulations.
Torque3D
It is an open-source 3D game engine. The key highlights of Torque3D are a modern rendering system (with basic and advanced lighting modes), editors (terrain, shape, road and river, material, and GUI), and a physics plug-in system (body dynamics and destructible objects). It also follows a server authoritative networking model to prevent cheating and exploitation of players.
Akeytsu
It is a 3D animation game development platform. Akeytsu offers an exclusive toolset for creating 3D characters and creatures. The advantages include a friendly user interface, an interactive viewport, and flexible controls.
The different tools are Spinner (circular widget), Direct Model Interaction (viewport picking system), Auto Rig (generate characters), and Cameras (create a cinematic experience).
The various features available are a light rig, joint light display, space switching, interactive blendshapes, skin painting, smart cyclemaker, and breakdown pose editor). Animations made with Akestu can also be integrated seamlessly with Unity and Unreal Engine 4.
Conclusion
Amidst soaring interest in Web 3.0, it is the right time to create NFT game and capture the eyes of players across the world. Use any of the above-mentioned platforms and disrupt the market with your state-of-the-art NFT game.
0 notes
Text
The start of rigging!
I started by building the skeleton for Valerie. To reduce any further clippings, I made the Y-axis follow to the next joint in succession. Once the skeleton was set up I made my controls. Most of them were just nurbsCircles but there were some that I needed to make a little more unique.
One of the most important things if the IK/FK switch on the arms. For the arms I had to duplicate the shoulder to wrist so there were three of them I renamed the duplicates FK or IK. I also made a switch control, so the animator can easily flick between the two. I connected all this up using the Node Editor. This was a first for me so I had to go through it a couple of times before I fully understood what I was doing.
For the fingers I wanted to create some preset movements that would be quite common during the course of our animation. I wanted a finger spread and a fist. So what I did was create a group for each individual finger control. I had to do it this way because if I used the Set Drive Key on the controller itself I would no longer be able to keyframe that. It would just revert back to the pose. I then used Set Driven Keys on the IK/FK switch, and added some attributes (Spread and Fist) Once the set driven keys were done I went into the graph editor and adjusted the timings for the fist creation a little bit to make it a more natural movement.
The feet were also something that needed some presets: Heel Twist, Toe Twist, Bank, and a roll. Most of these had to be produced in completely different ways. First of all though I had to create a reverse foot rig, though to make this all possible. I then added the attribute titles to the foot control as it will be easy to find and access at all times.
For the heel twist and toe twist I used the connection editor. I made use that I knew on which axis the heel and toe rotated to rotate left and right. In the connection editor on the left I selected the foot control and then the Heel twist and the rotation axis of the heel joint on the right. I did the same for the toe twist.
For the Bank I had to group the reverse foot joints twice naming one inner bank and the outer outer bank. I then moved them to the middle of the foot and then to either edge of the foot. To connect these to the attribute I had to use the node editor and an array of nodes to connect them up.
For the roll I used the Set Driven Key method. This was because this is a three part movement. For the attribute I chose a float and made it so it had a maximum value of 10 and a minimum value of -10. Using the set driven key I keyed all of the reverse foot joints to 0 when the Roll attribute was at 0. Then when I changed the roll attribute to -10 I made it so the heel was flexed up and keyed the joints. The next value was 5 at which I made it look like she was standing on her toes. Then at 10 I put the foot back to being flat and moved her so she was on the tips of her toes.

Next I moved onto the skinning of the character. I used a variety of ways to make sure the skinning was done properly and didn’t clip. Where major areas needed redoing I used the Weight Painting, but if it was more delicate areas or smaller areas I used the Component editor smooth skin tool to correct the individual vertices.
At this point, as well, we decided that it would probably be for the best to have the shoes and socks skinned with the characters, as they don’t need to flow in the same way as the main clothing. Since I had already skinned the character all I had to do was copy the skin weights of the character across to the socks and shoes. This actually worked surprising well and I only had to perform minor tweaks after.

Then it can to the face. I was debating on what to do here and based off my last project I decided to go more down the joint root rather than blendshape root. I find that this is a little more flexible but it also keeps the file size down as blend shapes increases that massively. So I went ahead and created the joints for that setup. And while I was at it I also created the joints for the hair set up. I used the nurbsCircle again to create the controls for the face. For each face control I grouped them and renamed the group the same as the control it was the parent of and then added _Pose to the end of it. This was so that I could create some preset facial expressions that would still allow me to move the controls as well.


I did have to add some blendshapes in like for the wink of each eye. That was because when I tried to use the joint system the mesh would cut through the eyeball. I also created a breathing blendshape so the stomach and chest would move out and in.
Then I moved onto the skinning of the face. Because I had already set up the skinning of the rest of the body I had to do it in a slightly different way so that they would not lose their weight. I had to go to Edit Influence and then the box on Add Influence where I turned the weight down to 0. This meant the joints were in the skinning system but had not weighted value. I then went used Paint Weights to add these weights on.
One of the things I did have to change after all this was the eyelashes. They had the blendshape on them to match the blinks of the eyes but they were also attached to the right via skinning. This meant that when I moved the head and then tried to use the blink blendshape the eyelashes would go back to the original translation. So I removed the skinning and parented them to the head control which solved this problem.
While I have condensed my explanation of what I have done this did in fact take me about two weeks to full do and check.
0 notes
Photo


By deleting some overlapping mesh and reversing some faces I got the Another aspect I discovered while fixing and experimenting with this was that because the model is created with curves if you don’t delete the history (or at least the curve element of the history) the mesh can be adjusted by adjusting the curves. One application that I can think of for this right now is adding the ability to animate the shape of the mesh without having to use something like blendshapes. It instead can be animated dynamically by keying the points on the curve.
0 notes
Text
Week 6 Summary
30 October - 05 November
• Research Sources
THE SHORT TAKE: TFF INTERVIEW W/ ANIMATOR AND DIRECTOR PATRICK OSBORNE: https://scenester.tv/short-take-tff-interview-w-animator-director-patrick-osborne/
Ponytail Tutorial: https://youtu.be/pYbdvVZQ7hE
Rooster Teeth ‘RWBY’ Tutorial #2: Using Maya’s Set Driven Keys for Easier Animation: https://youtu.be/v3aGLI6yiOE
Rooster Teeth 'RWBY’ Tutorial #6: Corrective Blendshapes: https://youtu.be/vEhHRU7f_Mo
Rigging a Cartoon Character in Maya: https://www.lynda.com/Maya-tutorials/Rigging-Cartoon-Character-Maya/191956-2.html
• Development
I have spent this week rigging and organising the characters to get them ready for animation.
• Strengths
Out of the two characters, Rockland is the stronger out of the characters. Since he has mostly blocky shapes, the weight-painting distribution worked a lot better than it did with Flynn.
I also posed the characters together to see how they looked outside of their own T-poses. Now that they have bones and the ability to pose, they take on a lot more of their own personalities.
• Area for Development
I have hit several areas of difficulties during this process. In a bid to speed up the rigging process by using things I picked up from the tutorials I looked at, I ended up overcomplicating the process and having to do a lot of fixing. As I enter this week coming, I will hopefully finalise the rigging
Especially with Flynn. Since she is a trickier design to get inside of, with her layers of clothes and hair, and her mouth cavity, weight painting has been near-nightmarish.
While all these constant changes in her weight painting have been good practise, I feel that they have set me back a bit. The weight painting might not end up perfect in her, but so long as she works and animates, I will be happy with it.
0 notes
Text
Maya and Mudbox 2017 Review
A new year, the new appear
I have to say, We prefer this new ‘skin'; it gives Maya a lot more a new look. In case you are a Maya user, you'll need the while to readjust in order to the new UI, yet after half an hr or so, you ought to be good to proceed, as well as the particular sound thinking behind the brand new layout should start in order to make sense. For that Softimage users out there that have had to transition in order to Maya, you'll find that will you can now middle-mouse button click any menus to obtain back in order to the last tool utilized within that menu. Because well as for Maya users who never skilled the benefits of this particular simple yet very useful shortcut, now's your opportunity.

Modeling and sculpting Alright, so once I has been accustomed to the brand new appear, I wanted to check out the brand new sculpting brushes that have been applied into Maya from Mudbox. I think they are usually a great addition plus should really help within numerous areas, from producing base meshes, to producing shot fixes and further blendshapes. Especially, they ought to allow artists to prevent out initial concepts prior to dropping them into the dedicated sculpting package. You have also got a choice of base meshes that will you can import in to Maya from the Visor, and the usual choice of Mudbox Stamps plus Alphas at your removal. This is all really positive indeed, but We would have loved the particular opportunity to jump upward and down the neighborhood levels of an item; this would have actually been useful. Also, whenever sculpting on meshes that will are around 1 mil faces or more, this does begin to possess a general effect upon the performance of Maya, and things become the little sluggish. This associated with course could be correct down to my device, but again inside a devoted sculpting package, I possibly could crack away at a design at that resolution plus far higher (say fifteen million faces or so) without bother. Perhaps I am as being a little bit harsh here though, because this is the 1st incarnation from the sculpting tools in Maya, which usually I'm really happy with regard to, and it does punch the Sculpt Geometry Device straight out the package. That being said, I'm still remaining yearning just for that will little bit more. The new Hypershade Now the big point that feels like this has not got the particular applause it deserves offers to be the up-dates towards the Hypershade. This really does seem like this particular is the star associated with the show here. Large improvements happen to be added that will should bring lots associated with pleasure for those dealing with look development in Maya. At this point a person have a fantastic Materials Viewer embedded into the particular Hypershade window, allowing a person to preview your covering networks in real-time. You may also edit the object within the Material Viewer plus switch between an arrears set of IBLs in order to see how your shaders react under different illumination conditions. The Work Region is replaced with the particular Node Editor, and a person can now add extra tabs, making the procedure of focusing on several shaders a much simpler affair. Another plus 1 of many is the particular fact that the Hypershade UI is very easy to customize. You can add plus dock new windows such as the Render View, the particular Outliner, and so upon, into the Hypershade, and for that reason create an interface that will suits your working design.

Animation and rigging Moving on, all of us arrive at animation and rigging. A large push has already been made to really speed up the performance of rigs in Maya. Through Seite an seite Rig evaluation and simply by utilizing the power associated with the GPU as nicely as the CPU, a person can now get rigs that would defy becoming played back in current to do exactly that will, if not faster. This particular does indeed make the difference; one of the particular major benefits is that will animators will no lengthier have to create because many Playblast because these people may have done within the past to acquire a sense of exactly how their animation is moving. This is a large plus, especially in the day and age exactly where shots have to become churned out left, correct and center, and whenever constant revisions are required.

From the UI up-dates, animators and riggers will certainly now find that these people each possess a menus set, each one crafted to their needs. Presently there is also a team of extra Keying equipment which should aid the particular animators available, and with regard to the riggers, we right now have the extremely helpful Delta Mush tool additional to the roster. The particular latter is a wonderful addition, and never only will be it easy to set up and use, it actually did a great work of fixing those bothersome deformation areas, such because under the arms plus round the hips. Bifrost and XGen On best of everything else, all of us have further updates in order to Bifrost and XGen. With regard to the fluid fans, you will be glad to listen to that the new Aero solver continues to become included, so you may create all of the particular atmospheric effects your fluid-loving hearts desire. You'll furthermore discover that Bifrost offers been ‘opened up' therefore you can dive in to each compound and begin editing the parameters in a more granular degree. By no means will be this ICE in Maya yet, but bit simply by bit, it's starting in order to move around in that will direction. For the Hair fans, there is right now a library of hair styles for you in order to pick from (based through the original Fur styles) and tackling feathers offers also been made a lot easier with the capability to use ramps in order to define the shape associated with feathers. To conclude upon Maya, it does really feel like there has already been an enormous heap associated with goodies added. Some associated with them I personally really feel need refining, but presently there are plenty of nicely thought out ideas plus well implemented tools that will have gone into this particular version. So overall, We cannot complain and I am really looking forward in order to getting my hands unsanitary with this particular release. Mudbox up-dates So we'll move upon to Mudbox, where, regrettably, there actually is not a lot to discuss. We right now have new falloff choices to the brushes, the twist feature put in to the Grab brush (useful for putting noses from shape), and they've furthermore included the Relax device (which I've always the new love for within Maya). Everything else appears to be pretty a lot exactly the same. We enjoy using Mudbox within fact it is inexpensive as chips to purchase, so for newcomers who wish to get their hands upon a sculpting package, or even for those looking with regard to an accompanying package in order to Maya, it's there with regard to the taking. However, We really would like in order to view a bit more advancement going into it. ZBrush, without a doubt, offers taken on the sculpting phase and is an excellent animal, but there is simply no reason some simple improvements to Mudbox (for instance, having the ability in order to combine meshes) couldn't become added to improve the particular workflow for people that use it. It actually is sad to discover out another year proceed by with very small improvement made to Mudbox.

Still, hey-ho, let's finish on a high: it can a good year with regard to Maya fans and I am sure there'll be a lot more to come. Maya Score (out of 5): 4. 5/5 Mudbox Score (out of 5): 3/5 Key features:::: Maya 2017 -- New UI - Toning Tools - Modeling Tool set Updates - Hypershade Up-dates - Parallel Rig Evaluation - Aero Solver -- XGen Updates Mudbox 2017 - New Falloff Designs - Twist Feature in order to seize Brush - Unwind Device System requirements: -- Operating-system: Microsoft® Windows® seven (SP1) and Windows® eight. 1, Apple® Mac OS® X 10. 9. five and 10. 10. by, Red Hat® Enterprise Linux® 6. 5 WS, CentOS 6. 5 Linux -- CPU: 64-bit Intel® or even AMD® multi-core processor -- RAM: 4 GB associated with RAM (8GB recommended) -- Disk Space: 4 GIGABYTE of free disk area for install (Maya), one GB of free hard drive space for install (Mudbox) Price: Maya 2017 -- Available from £145 for each month, or £1, one hundred sixty per year Mudbox 2017 - £10 each month
0 notes
Text
Given there are tools that can automate things like weight painting and rigging, not to mention a default humanoid bone rig to start from, I'm not too worried about that part.
My success with creating my own avatar will rely heavily on two things: the depth of my creativity in overall design, and my ability to 3d model bipedal characters. I understand most of the process, on the unity side, on the texturing side, a little on setting up the uvs, I know how to set up an fbx to make things easier in substance painter. I've even done weight painting and adding my own bones and shape keys. So all that's left is my ability to model or come up with an appealing character design. I've kinda decided on creating a wolf. There is a particular dragon wolf that I grew up with when I came up with my sona, and the proportions appealed to me. So I may try to come up with a design around it or try to create a cutesy wolf avatar that has more functionality and clean setup than the regulus.
I also have the option of just using the regulus to derive a character similar to the mayu, but canine. Since that's what Azuki did to the kepler. I could be wrong, but that is strongly likely. But that means I need to make a clean topology and functional avatar that rivals the mayu if I really want to make my mark.
The bigger thing to be afraid of is future implications. Socially I might have to set up a discord server and start managing a large scale group server. I might have to set up meetups. I might have to interact with people who need help setting up. I might be asked questions about the avatar I don't know how to answer. More and more people might try to join me whenever I'm blue or green in vrc, even orange. I might have to constantly keep the avatar up to date. I might have to set up face tracking. I might have to deal with full body tracking issues, which I currently have no way to test.
For now I need to know modeling. But maintenance, social changes, fbt, and facetracking are the main things I will need to worry about if I pull this off. To start, I could do what Lone did and just make the avatar for myself. Then I can worry about making it open to the public later.
Also to add to things I will need to model the avatar twice. Unless I plan on making the quest model the pc model, I need a high poly version and a low poly version of the character. Guesstimation 30k tris for quest and 60k for pc. I've seen a retopology tutorial before. Not sure if it's easier to make a low poly from a hi poly versus the other way around. But I need to master modeling in general.
I will need to make the respective viseme blendshapes, and other common ones. They're all in japanese names, so I'm not sure what they mean. But I assume they're important for mmd worlds at least. And I will need to model in a way that makes changing the face shapes like that possible and not a hassle. So that's where all the difficulty level is going to be. It's all the blender work, not the texturing. Not the unity side of things or the animator, though the animator is it's own beast. But one I'm somewhat familiar with. And yeah, let's see how this goes.
If I pull this off and the avatar is a success, I will have a source of revenue, and every asset that I make for it such as clothing, hair, etc. will also be potential sources of revenue.
And I do need to worry about the bones to some extent. Even if I can automate part of it, it's not gonna cover everything. It was a bit of a struggle to add the nose bone to the kepler. As much as it was a struggle to make bones for the coat straps and it wasn't perfect. Or bones for the long sleeved shirt I made. But this is a challenge I want to tackle. I think it'd be fun. And ironically it's easier than trying to make a world from my current pool of knowledge. And pulling off miracles like this makes a great bandage for trauma centered around posturing a gaslighter. Vrchat is where I'll build myself.
0 notes
Text
Some of the additions I'm making don't need to be a control. Like the thick tail didn't need to be a blendshape for example. But from a learning perspective these are good skills to perfect. And from an avatar creator perspective, making added features for an avatar is part of what makes an avatar base appealing. Like even if I'm not using all of the Mayu's features or the khnfucat's, it's still good to have, some people use it. It can get in the way of adding new stuff to it, but that's why Cyan had multiple versions of the khnfucat with some of those features stripped. And if I do make my own base, that's what I'm going to do. There will be a stripped version that other avatar creators can add to, and the featured one most people will use instead. And while I am taking very small steps towards the actual process of making a base from the ground up, I have touched on many areas of the process already. Modeling, animating, shape keys, substance painter, animation clips, vrcfury, understanding the settings in the avatar descriptor, physbones, contact senders and receivers, visemes, expressions menu and parameters asset, mastering the animator, weight painting and bones. The more and more I understand parts of the process, the better I will see the workflow as a whole. And the more possible it will seem when I finally decide to do it. Until then I will keep showing my mastery of parts of the process.
0 notes
Text
MAYA Tutorials 2.5
Notes taken from An Essential Introduction to Maya Character Rigging by Cheryl Cabrera
Regularly delete history before you make big changes in the model
Do not combine any accessories to your model, such as hats or ties
Once you mirror, check your normals to verify their position [display > polygons > face normals]
Deleting history on geometry after adding blend shape deformers will delete the blendshape deformers
[Edit Deformers > Bake Topology to Targets]
Using this will allow the base shape to be changes and for the blend shapes to change with it
Phong shader is good for eyeballs
You can paint directly onto your model with the 3D Paint Tool (this might come in use for set building)
Make texture maps within the binary system (128, 256, 512, 1024, 2048)
IK spline solver in the spine
Bind Skin Options suggested by the book
Bind to: selected joints
Bind method: closest in hierarchy
Max influence: 3
[edit – delete by type – non-deformer history to delete history but preserve blendshapes]
Component Editor to help work the influences out
[skin – edit smooth skin – smooth skin weights] – to fix faulty areas which can then be adjusted further with weight painting
The book also has a section on how to make a character ‘breath’ which I would like to try and implement in Flynn as she needs to be presented more human than Rockland. This involves set driven keys and expressions, which are the more technical side of animation.
0 notes