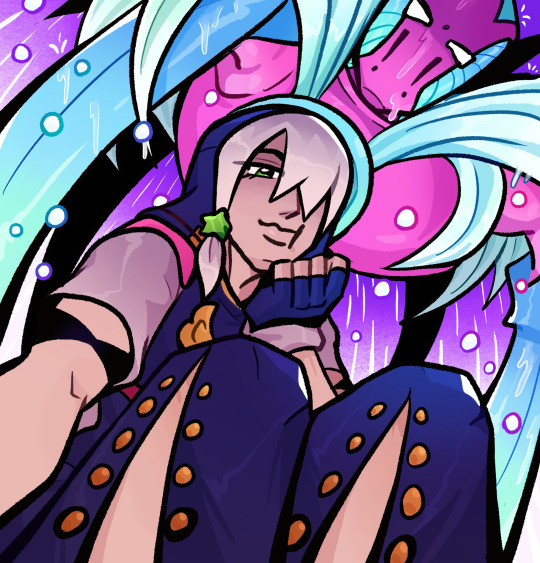
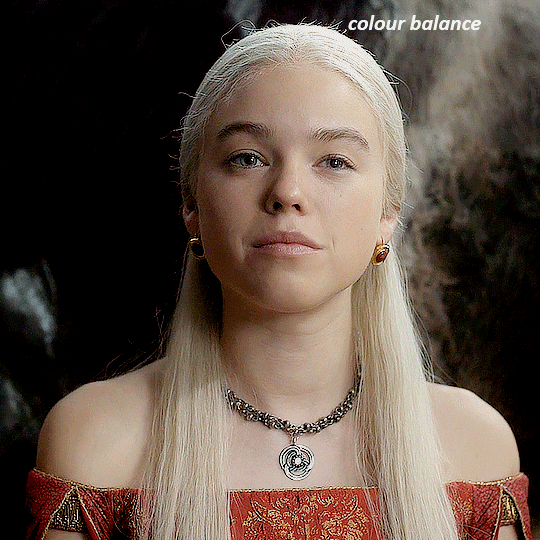
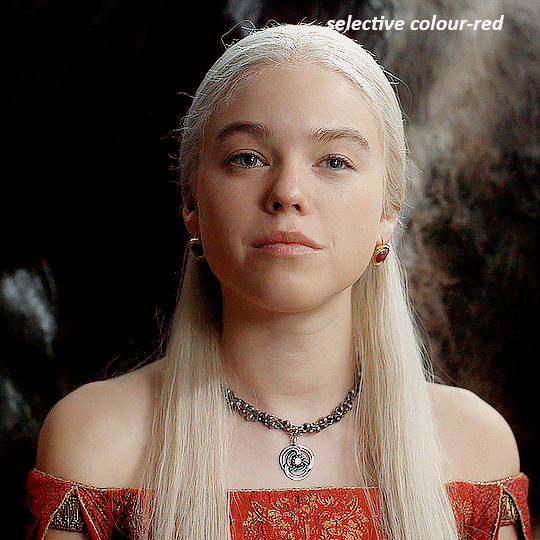
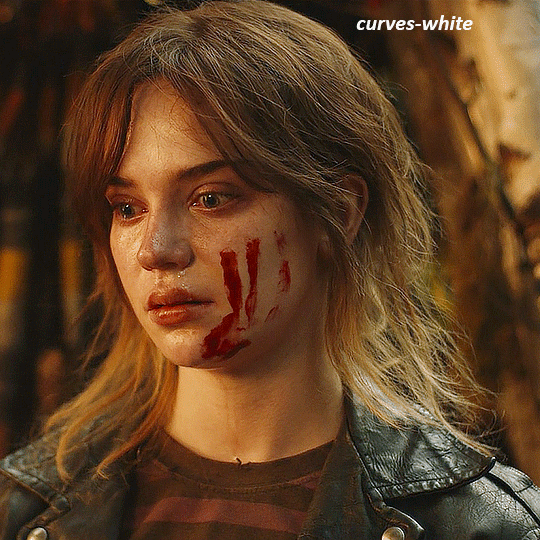
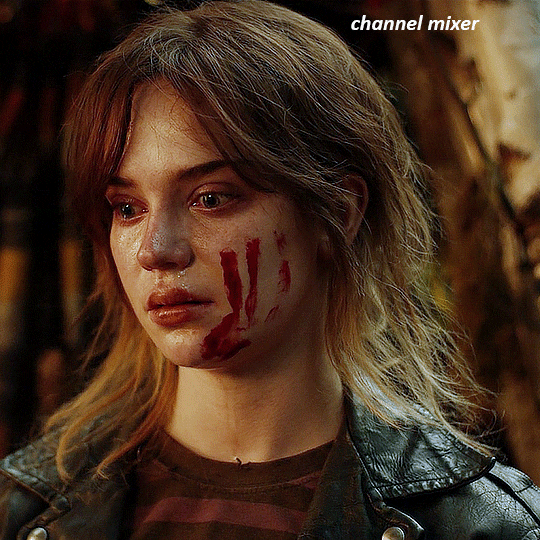
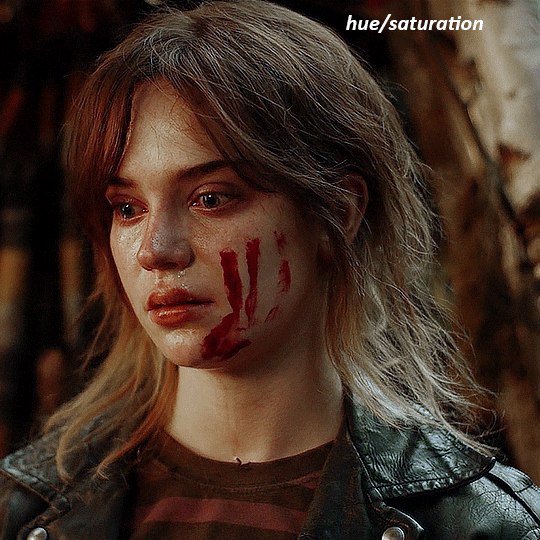
#the colours look so saturated here...
Explore tagged Tumblr posts
Visit Tumblr Blog
Explore Tumblr blogs with no restrictions, modern design and the best experience.
Last Seen Tumblr Blogs


Fun Fact
There are dozens of funny blogs to kill time on Tumblr.
Text
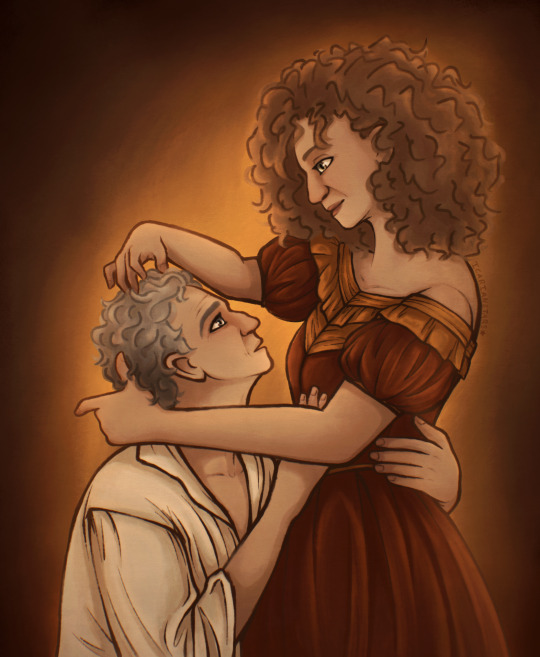
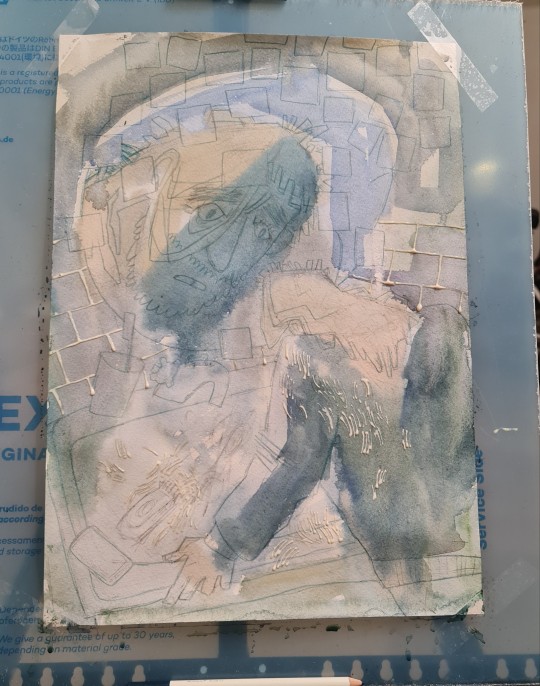
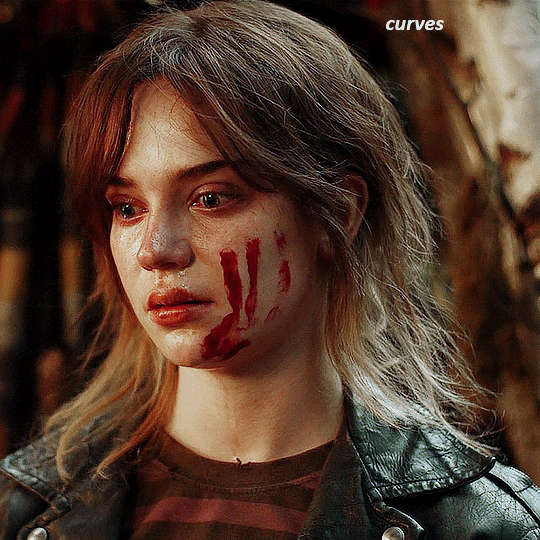
Twiver in the 1840s <3
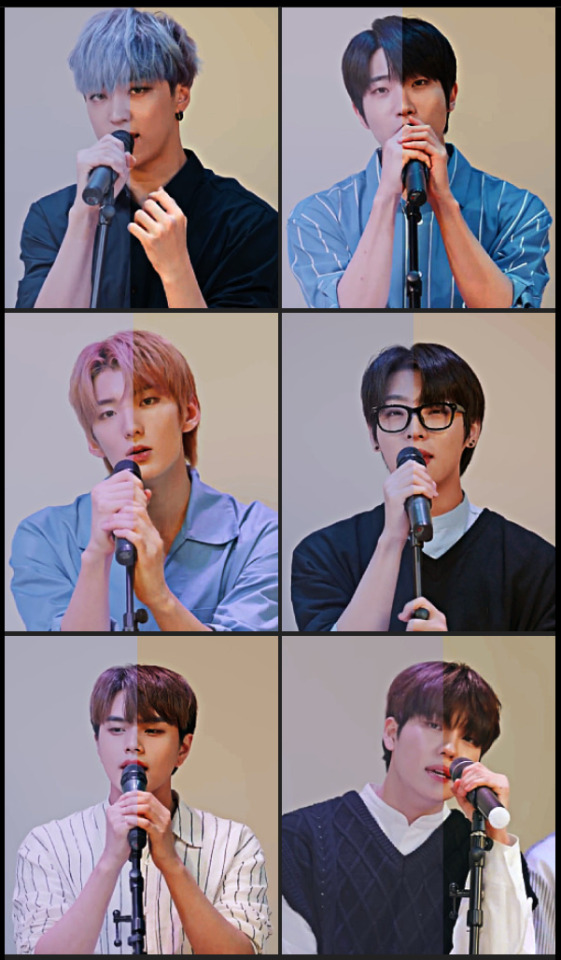
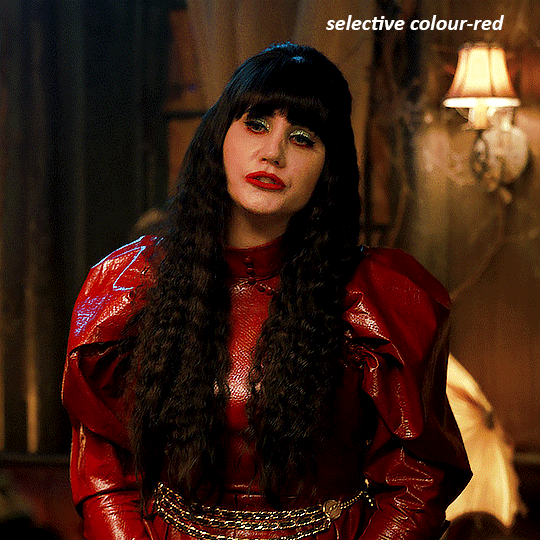
#so I know I said I was going to post this like a week ago but uh…#basically I forgot#it’s here now though!#also how saturated is it for you cause it looks pretty good on my ipad but colours look really dull on my phone#doctorriver#twiver#doctor who fanart#doctorriver fanart#twiver fanart#river song#river song fanart#twelfth doctor#12th doctor#twelfth doctor fanart#12th doctor fanart#my art
127 notes
·
View notes
Note
Shueisha color teasers dropped! thoughts on the pallettes?
Okay quick rundown of what I think!

I think Jodio and Dragona look the best, I’m glad they kept Jodio’s colours, and Dragona looks more or less what I expected!
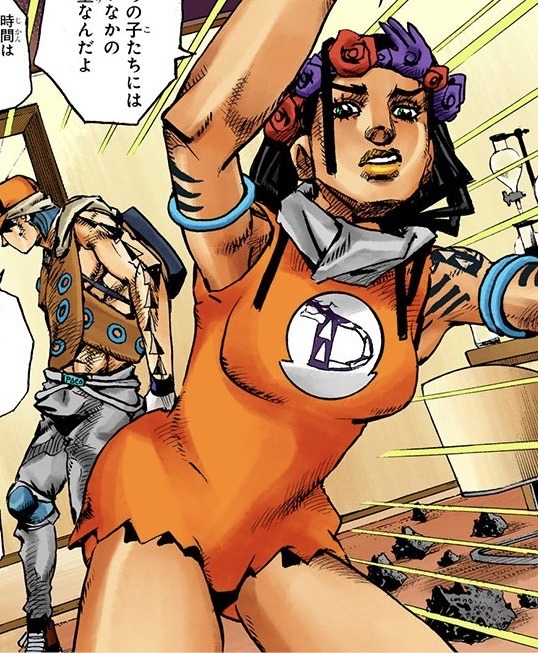


Though I’m not in love with the orange outfit for dragona, I think green or purple would have looked way better! Paco is fine, though I think his hair should have been a dirty blonde.
And I’m so sorry Usagi enjoyers, he’s a lost cause, they made him tingle. They feared to let him slay, they debuffed him. It almost looks alright but then they made the hat neon blue,,, should of been at least red to at least compliment just a lil

I think everyone else’s colours are fine! Though kinda just standard, and I do love November rain, I won with him having blue!! (Looks like weather report which is super cool)
Tbh I can get use to these colours, EVEN though I’ll probably still use the colour palettes I’ve been using, not like Shueisha colours are canon, It’s disappointing they just used palettes from certain Araki paintings over trying to make their own decisions on palettes
Jodio is fine, seeing Araki used it multiple times so it feels like that is what Jodio is supposed to look like, but taking from a painting where the whole point is to be one certain colour scheme, where everyone matches (Araki does these types of paintings a lot) feels somewhat misguided and will make Dragona, Paco and Usagi blend together and while Jodio will stand out.
I feel like there should be more variety of colours amongst the group, similar to how Golden Winds cast are all defined by one colour. I felt like it was too soon to give them colours, but again maybe I’ll warm up to them,
Definitely still using my own palettes whenever I feel like drawing them again🩵🩵🩵
#ask reply#not a short post at all I’m so sorry#I HAD MANY thoughts#they aren’t terrible but they aren’t great either#besides jodio and dragona#I’m so glad they actually made dragona brown over white washing em 😭#I think just for that we won#dragona enjoyers can rest easy#also like I didn’t show it here but some coloured pages look really bad#like too saturated and too much airbrushing#I don’t even think the manga looks that bad but recent pages are ridiculous
369 notes
·
View notes
Text
i still need to figure out a clasp but these necklaces are done:


new skill unlocked. thank you Beading Time tutorial <3
#i was going to buy clasps but they only sold…half of the system#i originally bought these for an embroidery project and had lots left over#aboit a year later i tried to use the beads makingn necklaces#ran out of beads so i bought more from the same place and…motherfuckers#the manufacturer changed the saturation of the colour of the beads#which ticks me off#it’s more visible in the photo of the purple (compare central vs edges) but in person the red is woefully different#(it even…stained the thread pink. which i’m sure isn’t supposed to happen)#i could’ve had more of the nevklace in og purple if i’d made it as wide as the red but i wanted it thicker#anyway i uave another one with smaller Actual Glass beads in progress#and one i am trying to figure out with seed beads in Fake Silver Colour which should turn out nice#no idea how imma do clasps here tho#randomness#look i made stuff
25 notes
·
View notes
Text

Bellara Lutare in Dragon Age: The Veilguard (2024)
#bellara#bellara lutare#dragon age#dragon age the veilguard#datv spoilers#photo#fan photo#belovedbellara#so it's pretty much the same photo#buuuuuut I played with the colouring a bit#does it look better?#the other one was like saturation highest in photo mode#and I think her ear jewelry stands out better here
13 notes
·
View notes
Text

"You slow down time"

"In your golden hour"
#sometimes i remember shes not real and i have to take a minute to mourn#wasnt going to post this since it was just painting practice (i did not end up painting) but then i ended up liking it so over here it goes#as long as nobody looks too hard at the lighting were good#love procrastinating on my drawings of ortega by. *checks notes* drawing ortega#however i Hate the colour difference between my tablet and my computer. i had to bump up the brightness and saturation on my laptop after i#-finished colouring. hell earth#fhr#ortega#pulp draws#edit: gods CRUNCHIEST quality holy shit#tumblr im strangling you
14 notes
·
View notes
Text
go silly hahaha
#there are some great mic skins on the skindex but i feel bad using them#like cmon im a professional mic enjoyer I can do this myself#so here's kinda eh Loudspeaker skin#if anyone can do better go for it#the leather looks way too blue bc i didnt realise the colour wheel was like#flipped on the saturation thing#so my slightly blue grey ended up Blue.#and i didnt realise until it was too late#trying to get back into playing minecraft but i am terrible at it#my minecraft phase was about 8 years ago#a lot has been added since then#bnha#loudspeaker au
43 notes
·
View notes
Text
I looooOOOVE your style!! And I love the media you made this with- is it painted?? The gradient and texture on Grian's sweater and trousers especially is SO eye-catching. And I love their soulmate heart connection :") Even if there's something a little off about Grian's heart (infected....)
The inset drawing with Grian and the gore is also sooo well done. I love when we get to see the darker bits of what being infected entails, and how Grian views himself.
This is so awesome. I love seeing the TAMN boys, it makes me so so happy :') thank you so much!!! <3 <3 - 🔒

For some reason I only want to draw them on paper and nothing else after the episode where they were drawn at camp <3 (There Are Monsters Nearby by uhohbestie)
below is an uncensored version

#TAMN fanart#sooo cool ahahaHAAAAA#OH GRIAN#THE CHANGE'S BEEN ROUGH ON YOU EH?#I love your style this is incredibly pretty#I especially like the way you've done the colours here with the mix been saturated and unsaturated#THEY LOOK SO GOOD TOGETHERRR RAAAAAAAGHHH#-- Key 🔑
120 notes
·
View notes
Text
I Do
Sylus x reader


✧ The day that he’s been waiting for has finally arrived
Content: Sylus x fem!reader, fluff, marriage, emotional sylus
A/N: Saw a post on twitter saying Sylus would be a misty eyed groom and I cried. So here we are. There will also be a part 2 with the honeymoon ofc! Also not proofread because I need to get ready for school !

The feeling in Sylus’ chest was unlike something he’s experienced before, it was indescribable.
Though his life has always been filled with chaos and riches, it felt bland whenever he would think back to the past before he met you. His world was unexpectedly dull before you had made an appearance. The dreary days bled into each other and the somber red of the N109 zone mocked him on the daily.
There was a gap in his life that only you could fill. Once you appeared it felt as if a brush with vibrant water colours has painted over his life. The days no longer bled into each other, instead he woke up every day with a purpose. To talk to you. The moon of the N109 zone became a saturated vermillion whenever you were around and he was able to find joy even the small things in life. He no longer cared about the material riches because to him, you were his proudest treasure.
Truly, he never thought a day like this would come. The powerful boss of Onychinus standing at an alter dressed in a white suit waiting for his beloved at the other end of the isle. At the end of the isle you stood in all of your glory. The way the white dress fabric was draped over your body made you look like the most beautiful greek sculpture that anyone could ever create.
The bouquet of roses that you held in your hands stood out against the backdrop of your white dress. You had stated how much you adored roses because they matched the ruby colour of his eyes. You were walking down the aisle with a part of him in your hands.
The organists fingers moved and the notes of ‘Here comes the bride’ began to fill the room. Step after step you approached your soon to be husband at the other side of the aisle way. He couldn’t stop starring, it was as if you were the only other person in the world at this very moment. The room full of people being completely drowned out by your shining beauty.
Sylus was not an emotional person by any means, many people believed he simply didn’t possess any emotions at all and sometimes he believed that was true. But that thought was put to an end the moment his eyes became misty as you approached him.
There you both stood across from eachother at the alter. Your smile was radiant as you stood across from him. He’s never seen something like it. If only he could capture this moment in his eyes forever.
The officiant began to speak as you both stood at the front hand in hand. The rings were presented to you both.
“Do you take this woman to be your wedded wife?” Asked the officiant.
“I do.” Responded Sylus.
“And do you take the man to be your wedded husband?”
“I do.” You stated with the most glorious smile on your face.
At the same time you both slipped the rings on each others fingers. Each ring consisted of half a red jewel. Together you both completed the jewel. You were both two half’s of a whole, two souls being bound togehter.
And finally, finally, the words were said.
“You may now kiss the bride.”
Cupping your face, Sylus leaned in for the kiss. Your lips connected and it felt as if a new spark was being born. You both could feel each other smile into the kiss. It was passionate and full of love. Pure, undying love.
“It is with great honor and delight that I present to you Mr. and Mrs. Qin.”
Sylus never knew that he could feel happier than when you said yes to his proposal. But here he was now hand in hand with his wife. Mrs Qin.
Forever you were his and he was yours.
His wife. His beloved.
#love and deepspace#lads#sylus#love and deepspace fanfic#lads fanfic#love and deepspace drabble#lads drabble#sylus x reader#sylus x you#sylus fluff#love and deepspace x you#lads x you#sylus lads#sylus love and deepspace
2K notes
·
View notes
Text
hell of my own making (determination to gif kingdom)
#speaking.txt#the colouring looks fine on my laptop but idk how i feel abt it on mobile but also idk if i should optimize for both mobile and laptop -_-#looks a lil darker and more saturated on my phone compared to my laptop and the laptop version is better augh#also ivan isn't in this image 1. cuz I couldn't fit the gif in the ss i took and 2. i still dont know if i like how it came out#the gods cursed me with horrible stubbornness tho i should've given up on this days ago yet here i am. still working on it 👍#also im trying to make myself more comfortable making posts on this account so if i post incessantly that's why 👍👍
0 notes
Note
EUAGHSHGHHHH
OUOUISYSHAAGUIIUIAGEHEHGGH JULI

Gah. Okay. I'm good. I'm totally cool and normal about this buT LOOK AT MY CHILDREN!! ALSO I DROPPED THE LAST ACTUAL SIBLINGS REF DOODLE LIKE TODAY HOW ARE YOU SO FAST AT ART?? *EXPLODES*
You have so many Knuxouge children ahhhh
Drawing challenge! Draw some with other Knuxouge fankids! Only if you want lmao
Ohhh I wanted to do this so badly because I love my knuxouge kids even if I don't have any references for them yet, but art isn't art-ing so uhh... I only have this doodle

Crysta and Rocky ... my beloved children ...🥺💕💞💕🥺💕💞
Ula and Mak by @thesafireartist
#CRAWLS OUT OF THE ASH#I LIVE#OKAY#CHILL BOI MAK!!#side note I love how you draw echidnas#HIS QUILLS! THEY LOOK EXACTLY LIKE HOW I IMAGINED THEM!!#OURPLE EYES#side side note I love your brush#ECHIDNA TAIL!!!#AND CRYSTA AND ROCKY LOOK SO FRIKIN COOL!#I haven't really analyzed their designs before but here we freaking go#I love the little floor to make Knuckles' crescent ToT#side side SIDE note the way you draw bat ears IS SO AESTHETIC#kneepads! I think Lula would get along great with rocky#earringsssssssssssssssss I love crysta#colour pops with bandaids!#asymmetric but balanced wraps!#LITTLE HEART BAT NOSE I LOVE WHEN PEOPLE DRAW THAT#also pfft yeah they are very saturated#AND DON'T YOU WORRY I HAVE GEMMA ART COMING YOUR WAY#and and yeah. knuxouge twins rule#SIDE SIDE SIDE SIDE NOTE THE WAY YOU COMPOSE YOUR PIECES!!#THE BALANCE WITH CRYSTA'S WING!!#OKAY THE ART STUDENT IN ME AS COME BACK IMMA GO NOW BUT I LOVE YOUR ART AS ALWAYS JULI!!<3333333#gifts for me!!! <3#crysta the bat#rocky the bat#ula the echidna#mak the echidna#chaos kids au
43 notes
·
View notes
Text

THE WALLS ; JJ MAYBANK

SYNOPSIS ; when an unknown face appears in the outer banks searching for a father she's never met, she's unaware of how her life is about to be completely turned upside down.
WARNINGS ; jjmaybank x routledge!reader, strong language, depictions of violence, afab!reader, sexual content, mentions of abuse, drug and alcohol consumption, strangers to lovers, fast burn to slow burn, canon adjacent, not proofread.
AUTHORS NOTE ; buckle up pookies, as this is merely part one of a multi-part fic that spans as far as the end of season three ( on the fence about season four but we will see ). as noted above, this fic will be canon adjacent, mainly focusing on the storyline as portrayed in the outer banks chapters of the 'netflix stories' mobile app. without any more of my yapping, i hope you all enjoy!
you can't help but squint once you step off the bus, your dollar store sunglasses doing very little to shield your eyes from the burning, outer banks sun. you bring your hand up in an attempt to further protect your eyes, needing to make your way to the seahorse hotel and fast.
a flash of long, blonde hair invades your vision, something you don't think twice about until the body attached to said hair knocks right into you, saturating your white tank top with her oversized cherry-coloured drink.
there's a beat of silence between both of you, behind darkened lenses your eyes bore into the girl before you. if looks could kill.
"shit! i am so sorry!" the blonde apologises, face turning as red as the newfound stain on your shirt. her hand darts out in an attempt to miraculously wipe the stain away "oh god, this is so embarrassing."
a part of you feels empathetic, it was an easy mistake to make in hindsight. another part of you wanted to push past the girl and continue getting on with your day.
"my name is sarah," she continues rambling, her hand still frequently scrubbing at the stain, making it worse "i didn't get your name, well no shit" the last part is barely a mumble, but you still catch it.
an unintentional laugh escapes you, finding amusement in her panicked awkwardness "if i tell you will you stop feeling me up?"
it was a joke, at least mostly, yet sarah froze in horror as the realisation set in. she was feeling up a stranger at the bus stop.
before she can begin rambling again, you speak up "my name is y/n." purposefully, you drop the surname. sure, sarah seemed sweet, but that didn't warrant spilling your life story at her feet.
sarah nodded in acknowledgement, taking a step out of your personal space and taking a proper look at you "touron?"
your face screws up, it feels like she just called you a name you couldn't repeat "excuse me?"
"you're a tourist, right?" sarah clarified, gesturing towards the scruffy backpack hanging from your shoulder.
"not quite," you trail off, unsure of how to broach your new arrival without dropping yourself in hot water "just, in town for a while."
"unlucky you.."
"unlucky how?"
sarah links her arm through yours, all but dragging you down the street alongside her "i'll fill you in on the way."
your protests and kidnapping allegations fell on deaf ears, only being told to stop being dramatic as she dragged you along. eventually, the dragging falls back into you willingly walking with her through pristine neighbourhoods that housed buildings like nothing you had ever seen.
you listened as sarah explained the outlandish rules that accompanied living on the island. the outer banks were essentially split in half, the kooks and the pouges, the haves and the have-nots, the sarahs and the y/ns.
when her pace eventually stalls, you have to tense your jaw to stop your mouth from falling open. you had seen some serious houses on the way here, but compared to sarahs they looked like dives.
"welcome to tanneyhill" sarah beams, but you can feel the uncertainty bubbling inside her as if she was embarrassed "come on, i'll show you my room."
you follow her through the glass doors and into the manor, eyes intently scanning the walls as you climb the staircase "you make a habit of bringing random strangers into your house?"
"do you make a habit of going home with random strangers?"
"depends if they're my type."
your quick rebuttal elicits a laugh from sarah as she pushes the door open, waving you into her room and heading straight for the closet "and what is your type?"
"you sweet on me, stranger?" you tease, your playful tone making it clear you were simply messing with her.
"with my whole heart, newbie" she laughs, the contents of her closet being dropped to the floor as she rifled through it "but our secret love affair must remain hidden as i am a taken lady"
with a dramatic gasp, you slap your hand to your chest and fall back on the bed "you wound me."
"sarah 'the heartbreaker' cameron is what they call me." as you're processing her surname, a white cropped tank is flung at you from the opposite side of the room "now, come on, boy talk"
"what if i wanna girl talk?" you question, holding the piece of fabric up to examine it "sarah 'the homophobe' cameron more like"
as she crosses the room to sit alongside you, sarah rolls her eyes "my sincerest apologies, sex talk then"
"cameron now i really think you want me." you wiggle your eyebrows at her, huffing when she hits you with a pink pillow with a sparkly 's' "hey! watch the rhinestones"
"you know, i was gonna try play matchmaker at the boneyard tonight but if you wanna be like that.."
"you just said a lot of words with very little meaning" you tut, not fully clued in on the outer banks slang.
by now you have risen to your feet, standing between the bed and the window as you changed into the clean shirt, balling up the stained one and stuffing it in your backpack.
"its a pre-storm rager on the beach, the one place kooks and pouges get along. we party as long as we can and when the storm hits, run for cover"
you're only half listening to sarah, instead your attention hones in on the head of curly brown hair down on the dock as it moves along a boat named 'my druthers'.
you barely register the figure by your side, watching just as closely as you were as the brunette is joined by three others, laughing and joking.
"that would be john b," without looking you can hear sarahs grin, mistaking your fascination for attraction.
"routledge?" your mouth opens before your brain can stop it, you knew who it was, but you needed to hear it.
"you know him?"
finally, your brain catches up and you somehow manage to pull a lie out of your ass "not personally, saw him on tv. some appeal for his dad."
sarah bellows out a soft, sad sigh, letting her thoughts be known without saying a word. there's an unspoken air of silence between you, until sarah, literally, shakes it off and stands upright again.
"wanna meet him?" the blonde offers, despite the fact its more of a demand as you're being dragged along once again.
only this time your refusal is much clearer, practically begging the girl to let you go before she managed to get you out into the yard. again sarah is misreading the situation, interpreting your panic as awkward butterflies.
your demands persist, though much quieter as you're dragged further down the dock, closer to john b and his friends.
"hello, ladies" john b's blonde friend greets with a low whistle and a cheeky grin, shamelessly checking both you and sarah out.
for a moment your anxiety vanishes, your entire nervous system sparking still but for different reasons. this might be the most beautiful boy you've ever set eyes on.
this. this was your type.
"you're new" he speaks, gesturing towards you "that's for sure, yet to be a time i've forgotten a face like that." with a wink, he takes your hand to place a kiss on the back of it.
you curse god. why couldn't you have met this guy somewhere else? why wasn't he the blonde stranger that took you home?
"you done macking on the kook?" a girls voice echos from behind him, her words and her expression dripping with disgust as she eyed you.
"i'm not a kook." you bite back, sightly too aggressive for a first impression but you couldn't help it with the look of clear disdain embedded on her face.
sarahs arm links through yours, a mumbled "easy, newbie" falling only on your ears "y/n is new in town, i brought her down here while i found out what you guys are doing on my dads boat." despite her civility there's a challenging edge in her voice.
"lest ye forget, i work here."
john b, suddenly emerging from the ships hull and hurling a snide smile in sarahs direction. you had only ever seen him on fuzzy news broadcasts, he was taller than you had anticipated, confrontational too.
though, genetics could explain that one.
"can we help you?" the girl speaks again, sending your eyes rolling as you face john b.
"can you tell your guard dog to stand down? last i checked one of us was invited here and funnily enough it wasn't her"
you hear another boy mumble an excited "cat fight!" to your new, blonde, hyperfixation as they exchange money on bets.
"seriously? i expect this shit from jj but pope? disappointing" john b tutted, sounding like a disappointed father as he got off the boat "not looking for trouble, just bringing back the diving shit, full."
menial conversation is exchanged between sarah and john b, though your attention mainly resides with the newly named jj. he was leaning back against the boat, rolling a joint without a care in the world.
you try to keep the glances to a minimum, after all you had much bigger problems to wade through right now, but you simply couldn't look away. he was the definition of magnetic.
even when he catches you looking, there isn't a morsel of awkwardness, just a knowing look of curiosity that lingered far longer than it should have.
then, he winks. he fucking winks before returning to rolling with that stupid, insanely hot grin on his face. you were far from shy, and only for the audience around you, you would've jumped on him long ago.
any reckless ideas potentially coming to fruition is spoiled when sarah, still linked with you, retreats back toward tanneyhill. with a final glance back at jj, you hold your thumb and pinky to your ear and mouth 'call me', earning yourself a wink and a crossed heart in return.
maybe this wouldn't pan out to be a total shit show after all.
#maybanksmusings#jj mayback x reader#jj maybank smut#jj maybank x reader#jj obx#jj maybank#outer banks#obx#obx 4#obx season 4#kiara carrera
626 notes
·
View notes
Text
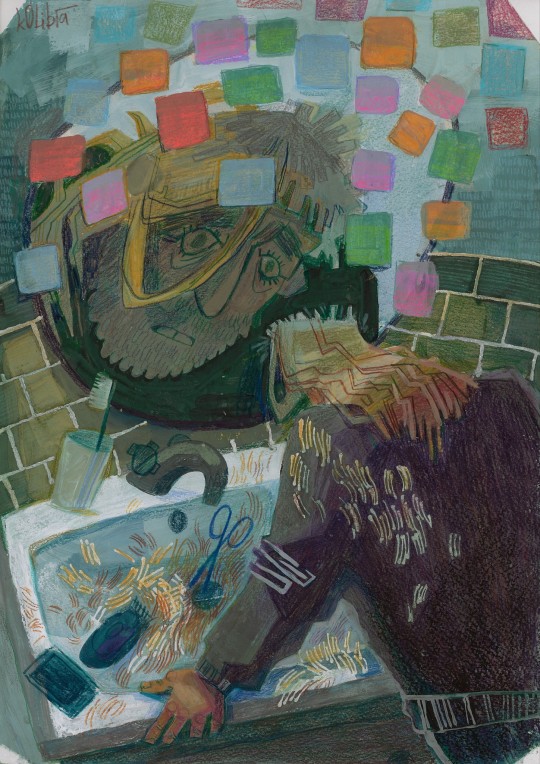
Hank feels older after the accident. He feels older, not in a "more mature" way, but more geriatric instead. Yet he just looks like a man of his age, he looks like before. He feels a deep disconnect — his appearance doesn't match his perception of time. The world goes around him as normal, his body goes on as normal. Grief doesn't leave any imprint on him, and he gets angrier and angrier at himself and more despaired.
And so, when his roots finally begin to turn grey, in a fit of inverted thinking, he cuts off his hair, leaving only grey hair. Is this proof of his grief? A punishment? A manifestation of guilt? It doesn't matter, and it does not get better. This becomes clear halfway through the process. Although now he has a shitty haircut, here goes the rest of his hair, even if he seemed to like it long. He is ruining everything in his life again.
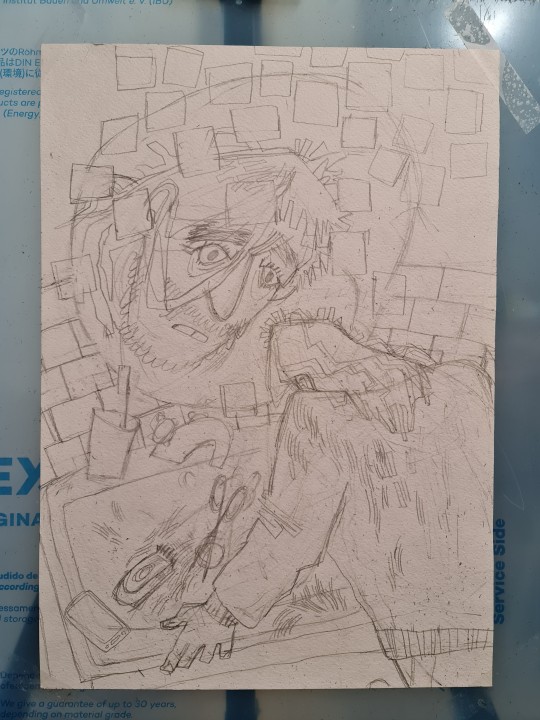
art process under the cut
This one was a doozy. Some of you might've noticed that this piece is done traditionally. To be more precise, the format is A3, and the mediums include: watercolours, gouache paints, coloured pencils, oil and soft pastels.
I haven't done traditional art in a while, especially on bigger formats, so my approach had to be more calculated than it usually is.
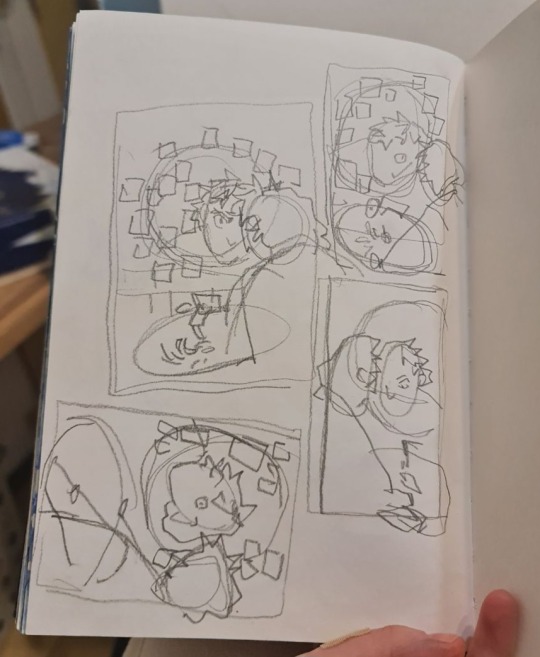
For the first time in ages, I had to pick up my sketchbook to come up with composition because sketching directly on A3 wasn't working out. After that was done, and I got the idea of how I wanted the things to be placed on the piece of paper, it was time to transfer the sketch.
It went well. I decided to follow the same pipeline I use for my digital paintings, so I did watercolour underpaint.
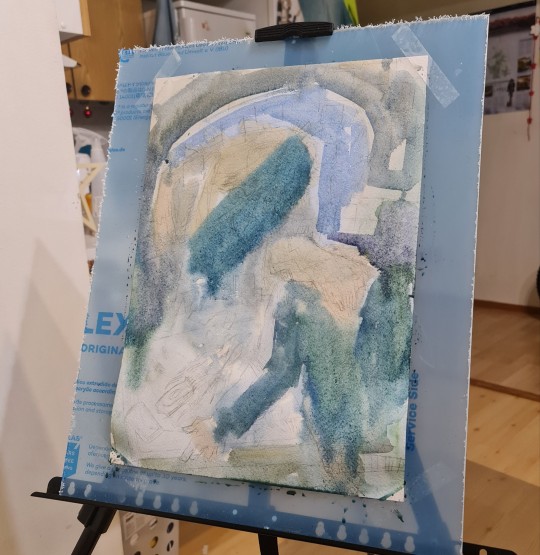
I wish I had determination to make the paint more saturated, but I was feeling quite anxious.
Then I refreshed the sketch with coloured pencils, which was a smart call on my part because otherwise, I would've definitely lost it when I put down gouache. I also applied masking fluid in some places.

Historically, painting with colour is my weakest skill, I tend to struggle with the feeling of depth especially. That's why I decided to figure out my colours digitally first, so I wouldn't loose my progress irl. I really wasn't in the mood of redoing the sketch and repainting.
You see, I really locked with this one lol
The next step was painting with gouache, I think I was the most impatient with this. I wish I would've taken more time, but alas. In general, it was pretty ordinary - applying colour and then adding definition to objects. But not too much because most of my detailing is achieved with pencils.
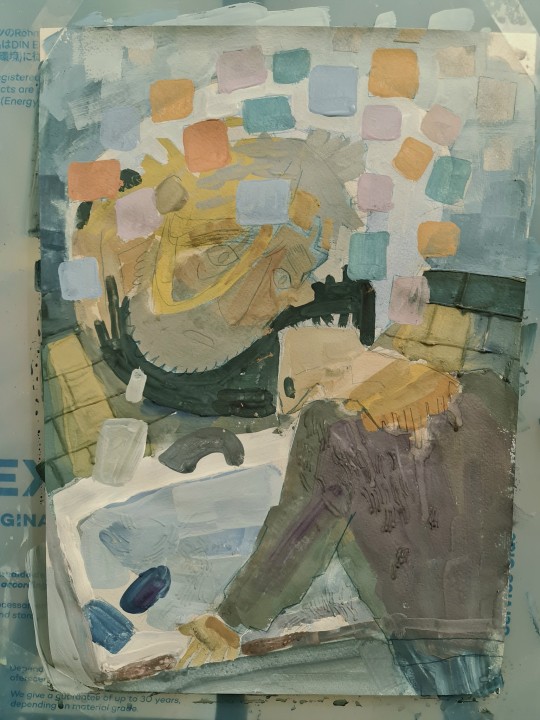
After that was done, I redefined the sketch following the photo I took (I was missing conveniences of digital painting here), and it was time for the dry materials. It was just a lot of work, but I had fun with it.
I'm satisfied with the end result. Of course, there are things that I don't like how they came out, but for the first illustration done traditionally in a while, I'll let it pass, hah.
Thank you for reading all of that!!!💖 Here's your cookie 🍪
449 notes
·
View notes
Text
here is the colouring tutorial i promised to go with my beginner's gifmaking tutorial.
to save image space, i've written up a simple explanation of how each adjustment layer works here, so i'm just going to over my colouring for these 4 different gifs.
as always, very image heavy underneath
there are many ways to get the same results and i'll use various methods usually just based on what i'm feeling at the moment. some of it is a little convoluted, but hopefully this will give you a rounded idea of how it all works so you feel more comfortable playing around with your own colouring
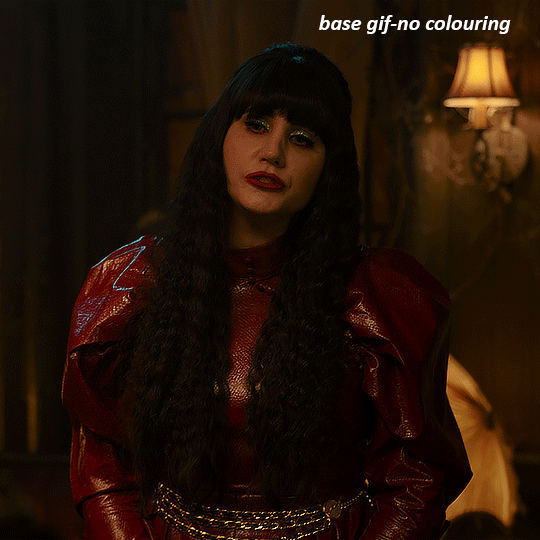
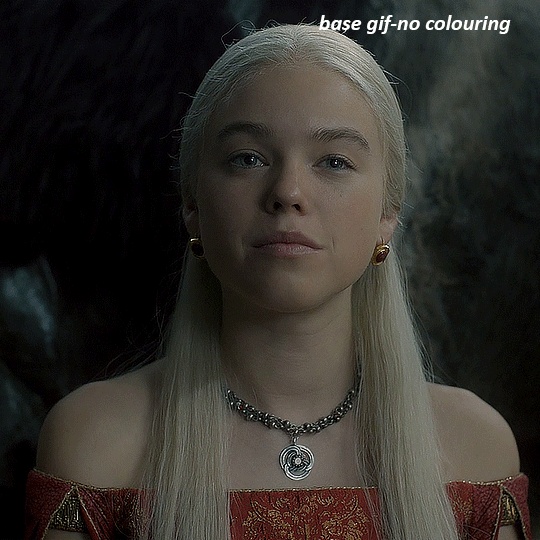
NADJA
this is the base gif with zero colouring adjustments, just resized and sharpened.
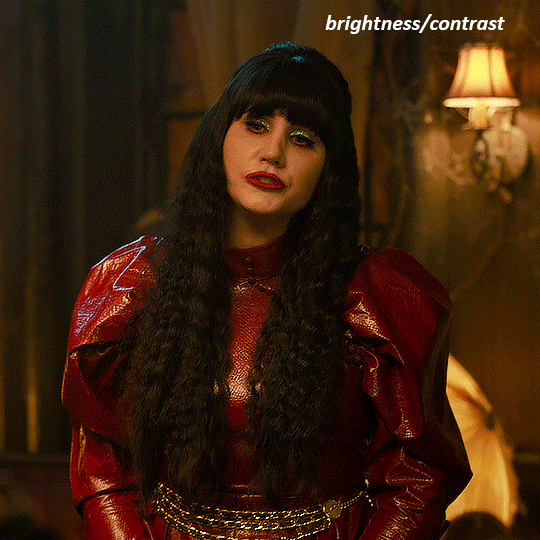
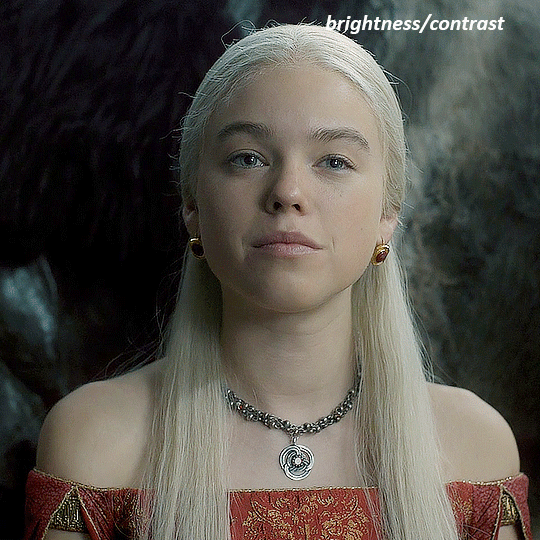
unless the base gif is already very bright, which doesn't often happen because directors nowadays are allergic to light, the first layer i add is always a brightness/contrast layer. i don't adjust any of the sliders, i just change the blending mode to "screen", and then adjust the opacity if needed. this gif was pretty dark, so i left it at 100%,
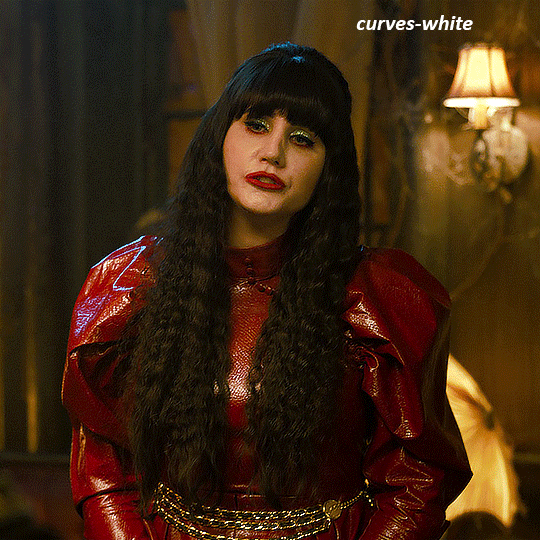
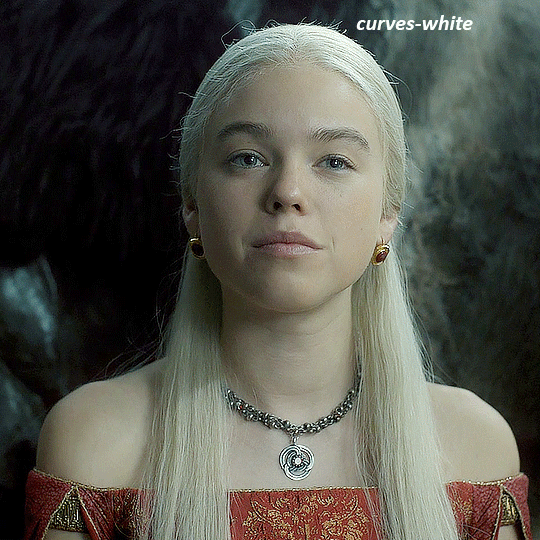
my next layers are always curves to even out the white and blacks. i use two curves layers, one for white and one for black. i used the white drop-picker and selected just below the lightshade on the lamp behind her, and for the black drop-picker i selected her hair near her neck which gives us this
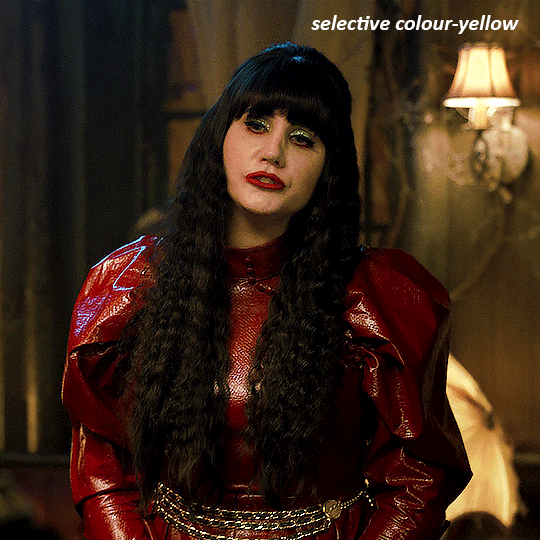
it's already looking much better, it's not as green tinted, but i want to make the red of her dress pop a bit more. in order to do that without making her face too red, i'm gonna remove some of the yellow. so next i'm gonna add a selective colour layer, and under the yellow channel i moved the yellow slider to -5 and the black slider to -52. now
now that the yellow is reduced, i add another selective layer, and under the red i move the cyan slider to -66 and the black slider to +29. now the red of her dress pops and her face is still a realistic tone. when i first made the gif, i added the red selective layer first, then added another selective layer under it and adjusted the yellows to offset it. you can always shift layers around or add a new layer underneath as you go.
voila
TOMMY
here is our base gif

this scene is better lit than the nadja one, but i prefer bright and colourful gifs, so i'm gonna once again add a brightness/contrast level and keep it at 100%
and then the curves layers to even it all out. since there isn't a spot that is immediately noticeable as white, you can hold the alt button with the white dropper selected and it will highlight all the white/very near white pixels. you can also zoom real close in to select specific pixels. i selected a from the white area around his chin/mouth. the same process works for finding a black spot with the black dropper, and for that i selected from a dark spot in his hair
the curves layers evened it out but also made the gif a bit more red and warm toned, and since i've decided i want the end result to be more blue/green, so i'm gonna add a colour balance layer. in the shadows channel i moved the cyan/red slider to -16, and the yellow/blue slider to +11

now the gif already looks great, it's bright, skin tone is accurate, he's not washed out, but like i said i like my gifs colourful, so i'm gonna add two more selective colour layers. in the first i'm gonna adjust the greens, bringing the magenta slider to -87, and the black slider to +81. in the second layer i'm gonna adjust both the blues and cyans, because when you see blue in a gif it's rarely ever straight blue or straight cyan, so always adjust both. (you could adjust the blue and green in the same layer, but i prefer to do them separately in case i need to move the layers around)
now finally i'm gonna add a hue/saturation layer because i think the blue of his suit is too blue when the sky behind him is more cyan. (also, since you only have 256 different colours to work with, you don't want too many different colours otherwise it will distort the colouring.) in the blue channel i move the hue slider to -12 to make the blue a bit more cyan, and i also move the saturation to +38 to make it pop more
and voila
RHAENYRA
here is the base gif (this one is going to get very convoluted and imo best exemplifies what colouring gifs is like most of the time)
as always, a brightening layer set to screen
now the curves layers. for the white i clicked on her hair at the top of her head, and for the black i i clicked in the shadows to the left of her.
but as you can see, while it added contrast, it also made the gif more green tinted than it was. you could click around more, or manually adjust the red, green, and blue lines on the curves until it looks better but i decided to add a channel mixer layer instead. in the green channel i set the greens to -95, and in the blue channel i set the blue to -97
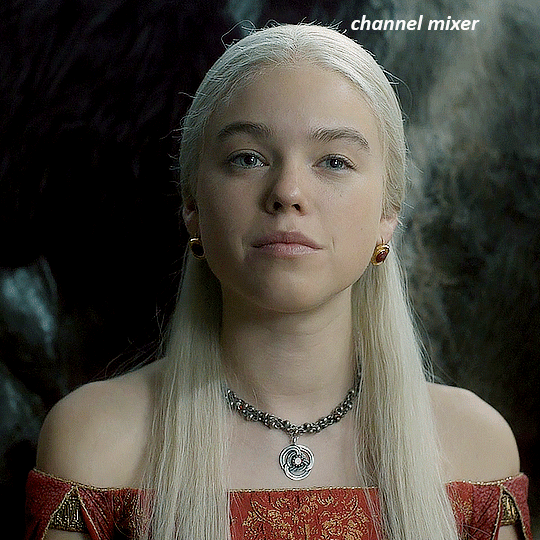
next i wanted to add a little contrast, but i find that using the contrast in brightness/contrast can saturate it too much, so instead i added a levels layer. first i adjusted the bottom bar, moving the right slider to 230 which reduces the overall brightness of the gif, so when i adjust the top bar it doesn't brighten the gif too much. on the top bar, i moved the right slider to 212, and the left slider to 9
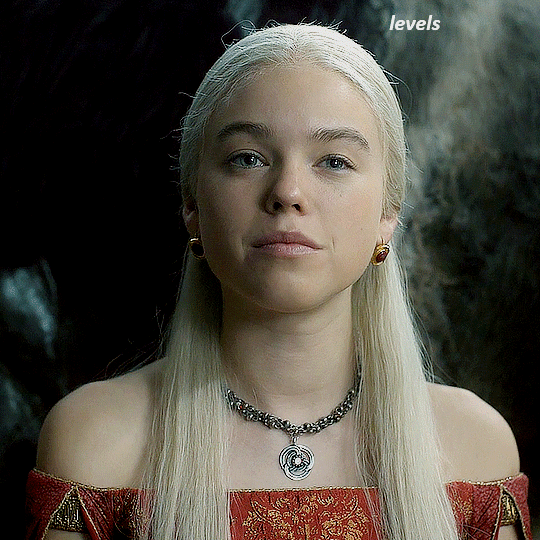
now, i'd like it to be not exactly warm toned, but less cool, and while i could use colour balance or a photo filter, i'm instead going to add a gradient map, using the default gradient pink 08, and setting it to blend mode soft light at 50% opacity

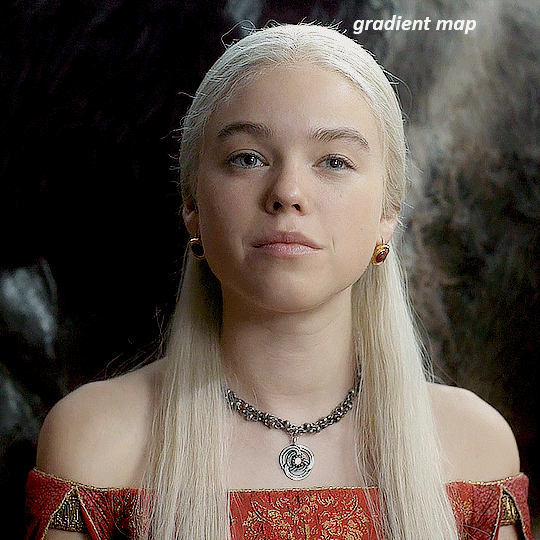
next i just want to increase the blacks a little, so i'm gonna add a selective colour layer and under black i'm gonna set the black slider to +10
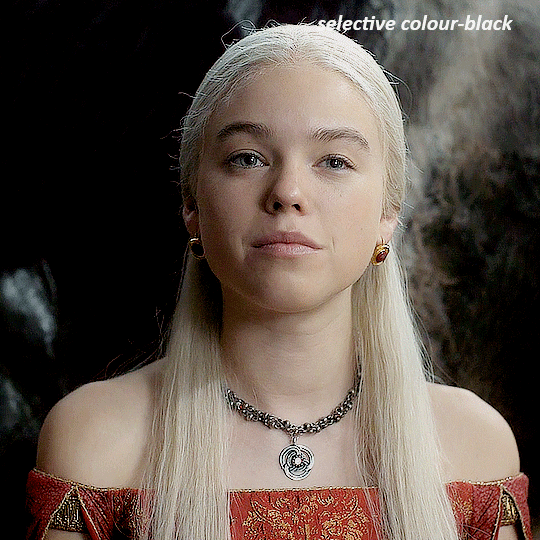
it's still not as warm as i'd like, so i'm gonna add a colour balance layer, in the midtones setting the cyan/red to +10 and the yellow/blue to -5
we're almost done, but i want to make her dress pop a bit more, so first i'm gonna add another selective colour to bring the yellows down a bit, setting the black slider to -15

and finally one more selective colour layer, in the reds, setting the cyan slider to -50, the yellow slider to +10, and the black slider to +15
voila
NATALIE
here's the base gif
as always the brightness/contrast layer set the screen
now the curves layer. for the white, i zoomed in and selected a pixel on her cheek under her right eye. for the black i the dark spot just above her head
now she's very yellow, so i added a channel mixer layer. in the red channel i set the reds to +88. in the blue channel i set the reds to +10
she's still a little too yellow for my liking, so i'm gonna add a hue/saturation layer, and under the yellows i'm gonna adjust the saturation to -60
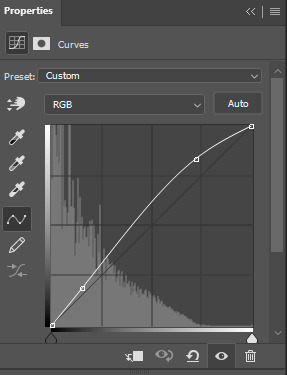
finally, i want her to be a it brighter, so i'm gonna add another curves layer, but instead of using the drop, i'm going to manually adjust it. the two points along the line are where i selected it and then i dragged until it looked how i wanted. i start with the upper dot, which made it brighter and moved the line into an arch, and then selected at the lower end of the line and dragged in back closer to centre to add some darkness and contrast
voila
and that's how i do my colouring. it's generally all trial and error, using a layer to fix one thing and then needing another layer to fix something the previous layer did.
play around, have fun, see what works for you and what doesn't. it will take a while for you to develop your own method and style, and even then you'll come across scenes that make you question if you have any sills at all. you do, directors just hate us
have fun and feel free to ask any questions
#tutorial#gif tutorial#colouring tutorial#photoshop tutorial#gifmakerresource#completeresources#*tutorials
276 notes
·
View notes
Text
<3
Anyway A+++++++ pic, made my night made my day, I think I wanna adopt him, son...., he's such a son, candy flavoured, trans coloured, cute...., smol...., lives on the edge..., better played with Lunalights give Isis the Fluffals.
#omg I love this so much#the slight papery texture over the piece gives it such a clean and soft watercolour feel#and the coloured outlines which you use for the highlights and shadows is amazing#im impressed by the dedication to not just outline your shading#but to alternatively outline the highlights and shadows#normally people stick to shadows#here (I think because of the combo black lines setting everything apart)#it creates such a beautiful vibe#it makes it feel very hard and glassy and gemmy but also very sweet#its a piece that looks like a lollipop tastes is what im saying#and considering how Sora treats lollipops#that makes complete sense to me#the colour choices for the highlights and shading is so pleasing too#the pink/red/purple used to shade the golds and oranges#the saturated blues on his shirt#the cute lil pink and cyan highlights in his hair#fluffal mouse's cute scarf and giant eyes (thank you for revealing the hearts in his ears#only learned that today) (I also like how saturated the blue on his whites greys and blacks are#it keeps the pic from ever feeling monochrome)#even the shading on his skin is pastel cause of the pink/blue#how is this so sweet and candy#so precious#I dont care if hes a war criminal hes MY war criminal#look at his confident smirk and lackadaisical pose this child fears NOTHING#look at Fluffal mouses giant soulful eyes there are no thoughts#only such a fearless duo could gamble their lives on Toy Vendor every day#the scissors look great#too! (edge imp sabres is seething enviously)#whats the fluffal behind him? it has fluffal eyes but its grey like metal#even the bg and strong black outline to foreground sora are genius
85 notes
·
View notes
Note
Coloring anon here, yes, I would definitely like to know more about how you color frame by frame and the other techniques you mentioned! It would be much appreciated, thank you!
Hi anon! I'd be happy to go over my preferred methods for colouring!

First resort (ideal):
Painting over shots with little movement (the first method in this tutorial)
Colour manipulation using selective colours (the second method in this tutorial; alternate tutorial -> i also sometimes add a hue/saturation layer on top to manipulate the cyans/blues as well)
Second resort:
Keyframes for shots with consistent movement where it's easy to hide "imperfections" (tutorial 1, tutorial 2)
Last resort:
Frame by frame colouring -> DISCLAIMER: the way I do this method is the easiest way I've gotten it to work for me but that also means that it's very inflexible when it comes to editing any of the colouring afterwards. Once you start colouring in frame animation mode you're basically locked in so you need your gifs to be exactly the way you want them prior to adding your colour
So in this tutorial I'll go over how I do my frame by frame colouring as well as how I create actions to automate the repetitive parts of this process! (Some resources that explain how to create actions are here: 1 2)
To use the select subject feature you will need Photoshop CC 2018 or later
Step 1: Preparing your gif with base colouring
So first you want to do your base colouring for your gif in timeline mode, which I've explained here. I keep my gifs short (ideally 40 frames or less) since this colouring process is tedious!
I make sure that in my hue/saturation layer, I turn the saturation in the yellow, green, cyan, and blue tabs all down to -100 (and for the yellows I usually add around +20 to +60 in lightness)
Here's my gif with the base colouring that I'll be starting with:

Note: turning down the saturation in almost all the colours gives you that nice silver/grey neutral background to paint on top of. It's a lot less noticeable when your painted layers aren't perfect
Step 2: Converting to Frame Animation Mode
I use the save action from this action pack to convert my gif from timeline mode to frame animation mode.
You cannot edit your base colouring from this point onwards!
Step 3: Using Select Subject
If you're recording an action this is the step you would *start recording*
This is what your window should look like:

Making sure your first frame and first layer are selected, go to Select at the top of your window and click Subject

You should then see the marching ants outline around the person in your gif

You then want to create a new solid colour fill layer (which can be found when you click that little circle icon at the bottom of your layers panel), and set the layer blending mode to colour.
The layer mask will automatically be created since you had the marching ants outline.

Since my person is in colour and not the background, I want to invert the layer mask by clicking on it and using command + i (or ctrl + i), and now this is what it looks like:

Note: Select subject isn't always perfect!!!, depending on how cluttered the scene is and how much contrast there is between your person and the background, select subject could either do a really good job like it did here, or screw up a little like it did here:

That's okay though because it still gives us a good base to start from! We can fix any issues by painting with black and white brushes on the layer mask.
Step 3.5: Create clipping mask
Thanks to @wolfchans for telling me about this because it gives us back a little bit of flexibility when colouring frame by frame! Instead of merging down, we can make a clipping mask instead. Right click the solid colour fill layer and select create clipping mask.


If you're recording an action, it's at this point where I would *stop recording*
Step 4: Fixing the layer mask if needed
So now I want his jacket and t-shirt to also be purple, and to show his fingers behind the glass. I make sure the layer mask is selected, and paint with a brush at 60-70% hardness (painting with black erases the colour, painting with white shows the colour). User smaller brush sizes to paint smaller details!
This is what my canvas and layer mask look like now.

Step 5: Repeat
Now I click on my second frame and second layer, and repeat steps 3-4. As you can see, using the clipping mask allows you to still see and edit the colouring of the previous frame, just make sure you click on the right frame and it's corresponding layer when you're doing further editing.

This is where an action is super helpful in cutting down all the repetitive steps and clicks you need to do. So at this point I'd just play the action I created and paint on the layer mask as needed.
Repeat for all your frames and then you're done! After this I convert it back to timeline mode again so that I can add my text and do any other effects such as blending or transitions. Hope this helped!!
#answered#Anonymous#*tutorial#userbeanie#userwintersoldado#userishh#userfaiths#usercats#usertj#tuserhol#userahri#usereus#usershreyu#userchibi#userbunneis#usermibbles#uservivaldi#carolook#userbuckleys#usertenacious#tuserheidi#userholtz
254 notes
·
View notes
Text
Colours and ISAT (spoilers ahead!)
I wanted to talk about colours and In Stars and Time today- I wanted to talk about specifically how colours work in isat and how silly goofy things could look if they could suddenly see colours. Because colour disappearing is something that happened a long time ago, there is a chance that the dye techniques have cahnged. While some things wouldn't change- such as being able to identify snow as white, who's to say the way they make fabrics and threads grey has changed slightly- because if a flower that was previously yellow and a flower that was previously blue separately make the same colour grey thread- who's to say that eventually they're used together to weave a fabric that looks like it's one shade of grey that in fact is patches of blue and yellow together? :)
So... I did a little experimenting. lol. Pardon the way everyone is drawn I was rushing so I could get to the fun part (the colouring of the clothes).
The greyscale version of the drawing is actually just the saturation turned down to 0! I took some liberties (I removed pure black and pure white from the drawing so i could play with the colours more)
If you wanna see more about how I did it (and how you could too) please read more below! teehee :)
So what I did was make a little program. teehee
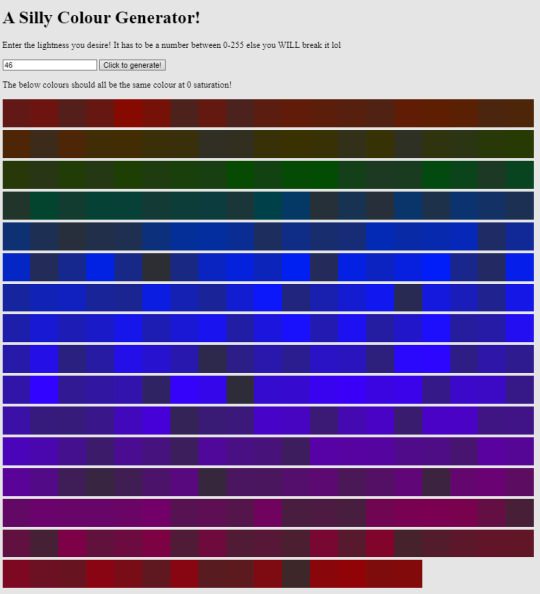
Please don't mind the stylization of it, but basically you put in a number of lightness (0-255) and it creates a bunch of colours that when put at 0 saturation, produces the same grey! basically you just need to know the lightness of the grey you're going for and it should spit out a bunch of colours! You can find this out by changing to RGB and there should be one value in all three lines that are the same: in this case it's 150 and that's what you'd enter into the program!
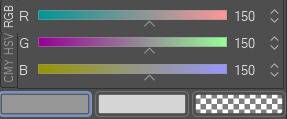
if you want to see it, it's here! password is: stardust
I had a lot of fun talking about this; it's something that I talked about while i was streaming because I was so excited by the idea. I wonder if anyone else has thought of this!!! teehee :) If you do fiddle with this please let me know it's so fun I'd love to see what you do!
#in stars and time#isat#isat fanart#isat spoilers#in stars and time spoilers#isat siffrin#isat mirabelle#isat isabeau#isat bonnie#isat odile#look im so normal about colours#please i love this topic#siffrin is unintentionally easter coded and I love it#waka art
280 notes
·
View notes