#the different coloured rolls either have different lengths and additional effects
Photo

bnha AU where everything is the same but aizawa’s capture weapon is made of extremely durable bubblegum tape
#bubblegum aizawa au#aizawa#aizawa shouta#shouta aizawa#melonstuff#the different coloured rolls either have different lengths and additional effects#or they were just cheaper at the store that day#red was on special last week so he switches to red flavour idk its logical#its also edible in a pinch so he always has emergency snacks#and instead of a knife he can just bite the weapon if he needs to trim it#its so rational my dudes#yeah i fell down the rabbithole of looking up datamined ultra impact img/sprites yesterday#and one of them the capture tape was tinted and textured in such a way that made me think oh hey that scarfs lookin T a s t y...#like a bubblegum strip... so this happened.
193 notes
·
View notes
Text
Hey hey new brand!! I have heard about this brand before, and when I heard that I was getting these through my door, I could not contain my excitement. I love their lingerie, and I have always wanted to try out their stockings too… Now I finally have the chance to!
About Honey Birdette
“Honey Birdette began in 2006 over a glass of champagne between two friends. Tired of not being able to find provocative lingerie and luxury bedroom accessories, they set out to inject a sense of sensuality into the Australian bedroom.
From carefully detailed lingerie to high-end toys for the bedroom Honey Birdette will guide you through everything you need for the pleasure parlour.
Honey Birdette boutiques are flirty, playful and unapologetically sensual, with lush décor and champagne served to guests.
Amidst the rows of pretty, naughty things lies the Pleasure Parlour. A treasury of amusements to send you blissfully to the brink and beyond. Create the ultimate boudoir experience with our range of bespoke accessories.
Luxurious massage candles, sensuously potent perfumes made in France and perhaps something to take the edge off or put the edge on leather crops, cuffs, collars and harnesses.”
“I’m not about trends. I believe in form and function. My aim is to create beautiful pieces that span both age and season—that perfect shoe or sweater that you revisit time and time again.”
– taken from their website
The Spec
Colour: Nude / Red
Size: Small
Denier: Around 15-20
Materials: 90% Polyamide, 10% Elastane
Price: £20.00
Website: Honey Birdette – Chic Bowtie Red Stockings
My Outfit
I don’t know what made me want to do this outfit, but I will say I was totally feeling it! I paired up my cream ribbed bodysuit with my red skirt. I added red heels to jazz it all up, but you can always opt for black or tan if you prefer.
My Deets
Bodysuit: New Look
Skirt: Miss Selfridge
Stockings: Honey Birdette
Heels: OnlyMaker
The Review
From The Website: Honey Birdette’s signature back seamed thigh high stockings have a silky smooth feel and sheer shiny appearance. Nothing elongates your legs like back seams! Our thigh highs have darker full foot reinforcements for a retro style touch. Perfect for suspender belts.
The Packaging: now let’s get right to it babes! The packaging is as shown below. You get the model wearing them on the front, along with the brand and model name. Flipping over, it goes into a little more detail about the pair inside, along with the sizing guide a small window and hosiery care.
When you get in, you will find the pair wrapped around card. These come with the foot and leg shaping to them, and rightly so if we are working with a sole panel and a backseam.
Getting Them On: I did my scrunch and roll, making sure I took care around the anklets. These glided right up with no issues.
On The Legs: that red backseam is something special. I wanted to enhance this, so I paired with a red skirt and red heels for this reason. It’s such a gorgeous bold red, with the backseam sitting on top of the nylons, so you get that full effect. I love the contrast, especially when they are paired with a nude base.
The quality did impress me I have to say. As soon as I got my hands on them, they felt really good and not cheap. I did think they did look it a little with the way they did the feet panels, but I can say the material used was nice. These also did have a nice amount of stretch to them for my leg length I also found these last very well on the legs; no rips or snags, which I am impressed with.
The fit of these are true to size, and I felt they were perfect for my leg length. I was able to sit these as high as I wanted to without tugging them either. I would recommend checking their sizing guide before purchasing if you are unsure of your size.
The feel of these are lovely and soft on the skin. They are super smooth to touch, and there is no irritation to the legs whatsoever either. I felt super comfortable wearing these today.
Can I also add how cute that ankle bow is as well? I didn’t mention it before, but it does need to be added. I love how small and simple it is, and such a lovely addition to the backseam.
youtube
The Toes & Ankle: I thought I would treat you all to some close ups, because I was loving them. I had plenty of wiggle room for my toes to move and there was no pressure added either. Around the feet and ankles, I had a lovely smooth finish with no wrinkles in sight.
I will also mention that I love they have a red sole panel that connects it all; all these little additions make all the difference!
So after all the good, there are some ‘meh’ points to mention. The first is how the sole panel doesn’t really sit well under the foot. I felt it was a little too baggy. The same can be said for the to caps on these; I mean they weren’t that bad, but it did bug me a little when I would prefer them to be sitting against the skin completely.
The second thing is one of the bows (on the left foot) I found that the red material covering the bow was actually falling away. You will be able to see it on the images below and I wasn’t too impressed when I saw this as soon as I got them on. This is what makes it look cheap.
The Bands: and I am working with the thinnest welt EVER! I mean I had to actually clasp onto the actual nylons to make sure they were being held up well. I was super scared to do so – this only eased near to the end of the day when I was getting them off. I was so conscious; I had to keep an eye on them to make sure they don’t end up ripping.
The band itself is pretty thick and doesn’t come apart easily – I did tug at it a few times to check and see.
I gotta say though, these look absolutely killer against the backseam. The overall look I am loving; it look super hot, it looks classy, it looks teasing. It’s just… I LOVE IT. That’s all!
My Thoughts?
These are a pretty awesome pair; and one of my favourites if I wanna play with colour. I really liked the quality and the look is just stunning. I will happily recommend these for sure!!
Honey Birdette Chic Bowtie Red Stockings Hey hey new brand!! I have heard about this brand before, and when I heard that I was getting these through my door, I could not contain my excitement.
4 notes
·
View notes
Text
A Fiction Writer’s Guide to English
Tips, tricks, and complaints on how to make your story sound a lot better
By a five-year-old someone not qualified to talk about writing
Disclaimer: By no means am I a writer, a linguist, or an expert on any of the subjects discussed below. However, I do read a lot (a lot), published and unpublished works alike, and this post is made to address certain syntactical, structural, grammatical, aesthetic, and linguistic issues that irk me whenever I come across them. The following is my personal opinion (albeit a well-researched one), and if I've said something horribly wrong, by all means tell me and I shall fix it post-haste. Probably.
Again, this is by no means fully comprehensive, and I doubt it is fully accurate, but from what I've read, this list could do a lot, with a few simple tips, to ameliorate fiction and fanfiction stories a thousand-fold; because, to be honest, a spelling mistake or a grammatical error is one thing that will infallibly take me out of a story and will get me to look at it with a much more critical eye.
Note: the grammar and punctuation rules below (mostly) follow the American set of rules as standard, since I am American, and most fanfiction stories use this standard as well.
I will probably, once the initial post is out there, come and update it when I come across something that would be a helpful addition; feel free also to shoot me a message or an ask if you have a question or need clarification on anything.
These tips are ordered in no specific way whatsoever, and credit goes to all the original creators of the images and posts I reference herein.
Use the passive voice wisely. You'll hear a lot of English Teachers tell you that the passive voice is bad bad bad, and should never ever ever be used. This is not the case. While one should shy away from using it too frequently, there are some cases where the passive voice is acceptable, and even preferable.
As a reminder, the passive voice is when the subject of the clause receives the action:
"The ball was kicked."
Use the passive voice sparingly; it is best used when "the thing receiving an action is the important part of the the sentence—especially in scientific and legal contexts, times when the performer of an action is unknown, or cases where the subject is distracting or irrelevant". (For more info, go here.
Pay attention to the setting and the time period of your story. While this may seem self-explanatory, I have seen far too many stories where everything is going perfectly until the student who is supposed to be in a London primary school asks his "Mom" to help him with his "math" homework. (The correct words are, of course, "Mum" and "maths”.) Similarly, a gentleman living in 1880's New York will not greet his friends with "Yo, what's up, man? You good? Cool." (Yes, that is an actual line I have actually read.) I know that this can be hard, especially for authors who don't live in the country their story is set in, but a little bit of research goes a long way in making your story sound better. (This doesn't apply to writers who use anachronisms and the wrong words purposefully, for humor or otherwise).
Accents and dialects. When you want a person to speak in a certain accent or dialect, research that accent or dialect a bit to understand the most prevalent words and grammatical form, and use them in your dialogue, and, if in first person, your narration as well. You can also think about adding certain regionally-specific words, spellings and grammatical structures. If imitating a work written in that region, definitely watch the spellings and alternative words, and incorporate them in both your dialogue and your narration. ( “mom” vs. “mum”, “math” vs. “maths”, “color” vs. “colour”, etc.).
e.g., in England:
I was sitting there, laughing --> I was sat there laughing.
curb (street), jail, tires, tv --> kerb, gaol (sometimes), tyres, telly, etc.
Beware punctuation with dialogue. Use commas.
(NEVER EVER EVER CLOSE A DIALOGUE QUOTATION WITHOUT SOME FORM OF PUNCTUATION! There must ALWAYS be either a period, a comma, a question mark or an exclamation point, or an em-dash before the quotation marks close.) The following image perfectly illustrates the proper ways of punctuating dialogue:
WARNING: Use em-dashes instead of en-dashes for interruptions. See below.
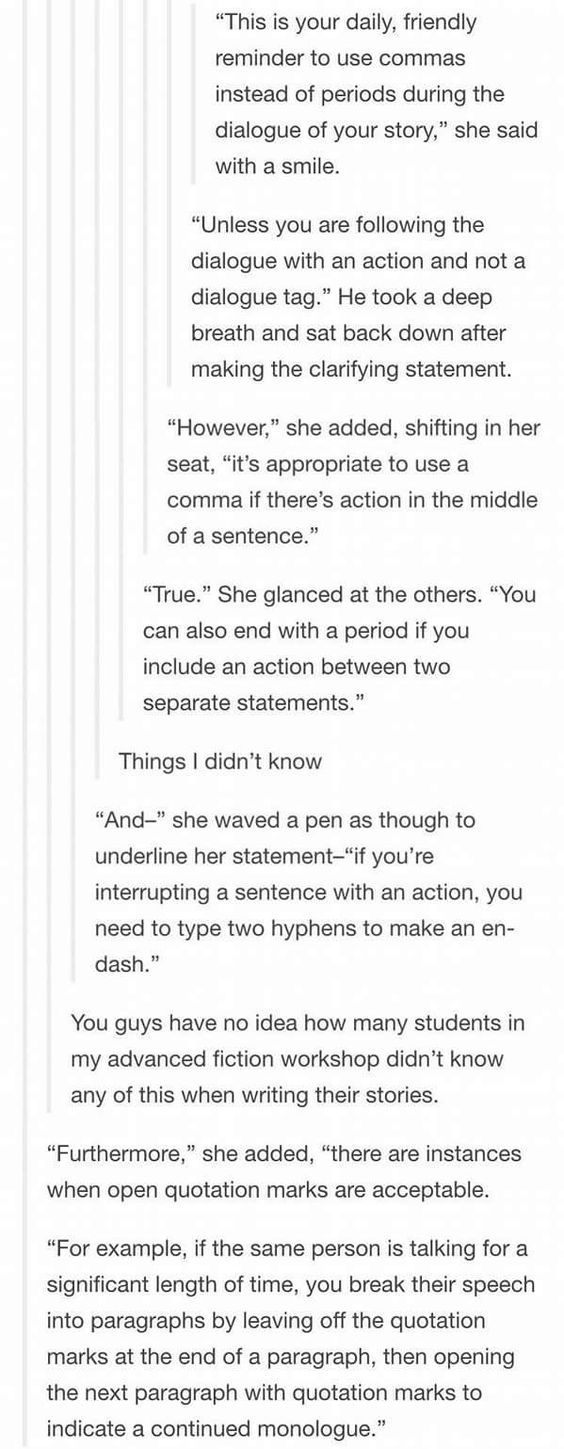
Dashes vs. hyphens
"-": hyphen, used to separate parts of compound words and last names. (e.g. five-year-old; pick-me-up; short- and long-term; Lily Evans-Potter)
"–": en-dash (because it has the width of an "N"), used in number and date ranges, scores, directions, and complex compound adjectives. (e.g., he works 20–30 hours per week; the years 1861–1865 were eventful; FC Barcelona beat Real Madrid 3–2; Ming Dynasty–style furniture is expensive) (Note: when you use "from" before a range of numbers, separate the numbers with "to" instead of an en-dash.)
"—": em-dash ("M"), can be used instead of parentheses, commas, colons, or for interruptions in dialogue, thought, or narration. (e.g., I know I'm right, and you're — stop throwing things at me!)
(For more info, go here.)
Vary sentence lengths. When your sentences are all the same length and all the same complexity, your story starts to sound monotonous. Experiment with length, clauses, commas and semicolons, etc.:
“This sentence has five words. Here are five more words. Five-word sentences are fine. But several together become monotonous. Listen to what is happening. The writing is getting boring. The sound of it drones. It’s like a stuck record. The ear demands some variety.
Now listen. I vary the sentence length, and I create music. Music. The writing sings. It has a pleasant rhythm, a lilt, a harmony. I use short sentences. And I use sentences of medium length. And sometimes, when I am certain the reader is rested, I will engage him with a sentence of considerable length, a sentence that burns with energy and builds with all the impetus of a crescendo, the roll of the drums, the crash of the cymbals—sounds that say listen to this, it is important.”
— Gary Provost
For more on sentence and paragraph structure, see thewritersguardianangel’s post.
Don't be afraid of contractions. Contractions are common in everyday speech and in everyday writing. Use these, especially in dialogue, since contractions will be used almost all the time, unless the character is older, teaching, or speaking intentionally formally. (A college student is not going to tell his friend "You have got to do this homework assignment, or you will fail the class, and the teacher has caught on to you. He will not be lenient." It'll look more like "You've got to do this homework assignment, or you'll fail the class, and the teacher's caught on to you. He won’t be lenient.")
Avoid overly verbose and complex wording, especially in dialogue. Don't use words that are very grandiose and complicated, especially in dialogue with younger people. A teen might use "merely" once or twice, especially in more formal speech, but will very probably use "just" instead. It makes dialogue more realistic too; real conversations don't often have very hypotaxical, full-of-dependent-and-subordinate-clauses language.
Use italics. Italics are, fortunately, available in all softwares and formatting when writing a story, so one mustn't shy away from using them. They provide a very good way to indicate emphasis, as well as to show anger or frustration without the use of capitals, which just make sentences sound like a petulant child throwing a tantrum. Compare "'I CAN'T BELIEVE YOU!' I yelled." and "'I can't believe you,' I hissed." Much more effective, no? (A good rule of thumb is: italics for everything except someone blowing their top. Think the end of Harry Potter and the Order of the Phoenix.)
Narrative Perspective. Unless using third person omniscient, stick to one narrative point of view for one section of text, and don't change the perspective style in the story. Don't start in third person close (like Harry Potter) and end in first person (like Percy Jackson).
A note about third person close: you can change whose perspective the story is told in throughout the story, but separate those perspective changes, either via a new chapter or a scene break ("******").
Perspectives:
First Person: usually singular, occurs when the narrator is telling the story. (Moby Dick, Percy Jackson). Can sometimes be plural (A Rose for Emily).
Third Person Close/Limited: the narrator is separate from the main character but sticks close to that character’s experience and actions. The reader doesn’t know anything that the character could not know, nor does the reader get to witness any plot events when the main character isn’t there (Harry Potter).
Third Person Omniscient: features a god-like narrator who is able to enter into the minds and action of all the characters (Little Women, The Scarlet Letter).
Use the subjunctive for conditionals and hypotheticals. This might be a bit of a controversial topic, so i'll make this optional, but strongly recommended. The subjunctive mood is what characterizes verbs in conditional and hypothetical situations, so wishes, dreams, hopes, predictions, etc. One should be wary of it in dialogue, though, because it isn't widely used. Use it freely in narration. Usually comes after if or that (e.g., I insist that he leaves leave now; If I was were there, I would be happy.)
Write out numbers. Don't use digits, use words. The man doesn't have 200 dollars, he has two hundred.
The verb "said". Unlike many who tell you never again to use the word "said" when constructing dialogue, I won't. "Said" is a good word, and should be used, but not over-used; find synonyms when it starts to get repetitive, and you can also use it with different adjectives to spice it up. Sometimes you don't need a dialogue tag at all. However, don't try to come up with a different synonym for "said" for every dialogue tag, since it just sounds excessively wordy and extremely trite. A mistake a lot of writers make is the above, which is to replace every single instance of the word "said" with some outlandish synonym. Also, be wary not to replace a dialogue tag with an action verb (which can also lead to a comma splice) (e.g., "I can't believe you," Mike raged, "you're such an idiot!" vs. "I can't believe you!" Mike growled. "You're such an idiot!")
Connect independent clauses correctly. Independent clauses are sentence fragments which have a subject and a verb, and can stand alone as sentences. If one wants to join them into one sentence, however, there are three ways of doing so:
One can use a semicolon (as discussed in the punctuation section below), or one can use a comma + coordinating conjunction. A coordinating conjunction is a word that can, after a comma, join two independent clauses, and they are FANBOYS (For, And, Nor, But, Yet, So). (e.g., Alex went to swim in the pool, but Max couldn’t come.)
The last way one can connect two independent clauses is with a conjunctive adverb. Conjunctive adverbs look like coordinating conjunctions; however, they are not as strong and they are punctuated differently. Some examples of conjunctive adverbs are: accordingly, also, besides, consequently, finally, however, indeed, instead, likewise, meanwhile, moreover, nevertheless, next, otherwise, still, therefore, then, etc. When you use a conjunctive adverb, put a semicolon (;) before it and a comma (,) after it. They can also be used in a single main clause, and a comma (,) is used to separate the conjunctive adverb from the sentence.
(e.g., There are many history books; however, none of them may be accurate.; I woke up very late this morning. Nevertheless, I wasn’t late to school.) These words can be placed pretty much anywhere in the second clause after the semicolon as long as they’re separated by commas on either side (e.g., Mark was happy to have finished his essay; his dog ate it, however, before he could hand it in.)
Punctuation, Punctuation, Punctuation. Watch your punctuation closely, because it can make or break your story. Dialogue punctuation has already been discussed above, but that is for formatting quotations, not for narration and the content of the quotations themselves.
Every sentence or sentence fragment, even it it’s a single word, MUST end with either a period ("."), a question mark ("?"), or an exclamation point ("!"). It can also end with an em-dash ("—") if and only if the thought or sentence is interrupted.
Commas are for separating sentences into more manageable chunks, to separate dependent clauses, and independent clauses with coordinating conjunctions (see below), and to mark off lists. (e.g., I wanted to talk to her, but she had to go shopping for milk, eggs, bread, and cheese.)
Use the Oxford comma. For those who don't know, the Oxford comma is the last comma in a list of things, just before the last item, usually before an "and" (e.g., milk, eggs, and cheese). It helps reduce a lot of confusion, and, while this is a topic that can be controversial, use it to be safe, and to avoid sentences like this: I dedicate this to my parents, my editor and Random House Publishing.
Beware the comma splice. Never ever ever separate two independent clauses (i.e., full sentences with subject, verb, and object) with just a comma. Use a period, a semicolon, or a coordinating conjunction instead. (e.g., A comma splice walks into a bar, it has a drink and then leaves. (for this example, make the comma a period or a semicolon, or eliminate "it" from the sentence.))
Colons (":") are for denoting lists and setting up quoted text (not dialogue. Use commas for that.) (e.g., What I need is this: eggs, flour, and milk.; In Moby Dick, the main character, in the beginning of the book, says: "Call me Ishmael.")
Semicolons (";") are for separating two independent but related clauses, as discussed in the comma splice section above.
Tenses and tense agreements. This is a big one. When writing a story, choose a tense for your narration and stick with it throughout. If you start in the past, as a lot of fiction does, stay in the past until the end. Also, make sure all the tenses in your narration agree with the main tense of your story. (For flashbacks, one of two ways are possible: a blocked off section in italics, with the same tense as the main story, or within the narration, in the tense past the tense of the story (i.e. has -> had; had -> had had))
If events A, B, C happen in order, and we take B to be the "present" in the story (i.e. when the events are unfolding):
Present: B is happening. C will happen. A happened.
(I walk down the aisle, happy. Hopefully nothing bad will happen. I wasn't able to cope when the incident last year happened.)
Past: B happened. C would happen. A had happened.
(I walked down the aisle, happy. Hopefully nothing bad would happen. I hadn't been able to cope when the incident last year had happened.)
Give your story to someone who hasn’t read it yet. Writing and editing a story is a very comprehensive process, and both you and your beta reader will probably have read it so much that your and their eyes will be jaded and will slide over mistakes. A fresh pair of eves will always be beneficial in sussing out mistakes, typos, plot holes, and the like.
Watch for homophones, misspellings and incorrect word usage. This is the one that is most obvious, and the one that the most people catch and the most people hate. For this reason I will list the most common errors I have seen in hopes of helping those lost souls find they’re way. (See what I did their?)
I’ll put in a break to not make this post any longer than it already is:
Index: v. = verb; n. = noun; adj. = adjective; prep. = preposition; adv. adverb; conj. = conjunction.
There vs. their vs. they’re
There = In, at, or to that place or position (Look over there! Who’s in there?)
Their = third person plural possessive pronoun (my, your, his, our, their) (This is their car, that one is mine.)
They’re = contraction for they are (They’re window shopping.)
ex: If you look over there, you can see the Simpsons. They’re looking for their car.
Your vs. you’re
Your = second person possessive pronoun (This is your card, that one’s mine.)
You’re = contraction of you are (Stop shouting! You’re so loud!)
You’re insufferable when you get your report card back.
Too vs. to
Too = adverb: to a higher degree than is desirable, permissible, or possible; in addition, also (It's too hot in here; You love the Beatles? I love them too!)
To = (prep): expressing motion in the direction of; identifying the person or thing affected; concerning or likely to concern something; identifying a particular relationship between one person and another
(walking down to the mall; he was very nice to me; a threat to world peace; he's married to that woman over there)
(infinitive marker): used with the base form of a verb to indicate that the verb is in the infinitive, in particular.
(He was left to die.)
-'s vs. -s vs. -s' (and similar apostrophic conundrums)
-'s = a contraction for is, has, or us; possessive indicator for nouns. (it's = it is; let's = let us; he's = he is; a car's = of a car; she’s done it = she has done it); NEVER A PLURAL
-s = indicator for plural nouns; with it, a possessive indicator. (phones = more than one phone; cars = more than one car; its = of it, owned by it)
-s' = indicator of possessive plural nouns, and possessive for words ending in -s. (cars' = of multiple cars; Iris' = of Iris)
Come on, let's go, he's not gonna come anytime soon. Iris' car's broken down, and the car's tires' air pressure is almost zero, and its exhaust pipe is clogged. The towing company workers are going to come soon.
Were vs. we're
Were = plural past tense of "to be"; subjunctive of "to be" (We were really happy; If I were rich, I would do this.)
We're = Contraction of "we are" (We're going out tonight!)
If I were you, I would have made your announcement when we were all together. Now we're all doing our own thing.
Who’s vs. whose
Who's = contraction of who is (Who's doing this?)
Whose = belonging to or associated with which person (Whose pen is this?)
Who's drawing on the board? Can you tell whose handwriting that is?
Who vs. whom
Who = what or which person or people, the subject of a verb; used to introduce a clause giving further information (Who ate my apple?; Jack, who was my best friend)
Whom = what or which person or people, the object of a verb (By whom was my apple eaten?)
Who left this jacket here? To whom does it belong?
X and I vs. X and me
X and I = (= we) used when both subjects are the subject of the verb. (Mike and I went to the mall.)
X and me = (= us) used when both subjects are the objects of the verb. (My father took Mike and me to the shop.)
A good way of figuring out which one to use is to get rid of the second person altogether, and see which pronoun you would use in that case: Mike and I went to the shop –> I went to the shop; He took Mike and me to the shop –> He took me to the shop.
Wary vs. weary
Wary = (adj.) feeling or showing caution about possible dangers or problems. (Be wary of strangers.)
Weary = (adj.) feeling or showing tiredness, especially as a result of excessive exertion or lack of sleep; reluctant to see any more of; (v.): to cause to become tired (He looked at me with weary, sleepless eyes.)
His long day’s march had made him weary, but, wary of possible dangers, he made himself stay awake and keep watch.
Affect vs. effect (for our purposes, excluding obscure definitions)
Affect = (v.) to have an effect on; to bring a difference to (The US foreign policy greatly affected European trade.)
Effect = (n.) a change that is a result or consequence of an action or other cause (The US policy's effect on European trade was largely detrimental.)
Judaism's effect on Christianity largely affected the New Testament.
Could of, would of, should of
THESE ARE NOT WORDS. They sound like real ones, but they're not. The correct forms are:
could have, would have, should have. (You can also contract them to could've, would've, should've.)
Lose vs. loose
Lose = verb; to be deprived of or cease to have; to become unable to find something; to lose a game
(I always lose my keys; If we don’t score soon, we’ll lose; I can’t keep losing people)
Loose = adjective; not firmly or tightly fixed in place; detached or able to be detached
(These pants are too loose; Let loose! You're too strung-up!)
Loose shirts and pants are comfortable, but don't wear them to interviews or you'll lose your reputation and respectability.
Except vs. accept
Except = (prep.): not including; other than (everything except for my socks) (conj.): used before a statement that forms an exception to one just made (I didn't tell him anything, except that I needed the money).
Accept = (v.) consent to receive; give an affirmative answer to; believe or come to recognize (an opinion) as correct (he accepted a pen as a present; he accepted their offer; her explanation was accepted by her friends.)
He accepted every one of her excuses, except for her claim that her dog had eaten her homework.
Peak vs. peek (vs. peaked/peaky)
Peak = (n.): point or top of a mountain; point of highest activity; (v.): reach a highest point
(He climbed to the peak of Mt. Everest; I peaked in sixth grade)
peaked (US), peaky (UK)= (of a person) gaunt and pale from illness or fatigue.
(You look a bit peaked/peaky. Are you ill?)
Peek = look quickly, typically in a furtive manner; protrude slightly so as to be just visible
(Faces peeked from behind the curtains; his socks were so full of holes his toes peeked through)
Don't peek through the curtains!, he said, then climbed to the peak of a nearby hill.
Advice vs. advise
Advice = noun: guidance or recommendations (e.g., He's in dire need of some relationship advice.)
Advise = verb: offer suggestions about the best course of action to someone; to recommend; to inform.
(I often advise my friends regarding their scholastic endeavors; I advise you to take this class; you will be advised of the requirements)
Go, advise him about what to do for his relationship; he'll heed your advice.
Suit vs. suite
Suit = (n.): outfit, set of clothes, men's outfit with jacket and pants
(He's wearing a very nice suit.)
(v.): be convenient for or acceptable to; act to one's own wishes; to go well with.
(He lies when it suits him; suit yourself; that hat suits you.)
to follow suit = conform to another's actions.
(James started eating and Lily followed suit.)
Suite = a set of rooms designated for one person's or family's use or for a particular purpose; a set of instrumental compositions
(I rented out the honeymoon suite; I love Gustav Holst's The Planets' Suite)
The man, dressed in a sharp suit, stepped out of the honeymoon suite, and his newlywed wife followed suit.
Curb vs. curve
Curb = (n.): a stone or concrete edging to a street or path
(He parked his car on the curb)
(v.): to restrain or keep in check
(Curb your enthusiasm)
Curve = noun: a line or outline that gradually deviates from being straight for some or all of its length; verb: to form or cause to form a curve
(The parapet wall sweeps down in a bold curve; her mouth curved down)
He parked his car on the curb, just where the road started to curve into the suburbs.
Ladder vs. latter vs. later
Ladder = a structure consisting of a series of bars or steps between two upright lengths of wood, metal, or rope, used for climbing up or down something
(He climbed the ladder.)
Latter = situated or occurring nearer to the end of something than to the beginning; denoting the second or second mentioned of two people or things
(The latter half of 1946; Arthur and Richard were friends, and the former died while the latter lived.)
Later = comparative of late. (I was late, he was later.)
Frank and Emma, while friends, had a falling-out; the former went into the ladder-making business, and, two years later, the latter moved to France.
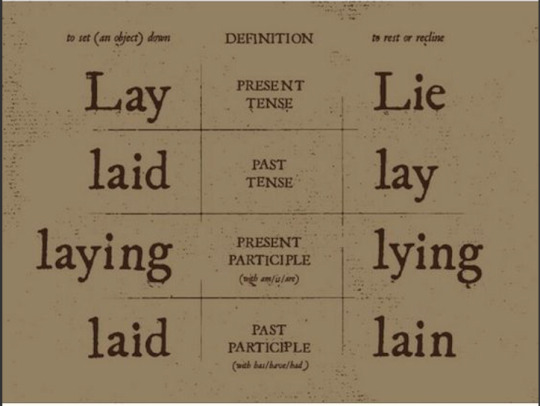
Lay vs. lie (re: the reclining or putting down definitions)
Break vs. brake
Break = (v.): separate or cause to separate into pieces as a result of a blow; to interrupt (If you pull on the rope too much, it'll break.) (n.): an interruption; a pause from work (You're way too tired! Take a break!)
Brake = (n., with equivalent verb) a device for slowing or stopping a moving vehicle. (If you want to stop your car, you have to press on the brakes.)
Don't step on the brake so hard! You'll break both our necks!
Taught vs. taut
Taught = past tense of "to teach" (I taught middle schoolers in Boston for three years.)
Taut = (adj.) stretched or pulled tight, not slack; (of muscles) tense and not relaxed (The rope was pulled taut; all his muscles were taut and straining)
In the fitness class my friend taught, he said that you shouldn't keep your muscles taut all the time.
Through vs. threw
Through = (prep.): moving in one side and out of the other side; continuing in time toward completion of; so as to inspect all or part of; by means of (a process or intermediate stage)
Threw = (v.) past tense of "to throw"
I threw the ball straight through the doorway.
Retch vs. wretch
Retch = (n., v.) make the sound and movement of vomiting (When I saw the blood, I retched.)
Wretch = (n.) an unfortunate or unhappy person; a despicable or contemptible person. (the wretches were imprisoned; ungrateful wretches)
I almost retched at the thought of being nice to that ungrateful wretch.
Ring vs. wring
Ring = 1. (n.) a circular band; a group of people or things arranged in a circle. (Her engagement ring was beautiful; the men stood in a ring.) 2. (v., associated n.) make a clear resonant or vibrating sound; (of a place) resound or reverberate with (a sound or sounds) (Church bells are ringing; the room rang with laughter)
Wring = (v.) squeeze and twist (something); break by twisting it forcibly (I wring the cloth out into the sink; I wrung the animal's neck)
If you don't stop that alarm from ringing, I'm gonna wring your neck!
Bear vs. bare
Bear = 1. (v.) To carry; to support; to endure. (He was bearing a tray with a tea service on it; weight-bearing pillars; I can't bear it!) 2. (n.) a large, heavy, mammal that walks on the soles of its feet, with thick fur (Polar bear)
Bare = (adj.) not clothed or covered; basic and simple
(He was bare from the waist up; the bare essentials of a plan)
Apparently, men can't bear to see women's bare shoulders.
Pose vs. poise
Pose = 1. (v., w/ associated n.) assume a particular attitude or position in order to be photographed, painted, or drawn (She posed for the camera). 2. (v.) to present or constitute (a problem, danger, or difficulty); to raise (a question) (This storm is posing a threat to our summer plans; a statement that posed more questions than it answered)
Poise = (n.) graceful and elegant bearing in a person.
(Poise and good manners can be cultivated.)
Poise is not just striking a haughty pose; it's about how you hold yourself.
Pore vs. pour
Pore = 1. (n.) a minute opening in a surface (this opens up the pores in your skin) 2. (v.) be absorbed in the reading or study of (I spent hours poring over my physics textbook).
Pour = (v.) (especially of a liquid) flow rapidly in a steady stream; to cause a liquid to do so (The water poured off the roof; I poured myself a glass of milk).
As I was cleansing my pores with a face mask and poring over my favorite book, I accidentally spilled the water I had poured myself all over my pants.
Breech vs. breeches vs. breach
Breech = the part of a cannon behind the bore.
Breeches = short trousers fastened just below the knee
Breach = an act of breaking; failing to observe a law, agreement, or code of conduct, or the action of doing so
(A breach of contract; the river breached its banks)
(Come on, guys, no one wants to hear about an army trouser-ing the perimeter.)
Rend vs. render
Rend = (v.) tear (something) into two or more pieces (teeth that would rend human flesh to shreds) — Note: the correct term is heartrending, since whatever does that rips the heart in two.
Render = (v.) provide or give (a service, help, etc.); cause to be or become; represent or depict artistically (A reward for services rendered; the rain rendered my escape impossible; the eyes are exceptionally well rendered)
The artist's rendering of the wolf's fangs, which would easily rend human flesh to shreds, was amazingly realistic.
Damnit
It's either dammit or damn it. The "n" disappears if it merges into one word, but stays if it's two.
Conclusion: Look. Writing is hard. I know. Some of the above tips seem fairly obvious, and I know that mistakes, errors, and typos happen and go unnoticed. That being said, if you apply these tips regularly, and devote a bit more time to proofreading and editing, the quality of your story and the satisfaction of a lot of your readers will increase tremendously.
Authors, I know writing is a thankless job, and many of you are sacrificing your own time to satisfy your followers and your readers; and for that, on behalf of your readers, and even on behalf of those that read and don’t leave reviews, thank you. Do not ever think that this post is meant to belittle you or your devotion to your craft; it is just a list of hopefully helpful suggestions that can help you and, with it, please those readers — like me — who are unfortunately too picky for their own good. And again, use these tips freely (I take credit only for putting them together), good luck, and know that you are universally loved for your efforts, past, continuing, stopped, or postponed. Thank you.
#writing#writing tips#grammar#english#english language#fanfiction#fiction#tips#vocabulary#punctuation#words#literature#perspective#verbs#verb tenses#orthography#homophones#misspellings#typos#errors#narration#narrative perspective#narrative voice#dialogue#authors#writing suggestions#dialogue punctuation#why did i make this
2 notes
·
View notes
Text
Noting Marzamemi
Easy and slow start in Syracuse. Georgio our cheerful and friendly host had said there was no rush for us to leave and we could have held on to the apartment for a bit longer into the day but time to move on.
We went virtually next door for breakfast and shared a couple of pastries ( there were only 4 on offer) in a tiny little cafe though there were seats outside but it had rained that morning so we just sat inside. Friendly lady running the joint.
We had arranged to meet Georgio at 11.30 and he duly rolled up we handed over the keys and were on our way. Apartment was a bit dark but a good size and we enjoyed it. Position excellent and free parking which saved 10 euros a night. Georgio a delight to meet too.
Our destination was Noto which we had not been able to get to 4 years before due to a shortage of time. It was really one of the must sees for this trip whereas Catania and Syracuse were slight afterthoughts at least for me though had proved to be very rewarding.
Only a 40 minute drive from Syracuse so we arrived about 1.00 found a park fairly easily in a side street at the top of town and went exploring. Noto is famed for having one of the most beautiful historic centres in Sicily particularly around the Walkway Vittorio Emmanuelle filled with baroque churches and palaces.
We quickly found it but were keen for lunch. A quick explore found that with a fair few tourists the decent lunch places were full so we settled on fresh takeaway rolls made before us in a little deli cafe. Liz’s favourite of tomato and mozzarella (tomatoes are the real McCoy here fresh as a daisy and red red not cool room orangey red). Salami, cheese and some spicy veggies in oil for me - excellent. We sat at a bench and downed them with a soft drink.
Now for town and the sights. Most of the sights seemed to be closed for visitors and we wondered if that was because it was Monday. Anyway we trooped along Corso Vittorio Emmanuelle and there were certainly some grand churches and buildings generally. However as we made our way along we both came to the same conclusion. We were whelmed by it but not overwhelmed. It felt almost a bit clinical, too clean. Lines of buildings a too symmetrical. It was “nice” but it wasn’t setting the pulse racing. We walked the length of the street and on through the gardens at the end which were nothing too special though the various little cafes and so on which might spark up at night were closed.
It wasn’t too hard to decide that we should keep going which was a shock to the system given this was our Number 1 destination for this trip. It may just have been a reelection of the resplendent architecture we had seen already particularly in Catania.
Anyway we pressed on and the next stop was within 30 mins - Marzamemi. This little fishing village had been recommended to us by Adelaide our B&B hostess in Catania. We immediately fell in love with it. Pretty small, fronting on to the sea. It seemed as if heavy rains had been through as one end of town which was where the port was had a street virtually submerged in water. We followed a couple of other cars through and not too deep. This turned out to be the quiet end of town at least from a tourist viewpoint.
We headed the other way to find a livelier (though on a small scale) centre. Quite a few restaurants and a small shopping area. We identified a little hotel on the main street parked up and they offered us a room for 50 euros. Great price and quite low for this time of year. However it was gone 4.00pm and perhaps they had a few vacancies.
Room was fine though was right on the front st so a bit noisy later we found. Still 50 euros a bargain. Having dumped the cases I set off to the nearby car park to park the car which was 10 euros overnight a bit of a shame but whatever. Street parking apparently not an option.
We set off to explore. First thing we noticed was the strong fishy smell. There used to be a tuna factory here which has now gone but they still process fish here in some way or other. We could see trays of what looked like salted fish. Next door to the processing centre was a sort of artisan food store. In a small warehouse set up with jars of everything from anchovies, jam to veggies in oil, cheese, biscuits, local wine and beers and much more. It was one of two outlets in town with the Italian tourists keen acquirers of these tasty tidbits it seemed.
We pressed on and a couple of very upmarket stores in town. One being O bags selling very stylish beach and fashion bags. We nearly bought a beach bag in Noto from the same store but a bit lumpy price wise and we are already running pretty close to our weight limits for next flight on Ryanair to London. I’ll pine for it though. The second shop (LAO) had very stylish jewellery, some dresses and watches as well as various house ornaments. Liz talked me into a watch which didn’t take much doing and shouldn’t trouble the weight constraints of Ryanair. Went back the following day and bought a second strap of different colour for it so two watches in one though inched marginally as a result towards the weight limits.
We continued on just looking at the various little shops and cafes. A lovely moment was on a small inland lake behind the main shopping area where there was a flock of flamingoes fossicking in the shallow water for whatever flamingoes eat. They were doing this by rapidly moving their legs back and fwd in the mud presumably to disturb bugs etc and then sticking their beaks in. In the late afternoon sun it really was a pretty sight.
After a quick change we headed for the lovely little city square. Old and quaint with sort of faded sandstone brick facades. One new building in one corner which had obviously slipped through the town planner’s net but it didn’t spoil the overall effect.
We found a bar/cafe in one corner and settled down for a beer and Aperol. Excellent local artisan beer for me. We people watched and chilled and pinched ourselves yet again. Thanks for the recommendation Adelaide most unlikely we would not have got here otherwise. We were so taken that I quickly nipped back and booked a second night at the hotel.
The restaurant next door looked good with tables and chairs outside so we booked for 8.00pm which was the earliest option. At 7.45 there was not a soul there (we have noticed the Italians like to eat quite late) though clearly they weren’t taking earlier bookings. One reason may have been that at 7.45 what looked like the effluent disposal truck rolled up, unleashed tubing which disappeared into the restaurant, cleared whatever it cleared and headed off by 7.55 ready for the first intake (or is that input) at 8.00. We had a birds eye view of all this form our seat next door.
We were a bit concerned that it might be a bit cool as a degree or two cooler than preferred but slipped a cardy on and Liz her leather jacket and all was good. By 8.30 the place was pretty full and buzzing with a few more tables being put out at the front for latecomers. Dinner was good I had some small red fish(name eludes) and Liz also can’t remember what she had a pasta from memory. The ambience obviously overcame us. A little walk around town at the end of the night and then we retired very happy with our choice.
Next day we breakfasted on some pastries at a little cafe next door. A croissant which was sort of permeated with jam and a pastry with fruit running through. Both yum. Liz was keen to get the beach so we headed for the car and drove out of town to a nearby beach. There was a little cafe bar and beach chairs for hire so Liz settled in. Sunny but a bit blowy. I fancied a drive so headed off along the beach road but not before setting up Narelle on maps fairly carefully. Without my trusty navigator I would have had to find my own way back.
The road runs virtually right beside the beach in the area so I headed west just taking in the scenery which in truth was nothing spectacular though a couple of lovely beach spots. I drove as far as Marina di Modica and on the way found where the car ferry goes to Malta. We could have come that way to Sicily possibly though they tend not to be any cheaper than flights and we didn’t want to take a car from Malta and leave it in Sicily with the added cost of that. I stopped at a pretty little place by the beach near MdM for an Arancini and soft drink and then headed back. All up probably had been a couple of hours with the stop. About 5/6 mins in received a call from Liz, the wind had become pretty strong and she was ready to head back. I put the foot down as I was still about 20 mins away, picked her up and we headed back to Marzamami.
A repeat of the previous day really. Went for a late afternoon stroll after showers. Bought my additional watch strap. Took photos. Soaked it all up. Forked out another 10 euros for the car park and then returned to the same little cafe bar for pre dinner drinks though this time we also had dinner there. This was followed by gelato from one of the little food stores/cafes.
Just a lovely little place Marzamemi. Off the beaten track. Quaint. Most enjoyable.
Next day proved a little trickier at settlement time. Liz headed downstairs to pay only to be confronted by a cost of 80 euros a night not the 50 we were advised. A protracted dispute ensued and clearly the young lady who had advised us either got it wrong, acted on a whim, exceeded her authority, was being mischievous or just decided to cut a deal on a slow day. We will never know. She was nowhere to be seen. It appeared that she was someone of authority as the receptionist at arrival time asked her what the price should be. Neither that receptionist nor the young lady were around.
They indicated that 50 euros was the price for a single and it clearly was as they showed Liz the books. However it was also clear at the time of booking that the two of us were going into the room as we were standing side by side. We also remembered the confirmation of price even the manner with which it was delivered - a slight twitch of the head. Liz was about to concede or suggest 50/50 when with a shrug of the shoulders the receptionist accepted the lower price and we headed off.
Left a bit of a nasty taste in the mouth not through our own doing and we wondered if the truth came out after we left or there were denials all round. Another little mental note get the confirmation in writing or reiterate the price clearly so there is no doubt. I kicked myself also for not reconfirming the price when I booked the second night rather than just assuming it would be the same. At least the issue might have come out earlier. Also, who knows, we might have checked other hotels for prices if the 80 was advised in the first place though probably unlikely. Anyway all part of the experience.
Still a great stop and thoroughly recommend Marzamemi. On to Modica.
2 notes
·
View notes
Text
One crumble recipe, eleven different desserts. This recipe for classic rhubarb crumble is made with only four ingredients. But in case you want something a little fancier, you’ll find ten easy ways to add variety and flavour.
Rhubarb crumble is a classic British pudding and everyone seems to have their own version of it. It’s absolutely delicious served warm with custard, although cream is good too.
Classic Rhubarb Crumble
Sometimes, you just want a basic recipe with no frills and furbelows. And this classic rhubarb crumble pares things right down to the basics. It contains only four ingredients and is really quick and easy to prepare. It’s also absolutely delicious.
Pulled rhubarb from our allotment.
It’s the trimmed sticks you need for this recipe.
I adore rhubarb and always look forward to the season. This is the first year for many years that we’ve harvested our own and it’s really quite exciting. With the first of the crop, I just want to make a rhubarb crumble.
Chop the rhubarb into roughly 2 cm pieces.
Scatter the rhubarb pieces with demerara sugar.
The crumble takes a little while to cook, but the hands on bit only lasts for ten minutes. All you need to do is chop some rhubarb. Place it in a greased oven proof dish and sprinkle some sugar over the top. Then rub butter into wholemeal flour along with a bit more sugar and spoon over the rhubarb. And bake! So simple, so quick, so easy.
Crumble topping prior to baking.
Crumble topping once baked.
Don’t worry too much about quantities. After all, this is your crumble and you should make it exactly how you like it or according to how much rhubarb you have. If you’ve got a bit more rhubarb, so much the better. Maybe you’ve got less, that’s fine too. If you prefer to have less or more crumble, just decrease or increase the amounts accordingly.
A good crumble falls into three distinct layers, sometimes four. There’s a rhubarb layer at the bottom, then a layer where the rhubarb juices soak into the crumble as it cooks. That’s the best bit I reckon. Then you have the crumbly top. You can also get a crunchy top layer, but you’ll need to look at one of my ten variations for that.
Rhubarb crumble is best served warm. Leave it for five minutes or so after it comes out of the oven. Because if it’s too hot it’s likely to burn your mouth. Serve it with warm custard, pouring cream, ice-cream or for a special treat, clotted cream. ‘Ansum.
Sugar
Rhubarb is quite sour, so depending on how sweet you like your puddings, you may want to add a little more or a little less than the stated amount of sugar in the recipe. I don’t like my fruit to be too sour, but nor to I like overly sweet puddings.
You can use any type of sugar in this classic rhubarb crumble. Each one will give a different taste and texture. I like to use demerara sugar with the rhubarb as it just seems to work well with it. But I prefer golden caster sugar for the crumble. It’s easy to mix in, doesn’t colour the crumble and the flavour isn’t as overt as most of the others. Muscovado will give varying degrees of caramel notes, depending whether you use light or dark. Other brown sugars will do much the same thing.
How Do You Make Vegan Rhubarb Crumble?
The humble crumble is a particularly easy pudding to veganise. All you need to do is swap the butter for solid coconut oil or a vegan butter. I use coconut oil as it doesn’t have any additives and it also gives a nice coconutty flavour.
Can you Make Gluten-Free Rhubarb Crumble?
Yes you can. Similar to the vegan version, all that’s needed to make this classic rhubarb crumble gluten-free is a simple swap. Use your favourite gluten-free flour instead of wholemeal wheat flour. I really like The Free From Fairy’s gluten free wholegrain flour.
Ten Variations on Rhubarb Crumble
At the start of the season, I always like to go for this basic rhubarb crumble recipe. There’s elegance in simplicity. And I really appreciate that lovely bracing fresh rhubarb flavour. However, when rhubarb becomes more abundant, I like to jazz it up a bit. So here are ten variations you can make to this classic rhubarb crumble if you so wish. You can also mix and match and use several of the variations in one dish. The permutations are endless.
Crunchy Top. Sprinkle a tablespoonful of demerara sugar over the top of the crumble prior to baking.
Ginger. The flavour of ginger pairs really well with rhubarb. You can do one of two things or even both. Chop some stem ginger and add it to the rhubarb along with some of the syrup. Or add some chopped crystallised ginger. If you prefer your ginger in the topping, then add a teaspoonful of ground ginger to the crumble ingredients.
Orange. Orange is another classic rhubarb partner. Squeeze the juice of the orange over the rhubarb before covering it with crumble. Then grate the zest into the crumble topping.
Strawberries. Rhubarb and strawberries isn’t an obvious pairing, but it’s an old one and a good one. Replace 100g of the rhubarb with strawberries.
Rose. Unless you’re a regular reader of Tin and Thyme, rhubarb and rose is a little known but effective partnership. I always use my homemade rose syrup, which is incredibly easy to make. But you can use rose water instead. If you use rose syrup, add two tablespoonfuls to the rhubarb prior to adding the crumble. But reduce the amount of sugar to 20g. For rose water, simply sprinkle a teaspoonful over the rhubarb.
Honey. Rhubarb and honey is another lovely combination, as I know from these rhubarb honey cakes. Just swap the sugar in the rhubarb part of the recipe for three tablespoons of honey.
Cardamom. Although many know about ginger, cardamom is another spice that complements the flavour of rhubarb. Cardamom is quite powerful, so it’s best to er on the side of caution. You can either add a ¼ of a teaspoon of ground cardamom to the rhubarb or to the crumble.
Nuts. Nuts are lovely in a crumble topping. You can either use ground nuts or chopped nuts. Swap 50g of the flour for ground nuts. Or just add 50g chopped nuts after you’ve rubbed the butter into the flour. Ground almonds or chopped walnuts are my favourite nuts to use.
Oats. The addition of rolled oats makes for a chewy crumble topping with a subtle oaty flavour. Use 25g less flour and stir the oats into the crumble after you’ve rubbed the butter into the flour.
Deconstructed Rhubarb Crumble. If you’re entertaining, you might want to serve something a little fancier than a humble crumble. Try roasted rhubarb with a crunchy topping tossed over the top. Cut the rhubarb into slim finger length batons. Sprinkle the sugar over the rhubarb and roast in the oven at 200℃ (400℉, Gas 6) for about ten minutes or until the rhubarb is soft, but still holding its shape.
For the crumble, use the recipe in this apple crumble and custard cakes. Bake on the lower shelf of the oven whilst the rhubarb is roasting. You’ll need to stir it about half way through to make sure it doesn’t burn. Alternatively use the “base” recipe in this apricot whisky honey cheesecake. Sprinkle over the rhubarb just before serving. Or you could allow guests to sprinkle it on for themselves.
Other Rhubarb Puddings and Dessert Recipes
Champagne syllabub with orange rhubarb compote
Mini chocolate & rhubarb pavlovas
Rhubarb & almond cream pasty pie
Rustic rhubarb galette with orange spelt flaky pastry
Waffles with rhubarb & rose compote & rose cream
White chocolate & rhubarb ice-cream (no churn)
And for even more rhubarb recipes take a look at my rhubarb category.
Keep in Touch
Thanks for visiting Tin and Thyme. If you make this traditional rhubarb crumble, I’d love to hear about it in the comments below. Do share photos on social media too and use the hashtag #tinandthyme, so I can spot them.
For more delicious and nutritious recipes, follow me on Twitter, Facebook, Instagram or Pinterest.
Rhubarb Crumble. PIN IT.
Classic Rhubarb Crumble – The Recipe
Classic Rhubarb Crumble

This recipe is for a basic rhubarb crumble and it's made with only four ingredients. But in case you want something a little fancier, you'll find ten easy ways to add variety and flavour in the blog post.
400 g trimmed rhubarb (6-8 sticks) ((14 oz))
40 g demerara sugar ((1½ oz))
120 g wholemeal flour ((4 oz))
60 g salted butter – cubed ((2 oz))
40 g golden caster sugar ((1½ oz))
Chop the rhubarb into 2 cm chunks and place into a greased ovenproof dish.
Sprinkle the demerara sugar over the top.
Place the flour and sugar into a large bowl. Then add the cold butter cubes. Rub between your fingers until the mixture resembles breadcrumbs.
Spoon the crumble over the rhubarb and bake in a preheated oven at 180℃ (350℉, Gas 4) for thirty minutes or so. The top should be golden and the rhubarb juices bubbling up around the edges.
Serve warm with custard, cream or ice-cream.
To make a vegan version, swap the butter for solid coconut oil or vegan butter.
For a gluten-free version, swap the wholemeal flour for gluten-free flour.
You can easily half or double the quantities of this crumble. You’ll need a bit less cooking time for a smaller crumble and about ten minutes more for a larger one.
Please note: calories and other nutritional information are per serving. They’re approximate and will depend on exact ingredients used.
Sharing
I’m sharing this simple rhubarb crumble with Lost In Food for #CookBlogShare.
Rhubarb Crumble – a Classic Dessert with Ten Variations One crumble recipe, eleven different desserts. This recipe for classic rhubarb crumble is made with only four ingredients.
0 notes
Text
Why You Need To Invest In A Panama Hat
http://fashion-trendin.com/why-you-need-to-invest-in-a-panama-hat/
Why You Need To Invest In A Panama Hat
With the warmer months of summer comes the need to dress cool. Lightweight cottons, linens, lairy Hawaiian shirts, swim shorts, deck shoes and espadrilles suddenly appear on city streets and seaside boardwalks.
But finding an individual style to lift you above the sartorial herd can be hard. The answer, sometimes, is a hat. Although, too often they’re an afterthought and sadly mostly look that way too. Shapeless floppy sun hats, tired old baseball caps and straw trilbies put paid to any thoughts of a stylish summer.
Luckily there is one that saves the day. The Panama hat brings an elegant boost to any summer outfit, however casual or formal. It adds a sense of real style to those sunny days, providing not only protection from the sun’s rays, but also an additional something – a welcome eccentricity, perhaps.
The Panama has been around for a long time, but how do you wear it without looking like an extra from Downton Abbey? Where did it originate and can it really be a warm-weather essential in a casual world where sportswear reigns supreme?
Selecting And Wearing A Panama Hat
Here’s a question: what do Benedict Cumberbatch, David Beckham, Mick Jagger, Anthony Hopkins, Paul Newman, Gregory Peck, Fred Astaire, Winston Churchill and JFK all have in common? The answer of course is that all have worn a Panama hat.
Mick Jagger, 1973
Until a few years ago hats were effectively dead. Few men wore them. Yet from the 19th century to the 1950s it was rare to be seen out without one. A fur felt fedora or homburg for autumn and winter and a straw Panama hat for spring and summer would be part of every man’s wardrobe. Now they are returning to popularity as men realise how a well-chosen hat can add style and personality to a look.
The traditional Panama is a fedora-style hat shaped with a central dent in the crown which is pinched at the front, with a variable width brim and made from creamy toquilla straw. But they vary in style and must be chosen carefully to suit your face shape.
Prince Charles during the British Royal Tour of Australia, 1994
A good hatter will help you choose a style and decide on quality and a colour to suit you. Sophie Dallison of Laird Hatters says, “When someone walks in looking for a Panama – we would usually ask if they are buying with an occasion in mind, whether they are looking for a traditional bleached white/black ribbon combo or a natural straw colour. A tan Panama tends to look more casual but you can easily dress it up with a suit.”
A good option is the racing trilby shape, says Dallison, “which sits between a trilby and a fedora in terms of brim width, and it looks fantastic on men and women alike.”
David Byrne of Talking Heads, 1982
How To Wear A Panama Hat
Does Your Face Fit?
Horses for courses is the rule here. Not all hats for all face shapes. Personal stylist, Sarah Gilfillan of Sartoria Lab often buys hats with her clients and advises, “A larger brim will suit a large man with a round face and a smaller brim will suit someone of a smaller stature.
Massimo Dutti
“If you have a round or square face select a hat with a lighter coloured, or narrower hat band. This makes the hat appear taller which will add some length to your face shape, so it won’t appear squashed by your hat”. Try on a few different styles and get used to wearing him.
Look Beyond The Classic
Many hatters offer styles beyond the classic cream coloured fedora style, which can carry a whiff of the drunken cricket fan. If you prefer a less restrained look, go for a hat with colour and less traditional shapes, such as a trilby (with narrower brim and high crown). Wear something that will offer a fresher look in terms of shapes and colours.
M&Co
Allon Zloof of Tom Smarte likes to find variations on the classic roots of the design of his hats, playing with both colour and shape. “Traditionally, the Panama hat was always made in the classic wide brim fedora hat shape in a natural colour with a black ribbon”. However, brands are starting to design hats “in not just the classic natural fedora [shape] but also in the trilby and pork pie styles in a combination of colours and more contemporary ribbons”.
Go For Quality
So the Panama can be found in all manner of shapes and colours, but what about quality? Zloof says: “There are different grades of Panama hat, which differ according to the fineness of the weave. The tighter, narrower weave is much lighter and more flexible, but requires much more time and work to create, which results in a higher cost”.
Simons
A good quality hat will, when properly looked after, last much longer than the cheaper alternative, so the investment will pay off eventually. A high quality rollable hat can be more easily stored for travel, too.
Wear The Hat, Don’t Let It Wear You
The great thing about the Panama hat is that most can be worn with anything. It will embrace both a sophisticated Riviera style with a linen suit and cream buckskin shoes as well as a very casual beach look complete with swim shorts and Hawaiian shirt. Whether you’re at The Derby or Glyndebourne, a beach wedding or a summer festival, a barbecue or a city pub, there is a style to fit you. The world is your oyster in a Panama.
How you wear it makes a difference though. Place it flat on your head for a conservative look, or throw it on at an angle for a jaunty look – but go carefully; you don’t want to look as if you’ve over-imbibed at the beach bar. Above all, wear it with confidence and purpose, like you’re not giving it a second thought.
Unknown
Fit For Purpose
Like any item of clothing, a Panama hat will look best when it fits properly – which in turn ensures it’s not going to blow off with the faintest of breezes. The hat should fit comfortably without you having to jam it on your head to make it stay put. On the other hand, it shouldn’t move around or feel as if it’s too loose, either.
“I see too many men picking up a hat that is too large or too small for them, usually because the range of hat sizes offered on the high street is too narrow,” says Zloof. “Take a tape measure, find out what head size you are and then choose your hat accordingly.”
Simons
5 Key Brands For Panama Hats
Pachacuti
The combination of its sumptuous jacquard silk band – made in Devon – with the fine llano weave make for a fedora that is refined and sophisticated. It’s handwoven by skilled fair trade producers from Carludovica Palmata with straw grown near the coast of Ecuador. A high quality rollable panama hat at a fair price, wear it to Henley, Glyndebourne, the Derby or Wimbledon or with shorts to the beach.
Buy Now: £145.00
Tom Smarte
This is hand-crafted in Tom Smarte’s UK workshop using the finest weave from the Ecuadorian toquilla plant. Lightweight, yet sturdy, it features a centre dent, a high pinched crown and an accentuated brim at the front for optimal balance between sun protection and style. Such quality deserves to be worn with a cream linen suit to a sophisticated summer event, but with board shorts on the beach at Fistral will do fine.
Buy Now: £350.00
Laird Hatters
This straw fedora is a fantastic summertime hat and offers something a little different. Lightweight and airy, it is perfect for the warmer months and is made from seagrass, giving it plenty of characterful texture. Made in the UK, it’s suitable for a day-to-day wear or a casual event – slightly more relaxed in style, it’s one for that Hawaiian shirt, although it would go equally well with a linen blazer and chinos.
Buy Now: £75.00
Christy’s
Christy’s is one of the few brands that has a hat factory in the UK. It imports its Panama hat hoods directly from Ecuador before they are shaped, blocked and finished by hand in the UK to the highest traditional standards. The cross weave offers a hat that’s slightly different, perhaps a little more casual, although it would be ideal for a beach wedding or summer party.
Buy Now: £159.20
Marks & Spencer
Not strictly a Panama hat, this offers an affordable alternative to those on a budget or who tend to leave their hats on trains or accidentally sit on them. This hand woven straw hat is lightweight, allowing plenty of airflow to keep you cool in the sun. Matched with some sunglasses and a T-shirt, it makes a perfect addition to your casual wardrobe.
Buy Now: £25.00
The History Of The Panama Hat
Although often mistakenly called a straw hat, the Panama itself is misnamed, as the genuine article originates in Ecuador rather than Panama.
Mark Rogers of Pachacuti, who works with Ecuadorian women to make hats ethically and sustainably, explains, “The Panama hat should be called the Ecuadorian hat as it originates from Ecuador, but it was first traded out to the world from Panama during the 19th century, consequently given the the misnomer. The hats are hand-woven by artisans from the toquilla straw (carludovica palmata) which grows in the coastal region of Ecuador. It’s hats woven from this fibre that are traditional Panama hats.”
Paul Newman on-set of the film ‘The Long, Hot Summer’, 1958
Dallison of Laird Hatters agrees about the origins of the true Panama and adds, “You can judge the quality of a Panama by its weave, its colour and the quality of the blocking. The weave is a determining factor – the finer the weave is, the more expensive the hat will be. Montecristi is famously known for its fine weave, with party-trick ability to roll and fit in a wedding ring. That being said there is no standardised grading system – it’s down to each producer to grade its range so, a word to the wise, be wary of Montecristi hats being offered at lower prices”.
American novelist Winston Churchill in New York City, 1916
And exactly how is a Panama made? It’s a predominantly handmade object, as Rogers explains, “First the leaves of the toquilla plant are harvested and boiled to remove the chlorophyll and then dried. The grass is then passed into the weaver’s hands, who will then split the long leaves into smaller and thinner fibres depending on the quality of hat they wish to weave. The weaver then begins the laborious process of weaving the hat which can take anywhere from a day for a standard weave sun hat to 3-4 days for a fine rollable hat. Hats like our incredibly fine connoisseur hats can take weeks to weave.”
0 notes
Text
Abarth 124 Spider review
For The best ‘MX-5’ you can buy, terrific performance, exhaust note Our Rating 5 Against Cost, limited interior storage, gloomy cabin 2017 The Abarth 124 Spider is the best ‘MX-5’ you can buy, but it comes at a price With a price tag upwards of £27,000, the Abarth 124 Spider is far from cheap, but it’s a relatively small price to pay for what is the best ‘MX-5’ you can buy. The beefed-up looks and additional power play a part, but the Abarth’s party trick is the Record Monza exhaust system, which creates a symphony of noise. It’s also more practical than the MX-5, while the 1.4-litre MultiAir engine delivers surprisingly good fuel economy. 14 Sep, 2017 4.5 Fiat and Mazda should be applauded for managing to disguise the platform-sharing roots of their respective sports cars. To our eyes at least, the Abarth version is the best of the lot, oozing road presence and tipping the hat to its heritage without being overtly retro. The exterior panels are completely bespoke, while the Spider is 139mm longer and 10mm wider than the MX-5. It could be argued that the Fiat is less elegant than the Mazda, but the Abarth has no such issues. It helps that the 17-inch alloy wheels fill the arches, while the enlarged air intake, rear diffuser, bonnet bulge and side skirts complete the racing effect. Tick the box marked ‘Heritage Look’ for a matt-black bonnet and bootlid. Image 11 of 14 Image 11 of 14 There are five colours to choose from, with San Marino 1972 black the only no-cost hue. Costa Brava 1972 red and Turini 1975 white will set you back £400, while Isola d’Elba 1974 blue and Portogallo 1974 grey each cost £600. Inside, the Abarth is surprisingly gloomy, but the cabin can be lifted by the no-cost option of black and red leather seats. Further details to set the Abarth apart from the Fiat include a chunkier steering wheel and stubby gearlever, along with an Alcantara-trimmed dashboard and centre console inserts. Standard equipment is generous, with heated seats, keyless start, automatic air conditioning, cruise control, DAB digital radio, 7-inch touchscreen and Bluetooth fitted as standard. Options include sat-nav, a Bose sound system and a Visibility Pack comprising full LED headlights, automatic lights and wipers, plus rear parking sensors. All models get an Abarth numbered plaque, screwed on the bulkhead between the two seats. It’s a nice touch, which reminds you that you splashed the cash on the flagship 124. Sat-nav, stereo and infotainment As the flagship of the 124 Spider range, the Abarth comes pre-loaded with a full suite of audiovisual options, but you’ll pay extra for sat-nav. Four speakers are fitted as standard, with media controlled via a seven-inch touchscreen. Image 3 of 14 Image 3 of 14 There are two USB ports and one AUX port, with smartphone connectivity via Bluetooth or the Aha or Stitcher apps. You can spend £795 on a premium Bose audio system, complete with nine speakers and a subwoofer, but you’ll be hard pressed to top the evocative exhaust note. As yet, Apple CarPlay and Android Auto are not available. 5 It’s almost impossible not to draw comparisons with the Mazda MX-5 when driving the Abarth, but it’s significant that the differences are noticeable. And this should be applauded; there’s no BRZ/GT86 identikit show here. Press the starter button and the engine roars into life, with the Record Monza exhaust acting like a highly-tuned musical instrument. You’ll never tire of the exhaust note and blipping the throttle becomes highly addictive, especially on downshifts. The Abarth immediately feels more rigid and beefier than the MX-5, helped by Bilstein dampers and stiffer springs and anti-roll bars. It’s also blessed with Brembo brakes and a mechanical limited-slip differential. Quite a package, then. It shows. Once on the move, the exhaust note threatens to steal the show, but you’ll soon discover that the Abarth is about more than just a symphony. It corners with a near absence of body roll, with the turbocharger on hand to catapult you out of the bend. The shortage of outright feel is a problem, but the steering is heavier than in the MX-5, albeit slightly less direct. But it doesn’t matter, because the Abarth has a playful side, with oversteer available should you want it, with the quick steering and limited-slip diff keeping you out of trouble. It’s tempting to keep it in Sport mode for maximum attack, but on the occasions when playing isn’t possible or appropriate, the Abarth switches into a more relaxed and comfortable roadster. The 250Nm of torque means you’re not forever changing gear, making cruising and overtaking a doddle. Engines The 1.4-litre MultiAir is borrowed from the Abarth 500 and is the same unit found in the Fiat version. But while the Fiat has to make do with 138bhp, the Abarth benefits from 168bhp, making it 10bhp more powerful than the 2.0-litre version of the Mazda MX-5. It’ll hit 62mph in just 6.8 seconds, before reaching a top speed of 144mph. Fire it up and your senses are stirred by the terrific soundtrack of the Record Monza exhaust system. Already the Abarth has the edge over the less well-endowed Fiat versions. Image 12 of 14 Image 12 of 14 Initially, the engine might feel a tad disappointing – you can blame the old-school turbo lag for that – but the magic starts once you hit 2,000rpm. This isn’t a car to take by the scruff of the neck to explore the redline. Peak torque comes in at 2,500rpm, making the performance remarkably accessible. While some might prefer the naturally aspirated MX-5 engines, the turbocharged MultiAir engine delivers some much needed theatre to the 124 Spider, especially in the Abarth, when it’s accompanied by that operatic exhaust note. A quick word about the optional six-speed automatic transmission. At £2,000, not only is it an expensive option, but it’s completely out of character with the roadster, with delayed shifts creating an infuriating driving experience. Avoid. 4 Image 4 of 14 Image 4 of 14 The Abarth 124 Spider is built alongside the regular 124 Spider at Mazda’s factory in Japan, so the build quality is better than you’d expect on other Italian cars. We’d also expect the Abarth to be dependable in the long term. Fiat’s 1.4-litre MultiAir engine is tried and tested in a number of Fiat and Alfa Romeo products, so we don’t expect it to provide too many problems. If something does go wrong, servicing and parts won’t be an issue. Standard safety equipment includes electronic brake force distribution (EBD), electric stability control (ESC), four airbags, tyre pressure monitoring and headlight levelling system. A Euro NCAP safety rating is unlikely, but the Mazda MX-5 was awarded a four-star rating, scoring 84 percent for adult occupants, 80 percent for child occupants and 93 percent for pedestrian safety. It was let down by a lack of cutting-edge technology, which is to be expected on an affordable roadster such as this. Warranty Like the standard Fiat 124 Spider, the Abarth benefits from a three-year unlimited mileage warranty, giving it an edge over the MX5’s 60,000-mile cover. The Abarth also comes with a three-year roadside assistance package and three-year paintwork warranty. Servicing An Abarth 124 Spider will require a service every 12 months or 9,000 miles, whichever comes soonest, which is shorter than the MX5’s 12,000-mile intervals. But given the fact that these cars aren’t likely to rack up huge miles, this shouldn’t be an issue. Abarth offers so-called Easy Car servicing plans, available from one to five years and a maximum of 45,000 miles. The chosen plan can be included in a monthly contract hire plan. 4 You have to make one or two sacrifices when buying a two-seater sports car, but the Abarth 124 Spider is surprisingly practical. The fabric folding roof disappears quickly and easily in a few seconds, providing welcome relief for 6ft-plus drivers and passengers who might find the cabin to be a little too cosy. It’s far from cramped, and instead evokes memories of classic roadsters of the past, albeit with a few more creature comforts and, we suspect, fewer leaks. The driving position is low slung and easily the best of the MX-5/124 range, giving you a tremendous view down the long bonnet (bulge included). A decent sized lockable glovebox is situated between the two seats, along with small door pockets and a space for your smartphone to the front of the gearlever. This is where you’ll also find the two USB ports. A pair of removable cupholders are located between the seats, one of which can be relocated to a slot to right of the passenger side footwell. Wherever you put them, they’ll get in the way of either your elbow or your passenger’s knee. Image 9 of 14 Image 9 of 14 Size At 4,045mm in length and 1,740mm wide, the Abarth 124 Spider is 130mm longer and 5mm wider than the Mazda MX-5. At 1,233mm, it’s also fractionally taller than an MX-5 riding on 17-inch wheels. It means that the 124 Spider loses some of the compactness and perfect proportions of the MX-5, but the effect is less obvious on the Abarth version. Leg room, head room & passenger space The additional length and width doesn’t equate to additional space in the cabin, which is lifted straight from the Mazda MX-5 and treated to a series of Abarth upgrades. Legroom is perfectly adequate, even for the tallest drivers and passengers, anyone over six feet tall might find the headroom a tad restrictive with the roof up. Boot With 140 litres of boot space, the Abarth offers 10 litres more than the MX-5, and the boot is shaped to allow the carrying of two cases. The fabric roof folds into the slot behind the seats, with no impact on the luggage capacity. 5 Fuel economy and CO2 emissions are rarely a key consideration when buying a sports car, but the 1.4-litre MultiAir engine delivers some reassuringly strong figures. A manual version could deliver as much as 44.1mpg on a combined cycle, with the automatic returning 42.8mpg. Image 6 of 14 Image 6 of 14 In both cases that’s more than the 40.9mpg offered by the 2.0-litre version of the Mazda MX-5, but not as much as the 47.1mpg possible in the 1.5-litre version. In all cases, you’ll need to show some restraint to achieve the figures, although steering clear of B-roads won’t be easy. If you’re still struggling to choose between the manual and automatic versions, the first-year tax rate might sway your decision. With CO2 emissions of 148g/km, an Abarth with a manual gearbox will cost £200 to tax, while the 153g/km of the automatic equates to a first-year rate of £500. Insurance groups All models fall into fall into the Group 29 insurance bracket, three higher than the Fiat 124 Spider. It’s the same as the 2.0-litre versions of the Mazda MX-5 which, given the potency of the Abarth, is a good result for the Italian. Depreciation It’s too early to assess the depreciation of the Abarth, but exclusivity and badge should ensure these models hold their value better than the Fiat versions. We expect the entire 124 Spider range to deliver similar returns to the Mazda MX-5, retaining 45-50 percent of their value after three years.
http://www.autoexpress.co.uk/abarth/124/100924/spider
0 notes
Text
Activity and Workout app explored and explained
[ad_1]
It's now been almost two years since Apple upped its fitness and sports tracking game with the Series 2, and plenty has changed since then with Activity and Workout.
With the Apple Watch Series 3, exercisers were once again given a boost through improved heart rate guidance and the addition of LTE, meaning that workouts were free from the shackles of your smartphone.
So, now you've got a smartwatch with waterproofing, standalone connectivity, GPS and a growing arsenal of third-party apps to hold your experience together. But, even still, Activity and Workout still remain the staple of your daily exercise, and further improvements are afoot through watchOS 5 and the Apple Watch Series 4.
Essential reading: Apple Watch super guide
That's not to say it's all perfect — issues still remain regardless of which Apple Watch model you're rocking — but below is a guide to help you get to grips with what's available right now.
The Activity app

The Activity app is the fitness tracking element of the Apple Watch, and keeps tabs on whether you're getting enough exercise per day.
It differs from most activity trackers by dispensing of step goals. Instead, the Apple Watch has three targets: Move, Exercise and Stand. Each target has a ring, which fills to denote your goal process.
The Move ring
The Move goal is effectively your step goal, but measured in active calories. Fill the ring by moving around and elevating your heart rate. This is a sneaky beast, because the Apple Watch will set the target based on your daily averages, so active people will find it tougher to fill the ring than more sedentary types. Our goal on day one with the device was 740 calories per day. Now it's 900.
The Exercise ring
Most guidelines say we should get 30 minutes of exercise per day, and this is the ring to keep you on target. Fear not, because anything above a brisk walk is classed as exercise, so take more short walks to hit your goal.
The Stand ring

The Apple Watch hates people who sit down, and it'll remind you of its hate 10 minutes before every hour. The good news is that you only need to stand for one minute in an hour to make the Apple Watch happy. Do that for 12 hours in a day and you've hit the goal. Wheelchair users can also get in on the action, receiving 'Time to roll!' reminders in place of Stand reminders.
Each is represented by a coloured wheel that you need to fill, and the app is accessible from the Apple Watch itself and the iPhone. From here, you can see your earned achievements, which days you worked out (indicated with a yellow dot) and also delve into the likes of heart rate and heart rate recovery.
Getting set up
When you load the app for the first time you'll be asked to input your vital statistics, which hones watchOS' algorithms to your body. If you skipped this step for any reason, you can adjust the settings in the Apple Health section of the Watch app on your iPhone.
Jog on: The best Apple Watch running apps
Every week, the Apple Watch will send you an update telling you how many times you've hit your goals. If you've done them too easily, or if you really struggled, it'll recommend a new goal that's more in line with your abilities.
If you don't dig Apple's recommendations, you can change your Move target by long pressing the metric in the Activity app. If you're hitting your goal too easily, or never even close to achieving it, then adapt it to test yourself, but not be unattainable.
Adjust your goals
You can get a progress update at any time by heading to either the Watch app or its iPhone variant. However, you can only see your history within the iPhone app. From there you can see a calendar view of every day, and whether you hit your goal on any given day.
Achieve something

One aspect of the Activity app that's refreshingly good is the Achievements. Accessible on the third tab of the iPhone Activity app, there are 19 achievements to unlock and they're no walk in the park. Hitting your daily Move goal 1,000 times is one achievement, for instance. Apple also introduces limited-time-only achievements on special days, like if you hit your exercise goal on Mother's Day or Christmas.
You can also share your progress with other Apple Watch friends. Working via both the iPhone and Apple Watch, you'll receive progress alerts and the ability to send encouragement (or taunts, if that's your style) throughout the day. This adds a nice social element to help spur you on.
Future encouragement
With watchOS 4, Apple added some intelligence to its Activity app to help you close those rings. In the morning you have the option of getting a personalized notification encouraging you to do something. For instance, if you're close to gaining an achievement it'll let you know, and it'll even tell you how you can earn it, or what you can do to match yesterday's activity level. If you're getting toward the end of the day and you're not close to closing those rings, it'll recommend something you can do to finish that sucker off.
That isn't the only type of personalization the Activity app will deliver, either. Every month, you'll also get challenges created specifically for you. So if you're feeling low on motivation and encouragement and need something to keep pushing yourself, the Apple Watch will do that for you.
The Workout app

While the Activity app attempts to replace your Fitbit (with some degree of success), the Workout app takes aim at your Garmin sports watch. With GPS now on board, it's able to at least track outdoor sports accurately – if you're using a Series 2 or Series 3, of course.
The Workout app is accessible from your Watch's home screen, and offers a host of tracked activity. Running, cycling, walking and swimming are all present, as is rowing, indoor cycling, elliptical workouts, stair stepper, and the immensely popular workout sweeping the globe - 'other'.
That 'other' category can also be changed into other activities not officially supported by the Apple Watch (yet), like wrestling and yoga. There are also two wheelchair-specific activities.
This was the point where we expected to deliver a host of useful advice about your workouts – but there's precious little to tell.
See your stats
If you start a run, cycle or walk you can choose from the Apple Watch whether you want to hit a specific time, number of calories, kilometres, or even just host an open workout. You swipe left or right on the screen to toggle between them.
And for Series 2 and Series 3 users, once you've entered the length of the pool, you can also do the same for your swim.When you get started, you can still swipe between screens to change the information you see on your run. You can keep tabs on your pace, your distance and the total time, while a swipe left will see you met with music control.
Essential reading: Apple Watch Series 2 v Series 3
For non-outdoor workouts, it's about the time, your calories and your current heart rate. The confusing part is that it doesn't matter whether you're rowing, stepping or engaging in a sweaty session of 'other', the metrics are the same. To Apple, all your sports are 'other' - although, once again, you can always change the label to something much less generic later on.
Choose your metrics

If you're not quite happy with the metrics the Apple Watch gives you, you can always customise them yourself. All you have to do is head to the companion app on iPhone. There, you can click 'Workout View' to customise the metrics and statistics you'll see.
There are two big options: multiple metric and single metric. Single metric will show you a single statistic at a time, and spinning the Digital Crown will let you see others. Multiple metric will let you see more than one, and you can even dive further.
You can customise which metrics you see for which workouts. For example, for an outdoor walk your default metrics are duration, active calories, heart rate and distance. But you can also add current pace, average pace and total calories. For outdoor cycle, it's a little different. Duration, current speed, heart rate and distance are the default metrics; you can add average speed, active calories and total calories if you are inclined.
Turn on Running Auto Pause
If you're big on running, whether indoor or outdoor, you know how important it is for your fitness tracker to automatically pause tracking when you stop. You could be at a stop sign or a red light waiting to cross the street, and your fitness tracker will be docking your workout. That just will not do.
Make sure your Apple Watch has Running Auto Pause turned on and ready to go. Just head to the companion app on iPhone, head to the Workout app and click 'Running Auto Pause' to on. You'll be good to go and much less annoyed.
HIIT it up
The Apple Watch's heart rate tracking is generally pretty strong, and outlasts many wrist-based rivals in interval performance, but it does fall down when you're trying to negotiate a target HR in short intervals.
We're still testing out just how effective the Apple Watch Series 3 is at dealing with higher heart rate, but it isn't something which appears to have improved over generations too heavily.
Prepare for VO2 Max
Brought in through watchOS 4 and iOS 11, Apple added a measurement for VO2 Max in the Health app. Currently, it seems that any device rocking the new OS will be privy to these smarts, but for now it appears to be stuck in the pipeline, and we're not even sure whether watchOS 5 will bring anything new here.
Create a fitness-based watch face
There are a ton of great watch face combinations you can use to make your life easier. Don't just stick to one watch face that tries to be a jack of all trades, because it'll no doubt be a master of none.
What you should do is create a specific fitness-based watch face you can turn to when it's time to get sweaty and challenge yourself. Consider using one of Apple's Activity watch faces - whichever you think looks best - and combine that with the Workout and Weather complications. Not only will you be able to see how your activity rings are doing throughout the day, you'll get to quickly launch into a workout, weather permitting.
Review your data
When you're done, you can review your data in the Activity app on your iPhone. The workout is stored under that day's activity, which is easy to review, but as workouts aren't listed together, it's nowhere near as good as a dedicated sports app for comparing sessions or progress over time.
You can review calories (active and resting), time, distance, average pace and average heart rate. You can't see a graph of your pace across the session or a map of where you've been.
Coming through watchOS 5

The above is everything you can explore through Activity and Workout right now, but there's also a few tidbits that Apple revealed during WWDC 2018 that are set to make their way to both apps later this year.
Automatic exercise detection
The major new feature being touted for watchOS 5 is automatic workout detection, but it's not exactly the automatic detection you're used to. Instead of just tracking automatically, the Apple Watch will pick up on the kind of workout you're doing and instead just give you a prompt to remind you to kickstart the tracking.
The Watch will send you a notification telling you that it thinks you're working out, and once you do, it'll give you retroactive credit for the amount of workout you've already done. Similarly, if you forget to end a workout, you'll get a nudge to do so.
More changes to workouts
After adding a host of new workout options last year, two new ones are coming to Workout this fall - yoga and hiking. The former is tracked using your heart rate, while hiking will also take into account your pace and elevation.
That's not all, either, with improvements also coming to outdoor running. The mode will soon have support for rolling mile paces, allowing you to see your progress from your previous running pace, and also receive pace alerts so you know when you're above or below your target. Cadence is coming, too, with the Watch showing your steps per minute, though this will also be available for indoor runs, and both outdoor and indoor walks.
Activity gets competitive
Fresh features aren't just appearing within Workout, as Activity is also set for a couple of new bits to play around with. And since sharing your stats is one of the key aspects of the app, Apple is improving this with competitions.
Once watchOS 5 has been released, you'll be able to challenge any of your Apple Watch friends to a week-long competition. Points will be awarded for every time a ring is closed, and users can check progress between themselves and a friend every day. The winner gets an award at the end of the seven days, as well as bragging rights until the next competition.
Get your next Apple Watch fix
Hot sports watch deals

Garmin Forerunner 735XT - save $70
$330

Garmin Vivoactive HR - save $80
$169.96

Garmin Fenix 5 Sapphire - save $115
$584.98
Wareable may get a commission
[ad_2]
https://excellentsmartwatches.com/activity-and-workout-app-explored-and-explained/
0 notes
Text
First trials of F-35 aboard HMS Queen Elizabeth begin this autumn
In late August HMS Queen Elizabeth will leave Portsmouth for her Westlant 18 trip. The ship will be away for around four months and, although not an operational deployment, this will be her longest and most demanding period at sea so far. The centrepiece of the deployment will be the fixed-wing First of Class Trials (FOCT) with F-35Bs touching down on her deck for the first time. In this article we look at the preparation and plans for the flying trials.
From simulator to real world
Since 2007 a great deal of work has been done in the F-35 QEC integration facility at BAE Systems at Warton. This £multi-million investment includes an F-35 cockpit and a simulator replicating the Flying Control (Flyco) office in the after island of the QEC. Using these tools it been possible to test the behaviour of the aircraft and how it interacts with the aviation systems fitted to the ship, and make changes to design where required.
The Landing Signals Officer (LSO) provides advice to the pilot to assist with safe recovery to the ship. In the simulators, the pilots and LSOs have been able to build up experience and develop the operating procedures for managing F-35B launch and recovery from the ship.
Advances in computing power and the sophistication and accuracy of modelling and simulations have helped to mitigate much of the risk involved with integrating a new aircraft with a new ship. The QEC were designed to operate the F-35 from the outset, her spacious decks and the experiences of the USMC, already operating the F-35B at sea, give every reason for confidence the flight trials will be successful.
Flyco and the LSO workstation, part of the F-35 QEC integration simulator at BAE Systems facility at Warton, Lancashire. (Photo: BAE Systems)
The F-35B cockpit simulator at Warton, part of the most sophisticated flight simulator BAES has ever built. (Photo: BAE Systems)
Preparing for carrier aviation without carriers
Despite the loss of the RN’s aircraft carriers in 2010, unique carrier aviation and combat flying skills have been successfully kept alive by a careful strategy developed by the Fleet Air Arm. Adding to the legacy experience flying the Sea Harrier and Harrier GR7/9, selected RN pilots have served in the US Marine Corps flying the AV-8B Harrier and in the US Navy flying F/A-18 Super Hornet. This means today there are about 60 qualified RN fast jet pilots, with about 20 other pilots at various stages in the training pipeline. The RN currently has 8 fully trained F-35 pilots and the RAF will have 18 by the end of this year. Although based at RAF Marham and 617 being an RAF-badged squadron, the UK Lightning Force is a truly joint effort. An RN pilot slated to become CO of 617 shortly which will has a total strength of 14 pilots. Of these, 2 RN and 2 RAF pilots are ab initio, the F-35 is the first frontline aircraft they have trained on.
During QE’s last brief period at sea, Hawks of 736 Naval Air Squadron, played the part of F-35s so that the flight controllers onboard could rehearse procedures for managing aircraft approaching the ship. Aircraft handlers have been practising their role using full-size dummy F-35 models aircraft at RNAS Culdrose. These and every other possible preparation has been conducted on both the naval and aviation sides ahead of the real thing, using a variety of simulations and synthetic training aids.
Land-based development testing
The first fixed-wing aircraft to land on HMS Queen Elizabeth will be from the Joint Strike Fighter (JSF) Integrated Test Force (ITF) based at the US Navy’s Paxutent River flight test centre in Maryland. Development of the Short Take Off and Vertical Landing (STVOL) aspects of the F-35B has utilised the specialised Centerfield STOVL facility at Pax River which includes a Ski Jump, a grated Hover Pit and an AM-2 Expeditionary Airfield (used by the USMC to create austere landing strips). Three British pilots are assigned to the ITF and have been preparing for the QEC FOCT for the last four years. A programme of successful ski-ramp launches has been conducted, including in substantial crosswinds and carrying full asymmetric loads. Results from the land-based test programme have reduced the risks and will speed up the ship-board testing process.
Work undertaken by the ITF is about defining the F-35’s handling qualities and the safe operating envelope. This is quite separate from the three aircraft of the RAF’s 17(R) Squadron Operational Evaluation Unit (OEU) based at Edwards AFB. They are part of the international F-35 Joint Operational Test Team (JOTT) focussed on weapons, combat tactics and operational considerations.
The ski ramp at Pax River, built in 2009 is a replica of the 45m, 12º Invincible class ramp. The ramp fitted to the QEC ramp is slightly different, angled at 12.5º and 60m in length.
Big decks, fast jets (at last)
The first jets to land on the ship will be conducting Development Testing in two 3-4 week phases (DT-1 and DT-2), with a break from the intense flying schedule in the middle. Four pilots will be assigned to fly two “orange-wired” F-35B ITF aircraft for the FOCT programme. These test aircraft are technically US-owned jets but the pilots will be British. During the trials, both aircraft will send data for analysis to QE which will be temporarily fitted with a telemetry system. Initial flying will be conducted in very benign conditions but as the trials progress, the ship can seek more challenging weather as she cruises up or down the Eastern seaboard of the US. Simulator models can only be trusted to a point so the programme must proceed with caution, starting at the safest centre of the flight envelope and moving outward. There are multiple test points to be worked through with variables such as wind conditions, sea state and aircraft loading.
DT-1 will involve the pilots getting acquainted with the ship and carrier qualified. Initially daytime, dry deck vertical landings and ski-jump take-offs will be tested, then moving on to night flying and wet deck conditions. For vertical landings, the pilots are assisted by advice from the LSO and visual cues from the Glideslope and long-range line-up indicator system (GILS). Two Advanced Stabilised Glide Slope Indicators (ASGSI) project a vertically colour-coded beam which can be seen between 2 – 5nm away by the pilot, depending on conditions. An additional visual aid for a vertical recovery is the Hihat which consists of 11 lights fitted in a vertical stack with two lights mounted horizontally, one either side at the correct aircraft hover height. This is mounted on the port quarter of the forward island as helps the pilot gauge height over the deck when in the hover.
The ASGSI installed on the port catwalk of QE (shielded to protect it from the effects of jet blast). It projects a beam of light, with coloured sectors, stabilised to remove the effects of the ship’s roll and pitch, indicating to the pilot if his approach is above, below or on the correct glide path.
Vertical landing at sea is now routine for USMC F-35Bs operating from their LHD/LHA assault ships. The automation of the F-35B’s flight controls make vertical landing a relatively simple affair compared to the very demanding workload placed on a Harrier pilot. As the QEC have a much larger flight deck and suffer less wind turbulence (because the island is further away from the landing spot), very little presumed risk is attached to this phase of flight testing.
Assuming the first phase goes well, DT-2 will involve more challenging sea states and the aircraft carrying dummy stores in various configurations. The Shipborne Rolling Vertical Landing (SRVL) technique will also be tried for the first time. This allows the aircraft to return to the ship at heavier weights carrying unused munitions or fuel. SRVL also reduces wear on the lift fan and heat impacts on the flight deck compared with vertical landing. SRVL requires flying a very precise approach profile with the aircraft touching down with around 60 Knots of forward speed so the wings are still generating part of the lift. Land too fast and the aircraft will run out of flight deck and have to take off again using precious fuel. Approach too slowly and the aircraft will descend too quickly, potentially hitting the stern of the ship or crashing on deck. This battle with the laws of physics has been managed successfully many times in the simulator but there are still some unknowns about performing this procedure on a moving deck at sea, which has important operational implications for carrier strike capability.
This year’s FOCT programme will define the safe operating clearances for the F-35 but a third development testing period (DT-3) is planned for mid-2019, as HMS Queen Elizabeth moves closer towards her first operational deployment in 2021. We will examine the other non-aviation aspects of the Westlant 18 deployment in another article to follow next month.
from Save the Royal Navy https://www.savetheroyalnavy.org/first-trials-of-f-35-aboard-hms-queen-elizabeth-begin-this-autumn/
0 notes
Text
Video Editing Techniques
Video Editing Techniques
Software
Picking the right software is a personal preference choice, however depending on your editing style one particular software might work better than others. The top four at the moment are Premier Pro, Avid, Final Cut Pro and DaVinci Resolve, but others include Lightworks, Sony Vegas and Autodesk Smoke.
Premier pro is known for its consistent updates, multi-cam editing, a customizable interface and is helpful when linking with other Adobe software. Its probably the most popular software for video editors to work on. The best thing about Premier Pro is being able to swap between different Adobe programs like After Effects, Audition, SpeedGrade and Media Encoder. Being able to send timelines between programs is really handy. The only downside is that you have to be subscribed to Creative Cloud which is £50 a month, luckily for us we have free up to date access to all of Adobe's software.
Avid costs £39 a month. Its really good for working on large projects, has server rendering compatibility and a huge feature set, but it can be rather clunky and harder to learn than other software's out there. It is favoured by Hollywood productions and normally used to edit feature length projects due to its non-destructive editing (NLE). Avid is designed to edit using just keyboard shortcuts alone which saves a lot of time in post production.
Final Cut Pro is the most expensive software out there for video editing costing £299. Its fast, has multi-cam support, compound clips and a sleek simple interface. The only downside is that it is Mac only; luckily for us we both have Macs. FCPX is a non-linear editing system so it performs non-destructive editing on your footage which is helpful, as well as background rendering and multi-cam editing. For the price though, it is very similar to Premier Pro and Avid.
DaVinci Resolve has great colour features, a sleek design, node-based effects and most importantly is free. Its the lesser known of the four as only recently has it become more than just colour correction software and doesn't have a lot of tutorials for editing. It is being constantly updated by Blackmagic and could become more used than other editing software out there soon.
Learn the Shortcuts
Learning your shortcuts is the best way to streamline your editing process. Once you figure out that the “L” button speeds up your playback, you’ll never want to sit through an interview in real time ever again.
Add Music and SFX
If learning shortcuts is the easiest way to speed up your editing process, then the addition of music and sound effects to your project is the easiest way to add depth and layers to your project. With music, make sure you choose something that fits with your visuals. A metal song doesn’t really work with a glorious shot of a field of tulips (unless they’re like, totally metal tulips), and a slow motion shot of a car-chase explosion doesn’t really warrant an upbeat disco track (although I would love to see it). Make sure to cut to the beat of the song, because it matters. A well-timed cut to the beat can be iconic, or it can be completely forgettable, if it’s done right or wrong.
For sound effects, subtle crowd noises, background sound effects, and other audio cues help the audience feel like they’re really experiencing what they’re seeing on the screen. If you’ve ever seen any behind-the-scenes videos of productions, you’ll notice that there’s rarely music or sound effects being played in real time; it’s all added in post.
For post-production, you should also always properly mix the music and sound effects with your footage audio to make it sound as natural as possible. As something of a side note, all of Pond5’s music and sound effect are available within the Adobe Premiere interface with our free Adobe Add-on, so you can plug temporary tracks into your project directly and see how they fit before you decide to purchase.
Ramp It Up… Or Down
Speed ramping is used for action scenes where something needs to be emphasized in either slow or fast motion, but starts in real time (see: 300, Inception, Transformers, Saving Private Ryan). It can also be used to finesse your clips so that they fit together better within your sequence. If you’ve got a three-second hole in your sequence, but your clip is currently 3.5 seconds, experiment with ramping up the speed to the right duration to make it fit. Conversely, you can slow it down if the gap is longer than your clip. Just make sure it fits and looks realistic!
When in Doubt, Cover It Up
If you’re editing an interview, or if your subject is telling a story and it seems to drag, the best thing to do is to add some b-roll or a+b roll to keep it interesting. Cut back to the person who’s talking if they’re saying something powerful or important, but don’t linger too long before cutting away just to break it up. If you’ve shot a lot of interviews, you’ll know that some subjects say “um,” “uh,” and “you know” a lot, and may ramble at times. You can cover up all these cuts while keeping the story moving. It also doesn’t hurt to go away to some live audio (a+b) of them to re-set, transition, or introduce the audience to another setting.
Space It Out, for Dramatic Effect
By adding footage to either cover up cuts, make your video flow more authentically, or transition to another location or idea, you’re making for a better piece — but these may not add any drama or tension. You can make your subject’s impactful statements stand out more if you give them some breathing room and let the viewer reflect on what they’ve just seen and heard. Keep the visuals going, but stop the a-roll and let the music and/or visuals aid the pause by increasing the volume or putting in the perfect visual cap on the soundbite. This video is a great example of letting the statements breathe while showing the wonderful visuals to enhance the story.
Stabilize It
In addition to poor-quality audio, having shaky footage can be a death sentence for your project. The good news is, there are great plug-ins and tools that will help you stabilize your footage that are out there, and even built-in to your editing software. Become very well-acquainted with them, because this can be a game-changer. Warp Stabilizer in Adobe Premiere/After Effects and SmoothCam in Final Cut X are the big ones, but there’s a powerful third-party plugin called ReelSteady that works really well in After Effects, from my experience. You can find apps that stabilize your phone video, as well, such as the well-reviewed Emulsio.
Re-Frame, If You Can
These days, cameras are shooting higher and higher resolutions, which has created the ability for editors to re-frame and push/pull the footage to interesting effects. Since 1080p is still the standard delivery resolution across many jobs, you have a lot of space to explore with 2K-and-above resolutions. Try adding a subtle push-in during a tense scene, or position your subject in the center of the frame if their eye-line was off. You can possibly even get two shots out of one clip if you’re shooting ultra hi-res and downscaling it.
The MAJOR caveat to this is to not go overboard, and try to avoid scaling up beyond 110% — especially if your camera isn’t that great. Pixelated footage is very noticeable, and a re-positioned clip doesn’t work if the actors or subject look out of place.
Colour Grading & Correction
The terms “color correction” and “color grading” are often used interchangeably, but refer to different processes of editing color in video. Color correction is usually done first. This is because raw footage tends to be over-saturated and the colors need to be balanced out. The process of color correcting does just that, by making sure footage looks exactly the way that the human eye sees things. If the white and black levels match what the human eye sees as white and black, then the other colors should be balanced as a result.
Color grading is the next step, where you create the actual aesthetic of your video. But this is an entirely optional process, especially if the film is meant to be a realistic as possible. However, the right color grading does help convey a visual tone or mood to heighten the narrative. For example, you may use darker tones to elevate the storytelling in a horror film.
0 notes
Photo

How to choose your Cricket Bat?
Cricket is a very technical sport with almost all products having lot of technical details. Cricket bat is the most technical product in game of cricket and is a must product to play cricket. Cricket Bat is fundamental to the game of cricket. Good cricket bats are generally expensive. It is majorly found that large proportion of players, mainly amateurs and children, are playing with the wrong size and/or weight cricket bat to the detriment of their game.
Choosing a perfect cricket bat is more difficult than you think. Almost every bat looks the same which makes it even tougher. Selection of a wrong size/ weight bat will reduce your level of performance.
The following steps will help you to find the best suitable bat for you.
Choose your Bat Willow:
This is one of the most important thing to choose. Cricket bats are carved from willow, which is a naturally fibrous wood. Each cricket bat manufacturer seeks to select the best woods for their products to ensure high standards and overall product quality. The two types of willow used for bat making are English Willow and Kashmir Willow.
English Willow is a soft, fibrous timber which is a preferred choice for the majority of bat manufacturers due to its high performance effect when striking the ball. Regardless of type, willow gets damaged and is prone to breakages over time. The cricket bat can become scarred, bruised and dented due to the nature of the game and the frequent high intense impacts of the ball hitting the cricket bat. On the other hand, Kashmir Willow comes from India. This is largely utilised by cricket bat manufacturers as a substitute for English Willow. The Kashmir willow is regarded as a harder wood and in comparison to English willow and does not have the same performance effect i.e. a player will not experience the same "sweet spot" when striking the ball as in English Willow. Kashmir willow will only be used for lower range and priced cricket bats. It is unlikely that a regular adult player, playing at a reasonable standard would choose to use a Kashmir willow cricket bat.
Some cricket bat manufacturers insert additional carbon fibre into the handle of the cricket bat to make the bat feel lighter in the hands. The insertion of carbon fibre also allows more power to be generated in shots and increases the shock absorption in the handle from high impact balls. Due to recent technological advancements and innovations, this material is can be inserted into the handle of cricket bats to add reinforcement and provide more power in the hitting zone.
Covered vs Uncovered Face:
The uncovered face means that the grains of the cricket bat are visible, whereas the covered face means that the blade of the bat is not immediately visible though you may be able to see the blade through transparent protective coating. Each of the above will appear differently on cricket bats, but most importantly of all, you should note that the bat's performance will not be hindered. Protective coating such as anti-scuff is applied in order to add maximise protection to the face of the cricket bat. This should prevent additional moisture being absorbed into the wood, as well as to help bind surface cracks together.
Number of Grains:
Number of grains on a cricket bat is something that varies from individual to individual. The number of grains will often differ from bat to bat. A cricket bat between 6 and 12 grains is a good indicator of quality willow. Cricket bats with 6 grains are likely to be slightly softer than 10~12 grains and therefore take longer to knock-in and reach optimal performance initially. However, please note there are some extremely good premium range bats with lower grains.
Willow Grade & Appearance:
Cricket bat prices vary significantly. In all experience, we do feel that cosmetic appearance has little correlation with bat performance. It is felt that thin grain bats are the best performing bats but that is not necessarily the case and they can tend to break more quickly. Whereas wider grained bats can perform just as well although they are slightly harder to start with, after playing in they were stronger pieces of willow.
The number of grains in a bat is a much debated issue (a grain is regarded as a year in the life of a tree) and there was a school of thought that 8 straight grains on the face produced the perfect bat. However, over the years, willow has changed and the ever increasing demand for willow has created a scenario where trees reach maturity more quickly. This means there are fewer/ wider grains, consequently the definition of grading and grains in a bat have evolved over the years. In conclusion, the most important factor when choosing your bat is to ensure that it is the one that feels right for you. In order to maximise your performance it is important to consider what you want from your bat and how you play the game as the game of Cricket is all about timing.
English Willow Bats are divided into following grades:
1. Grade 1+ [A]: The most expensive willow and arguably the best looking blade. It is a highest quality of English willow and mainly used for the player’s bats by the manufacturer. These days, it is increasingly being rolled-out to top end bats for the public. The grains are straight and even, the wood unbleached and there should be minimal to no marking or discoloration on the bat face. There may be some red wood evident on the blade and generally there will be at least 6 fairly straight grains visible on the face.
2. Grade 1 - G1 [A]: It is a top quality English Willow. Good straight grain structure and unbleached with minimal marking or discoloration in the face.
3 Grade 2 - G2 [B]: It is an excellent quality blade but usually more red wood may be visible than on a grade 1 which does not affect the playability of the bat. Similar number of grains to a grade 1 with potentially the odd blemish or butterfly in the grain on the face.
It is an unbleached English Willow with some irregular grain patterns and some blemishes/ coloring across the blade.
4. Grade 3 - G3 [C]: The most extensively used grade of blade which offers excellent value for money. A grade 3 blade may have up to half the face in a tint/red wood colour but this does not affect playability. This grade will have around 5 grains on the face that may not be that straight and there is likely to be some specks or butterfly marks on the grains on the face of the bat. It is a usually unbleached English Willow with irregular grain pattern and some marking and discoloration in the blade.
5. Grade 4 - G4: It is an English Willow usually bleached and often non-oiled with a covering to the face of the bat. Usually over half of the blade may have a discoloured area but the product playability should not be affected. There are often only 4 grains and there are more butterfly stains and marks on the face of the bat.
6 Grade 4 – G5: This grade is produced during production process and is basically similar to a grade 4 but may have more stain in the wood so cosmetically will not look as good.
Shape, Size & Bow of the Bat:
It is often claimed that bats are specifically designed for either front or back foot play. In reality, we all have to play on both front and back foot, so it is therefore best to choose the bat that just feels right for you. As all players differ in the way they play and hit the ball in slightly different areas of the bat. Whilst it is impossible to cater for every impact area if you choose a bat whereby the wood is focused on your normal impact position, then this gives a better chance of finding the bat that will be right for you.
This varies from individual to individual as some players prefer bats with a large bow whereas others don't. Professional players mainly prefer larger bow with thick edges to better meet the rigors of the modern game. Same is being reflected in the designs available to the general public by the manufacturers these days. The size of the bow can have an impact on the pick-up of the cricket bat and an increased bow can often result in the cricket bat having a heavier pick up. Some bows are higher or lower down the bat depending on batsmen's hitting style, or to reflect the pitches which you play on. A low bouncing wicket may requires a lower bow compared to the dry climate and bouncy pitches.
You can choose your Bat size as per following Size chart:
Cricket Bat Size Chart
Bat Size
Approx. Age
Height of Batsmen (feet)
Bat Length (inches)
Bat Width (inches)
1
4-5
to 4'3"
25 3/4"
3 1/2"
2
6-7
4'3" - 4'6"
27 3/4"
3 1/2"
3
8
4'6" - 4'9"
28 3/4"
3 3/4"
4
9-11
4'9" - 4'11"
29 3/4"
3 3/4"
5
10-12
4'11" - 5'2"
30 3/4"
4"
6
11-13
5'2" - 5'6"
31 3/4"
4"
Harrow
12-14
5'6" - 5'9"
32 3/4"
4 1/6"
Full SH
15+
5'9" - 6'2"
33 1/2
4 1/4"
Full LH
15+
over 6'2"
34 3/8"
43/4"
Edge Profile:
Big edge profile which increases from the shoulders and maximises at the sweet spot, generates supreme balance with an extended sweet spot that covers the entire width of the blade. This varies from individual to individual choice.
Choose you Brand:
There are many brands available in market these days but very few brands make most reliable Cricket bats. Some of the most reliable Cricket bat manufacturers worldwide are SS, SG, Kookaburra, GM, Gray Nicolls, Indian Tigers, BDM etc.
Good Cricket bat is a combination of batsman’s taste and the skill of a bat manufacturer. The bat is made of wood, which is a natural product. There has to be some small knots or spots on the bat. So the bat must always be chosen on the basis of the feel and not looks. A great cricket bat is not going to make you a great batsman but it’s the only tool you have to prove your talent and skills. The correct bat will help you to become as good batsman.
Toe Guard:
The toe of the bat is not as strong as its middle and is vulnerable to breakages die to less amount of wood there. It can be prevented through fitting a toe guard. Premium range cricket bats comes with a toe guard already fitted. Cricket bat is normally designed to strike the ball 6-8 inches up from the toe, in the centre of the blade. When batsmen faces Yorker deliveries at the toe end, the impact of a moving bat meeting the speed of the ball can be very high, thereby causing the wood to dent or split. As a result it would be advisable to fit a toe guard to reduce the risk of breakage.
Natural Finish:
This means bat with uncovered face, with the willow not covered by an anti-scruff cover or face tape. Most all top-end bats offer this natural, traditional finish. Some of the lower grades of willow maybe bleached to artificially replicate the colour of high-quality willow.
Pick-Up of Bat:
While choosing your bat, position yourself in your normal stance as you would stand at the crease. Simply pick the cricket bat up as you would as if the bowler was about to deliver the ball. When you pick the cricket bat up, note how the bat feels in your hands, i.e. is it light or heavy? Where is the balance of the bow? Is it a lower middle or a higher middle? More generally can you hold the cricket bat in one hand, when stretched out in front of you?
When trying out cricket bats, it is advisable for you to wear a pair of batting gloves. That way you gain a reliable insight into how the cricket bat actually feels in your hands. It is also advisable for you to practice some shots without a ball, to see if you can use the bat effectively.
Weight of Bat:
This is the essential part of buying a bat and there is lot of discussion these days about heavier vs lighter bats. The heavier bats are durable and provide more power to the shots. A lighter bat will allow you to play all the shots with faster bat speed and better control.
If you choose a lighter bat then you will most likely have to compromise slightly on the thickness of the profile and edge profile but this should not be a problem. We strongly believe that, in order to get the best performance out of a bat the most essential element is to choose the right weight for you, this will really help you to time the ball better and ultimately make more runs.
If a 2lb 9oz and a 2lb 10oz bats are placed in front of the player, it is unlikely that he/ she would be able to tell the difference. We feel pick-up is more important than dead weight as pick-up determines how the bat will feel in play. Nobody will be able to tell you what the right pick up is for you, or the exact weight you should use, infact it is a question of what feels right for you.
English Willow Bats are lighter than Kashmir Willow. So, you should select your bat according to its feel and pickup. Sometimes heavy bats feel lighter due to smart bat making technique.
Short or Long Handle:
It is strongly advised for players to choose a short handled cricket bat for increased control. However if you are tall, i.e. above 6 foot 2 inches it might be advisable for you to select a long handled cricket bat, they are however, much less readily available due to very less demand. Infact, many tall players are also opting for Short Handles.
Handle Type (Round or Oval):
Generally, a good bat handle absorb the shock created from the ball. Oval shape in the lower handle provides strength to its structure. It improves the pickup of the bat. It also provides players a better directional feel. But it is difficult to grip oval handle bat too hard. As a result the top hand controls the shot. So we recommend the technical batsmen should go for oval handled bat. Round handle provide more control to the bottom hand. Thus hard hitting batsmen must choose round handled bats. You can select the length of your handle as per your comfort level.
Number of Grips: No two hands are same, so batsman’s hands affect the design of handle. If a batsman has small hands, he should go for a thinner handle. This can be managed by applying extra rubber grips. The grips help you to get the actual width and feel of the handle you want. Many players like to have two grips. It provides lighter pickup and improved bat speed. But it also adds some extra weight to the bat. Choose number of grips on the basis of your feel of the bat.
Purchasing Decisions:
You must also consider the following points prior to purchasing your new Cricket bat:
1. Budget: You must analyze as how much you want to spend on your cricket bat? This is a most important point to consider when selecting your cricket bat. If you have no budget constraints then you can target the Players’, Limited edition, and top end senior range bats.
2. Which Cricket bat have you used before: Are you happy with your previous Cricket bat or the brand in terms of quality, personal performance and overall satisfaction? If you are satisfied then you should consider purchasing a cricket bat from the same bat manufacturer/ brand.
3. Growth as a Player: If you are a child looking to purchase a cricket bat or are buying a bat for a child, it would be worth considering his/ her growth. When your child is growing quickly, particularly during his/her early teens, selecting a cricket bat is a whole lot harder. If this is the case, it would be advisable not to spend large amounts of money on a top end cricket bat that could potentially only be used for half a season.
4. Seriousness as a Cricket player: The level you are playing determines how frequent you will be using your cricket bat. If you are playing at a high level, you will probably be playing multiple times a week against high quality quick bowling. Therefore you requires a high quality Cricket bat.
0 notes
Last Seen Blogs

kurryniissuh
黑進門門清

englishswift
Katie| Swift

hplmienbac
Compact hpl Miền bắc

hitcanta-blog
Hit Çanta

smply-me
Simply Me