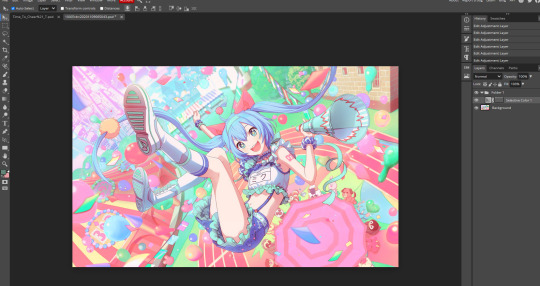
#the saturated image is closer to what i see with my blue light filter on nssjsj
Text
*GOOFY AHHH TUTUORIAL*
lesson 2: getting started on psds!!
hit "read more" if interested!
** NOT ALL PSDS ARE FILTERS, PSDS ARE USUALLY BASES THAT YOU CAN OPEN UP. PSDS ARE PHOTOSHOP FILES THAT YOU CAN OPEN UP AND EDIT WITH ALL OF THE LAYERS. THIS IS A TUTORIAL FOR A FILTER PSD (aka, making your OWN filters) **
hey there!! welcome to lesson 2. you don't need to tune in on lesson 1 to understand this, because it was just about finding editing programs and finding tutorials and motivation, so if you already know about all of that, you are basically prepared for this lesson.
this is a tutorial for PHOTOPEA, idk if this works anywhere else. also, this is INTENDED FOR A COMPUTER. (ex: dragging and dropping files and all of that stuff)
STEP 1: the first thing you may* see when going into photopea is this screen:
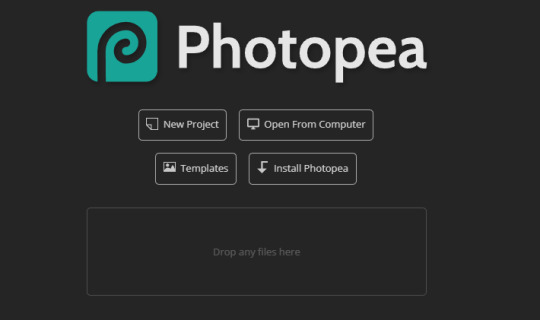
drag any image into the box that says "drop any files here" if you are a noob and don't know how to drag and drop files you can find a tutorial here. anyways, like i was saying drag and drop any image.
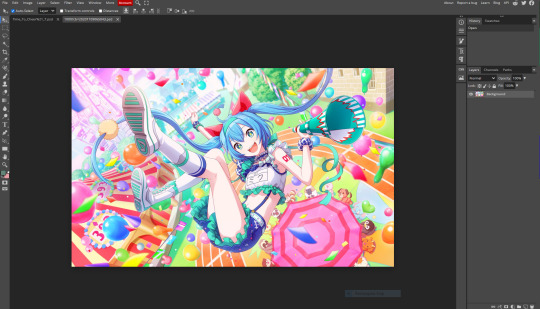
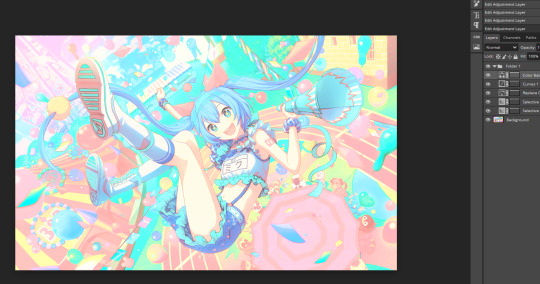
now it should look something like this (but instead of the hatsune miku image its the image that you prefer):
STEP 2*****: now that you have your image, look at the symbols at the bottom right corner. you should see this folder image (folder is circled in red)

you should click the folder button. now you have created a folder. this is going to be the filter.
now that you have the folder down, before proceeding further make sure that its HIGHLIGHTED
go a little bit above the corner, and you folder should be highlighted like this
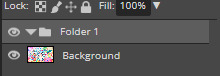
if its not, just click on it.
now that its highlighted go back to that right corner and click this half circle button that i circled in red

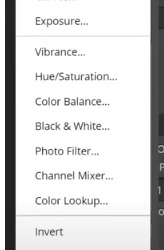
once you click it, this should pop up

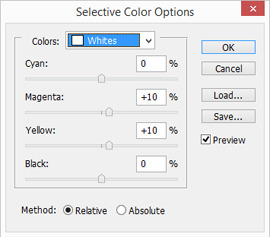
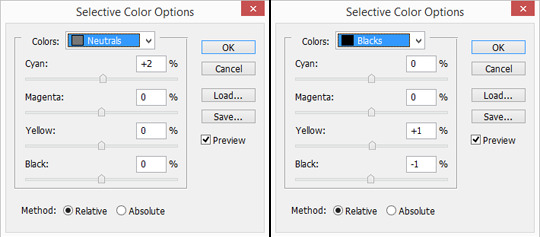
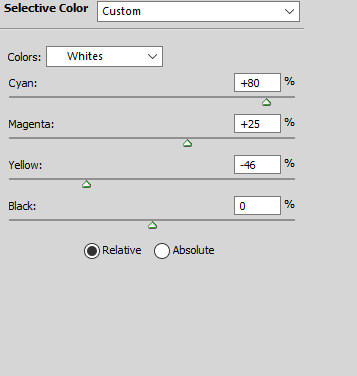
i usually hit the "selective color button" first
it usually presents you with this:

at the top of the image, you should see the "colors" button, thats the color you are editing. click it and choose the color you want to edit. you can edit how much a certain color is in a color lol. if yk what i mean.
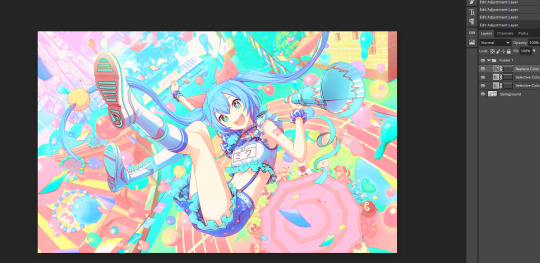
now i spent a little bit of time editing the selective color, and you can see that the image looks a little different. scroll up to the original image on stop one to see what im talking about! you can add many selective colors until your satisfied!
as you can see, i've added another selective color!

now, right below selective color, (back in the half circle menu) you can see "replace color" this is what it looks like (i've already edited it but you get the idea)

you can choose a color to make FUZZY** and after you do that, you can change the hue, saturation, and lightness to your liking.
here is what my miku image looks like after FUZZINESS**, not a big difference but u can still kinda see it.
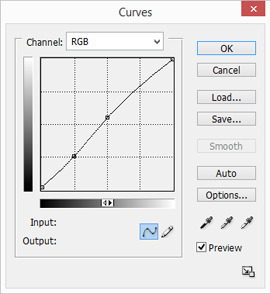
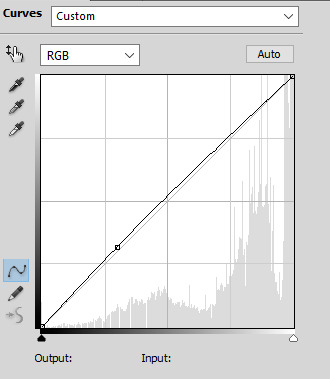
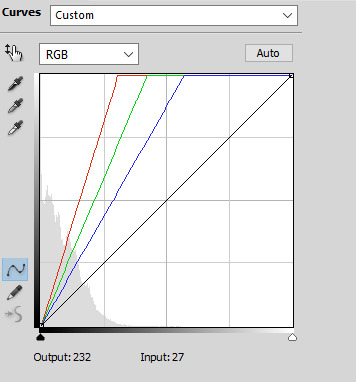
STEP 3*****: after you've done that, go back to the half circle menu and close to the top but not all the way, you can see "curves". they look like this:
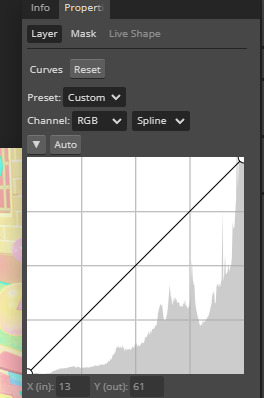
now you can bend them and destroy them to your liking.
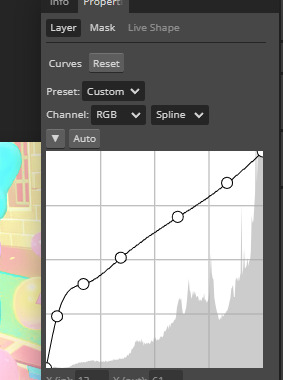
(the higher UP you make your curve go, the lighter it gets, the more LOW you make your curve go, the darker it gets. it also does some other stuff too***. just keep on breaking and bending it to your liking.)
now this is what my filter looks like

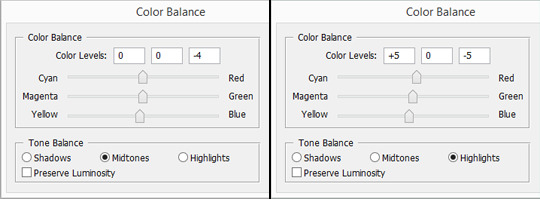
STEP 4*****: after your done with abusing and breaking lines now go back to half circle menu and find "color balance". it should look like this
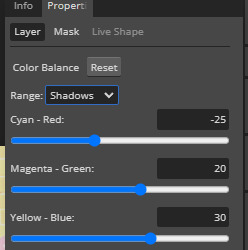
its already edited but whatever (everyone thing should start at zero) but just move the circle more towards the color that you want there to be more of. also hit the range thing to effect more then just the shadows.
now heres what it looks like:
the difference is VERY small****, but you can see that theres more green and cyan + blue when you look closer.
Step 5*****: near the curves thing, you should see "brightness/contrast" you should probably hit that. and it should look like this
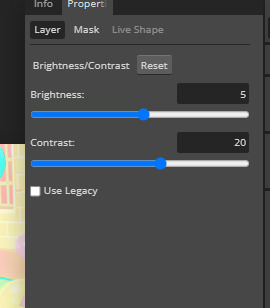
adjust it to your liking! its already been adjusted in the image as you can see but still.
Step 6*****: now if you hit the half circle button and look a little bit BELOW curves you should see "vibrance" it also has a saturation button but just drag the circle to your liking.
Step 7*****: next is "photofilter" its in the half circle button in the middle. if you want more of a certain color, click on the orange box to change it. here is what it should look like btw:

also the "density" is how much the color effects the image.
step 8: also, near the "photofilter" in that middle row a little bit above it, there is hue/saturation. its pretty explainable what it does, but just adjust the circles to your liking.
i have been editing this for the last hour, i hope atleast ONE person finds this post helpful. if you are currently reading this, thank you! if you used this tutorial, PLEASE send me the PSD you made!! (through the "request" button on my blog or @ me in a post!!) /nf
IF YOU FOUND ANY OF THE * SYMBOLS, THIS IS WHAT THEY ALL MEAN:
.. * i HOPE your photopea looks like that, it SHOULD. if it doesn't look like that your PROBABLY not on photopea.. your probably on some alien website or something. ** I honestly don't know what "fuzziness" means yet so i'm just as confused as you are. *** other stuff being: change of colors, making the image more red (making it look like it took place in hell!) interverting the image, making the colors more gray. **** honestly a lot of the options make the difference very small ***** you don't need to use ALL of these options if you don't WANT TO. i honestly don't use photo filter for most of my edits.
127 notes
·
View notes
Photo


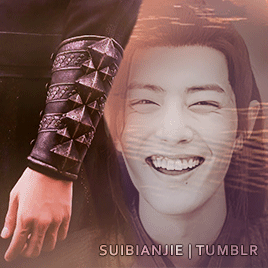
#ShowYourProcess, pt 2
Tagged by @inessencedevided for this gifset ❤ (you can see her post here)
From planning to posting, share your process for making creative content!
To continue supporting content makers, this tag game is meant to show the entire process of making creative content: this can be for any creation.
RULES: When your work is tagged, show the process of its creation from planning to posting, then tag 5 people with a specific link to one of their creative works you’d like to see the process of. Use the tag #showyourprocess so we can find yours!
This is a bit long so sticking the rest under the cut. (^ω~)
1. Planning
This set was actually part of a pair (with this Lan Wangji one) so most of the planning happened when I made that one. Basically, I knew I wanted a static central image surrounded by animation. I tried to pick a variety of scenes to show Wei Wuxian’s range of emotions, and wow was it hard to narrow it down to only 6.
For these kinds of gifsets, there’s actually two stages: creating the photomanip and then making the actual gif.
2. Creating
So here’s what I started off with for the photomanip:
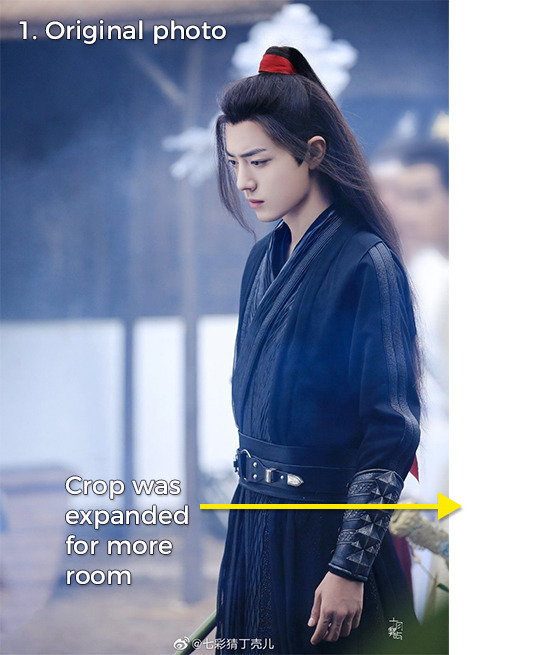
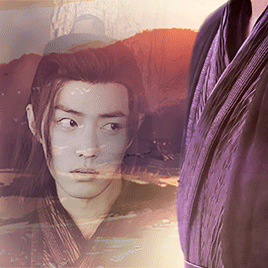
The photo had Wei Wuxian on the right side of the image, so I extended the crop to put him closer to the center.

I used a layer mask to remove the background. It’s not a super precise mask but I know I can always come back later to refine it.
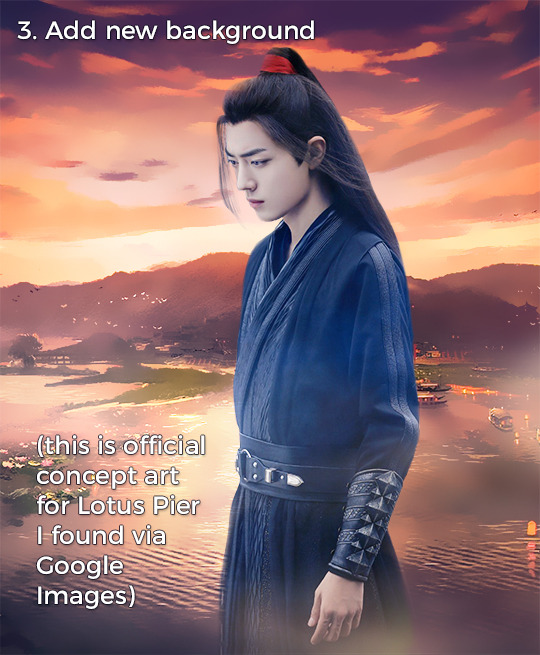
This is official (I think?) concept art of Lotus Pier, and I just added some Surface Blur + a hue/saturation adjustment layer to make it look smoother and more vibrant. The Lan Wangji set was very blue/green, so I wanted this one to be heavy on the warm colors.
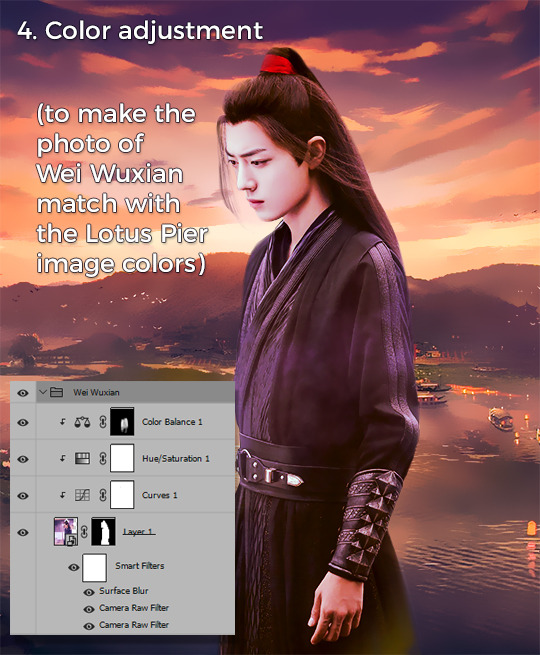
Obviously the photo of Wei Wuxian didn’t match at all with the background. To change that, I first used to Camera Raw filter to change the overall temperature from cool to warm. A little Surface Blur was added on top to remove some of the film grain. After that I played with some adjustment layers until I was happy with the overall coloring.
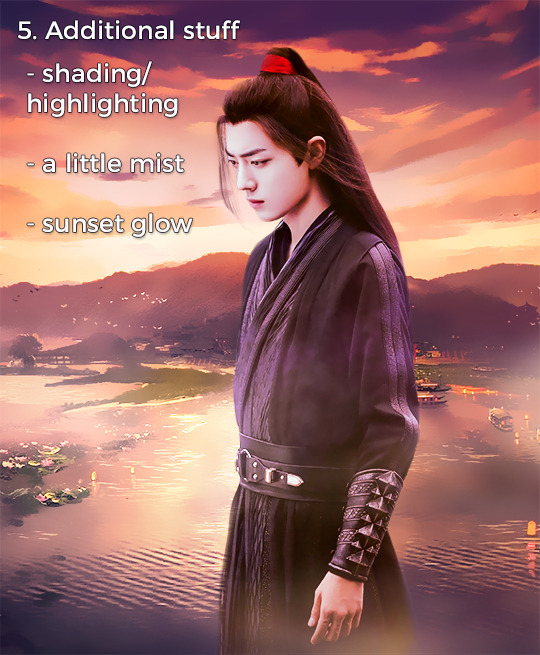
Almost done! It didn’t quite have the visual pop I wanted, so I painted in some mist + more golden light to make that sunset really stand out. I also adjusted the shadows/highlighting (a separate layer set to Overlay or Soft Light + brush tool).
Phew, that’s stage 1 done! Now on to the actual gifset.
I always make a separate “planning” file for these types of sets to make sure the overall look is right:

Each segment of the photomanip gets cut and added to the corresponding gif. I often mock up what it looks like to make sure the masking is correct:
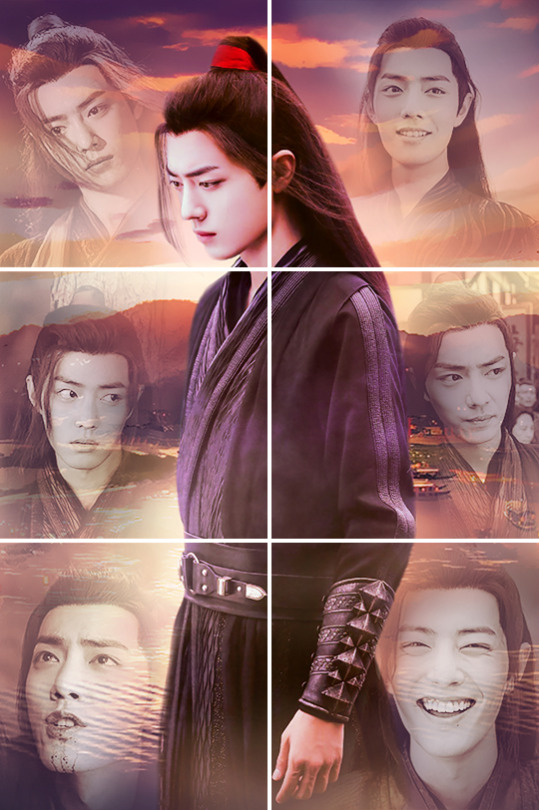
After that, I import video clips and create each separate gif. Here’s what gif #1 looks like after it’s been trimmed, cropped, and sharpened:

I wanted the overall gifset color to have those sunset colors, so each gif got a group of adjustment layers to make them more neutral. The section of the photomanip then gets added on top:

Repeat for the other gifs, add in the watermark, and then they’re ready to export!
3. Posting:
As always, I hold posts in drafts for at least a day or two and check for mistakes. I also look at it on both desktop and mobile to make sure any details/text don’t get lost.
Wow that was a lot. Hopefully it made sense! I already tagged people in my first #showyourprocess, but if anyone else would like to play please feel free to tell me!
(づ ◕‿◕ )づ
#showyourprocess#tag game#gif making#photoshop#tutorial#mystuff#mytutorial#wei wuxian#long post#fun fact: i originally was going to include more clips of WWX being just really sad and/or distraught but man i couldn't do it#he baby and when he sad i sad T_T#don't judge me lol
47 notes
·
View notes
Text
A Son of Summer Storms
I friggin’ love fae lore and I love Micoverse so of course the second Em drew those fairy boys I was head over heels for it and had to write a thing.
This is soft and sweet and fluffy and I like it very much.
---------
Once upon a time, a little boy wandered into the forest alone.
It started out as an ordinary forest and it was an ordinary path he walked down. But the moment he strayed from that path and pushed his way through a dense wall of summer lilacs, the mortal world fell away and he was lost in Fairyland.
And the Green Country was no place for a mortal child.
"Hello, little boy!"
A cheerful voice made Milo stop in his tracks, looking around for the source. The trees in this part of the woods (for he had no idea where he had wandered yet) were tall and wide with age, their canopies the richest emerald green in the universe.
"Hello?" Milo called, turning on the spot, the underbrush crunching softly under his sneakers, "Who's there? If--if you try to kidnap me, I'll bite you!"
Someone giggled and Milo spun around to see a tall young woman leaning against the base of a tree. She certainly hadn't been there mere moments before and there was something about her thin smile that made the hair on the back of his neck stand on end.
She was thin, almost bony, with sharp features and fluffy brown hair that almost looked like feathers with the way it lay across her shoulders. The tips of her hair were saturated a brilliant pink that contrasted sharply with the simple black dress she wore and her feet were bare despite the forest they both stood in. Sunlight filtering through tree leaves played odd patterns across her bare skin and Milo had to blink away the blurry images of feathers rustling down her arms and spreading from her neck.
"Who're you?" He asked bravely, chin in the air, all the bluster of a teenager and the arrogance of a human.
"You can call me Birdie~" The girl trilled, skipping over the forest floor with barely a sound, her footsteps light. Within moments she was well into Milo's personal space, leaning close to him, starring into his eyes, "And what's your name? I bet it's something...noble sounding."
Milo swallowed hard, acutely aware of how close she was and how hard his heart was beginning to pound in his chest. This close, Birdie's eyes were a bright red that blended easily into soft pink, flecks of gold flickering in the light. Her soft, pink lips were curled into a curious smile. Milo couldn't look away from her.
"Uh", His voice felt like it was getting stuck somewhere inside him, "Um, I...my name's--"
Something crashed loudly in the forest and Milo jumped, snapping his head around to the right. Everything was still, except for the twittering birdsong and the sound of rustling leaves. A hand curled around his shoulder and he turned back to Birdie to find her smiling warmly at him. Her eyes looked like rubies glittering in the faint shadows of the trees.
"It's rude not to tell a lady your name," She purred. The pad of her thumb swept across his jaw, coming to rest on his chin. He could feel the tip of her fingernail brushing his lower lip and heat crept up his face, making his ears burn. Where she touched him, his skin felt like it was on fire and it made his head foggy and his stomach hot. The rest of the world fell away and all he could see were her bright, burning eyes.
He sucked in a shaking breath, tasted something slow and sweet like honey on his tongue, “M-my name’s Mi—“
A bellowing roar shattered the thick tension that had blanketed the hair’s breadth space between Milo and Birdie. Milo jerked backwards, twisting to try and see what was coming for them out of the forest, but a hand clamped down on his shoulder, pinning him in place, something sharp pricking into his skin. He looked up and let out a strangled cry of fear; Birdie’s human appearance had warped. Brown and red feathers had sprouted from her skin, needle teeth filled her mouth, and her flesh had turned a steely gray. Milo screamed, trying to shove her away even as her long red nails sank into his skin through his hoodie and pulled him closer.
“BIRDIIIIEEEEEEE!”
A huge figure exploded out of the trees and smashed into Birdie. A meaty fist closed around her throat and tore her away from Milo, her claws ripping over Milo’s shoulder and shredding his hoodie. Milo was stumbled and fell backwards, clutching at his arm as blood welled hot and stinging through his fingers.
His savior was a creature that was almost as big as a tree with browned skin and dark hair. Two horns curled from the wreath of flowers and ivy that seemed to sprout from his skin and his lower half consisted of sleek brown fur over muscular digitigrade legs. A long tail with a tuft of dark fur lashed the air behind him and his enormous black hooves dug pits into the forest floor as he slammed the thing that Birdie had become into the trunk of a tree.
“I told you to stay out of my forest!” The huge man snarled, unconcerned by Birdie’s claws as they raked across his bare chest and over his arms. They didn’t seem to be doing much damage, “And assaulting a yearling—shame on you!”
“He’s fair game! He’s only a—ghrnk!” Birdie’s retort was cut off as the horned man pressed his weight into her neck, choking off her air.
“Last warning, Birdie. Come here again and I’ll pop your head off easy as a dandelion, I swear to Fates themselves! Now get out fo here!” The man hurled Birdie to the ground and she scrambled away from him, hacking and coughing. As Milo watched in terror and awe, the back of Birdie’s dress bulged until it tore, splitting down the middle and slipping off her thin frame as two, massive blood red wings unfurled from her back, a tail of feathers spilling out behind her. With a decidedly inhuman scream, Birdie launched herself into the air, beating her wings until she’d ascended above the canopy. Soon, she was out of sight and, eventually, even the heavy beat of her wings faded away.
Milo’s rescuer snorted, scraping a hoof across the dirt before he turned his attention to Milo. He instantly softened, a warm and friendly smile spreading across his face as he crouched down in front of the frightened teenager. Milo shrank away, half his hoodie stained in blood and fear making the wounds bleed faster as his heart thudded in his chest.
“Easy, little one, I’m not gonna hurt you. I’m here to help. I’ll take you to someone who can heal your wounds for you,” And before Milo could get away the big creature had scooped him up in his broad arms, cradling Milo’s small frame to his broad chest, “You can call me Dan. This may be a bit of a rough trek but try to get some rest. You’re safe in my forest, on my word.”
Milo barely managed to get a out a breathless gasp before Dan made his way back into the trees. His footsteps were shockingly light for his size, his hooves barely disturbing the plant life beneath them as he ran. In his arms, Milo was barely jostled by the movement and, with the sudden peace that had befallen them, the shock and pain of what had happened truly began to set it. The jagged cuts on his shoulder were stinging horribly and pulsed with deep, throbbing ache, making tears well into his eyes and choke his breath. He was lost in a forest he didn’t recognize, had been attacked by a monster bird-lady, and was now in the arms of some kind of giant cow-goat-man.
Milo began to cry.
It was a strangled and choked sob that left his throat, something he desperately tried to smother down as the shock sank an ice cold stone into the pit of his stomach. Tears smeared across his cheeks as he turned his face and tucked it into Dan’s striped sweater, shivering with pain and confusion and fear. He kept his face hidden and his eyes closed until he felt Dan’s gait slowing and, through the iron stench of blood in the back of his throat, he caught the scent of sweet flowers and crisp water.
“Cad atá mícheart!?” Even with his vision blurred by tears, Milo could see the surface of the small pond Dan had stopped in front of ripple with the words that came clear and sharp from nowhere, “I smell blood!”
Milo gasped, pressing back into Dan’s chest as a figure rose from the water with barely a splash. They stood on the surface of the crystal clear pond as if it were solid glass, a robe of perpetually falling water was draped from their shoulders and arms, casting them in an outline of rippling crystal waters.
Dan crouched down at the edge of the pond, carefully depositing Milo into the soft grass and tiny clusters of flowers. Milo stared up at the figure who’d come from the water as he hurried forward, tiny splashes popping under his bare feet until he too was crouching over the teenager.
“It was Birdie,” Dan said, a little breathless, one warm and steady hand on Milo’s back, “She was playing her usual games with this youngling in the forest. You can heal him, right Jake?”
Milo swallowed hard, looking up into Jake’s eyes; they were a soft, pale blue, as cool and calm as a sunny day’s sky. Despite having just risen from the water, his blond hair was fluffy and dry, a crown of thin, crystalline spires rested on his head, and beads of translucent silver-blue hung from his ears and clung to his wrists like morning dew drops.
“Dan…” Jake said carefully, eyeing Milo with a curious sort of concern, “This is a human…”
“What? But…but he has a tail…”
Jake tore his gaze from Milo and looked up at Dan with a somewhat exasperated expression, “Dan, croí tairisceana, it’s fake. It’s attached to his sweater.”
“B-but he smells like fae!” Dan protested desperately. Milo looked between them rapidly, frightened and still very much bleeding out across the grass.
Jake’s eyes flashed as he turned back to the shivering teenager, leaning so close Milo could see the glittering, wave-like patterns running down Jake’s cheeks and curling around his neck. The tight navy leotard under that waterfall robe was iridescent and shimmered shades of cerulean and turquoise beneath the sunbeams and the reflections from the water’s surfaces. Milo shrank away from the man, watching him warily, sniffling and trying to contain his tears.
“Come on, now, little one, Dan and I aren’t going to hurt you.” Jake told him with a gentle smile, “My pond’s magical, I can heal you.” He slid his hands under Milo’s arms and lifted him into the cool waters, helping him rest against the edge as the water lapped at his chin. Milo clung to Jake’s arms, shivering, wincing at the stinging pain in his shoulder, afraid of going under the water and being unable to come back up.
“You can call me Jake,” His fingers were light, summer raindrops and midmorning mist, as they helped ease Milo out of his torn hoodie, “I’m a water fae. And this is my good friend Dan,” Milo watched as Jake handed the drenched shark hoodie over to taller creature still on the shore, “He’s an earth fae, has a particular affinity for flowers. This is his forest. So my questions for you, little shark, are what do we call you, what is a small mortal like you doing in the Green Country, and why, of all things, do you have a fae woven garment?”
Milo frowned at the ropes of dark red blurring and smearing away in the water before he took a deep breath. Steeling himself, he glared up at the water fae,
“I dunno where this Green Country place is or what you mean by fae garment or whatever. But name’s Milo and I’m looking for my dad!”
Jake blanched and Dan made a strangled noise on the shore, nearly dropping the thin wooden needle and hemp colored thread he’d been using to mend Milo’s hoodie. Milo immediately got the sense that he’d just done something very, very wrong.
“Buachaill dúr!” Jake hissed, ducking low in the water and looking around frantically. One the shore, Dan got up and began to pace the perimeter of the clearing, turning his head this way and that, “Don’t you know anything!? Giving your name out like that! Honestly!” The water rippled angrily around him for a moment or two before it stilled again and he let out a sigh, “It’s out there now and the wind will carry it away. If we’re not careful…nh. I suppose there’s…nothing for it…”
“What? What did I do? I don’t understand?” Milo straightened up in the water, edges of his damp hair clinging to his neck, panic twittering a frightened bird in the ribcage of his chest.
“Names have power, little shark,” Jake said in a low voice, sympathetic, genuinely concerned as he sifted thin streams of water between his narrow fingers, “Giving someone your name gives them power over you and not all fae are as kind as Dan and I. You should have given us a nickname or a false name. Anything but your real name.”
“How do you know it was my real name?” Milo challenged, sticking his chin in the air.
Jake looked at him with those crystal blue eyes and then said in a very soft voice, almost a whisper, “Milo.”
And Milo felt it.
He felt his own name reverberate in his chest, tug at something deep inside him that resonated through his bones and made his scalp tingle. It was as if someone had tugged on the very thread of his being. He felt like if they pulled any harder than he would come completely undone and would cease to be Milo at all. It left a sensation like fear that someone could know him so intimately, but somehow gave him comfort that anyone knew him like that at all.
It left him dazed and gasping, blinking stars from his eyes as Jake’s cool and gentle hands kept him from slipping under the surface of the water.
“That’s why you don’t give your name to fae,” Jake was all sympathy and soft touches, hoisting Milo out of the water and setting him on the grass as Dan came back from his circuit around the clearing, “Now, we need to get you back to the mortal world before—“
“I don’t want to go back!” Milo shoved Jake’s hands away with a scowl, “I’m looking for my dad and I’m not going back to the foster home until I find him!”
“Foster home,” Dan repeated, brow furrowing as he settled back down on the grass and picked up the hoodie again, “You don’t have parents?”
“All I have is that hoodie,” Milo nodded to the shark-tailed sweater Dan was still stitching up, “It’s the only thing my dad left me. I never even met my dad and my mom gave me up when I was real little. This forest—or, the forest I was in earlier?—was the last place my dad was seen. So I’m looking for him.” He wrapped his arms around himself and then blinked in surprise, peering at his shoulder, “Ah! My arm! It’s healed!”
“I did say my waters were magic,” Jake said smugly, leaning against the bank and resting his chin on his folded arms, “And I still think we should return you to the mortal world. It’s dangerous for humans to be in fairy country, especially now that you’ve said your name aloud.”
“And I said I’m not leaving!” Milo said stubbornly, “Unless you can help me find my dad, I’m not going anywhere!”
Jake looked helplessly at Dan who simply shrugged and snapped off the thread he’d been using. He handed the hoodie back to Milo who took it gladly and clutched it to his wet chest, grateful to have it back. He looked more relaxed now that he had it with him again.
“That sweater was made by a fae,” Dan said, tilting his head slightly, as if he were observing something curious to him, “It’s very special and carries a very strong magic. You should take good care of it.”
“I always do,” Milo said. And he meant it.
There was silence for a moment, filled with the sound of the forest around them. It was a weighted quiet, one where danger paced on the edges, just out of sight, in the shadows of the trees and on the distant horizon; an uncertain future. But in that moment, between the three of them, there was a comfort and companionship that was sprouting, a tiny bud of a blooming flower, still green and climbing from the shell of its seed. All it needed was to be nurtured.
“You should stay here for now,” Dan finally said and Jake snapped his head up, looking shocked at the suggestion, “It’s going to be dark soon and finding a way for you to get back will be too dangerous to do at night. You can’t go back the way you came in, so we’ll have to find a different path for you to take.”
“I’m not leaving,” Milo repeated with a huff, “But I’m not sleeping on the ground either.”
Dan chuckled, climbing back to his hooves,
“Then let me work a little magic…”
*****
It only took a little bit of gentle coaxing and some whispered words for the giant, old tree sitting right at the edge of the pond to billow out and up, forming a massive hollow in the base of its trunk. The grass smoothed itself down into a short, soft carpet, a short, rather fat tree melted itself into shallow sort of bowl that Dan packed with feather pillows and satin soft blankets, and sweet scented flowers curled into vines that draped over the entrance to give the little hut some privacy.
Milo was absolutely over the moon to see magic in action and he pestered Dan for several hours afterwards about how it was done. Jake laughed at the pair of them which drew Milo’s attention and the water fae soon found himself under a barrage of questions about his own particular magic. By the time it seemed Milo had exhausted his inquiries, the sky was turning soft pink and bruise purple and silver-white stars were beginning to show themselves against the blurring colors. The air was growing cooler, the tropical heat weather turning to an autumn night chill.
Once, and only once, was the pleasant atmosphere broken. Milo had wandered to the edge of the clearing, curious but unwillingly to stray too far from the two fae who had treated him so kindly. Dan and Jake were talking quietly to one another when Jake suddenly bolted upright and spun in his pond, flinging a hand out in Milo’s direction. A tendril of water snapped snake-like through the air, lashing itself around Milo’s wrist and dragging him away from the bush he’d been standing next to. The teenager stumbled, dropping the handful of berries he’d been about to pop into his mouth. He glared at Jake as the water fae had released him.
“What the hell’d you do that for?”
“Don’t. Eat. The food.” Jake said seriously, “Never eat the food in Fairyland. Or you will never, ever find your way home.”
Milo stared at him with an odd blankness, a faint crease between his brows that was a mixture of so many emotions it would have been impossible to give it a name. When he spoke, his voice was hollowed out and tinged with painful rot,
“I don’t have a home.”
*****
It was dark.
Milo had long since fallen asleep in the small house Dan had made for him, once again in his hoodie and wrapped in blankets. He was breathing softly in the quiet of the forest’s night sounds, only stirring occasionally in his dreams.
Dan watched him through the curtain of leaves and flowers for a moment, affection and concern and maybe a tinge of longing in his warm eyes. Then he turned away, tail swinging back and forth, his hoofsteps as soft as ever. Jake was on the opposite side of his pond from the little hut, acting like he was ignoring it even as it was clear he was keeping it in the corner of his eye. Dan crossed around the edge of the pond and settled down in the grass nearby. The surface of the water looked like a small patch of the sky, violet-blue-black and sewn with diamond stars, only disturbed every so often by a firefly’s flickering light as it darted across the pond. Pale white blossoms in the branches of the giant tree-turned-hut glowed in the moonlight, and the sounds of the night forest hummed a soft lullaby into the dark.
Jake was leaning against the bank again, lazily turning his fingers around some purple flowers that had opened their petals wide to drink in the night. Dan watched him for a long stretch of quiet time, neither of them speaking, just enjoying each other’s company, acutely aware of the mortal presence asleep on the other side of the pond.
“He shouldn’t stay here,” Jake murmured, his eyes lidded and almost tired looking. The crystals on his wrist shimmered with reflected starlight, almost like chips of ice in the night, “It’s not safe.”
“His name is on the wind,” Dan said with a heavy sigh, “He’s not safe anywhere. Even if we found a way for him to go back, some fae could still come through and snatch him.”
Jake looked solemn, dropping his hand from playing with the flowers and folding his arms to rest his head on them again. He opened his mouth to say something, closed it again, and sighed. A breeze rustled through the clearing, stirring up a scent like apple blossoms and sugar. The surface of the pond didn’t move.
“We could adopt him.” Dan offered and Jake shot up to fast he caused a wave to roll across his pond, splashing in on itself before it calmed again, “No, wait, Jake, hear me out, all right. He—he’s alone. He said it himself, he’s alone and he doesn’t have a home or a family.”
“Dan—“
“Jake! Listen! His name is already on the wind! He’s in danger as it is,” Dan sounded like he was pleading, “But—but if we adopted him, if we keep his name, then no one else can take him. And you and I both know we won’t…we wouldn’t…he wouldn’t be a thrall, Jake, he’d be safe.” Jake bit his lip, glancing towards the hut, nervously weaving his waterfall robe through his fingers, “He doesn’t have anybody. And he said he’d stay here anyway. If…if we can just do one good thing…Jake…we’d be…all he has…”
“His world,” Jake’s voice was low, careful, afraid, “We’d be his world, Dan. We’d have to—do you know what that would take. This place…it’s not for humans. Even if he has that sweater, this place will eat him alive if it can.”
“We’ll teach him.” Dan said resolutely.
“He’d need to learn of the Courts, of where he’s not to cross, of how to speak to fae so they can’t own you.”
“We can do this, Jake.
“Dan!” Jake sounded desperate, his gaze searching, his mind grasping for a reason why this was wrong, why they shouldn’t do this, why they should forget the boy and leave him to the mortal world. But he’d known the second Dan had suggested it that he wanted to protect that little boy. A child, abandoned and alone and hurting, blessed with a fae gift he didn’t know the origins of, unafraid of the wonders and dangers of the Green Country. A brave and noble soul like the knights of old legend.
“Maybe we could find his father…” Jake said, more to himself than to Dan. But his friend answered anyway.
“You know he’s probably a fae, right? His dad is probably fae so—“
“He’s probably here somewhere.” Jake sighed, shoulders slumping in a defeat that had happened long before, “All right. All right, we’ll take his name. Tá mé ró-shean le haghaidh seo…”
Dan chuckled, his smile bright in the dark, tail flicking happily in the grass.
They both turned to look at the hut where, behind a curtain of sweet, colorful flowers, in the quiet belly of an old tree, protected by magics as old as time, was a little boy with fire red hair and lightning in his soul who had wandered into the forest alone.
The little boy, Milo. The son of summer storms.
--------------
Translations:
Cad atá mícheart!? = What’s wrong!?
croí tairisceana = tender heart
Buachaill dúr! = Stupid boy!
Tá mé ró-shean le haghaidh seo... = I’m too old for this...
23 notes
·
View notes
Photo


Orange and Teal Coloring Tutorial
Difficulty Level: Intermediate to Advanced
I'm using Photoshop CS2, but this will work in any version 5.0 or later. Your adjustment layer panels may look a bit different from mine but they do the same thing.
This effect works best on images with a variety of colors and few grays, and without a strong color cast. It looks really great on images of people alongside blue sky or bodies of water. It also helps if the image can be brightened easily.
First off, I want to say I didn't come up with this method. There's tons of tutorials online for how to do it, this is just my version geared towards coloring screencaps. I learned this from this video by Denny's Tips.
I'm going to be using this screencap of Max from Black Sails.

Step 1
Brighten and add contrast however you prefer when starting. If you feel your image needs color correcting, hold off for now.
This screencap is already very bright so I made some very minor adjustments with a curves layer and set it to 80%.
Step 2
Here's where the magic happens. Add a channel mixer adjustment level and go into the blue output channel. Change green to +100 and blue to 0. This dumps all the information on the blue channel onto the green channel. Now you have a red and cyan duotone.

If it looks all red/pink or all cyan, or there’s a ton of gray or taupe, the image doesn't have enough variety in color for the effect to work well. If you think you can fix that with color correction (for example if the original image has a strong blue or cyan cast on skintones), turn off the channel mixer layer and add your color correcting layers below it. Then turn the layer back on.
Step 3
Now we need to change the red into orange. You can do this with a hue/saturation layer and a selective color layer, or just a selective color layer. I'm going to do the former.
In the hue/saturation panel, go into reds and increase the saturation to around +40. Then move the hue slider to the right to make an orange color. Stop wherever looks good to you.
Keep in mind that in most cases, skintones will appear to lighten as the slider gets closer to yellow. The saturation balances this out a bit, but we'll need the help of selective color and other layers to make sure POC aren't whitewashed and the undertones don't look off. Max has a golden skintone, so I'm moving the slider closer to yellow.
Go into cyans and increase the saturation. Usually I use the same number as the reds, but if there’s a lot more cyan than red in your image you might want to add less saturation to the cyans to help the red stand out. In most tutorials I've seen, this effect is actually an orange and cyan duotone despite the name, but I prefer how it looks with teal, which is greener than cyan. If you also want a teal color, an optional step is moving the hue slider to around -3.


Step 4
Add a selective color adjustment layer. We're going to make more adjustments to the orange color and enhance both the orange and cyan. This is also where you can make the cyan more teal if you prefer.
Select reds. Cyan -100, Magenta +100, Yellow +100 will push red as far as it can go. But we want orange, so put a lower number for magenta than yellow. If you want a more muted color, use a higher number for cyan. I'm adding some black as well to make sure Max's skin isn't too light.
Select cyans. Cyan +100, Magenta -100, Yellow -100 will push it as far as it can go. Use a higher number for yellow if you want a teal color.

Even though we added yellow to the red, and may have added yellow to the cyan, there's still not enough data in the yellows and greens for adjustments to really make a difference.
I like to add some yellow and sometimes also magenta into the whites to put some color back into the highlights of the skin.
You may also want to adjust the neutrals and blacks, but be careful not to ruin the duotone effect.

Step 5
This is looking pretty good, but we can still improve it. Now is the time to do color correction on the original image if you want. I had you hold off until now because it's not always necessary for this effect, and while it can improve the results, it doesn't always depending on what color the cast is and what you're correcting it to.
Combine your channel mixer, hue/saturation, and selective color layers into a group (CTRL + G) and turn the group off. Add your color correcting layers below this group - it's best if the adjustments are minor. Then turn the group back on and see if you like how it looks.
For this image, I wanted to see if I could add some color into the sand behind Max. Correcting the slight blue cast on the sand in the original image achieved this, but it also made her skin more saturated than I wanted once I turned the group back on. I balanced this out by going back into the selective color layer and adding more black to the reds.

Step 6
Now I like to add oranges and browns to the whole image to ensure the skintones aren't too unnaturally orange, bring the cyans closer to teal, and correct skintones on POC if necessary.
I went back to my original image and selected a midtone on Max's face, then made a solid color fill layer at the top of the group. Usually I choose multiply or soft light for the blend mode. Set at a low opacity. My settings here are #c09886 set to multiply at 8%.
The photo filter adjustment can also be helpful here. Use one of the warming filters, an orange or yellow, or sepia. For this image I picked sepia and set the layer to 50%.

It’s subtle but I promise there’s a difference.
Step 7
And you're done! The group you've created should work on most other images, but obviously to get the best results you'll need to tweak it for each image.
Please like or reblog if you found this helpful.
229 notes
·
View notes
Text
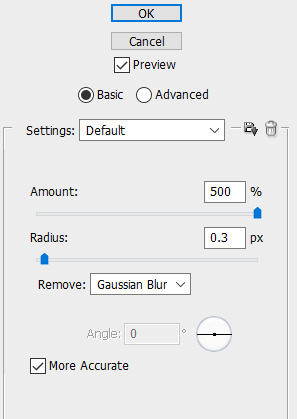
Gif Coloring Tutorial
Requested by anon. Sorry for taking so long to post this!
This tutorial goes over how I color gifs, including tips for coloring dark scenes and scenes that are heavily filtered with a certain color (i.e blue scenes, yellow scenes, etc.).
We’ll be going from this:

To this:

Warning: This post is gonna be really long! (if the read more breaks blacklist “long post” or “usermerlin gif tutorial”)
*I’m using Photoshop CS5
1. Gif Making Basics (Note this part won’t include images since the anon specified coloring and avoiding noise I’m gonna focus on that)
First I take screencaps using Potplayer.
In PS I import the frames by selecting File --> Scripts --> “Load Multiple DICOM Files”
Once the images have loaded I go to the drop down menu on the animation window and select “Make frames from layers”.
Then I crop my gif using the crop tool. I put all the layers into a group (select all the layers and press ctrl + g (cmd + g if you’re using a Mac)
Now I sharpen my gif. I’ve created an action to speed up this process using user thepunisher’s action tutorial. I didn’t include the grouping of my layers in the action so that’s why I always group them before starting my action so that it works properly. My sharpening is pretty standard from what I’ve seen. I use smart sharpen:
Now I can start coloring!
2. Basic Coloring
In this section, I’ll be going over a basic, but vibrant, coloring. When making adjustments you have to be careful not to increase brightness or vibrance too much or your gif will become grainier. Same goes with making changes to the colors. It’s better to have more layers with slight adjustments
I always start by brightening up my gif. Sometimes I use curves to both brighten and adjust colors. For this particular gif I didn’t, but I use this adjustment often. User villainelle has a tutorial for using curves to color adjust here and so does user thepunisher here. They have slightly different approaches and I use either depending on the scene. I’ll also be explaining this adjustment more in the next section but I learned how to use it from them.
Step 1:
For this gif, I just started with an Exposure adjustment layer. Exposure allows you to change the tones of your document. Gamma adjusts midtones, offset adjusts shadows, and exposure adjusts highlights. It’s really helpful with brightening up dark scenes or heavily shadowed scenes. I usually only adjust the midtones/gamma. Here are my settings:

I increased the Gamma to 1.12
Step 2:
I then use a Brightness/Contrast layer to adjust the highlights (you could also do this with Exposure but I find Brightness more manageable). At this point, I’m only increasing the brightness. I won’t increase or decrease the contrast bar. Here are my settings:
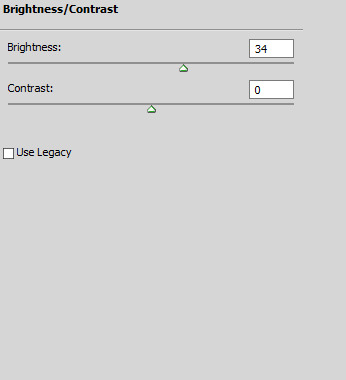
I increased the Brightness to 34
Step 3:
After adjusting the brightness, I want to bring back some depth (I’m probably using this word incorrectly tbh) to my gif by increasing the contrast before moving on to color correction and vibrancy.
To increase the contrast I use a black and white gradient map and set it to soft light. Then I lower the opacity between 10%-50%, depending on the scene.
You could also use Levels or Brightness/Contrast but I find the gradient map is easy to control while also making the gif more neutral. For this gif, I set the transparency to 10% but could go a little higher because the scene is naturally bright. All these adjustments are really about your personal preference.
Step 4:
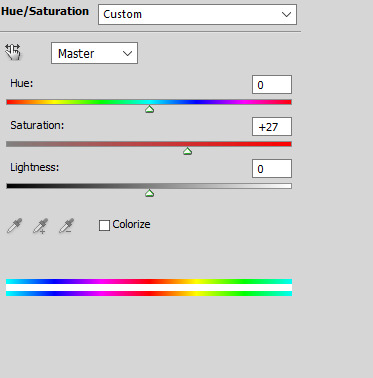
Now I can move on to the colors. For basic coloring I usually start by increasing the saturation. I use a Hue/Saturation layer because this way I can increase the saturation of everything. I feel like the Vibrance layer tends to just make the gif warmer rather than making the colors pop- and I have less control over individual colors. For this gif, I increased the saturation for all colors (”Master”) to 27:
Step 5:
After adjusting the vibrancy I move on to color adjustment. This can really vary based on preferences. I tend to prefer to make my gifs cooler in tone. I use Selective Color and Color Balance to manipulate the colors.
I started by adding a Color Balance layer to adjust the colors on Aziraphale’s face:

I increased the Cyan to 4, the Magenta to 3, and the Blue to 1 to make the skin tones more neutral. I’m moving the bars toward the colors I want to add. So if my gif is too yellow I’d move it toward blue and if it’s too red I’d move it toward cyan. Also note that I only made changes to the midtones. If I wanted to make changes to the darker or lighter parts of this gif I’d alter the shadows or highlights but I usually only do that for rainbow gifsets. Typically, I prefer Selective Color to make more drastic color alterations so I have more control over the specific color I’m changing.
*Be careful when making these types of changes. You don’t want to make drastic changes to the natural undertones of a person’s skin. Same goes when you’re brightening your gif. You can easily whitewash if you’re not careful. User amorverus has a great tutorial on avoiding whitewashing in coloring here .*
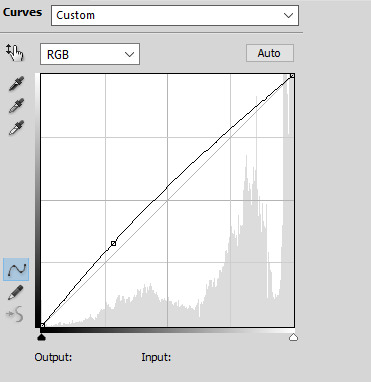
I also wanted to brighten up the gif more after this so I added a curves layer :
Then I used Selective Color to decrease the yellow tones in the White background:

I decreased it by 26. I almost always do this for scenes with white backgrounds or large blocks of white.
Step 6:
After I make some color adjustments I adjust the brightness and contrast again. I always add another Curves layer to increase the brightness of the shadows by slightly lifting the line on the bottom left:
Then I use Levels to change the contrast of my tones. I usually increase the contrast by moving the left hand point slightly to the right:

After that I add another Curves layer, decreasing the shadow and increasing the highlights like this:

I feel like this adds some nice depth to my gif and brings out the colors more. The amount I decrease or increase the curve depends on the gif itself, so definitely play around with this.
Step 7:
Now I go back to make some last color changes. I added another Selective Color layer and increased the Black on Whites:

Finally, I added another Selective Color layer adjusting the Whites again. I decreased the Yellow again and also increased the Cyan and Magenta to make the blue in the sky pop a little more:
I used a layer mask to erase this layer on Aziraphale so the change is only apparent on the sky.
Now I’m done! Here’s the same method on two other scenes:


And I uploaded the .psds (dl here) so you can take a closer look at what I did in Photoshop. Keep in mind that I don’t always follow these steps in the exact same order. Psd #3 features the curves color adjustment method and has some more adjustments. It really depends on the scene itself and the mood I’m in. Practicing a lot will build your familiarity with the different adjustments and hopefully boost your confidence in making your own coloring!
3. Hard to Color Scenes
Blue/Yellow/Green/Red Scenes + Dark Scenes
These types of scenes can be hell to color but there are some techniques to help balance the colors so that you have something that’s easier to work with.
For general dark scenes, adjusting the Exposure can be really helpful. Unfortunately increasing the Gamma or Exposure too much can make the gif grainy so be careful when using it. Consider using it in combination with Brightness/Contrast and Curves to avoid making drastic changes.
Another helpful adjustment layer is the curves layer. As the tutorials linked above explain, using the midtone or highlight dropper tool can help adjust the presence of red, green, and blue in your gif. Photoshop will balance against the color you select.
Let’s take this scene for example:

This scene is really yellow. Using color balance or selective color to balance it out could help but given how yellow it is, you’d need to use a lot of these layers to gradually change the colors or you’d make your gif too grainy. Using Curves, we can adjust colors with less layers and hopefully introduce less grain (sometimes this type of adjustment can result in too drastic a change, so your gif becomes hella grainy so be careful). I used the midtone dropper around here:

And got this:

Here’s the Curves layer:

The shadows are a little more intense than they were to begin with but that’s easier to adjust. You could also keep messing around with the dropper so the scene doesn’t become darker. You could it make it slightly less yellow and then finish the rest with color balance and selective color. Either way, I’m satisfied with this so now I can continue coloring:
Here’s an example of a dark and blue scene:
Usually for darker scenes, I use the midtone dropper but that wasn’t resulting in a change I was happy with. I used the highlight dropper instead, clicking on the flecks of snow in the bottom right:

Here’s the Curves layer:
And here’s the final gif after coloring:
This method is great for making big changes to the lighting and colors of your gifs.
HQ GIF Tips:
Save Settings:
I save my gifs with Diffusion because I find that the dithering is usually less noticeable that way, so my gif looks smoother. Pattern can also look really nice though, depending on your coloring. Try out both and see which you prefer! Here are my settings:

Coloring:
Making drastic changes all at once can make your gifs grainier. Be careful not to change a color too much one one Selective Color or Color Balance layer. It’s better to make smaller changes over multiple layers. Same goes for increasing brightness and vibrance.
Source:
Use the highest quality video source you can. That’s an easy way to make HQ gifs. Blu Ray or DVD quality is better than Itunes for example and both of those will be better than clips from Youtube. If the file size is bigger that typically means there less compression so the quality will be better. If you can’t find larger sizes or you don’t have the space or time to save larger files, just make sure it’s at least 1080p. Keep in mind that now that gifs are converted to gifv, your gifs might look grainy or blurry when you post them even if they look fine when you save them. You can go back and mess with the coloring to see if this helps but otherwise there’s not much you can do about the conversion.
Those are all the tips I have for now! If anything doesn’t make sense or you have any questions please let me know.
#gif tutorial#coloring tutorial#photoshop help#long post#usermerlin gif tutorial#I hope this helps!!#sorry this got so long :(#please let me know if you still have any questions or if something doesn't make sense#I get all rambly#my current coloring is really a messy mix of all the tutorials I've ever seen#I'm gonna reblog this a couple of times to make sure it gets seen#I'm gonna go to sleep now lol
35 notes
·
View notes
Text
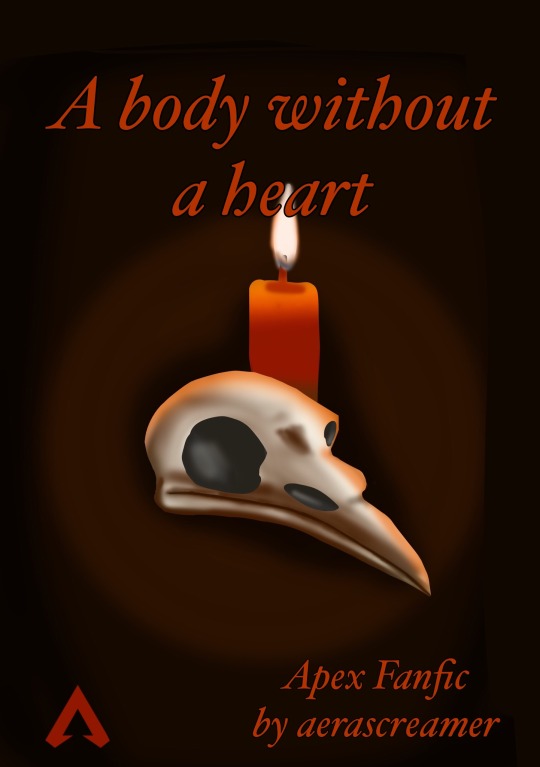
A body without a heart
Part 1: Stranger
An Apex Fanfic
Fandom: Apex Legends
Genre: General Fic
Word count: 2854
Warning: violence and death mention.
Read here too (highly recommended because phone Tumbler screw my text format):
Wattpad
Ao3
----
New season, new competitor.
But this time, "the new guy" couldn't be more different than any of the Legend.
Revenant never interacted with anyone, leaving the dormitory early to go we don't know where.
And if he has to talk to someone, it's either with anger or despises.
The first game of the new season is gonna be full of surprises
----
Note: based on this idea that I brainstormed a lot
Part 2
----
The repetitive hits of Artur's beak on their cheek woke up Bloodhound nested in a hammock.
Above the treetops, the sky blushed in various shades of white, orange, pink and peach as the sun went up, while the fresh wind pushed the scent of the forest to the hunter's nose who detected mushrooms, moss, and flowers.
Disconcerted to find themselves in the middle of the branches and leaves, they remember in flash images to have sneak out of the dormitory late at night.
Speaking of which, the hunter could see one of the windows between two dead trees.
"Is Revenant behind it, staring in my direction?" They thought, gently petting the crow, listening to him singing along the other birds.
Since the robot joined the Apex Games, an oppressive atmosphere enveloped the place, leaving the hunter in constant disturb.
It prevented them from sleeping on their two ears so they decided to guard the corridors, sometimes all night and at the cost of poor reactivity the following day.
But with the new season right around the corner, they needed as much rest as possible...
Fortunately, they could count on Wraith's sixth sense or Crypto's surveillance drone to keep an eye on everyone.
"Caw?"
"Yes, you'll have holly berries later. Also, you need to do more exercises or you're gonna get fat."
"CAW!!"
****
The growls coming from the spaceship's motor echoed in all the rooms of the vehicle.
Tension ruled over the Legends' soul, as they approached the arena World's Edge.
With Lifeline's help, Bloodhound clipped their jetpack on their back right before Octane interrupted them.
"Sure you haven't seen my protection glasses?"
"No Octane, it's the third time you asked me."Bloodhound replied.
"Wait you lost them again?"
Lifeline raised one of her eyebrows with a judging glare.
"I... Guess?"
Both looked at the roof of the dropship in exasperation as the daredevil ran back to his room turned upside down.
"Come on I need them now! We're dropping in one minute!!" He exclaimed while stamping on his feet.
"You know what, take my spare ones and leave me alone." The hunter offered as they headed to their quarter.
They quickly grabbed the glasses in their wardrobe and tossed them at the young man.
"Nice! Thank you compadre!"
"Warning, drop zone ahead!" The IA lady announced.
Time has come... the new season has begun.
The new competitors started at the screens hanging in the middle of the ship, hoping to be matched with a veteran fighter like Bangalore or a trustworthy support like Lifeline.
Some faces lightened, others bit their lips.
Bloodhound headed to the descendant platforms, soon joined by Pathfinder.
"Hi, Bloodhound! I'm glad to have you on my team this time." The MRVN greeted, rising his hand.
"Me too felagi."
Although his personality showed friendliness, Pathfinder enjoyed fighting in the arena and his precise shots made him an opponent to never underestimate.
The frozen wind whirled around the Legends as the platforms pierced through the clouds.
"The hunt begins. May the gods bless you."
Out of nowhere, a scarlet figure landed with a loud bang between the two Legends.
It stretched its long smooth arms and looked at the MRVN.
"Revenant! Ready for your first match? I'm sure you-"
"Save me your breath, I work in silence." The newcomer reprimanded with a sharp tone.
He turned his head briskly to the hunter and stared at them with intensity, as he did with everyone.
Although his metal face didn't express any emotions, Bloodhound felt a deep rage and feeling of envy boiling underneath.
Revenant took the time to discover the arena before nosing-down, leaving a sad-screened Pathfinder behind.
The hunter tapped on his shoulder with compassion before the two jumped right into the red silhouette's diving trail.
The shadow of the Harvester projected its darkness on a totally devastated Capitol City.
Stunned by the damage caused to the landscape, Bloodhound couldn't keep their eyes away from the giant scar opened by the lava fissure scorching the earth.
Some buildings in which the hunter used to fight looked like they collapsed from the inside with fires still not extinct, saturating the air of ashes and dust.
The grey clouds filtered the light that shaded the sky in red, gold and orange, darkening the atmosphere.
Nevertheless, Revenant dived headfirst into the lost city, his tall figure blending almost perfectly into the chaos.
As Bloodhound landed next to him on top of a building standing with courage, the red shadow looked below at a supply bean in the middle of an open field.
"I'm going that way. Don't even think about following me." He warned
"Got it !" The robot went downstairs, oblivious to the bright eyes following his movements.
Watching Revenant dropping, Bloodhound asker themselves how their teammate ended up so full of animosity, especially compared to the blue robot...
Nobody knew where he came from. He popped in the Games like a ghost, without knocking at the qualifier's door.
"Do you need a Sentinel Bloodhound?, Pathfinder asked from a lower level.
"Yes, please."
*****
Revenant moved with silence and fluidity through the grass of a hill.
Following a few meters behind, Pathfinder and Bloodhound discussed the MRVN's journey to find his creator and what he learned on the way.
"And that's why he taught me how to cook Leviathan's meat, the robot concluded, walking with stiff movements.
"Interesting story. It reminds me of that hunt where I took down a Prowler."the hunter remembered.
"A Prowler?! They're really dangerous!"
"Yes but this one was pretty old and lost a paw unfortunately"
A gunshot cut the hunter in their story.
Two enemy squad exchanged fire behind the hill.
Pathfinder took his Peacekeeper and checked his grapple.
"What should we do friends?"
"Let's get closer to have a better view of the situation first"
But without consulting his teammates, Revenant darted in the direction of the fight.
"Wait!" the blue robot turned his to the hunter.
"Follow him." He grappled away.
Bloodhound ran as fast as they could, reached the top of the hill and observed the battlefield through their sniper scope.
Quick and stealthy, Pathfinder already knocked two members from one of the squads behind a large boulder and finished the last opponent with a punch, sparing any unnecessary injuries.
Close to a small house, Revenant fought each member of the second squad at the same time.
Ignoring the bullets hitting his chest like unpleasant mosquitoes, he grabbed a contestant's head, slammed it into a wall, rushed to catch his frightened teammate in order to cut her throat before punching the last member to the ground.
He fought and killed the targets with professional precision, trained... or even created for it without a doubt.
Moving naturally in the battlefield with ease, he glanced at each defeated enemies with an air of superiority, as if they stepped too far into his territory...
A new apex predator has taken the lead in his first try.
A leaf cracked under someone's step.
A fatal mistake.
Bloodhound immediately faced the new opponents coming in their back.
They shoot, hit a disoriented Mirage in the chest and rushed to cover.
Switching for their R-99, they climbed on top of a tall rock and emptied a magazine on Gibraltar who carried his fallen teammate to safety.
Taking the opportunity, Wraith sneaked behind the hunter.
They grabbed her arm, stopping the kunai before it pierced their chest.
She pushed their leg and the two fall on the grass.
Restoring their balance, Bloodhound leaped on the skirmisher and knocked her out.
"One squad... down..."
they panted
"Good job, " Pathfinder congratulated, "We're getting closer to the cham- Oh no! The Ring is closing!"
The hunter saw the giant wall of fire approaching quickly in their direction.
They hissed and started running right away, Pathfinder waiting for them.
Further away, Revenant's blood-red silhouette got smaller and smaller the further he ran.
A hundred knives pierce their lungs with sand rubbing their throat.
Their glasses clouded like in winter, while the breathing mask failed to provide enough oxygen to sustain the prolonged effort.
Bloodhound abruptly got grappled and pulled towards Pathfinder, who took them under his arm before they blacked out.
Part 2
2 notes
·
View notes
Text
Mobile Editing for Beginners!
I was out for a run last night through the park next to my apartment, and I had to stop because the light was just TOO GORGEOUS. Golden hour should be illegal here. Honestly I’m not sure I’m capable of getting anything else done when there are photos that could be taken!
Anyway, since I was running, I only had my phone on me, so that’s what I used to grab a few quick shots. It seemed a little counter-productive to move them to my computer for editing, since they’d have to come back to my phone to share on Instagram anyway, so I decided to edit on my phone when I got home.
Hello, Snapseed! I’ve been hearing good things about this app, but I haven’t had a reason to use it ‘til now! I thought I’d share a guide/review of the app and quick overview of how I edit my landscape photos.
Disclaimer: I’m an android user. The interface should be very similar for iphones, but if you find any differences, let me know and I’ll update this!
When you launch the app, you’ll get a screen that looks like this. When you tap it, it’ll take you to your gallery to pick a photo for editing.

Once you’ve picked an image, you’ll see three options at the bottom of your screen: Looks, Tools, and Export. Looks are like Instagram filters, the Tools menu contains all of the individual options for editing, and Export is how you save your results. We’re going to focus on Tools for now.
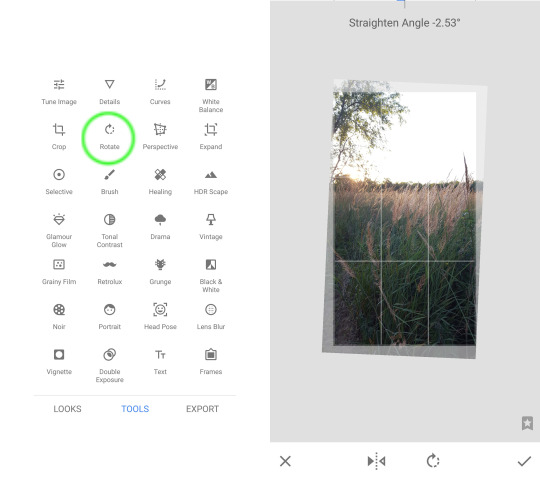
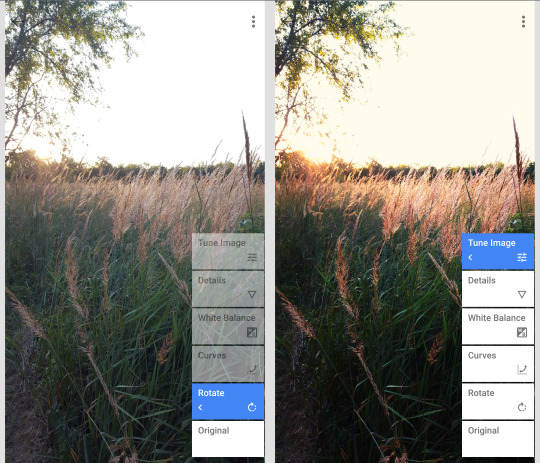
My first step is always to adjust the angle. I know I don’t want to share it with a crooked horizon, so I fix it right away so that all of the later steps look closer to what I actually want to share.
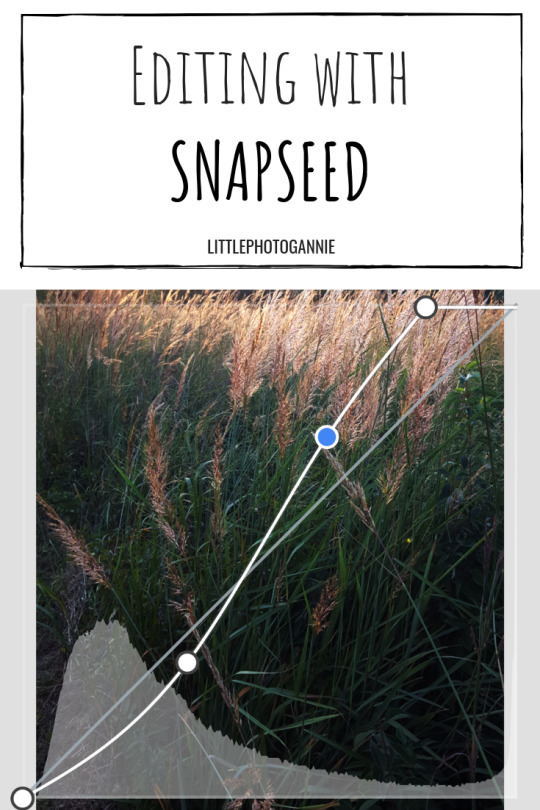
Next, I adjusted curves (this link has a pretty good overview of editing with curves in general). When you open this setting, you’ll see a diagonal line across the image (the curve) and the histogram across the bottom. I think histograms probably deserve a post of their own, but the quick version is this: Divide the chart into thirds. The left section shows your shadows, the middle section is for midtones, and the right is for highlights. I like to think of it as peaks showing the most dominant tones and valleys showing the least dominant tones. What you want is for the peak to be somewhat balanced over the midtones and spilling into shadows/highlights. My image was underexposed, so the histogram is skewed to the left (more intense shadows).
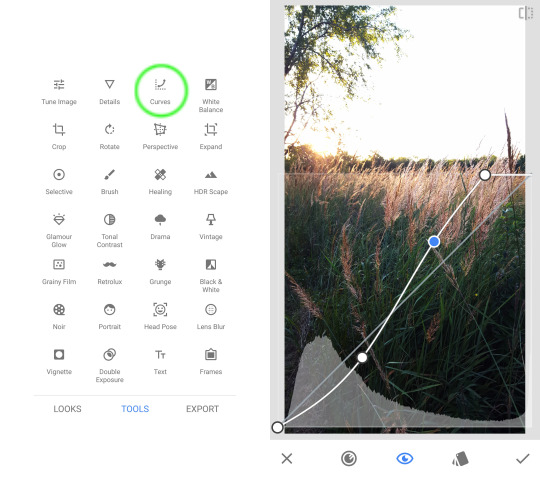
You can add handles to the curve by tapping it, and drag up or down to edit the shape. This “S” shape is pretty common; it brightens highlights and darkens shadows, which really makes images pop. I’d suggest playing with the options to find what works for your style! If you need to get rid of a handle, you can tap and drag it off the bottom of the chart. If you move the top-right or bottom-left handles, you can adjust the “pure tones” in the image. Basically, sliding the top-right handle toward the center makes more pixels pure white, and sliding the bottom-left handle toward the center makes more pixels pure black. There’s no reason you have to adjust all these things every time you edit an image, but the option is there if you want it.
I bumped up the highlights, dropped the shadows, and added a little more white because I wanted to really show the light coming through the tops of the grass.
Next, I went for the white balance. There are two main tools here: temperature and tint. Photography rules say you want your whites to be white (such as clouds, someone’s teeth, maybe a blank wall, etc.), and white balance (aptly named) is how you can get there. Adjusting the temperature slider will make your images “warm” (more yellow/orange) or “cool” (more blue). I usually make my photos a little warmer than the “correct” value, but it’s all personal preference.
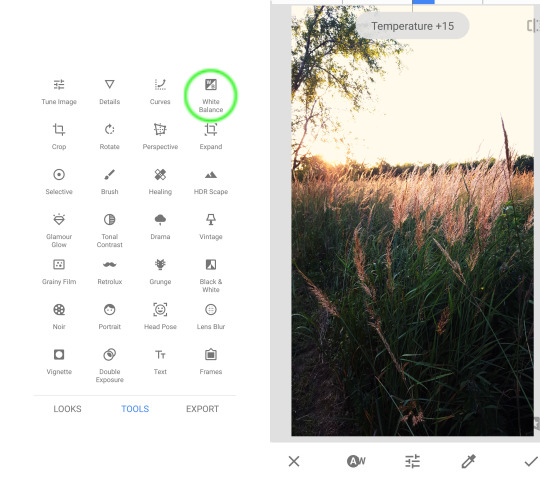
If you have to make any dramatic adjustments to the temperature, you may end up with a different color tint. That’s where the tone menu comes in. You can use the slider to add more pink or green to even out the image.
I decided to try out the Details next (top row of the tools menu, second from the left). I’ve seen basically the same feature under different names in different programs. Increasing detail (structure) acts like a Sharpen feature; decreasing detail acts like Soft Focus. Here’s how it looked (the center image is from the last step of my white balance edits, so no detail change is applied):
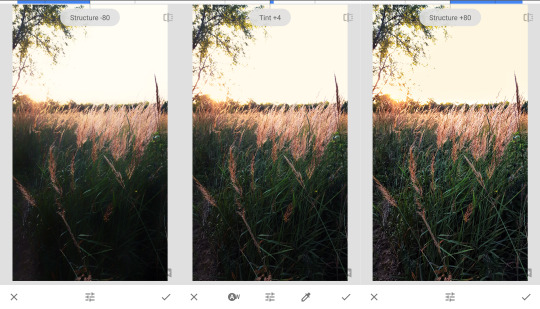
I liked a little bit of the softer look here, so I set it to -20.
The other important menu here is Tune Image. We accomplished pretty much all of the changes you could make here by using other tools, but if you’re more comfortable with this interface, use it! Brightness, contrast, ambience (add light to entire image), highlights, and shadows can be covered by the Curves edit. I use Curves because there’s more of a gradient in how the effect is applied (remember the “S”?); with Shadows/Highlights, it’s all or nothing. Warmth is covered by the White Balance menu, which, again, gives you more options to control the result. I did nudge the saturation up just a tiny bit for some more punch to the orange tones in the tops of the grass.
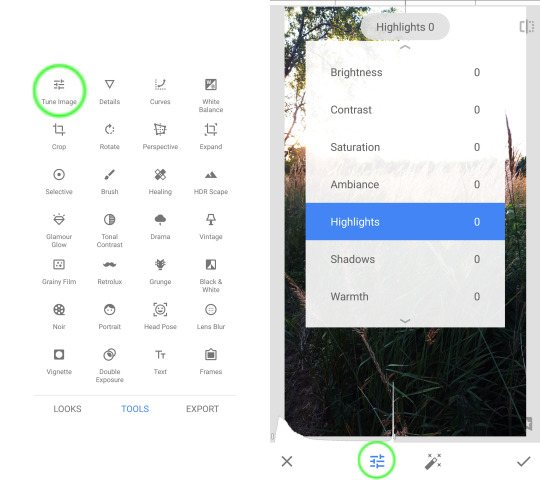
We’re almost done! If you want to go back and change any of the edits you’ve made, tap on the image options icon in your top toolbar (it looks to me like sheets of paper and an arrow) and then select “View Edits.”
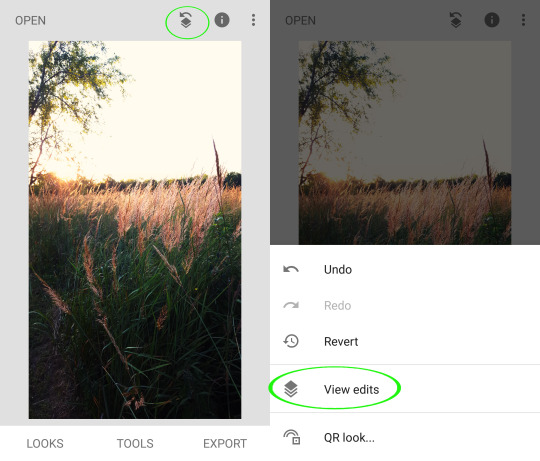
Here you can see all of the changes you’ve made to your image, and you can adjust them if you’d like! You can also go through it step by step to see the change between each edit.
And we’re done with this photo! I decided to save my changes as a preset. To do that, go to the “Look” menu, scroll all the way to the right, and tap the plus icon. Here’s how it looked applied to another photo I took that night:

If you want to try out the filter (Look) I made, you can find the QR code here. (You can add it to your image using the button right under View Edits)
All in all, I’m pretty impressed with this app! I like that it has plenty of options for different editing styles with traditional tools like curves and white balance but also more modern additions that probably look more familiar to instagrammers and the like.
Would anyone be interested in a Part 2 of this tutorial? Maybe a portrait-centric version? There’s so much more to this app than what we’ve talked about here! Masked editing, dodge & burn, black and white photos....
As always, if you’ve learned something from this (or any other post!) and you want to share, tag @littlephotogannie or use #littlephotogannie on Instagram! I love a good before and after from post-processing. Happy editing!
#editing#mobile photography#phone photography#photo editing#snapseed#mobile editing#how to#photography for beginners#tips
7 notes
·
View notes
Text
Moonlight Sonata
an overdue gift for @hansaera <3 (Solavellan non-explicit nsfw)
Indecision weighed on Athelas like an armor made from lead; instead of protecting her vulnerabilities it latched onto her hesitation, strengthening the influence of her insecurities. Acting alone put her in a dangerous position but she wanted to entrust no one else in this matter, this personal quest. Blood from her kill snaked its way downstream as she rinsed her dual blades beneath the flowing water, moonlight glinting off the sharp steel casting shimmering reflections of light across the rocky bank. She watched as the slender trail of crimson faded its way around the bend in the river, splashing up onto the roots of one of the towering lush trees that spanned most of the Emerald Graves.
Had she made the right decision?
The intrusive thought pushed its way back to the forefront of her mind, rattling loudly against her conscious. It had been a subtle thought at first, when she had plunged her blade deep into her target’s back, just a whisper of a voice in the back of her mind. As the finished him off with a quick blade to the throat and fled the outpost, a small voice in the back of her head. The doubt ate at her, like a parasite, constantly draining her of her courage. By the time she had made it back to the Inquisition camp it had developed into a full blown scream. No one, not even her guards had even noticed her slip away to extract her hit, return, and leave for the river—or so she thought.
“…Athelas.”
Was this kill worth it? Were more lives saved by ending that man’s…?
Guilt seeped in alongside the doubt, drowning out all other feelings trying to surface. She continued to scrub the blade long after the blood had well washed away, her vision blurring as her movements became harsher. She gasped.
“Athelas!”
The sleek edge of her blade bit her skin, slicing open her palm. Dropping the dagger, she clenched her hand and brought it to her chest, blood leaking from her fist, and twisted sharply to see Solas standing a few hesitant feet away. When he saw the blood his eyes widened and he appeared at her side in a flash.
“Allow me,” he said, extending his right hand.
Athelas complied, letting him take her wounded palm and open it slowly. It was a careless cut, not too deep but just enough to break through the first few layers of skin. Blood rained the down the side of her hand as he spread her fingers open to get a better look. A soft burst of light emerged from his left hand almost immediately, illuminating his face in a swath of blue light. The sharp cut of his cheekbones became exaggerated as he guided the light over her cut, a few sparks of healing magic sunk into her broken sink. The magic sewed her skin back together before her wonderstruck eyes.
Solas lowered her hand back into the stream and she watched as the blood ran off, swirling down the little currents of the river. He turned his attention back to her as he lifted her hand out of the water and brought her knuckles to his lips. He pressed a gentle kiss on it before giving her hand back.
“I’ll never get over how you do that,” she said, a small smile playing on her lips as she stretched her fingers and rolled her wrist, “Sometimes I think you like to show off.”
“I will never pass up the opportunity to impress you,” he said simply.
She let out a small laugh, but her guilt cut it off prematurely. She looked back down at the freshly healed hand and thought back to the way her target’s hands reached out for her in surprise right before she slit his throat. He had no idea what was coming.
Solas noted her shift instantly.
“Athelas, I know you snuck out. Is everything… alright?”
She swallowed thickly. Normally, she’d be able to keep her composure, but around Solas… he had a way of breaking down her walls with just a look, melting her defenses with a simple touch. She knew the guilt was written across her face and that he could read her like an open book. And she felt herself break.
“I couldn’t just let than man live after what he did… those poor children,” she broke, face falling into her hand, “he murdered their parents… leaving them all alone.”
Images flashed behind her eyes despite her best attempts to push them away, the faces of her own parents, their eyes glazed over with far away expressions… the fear that ripped through her… the same fear she saw in the eyes of those two little girls that clung to her legs when she walked into that rebel camp in the Graves a few days ago. Her heart ached for them, for the world of love they were suddenly deprived of just as she had been years ago.
“I couldn’t just… just…” she trailed off, the words she so desperately wanted to voice died on her tongue.
Solas began to rub her back, the firm yet gentle caresses anchored her.
“You did everything in your power to stop more harm from spreading. Those children, they are lucky to have someone like you watching out for them,” he whispered against her silken hair, “no one else will suffer by his hand. You have done the right thing.”
She lifted her head and stared into his eyes, feeling vulnerable. His fingers caught a strand of hair that had fallen across her face and tucked it behind her ear, making her shiver. He continued to comb through her long tresses, the repetitive motion easing some of the tightness in her chest, and she felt some of the tightness in her chest unwind.
“You have suffered enough, ma vhenan. Let the guilt go.”
Tears fell freely down her face as she gazed into his blue eyes, finding only kindness, understanding, and acceptance swirling in their depths. His hands cupped her face and used his thumbs to wipe away the evidence of her sorrow and guilt. He leaned forward and pressed a soft kiss to her forehead. When he pulled away and looked at her again, his expression changed from loving gaze to shocked concern.
“Did you cut yourself elsewhere?” He reached for the lapel of her shirt, as she glanced down.
“What,” she glanced down, pulling hands off the fabric. There was a dark stain where blood at seeped into the front of her tunic. “Oh no, no!,” she exclaimed, heat rising to her cheeks, “it’s from my hand. I should have been more careful. Now I’ll have to wash the shirt too,” she laughed quietly. Her eyes roved over his own attire, “it looks like you might need to do some washing yourself.”
It was Solas turn to inspect his own mud smeared and sweat stained sweater, also covered in small traces of her blood.
“Ah, I truly am that unwashed apostate now.”
“Unwashed, apostate hobo.”
The subtle tease earned her a half-hearted glare.
“Pardon, I misspoke, my unwashed, apostate hobo,” she corrected, a sly smirk breaking across her face.
She moved closer to the stream, fishing her forgotten dagger from the water and tossing it ashore.
Leaning in, she brushed her nose across his cheek, lips barely touching his skin. She felt his shuddering breath and felt encouraged, leaving a light trail of kisses down his jawline, lingering by the dimple in his chin while gazing up through hooded eyes.
He raised a brow in challenge, his own eyes smoldering down at her. “Perhaps I am in need of a bath.”
The next thing she knew she was falling into the water.
Solas wrapped his arms around her bare torso, dragging her further out into the river. When she began to panic, he halted, just treading calmly as she adjusted. She tremored in his embrace, not letting the sound of the rushing water take her back to a dark place in her mind. There had been a time that even sitting on a riverbank would have sent her into full blown panic attack, but she had been working to conquer her own demons since she left her clan for the conclave. One at a time. And tonight she had laid to rest another, for those children, and for herself.
She focused on the present, the feel of him all around her, the sensation of cool water refreshing her warm skin, soaking into her hair. Her surprise laughter once she realized she was alright was soon swallowed as his mouth found hers. She did not know what kind of magic this was, or if it was even magic at all. The way he could electrify every nerve in her body with a simple kiss excited her. He moved from her lips to her throat, nipping the sensitive skin from her neck to shoulder, peeling away the saturated cloth of her shirt to expose her collarbone. She clutched into his own damp tunic, heart fluttering within her rib cage has his mouth moved lower still, unbuttoning one button at a time. Ripples spread across the water’s surface from their movement glinted in the moonlight that filtered down through the treetops. His wandering hands explored the skin bared to him, tracing the tender lines of the scar than crossed her ribcage, his mouth not far behind.
This feeling, this need… it was all entirely new, and entirely overwhelming. She guided his face back to her own, “The shore.”
She was weightless as he tucked her legs around him once more, gliding through the water. At the riverbank once more, their limbs became entwined as they worked to relieve themselves of the wet fabric, tossed and left in forgotten piles. He resumed his attentive affection to her chest, kneeling before her so that his mouth mouth could graze over the scars that marked her ribcage. She shuddered as his warm breath ghosted over her torso as he made his way to the bones of her hips, and then down her right thigh. Her sensitive skin came alive has his lips brushed all the tender places that yearned to be touched.
She was a slave to his song, and with his mouth he knew how to make her sing. His caress played into her need in perfect harmony. His tongue held powers she had never known, and his devotion nearly broke her. Tremors rippled through her body as she fought to stand as he conducted every nerve in her body to his will. Her fingers dug into his shoulder as she braced herself for the release that would soon overpower her. Her cry was a foreign voice to her ears as the song came to its finish. It echoed in her mind, taunting and enticing.
This can’t be how the song ends, she thought to herself, gently pushing his shoulders back to lay him down on the soft grass of river bank. She sank unto him, the sweet ache of being filled once more by his presence nearly sent her over again. But this time, she was in control, she was the conductor and he her muse. She set the steady rhythm of their song, their lips singing against one another with soft cries of pleasure and desire, a melody for their ears alone. The crescendo of ecstasy of their passion lit every fiber of her being on fire, with each rock of her hips and tightening of his grip on her thighs. And when finally, when they hit that final note, the rush of the finale had her crying his name once more. She slumped forward, her hair falling in front of her like a curtain around his face. He tucked strands behind her ear as he went to cup her cheek, peppering her with soft kisses.
She laid down atop him, resting her forehead on his, catching her breath as he did the same, their sighs falling over one another as they synced their breathing. Feeling him shift beneath her, reminding her he was real and solid, supporting her.
“Thank you,” she whispered.
He smiled, “You are stronger than you give yourself credit for, vhenan.”
“If you say so.”
“I do.”
He captured her mouth in a kiss once more, feeling the weight of his comfort his words offered.
And she believed him.
#solavellan#solas#solas x lavellan#solavellan fanfiction#Athelas Lavellan#Hansaera#smut#emotional smut
68 notes
·
View notes
Text
Claire-voyant Chapter 1
So here is my first youtuber ego story thing. I think its bad but my friend says its good \_(’_’)_/. Either way I sincerely hope you enjoy!
I would like to thank @retro-remix for being my editor since im horrible with words and @markiplier-egos for a very specific insult near the end of the story XD.
@itsdanimotherfreakingglitter @markiplier-egos @moonysmayhem @sunstar121 @ferociousfangirlofmanyfandoms I believe you guys wanted to be tagged for this? Sorry if im wrong!
I really messed this up. Im sitting on a high ledge trying to evade a pink haired lunatic, a man with bandages over his eyes, some sort of 3-D filter demon, among others. I must be nuts because the only thing that crosses my mind is ‘why do they all look alike?’ Oh, where are my manners! My name is Claire, and im currently stuck in some sort of large house belonging to some very crazy people. You're probably asking what the heck is going on? Well, it's a long story, so I hope you have some time on your hands.
I guess it all started a while ago ...
I hated today. Today was the first day of the new school year. All I had to do was make it through the day without catching the attention of bullies, and what did I do? Now i’m running down the streets being chased by kids two grades above me. Sometimes being the odd one really bites me in the butt. I look behind me, only to find that they’re still on my tail! I see the park up ahead and skid onto the path. Surely i’d lose them in the thick woods that lined the park! Right? I rush into the woods, dodging trees and shrubbery. I can hear them tearing through the undergrowth as I start to get stitches in my side from running, my knee high socks snagging on thorns. I come upon a cliff and realize I can't get down without harming myself. When I turn around there they are, Staring at me.
“Where you gonna run now, Claire-voyant? Dontcha got something in your “magic satchel?” one of them called. I grit my teeth at the nickname, and hug my satchel closer. It had all the things I thought would come in handy, which included, a flashlight, a multi-tool, some twine, and other trinkets I thought would be useful. Although right now I didn't have much to fend them off with. I had a pocket knife, but even deep in the woods they would find a way to get me in trouble if I pulled it out on them. “What's the matter? Didn't see this coming?” I don't reply as I edge closer to the cliff. I don't need to engage them when they have me between a rock and a hard place. “If you dont wanna play our game, you can always play with the bottom of the cliff instead!” the other shouted rushing forward. I panicked and dove off the cliff. Not the best idea, I admit, but I wasn't thinking. The last thing I remember is a bright flash before I hit the hard ground, and everything going black.
I'm sleeping. I must be. My eyes are closed, and I don't feel like getting up so it must be monday. Except my bed feels like a rock, and my blankets must have fallen of in the night because im super cold. I open my eyes only to close them tightly again. It's too bright, and im getting a headache from it. I bolt up at that. I am not a morning person so my room always, always has the blinds shut. This is not my room. I look around to find im in some sort of studio. ‘How did I get here?’ I think to myself. I have vague memories about hitting my head, but I don't remember how. I think back to the day. I can remember everything up until school ended, then it gets hazy. I hear ringing in the distance, no not in the distance. My ears are ringing. Wait . . . headache, Light sensitivity, memory loss, ear ringing. I think for a minute. Aren't those the symptoms of a concussion? I'm not too sure, but whatever it is it can't be good. I decide to try and find help immediately. After all one thing I know for sure is that if not treated, concussions bring pain. Unfortunately for me, this is the exact time someone walked through the door.
It was a man, wearing pink suspenders, and shock of pink hair. He also had a silver gun in hand. That made me worried. The instant he saw me I bolted up and looked around for a place to hide. There was two chairs in front of a fake brick wall. I ducked behind the brick wall and climbed up a ladder that led to a catwalk. Looking down, I see the bewildered pink man shoot his gun at me while running towards the ladder. At the end of the catwalk I spied a door and ran to it, while hearing bullets ricochet off nearby metal objects. I pull open the door and lock it behind me. I then pull a pair of pliers out of my satchel and break the door handle. I hear him yelling as he pounds on the door, but I dont stick around to hear what he’s saying. I skid around the next corner and stop to catch my breath. As the adrenaline ebbs away I feel a sharp pain through my skull. My headache is getting worse. Concussion or not I definitely need help, but is there anyone else here? If so, are they all as crazy as that cotton candy lunatic?
I decide it will do no good if I stay here and do nothing, so I set off down the hallway. I open a door and slip through into a library. Its really dark so I pull out a flashlight from my satchel, and I wander through the maze of bookshelves. Some of them seemed like good books, but the jabbing in my forehead pushed me forward. Suddenly I came upon a desk with someone in it. I immediately hid. I could hear the noise of a pen on paper and muttering, as I slowly inch away towards an elevator I see at one end of the room. Through the books I can see he has bandages over his eyes. This should be easy, all I have to do is make no noise and he wont be able to tell im there! I slowly walk across the floor. Im a foot away from the elevator when I hear him talk. “The Host believes you are hurt. The Host will forgive you for sneaking around his library without his permission if you go get treatment. ” I stood planted where I was in shock. How did he even know I was there? Then the cotton candy lunatic walks in, and we lock eyes. This gets me moving. I sprint to the elevator and press a random floor. The elevator slams shut just as he runs up to the door.
The elevator door opens to a dark room. It looks like some sort of office, with a desk in the middle of the room. I walk over to the desk only to find papers strewn about it. I pick up a newspaper clipping. “Three people killed at Markiplier Manor. ” it read. Before I had a chance to read the article the door opened to reveal a man. I think anyway. He was completely monochromatic with overlapping images of himself in blue and red. Like as if someone had drained all the saturation from a photograph and added a 3-D filter. Panicking, I ducked behind the door as he opened it. He closed the door and walked to the desk. He sat down and began to work on whatever papers that were there. He hadn't seen me. He hadn't seen me! This was my chance! I carefully crept to the doorknob, keeping a watchful eye on the man. At one point he looks up and sees me. We both stare at each other until I break the silence by throwing the door open and bolting down the hallway. I look behind him to see him speed walking towards me. Why he wasn't running? I don't know, and I don't care because it gave me a big enough headstart. I frantically look for a place he won't find me. I look around and find a high shelf with potted plants next to a window. I clamber up and pull up my feet just as the monochromatic man walks up. I hear him dial someone on his phone. “Tell everyone to be on high alert for a young girl. ” I hear him say. He ends the phone call and walks away. I lean my head against the window. After all that the adrenaline has worn away again, and i'm left with a blinding headache. The coolness of the glass takes away the edge of the pain, so I stare out the window.
Outside I see a beautiful garden, filled with trees, flowers and a pond. On the other side there seems to be another place. It's a lime green manor of sorts, with blue window shutters and a blue door. Many people walk by, putting me on edge, but they always seem to pass. I must be crazy because instead of being scared all I can think about is why they all look similar. Like, they all wear the same face. Are they twins? No there are at least 12 of them, maybe more Is there a word for 12 twins? Is it possible? If not what are these guys? Looking down at the passing people. I spot the black and white guy, the bandage guy, and the pink carnival guy, but also new people. There is a normal guy in a tux, a guy wearing robes and has a peanut butter beard, a doctor, four news cast guys, four robots, and a guy with a skateboard and a tank top.
*time skip brought to you by doritos*
I don't remember when I fell asleep, but I woke up to someone trying to grab my foot. “What the-!”I screamed and pulled it up from where it was hanging over the edge. Looking around I found that all of them were gathered around my hiding place. I could barely think with my headache, but one clear thought I had was ‘I am so massively screwed!’ The monochromatic man cleared his throat. “We would greatly appreciate it if you could get down from there. ” he said flatly. “Why? So you can attack me, you desaturated demon?” I called down. He didn't seem very pleased at my remark but said nothing. “My diagnostics indicate you are already damaged” the robot in the blue shirt muttered. I pulled out my pocket knife. “Yeah, and I don't feel like getting ‘damaged’ even further!” I said slowly, clenching my fist in pain. The regular guy in the tux spoke up “I hope you didn't ruin any of my plants up there!” The demonic 3D man knocked him upside the head. “Thats not whats important right now!” he sneered. That got me mad. I wasn't thinking very straight with my headache, but this guy seemed nice. Trust me when I say I can tell these things. So I chucked my pair of pliers at him. “Leave him alone you hot topic wannabe!” I shouted. He lunged for me, but the man with bandages held him back yelling “The Host holds Dark back with all his might, just as Claire passes out from her concussion!”
And then everything goes black.
I’m asleep again. I’m sure of it this time. I'm on a soft bed with the blankets pulled up, and i’m hugging my pillow. Except it's still very bright. I sit up fast. The one in the doctors coat is at the end of the bed. I inch back in the cot. He hold up his hands. “Its okay! Jeez, I won't hurt you! In fact im very glad you woke up! We were all very worried. ” he spoke softly. I stare at him. “Worried? You guys were chasing me! I was shot at!” I yelled. He flinches. “That was probably Wilford. Look I only want to patch you up and send you home. Dark isn't very fond of you after you called him a ‘hot topic wannabe’!” I mess with my blanket for a bit before saying “I don't really have a home. ”
10 notes
·
View notes
Text
I don’t really like saying anything uber mega personal here, because I’m sorta just here to reblog relative stuff, and maybe write a little? However, I feel I need to get some stuff off my chest. Depression is perhaps the most devastating mental war there is. It is at moderate difficulty to enter such a war zone, although ridiculously easy to remain. You have no choice to vacate and return to your family, only to man the guns and arm yourself to endure this one soldier battle. The rivalry between joy and depression plays tug of war with your mental stability, a lone troop desperate to escape. Joy enrolls and deports you to the battlefield with little to no notice, a lingering presence of an infinite vast No Man’s Land. Tarnished terrain with jagged sharp branches that disperse from ash brown bark makes the land look like a filter. Not a single barricade in place, you trek onward with the assumption this first passage will be simple to cross. A few miles in, unsuspecting of such a disturbance, you fall into a trench. Luckily it isn’t very deep, minor as if it were unfinished. You dig your fingers into the Earth, flinching as you feel a rock attempt to slip beneath your nail. You check your flesh, unscathed as it has always been, many would compliment and envy your complexion and condition. Upon settling both feet onto the terrain, you step on a shard of glass that barely pricks the heel of your sneakers. “I may need a change of footwear more suitable,” you conclude, pulling out a pair of pristine combat boots. Your eyes dart between your current favorite pair of rainbow sneakers, and the midnight black combat boots. Reluctantly, you change pairs and stuff the favored item into your rucksack. Wiggling your toes and looking down, you realize you much preferred the saturated and colorful option over the grim, achromatic resort. The petal falls free from the rose, the first chip off the old block that is your happiness. The glass caught between the soles go unnoticed by your newly recruited self, properly suited for the rubble now. As your mind begins to wander and ramble, distracted you trip over a small sack barricade. A hand swats away dust and pebble nestled into the fabric of ocean blue denim jeans, yet again a favorite article of clothing. A light sigh slips between parted, plush lips as a set of leg pads jerk free from a small compartment. Strapped tight around plump thighs and durable knees, the color is a dim grey that instantly makes you miss the vibrancy of your trousers. Weeks fly by as quickly as the crows overhead, days of the week less monitored than prior. Was it Monday, or Wednesday? Perhaps it was a Friday or Sunday? The silver watch fastened around an overused wrist broke long ago, and so you lost your track of time. Barricades, debris, rivers and trenches have came your way and ultimately resulted in an entire change of your wardrobe. “I won’t be leaving this place with all intact.” Thought to be alone, the pistol within its holster is gripped firmly upon a shadowy figure approaching. “Hey friend, I’ll help you find your way about. It’s awfully lonely here, isn’t it?” spoke a scrawny civilian, decked in gear alike yourself which indicated they may have been a solider rather than common folk. You nod and accept the invitation of their company, friendship is a good thing after all; they appear wholly capable of surviving these harsh conditions, the battle will be easier together. What is it you’re looking for, pal?” “Um, it’s the guy who created all of this..destruction. The bodies,” You gesture your thumb towards one of the many surrounding piles of lifeless corpses, sided by various weapons. Their eyes widened in fear, taking a hasty few steps back before exclaiming in a shaky manner “Oh no, not it.” “You’re seeking it,” “Yes, I am? Who exactly are we talking about here?” They shook their head, retrieving a dull blade beside a body they for some reason took interest in. Aged blood the shade of rust was smeared by saliva coating a slim thumb, much to your surprise. “Not a who, a what. Maybe a who depending on how far gone you are.” You tilt your head in confusion. “It is a gastly demon you see, one I advise to steer clear of.” In a battle stance, you shake your head triumphantly, “I will act accordingly when I see it, then.” The following crackle of vocal cords startle you, this man hasn’t been so loud, every word spoken pillow soft. Anxiety racks your nerves and thought process, heart beat increasing. “You can’t see it, useless kid. Do you lack sense? It’s invisible or otherwise similar to dense smoke, kind too. It has to be to ensure the thoughts can get in, now let’s travel onwards.” You hadn’t thought much of the insult, as it’s been heard so many times you assume it’s likely correct, that you lack sense. Useless was a new one, however speaking up may not be quite beneficial, so you follow his lead now. A sickly crooked smile highlights already wrinkled features, skin crinkled even more so thanks to his expression as you begin to feel inferior in comparison to this solider. He knows more about this creature, after all. Months have sailed along in resemblance to the battleships that once littered the now surrounding body of water. During this journey you were fortunate enough to meet another survivor, and learn more about Sixten, the other occupant of your party. Anorexic and skeletal in result of such, he forcefully kept true to making his body reject all meals. You found this out the one night he’d stripped himself of his sweater and faced the dead trees, the only sound other than the roaring, luminescent fire being gagging and violent hacks. Sixten Davis, Luci Furr, and yourself. You and Luci have grown quite close, a relationship that blossomed gradually although now somewhat sketchy. Being with her, you've learned it's much to blame yourself over the latter; Hearing seemingly endless complaints and witnessing shed tears pool at the underside of her pointed chin. The loyalty established is as well questionable, as many a nights may you find hear her lilted giggling and Sixten's voice mingling in the distance. "We've met the end of land, sea is only ahead," You exclaim with a hint of sadness, the life and essence you once contained now in bottled amounts. "Make yourself useful then, and begin to craft a raft," Luci giggled at the intentional rhyme in his demand. "Perhaps you can help?" You inquire sharply, eyes narrowed and brows knitted together in irritation. Luci was quick to defend Sixten's honor, unlike yourself. "He's on watch for any more demons, don't be rude to him. We don't have to help you, you're luck to have us." Relax, the therapist once said it helps to breathe deeply. "This is why I must insult them, I don't get why they can't just learn." Your eye twitches, ire boiling in the pit of your stomach. Inhale. "It's their fault anyways, dragging us along on this trip," "Ungrateful as always." Exhale. "You both treat me like absolute trash! How is it my fault, when Luci is the one who ate all the rations? When you're the one who screwed the calculations and sent us on a run around in the forest?!" You soon regret this outburst, silence numbing your skin as it tingles and the palms of your hands grow clammy. A year has driven by now, and you've forgotten the type of car you'd once desired, otherwise you would compare the statements. Luci robbed you of your supplies and self esteem, whilst Sixten had vicked you of your prized physical attribute. A once clear complexion was now littered with scars from a sharpened blade, the same dull knife Sixten pocketed and spent time repairing afterwards. To spite you, he'd carved many insults into the flesh of your stomach and chest to remind you of who you are. Tired limbs swam through filthy waters to the next slice of land, fragile bones creaked and moaned like old wood from the constant maneuver of land not one bit level with the rest. Here you stand now, before the ghoul you've long searched for. It depressed you how many trials you'd suffered just to see it was exactly as Sixten described it, smoke. "Hello, it." "Please, call me friend." It's voice echoed and repeated as if someone played multiple audio clips at the same time from different tabs. It's tone was inviting, warmth enveloping you as it approached a single step closer. You shook my head hastily in rejection, fearing now what friendship's purpose was, and what it truly meant. It's hand was firm and constricting on your shoulder however, despite the vain attempt at warding it away. Physical contact has grown void in your life, it's hold served pleasant and home-like. "I cannot hurt you, my dear. Please, invite me in." It's request made little sense, nonetheless you accepted it. Everything sounded fuzzy and unclear with it's grasp growing uncomfortable now, the pain felt relieving though, you make no attempt to pull back. Slowly nodding, it smiles, "Good, very good." You realize it didn't smile, rather you visioned it. Charming little nothings were whispered softly and rotated about in your membrane, and the cold pressure of a pistol to your temple failed to wake you. "You've endured so much pain, why not join me, and lessen the amount of hurt you experience? You don't have to feel it any more." Hot tears streamed down cool blemmished cheeks, calloused fingers pressing tighter into the weapon. "Pull the trigger." For a mere moment you debated tugging it back, before your eyes widened upon seeing yourself stand upright before you. The curve of plush lips complemented untouched skin. A rainbow tie die t-shirt to match your rainbow sneakers, Converse brand just like you liked them. Ocean blue denim jeans. "The sooner you do, the quicker the pain will vanish." Beside that image was the current you, mirrored in horrific fashion. This wasn't the you everyone would recognize and remember, certainly not the one you'd wanted to be. Dusty combat boots that faded away from their once true color of midnight black, split from the now flat soles. Loosely hanging padding on your legs, arms, and chest. Greasy locks strewn about a grimey forehead, dandruff flakes caked onto your scalp. Ocean blue denims now faded to an ash color, a tiedie shirt near black and white. A trembling hand pulls up the shirt to reveal carved flesh, reading adjectives like "Stupid," "Useless," and "Weak." A violent scream echoes, and a bang follows. The trigger was pulled.
2 notes
·
View notes
Photo

MONTANA SHOP UK EDITING IN PHOTOSHOP
In my group we had to select our favourite out of a few photos, we then discussed why this was the best. We looked back at the photos we took on our own phones and the different compositions. We talked about placing elements from the brief onto the photo - logo/slogan where is the best place for it?
Ideas discussed -
Photo – half blue/half pink background. Take frame off and put logo there in blue.
Does the frame work – does it look odd?
Too cluttered too many items in the photo – with perfume bottle, camera, frame, and phone.

Best photo -
Photo with the half pink and half blue background. No frame – plain background. Items include a tape, camera, radio and remote.
It relates to visual entertainment. Much more minimal than the other photos so more space to play around with.
Zoom out from the photo. Adjust height so it is equal distance between the bottom and top of image.
Logo needs to pop out, maybe with a shadow behind it.
Create a border in Photoshop maybe. The backdrop should have the line exactly in the centre.
Two colours merged together. Gender - Pink for woman and blue for men but then we have mixed the objects – blue video against a pink background. Pink radio against blue background.
We discarded some images – some were too cluttered with too many items. In some photos the CDs and frame in the background didn’t work
Things to think about before editing Photoshop -
Colours you will be putting on the logo and slogan.
Black text might work well.
Tools used in Photoshop - Crop and patch tool – select an area.
Slogans and the logo could go over the content of the image?
The slogan could go over the radio. Play around with perspective.
How to approach editing photos for a client
Editing techniques
Capture One - Folder – Images.
Open this to see 4 folders - Capture, Output, Selects, Trash (Arrange documents like this. Get used to arranging the work and separating it into different folders)
Open the one we want to edit, e.g. CR2 RAW. It will go straight to camera RAW. Raw is similar to Light Room (better understand both in depth because may use a combination of both of these, depends on how you want to edit your photos.
Clean up areas on board and lines on clipboard.
Basic editing module –
Element of cleanliness - subtle shadows, not too dark, highlights not too overexposed and also the image needs to look clean and tidy.
The items have been placed on a chip board. I think to keep elements such as the rough wood from the clipboard in there
First I need to change exposure - saturation because I am working with vibrant colours
Move exposure meter slider up, this increases it so you get highlights coming out.
Boost contrast slightly. Bring it down until happy = 16
See what highlights work in both extreme circumstances. I feel 0 is fine.
Shadows add more light. Whites = 0
Increase density of shadows slightly +8 in shadow.
Clarity? If you increase the image you can see it clearly. Zoom in quite close - lighting flattens out the texture of the border. You can see details coming to the surface. I feel this is not helping the image though as it is showing bits of texture. I think texture in the wood helps so I don’t need to bring this out. I have decided to leave clarity alone. In some cases it helps. For example in noisy photos at night it helps clarify images. So certain editing tools work better in different circumstances.
Increase saturation + 8 in order to get richness out of the blue and pink. Don’t over saturate though and don’t over edit. This product needs to be a real representation of the products you are selling.
No curves or filters. Sharpness result -add a little. Not too much as this changes the image too much. Extra crispness is all that was needed.
Pixels were too much - Increase to 45+ which means you don’t get pixels but more sharpness. ISO 100 - so therefore there is no need to reduce noise, no need to alter it.
Add detail to image
Duplicate layer = Ctrl+J or right click on the image. (Try and use shortcuts because this is a better way of working and you must get used to it when editing images – this makes you much faster)
Work directly onto the image now.
Clean image up. How? Patch tool or Clone stamp.
Get rid of imperfections and clean image up.
Spot healing brush tool – press J button on keyboard. Main areas to clean up – zoom in 50% or further - press and hold space bar and then clean the image.
See a hole in the bord – zoom and can see it is made up of pixels. Brush modes and sizes – better result with the tool. Select size of brush and main colour of pixels and then click on it. It will get rid of the hole. It will fill in the hole with the exact colour to match the board.
Zoom around the photo - think what should be there and what shouldn’t? Needs to be as clean.
Turn visibility on and off to see what it need to get rid of and see progression.
Spot healing tool – to get rid of shadow marks. It is not good to leave marks behind. For this though Patch tool is a better tool.
Flick through both options to see which works better.
Clipboard- marks in wood – Spot Healing tool good for this. Click and drag to get rid of lines in the wood.
Subjective editing - be subtle, don’t go too far.
Crop images at end. Think about platforms.
Select straightening tool – draw a line that it is straight and set to original crop. Select it and it will then crop and straighten itself in Photoshop.
Next -
Interact – Capture JPG High resolution can use ‘In Design’. Download this and put it on your hard drive.
Bring logo into existing document.
File and embed.
Logo double click.
You need to rasterize it. Right click rasterise layer. Turn image off so you can just see the logo.
Magic wand tool good for working with two block colours. You can select colours. Helps do things quickly
Isolate black type face and get rid of the white background. Click white area, you will see ants round the white area.
Press shift to select other areas to delete all at once.
Deselect it. The white background disappears.
The logo now looks neat with no white bits, clear background which looks better against the image.
Apply adjustment layer to selection. To help change text use shortcuts –
When you hover over layer icon hold down ctrl and click inside layer window, select all layers in window. Do it exactly to that selection.
Adjustment layer- solid colour. See new layer mask and change the colour. Then in the future just double click on this. It will change colours in real time. Press ok
Turn visibility off.
Resize image. Is white ok?Experiment.
Eye dropper to change colours in the image. Alter the blue colour. Ctrl+T to resize it – big or small. Play around with positioning.
Colour subjective
Introduce text to image. Add the slogan – ‘Paint & Create’.
Think about where it should go on the image. What colour works best. What size?
Type tool – click. 260pt to bring the box closer to the word. Take the box size right down to the edges of the word then it is easier to position the words in the image. Use arrow keys to move words around until you are happy with where they are positioned.
Change colours of slogan, click solid colour, use eye dropper to adjust colour.
Experiment with sizes and colour in frame. The colours and size of the logo/slogan is my choice - PAINT - blue, &- white, CREATE- pink. I think it looks soft and cool.
Save As PJEG and TIF

Why are these the best images from your shoot?
We narrowed down our shots to one image with 2 different coloured backgrounds and a blank background. We decided that anything on the background.e.g. The frame or discs didn’t suit and that the logo might not fit in the frame either. All objects used are all some type of technical entertainment items, the frame seemed like the odd one out. Luckily, our last photograph we all agreed upon, this had the frame removed too. If it weren’t removed, we could have photo shopped it out.
Did you end up developing your original set designs / compositions?
We shot according to our original test shots, although we developed it further with a second colour for the background and / or base.
What went well? What didn’t go so well? What would you do differently next time?
Overall, I am happy with the result and think it was successful. The final image is vibrant and fresh. I think maybe I would improve with a better logo/slogan colour. If the client is happy with their logo/slogan, then I am happy, if they want me to change it with my artistic eye, then I would be happy to do this also.
Why is it important to discuss the set ups with other people?
It is important to be able to work in a team as well as independently. We therefore share each other’s ideas that potentially we may not have come up with.
0 notes
Text
Asus ROG Strix XG17AHPE 240Hz Portable Monitor Review: Expensive Innovation
Having a portable monitor is a lifesaver. Whether your laptop’s screen just doesn't give you enough space or you’re looking for something to connect to a smartphone or tablet, having an extra screen can instantly boost your productivity. But what if that lightweight screen wasn’t all business? What if it had a fun side too?
The Asus ROG Strix XG17AHPE is just that, bringing a pro-level 240 Hz refresh rate to a portable screen for the first time. The 17.3-inch monitor (DisplayPort Alt Mode over USB Type-C or HDMI) delivered most of what I wanted and needed for both work and gaming and made its mark as a one-of-a-kind product. But that innovation comes at a $500 price tag that leaves us wondering if you’re better off just buying one of the best gaming monitors instead.
Design of Asus ROG Strix XG17AHPE
With speedy specs, there’s no doubt that the Asus ROG Strix XG17AHPE is for gamers, but with portable monitors offering little space to work with, gamer aesthetics are only embodied by a pair of watchful eyes that are the Asus ROG logo. With black the dominating color, the overall look here is pretty mute, but Asus found subtle ways to include premium touches.
With its subtle placement, smooth feel and silver look, the Asus ROG logo actually looks good in a bottom bezel that also manages to fit in two 1W front-firing speakers without taking up too much room. The back of the Asus ROG Strix XG17AHPE is its fanciest looking part. A diagonal line starkly divides two contrasting brushed finishes that makes one half look darker than the other. Here lies another ROG eye that glows when the monitor’s on. I’m not usually a fan of massive branding, but when the logo looks this good and gives out a vibe this creepy, I can’t help but appreciate it.
The 17.3-inch Asus ROG Strix XG17AHPE will naturally take up more desk space than the 15.6-inch MSI Optix MAG161V (15.7 x 9.9 x 0.4 inches for the Asus versus 14.05 x 8.94 x 0.43 inches with the MSI), but it’s still comparably thin and even thinner than the Lenovo ThinkVision M14 (12.7 x 8.2-8.7 x 3.8 inches). However, with its larger size, the Asus is also heavier than those non-gaming portable displays (2.3 pounds versus the MSI’s 2 pounds and the Lenovo’s 1.3 pounds). But if you want larger screen size, which is handy for immersing yourself in the game as much as possible, the extra screen real estate will be worth the extra pound, and pixel density is still fantastic at 127.3 pixels per inch.
A small way the Asus ROG Strix XG17AHPE starts earning its price tag is through versatile connectivity options. If you have a laptop or desktop with a USB-C port that supports DisplayPort Alt Mode, you can connect to the monitor that way. If your computer's USB-C port can charge other devices, you can even use the ROG Strix XG17AHPE without ever having to worry about it running out of battery. Through USB-C, the monitor can receive up to 12V at 2A (with USB Power Delivery 3.0). With my laptop’s Thunderbolt port, I was able to use the ROG Strix XG17AHPE with a single (included) USB-C to USB-C cable for hours without its battery life ever dropping. USB-C also serves to connect tablets and smartphones, including a Samsung Galaxy S10 I connected to it effortlessly.
Either of the two USB-C ports can power the monitor, so if none of your system’s ports can’t do that, you can use one to connect to your device and the other to supply it power. The Asus ROG Strix XG17AHPE comes with a USB-C to USB-A adapter, which plugs into an included power brick. That adapter also means the monitor can connect to your system’s USB-A port and receive power.
In addition to USB-C or USB-A, you also have the option to connect to a device’s HDMI port via a MicroHDMI to HDMI cable. This opens up possibilities in the world of Raspberry Pi, gaming consoles and even cameras. If you use HDMI, it’ll either run on battery (see the Battery Life section) or you could simultaneously give the monitor power through a USB-C cable. There’s also a 3.5mm headphone jack for plugging in your best gaming headset.
The panel’s left side holds all the ports and controls. Controls come in the form of a power button located higher than the rest of the inputs and lights up when on or charging, plus three additional buttons. They’re all pretty shallow but worked on the first try.
Origami Stand on Asus ROG Strix XG17AHPE
Like with many portable monitors, the Asus ROG Strix XG17AHPE uses an origami-style stand that you must fold a certain way to prop up the monitor. It felt a little more intuitive to fold than the one found on the Optix MAG161V, and the Asus has a magnetic hard bit that secures under the bottom bezel for added stability. But the stand was still a pain in the butt.
The origami stand does allow for different levels of back tilt, but I sometimes wished I could get the monitor closer to 90 degrees to better line it up with a connected laptop. If my table started shaking due to aggressive typing, I’d notice the XG17AHPE wobbling too. But the monitor never came crashing down, even if I slid it across my desk (putting pressure on the top bezel was a different story though).
In portrait mode, the stand never failed me, but I felt nervous the whole time. The stand just doesn’t provide enough of a foundation for me to feel safe using it that way long-term or with a wobbly table. But I have to admit that having this much vertical screen space is fantastic for reading and something missed with the vast majority of laptops.
We wish more monitors would employ a reliable and sturdy kickstand like Lenovo does with the ThinkVision M14, which has not one, but two built-in stands. Portable monitors are just too delicate and, in the XG17AHPE’s case, expensive to bet it all on thin, bendy stand-sleeves. The monitor will eventually be available as a different SKU (XG17AHP) with a tripod stand, (plus the same sleeve and a bag), but that ups the monitor’s price to $600.
As bad as this thing is as a stand, it’s even worse as a protective case. While the cover makes a debatably safe stand, it’s an undeniably flawed protector that leaves the sides and back of the monitor exposed. Since this monitor’s meant for traveling, we expected Asus to provide a sleeve that covered all bases without easily sliding off.
Gaming Performance of Asus ROG Strix XG17AHPE
A 240 Hz monitor opens up a world of potential for first-person shooters and other eSports. While even the best graphics cards for gamers can’t always push AAA titles at a frame rate of 240 frames per second (fps) and high settings, eSports games look extra smooth at 240 fps with low latency and the elimination of disastrous distractions, like ghosting. The Asus ROG Strix XG17AHPE's FreeSync fights off screen tearing, which happens when your GPU’s frame rate doesn’t match up with the display’s refresh rate, but that only works with AMD graphics cards.
Unfortunately, with New York City in lockdown we couldn’t use our lag tester on the Asus ROG Strix XG17AHPE; however, I put it through its Overwatch paces, paired to a gaming laptop running an Nvidia GeForce GTX 1060 mobile GPU. I used the monitor’s out-of-the box settings, so overdrive was set to Level 3.
As I played Overwatch for a few hours, I didn’t notice any input delay with the monitor with the game set to run at 1920 x 1080 at 240 Hz, but with a GTX 1060 GPU, I was only able to hit a frame rate of about 63-85 fps. To maximize the screen’s potential, I’d need a more-powerful GPU that can push out 240 fps with this game.
Still, images on the ROG Strix XG17AHPE appeared smooth, even during Sigma’s most intense and fastest moments of battles or when enemies filled the screen. Trotting around felt very smooth and realistic. Ocean waves in the distance moved smoothly without stuttering. I’m used to gaming on a 17.3-inch 144 Hz screen, so I didn’t notice a grand improvement in quality when graduating to a 17.3-inch 240 Hz display. But if you’re moving from a standard 60 Hz screen, your experience may differ.
On-Screen Display, Calibration on Asus ROG Strix XG17AHPE
The Asus ROG Strix XG17AHPE's on-screen display (OSD) is surprisingly navigable for a portable monitor settings menu. Pressing the menu button on the side brings up icons on the display that align with the corresponding buttons for activating. This makes it easy to know where the buttons for scrolling, selecting and back are. It’s no joystick, but the pop-ups are large and proved helpful in navigation.
Asus also surprised me with a large number of calibration options on the ROG Strix XG17AHPE. The Gaming menu features overdrive (five levels of overdrive, plus off), an option for toggling FreeSync and the GamePlus menu, which has a crosshair, timer, FPS counter and display alignment. In the GameVisual section, you can pick from eight image modes. Racing is the default, but there’s also Scenery, Cinema, RTS/RPG, FPS, sRGB, MOBA and User. The Gaming section also has Shadow Boost, which, according to Asus, “clarifies dark areas of the game without overexposing brighter areas” with three levels, including 0, the default.
The Image section of the ROG Strix XG17AHPE's OSD provides control over things like brightness, contrast and the blue light filter, depending on the mode selected. Meanwhile, the Color menu has options for Color Temp (cool, normal, warm, or user with red, green and blue sliders from 0-100%), Gamma (2.2, the logic default, or 1.8 or 2.5) and Saturation.
Other menu sections include Power, Input Select (HDMI or USB Type-C), My Favorite, for shortcuts and customized settings and System Setup, with standards like language, volume, key lock, OSD setup and reset. There’s also an Auto Rotation feature, but to use it you must download Asus’ DisplayWidget software.
Image Quality on Asus ROG Strix XG17AHPE
We did our testing with out-of-the box image settings, so the Asus ROG Strix XG17AHPE was in Racing Mode with contrast set to 80 and the blue light filter and Shadow Boost off.
The ROG Strix XG17AHPE worked great as my general second display with plenty of brightness. Even when I was facing a sunny window, the screen was bright enough for productivity use at 50% max brightness, and games were playable at this setting, albeit more dull.
Word documents were luminous enough to edit while looking at the monitor head on, and when I turned it perpendicular from me, I could still view documents and games, but with just a touch of reflection in the further third of the screen. When I boosted brightness up to 100%, that reflection was barely noticeable. Additionally, with the screen completely flat, I could comfortably view documents and movies, only sacrificing a small amount of brightness. Credit is due to Asus’ use of IPS, a panel tech known for strong viewing angles.
Overwatch, a particularly colorful game, looked properly saturated on the Asus ROG Strix XG17AHPE, and dark colors were distinct. Different shades of dark green topiaries and a yellow sunflower were apparent in shadowed corners. Colors on the movie Mission: Impossible Fallout were also strong, from green poplars that looked exuberant and vivid as Ethan and Ilsa walked past them, to differing shades of gold and rust in a club scene. Even the secretly olive green in Ilsa’s jacket was discernible on the ROG Strix XG17AHPE.
The ROG Strix XG17AHPE proved pleasantly bright in our testing but fell short of Asus’ 300-nit max brightness claim. Still, 285.6 nits is plenty and still brighter than the next runner up by 117.2 nits, as well as the average of the comparison group by 81.6 nits.
Asus claims that the ROG Strix XG17AHPE covers 100% of the sRGB color space, but our review unit actually surpassed that slightly. Colors on the Asus should look more saturated than those on the MAG161V or the 15.6-inch Asus ZenScreen MB16AC. The Lenovo fell behind the XG17AHPE by 11.5%. When it came to the wider DCI-P3 space, the XG17AHPE hit an impressive 77.5% coverage, significantly better than what MSI’s MAG161V or Asus’ MB16AC can do here.
Battery Life on Asus ROG Strix XG17AHPE
The Asus ROG Strix XG17AHPE runs on a 7,800mAh battery. If you have a USB-C or USB-A port with Power Delivery 3.0 support, it can provide the monitor enough power to save you from having to get a charger. When I used it with a Thunderbolt port, battery life never fell below 100%, and when I used it with a supporting USB-A port for 7 hours at max brightness, the battery life only dropped to 97%.
But if your device doesn’t have a Power Delivery port, the monitor will be running off battery power. With the Asus ROG Strix XG17AHPE running at 240 Hz and using the speakers at max volume, it lasted about 2 hours at 80% brightness. At 100% brightness and without using the speakers, it lasted about 3 hours and 30 minutes.
At 60 Hz, the display uses less battery power. With brightness maxed out, but rarely using the speakers, the Asus ROG Strix XG17AHPE lasted 3 hours. When I used the XG17AHPE at 50% brightness at this refresh rate, the portable monitor lasted about 4.5 hours.
Asus claims that the ROG Strix XG17AHPE can get enough juice to game for 2 hours at the max 240 Hz refresh rate with an hour of charging.
Audio on Asus ROG Strix XG17AHPE
It’s not the primary reason people buy portable monitors, but the Asus ROG Strix XG17AHPE's two 1W stereo speakers are shockingly loud and might outblast a connected phone, tablet or disappointing laptop speakers. The ROG Strix XG17AHPE’s speakers were especially handy when I played emulated N64 games off a Raspberry Pi, which, of course, doesn’t include speakers, as would also be the case if you connected the XG17AHPE to a gaming console.
Because the speakers on my laptop are particularly bad, the Asus ROG Strix XG17AHPE's speakers were actually an upgrade when I played Overwatch. With front-firing speakers, audio from the monitor never sounded muffled. During battle, I could make out the differences in sound effects from various weapons and still clearly hear characters' voices and even that of my teammate, who wished something bad would happen to me in real life (I hope you live a long life, pal!). Overall, the Asus ROG Strix XG17AHPE provided fuller sound, even allowing me to hear wind blowing in the background during a quiet training session that I couldn’t hear when I toggled audio back to my lackluster laptop speakers.
Hearing Mission: Impossible Fallout was also easy, even with the windows in my Brooklyn apartment open. Ethan and Ilsa’s whisperings were hard to make out, but gunshots were booming, and I could even follow the echo of Luther’s pained voice traveling down a tunnel.
You can also plug a pair of cans into the display’s 3.5mm headphone jack, which uses an integrated ESS ES9118 digital-to-analogue (DAC) converter. For audiophiles, the SoC drives 24-bit, 192 kHz lossless playback that Asus promises delivers “unprecedented dynamic range and ultra-low distortion.”
Bottom Line
The Asus ROG Strix XG17AHPE is an amazing portable monitor for gamers with the need for it. Nothing can compete for pairing with a good graphics card or gaming console or just packing up for a LAN party, thanks to its thin build and 2.3-pound weight. And with great viewing angles, it’s also a great second screen for work.
But $500 is a steep price to pay for a portable monitor considering that some of the best full-sized PC gaming monitors are available for less. 240 Hz monitors are so speedy that they’re in their own category, but our favorite 240 Hz desktop monitor right now is the Samsung 27-inch CRG5, which as of this writing is a mere $400. Looking around online, I also found a 27-inch LG 240 Hz monitor for pre-order at $279 and a 240 Hz Acer 25-inch available now for $300. At $500, then, the XG17AHPE isn’t for gamers seeking an inexpensive way to add a 240 Hz display to their setup.
Therefore, this monitor’s best audience is those who need a monitor they can easily pick up. If you travel a lot, the Asus ROG Strix XG17AHPE will make sure you’re never stuck gaming on a lackluster screen or, even worse, not gaming at all.
If you’re just looking for a quality portable display, the Lenovo Thinkvision M14 isn’t fit for gaming, but is half the price ($250) and has a built-in kickstand rather than an annoying origami stand. That said, you can’t get this level of color saturation from Lenovo’s monitor. And the ROG Strix XG17AHPE's port selection brings valuable versatility, including console gaming, connecting to a Raspberry Pi and getting power and data from one cable.
If you need a gaming monitor that can move with you while delivering very high refresh rates, the Asus ROG Strix XG17AHPE is a premium option, but it’s also the only option we know of.
0 notes
Text
B.E.T.T.E.R. P.I.C.S.

We all strive to improve our image-making techniques. Even the most seasoned veteran thinks about the many facets that determine a successful image before pressing the shutter. If it's your profession, the bills demand this. If you're an avid camera club shooter, you endeavor to attain a blue ribbon. If you're on a once-a-year vacation, you aspire to return with the best possible images. If you just picked up a camera for the first time, you thirst to look at the computer and relish what you see. Take with you the information included in this week's Tip of the Week to come home with B.E.T.T.E.R. P.I.C.S.
B = Balance - To create balance in your photos, place important elements to the sides, top and bottom are evenly weighted. The composition should be visually stable. Think of a balance scale. If one side contains more weight, it will fall to that side. If that occurs in a photo, the viewer's eye is drawn to the heavy side and not to the other. This leaves them wondering why the lighter side exists.
E = Exposure - Use your histogram to evaluate proper exposure, not what the image looks like on the LCD. A digital image is composed of ones and zeros, and the histogram shows the math. What looks correct on the LCD may not be the best exposure. Trust the histogram-it doesn't lie.
T = Texture - Texture relates to exposure in that if the image is overexposed, delicate textures lose detail. Clouds are a great example, especially when storm clouds exist or delicate reds, yellows and oranges appear at sunrise and sunset. To maintain texture, check your red channel for sunrise and sunset images and your histogram if a wide range of textures exists in storm clouds.

T = Telephoto - A telephoto lens is used to make far-away objects appear closer-that's obvious. What's not as obvious is their ability to narrow depth of field. The longer the lens, the less depth of field. To help throw a background out of focus, use a longer lens and open the aperture to its widest setting. When a subject stands out from the background, it commands more attention. One of my slogans is, “The Background is Equally As Important as the Subject.” Use a telephoto to help narrow depth of field.
E = Evaluate - Another one of my pet slogans is “Edit Before Pressing the Shutter.” The “E” in this case refers to "evaluate"-evaluate the background and light before pressing the shutter. If the background is busy, no number of shutter releases changes it. If the light is flat and ugly, no number of shutter releases changes it. If the light and background are poor, evaluate the situation and edit before pressing the shutter. Move on or wait for another day.
R = Resolution - Resolution is critical. If the photo isn't sharp, it's a throwaway. It's nice that today's cameras can be used with higher ISOs, but I've seen this work against aspiring professionals. Some think they can handhold the camera and still get a sharp shot. A) while this may be true, the file contains more noise-a negative. B) What if that one-in-a-million shot is the one where the camera moved? Use a tripod to obtain the most resolution, especially when using a long lens. Yes, yes, yes!
P = Polarizer - A polarizer is one filter that can't be replicated with software. What it does to saturate a blue sky is magical. Work 90 degrees to the sun for maximum polarization. More importantly than what a polarizer does for a blue sky is what it does to remove glare. Glare robs color of its saturation. Spin the polarizer and the glare is removed. When you photograph wet surfaces and shiny objects, use a polarizer to restore color. Yes, yes, yes!
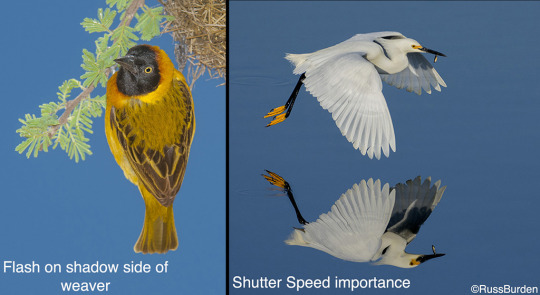
I = ISO - Use ISO strategically to obtain the best possible file with the least amount of digital noise. The lower the ISO, the smoother the file. Yes, today's cameras can be used at higher ISOs, but why lock the ISO to 800 if a cleaner file can be made at ISO 100? The cleaner the file, the more the photo can be cropped or enlarged. Both of these aspects are huge benefits.
C = Contrast - I make 98 percent of my photos outdoors, and I always carry a flash. A flash, you ask-why do you need a flash if you're outdoors? Bright sun creates very contrasty light. The greater the contrast, the deeper the shadows. If the shadows are dark, is there a way to brighten them up? Yes, with Flash! Ahh, now I understand why you always carry a flash. Use your flash when the light is contrasty to place light in the dark shadows to reveal detail. A diffuser or reflector can be used, but both are more unwieldy than flash.
S = Shutter Speed - Shutter Speed is important to stop action, produce creative results and create sharp images. If you want to freeze the motion of a moving subject, use a fast shutter speed-raise the ISO and open your aperture to accomplish this. Use a slow shutter speed to produce creative results. Pan the camera, zoom the lens during the exposure or set the camera on a tripod and let the moment be painted on the sensor. Use a low ISO and stop down the lens to use these techniques. If you use a long lens, the faster the shutter speed, the greater the chance of obtaining a sharp photo. The longer the lens, the greater the need for a fast shutter.
Use the above and get out into the field to make B.E.T.T.E.R. P.I.C.S.
Visit www.russburdenphotography.com for information about his nature photography tours and safari to Tanzania.
The post B.E.T.T.E.R. P.I.C.S. appeared first on Outdoor Photographer.
0 notes
Text
I Can’t Stop Looking At Girls I Don’t Know On Instagram
New Post has been published on http://foursprout.com/happiness/i-cant-stop-looking-at-girls-i-dont-know-on-instagram/
I Can’t Stop Looking At Girls I Don’t Know On Instagram
@criene
I don’t know you, let me make that clear. I only found you because I clicked on a certain hashtag, or a location, or a tagged handle in a friend’s photo, which led me to another profile, which led me to another profile, which led me to you. You’re not a celebrity, at least not in the sense that you have the blue verified badge next to your name and over a million followers. But you have something, something unnamable, that makes people want to follow.
I’ve shown pictures of you to my hairdresser so I can ask, “Will you make me look like that?” I’ve looked up the locations of restaurants where you’ve eaten, clubs where you’ve taken shots, so I can see the prices on the menu. I know when you have a new relationship, or have gotten a haircut, or have started a juice cleanse, and every time you recycle or delete or repost a picture, I feel smug, as though I’ve caught you in the act, as though I have you figured out.
I’ll go through phases where I check in on your once a week, or every day, or sometimes months will pass by because I’ve forgotten about you (sorry) but then I’ll remember you again and have dozens of new pictures at my perusal all at once, a rare gift. I imagine what it would be like to see you walking down the sidewalk or from across a bar, but perhaps I wouldn’t even recognize you without a carefully selected filter and a FaceTuned mask, without your being able to control the contrast and saturation and color of your surroundings.
You’re a member of an NBA dance team. You teach SoulCycle. You’re a sophomore at the college I graduated from three years ago who appears to be on an eternal Spring Break. You create smoothie recipes, or you’re a reigning beauty queen, or you have abdominal muscles that make me pinch my own soft belly with almost vindictive envy. I watch you do aerial yoga and keg stands and fouetté turns and kissy faces. Maybe you’re not beautiful, at least in the conventional sense (not that I could say what conventional beauty is anymore). But I can’t stop looking at you. Wide-hipped or narrow, muscular or delicate, exhibitionist or demure or twee or drunk, all of you share one thing: you’re unapologetic. You know that I’m looking at you, and you like it.
That’s not to say you’re self-absorbed, but undoubtedly some of you are. It’s an art, maintaining your presence. You know I am watching, and so you feel the compulsion to perform. But who took that picture of you from behind, kneeling in the sand, the twin peaks of your ass perched on your bare feet? Who had the patience to film you clinking glasses with your (equally beautiful) friend over and over for last night’s Boomerang? Who were you able to commandeer into capturing your sultry grin as you slid a piece of sushi into your mouth? I have fantasies of my own perfect photos, of the images I desire to capture of myself and share with the digital world, but giving voice to those desires feels like the confession of a lurid sex act. You’re not afraid to ask for what you want, and humility is an inevitable sacrifice.
I apologize for everything. I’m sorry that my breasts aren’t bigger and that the heels I wear aren’t higher and that my arms are either not skinny enough or not muscular enough, depending on the day. I’ve dyed my hair a different color every year since I was 16. I’ve bought a dozen different facial masks from Sephora and use them nightly on a rotating basis. I spent 40 dollars on Matcha green tea powder and couldn’t even choke down a tablespoon’s worth. But still, I’m not who I want to be. I want to be posed next to a spin bike in a sports bra, hard-bodied and flexing. I want to be on the bow of a ship, my butt cheeks and boobs spilling from my bikini and a beer in my hand. I want to be a precious bride in white lace peeking up from a bouquet, so ethereal and unblemished that no one could possibly scroll by without double-tapping my poreless face. I want to collect likes and comments like coins, each “beautiful!” and “stunning!” and fire emoji bringing me a little bit closer to feeling something like content.
Sometimes my friends and I talk about you like you’re someone we know. We discuss the bandage dress with the racy cutouts that you wore last Friday, or the sun tattoo that you got around your belly button just in time for Coachella. Your wedding ‘grams gave us fodder for months—the way your hair was crowned with wild flowers, the Alexander McQueen gown that half of us liked and half of us thought was kind of slutty for a church. “I love her,” we say, “I’m obsessed with her,” but our love isn’t sexual; it’s covetous. I look at each one of you and think, I would be happy if only I looked like you. But all of you are so different; it seems the only thing you all have in common, besides not feeling the need to apologize, is that none of you are me.
When I look at you, I feel lesser, and consequently, I feel mean. Hurling insults makes me feel powerful, even if those insults are just inside my own head. I criticize the width of your thighs, the hemline of your skirt. Slut feels good; so does gaunt, and obsessive, and vain. Stupid feels the best. Even when you pair your photo with a clever caption or you’re hoisting up a diploma in a cap and gown as indisputable evidence of your intellect, I want to feel that I have something over you, something you can’t forge. I hate thinking these things, but I can’t stop thinking them any more than I can stop looking at you. I wonder, is it unfair to think that an invitation for praise must also invite criticism? Can admiration and detestation coincide? I’ll show a picture of you to my boyfriend, say, “Isn’t she kind of fat? Would you ever date a girl that muscular?” Instead of validating my critique and assuring me that I am right and that you are wrong, he asks, “Who is that? Why are you even looking at her?” I don’t know. But I can’t stop.
When I can’t sleep at night, I’ll look at you. Sometimes I’m led down a black hole, and suddenly I’m three years deep into an account profiling hundreds of you bikini-clad women, naughty co-eds, all thongs and hips and smooth, tight midsections. Iridescent waist-length hair. Thick scoops of asses. Water nymphs of all shapes and sizes, each more sumptuous and scantily clad than the next. Hours later, the LED light of my iPhone having burned an ache in my temples, I’ll wonder how I got there, how it goes so late, why I suddenly feel that I might cry.
It’s not even that I think it’s real; I know it’s not. I’ve scrolled through too many fitness Instagrams where the model shows a split screen: here I am flexing with my leggings waistband pulled up past my belly button; now here I am relaxed and slouching, soft and supple just like you! But you’re not like me; none of you are. Some of you are disciplined and talented, some of you simply born into bodies that feel cruel not to share. We don’t ask what you eat for your meals, where you buy your clothes, how much you can bench press, or how many drinks you had last night, but when you tell us, we listen, and so you continue. You seduce us. We encourage you. Can you be at once self-aware and obsessed?
And yes, there is a ‘we,’ because I know I’m not alone; I can’t be alone. In the comments, guys tag other guys. Girls tag other girls. We all look; we all gawk. What would it be like to be looked at like that outside of the filter? Every day I find myself averting my eyes from the eyes of strangers, ducking my head, shying away. It’s more comfortable to be admired through the rear window than the front.
‘Selling yourself’—it’s a skill now, not a sin. Whether you’re an aspiring actress or food blogger or photographer or just plain photogenic, you’re forced to scream out your name, forced to demand recognition, command attention. Should you be faulted for screaming louder than me? Should you be shamed for wanting to be seen?
More times a day than I care to admit, I put my thumb to my screen to select the app and scroll through your pictures. How can so many of you be so rich? How can so many of you be so beautiful? My fiancé will watch me stare into my iPhone, say, “What are you looking at? Why do you spend so much time on there?” Because I can’t stop, I want to say. Because you are so impossibly fit and cool, and I don’t know who you are when you’re not posing for a picture—I don’t know whether you’re sad or lonely or scared, because you’re already thinking about your next post, and it seems that no matter what you’re doing or trying or experiencing you’re always thinking about your next post—but I just want you to know that I’m with you. That I’ve tried, but I can’t seem to look away.
0 notes
Text
3 Frequently Asked Photography Questions, Answered
Some of the most frequently asked questions we get emailed about are around cameras. As photographers, we shoot every single day, so we’ve acquired quite the amount of gear and learned a lot along the way. Thomas initially picked up photography to help me with the blog back when we started in 2011, but since then, we’ve both fallen in love with it. It was frustrating at first, but with any new skill, it takes a lot of time and practice. Not a day goes by when we don’t shoot something, whether it’s for work or play. Here we’re sharing our three most frequently asked questions that range from what cameras we use to how we edit.
What kind of cameras and lenses do you use? When do you use each?
We have two types of cameras that we use 95% of the time- a Leica MP 240 and a Sony RXRII. The Leica MP 240 is a manual focus rangefinder camera, which is what we use for all of our outfit shots and many of our travel photos. We use these because we believe that the Leica M cameras give our images a special feel. We have two camera bodies and 4 different lenses. Most of our shots are shot on our Leica 35mm f/1.4 lens, which is an incredible lens that is extremely versatile for everything we shoot. Our next most used lens is our new Leica 28mm f/1.4, which is great for landscapes. We have two different 50mm lenses that we use for different purposes. Our Leica 50mm f/2.0 APO we use for closer portraits, product shots, architecture shots and some landscapes. Our Leica 50mm f/0.95 is a specialty lens with a super wide aperture, that means that it’s specially tailored for low light photography and it has an extremely narrow depth of field. We use this lens at night and when we want a very blurry background.
For flatlays, details shots and some travel shots, I shoot on a Sony RXRII, which is a professional level point and shoot. This is a great camera which actually uses the same sensor as the popular Sony a7RII. The 35mm f/2.0 lens is great for all picture types. And having a point and shoot means I can fit it in my purse and it’s much easier to use compared to the Leicas.
I’m also taking more and more photos just on my iPhone, including all of the Daily Look pictures. The quality of the images just keep getting better, there’s no easier camera to use and I always have it on me.
How do you edit your photos for the blog and for Instagram?
I edit all of my blog photos on my computer using Lightroom. I use mostly VSCO pre-sets for Lightroom and I’ve been using Kodak Portra 400 VC- most lately. After adding the film preset, the images don’t need much tweaking because it’s always our goal to capture the best possible image in camera. I’ll make slight adjustments to Exposure, Highlights and Shadows to get the light just right. I’ll up the Black just a bit to give it an extra pop. As far as color, I’ll balance out the Tint more towards the pink, our camera normally has a slight green tint anyways so this counteracts it. White Balance is normally pretty accurate, but I often make a slight adjustment depending on whether I think the photo should be warmer (more orange/yellow) or cooler (more blue). Depending on the scene, I often bump up Vibrance just a bit. If the photo needs it, I’ll rotate it. Sometimes I’ll edit an Instagram photo in Lightroom vs VSCO if I’m pulling the image from my camera rather than my iPhone.
For Instagram, I edit all of my photos using the VSCO app. I use about 3-4 different filters (my favorites include A5, A6, E5 and T3), that all cohesively pair well together, so the photos flow when they’re laying next to each other. I really don’t spend much time editing, sometimes I’ll adjust the exposure, up the contrast, add some saturation or bring the pink hues out in the tint. I love the app Planoly to help layout my feed so I can see what will make the most sense for the next image I’m posting.
What camera would you recommend for under $1000? Under $2000? Over $2000?
The first thing worth mentioning is that buying a new camera or major piece of equipment isn’t always the solution for you to improve your photography. In our opinion, you should look to upgrade camera gear only once you feel like you’ve hit the absolute limits of your equipment. Another note is that you should try renting gear before buying, we’ve made lots of mistakes in the past, so this year we decided to use Parachut, which is a monthly subscription camera rental service which lets us swap gear for a special project or if we are considering purchasing a new lens or body. This is not sponsored at all, Thomas actually found an article about them and was probably one of the first people to sign up for it because he loves testing out new gear before committing.
With that being said, we often tell people to get the newest iPhone if their budget is under $1000. The cameras on these phones just keep getting better and better and you’ll always have your phone on you. The larger iPhone 7+ has two lenses with one being a telephoto that’s great for those things a bit further away. If you are willing to spend over $1500 the Sony a7II and the Fujifilm Xt2 come highly recommended. If you are looking for a professional level camera and have a budget over $2000 we’d be happy to provide further advice, feel free to email us at [email protected].
Outfit Details over here.
The post 3 Frequently Asked Photography Questions, Answered appeared first on Gal Meets Glam.
First found here: 3 Frequently Asked Photography Questions, Answered
0 notes
Last Seen Blogs

purekhaos247
The Gamer The Musician And The Random Crazy Person


the-imaginative-hobbyist
The Imaginative Hobbyist

tumbir13
Untitled

greebledgoblin
enter the cave of the busty bastard