#there are like 400 gifsets i want to make for this video
Note
love love LOVE your The Sign gifsets. im still a newbie in giffing lmao and your gifs are like reaaally pretty so i was wondering how you do your gifs? i really like how it's sharp and the colors pop up beautifully (only if you don't mind sharing ofcc <333)
bun this is the kindest thing you could have said to me, thank you so much <3 i wanted to write down my giffing process for a while in case anyone would find anything in it helpful, so thanks for giving me a push!
guzhu-furen's photoshop gifmaking process (kinda oriented on saving up time)
from

to
1. Downloading a video. i prefer to download video files instead of making screen recordings because the latter usually leaves watermarks/captions and makes image quality lower. i will not be linking the downloading websites themselves directly, but they are all easy to find through search engines if you know what to search for! i download ql dramas from:
youtube:
if the video you need is above 1080p quality, search for youtube4kdownloader
if the video is age restricted, search for 9xbuddy
both these websites work for normal videos too!
mkvdrama usually has 1080p episodes of most asian dramas.
dramacool also has downloading options in case the show is not available on other websites!
2. Screencapping (i learned it through this tutorial)
i screencap using KMPlayer. here is the installer i used, but you can find versions of this program on various websites and torrents too! install the program and proceed.
screencapping steps: open KMPlayer > press "CTRL + G" to summon the Frame Extraction window > set identical settings to these:
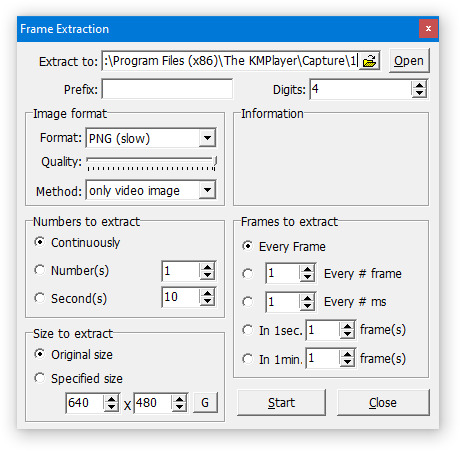
note which computer folder the screencaps will go to (it has a label "Extract to") > go to that folder on your computer and create a bunch of numbered folders there, for example ten folders named from 1 to 10, these would be our separate folders for ten gifs > write "1" or a name of another numbered folder after the backslash in "Extract to" bar in kmplayer > go the timestamp that will be the beginning of your gif in KMPlayer > press "Start" in the Frame Extraction window and press play on the video > when the moment you need to gif is over, press pause on the video and press "Stop" in the Frame Extraction window. great, you now have your folder of screencaps!
3. Importing screencaps to Photoshop
i use Adobe Photoshop 2023, but had used Adobe Photoshop CS5 for a long time before that, so you can use any version you have or find! it's available on various websites and torrents.
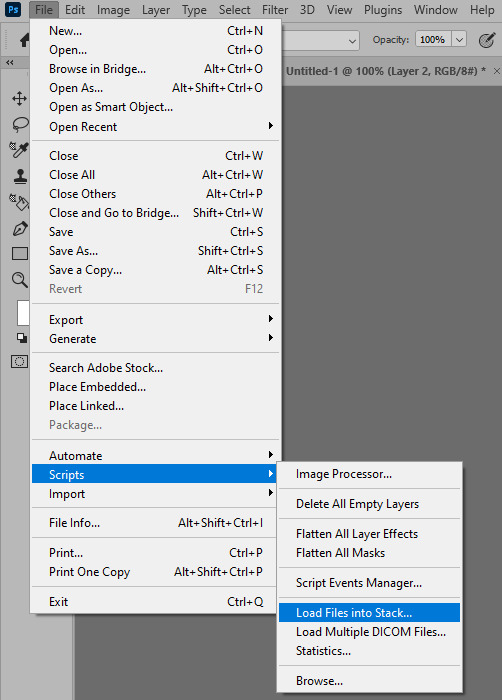
open Photoshop > Scripts > Load Files into Stack > press Browse in the "Load Layers" window that was opened
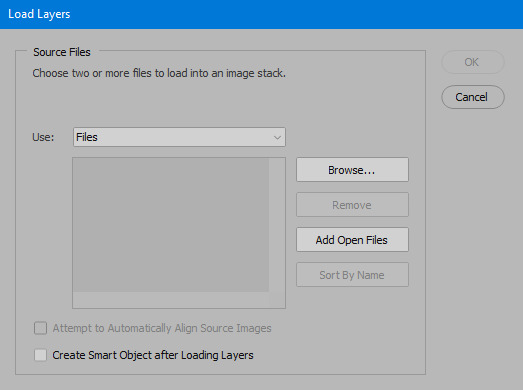
open your screencaps folder (and pin the KMPlayer Capture folder for faster future access) > pick the screencaps you want for your gif by clicking on the first one, and then clicking on the finishing one while pressing Shift on the keyboard > click OK and let them load for some time! i have 65 screencaps loading at the moment
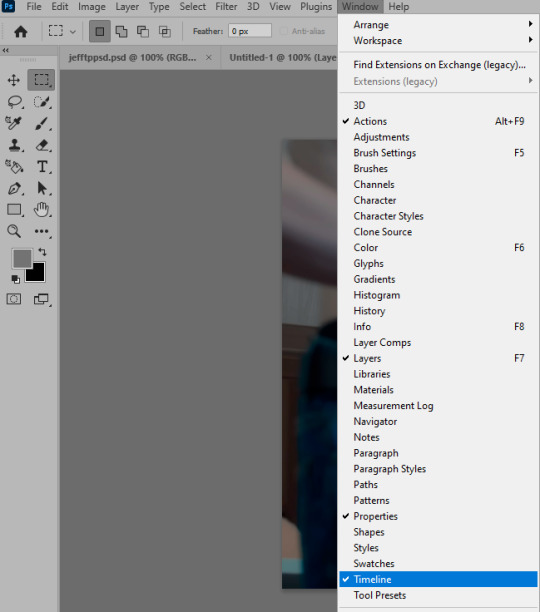
when the screencaps finish loading go to Window > press Timeline > press Create Video Timeline in the opened sidebar > press three dots that will say "Convert to frame animation"


4. Sizing & making the base of a gif
next part will be automatic. i use actions for almost everything from this moment. download the basic action pack here and my additional action pack that we will need here. load them in your photoshop actions window (Actions > Load Actions).
play the Script action to create frames.
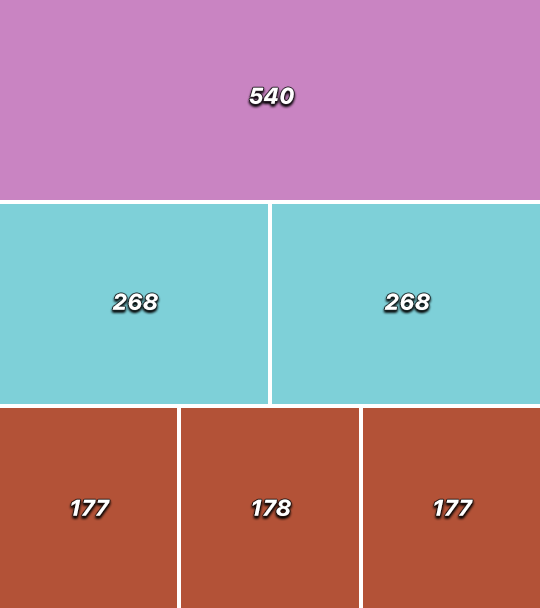
now onto sizing your gif. these are tumblr's width dimensions for 3 types of gifs
my gifs are usually 540 px in width and 640, 400 or 345 px in height. i added a 400 px action (Sizing 400) in the action pack, you can use it! or you can follow the steps by hand:
Image > Image Size > put in the height you want and add 4-6 pixels there (mine will be 406 for a 400 px high gif) > OK

now we need to crop the gif for it to fit tumblr's dimensions:
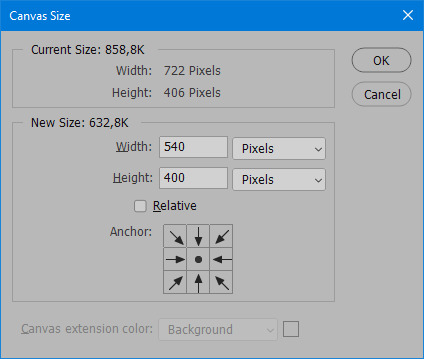
Image > Canvas Size > change Width to 540 (or 268 or 177) and take away the 4-6 pixels that we left in the previous step in Height
when you figure out which gif dimensions work best for you, record an action and use it to save up time!
after sizing use the action Smart Object. now we have the base of our gif!

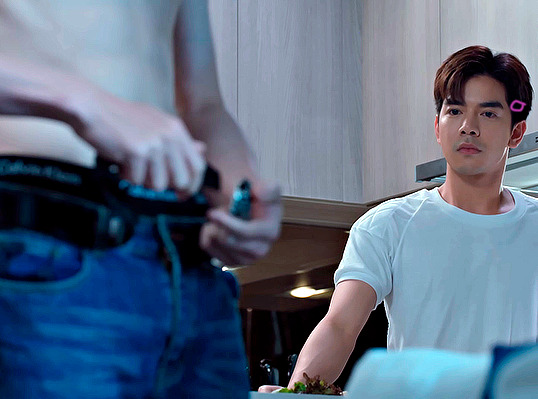
you can move your gif left or right if you want! i will be doing this because i would like to show more hips in the gif.
press Ctrl + T > move the layer however you need (not in height though) > press Enter to save
i moved it to the right and my gif looks like this now:
5. Sharpening (i use Tan's sharpening settings explained here)
i added two sharpening actions in the pack, they are called Sharpen Spicy and Sharpen Spicy 12. you can use one of them or you can sharpen your gif by hand, i will explain how to do it below.
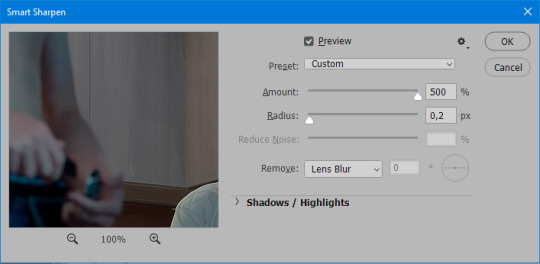
Filter > Sharpen > Smart Sharpen > 500% amount, 0,2 px radius > OK
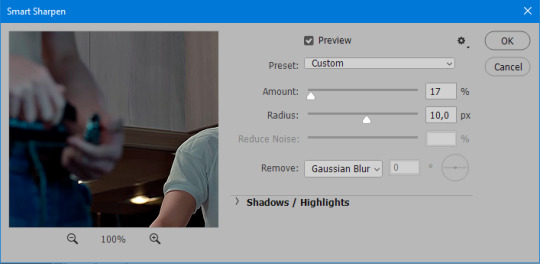
Filter > Sharpen > Smart Sharpen > 17% amount, 10,0 px radius > OK (you can change 17% to lesser or bigger, depending how intense you want your sharpening to look. i use 17% for 4k footage and 12% for 1080 px or less videos)
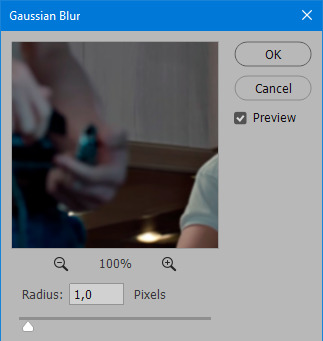
to smooth the sharpening a bit i use Gaussian Blur (this is optional, you can leave the sharpening as it is if you want your gif to be sharper).
Filter > Blur > Gaussian Blur > Radius 1,0 pixels > OK
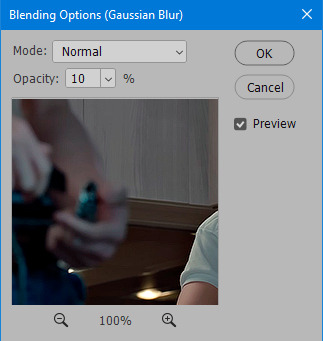
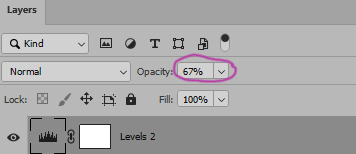
now change blending intensity to let only a bit of the blurring effect stay (you need to change this by hand if you used the sharpening action also).
press Blending Options (the highlighted place) twice > change Opacity to 10%

this is what my gifs looks like with sharpening now!

6. Colouring (i learned how to colour the way i do through this tutorial)
to make it easier for you to learn i will share my blank colouring file. i created it to save as much time while giffing as possible, so whenever i need to colour a gif i simply duplicate all the blank adjustment layers to the base of my every gif and start colouring! once you figure out which adjustment layers work for you best, i recommend creating a blank colouring file too to save time.
if you want to go the easy way, open my colouring file and duplicate selected layers to your gif file by Layer > Duplicate Layer > insert gif's document name

if you want to learn by hand, create the adjustment layers that i will be naming in the process on your own, you can find them all in Layer > New Adjustment Layer
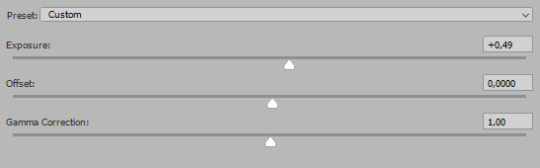
now we will use adjustment layers for our colouring from the bottom to the top! first, Exposure layer to add a bit of light to the gif. i don't always use Exposure because sometimes shots are bright enough on their own. i will, however, use it here. don't use it on your gif too much, because in the next few steps we will also be brightening the gif with other adjustment layers. i added +0,49:
next, Hue/Saturation layer. i use it in gifs with neon lighting to color correct overly bright colours. for example if your characters are standing in neon pink, you might want to lessen Saturation in Magentas and Reds to make the final gif less pixelated, and etc. i will not use Hue/Saturation on this gif, cause it doesn't need it.
proceed to the layer Levels. this layer usually does most of my colouring. click on the lowest white dropper in your Levels window:
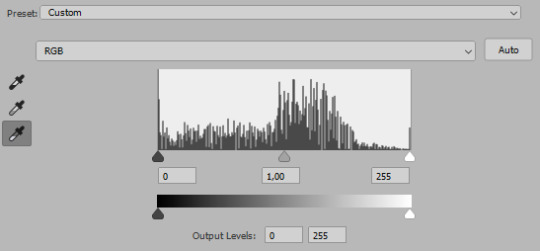
now choose a light place on your gif and click on it with the white dropper. it works especially well if you use the white dropper on the lightened parts of face skin. you can play around by choosing different bright spots and seeing what works best. here is the spot i chose and the resulting colouring:


this is too light, so now we need to balance it out with the black dropper:

choose one of the darkest places this time and click it with black dropper! once again, you can play around and click different spot to see what works best. i will be clicking the highlighted spot and you can see what my gif will look like with this Levels settings

as you can see, darkest places became darker and other colours were corrected a bit! now, this is still too bright, so i will be decreasing the opacity of Levels layer from 100% to a smaller number:
i will have to continue in another post because tumblr only allows 30 pictures per one post in the new editor now and i'd like to explain everything in visuals. click to continue
77 notes
·
View notes
Text

i was tagged by both @jeonwon-wonwoo and @irlvernon, tysm maddie & max!! i was hoping someone would tag me this year, i love looking back on things like this <3
rules: link your favorite and/or most popular post from each month this year (totally fine to skip months) and tag some CCs you love!
JANUARY
most popular: lee jihoon, world's cutest loser (2.2k notes)
- i loove compilation sets, and this one was so hilarious and fun to make
favorites: bss just do it & woozi's habit
- i love the colors of my bss set! & i hadn't done much with fun text before, so i enjoyed picking out the font lol.
- as for woozi's thumb-biting habit...once i noticed it, i started looking for it everywhere
FEBRUARY
most popular: mafia mingyu (700 notes)
- i giffed so much of its2, and cute mafia loser mingyu was impossible to resist
favorites: attacca era & post-show arts and crafts
- i had a brief affair with attacca as my favorite era...it is impeccable, after all <3
- i noticed woozi making a little fan in the background of an after-show video and thought it was cute
MARCH
most popular: hao & vernon "get your hand off of me" (800 notes)
- these two were just too funny dsjfnlsfhj, i had to immortalize them somehow
favorite: dk & woozi at caratland 2023
- sweet sweet boys whom i adore with my whole heart...
APRIL
most popular: woozi for rmtcrw (500 notes)
- as the caption says, rmtcrw woozi was an absolute gift
favorite: super mv outfit details
- my dirty little secret is that i didn't care much for super when it first came out, but watching the mv while making this set made me come around
MAY
most popular: woozi wants to be reincarnated as a cat (2.7k)
- we stan one (1) catboy in this house. he's so correct actually.
favorites: svt's 8th anniversary & woozi fml video behind
- i was camping during the 8th anniversary and i literally drove 40 minutes back to my house to post this set...i couldn't let it go to waste.
- behind the scenes woozi is so goofy silly, i love his awkward little hiccuppy laugh
JUNE
most popular: jeonghan "what would you do if i became a cockroach?" (1.2k notes)
- classic jeonghan behavior necessitating a set...
favorite: an ode album covers
- my first foray into anything graphics-adjacent! it came out exactly how i planned, and it's my favorite thing i've created thus far
JULY
most popular: snoozi (5.2k notes)
- my most popular set of the year! i love how many people enjoyed the pun, and i looooved compiling all the sleepy woozis
favorite: it's definitely snoozi, but honorable mentions include strawboory & svt + tv tropes
- strawberry boo was already too cute not to gif, and as soon as i had the pun in mind, nothing could've stopped me from using it
- svt + tv tropes was so fun! i actually have a few ideas for a part 2, but not enough for a whole set yet.
AUGUST
most popular: "in the market" song (700 notes)
- i was flabbergasted by this, woozi's memory terrifies me. instant gifset.
favorite: a rainbow of wz hair colors
- i loved coloring this set, for obvious reasons. vibrant gifs my beloved.
SEPTEMBER
most popular: follow tour vcr (500 notes)
- the moment i saw this, i loved it. i'm not exactly sure what the plot was, so i had my own interpretation ofc.
favorite: svt mvs + pink & blue
- i was on a mission for rq&s, but i ended up going a little broader instead. i had fun making the templates!
OCTOBER
most popular: pd woo (700 notes)
- it's just a single large gif, but man is it a cute face. the 700 notes are me reblogging it 700 times in another life.
favorite: first love & letter album covers
- wahhh these were so fun to make! the "love" one is my favorite, they're such good boys honestly.
NOVEMBER
most popular: woozi's birthday (400 notes)
- i really enjoyed creating the layout for this and adding all the cute bits and pieces. it's one of my favorites from this year :)
favorite: it's definitely the birthday set, but honorable mention for the birthday box photoshoot
- pink sweater...
DECEMBER
most popular/favorite: 2024 sg spot (180 notes)
- life got difficult in december, so this is my only set. behold!
this was fun! here's to more giffable content in 2024! ^^
a lot of my favs have already been tagged so apologies for any double tags, but (if you're so inclined) i'll tag @jeongtokkie @sevencoloredstar @woozis @goblinvern @wnjunhui @junranghae @dinoboos @junmail @hoshingi and @kiimtaehyung <3
11 notes
·
View notes
Text
i hate that i see one gifset of stsc and my whole body just. locks up. and starts shaking. i hate that i immediately feel like im going to die. im not in danger oh my god im just. im just looking at a fictional robot and my body makes me react as if i have to run. run from what??? im so tired of feeling so nauseous and dizzy and angry every single day. my god i miss stsc more than anything. loving ken is great but it is not the same. nothing is the same. i have come to truly hate TF with my entire being, even tho TF didnt hurt me, it was someone i associated with TF. but i am so bitter about what happened to me and i wish the franchise never existed bc then i never would have met my abuser. but at the same time i miss TF so badly i just want to be able to look at an insignia without crying, or think of a flower meadow without my heart breaking, or listen to the 400 songs collecting dust on my TF playlist. my god there is so much music i miss, but every time i listen to a song on that playlist, my brain just associates it with my TF ships and then i miss them too badly and i cant enjoy the music for what it is. i have tried associating them with ken. i have tried associating them with barbie. it doesnt work. the furthest ive gotten is associating 7 out of 200 megakeri songs with patrickeri but !!! thats just!!! 7 songs!!! out of!!! two!!! hundred!!!!!
i dont know how to explain it to someone who doesnt get triggered but its literally like... spikes of adrenaline shooting through my body and making me shake every time i see something related to TF or even something that would remind me of a TF selfship i had. and my breathing either becomes very short or i just hold my breath entirely. and i start sweating and my body locks up and there's this urge to run, to hide, to call for help, but i cant do any of that, i just freeze up. and like lol thats so stupid bro. ill see a color and it triggers me, ill see a honeybee and i start crying, i see a flower meadow, or like. just. the word starlight. or hearing a song that reminds me of my TF ships. i miss them all so fucking badly. i see hailee steinfeld and it hurts so bad bc i loved her the most in the bumblebee movie, i loved charlie so dearly, she was one of my favorite main f/os years ago, now its like... i just have such a horrible horrible horrible association with charlie and bee and TF in general and i . dont know. how to reclaim that. and seeing them makes my body react like "you're gonna die holy shit" just automatically. immediately. i cannot control it. it just happens. it sucks.
steve blum hugged me so so so tight just days ago and said stsc would never hurt me. like three times. and that stsc misses me and loves me. growled it, as if stsc was truly enraged for being ripped away from me. and yet my brain is still like... numb. i watch the video with steve and im numb. he hugged me tightly and rubbed my back and, like, okay great i didnt have any "oh my god im gonna die" feelings when he was voicing stsc for me, but i was just... numb. totally shut down. i didnt expect seeing him again to fix me, but i was hoping so terribly that it would do something. anything. but i am tired of feeling this way and i want to try to do something about it even if theres almost nothing i can really do except try my fucking best one day at a time
i think one of my main problems is ive spent three years LOVING TF, feeling good with it, la la la. and then BAM about nine-ish months of being isolated with someone who ruined my fucking life. now spent about 16-ish months looking at TF whether it's a gifset or a photo or even just a flower that reminds me of a character or something, then having a trigger reaction where im crying/vomiting/hyperventilating, and then disengaging with TF entirely and spending days trying to come down from being triggered. for over a year, i have been unintentionaly training myself to believe i cannot look at TF. like. i am unable to ground myself when im triggered, i am supposed to say "ok im scared right now but he would never hurt me" or whatever. but i havent been able to do that, i just get triggered and immediately try to get away from whatever i saw that triggered me, and its wired my brain to believe TF is genuinely something to avoid.
i think i need to get into the habit of drawing myself with a TF character at least... once every two weeks. or once a week if i am able to. but i cannot just sit here, missing TF every day, get triggered if i see it, and then avoid it and then cry about avoiding it, and the cycle continues. i cannot keep fucking doing that. dude there has to be a way for me to fix myself. i need to train my brain to believe its gonna be ok even if it takes a long ass time. and then the next time i meet steve blum maybe ill feel? better? cmon, if the voice actor can hug me and say stsc would never hurt his little starflower and my brain doesnt believe that, then there is something else i gotta do. i cant just sit here and feel bad!!!! i have tried several forms of therapy and then i ran outta money, i have tried watching the shows but got a BAD reaction out of that, i tried commissioning ppl to draw myself with TF characters but it's done nothing but waste my money bc i cannot look at the pics, i have tried talking to friends about TF and associating it with them, but none of this shit has worked. but you know what did genuinely make me feel better back when this was really fresh? me drawing myself with TF characters and people commenting nice things about it. me posting drawings of me with stsc and people writing a nice tag or a nice comment. that helped the most. i need to get back into the habit of doing that even if i just get one (1) nice comment, i know it will make a difference. nice comments have always made a significant difference for me whether it's my inbox or dms or replies, any time someone shows me kindness, it helps a lot. and maybe if i just. keep. doing that. i can slowly but surely condition myself to believe again that im safe when i see TF. because i am. i am safe and i am loved and i am missed even if i dont believe that at ALL i know it's there even if i'm completely numb to it
my goal isnt even to hyperfixate on TF again. its to just... be indifferent to it, god that is the best case scenario for me right now, realistically. i just want to not be immediately triggered. i'll have reactions with ken or driver sometimes where i'm like "what if they hurt me" but that's not a trigger. i dont feel like im going to die when i look at them. but i feel like im going to die when i look at TF and im so sick of that. lol im done with that. fuck that. i shall take matters into my own hands. even if it takes years i am NOT giving up!!! no matter how many times i cry and scream and stress vomit and jolt awake from nightmares and make vent posts saying "its hopeless ill never ever ever reclaim them" i WILL fucking reclaim them i dont care if it takes me until im 90 years old!!!!!!!!! i hate living like this and i KNOW if i keep kicking and thrashing eventually something's gotta give. i cannot just lay here on the ground and cry. i gotta get up and scream the entire time and claw my way out of this deep dark depressing pit so i can eventually get out. what is that saying - fake it til you make it??? well ill keep drawing myself being so so so loved by these characters, and faking it until i finally fucking MAKE IT
4 notes
·
View notes
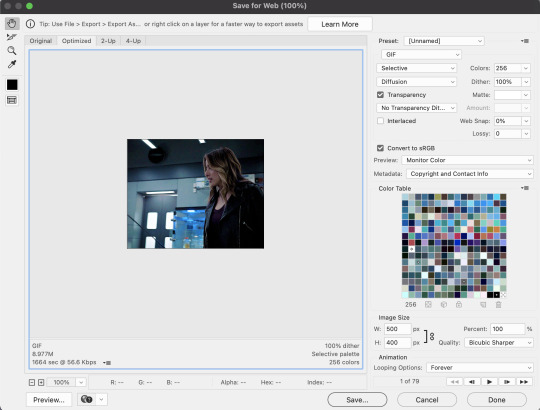
Photo


The Hockey Aesthetic™️
#bardown#tsn#jesse pollock#emilie hanskamp#corwin mccallum#homemade gif#emilie is the cutest person ever#i want to be her best friend#there are like 400 gifsets i want to make for this video#but i only have the patience for one a night i think#specifically i want to make one about the lake louise outdoor aeshetic
44 notes
·
View notes
Text
Mini Vapoursynth Tutorial ♥︎
Hello!! I was asked to make a little tutorial on how do I work with the Vapoursynth settings when I gif so below the read more you’ll find how I work with it and a lil before & after of the gif!
Hope you understand! ☺️
First things first, you need a video to work with (lol). I always like to cut the video parts I want to gif first and then put them through VS one by one to make it easier to work with (and to spare my laptop from dying processing everything) but I know people that prefer to run the entire original video through VS first, then cut the part they want to gif. Whichever you prefer is totally fine!
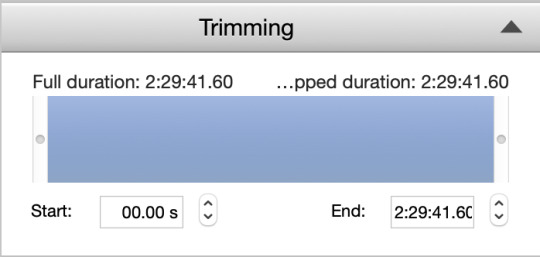
To add a video to VS all you need to do is drag it to the VS icon and drop it. You’ll get this window where you’ll have to specify the length of the video section you want VS to work on (yes you’ll have to write all the zeros):
Start of the section:

End of the section:

This will open that exact section on the program and you’ll be able to start to work with it from here.
You’ll get this window next (it’ll open on Chrome):
(Gonna add that, apart from this window, the Vapoursynth Editor will open too, but I’ll get to that later, just don’t close it)
You’ll have the settings on your left, your video in the centre and then another bunch of settings on the right.
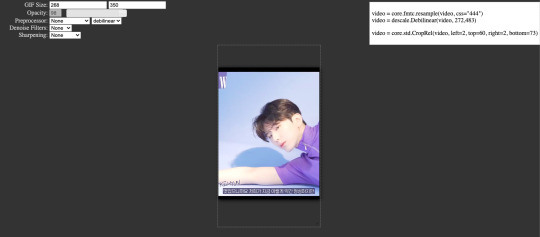
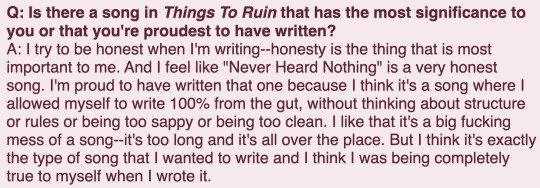
The first bunch of settings allow you to modify the size of the gif (in this case I’ve chosen 268 (width) x 400 (length), to make a 2 gif gifset, but you can do up to 540 (width) and basically any length you want...idrk if there’s a length limit on tumblr tbh...). I don’t touch anything else apart from the Denoise Filters and the FineSharp setting.
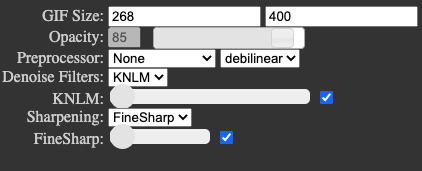
You need to tick those and then you’ve got two options: either change the settings using that sliding circle OR change them on the second settings bunch on the right. I do it there because I find it faster and more precise but you do you.

NOW to change the settings on the right side, what you ONLY want to change is the part where it says “1.6″ and “0.22″ because the values correspond to the Denoise Filters and FineSharp settings I told you before (if you use the sliding circle on the left side you’ll see these values changing automatically as you move the circle from left to right).
The Denoise Filters (the “1.6″ you want to change) are gonna smoothen the surface of the video, they’re gonna get rid of those little grains you see on videos that are not hd.
The FineSharp setting (the “0.22″ you want to change) is gonna harsh the lines and make them more defined.
Here, it depends on the original video you’re working with and the quality it has: if you have a very high quality video you’re not gonna want to use a very high value for any of those settings bc you’ll end up with a super blurred gif that’s gonna look weird. If the video is lower in image quality, you’ll have to play with the values.
The sh*tty thing about this is that, as you start changing the values, the result doesn’t show up on the gif in the middle immediately, meaning that you’ll have to run the code and open the gif on Photoshop to see the result. So it’s a matter of trial and error. If your resulting gif doesn’t show up on PS the way you want it to show up, you’ll have to go back to VS, change the combination of both settings, run it again through the software and check it again on PS.
The values I normally use for both settings usually range from 1.5-1.8 for the Denoise filter and 1.6-1.9 for the FineSharp. It really depends on the original video you’re working with, so always try to find the highest quality videos you can to make gifs from them.
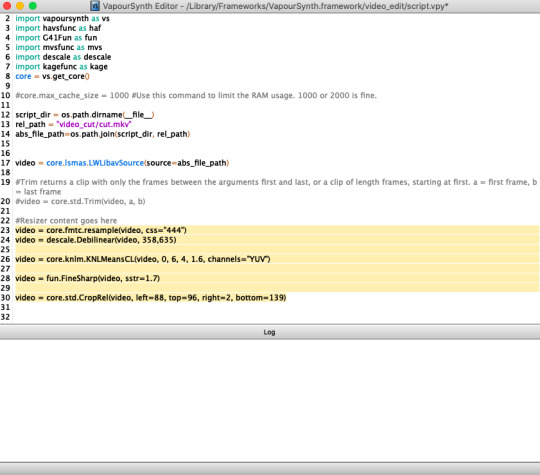
Now once you’ve got your settings ready, all you need to do is copy the code,

open the Vapoursynth Editor window I told you about at the beginning and paste it where it says “#Resizer content goes here”:
Then, at the top bar, click on “Script” and in the drop down menu chose “Encode video”:

This will open yet ANOTHER window:

All you have to change here is where it says “Header: No Header”. you’ll want to click on those blue arrows and chose the option that says “Y4M”.

If you don’t chose this option, the encoder will give you an error message and won’t work, so if you ever get any errors check out you don’t have this unselected.
Once you have this all you need to do is press start (at the bottom right of the window) and let the program do its magic. It’ll start encoding the video and giving you lots of words and stuff and you’ll feel like a hacker breaking into some Country’s Government security system.
The moment it finishes encoding it’ll give you a “Finished encoding” message in green and you’ll have to press “Save” (in the middle right of the window) for it to save the video to your VS Output folder.

From here all you have to do is open PS, import the video and start working with it there!
This is the comparative with and without VS:

I haven’t used any PSD on top of them just so you can see the real difference.
Hope this was useful!
Bye!! ☺️💕
122 notes
·
View notes
Note
how do u make ur gifs?
Hi, anon! I use photoshop. (there are vids on yt that show you how to get it for free)
I'm gonna use this gifset as example.
This is turned out to be a long post, so I'm gonna add the cut.
1. I cut and export - can be done with any video editor - from the ep (always give preference for the highest quality you can find) the scene(s) I wanna gif. Then, import the video to photoshop to create layers. Photoshop > File > Import > Video Frames to Layers

2. After you select the video, this window will open. I like "from beginning to end" option and after just delete the layers that you don't want.

3. Select "OK" to create the frames.

here I already deleted the ones I didn't want.
If the timeline and layers panel doesn't appear, click on "window" at the top.
4. Set the velocity. important: you have to select all frames!

(click on the symbol next to the numbers to appear the options ⬇️)
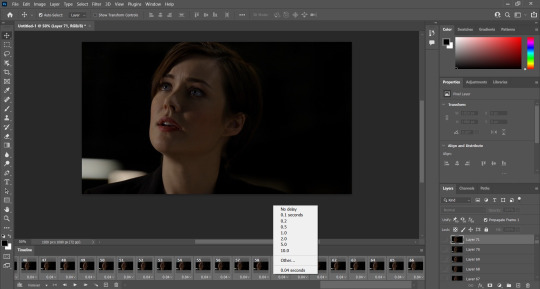
Here, it's very much the preference of each editor. Personally, I like above 0.06.
5. With the velocity set, select all layers and all frames to convert to video timeline and convert to smart filters.

⬇️

⬇️
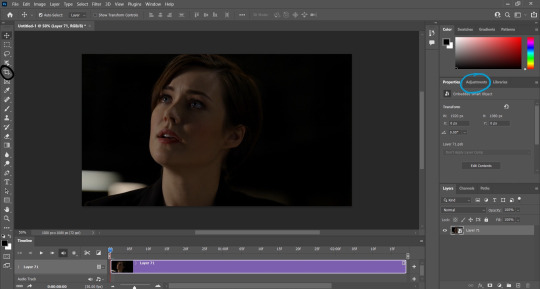
6. Now, it's time for coloring, cutting - tool circled in black - (if you want and/or need to) and sharpen. Let the creativity flow!
What I do is:
- resize the image (Image > Image size) setting -> w: 600 pixels and leave the proportion tool on so photoshop automatically adjusts the height
- crop it - tool circled in black - to a size I like.
- color it - tools circled in blue. I come up with my own PSDs (just messing around with the colors). I have 2-4 psd of my own that I use for base.
- sharpen Filter > Sharpen > Smart Sharpen (my fav setting is amount: 400; radius: 0.2 - 1.0 - I'll be adjusting these first two settings until I find one I like - ; reduce noise: 10; remove: lens blur)
- and then, resize again for export (Image > Image size). In this part, I try to find the max size - adjusting only width and leaving the proportion tool on so photoshop automatically adjusts the height - I can export without passing 10 MB that is the tumblr limit or you can put 540x. Always paying attention to not pass the limit.
7. Done!
That's it! :) I know it can sound confusing, but it's just at the beginning. Feel free to send me a ask again if you still have a question! <3 Really, please, I'd love to help you!
Oh and when I wanted to learn how to make collage (like the ones that you can find in the mega link "+" in this post), I watched this tutorial.
#anon#gifs#gifset#resources#i would screen record my process of gif making#but idk how to#:(#i always download the 1080p versions of the eps#tbl and cm#you can try find in scenepacks accs on ig#and on logolessdesires on twitter#or if you want the links to download 1080p eps for tbl and cm DM me
13 notes
·
View notes
Text
Gif/Coloring Tips (not quite a tutorial)
Note: I’m using Photoshop CS6.
I just thought I might post this in case it helps anyone improve their giffing skills or inspire them to get back into the giffing game.
I pretty much always see gif/coloring tutorials say to crop/resize/sharpen and THEN color. I propose to color and THEN crop/resize/sharpen.
When I got back into giffing and hadn’t done it in years, I saw a post saying they found big gifs easier to make and that inspired me to start giffing again.
And when I did I found it so much easier to color the gif because I could see all the colors I was working with cause the gif was so big (540px).
So I would color when the gif was still 1920x1080 and then resize it to 268px and once it was small I couldn’t see some of the small areas I’d done coloring for but I could see the difference it made if I turned some of the layers off. Sometimes I’d removed some colors from overly pixellated areas that would make the gif look slightly bad if I hadn’t, either they were too saturated or too bright or dark making them very pixellated. By working with the gif in 1080px I could see everything I was working with.
Steps Overview:
Import Screencaps
Create Frame Animation
Change Frame Delay (0.05 or 0.06)
Coloring
Cropping/Resizing
Adding text/subtitles (Arial Italic 9-11pt)
Convert to Smart Object (do not select coloring folder when converting)
Shorten Gif (if necessary)
Sharpening (Unsharp Mask + Smart Sharpen)
Save for Web (Adaptive/Selective Pattern or Adaptive/Selective Diffusion)
Now in more Detail:
Import Screencaps (Extract every frame when getting the caps)
Create Frame Animation
Make Frames from Layers
Select All Frames
Reverse Frame Animation
Set Loop to: Forever
Change Frame Delay to a range of 0.04-0.07
(0.05 or 0.06 will probably be the right speed most of the time)
Color Your Gif (yes color your gif now while it’s big and you can see every color you’re working with)
Crop/Resize (depending on # of gifs in your gifset: width x height)
I always resize with a couple extra pixels in width and height to get rid of transparent edges. (I will give examples below)
1 gif: 540 x 400
2 gifs: 540 x 350-400
2/3 gifs: 540 x 240-300
example: 1920x1080 ➝ 544x306 ➝ 540x300
2 gifs (side by side): 268 x 300-600
4 gifs (side by side): 268 x 268
4+ gifs: 540 x 220-280
6 gifs: 268 x 180-200
8 gifs: 268 x 150-170
example: 1920x1080 ➝ 274x154 ➝ 268x150
example: 1920x1080 ➝ 292x164 ➝ 268x160
example: 1920x1080 ➝ 309x174 ➝ 268x170
9 gifs: 177 x 150-250/178 x 150-250/177 x 150-250
(middle gif will be blurry if you don’t make it 178 rather than 177)
(To reinterate: left: 177. middle: 178. right: 177)
example: 1920x1080 ➝ 274x154 ➝ 177x150 (or 178x150)
example: 1920x1080 ➝ 363x204 ➝ 177x200 (or 178x200)
example: 1920x1080 ➝ 452x254 ➝ 177x250 (or 178x250)
10 gifs: 268 x 140-160
example: 1920x1080 ➝ 272x153 ➝ 268x140
example: 1920x1080 ➝ 274x154 ➝ 268x150
example: 1920x1080 ➝ 292x164 ➝ 268x160
Add text (Arial Italic 9-11pt or Calibri 10-13pt)
I think those are the two most used fonts. You can use whatever you want of course but I think Arial might be the standard for like gif subtitles.
Convert to Smart Object (Only select the layers not the folder with your coloring)
Shorten gif
once in Smart Object you can just Set the Start and End of the Work Area on the timeline
therefore no need to delete frames that you then have to ctrl+z to get back if the gif is a tad too short)
Sharpening - This is what I use:
Unsharp Mask: 15-20%, 6.0 pixels, 0 levels
This adds more depth, like you know those 60fps video where it feels like you could reach into the video or the people could reach out, yeah kinda like that.
Smart Sharpen: 500%, 0.3px, Remove Gaussian Blur, ☑ More Accurate (ticked, very important to tick it)
Save for Web
Selective/Adaptive + Pattern/Diffusion
Try different combinations for each individual gif, such as:
Selective Pattern
Adaptive Pattern (i use this most often)
Selective Diffusion
Adaptive Diffusion
Adaptive+Pattern will look best more of the time but sometimes Selective+Pattern will look better.
Diffusion will sometimes be better looking than Pattern but I mostly use pattern now.
Open Gif in Photoshop
The frame delay might have changed to something slower or faster. Check that it’s still the same, if not then: look at the next step.
Change Frame Delay (back to what you set it to original)
(This might not be a problem for everyone but it is for me)
Usually if you set it to 0.06 originally then it’ll have changed to 0.07, if you set it to 0.05 then it’s possibly 0.04 or even 0.03.
So change the frame delay back to what you had it on.
Save for Web (again)
Upload to tumblr and save as draft (so you can check that gif speed and everything else looks good)
Post!
#my tutorials#gif stuff#gif tutorial#photoshop tutorial#photoshop#giffing#hope this helps at least one person#i plan to post some more gif related advice at some point#might consider making a proper gif/coloring tutorial at some point if there's any interest
96 notes
·
View notes
Note
Hi! Can I ask how you make your gifsets? (program, process)? Hope you have an amazing day, your Daisy gifs are gorgeous btw ❤️💔
hello!! hope you also have a great day, and thank you!! and sorry this took a little longer to put together than i thought it would!!
i'll try to explain my process as best i can, and hopefully it makes sense.
program(s)
first, i use photoshop 2021 to make gifs, and i use mplayer osx extended for screencaps. also, i try to avoid using clips from YouTube because the quality usually isn't as good, but if I do have to use that I use 4k video downloader
process
first, first thing you need is the clip that you want to make gif from. the easiest way to find this (in my opinion) is just to search "[...] scene pack" or "[...] mega link." I usually try to make sure the clips i use are 1080p because anything less than that is lower in quality and the gifs aren't as sharp.
second, i open the clip in mplayer to get the screencaps ill use to make the gif. i do this by pausing the video right before the part i want to gif, then pressing and holding command+shift+s (for mac) until ive got the full scene. if you want, you can create a folder on your desktop for screencaps, but I usually just leave them there and delete them once im done.
the next step is when i actually open photoshop. to start, go to file>script>load files into stack
this is where you're going to load in the screencaps you just took. go to browse, then select the first screencap and hold down shift until you select the last screencap, then hit ok
after that i usually crop my gifs. in general, i use 540px x 400px, but that changes based on what exactly im giffing. the way i crop gifs is by clicking the crop icon on the left side, then, above the workspace, selecting W x H x Resolution > 540 px x 400 px > px/in
the next parts so the most complicated part to explain so im gonna use a picture for reference
click create frame animation

next, go to the three horizontal lines across from the word “timeline” at the bottom. once that menu opens, click “make frames from layers” at this point the gif is backwards, so you’ll want to go back to that same menu and click “reverse frames.”
now that your gif’s frames in the correct order, you can set frame delay. select all the frames in the timeline, then right click so get a box that looks like this:

i almost always set frame delay to .05, but if i have less than ~20 frames ill set it to 0.06
next, click the symbol in the bottom left corner (you can see it in the photo above) to convert the frames to a video timeline
after this, on the bottom right side, select each layer of the gif under the “layers” tab. right click, then select “convert to smart object.” this will allow you to sharpen your gifs. to do that, at the top of the screen go to filter>sharpen>smart sharpen. the settings i use are 500% at 0.4px, then i sharpen again 10% at 10px
here's the gif before sharpening:

sharpened 500% at 0.4px:
sharpened 500% at 0.4px then 10% at 10px
coloring
once this parts done you can start coloring your gifs/adding adjustment layers. the main ones I typically use, in order, are curves, brightness, levels, selective color, and vibrance. the first three adjust the lighting of the gif and the last two adjust the color. other layers i use are saturation, color balance, and photo filter, which all adjust color.
to add adjustment layers, you can either
1. go to layer>add adjustment layer>select the layer type
2. pick a layer type from the icons on the right side (above the layer list)
honestly, the easiest way to do this part is to just select “auto” and photoshop will automatically adjust curves, brightness, and levels, but i usually slightly tweak it from here until im happy with it.
curves: use the white dropper to select the lightest part of the gif and the black dropper to select the darkest part. you can manually adjust the curve within the little graph too, but typically you don't need to (i only do when the actual scene the gifs from has a tint i don't like, ex. if its really green ill go to the dropbar, go to green, then adjust it until ive mostly neutralized it)
brightness/contrast: brightening too much will sometimes decrease the quality, where increasing the contrast will sometimes help increase the quality
levels: honestly you can almost always get away with not using this unless the lighting in a scene is really bad/weird. use auto then adjust as needed
this is what the gif looks like after adding adjustment layers:
curves: input 85, output 92
brightness: brightness 19, contrast-32
levels: 0,1.11,255

now you can get to actually playing around with colors!
the first thing i do is add a layer of selective color, go to black, then increase black. this is one of the last ways to increase quality slightly, as it can make the gifs look a little sharper.
next i add vibrance. typically, unless the scene itself is already pretty colorful, ill increase vibrance almost fully, and slightly increase saturation. the issue with increasing saturation too much, especially when your giffing people, is the colors start to look really unnatural
for this particular gif, i added a hue/saturation layer, then decreased red and increase blue and cyan, because there was a lot of both of those colors in the background and i wanted it to stand out more. i then added another selective color layer and increased cyan for both blue and cyan.
these are the specific adjustments i made:
selective color: black>black +9%
vibrance: vibrance +76, saturation +10
hue/saturation: red -15
selective color: blue>cyan +75%, cyan>cyan 49%
hue/saturation: blue +4, cyan +5
saving
once you're done coloring, you can save your gif. to do this, go to file>export>save for web (legacy)
these are the save settings i use:
also, the gif size limit for tumblr is 10M, so make sure your gifs are all under that size. if they're too big, you can either adjust the image size on the save page (or while making the gif) or shorten the gif
and here's the final product!
i hope this was helpful :)
5 notes
·
View notes
Text
#showyourprocess
From planning to posting, share your process for making creative content!
To continue supporting content makers, this tag game is meant to show the entire process of making creative content: this can be for any creation.
RULES — When your work is tagged, show the process of its creation from planning to posting, then tag 5 people with a specific link to one of their creative works you’d like to see the process of. Use the tag #showyourprocess so we can find yours!
I was tagged by @baoshan-sanren for this word of honor set (thank you!!!)
I'll be tagging:
@cescedes for this wangxian set with really interesting blue coloring
@thatgothsamurai for this fanart of Wen Kexing that lives in my head rent free at all times
@yvlan for this lovely lwj set
@ostardust for this heartrending wangxian set (especially the last gif with the blue coloring in the trees)
@absentia123 for this aesthetic edit of Wen Ning
no pressure, especially if you’ve been tagged already or if you made the edit a while ago!!
I was very excited about this set. I started thinking about it when I was writing a meta about Zhou Zishu that included the line "A ghost and an assassin, two entities who should never see the light of day, walk side by side in the human realm."
I thought that could serve as a summary for the drama as a whole, so I tweaked the wording and turned it into a gifset.


Process:
1. Choose moments -
gif 1 was Zhou Zishu as an assassin, so it had to be ep 1
gif 2 had to parallel gif 1 with a shot of Wen Kexing looking towards the camera, and I wanted a moment with the red robes, so ep 31
gif 3 has the text "step into," so I chose the moment in 32 when Zishu steps towards Kexing for a visual pun
gif 4 had to be episode 37 when they're diffused in light (I found 37 on tumblr, downloaded it, and cropped it to avoid the subtitles)
That also meant the set started with Zhou Zishu's first appearance and ended with the final shot of the whole show, and it set up a nice color gradient of dark to light.
2. Import video frames to layers in photoshop - I have the raw .mp4 files downloaded, dm me if you want to know where to get them. I use frame animation, so I then selected 63 frames for each gif and set the frame rate to 0.07. I really like all gifs in a set to be the same length, and I think 0.07 usually looks natural and smooth, so I try to have my number of frames as multiples of 7. Does that matter? Probably not, but it makes me feel better.
3. Create smart object from layers
4. Add base coloring - for Word of Honor, I borrow @zhouszishu 's coloring as a base, which they shared here. I do my own coloring for cql sets, but their WoH base coloring is gorgeous and I like saving time.
5. Add text - I used Trajan Pro Bold, which is a basic font that comes with photoshop. I tried using a fancy font I downloaded from the internet first, but then I realized I didn’t know what I was doing and gave up. :)
6. Sharpen gif - I follow this glossy sharpening tutorial
And now for the fun part -- figuring out how to add effects!! I am a photoshop newbie in many ways, so I was looking at tutorials while doing this.
The process was largely the same on each gif, so I'll break down the most complicated one:
I had the base gif and the base coloring, and I wanted to make the background red.

Following this tutorial, I used a giant soft brush (300-400 pixels, 0% hardness) and colored the background red, then set the blending mode to color. I did the same thing in black around the edges, but with blending mode soft light. There was still some blue showing through between the ribs of the fan, so I used hue/saturation to desaturate the blues to make it less obvious.
Then I added the text and set the blending mode on the text to "difference" to get the effect of reversing whatever is behind it.

I then added a gradient mask (solid to transparent), clipped the mask to the text layer, and played around with it until the gradient was visible, but you could still read the text. And we end up with this!!
I then repeated that with each gif, and made additional adjustments on each, including using a giant soft brush in black around the border of gif 1 to make the rooftop less visible and intensifying the greens in gif 3
I had subtly different versions of gif 1 and gif 4 saved, because I wanted the text to dissolve into the background, but also to make sure you could still read it. I also made an alternate version of gif 3. I like to save multiple versions and usually an alternate gif or two to make sure I actually like the way things look when they're uploaded. So I made this:

But I decided that final version was more satisfying even though the text placement is meh, because he actually completes the movement before the loop restarts.
And that's it!! Nothing too complicated, and I am in awe of so many other creators on this site. But thanks for tagging me!
5 notes
·
View notes
Text
thanks for the tag @willroland :)
why did you choose your url?
well i grew up on the internet in the early 2010s so i was obsessed with starkid which lead to musical theater in general which lead to dear evan hansen which lead to will roland which lead to be more chill which lead to joe iconis and that hasn’t lead anywhere else because i’m so far up this man’s ass he could tell me to jump and i’d give him 5 million dollars for a bloodsong of love revival.
anyway.
funny enough it was because i was so up will roland’s ass that i gave joe iconis’ music outside of bmc a chance (back when he tweeted out a thread of joe iconis songs the night before the tonys). and he was right. he has taste even if all i see from him nowadays is globe twitter.
anyway.
never heard nothing (along with the bar song, try again, and last on land) is the quintessential joe iconis song in my humble opinion. but also my opinion is backed up by joe so. i’ll just let him say it.
here’s a link to the song. listen to it if you have any interest in joe iconis and his work.
any side blogs? if you have them, name them and why you have them
yeah this is actually a sideblog.
my main is @cockbiteproductions which is personal + rooster teeth. every day i want to throw rocks at mcyt fans but i myself am a rooster teeth fan and so my house is very glass and breakable.
and then there’s marvel @sebastianskywalker (can you guess who was excited by the idea of sebastain stan playing young luke? lol).
star trek @jimtiberivskirk.
star wars @fulcrumahsoka.
anime @kvchiki.
and that’s the important ones. i use this one and my main the most though. which is already almost not at all these days.
how long have you been on tumblr?
hahahahahaha. 2012. fuck.
do you have a queue tag?
yeah it’s “swiss fucking queue” which is from when michael jones says “swiss fucking cheese goddammit” in his impossible game rage quit. everyone on my main gets it but i hope anyone who sees it on my sideblogs gets confused because it’s the same queue tag across all my blogs.
why did you start your blog in the first place?
i was about to say “well my first blog was fandom” and then i realized that applies to literally all of them. so yeah. fandom. i generally make a sideblog when i want to make new fandom friends because none of my current friends are into the thing i am into. it works well.
why did you choose your icon/pfp?
will roland. because will roland. when my bio said “joe iconis and will roland” it wasn’t lying. but anyway i like projecting on characters wrol plays.
why did you choose your header?
it’s off this set lol. same photoshoot as the one from my icon.
what’s your post with the most notes?
lol it’s this shit gifset i made of nik dodani as jared in the deh movie trailer. he actually reposted a video of him scrolling through it on his insta story. which is unfortunate because it looks like shit. i usually have flux on while using any device and i turned it off while making this but i guess my brain is just fucked about it now because it’s 1. way not bright enough 2. way too yellow. ugly as shit.
how many followers do you have?
on this blog? uh i think getting close to 400 idk tho. idc. i just come here to scream about musical theater i rarely care about clout.
how many people do you follow?
idk around 750. a girls gotta sustain like 5 different blogs. that + never using tumblr anymore means i never see what anyone posts ever unless i go to their blog directly lol.
have you made a shitpost?
this blog is 1/3 shitpost 1/3 rando reblogs 1/3 ranting about joe iconis shit no one else cares about
how do you feel about ‘you need to reblog this’ post?
im spiteful so it’s an immediate no reblog from me. but i also dont really blog about social justice or anything much anymore. so unless a post has drastically altered how i think about a topic for the better i dont reblog it.
do you like tag games?
yeah! they’re fun. i’ll take any opportunity to talk about myself. + i generally learn something about the person who tagged me.
do you like ask games?
yeah! i get too anxious about reblogging them though lol i dont want people to think i want attention even though im an evil little attention whore.
which of your mutuals do you think is tumblr famous?
famous? on this sideblog? no one lol. not necessarily famous but @nothingunrealistic is probably one of the people that has the most longevity in the deh fandom on here so they have a decent amount of followers from that i assume. @unproduciblesmackdown and @kkamikazed also draw good fucking art so they get clout like that lol. i think @annabelle--cane is also like. decently large? idk. no one in this tiny niche subsection of musical theater tumblr is really tumblr famous though. that’d be a nightmare lol. wait there might be one person i think that’s a sideblog but i can’t remember who lol.
do you have a crush on a mutual?
thank fucking god no. could you imagine?
well i already mentioned @nothingunrealistic @unproduciblesmackdown @kkamikazed and @annabelle--cane earlier so i guess them. only if yall wanna tho. also @talkfine @rovermcfly if yall wanna do this. and anyone who wants to talk about themself go for it.
#teresa talks#oh hang on#about me#hang on wait maybe. talkfine and you can bond over the whole mcyt + musical theater thing actually
5 notes
·
View notes
Note
how do you make your gifs?
hi there! i’m not sure if you wanted the very basics or a tutorial, but i think this is more of a tutorial? sorry if that isn’t what you wanted! i tend to overexplain everything ;;;
i only started making gifs this summer, but i hope i explained everything (somewhat) clearly! feel free to send any other questions if you have any~
to make gifs, i use vapoursynth (alternatively, you can use avisynth) and photoshop cc 2019
under the cut!
downloading videos:
so! for live stages, i always use the ts file for it. ts files give the best quality for your gifs, and i’ve found i don’t like how the quality looks even if it’s 1080p, but that’s all your preference!
to find and download ts files, i use these websites:
4sashi, kpop24hours, kpopexciting // along with these, i’ve heard you can use twitter as well for ts files but i honestly don’t know what to search to find them lol
if you’re downloading from youtube, i always look for 4k videos, but if i can’t find any 4k for what i’m looking for, i use 1080p! i don’t really like going less than that, though ;;
to download youtube videos i use 4k video downloader! it’s really nice because it lets you download any youtube video (no matter the length) and it lets you download it in the highest quality for free! (if you want to download videos with 4k resolution, you have to pay a one time fee of $20 *i believe* and you have an access key for up to three computers! otherwise, 4k video downloader is completely free!).
if you want to download anything from vlive or twitter, i normally just look up “vlive video downloader” or “twitter video downloader” and just click the first thing that pops up
using vapoursynth: (link to where i downloaded vapoursynth -> here)
i somehow by miracle got vapoursynth to work on my windows computer, but i honestly have no idea how because the first time i tried it just would not work! it’s a big pain, but i’ve heard it’s a lot easier to download and get to work on mac! if you’re using windows, though, a nice alternative is avisynth, which i used before i got vapoursynth!
vapoursynth is really simple to use, to be completely honest! i don’t know how good i’ll be at explaining it so i’ll leave a link to a tutorial i used at the end of this explanation! it can be a bit daunting at first because of all the code, but tbh you don’t really need to know everything it says, most of it is just copy and paste!
to get the resizer and the vapoursynth script to load, you just have to click and drag your video file over on top of the file called vapourscript, which can be found in your vapoursynth folder! (my folder is called “VapourSynth64Portable”, because that’s how it came for me) to know if you’re in the right folder, you should see other files in there like “gifs” “scripts” “plugins” and others!
after you drag your video file onto the vapourscript and resize your gif, copy what it says in the resizer and paste it in vapoursynth!
here’s the tutorial i used to explain it easier -> here
options i use:
i normally use the size 268 x 400 in the gif resizer (makes it portrait), or if i want it to be a landscape type size, i use 268 x 200!
if you’re using a ts file, click the preprocessor option (the first one that says none), and change it to one of the qtgmc options! i always use qtgmc 60 fast, but it’s up to you!
for anything else (mkv, mp4, etc), i would suggest leaving it on none!
i don’t use any sharpen actions in photoshop, i use vapoursynth instead!
typical vapoursynth settings:
for the amount of frames: ts files i try to keep under 200 (even under 100 if possible) and for everything else i don’t really pay attention to the number of frames!
everything from here on is done on photoshop!
coloring:
this is all preference!! a lot of gifmaking is just about what you like personally! some people actually have a base psd or use others’ colorings (again, preference!), but i personally really love coloring, it’s my favorite thing about gifmaking, so i almost always make a new psd (coloring) for every gifset i make! the main things i use in coloring though are selective layers, color balance, hue/saturation, threshold, contrast/brightness, and then i top it off by lessening the exposure!
frame delay:
0.04 or 0.05 seconds, i never use anything above or below that! this is another preference thing though lol
exporting:
to export your gif go to file > export > save for web (legacy)! here are my export options!

i hope this tutorial helps you! sorry if it was too long or if i overexplained anything/made it even more confusing! i only started making gifs during the summer, so if you have any tips for me as well, please don’t be afraid to send any in! you can send in any more asks as well, if i made things too confusing/you have any more questions!
bye bye!
43 notes
·
View notes
Note
hi! do you have a gif tutorial by any chance? yours are absolutely stunning 💓
Hey, thanks buddy! You’re hecka sweet. I can give you a little preview into my own process, but keep in mind that I’m sure there’s a heck of a lot of better tutorials (I’ll link them in the tutorial, they’ll be under part 2 coloring section). But this is how I go about it:
Part 1: Prep
Believe it or not, this is where most of my time goes. I’ll assume that you have some kind of photoshop that can make gifs at this point (I personally use Photoshop CC 2015) as well as the video files for whatever you want to gif.
First thing after having the video files for what’cha want to gif, we’ll have to upload the frames to photoshop. My method depends on how short the video files actually is.
If it’s a short mp4 files (e.g. a trailer from yt), I can just upload the part I want to gif by directly opening photoshop and clicking on the top menu: file >> import >> video to frames. Click on the video file and select the range you want to gif.

Easy peasy, you can now skip to step 2 in that case!
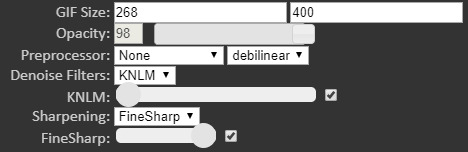
Unfortunately, the file is usually a large, 2-3 hr long, mkv file so that won’t cut it. Instead, you’ll need create a file that contains each frame as a screenshot (don’t worry, it’s not as tedious as it sounds!). There’s several ways to go about this, but I personally use a combination of Adapter and VLC.
Adapter will allow you to input a range and create a file to save your frames. Makes sure to pick a custom place to save your files (under directory) and your export frame rate to be ~24 images per second. At the bottom of the screen, you can also pick the file type of your screenshots - I personally will save them as PNG. I use VLC to find the range (since it’s the only video player I can find that opens mkv files AND works on mac) since unfortunately Adapter won’t let you preview the actual video, unlike when uploading to photoshop.
Here’s another tutorial on Adapter that is a lot better written >.>
Once that’s all done, we can finally upload to photoshop. To do this, you’ll go to the top menu like you would to directly download the video file, but instead click file >> scripts >> load files into stack. Click “Browse” and select all the screenshots in your file. Click okay.
Give it a few moments (or in my case, 15 minutes or so bc it’s slow for me for some reason ;_;) until the upload is complete. Once it’s complete, you click “create frame animation” at the bottom (if you don’t see the timeline, go to the top menu and select window >> timeline).

You’ll see only one frame so far. No worries, select the 4 little lines at the top right of the timeline and select “make frames from layers”.

So close! Now we need to reverse the frames and the layers. This does get a little tedious, so bear with me. Select all the frames and go down to the same drop down menu (with the 4 little lines) and click reverse frames. To reverse the layers select all except the bottom one (for some reason it’ll give me an error if I try to select all of them) and go to the top menu: layer >> arrange >> reverse. Then click that bottom, troublesome layer and click layer >> arrange >> bring to the top.
A tedious method indeed, but you can make it easier by memorizing the hot keys or, better yet, creating an action (which allows you to save numerous steps).
Tutorial on actions here.
Finally (I swear there’s light at the end of this tunnel), go to the bottom of the timeline and click “once” and select “forever” to the gif will loop once you save it.

OKIE DOKIE, FINALLY READY TO ACTUALLY MAKE THE GIF.
Part 2: Coloring + Sharpening + etc
There are loads of methods on coloring, which heavily depends on your preferences. No matter what, I usually start with levels to up the contrast. Add a little bit of darkness (leftmost slider…thing - don’t go too crazy, I stay within the 5-15 range unless I’m doing something special), and up the brightness by sliding the other two sliders to the left.
Now it all depends on you. Do you want vibrant? Single color specific? Pale? Whatever you might want, I tend to use the following the most: levels, selective color, color balance, hue/saturation, brightness/contrast, vibrance, and occasionally gradient map.

Check out specific blogs below for more information on that (or if you want to know how color a specific way, let me know).
Blog recs for tutorials:
@chaoticresources || @itsphotoshop || @completeresources
+ their recommended/affiliates (on the side of each blog)
Okie dokie, before moving forward, we’ll need to resize the gif if you haven’t already. Tumblr specifically allows for only different three widths: 540 px (one gif across), 268 px (two gifs per row), and 177 px/178 px/177 px (three gifs per row, yes the middle is 1 px more). The height has less limitations, but all your gifs should generally be the same within one gifset (unless you’re going for something interesting); each gif in a row specifically has to be the same height, however, or else you’re gonna get some funky results.
Note: my most generic sets tend to be 8 gifs, 2 per row. These tend to have a height of 154 px. But all up to you, my dude.
Once you’re all done coloring and resizing, it’s time to sharpen. The quickest way to sharpen is to convert your timeline to “video timeline”. But I personally dislike that method for various reasons (mostly bc saving a gif while in that mode takes like 700 years for my poor computer and I have less control over each individual frame), so I’ll show you my tedious as heck way (hint: once again, I use actions to do this).
To sharpen each frame, you have the frame and corresponding layer selected. Then in the top menu, select filter >> sharpen >> smart sharpen. My settings are as follows: amount ranges between 250-400%, radius is 0.3-0.4 px, reduce noise is 10%, and remove gaussian blur. You’ll have to do this for each frame/layer, so again I suggest either learning/downloading actions or learn the video timeline method.
Lastly, make sure your gif delay is around 0.5 secs - or at least that’s what I use. Sometimes I’ll go up 0.7 or even 0.9 secs if I have a really really small amount of frames and I want to make the gif look like it lasts longer ^^;.
Part 3: Saving and Posting
Okie dokie, so this should be the easy part, right? Maybe? All depends on your gif. You see, when you save (top menu: file >> export >> save for web), you gotta make sure your gif is under 3M…but I usually try to get under 2.87 M to be safe (I’ve saved at 2.9M before and the file ended up being bumped up to over 3M when I checked the file itself….very rude).
Anywho, the best way to cut down size is deleting frames. Other methods include playing around with the coloring (less vibrant, for instance) and height (especially for 540 px gifs).
So once you get a decent size, click “preview” to see how your spiffy gif will be looking. Once you’re satisfied, you can finally save! Upload those bad boys to tumblr and tag them with appropriate tags (e.g. the fandom edit tags or tagging blogs if that’s your sort of thing). Finally done to show the world :’D
Hopefully that was someone helpful? ish? If you need any specifics, let me know.
7 notes
·
View notes
Text
Good morning, Starshine! I hope you are all having a wonderful day free of stress and full of happiness!
And now the real reason I’m here: since posting this gifset of how terrifying the Six summons must be for Noct to experience (bc Noct/pain/anguish is my OT3), I have gotten asks about how I made the gifs and got the Astrals to appear in game so I could snag video. I have about eleven different ones in my inbox now so I figured I would just make a hopefully user-friendly post to consolidate things. Also wow, you guys, that is probably the most traffic I’ve ever gotten on a post you guys are great thank you 😊
I did kind of answer some of your questions awhile back in this post here, but sadly there is no good trick for getting the Astrals to appear. I really did just spend hours running around in one of my lower level saves letting everyone die until they showed up. Howevs, because I’ve seen it mentioned a lot in tags on that gifset that I shamelessly read all of, I do want to like go and ahead and HASHTAG#CONFIRM that Titan is by far the Rarest of them all and A Shy Boy. To put the level of Rarest of Them All I’m talking about into perspective, Leviathan - who can only be summoned near a body of water - showed up in the middle of the goddamn desert outside Hammerhead three times before I got Titan once. “But Ayla!” you ask, “HOW did you get him to appear?”
GOOD QUESTION. THE ANSWER: I WASTED HOURS OF MY ACTUAL REAL LIFE. Following in my footsteps is not suggested. To finally get his cantankerous ass to grace my poor boys with his presence I went to Formouth, let those level 80 walker things kill the bros, and then set the game to easy so carbuncle would revive Noct whenever he died, and let the level 80 things kill him over and over and over again while I worked from home one day until upon the rapid approach of Noct’s 74279084675486th death, the summon music started playing and lo and behold, a wild Titan appeared. So Noct had a really bad day and I still feel guilty about that, and the video that I got is actually pretty shitty, quality wise, but it is my precious and I feel like I should get a medal for it and several awards elsewise. It’s not even an actual accomplishment on my part and I am still filled with pride for my Titan vids. This game, man. Of course after I was done with him the prick immediately showed up again in the Vesperpool, of all places, so whatever, you thrice-damned pissbaby quake monster, I guess the high ground (and low ground, and all ground) is still yours. In my main save, which is over 400 hours, I still haven’t gotten the Titan summon, to which I say 🖕🏻🖕🏻🖕🏻
Anyway! Yes I got vids, and it took a long time, and it probably wasn’t really worth it but since I did it please god use them, help validate their existence. They are totally up for grabs if you want to make your own gifs or caps or edits or just look at them because the summons in this game really are so cool. I posted them individually to Tumblr, those posts are:
Titan (both versions)
Shiva
Ramuh
Leviathan
I actually got like 4 of Shiva and 3 of Leviathan (and weirdly only the 1 of Ramuh, but getting Ramuh to appear is cake, baby, so that’s okay), but only posted one of each for them, so if you guys want to see the others/want them for gif making or edits or w/e just let me know I will upload.
If you really really want to get your own vids, the post I linked way up top is kind of a general rundown of how I went about baiting them all, but it’s really mostly luck. The only other thing I will mention is that you should always save before you summon one and then go reload once it happens, because there’s a wait period between one summon and another that varies and is annoying and makes only a modicum of sense like most of this ridiculous tire fire of a game that I inexplicably and passionately love to the depths of my soul. *Kanye shrug*
(PRO FFXV-FISHING TIP: same rule applies for the carp pond. catch one, save, reload! It will cut your war with the carp by figurative years and literal hours).
So I think that’s it. Thank you for your time. And uh The End.
12 notes
·
View notes
Text
5 Things Tag
Tagged by @blessedlunatic (Thanks Julie!!)
5 things you’ll find in my bag
(Like Julie I don’t carry a bag so let’s go with pockets)
Phone
Wallet
iPod
My Metro card/train ticket
Headphones (I guess this qualifies as separate from my iPod?)
5 things you’ll find in my bedroom
A buttload of CDs
A super rad painting of the NewsRadio logo that my friend Allie made for me
My Buffy library playset with all my figures inside
More knickknacks than any person needs to have
A cool as heck Stars Hollow poster that my friend Michelle got for me
5 things I’ve always wanted to do in life
Learn like every single language, but more realistically at least be fluent in one language besides English
Feel like, generally comfortable/stable
Date at least one (1) person
Find something that makes me money that I am qualified for & won’t cause me incredible amounts of anxiety
There’s probably something else but I am drawing a huge blank right now and have very few goals
5 things that make me happy
J
Kelsox
"Home” by Vanessa Carlton
Pokémon
Thunderstorms
5 things I’m currently into
The band Hem
Stardew Valley
Scrubs (though when am I not)
“Strawberry Swing” by Frank Ocean
Pokémon (though, again, when am I not)
5 things on my to do list
Listen to the music in my library that I haven’t listened to yet
Do Something to change all of *gestures to life in general* this
Finish writing the fanfic I’m working on
Clean out the gifsets in my WIP folder
Finish playing through Breath of the Wild and all of the Pokémon main series games in depth before I get distracted by something else
5 things people may not know about me
I’ve been into Sonic the Hedgehog for about as long as I can recall which means that yes I inevitably had more than one Sonic fan character created during middle school
Back in 2008 I co-founded a Pokémon sprite shop (i.e., people requested fusions/type changes/etc. and I [and other shop members] made them) on a forum that existed for a year and a half, during which period I produced ~400 Pokémon sprites, because, y’know, I’ve never done anything particularly compelling or productive with my life
I’ve done minimal work on it since like, high school, but I still technically collect video game stuff
I’ve met six musical artists that I love
I had The Hardcorest Invader Zim obsession during middle school
Tag five people: @drcoxsredwingsjersey, @pcrrycox, @troglobite, @officialrapunzelfitzherbert, @tattooeyes (only if you all want to do it), and anyone else who wants to do it say I tagged you!
6 notes
·
View notes
Last Seen Blogs
tinyorangepotato
The Tiny Orange Potato

salvatoreiacoi
Salvatore Iacoi
becomingmissfarrell
UoB PGCE Student
quelend-underground
Art and Bears

cocolauxxsstuff
Untitled