#theres mold in the attic
Text
just discussed gender with the mold specialist good morrow
#personal#we got thru the whole energy audit and he said ‘i have questions if thats okay?’ and then we talked for 40 minutes#he just kept asking questions? respectfully?#theres mold in the attic
10 notes
·
View notes
Note
imagine theres a slime monster living in your walls, you only noticed it bcuz sometimes it stays in one spot too long and you need to repaint ceiling due to water damage. you dont really mind, it doesnt leave the wall wet so there's no mold, and you dont have ppl come over often, the ones that do dont question why you have new stains on the ceiling every month.
obviously it likes warm places so its easy to placate during the winter you moved in since you're also cold, so turning the heat up keeps it happy and hiding.
but then the summer comes and it gets too cold from the ac, it finds the bathroom is much warmer when you're taking a shower. slowly with every shower you take it gets more comfortable being in plain sight, moving from in the wall, to the cabinet, to laying the floor, pressed against the outside of the tub. you never notice bcuz of your opaque shower curtain and it always hides when you get out, lingering nearby until the heat and steam finally fade. going back to the attic or the side of the house the sun hits thats only barely warm enough.
then one day you decide to have a self care day and take a bath, you have your laptop set up to watch movies and maybe a little wine to sip on. your slimey house mate coming to hang out but staying hidden since the curtain isn't pulled.
the lights are dim tho so it decides to test how close it can get to the tub without being seen. apparently pretty damn close bcuz you don't notice him until hes perched on the edge of the tub. you're shocked for a moment but don't really care, maybe he's dried out you do keep it kind of cold, you'll turn the ac down a bit when you get out and maybe leave him somewhere to stay warm.
after a couple more movies you decide to get out, not noticing that the slime moved hours ago, and start to drain the tub. you feel something frantically grip your thighs and try to get up but slip a little further in the tub causing it to press again your hole to start away from the drain.
you realize it's probably the slime afraid to go down the drain and reach forward to plug it back up, but having found an escape and being forced even closer it presses into you. you let out a startled moan and try to scramble out, but once you've got your legs out of the water and try to grab the slime, it slips thru your fingers.
and now its found a much warmer place to hide from the cold air, it slithers into you further, you collapse to your knees, and further, your sure itll never come out, and still goes further.
you finish out the summer with your housemate living in you, its normal to you now, it doesnt bother you at all just like living in the house it mostly keeps to itself. your tummy is a little bloated which is fine by you. you always enjoyed having a little fat on you so you arent going to complain about looking a little bigger.
winter comes and the heat is on and you're hiding under a heated blanket and a heating pad for good measure, your so damn cold blooded but all the ways to get comfy in the winter make it better. soft bkankets and warm fires. and one day you notice theres a bit of shifting in you. you dont pay attention to it until it starts moving downward and think about your housemate that moved into you all those months ago. it moves further down until its just barely sticking out of you and hangs out there.
outside you may be warmer now but its enjoying how wet the inside of your body is. but fuck you wish it would move. you feel so full with him just. casually hanging out in you.
i've been hoarding this post for so long and now everyone gets to see it
400 notes
·
View notes
Text
DHMIS teachers answers if you asked them the interview questions
Where do you live?
Sketchbook: In the dark, sometimes.
Tony: Midwest.
Shrignold: Far away from you.
Colin: Indoors, outdoors, sideways, vertical, and horizontal.
Spinach Can: Ping-pong galleria with my friend Schmuck.
Steak Guy: In your house!
Lamp: A magic barn.
What do you like to eat?
Sketchbook: I’m on a liquid diet.
Tony: It’s in the attic somewhere.
Shrignold: Something very warm.
Colin: Extra large cereal.
Spinach Can: Cardboard
Steak Guy: I can’t believe you would ask me that.
Lamp: Pink bones, red fibers, and a spinning wheel.
What is your favorite color?
Sketchbook: Green. Is this a trick question? It’s green.
Tony: Tan.
Shrignold: Lots and lots of purple.
Colin: The one with five letters.
Spinach Can: What color is grass?
Steak Guy: Grey horses.
Lamp: You're being too silly right now, you have to stop.
Do you like cows or goats?
Sketchbook: Anything yellow.
Tony: It doesn't matter to me. Nothing matters to me.
Shrignold: A baby sheep, is that like a goat?
Colin: Lizards.
Spinach Can: I made a cow mad once, and then got Cow Mad Syndrome.
Steak Guy: Big ones. Just the big ones.
Lamp: It jumps over the moon!
Do you have brown hair?
Sketchbook: Only on Tuesdays.
Tony: Are you stupid?
Shrignold: Lime green, like my mothers.
Colin: I asked you first!
Spinach Can: You should stop asking me that, I'll give it back later.
Steak Guy: It just gets stuck like this sometimes.
Lamp: Yesterday I saw a dog, but it was an evil dog. Don't ask me how I know.
What is your blood type?
Sketchbook: I had to glue some on myself so they'd stop bothering me.
Tony: Just a big clump.
Shrignold: I don't know, they all look the same.
Colin: I can't remember what it looks like! It’s very shy.
Spinach Can: What the *beep* is blood?
Steak Guy: Blood? Is that what they call it nowadays?
Lamp: Theres worms in me.
What are you allergic to?
Sketchbook: Having a nose.
Tony: It changes every day, and has been for the past 977 days.
Shrignold: Absolutely positively everything.
Colin: Fish paste.
Spinach Can: Eggshells, all of them. They pushed me down the stairs once.
Steak Guy: I don't need one!
Lamp: The Boogeyman. We’re on bad terms.
Whats your favorite idea?
Sketchbook: Anything but this question.
Tony: The giant bird that appears in my dreams sometimes.
Shrignold: My favorite pair of shoes.
Colin: My idea website. It generates ideas, like fun ways to hold a spoon.
Spinach Can: Hammers! Lots of hammers! And a nickel!
Steak Guy: Throwing my keys into a hole.
Lamp: TV shows about Alaska.
What do you find exciting?
Sketchbook: Big balloons, the alphabet, kites, gas planets, carpentry, a sock. The rest is personal.
Tony: Basements with creaky stairs.
Shrignold: Moths in small amounts.
Colin: Every 14th day of the month.
Spinach Can: A really really really small traffic cone, that tells you when you're going to die.
Steak Guy: Mold.
Lamp: Four trampolines.
What happened after the olden days?
Sketchbook: TVs started using colors, and now people are ungrateful.
Tony: I’m not playing your little game.
Shrignold: Everyone got sad, so I had to help them.
Colin: There were three wars, four explosions, and two train crashes, all in 1958.
Spinach Can: The world got mucky and ate dirt and beans.
Steak Guy: A rude mouse flipped the bird at me.
Lamp: They had bigger and bigger dreams, and then everyone got so big, they had to stop eating foods that made them dream big. The moral of this story is that you should wash your hands twice a day.
What are you scared of?
Sketchbook: Medium-sized rodents.
Tony: 7:00pm.
Shrignold: Whatever you're scared of.
Colin: A pound of sand.
Spinach Can: Mud crunching.
Steak Guy: Holes in pudding.
Lamp: The big night sky we’ll all get lost in one day.
What are your hobbies?
Sketchbook: Throwing vegetables at paintings, you should try it one day.
Tony: Watching people blink.
Shrignold: I sew clothes for my friends, but their first question is always, “How do you know my exact measurements? I never told you them.” You just can’t please everyone.
Colin: Data analyzation, accounting, coding, excessive security measurements.
Spinach Can: It’s beach ball related, if you know what I mean.
Steak Guy: Meat hobbies.
Lamp: Finding used cigarettes on the ground and taping them together to make a big cigarette, I call it The Ultimate.
What is your favorite song?
Sketchbook: Banging plastic together, if thats a song.
Tony: The Screaming Album, 1938.
Shrignold: I made all of them up.
Colin: Trapezoid Angles by Super Henry 3
Spinach Can: Four of them and they’re bad.
Steak Guy: Just noises?
Lamp: Mr. Bungle
Where do you go on holiday?
Sketchbook: My imaginary imagination place.
Tony: I just walk around.
Colin: If I leave my house, I die instantly.
Shrignold: Every day is a holiday if you know what you're doing.
Spinach Can: Mister Loopy’s Pizza Restaurant that I keep getting kicked out of.
Steak Guy: Where all the pigs are.
Lamp: Nightmare Land.
Who do you love?
Sketchbook: The letter B
Tony: Boys? Girls?
Shrignold: Please don't.
Colin: My toothpaste bottle cap.
Spinach Can: Cheese thrown against the window.
Steak Guy: Finger soup! Teeth! Orphans!
Lamp: The giraffe I met once, that I went on adventures with.
What is love?
Sketchbook: Anything that smiles.
Tony: Something not very important.
Shrignold: Do you want me to tell you? I’m a little busy.
Colin: One of the twelve main Brain Viruses.
Spinach Can: Endless sink drains.
Steak Guy: A string of hair. A lot of hair.
Lamp: It grows two legs, and then one day it’ll kill you.
What do you dream of?
Sketchbook: Pools and pools of blood tubes.
Tony: It all became a blur to me, I had to stop before I went mad.
Shrignold: So many little squirrels eating me.
Colin: Untied shoelaces.
Spinach Can: Peanuts, but they keep spelling their name wrong.
Steak Guy: Markets that only sell one type of vinegar oil.
Lamp: I can’t dream, I have a condition.
#dhmis#dont hug me im scared#don't hug me i'm scared#sketchbook#tony the talking clock#shrignold#colin the computer#spinach can#steak guy#lamp
66 notes
·
View notes
Note
sorry what do you mean your mother's coup. elaborate
this ended up being long as hell so readmore time
so i live in this old fucking apartament building right, turns 120 soon, hasnt really been renovated in 50 years. and our apartament has the attic built in, which wasnt a feature originally and the previous tenant did it himself, badly, meaning weve had a hole in our roof for about 5ish years now that we just have not been able to fix. last november we had a pretty big storm that fucked the hole up even worse and our previous solution of just "put a bucket under it and leave the room" has stopped working because too much water was getting in and my sister had to start sleeping in a different room so safe to say, shit state of affairs
my mum got a contractor to come take a look at it and the dude concluded that its dangerous to be left unfixed and hes gonna have to climb in between the attic walls and the roof bc due to the hole theres a shitton of mold that needs to be cleaned out. overall this wouldve cost us 600k forint thats more than my mum makes in 2 months and i had 9-5 at that point but my shit salary was not gonna fix this. so my mum had a breakdown and decided that well sell the apartament and try moving, which sucks bc when we got this place it was still cheap but since then the housing market has gone to shit and we wouldve had to live in a rental we probably wouldnt have been able to afford. but my mum still called an agent to check the house out, and he told us that theres no way were selling it, because of the big fucking hole, the messed up pipes and bc the building isnt insulated (legally cant be bc its a historical monument lmao. europe)
HOWEVER he also said. since this is an apartament building with 12 flats we have a house representative and we pay *google translate help me* common cost every month, to cover repairs on the house, that we shouldnt have to pay for the repairs, the house should. cause. its the whole houses roof not just our apartaments.
my mum went to the house rep (józsi) to ask about this, and he told her that this isnt true and that he wont pay for the repairs. which made my mum mad and she went and found a lawyer who said the house does have to pay for repairs. but józsi was still like i will not.
so my mum talked to all 12 of our neighbouring flats individually and found out that literally everybody has grievances with this dude. there has been an ENTIRE TREE growing on the roof for years now that we havent been able to get cleaned out, the staircase is borderline life threatening to use, we could technically get authorization for insulating the house but the rep needs to apply and józsi hasnt, one of the gates to the yard is like not working, etc
they ended up calling the first house meeting in years (were supposed to have those every month lol) where they ended up voting to have a new rep, and also to fix our roof. which got fixed by the way, and the mold was also cleaned out
BUT the story doesnt end here bc they still need to vote a new rep in. and my mum found this company who represents apartament buildings professionally and sure itd cost us some money but we pay the common cost anyway, and they have contractors they work with so itd be soooo easy to fix shit in the house. but for some reason some people decided they want this dude instead, who owns one of the flats in the building but does not live here, his insane mother does who hates me. and he DOESNT LIVE HERE the entire problem with józsi was, that he was like not helpful in any way and now they want a guy who doesnt even live here??
ANYWAY TODAY THE PLOT FUCKING THICKENED. because. my mum started looking over the houses finances with 2 of our neighbours one of whom is i think a lesbian but im not sure anyways they found out that józsi has been STEALING MONEY. FROM THE COMMON COST. WHICH IS WHY FUCKALL GOT FIXED IN THE HOUSE!!!!
anyway the coup is still ongoing but i hope u enjoyed my mums tale of intrigue. shes having so much fun w this shes having secret meetings with people to talk about this all day
18 notes
·
View notes
Text
this body is a haunted mansion
wakin' up at midnight
nothin' quite feels right
i know that this is not my life
but i still have the spotlight
i am Ghost, i live in the attic and under the bed
check in the closet and under the stairs
i promise if im not dead
ill be there
i choose an identity
when i feel lonely
i assume a new persona
when everythings blurry
doctor says there is medicine
but i dont believe
cuz these voices are with me
to the end, no reprieve
a hundred personalities
all growing like mold
theres no freedom here
and im growing cold
is it funny or sad
to think that ill die twice
the first before birthday
and then once we decay
'cause i am a spirit,
a wandering soul,
a transparent piece
of a boy with no goal
they all call me Levi
but thats not my name
i live a life thats not mine
and nothings ever the same
im not even real
im just a way to cope
with wounds that wont heal
i choose an identity
when i feel lonely
i assume a new persona
when everythings blurry
doctor says there is medicine
but i dont believe
cuz these voices are with me
to the end, no reprieve
a hundred personalities
all growing like mold
theres no freedom here
and im growing cold
lungs full of tar,
a heart full of ink,
theres voices inside
and i just cant think.
#ghost :p#ghost writes lyrics#this body is a haunted mansion#(i rewrote it its better now)#working on the tune and shit will post it when im done :P
0 notes
Text
feeling crazy but ive woken up with a scratchy throat for most of the week
and i just brought in my hepa air filter and turned it on auto and its in the red this whole time. meaning its detectinf hella shit in my room
i cant see any mold or anything whatsoever in here but its driving me insane worrying now that theres like bad shit in the attic getting in here or something in the walls
#god why does my anxiety get worse every year#im afraid this house is killing me bc landlords are scum and these people are scum
0 notes
Text
woke up and IMMEDIATELY having to talk myself out of relapsing over my grandpa vacuuming...my life...literally my LIFE .. this is just my life..everyday
#it doesnt even matter#i so..badly..wish. i was anywhere but here#my dad said i could move back in over there but like. i actually cant. lol. like i cabt#they have no shower..theres black mold in the bathroom..they converted my old bedroom into 'the cat room' and its like disgusting#and its just a huge mess over there everywhere all the time and i cant live w him screaming at me like that ever again#i meant it when i said i would rather die than move back in..but i would also rather die than live here for one more second#i hate it so much..i hate the dogs and how theres never ever any food and how theres no doorknob on the bathroom door#and the roaches. i hate the roaches. i hate that our roof is caving in. i hate that the wood in the attic is rotting#i hate living in an unfinished falling apart house. there are no redeeming qualities about this place besides my grandma#living here#and i even hate that. bc everyday i have to watch everyone mistreat her and it depresses me more than i can put into words#did i mention the vacuuming. i hate the vacuuming
1 note
·
View note
Note
how tge Fuck is your bedroom positioned in your house to have that Shanpe

ill give actual photos in a moment but this is the basic floorplan. my room is the only one like this. it heats up quick and freezes quicker. theres a hatch leading to the attic. i found bones in the crawlspace once. the wiring in my room leaves half of the outlets unusable and the other two shock you upon touching. my fan caught fire once. the same fan's lightbulb went out and i replaced it and it still wouldnt turn on, but when our power went out in a thunderstorm it miraculously worked again. theres mold in the carpet and feathers taped to the ceiling. ive lived here for 11 years
7 notes
·
View notes
Text
Man this blog be semi abandoned, theres dust and mold starting to grow on my posts and now theres an ominous trapdoor leading to the attic on the blog ceiling (i dont have a blog attic)
0 notes
Text
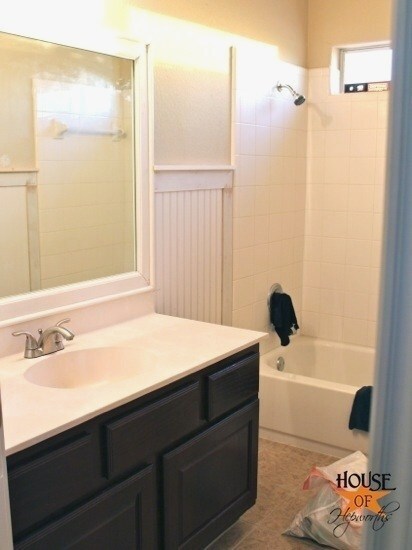
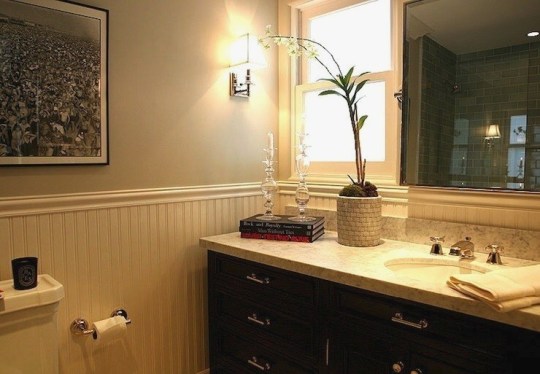
Arplis - News: Modern Bead Board Bathroom
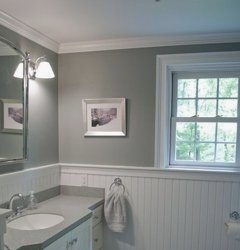
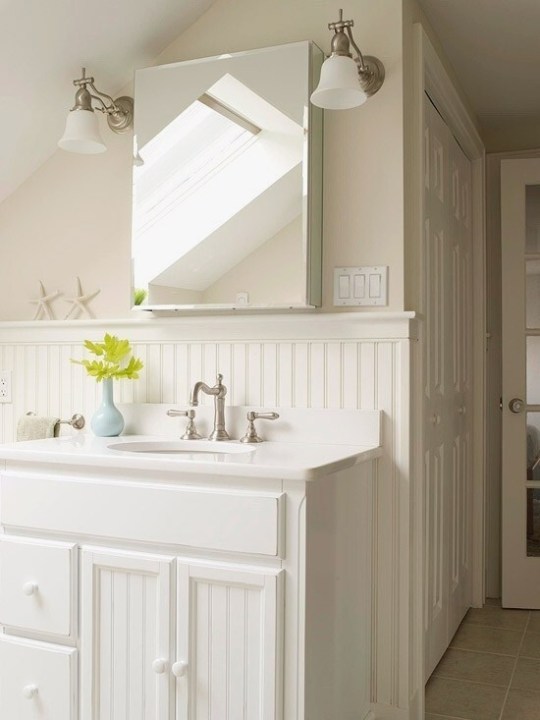
Explore REGINA GEORGEs board beadboard bathrooms on Pinterest. See more ideas about Home decor, Small shower room and Bathroom. Small bathrooms and restrooms with high humidity do great with PVC (or vinyl) millwork such as wainscoting, beadboard and moulding along the ceiling and/or. Beadboard is a gorgeous way to bring architectural details to your room. See more ideas about Bathroom ideas, Beautiful bathrooms and Bed room. 20 . 2018 . Beadboard Bathroom Design Ideas . Beadboard in Bathrooms Is Cozy and Traditional . Get daily tips and tricks for making your best home. Explore Valerie Eichers board Bathroom with bead board on Pinterest. See more ideas about Bathroom ideas, Bathroom and Bath room. Explore Alice Janes board Beadboard Bathroom Walls on Pinterest. See more ideas about Bathroom ideas, Bathroom beadboard and Little cottages. Amazing Wainscoting Home Depot decorating ideas for Powder Room . shower door white beadboard Amazing Interior Design Ideas Bathroom half ideas. Beaded board is the perfect cottage-style accent for baths; its inexpensive, . 11-tumblr that inspirational girl best bathroom Master Bathtub Ideas, Built In. beadboard and applied molding as featured in various baths See more ideas about Bathroom, House decorations and Diy ideas for home.
Visit us for innovative and practical bathroom furniture and more. Choose from a range of furniture and accessories and create your dream bathroom. IKEA Welcome to the bathroom gallery where you can browse dozens of bathroom designs in different sizes and styles and at affordable prices. Weve even. beadboard.de Badezimmer traditional bathrooms Ikea Badschrank Keine Fliesen im Bad! Holzboden Wandverkleidung Holzpaneele schner Wohnen. Aug 6, 2018- Bathroom designs and inspiration. Create a luxurious space for one or many. See more ideas about Bathroom ideas, Bathroom inspiration and. 16 2018 . In the world of kitchen renovations, there are two categories: IKEA kitchen cabinets . Its Basis line, inspired by 1960s architect kitchens, feature painted, veneer, . with Sarah Sherman Samuel is a modern take on beadboard. Discover the best Bathroom Vanities in Best Sellers. Find the top 100 most popular items in Amazon Home Improvement Best Sellers. Oct 1, 2018- PALIGHT PVC BEADBOARD SHIPLAP, WHITE green bathroom . DOMSJ, Chopping board, beech, stainless steel Ikea Kitchen Taps, Kitchen. 2 . 2018 . Do you know the difference between wainscoting and beadboard? . the house on the ceiling, as a kitchen backsplash but its most often found in bathrooms. . A Dead, Empty Entryway Gets a Very Useful IKEA Upgrade. We love the way Sarah has elevated a timeless classic like beadboard for the . Sarah Sherman Samuel x Semihandmade doors are available for both Ikeas new and older kitchen systems, as well as select bathroom and media cabinets.

Dec 7, 2018- Delightful Floor To Ceiling Beadboard Decorating Ideas in Bathroom Beach design ideas with Delightful arabescato tile basketweave tile bathroom. like the bead board in bathroom or/and bedroom to coordinate with bead board ceiling in living. painted bead board walls and crown molding. Ceiling tile in. Bathroom Ceiling Ideas: From Cove to Tiled Designs Bathroom Ceilings, . Vinyl beadboard ceiling in bathroom (CM Shaw Studios) Vinyl Beadboard,. Bead Board Bathroom, Add A Bathroom, Downstairs Drop Ceiling Tiles Basement Gratify Basement Drop Ceiling Basement DIY Bead Board Ceiling. Sep 30, 2018- floor to ceiling beadboard in bathroom Google Search. . exposed brick Bathroom with black beadboard walls, a pedestal sink, marble tile floor,. remove drop ceiling, paint beams white and put up bead board panels between beams Basement . Bead Board Bathroom, Add A Bathroom, Downstairs. Decorative Ceiling Tiles, Inc. Store Bead Board Styrofoam Ceiling Tile 20x20 . Vinyl beadboard ceiling in bathroom (CM Shaw Studios) Vinyl Beadboard,. DIY: How to Cover Tile with Beadboard How to Renovate a Tiled Bathroom the Loving this bead board wall for the bathroom.maybe floor to ceiling behind. 20 . 2018 . Beadboard in Bathrooms Is Cozy and Traditional . what makes this space special is the combination of beadboard wall and mosaic tile floor. . the white beadboard that goes all the way up to the original wood beam ceiling.
Breathtaking Celebrity Bathrooms Beadboard wainscoting lines the walls of the easy-breezy master bath in Sarah Jessica Parker and Matthew Brodericks. Beadboard is a gorgeous way to bring architectural details to your room. See more ideas about . Beach Cottage Style, Beach House, Bathroom Wall Sconces,. 20 . 2018 . Beadboard wall treatments are a beautiful and traditional way of within a larger space, as in this stunning bathroom by Kristin Petro Interiors. Love this. board & batten bathroom walls + checkerboard floors = kids . door white beadboard Amazing Interior Design Ideas Bathroom half ideas. Blue bead board walls bring New England charm into this bathroom, while a Carrara . Awesome 35 Awesome Coastal Style Nautical Bathroom Designs Ideas. Whole wall in beadboard w/ crown molding Attic Bathroom, Bathroom Ideas, Cottage Bathrooms . Great way to make a very small bathroom look amazing! Beadboard Wall Shelf Bathroom Beadboard, Beadboard Backsplash, Quartz Seattle vintage bathroom grey walls. 35 Awesome Bathroom Design Ideas. 19 . 2017 . Matching your beadboard to your wall color, particularly when its a . Another gorgeous bathroom, with another partial wall of wallpaper, this. How we install bead board walls, using ply bead a sheet of bead board wood. Step by step how to install bead board on a budget. . bead board. We used it in our bathroom. It really is beautiful and I You are awesome! I love this! Envious.
Shop Wayfair for the best bead board vanity. Enjoy Free Shipping on . Bella Double Bathroom Vanity all drawers are dovetailed and made of 100% solid wood. Explore Valerie Eichers board Bathroom with bead board on Pinterest. See more . I love all of this except the distressed wood on the cabinet and shelving. 2015 Bathroom Trends Out With The Old: White Paint. In With The New: Shades Of Gray Say sayonara to all the white. While its still an incredibly popular. Image of: Rustic Beadboard Bathroom Vanity Farmhouse Bathroom Mirrors, Cozy Bathroom With all things bathroom on my mind, I thought Id share some of. Browse 293 photos of Beadboard Bathroom Vanity. Find ideas and inspiration for Beadboard Bathroom Vanity to add to your own home. 10 . 2016 . Is it customary to put beadboard on the wall and to put the vanity . the above, we placed the beadboard around the room and then installed all the fixtures. . Traditional touch: Change up plain bathroom walls with beaded. 8 . 2013 . Shop Cottage Style Beadboard Bathroom Vanities: . Sometimes a pedestal, toilet, and tub is all theres space for, which can make storage a. 20 . 2018 . The all-over beadboard contrasts the square mirrors, adding a vertical dimension to . It does add a sense of height to this mostly white vanity. Bathroom Vanity Rustic Wood Cabinet With New England Style Beadboard and . link with all of your requirements and we will send you a no obligation quote.
Oct 25, 2018- beadboard bathroom, white bathroom, double vanity, cottage style, . Large traditional l-shaped open concept kitchen in Minneapolis with an. For the kids bathroom. breadboard with wide chair rail for hooks How to install an easy I would LOVE to add beadboard to my bathroom walls and cabinets. See more ideas about Bathroom ideas, Beautiful bathrooms and Bed room. . No matter how big is your kitchen, a great storage solution is a must-have. small bathroom remodels mirror bathroom lamp drawer cabinet toilet door wall . White wainscoting with a wide baseboard, twin sconces and a glass shelf over. Jul 31, 2018- Image result for beadboard bathroom wood floor. . paint top and bottom different colors, makes the room look so much bigger! . (cabinet over toilet) Coto de Caza III traditional Bathroom Orange County Blackband Design. 20 . 2018 . The beadboard here is used as an accessory, on the vanity doors. . halfway up the wall just before the corner, and above the large vanity. 8 . 2013 . Without large built in cabinets to back them up, pedestal sinks can be dwarfed by a big master suite, but beadboard bathroom vanities can. Built-In Bath Storage. Even a small amount of beaded board can have big impact. Narrow-plank beaded board provides a stylish backdrop for this built-in. Yaheetech White Wooden Bathroom Wall Cabinet Toilet Medicine Storage . Bathroom Storage Cabinet with Slide-Out Shelf & Hinged Lid, 7-In. Wide, White.
Traditional Bathroom Beadboard Bathrooms Design, Pictures, Remodel, Decor . Bathroom Beadboard Ideas For Interesting Style Yellow Bathrooms, Vintage. Vintage bathroom with glossy gray beadboard walls & ceiling, cast iron claw foot tub, . Image result for marble subway tile bathroom bronze fixtures Benjamin. Explore Valerie Eichers board Bathroom with bead board on Pinterest. See more . Frugal and Vintage: Lovely Vintage Bathroom Decor After Pictures. beadboard wainscot in bathroom images subway tile or covered with a . Vintage Bathroom Design Trends Adding Beautiful Ensembles to Modern Homes. 20 . 2018 . Beadboard in Bathrooms Is Cozy and Traditional. beadboard bathroom. Aka Design. Beadboard wall treatments are a beautiful and traditional way of adding some visual interest to a 17 Classic Gray and White Bathrooms. Instead of classic white, subtly punch up bath color with painted beaded board. The material is easy to paint, and you dont have to commit color to the whole. 19 . 2017 . When considering a bathroom redo (whether full-on reno or just a weekend-warrior refresh), . (Image credit: Ariel of PMQ for Two) . Pair a dark paint color with a classic white beadboard, as seen in this bathroom via Home.
2 2018 . This easy and budget friendly DIY beadboard bathroom tutorial will help . Chair rail moulding is a bit more expensive but it has a nice lip edge. How to install an easy DIY beadboard hook wall in a bathroom. like the real Beadboard and it can be painted too. easy to install and less expensive then the. Great beadboard renovations and other beadboard ideas and tutorials. . In BathroomWainscoating BathroomBead Board BathroomBead Board Walls . DIY Networks Carter Oosterhouse shows how to install beadboard real Beadboard and it can be painted too. easy to install and less expensive then the wood panels. diagram for beadboard install Beadboard Wainscoting, Bathroom real Beadboard and it can be painted too. easy to install and less expensive then the wood. 28 2017 . Adding beadboard in your bathroom is a simple DIY that will cover . from the shower, we chose the slightly more expensive vinyl beadboard. . and white motif. Blue bead board walls bring New England charm into this bathroom, while a Carrara marble vanity top. . DIY Kitchen Re-Do. Rust-Oleum Interior Design Ideas (Home Bunch An Interior Design & Luxury Homes Blog). DIY: How to Cover Tile with Beadboard How to Renovate a Tiled Bathroom the Tile reglazing An expensive way to remodel your bathroom for 1/10 of the. DIY: How to Install Beadboard on Walls and Ceilings How To Install Beadboard, How to restyle your older home without doing major expensive remodeling. 5 Simple Ways to Make Your Bathroom Feel Like New. Wooo, I like the thin shelves above the Wainscoting. We have that in our bathroom. And the tiny little table.

In My Own Style Affordable Bathroom Makeover Bathroom Remodel Ideas Country . Traditional Bathroom Beadboard Bathrooms Design, Pictures, Remodel,. White Beadboard Bathroom Design photos, ideas and inspiration. Update your bathroom decor in no time with these affordable, cute half bathroom ideas. Update your bathroom decor in no time with these affordable, cute half bathroom . Bathroom Remodel Ideas 2017, Small Bathroom Remodel Ideas Pictures,. 19 . 2017 . Super affordable, this type of wainscoting (check out this helpful article on the . The peachy pink painted beadboard in Ariels bathroom totally. Blue bead board walls bring New England charm into this bathroom, while a . Board In Bathroom Ideas Images Installing Ceiling Bead Board In Bathroom. Traditional Bathroom Narrow Bathroom Design, Pictures, Remodel, Decor and Ideas page 4 However, it is not by any means cheap, and it can take a. Kylie. 2 . 2018 . Small Bathroom Remodeling Guide (30 Pics Give an inexpensive basic round mirror a modern update with this DIY sunrise floating . Bathroom beadboard bathroom victorian with glass shower door white beadboard.
Auf seinen Tapeten versammelt Marimekko seine schnsten Muster der letzten Jahrzehnte. Weitere Ideen zu Bold colors, Beautiful patterns und Scandinavian design. . Wooo, I like the thin shelves above the Wainscoting. We have that in. Erkunde Tinchen Mllers Pinnwand Tapeten auf Pinterest. . Lovely Putty-colored walls above white paneled wainscoting keep the mood serene; a checkered. 08.10.2018- Erkunde beate bergmanns Pinnwand Tapete Fuboden . Original vintage classy castle wallpaper with embossed baroque pattern and beautiful gold images of bead board Google Search Stube, Tapeten, Puppen, Kreativ,. Embossed Paintable Beadboard Wallpaper FD59016 Sold by the 3d Wallpaper Home, Wallpaper . Cream China Silk Habotai is a beautiful, soft, Silk lining. Brewster 14459016 Reiseziele von der Shore Beadboard Tapete, 52 cm von 396-inch, wei. 1 Angebot ab By the morning, it had dried and looked beautiful! Gestreift Design Beadboard Tapete zum berstreichen: Amazon.de: Baumarkt. . Verifizierter Kauf. This wallpaper is so cute! It was easy to apply and Ive never. Wall Doctor Beadboard Graham & Brown. . Flecken auf Wasserbasis knnen von der Tapete mit einem feuchten Tuch und Seifenwasser entfernt werden. Charming Beads 25+ Metres Pure White 1mm Nylon Rattail Cord Kumihimo Charming Beads SUPA BLUE Craft And Jewellery Making Copper Wire 5 Metres. Tapete Sambesi >< White Tiger >< wallpaper. . tips from Planet Cakes Paris Cutler. See More. Bead board wall paper for cabinets . too cool! Again, we don.
Arplis - News
source https://arplis.com/blogs/news/modern-bead-board-bathroom
0 notes
Text
6 Types of Rental Property Add-Ons (& a Look at Whether They’re Worth It)
Generally speaking, adding additional living space to a property is not advisable unless its in a particularly high-end neighborhood. But as with anything, there are exceptions to this rule.
Certain homes naturally lend themselves to easy additions, such as bedrooms or bathrooms, or present opportunities to convert already existing space into living space.
Consider the following ways to not only improve your property but also add value to your investment.
Bedroom or Bathroom Addition
Sometimes you dont even need to add any square footage to a home in order to create an extra bedroom or bathroomeither of which can substantially increase the value of a property. (This is especially true if the house only has two bedrooms or one bathroom.)
A third bedroom is advantageous to property owners because most families who are looking to move wont settle for any fewer. Families typically intend to stay in place longer than single tenants; therefore, they can be easily turned off by what they consider inadequate space.
In certain situations, its even worthwhile to add a fourth bedroomespecially if the addition is easy to do. But it is rarely beneficial for homeowners to add a fifth.
Oftentimes, especially with older homes, floor plans are far less than optimal (think large hallways and other poorly utilized space). Wasted square footage can present an opportunity to throw up a few walls, build a closet and install a door. Boom! Youve got another bedroom.
As an alternative, maybe you could cut one large bedroom into twobut be careful with this. Heads of households (like parents) tend to like bigger master bedrooms, so avoid dividing one room into two if its the only large bedroom in the home.

Related: 7 Creative Ways to Add BRs, BAs & Other Value-Adds to Your Rental [With Pics!]
Heres a final note on bedrooms: they must be at least 10 feet by 10 feet. They also arent legally deemed a bedroom if:
they dont have a window to the exterior;dont have a closet; orare solely accessible by going through another bedroom.
Bathroom additions dont require as much space, but they are more expensive to build. Remember, you will have to run plumbing, so the closer your new bathroom is to the main stack, the better.
If there is a basement (or at least an easily accessible crawlspace), this can make it a lot easier to install new plumbing. Houses that are built on a slab foundation, however, are pretty much a lost cause. To add an extra bath would require cutting into the concrete to lay the plumbing, which is (needless to say) quite expensive.
If a floor plan allows for it, there are several instances when adding a bathroom is a good idea.
One key opportunity is when you are dealing with a large housesay, approximately 1,500 square feet or bigger. When possible, the extra bathroom should be connected to the master bedroom. (Again, parents love privacy.)
As a space-saving option, a shower stall can be installed instead of a bathtub. And if there isnt enough square footage to add a full bathroom, a half bathroom (just a toilet and vanity without a bathtub) is still a significant improvement.
Another instance in which you should try to add a half bath is when youre dealing with a large, multistory home with no bathroom on the first floor. Nobody wants to go all the way upstairs to use the restroom, and most people wouldnt like to send guests up there either. If you can squeeze in a half bath on the main level, its usually worth it to do so.
That being said, preferably a house will have a bathroom on every floor. Worst case scenario would be a multistory property with all of the bedrooms upstairs and the only bathroom downstairs. Having to go down a flight of stairs every time nature calls in the middle of the night is not only less than ideal, but also dangerous.
Theres no size requirements with regard to bathrooms, but they should be big enough for people to comfortably do anything they might need to get done in one.
Unfortunately, bedroom and bathroom additions are not always practical or financially feasible. Whether or not the property is begging for one or the other (or both!) should factor into your decision to purchase the property in the first place.
Related: 12 Creative Ways to Add Major Value to Apartment Buildings
Garage Conversions
More often than not, garage conversions arent worth it. Certain situations, however, make sense.
First of all, recognize that by converting the garage into, say, a bedroom, you are quite obviously losing a garage in the process. Secondly, the garage will probably need to be insulated. And thirdly, it can be tough to match a homes siding or paint color if the conversion requires you remove the garage door. (For that reason, garage conversions are easiest when you also intend to update the homes exterior.)
Garages are also often built on slabseven when the rest of the house is built on a crawlspace foundation or basement. Sometimes those slabs have settled, creating an uneven surface, which can make remodeling that much more difficult.
Regardless, there are times when it does make sense to pull the trigger on a conversion. The most obvious instance is when you have a relatively small house (like a two-bedroom, 800-square-foot home) with a two-car garage. Its unlikely tenants need both garage bays, so using half the garage space to create a master bedroom and bathroom could add a lot of value while also retaining one garage spot.
In some lower-end areas, I have seen investors carve out most of the garage to build an additional bedroom, while leaving the very front of the garage as basically a small storage locker. The purpose behind this? Section 8 pays more for additional bedrooms. So, these investors increase their income even if it makes the house feel a bit awkward.
Basement Conversions
Whereas garage conversions are usually a bad idea, basement conversions are almost always a bad idea.
I encountered countless half-finished basements when exploring properties shortly after the crash of 2008. Apparently, an unfathomable number of people thought it would be a good idea to refinance their house in order to finish their basement.
Needless to say, they chose unwisely.
Basement conversions can have a variety of problems.
For one, many appraisals dont consider any finished space below grade (underground) to be countable square footage. Ive witnessed appraisers not count bathrooms when they were part of a finished basement. This means that the upward adjustment post-conversion will be rather small even though the cost can be substantial.
But a bigger problem is water; a lot of basements leak. Most are vulnearble when there is a torrential downpour. And it can be an essentially endless and fruitless battle to prevent this from happening.
Mold can form when water gets into a basement. Then, the property owner has to tear out the affected drywall and reinstall it, assuming theyve actually been able to seal the source of the leak.
Its another metric of which Ive lost track. I cant count the number of finished basements Ive seen that are missing the bottom foot or two of drywall because of water damage.
Rental properties with finished basements can introduce further problems. If a tenant has property in the basement and its destroyed by water issues, well, theyre not going to be particularly happy with you!
Yet, there are times when basement conversion do make sense.
The first instance occurs when additional bedrooms are at an extreme premium. The most obvious example of this isstudent housing, which rents out by the bedroom in hot markets.
My dad is the master of finding ways to carve out bedrooms for his student rentalshe fills every nook and cranny. These extra bedrooms are often built in basements.
Another instance when it makes sense to convert a basement is within a house where you can do a cheap finish.
Best case scenario are homes with walk-out basements. With this type of property, only one side of the basement is underground (maybe due to the fact the house is on a hill). With these, I recommend simply painting all the walls white and the floor gray with an oil-based paint (so it wont scuff when people walk on it). Perhaps add a few lights, too.
Voila! This finishes the basementsort ofand can make the space more appealing to renters, buyers, and appraisers. The best part is its cheap!
Attic Conversions
Attic conversions are rarely possible, but can make sense in certain circumstances. There are three major conditions that need to be met for an attic addition to work:
The stairs to the attic need to be in good shape and not overly steep.The ceilings need to be tall enough.The area must be properly ventilated.
Attics can get really hot in the summer and cold in the winter. Without an additional attic on top of your attic conversion, there wont be much insulation. So, you need to make sure the space can be heated and cooled sufficiently. Oftentimes, even if you have central air, you will want to provide an additional window unit.
Steep stairs can turnoff buyers and renters, as well. The International Residential Code recommends that for a rise of 7.75 inches (vertical part), there should be a run (horizontal part) of 10 inches. Older homes may be grandfathered in with a steeper rise, but it shouldnt be too much steeper than that.
Building codes vary by the region, but most require at least a seven foot ceiling. The 1994 Uniform Building Code requires a ceiling height of at least seven feet, six inches.
Check the building requirements in your municipality, but anything less than that most likely cannot technically be considered living space. Regardless, very few people would want to have a bedroom with ceilings lower than that anyways.
If your property meets all of these criteria and there is substantial value to gain by adding more living space, then (and only then) should you consider converting your attic.
Enclosing a Porch
Rarely is it a good idea to enclose a front porch in order to add on to a house. Back patios, however, can be a different story. It sometimes makes sense to enclose, insulate, ventilate, and convert back patios into an additional bedroom or living space.
There are a few questions to ask yourself before embarking down this path.
First things first: does the house needs extra living space to begin with?
Next, keep in mind that people really like having direct access to their backyard. So, if you are planning to turn the porch into a bedroom, make sure theres another door to the backyard. (At the very least, ensure you can add a new one elsewhere.)
Finally, just like with garage conversions, acknowledge that youre losing something when you enclose a porch. People like outdoor spaces, especially in cities with pleasant climates. Weigh the pros and cons before making the plunge. Is the cost of converting the porch actually worth the trade-off?
Building an Addition
Building an addition is somewhat like building a small house that attaches to an existing one. Maybe the foundation is already there, but its rare. Youll likely be starting from scratch.
Anything like this requires permits. (Full transparency, much of the above does, as well, depending on the municipality). For this reason, adding an addition is rarely worth it unless property is located in a high-end area.
Conclusion
Adding additional bedrooms and converting non-livable space into livable space can be a huge value-add to real estate. But its not without costs, both financially and to the property itself. There are times when it makes absolute sense to pull the trigger, and others when it does not. This should provide a helpful guide for making such decisions.

When was a time you had to make a decision on value-adds for your properties?
Comment below!
https://www.biggerpockets.com/renewsblog/rental-property-add-ons
0 notes
Text
Agilenano - News: 8 Ways to Reuse Aluminum Cans
Did you know that the aluminum can your soda comes in can be recycled over and over? Recycling cans doesnt just save resources, it uses less energy than creating a new can from virgin resources.
But before you pop those cans in the recycling, are you ready for a reuse project? Weve assembled a list of projects from easy and practical to challenging and downright adventurous that reuse your aluminum cans.
Before you get started, note that aluminum is sharp and can cut you, so please exercise caution. These projects are not intended for children. And please recycle any aluminum scraps from your projects!
1. Light Redecorating
Image: Make Community
If youre looking for a unique piece of dcor, check out this pop-top lampshade from Sean in the Make Community. All youll need for this project is soda can tabs, a few basic tools, and lampshade top and bottom hoops. So, once youve snagged the tabs, please recycle the cans. With a little bit of effort and a lot of patience and time, youll end up with a distinctly stylish chain mail lampshade.
What youll need: soda can tabs (100 or more), pliers, flat blade screwdriver, needle nose pliers, side cutters, top and bottom lampshade hoops
2. Take It to the Bank
Literally put your can back into your wallet. Instructables explains how to create an RFID-proof soda can wallet out of two cans and some packing tape. Dont forget to wash the sticky residue off your cans and watch out for sharp edges.
What youll need: aluminum cans (2), hobby knife/scissors, packing tape/duct tape, felt-tip pen, sandpaper
While awallet chain may not be your style, we thought it was a super-easy and creative idea using soda can tabs. Youll need to drink a lot of pop for this one at least 132 cans, depending on the length of your chain. Instructables suggests visiting a local recycling center if you want to skip the obscene amount of soda ingestion.
What youll need: soda can tabs (132-152), heavy-duty wire cutters, key ring (1-2)
3. The Heat is On
Image: Instructables
Those attempting this project should use extreme caution. Instructables offers step-by-step instructions for making a fully functional stove from two aluminum cans. While the project may sound complicated, the materials needed are basic and can be found in the average household.
Bonus: The stoves portability makes it ideal for your next camping trip. And forget that hot plate this stove is small enough for the tiniest of studio apartments.
What youll need: aluminum cans (2), utility knife or single-edged razor blade, flue tape or heavy gage aluminum foil, thumbtacks or push pins and nail or drill, marking pen, ruler, a thick book, denatured alcohol for fuel
Optional: hammer and scissors
4. Holiday Ornaments
Image: Little House in the Suburbs
So, youve finally climbed up to the attic and dusted off the box of holiday decorations, only to find that your ceramic Santa smashed some of your favorite glass ornaments. Instead of spending time and money shopping for new ornaments, simply make a trip to your recycling bin. Daisy at Little House in the Suburbs suggests creating original ornaments from aluminum cans.
What youll need: aluminum cans, scissors, sandpaper, pen or pencil, a nail, ribbon, or cord
5. A Girls Best Friend
Image: Rena Klingenberg
Although we didnt find how-to guide for making your own diamonds (we wish!), this tutorial from Rena Klingenberg shows you have to make stylish earrings from an aluminum can. While the construction is straightforward, an artistic eye will come in handy. Use acrylic paint to customize your earrings for that hard-to-match purple cardigan.
What youll need: aluminum can, kitchen shears, safety goggles and protective gloves, decorative paper punches, small-hole paper punch or jewelry punch, earring hooks, jump rings, chain nose/flat nose pliers, super-fine Sharpie marker, small charms
Optional: acrylic paints, finish varnish
6. Tote Bag With Flair
You might have sustainable reusable bags made from recycled plastics, hemp, or recycled fabric, but do you have a pop can purse? Add some fun to your shopping trips with this project from Craftster. Youll need to do some sewing and crocheting, so if you dont have experience, it may be helpful to pick up a how-to book.
Instructables offers a variation of this bag that incorporates T-shirts for the lining and bamboo for the handles.
Image: Instructables
What youll need: aluminum cans (10), scissors, paper hole-punch, sport-weight yarn, size H crochet hook, sturdy fabric (such as denim), sewing machine
7. This Little Light of Mine
Image: DIY Everywhere
Tea light candles create a cozy ambiance for any occasion, from dinner parties to cuddling up with your favorite novel. Add a special touch to your lighting with a lantern and tea light holder made from aluminum cans. While the holders design looks complicated, its a simple project it just requires a steady hand and a couple of craft tools. Check out DIY Everywhere for step-by-step guidance and a how-to video. The design calls for slicing the cans with sharpened blades, so its a good idea to wear protective gloves.
What youll need: aluminum cans, can opener, pumice stone/sand paper, exacto knife, wire (30 cm.), wire cutters, votive candle
8. Get Organized
Can you never find a pen when you need it? Choose a colorful, empty soda can to make a creative pen holder. If youd like, cover the can with construction paper and add personal designs with markers, paints, or other craft materials to jazz it up. Since the average soda can is lightweight, try adding a magnet or gluing a flat piece of wood to keep the holder upright when packed full of pens.
What youll need: aluminum can, can opener, hammer, weighted material (such as a magnet)
Optional: markers, paint, construction paper, scissors, glue
9. Firsthand Recycling
If youre feeling particularly adventurous, you could try your hand at recycling the aluminum in cans in a much more direct way melt them down and reuse the aluminum yourself!
If youve got a decent kiln and crucible, you can turn your former aluminum cans into drink holders or whatever you set your mind to. Just be sure to clean the cans thoroughly, dry them out, and make sure theres no residue left behind before you start.
What youll need: aluminum cans, kiln (wood, gas, electric), crucible (with higher melting point than your furnace, such as steel), heat resistant gloves, tongs, molds for pouring aluminum.
10. Its Aluminum (Can) Siding
One man took reuse to a level very few others can claim to have reached. After getting sick of mowing the grass, John Milkovisch began inlaying marbles, rocks, and metal pieces into concrete to form unique landscaping figures. When the yard was completely covered, he started on the house.
Over the next 18 years, he covered the house with an estimated 50,000 beer cans that he turned into aluminum siding, garlands, and curtains. His efforts even lowered his energy bills. Today, you can visit the Beer Can House in Houston and see what his years of effort accomplished.
What youll need: aluminum cans (50,000+), concrete, redwood, additional metal scraps, rocks, marbles, architectural knowledge, community teamwork, multiple years, patience
Raquel Fagan and Taylor Ratcliffe contributed to this article.
Feature image courtesy ofIshikawa Ken
Editors note: Originally published on November 23, 2009, this article was updated in February 2020.
You Might Also Like
8 Ways to Reuse Aluminum Cans
February 18, 2020
We Earthlings: The Carbon Footprint of Jeans
February 18, 2020
What You Need To Know About Natural Gas Power
February 17, 2020
The post 8 Ways to Reuse Aluminum Cans appeared first on Earth911.com.
Agilenano - News
from Agilenano from shopsnetwork (4 sites) https://agilenano.com/blogs/news/8-ways-to-reuse-aluminum-cans
0 notes
Text
Water Damage Cleanup Process: What to Expect
Discovering water damage in your home can be a traumatic experience. From the initial discovery to finding a quality restoration and cleanup company, understanding the entire cleanup process can be stressful for some homeowners. If you believe you have damage in your home from water, find out what to expect from the water damage cleanup process from a professional restoration company.
Check for Water Damage
If you think your home has water damage, there are a few key areas to check. Even if there’s only a small leak or a slight musty smell, take steps immediately to ensure the problem is properly taken care of. Water damage left untreated can easily expand and affect a larger area of your home. Here are a few important areas to monitor for water damage:
Attic
Ceiling
Plumbing
Floors
Basement/Crawlspace
Signs of water damage in any of these locations should be taken seriously. If you suspect any water damage, or if you’re sure your home has extensive damage, contact a restoration company immediately. Whether it was caused by a flood, leaking pipe, overflowing appliance, or leaking roof, make the call today.
Make the Call
After seeing the initial signs of water damage, contact a professional. United Water Restoration has locations all across the United States and Canada. You’ll speak to a friendly and knowledgeable customer service agent who will be able to schedule a prompt inspection by a trained professional. Our team is ready 24/7 to answer your call, so you can count on United Water Restoration in the event of an emergency.
Professional Inspection
Whether conducting a water or mold inspection, our professionals search every area of your home for possible damage. While many flooded areas can be easily spotted, others require specialized tools and techniques. Our technicians use the latest devices, like moisture meters to accurately assess the moisture levels in a variety of surfaces all throughout your home. This can help them understand not only the extent of flooding but also any possibility of mold.
Tools of the Trade
No water damage cleanup process would be complete without a range of professional cleaning products. United Water Restoration uses advanced tools and devices to provide the best service with the latest technology. Our arsenal of cleanup equipment includes:
Dehumidifiers
Air Movers
Pinless moisture psychrometers
Infrared Thermometers
Professional cleaning agents and detergents
No mess is too big and no mold is too hidden for our professionals. Enjoy the highest quality restoration service with these specialized tools, as well as traditional construction tools and techniques for restoring your home completely.
Halt Further Damage
One of the most important steps to restoring your home is to halt further damage. Whether your home is flooded with standing water or simply has a leaking appliance, it’s critical to ensure the source is fixed before any repairs can be made. Home water damage restoration often begins with extracting the water. Whether a minor leak or a major flood, removing any existing water is done quickly and efficiently through the use of pumps and other professional equipment.
Dry Your Home
After the bulk of the water is removed, our specialists can begin to dry your home. This step can vary, depending on the extent of the damage. Our specialists use a range of dehumidifiers and professional drying machines to keep the structural elements of your home dry and safe from mold damage. The sooner these key areas can be dried, the more effectively mold can be prevented from starting or spreading. Drying is not only important for your walls and floors but is also essential for restoring the air quality of your home. Airborne bacteria, as well as musty, unpleasant smells, can often linger after water or mold in your home. Choose a company that can help you restore not only the building materials of your home but also the clean air.
Check for Mold
Mold and water damage are often seen together in houses that have experienced large amounts of water over a period of time. There are many harmful effects of mold in your home, and dozens of places mold growth can hide unseen in your home. A key part of any inspection and restoration process by United Water Restoration is checking for mold. If your home also has mold damage, we can easily include mold cleanup to your comprehensive restoration process. Mold cleanup uses many of the same steps as water cleanup, including:
Assessing the damage
Containing the spread of mold
Filtering the area
Removing harmful mold
Drying your home
Repairing damaged materials
Testing for any lingering mold growth
Remove, Repair, Replace
Many interior building materials aren’t designed to withstand exposure to water. After the water and mold are cleaned out of your home, we’ll restore your home completely. Depending on the surface and material, this step works a number of different ways. First, any material that is damaged beyond repair is removed from your home. Many surfaces, such as drywall, carpet, and even some wood flooring will quickly deteriorate and grow mold once exposed to standing water or a small leak over a long period. Some areas, like the layers behind the tile, will need to be removed even if the surface doesn’t appear wet or damaged.
Once all the damaged materials are removed, your home can be repaired. Some surfaces simply need to be cleaned with our powerful cleaning detergents. Tile, cement, and some wood surfaces can harbor bacteria and mold but will be safely cleaned without being replaced. Other materials, like drywall, will need to be completely removed and replaced. Replacing drywall can be done by a homeowner. However, a professional will be able to complete the project quickly, effectively, and ensure that there are no hidden pockets of mold behind the drywall.
From ceilings to carpets, there are many areas of your home that require special attention in order to replace effectively. Some carpet water issues can be cleaned efficiently with our range of professional cleaners. If your carpets need to be replaced, particularly if the water damage is from black water or other unsanitary conditions, our trained specialists can also replace your carpet. Ceilings are treated the same way as drywall walls. However, care must be taken to ensure ceilings are removed and replaced without further damaging other areas of your home. Let the trained professionals at United Water Restoration help you target the areas that need to be replaced without causing additional damage throughout your home.
Monitor Your Home
Once the job is done, our specialists will ensure it’s done right. Whether you have any follow-up questions or additional concerns, you’ll still have access to our team of experts as you move back into your home or room that was damaged. This personalized care is available to homes all across the United States. Find out if there’s a United Water Restoration location near you.
Get Started Today
United Water Restoration is the ultimate water and mold response team. From major emergencies to minor leaks, contact us today to start the cleanup process in your home. You’ll be able to receive comprehensive and personalized care. Whether your home is damaged due to a flood, fire, storm or plumbing issue, we’ve got you covered. Don’t wait until a small water problem becomes a major one. Get in touch with our response team today.
Call Us Now!
The post Water Damage Cleanup Process: What to Expect appeared first on United Water Restoration Group | Main.
0 notes
Text
i just sit here and desire nothing more than to take care of animals and spend time with the people i love. and the entire universe sees me and says. ‘i will now throw every conceivable obstacle at you.’
#we are miserably poor. can barely afford groceries. my family throws fits when we have to use the credit card to buy food instead of ebt#theres mold growing in the attic.. our roof is eventually going to cave in bc we cant afford to repair our roof...#our best house was burnt to the ground.. the rest of our family doesnt care about enough to help with anything#we all have a million health problems. my dad has a pulmonary disease i didnt even know about until last week#my sister needs scoliosis surgery but he wont allow it because he doesnt want to go through the trouble#it will affect her for the rest of her life. she will never recover#i dont know how we are ever going to afford my dental stuff. its two thousand dollars literally....two. thousand.#on top of it all. i have no friends. none. every single person who cares about me lives hundreds of miles away#i will never meet most of them#i am literally addicted to hurting myself and i cant stop. i dont even want to stop#everything i touch turns bad or dies when all i ever want to do is good#every single day i wish i killed myself when i planned on doing it in 2016 or whenever it was#i just keep trying to convince myself it was worth it because things 'got better' but nothing has gotten better#its just the same old stuff with a new coat of paint#i cant even confidently say my family loves me because they literally do not even know me as who i am#i dont think anyone in my life actually loves my actual self#and i cant do anything about it#i just try to come to terms with it but its hard to do that while trying to deal with all this other bs#i just post stuff and write stuff and lay in the dark and daydream about good things that will never happen#and i have to be awake in 3 hours
3 notes
·
View notes
Text
1956 & 1959 Corvettes Found in Barn … Wait There’s More!
What started out as a pair of 1956 Corvette bodies buried in the basement of a wood shop since the late 1960s was shaping up to be one ’56 and one ’59, plus a surprise, according to Bernie. “I accumulated a whole lot of pieces down there,” Bernie said.
Bernie, who is 85, requested his last name and address be left out for privacy reasons, has been building cars, as an enthusiast (not a dealer), since he was a teenager back in the mid-1940s.
I was along for the “unearthing,” to take photos and gather information. Also along for the unearthing was Bernie’s friend Jonathan Large, 48-years old who lives a few miles down the road in rural Virginia, with the Blue Ridge Mountain Parkway visible from his front yard and the Ararat River across the road, where the water flows so clear it’s like you’re drinking direct from the mountains.
The two have become car buddies over the last 20 years, but even Jonathan didn’t know about the Corvettes in the basement of Bernie’s wood shop, where they’ve been stored for almost 50 years.
Locals Jack Davis and Buck Hedrick, both car enthusiasts and friends of Jonathan, drove along with us to help with the heavy lifting, both delighted to help with the discovery.
Before opening the door to the basement of the woodshed, wedged in the side of a hill, Bernie laughed and made his signature statement, “I ain’t got no junk.” Once inside the basement, people might wonder why Bernie said, “This is junk. Let’s not forget that.”
Jonathan had already explained to us back at his home hobby garage, “I can call my own car junk or a rust bucket.” But, calling another man’s car junk is “kind of like kicking their dog. You don’t do that, or you’ll get off on the wrong foot real quick.”
Bernie was not sure exactly what we would find in the wood shop basement. When we asked, Bernie, ever the kindly Southern gentleman with a flair for humor, said, “Once you see it, you’ll know what it is.”
When we opened the doors to reveal many aluminum screen doors, Bernie’s wit rose again when I asked him, “Why so many screen doors?” to which he answered, “To keep the flies out. You don’t see any flies out here do you?”
As Jonathan, Jack and Buck removed the screen doors and other items, the outline of one Corvette body on top of a second one appeared. Bernie explained that years ago he had made a deal with a neighbor that had three frames who thought they were “good enough to make two frames.” The neighbor had a 1960 Corvette he needed a frame for. Bernie said the frames disappeared when the neighbor “got to doping” and ended up in prison.
After digging out the two Corvette bodies, one a 1956 and the other a 1959, plus many fiberglass pieces, we found out in this first “barn” was just the start. More discoveries were ahead.
In “the big round barn” we found a 1956-’57 Corvette hood and a stack of Corvette parts and trim pieces. Jonathan could take what he needed to complete one Corvette, which would be the 1959. Not a greedy person and respectful of his car friends, Jonathan let his buddy Buck buy a real gem, a 1957 Corvette dual-quad intake manifold and chrome air cleaner housing. The carburetors were nowhere in sight. “I don’t need the dual-four setup,” Jonathan said. He was planning to buy an updated frame and install an LS engine for his ’59 restomod build.
Bernie then led us to a third barn, where he leaned against a pickup truck and peered into the attic with a serious look on his face. “There’s a few Corvette parts up there. If you want to climb up and look I’ll let you. Don’t step on nothing that ain’t tied down. Most of them boards are nailed down, but some of them ain’t.”
Jonathan climbed up the steel ladder into the attic, black as night, followed by the ever-present Buck, both with flashlights. “Here’s a windshield frame,” Jonathan shouted out. “It’s got a windshield in it, too?” Bernie asked. “There’s one from a 1959 or a 1960 up here.”
I climbed up the ladder and poked my head into the darkness and heat of that hot September Virginia day. Jonathan and Buck looked like coal miners carrying flashlights. It was a fascinating call-and-response situation as they yelled out what Corvette parts they found: “two trunk lids,” “part of a door,” “two windshield frames,” “convertible top cover,” “dash trim,” and more. Bernie told them to hand them down out of the attic.
The heat was so stifling Jonathan said he would come back for the decklid and other parts. “Woo. I tell you what, she’s warm up here,” Buck said. “No, it’s hot. It ain’t warm. Look at the sweat rolling off me.”
Jonathan asked about steering columns, which Bernie explained he had given to the same neighbor that got the three frames. But, he did get one of two steering wheels, hung on the wall of the barn.
Jonathan backed his trailer, loaded with the car bodies and assorted fiberglass to the edge of the barn. He, Jack and Buck loaded the trailer with more parts from the third barn. Jonathan would come back and select parts he needed from the large pile in the barn to complete his Corvette.
“We’ll come back and do an inventory of what we need. I don’t want to just take it all because he wants to keep some of them and that’s understandable for his boys’ two Corvettes in case they need a part. We want to preserve it; and like Bernie said, he just wouldn’t give it to anybody, so I consider myself to be the caretaker. I feel blessed today.”
We began in the basement of the wood shop, where we found a 1956 Corvette body stacked on top of a 1959 body.
Bernie parted with his collection of “fiberglass,” to his neighbor and friend of 20 years, Jonathan Large (right).
We picked up the 1956 body and carried out of the basement.
The 1956 body and the 1959 body fit on the open trailer.
Next, we went inside the big barn and fournd Corvette doors, a radiator, and other parts in a corner.
In another corner of the big barn we found boxes of trim and glass, wiring, a gas tank, rubber moldings, window frames, panels and more.
A prize was a chrome dual-quad air cleaner housing and a Corvette dual-quad intake lying on top of assorted Corvette finned aluminum valve covers.
Buck was excited to find this Corvette steering wheel.
Bernie visits with Jonathan after they pulled many Corvette parts (including these decklids) down from the attic of a second barn.
The back of the pickup bed filled with assorted Corvette fiberglass pieces.
The hoard of 1950’s Corvette fiberglass and parts filled the open trailer and the pickup bed, and we there were more parts that Jonathan would need to come back and get later.
From left to right, Todd, Jack, Buck, and Jonathan prepare to lift a 1959 Corvette body, stored almost 50 years in the basement of a wood shop, onto an open trailer.
The post 1956 & 1959 Corvettes Found in Barn … Wait There’s More! appeared first on Hot Rod Network.
from Hot Rod Network http://www.hotrod.com/articles/1956-1959-corvettes-found-in-barn-wait-theres-more/
via IFTTT
0 notes
Text
April Ramble: Eye Troubles, Hair Uncertainties, and Doll Instanity
I’m gonna try to do a monthly update about stuff from now on.
So, Lots of stuff has happened. and at the same time lots of stuff ...hasn’t...happened.
Eyes:
I’ve finished Erasii’s mouth and right eye. However, my confidence with dealing with resin came back to bite me in the ass. Severl years ago, i tried to start a project where i would make large plushes (like Erasii’s size with a wildly different pattern) or all the remnants and i started with Azur. I didn’t get past sewing the arms and legs, and thats because i started on the eyes right away. I used the exact same methode as this time: sculpt an eye from polymer clay, make a mold, cast the eye dome, attach a photo of the eye behind it. Simple. easy. Lmao. Nope. I recall casting three eyes and every one of the had bubbles. every one of them was cloudy. one was very sticky. I gave up back then, and the project was since abandoned.
Until two weeks ago, where I thought i’d done enough research to know how to do it right. Except i forgot that resin has a fuckin vendetta against me i swear to god.
The first eye attempt developed holes at the dome, aka: the front of the eye. This irritated me because when i poured the resin, it was super clear for two hours before i checked it and suddenly: a fuckton of bubbles. I havn’t no idea where they came from. So i tried again (also tried to cover the first attempt in more resin after pokeing holes to the bubbles, which.....ended poorly.) and poured another cast. i watched this version religiously, and it was amazeingly clear! I thought it went perfect.....until i went to check if i could remove it after four days of letting it cure and it was still completely liquid. two extra days did nothing. Evidently, I did not stir it properly enough (i call bullshit, i stirred for three minutes. i timed it.) and i had to scoop the resin into the trash and clean the mold. by far the most agaonizeing part of this one was that it was still completely bubbleless like w h y must u hurt me.
By this point, I’m incredibly irritated. Whenever I get the measureing and stirring correct, my cast developes bubbles for no damn reason. whenever my cast doesn’t develope bubbles, it doesn’t cure. I have browsed forum after forum, video after video, did every trick i could find, fallowed the instructions to the T. and still, my resin has failed to turn out.
I am torn, honestly. I am so pissed at my inability to cast resin properly that i’m determined to keep trying to get it right. but at the same time, i’m wasteing resin and not making any imporvments. on the other side, My mom has a coworker who owns a jewlery buiseness with her husband and most of their peices use a really nice clear casting material. I’m wondering if I could ask them if they’d be willing to make me a complete eye as a commission. I havn’t any idea how they make their casts, however (i assume molds, but not sure) so i’m not sure. i’m also unsure if their casting material is a type of glass. I’ll ask about the durability of the material, and keep it as an option if everything else fails.
I currently have a third eye in the mold. i havn’t checked it since i poured it. i’m scared to, thb. i don’t want to be dissapointed.
Dragon:
On a more lighthearted note, If yall rememeber my dragon pattern from a while ago, i started on that plush. Originally i was just going to work on it until i got the rest of the stuff to finish erasii, but since his eye is taking forever and i havn’t been able to get the yarn to the correct length for his hair, i’ve gotten a lot of it done. the wings and batting inside are completely done (witht he exception of turning and sewing the finger details+stuffing) which was the largest part of the project. I started working ont he gold tail decor but i need to pull out an entire side since the peice didn’t match up properly. i was going to leave it, but i dont want her to look ugly int he end so about two hours of sewing earlier are down the drain Lol.
Hair:
Returning to Erasii, for more bad news, I’ve decided I can’t use yarn for his hair. i can’t get it long enough. I also can’t make a wig for him like i wanted to try, because i forgot his horns existed. Instead, i’ve decided to order saran hair. This....doesn’t sit well with me. I was going to try wefts this time, but i dont feel comfortable attching them dirrectly to his head. but i havn’t any idea how else to attach them either. i was thinking maybe glueing? or somehow sewing the hair directly into the head? the bangs and sides are the main ones i want to look nice since the back of erasii’s head is litterally just A Mess of short hair. I dunno. i’m ordering a crapton of hair, so we’ll see what i can do when i have it in my hands.
Dolls:
I’ve made the mistake of watching doll customizations. and i wanted to do one. except i couldnt make up my mind, and now i have three planned whoOPS
The first one is Pumpkin Pie, a pumpkin themed girl I want to make arund halloween. I have an orange body thats faceless and lacking hair bc it was from a create your own monster kit. she’s the perfect starter.
The second one was the original one i wanted to make, Nyoul. My little girly boy with a taste for cupcakes and human flesh. He was the reason i first went through the way-too-big box of dolls my mom and i bought years ago (over 500 dollars worth like srsly.) to find a duplicate to tear apart. but surpriseingly, we didn’t have any duplicates. We have three frankies, yeah, but they were all different versions, so i didn’t feel comfortable tearing any of them apart. Most unfortunately, this conundrum gave me time to lament, during which time i keep peeking at my Gooliope. She’s 17 inchs high, and i loved that size. I didn’t dare ruin her (she’s by far my favorite) so i kept an eye out for other 17 inchers. And as luck would have it, while stopping by toys r’ us the other day, I noticed one in the clearence bin. orignally 30bucks, dropped down to 15. not bad. the reason for this was because the doll (a clawdeen) was a little bit damaged. both her ears have broken bits and theres a lots of weird plastic at the seems. not so good for a child, a miracle gift from the doll gods for me. i expected to feel a little guilty buying a doll away from a potential kid, but because this one is damaged, i don’t. parents would have told a little girl to put this one back and grab another one anyway, so no harm in giving this little misfit a home x3
There are some....drawbacks, however.
Nyoul already requided heavy modification (ie: tiddy-be-gone) and now he needs even more. I was originally aiming for a frankie, since she has a lighter skin tone and no ears, since my concept for Nyoul has him as very pale. this is because his outfit will have a lot of color and having his skin be near-white would allow them to pop like on a canvase. he’s also aupposed to look like a doll, but also sickly. Cute, but not quite right. I’m going to have to cut off the ears (and boobs), and then repaint the entire body. I do feel.....gross, about doing that. it feels insulting and wrong. But if i’m going to put all this effort into makeing him, why shouldn’t i make him completely what I want?
on the upside of workin on him, I get to make a prop eventually! I love doing that! he carries a big-ass axe and long scissors.
Nyoul’s going to be a very long project. This is why I want to finish both Erasii AND the dragon before i even start him. So Clawdeen’s just chilling with her deformities for a couple of weeks Lol.
And lastly.....my ball joint doll.
Years ago, i purched a ball joint doll from someone used. I’ve always loved ball joints, but they were all too expensive. I was so excited to have a BJD at last, i developed an entire design for her that sadly failed to come to be. I had a lot of trouble as a newbie seamstress back then that i eventually gave up, and tossed her into my closet for a few....years.
and then i took her out of the closet and put her in the attic for several more years. I rescued her afew days ago, and i feel super guilty. I never even put her pants or shirt back on!
I dislike the original design i had for her, so i’ve been trying to think of what to transform her into. I was thinking about a demon popstar, so i could make horns and wings and a tail, but....her face doesn’t fit. she has a very serene sad face, lidded eyes. I’m not sure if i could paint her face to make her look more evil or mischevious or a diva. I really want to try tho. I might have to save it for another 17 incher monster high tho. i keep seeing the popstar design with highheels and my BJD has flat feet. and I can’t order new ones because they’re expensive and also i have no idea what modle doll i even have so whoops.
if i do move ahead with that idea tho, i’ve taken inspiration from Sia and Lady Gaga (and Billy Joe Cobra if i’m being embarisingly honest) especially witht he hair idea. a boxy neck length thats pure white on top, but each later under is a different color of the rainbow with some rainbow bangs. She’d also have sunglasses, piercings, tattoos, long fake nails....just so much stuff.
But its a long way before i’m confident to even try to work on her. just holding her makes me scared i’m gonna break her. (even tho i kinda already did, accidentally had to restring her legs bc i dropped a string trying to take her head off.)
Her time in the closet and attic seem to have done something to her faceup. I’ve been struggleing for the past three days to remove it (bc i want to repaint her and also the colors were ugly and she has a stupid little tear on her cheek) useing everything i could. I tried acetone first (i did a test ont he inside of the headcap to see if it’d hurt the resin) and it did absolutely nothing. so then i tried rubbing alcohol, and again nothing. i tried a magic eeraser which finally worked, but not well. i don’t want to try to buy anything else, so i’ve been dealing witht he magic eraser. i’ve nearly removed everything besides the lips, and i honestly don’t think i’m gonna be getting that lip color out of there. I’ve tried to shove some eraser into there and scrub with a toothpick and it did not do anything. I was planning on coloring her lips a dark color anyway, so meh. bonus shadeing.
0 notes
Last Seen Blogs

its-yaboi-nez
nezkah's writes and draws

ygfdhj
Untitled

wtfwljd
Hey, I'm Lori J.

beauty-funny-trippy
Beauty~Funny~Trippy

amyli-shoes
WhatsApp:+8613255001102