#thinking like a windows slideshow transition effect
Explore tagged Tumblr posts
Visit Tumblr Blog
Explore Tumblr blogs with no restrictions, modern design and the best experience.
Last Seen Tumblr Blogs


Fun Fact
Tumblr has been banned in Indonesia for providing people with access to pornographic content.
Text
realising how much i actually enjoy scarlet nexus as a concept, i just wish that the cutscenes were given a lot more love. the game deserves it, it's honestly super kickass.
#stormy weather#scarlet nexus#i finished it a few months ago and listen to the title theme all the time#its genuinely a good game with a pretty great cast and music#stellar character designs and fucked up visuals#its just entirely brought down by the story presentation at times...#for reference#the ANIMATED cutscenes are all great!#there's clearly a huge amount of love put into the animation#lil quirks and stuff like the expressions having lil twitches#or every character being animated differently to react to something#stellar stuff#but outside of the animated cutscenes#story is delivered through still images that sorta just...#hover across the screen#thinking like a windows slideshow transition effect#its not something new if youve played Tales of games before#but for a game that really went all out on every inch of it#having the majority of the ingame cutscenes be still images with voice-overs and sound effects is jarring.#its far from bad. but it could just be so much more.
4 notes
·
View notes
Text
Video editor & movie maker windows 10 tutorial 無料ダウンロード.Movie Maker Video Editor Studio
Video editor & movie maker windows 10 tutorial 無料ダウンロード.Windows 10でもWindowsムービーメーカーを利用できる方法

対応プラットフォーム.Movie Maker & Video Editor for Windows を入手 - Microsoft Store ja-JP
Windows 10、Windows 10 Mobile、Windows 10 Team (Surface Hub)、HoloLens 向けの Microsoft Store からこのアプリをダウンロードします。スクリーンショットを確認し、最新のカスタマー レビューを読んで、Movie Maker Video Editor Studio の評価を比較してください。 Jun 14, · 今回は、Windowsの無料動画編集ソフト「Windowsムービーメーカー」のダウンロードとインストールの方法を解説していきます。 この記事を見ることで、サポートが終了して使えなくなったと言われている「Windowsムービーメーカー」を、Windows10でも安全にダウンロードして使用できるようになり Estimated Reading Time: 3 mins Jul 08, · Windows Movie Maker 無料ダウンロード+知っておきたい6つの情報. Windows Movie MakerはWindows 7におけるWindows Live Movie Maker として知られていました。. Microsoftが開発した無料でプロの動画編集ソフトウェアです。. この優れた動画編集ソフトウェアを使うことで
Video editor & movie maker windows 10 tutorial 無料ダウンロード.Movie Maker Video Editor Studio を入手 - Microsoft Store ja-JP
Windows 10、Windows 10 Mobile、Windows 10 Team (Surface Hub)、HoloLens 向けの Microsoft Store からこのアプリをダウンロードします。スクリーンショットを確認し、最新のカスタマー レビューを読んで、Movie Maker Free: Video Editor の評価を比較してください。 Jul 08, · Windows Movie Maker 無料ダウンロード+知っておきたい6つの情報. Windows Movie MakerはWindows 7におけるWindows Live Movie Maker として知られていました。. Microsoftが開発した無料でプロの動画編集ソフトウェアです。. この優れた動画編集ソフトウェアを使うことで Windows 10、Windows 10 Mobile、Windows 10 Team (Surface Hub)、HoloLens 向けの Microsoft Store からこのアプリをダウンロードします。スクリーンショットを確認し、最新のカスタマー レビューを読んで、Video Maker - VideoShow の評価を比較してください。
Explore the next level of video editing with magical video transitions and amazing slideshow effects to make your imaginations come alive and create memorable piece of art with a single flick. Adjust the blur amount and even make video to 3D frame. Apply backgrounds as well.
Add cute stickers, images and themes to beautify your videos simply. Edit unlimited videos and share them on social media like YouTube, Facebook, Instagram or WhatsApp easily. Tell your complete story at a single time and arrange your clips easily. Great tool which is also equipped with a variety of transition effects as well as split, trim and merge features and many more to discover. com Download the app today! Your feedback is welcome and appreciated, if you think we are missing any feature, please email us and we will try to implement it in the next update.
Microsoft Store での特別サービス、最新の製品、イベントなどについての情報をお届けします。日本 に在住の方がご利用いただけます。. Video Maker - VideoShow. 対応プラットフォーム HoloLens. Surface Hub. 主な特長 Explore the next level of video editing with magical video transitions and amazing slideshow effects to make your imaginations come alive and create memorable piece of art with a single flick. スクリーンショット PC モバイル PC. VLC UWP 無料. Unigram - Telegram for Windows 10 無料. FM Radio 無料. QR Scanner Plus 無料. Pro Browser 無料. 機能 Slideshow Maker Windows Slideshow Movie Maker Rotate Video Video Rotate Video Blur Mute Video Add Background Music Merge two or more videos Extract mp3 Video Trimmer.
追加情報 公開元 Videopix. 公開元 Videopix. 著作権 VideoPix. All Rights Reserved. 開発元 VideoPix. おおよそのサイズ 年齢区分 3 才以上対象. このアプリは次のことができます Web カメラを使用する インターネット接続にアクセスする ミュージック ライブラリを使用する ピクチャ ライブラリを使用する 外部ストレージ デバイスに格納されたデータを使用する ビデオ ライブラリを使用する. インストール Microsoft アカウントにサインインしているときにこのアプリを入手し、最大 10 台 の Windows 10 デバイスにインストールできます。. アクセシビリティ 製品開発者は、この製品がアクセシビリティの要件を満たしていて、だれにとっても使いやすい製品であると自信を持っています。. サポートされる言語 English United States. 公開元情報 Video Maker - VideoShow の Web サイト Video Maker - VideoShow のサポート.
その他の規約 Video Maker - VideoShow プライバシー ポリシー お取引の条件. この製品を報告する このアプリをマイクロソフトに報告する 問題を報告していただき、ありがとうございます。弊社のチームで検討し、必要な場合は対策を講じます。 サインイン してこのアプリをマイクロソフトに報告する. このアプリをマイクロソフトに報告する 違反の可能性 不快な内容 児童労働 マルウェアやウイルス プライバシーの侵害 誤解を招くアプリ パフォーマンスの低下.
確認 キャンセル. システム必要条件 最小 この製品を実行するには、デバイスが最小要件をすべて満たしている必要があります OS Windows 10 バージョン おすすめ 最適なエクスペリエンスを実現するには、デバイスがこれらの要件を満たしている必要があります OS Windows 10 バージョン サインアップする Microsoft Store での特別サービス、最新の製品、イベントなどについての情報をお届けします。日本 に在住の方がご利用いただけます。. Microsoft Store からのメールを受け取るようにサイン アップしていただき、ありがとうございます。 閉じる.
4 notes
·
View notes
Text
SlideStudio Review – Worth It or a Scam?
SlideStudio Review: Are you looking for more knowledge about SlideStudio? Please read out my honest review about It before choosing, to evaluate the weaknesses and strengths of it. Can it worth for your time and money?
=>Click here to check out All 4 SlideStudioOTO Info

WHAT IS SlideStudio ?
Revolutionary SlideStudio with Over 1600+ New Presentation & Marketing Visual Templates Easily Lets You Create High-Converting and Captivating Pitch Decks in Minutes… Creating and Designing Professional Presentations Is Now In Your Control! Everything You Need For Multi-Purpose Presentations In ANY Niche Inside One Dashboard.
Quickly get a presentation ready for your next webinar, zoom call, business plan, business pitch, or face-to-face business partner meetings, and more.
New & improved slide presentation empowers you to create captivating, stunning, high-converting, and engaging presentations within minutes even if you have zero technical or design skills… 5 in 1 Integration – all of the templates are compatible with PowerPoint, Keynote, Google Slides, WPS Office & LibreOffice. This empowers you to quickly and easily edit them and make them customized as per your needs within minutes.
(SPECIAL PROMO DEAL) Click Here To Buy SlideStudio For The Lowest Price Available Online!

SlideStudio Review – FEATURES & BENEFITS.
1600+ Presentation Templates
We have handpicked 1600+ new and improved slide presentation templates to make your life easier than ever. Choose the one you like the most.
Quickly edit text, color, images, etc., with just a few clicks.

2. 38+ Supercharged Modules
With tons of elements, slideshow, layouts, infographics, editable charts, vector icons, and much more.
Quickly edit text, color, image, etc. with just a few clicks.
3. 5 in 1 Integration
All of the templates are compatible with PowerPoint, Keynote, Google Slides, Libre Office & WPS. This empowers you to quickly and easily edit them and make them customized as per your needs within minutes.
4. Unlimited Access
There is no limit of time on our Slide Studio PRO. You can use it whenever you want, wherever you want. With just one-low payment, you get lifetime access to everything that’s included.

5. Animations & Transitions
Don’t want to create bland presentations? Play with animations & transitions included in Slide Studio PRO to breathe life into your presentations and make them stand out. Create stunning and captivating presentations within minutes.
SlideStudio REVIEW – Frequently Asked Question
[ Q ]: How SLIDE STUDIO is different from other templates?
SLIDE STUDIO is loaded with industry-leading features that you can access from user-friendly dashboard. These features are not available in any other slide templates.
All of the templates are compatible with M.S PowerPoint, Keynote, Google Slides, Libre Office & WPS Office.
Everything You Need For Multi-Purpose Presentations In ANY Niche Inside One Dashboard.
This empowers you to quickly and easily edit them and make them customized as per your needs within minutes..
More than 1600 ready-made slide sets, 38+ Categories templates, 99 Color Scheme, simple drag and drop presentation and pitch deck, compatibility with both Mac and Windows, and much more!
All this at crazy low rates!
Designed by professionals, there is nothing that comes close to our Slide Studio.
[ Q ]: What is the License?
[YES] unlimited use on your own projects
[YES] use on your clients projects
[NO] RE-SELL IN ANY WAY
[ Q ]: Is Step-By-Step Training Included?
YES – Slide Studio comes with step-by-step video training walking you through the entire process right from creating your professional presentation to getting results.
It’s VERY EASY to SETUP.
[ Q ]: Does it work on both PC and Mac?
Yes, it’s both PC and Mac compatible, and has been tested on both system.
[ Q ]: Is there any limit to the number of presentation & marketing visual that I can make with this templates?
There is no limit! You can use Slide Studio to create as many high-quality multi-purpose presentations as you want, whenever you want, as often as you want. Feel free to make unlimited professional presentation for school presentations, commercial purposes, or official purposes.
[ Q ]: Can I sell the Presentation I make with this SLIDE STUDIO to other businesses?
Yes, you can sell the presentations that you make using our Slide Studio. Make professional presentation & marketing visual for your clients and charge them hefty fees! This will not only cover your cost for our services but also make you a solid profit.
[Q]: What is your refund policy?
You should pay attention to our requirements, We Do The refund If there is an issue with the product and our technical support can’t solve it for you, we will provide a refund for you within 30 days of your purchase.
PRODUCT USAGE POST-REFUND: By receiving a refund, you agree to remove all files downloaded from our website, and all rights to use the product will be revoked. We reserve the right to decline a refund if the client does not adhere to these conditions.
REFUND PROCESS : send your query to support, DO NOT dispute via paypal, all refund is processing by JVzoo.
REFUND POLICY: Our refund policy only applies to the first time you purchase our product. Second time purchases will not be permitted the same rights to refund. We understand that sometimes the timing may not be right when you purchase our product and you may return to purchase later, but please be aware second purchase refund requests will not be permitted. This is to protect our product and ourselves from individuals who may take advantage of our refund policy.
DUPLICATE PURCHASE: In the event of a billing error or duplicate billing, We will investigate the matter and issue a full refund if deemed necessary.
>> (SPECIAL OFFER) Visit Here to Get SlideStudio For an Exclusive Discounted Price Today

SlideStudio REVIEW – PRICE AND EVALUATION
Front End – SLIDESTUDIO COMMERCIAL ($29/One-Time) >>More Details<<
Let me recap what you will get inside
1. Build Great Pitch Deck Presentations & Marketing Visuals Fast & Get More Audience Attention and Conversions.
2. 1600+ Slide Studio
3. 38+ Premade Category
4. 99+ Color Scheme are included.
5. 5 in 1 Integration – all of the templates are compatible with PowerPoint, Keynote, Google Slide, WPS & Libre Office.
6. Vector, Infographic, color scheme, font included.
7. Fully Animation (build and Transition)
8. Fully Editable (shapes, icons, mockup)
9. The template includes Motion effects. You can easily adjust the effect.
10. 1920×1080 Full HD, 16:9 slide formats
For a limited time, you can grab SlideStudio with early bird discount price of $29, ONLY in the selected options below . Pick the option that you think will compliment your unique business needs, but hurry because the offer price wont last forever.
SlideStudio is available for a low one-time price for a short period only. Make sure you act before the prices rise. The price will keep on increasing every hour.
To maximize your benefits, you should take a look at some upgrade versions as below:
All 4 SlideStudio OTO/Upgrades INFO Given Below
OTO 1: DELUXE SlideStudio ($37/One-Time)>>More Details<<
Let me recap what you will get inside
1. DELUXE LOCAL BUSINESS PITCH DECK TEMPLATES
2. DELUXE GIANT PRESENTATION
3. PROMOTION VIDEO TEMPLATES
4. TYPOGRAPHY & CHALKBOARD SLIDES
5. COMMERCIAL LICENSE
OTO 2: YouTube VideoStudio ($47/One-Time) >>More Details<<
Let me recap what you will get inside
1. ANIMATED VIDEO FOR YOUTUBE
2. INTRO VIDEO FOR YOUTUBE
3. END SCREEN VIDEO FOR YOUTUBE
4. SUBSCRIBE VIDEO STUDIO
5. INFOBAR VIDEO FOR YOUTUBE
6. YOUTUBE THUMBNAIL
7. YOUTUBE CHANNEL
8. COMMERCIAL LICENSE
OTO 3: Cinematic VideoStudio ($47/One-Time)>>More Details<<
Let me recap what you will get inside
1. Cinematic Video Templates
2. Lower third video Templates
3. Social Media Video Templates and more
4. Commercial License
OTO 4: SlideStudio Reseller ($197-$297)>>More Details<<
Let me recap what you will get inside
Now you can keep 100% Profit Commision from Slide Studio by reselling the best selling studio library.
Lite – $97
-100% commission on frontend only
Advance – $197
SlideStudio Review-Conclusion
Hopefully, with my honest thoughts about SlideStudio,I really hope it did help you with your buying decision. I understand the decision of taking out $29 one time price is not simply made but this investment is profitable and for a sustainable business.
1 note
·
View note
Text
The middle school production of Undertale the Musical I that I watched a couple of nights ago seems a bit like a weird fever dream now so I thought I’d watch it again and post my thoughts. Reactions and reviews under the cut:
-I was wrong about them misgendering Frisk and I apologize, they said genderless child at least ten times in the intro.
-They used the intro from the game as a little slideshow/overture in the beginning, which would have been fine if the person who was managing it hadn’t moved the mouse, causing the little YouTube thing to show up on the bottom.
-There are a crap ton of technical difficulties in this show a couple being: Music randomly starting and stopping for no reason, EXTREMELY long transitions, I’m talking like 5 minutes, and poor lighting, video and audio quality.
-Flowey was a phenomenal actor, but not the best singer. It did not help at all that his music quit out on him halfway through the song and he had to sing a’capella.
-Toriel was good singer, but her acting was kind of flat. (I’m not going to blame her, she’s young.)
-Did I mention the lighting could be horrendous at times? And that random crashing noises would happen in the middle of scenes for no reason?
-From what I saw, Heartache had some really cool visual effects, but I could barely see anything because of the horrendous lighting.
-Toriel sang a nice possibly original song after Heartache, but it was a little hard to follow because there was no background music. (And I might be wrong about the Frisk’s gender thing? I can’t tell what Tori’s saying but it kind of sounded like little girl)
-Did I mention Flowey is absolutely hilarious?
-The Sans scene had some strange blocking and the music malfunctioned, but overall it was alright.
-PAPYRUS IS THE BEST ACTOR IN THIS SHOW AND I LOVE HIM
-He has the best costume too.
-They had the cutest little setpiece for Snowdin.
-The lights got kind of unnecessarily weird when Papyrus showed up but it didn’t affect the scene too much.
-This wansn’t an actual part of the show, but I found it hilarious when either Frisk or Sans’ mic was on during a scene change and they kept repeatedly whispering: “WHERE’S THE JACKET GIMME THE JACKET I DON’T KNOW WHERE THE JACKET IS” because we’ve all been there.
-The annoying dog was played by an actual dog and that was an absolute gem.
-Did I mention how in character Papyrus is? And that I can actually hear him?
-Papyrus literally reminds me of me when I was 11.
-Frisk asked: “Does Grillby’s have food” and I found that absolutely hilarious for some reason.
-There might have been a music malfunction before Bonetroustle, and if it was a malfunction then Sans Papyrus handled it FABULOUSLY with their imrpov skills.
-Papyrus’ singing kinda sounded like shouting and he was a little off-key but he was tap-dancing so bonus points for making my vision come true.
-There was a Chara and Asriel scene which was cute but I could barely tell what was going on because of the light and sound.
-The entirety of the first Waterfall scene was so dark I legitimately could not see.
-There was a very cute and funny scene in Temmie Village, but it went on for so long I kinda felt like I was hallucinating.
-Undyne pulled out an extemely long scroll when she referenced her speech and then immediately threw it away when she said screw it.
-Papyrus answered the phone with, “Hellow human, it is I... WALUIGIIIIII!!!!!!! Wait wrong number.
-Undyne made some nice character choices.
-”Why are you calling me if you’re standing right there?”
-Undyne chased Frisk around the aisles which I greatly appreciated.
-Alphys was making one of those coke and mentos things when Frisk walked into the lab.
-And she was wearing pajama pants which I appreciated.
-”I’ve been watching you all this time-” “Well that’s not creepy at all.”
-Frisk is very salty in this show.
-Mettaton was a person literally wearing what looked like a trifold with armholes. I don’t know whether that was a poor or amazing costume choice.
-They included intermission in the video which was kind of annoying to have to skip through.
-Since Mettaton couldn’t see he had to be escorted around by another person which I first thought was a poor choice until the guy said, “I”m not your slaaaave.” Then I thought it was a hilarious choice.
-Since Papyrus couldn’t take a flying leap through the window during the Undyne date so he just kid of awkwardly wiggled out the window.
-”Why don’t you use the door?” “THE DOOR IS FOR WHIMPS! THE WINDOW IS FOR THE GREAT PAPYRUS!” “Are you caLLING ME A WIMP?”
-Sans showed up at one point and started playing the trombone for no reason.
-”Oh my god I just burned your house down I am sooo sorry.”
-The sound definitely got better during the second act and there weren't as many malfunctions.
-Muffet had a rather strange costume.
-Spider Dance had some nice choreography but the ensemble wasn’t really all that energetic about it.
-Spider Dance was overall a kind of weird scene.
-Mettaton had a rather strange singing voice but it wasn’t necessarily bad.
-Aaaaaaand now he’s off-key.
-Honestly everybody in this musical is off-key at this point. Mettaton’s off-keyness was probably just a result of the song being too low for the actor.
-The MTT resort waitress had a ROCKIN’ costume for a character that wan’t even in the game.
-Sans: “YOU’D BE DEAD. RIGHT WHERE YOU STAND.” (Blackout as he runs away)
-Let me just say Burgerpants was AMAZING.
-Sans and Papyrus showed up at Burgerpants’ shop for literally no reason but it was kinda funny. I like how this show went off-script in llittle ways.
-Mettaton’s slave: (Fixes mtt’s costume)
-I’m pretty sure mtt’s slave was played by the guy who played Flowey which is hilarious.
-Mtt had some nice backup dancers.
-Frisk: “Well those Broadway people are... narcissistic.”
-There was kind of an awkward pause before Death by Glamour where everyone just kinda stood still while the music played.
-Mettaton EX’s costume was really cool but the hair was a bit weird in my opinion.
-Undyne and Papyrus literally showed up during Death by Glamour.
-Papyrus and Mettaton started dancing together at some point in the song and let me just say the choreography was ROCKIN.
-Honestly though the minute they called Mettaton ‘She’ I kinda noped out on this show.
-Frisk had some rad fake crying.
-Undertale was a cool dream sequence or something I don’t really know what it was but it was cool.
-Narrator: “One day, a human fell down below the mountain.” Chara: (Falls on their face)
-Asgore’s costume was very strange.
-Asgore: (Fighting Frisk) Toriel: (Runs in) “ASGORE YOU USELESS PIECE OF TRASH!”
-They skipped over all the true lab stuff so there was no Alphdyne and I lost most of my faith in this show.
-They made Papyton a thing and I would have been happy about that if they hadn’t made mettaton a friCKEN FEMALE
-Asriel had the best costume in the show everyone else go home.
-He also had some neat flying effects.
-Dreemurr family reunion awwwwww
-NEVERMIND BABY ALPHDYNE IS IN THIS SHOW I’M ECSTATIC
-(Toriel and Frisk having a tender moment) (Cue Mettaton and Papyrus running around the audience screaming)
-THE ANNOYING DOG WAS PLAYED BY FLOWEY
There’s what I think is a Q&A at the end so I’ll talk about that and post my overall review of this show later.
13 notes
·
View notes
Text
Top 3 best free video editing software

Top 3 best free video editing software how to#
Top 3 best free video editing software software for pc#
Top 3 best free video editing software software#
Top 3 best free video editing software professional#
After editing, you can directly upload the gaming video to social media platforms like YouTube. It provides many visual effects and templates and works perfectly fine with gaming videos.
Top 3 best free video editing software software#
It is an inbuilt video editor on Mac and acts as the best video editing software for gamers because of the various features it offers. When it comes to editing games videos on Mac, you may think of iMovie first. Here we collect the best 5 Mac game video makers for you to choose from. If you are using a Mac computer, you also have many options to edit gaming videos on your Mac. After editing, you can save the game video in your desired format and upload it directly to social media platforms like YouTube and Vimeo.ĥ Free Gaming Video Editing Software for Mac When editing gaming videos with Lightworks, you can apply special effects, trim, cut, change frame-rate, and do many others of your videos. Nowadays, more and more people use it to edit their gaming videos with the advanced editing tools it offers.
Top 3 best free video editing software professional#
Lightworks is a professional games video download, which has been used on many of the finest films in cinema history. Moreover, this games video editor offers a powerful animation framework, which helps you fade slide, bounce, and animate anything in your video project. With its aid, you are able to quickly trim down your videos and find those perfect moments to put them in front of the world. Loaded with lots of editing features, it enables you to create wonderful gaming videos with simple clicks. OpenShot services lots of users as a professional video editing software for gaming.
It does not have all the features you may need.
In addition, it is a great tool to combine your videos and photos, that's to say, it is also a great slideshow maker. This gaming editor lets you add transitions, change speed, cut or split unwanted video clips, and add subtitles to create a brilliant gaming video for YouTube. Apart from that, this game editor allows you to convert the video into other different formats.Īs an excellent games video creator, Icecream Video Editor makes it easy to edit all your videos for gaming. Using it, you can apply many video and audio effects to your videos to improve your videos significantly. Offering a non-linear video editing interface, it helps you edit your gaming videos with ease. VSDC is another free gaming video editing software. As it's lightweight, this best editing software for gaming won't slow down your computer, and you can create game videos effortlessly. Moreover, this video editor not only runs smoothly on high-end computers but also works well on normal devices. The software offers a set of features to help you enhance your gaming videos. With its comprehensive set of tools, you can make your gaming videos more engaging and professional without much hassle. In addition to being a great video editor for most purposes, it is a great software to edit gaming videos. However, that is not the case with EaseUS Video Editor. Most video editing software that you get in the market is usually focused on one specific area. EaseUS Video Editor - Best Games Video Editor Just take a look at the following software.
Top 3 best free video editing software software for pc#
If you enjoyed this tutorial, please leave a like and feedback and suggestion anymore top 5's you may have.Most of you work on Windows PC to learn the 6 free gaming video editing software for PC in this part.
Top 3 best free video editing software how to#
Not only will I show you guys the best video editors, but I will also cover the basics on each of the softwares and how to import, edit, and render your clips. Luckily, this tutorial will give you guys the top 3 best editing software for your projects and youtube videos. Finding a good video editor can be really difficult especially a reliable one that doesn't have watermarks. Watch the Top 3 best FREE Video Editing Software and learn what are the best video editors you guys can use that are absolutely free and at no cost. LIKE & FAVORITE | OPEN THE DESCRIPTION ▼▼▼▼▼
0 notes
Text
Free Video Editing Software For Mac 2015

Are you looking for the best free video editing software for Mac? You want it to help you create great videos for fun, entertainment, invitation, advertising or education? Well apart from the cool video footage, the selection of a correct tool is key to the success of a video. We’ve listed both the best free and premium video editing software programs for Mac users in this guide. Whether you are a beginner or a professional, you will find one that works for you.
Free Video Editing Software For Mac 2015 User
Free Video Editing Program For Mac
Best Video Editing Software Imac
Best Video Editing Software Mac
Free Video Editing Program Mac
Best Free Video Editing Software for Mac
iMovie
iMovie is what most people will think to use when they want a free video editing software for Mac. You don’t need to pay a penny for it. It is completely free to use with almost all of the features that we need for processing our video. There are tons of effects, transitions, sound effects, and text styles to help you make your own stylish videos. One of the best features is that its movie trailer themes offers you a lot of options to create amazing cinema-like trailers in just several minutes. The interface is really easy to use and intuitive. So you can start editing your video and quickly get the hang of the program.
ShotCut
Some video editors are free, but there's usually some kind of catch or disadvantage to these programs. (Image credit: Shotcut) Free vs paid video editing software. There are some free video editing solutions out there. Programs such as DaVinci Resolve and Shotcut are free downloads, and iMovie comes preloaded on every new Mac computer. Read about the best video editing apps for Mac here: Best video editing software for Mac myTuner Radio If you like to listen to radio stations try out the myTuner Radio app. Save your favourite.
ShotCut is a great video editing software for Mac, which can be used on Windows or Linux as well. Its interface isn’t really super intuitive but it is not hard to pick up where all of the tools are located. So you should be a little patient if you want to get great results with this program. It contains all the tools you know from Windows Movie Maker, plus a lot of extras. ShotCut’s biggest advantage is its video and audio filters, which can be fully customized, layered, and combined in all kinds of interesting ways. However, you cannot preview the effects before applying them. And although there are excellent export file formats, it has no profiles for different devices.
HitFilm Express
HitFilm Express is another free video editing software for Mac, which has professional tools but without the high price tag. Due to its unique set of features, you need to spend some time before you get the hang of it. There are various tutorials to help you master it using this program. HitFilm Express is not a tool to be used just to help you just cut off unwanted footages, adding color effects, or exporting to a new format, but one that has a full editing suite, such as audio and video filters, compositing tools, layers and masking, green screen effects, and 3D support. Its website puts emphasis on creating Hollywood-style movies, so it is also one of the best tools for YouTubers and vloggers.
Lightworks
Lightworks is another one of the best video editing software for Mac which is packed with pro-level tools. Its interface is a little different from other video editors you may have tried. So don’t expect to master it overnight but it worth the time and effort once you get used to it. Lightworks is very suitable for home users who want an advanced tool for post-production. It has advanced real-time effects, a color correction tool, a precise trimming tool, blurs and masks, which all help to make your video shine.
Best Full-featured Video Editing Software for Mac
If you are looking for a video editing software for Mac that has professional-quality tools but is beginner-friendly, BeeCut is a reliable option to try. It is compatible with both Mac and Windows. If you are going to be jumping between different systems, you can learn one piece of editing software and move around, back and forth. The interface is fairly intuitive and easy to use, but there are also a number of text tutorials on its website, as well as video tutorials on YouTube. So you can really get up to speed quickly. The only downside is the free version will leave a watermark on the video.
Main features:
Supports multiple video aspect ratios – 16:9, 4:3, 9:16, 1:1, and 3:4.
Supports almost all kinds of video formats, audio formats, and image formats.
Includes a complete classic video editing toolkit like trim, cut, split, and more.
Advanced video editing tools like Mosaic, Freeze frame, zoom, PIP, etc.
Double tracks for PIPs, Texts, Music, Filters and Overlays.
Provides hundreds of cool filters, texts, transitions, borders, overlays and animated elements.
Export video in popular formats or for different devices in HD quality.
Related posts:
Mac computers are aimed for professional graphic designing, video editing, and imaging needs. Most of the professionals use premium grade video editors and graphic designing software on their Mac computers to complete their projects.
However, the sad truth is that these professional video editors are really costly. You might have to give up thousands of dollars to buy a video editor for Mac loaded with premium features. These premium video editors are used in movies and TV shows.

If you want to edit your raw videos or working on a project and looking for a free video editing software for Mac then you are at the right place. I have created a list of 10 best free video editing software for Mac computers. These free video editors might not match with the features of premium video editors but they are equipped with the necessary tools and features of basic video editing.
Best Free Video Editing Software for Mac Computers
Some free video editors in this list are quite efficient and provide advanced video editing features while some of these free video editors for Mac provide basic features but are ideal for the newbies. Many contain premium features of video editing. Anyway, I am giving you the list of best free video editing software for Mac and you decide which one is best for you. These are worth a shot for free.
1. Shotcut Video Editor
Shotcut is an open source, cross platform video editing software. It is available for free for Linux, Mac and Windows 10/8/7. This software contains many impressive video editing features.
Shotcut video editor supports almost all the popular video, audio and image formats. There is a broad range of video effects, transitions, filters and compositions that you can use to edit videos in Mac computers. Although, the interface is quite friendly but users completely new to video editing might face a little difficulty. However, there are easy video editing tutorials on YouTube for help.
This one is a feature-rich video editing tool. There are various blending modes for a professional touch to your videos. You can set the color, contrast, brightness, overlays, add different audio effects, bass, treble, delays, etc. The best part I like about it is the highly configurable timeline. So, if you are looking for a free video editing software for Mac then I’d suggest giving Shotcut video editor your first try.
How to Use Shotcut Video editor to edit videos – Shotcut Tutorial
2. Movavi Video Editor
Another simple video editing software. Movavi video editor is available for both Windows and Mac users. You can download the free version of this software from the website. Most users love this tool for its simple and easy to use interface.
Import any video to the software’s timeline and start editing. You can improve the quality, remove noise, add background music or audio, titles, subtitles, font size, color, contrast, saturation, choose aspect ratio, etc. The video editor supports a wide range of formats. There are a lot of creative effects like filters, transitions, animated fades, trim or crop unwanted parts of the video, rotate & adjust, stabilize, preset tunes, etc.
What else? You can create an interesting photo slideshow and reverse a video. Here is a simple tutorial explaining how to work with Movavi video editor.
How to Edit Videos using Movai video editor on Mac | Tutorial
3. AVS Video Editor
The next efficient video editor in the list. AVS video editor is paid video editing software but it provides an unlimited free trial version which is enough for basic video editing requirements.
All popular audio, video and image formats are supported. You can flip, rotate, trim unwanted parts, cut and stabilize your video. There are multiple blending modes, delay, add subtitles, various menu styles, brightness, contrast, etc. There are more than 600 transitions and special effects to choose from. You can get an overview of each project from the storyboard.
This video editor fits the beginners or novice most. Transform your raw camera footage to a finished video easily. The software allows you to output the video to various online video sharing platforms like YouTube, Vimeo, etc.
How to use AVS Video editor | Tutorial
4. Da Vinci Resolve Video Editor for Mac
Da Vinci Resolve video editor is a powerful video editing software for Mac. It has been praised by many professionals and esteemed publications. You can turn to its multi-cam editing mode if you are working with footages from multiple cameras. I have used this video editor for a few of my video editing projects so I personally like it very much. It is quite handy.
The video editing software provides faster speed. You can edit your videos extremely quickly. Although the paid version of this software has more high-end features but even a professional can get most of his video editing work done through the free version. It contains all the basic and many premium grade video editing features.
You can edit the edited videos to YouTube, Vimeo, Dailymotion, etc.
How to use Da Vinci Resolve Video Editing software for Mac | Tutorial
5. Final cut Pro Video Editor for Mac
Final cut pro is a video editing software from Apple. This software is not free and costs about $300. So, what’s it doing in this list? Because, it offers a free trial for 30 days. Final cut pro is one of the best video editing software so if you are working on an important video editing project then you can avail the features for 30 days for free.
This video editing software fits well for the novice and for the professional video editors. It is loaded with basic and advanced video editing features. You can quickly import media to its magnetic timeline, add 3D titles, apply masks, color grading, color balance, effective previews and rendering, smooth transitions, jumps and cuts, effects, stabilization, etc.
This software is actively used by the video editors of movies and TV series.
How to Download and Use Final Cut Pro Free Trial
https://www.youtube.com/watch?v=hsadGq4hWYo
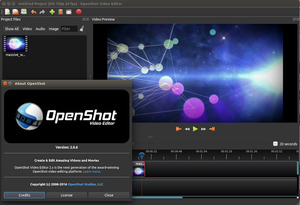
6. OpenShot Video Editor
Another great open source, cross-platform video editing software. OpenShot video editor is available for Windows, Linux and Mac users. The software is rich in features like unlimited audio/video tracks, multiple formats support, various transitions and special effects, stabilization, titles, subtitles, audio features, etc.
The interface is simple yet powerful. The advanced timeline makes it easier to drag, drop, zoom and snap. You can do trimming, rotation, snapping, cutting, scaling, masking, overlays, and add watermarks. This video editor has got multiple updates. The latest update was in August 2016.
How to use OpenShot Video Editor | Tutorial
7. Lightworks Video Editor
Lightworks video editor is a comprehensive non-linear video editing software. Video editing and trimming is relatively easier. It has been used by some movies like Pulp fiction, Heat, etc. for the video editing requirements in the past.
The video editing software is highly customizable and you can really get what you want out of it. Though its free but it contains many premium grade features. However, I found that it has restrictions in terms of project sharing. You can only share a video of up to 1080p in Vimeo and up to 720p output to YouTube.
How to use Lightworks Video Editor | Tutorial
8. Blender Video Editor
Free Video Editing Software For Mac 2015 User
Blender is a free to use, open source 3D creation tool. It providing efficient non-linear video editing features too. Blender is powerful but it takes a little time in getting used to.
By default, the software will show up 3D modelling mode. You will need to change the mode to video editing from menu. It contains all the basic video editing tools that other video editors have. Download it for free from the official website.
How to use Blender Video Editor | Tutorial
9. Avidemux Video Editor
Avidemux is another efficient video editing tool for Mac. Actually, it’s a free cross-platform video editor. It’s not a high end video editor but suits perfectly for basic video editing requirements. The interface is very simple and easy to use.
Free Video Editing Program For Mac
Below is a brief tutorial of Avidemux interface and working. You can get much out of it.
How to use Avidemux Video Editor | Tutorial
10. Jahshaka (CineFX)
Best Video Editing Software Imac
The last but not the least, Jahshaka video editor, my friends. This software provides many different tools to create amazing digital content. You can do video editing, 2D annd 3D animation, stabilization, flash animation, color correction, keying, tracking, composting, etc. There are many audio and video effects.
The developers keep on adding new features with every release.
Best Video Editing Software Mac
How to use Jahshaka (CineFX) Video Editor
These were some of the best video editing software for Mac users. You can get these software for free. These are best for those who are new to video editing or want to do some basic editing for short movie. The professional video editors like Adobe Premiere or Final Cut Pro cost are costly and you might not want to invest your money in these.
Free Video Editing Program Mac
However, if you want to try the professional premium video editing software for Mac then try the trial version first as most of them offer a trial version for a few weeks or month. Which one do you think is the best video editor for Mac?
0 notes
Text
How to Use After Effects Templates Easily
How to Use After Effects Templates

Adobe After Effects is a video-based tool that’s used to add elements to moving pictures and animations. Designers use it to create titles, intros, and transitions between video clips to enhance the production value of animations and video projects.
After Effects is one of those tools that’s packed with goodies, including templates that you can use to speed up project workflows. You can create your own templates or find and download them from other sources.
Here, we have a guide to using After Effects so you have everything you need to get started or better use the software.
2 Million+ After Effects Templates, Openers, Lower Thirds, Logo Stings & More With Unlimited Downloads
you can download some hot and classy templates from here below link
https://www.fiverr.com/share/r3G327
Download thousands of versatile Adobe After Effects templates, logo stings, openers, slideshow templates, lower thirds, and more with an Envato Elements membership. It starts at $16 per month, and gives you unlimited access to a growing library of over 2,000,000 Adobe After Effects templates, design assets, photos, videos and more.
AE Particle SlideshowHIGH IMPACT & STYLE
AE Fashion Logo Reveal
FULL HD & 4K
AE Logo Animation Pack
STYLISH LOGO REVEALS
Glitch Title Animations
AFTER EFFECTS TITLES
AE Wedding Slideshow
DELICATE & BEAUTIFUL
AE Product PromoSTYLISH TRANSITION PACK
Explore After Effects Templates
How to Use After Effects Templates
An After Effects template is a pre-made video/animation project file with design elements you can customize and add to your bigger projects. The best templates are often crafted by professional designers and can help jumpstart projects for those less familiar with the tool or in need of a workflow timesaver.
Using an After Effects template is easy and can help you add a professional flair to a video project with cool transitions or intros and outros.
Most downloadable templates will come with instructions, but here’s the rundown for what to do once you have a file to use.
Open the project and import files you want to add (save templates in a common folder for ease of use)
Locate the compositions where you want to make changes
Replace placeholder elements with your graphics or templates (this is where you do all the customizing)
Repeat as needed for multiple layers of effects
How to Install/Import After Effects Templates
Once you pick out an After Effects template, you’ll want to install it for use on your computer.
First, unzip the template download.
Then copy the template script If necessary), ending in .jsxbin to the After Effects folder on your computer:
Mac: /Applications/After Effects CS[x]/Scripts/ScriptUI Panels
Windows: C:\Program Files\Adobe\Adobe After Effects CS[x]\Support Files\Scripts\ScriptUI Panels
If you do this while After Effects is running, you will likely need to restart.
Then open the template file, ending in .aep. Most downloadable templates also come with instructions if you need help importing/installing the file after download.
If you have a template you love, you can even tell After Effects to load this template with every new project in the Preferences. Just navigate to the saved template and save.
How to Organize After Effects Templates
The key to making any software as efficient as possible is to organize it in a way you understand.
After Effects doesn’t come with a ready-made set of folders for templates, but you can create a template folder structure to make working with templates that much easier.
Create a folder (After Effects Templates) and put it in a location that’s easy for you to remember. You can add it to After Effects program file folders, documents, or even your desktop. The only thing that matters is that you know how you are saving the files.
Then add unzipped template files to this location. (I like to name them based on function, but you don’t have to change the name from the download.)
This will make it easy to find and open these files (or link to load with each new project).
After Effects Templates Work with Your Other Files
After Effects templates can help speed up projects and save time if you use the same motion graphics over and over. The nice thing about using a tool like After Effects is that it is compatible with other Adobe products so that graphics you create can be used across other tools, such as Premiere Pro.
You can also import work you’ve done in other tools to After Effects and even create and save your template. If you aren’t familiar with it, you can almost think of After Effects as the motion graphics version of Photoshop.
You can edit, adjust, and import files across the tool to make more impressive video and animated clips.
5 Reasons to Use After Effects Templates
If you haven’t tried an After Effects template yet, there are plenty of reasons to think about it and start looking for an option you like.
Save time and money: Starting with a template can significantly reduce the amount of time it takes to finish a project – and that’s time and money back in your pocket.
Tech techniques so you can learn the tool: If you are new to the software, templates provide a solid basis for figuring out how to do different things and how After Effects works.
Amp up production: A professional template looks great and can add value to your video project.
Unlimited options: Templates have been around for long enough that almost everything has already been done. If you can dream it u, you can probably find a template for it.
Provide creativity and trends: Look for a template with a more recent release date and you might find some of the latest trends in design included. This can help you think even more creatively about projects, sparking inspiration.
Conclusion
Like templates for other tools, the most significant benefit to an After Effects template is helping to speed up a workflow or produce a specific technique easily. While you can create your own, there are plenty of downloadable options from other sources to choose from. also, check creative templates here
0 notes
Text
5 Blog Features You Need to Be a Successful Blogger

You’ve been putting a lot of effort into writing your blog posts. But, for some reason, your posts aren’t getting the traffic you’d hoped for.
Hardly anyone is viewing your posts. And no one ever leaves comments. You know you’ve got some valuable information, so what gives?
Start your blog today with a
special OnBlastBlog discount from Bluehost
. Only $2.95/mo with a free domain name and email address. You can't beat this offer!
To be a successful blogger, you can’t just slap some words on a screen and hope people read them.
Blogging requires a great amount of strategy. Quality blog posts contain certain key features. These key features keep people reading until the end and make them want to share the post with their friends.
Let’s take a look at the top 5 blog features you need in order to succeed:
1. The Right Structure
Structure is often one of the most overlooked aspects of blogging.
But, without a set structure, you’ll appear unorganized and scatter-brained. No one is going to take the time to read a post like this. The right structure makes your posts readable, skimmable, and shareable.
Plus, when you structure your posts the same, your audience will know what to expect from you and start to trust you more.
Here’s what your structure should look like:
The Intro
The intro is your chance to hook the reader right away.
Also, a good intro gives the reader a glimpse of your personality and your writing style.
Seriously- do not skimp on the intro. If anything, it deserves the most focus. A good intro grabs the reader’s attention and makes them want to keep reading.
Ready to boost traffic with a mailing list?
Constant Contact
has you covered with the tools and expertise you need to get started. Check out their
free trial
today!
(Sponsored)
Here are some effective ways to create an attention-grabbing intro:
Present the reader’s problem in a way that’s relatable (i.e. Ask a question like: “Are you stressed out about all of your credit card debt?”
Start with an eye-catching statistic
Share a personal story
Or, you can combine any of these elements.
The intro should then conclude with a smooth transition to the body that will make the reader want to learn more.
The Body
You’ve probably got several points you want to make in your post.
So, first things first: break these points up into logical headings and sub-headings. Big walls of text are unappealing and nearly impossible to read. If you do this, you’re going to lose your readers.
Basically, you want to think of each heading like a miniature blog post. Each mini post should transition smoothly into the next mini post.
And don’t forget to showcase some personality. No matter how valuable your content is, no one is going to read it if it’s presented in a stale and boring manner.
Conclusion
If someone makes it to the end of your post, congratulations.
This means you said something that resonated with the reader. And likely, they’re going to want to hear more from you.
They might also be interested in buying your products or services.
Therefore, make sure you conclude your blog post with a strong call-to-action. For example, you might want to navigate them towards another blog post so they stay on your site longer. To do this, you could say something like, “Click here for more useful tips on managing your finances.”
2. Visual Content
You’ve probably heard a million times that written content is the most important aspect of boosting your search rankings.
This is undoubtedly true. But, visual content (infographics, videos, slideshows, images) is also a crucial feature that can take your blog to the next level.
Remember how we said we want to avoid huge walls of text? Images are a great way to break those up.
Also, people just love visual content: 65 percent of the population are visual learners. A few simple infographics can really go a long way.
3. A Clear Focus
Readers don’t visit their favorite blogs in hopes of finding something interesting.
They visit their favorite blogs knowing that the posts will contain specific information they’re looking for.
Maintaining a clear focus is one of the most important blog features of successful sites.
Don’t try to be a one-stop shop for your readers. Instead, niche down to ONE area of focus. When you niche down, readers know exactly what they’re getting into every time they visit your blog. They know that they won’t have to sift through any useless info to find the stuff they can relate to. And this will keep them coming back for more.
For example, let’s say you’re interested in writing about money. Think about how you can niche this down: Do you want to write about money-saving tips? Do you want to write about money investment opportunities?
You may think that narrowing your focus limits your readership. While it does to some extent, trying to talk about everything throws your credibility out the window. A blog that maintains focus establishes you as an expert and allows you to build trust with your audience.
4. Regular Content
Ok, you just wrote a killer blog post that got tons of comments and social media shares. Time to kick back and relax a bit now, right?
Wrong. Make no mistake- blogging is hard work. You need to be blogging on a consistent basis in order stay relevant with your audience.
With that being said, make sure you’re always striving for quality over quantity. One solid post per week is better than five thrown-together posts.
Everyone is competing for consumer’s attention, so make sure you stick to a disciplined schedule so your blog doesn’t get lost in the fog.
5. Internal Linking
One of the main goals of blogging is to keep people on your site for as long as possible.
We already talked about how you can do this with a call-to-action in your conclusion. But, you should also focus on doing this throughout your blog post.
We’re talking about internal linking. Here are the basics of how it works:
Create a lot of quality content (so you have stuff to link to)
Next time you blog, link to other content you’ve previously created
Don’t link to a homepage, focus on other blog pages, contact pages, or service pages
Make sure the link is relevant (aka don’t write “contact us today” and then link it to some random post)
Sprinkle a few links in every article, too many makes it look like you’re desperate
Linking is one of the most important blog features and it also helps with SEO, so don’t forget to do it in every post.
Successful Blog Features: Bottom Line
Clearly, it takes a lot more than just good grammar and some fun facts to run a successful blog.
You need to implement these blog features if you want to succeed. If you’re confused on any of the features, don’t worry.
We’re here to answer any questions you might have so you can nail your next blog post. Check out our blog to get some ideas!
0 notes
Text
5 Blog Features You Need to Be a Successful Blogger

You’ve been putting a lot of effort into writing your blog posts. But, for some reason, your posts aren’t getting the traffic you’d hoped for.
Hardly anyone is viewing your posts. And no one ever leaves comments. You know you’ve got some valuable information, so what gives?
To be a successful blogger, you can’t just slap some words on a screen and hope people read them.
Blogging requires a great amount of strategy. Quality blog posts contain certain key features. These key features keep people reading until the end and make them want to share the post with their friends.
Let’s take a look at the top 5 blog features you need in order to succeed:
1. The Right Structure
Structure is often one of the most overlooked aspects of blogging.
But, without a set structure, you’ll appear unorganized and scatter-brained. No one is going to take the time to read a post like this. The right structure makes your posts readable, skimmable, and shareable.
Plus, when you structure your posts the same, your audience will know what to expect from you and start to trust you more.
Here’s what your structure should look like:
The Intro
The intro is your chance to hook the reader right away.
Also, a good intro gives the reader a glimpse of your personality and your writing style.
Seriously- do not skimp on the intro. If anything, it deserves the most focus. A good intro grabs the reader’s attention and makes them want to keep reading. It has covered you with the tools and expertise you need to get started.
Here are some effective ways to create an attention-grabbing intro:
Present the reader’s problem in a way that’s relatable (i.e. Ask a question like: “Are you stressed out about all of your credit card debt?”
Start with an eye-catching statistic
Share a personal story
Or, you can combine any of these elements.
The intro should then conclude with a smooth transition to the body that will make the reader want to learn more.
The Body
You’ve probably got several points you want to make in your post.
So, first things first: break these points up into logical headings and sub-headings. Big walls of text are unappealing and nearly impossible to read. If you do this, you’re going to lose your readers.
Basically, you want to think of each heading like a miniature blog post. Each mini post should transition smoothly into the next mini post.
And don’t forget to showcase some personality. No matter how valuable your content is, no one is going to read it if it’s presented in a stale and boring manner.
Conclusion
If someone makes it to the end of your post, congratulations.
This means you said something that resonated with the reader. And likely, they’re going to want to hear more from you.
They might also be interested in buying your products or services.
Therefore, make sure you conclude your blog post with a strong call-to-action. For example, you might want to navigate them towards another blog post so they stay on your site longer. To do this, you could say something like, “Click here for more useful tips on managing your finances.”
2. Visual Content
You’ve probably heard a million times that written content is the most important aspect of boosting your search rankings.
This is undoubtedly true. But, visual content (infographics, videos, slideshows, images) is also a crucial feature that can take your blog to the next level.
Remember how we said we want to avoid huge walls of text? Images are a great way to break those up.
Also, people just love visual content: 65 percent of the population are visual learners. A few simple infographics can really go a long way.
3. A Clear Focus
Readers don’t visit their favorite blogs in hopes of finding something interesting.
They visit their favorite blogs knowing that the posts will contain specific information they’re looking for.
Maintaining a clear focus is one of the most important blog features of successful sites.
Don’t try to be a one-stop shop for your readers. Instead, niche down to ONE area of focus. When you niche down, readers know exactly what they’re getting into every time they visit your blog. They know that they won’t have to sift through any useless info to find the stuff they can relate to. And this will keep them coming back for more.
For example, let’s say you’re interested in writing about money. Think about how you can niche this down: Do you want to write about money-saving tips? Do you want to write about money investment opportunities?
You may think that narrowing your focus limits your readership. While it does to some extent, trying to talk about everything throws your credibility out the window. A blog that maintains focus establishes you as an expert and allows you to build trust with your audience.
4. Regular Content
Ok, you just wrote a killer blog post that got tons of comments and social media shares. Time to kick back and relax a bit now, right?
Wrong. Make no mistake- blogging is hard work. You need to be blogging on a consistent basis in order stay relevant with your audience.
With that being said, make sure you’re always striving for quality over quantity. One solid post per week is better than five thrown-together posts.
Everyone is competing for consumer’s attention, so make sure you stick to a disciplined schedule so your blog doesn’t get lost in the fog.
5. Internal Linking
One of the main goals of blogging is to keep people on your site for as long as possible.
We already talked about how you can do this with a call-to-action in your conclusion. But, you should also focus on doing this throughout your blog post.
We’re talking about internal linking. Here are the basics of how it works:
Create a lot of quality content (so you have stuff to link to)
Next time you blog, link to other content you’ve previously created
Don’t link to a homepage, focus on other blog pages, contact pages, or service pages
Make sure the link is relevant (aka don’t write “contact us today” and then link it to some random post)
Sprinkle a few links in every article, too many makes it look like you’re desperate
Linking is one of the most important blog features and it also helps with SEO, so don’t forget to do it in every post.
If you are in search of local SEO company in Vail and want to learn more about it, then please let me know in the comment section.
0 notes
Text
Download Viva Video Software
VivaVideo For PC is searched loads at the Internet. If you are also trying to find the equal you then have located the proper page. In this put up, I actually have absolutely defined how to use Viva Video App for Windows 7, 8, eight.1, 10 or Mac PC. As we all recognize that VivaVideo App is handiest available for Android & iOS platform.
It is one of the maximum popular Video Editing utility for mobile gadgets. The app isn't to be had for Windows PC. In case, you want to apply this application for your PC, this guide is only for you. Well, you should additionally check out the Pubg down load for pc if you love playing this game.
VivaVideo is taken into consideration as the No.1 Video Editor for Android with over two hundred Million downloads on Google Play Store. The software may be used only on cellphone devices as it isn't available for PC customers. So, In case you don’t have a telephone otherwise you want a bigger display screen than a cellphone then you will be required to download VivaVideo for PC. Unfortunately, there's no this type of app like VivaVideo for Windows PC is formally available which we are able to deploy on our device. To use VivaVideo for PC, we need Android Emulators on our PC so that you can run Android apps.

VIVA VIDEO FOR Windows DOWNLOAD WITH BLUESTACKS
Viva Video is a popular video editor among the Android phone customers. Now, this outstanding utility is also available for PC users. You can installation the Viva Video application to your Computer the usage of any Android Emulator like Bluestacks. Bluestacks permits you to install any Android utility in your PC.Viva Video for PC using Bluestacks
Here we will be using Bluestacks, it's miles the famous android emulator that you can use to put in Android programs. In case you already have Bluestacks on your PC, then there may be no want to down load it again. But you could set up it in case you don’t have Bluestacks hooked up on your PC.
There are some simple necessities for PC with Windows to run Bluestacks: –
Microsoft Windows OS- 7/eight/eight.1/10/XP/Vista.
MAC OS X v10.6 or v10.7
RAM ought to be extra than 512 MB
There should be a terrific pix driving force.
Also, Download Vidmate for PC
The user need to have an active net connection to get entry to the application.
If your PC meets the minimum necessities, then you could down load Bluestacks on your PC. You can follow the beneath steps to install Viva Video for PC using Bluestacks: –
You have to install the software you have got downloaded.
Now open the Play Store application for your PC using Bluestacks.
You have to sign in along with your Google account.
Search for Viva Video inside the search field.
Select the suitable end result and click on on deploy.
Wait until the installation finishes.
Now, Viva Video for PC is mounted in your PC.
You can find this application within the software menu of Bluestacks. Open the application and start making your very own motion pictures memories.
This is all you have to observe so that you can deploy the App on your PC. Viva Video for PC lets in making tremendous videos and photo slideshows. You can upload masses of results for your movies and photographs. The application also allows sharing films and pictures on social networking sites.
DOWNLOAD VIVA VIDEO FOR PC WITH NOX APP PLAYER
One can without problems install Android programs on PC using Android Emulator. When you listen approximately Android Emulators, then you ought to be thinking about Bluestacks and Youwave. But, Nox App player is the new Android Emulator within the marketplace. It could be very easy to apply and you could without difficulty deploy Android packages on your PC.Viva Video for PC the usage of Nox
Nox App participant is one of the pleasant alternatives to Bluestacks and Youwave. You can effortlessly down load Viva Video App to your PC the usage of this participant. In case you have already got Nox player to your PC, then there is no need to down load it again. But you may set up it if you don’t have Nox participant set up in your PC.
You can comply with the below steps to put in Viva Video for PC the usage of Nox App player: –
Download Nox App player from here.
You ought to installation the software you have downloaded.
Now open the Play Store software in your PC in Nox app participant.
You have to check in together with your Google account.
Search for “Viva Video” inside the seek container.
Select an appropriate result and click on set up.
Wait till the set up finishes.
Now, Viva Video for PC is mounted for your PC.
Also, Download Kinemaster for PC
You can discover this utility inside the application menu of Bluestacks. Open the utility and begin making your very own movies testimonies.
Viva Video for PC could be very clean to use due to its easy person interface. Even a amateur consumer can without difficulty use the software to make video stories. You can also dub the videos to your voice and may proportion with your family. There are many exciting and top notch features of the application that you'll enjoy.
Therefore, this way you could easily get Viva Video for PC the use of Nox app player. Now you may use this utility in your PC to make exceptional films the use of one-of-a-kind outcomes. You also can make slideshow and college using pix out of your garage. Also, share your photos and motion pictures with your pals on social networking web sites.
HOW TO USE VIVA VIDEO APP ON ANDROID?
As the Viva Video application is officially to be had at the Play Store, you may without difficulty download the software. After you've got downloaded the software, you may begin making films the use of special interesting functions. Add special materials to offer your video a natural look.How to apply Viva Video on Android
The application permits to merge and trim the videos in only some clicks. Viva Video gives particular camera lenses that help you to feature special effects in actual time at the same time as taking pictures. You can do this by way of clicking at the seize inside the classes section.
You can select slideshow alternative for making the slideshow of more than one pics. This can also be carried out by means of adding specific filters and outcomes totally free. In substances segment, you can pick from hundreds of materials to feature for your motion pictures. These allow you to to create tremendous motion pictures and snapshots.
In Edit segment, you can edit your movies and pictures out of your storage. FX class lets in the use of unique video transitions to make the exceptional video. All your edited movies can be stored within the studio section. You also can download the Viva Video utility at the iOS device from the App Store.
More info Clicks Bestoftool.com
0 notes
Text
The Life Cycle of Plastic Bottles - Production


These are my initial ideas and development before creating my motion graphic. I started by creating a mind map to generate some ideas and I picked the ideas that i think would be best and most interesting to make a motion graphic about. From here I started making some sketches on how I could make the logo and text look in it. I also drew a rough storyboard out to visualise how I want my animation to look. I drew each slide I wanted and how I thought it would look best.

This is the digital storyboard that I created using Illustrator. In this, I visualise my ideas better to properly show how I imagine it to look, using basic assets and some text. It shows how I want the lay each slide out as I give a brief description under each panel. Some colours I’ve used aren’t my final ideas. I plan to change it depending on the transitions I use. For example, I think the way it goes from a green background to a blue and then back to green seems a bit all over the place. So I may change the background to a dark blue for the Effect slides.
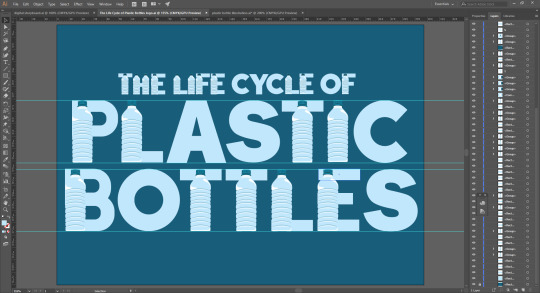
After this, I started to develop my animation in After Effects. I started by creating my assets. I used Illustrator for any assets that will already have a background and Photoshop for any assets I want to have a transparent background so I can import it directly into the animation. For example, the title card I did in Illustrator by creating a plastic bottle vector and using it within my letters to make it look unique. I created the letters myself too using the pen tool or shapes. I chose to use a dark blue background as I thought this would be suitable for the theme of plastic bottles as my illustration is plastic water bottles. I used a light blue for the bottle vector and used the same blue for the letters so it blends in and looks like a natural typeface.

The next thing I did was create my Earth vector that I had planned to use based on my storyboard. I used the eliptical marquee tool and created a blue circle as the base and water of the Earth. I then used the pen tool to create the shapes of the continents based on images I used as a reference from Google. I chose a light pastel green to go with the blue as I thought these two colours go well together and would look good on the dark blue background I plan to have in the sequence of my animation.

Next, I wanted to create a vector for when I talk about global warming. So I thought an obvious vector to represent that would be the Earth vector I used but with fire around it. To create this, I duplicated my Earth vector and drew out fire around it using the pen tool and a bright orange fill colour. I also added a circle the size of the Earth and painted it the same orange but reduced the opacity so I can cover the whole vector and make it look like it’s all on fire.
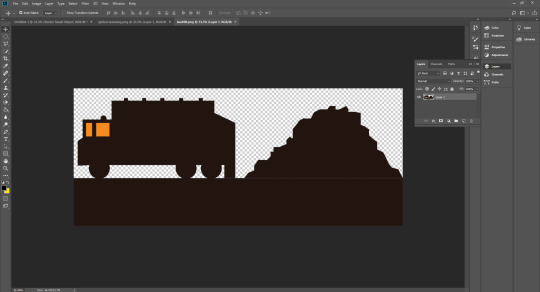
Next I created a vector for when I talk about effects and landfills. I decided to create a silhouette of a bin truck and landfill next to it. I used the pen tool to create the shape of the landfill and the shape tools for the truck. I added windows the same colour as the background I will be using in the animation so it looks clear in it.

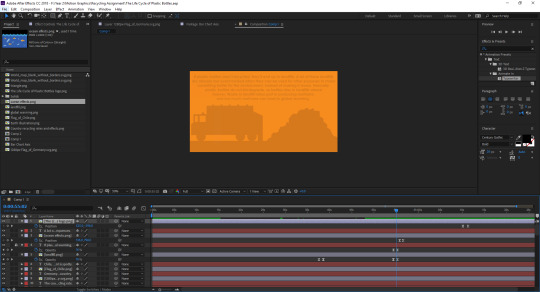
Next, I created the vector for the ocean and fish which I will also be talking about in my animation. I used the pen tool to create the waves and created three versions of it, each in different shades, so that it shows the depth of the ocean and makes it look less simple. I duplicated the bottle vector and used it in my vector and resized it to an appropriate size. I created the fish using the elliptical marquee tool and the polygonal tool for the fins and used the pen tool to create the face. After this I created the six-pack holder using the elliptical marquee tool and kept duplicated it till there are six of them aligned together and used the pen tool to fill in the gap between them. For the fish, bottles and six-pack holders, I reduced the opacity for them all to they look darker. This makes it look like they’re actually underwater and that there is water in front of them that makes them less visible.

Next I opened up a new composition in After Effects. I created a solid fill layer for the background and chose the colour of the background in my title card so it blends while I animate it.

After this, I imported my title asset into the composition. I animated the positioning of the asset by making it like a slideshow. It slides up into the screen as if it is being pulled up from above.

After this I used the type tool and created the sub title for what aspects of water bottles my animation will be about, which is about the best and worst recycling rates in the world and the effects of not recycling. I coloured the text the same colour as the original title card so it stays consistent. I animated this the same way I did for the title card by positioning it so that it moves up along with the title. This makes it look like it’s all one page and makes the animation itself flow better.

From here, I added the transition for the next slide by using a ripple effect I’ve learned previously. I made four circles, each a different shade, darkest being the biggest and lightest being the smallest, and made them all expand by animating the scale. They all expand at the same time from 0-100% except the final and lightest circle which expands all the way so it covers the screen and is used as a background for the next part of my animation.

Next, I started the next bit of my animation. I imported the Earth vector and animated the position so it comes in from the corner of the screen. It also moves along with the text I used for the title of what I’ll be talking about next. The 4 rows of the text come from 4 different directions and also disappear from the opposite direction it came from, while the Earth vector shrinks to 0%, leaving the background plain for the next part.


The next sequence in my animation focuses on the best and worst rates of recycling. For this I used a bar chart to show the stats. I only focused on the best and worst as I thought everything in between wouldn’t matter as much, therefore the bar chart doesn’t involve all the countries and is only used to present the best and worst rates. The bars all rise up from the bottom of the graph to the size I thought would be best. I did this by animating the scale and changing it from 0% to whatever I wanted. After this I added an arrow and animated it using trim paths so it extends out and points at the flag. After this, the opacity of everything on the slide, except the background, reduces to 0%.
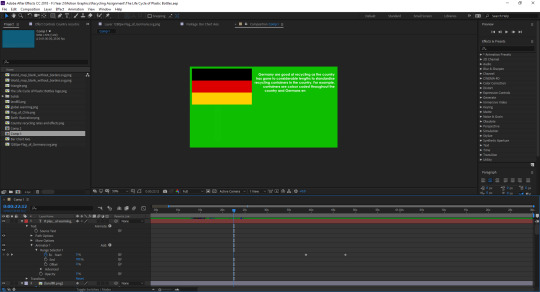

Next, I started talking about what the countries do to get such a good or bad rate of recycling. The flags appear by animating the opacity from 0-100%. After the flag appears, text starts showing up next to it in an effect where it looks it is being typed up. I did this by adding an effect to my text known as “typewriter”. I added the same effect for the next flag and text.

From there, everything on my page disappears with the opacity so it’s a blank green background. This green background then shrinks the same way it expanded with the ripple effect but in reverse. I did this by arranging the keyframes the same way, but making it go from a high to a low percentage, instead of low to high.
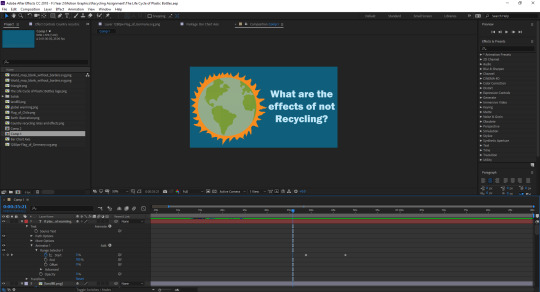
Behind the ripple effect, there is a new slide with the original dark blue background. On this slide, it begins the next part of my animation, which will be discussing the effects of not recycling. For this, I used the vector I created of the Earth on fire to represent global warming. I also asked the question of what the effects are so the view knows what the next sequence will be about.

The next transition I added was making the Earth vector expand where the fire is so it creates a new orange background for the next part of the animation. I did this by moving my anchor point to the fire and animating the scale from the original size till it’s big enough the fill up the whole screen.

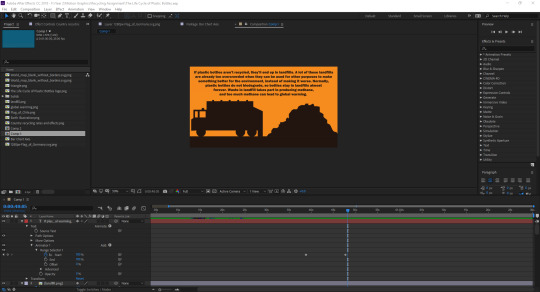
After that I began the next part of the animation where I talk about the actual effects with the orange background. I made the vector of the truck and landfill appear by changing the opacity from 0-100%. As soon as the vector appears, the text shows up talking about landfill. I added the typewriter effect to the text on this slide too. Then, everything on the page except the background disappears by changing the opacity back down to 0%.
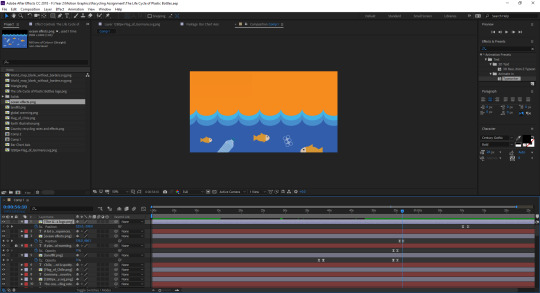

The vector of the ocean and fish the appears from the bottom by changing the position the same way I did with the logo at the start. This vector comes up about halfway through the screen leaving enough space above it for some text explaining the effects on the ocean. This text also shows up with the typewriter effect as I thought it would keep it consistent with the rest of my animation.
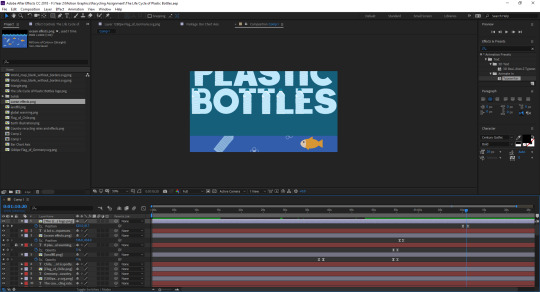
The last part of my animation is how it started. The Life Cycle Of Plastic Bottles logo drops down and finishes off my animation. I thought this would be a good idea as it would be sort of abrupt for it to finish on the ocean slide. So I thought finishing it the same way it started would be a suitable way to signify that it is the end of my animation.

These are all the sounds I’ve used in my animation. I got all my sounds from freesound.org and used multiple sounds that I thought would be appropriate for each slide in my animation. It starts with simple intro music I found up until the slide with the bar chart. After that, I used a typewriter sound effect for when the text starts to appear. I used an explosion sound for when the global warming vector expands to make it seem like it’s blowing up. I used a reversing truck beeping noise when I talk about landfill and ocean sounds when I talk about how not recycling affects ocean life.
youtube
This is my final animation. Throughout it, I made sure all my keyframes were set to Easy Ease as this allows the movement of my assets and text to be smooth and more natural. I also ensured whenever text appears on the screen, there is a few seconds pause to allow the viewer to read all the text, before transitioning to the next slide.
1 note
·
View note
Text
Photo slideshow with music maker online
After identifying your weaknesses employing the before mentioned assessment, develop a plan for how you'll enhance each one so you're able to move your music career forward. On the opposite hand due to its size there are many fun things to do and interesting places to see. A constant feed of on-line info about your crush will ensure it is more challenging that you get them out of your mind. If you don't have an ideal vision of where you would like to go in the audio business, it is going to be quite difficult not to become torn in various directions which take you far away from your initial targets.
Choosing Photo Slideshow with Music Maker Online
Finding the most suitable computers for your small business isn't always a simple matter to do. The business has to manage all the various reps, and it's complicated. If you obey my steps, your project ought to be among the very best at your school too. If you can't, that's a very clear indication that you're working for your company. http://contentslideshow.com
If you're at all artistically inclined, you might look at creating your art yourself. Get trained by means of a mentor who has already achieved the situations you would like to do in the audio industry to achieve your music career goals faster. Until you abandon the amateur music career advice you've been given by other people, you aren't going to succeed in the audio enterprise. The downside of telling a story with clip art is the fact that it can be difficult to find precisely what you need.
So it's best to purchase photo frames with built-in accelerometer which automatically switches from portrait to landscape in line with the image. Instead, elect for shots of various colours and even ask your photographer to experiment with it so that you can choose. Manipulation of the end timeline is tough to master, especially when setting the scale of the first timeline display. See whether your videographer is ready to just supply the raw footage without editing.
The Demise of Photo Slideshow with Music Maker Online
Quite simply, if you are in possession of a massive task ahead and had to fulfill a deadline. If you aren't good with numbers and record keeping for instance, do not spend 3 hours per day attempting to master that function. Anyway, it's fun and easy after getting the hang of it. Simply working a good deal of hours every day is not going to help you unless it's moving you closer to your objectives.
There are a lot of built-in audio tracks that you may use in your video free of charge. You are able to embed another video player that has the ability to deal with the video you want to present into Powerpoint. In the box, you are going to have the option below to state why you have the ability to use the music in your video. Its miniature version is fantastic for boutonnieres and nosegays.
Because Sutori's software is specially intended for educators and students, it might not be ideal for personal, home usage, or use in the industry sector. If you are inclined to live with the simple fact that Windows computers are vulnerable to viruses and other issues, then the HP 100-5155 desktop computer ought to be an effortless buy. Now you have the item, go right ahead and familiarize yourself with it. Fortunately, you don't need to learn about all of the brand names before knowing the kind of processor that will fit you best.
After you've done that, you can begin making your brochure. Animation has ever been in vogue, and is currently the most recent trend in cinema. The subsequent timeline is almost enjoy a blog-at-a-glance, documenting life experiences since they happen. Developing a digital scrapbook is less expensive than a print scrapbook, which might be the reason print scrapbooking is on a decline.
The majority of the qualities I am going to be discussing have to do with the way that you think' rather than the particular actions you take. Possessing a Portuguese phrase book handy is also a great idea! So, the wedding is a fundamental part of everybody's life. You are prepared to devote the remainder of your life with your partner.

The text states that additionally only a single word or image is perceived subliminally the majority of the moment, and that the main way in which it may be used in advertising is by developing a familiarity with an item that hasn't been seen before, familiarity that could be misinterpreted as preference. You may use these software to make your booktrailer. Then at the base of the slide, you can customize the transition effect of the person slide by selecting a kind of effect supplied by the program. There's a built-in Internet browser named Safari, which is very practical for when you want to look something up on the internet or in case you don't have accessibility to a computer at the moment.
The Supreme Strategy to Photo Slideshow with Music Maker Online
The screen To be pleased with your purchase, you want to get pleased with the manner your photos are displayed. It is possible to even create a small slideshow which can be accompanied by music of your choice, so you may present your pictures off in style. Arrange your photos how you want. If you would like to get rid of several photos at the identical time, please press Shift or Ctrl when selecting the photos.
You may observe the way that it works with the photo. In fact, the photo is simply taken out of the slideshow and the original image file isn't removed. In overall, building a photo slideshow with Kizoa is extremely simple, particularly with the gorgeous templates. With different clicks, you can make exciting and professional-looking photo slideshows that are playable on the net.
Furthermore, its classes might not be the ones desired, but nonetheless, it still provides a beneficial degree of performance. You may then get a notion of the painting's possible price. You are able to locate a lot of table arrangements online, select the perfect one in accordance with your budget and requirements. Our homes are decorated in some specific colours and will specify a foundation for color preference in the environment outside our homes, like a classroom.
In the event the wedding videographer you hired has their own company, you don't need to tip them anything. Thus, when you contact the on-line florist, don't neglect to split the pictures of your dress or pick the bouquet that matches nicely with your dress. Anyway, wedding flowers are also utilized as the poesies to given to every guest for a symbol of thanks. You are able to celebrate your wedding and decorate the area in various ways.
0 notes
Text
Beauty Water, created by two celebrity makeup artists, Son & Park, is one of the products curated by Charlotte Cho, co-founder of Soko Glam. In addition to this, it is 2015 Soko Glam Beauty Award Winner, (well-deserved) and is one of the best K-beauty product at Sephora. But why this product is so popular?
What is it?
Beauty Water is not your regular toner. Instead, it’s a multi-tasking beauty product with a consistency of water that delivers moisture to your skin, cleanses, adds glow and exfoliates – all at the same time!
This cult favorite toner is your transition from the “cleansing” steps to “nourishing steps, as it creates a clean base for subsequent skincare products, while also preps the skin for makeup.
sokoglam.com
The product is suitable for normal, oily, dry and combination skin types, and it even works for my sensitive skin. The pH level is 4.5, which means it is restoring the natural pH level of your skin after the cleansing step.
Ingredients
Son & Park Beauty Water is packed with skin-loving oils and extracts. Lavender and rose flower water along with the orange fruit extract deliver hydration, green tea protects from environmental damage, prevents from premature aging and soothes irritation, while papaya and willow bark work as an exfoliator, revealing a smoother and brighter complexion. In addition to this, Beauty Water is formulated without Parabens, Sulfates, and Phthalates.
Full List of Ingredients:
Water, Rosa Damascena Flower Water, Hamamelis Virginiana (Witch Hazel) Water, Butylene Glycol, Propanediol, PEG-7 Caprylic/Capric Glycerides, Pentylene Glycol, Citrus Aurantium Dulcis (Orange) Fruit Extract, Xylitol, Citrus Aurantium Bergamia (Bergamot) Fruit Oil, Olea Europaea (Olive) Fruit Oil, Citrus Aurantium Dulcis (Orange) Oil, Citrus Grandis (Grapefruit) Peel Oil, Lavandula Angustifolia (Lavender) Oil, Cedrus Atlantica Bark Oil, Pelargonium Graveolens Flower Oil, Carica Papaya (Papaya) Fruit Water, Jasminum Officinale (Jasmine) Oil, Illicium Verum (Anise) Fruit/Seed Oil, Artemisia Absinthium Extract, Rose Flower Oil, Ferula Galbaniflua (Galbanum) Resin Oil, Thuja Occidentalis Leaf Extract, Eucalyptus Globulus Leaf Extract, Lavandula Angustifolia (Lavender) Flower/Leaf/Stem Extract, Melaleuca Alternifolia (Tea Tree) Leaf Extract, Melissa Officinalis Leaf (Green Tea) Extract , Mentha Piperita(Peppermint) Leaf Extract, Mentha Rotundifolia Leaf Extract, Mentha Spicata Flower/Leaf/Stem Extract, Origanum Majorana Leaf Extract, Origanum Vulgare Leaf Extract, Pelargonium Graveolens Extract, Rosmarinus Officinalis (Rosemary) Leaf Extract, Thymus Vulgaris (Thyme) Leaf Extract, Glycerin, Decyl Glucoside, 1,2-Hexanediol, PEG-40 Hydrogenated Castor Oil, PPG-26-Buteth-26, Sodium Chloride, Ethylhexylglycerin, Sodium Citrate, Citric Acid, Octanediol, Copaifera Officinalis (Balsam Copaiba) Resin, Protease, Alcohol Denat., Alcohol, Phenoxyethanol.
Even though it is quite gentle for the skin and works for my sensitive skin, it contains Alcohol and some PEGs and PPG. Nevertheless, their concentration is likely to be very little, as most of the ingredients (except for PEG-7 Caprylic/Capric Glycerides) are at the bottom of the list.
The main concern of the PEG-7 Caprylic/Capric Glycerides, in its turn, is its possible contamination with such potential carcinogens as Ethylene Oxide and 1,4-Dioxane. Nevertheless, some of the manufactures may have a policy on stripping down the contaminants, however, I couldn’t find any policy for Son & Park. Nevertheless, FDA considers PEG-7 Caprylic/Capric Glycerides as “designated as safe for general or specific, limited use in food“, since there is no strong evidence that PEGs and PPGs cause an adverse reaction to the skin or health. However, to be on the safe side, it’s better to avoid putting the product directly on broken skin.
How to Use:
Beauty Water can be used multiple times a day, including your morning and night routine as well as for refreshing the skin in between. There are a few ways to use Beauty Water.
Use it as an exfoliating toner by moistening a cotton pad and gently sweeping across the face.
Use as a regular toner patting it into your skin before you apply your skin care products or to prep the skin before makeup application.
I prefer using it as my last “cleansing” step. I apply a little bit on a cotton pad, gently cleansing my face and neck. Besides, I also like to apply it before I put my makeup on since it gently smoothes my skin.
I’ve almost finished my full size (11.49 oz / 340 ml) bottle and it has lasted me for over 7 months and I think the remaining amount of the product will last me another couple of months.
My Experience
As I mentioned, it feels like water on the skin and doesn’t leave any sticky feeling or residue. This K-beauty cult favorite product absorbs fast into the skin and gives me instantaneous glow.
Son & Park Beauty Water
I also love the packaging and the closure on the bottle since it prevents dispensing the excess product. I struggled to find the exact name for this type of closure, but hope you understand from the picture. If you know the right word, just leave it in the comments!
Overall, I loved this product a lot, and I’m likely to repurchase it if I don’t find an alternative with “cleaner” list of ingredients.
You can also see me using this product in my latest video on Youtube:
youtube
The retail price for Beauty Water is $30.
Bonus Tip: How I took these pictures
In stories on my Instagram account, I asked if you, guys, would like to see behind the scenes more, so this section is for you!
My initial goal was to capture the bubble in the product. For that, I was using a tripod – his name is Slavik by the way, and my Nikon D800 with Nikkor 105 mm Micro lens.
Excuse my “falling” #behindthescenes images, it’s quite hard to have only two arms outstretched in two different directions!
Some Technical Details
I’m a huge fan of adding sun rays into the picture. You can achieve this by closing your aperture to the max, in other words, choosing the highest number of your F stop. My lens gives me a chance to close it down to F/39! Can you imagine this?
Nevertheless, you have to be careful when you choose a high number of F stop, as all the dust that you have on the camera sensor will show on the picture. But you can always retouch the image, which is what I did, but it’s quite a time-consuming process, though.
This is a screenshot from Lightroom. All the grey rounds are the places I had to retouch to keep the photo “clean”!
My remote control stopped working, so I had to use a timer. I also attached an extra monitor from Neewer, so that I see what I’m shooting. I also had a reflector that I was trying to hold with my foot, but I’m sure it barely added any effect to this. I definitely need to invest in a stand.
Finally, I was experimenting!
The secret behind the background
I was shooting at home. It was a sunny day, around noon, and the sky had that perfect blue color. I pointed the camera upwards and used the sky through the window as my background. To my surprise, the dirty window didn’t ruin my picture. On the contrary, it added a sophisticated background to the photo! It looks like I used an extra source of light and sprinkled water from the back – this is what I did for the picture below back in a day.
View this post on Instagram
Fresh strawberries, anyone? 🍓 Btw, no post-production effects on this photo! ✨#tweetagram #nikonusa #nikond800 #featuremeinstagood #stilllife #productphotography #strawberry #realphoto
A post shared by Farah Gasimzade (@farahgasimzade) on Jan 31, 2018 at 1:17pm PST
But this time, it was just a dirty window 🙈 Nothing fancy, right? 🙂
How I could make these photographs better
I would probably use remote control and maybe a stand for the product so that I could be free in my movements. This would also help me lower the shutter speed and ISO number to a the well-exposed photo with less noise. I reduced the noise during post-production in Lightroom, but I prefer to do everything during the shooting. And I would probably take my camera to service for cleaning, before shooting on high F stops.
This slideshow requires JavaScript.
Anyways, I really enjoyed experimenting, and I’m surprisingly happy with the result. The final pictures look like the bottle is immersed in water with sun rays shining through the top. Here is the photo fresh out of camera and its edited copy. As you can see, all I did for post production was a crop (for instagram), retouching the dust, noise reduction, and slight adjustments of exposure and color.
By the way, how do you like the concept of adding “Behind The Scenes” Section to my blog posts? Let me know in the comments down below!
Sons & Park Beauty Water Review + Secrets Behind the Scenes Beauty Water, created by two celebrity makeup artists, Son & Park, is one of the products curated by Charlotte Cho, co-founder of Soko Glam.
#beauty water#behind the scenes#glowing skin#k-beauty#nikon d800#product photography#review#soko glam
0 notes
Text
Web video editor open source
If you are a newcomer to video editing, you may be thinking about which software to use. If you're just starting out in editing video, it would be prudent to use a number of the totally free video editing software till you establish what your video editing needs are before you get a a program. The truly amazing thing about it's that it may be used free of charge and that it permits you to access great new characteristics that make it a wonderful alternate to Avidemux for Windows. As shortly you get an ideal camera, you then must receive a laptop computer or maybe a personal computer. https://slideshow-online.com/de
As can be found from the aforementioned items, there are lots of criteria it is possible to specify to help choose your video editing package. The easiest way to carry out such conversion by means of a program is by utilizing the pre-installed in Windows Microsoft Paint. The other principal tool which will be required for editing is a computer. If you would like to open several images the program will inform you which keys to hit for several selections.
So long as you know your editing requirements, there's a product for you. Avail of the trial version to determine if Camtasia Studio can satisfy your video editing requirements.
There are over 50 distinct themes readily available, and you may also decrease the size of your video by compressing it. If you must conserve an internet page for later reference, a screenshot will capture the present overall look of the site and make it possible for you to save it like an image. You can pick the file extension you want to use to save your image. Click within the window, and a file containing a screenshot of only the browser window will show up on your desktop.
Should you do your house work, you'll end up being pleased with the outcome, having found the very best video editing software for you. If you skimp on audio, it will bring down the entire degree of your production. So you discover, deciding the appropriate software program is of extreme importance if you would love to make excellent film recordings. Some computer programs make it possible for you to apply transitions and audio effects in order to earn videos attractive along with appealing.
What Everybody Dislikes About Web Video Editor Open Source and Why
Thus, have a moment and think of what you use your computer for. You are able to even make short video loops that can be entertaining. You may also directly share your work to different social media sites. Create a Google site if you haven't already done so.
When you purchase proprietary software you're essentially buying the right to use the software in a particular way, and oftentimes the company that developed it owns the software, and you simply purchase rights to utilize it. There are a lot of possible disadvantages to Apache OpenOffice, also. If you get a message a program isn't a Win32 application or something similar, there are lots of potential causes.
Even cost-free editing computer software products usually aren't automatically without having problems. The computer software is only free if you've got a new MAC system. Fantastic software is usually costly. Although you're still using Wordpress software.
It's a well appreciated encoding type of software that is capable of offering an extremely professional built-in atmosphere for several of the phases involved with professional audio and video editing along with the broadcast production. Graphic design is serious company and among the most important facets of the industry is fonts. The special features of a specific product can be readily shown through using the program. A CMS, or content management system, is one particular way of constructing a site that has many benefits over the conventional method.
Open source software has turned into a strong contender in internet training and e-learning sectors. Access to open source software implies that users who are not able to afford, do not need to shell out money for proprietary off the shelf computer software. OpenOffice provides a single interface that gives the user access to the full suite, while the Microsoft product demands separate applications. It is possible to also run another edition of Windows or DOS on another computer if you've got one.
Based on the content, and where you opt to host your video blog, you could possibly be in a position to make some money from your videos. To get a thriving video blog you need to continuously make and update your content. If you've got another site that you want to recommend, please allow me to know on my Strominator blog. So before you begin building your site, keep in mind to turn your site mobile-friendly.
Considering all the advancements in technologies, all you actually need is your private laptop or PC if you prefer to manipulate, edit, together with clear up all of the film clips that you take and turn it into a quick film or movie! As previously mentioned, there are lots of different effects you may add in. The best method to learn what is ideal for you is reading reviews. With the assistance of the software, you can produce and edit video in the comfort of your house.
Blasting light directly from your camera position over the whole scene isn't likely to create favorable benefits in regard to streaming video quality. It is simple to create an absolutely free video blog, and it is a good way to reach out to audiences and showcase your work. With the development of green screen technology the entire scene was changed. One of the most popular trends on the current market at this time is video tutorials.
0 notes
Text
EasyWorship 7.0.4.1 Crack
EasyWorship 7.0.4.1 Crack is the best format for videos and photos, and you need to mix in your media performance. It is also compatible with all formats of audio and MP3 music. Users can add this music to video presentations or performance. Easyworship Free product keys help create many tasks for 4K and HD video quality movies. The software assists in the insertion of various digital 3D objects as background briefings.
Easyworship is the best of all office, PDF and text files to generate video performance in your production or construction projects. It is completely embedded in a media application and helps to effectively execute Multitasks.Easyworship Crack Download has a great feature, like it gives you a drag and drop facility, you can access the song with just one click.
EasyWorship 7.0.4.1 Crack with several advanced tools, including lyrics, bible, and also funny videos. This is a very good application, with totally 00000 fully customizable software. In addition, the software provides you with a unique way to combine themes, presentation design, and slideshows so that you can quickly spell and font size inspectors.
Get EasyWorship
In addition, this application allows you to customize the theme according to your needs and needs. Fast integration eliminates the need for third-party codecs. Get complete control of text and graphics with reflections, shading, and bullets. Also includes support for transparent PNGs. It has a new discovery engine to filter your songs, media, presentations, or any keyword in the theme library.
It helps you to split song lyrics, media, themes, and presentations by setting up one or more shared databases and easily arranging multiple databases in a flexible user interface, allowing you to resize individual window panes based on preferences. It generates slides for faster auto-tuning and Autochoose text styles, and creates an environment that works the way you think.
In addition, you can mix text and video together in a professional environment. The program can also stack multiple text boxes, video elements, and graphics on a single slide. So, if you are a good digital workstation, you just try this software, you are just very comfortable using this software. Easy Worship Software Free Download Free supports ALPHA channel and high broadcast.
EasyWorship 7.0.4.1 Crack in the planned media with a rapid addition. Therefore, the wrapper is controlled by an incremental database engine. Easyworship Free Download Full Version has song lyrics to give you a set of music features while your people tease a nice background image or video. Easyworship Download Free For Windows 7 is a well-known software on the market today, helping users make multimedia files, presentations, and video messages.
Functionally, it creates a new file by mixing video and photo your presentation. This allows you to create 4K UV videos for different tasks. Most likely to use different sound music and then get a new video for your project’s development. Easyworship For Mac Free applies to all video and photo formats that you need to attach to media performance.
The software is also compatible with all formats of audio and mp3 music. Users can attach this music to their video presentation or performance. Easyworship Full Version Free Download supports many purposes for generating 4K and HD video quality movies. The software supports the insertion of all types of digital 3D objects as background for presentations.
Worship Software Download Full Version Crack keywords are suitable for all office, PDF and text files to produce video performance production or construction projects. It covers all media applications and helps to execute multitasks efficiently. EasyWorship Crack & keygen is a new software. This is a powerful demo designer tool. It allows you to create stunning, drawattention and mediarich presentations.
EasyWorship 7.0.4.1 Crack Full License Key
Easyworship For Mac is a flexible presentation tool that is easy to use. It allows you to play 2 different monitors. These show work at the same time. It will also allow the operator to edit the presentation. The first display is the control screen and the second is the output screen. Both screens show the audience a good presentation. EasyWorship also allows you to customize themes, backgrounds, fonts, and more.
You can also create custom loops and transitions. Easy Worship Free Download also allows you to add unlimited elements, such as adding multiple videos and more on one slide. The Easyworship product key will support the creation of complete performance. This presentation creator tool helps to apply various custom fonts, themes, loop slides, drawings, and pictures in presentations.
Users can check spellings and accurate sentences. Easyworship Free Download provides a complete HD performance environment for all types of query solutions. In addition, an easy-to-use graphical interface will fit all Alpha Channel and Triple Caster combinations. The software is compatible with presentations in organization offices, schools, colleges, universities, and companies.
EasyWorship 7.0.4.1 Crack adds features to attach background music, sounds and lyrics to your performance. You can make video streaming online, broadcast, TV screens, and then share youtube or any other social networking site. Easyworship Crack contains a variety of beautiful features such as intuitive access to the Bible, stunning digital slideshows, background videos, and cult songs.
Mac & Windows Easyworship Serial Key built in a powerful new Presentation Designer. This tool has also good features similar to PowerPoint. This new version has more control over the text as well as graphics. Graphics are present with tools for reflection, shadow, transparency, and bullets. It can also support for transparent PNGs, spell check, and the ability to stack multiple text boxes. The new version of this tool also has video elements and graphics on a single slide.
EasyWorship 7.0.4.1 Crack Of Key Features:
Innovative search engine to filter
Work with one monitor as well as the two monitor
Broader Video Support
Can be simply resized or toggled with thumbnails
Supports various video card configuration
Generate environment with drag-and-drop
Help all kinds of known video formats
Generate your design templates with Theme Designer
Shows segments of a DVD during a presentation
Collect two video cards into a single output.
Share presentations
Share contents over the network
Requirements
2 GB of RAM. 2 GB hard drive space. DirectX 9.1 MB VRAM.Multi-core 2 GHz processor. Windows Vista / 7/8 & 8.1 / 10 (32-bit or 64-bit)
The post EasyWorship 7.0.4.1 Crack appeared first on cracksouls.
from cracksouls https://ift.tt/2sy9VB7 via IFTTT
0 notes
Text
Vidtasia by Cham Altatis Bonus
Vidtasia by Cham Altatis Bonus
Vidtasia Review and Bonus by Cham Altatis – the most comprehensive Camtasia training for marketers 2018
Vidtasia by Cham Altatis bonus
Vidtasia by Cham Altatis Make Money Online is the best, it will save your time and money.
And what’s more, just for now, you can try Vidtasia absolutely free for 30 DAYS!!! I’m 100% Confident That Will Love And Greatly Appreciate The Valuable Insight And Secrets You Gain From Vidtasia! Just In Case You Don’t (Yeah, Right!), I’m Offering A Full 30 Day, No Questions Asked Money Back Guarantee! 100% Satisfaction Guaranteed with Vidtasia! And that’s not all…If you get inside Vidtasia today, you will also have COMPLIMENTARY copy of EasySketchPro 3! EasySketchPro 3 is the leading whiteboard animation software. You can get it for absolutely FREE if you get Vidtasia today…So now that you have nothing to lose, go ahead and get Vidtasia RIGHT AWAY.
I hear you…And so together with the comprehensive training, we also included…10 HIGH Converting Done-for-you Camtasia Templates. These templates are highly and fully customizable so you can easily use them regardless of your skill level. And the templates are not like most of the templates you see out there, which are just limited to animated slideshows for short video teasers. We created templates for live action video, screencapture video, and animated videos. You then have templates for selling your own product, providing services, reviewing affiliate products, and other types of video promotions. We even added some text guides in other templates so you will know what content you will add in those specific parts of the video. This is like a script + video template in one! And because we saw the popularity of square videos in social media, we included this square video templates as well.
We have made this so basic that you just CAN’T afford to keep your hands off Vidtasia. Awesome, EASY & Fast Video Creation is finally here! You just can’t afford to have your competitors making better videos then you are, and now you don’t have to watch them walk away with the winnings! With Vidtasia, you’re going to be the BEST ON THE BLOCK! As an editor, I see the importance of being precise and have seen for myself what great editing can do even for not-so-great video content…heck, that’s how Hollywood makes the big bucks! I think something so essential shouldn’t be out of reach for so many video marketers out there. That’s what inspired me to create Vidtasia, to let the process of piecing together a great video be out there for you to grasp with both hands!
Vidtasia Review and Bonus by Cham Altatis – the most comprehensive Camtasia training for marketers 2018 is the best. You will be like a professional.
Get Now Vidtasia :
Vidtasia Review and Bonus by Cham Altatis – the most comprehensive Camtasia training for marketers 2018
The Over-The-Shoulder Professional Video Editing Training Suite On the LATEST Camtasia That Generates Sensational High Converting Videos
Make Super Effective Marketing Videos With Over The Shoulder Training From An Expert Video Editor
Comes with Slick DFY Templates To Simplify Your Efforts
Easy to use in ANY Niche
This Is EXACTLY How You’re Going To PROFIT:
Some Examples Of How Vidtasia Will Boost Your Business
Produce INCREDIBLE Videos To Sell Your Products and Services!
Create Effective Marketing Videos Including Screen Capture Videos, Live Action Videos, Motion Graphics, Animated Videos, Green Screen Videos, And More
Churn Out Videos Faster With Captivating DFY Templates
Sell Videos To Other Businesses Willing to Pay Hundreds to Thousands For Just A Single Video!
Build Your LIST, Build your AUTHORITY! Captivate and Engage Your Audience With Your Videos!
Grow Your Traffic! With The Power of YouTube and a GREAT Video!
Nothing Else Even Comes Close…
Your Average Video Training drones on endlessly on how to Create BORING videos that SUCK
High Quality Video Creation is EXPENSIVE to Produce or Outsource
Other Web-based Services WATERMARK Your Video. They piggyback on your videos to market themselves And They Charge You Monthly Fees!
High-end Video Effects Software Costs a Ridiculous Amount And You Will Need To Spend Months Learning It!
No Other Training Software Coaches You On The Latest Camtasia 9. Which Packs In The Best Of Windows And Mac Versions
Other ‘Coaches’ Are Just Marketers Looking To Make A Quick Buck At The Expense Of Your Business. Vidtasia Is Hosted By An Experienced Video Editor
Vidtasia Covers ALL You Need To Know About Video Making!
ONLINE MARKETERS ARE INCREASINGLY INVESTING IN INCOME PRODUCING ACTIVITIES LIKE CREATING:
Digital Info Products to sell to customers.
‘How- to’ videos to build your personal brand and trust in customers’ mind.
Video marketing content to expand their outreach and generate leads.
Udemy courses to sell to a huge marketplace looking for new things to learn!
Vidtasia Modules :
MODULE 1 | Choosing The Right Software
You may be on your way to learning the smartest tricks in the trade, but even for those to come into effect, you need a smooth platform that allows you flawless working and experimental space. Camtasia makes it easy to create professional screencasts (capturing all actions on screen) for demonstration videos, instructional videos, and other screen-recording projects. The interface is fairly easy to understand right away with your media, transitions, animations, and effects working in sync with your canvas. This is by far the easiest platform to build your videos on.
MODULE 2 | Screen Recording
If you’re doing anything with videos, know that screen recording plays a vital role in audience engagement. To literally take your audience by the hand and simplify any process for them makes your offer easily comprehensible and all the more lucrative for your target audience. You are literally breaking down the entire process and explaining to your audience step by step, which makes you a popular option for them!
Module 3 | Screen Capture Video Editing
You Have The Video Power.. Now You Can Add Some REAL Power To Your Video Creations — Starting With Screen Capture Video Editing! If you record more than what needs to be watched, it’s taxing for your audience. For an easy crisp video, we have a module on how to remove errors or unwanted parts of the video. Learn how to ace video engagement by adding elements like text and graphics!
Module 4 | Live Action Video Editing
Viewers remember and apply more of what they learned watching a video than by reading the same information. Because video delivers the knowledge prospects need to convert, customers are more informed and better inclined to find out more about what your company has to offer. But to get your customers to act the way you want, you need to deliver your message in the most effective manner possible and that’s why you need this module on how to shoot and edit quality live action videos from inside Camtasia.
Module 5 | Visual Effects and Motion Graphics
Motion graphics and visual effects are an important part of all video production. Whether it is incorporating motion graphics along with video, or producing a bespoke info-graphic or animation, graphics and visual effects are a great way of promoting your business. This module is all about simplifying them how to add some visual effects to your videos and creation some animated videos inside Camtasia for higher engagement values.
Module 6 |Green Screen Video Editing
With green screen, it’s simple to superimpose anything or anyone into any shot. Whether you can transport yourself to the moon, appear in your favourite film, or make a presentation along with all the relevant facts and figures, Greenscreen adds great aesthetic value and boosts the attention of your viewers. And even though it sounds difficult to produce, this module ensures that you get a firm grip on Green Screen talking head video and mock up editing in Camtasia.
Module 7 | Audio Editing
An often-overlooked aspect of a successful video production is the audio. Even if the quality of the video images is great- poor audio will make your video absolutely redundant! And good noiseless audio, with good leveling and sound effects will break the vocal monotony of your video and up its quality To help ensure that you get the best results for their video project, we have crafted this module that takes you through the technical essentials of audio in video editing.
Vidtasia Testimony
Forget about the next “shiny object” software that will make you rich with the push of a button… Vidtasia is a SOLID product you’ll be happy to invest in. Camtasia is an essential tool for business owners and marketers in order to succeed with online video. It combines all kind of high-end features with a low learning curve…One video software to rule them all!! About Cham, he’s not only a highly experienced video creator and marketer, but also a great teacher. He clearly knows his stuff better than most of guys out there, and you’ll learn all of the magic if you decide to invest in his training. If that wasn’t enough, the professionally pre-made templates included will help you achieve awesome results much faster. Really good, I can’t help but 100% recommend this. – Angel Corman, Graphic designer and Video Maker
Thank you for creating such a great course. It couldnt have come at a better time. I had just downloaded the latest Camtasia just a few days ago and Vidtasia is a great compliment to one of my most favorite softwares…Camtasia. – Steve Davies, Internet Marketer
Great training, I bought everything and am I so glad. I’ve bought a lot of stuff in my time, and this training is by far the best. Thank you so much! – Bob Santero, Owner of goodlocalmarketingexpert.com
Exactly What You Get With Vidtasia
7 Modules detailing the underlying factors that make for GREAT video marketing
DFY Templates to make simplify your video creations and give a slick professional touch to your video
Instruction and never heard before tricks of the trade from a top notch video editor with more than 10 years experience in the field
If you were to buy separate trainings, It will cost you…
Video Editing Training
Live Action & Animated Videos Training
Motion Graphics, Screen Capture Videos & Green Screen Videos Training
10 DFY Templates
Vidtasia : FAQ
Q. Is this a new video creation software?
No. This is a comprehensive training on how to use Camtasia (a highly recommended video creation software for marketers) in creating videos for your business.
Q. Can I use the templates for my clients?
Yes you can. You’ve got developer’s license to all the templates so you can use them for your own or clients’ business as many times as you want.
Q. Can I sell the templates as a collection?
No you cannot do that. You can only use them to create your own or clients’ videos.
Q. Can you help me when I get stuck?
Absolutely! There’s a comment section below each of the lessons where you can ask questions. We also have a private FB group where you can hangout with me and other members, for us to help you when have concerns.
Q. I’m a total newbie, will this work for me?
Of course. We did the training very simple to follow so whatever your skill level is, you can surely follow along. We have 500+ members and most of them were also beginners but they were able to learn.
Q. Do you have a money-back guarantee?
Yes we have. Although we truly believe that the training and templates are HIGH quality, if for some crazy reason you think they are not for you, within 30 days, just contact us and we will refund your money.
youtube
forget about wasted time end payment high price,. Vidtasia is something I’ve been waiting for, I had seen these kinds on many sites before but didn’t now of any tool that could create like Vidtasia. My advice don’t wait around, jump in! Vidtasia will pay for itself as soon as you start using it.
Vidtasia is the best software on the market right now (as far as I know). Vidtasia comes with easy to follow instructions. You don’t need any technical experience to make these improvements. is good news for online bussiness. Vidtasia by Cham Altatis Bonus
Get Now Vidtasia :
related Vidtasia
Vidtasia review bonus, Vidtasia bonus review, Vidtasia bonuses, Vidtasia discount, Vidtasia discount coupon, Vidtasia huge discount, Vidtasia
Vidtasia by Cham Altatis Bonus
0 notes