#toolbar menu in fragment
Explore tagged Tumblr posts
Visit Tumblr Blog
Explore Tumblr blogs with no restrictions, modern design and the best experience.
Last Seen Tumblr Blogs


Fun Fact
Tumblr was created by web developers David Karp and Marco Arment.
Text
Enhancing Data Organization in Google Sheets: The Importance of Adding Headers
High-quality professional Google Slides design: Common Questions Answered
1.How do I add headers in Google Sheets?
To add headers in Google Sheets, click on the row number where you want the header (usually row 1). Enter your header titles in the cells of that row. To format them, select the row and use the toolbar options to bold, change text size, or adjust background color. You can freeze the header row via View > Freeze > 1 Row.
2. How do you fragment shapes in Google Slides?
To fragment shapes in Google Slides, select the shapes you want to combine. Click on "Arrange" in the top menu, then choose "Grouping" and select "Ungroup" if they are grouped. After that, go to "Arrange" again, select "Subtract" to create fragments, or use "Intersect" for overlapping areas. Unfortunately, Google Slides does not have a direct "Fragment" feature like some other programs.
3. How do I add a line animation in Google Slides?
To add a line animation in Google Slides, first select the line you want to animate. Then, click on "Insert" in the menu, choose "Animation," and select your preferred animation type from the sidebar. Adjust the timing and trigger options as needed. Finally, click "Play" to preview the animation. Save your changes when you're satisfied.
4. How do I add transitions to text in Google Slides?
To add transitions to text in Google Slides, select the text box you want to modify. Click on "Insert" in the top menu, then choose "Animation." In the Animation panel that appears, select a transition type from the dropdown menu. Adjust the speed and click "Play" to preview. Remember to apply the transition to other text boxes if needed.
5. How do you markup on Google Slides?
To markup on Google Slides, use the "Scribble" tool in the Shapes menu. Select "Line," then choose "Scribble" to draw freehand. You can also add comments by clicking on the comment icon or using the "Insert" menu to add shapes, text boxes, or images for annotations. Adjust colors and line thickness as needed.

Visit: VS Website See: VS Portfolio
0 notes
Text
Home page comparison

Let me compare it with the Yuque homepage
Different from common mobile applications, the homepage I came to is not one of the pages in the tab menu bar at the bottom. The main content of this page is the recently visited pages and all file pages created in the personal space. Functions such as personal space and
settings center are placed at the top.
The latest access in the main area only displays one recently accessed file instead of multiple files, which has certain limitations. HE Tuber The function of the new button on the right side of "My Page" is to create a new first-level page, which is in line with conventional thinking and will not easily cause confusion among users. The New button on the right side of each file/folder functions to create a new sub-file of the file, and the buttons are arranged clearly and neatly.
The homepage of Yuque is a "note" page. This design helps users quickly record fragmented content after opening the application, ensuring "ready-to-use" and reducing the user's search and operation paths. The main content of the "Note" page is a list of note preview cards. Each card contains part of the note's content, the latest editing time and other information. Search, sorting, management and other functions are placed in the toolbar on the top right. .
The function of creating a new note is placed in the form of a floating button on the lower right side of the page. For most users who are accustomed to operating with their right hands, it is convenient and quick to click the button.
In addition, the button uses Yuque’s theme color design, which effectively distinguishes it from the background environment and improves recognition and intuitiveness.
In order to facilitate comparison with the home page of I Lai, the picture also adds the "Documents" page in Yuque, which also displays the document list. Similar to the "Notes" page, the document page is also displayed in the form of a preview card list. Cards It contains important information such as the document's title, part of the content, the knowledge base it belongs to, and the latest editing time, making it easier for users to quickly find and locate the document.
② Edit page comparison
Let me compare it with the Yuque edit page
Comparing the document editing functions of WoLai and Yuque respectively, Yuque's pages are more concise than those of WoLai, but this also brings about the loss of some functions and the reduction of convenience.
As mentioned earlier, the document in My Lai is readable and editable. The menu button on the top left of My Lai can return to the directory page to view other files for reading and editing. You can pass between the editing page of the document and the directory page. The left-swipe and right-swipe mode switching greatly improves the convenience of operation and is also in line with conventional operating thinking.
The path of the page is also displayed on the right side of the menu icon, allowing users to quickly locate the parent folder of the file and avoid switching back and forth between the directory page and the edit page. The title table of contents of the document is placed on the upper right side of the page in the form of a floating button. After clicking, the title table of contents will be opened in the form of a drawer on the right side, allowing users to quickly jump to the corresponding area.
There is not much difference in the arrangement and layout of the keyboard editing area between the two. There are only some differences in functions. For example, Yuque's undo/redo functional operations are placed separately in the upper right corner of the page, while Ilai merged these two functions into in the keyboard editing area.
③ Search page comparison
Let me compare it with Yuque search page
The initial list displayed on the search page I came to is the recently browsed files, while Yuque’s is the search history. For the search page, providing search history records should be more likely to meet the needs of users to enter the search page, and be more consistent with conventional thinking and design.
After entering the keyword search results in the search box where I came, you can select the matching mode. The exact matching mode can match the content in the document. By default, Yuque's search function allows for precise full-text search.
In the display of search results, I have given the number of search matching results. The documents of the search results are displayed in the form of a list, and the folder to which the file belongs is marked on the right side of the list item, which helps users to filter better. Check.
Yuque divides the search results into three categories: notes, documents, and knowledge base, all of which are displayed in the form of a preview card list. For document type search results, the card can display the document title, part of the content, and the knowledge base it belongs to, etc., which also helps users to locate more accurately.
Generally speaking, the search functions of the two on the mobile terminal are not very complete. For example, Wilai does not provide search history, and the search results do not have filtering and sorting functions. Yuque does not provide search, filtering and sorting functions in the public Yuque space.
④ Personal center page comparison
Let me compare with Yuque’s personal center page
Both Wolai and Yuque's personal center pages have designed some promotional elements and functions. Wolai displays the function modules of invitation posters and invitation links in the first section to encourage users to share and promote products. Yuque puts member introduction in the first section to let more users understand the membership system and then become paying users.
In addition, there is also a Yuque public account promotion section below to increase the user attention of Yuque’s publicity platform and allow users to obtain Yuque’s updates in a timely manner.
The other parts are common modules such as account information, feedback and help. In addition, Yuque also has a "My Garden" entrance at the top of the page. "My Garden" is similar to a personal external homepage. Since Yuque also has its own knowledge content community, the personalized settings of "My Garden" can make it convenient for users. Show off your personality to others and encourage users to share and socialize.
4. Business model and operation
1. Business model
As a note-taking tool application, WoLai and Yuque currently do not have many ways to make money. They mainly make money by providing value-added services and allowing users to pay for membership .
Wolai and Yuque currently have two different personal membership systems. The following are comparisons between the free personal version of Wolai and Yuque and the other two membership versions.
I come to the personal membership system
Yuque personal membership system
The functions provided by the free version of the two products are enough to meet the daily basic use of most users. This model of using most basic functions for free and paying for some advanced functions does not harm the user experience, but can also attract basic users. When the user base reaches a certain level, considerable revenue can be achieved even if the proportion of paying users is small. But the premise is that the value-added services provided by the application must be sufficiently attractive to users and be functions that users actually need.
For example, Wolaizhong's space full-text search, mind mapping, WeChat clipping and other functions, Yuque's unlimited manuscripts and knowledge base, more formats and larger attachments, Internet disclosure and other functions are enough to attract deep users to pay to improve their use. Experience some value-added services.
If you want to continue to add highlights to value-added services to attract users to buy, you need to be careful not to reduce the quality of basic services in order to let users choose value-added services. This will lead to the loss of users, and let value-added services be more based on user experience. Addition to achieve a balance between business value and user experience.
In addition to the profit channels of value-added services, the two products can also consider inserting advertisements to make profits. Advertising requires the product to have a certain number of users. Only when the number of users is sufficient, more merchants will place advertisements, so it can also be done Some activities are used to promote products and increase the number of users.
For example, Wolai has an invitation and points mechanism. By inviting new users, you can obtain certain points. When the points accumulate to a certain amount, they can be redeemed for the corresponding membership version space.
2. Operation and promotion
Comparing the official Weibo accounts of Wo Lai and Yu Que, the number of followers on Wo Lai's Weibo is around 6,000, while the number of followers on Yu Que's Weibo is around 18,000, which is about three times that of Wo Lai, and the number of posts on Yu Que's Weibo It’s also more than three times what I came for. The content published by Yuque mainly includes sharing of good articles, event introductions, user stories, etc. The content I will publish is mainly version update introduction, function demonstrations/tutorials, etc.
Comparing the WeChat public accounts of the two, we can find that Yuque’s update activity is generally higher than that of Wo Lai.
The former's tweet update frequency is 3-4 times a month, with 3-4 articles each time. The content of the tweets covers a wide range, including event introduction, knowledge management, version update introduction, function usage tutorials, user story sharing, language Que selects good articles and so on.
The latter's tweet update frequency is not fixed, sometimes 3-4 times a month, sometimes once every 1-2 months, and there are cases where it has not been updated in the past three months. Its tweet content includes promotions and user stories. , version update introduction, function usage tutorials, product introductions, etc.
In terms of release content, it is recommended that the relevant public platforms of the two products publish more articles on product concepts and knowledge, strengthen the emphasis and output of the core value of the product itself, and combine the product with its equivalent spiritual value. Strengthen users' brand recognition and pave the way for conversion into paying users.
In addition, we also need to pay more attention to the operation of the brand, and release version upgrade information for small bugs and small needs. This can amplify the value of the service and increase users' enthusiasm for feedback. Users can feel that their needs are taken seriously.
The updated functions are displayed in the form of pictures, texts or videos, allowing users to understand the new functions more intuitively and feel that the product team attaches great importance to users. Both of them do a better job in this regard. Not only can they continuously publish version update introductions on WeChat public accounts, official Weibo and other platforms, but they also make the latest product progress (Wolai) or product plans (Yuque) public for users to view. Keeping users informed of the future planning and development of the product will help increase users’ trust in the product.
I come to the latest progress page
0 notes
Text
The 5 Best Mac Image Viewer Apps With Unique Features
Finder’s Gallery view allows you to quickly scroll through folders of photos on your Mac with an enhanced preview pane and rich metadata. However, these reviews still aren’t large enough to see which shots are best. Preview works fine for basic use, but it lacks powerful navigation controls and features that you simply need for a superior experience.
You don’t need an important app like Apple Photos or Adobe Lightroom, or one that supports complicated databases, to update and organize your collection while displaying images. We’ll show you a number of the simplest photo viewer apps for macOS with unique features, and the way you'll use them.https://bit.ly/2xmM4uV
1. XnView MP
XnView MP may be a feature-packed media viewing and cataloging app. It provides many features often found only in paid apps, including tools to classify and type photos, batch operations for processing multiple images, the power to edit metadata, and support for 500 image formats. See XnView MP’s list of supported formats to review them.
When you launch the app for the primary time, you’ll see three panels. To the left is that the Finder filing system with three-section tabs. Folders allow you to browse an inventory of folders on your computer. Photos you wish becomes visible within the Favorites. Meanwhile, The Categories Filter tab consists of pre-configured categories that allow you to aggregate and label them simultaneously.
The center panel shows thumbnail previews of the pictures selected from the left. Drag the slider to regulate their size. you'll also customize the view type to point out more or fewer details. Head to look at > deem and choose the sort. Further, the app allows you to sort images by title, date, and file size, or maybe filter them by rating, labels, comments, or tags.
2. Apollonia
Apollo One is an intuitive image viewer app that allows you to organize and consider photos in an efficient way. The app features a built-in camera RAW processing engine so that you'll quickly check out images before you import them. The app gives you access to varied local and network folders through Places. To configure places, press Cmd + N or click the Browser button on the toolbar.
Click the Plus (+) symbol to feature a folder. With a couple of keystrokes, you'll freely browse the contents. to examine any image, press Cmd + I or click the Inspector button on the toolbar. Here, you'll see the small print of a picture and camera-related information like its serial number, shutter count, and more. ApolloOne has built-in support for thousands of digital cameras.https://bit.ly/2RG7F8j
You can sort images by creation, modification date, file size, and type, or define your custom sort options in either an ascending or descending manner. you'll also filter images by tags, ratings, and labels.
The slideshow mode (Preferences > Slideshow) shows you photos with 12 different transition effects and loops. you'll even found out a playlist to play within the background. to start a slideshow, press F5; use F6 to prevent it.
3. q View
q View may be a simple, cross-platform, minimal image viewer app with no toolbars or unnecessary menu items. It just focuses on your image with a descriptive title bar showing the filename, number, resolution, and size. once you launch the app for the primary time, you’ll see a blank window. Navigate to File > Open and choose a folder to display its contents.https://bit.ly/3eq6VOe
Press the left or right arrow keys to navigate around photos. Scroll the mouse wheel to concentrate or out and right-click the image to access the knowledge panel. you'll rotate, flip the pictures, or switch to original size to look at them intimately.
4.Lynn
Lyn may be a lightweight media organizer and viewer for macOS. It’s designed for photographers, graphic artists, and web designers. It supports non-standard, old, and RAW image formats from a good range of digital cameras. With a camera model Lyn supports, it can load and progressively scale high-resolution images faster.
The app uses the standard folder structure of Finder. In contrast to Photos or Adobe Lightroom, it doesn’t use any image library. The database overhead of this procedure slows down the viewing process and also consumes your Mac’s resources.https://bit.ly/2K7R6Ow
When you launch the app, you’ll see three panels. To the left, you’ll see the whole folder structure, any smart folders you create, and devices you’ve connected. The viewer shows the contents of the chosen folder, with different view options. Icon view shows the thumbnail view of images, and List view shows a little thumbnail with the image metadata. At the proper, you’ll see the Inspector panel.
5. Fragment
The fragment may be a cross-platform image viewer app. It’s based around a heads-up display (HUD) interface, almost like a computer game, to visually represent data. You won’t see any toolbars, menus, or buttons. The controls are overlaid on the screen only you point at the interface elements with the mouse. What controls you see depends on the position of your mouse on the screen.
To get started, click the no image link and browse to a folder location. once you hover your mouse at the highest of the window, you’ll see a timeline-type strip of thumbnails. Then, hover your mouse over the side to open edge panels.
The left panel offers different viewing modes. and therefore the right panel allows you to crop or rotate the image. At rock bottom, you’ll see the small print of your picture.
1 note
·
View note
Text
first we need inflate the menulist to fragment or activity and then we call onOptionsItemSelected for normal menu item or we can call setOnQueryTextListener to search icon in toolbar make sure your Activity or Fragment should need to implement SearchView.OnQueryTextListener and its methods as shown in below code
Here is the java code
@Override public void onCreateOptionsMenu(Menu menu, MenuInflater inflater) { inflater.inflate(R.menu.main_right_menu, menu); MenuItem item = menu.findItem(R.id.menu_search); SearchView sv = (SearchView) item.getActionView(); if (sv != null){ sv.setSubmitButtonEnabled(true); sv.setOnQueryTextListener(this); } super.onCreateOptionsMenu(menu, inflater); } @Override public boolean onQueryTextSubmit(String query) { Log.e("Tag",query); return false; } @Override public boolean onQueryTextChange(String newText) { Log.e("Tag",newText); return false; } @Override public boolean onOptionsItemSelected(MenuItem item) { // Handle item selection switch (item.getItemId()) { case R.id.menu_filter: showFilterOptions(); return true; default: return true; } } private void showFilterOptions() { final Dialog dialog = new Dialog(activity); dialog.setTitle("Filter By"); dialog.setContentView(R.layout.customer_filter); dialog.show(); }
Here is my xml resource menu file orderInCategory refers that menu item has to shown in tool bar as in below images or toolbar dots menu, here i set its value to 1,that means it will visible in toolbar at right side actionViewClass class refers which action class should call by clicking the menuitem
<?xml version="1.0" encoding="utf-8"?> <menu xmlns:android="http://schemas.android.com/apk/res/android" xmlns:app="http://schemas.android.com/apk/res-auto"> <item android:icon="@drawable/ic_filter_list_white_24dp" android:id="@+id/menu_filter" android:orderInCategory="1" app:showAsAction="always" android:title="@string/filter"/> <item app:showAsAction="ifRoom|collapseActionView" android:icon="@drawable/ic_search_white_24dp" android:id="@+id/menu_search" android:orderInCategory="1" app:actionViewClass="android.support.v7.widget.SearchView" android:title="@string/search" android:iconifiedByDefault="true"/> </menu>
#gallery-0-5 { margin: auto; } #gallery-0-5 .gallery-item { float: left; margin-top: 10px; text-align: center; width: 50%; } #gallery-0-5 img { border: 2px solid #cfcfcf; } #gallery-0-5 .gallery-caption { margin-left: 0; } /* see gallery_shortcode() in wp-includes/media.php */
toolbar search menu in fragment
toolbar search menu in fragment
Android toolbar Menu with search in fragment first we need inflate the menulist to fragment or activity and then we call onOptionsItemSelected for normal menu item or we can call setOnQueryTextListener to search icon in toolbar…
0 notes
Text
Service To Merge Audio And Image Information To Generate Videos
If you would like to merge a bunch of audio tracks into one file, AVS Audio Editor is at all times prepared to assist, even when your enter files are of various formats. Filmora Video Editor is little doubt the perfect mp3 joiner device with merely the whole lot a consumer would require. You'll be able to even merge a wide range of audio file codecs with this software program so much the identical. We supply from Videoblocks & Audioblocks, with over forty,000 belongings to select from in your on-line video enhancing initiatives. Which signifies that because of MergeMP3, I misplaced a couple of week in mission time because I now must go and restore it is screw up. Not impressed. In January 2000, AOL and Time Warner introduced plans to merge, forming AOL Time Warner, Inc. The terms of the deal referred to as for AOL shareholders to own 55% of the new, mixed company. The deal closed on January 11, 2001. The new company was led by executives from AOL, SBI, and Time Warner. Gerald Levin , who had served as CEO of Time Warner, was CEO of the brand new company. Steve Case served as Chairman, J. Michael Kelly (from AOL) was the Chief Financial Officer, Robert W. Pittman (from AOL) and Dick Parsons (from Time Warner) served as Co-Chief Working Officers. 28 In 2002, Jonathan Miller grew to become CEO of AOL. 29 The following 12 months, AOL Time Warner dropped the "AOL" from its name. Select MP3 recordsdata" from the Save as type" drop-down menu. Choose and test data you'd wish to merge. Audacity presents many extra choices, nonetheless really if all you want is to make a piece of audio shorter - possibly for a hoop tone - then Free MP3 Cutter will get the job completed. How To Use MP3 Merge - Download this system in a zipper file from the developer here Extract the zip file and run the program - in our examples, we'll use the commands from the File menu nevertheless you too can use the equal icons on the toolbar.

How can I combine mp3 recordsdata. Magicode MP3 Cutter is the last passage in our rundown of the best on-line mp3 cutters. Drag the added MP3 recordsdata out of your album to the Timeline at backside one after the opposite. Typically, we would like to lower up a big MP3 information into several segments to save lots of a number of our models house. While you like listening to MP3 music or audio books, this MP3 joiner is perfect for you. Have been using this for years to merge mp3 files and other routine duties. Quick and simple. Once fre: ac begins, drag the MP3 info to be merged into this system window and prepare them within the order you like utilizing the mouse order. Collabs are songs created collaborativelly on-line by the Bandhub neighborhood. On this case, it's possible you'll merge and edit music recordsdata with just some clicks. With the program, you presumably can crop the video and take away unnecessary fragments from it, merge several clips into one and add music to them, convert the video format and alter its decision, create a slideshow. I have to warn you that the tactic I'm about to indicate you is probably not the safest approach to merge MP3 information. But, if the files are recorded in the identical bitrate, and they are playable in iTunes, then this methodology ought to work typically. You do not want to be an professional audio editor to utilize the MP3 Cutter. For MP3 modifying online with this web site, you simply have to upload the MP3 file to the official net page and then it's going to pop up another webpage that means you can edit the tracks particularly after importing. When this feature is chosen, http://www.mergemp3.com you presumably can select a folder to avoid losing your merged FLAC file. Besides normal MP3 format, MP3 Toolkit helps most of common audio & video formats like WMA, WMV, MP4, WAV, OGG, FLV, MOV, M4P, M4A and more, also helps top quality audio like FLAC and APE. With MP3 Toolkit, you'll be able to convert, minimize, merge, rip and document MP3. One of the simplest tools, Shuang's Audio Joiner helps you merge your audio recordsdata free of charge. In the event you like using GUI packages or a not very tech savvy, in each conditions this tool could be excellent for you. It's appropriate with the preferred audio codecs, viz. MP3, WVA and WMA so, you can be part of recordsdata with any of those extensions and export the merged file in your most popular format. Member Access is ASCAP's safe on-line web portal that gives you with access to your ASCAP data. When you activate your Member Access account, you will have the power to replace personal particulars (e.g., address, checking account info, etc.), view and print the entitled party and share details of your Works, view and obtain ASCAP performance statements, register your works and electronically create and observe service requests to ASCAP. Future online sources for ASCAP members will probably be supplied via Member Access so activation of your account is highly advisable.

Step three. Click on Merge" button to start merging your recordsdata. It is a free instrument which might merge MP3 recordsdata. 2) As for me, the best option to split-be a part of mp3s (and with out re-encoding) is legendary Mp3directcut I made turning into a member of of 2 recordsdata of the equivalent bitrate actually in no time. To control the situation of two MP3 data, drag them to the place of your alternative. The audio format could be WAV , WMA , MP3 , OGG , AAC , AU , FLAC , M4A , MKA , AIFF , OPUS or RA Audio file dimension is likely to be as a lot as 200M.Audacity may also be a highly regarded MP3 merger which may run on Residence windows, Mac and Linux. You want to use it to separate any audio into as many objects as you want, or you can also merge mp3 on-line as many MP3 recordsdata as you want with Audacity. It moreover has other video enhancing features like audio filters and results which might enable you to deal with music data which are problematic in a roundabout means. Furthermore, Audacity is a widely-used open-supply audio modifying and recording program.
1 note
·
View note
Text
Free MP3 Video Converter
Mp3 is an incredible technological software that is used for trimming music as properly track from the unique creation. Choose MP3 recordsdata" from the Save as type" drop-down menu. Choose and check data you'd like to merge. Audacity presents many extra choices, nevertheless actually if all you want is to make a chunk of audio shorter - perhaps for a ring tone - then Free MP3 Cutter will get the job completed. How To Use MP3 Merge - Download this technique in a zipper file from the developer right here Extract the zip file and run the program - in our examples, we are going to use the instructions from the File menu however you can also use the equivalent icons on the toolbar. FreeLogoDesign is a free emblem maker. Our on-line design software permits entrepreneurs, small companies, freelancers and associations world wide to create professional wanting logos in minutes. Create your individual emblem design with Free Emblem Design, a hundred% free, fast and effective! Via our logo creator in 3-steps you possibly can create and add your personal logo, in minutes. Audio Recorder Professional is an helpful actual-time audio recording software program that lets you doc any sounds out of your sound card and save the recording straight into MP3, WAV or OGG information. The recorder produces high-quality recordings with constructed-in superior audio report engine. With Auto. Report perform, you'll set the time to begin a recording, www.mp3joiner.org as well as the situations (for example, time, file measurement, recording measurement) to cease a recording. Rather more, Auto. Doc might be activated mechanically when Audio Recorder Professional is just started. Though Easy MP3 Cutter Joiner Editor would possibly give attention to the MP3 format, it additionally supports quite a lot of others, including popular file sorts like M4A, FLAC, WAV, AAC, WMA and WMV. It additionally does extra than just minimize and trim. Create fade in and outs to your tracks so they circulate extra easily throughout playback or apply any one of the filters that assist noise reduction, tempo and more. The first step you may wish to take is to hook up with the Merge MP3 website and click on on the link right here positioned beneath OBTAIN. Moreover, the alternative advantage of using this program is that you would have the ability to add picture to your newly created mp3 file which might be completed by simply dragging the popular picture on the picture timeline below. Visual MP3 Splitter & Joiner is a helpful software program utility that can break up and mix WAV and MP3 files. You'll be able to reduce a large audio file to small components without recompression and loss in quality. For splitting you need not enter begin and end occasions manually. It is enough to select the specified part visually using a mouse - the program draws MP3 and WAV recordsdata as waveform. It's totally easy to find a sound fragment by scrolling and zooming. To establish blocks you need to use a constructed-in player, then you'll be able to transfer borders to chop them by zero.1 and zero.01 sec. Visible MP3 Splitter & Joiner can break up MP3 recordsdata into equal information by number of parts, by time and filesize. Need to merge quite a few MP3s into one file? Look no extra… Our Free Merge MP3 is your closing station. It could actually show you how you can merge quite a few audio recordsdata with utterly completely different codecs into one larger file with one format paying homage to MP3, WAV, WMA and OGG with out problem. With this powerful software, you may as well mix many separate music tracks into one non-cease audio CD.
The main draw back is that this program solely works with MP3 information. The others in this record are appropriate with other audio formats however when you've got a group of MP3s you wish to merge, this will get the job carried out. The UI is straightforward and all you need do it load up your tracks, free online photo editor remove background put them in order and be part of them. The result's one large MP3 file with all of your merged tracks in one.Correctly, then you'll be able to truly search assist from the WavePad Audio File Splitter that lets you break up massive audio data with mp3, wav and different extensions without cost. So, you possibly can merely acquire this system, export it to your thumb drive and it's doable for you to to hitch MP3 recordsdata in conjunction on any LAPTOP with Home windows OS. To merge audio files into one, all you may need to do is to hit Add tracks button and browse for the audio tracks that you simply need to work on. As quickly as the MP3 information are loaded to the browser, select the portion that you just have to merge, after which click on Be a part of button. To sum issues up, Free MP3 Joiner combines ease of use with a number of useful parameters so as to enable you merge multiple audio info and convert them to fully completely different codecs.Nonetheless, there are some demerits I should put them clear. claims it may probably address larger than 300 audio codecs. Once I examine track tracks in MP3, AAC, AC3 and M4A format, this online tune merger can acknowledge these recordsdata actually. Nonetheless, apart from merging MP3 recordsdata, this audio joiner appears taking with out finish to add the other audio tracks for combining.
1 note
·
View note
Text
Mate translate chrome extension

A search function is also available to help you find them. When learning a new language, this feature should be very helpful.Īlternatively, you can just inspect your translation history to view all the words and phrases that have been processed. If you need to remember certain translations, you can save them in one of the word lists in your Phrasebook. View your translation history and save words and phrases A fee is required, of course, but this may be a good option if the computer translation just doesn’t cut it. Since certain languages are very difficult to read for a non-native speaker, such as Russian and Chinese, it certainly helps that transliteration is provided when translating.įor a number of languages, you can request a human translation that will be delivered to you in a few hours. Offers text-to-speech, transliteration and paid human translationsĪfter translating a word or phrase, you can use the extension’s text-to-speech feature to listen to them being read, which can be very helpful for language learners. An optional feature also enables you to generate translations by double-clicking words.Īdditionally, Mate Translate is available from the Chrome toolbar, where you can also select the source and target languages, as well as access your phrasebook. When you’ve found a word or phrase that you don’t understand, you can just select it and use the Shift+T key combination to generate a translation, as well as access this option from the context menu. You can just select any word or text, press a hotkey and view the translation instantly, and the extension offers quite a few other useful features as well. Mate Translate is a Chrome extension that makes it easier to get translations while browsing the web. There are plenty of online services that you can use, but they aren’t as convenient as many would like. Algorithms make errors in linguistic subtleties, so for serious tasks, use a trained professional.While computer translations are far from perfect, they have gotten a lot more accurate in recent years, and things can only get better. The perfect online translator has not been created yet. On the other hand, Google Translate is now sufficient for most tasks.īrowser-based extensions do not fully replace the web versions of translators, but make the interaction with the text more comfortable, eliminating the need to open an extra window in the browser. There are a lot of online translators, but rarely any service can offer something unique. However, it is not necessary to know these languages in order to successfully solve problems: online translators provide professionals with the necessary information. It’s hard to imagine a marketer who hasn’t come into contact with foreign languages to some degree. Features a phrasebook to help you learn languages. The extension brings together a community where you can ask for translation advice, or give explanations yourself. It supports 5 translation modes: inline, pop-up, in-window, words and phrases, web pages.ġ4 languages and 130 dictionaries, including a custom dictionary. The peculiarity of the extension is that it uses the mechanics of Google and Microsoft Bing. The feature is the availability of custom dictionaries that reflect the slang subtleties of languages.ĩ1 languages and a limit of up to 5,000 characters. Standard functionality: translation of phrases and web pages. In the arsenal of the extension 103 languages. In the Chrome browser, this feature is built-in, no additional extensions are needed to translate pages. You will see “Translate Page” in the drop-down list. To translate the whole page, select Google Translator from the context menu. Copied fragment will appear in the translator field automatically. Clicking on it will open a translator window where you can translate text as in the web version. The second way to work with small fragments is through the extension icon. The service will open in a new tab with the result of translation. To work with individual phrases, select the text, and select Google Translator in the context menu. Its purpose is to make it easier to work in the browser. Google’s extension corresponds to the web version of the translator: also 109 languages and a limit of 5,000 characters. Here are examples of four browser extensions that will help the marketer with online translation. Here are examples of four browser extensions that can help the marketer with online translation.
0 notes
Text
Image viewer mac

#IMAGE VIEWER MAC FOR MAC#
XnView Mp is one of the most amazing apps that have unique features in terms of viewing images. They can be really helpful in providing the best presentation with interesting content and fun transition effects. The slide show feature of the Fragment is amazing and useful because it contains a combination of more than 50 transitions. There is also a menu for the connectivity and sharing options that allow the users to export and share their apps on exporting different social media platforms This gives the user proper and easy access to a better view of the image too. The panels on this image viewer have a slide down feature they only come up when you hover over them. There are no toolbars or any kind of big buttons to block the preview of the image without any disturbance. This helps in proving clarity to the preview of the picture. It is used in video games that cover the whole screen to make everything more visible. The Fragment Image Viewer comes with a heads-up display (HUD) interface.
#IMAGE VIEWER MAC FOR MAC#
It is one of the finest image Viewers designed for mac with loads of features to make your work easier. When it comes to elegance in designing and better image previewing ability then no one can match the efficiency of Fragment Image Viewer. It can provide a preview in 11 different loops and transitions too. The Apollo One has incredible features when it comes to slide show previews of the Images. There is also a filter option through which you can filter your images according to tags, ratings, and labels. It can give a better overview of the whole content. The Appolo One also provides an option of sorting the images in ascending and descending order.
1 note
·
View note
Text
CCleaner Portable is the most popular computer optimizer and system cleaner designed to keep your PC clean and running at optimal speeds. Quickly remove all junk, temporary and unnecessary files from your computer. This will not only free up valuable hard drive space, but you will also notice a significant increase in performance and speed. The program has an intuitive interface that allows you to quickly see the different sections and types of files that you want to delete. Window cleaning The Windows section category includes cleaning options for Internet Explorer, Windows Explorer, System, and advanced cleaning features. Internet Explorer: Delete temporary Internet files, history, saved passwords, auto-fill form history, index.dat, cookies, and more. Windows Explorer: Recent Documents, Thumbnail Cache, Jump LIsts, MRU, Network Passwords, and more. System: temporary files, DNS and font cache, Start menu and desktop shortcuts, Windows error reports and log files, Chkdsk file fragments, memory dump files, and more. Advanced cleanup options: custom files and folders, old window installation, IIS log files, window size / location cache, prefetch data, event logs, and more. App cleaning The Applications category includes cleanup options for Mozilla Firefox, Thunderbird, Google Chrome, and the Opera web browser. Also, it includes popular applications like Adobe Photoshop, Adobe Acrobat, GIMP, Google Earth, Microsoft Office, and more. Also featured is an Internet category that includes Audacity, BitTorrent, FileZilla, Java, Yahoo Toolbar, and other popular Internet applications. Multimedia programs add to the list of cleanable applications such as Adobe Flash Player Freemake Audio Converter, Media Player Classic, MediaMonkey, and VLC Media Player to name a few. Popular utilities and native Windows programs can also be cleaned. The list includes 7-zip, AVG Antivirus, CDBurner XP Pro, Windows Defender, Nvidia Install Files, Avast! Antivirus, MS Wordpad, MS Search, Regedit, more. Additional tools CCleaner Portable also includes a registry editor, a handy uninstall tool, a startup manager, a file finder to locate duplicate files, and a system restore function. Release year: 2021 Version: 5.79.8704 System: Windows® 7/8 / 8.1 / 10 Interface language: Multilanguage- English included File size: 23.22 MB Format: Rar Execute as an administrator: There's no need
0 notes
Text
MacKichan Scientific Workplace Crack v6.1 + Patch[2022]

MacKichan Scientific Workplace Crack + Registration Key Free

MacKichan Scientific Workplace Crack is a full-text editor that supports math exercise tools for students teachers and other types of users. The complete package includes MuPAD files TruType fonts graphic filters. Spell checkers shell documents screen style files snippets help documentation document manager, style editor exam creator sample documents BibDB (manage bibliographic databases) and TrueTeX. You May also like Quicken Crack The interface is comfortable to work with. Although many options are included here, you can refer to the user manual to get a better idea of how Scientific WorkPlace works. It is possible to import images, fragments MacKichan Scientific Workplace Keygen makes writing, sharing, and writing math and science texts easier than you ever imagined. This software is a simple word processing tool that integrates math. Text in the same environment. The MuPAD computer algebra engine built into Scientific WorkPlace 6 allows the user to perform on-screen calculations and organize them correctly. MacKichan Scientific Workplace Serial Key a completely new architecture based on Mozilla, Version 6 offers more flexibility than previous versions. Depending on your printing and laptop needs, you can save or export your documents in a variety of formats. It also has an open source program called MySpell that includes a large number of dictionaries for more than 40 countries. When you type a word incorrectly, the program will display it with a wavy red line.
MacKichan Scientific Workplace Crack Key Features
- Has an algebraic computing engine called MuPAD 5 for on-screen computing - Functional toolbar for easy access to calculation options - The Calculate mathematical operations using 150 units of physical measurement - MacKichan Scientific Workplace keygen Easy to type math and physics operators in text documents - It has an algebra calculation engine called MuPAD 5 to perform calculations on the screen - Has a functional toolbar for easy access to calculation options - Calculate mathematical operations using hysical units of measurement - Ability to easily type mathematical and physical operators in text documents. MacKichan Scientific Workplace Torrent: Uses natural mathematical signals, so there is no need to apply complex syntax to evaluate, simplify, solve, or enter mathematical expressions. Full suite capabilities are available. You can calculate, numerically or numerically, the derivative, the solution of algebraic and differential equations. With the menu commands, you can calculate more than 150 physical units of measure. MacKichan Scientific Workplace License Key makes writing, sharing and writing mathematical and scientific texts easier than you ever thought possible. This software is a simple word processing tool that integrates math and text in the same environment. The MuPAD 5® computer algebra engine built into Scientific WorkPlace 6 allows the user to perform on-screen calculations and organize them correctly. With a completely new architecture based on Mozilla, version 6 offers more flexibility than previous versions. Depending on your printing and laptop needs, you can save or export your documents in a variety of formats. The software also has an open source application called MySpell, which includes a large number of dictionaries for more than 40 countries. When you misspell a word, the program displays it with a wavy red line. MacKichan Scientific Workplace Crack uses natural mathematical symbols, so there is no need for complex syntax to evaluate, simplify, solve, or place mathematical expressions. MacKichan Scientific Full Crack Lifetime Free: It save images to a file, edit document information, and apply one of the many available predefined styles. As for mathematical operations, you can insert fractions, radicals, subscripts and superscripts, operators, matrices, labels, unit names, spacing, HTML fields, among others. Additionally, Scientific WorkPlace allows you to customize the appearance of labels and styles, assign function keys, save user preferences, perform an online search, and many more. MacKichan Scientific Workplace Registration Key app is surprisingly light on system resources as it uses little CPU and RAM. It has a good response time and works well, without causing Windows to hang, hang, or show error dialog. We have not found any problems in our tests. Still, Scientific Work Place should please all users. Full suede functionality available. You can compute derivatives symbolically or numerically by solving algebraic and differential equations. With the menu commands, you can calculate with more than 150 physical units.

System Requirements - Windows ® 7 or above; macOS ® 10.10 or above - 800 MB – 1 GB hard disk space, depending on the type of hard drive and installation options selected - Internet connection, How to install MacKichan Scientific Workplace Crack? - After downloading, extract the RAR file. - Archive. - Uninstall the previous version of this software (if you have any). - Follow the instructions given in txt. - File to continue the installation process. - Finished. - Thank you for visiting our site. Read the full article
#MacKichanScientificWorkplaceCrack#scientificnotebook#scientificwordfree#scientificworkplacefreedownload
0 notes
Text
The best technique to Add a Logo to Your Email Signature
Whether or not you're using email to progress new things, thank customers for joining, or offer your latest flyer, you can make your messages more master by adding a logo to your imprint.

Checking your logo puts your picture's stamp on your trades with customers, expressing your business' image and voice and building brand affirmation appropriately.
Remember: Emails aren't just among customers and organization reps; they're between customers—or anticipated accessories—and your picture. Get customers acquainted with your logo and sustain their relationship with your business by denoting your messages.
Why You Need a Logo in Your Email Signature
For a certain something, it should take you 5 minutes tops to stick your logo on your email signature, which is hardly a blip on your day. In any case, if that is certifiably not an adequate inspiration to do what should be done, here several huge ones to consider: Logo purchase online.
1. Brand Recognition
Your logo is the substance of your business or brand, which suggests it's a face you need seen as routinely as possible by people partner with you. People will overall handle pictures more quickly than they do message, and after some time, they'll have the alternative to immediately recollect you by your logo. A concise look at your email is all things needed for the beneficiary to review what your character is – and they'll be less disposed to forget later on. buy business logo.
2. Singular Connection
It's typical basic for customers to neglect to recollect that there's a person on the contrary side of the screen who is successfully considering them messages.
Regardless, when your name and occupation title is coordinated with your association logo, it's anything but's a connection between you, the human, and you, the association, for your group. Adding your logo to your exceptional permits you before long to outline a relationship with your group while adjusting your association at the same time.
3. Brand Identity
However an inside and out reviewed plan, your logo is at last a vessel for the significance you insert it with. Consequently, with each email you send that is composed with your logo, the substance of that email—the voice, the symbolism, the message—will regularly be joined to your logo, assisting with setting up the character of your image. Buylogos
This reiterated receptiveness is what will help you with forming your picture character as time goes on, as your group ends up being more familiar with your logo and the characteristics they come to associate it with.
Best Practices for Using a Logo in Your Emails
Since you've invigorated your email signature, recollect these tips to expand the practicality of your logo:
Scale for convenient
This year, convenient addressed practically 50% of all email opens. That suggests it's especially critical that your messages are fathomable on adaptable. Guarantee you make an adaptable genial logo plan, and that your email format is appropriately assessed for the compact screen. buylogo.
Expansion alt text marks
Alt text marks are pieces of text that depict an image, or for the present circumstance, your logo. They end up being valuable when an image record can't be stacked.
If your logo doesn't stack when a customer opens her email, she'll see the alt text rather than the image. This is a smooth strategy to keep your messages ostensibly fulfilling, regardless, when your logo doesn't show.
Use a clear logo establishment
Your logo will appear more master in the characteristic of your email if you use a direct logo establishment. Thusly, your logo will look unbelievable paying little notice to the email design you pick. Where to buy logo
Consider assessing and position
sizing_&_placement
In the wake of adding your logo to your email signature, reliably send yourself a test email to be sure the logo is throughout put. Watch that your logo is adequately gigantic to see, yet not so colossal it overpowers the rest of your email.
Play around with the position and assessing to guarantee your logo changes ostensibly with the rest of your email imprint and fits well inside your email format. Logo buy online.
7 Easy Steps to Putting Your Logo in Your Gmail Signature
We will start with Gmail, as it's the most notable email provider. (Peer down for an informative exercise on adding your logo to an Outlook email signature.)
Besides, in case you need to add your logo to an email with another provider like Yahoo, don't pressure—most of the cycles are very tantamount. Essentially try to get some answers concerning your specific provider to guarantee you have the right logo record type and size for the work.
You can take a gander at this video here for a basic, little by little visual helper; or, read on for the rule steps to add a logo to your Gmail signature. Buy a logo for my business.
Stage 1. Snap the Gear image in the upper right corner of your Gmail record, and thereafter click Settings.
Stage 2: In the General tab, peer down to the Signature fragment. In the space gave, enter the substance you'd like to recall for your imprint. Consider your obvious a business card, with your total name, work title, and contact information, for instance, your phone number or association with your association site.
Stage 3: In the toolbar over the textbox, click the picture image (which appears as a square with a diagram of a mountain) to add an image. Buy logo online.
Stage 4: Click Upload to move an image saved to your PC. If you'd prefer to move a photo from the web, click Web Address (URL) and reorder the association with your image. (Note that Gmail can be truck, and that it's anything but's a case or question mark in the substance box rather than the image you moved—that is OK.)
Stage 5: Scroll down and click Save Changes.
Stage 6: Test your imprint by informing yourself. Guarantee the logo shows up in the email, and that it's the right size. Buy a logo
Stage 7: If you need to change your interesting's logo or text, get back to Settings and peer down to the Signature Here, you can tap on the image to make it greater or more humble. You can moreover meddle with text based styles and tones, and test with adding a trademark or associations with your online media pages.
Directions to Add a Logo Signature to Outlook
If you use Microsoft Outlook as your email provider, adding your logo to your specific simply several minutes. Here's the way you can do it in 5 phases:
Stage 1. Open Microsoft Outlook, and go to the Tools drop-down menu. Then, select Options. Logo buy
Stage 2: From there, click on Signatures, to open the Signature and Stationary Dialog Box. (Of course, you can go to the Insert tab, click Include, and thereafter click on the Signatures decision.)
Stage 3: In the Select Signature to Edit box, pick the imprint that you need to add your logo to.
Stage 4: Now, you should see a portion for Edit Signature; there, put your cursor on where you need to insert your logo. Then, in the Insert Picture trade box, select the logo and snap on the image. Your logo should then normally be installed into the imprint, and you should have the choice to see it straightforwardly in the talk box. buy logo design
Stage 5: Click on OK in the Signature and Stationery talk box to finish, and you're all set!
Over to You
Arranged to put your logo before your customers?
Remember, adding a logo to your email mark is a huge strategy to stamp your messages, helping with setting up your picture's force and drive brand affirmation among your group. Constantly twofold peruse that your messages are sending with your imprint, so you can in the end foster this affirmation. buy logo.
#buy logo#buy logo design#logo buy#buy a logo#buy logo online#buy a logo for my business#logo buy online#where to buy logo#logo buying sites#buy business logo#logo purchase online#order a logo#logo order online#buy company logo#buy logos online#how to buy a company logo#get a custom logo#logo designs for sale#business logos for sale#logo purchase#purchase logo online#purchase logo#purchase logos#buying a logo for business#buy a company logo#logos to buy#buy logo for company#where to buy a logo#buy company logo online#logo design service online
0 notes
Text
The Exorcist Typography: Horror.

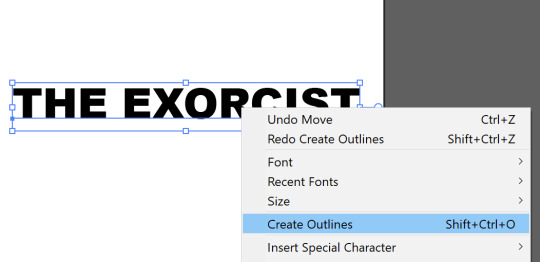
The base font for this typography was Arial Black, which is the same font used for the other styles of typography I have done for ‘The Exorcist’. And again, I had to make ‘The Exorcist’ into separate letters and ungroup them before I could start creating the typography. To do this, I right-clicked on the text and selected ‘Create Outlines’. This can also be achieved with the command SHIFT + CTRL + O or by going to Object > Expand. This will make each letter it’s own separate shape and layer, but to begin with they will all be grouped. To ungroup, the command is SHIFT + CTRL + G.
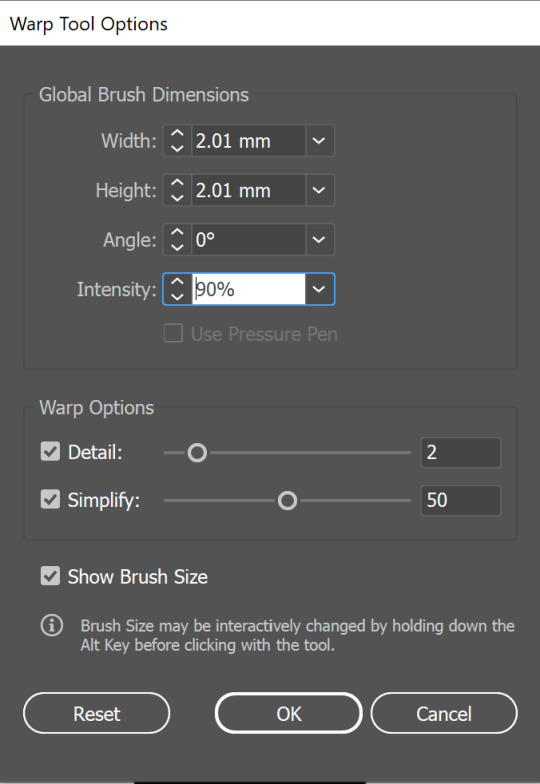
The text I am creating is for a horror so the design of it is meant to be like dripping blood. This is a very typical style of typography you’d expect to see in horror movies, especially horror movies made in the 80s. To stretch the text downwards to create this effect I have to use the Warp Tool which can be found in the Toolbar. However, because of the low intensity set by default, you must double-click this tool to open up the menu above. And then drag the 50% intensity to 80% or 90%. If you don’t do this, it doesn’t drag the letter to a peak and therefore doesn’t create the effect. You can also change the brush size in this menu or you can do so by holding SHIFT + ALT and dragging to the correct size while holding left-click.

This is an example of a 1980s horror film which makes use of this style of typography. This is from a film called ‘Night Train To Terror’ released in 1985, and you can see the blood drip effect on the word ‘Terror’. This is an example of when the style of a word is represented by it’s definition. I think this an effective approach to typography that is in relation to horrors.

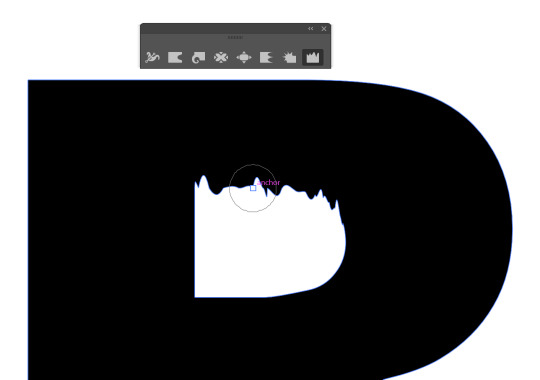
Above is a screen capture of what it looks like when you are creating the effect using the warp tool. You can see a blue outline underneath the T, and the circle is where my mouse was. As long as I am still holding down left-click, the T hasn’t changed at all. But as soon as I let go, the blue will disappear and I will have altered the shape. When warping a shape like this, it’s always better to move the mouse slowly. This is because dragging down really fast and without care can often lead to there being a sharp point. This would be ineffective for the blood drip effect.
I also made use of the Wrinkle Tool which could be located from the same drop down menu as the Warp Tool. I found this tool to also be the most effective at 90% intensity, however I did feel it worked better when using a smaller brush size. I went across the image using this tool to both add to the blood drip effect as well as reducing the amount of straight, clean lines. I did not feel that having lots of clean lines would be very effective for horror typography.

This is where I expanded on the horror style of typography and decided to merge it with the techniques I had learned whilst creating work for the crime/thriller genre. I did this by placing a black rectangle behind the text. I did this by dragging a rectangle to size using the Rectangle Tool and then putting it to underneath ‘The Exorcist’ in the layers panel. Finally, I selected both the text and the rectangle and pressed ‘Minus Front’ in the Pathfinder window. This subtracted the text from the rectangle, leaving 3 solid shapes: the rectangle, the circle inside ‘O’, and the shape within ‘R’.

Using the same process I used created the crime/thriller typography, I selected everything in the artboard and started cutting up with the Knife Tool. I did lots of cuts in a random pattern in order to create the fragmented look I had made previously. However, I decided to not do it quite as much as I felt it would be harder to keep the legibility.

This is the final product of using the Knife Tool and I really like it. It looks shattered enough for it to be very noticeable, but not to the point that any of the text is hard to read. I thought that the dripping and extreme fragmentation would make that the case.


Finally, I also incorporated the techniques I had learnt from creating action style typography. For this, I used the gradient tool to draw a vertical line which shows that the gradient will be going vertically instead of across the design. Then, I changed the colours of the gradient by double-clicking the Gradient Tool to open up a menu and selecting which colours I wanted to replace.


These are the two final colour schemes for the horror typography. Initially, I wanted to go for blue and purple as I felt these were both commonly used colours in horror movies. In particular ghost films. However, I then decided to go for blue and black as I felt this was more typical of a horror film in general to have a darker colour scheme.
0 notes
Text
How to use W3 Total Cache Settings Explained – A Beginner’s Guide
W3 Total Cache Settings Explained – A Beginner’s Guide
Adding a caching plugin to your website is one of the first things to do if you want to speed up your website. Among the best plugins for the job is W3 Total Cache. While the plugin is highly popular with WordPress users, getting through the settings (15+ options in General Settings alone) can scare a beginner. But once you get it right, it can give a boost to site speed. In this post, we’re going to specifically focus on the best W3 Total Cache settings to use on shared WordPress hosting.There’s a lot of ground to cover, so let’s get started.How to configure W3 Total Cache by @w3edge to speed up your #WordPress siteCLICK TO TWEET
W3 Total cache settings – dashboard
W3 Total Cache
Author(s): BoldGrid
Current Version: 0.14.4
Last Updated: August 13, 2020
w3-total-cache.0.14.4.zip88%Ratings1,000,000+InstallsWP 3.2+Requires
Once you’ve installed and activated the plugin, you’re ready to get started.
Plugin dashboard
1. Plugin menu: You’ll see a new item Performance added to the toolbar as well as to the menu on your WordPress dashboard.

Click on Performance in your dashboard sidebar and take a minute to browse through the plugin menu to get an idea of all the various feature areas.

That big list can be scary, but the good thing is you may not have to deal with many items, especially on shared hosting.
2. Compatibility check, empty all caches: The dashboard is the place to clear caching modules and check plugin-server compatibility.

To begin with, click Check Compatibility. The results reveal what the plugin can or cannot do with your current server configuration. Based on the results, you can enable plugin options and see if you need additional server support for some settings.

With shared hosting, you’re unlikely to be able to fix any of the compatibility issues. That’s fine – don’t stress!
Let’s get configuring now…
W3 Total cache settings – General Settings
This section of W3 Total Cache Settings is where you get to enable/disable the plugin’s individual functions. Thereafter, you can refine each function under the respective menu item.
Here’s a quick overview:

Clicking the links will take you directly to that section of General Settings on the same page.
We’ll focus on the W3 Total Cache settings relevant to a shared server setup:
Some settings such as Opcode cache and Fragment cache are applicable only to premium plans. And some others like Reverse Proxy are more relevant to a private server environment or may require additional software (Monitoring).
1. General
Preview mode helps you try out changes before going live with them. You can view the changes in a separate browser and they won’t take effect until you deploy them.

It’s a good idea to always use Preview mode first, as functions like minifying can break your site sometimes.
2. Page cache
This section is really the heart of the plugin. Fortunately, it’s easy to set up – just check the Enable box and select Disk: Enhanced for the method.

3. Minify
Minification can sometimes break your site, so you should employ some caution here:

Minification compresses and combines the many CSS and JavaScript files on your website. Selecting Auto takes care of it automatically. Make sure to preview after choosing this setting to make sure minification isn’t causing any issues on your site.

4. Database cache
This one caches the results of common database queries. It can hog server resources and, on a shared server, may actually work against you. It’s best to skip this option.

5. Object Cache
Object cache too can draw heavily on server resources so it’s better to keep it disabled on most shared hosting plans.

6. Browser cache
This tells visitors’ browsers to save a copy of the page and reduces calls to your website. You should definitely Enable this option.

7. Content delivery network
If you’re using a content delivery network (CDN), enable this one. Consult your CDN’s support for how to actually input the information, as the process depends on the exact CDN.

8. Miscellaneous
Covers a bunch of settings, the first one enables a Google Page Speed dashboard widget and requires an API key. Enabling it is optional, as you can always test pages manually.

Leave all other settings as the defaults.
9. Debug
Enabling this option adds debugging information at the end of each page. Unless you’re actively using it, keep it disabled. Only the modules that you enable in General Settings are available in this section.

10. Import export
To replicate W3 Total Cache settings on another website, click Download to create a file containing the current active settings. Then upload this file to another site to recreate the same configuration. It can also double as a backup for W3 Total Cache settings.

If you want to start afresh, click the Restore Default Settings button.
W3 Total cache settings – fine-tuning the General Settings
After enabling the different options under the General Settings Tab, you can fine-tune the enabled options by clicking the respective item in the plugin menu.
1. Page cache
General: Configure it according to the screenshot below:

Enable SSL cache only if you’ve implemented SSL on your site.
Aliases: This is not useful to most websites, so skip this one.

Cache preload: enabling it builds a cache automatically even before a visitor requests the page. You’ll need to type in the XML sitemap file of your website. Preload the post cache upon publish events ensures that the cached version is updated each time you publish.

Purge policy: This section specifies which pages are to be purged (AKA, have the cache cleared) when a new post is published or edited.

Advanced: Further, you can exclude some browsers from receiving cached versions, create exceptions and more. Enable the Compatibility mode, and leave the rest as the defaults.

2. Minify
Since we have enabled the auto option for Minify under General settings, there’s not much to do here.
General: The plugin author recommends that you go with the default settings, though you could enable notification for Minify errors.

HTML & XML: Enable all checkboxes, except Don’t minify feeds.

JS And CSS:

Advanced: Here, you can choose to exclude pages and files from minification, set the update interval and when to delete expired cache data (garbage collection). Default settings are fine, but you can change values if you wish.

3. Browser cache
General: Make sure to enable Set Last-Modified Header.

Also, enable gzip compression to compress text files, as well as Prevent caching of objects after settings change so browsers can identify newly cached files.

Leave the rest as the defaults.
You’ll find similar options in the CSS and JS section, the HTML & XML sections and the Media section, and you can leave them as the defaults.
W3 Total Cache settings – other settings
These settings allow you to handle certain types of users differently. You don’t have to do this – but it does give you extra flexibility.
1. User agent groups
You can create a group, say for mobile users, check Enable and select the relevant theme. While creating multiple groups, place the most important group at the top.

To direct a group (say, Android users) to an entirely different site, paste the URL of that website in the Redirect Users To field.
2. Manage referrer groups
This setting directs users coming from different sources such as Google or Bing, to cached webpages specific to that set of users.

3. Cookie groups
Use this setting to create different sets of cookies and assign it to specific groups like subscribers or mobile users to create a unique cache for each.

Enjoy your faster WordPress site
That covers most of the basic settings for W3 Total Cache. After configuring your site like this, you should be set up to enjoy significantly faster page load times.
The post How to use W3 Total Cache Settings Explained – A Beginner’s Guide appeared first on The Coding Bus.
from WordPress https://ift.tt/3h3Bf1f via IFTTT
0 notes
Link
How to make Bottom Navigation bar in Android
Hello World, Today we are going to learn how we can make a nice bottom navigation bar in android. We will see how we can implement bottom navigation and how to work with fragments and many other things and trust me you will enjoy this tutorial.
Before making our bottom navigation bar lets look at our final result. See the below gif.
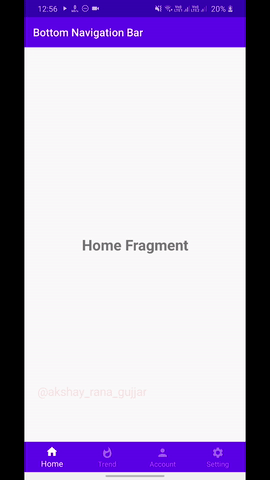
This is a clean and material design based bottom navigation bar. So let’s see how to code this.
Add Bottom Navigation Bar Dependency
To make the bottom nav bar, first, we need to add the dependency for the bottom navigation bar.
Open your build.gradle file and add this dependency.
implementation 'com.google.android.material:material:1.1.0'
After adding the dependency hit the sync button and after syncing the project, we can use BottomNaigationView in our layout file.
Add BottomNavigationView in Layout
Open your layout file and in the layout XML, we need to add 2 things. The first thing is FrameLayout, which will contain our fragments and the second thing is BottomNavigationView.
See the below code.
<?xml version="1.0" encoding="utf-8"?> <androidx.constraintlayout.widget.ConstraintLayout xmlns:android="http://schemas.android.com/apk/res/android" xmlns:app="http://schemas.android.com/apk/res-auto" xmlns:tools="http://schemas.android.com/tools" android:layout_width="match_parent" android:layout_height="match_parent" tools:context=".MainActivity"> <FrameLayout android:layout_width="match_parent" android:layout_height="0sp" android:id="@+id/frameLayout" app:layout_constraintTop_toTopOf="parent" app:layout_constraintBottom_toTopOf="@id/bottomNav" /> <com.google.android.material.bottomnavigation.BottomNavigationView android:layout_width="match_parent" android:layout_height="wrap_content" android:id="@+id/bottomNav" app:layout_constraintTop_toBottomOf="@id/frameLayout" app:layout_constraintBottom_toBottomOf="parent" android:background="@color/colorPrimary" app:menu="@menu/bottom_nav_menu" app:itemIconTint="@color/bottom_nav_item_selector" app:itemTextColor="@color/bottom_nav_item_selector" app:labelVisibilityMode="labeled" /> </androidx.constraintlayout.widget.ConstraintLayout>
Explanation:
First, we have ConstraintLayout as parent layout and then in children we have, FrameLayout and BottomNavigationView.
Nothing is fancy here except BottomNavigationView. Have you noticed the app:menu=”@menu/bottom_nav_menu”. In this line, we have created a menu for our bottom nav which we will see later. Let’s move further.
Next, we have app:itemIconTint and ;app:itemTextColor which has the same value @color/bottom_nav_item_selector. So what this property means and what is the value. These properties or attributes help us to change the nav icon color.
If you noticed the bottom nav icon color they are white in color and the active screen has solid white color and rest are having off white color. How you can customize these bottom navigation bar icons? I will tell you later in this tutorial.
Next is app:labelVisibilityMode and the value is “labeled”. This property is responsible for weather showing text below of the icons in Bottom Navigation Bar. There are other values are as follows:
Selected
Unlabeled
Auto
Selected: Text will be shown only selected navigation item.
Unlabeled: Text will be hidden in navigation.
Auto: Icon text will be shown if there are 3 or less items in navigation and text will be shown only at the selected item when there are 4 or more items in navigation.
Now let’s see how to add items or menu in the bottom navigation.
How to make menu for BottomNavigationView?
To make menu for the bottom navigation bar, first, we need to make a menu folder under the res folder.
To make a folder under res, right-click on res folder in android studio and then click new then click on Android Resource Directory.
Then a popup window comes and click on resource type and select menu and hit OK.
Now your menu folder is created. Now we need to make our menu resource file. To do that we need to right-click on the menu folder and click on new -> Menu Resource File.
Now we name our menu file same as in BottomNavigationView in activity layout file which is bottom_nav_menu.
See also: Gradient Status bar and Toolbar
In this file, we will add out menu item as shown below code.
<?xml version="1.0" encoding="utf-8"?> <menu xmlns:android="http://schemas.android.com/apk/res/android"> <item android:id="@+id/home" android:icon="@drawable/ic_home" android:title="Home" /> <item android:id="@+id/trend" android:icon="@drawable/ic_trend" android:title="Trend" /> <item android:id="@+id/account" android:icon="@drawable/ic_person" android:title="Account" /> <item android:id="@+id/setting" android:icon="@drawable/ic_settings" android:title="Setting" /> </menu>
In the above code, we made 4 items for our bottom navigation. Each item has an id, an icon, and title. Simple.
Now see how we can customize the icon color of items.
How to Change Icon Color of BottomNavigationView?
To change icon color when an item is selected in the bottom navigation bar like below.

You will need to make your own color selector XML file. Follow the tutorial.
First, make color directory under the res folder. Right click on res folder and select new -> Android Resource Directory.
Hey read the full article here: Bottom Navigation Bar in Android
Thank you for reading and have a nice day.
0 notes
Link
Android project base app development course build (Real App) ##FreeOnlineTraining ##UdemyFrancais #Android #app #Base #Build #Development #Project #real Android project base app development course build (Real App) Welcome to this Android project base app development course build (Real App). If you want to learn Android Apps development from scratch, then this is the course for you. In This Course First You Will Learn Basics of Android. After that you will learn how to develop a complete Project. This course is designed for create real World Android Apps. Here is Some List That You Are Going To Learn In This Android App Development Course: Android Layout Design XML/UI Android Date Picker Dialog Android Bottom Navigation Bar Android Menu bar Android Fragment, Develop an App Using Android Fragment Develop Android Project Show Case App Work With Android Firebase Database Work With Firebase Authentication Android Custom Toolbar Android Card View Android Firebase Insert Operation Android Firebase Update Operation Android Firebase Delete Operation Android FirebaseRecyclerAdapter Udemy Provide 30 Day Money Back Guarantee . So After enroll This course if you don't like this Course You can Return your money back,No Question Asked. Sign Up To This Course and You Will Get: Project Base Android App Development Video Lectures Real World Example of Android Project Become Master With Android Firebase Database Develop Complex Android App Using Firebase Database How To Become an Android App Developer? Step by Step Guide For Android App Development. Here is Some Feedback about this course from my Students: "This course is enough good for start android apps development.This course cover all basic features of android and then real world android apps.I Mostly like Expense Manager App section using firebase. Best course so far.this course contain a lot of information about android development." "I wanted an app development course that would show what is really important and that is what I got. I learned all features of Android for becoming Android developer. Certainly would recommend the course. " "Best android apps development course so far. First I learn basic of all android components. After that I learn how to develop real world android apps for client and App Store. I mostly like all firebase sections of this course. Instructor shows how to develop real world apps using firebase. After complete this section I learn a lot about firebase and I build many real world android apps. Thanks for your course." "Best Android development course I have taken so far. The teacher has amazing teaching skills. He has the ability to describe all parts very clearly on a step-by-step basis. Highly recommended! " "Very well made course about Android Development. Will continue and hope to learn a lot more. I am very happy with what I have learned so far!" Who this course is for: Who is want to learn android development Who is want to build real world android app Who is want to learn Firebase database 👉 Activate Udemy Coupon 👈 Free Tutorials Udemy Review Real Discount Udemy Free Courses Udemy Coupon Udemy Francais Coupon Udemy gratuit Coursera and Edx ELearningFree Course Free Online Training Udemy Udemy Free Coupons Udemy Free Discount Coupons Udemy Online Course Udemy Online Training 100% FREE Udemy Discount Coupons https://www.couponudemy.com/blog/android-project-base-app-development-course-build-real-app/
0 notes