#android toolbar menu
Explore tagged Tumblr posts
Visit Tumblr Blog
Explore Tumblr blogs with no restrictions, modern design and the best experience.
Last Seen Tumblr Blogs


Fun Fact
China blocked Tumblr because of pornography and censorship problems in 2013.
Text
Summaries, Custom Article Actions, Obsidian Integration, and More
Today we’re launching Instapaper 8.6 for iOS and macOS, which includes Summaries to quickly get a snapshot of an article, Custom Article Actions to customize the toolbar in the article view, and many more new features that you’ve been asking for.
We’re also launching our official Obsidian Plugin, which syncs all of your highlights and notes to Obsidian.
Summaries
Summaries provide both an overview of the current article, and a list of Summary Highlights which showcase the most important sentences in the article.
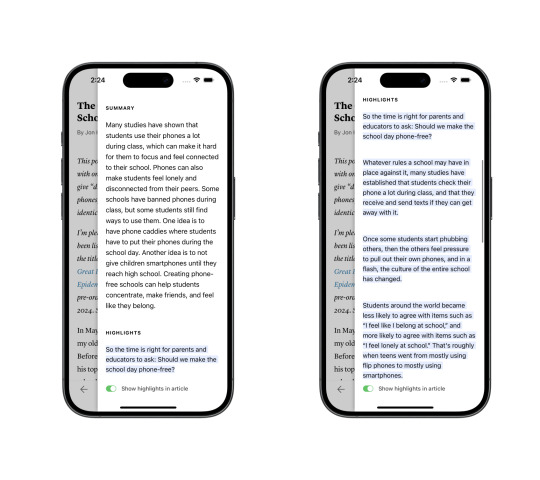
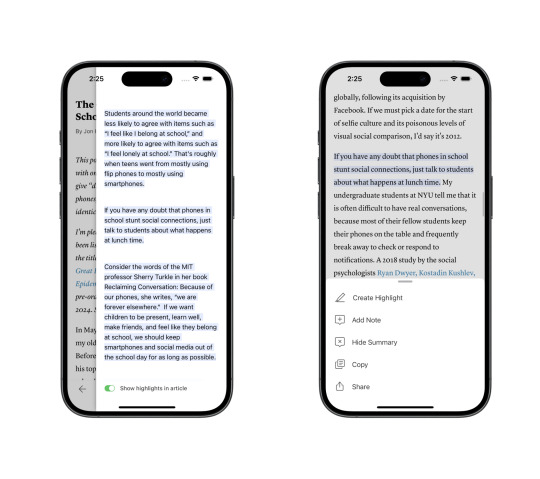
You can access Summaries by tapping the “...” menu then tapping Summarize. We wanted to make Summaries accessible from wherever you are in the article, so you can also swipe from the right edge of the article to open the summary.
Tapping any of the Summary Highlights will take you to that place in the article, and you can easily highlight or create a note by tapping the summary highlight. There is also a toggle that enables you to show all Summary Highlights in context while you’re reading the article.
Summaries are limited to 5 per month for free users. With Instapaper Premium you’ll get unlimited Summaries, and Instapaper will automatically sync Summary Highlights to your device. If you have the “Show in article” toggle enabled, Instapaper will automatically show the Summary Highlights in the article without needing to fetch the summary first.
Summaries are available in Instapaper 8.6 on iOS, macOS, and on the Instapaper website. Android support coming soon!
If you’re interested in the technical details, we also published a post about how Instapaper Summaries are generated.
Custom Article Actions
In the article view, you can now customize the toolbar actions by long pressing an icon, and replacing it with a customized action. We’ve received a lot of requests from people who frequently use text-to-speech or view their notes, and want an easy way to do that from the toolbar. So if you’re using Instapaper for heavy research, your toolbar might look something like this:

Custom Article Actions are available today on iOS and macOS.
Obsidian Plugin

We’re excited to share our official Obsidian Plugin, which is the only plugin that can sync all of your highlights and notes to Obsidian.
You can enable the plugin by searching for Instapaper in Obsidian Plugins. After installing, navigate to Settings > Instapaper (under Community Plugins), log in with your Instapaper credentials, and your Notes will start syncing.
Additional Features & Improvements
In addition to the above, we’re launching a number of additional features and improvements in Instapaper 8.6:
Oldest article sync is now available. If you'd like to sync your articles oldest first, you can navigate to Instapaper Settings > Advanced > Home (Under Syncing) > Oldest First.
Support for iOS default system browser when opening links. You can switch to the iOS default browser by navigating to Instapaper Settings > Browser > System.
If you prefer Dark Mode slightly less dark, True Black can now be disabled in Instapaper Settings > Advanced > True Black.
Toggle to enable or disable scrolling under the status bar available in Settings > Advanced > Full Screen.
Option to remove “via Instapaper” attribution when sharing articles is available with Instapaper Premium in Settings > Advanced > Sharing.
Improved display of code blocks in reader view.
Increased largest font sizes for better accessibility.
As always, if you have any feature requests, questions, or concerns please feel free to reach out at [email protected].
– Instapaper Team
9 notes
·
View notes
Text
Ok, trying to catch up here. One thing I'm seeing is that you can only install the "app" (it's literally just the website, like actually literally just the website, there's a file on the website that tells the phone to add the shortcut link as an "app" and what URL to open) on iOS.
Android users - this is false!
When you've got the website open and are logged in so you're on the profile page, in the 3 vertical dots menu, click "Add to Home Screen" or "Install App" or similar wording. Accept the prompt that comes up. Then, once it's installed and you've got it open, you can click the notifications icon in the upper right of the site and enable notifications.
You can also install this app on your computer, there's a download icon in the toolbar at the top. (At least on Windows, y'all Mac users are on your own, heh!)
9 notes
·
View notes
Text
Hate the "Go Premium" buttons? Have TamperMonkey?
Have I got a script for you :)
To be specific, it removes the "Go Premium" button in the bottom left of the screen (above the "Create" button), as well as the premium call-to-action button in the top right (under the search bar). This has only been tested on desktop, but may also work on mobile browsers that allow extensions (eg. Firefox on Android)
This is very simple, but it's effective- for now at least. It currently uses the site's randomized class names to select the elements to remove. If these change in the future (which is unfortunately very common, sorry) then this may stop working and need updating
Here's the script:
It's pretty clear in what it does, and of course it's perfectly safe haha
EDIT: Oh right, instructions!
If you don't already have TamperMonkey, you can most likely get it from your browser's extensions store. Here it is for Chrome and Firefox
Once installed, click on the extension's icon in your browser's toolbar (or access its settings menu in general)
Hit "Create new script..."
Copy and paste the full script from the gist page into the interface and save it
Reload tumblr and it should work!
#α¹#meta stuff#coding stuff#figured i'd just slap some things together bc i saw some people asking about it#hopefully they don't break this immediately >_>
3 notes
·
View notes
Text
LibreOffice does offer a view-only app for Android that allows you to look at documents from LibreDoc.
If you want a mobile alternative that allows u to write/edit stuff, I suggest notion. Its free, it allows u to access ur stuff from across paltforms for free, and while it does have a pro upgrade option, it's never shoved on you. While it does have an AI assistant, notion does not use your data to train any models and does not allow third parties that are used in the models to store or train their own models with your data (it clearly spells this out in its Notion AI Security & Privacy Practices page on their website.) Its super unobtrusive as well, so u don't have to worry about it forcing itself on you like literally every other ai "assistant". Seriously when you boot notion up for the first time after an update, it goes "hi, I exist, you can access me via a button on a toolbar that's visually distinct from all the other buttons on the toolbar so u don't accidentally keep clicking on me, and it opens a menu with options for how to use me! Bye!" and basically gets out of the way and never bothers you again.
But thats just my opinion, im sure theres other options, thats just the one thats worked best for me.
Microsoft Office, like many companies in recent months, has slyly turned on an “opt-out” feature that scrapes your Word and Excel documents to train its internal AI systems. This setting is turned on by default, and you have to manually uncheck a box in order to opt out.
If you are a writer who uses MS Word to write any proprietary content (blog posts, novels, or any work you intend to protect with copyright and/or sell), you’re going to want to turn this feature off immediately.How to Turn off Word’s AI Access To Your Content
I won’t beat around the bush. Microsoft Office doesn’t make it easy to opt out of this new AI privacy agreement, as the feature is hidden through a series of popup menus in your settings:On a Windows computer, follow these steps to turn off “Connected Experiences”:
File > Options > Trust Center > Trust Center Settings > Privacy Options > Privacy Settings > Optional Connected Experiences > Uncheck box: “Turn on optional connected experiences”
40K notes
·
View notes
Text
Samsung Notes finally brings its handy math solver to Galaxy phones with One UI 8
Joe Maring / Android Authority TL;DR The Samsung Notes app in One UI 8 has received some interface and functional improvements. The latest version of the app includes a new customizable toolbar, an updated Default note style menu, and new search filters. Samsung has also added the Math Solver feature on devices with an S Pen. The One UI 8 beta update for the Galaxy S25 series brings several…
0 notes
Text
How To Share Screen On Zoom On Phone
How to Share Screen on Zoom on Phone ?
In today’s fast-paced digital world, virtual meetings and presentations have become normal. Whether you’re working remotely, attending a class, or catching up with friends and family, Zoom is one of the most reliable platforms for video conferencing. While most people are familiar with using Zoom on a computer, many don’t realize that the mobile version is just as powerful — especially when it comes to screen sharing. If you’ve ever wondered how to share screen on Zoom on phone, this blog will walk you through everything you need to know.
Why Share Your Screen on Zoom ?
Screen sharing can be incredibly useful. Here are some common scenarios where it comes in handy
Business meetings: Presenting a PowerPoint, spreadsheet, or application.
Education: Teachers can show notes, diagrams, or tutorials to students.
Tech support: Easily show someone your phone screen for troubleshooting.
Collaboration: Work together on projects and brainstorm visually.
Now let’s dive into the actual steps of how to share screen on Zoom on phone.
Steps Before You Start
Before jumping in, make sure you meet the following requirements:
You have the Zoom app installed on your phone (available on iOS and Android).
You are signed in to your Zoom account.
Your Zoom version is up to date.
You have a stable internet connection.
The host of the meeting has enabled screen sharing.
Now that you're ready, let’s explore the step-by-step guide.
Step-by-Step Guide: How to Share Screen on Zoom on Phone
Step 1: Join or Start a Zoom Meeting
To begin, open the Zoom app on your mobile device. You can either:
Join a meeting by entering the Meeting ID and passcode.
Start a meeting if you’re the host.
Once you're inside the meeting, you’ll see several icons at the bottom or top of your screen, depending on your device.
Step 2: Tap the “Share” Button
On both iOS and Android, look for a button labeled “Share” or “Share Content” — usually in the bottom toolbar.
Tap on this button, and a menu will appear with multiple options.
Step 3: Choose “Screen”
From the list of options (which may include “Photos,” “Documents,” “Web URL,” etc.), select “Screen.”
At this point, your phone may ask you to grant permission to Zoom to record or mirror your screen. This is completely safe and is only used for broadcasting your screen to other participants.
Step 4: Start Broadcast (iOS) or Start Now (Android)
Depending on your operating system, the next step will differ slightly:
On iOS (iPhone/iPad), tap “Start Broadcast”. A three-second countdown will begin, and then your screen will be live.
On Android, tap “Start Now” when the system warning pops up.
Once you confirm, Zoom will start sharing your phone screen in real-time with everyone in the meeting.
Tips While Sharing Your Screen on Phone
Now that you know how to share screen on Zoom on phone, here are a few additional tips to enhance the experience:
1. Enable Do Not Disturb
This prevents notifications from popping up while you’re sharing your screen, which protects your privacy and avoids distractions.
2. Keep Your Battery Charged
Screen sharing consumes more power than usual. Ensure your phone is charged or plugged in during long sessions.
3. Switch Between Apps Carefully
While your screen is being shared, anything visible on your phone will be shown to others. Be mindful while switching between apps or tabs.
4. Stop Sharing When Done
To stop sharing, simply return to the Zoom app and tap “Stop Share.” This will immediately end the screen broadcast and return you to the video meeting.
Common Issues and How to Fix Them
1. Can’t Find the Share Screen Option
Make sure you're using the latest version of Zoom and that the meeting host has enabled screen sharing for participants.
2. Lag or Delays
This is often due to a weak internet connection. Try switching to Wi-Fi if you're on mobile data.
3. Zoom Doesn’t Have Screen Recording Permissions
Go to your phone settings and enable permissions for Zoom under “Screen Recording” or “Display Over Other Apps.”
Final Thoughts
Learning how to Share Screen on Zoom on Phone is a game-changer for mobile users. Whether you’re in a business meeting, a virtual classroom, or a family catch-up, being able to visually share your screen enhances communication and collaboration. It’s quick, easy, and powerful once you know the steps.
Next time you’re in a Zoom meeting on your phone, try using screen share. With just a few taps, you can deliver presentations, solve problems, or simply explain things better. Technology is all about making life easier — and Zoom’s screen sharing feature does just that.
0 notes
Text
The Samsung Galaxy Tab S10 Ultra is a great tablet.

If you Google the mouthful, "Samsung Galaxy Tab S10 ultra review," you'll be forgiven for thinking this tablet is "Unwieldy," "too big," and "a behemoth."
The internet is covered with page 1 and 2 search results on Google, YouTube, and other locations, which are all very quick to tell you just how unusable this tablet is. It doesn't know what it is or how they tried Dex, and it just doesn't work.
These reviews often (not always) come from people who will also tell you how the iPad is a masterclass in the tablet world and laud the equivalent iPad Pro's
Many of these reviewers are stuck in a world where they rely on Windows or Mac software to do their jobs, and as such, if tools specific to their workflow don't exist, then something is a dud...
However, there is a huge Army of people out there for whom a device such as the S10 Tab Ultra is a great laptop alternative, and as one of those people, I'd like to explain a few reasons why.
As I've implied above, many reviewers find reviewing these types of systems difficult for three reasons.
Many of them are tied into the IOS infrastructure and come from the iPhone world. In doing so, they are immediately in unfamiliar territory.
If they are Android users, they are probably using a Laptop for most of their work and are trying to treat the Tablet as another Android phone device or, at best, a smaller tablet, which is, for the most part, just phones with bigger screens.
Finally, there is the issue of being tied into familiar software and workflows. This can make objective reviewing of a tablet like this very difficult because you are battling not just a new device but also new software.
I don't have any of these issues because my main daily driver is a Chromebook if I'm not using a Linux desktop. So, I'm adept at using alternative software and web front ends and am generally not tied to Windows or Mac OS desktops.
That ability to adapt my workflow has been invaluable when using this tablet.
You'll first notice that the tablet's snapdragon chip is powerful. I didn't realise how powerful it was until I installed Ollama under Termux and ran the llama3.2 model on the Tablet. It ran as fast as my i7/32Gb LG Gram running Arch...
You also notice just how much grunt it has when editing video in things like Insta360, and it's as fast, if not quicker, than the Pixel 9 Pro XL.
This also highlights another thing Samsung does that Apple just can't: It multitasks. I can put the render behind other tasks; it carries on, and I can do something other than watch VideoLeap render.
A device with a screen this size will immediately draw comparisons with a Laptop, and the obvious question is, can it or should it be used as one? With a good keyboard case, I do and have found no issues doing so. This, however, is possible because I am not tethered to software that I require for specific workflows, such as Adobe, for video editing. (That being said, Capcut is a beast on this thing.) Over the years, I've adapted my workflow to web apps, Android apps and the outcome rather than the tool.
That last sentence is significant because if you want to use the Tab S10 Ultra as a laptop device. You are going to need to be flexible in the software you use. Android has a lot of software available. A lot of it scales really well in Tablet Mode
This is assisted in no small amount by Dex, a Samsung service which a lot of people review via the Samsung phones, and is included and I'd even say is far more useful on a Tablet.
Dex, in a nutshell, makes your Tab S10 Ultra operate more like a Windows Desktop. It has a toolbar with menus and shortcuts, launcher icons, and Android apps that can run on Windows. Coupled with a second screen, I have zero issues using the Tab S10 Ultra as a Laptop replacement. Dex isn't perfect; however, no other Desktop is. They all have problems. Dex will, however, provide an interface on the tablet when working with a keyboard and a mouse, which feels familiar, provides windows you can cycle through and lets you get work done.
So in summary the Tablet itself is best described as having
Powerful Performance: Features a Snapdragon chip capable of running demanding applications and AI models efficiently
Superior Multitasking: Allows background rendering while performing other tasks
DeX Integration: Provides a desktop-like experience with familiar interface elements and window management
And is best suited for people who are
Comfortable with the Android ecosystem
Willing to adapt to web-based alternatives
Looking for a versatile device that can handle both creative and productive tasks
1 note
·
View note
Text
Title: Optimizing Development: Leveraging Android Emulators on VPS for App Development
App development is a complex and time-consuming process that requires a lot of resources, including hardware and software. One of the most critical tools for app development is an emulator, which allows developers to test their apps on different devices and versions of Android.
However, running an emulator on a local machine can be slow and resource-intensive, especially if you need to test on multiple devices simultaneously. One solution to this problem is to use a virtual private server (VPS) to run your emulators.
A VPS is a virtual machine that runs on a remote server, which you can access over the internet. By using a VPS, you can run your emulators on a more powerful machine than your local machine, which can significantly improve performance and speed up your development process. In this blog post, we will explore how to optimize your development process by leveraging Android emulators on VPS for app development. We will cover the following topics:
Setting up a VPS for Android development
Installing and configuring Android emulators on VPS
Testing apps on Android emulators on VPS
Best practices for using Android emulators on VPS
Setting up a VPS for Android development The first step in using a VPS for Android development is to choose a VPS provider. There are many VPS providers available, including DigitalOcean, Linode, and Vultr. When choosing a provider, consider the following factors:
Performance: Look for a provider that offers high-performance servers with fast CPUs, plenty of RAM, and solid-state drives (SSDs).
Operating system: Choose a provider that offers the operating system you prefer, such as Ubuntu, CentOS, or Debian.
Cost: Compare the prices of different providers and choose one that fits your budget.
Once you have chosen a provider, you can create a new VPS instance. Most providers offer a simple interface that allows you to choose the operating system, CPU, RAM, and storage options for your VPS. After creating your VPS instance, you will need to install the necessary software for Android development. This includes the Java Development Kit (JDK), Android Studio, and the Android SDK. Installing and configuring Android emulators on VPS Once you have set up your VPS and installed the necessary software, you can install and configure Android emulators. To do this, follow these steps:
Open Android Studio and create a new project or open an existing one.
In the toolbar, click on Tools > AVD Manager.
Click on the “Create Virtual Device” button.
Choose the device configuration you want to use, such as a Nexus 5X or Pixel 3.
Choose the Android version you want to emulate, such as Android 11.
Click on the “Finish” button.
After creating a virtual device, you can start the emulator by clicking on the “Play” button in the AVD Manager. Testing apps on Android emulators on VPS Once you have set up your emulators on VPS, you can start testing your apps. To do this, follow these steps:
Connect to your VPS using a remote desktop client, such as Remote Desktop Connection on Windows or Remmina on Linux.
Open Android Studio and open your project.
In the toolbar, click on Run > Run ‘app’.
Choose the emulator you want to use from the dropdown menu.
Click on the “OK” button.
Your app will now be installed and launched on the emulator. You can use the emulator to test your app’s features and functionality, just as you would on a physical device. Best practices for using Android emulators on VPS Using Android emulators on VPS can significantly improve your development process, but there are some best practices you should follow to ensure optimal performance and efficiency. Here are some tips:
Use a high-performance VPS: Choose a VPS with a fast CPU, plenty of RAM, and SSD storage. This will ensure that your emulators run smoothly and quickly.
Use the latest version of Android: Use the latest version of Android for your emulators to ensure compatibility with the latest features and APIs.
Use multiple emulators: Use multiple emulators to test your app on different devices and versions of Android. This can help you catch bugs and issues that might only occur on certain devices.
Use headless mode: Use headless mode to run your emulators without the graphical user interface. This can save resources and improve performance.
Monitor performance: Monitor the performance of your VPS and emulators to ensure that they are running smoothly. Use tools like top and top to monitor CPU and memory usage.
Optimize your app: Optimize your app for performance and battery life. This can help ensure that your app runs smoothly on emulators and physical devices.
Conclusion
Android emulators on VPS can significantly improve your app development process by allowing you to test your apps on different devices and versions of Android. By following best practices and using high-performance VPS and emulators, you can optimize your development process and ensure that your apps are of the highest quality. So, if you’re an app developer looking to improve your development process, consider using Android emulators on VPS. With the right setup and best practices, you can take your app development to the next level.
0 notes
Text
Short Cut Keys: How to take screenshot on Windows, iOS, Chromebook, Mac, Android
Screenshot is one of the best features in our devices, it allows us to capture important details at any time. In different devices, there are many ways to capture screenshots. Devices such as Windows, Mac OS, iPad, iPhone, Android, and even Linux have different ways to take screenshots. On different operating systems of devices, there are different ways to capture screenshots.
How to take screenshot on any device?
People use this feature to capture important documents and useful information. Mobile and laptops have different operating systems. Therefore, both devices have a distinct way to take screenshots. In this article, we will go through the details regarding this topic. So read this article till the end.

(Image Source: MySmartPrice) How to Take Screenshot on iPad, iPhone, Apple Watch? If you have an iPhone or iPad that doesn't have a Home button, then you must hold down the side button and volume up button together to capture a screenshot. If you have an iPhone or iPad that has a Home button, then hold down the sleep/wake button and press the Home button to capture a screenshot. Captured images will go directly to the Screenshot album. Once you capture the image, the device's markup tool will appear at the bottom of the screen where you can edit the captured image. To capture the entire web page, follow the simple steps. - Open Full Page Tab - Done - Save PDF to Files The file will be accessible via Apple's Files app. If you have an Apple Pencil, then you can easily take a screen grab with a drawing tool. If you are recording your screen through screen recording, then you can easily take screenshots, you can pause the video and take a screenshot this way. You can also use some software to emulate your screen onto a computer screen. Further, you can capture the screen on your computer. Software such as LonelyScreen, and AirPlay allow you to do such things. To take screenshots on the Apple watch follow the steps - Go to the 'My Watch - Go to the General - Click on Enable Screenshot - Hold the Side button and Digital Crown together The Screenshot goes to your iPhone, Yes, you heard it right, the captured screenshot appears on your connected iPhone. How to take Screenshot on an Android device? There are many Android devices available on the market. Therefore, the screenshot command may be different depending on which brand you are buying. However, most Android devices have the same ways of capturing screenshots, holding down the power and volume buttons together. Nowadays many devices have a screenshot button on the pull-down shade. You can easily take a screenshot by clicking on it. On Android 10 and 11, you get many screen recording options as well, you can record the video and capture the desirable portion of it. If you have Google assistance, then ask it to capture the screenshot. In Samsung devices, you can edit the captured image, just open the Air Command menu, then tab 'Smart Select' to choose the desired size and shape. In Samsung devices you can also take screenshots by just Ninja Chop game, just swiping your hand from left to right. Before doing it you have to bring change in your setting. - Go to the Setting - Go to the Advance Feature - Go to the Motion and Gesture - Select the Palm swipe to capture How To Take Screenshot on a Windows 10 PC? To capture screenshots on Windows 10, you must use the print Screen button. You can easily perform this task by just pressing the upper-right side. You just have to tab PrtSc once to copy the full screen. You can then paste it anywhere you want by just pressing Ctrl + V. If you have a big screen, and you want to capture only the window part, then press Alt + Print Screen. Use the Shift + Window Key + S keyboard shortcut to launch a small toolbar at the top of the screen where you can choose between capturing the full screen, a custom portion, or a specific window. There is another option available for those who prefer the snipping tool on Windows 10. Yes, you have heard it right, this app can be located at the start menu which has the same capturing functionality as Snip and Sketch. The Xbox Game Bar also gives a feature to capture the moments, it allows you to record gaming sessions. You have to start screen recording, Use the screen grab by pressing the Window Key + G. How To Take Screenshot on Windows 11? On Windows 11 there is a different way to capture screenshots. You just have to tab Alt + PrtSc to perform this task. Your screenshot is placed in the Picture folder in Screenshot by pressing Window Key + PrtSc. You have also another option using Onedrive. Follow the steps. - Go to the setting - Backup in OneDrive - Check Automatically Save Screenshots After applying these steps, your captured screenshot will go into the cloud. Microsoft provides you with a combined version of the Snipping Tool and Snip and Sketch tool, the Shift + Windows Key + S shortcut to get options for fullscreen, custom, and window capture. In Windows 11 you can easily assign the Snipping Tool to the PrtSc key - Go to the Settings - Go to the Accessibility - Keyboard. - Use the Print Screen Button to Open Screen Snipping The Xbox Game Bar gives a feature for screen recording too. You can do it with Window Key + G then tap on the camera button in the capture section to save a screenshot. Tablet users can capture screenshots by pressing the Volume up and Power buttons together. Captured screenshots will be placed in the screenshot album. How to take Screenshot on Mac? To initiate the screenshot tool, you have to either press Command + Shift + 5 or Launchpad - Other - Screenshot. You can do it from a keyboard shortcut because it preferable and easiest way to capture screenshots on Mac. To capture the entire screen press Command + Shift + 3. If you want the captured part just press Command + Shift + 4, then select the part you want to take. For specific window press Command + Shift + 5, if you have Mac with a touch screen, then press Command + Shift + 6. How to take Screenshot on Chromebook? Some model of Chromebooks has a screenshot button that looks like a camera. If you want to use the shortcut, then press Shift + Ctrl + Show Window, and select Screenshot to capture part of the window, full screen, and a specific window. If you are using an external keyboard, then the shortcut key changes a little bit, for the entire screen press Ctrl + F5, for the part of the screen press Ctrl + Shift + F5. In 2021, Google introduced in Chromebook a new feature that helped users capture screenshots very easily, Just pressing Screen Capture, you will be able to capture the entire screen, part of the screen, and a single window. How to capture Screenshot on Linux Device? There are many ways to capture screenshots on Linux devices. You can do it all by opening the Activities menu and selecting Screenshot. You can select your desired portion of the screenshot whether the whole screen or a single window. Linux operating system also allows you to do print Screen button, just press Alt + Print Screen shortcut for the specific window. Press Shift + Print Screen which allows you to select a custom area to capture.e Many programs can help you with it, for example, the GIMP program allow the user to capture screenshot you just have to perform the following steps. - Go to the File - Go to the Acquire - Press the Screen Shot button.
FAQs:-
How to use snipping tool in Windows? Use short cut key: Windows + Shift + S, to enable the snipping tool in Windows. Afterward, you need to select the area to take a screenshot. How to take a screenshot on Chromebook? Press Shift + Ctrl + Window to take a screenshot on Chromebook. If your keyboard does not have Windows button, use short cut key: Ctrl + Shift + F5 How to take a screenshot on Windows without Print Screen? If you do not want to use or do not have a "PrtScn" button to take a screenshot, you can use Fn + Window + Space Bar. Read the full article
#Howtotakescreenshot#HowtotakescreenshotonAndroid#Howtotakescreenshotonanydevice#HowtotakescreenshotonChromebook#HowtoTakeScreenshotoniPhone#HowtotakescreenshotonWindow#HowtotakescreenshotonWindow10#HowtotakescreenshotonWindows11
0 notes
Text
How to Download Fonts for Cricut on Mobile Devices?
There are many ways to make Cricut projects with all sorts of fonts. These fonts can be added to various projects, such as coffee mugs, shirts, or t-shirts. However, fonts designers make a free version of fonts for personal use. Users who wish to download fonts for Cricut can easily download them from a free website. Hence, the write-up will cover the process of downloading fonts and adding them to the Design Space app. Besides, you will learn the key differences between .TTF and. OTF file types for fonts. Further, we will also discuss how to use fonts on Design Space. In this blog, you will find all methods for downloading eye-catching fonts on various devices, including iPad, iPhone, and Android devices.
Differences Between .TTF and .OTF Fonts
There are mainly two types of font files: .TTF and .OTF files. The TTF stands for TrueType Font, and OTF stands for OpenType Font. While downloading the fonts, you will find these two types of font files.
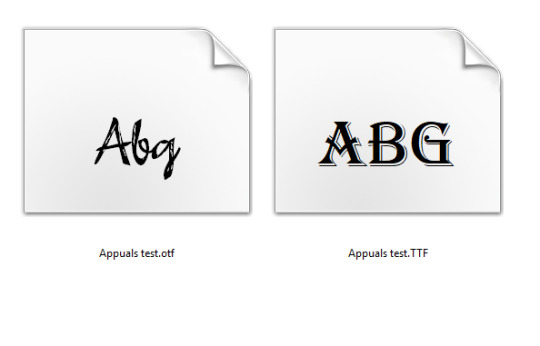
The biggest difference between these files is that .OTF comes with more advanced features. For example, it has special characters, glyphs, and embellishments, giving you more options for designs. Since .OTF offers incredible design options; we recommend you download and install an .OTF file.
If an .OTF option is not available; you can use .TTF, which works perfectly fine with Cricut Design Space. Also, TTF files are larger in size; therefore, they will consume more space on your hard drive.
How to Download Fonts for Cricut on iPad/iPhone?
Downloading fonts on iPad/iPhone devices is simple, and you can download them from the font app. This app is available for free on the App Store.
To install the fonts on your iPad device:
Go to the App Store and download the font manager app, i.e., font.
Afterward, download the font file. You will find the downloaded file in .zip format.
Then, unzip the file, launch the font app, and click on Font Finder.
After that, select the Open Files button and go to the font file you want to install.
Next, hit the Installer tab and click the Install button.
Then, hit the Continue button and allow.
Close the font app and then go to your settings application. Click on the Profile Downloaded.
Now, click the Install button. (Click Install if you see a warning message such as the profile not signed.
Finally, you will see a message saying Profile Installed. Hit the Done.
If you have installed the fonts correctly, then you can use them in your Design Space.
How to Download Fonts for Cricut on Android?
Now, you need to read the following instructions for downloading the fonts for Android devices. Again, you need an app called font. To download, follow the steps mentioned below:
Download and install the font manager app (font) from the Google Play Store.
To find the downloaded file, go to the Downloads App file and extract the same to unzip it.
Then, launch the font app and go to My and then My Font options. You have to open it to see the preview and install the fonts on the device.
Finally, hit Set to finish the installation.
Furthermore, you are free to use the fonts in the Design Space.
How to Use Your Own Fonts in Design Space?
To add the fonts to your Design Space, you first need to download the fonts to your computers or mobile devices. Also, the fonts can be downloaded from a website that offers fonts for free.
Launch the Design Space app on your device. Earlier, if the software is open, then you may require it to close it. Then restart the app before new fonts appear properly.
Open the new Canvas to create a new project.
Hit the Text Tool from the toolbar on the left.
From there, add a textbox to your canvas.
Then, hit the front Drop-Down menu to open the list of fonts.
Choose System to find only the fonts you have installed on your device.
Then, opt for the new font at the front of the queue.
This way, you can easily use any fonts that you want on Cricut Design Space.
Conclusion
In short, the key differences in font files might have helped you understand the right file type for fonts, and you can download them accordingly. Coming to the downloading of fonts, we have explained the same for both Android and iPad/iPhone devices. After downloading and installing fonts, learn how to use the fonts in Cricut Design Space. The download fonts for Cricut Design Space will be easy for you and won’t take much time to install. Just read the instructions carefully and download them accurately.
FAQs
Question 1: How to download fonts on Design Space for a Windows computer?
Answer: To download the fonts on a Windows computer, read the following instructions carefully:
Download the fonts file from the website that offers free fonts.
Then, right-click on the downloaded .zip file to extract it.
Afterward, right-click the Font File and click on Install.
Follow the on-screen commands to install the fonts on your device.
Finally, the fonts will be installed in your Design Space, and you can use them in your Design Space.
Question 2: How can I download Cricut fonts for free?
Answer: Many designers make free versions of fonts. Plus, free fonts are easily accessible on any website, such as fonts.google.com and dafont.com. These two websites offer free fonts that work perfectly with your Cricut Design Space. You can download the fonts and unzip the downloaded font files. Further, after installation of the fonts, it will be ready to use on Design Space.
Question 3: Does Cricut cost for fonts?
Answer: Even though Cricut offers various fonts for free, there are many fonts available on the Design Space that require you to pay. If you do not use a Cricut Access subscription, then most fonts will cost you around $4.99. However, when you buy them once, you have access to these fonts or other resources for a lifetime.
#Download fonts for Cricut#Cricut.com/setup#cricut.com setup download#cricut.com sign in#cricut.com/create#cricut.com design space#cricut.com/setup mac#cricut.com/setup windows#cricut explore air 2#cricut setup#www.cricut.com/setup
0 notes
Text
Ao3 Tips and Tricks
So I thought I would make a post about some cool stuff you can do with Ao3 and userscripts, and some tips I’ve learned from setting them up for myself! I promise it's not hard, though this is a lot of info. I'm happy to help if I can.
What You’ll Need:
First, you will need the Tampermonkey extension for your browser (depending on what browser you use, Greasemonkey is the equivalent). On Android, you can even run Chrome extensions on mobile with Kiwi Browser! It is easiest to configure the scripts on your desktop and then sync to mobile with Tampermonkey’s cloud sync feature or by exporting the configured scripts and importing in your mobile browser (I will explain how to do this later in the post). If you use any of the tweaks I outline below, be sure to backup your scripts in case your settings are lost.
Once you have Tampermonkey installed, you can get scripts from GreasyFork. The inimitable @flamebyrd also has some great scripts and bookmarklets and has been incredibly helpful while I figured all this out.
Find a script that looks interesting, click on it, and then click “install this script.” Pretty straightforward. Once you have it installed, you can go to Tampermonkey to configure it (only necessary for some scripts) by clicking on the Tampermonkey extension icon in your browser (under the three dot menu in Kiwi) and clicking “dashboard”, then clicking the edit icon next to the script you want to configure. When you’re done, click File->Save.
Scripts and instructions under the cut
Some of my favorites:
Flamebyrd’s Incomplete Works script - fades out WIPs on works listings, and displays the work stats (wordcount, chapters, etc) in red on single works to make it more obvious that they’re WIPs as you’re browsing:

Flamebyrd’s Ao3 to Pinboard bookmarklet/script - if you click the bookmarklet while on a work’s page, it opens the Pinboard save screen and prefills the title, tags, description, word count, etc, and adds ?view_full_work=true&view_adult=true to the URL so Pinboard’s archiver will archive the complete work and not the adult content warning screen (note that Pinboard still cannot correctly archive works locked to Ao3 users, so you may want to download them as a backup. I’ve asked him about fixing that.), based on your selections when configuring the bookmarklet on the linked page. If you use the userscript, it adds a button to the works listings page so you don’t even have to open the work to save it:
I tweaked this script so that it only grabs the first pairing tag, since I don’t typically care about secondary pairings and they were clogging up my Pinboard tags. It’s a simple fix (though I know nothing about coding so I had to do some googling and inspect-sourcing; kinda proud of myself tbh):
Just change this part of the script
if ( options.relationship_include ) {
- $(".relationships a.tag", $work).each(function () {
To this
if ( options.relationship_include ) {
- $(".relationships a.tag:first", $work).each(function () {
I also found this cool mobile-optimized Pinboard bookmarklet called Pincushion and combined it with Flamebyrd’s script. Everything works except the auto-tagging, but I’ve reached out on GitHub to see if he can help (according to Flamebyrd, there’s no tag field ID attribute to map to). However, this bookmarklet has tagging autocomplete features that make it easy to tag manually. For example, if you type “steve 21st” it will suggest “steverogersvsthe21stcentury” rather than having to type out “steverogersvs…” in order for it to autocomplete like it does on the regular Pinboard bookmarklet. I actually have two buttons set up (which you can see in the next screenshot) - Flamebyrd's to quickly grab the tags and close without me having to do anything, and then the Pincushion one to quickly edit the tags. If anyone's interested, I can explain how to do that.
To combine Pincushion with Flamebyrd’s script (so it works from the Ao3 works listings page as mentioned above), simply change this part of Flamebyrd’s script:
t = t.split(" ").join( options.space_replacement );
var pb_url = "https://pinboard.in/add?url=" + encodeURIComponent(q) + "&description=" + encodeURIComponent(d) + "&title=" + encodeURIComponent(p) + "&tags=" + encodeURIComponent(t);
void(open(pb_url, "Pinboard", "toolbar=no,width=700,height=350"));
To this
t = t.split(" ").join( options.space_replacement );
var pb_url = "https://rossshannon.github.io/pincushion/?user=YOURUSERNAME&token=YOURAPITOKEN&url=" + encodeURIComponent(q) + "&description=" + encodeURIComponent(d) + "&title=" + encodeURIComponent(p) + "&tags=" + encodeURIComponent(t);
void(open(pb_url, "Pinboard", "toolbar=yes,width=600,height=700,left=50,top=50"));
You’ll need to get your API Token from your Pinboard account and plug it in where it says YOURUSERNAME and YOURAPITOKEN (number part only) above.
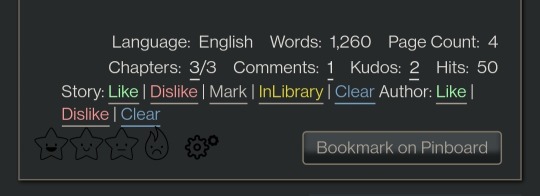
FanFictionNavigator - mark fics as Like/Dislike/Mark/InLibrary, highlight with colors based on which option you select, hide/show based on category, like/dislike author and highlight with color. Only you will see how you've marked things.
You can tweak the colors for the highlighting by configuring the script (I find the default colors make the text hard to read because I use the Reversi skin on Ao3 for white-ish text on a gray background). I also changed it so that when I click “hide likes” it only hides liked fics and not liked authors (i.e. hides fics I’ve read, but not unread fics by authors I like), changed the color of the like/dislike/etc links to match the highlighting color and to show up better, and changed the way it highlights authors (I think the default is bold/strikethrough which doesn't really catch my eye. I changed it to highlight the author name in red/green):

Here are my configured scripts if you’d like to use them instead of tweaking yourself (you need to install both):
FanFictionNavigator
FanFictionNavigator - Colors
Note: Your settings for this script will sync via Tampermonkey but not your data (i.e. fics you’ve liked/marked/etc). If you ever switch between browsers, you’ll need to go to your Ao3 Dashboard and click FFNOptions, export your data, then go through the same process to import it into the new browser.
AO3: Kudosed and seen history - highlight or hide works you kudosed/bookmarked/marked as seen. If you want to use this with FanFictionNavigator, you’ll need to turn off “highlight bookmarks” from the settings under the “Seen Works” dropdown that gets added to your Ao3 navbar or FFN’s colors won’t show. Again, data doesn’t sync between browsers but you can copy it from the dropdown settings. However, it pulls your kudosed and bookmarked fics from Ao3 itself, so that will always show. It's just seen/skipped that doesn't sync:
Ao3 download buttons - adds a download button to the works listings page so you don’t have to open the fic to download it. However, it also doesn’t play nicely with FFN’s colors, so I’m using AO3 Review + Last Chapter Shortcut + Kudos-sortable Bookmarks script which also has a download button that works with FFN (a small down arrow next to the author name). The download button doesn’t work as-is from that link, so here’s my tweaked version based off of this comment. You can configure what format you want it to download by default in the script. There’s also a tweak in the comments to fix kudos-sorting, but it overloads Ao3 and you get a “retry later” error for a few minutes when you try to open Ao3, so I don’t recommend it. I don’t know if any of the other functionalities of the script work because I don’t use them, but it looks like there are tweak suggestions in other comments you can try:

I was using Ao3 Replace Words to replace words in fics that bug me but I realized it wasn’t working on mobile, so I’m using zensurf instead which is not Ao3-specific but works basically the same way. If you want to limit it to just Ao3 (so it doesn’t change words on non-fic sites), just add this
// @include http://archiveofourown.org/*
// @include https://archiveofourown.org/*
Above this line
// ==/UserScript==
(function() {
You can // @include other fic sites like ffnet that way too.
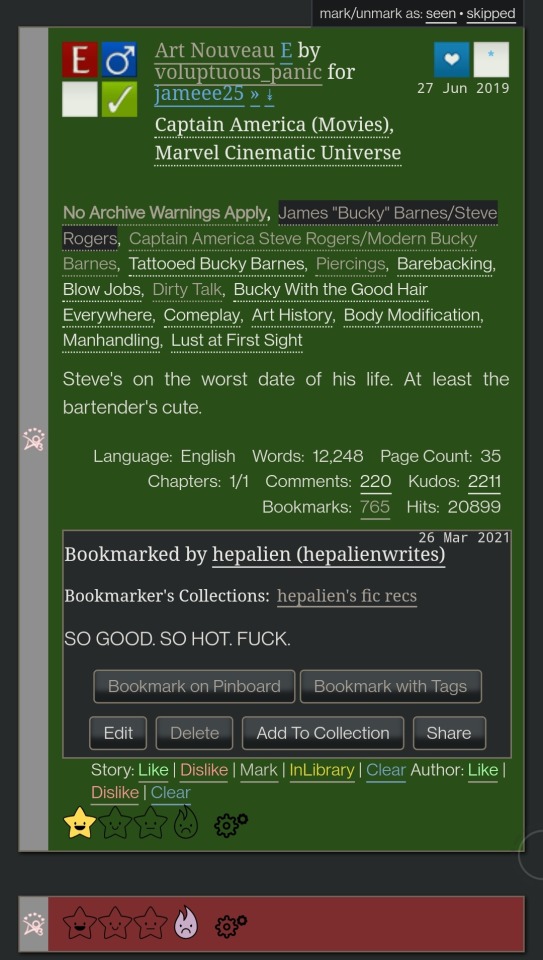
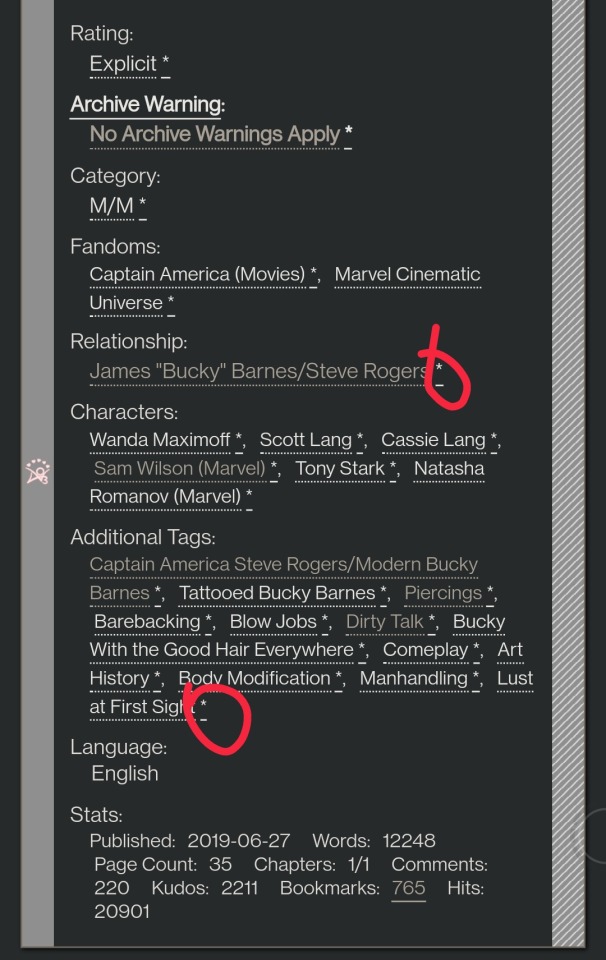
AO3: Links to Last Chapter and Entire Works does what it says on the tin, but the creator was kind enough to give me a code snippet to add that makes the “E” (for Entire Work) appear next to all works and add ?view_full_work=true&view_adult=true to the work URL so that I can easily right-click and share to Instapaper and have it be saved correctly (not just the first chapter but the whole work + not the content warning screen for NR/M/E works). Here is the script with this tweak applied:

I think those are the only ones that I’ve done special tweaks for. Here are some others that I find useful that either don’t require any configuration, or should be pretty straightforward to configure and are explained on the script page.
AO3 author+tags quick-search - doesn’t require configuration
Generates quick links from AO3 fics to more by the same author in the same fandom (or character/pairing/any other tag):
Remove leading spaces in AO3 - doesn’t require config
Removes the leading indents for paragraphs in AO3 works.
Ao3 Only Show Primary Pairing - you have to enter the pairings you want in the script, and you can change how early in the sequence they must appear before the work is hidden. Also works with character tags.
Hides works where specified pairing isn't the first listed. Hidden works show a placeholder that you can click to unhide:

AO3: highlight tags - have to enter the tags you want highlighted, as well as the color you want. It matches case so you may have to enter both “Dog” and “dog”, for example.
Configure tags to be highlighted with different colors. This makes a tag more obvious to your eye when browsing. I use it to highlight things I’m wary of in red so I don’t miss them and start reading a fic I might not want.
AO3: Tag Hider - configure how many tags you want to see before it hides them
Hide tags automatically when there are too many tags. Add hide/show tags button to browsing page and reading page.
AO3 Remove Double-Spacing - no config
Removes awkward double spaces between paragraphs on AO3. Doesn’t smush together paragraphs that have a single line break - it leaves those alone.
ao3 series collapser - no config
Collapse works that are later than part 1 of a series. Leaves a placeholder so you can uncollapse if you want to see it.
AO3 Blocker - no config, but you enter what you want to block from the added navbar dropdown in Ao3
Fork of ao3 savior; blocks works based on certain conditions. I find this simpler to use than Ao3 savior.
FYI there are also style scripts for Pinboard on greasyfork and userstyles.org (this site is slow af for some reason, so be patient while it loads). I use show unread bookmarks more clearly and Modern Pinboard Style (basically a dark mode). Neither require config unless you just want to tweak the settings to your liking. To install to Tampermonkey from userstyles, scroll down to “Install style as userscript”.
I also use these extensions in Kiwi:
Ao3rdr - Adds a star rating system (pictured in some of the screenshots above) to Ao3 works that only you can see. This one will sync your data between devices if you use the cloud sync option, which I recommend so you don’t lose your data if something happens to your device or browser.
Dark Reader - not really necessary for Ao3 if you use Reversi skin, but does make all browser pages dark mode if you want it on sites other than Ao3.
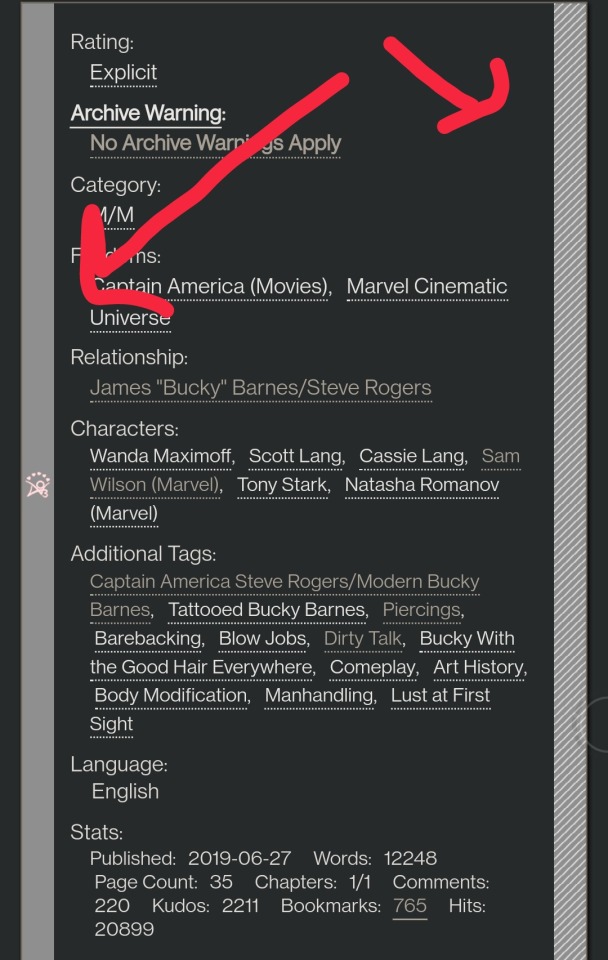
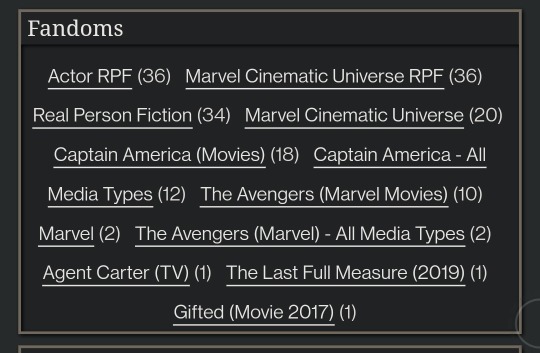
Speaking of Ao3 skins, I have another one set up in conjunction with Reversi that shows all the fandoms on a user’s profile, rather than having to click “expand”:
Unfortunately, I can’t remember where I found this. To set it up yourself, go to your Ao3 -> Dashboard -> Skins -> Create Site Skin, fill in the Title (has to be unique), and paste the code below in the CSS box:
#user-fandoms ol.index {
padding-bottom: 0;
text-align: center;
}
#user-fandoms ol.index li {
display: inline;
margin-right: .5em;
line-height: 2.15em;
}
#user-fandoms ol#fandom_full_list {
padding-top: 0;
padding-bottom: 1.5em;
display: block !important;
}
#user-fandoms p.actions {
display: none;
}
Then hit Submit -> Use. There are ways to hide or highlight various elements (ships, characters, blurbs, work stats, etc) on a works listing page using skins on Ao3. This is getting long so I’m not going to go into that, but I’m happy to help if you want to try it. It’s very easy.
Once you have everything configured on Tampermonkey on your desktop, you can migrate it to your mobile device in one of two ways:
Option 1: Go to Tampermonkey settings and change Config Mode to Advanced
Go down to Script Sync and select your preferred cloud service and save
It will ask you to log in to said cloud service
Install Tampermonkey in Kiwi and do the same thing
Wait for it to sync (this can be slow)
It should sync any changes you make moving forward, but again, it’s slow
Option 2: go to Utilities and check all 3 checkboxes under general (include script storage, include Tampermonkey settings, include external script resources)
Either export to your preferred cloud service or
Export as a zip file, move it to your mobile device, go to this same screen and import
I would recommend exporting as a zip for a backup even if you don’t use it to migrate your scripts
You can unzip and upload individual script files (.js) on this page if you ever need to reinstall a single script with your settings instead of all of them
Let me know if you run into any issues and I can try to help! The script writers are also super nice and helpful if you reach out to them. Yay fandom!
#ao3#archive of our own#fanfiction#ao3 resources#fandom#fanfic#tech#Tampermonkey#userscripts#ao3 tips#musette22#I hope you don't mind that I used you for the 'liked author' example ^_^#ditto voluptuous_panic#y'all should read art nouveau it's so good
482 notes
·
View notes
Text
How to Share Screen on Zoom Via Desktop, Android, and iOS.
Screen sharing is one of Zoom’s most powerful features, allowing users to collaborate effectively during meetings. Whether you are hosting a business conference, giving a presentation, or conducting an online class, knowing how to share my screen on zoom is essential. In this guide, we’ll cover how to share your screen on Zoom across different devices, including desktops, Android, and iOS.
Why Screen Sharing on Zoom is Important
Screen sharing in Zoom enhances virtual communication by allowing participants to present content visually. It is useful for:
Online meetings and presentations
Demonstrating software or workflows
Collaborating on projects in real time
Conducting virtual training sessions
Sharing documents, images, and videos
Now, let’s go step by step on how to share your screen on Zoom from various devices.
How to Share Your Screen on Zoom via Desktop (Windows & Mac)
Prerequisites:
Install the Zoom app on your desktop.
Ensure you have a stable internet connection.
You must be a host, co-host, or have screen-sharing permissions enabled by the host.
Steps to Share Your Screen on Zoom (Desktop)
Start or Join a Meeting: Open Zoom and start a meeting or join an existing one.
Click on the ‘Share Screen’ Button: In the bottom toolbar, click the green ‘Share Screen’ button.
Select the Content to Share: A window will pop up showing different options such as your entire screen, a specific application window, or a whiteboard.
Enable or Disable Sound and Optimization:
If sharing a video or audio, check the ‘Share Sound’ box.
For better video playback, select ‘Optimize for Video Clip’.
Click ‘Share’: Once you choose the content, click the ‘Share’ button, and your screen will be visible to participants.
Stop Sharing: Click ‘Stop Share’ at the top of the screen when you are done.
Advanced Screen Sharing Features on Desktop
Annotate: Allows participants to draw or highlight on the shared screen.
Remote Control: Give control of your screen to another participant.
Multiple Participants Sharing: Enable multiple people to share their screens simultaneously.
How to Share Your Screen on Zoom via Android
Prerequisites:
Install the Zoom app from Google Play Store.
Join or start a meeting with screen-sharing permissions.
Steps to Share Your Screen on Zoom (Android)
Open the Zoom App: Launch Zoom and join a meeting.
Tap on ‘Share’ Option: At the bottom menu, tap the ‘Share’ button.
Select ‘Screen’ from the Options: Various sharing options will appear; select ‘Screen’.
Grant Permission: Zoom may prompt you to allow screen recording; grant permission.
Start Sharing: Your screen is now visible to all participants. You can switch apps, and your actions will be displayed live.
Stop Sharing: Tap ‘Stop Share’ at the bottom when you’re finished.
Additional Features for Android Screen Sharing
Enable Audio Sharing: Share device audio while sharing the screen.
Use Whiteboard: Draw and annotate during the meeting.
Allow Others to Control: Certain Android versions allow remote control access.
How to Share Your Screen on Zoom via iOS (iPhone & iPad)
Prerequisites:
Install the Zoom app from the App Store.
Join or start a meeting where screen sharing is enabled.
Steps to Share Your Screen on Zoom (iOS)
Open the Zoom App: Start or join a Zoom meeting.
Tap on ‘Share Content’: In the meeting controls, tap the ‘Share Content’ button.
Select ‘Screen’: Choose ‘Screen’ from the sharing options.
Enable Broadcasting:
Tap ‘Start Broadcast’ when prompted.
A three-second countdown will appear before sharing starts.
Navigate Through Apps: Once broadcasting starts, anything displayed on your screen will be shared with participants.
Stop Sharing: Return to Zoom and tap ‘Stop Share’ to end the session.
Unique iOS Features for Screen Sharing
Screen Annotations: Draw on shared content for better explanations.
iPad Multi-tasking Support: Use split-screen mode for efficient presentations.
Share from Files & Apps: Share documents, photos, and videos directly from your iPhone or iPad.
Troubleshooting Common Screen Sharing Issues
1. Screen Share Button is Disabled
Ensure the host has allowed participants to share screens.
Go to Zoom settings and enable ‘Screen Sharing’ under the meeting controls.
2. No Sound While Sharing Video
Check the ‘Share Sound’ option before starting screen share.
Increase system volume and ensure audio permissions are granted.
3. Poor Screen Quality or Lag
Use a high-speed internet connection.
Close unnecessary applications to improve performance.
Enable ‘Optimize for Video Clip’ if sharing a video.
4. Screen Sharing Not Working on Mobile
Restart the Zoom app.
Update to the latest version from Play Store or App Store.
Ensure screen recording permissions are granted.
Best Practices for Effective Screen Sharing
Prepare in Advance: Keep your presentation files or applications ready before the meeting.
Close Unnecessary Windows: Avoid distractions and ensure privacy by closing irrelevant tabs or apps.
Use Annotations: Highlight important points with Zoom’s annotation tools.
Enable Dual Monitors (for Desktop Users): Use one screen for presentation and the other for monitoring participants.
Mute Notifications: Disable pop-up notifications to avoid interruptions during screen sharing.
Conclusion
Mastering screen share in zoom can significantly enhance your virtual meetings, presentations, and online collaborations. Whether you're using a desktop, Android, or iOS device, following these steps will help you share your screen efficiently. By implementing best practices and troubleshooting tips, you can ensure a smooth and engaging screen-sharing experience on Zoom.
0 notes
Note
i'd be really interested in hearing more about linux from you! i've had a windows-shaped chip on my shoulder for goddamn years (let me manage my software efficiently let me customize my computer to its smallet atom let me remove the thirty goddamn piles of telemetry windows installs to get you to use bing) but i've always found forum threads on it to be mostly by people who already use linux talking to each other.
i know asking 'what's good about linux' is a bit redundant, since it depends on the distro-- but how was the switch? has your particular distro been your go-to, have you switched around, etcetera?
Oh yeah, that makes sense. The kind of stuff that would ten to have longevity is, I imagine, all related to troubleshooting how to perform really specific tasks on a particular distribution rather than anything like.... broad?
I can kind of run through the ones I've used though, for sure.
Aside from a computer lab we used exactly one (1) time in high school that was running on clients run by a unix server, I was a purely Windows only person from 1996 to 2009, when my dad's ancient eMachine could no longer run windows. He only needed it for looking up recipes and sending email so we decided to try ubuntu since it was generally considered the "only" entry level linux distro for windows users then.
Now, I doubt that was an accuracte characterization of options. But, much like you, I was faced primarily with forums discussing really specialized troubleshooting for most other major distributions available.
Plus ubuntu was 1) free 2) easy to download and install with a blank DVD I already had on hand that day.
It was, like. Fine. I had never really operated a terminal beyond doing really basic copy pasting and ip pinging in the windows command line. So that was super intimidating, and much harder to avoid back then. The user interface was "upside down" to me, since the idea of a top toolbar wasn't really something I'd ever done. But honestly it mostly worked the same way. Similar icons in similar places, programs opened in the same kind of menu, etc.
The first distribution I personally used for any meaningful period of time was Linux Mint, which you'll note is still my personal favourite based on past recommendations lol. That was around 2012, when I started dual booting it and windows. By 2014, I had gotten used to it enough to start fucking around with it more full time, certain that I could deal with any weird problems before they interupted my work or anything like that.
But it wasn't really until around 2018 that I could confidently start recommending Linux to most windows users and be certain the transition would be relatively comfortable. Around then, graphical interfaces for programs started becoming much more common. With this most recent installation I just did, I didn't have to use the terminal (command line) at any point at all. I did use it a few times because it was faster since I had the codes memorized, or in a few cases the codes were provided for copy pasting and it was faster than graphical navigation. But mostly, you can do anything you need to in the software manager these days.
Since then, I've tried a few other distributions, but honestly Linux Mint for desktop and LineageOS for phone really cover my bases in terms of ease of use vs control of experience.
I've tried Elementary OS, which I found particularly good for replacing windows on netbooks. It's good, but not my speed.Now that KDE supports touchscreens, most lightweight hardware I would suggest Kubuntu instead for anything I would have suggested elementary.
Kubuntu is what I run on my raspberry pi's touchscreen for handling my pi-hole adblocker. It's very, very lightweight, as evidenced by running an entire hd touchscreen off a battery driven raspberry pi. Lineage was too resource heavy to run on a pi, but it is my suggestion for any tablet or phone that initially ran on android.
I've never tried cinnamon on a touchscreen tbqh. But I did use it as my desktop environment for many years on linux mint.
So now I'm starting to get into some weird specialty terms that you would never have in windows.
Basically, when you think of a linux distribution, you can think of it as having two parts. There's the specific development group, like Mint or Kubuntu. And there's the framework they are developing within. Like KDE Plasma, XFCE, CInnamon, or GNOME. So, there are certain similarities in the way groups of distributions look and behave, as well as what hardware they work best on.
The good news is if you have a computer that runs windows, it is already more than strong enough to run every kind of linux there is.
"Type of hardware" in this case tends to refer to stuff like raspberry pis or low power netbooks, etc that never had windows in the first place.
Anyway, I personally like XFCE. Everything is very snappy, with straight lines, not a lot of transparency or curves or graphical effects. I like a very plain desktop environment. My favourite XFCE is the XFCE branch of Linux Mint.
If you like something more visually rich, with transparent windows and such, you want either GNOME for something that is fancied up right out the gate, or KDE Plasma for something that has the maximum amount of customization including ALL the fanciest bits and pieces. My preferred GNOME is Arch, but in terms of suggestions for coming in from windows, I definitely suggest Ubuntu instead. For Plasma, Kubuntu is my go to. Fedora never really did it for me.
Cinnamon was designed specifically with making the transition from Windows as comfortable as possible while also maximizing the fun stuff available, and is pretty similar to GNOME in terms of how much it offers. I prefer Mint for this as well, though again Arch is a good one if you're willing to be a bit more ambitious about the changeover.
Anyway, now that I've taken the maximum possible amount of time... "What's good about linux?"
I like how much faster everything responds even on very old and slow computers. The hardware support is very robust, and unless you have an extremely advanced, state of the art gaming or animation rig that is less than 6 months old, every piece of hardware you have is going to be supported by some kind of linux.
I mean shit, dude, ubuntu can run your fridge. Or your city's traffic controllers.
Almost anything you can do on windows or mac you can do on linux, and most of the time you can do it faster and easier. The only stumbling block is that some of the skills you use for windows, especially troubleshooting skills, really don't translate.
But, these days, support communities are so wide spread and have such low barriers to entry that basically every problem can be solved pretty quickly. You just have to be ready to struggle to learn new skills like "how to tell if a forum is good" and "how to copy paste a log file into a comment and wait 6 hours for the one dude in like Lesotho who knows how to solve this problem for you to log on" and "forcing yourself to read the reddit comments for your solution even though reddit's whole design makes your migraines sooooooooo bad."
So basically the "difficult" parts are more tedious than truly hard.
But honestly, you will be surprised how comparatively few problems you run into compared to windows, with its constant lagging and resetting stupid shit you turned off two weeks ago because of an update or whatever.
15 notes
·
View notes
Text
Some September 1st Updates
the READING SPEED difference of a novel at my level! I read the first chapter of 撒野 yesterday and this author is at exactly my reading level right now. I hit 0-2 new words each pleco page, which is usually the sweet spot to either guess the word or if I look it up I can pretty quickly adapt to recognizing it in context. Its also the sweet spot where if I only rely on guessing for new word meanings, on a second pass through I can fairly well guess the meaning quickly.
It was a 32 page chapter in pleco and I read it in 20 minutes. Compared to the 20 pleco page per chapter pingxie fic i just finished (like 124k characters! WOW I read and FINISHED that much!), which was taking 30-40 minutes per chapter (mainly because of number of new vocabulary per chapter being a bit higher). If I’d wanted to speed read saye I could have, I’d have missed some small details but I could have tried if I wanted.
Then I did a second pass later in the day with the audiobook just following along with the text. Realized 1. I knew most words in the audiobook and did not follow as well as i thought - but those first listen throughs without having seen the chapter I did manage to figure out the main character just broke up, just travelled somewhere, ran into a girl and somehow the girls brother showed and the two guys interacted a little and someone was being somewhat helpful, then the main guy met his father trying to ‘pick him up.’ Which is a true but very rough summary of what happens in the first chapter. By reading I could confirm the words I thought were names AS names, figured out WHY the girl was interacting with the main guy and that there were actually two girls in chapter 1, and figure out who helped who and who was the girl’s brother. Also somehow before I looked at the chapter text I never caught that the audiobook mentions a motorcycle despite me knowing that word and it SOUNDING like mota-che/motorche! it sounds like the word and i knew it and didn’t hear it! Then later following the audiobook with the text I realized another issue I had, is I’m not used to listening to soft voices with such faint pronunciations of the final sounds. I’m much more used to deeper crisper pronunciations and being able to rely clearly on initials and finals AS much as tones to recognize the words, whereas this particular audiobook i needed to mainly rely on tones and initials to figure out what word was what - that probably threw me off a bit. It’s probably good for me to get practice listening to such a different voice to what I’m used to. I have definitely learned the deeper the voice, the more I have a far easier time figuring out what’s being said. Also standard accent more like beijing but without a huge amount of ‘er’s just some, and taiwan accent are the easiest for me to hear when i’m not pa
For anyone curious, here is the audiobook for SaYe I’m listening to: https://youtube.com/playlist?list=PL2w27tfjeeaySbMK272NpXwUtsBc-e3YN
Also here’s a chinese audiobook youtube I found: https://www.youtube.com/c/%E6%9C%89%E5%A3%B0%E5%B0%8F%E8%AF%B4%E5%90%AC%E4%B9%A6%E4%B8%96%E7%95%8Cyoushengxiaoshuo/playlists
Which includes The King’s Avatar: https://youtube.com/playlist?list=PLTJaWZoVPdT1ZhIQIKxVci7fVEHr-oX6k
And ErHa: https://youtube.com/playlist?list=PLsxEOGKlBMaFa6CS6Hf5ndy6qTtUL0Au_
Anyway, its a great book right now for reading practice. It’s very much around my level. I will probably stick with this author for a little while and solidify what I know/my base reading level.
-
IN OTHER NEWS:
I am apparently living proof listening-reading, heavy emphasis on re-listening a TON in the background as you work or type or walk/drive whatever, works for learning new words.
I re-listened to guardian chapter 1 audiobook at least 20-30 times by now, just a tremendous amount. Chapters 1-10 I’ve listened to at least 5 times by now random chapters at random days, and some probably also 20 times.
I have listened to these chapters enough, that I can officially follow so much that I know nearly every freaking word I hear, I know it immediately on hearing in at least 3 different audiobooks, and the few ‘less familiar’ words I recognize a second after hearing (like hearing ‘audacious’ or ‘glum’ in english it just takes me a second to re-remember), and the very few still forgotten words/specific details I learn From those words I can actually pick up from the context of listening.
I hear ‘powei’ and somehow forgot it AGAIN? Oh it means ‘rather’ in this context. ‘anli’ well i always hear ‘anlishuo’ as in ‘people say/generally speaking’ so ‘anli’ in this context must mean ‘generally/generally speaking.’ chuanghu? can’t remember it because i was just typing this JUST now and only hearing a few words from the audiobook in the background - well in context its obviously window, but out of context my brain said window and i just couldn’t remember if it was window or curtain but felt curtain had something more complex than ‘hu’ as the second half - just looked it up and my guess was right, even with no context which i’d have had if i’d been listening better and it had been clear it’s window, it still made me think ‘window’ immediately just hearing the sound. ‘xiang yi ge ren’ sounds like ‘looks like a person’ which is the next phrase i just randomly heard. ‘hua le yao ming’ shouted for their life/in awful terror? or that would be ‘huo’, so maybe ‘streaking toward him to take his life’? would make sense in context of a horror scene - i just looked it up and 划了要命 would be the second one. even IF i heard the wrong line, both of those are pretty close to a good guess in context and hua is the only unknown because without context i can’t place if it was hua or huo. i still confuse the words wu and wo for hold etc, but in context i can tell which one it is (wo is hold a hand, hold a face, etc).
I’m genuinely at a point where I can just completely follow the plot through at least the first 20 chapters from listening. And for most scenes, follow every detail too including stuff like guo changcheng spending half a year not working at home after he graduated, being so afraid of the phone, da qing being fawning to shen wei when they meet and rubbing against his leg, the specific conversation details when da qing runs across zhao yunlan’s car in chapter 2, what zhao yunlan’s room exactly looks like, etc. Its super cool to be able to follow the audiobook so well I can follow the story and details even when I don’t have time to read! It’s so fun! And it was not very hard!
It took 40 minutes of upfront study where you set time aside to focus: 20 minutes to have a program read the chapter aloud while you either see unknown word definitions pop up (like in Pleco) or look them up with some click dictionary as you listen. 20 minutes to go through and listen to the audiobook as you follow along with the text. Then after that, just play the audiobook chapters you’ve done this with whenever you want, either paying attention like when going to bed soon or walking, or in the background like when cleaning or doing busy work or driving. Since background listening can be done easily whenever all you have to do is remember to click play when you want something to listen to.
I’m honestly blown away by how much 3 months of studying mainly like this (which is quite fun and only requires me to carve out a small amount of actual study focused time) has improved my listening skills. I can now also listen to the 2ha audiobook okay and follow along (provided its a chapter I’ve read before so I have at least some prior context to help me out) - at least so far as that’s what I’m listening to right now. Basically, I can tell Guardian has both upped my vocabulary significantly and also improved my automatic recognition of many words I half-knew and learned since.
I recently found a new Guardian audiobook read by a deep voice and its lovely (and utilizes music and echo for effects, its lovely to listen to) I hope the poster keeps updating: https://fm.qq.com/show/rd002ED4aN0mYz2L__
I’ve been listening to it lately.
---
Also! Directions for using Pleco Android for screen reader:
1. To get any page bookmarked online:
Open a page in your mobile web browser you want to read. Click the menu, click share, click Pleco Reader (or ‘more’ or ‘...’ then Pleco Reader).
Go to Clipboard Reader. Now when you click text, dictate text megaphone will be an option.
*Since Clipboard Reader is free, you can do this to read in Pleco and have things spoken aloud with no money spent. (Though I find the Reader tool worth the money and add ons).
2. To have any text ‘dictated aloud’:
Go to Pleco’s menu, Settings, Audio, click ‘use TTS if no recording,’ then for Sentence Audio section area System TTS Setting click Speech Services by Google (you can also experiment by clicking other options I am just stating what worked for me, it didn’t work at first I had to make that my default TTS in my Accessibility-Talkback Settings menu on my main phone first and restart my phone before all this).
Then click the area right below to mess with speed and sound of the TTS voice.
(Note, to test if TTS is working you can go to any dictionary entry sentence, click the speaker next to the sentence and see if it plays audio. If it does not, you will get an error message and directions on what to change in your phone settings. That is what initially happened to me: I had to go to phone Settings, Accessibility, Talkback, TTS Engine, TTS Engine voice and settings. Pleco recommended I choose Speech Services by Google, and uninstall then reinstall the Chinese voice. Then restart the phone. That worked for me. An additional note: I have Talkback setting on ‘on’ and just have it in my toolbar to use if desired but am not actively using it. If you turn Talkback setting ‘off’ in the actual Settings area of Accessibility, I am not sure if it will affect Pleco’s ability to dictate).
3. How to put it together:
Now go to Clipboard Reader and read the page from the internet you wanted or text you pasted, or go to Document Reader and open the document you wish to read.
Click a word as a place to start. Now you should see both the loudspeaker (for pronouncing the single word) and the Megaphone next to it to start dictating all text. (If your phone is weird like me, you may need to press the megaphone a couple times before the audio works).
If you wish to change dictation reading speed, simply hold down the megaphone and select the speed desired.
Now that I’ve figured this out I really want to take pictures of my print book, make a pdf, and listen to all the changes.
(Now I just have to fix my weird dictionary in Idiom app and I’m all set on the new phone!)
---
All I’ve been doing the past august study wise is just reading pingxie fic and finishing, and listening to audiobooks. It’s been a busy time for me ToT
I do think it proved you can be lazy and still make some improvements though:
1. Reading in Pleco (or click-dictionary tool of your choice): pick something and read a chapter a day (that’s what I did, obviously the easier this is the less time you’ll need, but aim for around 30 minutes a day and reading material closer to your level if you don’t want to read too long)
2. Listening-Reading Method something above your reading level that you enjoy. Should take 40 minutes a couple times a week to several times a week to hours a week, depending on how intense you want to get with it and how much you’re going to alternate/include the reading portion. I did like 1-2 chapters a week so I was only spending 40 minutes to 1.5 hours a week doing this, or 3 hours one week no time another week. This is definitely something where you can do 6-12 hours one month then coast on it for another month just repeating older material’s audio/re-reading sections (which is what I did with guardian, doing 22 chapters then switching to just listening to audio a lot).
Once you’ve done a little L-R steps 2 and 3 (in either order, whatever works for you - and doing step 1 if you want more context prior to steps 2 and 3), then just make time during your days to play the audiobook chapters you’ve studied. You don’t need to be focusing every single time (although focusing on actually trying to follow the audio the first time you listen without text to aid you will probably speed up your comprehension a lot by giving you a lot of basic-context to help you comprehend more later). Aim to listen whenever you’ve got down time! Or time where you’d play music or some background youtube video or podcast - walks, exercise, drives, when cleaning, when browsing the web goofing off, when working if you have times when you’d listen to music with lyrics or a podcast in the background without issues, times when you don’t need to focus 100% on listening just putting it on to hear in the background).
That’s all I’ve done for study since May. It takes me about 30 minutes 5 days a week, plus 1-2 hours listening-reading actively a week. So 2.5 hours plus 2 = 4 hours of active study a week. Sometimes more like 8-10 if I got really into reading something or Listening-reading to several chapters. Then after that (very easy to fit into my life 4-10 hours per week of study) I just play the audiobook whenever I have downtime at work (that’s usually 0.5-4 hours where I just let it play because I forget its on while working on spreadsheets, updates, emails, etc, or play the audiobook while messing around on the internet in my free time at home, sometimes I put on music instead), while walking so 15-30 minutes maybe 3 days a week, while driving far so maybe 20 minutes - 2 hours per week. maybe lets say 2 hours*4 days a week (I don’t remember to listen every day) so 8 hours random listening+1.5 hours walking+1 hour driving per week. That’s 11.5 hours listening in the background or paying attention plus lets say 4 hours of active study a week. So 15.5 ‘study’ hours for chinese per week - an average overall of ~2.21 hours of chinese ‘study’ per day. This isn’t counting when I get into weibo and goof off, get into some chinese show with no english subs and just start watching it (I watched 16 episodes of Humans cdrama in August which is ~10.66 hours for a total of at least (15.5*4 weeks = 62 hours + 10.66 hours -> ~72.66 hours spent ‘with chinese’ in August at minimum. 4 weeks*7 days = 28, so over around 28 days or most of august I did 72.66 total hours/28 days -> or ~2.595 hours of chinese per day as an average. So... my guess that I spend at least 1-2 hours on chinese per day as the average was a decent guess. Looks like I’m usually 2 hours to 2.5 hours daily as an overall average. It’s not that hard to get in that much without a ton of time in the day once you get some listening skills built up ToT Deciding to build up my listening skills has been one of the funnest goals in chinese so far.
Notes on Listening Reading Actively - it also doubles as increasing your exposure to listening to your target language, and the more hours the better even if its passive in the background, just more hours adding up toward your mind getting a better ability to parse the sounds of the language is going to help your overall listening comprehension in general. So even if you don’t pay attention much and can’t follow the whole plot and only catch certain scenes, you will be improving at least comprehension of: hearing words you know, hearing colocations and common phrases and recognizing more automatically which will help with speaking/writing indirectly and reading recognition of those things, overall ability to hear things correctly in different combinations and getting used to the common combinations.
You will be surprised how much more you can pick up of plot and details the 3rd listen compared to the first, the 5th listen, the 10th listen. It’s wild. Like... I’m listening to the 2ha audiobook and even having never read it in chinese, just knowing basic context, the 2nd read through I caught so much more of the plot throughout just because I had forewarning of when scenes change a lot, what audio plays during some parts I recognized in previous listens, and so I have more focus for figuring out the new details I missed. Whereas the first listen, I didn’t always know WHAT the scene context was until I heard a familiar line or description I remembered from the english version of the scene, but on a second listen I now have a better guess at the scene the lines are probably taking place in before and after those lines I recognized in the first listen. And this continues etc each time you re-listen to something. (So yes, that initial context of knowing what you’re listening to with a previous read of its translation or target language transcript will definitely speed up comprehension pick up - but if you just wanna test what your basic listening comprehension to new content is then it works fine just going into new audio with no prior context its just more difficult at first lol until you build an idea of the context from listening).
The original Listening-Reading Method person did like 40+ hours a week, 8 hours most days, no wonder they made fast progress! They often included reading in some form (hence the name) and later translation, so they also were constantly working on listening AND some reading skills AND eventually often some speaking/writing skills. Doing it my way results in mostly listening comprehension of stuff you could already read to a degree, more automaticity in recognition, and for picking up new vocabulary both in listening and reading. I do extra reading on the side with other stuff to get more reading practice in an isolated way (since I’m trying to push my reading speed up above speaking speed). I always try to do it the way the creator originally intended, but I am not able to focus on things for more than 20 minutes at a time, 40 to a couple hours if I take a break every 20 minutes. So doing it 8 hours just doesn’t work out.
---
I’m fairly happy!
I am on plan for my main goals that started this style study plan:
1. Improving my reading level to get to start being able to extensively read actual danmei novels - we got there! I am at a reading level appropriate for SaYe at 98% comprehension when I checked, and at a bit above 95% comprehension for Guardian! I’m now continuing with that goal while adding on increasing reading Speed in general.
2. Improving listening skills so I have better automatic recognition of partly-known words from reading (working super well so far - I can tell because ability to watch cdramas in only chinese has improved noticeably and gotten much easier), and so I can start following the main plot and key details of audiobooks of things I’ve read before (working great for guardian, starting to work with other audiobooks provided I listen to the chapters a few times or several times if its brand new material I have no context for, however reading level matters and while things I have prior familiarity with are going very well - brand new materials are still quite challenging in that they require multiple listens for the full plot and several listens before I start picking up most non-plot-critical details).
#rant#september#september progress#august#august progress#listening reading method#pleco#rec list#audiobook#guardian#take all my study advice with heaps of salt#do what feels right for YOU#this is just the study plan that's been working for me recently#for my main goals: increasing base reading level and improve listening comprehension
36 notes
·
View notes