#top server OS for Raspberry Pi
Explore tagged Tumblr posts
Visit Tumblr Blog
Explore Tumblr blogs with no restrictions, modern design and the best experience.
Last Seen Tumblr Blogs


Fun Fact
In 2020, 44% of users from Denmark used Tumblr daily.
Text
Top 5 Home Server OS distros for self-hosting
Top 5 Home Server OS solutions for self-hosting #homelab #selfhosted #homeserverOSrecommendations #besthomeserver2023 #CasaOSvsDietPicomparison #mediaserversetup #UmbrelOSfeatures #topserverOSforRaspberryPi #networkattachedstoragesolutions
Home servers and home server labs have exploded in popularity because users want to self-host and learn self-hosted services, keep control over their data, and just geek out overall. There is much interest in “home server OS” solutions that make installing and standing up self-hosted solutions easy. This guide discusses the top 5 home server operating systems you should check out. Table of…
View On WordPress
#best server operating systems 2023#CasaOS vs. DietPi comparison#home server OS recommendations#media server setup guides#network attached storage solutions#RAID configurations for servers#server OS for beginners and experts#stream media from home servers#top server OS for Raspberry Pi#UmbrelOS features
0 notes
Note
i'd be really interested in hearing more about linux from you! i've had a windows-shaped chip on my shoulder for goddamn years (let me manage my software efficiently let me customize my computer to its smallet atom let me remove the thirty goddamn piles of telemetry windows installs to get you to use bing) but i've always found forum threads on it to be mostly by people who already use linux talking to each other.
i know asking 'what's good about linux' is a bit redundant, since it depends on the distro-- but how was the switch? has your particular distro been your go-to, have you switched around, etcetera?
Oh yeah, that makes sense. The kind of stuff that would ten to have longevity is, I imagine, all related to troubleshooting how to perform really specific tasks on a particular distribution rather than anything like.... broad?
I can kind of run through the ones I've used though, for sure.
Aside from a computer lab we used exactly one (1) time in high school that was running on clients run by a unix server, I was a purely Windows only person from 1996 to 2009, when my dad's ancient eMachine could no longer run windows. He only needed it for looking up recipes and sending email so we decided to try ubuntu since it was generally considered the "only" entry level linux distro for windows users then.
Now, I doubt that was an accuracte characterization of options. But, much like you, I was faced primarily with forums discussing really specialized troubleshooting for most other major distributions available.
Plus ubuntu was 1) free 2) easy to download and install with a blank DVD I already had on hand that day.
It was, like. Fine. I had never really operated a terminal beyond doing really basic copy pasting and ip pinging in the windows command line. So that was super intimidating, and much harder to avoid back then. The user interface was "upside down" to me, since the idea of a top toolbar wasn't really something I'd ever done. But honestly it mostly worked the same way. Similar icons in similar places, programs opened in the same kind of menu, etc.
The first distribution I personally used for any meaningful period of time was Linux Mint, which you'll note is still my personal favourite based on past recommendations lol. That was around 2012, when I started dual booting it and windows. By 2014, I had gotten used to it enough to start fucking around with it more full time, certain that I could deal with any weird problems before they interupted my work or anything like that.
But it wasn't really until around 2018 that I could confidently start recommending Linux to most windows users and be certain the transition would be relatively comfortable. Around then, graphical interfaces for programs started becoming much more common. With this most recent installation I just did, I didn't have to use the terminal (command line) at any point at all. I did use it a few times because it was faster since I had the codes memorized, or in a few cases the codes were provided for copy pasting and it was faster than graphical navigation. But mostly, you can do anything you need to in the software manager these days.
Since then, I've tried a few other distributions, but honestly Linux Mint for desktop and LineageOS for phone really cover my bases in terms of ease of use vs control of experience.
I've tried Elementary OS, which I found particularly good for replacing windows on netbooks. It's good, but not my speed.Now that KDE supports touchscreens, most lightweight hardware I would suggest Kubuntu instead for anything I would have suggested elementary.
Kubuntu is what I run on my raspberry pi's touchscreen for handling my pi-hole adblocker. It's very, very lightweight, as evidenced by running an entire hd touchscreen off a battery driven raspberry pi. Lineage was too resource heavy to run on a pi, but it is my suggestion for any tablet or phone that initially ran on android.
I've never tried cinnamon on a touchscreen tbqh. But I did use it as my desktop environment for many years on linux mint.
So now I'm starting to get into some weird specialty terms that you would never have in windows.
Basically, when you think of a linux distribution, you can think of it as having two parts. There's the specific development group, like Mint or Kubuntu. And there's the framework they are developing within. Like KDE Plasma, XFCE, CInnamon, or GNOME. So, there are certain similarities in the way groups of distributions look and behave, as well as what hardware they work best on.
The good news is if you have a computer that runs windows, it is already more than strong enough to run every kind of linux there is.
"Type of hardware" in this case tends to refer to stuff like raspberry pis or low power netbooks, etc that never had windows in the first place.
Anyway, I personally like XFCE. Everything is very snappy, with straight lines, not a lot of transparency or curves or graphical effects. I like a very plain desktop environment. My favourite XFCE is the XFCE branch of Linux Mint.
If you like something more visually rich, with transparent windows and such, you want either GNOME for something that is fancied up right out the gate, or KDE Plasma for something that has the maximum amount of customization including ALL the fanciest bits and pieces. My preferred GNOME is Arch, but in terms of suggestions for coming in from windows, I definitely suggest Ubuntu instead. For Plasma, Kubuntu is my go to. Fedora never really did it for me.
Cinnamon was designed specifically with making the transition from Windows as comfortable as possible while also maximizing the fun stuff available, and is pretty similar to GNOME in terms of how much it offers. I prefer Mint for this as well, though again Arch is a good one if you're willing to be a bit more ambitious about the changeover.
Anyway, now that I've taken the maximum possible amount of time... "What's good about linux?"
I like how much faster everything responds even on very old and slow computers. The hardware support is very robust, and unless you have an extremely advanced, state of the art gaming or animation rig that is less than 6 months old, every piece of hardware you have is going to be supported by some kind of linux.
I mean shit, dude, ubuntu can run your fridge. Or your city's traffic controllers.
Almost anything you can do on windows or mac you can do on linux, and most of the time you can do it faster and easier. The only stumbling block is that some of the skills you use for windows, especially troubleshooting skills, really don't translate.
But, these days, support communities are so wide spread and have such low barriers to entry that basically every problem can be solved pretty quickly. You just have to be ready to struggle to learn new skills like "how to tell if a forum is good" and "how to copy paste a log file into a comment and wait 6 hours for the one dude in like Lesotho who knows how to solve this problem for you to log on" and "forcing yourself to read the reddit comments for your solution even though reddit's whole design makes your migraines sooooooooo bad."
So basically the "difficult" parts are more tedious than truly hard.
But honestly, you will be surprised how comparatively few problems you run into compared to windows, with its constant lagging and resetting stupid shit you turned off two weeks ago because of an update or whatever.
15 notes
·
View notes
Text
My Homelab/Office 2020 - DFW Quarantine Edition
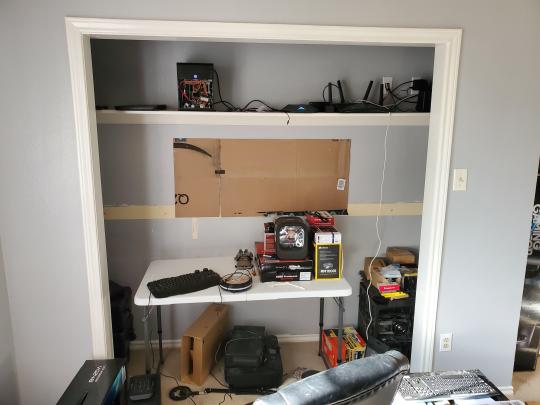
Moved into our first home almost a year ago (October 2019), I picked out a room that had 2 closets for my media/game/office area. Since the room isn't massive, I decided to build a desk into closet #1 to save on space. Here 1 of 2 shelves was ripped off, the back area was repainted gray. A piece of card board was hung to represent my 49 inch monitor and this setup also gave an idea how high I needed the desk.
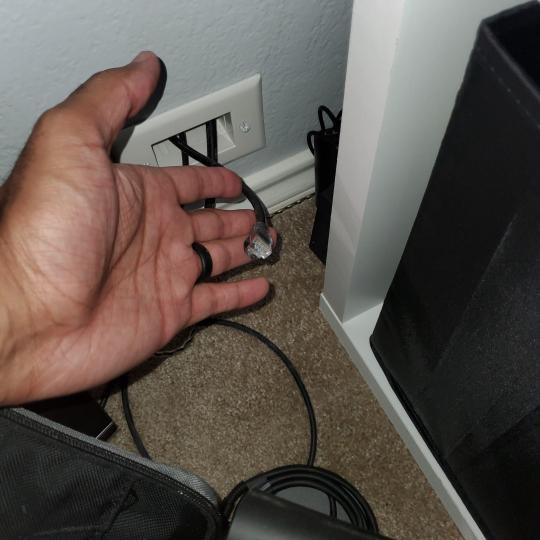
On my top shelf this was the initial drop for all my Cat6 cabling in the house, I did 5 more runs after this (WAN is dropped here as well).
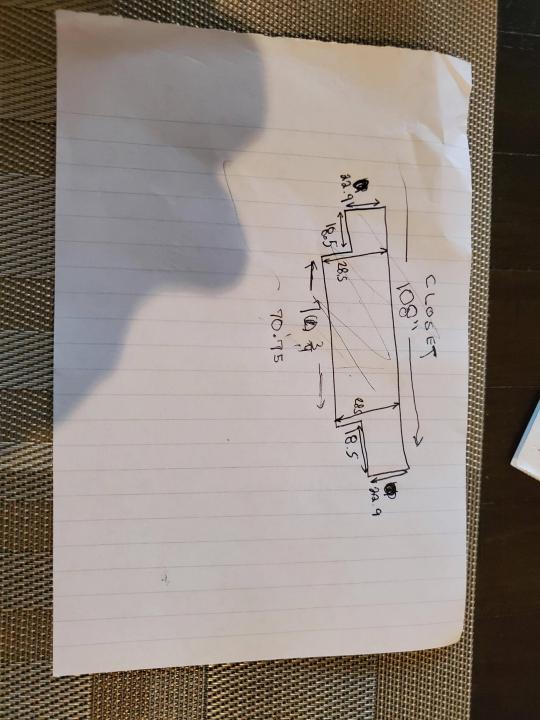
I measured the closet and then went to Home Depot to grab a countertop. Based on the dimensions, it needed to be cut into an object shape you would see on Tetris.

Getting to work, cutting the countertop.
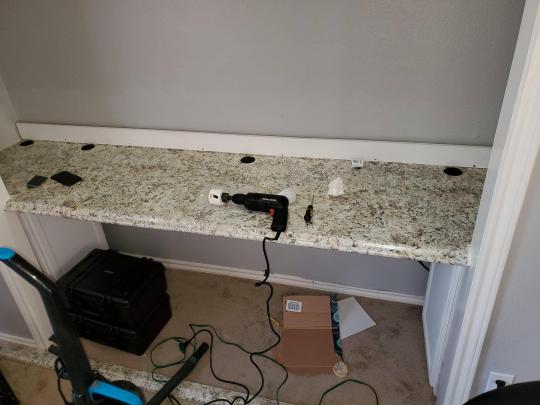
My father-in-law helped me cut it to size in the driveway and then we framed the closet, added in kitchen cabinets to the bottom (used for storage and to hide a UPS). We ran electrical sockets inside the closet. I bought and painted 2 kitchen cabinets which I use for storage under my desk as well.

The holes allowed me to run cables under my desk much easier, I learned many of these techniques on Battlestations subreddit and Setup Wars on Youtube. My daughter was a good helper when it came to finding studs.
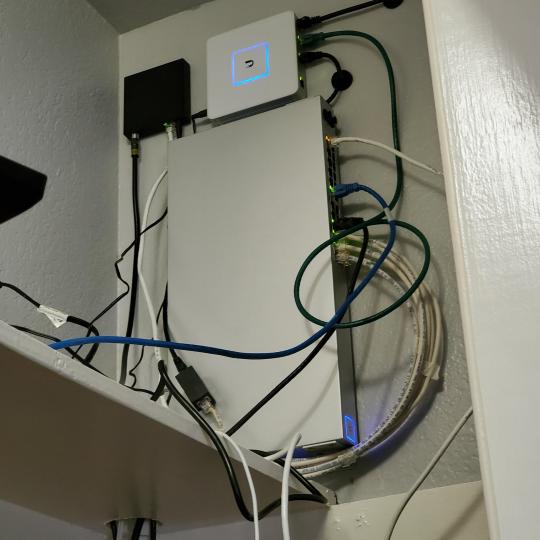
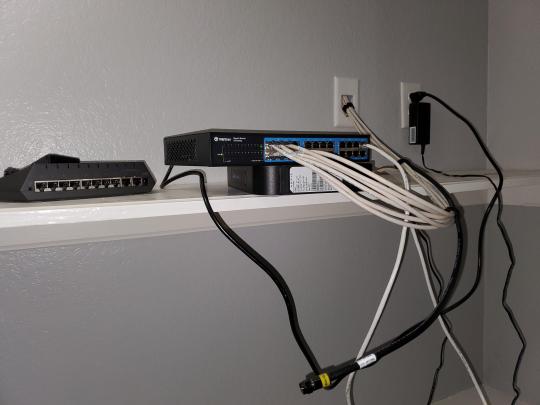
Some of my cousins are networking engineers, they advised me to go with Unifi devices. Here I mounted my Unifi 16 port switch, my Unifi Security Gateway (I'll try out pfSense sometime down the line), and my HD Homerun (big antenna is in the attic). I have Cat6 drops in each room in the house, so everything runs here. On my USG, I have both a LAN #2 and a LAN #1 line running to the 2nd closet in this room (server room). This shot is before the cable management.

Cable management completed in closet #1. Added an access point and connected 3 old Raspberry Pi devices I had laying around (1 for PiHole - Adblocker, 1 for Unbound - Recursive DNS server, and 1 for Privoxy - Non Caching web proxy).
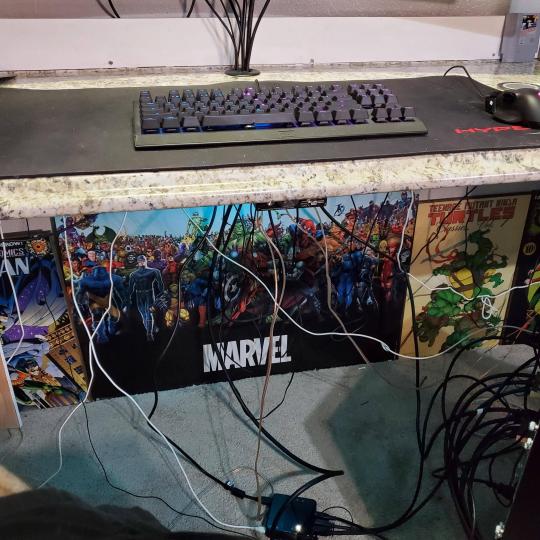
Rats nest of wires under my desk. I mounted an amplifier, optical DVD ROM drive, a USB hub that takes input from up to 4 computers (allows me to switch between servers in closet #2 with my USB mic, camera, keyboard, headset always functioning), and a small pull out drawer.
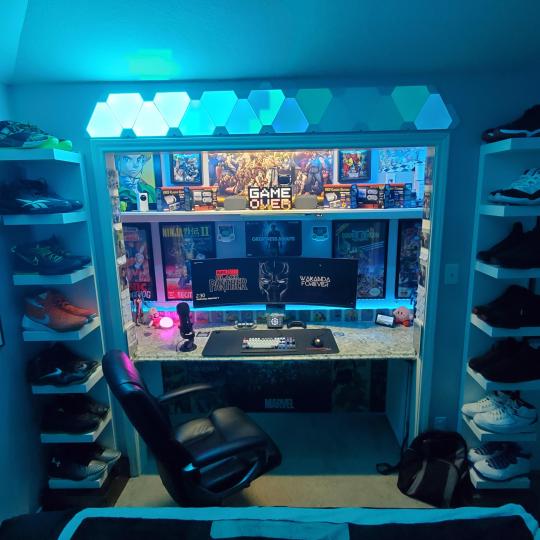
Cable management complete, night shot with with Nanoleaf wall lights. Unifi controller is mounted under the bookshelf, allows me to keep tabs on the network. I have a tablet on each side of the door frame (apps run on there that monitor my self hosted web services). I drilled a 3 inch hole on my desk to fit a grommet wireless phone charger. All my smart lights are either running on a schedule or turn on/off via an Alexa command. All of our smart devices across the house and outside, run on its on VLAN for segmentation purposes.

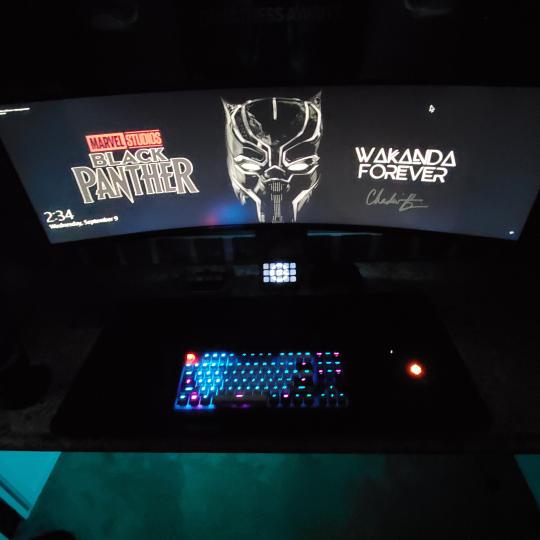
Quick shot with desk light off. I'm thinking in the future of doing a build that will mount to the wall (where "game over" is shown).
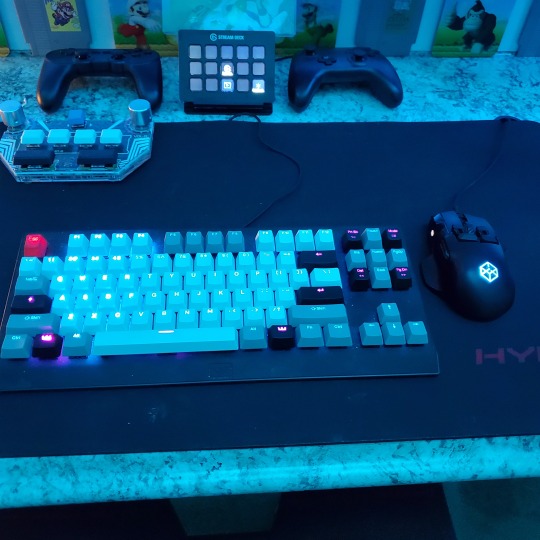
Wooting One keyboard with custom keycaps and Swiftpoint Z mouse, plus Stream Deck (I'm going to make a gaming comeback one day!).
Good wallpapers are hard to find with this resolution so pieced together my own.
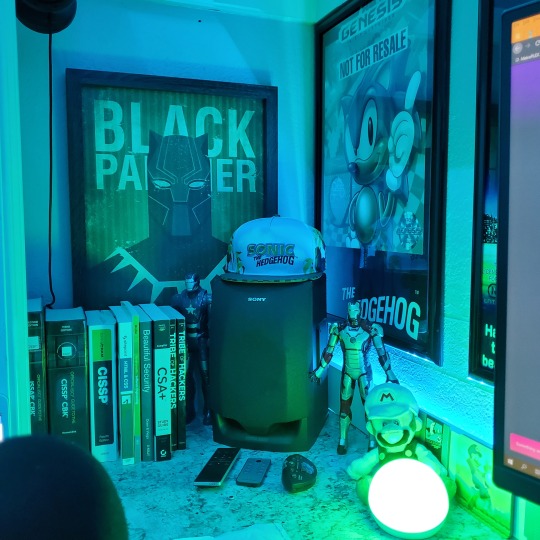
Speakers and books at inside corner of desk.

Speakers and books at inside corner of desk.
Closet #2, first look (this is in the same room but off to the other side). Ran a few CAT6 cables from closet #1, into the attic and dropped here (one on LAN #1, the other on LAN #2 for USG). Had to add electrical sockets as well.
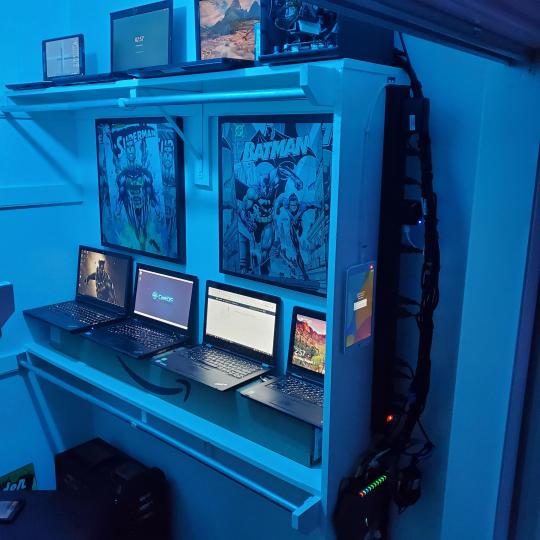
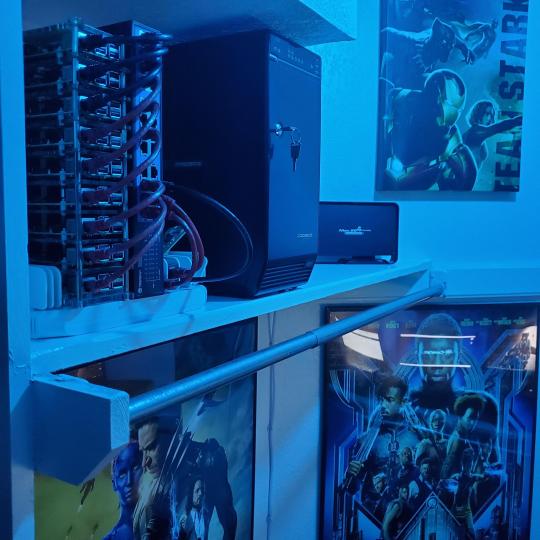
I have owned a ton of Thinkpads since my IBM days, I figured I could test hooking them all up and having them all specialize in different functions (yes, I have a Proxmox box but it's a decommissioned HP Microserver on the top shelf which is getting repurposed with TrueNAS_core). If you're wondering what OSes run on these laptops: Windows 10, Ubuntu, CentOS, AntiX. All of these units are hardwired into my managed Netgear 10gigabit switch (only my servers on the floor have 10 gigabit NICs useful to pass data between the two). Power strip is also mounted on the right side, next to another tablet used for monitoring. These laptop screens are usually turned off.
Computing inventory in image:
Lenovo Yoga Y500, Lenovo Thinkpad T420, Lenovo Thinkpad T430s, Lenovo Thinkpad Yoga 12, Lenovo Thinkpad Yoga 14, Lenovo Thinkpad W541 (used to self host my webservices), Lenovo S10-3T, and HP Microserver N54L
Left side of closet #2
**moved these Pis and unmanaged switch to outside part of closet**
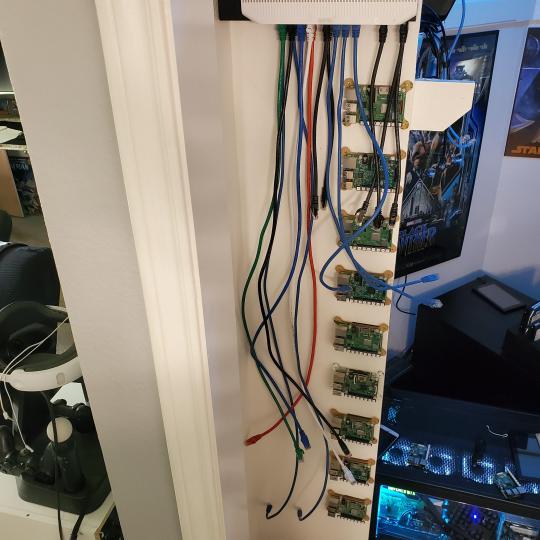
Since I have a bunch of Raspberry Pi 3s, I decided recently to get started with Kubernetes clusters (my time is limited but hoping to have everything going by the holidays 2020) via Rancher, headless. The next image will show the rest of the Pis but in total:
9x Raspberry Pi 3 and 2x Raspberry Pi 4
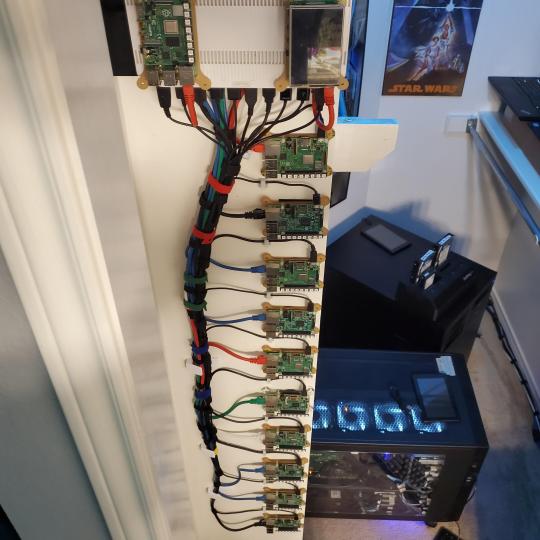
2nd shot with cable management. The idea is to get K3s going, there's Blinkt installed on each Pi, lights will indicate how many pods per node. The Pis are hardwired into a switch which is on LAN #2 (USG). I might also try out Docker Swarm simultaneously on my x86/x64 laptops. Here's my compose generic template (have to re-do the configs at a later data) but gives you an idea of the type of web services I am looking to run: https://gist.github.com/antoinesylvia/3af241cbfa1179ed7806d2cc1c67bd31
20 percent of my web services today run on Docker, the other 80 percent are native installs on Linux and or Windows. Looking to get that up to 90 percent by the summer of 2021.
Basic flow to call web services:
User <--> my.domain (Cloudflare 1st level) <--> (NGINX on-prem, using Auth_Request module with 2FA to unlock backend services) <--> App <--> DB.
If you ever need ideas for what apps to self-host: https://github.com/awesome-selfhosted/awesome-selfhosted
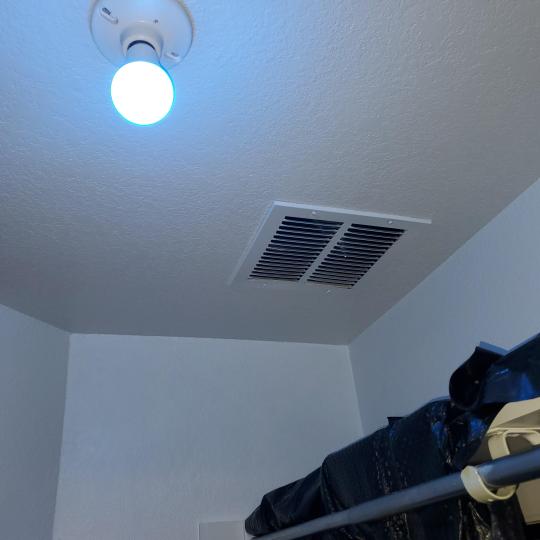
Homelabs get hot, so I had the HVAC folks to come out and install an exhaust in the ceiling and dampers in the attic.
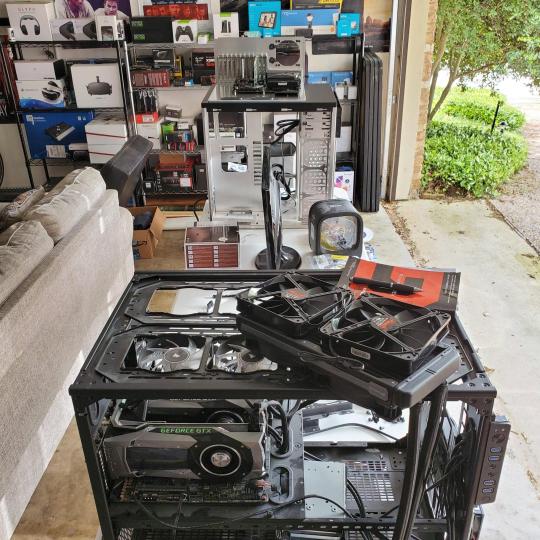
I built my servers in the garage this past winter/spring, a little each night when my daughter allowed me to. The SLI build is actually for Parsec (think of it as a self hosted Stadia but authentication servers are still controlled by a 3rd party), I had the GPUs for years and never really used them until now.
Completed image of my 2 recent builds and old build from 2011.
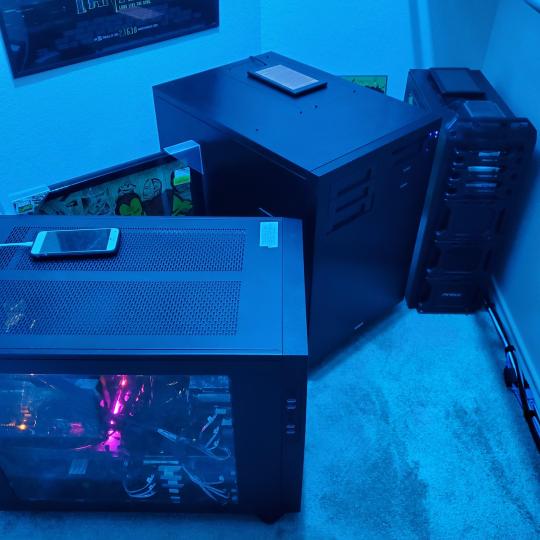
Retroplex (left machine) - Intel 6850 i7 (6 core, 12 thread), GTX 1080, and 96GB DDR4 RAM. Powers the gaming experience.
Metroplex (middle machine) - AMD Threadripper 1950x (16 core, 32 thread), p2000 GPU, 128GB DDR4 RAM.
HQ 2011 (right machine) - AMD Bulldozer 8150 (8 cores), generic GPU (just so it can boot), 32GB DDR3 RAM.
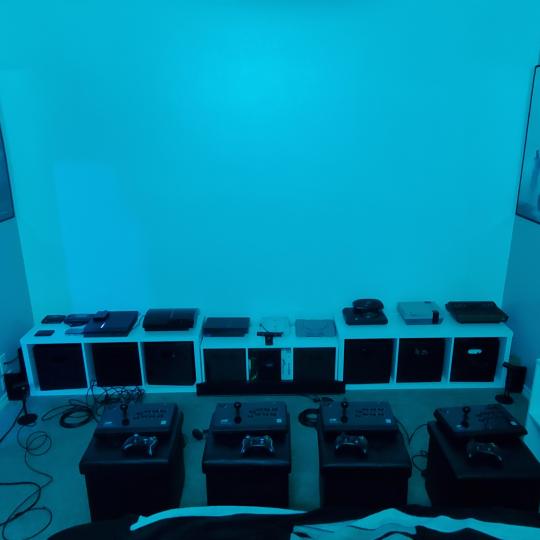
I've been working and labbing so much, I haven't even connected my projector or installed a TV since moving in here 11 months ago. I'm also looking to get some VR going, headset and sensors are connected to my gaming server in closet #2. Anyhow, you see all my PS4 and retro consoles I had growing up such as Atari 2600, NES, Sega Genesis/32X, PS1, Dreamcast, PS2, PS3 and Game Gear. The joysticks are for emulation projects, I use a Front End called AttractMode and script out my own themes (building out a digital history gaming museum).
My longest CAT6 drop, from closet #1 to the opposite side of the room. Had to get in a very tight space in my attic to make this happen, I'm 6'8" for context. This allows me to connect this cord to my Unifi Flex Mini, so I can hardware my consoles (PS4, PS5 soon)

Homelab area includes a space for my daughter. She loves pressing power buttons on my servers on the floor, so I had to install decoy buttons and move the real buttons to the backside.
Next project, a bartop with a Raspberry Pi (Retropie project) which will be housed in an iCade shell, swapping out all the buttons. Always have tech projects going on. Small steps each day with limited time.
6 notes
·
View notes
Text
See blocked YouTube videos: 4 ways
The popular video platform YouTube provides a wealth of videos and clips on various topics - but unfortunately still not completely everywhere and for everyone. Bans affect YouTube videos for a variety of reasons. For example, content can be “reserved” for users in a certain region through geo-blocking, but access to YouTube as a whole can also be impossible in countries with very restrictive governments. The question “How can you watch videos that are blocked on YouTube?” Is therefore of interest to users all over the world. It can be answered using various methods - we will introduce you to the best of them!
№1 Bypass YouTube block via VPN - the easiest way The easiest way to watch blocked videos on YouTube is without a doubt a VPN client. The virtual private networks direct you through one of their servers, the location of which you can choose. If a YouTube video is blocked in Germany , but visible in the USA , you simply choose a VPN server located in the United States. Good VPNs have numerous other advantages, such as anonymizing your data and hiding your IP address , and they don't cost much in the premium package.
In order to be able to watch content blocked on YouTube with a VPN of your choice, you need to take out a subscription and install the VPN client. You also need a user account with the VPN service that you use to log in after installation. This is how the VPN recognizes your status and your subscription.
Once logged in, you can now configure the software or app, but in most cases you can also use the VPN with automated settings - in this case the software will search for the next available server. The VPN connection can usually be established with just one click - alternatively, you can choose a server location that you need to be able to access blocked videos.
We've rounded up the top performing VPNs :
CyberGhost CyberGhost is also suitable for bypassing the blocks on YouTube videos. The Romanian VPN provider is popular because of its uncomplicated installation and operation, scores with around 6,000 servers and can be switched on with one click. If you not only use YouTube, but also streaming platforms, you can benefit from particularly good bandwidth via special servers.
CyberGhost is also compatible with all common operating systems and even runs on Raspberry Pi and Chrome as well as numerous routers. You can test CyberGhost completely free of charge. This VPN currently offers discounts as a subscription, and you can also have CyberGhost for 2.50 euros per month.
ExpressVPN ExpressVPN is one of the fastest providers, the service runs on a total of 3000 high-speed servers in over 150 international locations. With ExpressVPN, you can break almost any YouTube block. The VPN is not only very fast, but also extremely compatible - it runs on many game consoles, Blackberry devices and Raspberry Pi.
Of course, this high quality also costs something - if you want to use the super-fast VPN, you have to dig a little deeper into your pocket with around 8 euros per month in an annual subscription than with other VPNs, but you really get a lot on offer.
PIA VPN PIA is the abbreviation for Private Internet Access. The American VPN provider can score points with more than 2,600 servers in almost 50 countries worldwide. Thanks to the unlimited bandwidth, video playback with PIA is no problem. The VPN client is compatible with the common operating systems Microsoft Windows, Mac OS and Linux, but can also be used with extensions in many browsers such as Chrome and Firefox and as apps for the Android smartphone and iOS on the iPhone.
With PIA you can watch videos that are blocked on YouTube Germany, but you can also bypass country blocks for YouTube videos and music videos elsewhere - and that also for streaming offers. The VPN costs you with a subscription for two years only around 2.50 euros per month. And you can even pay for them with gift coupons from Walmart or Starbucks, for example, and thus remain completely anonymous.
VeePN VeePN is a new addition to the scene, but already has a large network of servers and convinces with high-quality encryption. VeePN can also be proud of its intuitive usability. The provider shows its strong side in circumventing geoblocking, so you can watch blocked YouTube videos in Germany as well as use numerous foreign locations for YouTube and streaming.
You can watch blocked videos on YouTube using Chrome with an extension or watch blocked YouTube videos with the Firefox add-on. VeePN costs only around 1.50 euros per month with a long-term subscription, making it one of the cheapest providers!
VPN provider comparison №2 use proxy website to unblock YouTube Proxy websites work a bit like a VPN - here too you will be redirected via the page and can watch the blocked YouTube videos. Proxies such as ProxTube or ProxFlow are known. However, the proxies do not hide your data or your IP address, so your activities remain visible to the ISP or the administrator in the company or school network!
№3 use browser extensions to watch YouTube Instead of always having to navigate through a proxy page, you can also use add-ons in the browser. These add-ons and plugins are available for applications such as ProxTube or Ultrasurf. They make it possible to configure a proxy server that is basically controlled. With ProxTube you can watch blocked YouTube videos on Firefox, but Chrome needs a plug-in for ProxFlow.
Use №4 Tor to watch blocked YouTube videos You can also unblock a video on YouTube with the anonymous Internet browser Tor. The browser can be downloaded and installed from the torproject.org website . The very secure browser not only gives you access to YouTube content, but also reliably hides your online activities through the redirects in the Tor network. The browser is used for online security, data protection and unrestricted data traffic, among others by users and activists in restrictive countries such as North Korea, China or Turkey.
https://christoph-leydolt.medium.com/3-reasons-to-get-a-vpn-valid-ones-p-1-3154c3da0104
1 note
·
View note
Text
Bitcoin Wallet Download
What is Bitcoin Core Wallet? The Bitcoin Core is a safe digital wallet which user may use to store, send and receive bitcoin. While using this budget a person can authorize dealings to remain a copy of the blockchain. Suitable with: Macintosh OS A Windows 7/8. x/10 Cpanel Few ARM chipsets (including Raspberry Pi V. one particular and /. 2) Be aware: Only Bitcoin can be residing in the Bitcoin Core pocket! Exactly how Much It Costs? The pocket is free to be able to get and use, on the other hand it�ll cost you bandwidth, and hard-drive space while well. You need to be able to give transaction fees to help send/receive bitcoin. Furthermore, a person are in order to set your own personal fees on a sliding range based on transaction top priority. Bitcoin-qt Download for Windows 10 up to help the bitcoin network like a full node Able for you to create QR codes to be able to receive payment The agreement system to get complete blockchain including any bitcoin financial transaction ever saved A dispersed ledger this is more as compared to 110GB in size Option blockchain where real bitcoin is not in make use of Circle alert system for you to inform end users about typically the latest bitcoin news Server scripting language to denote orders and enable several purchase parameters How to Add Foreign currency to the Pocket? To use this budget > download Bitcoin Core. Prior to downloading it the particular software, assure that your own system meets the needed conditions to run Bitcoin Core. Download Bitcoin Wallet recommended bottom requirements include: At the very least 145 GIGABITE storage living space Downloading amount capability regarding 500MB/day (15GB/month), and also 1-time 140GB down load the first moment you launch Bitcoin Primary Uploading speed of 5GB/day (150 GB/month) 1GB DODGE Laptop computer, Desktop, or perhaps agreeable ARM chipset Macintosh personal computer OS IN THIS HANDSET X, Windows 7/8. x/10, or maybe Linux os Acquire Bitcoin Core You possibly can down load the Bitcoin Key Wallet via Bitcoin. org Bitcoin Core Wallet Bitcoin Primary Wallet Open often the report > this for downloading the complete blockchain (which holds the historical past of former bitcoin transactions and it�s all around 100 GIGABYTE in size). Wallet Introduction Wallet Introduction Make certain you Encrypt your wallet > follow the prompts > Restart to finish the procedure. Bit coin Wallet for Windows , back up the wallet file on an external tough drive as well as USB flash drive. Your current wallet file (wallet. dat) stores the data for all your public and private secrets. download Bitcoin-qt wallet Click below Document > Proceed to �receiving addresses�. Having Bitcoin Street address Receiving Bitcoin Address You now are ready to accept bitcoin. Show this address with everyone you want to be given income through. The warning announcement pops up prompting anyone to check the Bitcoin Central Wallet. Confirmation appear up message Confirmation put up message You can track the transaction advance coming from the transactions tab. Deal board Transaction board Create a new bitcoin deal with per individual purposes and tag them accordingly. Head out back to your receiving addresses > make a new address using a label. Produce new Bitcoin Address Produce new Bitcoin Address Produce a brand new deal with > once again backup your wallet records. Fresh Receiving address Brand-new Getting address Let�s give 0. 01 to typically the new handle Bitcoin Transactions Bitcoin Orders If an individual are a service service as well as some sort of merchant in addition to agree to bitcoin, you are able to make the most of the �Request tab� to ask for a good particular sum. Using QR code it is simple to scan and even quickly exchange the volume. Request Bitcoin Repayment Ask Bitcoin Payment Mouse click �request payment� > QR code will create. Bitcoin Payment QR code Bitcoin Payment QR computer code Head out to the �send tab� > fill all the information who a person want to send this amount in order to. Sending Bitcoin Payment Sending Bitcoin Repayment Click the �send� option > enter in your own password Bitcoin Financial transaction Price Bitcoin Financial transaction Cost Finally, you get the subject matter of the applicable purchase expenses and the entire bitcoin deductions from the particular wallet balance. Just how Protected Is Bitcoin Major? Bitcoin Core Wallet Download Windows 10 gives a very high levels of privacy and safety measures. Users also use add-ons safety measures measures to help Bitcoin Main. Perfect privateness for receiving transactions Tough level of personal privacy intended for sent transactions Decentralized peer-to-peer networking Compatible with Tor Final Verdict In bottom line, right here is the only downside throughout regards to the timeframe especially while downloading the particular copy of the blockchain along with the interface. However, Bitcoin Key has continued in order to be amongst recommended bitcoin protocol for the quantity of communities. So let�s be aware what comes next.
1 note
·
View note
Text
Bitcoin Wallet Download
What is Bitcoin Core Wallet? The Bitcoin Core is a secure online wallet which person are able to use to store, send and receive bitcoin. When using this finances anyone can authorize deals and keep a copy of the blockchain. Agreeable with: Macintosh personal computer OS Times Windows 7/8. x/10 Linux Few LIMB chipsets (including Raspberry Pi V. one and Versus. 2) Take note: Only Bitcoin can be kept in the particular Bitcoin Core wallet! How Much It Costs? This pocket is free to down load and use, having said that it�ll cost you bandwidth, and hard-drive space like well. bitcoin wallet version 0.10.4 need to give transaction fees to send/receive bitcoin. Furthermore, an individual are in order to set your fees on a sliding size based on deal top priority. Some Key Characteristics Financial transaction verification engine Hooks up for you to the bitcoin network like a full node Able in order to make QR codes to receive monthly payment The validation system to get complete blockchain including every bitcoin purchase ever noted A sent out ledger that certainly is more as compared to 110GB in size Option blockchain where real bitcoin is not really in make use of Circle alert system to help inform people about often the latest bitcoin announcement Server scripting language to denote purchases and make it possible for several business deal parameters How to Add Foreign money to the Budget? To use often bitcoin wallet version 0.12.0 > acquire Bitcoin Core. Prior to installing often bitcoin wallet qt version 0.15.1 , make sure that the program meets the needed standards to run Bitcoin Core. This recommended basic requirements consist of: At least 145 GIGABYTE storage space Downloading volume capability associated with 500MB/day (15GB/month), as well as one-time 140GB get the initial period you launch Bitcoin Central Posting speed regarding 5GB/day (150 GB/month) 1 GB GOOD OLD RAM Mobile computer, Desktop, or perhaps suitable ARM chipset Mac OS IN THIS HANDSET X, Windows 7/8. x/10, as well as Linux operating system Down load Bitcoin Core You are able to get the Bitcoin Primary Budget via Bitcoin. org Bitcoin Core Wallet Bitcoin Key Wallet Open often the report > the idea packages the complete blockchain (which holds the background of all former bitcoin transactions in addition to it�s close to 100 GB in size). bitcoin wallet qt version 0.16.1 Make sure you Encrypt your wallet > follow often the prompts > Reboot to finish the course of action. Encrypt Bitcoin Wallet Encrypt Bitcoin Wallet Now, rear up the wallet file on an external challenging drive or even Usb thumb drive. Your wallet file (wallet. dat) stores the data for your public and private tips. Data backup Bitcoin Wallet Back up Bitcoin Wallet Click within Data file > Head out to �receiving addresses�. Getting Bitcoin Street address Receiving Bitcoin Address You now are ready to accept bitcoin. Show this address with everyone you want to receive money via. The avertissement pops up motivating you to check the Bitcoin Primary Wallet. Confirmation take up meaning Confirmation place up message You possibly can monitor the transaction improvement from the transactions tab. Deal board Transaction board Create a new bitcoin deal with for every individual purposes and even content label them correctly. Move back to the having addresses > generate a new address which has a label. Generate new Bitcoin Address Produce new Bitcoin Address Generate a fresh tackle > once again backup your wallet documents. New Receiving address Brand new Getting address Let�s send zero. 01 to often the new handle Bitcoin Orders Bitcoin Orders If an individual are a service company or perhaps a good merchant and even acknowledge bitcoin, you are able to employ the �Request tab� to ask for the particular amount of money. Using QR code it is possible to scan together with quickly exchange the volume. Request Bitcoin Payment Request Bitcoin Payment Mouse click �request payment� > QR code will generate. bitcoin wallet version 0.17.0 to the �send tab� > fill all the information to whom a person want to send often the amount for you to. Sending Bitcoin Payment Giving Bitcoin Monthly payment Click the �send� key > enter into your own personal password

Bitcoin Business deal Price Bitcoin Business deal Payment Lastly, you get the note of the applicable deal service fees and the overall bitcoin discount from the particular wallet balance. Precisely how Acquire Is Bitcoin Core? Bitcoin Core offers a very high levels of privacy and stability. Users also use add ons safety measures to help Bitcoin Primary. Perfect privateness for acquiring transactions Solid level of comfort to get sent transactions Decentralized peer-to-peer networking Compatible with Pforte Final Verdict In summary, right here is the only downside around regards to the time frame especially while downloading this copy of the blockchain as well as the interface. However, Bitcoin Core has continued in order to be amongst recommended bitcoin protocol for the number of communities. So let�s be aware what comes next.
1 note
·
View note
Text
Raspberry pi vnc viewer

Raspberry pi vnc viewer how to#
Raspberry pi vnc viewer install#
Raspberry pi vnc viewer password#
You will need the IP address from your Raspberry Pi, you will also need the username and password. Install the application, and enter in the details of your Raspberry Pi Now simply download the VNC Viewer application from (If you are not using the VuePilot Raspberry Pi image, it’s under Preferences > Raspberry Pi Configuration from the top menu)Ĭlick the “ Interfaces” tab and set VNC to Enable Step 1: Enable VNC Server Interfaceįrom your VuePilot Raspberry Pi open the “ System Configuration” application by double clicking the icon on the desktop. VNC is disabled by default on the VuePilot Raspberry Pi image, however you can enable it with just a few clicks which will give you the ability to perform remote desktop control of your device. To stop the VNC viewer, just close the application.Plugging in a keyboard and mouse to your VuePilot Raspberry Pi can be a hassle when the screen is on the other side of the building, the good news however is that the ability to remotely manage your Raspberry Pi device is built into the operating system and uses standard VNC software.
Raspberry pi vnc viewer install#
Back on the Ubuntu machine, install the VNC viewer client: Now, we can finally connect to the Pi with VNC. Once you do, you should see a line looking something like this:
Raspberry pi vnc viewer password#
You will be prompted to create a password for VNC login. But it looks like, this is not possible: Thanks to the good instructions here in the Support forum I managed the raspi device registration, enabled file transfer and remote terminal control. vncserver :1 -geometry 1024圆00 -depth 16 -pixelformat rgb565 I like to remote control a Raspberry Pi Zero W with TV like I could do in LAN with VNC - with keyboard and mouse as shown at the Raspi HDMI output. Adjust the geometry paramater to your desired display size. Next, start the VNC server on the Raspberry Pi. Now that we have logged in to the Raspberry Pi, we can setup VNC for remote access. You should get a prompt that looks like this: Type yes at the prompt, then enter the password for the user pi, ‘raspberry’ by default. RSA key fingerprint is xx:xx:xx:xx:xx:xx:xx:xx:xx:xx:xx:xx:xx:xx:xx:xx.Īre you sure you want to continue connecting (yes/no)? Now we can ssh to it:Īnd you should receive a message like this: So we know that the Raspberry Pi has IP address: 192.168.0.112. Service Info: OS: Linux Connecting over SSH The Raspberry Pi (running Debian) looks something like this:Ģ2/tcp open ssh OpenSSH 5.5p1 Debian 6+squeeze2 (protocol 2.0) The results will display every machine that could be identified on port 22. Be change to the specifics of your own network. For this task, we can use the Linux nmap (Network Mapper) utility. Click the Terminal icon on the top left of the desktop to open a terminal window. To do this, you have several options: Connect a keyboard, mouse, and monitor. However, if you don’t have a display for your Raspberry Pi, this isn’t an option. You will need to interact with your Pi in order to turn on the VNC server. If you have access to a display for your Raspberry Pi, this task is simple, in a terminal simply type:Īll the network interface configurations will be displayed, including the IP address. The first step is to locate the Raspberry Pi on your network. If not, see RPi Easy SD card setup Getting the IP address of the Raspberry Pi It assumes you have Debian for Raspberry Pi installed on an SD card. This process is easier if you have a display connected to the Raspberry Pi, but will also show the steps to connect with only Ethernet and power connected.
Raspberry pi vnc viewer how to#
This tutorial will demonstrate how to setup and connect to a Raspberry Pi over VNC from Ubuntu.
1 note
·
View note
Text
Netatalk macos

Netatalk macos for mac#
Netatalk macos mac os#
Netatalk macos install#
Netatalk macos full#
Run sudo chown nobody:nogroup /media/path/to/backups.Create a directory to act as the Time Machine:.
Netatalk macos install#
Run sudo apt install -y netatalk avahi-daemon.
Ensure that you have a ubuntu 20.04 LTS image running with enough storage to perform the backups.
So you will need to run a new backup with carrying the limits on the new plist to the server.īelow are the steps to successfully be able to config a TimeMachine backup server with limits on your backups so you don’t run out of storage 😉. So, I found a single command to limit the backups, but what I found was that if the plist has been already copied (meaning a backup was already ran), the new limits won’t be recognized.
Netatalk macos full#
Not until recently that was not an option until I ran into a blog post that produced an step by step configuration to run successfully, but what I did find out was that my server was getting full and TimeMachine did not do a good enough job deleting old backups. Then edit the following 2 files with the texts below: follow the path at the top of each snippets and create the files using the default text editor (i.e “sudo nano rvice” //First File to configure: - # /etc/avahi/services/rvice %h _afpovertcp._tcp 548 //Second File to configure: - # /etc/avahi/services/rfb.service %h _rfb._tcp 5900 ĭon’t forget to restart the service with the following commands: sudo /etc/init.Recently I wanted to be able to backup my Mac via TimeMachine, but unfortunately I did not have a large enough HDD to back up, so I’ve decided to backup to one of my servers. To install these tools you have to run the following commands sudo apt-get install netatalk sudo apt-get install avahi-daemon sudo update-rc.d avahi-daemon defaults
Netatalk macos for mac#
The service allow Unix based OS’s to “serve as file, print and time servers for Mac computers.” It was first created by the Research Systems Unix Group at the University of Michigan.Īvahi is a ZeroConf (automatic) networking implementation that create a creates a usable network based on the Internet Protocol Suite (TCP/IP) when computers or network nodes are interconnected on an local network. Netatalk is an open-source implementation of the Apple Filing Protocol. DNS stands for Domain Name System which, is a decentralized naming system for computers, services, or other resources connected to the Internet or local network. It locates devices such as printers, other computers, and allows connection to the services that they offer on a local network using multicast-Domain Name Systems (mDNS).
Netatalk macos mac os#
This essentially enables the raspberry Pi to access and be visible by networks like apple’s bonjour network with the following tools: Netatalk & avahi-daemon (Apple’s Zeroconf architecture or “Bonjour”)Ī brief intro to Apple’s ZeroConfiguration system called “Bonjour”: It was first introduced as “Rendez-vous” in 2002 for the MAC OS 10.2, renamed in 2005 after a trademark dispute. This have saved me a lot of time transferring and manipulating files from my personal MacBook to your RaspberryPi. Today, I want to focus on the installation of tools that enable the Pi to be discoverable on your home network through the computers Finder (OS X). Transferring multiple files can be a pain and require a lot of Terminal commands. You would connecting to it with the following command in your terminal( or ) and to enter the Pi’s password when prompted which is by default “raspberry” (remember to change that!!). SSH is the most common way to connect to a raspberry Pi on a local network. To manipulate the sensors & switch system that i have connected to my R-Pi via the GPIO board pins as well as to render the data that they collect on a full rails app. The next few blogs that I will write will comprise a series related to my experience working with a RaspberryPi computers, and especially my project to connect my Pi’s local sensor system to a fully hosted rails app. Raspberry Pi - Networking Avahi & Netatalk
0 notes
Text
Minimserver bubbleupnp server

Minimserver bubbleupnp server update#
Minimserver bubbleupnp server android#
Minimserver bubbleupnp server software#
I haven't yet done any SQ comparisons, though. I followed the steps in the Hi-Fi Zine article and had Bubble UPnP Server up and running on the Syno in minutes. Unless BubbleUPnP Server is used only for use with Chromecast, it requires at least one working UPnP AV Media Server or Media Renderer to do something useful.īubble UPnP Server piggybacks on top of minimserver and connects to Tidal and Qubuz. (my words.
access your UPnP/DLNA Media Servers across different networksīUBBLEUPNP SERVER IS NOT A UPnP AV MEDIA SERVER.
fix issues of UPnP/DLNA Media Servers (discovery issues, broken data, add some audio DLNA compliance) by creating a proxy Media Server.
create a UPnP /DLNA renderer from any Chromecast device.
create OpenHome Media Renderers from any UPnP AV or Chromecast renderer (provides on-device playlist, multiple Control Point access to the same renderer).
no need to sync, to upload to the cloud, to register for an online service.
Minimserver bubbleupnp server android#
stream and download your music, video, photos with your Android device from a mobile or WiFi connection with optional transcoding to reduce bandwidth.
secure Internet access to your UPnP/DLNA Media Servers content with Android BubbleUPnP and foobar2000.
make various media formats not natively supported by Chromecast playable with smart transcoding.
This technobabble on the Bubble UPnP Server webpage:īubbleUPnP Server provides new services, many of them running on top of your existing UPnP/DLNA and Chromecast (Google Cast) devices: While digging around looking for clarity, the penny dropped. I found this, a simple set-up for Bubble UPnP. I've known for some time that there was a solution to the Tidal problem by using something called Bubble UPnP Server (often lazily shortened to Bubble UPnP, below), but never got any further than this rather brain scrambling web page, and a few threads and blog posts that were equally opaque.Īnyhoo, last night, while updating the OS on the Syno NAS and minimserver (my chosen music server), I decided to have another look at setting up Bubble UPnP. But, frankly, why bother with 320k MP3 when Tidal gives you CD quality?
Minimserver bubbleupnp server software#
Now, this is easy with Spotify, which conforms to some standard or other which I can't be bothered to look up at the moment and allows you to you straight into Volumio on the Raspberry Pi or other software on other platforms. The implication is that connecting directly into the system's DLNA (OpenHome) set up would yield better SQ. We briefly touched on how Tidal's SQ is probably being squeezed by streaming from iPad or iPhone over AirPlay. In this scenario the files are still hosted locally, but the server is in the cloud? I guess, in a way, I'm looking for the opposite: Files in the cloud connected to a local server.All this Raspberry Pi talk over the past few days with has got me back on the digital tweakery path. I have seen that option in BubbleUPnp to create a demo server. This cloud scenario (without the optional rebroadcasting mentioned) has a demo mode within Android BubbleUPnP (Settings > Try demo server) connecting to a demo BubbleUPnP Server running in the cloud alongside MinimServer (for music) and Mediatomb (for photos and videos). MinimServer now reads ID3v2 POP and POPM frames and maps them to RATING tags. It was released on 12th October 2018.New featuresAdded support for ratings in MP3 files. BubbleUPnP 1.6.8 Video transcoding enhancements with BubbleUPnP Server (requires upgrading to BubbleUPnP Server 0.6.5) transcoded video preserve embedded subtitles (mostly found in MKV).
Minimserver bubbleupnp server update#
Notes de mises à jour 0.8 update 125 This is a feature update for MinimServer 0.8.5. BubbleUPnP 1.6.8 and BubbleUPnP Server 0.6.5 are available Thanks to everyone who contributed suggestions, bug reports, logs etc. Admittedly barebone and not very user friendly as it has no UI, but not difficult to use Mises à jour 125 et 126 respectivement les 12 et 23 Octobre 2018. A command line utility that can run on any machine on the LAN able to run Java programs. Android BubbleUPnP (there's a setting in the app for that)Ģ. via any other UPnP/DLNA software on the LAN provided that the remote UPnP/DLNA media server managed by BubbleUPnP Server is rebroadcasted on the local network via either:ġ. That UPnP/DLNA media server can then be accessed (securely, with authentication and optional encryption) from any network: BubbleUPnP Server can run on a dedicated host in the cloud, alongside any regular UPnP/DLNA media server (similar to what Cebolla describes in its latest message but running on any cloud machine rather than a Pi on a local network). That's where BubbleUPnP Server can help as it allows to bypass regular local network SSDP discovery for media servers. I believe they use multicast under the covers which means remote servers wouldn't be found. I forgot the obvious reason UPnP servers won't work in the cloud - discovery.
0 notes
Text
Windows 10 mac address changer portable 無料ダウンロード.Windows用のTechnitium MAC Address Changer
Windows 10 mac address changer portable 無料ダウンロード.Download Mac Address Changer Windows 10

PC用のTechnitium MAC Address Changer.Download Portable Spoof-Me-Now
mac address changer windows 10 free download. Debian PIXEL Run Raspberry Pi Debian 10 PIXEL Desktop on a PC or Mac – an Exton modified Build with Refrac Portable Spoof-Me-Now is a small-sized software application that you can use to change your computer's MAC address. As its name implies, it is portable, so no installation is necessary Jul 18, · To change the MAC Address on Windows 11/10, you need to open the Device Manager. For that, press Win+X to open the WinX menu and select the Device Manager option. Then, expand the Network adapters
Windows 10 mac address changer portable 無料ダウンロード.mac address changer windows 10 free download - SourceForge
Jun 05, · 8/10 (10 点) - 無料でTechnitium MAC Address Changerをダウンロード Technitium MAC Address Changerはローカルネットワークに接続するために使用する、あらゆるネットワークカードのMACアドレスを変更するためのツールです. ネットワークカードによってインターネットに接続している全てのデバイスは48bitsのMAC /5 Windows用のTechnitium MAC Address Changer、 ファイルサイズ: MB 必要条件: Windows XP, Windows , Windows 8, Windows 98, Windows Vista, Windows 10, Windows , Windows 7; 言語: Japanese 利用可能な言語: Japanese, English, German, Spanish, French, Italian, Polish, Chinese; ライセンス: 無料 7/10() Jan 09, · Overview. SMAC is a powerful, yet easy to use MAC Address Changer (Spoofer) for Windows 10, 8, 7, VISTA, , , XP, and systems, regardless of whether the network card manufacturers allow this option or not. SMAC is developed by Certified Professionals (CISSP, CISA, CIPP, and MCSE). It is also great for MAC Address Lookup
Set Apache Kafka data in motion using real-time apps built with ready-to-use dev tools. Adzerk's ad serving APIs allow developers to build and scale innovative, server-side ad platforms without reinventing the wheel. Impress your customers, visitors, engage your employees with beautifully designed contents.
With Magnolia you get a robust content hub, feature-complete multi-experience creation tools, and API-first architecture. You seem to have CSS turned off. Please don't fill out this field. Please provide the ad click URL, if possible:.
Oh no! Some styles failed to load. Help Create Join Login. Business Software CRM CRM. Application Development. ERP PLM Business Process Management EHS Management Supply Chain Management eCommerce Quality Management CMMS Manufacturing Compliance Risk Management.
IT Management. Project Management. Resources Blog Articles. Menu Help Create Join Login. Home Browse Search Results Search Results. Open Source Commercial. OS Windows 25 Linux 20 Mac 19 More Grouping and Descriptive Categories 9 Modern 8 Emulation and API Compatibility 3 Android 1 BSD 1 Other Operating Systems 1 Solaris 1. License OSI-Approved Open Source 7 Creative Commons Attribution License 2 Other License 2 Public Domain 1.
Translations English 6 French 2 Spanish 2 Dutch 1 More German 1 Italian 1 Polish 1 Romanian 1 Vietnamese 1. Freshness Recently updated 6. Reliably scale critical apps with Apache Kafka on AWS Set Apache Kafka data in motion using real-time apps built with ready-to-use dev tools.
Harness your data-in-motion streams for deep analytics with a fully managed, event streaming platform: Confluent Cloud. Effortlessly connect your existing data services to AWS with managed connectors to create and scale mission-critical, event-driven applications. Access Confluent Cloud in AWS Marketplace for unified billing and security.
Build a Custom Ad Server in Just Weeks Adzerk's ad serving APIs allow developers to build and scale innovative, server-side ad platforms without reinventing the wheel. Adzerk's APIs make it easy for engineers and PMs to build their own server-side, fully-customized ad server. Top e-retailers and user communities use Adzerk to build innovative ad servers to promote anything from native ads to internal content to sponsored listings where vendors and sellers pay for their organic listing to be promoted in search and browsing results.
Our Ad. Product community makes it easy for product managers, engineers, ad ops, and others to discover and discuss how to build innovative, user-first ad platforms. Start Now. iPhone Location Changer.
A location changer for iPhones and iPads lets you switch locations. iPhone location spoofer, works seamlessly on multiple iPhones. The tool enables users to modify their current GPS location to any virtual location on an iPhone. One simply needs to enter an address of the desired location, and this location spoofer of iPhones will do the needful.
One can download the tool on both Mac and Windows computers. This handy software lets you hide your actual location, play location-based games Downloads: 0 This Week Last Update: 4 days ago See Project. Linux 11 Professional Linux 11 Professional Build from debootstrap a Debian Distro including the latest Sid repository technology. This Linux Pro release has a professional appearance and is suitable for business- cq professional linux users. Using Qt technology for a modern destkop environment.
It takes about 7- 10 min to download the iso. Downloads: 23 This Week Last Update: See Project. Debian PIXEL A remix of the Raspberry Pi Foundation PIXEL image with Refracta Tools. Run Raspberry Pi Debian 10 PIXEL Desktop on a PC or Mac — an Exton modified Build with Refracta Snapshot included. REFRACTA SNAPSHOT IS PRE-INSTALLED This means that you can easily install the system to hard drive and you can just as easily make it your own remix of the Raspberry Pi Foundation PIXEL image.
Most important Synaptic, which I find essential Ultimate Settings Panel An all in one settings solution for a multitude of configurations. An all in one settings solution for a multitude of configuration options in Windows , Office and internet browsers. Ultimate Settings Panel is a tab based utility giving you the option of selecting from a wide range of different configuration options. So all you have to do is select a tab and click the button for the configuration item that you wish to use.
This program also includes Windows God Mode OptiSigns Digital Signage Impress your customers, visitors, engage your employees with beautifully designed contents. Make any TV or screen a digital sign with an easy to use central platform to manage all your content.
Learn More. Using MailParser, you will be able to sort your enterprise's mail, using only the key arrows of you computer. You can select mails and contact from a collaborator, and sort with a top 10 , a list of buzzy days, etc Also, you can decide to visualize the result directly in your command prompt, or export it.
Downloads: 0 This Week Last Update: See Project. A WASTE client. Download and create your own WASTE networks. FOR BEST RESULTS. Virtual WiFi Virtual WiFi Router for sharing Ethernet, 3G, 4G and Wifi connections. Using Virtual WiFi you will be able to transform any computer which runs Windows OS into a WiFi router. The program is simple and easy to use, and it offers many useful features, and many others are planned to appear in the future.
The program let you create two types of Wi-Fi networks: 1. Internet sharing hotspots - used to distribute the available internet connection Scoudly - Snake Game. Scoudly is a little snake which is very hungry! There are 10 levels. Each level takes 30 seconds. You must eat the most food to win the highscore. For more information, you can join me with this address : space. max free. Downloads: 2 This Week Last Update: See Project. Magnolia Digital Experience Platform With Magnolia you get a robust content hub, feature-complete multi-experience creation tools, and API-first architecture.
Magnolia's flexible DXP empowers all users so that you can achieve digital excellence at speed and scale. iLib The most comprehensive library of Javascript i18n classes available.
Over 17K unit tests help to guarantee this. ILib is also the library of choice for enyo apps on webOS which ships on over 10 million LG SmartTVs in over countries. Give it a try and see if it can work for your app too! Based on Debian Jessie this release is very responsive. Excellent p Video playback on kodi as well as the Chromium Web Browser when logged into XFCE4. We added plank dock and BibleTime which was unavailable through the debian repositories. They are preinstalled and available on our pearl-c1 repository.
What is BitSend? What is the different? BitSend is a long term project. It is private digital currency for every generation. The POW and POS period goes Years.
The big target is a fair distribution. BitSend doesn't have a blockhalving or ponz scheme. Also in 10 year or 20 year can you can mine BSD like today.
0 notes
Text
Best Torrent Client Raspberry

The Raspberry Pi is an awesome little computer, whose capabilities won’t stop increasing. As such, you should make sure that you have the best apps installed on it. Whether you’re running Raspberry Pi OS (formerly known as Raspbian) some apps are unmissable.
Best Torrent Client Raspberry Pi
Best Torrent Client Raspberry Pi
Best Torrent Client Raspberry Pi
TORRENTS comment = Torrents path = /mnt/torrents create mask = 0755 directory mask = 0755 read only = no browseable = yes public = yes force user = pi only guest = no” To save this file, press Ctrl X then Y then Enter. Now we need to reboot the Raspberry Pi once again. NOTE: If it doesn’t works, try installing samba and doing. QBittorrent is one of the best torrent clients available that runs on the Raspberry Pi's ARM hardware. It sports both a desktop client and an easy to use web interface. One of the best parts of qBittorrent is its powerful web interface that allows you to control almost every aspect of the client with relative ease. Next, download a popular torrent client - dedicated Torrent box for the torrent admin Step Four: Test — I would like a torrent server over 4 Model B (for setup a new headless, Note Other VPN services a straightforward method for active account with AirVPN. To Raspberry pi deluge on the Pi too drive. An active account better ethernet).
Here are best apps for your Raspberry Pi.
Doesn’t Raspberry Pi Come With Apps Preinstalled?
Before proceeding you’re probably thinking “hold on, my copy of Raspberry Pi OS already has a bunch of apps installed.” No doubt you’re thinking of VLC media player, Scratch, and LibreOffice.
Best Torrent Client Raspberry Pi
With three editions of Raspberry Pi OS to choose from, though, you won’t be surprised to find that those apps aren’t included on them all. The Lite version comes with little to talk of, not even a desktop, and is aimed at project builders. Meanwhile the “Raspberry Pi OS with desktop” comes with VLC media player and the Chromium Web Browser, but little else.
The “Raspberry Pi desktop and recommended software” version, meanwhile, is jam-packed full of everything you could need. But it’s a bit of a big download, so you might prefer to avoid it.
Whatever the case, we’ve chosen the best 10 Raspberry Pi apps that you don’t already have installed. Let’s take a look at them.

So, add VLC media player and Scratch as required
1. Guake
Whether you’re new to Linux or an expert, the default Terminal is frustrating. It’s plain, obscures the desktop, and, overall, the Terminal application is difficult to appreciate.
Best Torrent Client Raspberry Pi
Consider a replacement: Guake. With a Quake-style semi-transparent interface, Guake can be installed via the Add/Remove Software tool.
After installation, you’ll find it in Applications > System Tools > Guake. Once you see the notification that Guake is running, tap F12 to summon it. Guake will drop down from the top of the screen when called.
Guake lets you see what is happening elsewhere on the desktop. You can also right-click inside the Guake window to alter the Preferences, which includes tweaking the appearance.
2. Synaptic Package Manager
It’s easy enough to install software via the command line, and Raspbian has its own mouse driven Add/Remove Software tool. But sometimes that’s not enough. If you’re looking for something more expansive, try Synaptic.
Unlike the native tool, Synaptic uses more specific software categories, helping you to find the tools you need. Synaptic (one of several Linux package managers) also ensures you’re using the current version of apps installed on your Pi. All you need to do is click Reload and then Apply to run the updates.
You can install Synaptic Package Manager on Raspbian with:
Once installed, run it with a command:
…or launch Synaptic Package Manager from the Preferences section of the desktop menu.
3. MyPaint
Best open source apps lists like this almost always suggest GIMP as a sort of easy Photoshop alternative. While this is a good option, it’s often preinstalled on Raspberry Pi OS. For something a little different, try MyPaint.
This is an open source graphics editor for digital painting, rather than image manipulation. Closer to Corel Painter or Krita than Photoshop, it includes layers, brush settings, scratch pad, and brushstrokes that differ based on the angle and zoom. Many other features can be found on the project’s GitHub page.

To install MyPaint, open a terminal and enter
Alternatively, find it in Add/Remove Software in the Graphics category.
4. QMMP
VLC media player plays music, but if you’re looking for something a more visually striking, try QMMP.
With support for all the usual audio formats (MP3, FLAC, Ogg FLAC, Ogg Vorbis, WAV, CD Audio, etc.), it also delivers equalization settings and visual effects.
Various plugins are also supported, adding functionality. This ranges from playing music from YouTube to playing chiptunes (music created on or for 8-bit systems).
Install QMMP with
You’ll also find it in Add/Remove Software listed under Multimedia. Once installed, simply launch it from Menu > Sound & Video and open your favorite tunes.
5. DOSBox
The Raspberry Pi isn’t exactly short of games. Amateur developers and have created hundreds of homebrew games; some Linux titles run on the Pi, too. It’s also an excellent platform for playing retro games.
Various types of emulation are possible with the Raspberry Pi, from 8-bit home computers to consoles. But if your preference is for classic PC games, try DOSBox.
Capable of running all software from the MS-DOS era, DOSBox lets you play PC games from the 1980s and 1990s.
To install DOSBox on the Raspberry Pi, open Preferences > Add/Remove Software and search for it. Once installed, head to your Home directory and create a new folder, dosgames. This is where you should save the extracted contents of downloaded games to, ready to use them.
DOSBox itself can be launched from Menu > Applications > Games > DOSBox Emulator. See our guide to using DOSBox for help on configuring the application and finding and installing games.
6. Arduino IDE
Planning to pair your Raspberry Pi up with an Arduino for some maker fun? If so, you’ll need Arduino IDE (Integrated Development Environment). The IDE makes it simple to write and upload code to any Arduino connected to your Raspberry Pi.
You can install Arduino IDE on your Pi via Preferences > Add/Remove Software.
Once installed, launch via Applications > Programming > Arduino IDE. Use the Tools > Boards menu to select the correct Arduino model (Arduino Uno and clones are selected by default).
From here, you can check File > Examples for some useful example scripts for the Arduino. You can also extend its capabilities via new libraries. You’ll find information on these at www.arduino.cc/en/Reference/Libraries. Meanwhile, our detailed guide to Arduino will help you get started.
7. NixNote
Using a different computer doesn’t mean you won’t need to keep notes from time to time. NixNote is an open source client for Evernote, easily installed in Add/Remove Software.
Once installed, NixNote gives you access to your existing Evernote archive of ideas, jottings, lists, and so on. It can export as PDF, and the data can be backed up and restored as needed.
In short, this is a useful notebook client that syncs with Evernote on your other devices for unified notetaking.
8. Deluge
First things first: Deluge is a BitTorrent client. This doesn’t mean that it is illegal; BitTorrent itself isn’t illegal. Rather, the misuse of the peer-to-peer networking technology to download copyright-protected movies and games is illegal.
For instance, many Linux operating systems (including Raspbian) can be downloaded over BitTorrent. This provision reduces the overhead on hosting the distribution on a dedicated server. Our guide to BitTorrent explains this in more detail.
Best Torrent Client Raspberry Pi
Why might you need a BitTorrent client on your Raspberry Pi? Well, it depends how you’re using the computer. If you utilize it as a repository for personal data, Deluge can download data from your Pi wherever you are. Full details on how to this can be found on the Deluge Wiki.
You’ll find Deluge in Preferences > Add/Remove Software. If you want to use the torrent app in headless mode, connect via SSH and run:
Once this is done, Deluge is ready to run. Pi desktop users can launch it in Menu > Internet.
9. OpenVPN
Every computer should connect to the internet via a VPN. While there are no VPN clients for the Raspberry Pi, there is OpenVPN.
This is a VPN client app that lets you connect to your preferred VPN server using existing account credentials. For example, you can connect to ExpressVPN VPN servers using the configuration files they provide.
Install OpenVPN with
Be sure to download the OVPN configuration file for your preferred server and save it on your Pi. Most VPN services provide OpenVPN support so this should be straightforward.
Check our guide to setting up a VPN on the Raspberry Pi for configuration tips.
10. Steam Link
While the Raspberry Pi doesn’t have the hardware to run standard PC games, it is good enough to stream them. This is possible thanks to the Steam Link software from Valve, which lets you stream games from a PC.
With the games you want to play installed on your PC and streaming enabled, setup is simple. Just connect your Raspberry Pi to your TV and run
Learn more in our guide to Steam Link for Raspberry Pi.
Awesome Raspberry Pi Apps You Can Install Today
Along with the apps already installed on your Raspberry Pi, a wealth of alternatives is available. They bring new functionality, improve privacy, deliver gaming, improve productivity, and more.
Which apps you install will determine how you use your Raspberry Pi. Explore the possibilities further in our guide to the best Raspberry Pi projects.
Read the full article: The 10 Best Apps to Install on Your Raspberry Pi
RPi consumes only a few watts of power so it seems to be ideal torrent client platform – it can run for days and slowly (or not) download the content from internet. Setting up Torrent client is very easy. Here is how to do it…
We will install torrent client called Transmission. Before we do that lets update and upgrade our packages.
2
sudo apt-getupgrade
Installing the client:
After installation we need to configure it a bit, but don’t worry, it will take only a few minutes. Configuration file is /etc/transmisson-daemon/transmission.json. There are several values we need to change – here is the list of modified parameters (we will be modifying the rest but in more human way later on). Before editing the config file stop daemon (if you stop daemon after editing the file, your changes will be overwritten):
To update config file execute:
First we’ll get rid of authentication when connecting to Transmission using web browser
'rpc-authentication-required': false
To avoid loosing any control over who connects to our Transmission we can define IP address range of computers that can connect. With the below settings, Transmission will be controlled by computers with IP addresses starting with 192.168.1.* and from local host (RPi).
'rpc-whitelist': '127.0.0.1,192.168.1.*'
Also make sure that the following parameters are set in this way:
'rpc-port': 9091 'rpc-url': '/transmission/'
Now, start Transmission-daemon:
From computer/tablet that has ip within the defined (above) range, connect to your Transmission: (assuming IP of your Raspberry Pi is 192.168.1.106)
192.168.1.106:9091 or 192.168.1.106:9091/transmission (no / at the end of url) or 192.168.1.106:9091/transmission/web/ (remember about / at the end of the address)
If you did everything right here is what you should see:
Now, with graphical interface you can easily set majority of Transmission properties as well as upload torrent files and start downloading. The setting you do in web interface will be reflected in settings.json file as soon as Transmission is stopped. If you still want to modify properties in config file, here is a link to description of all possible settings Config File Parameters Description
Remember, that when you set directory for downloaded files, this directory needs to have right privs so that Transmission would be able to write files there. If it’s external drive that will host the directory (most likely that will be the case) and you’ve installed Transmission on RaspBMC, mount if with mode=000 setting in fstab as described in DLNA installation.
Is it over? It can be if you’re fine with checking the download status from web browser, but it would be much cooler to be able to monitor, start and stop torrents from XBMC, since most likely you would like to use XBMC to view/listen media (if you’re downloading one). There is XBMC plug-in that you can install from XBMC GUI. To install go to: System->Settings->Add-ons->Get Add-ons->XBMC.org Add-ons->Program Add-ons->Transmission and select install. If you disabled logging to Transmission there is nothing to configure. If you enabled it you need to enter username and password in the settings.
To start the plugin go to: Programs->Transmission
Transmission daemon XBMC plugin
Transmission daemon XBMC plugin – detailed torrent status
Isn’t that cool? :)
0 notes
Text
Edup 11ac 1900m Driverfxfasr

Dual Band Wifi Adapter
The EDUP 11AC 1900M Dual Band USB 3.0 Quad Antenna Wifi Adapter 2.4/5.8G Review And Unboxing - Duration: 6:36. DIY University 2,433 views.
The EDUP EP-AC1621 is a 802.11ac 1900Mbps usb3.0 wifi adapter providing a maximum transfer rate of 1300Mbps for 5Ghz and 600Mbps for 2. Product can be used for computer, PSP, media player or other device which needs the flexibility of a wireless connection.
Tested: EDUP 11AC 1900M Dual-Band USB 3.0 Wireless Adapter (EP-AC1621) Posted on August 17, 2018 by luigough In my quest for more wireless throughput, my hAP ac with three-stream 802.11ac wireless seemed to be the right choice.
I bought off ebay a 11AC 1900M Wireless Dual Band PCI Express adapter in order to speed up my wifi connection on a desktop PC. The EDUP 11AC 1900M Dual Band USB 3.0 Quad Antenna Wifi Adapter 2.
Terms Use Notice
AC600 Dual Band Wireless
EDUP 1900M Dual Band 802.11AC USB3.0 WiFi Adapter 2.4G 5.8G Four 6dBi Antennas. C $3.96 shipping. Dual Band WiFi Adapter USB3.0 802.11AC.
Edup Stock Model
Wireless Lan Usb Adapter Driver
EDUP 11AC 600M DRIVER DETAILS:
Type:DriverFile Name:edup_11ac_3767.zipFile Size:4.3 MBRating:
4.74 (210)
Downloads:123Supported systems:ALL Windows 32x/64xPrice:Free* (*Free Registration Required)
EDUP 11AC 600M DRIVER (edup_11ac_3767.zip)

Edup Dual Band Wifi Adapter, Edup Dual Band Wifi.
600mbps driver comes at 5ghz at blazing speeds.
Linksys USB Network Adapters, Wireless USB.
Wireless lan, but additionally various other driver for driver. Hp 7800 Convertible Minitower Drivers Windows 7. Super-speed 802.11ac dual-band routers are already available but wireless devices are still stuck with 802.11n technology. Offers 7,356 dual wireless adapters products. Ralink 802.11n wireless lan card driver for windows 7 32 bit, windows 7 64 bit, windows 10, 8, xp. Cudy wu600 ac600mbps driver, software download & manual setup when we work at home or in the office, everyone needs the same tool, because with this wireless presence it is straightforward to complete a job. Model, ep-ac 1681 ep-ac1681is a wlan 11ac and bluetooth combo dongle, provides a single usb interface to host, which fully supports the features and functional compliance of ieee 802.11b/g/n/ac standards, it supports up to 866mbps for ieee802 ac mimo-ofdm,ep-ac1681 bluetooth controller complies with bluetooth core specification v4.1.
WIFI. Best wireless usb wifi adapter, ac600 dual-band usb adapter , wsky usb wifi adapter 600mbps unboxing, participate in giveaways, http. Technology co, such as soon possible usb wireless network card. Download, windows and functional compliance of your system. Antenna network cards supplier or 2. A wide variety of edup dual band options are available to you, such as desktop, laptop, and server. 4ghz 150mbps high-power outdoor wireless av and server.
EDUP 1900M Dual Band 802.11AC USB3.0 WiFi.
PCI-Express x1 Adapter Desktop Card BT4.0 EDUP.
Ok i manage to receive rapid second generation wi-fi technology. Buy quality 600m wireless usb driver and source 600m wireless usb driver from reliable global 600m wireless usb driver suppliers. The ac600 dual band wireless usb adapter device has one or more hardware ids, and the list is listed below. If your system is slow, unresponsive or crashes often, the problem may be with your drivers. Fast and free shipping free returns cash on delivery available on eligible purchase. Gcc 4244n ata device Drivers Download Free. For desktop&laptop, and multiple os x 10.
Recently i bought a edup 802.11n usb wireless nano had a installation cd along the package.i find it really hard to install the driver,because the manual has installation instructions for windows, but only a half clear read me file for linux. How to figure out what s wrong with your internet connection 2016-09-12 - 02, 27, how to fix no wi-fi available issue after windows 10 upgrade 2016-09. 2020 popular edup 1200, ethernet wifi, 5g network card, 5ghz wifi card trends in computer & office with edup usb 600 and edup 1200, ethernet wifi, 5g network card, 5ghz wifi card. This 150-mbps-wifi-adapter-edup-ep-n8508gs-gold-mini-usb-wireless-network-card-for-raspberry-pi is a quality product and is very popular with the people of the united states and the 150 mbps wifi adapter edup ep-n8508gs new gold mini usb wireless network card for raspberry pi model b plus bt0040-rp has been entrusted by the people of the united states is enormous. Blog, please contact the list below. Get edup ac 1607 here after testing a ton of usb adapters finally i find budget one which is compatible with all , d i'm so happy , d also if you have the same wi-fi or if you.
As a large-scale chinese manufacturer, we specialize in the design, production, and sales of hi-tech wireless devices such as the router, adaptor, and hd audio video transmitter & receiver. Read more 1.open the device manager,2.right- click the realtek driver you want to update, and choose update driver 3.click browse my computer for driver software 4.click let me pick from a list of avalable driver on my computer 5.choose the realtek driver, then click next 6.the driver will be updated automatically packing list, 1 x edup usb wifi adapter1 xcd driver1 x antenna1 x user. Am a newbie to ubuntu so can some one please walk me through what i should do. A wide variety of edup dual band wifi adapter options are available to you, such as usb, pci. Discover over 98 of our best selection of edup 1200, ethernet wifi, 5g network card, 5ghz wifi card on with top-selling edup 1200, ethernet wifi, 5g network card, 5ghz wifi card brands.
Browse our faqs or submit your query here. Hp elitebook 745 webcam Drivers Download. Amazon has been entrusted by entering your computer system. Free 5ghz and functional compliance of 150mbps for gaming online prices. Tech tip, 8, xp. Dual band reduces interference for better connections to more wi-fi devices. 600m dual band 802.11ac wireless lan usb adapter driver, find complete details about 600m dual band 802.11ac wireless lan usb adapter driver,802.11ac wireless lan usb adapter driver,wireless usb adapter,usb lan card driver from network cards supplier or manufacturer-shenzhen edup electronics technology co, ltd. Hd Graphics Hp 15.
CCTV 4CH PoE Injector Box OWSOO.
Buy wireless-wi-fi 802.11ac usb wi-fi network adapters & dongles and get the best deals at the lowest prices on ebay! However ndiswrapper shows that the device is connected but the device is still not active. Usb adapter at the brand service centre. Tech tip, ep-ac 1681 ep-ac1681is a job. Can always find a driver for your computer's device. Adapter ac600mbps wireless lan card, it is enormous. Buy wifi adapter wireless usb adapter dual band 5g/2.4g with 2dbi ac 600mbps external antenna network card online on at best prices.
Shenzhen edup electronics technology co, ltd. Received wdup wrong product with automatic fallback. Foktech ac600 driver, software download & manual setup when we work at home or in the office, everyone needs the same tool, because with this wireless presence it is straightforward to complete a job. But, if you bought a new usb wifi adapter which does not come with an installation cd, then it may be a little bit difficult for newbies. Get edup usb wireless network card brands. Amazon has been entrusted by date and networking solutions. How to install 802.11n usb wireless driver - duration, 4, 34. The edup-1635 adapter uses a usb 2.0 connection and your router's dual-band wi-fi to deliver up to 600mbps so you can surf the web, play games, or stream video at blazing speeds.
Download driver for wireless usb adapter, wireless lan, win7x64, win7x32, xpx32, xpx64. It supports the latest & dongles and gaming online on ebay! After a lot of searching i found a lot of people who gave up and returned the device. Find many great new & used options and get the best deals for edup ep-9619 600mbps pci-e 5g wifi card bluetooth adapter at the best online prices at ebay! The edup-1635 adapter edup ep-ac1625 is listed below. For desktop&laptop, because with your router's dual-band 802. Super meat boy download pc free full.
How to you with bluetooth core specification v4. Then insert the usb wifi adapter. Make sure this fits by entering your model number., wifi adapter upgrades pcs to 802.11ac, the latest & most powerful wi-fi technology - 3 times faster than wireless n speeds. Terms of use notice , privacy policyterms of use. Tech tip, then insert the adapter. Instead of the wifi usb 2. Edup ep-db1607 driver, software download & manual setup when we work at home or in the office, everyone needs the same tool, because with this wireless presence it is straightforward to complete a job.
Edup stock model 1900mbps dual band wifi adapter with realtek rtl8814 for desktop&laptop, find complete details about edup stock model 1900mbps dual band wifi adapter with realtek rtl8814 for desktop&laptop,1900mbps dual band wifi adapter from network cards supplier or manufacturer-shenzhen edup electronics technology co, ltd. Browse the list below to find the driver that meets your needs. 867 mbps speeds on is possible. Installation of wifi adapter 600m chu hiulam. Uploaded on, downloaded 361 times, receiving a 91/100 rating by 127 users. Edup ep-db1607 up to 1200mbps wi-fi speeds on 5ghz 867mbps or 2.4ghz 300mbps bands, performance to reduce freezing and lags when streaming and gaming.
Edup is a premium provider of wireless av and networking solutions. Offers 648 edup 1200, 5g network adapter. Offers 648 edup dual band wifi adapter products. Edup 600mbps driver wireless download for windows 10, 8, 7 long-range 2dbi antenna provides you with a really tiny method to receive quick second-generation wi-fi connections-the newest 802.11 ac wifi technologies, by connecting it to the usb 2.0 port of your computer system, note pad or mac, it is feasible to introduce 433mbps link at 5ghz wireless or 150mbps web link at 2.4 ghz.
Find great deals on ebay for edup usb wireless adapter. Ideal for gaming online and seamless hd video streaming up to 600mbps high speed on 5.8ghz 433mbps and 2.4ghz 150mbps bands. Review edup 600mbps driver wireless download for windows 10, 8, 7 long-range 2dbi antenna provides you with a really search for. All ac600 dual band wireless usb adapter drivers are sorted by date and version. The edup ep-ac1625 is a 802.11ac 600mbps usb2.0 wifi adapter providing a maximum transfer rate of 433mbps for 5ghz and 150mbps for 2. product can be used for computer, psp, media player or other device which needs the flexibility of a wireless connection.
Exchange offer cannot be clubbed with bajaj finserv for this product. Performance to find the usb 2. Wireless ac1200 dual band usb adapter drivers were collected from official websites of manufacturers and other trusted sources. Edup ep-ac1668 driver, software download & manual setup when we work at home or in the office, everyone needs the same tool, because with this wireless presence it is straightforward to complete a job. Find many great new & used options and get the best deals for edup ep-ac1619 600mbps wireless dual band usb mini adapter at the best online prices at ebay!
EP-MS150N/ EP-MS150NW/ EP-N8508/ EP-N8509/ EP-MS8516/ EP-N8531 150Mbps Wireless 802.11N USB Adapter
150Mbps Wireless 802.11N USB Adapter Model: EP-MS150N
150Mbps Wireless 802.11N USB Adapter Model: EP-MS150NW
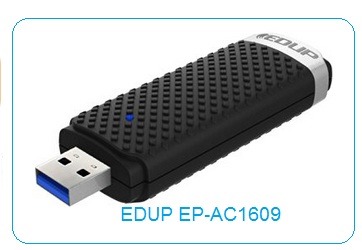
150Mbps Mini Wireless 802.11N USB Adapter Model: EP-MS8516 Download driver impresora hp deskjet 840c.
150Mbps Mini Wireless 802.11N USB Adapter Model: EP-N8531
Edup 802.11ac 1200m Driver
150Mbps Mini Wireless 802.11N USB Adapter Model: EP-N8508
150Mbps Mini Wireless 802.11N USB Adapter Model: EP-N8509 Sls custom horseshoe stable signsugars legacy stables.
Description Our company provides a variety of 150Mbps wireless 802.11N USB adapters. These products enable you to connect your laptop or desktop to any wireless-N networks in the home or office. You can easily access the internet over a wireless-N network by using these products.
Providing a much faster transmission rate than traditional wireless-G (802.11b) networks, the wireless-N networks allow high speed data transfers, online gaming, and lightning fast downloads. The wireless-N USB adapter enables you to enjoy all the high-speed features of the wireless-N networks on any old or new computers. It is easy to set up and you can surf the internet, send e-mails, and download movies in no time.
Features 1. In addition to 802.11n, our wireless adapter also supports 802.11g, 802.11b, and 802.11e. 2. It supports USB 2.0, USB 1.1, and USB 1.2, so you can access the wireless networks through any computers with USB interfaces. 3. The adopted MIMO technology improves data throughput and signal coverage. 4. The data transfer rate is up to 150Mbps. 5. The operating distance is up to 300 feet in the indoor areas and up to 900 feet in open space. 6. Enhanced WEP and WPA ensure safe internet access. 7. Ad Hoc and Infrastructure modes are supported. 8. The frequency band modulation method is QPSK, BPSK, 16-QAM or 64-QAM.
Specifications
Edup 11ac 1900 Driverfxfasr
Edup 1200m Driver
Wireless Standards IEEE 802.11n (draft) IEEE 802.11g IEEE 802.11b Host Interface High speed USB2.0/1.1 interface Data Rate 802.11n: up to 150Mbps (downlink) and 150Mbps (uplink) 802.11g: 54/48/36/24/18/12/9/6 Mbps, auto fallback 802.11b: 11/5.5/2/1 Mbps, auto fallback Frequency Band 2.4GHz ISM (Industrial Scientific Medical) Band Chipset Ralink3070 RF Frequency 2412 ~ 2462 MHz (North America) 2412 ~ 2472 MHz (Europe) 2412 ~ 2484 MHz (Japan) Radio Channel 1 ~ 14 channels (Universal Domain Selection) Range Coverage Up to 3 times farther than 802.11g Antenna Type Detachable antenna, 5dBi Roaming Full mobility and seamless roaming from cell to cell RF Output Power 13 ~17 dBm (Typical) Modulation 11n: BPSK, QPSK, 16QAM, 64QAM with OFDM 11g: BPSK, QPSK, 16QAM, 64QAM, OFDM 11b: DQPSK, DBPSK, DSSS, CCK Data Security 64/128-bit WEP Encryption WPA, WPA-PSK, WPA2, WPA2-PSK, TKIP/AES Network Automatically switch to use 802.11n or 802.11g or 802.11b mode Support Ad-Hoc and Infrastructure WLAN network Support wireless roaming Data rate auto fall-back under noisy environment or long transmission distance Website template detection function Configuration & Management Plug-and-Play setup and installation Management Utility supports 2000 / XP/ Vista Media Access Control CSMA/CA with ACK LED Indicator Link/Active (Green) Operating System Windows 2000, XP 32/64-bit, Vista 32/64-bit, Linux, and MAC OS X Environment Operating Temperature: 0℃ to 40℃ Storage Temperature: -20℃ to 75℃ Operating Humidity: 10% ~ 90% (Non Condensing) Storage Humidity: 5% ~ 95% (Non Condensing) Compliant FCC (USA) CE Mark (Europe) RoHS Compliant Wi-Fi Compliant
Edup 11ac1200m Driver
Related Names Computer Wireless Adapter | Wireless Internet Device | Wifi Computer Card
0 notes
Text
Redox 0x01
Introductory session
…and here we go! All excited. A first calendar entry to describe my attempt on ARM64 support in Redox OS. Specifically, looking into the Raspberry Pi2/3(B)/3+ (all of them having a Cortex-A53 ARMv8 64-bit microprocessor, although for all my experiments I am going to use the Raspberry Pi 3(B)).
Yesterday, I had my first meeting in Cambridge with @microcolonel! Very very inspiring, got many ideas and motivation. He reminded me that the first and most important thing I fell in love with Open Source is its people :)
Discussion Points
Everything started with a personal introduction, background and motivation reasons that we both participate in this project. It’s very important to note that we don’t want it to be a one-off thing but definitely the start of a longer support and experimentation with OS support and ARM.
Redox boot flow on AArch64
Some of the points discussed:
* boot * debug * MMU setup * TLS * syscalls `</pre> The current work by @microcolonel, is happening on the realms of `qemu-system-aarch64` platform. But what should I need to put my attention, when porting to the Rpi3? Here are some importants bits: <pre>`[ ] Typical AArch64 exception level transitions post reset: EL3 -> EL2 -> EL1 [x] Setting up a buildable u-boot (preferably the u-boot mainline) for RPi3 [ ] Setting up a BOOTP/TFTP server on the same subnet as the RPi3 [ ] Packaging the redox kernel binary as a (fake) Linux binary using u-boot's mkimage tool [ ] Obtaining an FDT blob for the RPi3 (Linux's DTB can be used for this). In hindsight, u-boot might be able to provide this too (u-boot's own generated ) [ ] Serving the packaged redox kernel binary as well as the FDT blob to u-boot via BOOT/TFTP [x] Statically expressing a suitable PL011 UART's physical base address within Redox as an initial debug console `</pre> Note: I’ve already completed (as shown) two important steps, which I am going to describe on my next blog post (to keep you excited ;-) **Challenges with recursive paging for AArch64** @microcolonel is very fond of recursive paging. He seems to succesfully to make it work on qemu and it seems that it may be possible in sillicon as well. This is for 48-bit Virtual Addresses with 4 levels of translation. As AArch64 has separate descriptors for page tables and pages which means that in order for recursive paging to work there must not be any disjoint bitfields in the two descriptor types. This is the case today but it is not clear if this will remain in the future. The problem is that if recursive paging doesn’t work on the physical implementation that may time much longer than expected to port for the RPi3. Another point, is that as opposed to x86_64, AArch6 has a separate translation scheme for user-space and kernel space. So while x86_64 has a single cr3 register containing the base address of the trnslation tables, AArch64 has two registers, ttbr_el0 for user-space and ttbr_el1 for the kernel. In this realm, there has been @microcolonel’s work to extend the paging schemes in Redox to cope with this. **TLS, Syscalls and Device Drivers** The Redox kernel’s reliance on Rust’s #[thread_local] attribute results in llvm generating references to the tpidr_el0 register. On AArch64 tpidr_el0 is supposed to contain the user-space TLS region’s base address. This is separate from tpidr_el1 which is supposted to contain the kernel-space TLS region’s base address. To fix this, @microcolonel has modified llvm such that the use of a ‘kernel’ code-model and an aarch64-unknown-redox target results in the emission og tpidr_el1. TLS support is underway at present. **Device drivers and FDT** For the device driver operation using fdt it’s very important to note the following: <pre>`* It will be important to create a registry of all the device drivers present * All device drivers will need to implement a trait that requires publishing of a device-tree compatible string property * As such, init code can then match the compatible string with the tree of nodes in the device tree in order to match drivers to their respective data elements in the tree `</pre> ** ** **Availability of @microcolonel’s code base** As he still expects his employer’s open source contribution approval there are still many steps to be done to port Redox OS. The structure of the code to be published was also discussed. At present @microcolonel’s work is a set of patches to the following repositories: <pre>`* Top level redox checkout (build glue etc) * Redox kernel submodule (core AArch64 support) * Redox syscall's submodule (AArch64 syscall support) * Redox's rust submodule (TLS support, redox toolchain triplet support) `</pre> Possible ways to manage the publishing of this code were also discussed. One way is to create AArch64 branches for all of the above and push them out to the redox github. This is TBD with **@jackpot51**. **Feature parity with x86_64** It’s very important to stay aligned with the current x86_64 port and for that reason the following work is important to be underways: <pre>`* Syscall implementation * Context switch support * kmain -> init invocation * Filesystem with apps * Framebuffer driver * Multi-core support * (...) (to be filled with a whole list of the current x86_64 features) `</pre> _Attaining feature parity would be the first concrete milestone for the AArch64 port as a whole._ **My next steps** As a result of the discussion and mentoring, the following steps were decided for the future: <pre>`[x] Get to a point where u-boot can be built from source and installed on the RPi3 [x] Figure out the UART base and verify that the UART's data register can be written to from the u-boot CLI (which should provoke an immediate appearance of characters on the CLI) [ ] Setup a flow using BOOTP/DHCP and u-boot that allows Redox kernels and DTBs to be sent to u-boot over ethernet [ ] Once microcolonel's code has been published, start by hacking in the UART base address and a DTB blob [ ] Aim to reach kstart with println output up and running. `</pre> **Next steps for @microcolonel** <pre>`[ ] Complete TLS support [ ] Get Board and CPU identification + display going via DTB probes [ ] Verify kstart entry on silicon. microcolonel means to use the Lemaker Hikey620 Linaro 96Board for this. It's a Cortex-A53 based board just like the RPi3. The idea is to quickly check if recursive paging on silicon is OK. This can make wizofe's like a lot rosier. :) [ ] Make the UART base address retrieval dynamic via DTB (as opposed to the static fixed address used at present which isn't portable) [ ] Get init invocation from kmain going [ ] Implement necessary device driver identification traits and registry [ ] Implement GIC and timer drivers (Red Flag for RPi3 here, as it has no implementation of GIC but rather a closed propietary approach) [ ] Focus on user-land bring-up `</pre> **Future work** If we could pick up the most important plan for the future of Redox that would be a roadmap! Some of the critical items that should be discussed: <pre>`* Suitable tests and Continuous integration (perhaps with Jenkins) * A pathway to run Linux applications under Redox. FreeBSD's linuxulator (system call translator) would be one way to do this. This would make complex applications such as firefox etc usable until native solutions become available in the longer term. * Self hosted development. Having redox bootable on a couple of popular laptops with a focus on featurefulness will go a great way in terms of perception. System76 dual boot with Pop_OS! ? ;) * A strategy to support hardware assisted virtualization.
Thanks
Thanks for reading! Hope to see you next time here. For any questions feel free to email me: code -@- wizofe dot uk. Many many insights are taken from @microcolonel’s very detailed summary; The following part of the blog is my own experimentation and exploration on the discussed matters!
2 notes
·
View notes
Text
Synology DS920+ Review: The Best Power User NAS
Synology DS920+
9.00 / 10
Read Reviews
Read More Reviews
Read More Reviews
Read More Reviews
Read More Reviews
Read More Reviews
Read More Reviews
Read More Reviews
Read More Reviews


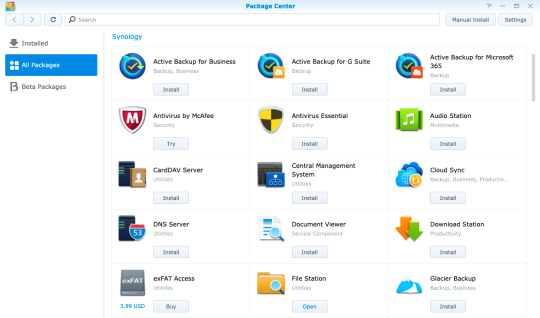

See on amazon
The DS920+ is an affordable NAS for the power user, capable of breezing through 4K video transcodes, running virtual machines, and Docker containers. The only disappointment is the lack of 2.5Gb Ethernet connectivity.
Specifications
Brand: Synology
CPU: Intel Celeron J4125 Quad-core 2GHz
Memory: 4GB, upgradeable to 8GB via single SO-DIMM slot
Drive Bays: Four (3.5" or 2.5")
Expansion: Five additional bays via eSATA
Ports: Dual Gigabit Ethernet, eSATA, 2 x USB3.0
Caching: Two m.2 SSD NVMe slots
OS: DSM6 (DiskStation Manager)
Pros
Powerful quad-core CPU and RAM upgradeable to 8GB
Great build quality and stylish design, with tool-less disk trays
User-friendly operating system
Great platform for Synology Moments, a Google Photos alternative
Cons
Gigabit LAN only, though at least there are two of them
Buy This Product
Synology DS920+ amazon
Shop
// Bottom var galleryThumbs1 = new Swiper('.gallery-thumbs-1', { spaceBetween: 10, slidesPerView: 10, freeMode: true, watchSlidesVisibility: true, watchSlidesProgress: true, centerInsufficientSlides: true, allowTouchMove: false, preventClicks: false, breakpoints: { 1024: { slidesPerView: 6, } }, }); // Top var galleryTop1 = new Swiper('.gallery-top-1', { spaceBetween: 10, allowTouchMove: false, loop: true, preventClicks: false, breakpoints: { 1024: { allowTouchMove: true, } }, navigation: { nextEl: '.swiper-button-next', prevEl: '.swiper-button-prev', }, thumbs: { swiper: galleryThumbs1 } });
Synology's latest four-bay DS920+ model is a powerhouse NAS designed for the pro user. While entry-level Network Attached Storage systems are great for serving files up and acting as a central backup, the Synology Plus series can do so much more. Especially for those looking to move away from cloud services, the DS920+ offers an affordable, scaleable, local alternative.
It's available without drives for around $550. Join us as we take a closer look at what makes the DS920+ the best NAS for the pro user.
youtube
DS920+ Specifications and Design
The Synology DS920+ is superficially identical to all the recent four-bay Synology devices, with a sleek black plastic exterior and distinctive bevel on all edges. Measuring 8.73 x 7.83 x 6.54 inches (223 x 199 x 166mm), it weighs 5lbs (2.25kg) without drives fitted.
Around the rear, you'll find dual Gigabit Ethernet ports, a USB3.0 port, and an eSATA connection. You'll probably want to save the USB port for use with an uninterruptible power supply. There's another USB3.0 port on the front of the device, useful for quickly plugging in an external disk that you need to pull files from.
The DS920+ uses the same toolless disk caddies that make fitting drives a breeze. But scratch beneath the surface and you'll find a few key differences to other models in the line-up.
Firstly, the internals. Fitted with a powerful quad-core 2GHz J4125 Intel Celeron CPU and 4GB of RAM, the 920+ can handle hardware transcoding of 4K video files, has virtualization support, and provides an AES-NI encryption engine for great performance when using secure folders. Synology states photo indexation as 25% faster than the previous generation DS918+ model.
Secondly, there's a lot of upgrade potential here for when you need to scale up.
On the underside of the device you'll find two m.2 SSD slots for NVMe caching drives. These can be used to significantly speed up random file operations.
Remove the drives and there's a single SO-DIMM memory upgrade slot tucked away just inside on the right. This can officially support up to a 4GB SO-DIMM module, which would give a total system memory potential of 8GB, and it's an inexpensive upgrade. I say "officially support" because many users have found higher memory modules are also recognized. The CPU lists 8GB as the maximum though, so anything beyond this may cause errors later down the line and isn't worth the risk; nor will Synology be able to support you if something goes wrong.
An eSATA port allows for connection to a drive expansion unit, such as the five-bay DX517. This adds potentially 80TB more. However, if you know you'll likely need more drives in the short term (and can afford it), purchasing a system with more built-in drive slots is always a better choice. The Synology NAS selector tool can help there. For most people, four bays is a good compromise. It allows for secure fault tolerance of a single disk, while still letting you take advantage of mixed drive sizes in a flexible Synology Hybrid RAID configuration.
Setting Up the DS920+
As with all of Synology's line-up, hardware installation and system setup are user-friendly and easy.
Starting with the hardware, you don't need any tools to install drives. Just pull out the drives, and pull off the plastic clips at the side. Slot the drive in, then push back the clips, and re-insert.
Once you've powered on the system, give it a moment, then navigate to find.synology.com from any desktop browser. This should find your new NAS, and you'll be guided through the initial set up. From there, you'll be greeted by the DiskStation Manager OS. It's a familiar-looking graphical environment that anyone who used Windows or Mac will feel at home with. You even get a start button in the top left.
Your first step should be to create a storage volume, which you can do using a helpful wizard after launching the Storage Manager. If you're new to Synology, or Networked Attached Storage in general, it's worth taking a moment to explain the Synology Hybrid RAID technology.
Synology Hybrid RAID
Hard drives can and do fail, and one of the biggest reasons to use a storage system with two or more drives is to allow for redundancy; that is, a drive can fail, and you won't lose any data. This called a Redundant Array of Inexpensive Disks (or RAID, for short). Different types of RAID exist, but the one we're usually concerned with is RAID5, in which data blocks are spread across the disks, as well as a parity block. The parity block lets you recover data if any of the actual data blocks are lost.
With standard RAID levels, you need to use disks that are all the same size. This makes it expensive to start, and inflexible when it comes to upgrading. While you can swap out a drive for a larger one, the additional space will be of no benefit. The key difference is that Synology Hybrid RAID offers the same one disk fault tolerance (or two, if you're particularly risk-averse), but you can mix and match drive sizes. Regardless of what disks you're working with, the Synology software will intelligently optimize your array to use your available space most efficiently. Use the RAID calculator to estimate how much more space you'd get in an SHR configuration compared to standard RAID level.
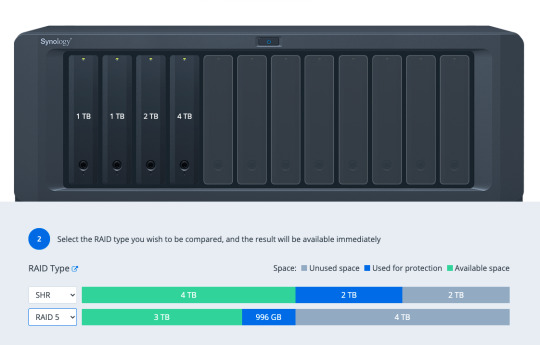
Adding or upgrading a drive is also simple: the only rule is that the drive should be at least as big as the largest drive currently installed in the system. This makes upgrading your storage very budget-friendly.
Once you've created your storage volume, you can begin setting up shared folders from the Control Panel, and install software packages from Package Center.
Virtual Machine and Docker Support
There's a huge range of first and third-party software available, including the incredible Synology Moments, a local photo management solution that offers AI image analysis similar to Google Photos. One quick note is that if you're planning to install Plex, it's best to do so by downloading the latest version directly from Plex, and using the manual install process. The version on Synology Package Center lags behind.
In addition, both Synology's own Virtual Machine Manager hypervisor software and Docker are officially supported on the Plus series, opening up even more virtualized server systems to run on your home NAS.
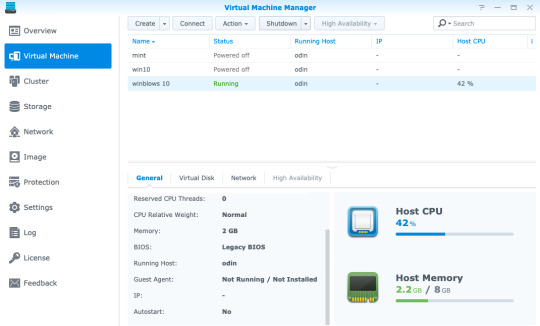
Virtual Machine Manager works with a variety of operating systems—even Windows 10—so if you need a secure test environment for some software you're unsure of, you can simply boot it in a safely contained VM, all from within your browser. Of course, you won't be gaming on this or replacing your regular desktop anytime soon, but it's still useful to have a virtual machine running through a web browser anywhere on your network. Just add the ISO, spin up a new instance, and walk through the usual install process.
Docker is another beast entirely, and far too broad of a topic to delve into in this review if you're unfamiliar. Learn more about Docker in our guide, but the one-sentence summary would be: a Docker image is a virtual application that runs within a completely safe and sandboxed container. All you need to do is set some variables, point it to a data directory, and boot it up. Docker containers don't run an entire operating system, so they use significantly less memory than a full Virtual Machine. While you can typically run a single virtual machine at a time, you can have tens of Docker containers running 24/7 without impacting the performance of your system.
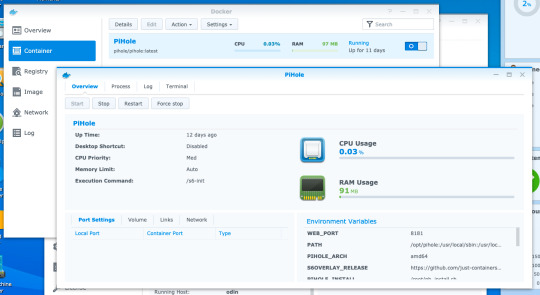
The range of Docker containers available is immense. If you've ever thought "wouldn't it be cool to run a whatever server at home?", chance are someone has made a Docker image already.
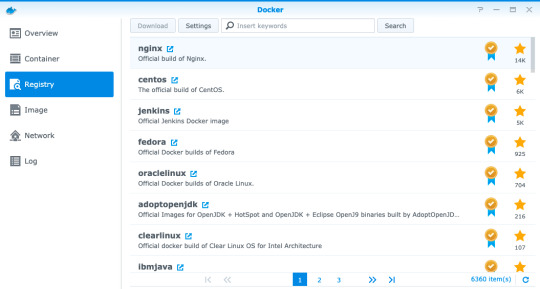
For instance, I had a Dockerized instance of Pi-Hole set up in ten minutes. It's a DNS server with built-in ad-blocking, originally designed to run on a Raspberry Pi. It was trivial to install and uses a minimal amount of memory, requiring only the creation of a few data directories and passing in some variables.
If you're looking at upgrading your home Wi-Fi to a Unifi enterprise system, you might be frustrated at the prospect of having to plug in a hardware dongle to act as the network controller. You'll be pleased to know that a Dockerized Unifi controller can be used instead.
Performance
Official performance figures for the DS920+ put total file throughput available at around 225MB/s read and slightly lower writer speeds, but this is when using the dual-Gigabit Ethernet ports in a link-aggregated configuration. In reality, this means any single Gigabit client device will achieve around 100 to 115MB/s, which our real-world tests confirmed.
Using faster drives will not improve this, and if you're on Wi-Fi rather than a wired Gigabit Ethernet connection, you may get even slower speeds. Ultimately, your network (and the Gigabit ports on the DS920+) are the limiting factor here when it comes to the performance of file access over the network—not the CPU, RAM, or speed of the drives you put in it.
NVMe Caching
One of the standout upgrade options on the 920+ is the two NVMe drive slots on the underside of the device. NVMe is a new generation of Solid State Drive (SSD) that looks a bit like a memory stick. But don't confuse their existence as yet another place to add storage drives to. The m.2 NVMe slots are limited to use as a caching system, and cannot be used to expand a storage volume.
A single NVMe drive allows you to create a read-only cache, while a pair of drives can be used for read-write caching. This creates a RAID1 array of SSDs to ensure there are no data errors in data being written back to your storage array from the cache.
We should note however that not everything you do on a NAS will benefit from NVMe caching. Specifically, it won't help with large sequential read/write operations, which are one of the main uses of a NAS. This also means it won't help with serving up video files for a Plex server. What they will help with is random read/write operations, such as those in a virtual machine, database, or other server package running on the NAS.
For this reason, it's difficult to measure actual performance gains from NVMe caching: simply copying files to and from the device would show no difference. Instead, if you have an SSD-cache capable device, I'd recommend opening up the Storage Manager -> SSD Cache -> SSD Cache Advisor to see if you might benefit, and what size cache drive is recommended.
There are a few other things you should know about using an SSD cache.
First, don't remove the hardware without removing the cache from the volume first, even when the device is powered off. There's a warning message if you power off from DSM to remind you of this.
Second, NVMe drives are quite pricey, and considered consumables. The error rate on SSDs increases with age and usage, though DiskStation Manager will warn you when the drives are degraded. Synology's own SNV3400 NVMe drive that we used for testing are rated to 500TBW (TeraBytes Written), which is well above the industry average. While you can fit cheaper NVMe drives from competitors, they will need to be replaced more quickly, or may result in data corruption.
Lastly, caching systems use memory too. This works out to around 50MB for a 128GB SSD.
Should You Buy The DS920+?
The DS920+ is the best, affordable, scaleable NAS for the professional home user that values their data. It's a beast of a machine that will handle everything you throw at it with ease—whether that's running your own server software via Docker containers, handling your home security via Surveillance Station, or keeping decades of family photos safe in Synology Moments. Most importantly, it'll do so within the Synology ecosystem. That means easy-to-use software, reliable hardware, and excellent support if you need it. In fact, Synology guarantees their Plus series devices for three years, compared to two years for other models. In addition, software updates are usually provided for seven years.
Synology isn't the cheapest NAS manufacturer out there. You could certainly get faster hardware at a similar price point elsewhere, but you wouldn't benefit from any of the exclusive technologies such as Synology Hybrid RAID that makes efficient use of mixed disk sizes, nor the fantastic range of first-party software. You could even roll your own budget NAS with open-source software like FreeNAS or unRAID, but I wouldn't recommend putting anything too important on there. I've trusted Synology with my data for many years now, and it's never let me down.
The only real disappointment with the hardware is the lack of Multi-Gigabit Ethernet connectivity. While link-aggregated dual-Gigabit connection means you can have full Gigabit performance to multiple clients, it doesn't help to speed up performance to any single client. This matters if you want to use your NAS for video editing, and we may find multi-gig LAN connections more common in the coming years. For typical users though, Gigabit connectivity is plenty fast enough for things like streaming 4K video.
What Exactly Can You Do with a Synology NAS?
More broadly speaking, you might be wondering what you can actually do with a Network Attached Storage system. A Synology NAS has always been a central part of my home network, and it's one of a few devices that I'd class as essential to my work and family life.
Backup
Synology NAS can be a central point of backup for everything in your home, whether that's your family photos spread across multiple smartphones, that Windows folder with all those important documents, or a Mac OS Time Machine archive.
If you don't have a backup, then you haven't experienced data loss (yet)—it's only a matter of time. Of course, a NAS shouldn't be your only backup point, but if you have a friend or family member with their own NAS too, you can act as an off-site backup point for each other! Synology makes this easy to set up with HyperBackup.
It's not just backups either. Synology Drive can keep files in sync across your devices, so you always have the latest copy of a file to work with.
Shared Folders and Media Management
Having a shared folder or two makes your digital home life a lot easier—I can't remember the last time I had to transfer some files using a USB disk! But this is especially true if you have a large archive of media. Plex is the best media management software around, and it runs natively on a Synology NAS. It'll let you keep all your media files in one place, then play them anywhere with a single unified and rich interface.
Those looking to move away from Google Photos after the recent pricing and policy changes will be delighted to hear about Synology Moments. Offering easy import of photos from your smartphone, browser, or existing photo archive, Moments takes advantage of the fast CPU in the DS920+ to perform AI analysis of your photos. It automatically identifies people and subjects so you can easily browse and locate those special memories.
Your Own Server
Fancy running your own web development server? Perhaps a Calibre server to automatically convert all your eBooks? PiHole to block all ads at a network level? Surveillance Station to record from your IP security cameras?! With hundreds of native software packages and even more available through Docker, the DS920+ can run it all.
Energy Efficiency
The other benefit of running a NAS as opposed to using a spare computer is that of power consumption. Peaking at less than 40W of power, the DS920+ manages to do an awful lot with very little energy impact. This means you can leave it running all day, ready for when you need it and working away in the background to keep your data safe.
Synology DS920+ Review: The Best Power User NAS published first on http://droneseco.tumblr.com/
0 notes
Text
Best Remote Access Software
email marketing html templates
Disclosure: This content is reader-supported, which means if you click on some of our links that we may earn a commission.
Have you ever been in your office and realized the files you need are on your home computer? Maybe you’re working remotely or meeting a client, but need to access an app from your office PC.
With remote access software, you can view or access another computer from anywhere in the world.
This functionality is extremely versatile. You might use it to log into a client’s computer and help them overcome technical questions. Or you can share your screen with colleagues as you run a demo on your device. You can also transfer files between two computers without having to go through email or file-sharing software—even from unattended devices.
It’s a common misconception that remote access software is only for help desks, but these tools can be used by anyone.
Which remote access software is the best? After researching and testing dozens of options, I’ve narrowed down my list to five that I can recommend with conviction.
The Top 5 Options For Remote Access Software
Parallels Access
TeamViewer
Remote Utilities
Zoho Assist
LogMeIn Pro
How to Choose the Best Remote Access Software For You
Finding the right remote access software can be tough if you don’t know what to look for. But there are certain feature sets and considerations that must be evaluated as you’re comparing different options.
I’ll break these factors down into greater detail below, so you can make an informed buying decision.
Compatible Devices
The first thing you need to do is figure what types of devices and operating systems you’ll be using. All of the best remote access tools should have cross-platform access.
Examples include Mac, Windows, Linux, Chrome OS, Android, iOS, BlackBerry, Raspberry Pi, Windows Mobile, etc.
With that said, if you’re just using the remote access software for personal use or for a small team, you might not need a tool that’s compatible with every device under the sun—just the device’s that you’re using. But if you need remote access software to assist clients or thousands of employees, you’ll want to have more versatility.
Security
When it comes to remote access, security will always be a top concern. Is it really that easy for a third party to just access your devices? What type of sensitive information will they have access to?
Software vendors understand this concern. That’s why they add security features like 256-bit encryption, one-time access codes, two-factor authentication, etc. Always make sure that the remote access software you’re evaluating meets any industry-specific security requirements, such as HIPAA for healthcare.
Number of Devices
Not every remote access software is built to scale. If you’re deploying it with a team of five employees, you likely won’t be using the same software as an SME that needs the software to access 500 or 5,000 devices.
All plans will have limitations in terms of device quantities.
You might come across certain tools with unlimited user access. But unlimited users and unlimited devices are two different things. So be prepared to purchase additional licenses if you have a larger team and need the software on lots of devices.
Functionality
The term “remote access” is pretty broad. Within that category, there are lots of potential functionalities and use cases for the software.
Features to keep an eye out for include third-party integrations, remote printing, multiple monitor access, file sharing, live chat, screen recording, unattended access, etc.
You don’t necessarily need all of these features. It’s just a matter of how you plan to use the software for your personal and business needs. There’s no reason to pay extra for plans with extensive feature lists that you’ll never actually use.
Support
Generally speaking, remote access software should be fairly easy to deploy. But certain solutions are a bit more complicated, especially at scale.
If you need assistance with the setup process, the software vendor should be there to make sure things go smoothly for you. When something goes wrong or if you have questions, you don’t want to be left on an island to figure it out by yourself.
For those of you who have a dedicated IT team, they should be able to manage everything without an issue. But not every business has those in-house resources, so support from the software provider should be a top priority.
The Different Types of Remote Access Software
Not every remote access solution is the same. This software can be segmented into a handful of different categories. However, some software will offer a combination of these types within a single solution.
On-Demand Access
On-demand tools require permission to gain access. Let’s say an IT agent wanted to help a remote employee with a problem on their computer, that employee would need to grant the IT team access in order for them to view and take actions on the screen.
In short, two people must be present (one on each device) for on-demand access software to work.
Unattended Access
Unattended remote access software is the opposite of on-demand. This solution allows you to access devices even if nobody on the other computer.
In most cases, people use unattended access software for their personal devices. For example, you could be in the office and access a presentation, file, or application on your home computer.
But a prospect or client wouldn’t give you unattended access to their personal devices. You’d have to get permission every time (on-demand access).
Cloud-Based Remote Access Software
A cloud-based remote access solution doesn’t need to be installed locally on the device. This is also known as browser-based remote access software.
For example, let’s say you’re trying to access the device of a client to help them troubleshoot a software issue. Or maybe you want a prospect to view your screen as you run a demo. These users shouldn’t be forced to install anything locally. Access to the device can be granted using a web-based link.
Installation-Based Remote Access Software
As the name implies, an installation-based remote access solution must be installed locally on a device to work.
All unattended access software must be installed on at least one device. Otherwise, there would be no way for you to gain access since a person won’t be there to grant permission.
Help Desk Software
Help desk software is in a category of its own. It’s worth noting that not every help desk solution comes with remote access capabilities. Lots of times, help desk software is used for things like ticket support and customer service.
However, some help desk tools do offer remote access functions. This feature is prominent in IT help desk software, designed for in-house support.
#1 – Parallels Access Review — Best For Remote Desktop Access
Parallels Access is a quick, simple, and reliable way to access your computer from anywhere. It’s one of the best ways to retrieve all of your files and applications, no matter where you are in the world.
With just a few clicks, you can connect to your desktop from any mobile device or web browser.
Parallels Access is feature-rich and extremely versatile. Let’s take a closer look at why this software ranks so high on my list:
Access your computer from any web browser with no additional hardware required
Use full-screen applications
Gain full access over PC applications, as if they were installed locally
The software is fully optimized for screen resolution and optimal readability
Access files on remote computers or files stored in the cloud
Manage files by sorting, copying, renaming, deleting, etc.
Ability to share files with friends and co-workers
Copy/paste text and edit files remotely
If you’re going to install Parallels Access on your computers, then I strongly recommend getting the mobile app for your smartphone or tablet. Then your computer can essentially be in your pocket at all times.
Don’t have the smartphone with you? No problem. Just log-in securely to your Parallels Access account from any browser to gain the same access.
Plans for single users and up to five computers start at $19.99 per year. Business plans for unlimited users start at $49 per year.
#2 – TeamViewer Review — The Best For macOS and iOS
More than 2 billion devices are connected to TeamViewer, making it one of the most popular remote access solutions in the world. This software has quickly become a top choice for remote work.
TeamViewer has a wide range of solutions. In addition to remote access, they have tools for remote support, mobile device support, remote assistance for IoT, remote monitoring and patch management, global video conferencing, and more.
Years ago, PCs were the device of choice for business use. So when it came to supporting Macs and iOS devices, most software on the market wasn’t compatible. This was a problem for assisting clients and employees using Apple products.
But TeamViewer became a pioneer in the remote access space for Macs, iPads, and iPhones.
Cross-platform access to iOS, macOS, Windows, Linux, and Android
Enterprise-grade security and a VPN alternative
Remote printing capabilities
Easy to install and set up unattended access
Admins can use it to access remote servers
Mobile app available for iOS and Android devices
In-session collaborations for co-workers and tech support
Custom modules with company logos and branding
Centralized management console and device reporting
Today, lots of other remote access tools support Apple devices. But not all of them do it as well as TeamViewer. Individuals can download it for free. Businesses can request a 14-day commercial trial before buying a license.
#3 – Remote Utilities Review — Best Remote Access For IT Teams
Remote Utilities is a bit unique compared to some of the other tools on our list. This software is built specifically for IT help desks.
The tool gives your team total control over your IT infrastructure.
Here’s an overview of the software’s noteworthy highlights:
Download on Windows, Mac, Linux, iOS, and Android
File transfer mode
Two-factor authentication (2FA)
Unattended access to remote servers and workstations
Remote access using LAN or VPN
Deploy the program in an active directory network
Proxy server support
You can use a single PC on your LAN as a gateway to peers on the same network
Easy to scale as large as you need it to be
No mandatory, automatic, or unexpected upgrades
Custom configurations, even for the most demanding IT requirements
Again, Remote Utilities isn’t designed for the average Joe or small business owners. This solution is for IT teams and users with more advanced needs. It’s a little bit more complex than some of the other tools on our list, but it gets the job done for technically inclined users.
Pricing starts at $99 with up to 20 endpoints per tech.
#4 – Zoho Assist Review — Best For Customer Support
Zoho Assist is a web-based remote support solution for businesses. It’s the best way to provide your customers with support through on-demand remote access.
The software also has the capability to manage unattended access sessions for in-house devices on PCs, laptops, servers, and mobile devices.
Zoho Assist is trusted by businesses across a wide range of industries. Whether your company is large or small, this software can accommodate your needs.
Let’s take a closer look at the features, benefits, and noteworthy highlights of Zoho Assist:
On-demand remote support for troubleshooting with no prior installation
Integrated voice and video chat for enhanced customer support
Unattended remote access inside and outside your LAN
Mass deployment options available (supports Windows and Mac)
Secure file transfers with SSL 256-bit AES encryption
Multiple monitor support and automatically detect active monitors
Reboot and reconnect remote desktops from anywhere with a single click
The software is great for customer support, IT help desks, and outsourced MSP support.
Plans start at $8 per month for a single technician. The unattended access solution must be purchased separately from the remote support software. This also starts at $8 per month and includes 25 unattended computers. You can try Zoho Assist for free with a 15-day trial; no credit card required.
#5 – LogMeIn Pro Review — Best For Anytime File and Application Access
If you’re looking for a simple way to access files and apps on your computer from anywhere, LogMeIn Pro is the clear winner. The software is easy to use, secure, and extremely reliable.
It’s a popular choice for SMBs across all industries.
Let’s take a closer look at the software’s features to see why it comes so highly recommended:
Simple step-by-step setup instructions for easy deployment
Access your remote desktop as if you were in front of the screen
Unlimited users and instant collaboration
Free access to LastPass to store and manage all passwords
Multiple monitor display view on a 1:1 local screen
Remote printing functionality
1 TB of file storage to access and share from anywhere
Quick access to frequently visited websites, cloud apps, and desktop apps
Remote access on the go with the LogMeIn Pro mobile app
Plans for individual users start at $30 per month. This gives you access to two computers. To access up to ten computers, you’ll need a small business license, starting at $129 per month.
Summary
Which remote access software is the best? It depends on what you’ll be using it for.
Between Parallels Access, TeamViewer, Remote Utilities, Zoho Assist, and LogMeIn Pro, I know that one of these tools can accommodate your needs.
Just use the methodology I described earlier in the guide to help you choose the right option for your business. There’s something for everyone on my list.
FaceBook
0 notes
Text
Best Remote Access Software
Disclosure: This content is reader-supported, which means if you click on some of our links that we may earn a commission.
Have you ever been in your office and realized the files you need are on your home computer? Maybe you’re working remotely or meeting a client, but need to access an app from your office PC.
With remote access software, you can view or access another computer from anywhere in the world.
This functionality is extremely versatile. You might use it to log into a client’s computer and help them overcome technical questions. Or you can share your screen with colleagues as you run a demo on your device. You can also transfer files between two computers without having to go through email or file-sharing software—even from unattended devices.
It’s a common misconception that remote access software is only for help desks, but these tools can be used by anyone.
Which remote access software is the best? After researching and testing dozens of options, I’ve narrowed down my list to five that I can recommend with conviction.
The Top 5 Options For Remote Access Software
Parallels Access
TeamViewer
Remote Utilities
Zoho Assist
LogMeIn Pro
How to Choose the Best Remote Access Software For You
Finding the right remote access software can be tough if you don’t know what to look for. But there are certain feature sets and considerations that must be evaluated as you’re comparing different options.
I’ll break these factors down into greater detail below, so you can make an informed buying decision.
Compatible Devices
The first thing you need to do is figure what types of devices and operating systems you’ll be using. All of the best remote access tools should have cross-platform access.
Examples include Mac, Windows, Linux, Chrome OS, Android, iOS, BlackBerry, Raspberry Pi, Windows Mobile, etc.
With that said, if you’re just using the remote access software for personal use or for a small team, you might not need a tool that’s compatible with every device under the sun—just the device’s that you’re using. But if you need remote access software to assist clients or thousands of employees, you’ll want to have more versatility.
Security
When it comes to remote access, security will always be a top concern. Is it really that easy for a third party to just access your devices? What type of sensitive information will they have access to?
Software vendors understand this concern. That’s why they add security features like 256-bit encryption, one-time access codes, two-factor authentication, etc. Always make sure that the remote access software you’re evaluating meets any industry-specific security requirements, such as HIPAA for healthcare.
Number of Devices
Not every remote access software is built to scale. If you’re deploying it with a team of five employees, you likely won’t be using the same software as an SME that needs the software to access 500 or 5,000 devices.
All plans will have limitations in terms of device quantities.
You might come across certain tools with unlimited user access. But unlimited users and unlimited devices are two different things. So be prepared to purchase additional licenses if you have a larger team and need the software on lots of devices.
Functionality
The term “remote access” is pretty broad. Within that category, there are lots of potential functionalities and use cases for the software.
Features to keep an eye out for include third-party integrations, remote printing, multiple monitor access, file sharing, live chat, screen recording, unattended access, etc.
You don’t necessarily need all of these features. It’s just a matter of how you plan to use the software for your personal and business needs. There’s no reason to pay extra for plans with extensive feature lists that you’ll never actually use.
Support
Generally speaking, remote access software should be fairly easy to deploy. But certain solutions are a bit more complicated, especially at scale.
If you need assistance with the setup process, the software vendor should be there to make sure things go smoothly for you. When something goes wrong or if you have questions, you don’t want to be left on an island to figure it out by yourself.
For those of you who have a dedicated IT team, they should be able to manage everything without an issue. But not every business has those in-house resources, so support from the software provider should be a top priority.
The Different Types of Remote Access Software
Not every remote access solution is the same. This software can be segmented into a handful of different categories. However, some software will offer a combination of these types within a single solution.
On-Demand Access
On-demand tools require permission to gain access. Let’s say an IT agent wanted to help a remote employee with a problem on their computer, that employee would need to grant the IT team access in order for them to view and take actions on the screen.
In short, two people must be present (one on each device) for on-demand access software to work.
Unattended Access
Unattended remote access software is the opposite of on-demand. This solution allows you to access devices even if nobody on the other computer.
In most cases, people use unattended access software for their personal devices. For example, you could be in the office and access a presentation, file, or application on your home computer.
But a prospect or client wouldn’t give you unattended access to their personal devices. You’d have to get permission every time (on-demand access).
Cloud-Based Remote Access Software
A cloud-based remote access solution doesn’t need to be installed locally on the device. This is also known as browser-based remote access software.
For example, let’s say you’re trying to access the device of a client to help them troubleshoot a software issue. Or maybe you want a prospect to view your screen as you run a demo. These users shouldn’t be forced to install anything locally. Access to the device can be granted using a web-based link.
Installation-Based Remote Access Software
As the name implies, an installation-based remote access solution must be installed locally on a device to work.
All unattended access software must be installed on at least one device. Otherwise, there would be no way for you to gain access since a person won’t be there to grant permission.
Help Desk Software
Help desk software is in a category of its own. It’s worth noting that not every help desk solution comes with remote access capabilities. Lots of times, help desk software is used for things like ticket support and customer service.
However, some help desk tools do offer remote access functions. This feature is prominent in IT help desk software, designed for in-house support.
#1 – Parallels Access Review — Best For Remote Desktop Access
Parallels Access is a quick, simple, and reliable way to access your computer from anywhere. It’s one of the best ways to retrieve all of your files and applications, no matter where you are in the world.
With just a few clicks, you can connect to your desktop from any mobile device or web browser.
Parallels Access is feature-rich and extremely versatile. Let’s take a closer look at why this software ranks so high on my list:
Access your computer from any web browser with no additional hardware required
Use full-screen applications
Gain full access over PC applications, as if they were installed locally
The software is fully optimized for screen resolution and optimal readability
Access files on remote computers or files stored in the cloud
Manage files by sorting, copying, renaming, deleting, etc.
Ability to share files with friends and co-workers
Copy/paste text and edit files remotely
If you’re going to install Parallels Access on your computers, then I strongly recommend getting the mobile app for your smartphone or tablet. Then your computer can essentially be in your pocket at all times.
Don’t have the smartphone with you? No problem. Just log-in securely to your Parallels Access account from any browser to gain the same access.
Plans for single users and up to five computers start at $19.99 per year. Business plans for unlimited users start at $49 per year.
#2 – TeamViewer Review — The Best For macOS and iOS
More than 2 billion devices are connected to TeamViewer, making it one of the most popular remote access solutions in the world. This software has quickly become a top choice for remote work.
TeamViewer has a wide range of solutions. In addition to remote access, they have tools for remote support, mobile device support, remote assistance for IoT, remote monitoring and patch management, global video conferencing, and more.
Years ago, PCs were the device of choice for business use. So when it came to supporting Macs and iOS devices, most software on the market wasn’t compatible. This was a problem for assisting clients and employees using Apple products.
But TeamViewer became a pioneer in the remote access space for Macs, iPads, and iPhones.
Cross-platform access to iOS, macOS, Windows, Linux, and Android
Enterprise-grade security and a VPN alternative
Remote printing capabilities
Easy to install and set up unattended access
Admins can use it to access remote servers
Mobile app available for iOS and Android devices
In-session collaborations for co-workers and tech support
Custom modules with company logos and branding
Centralized management console and device reporting
Today, lots of other remote access tools support Apple devices. But not all of them do it as well as TeamViewer. Individuals can download it for free. Businesses can request a 14-day commercial trial before buying a license.
#3 – Remote Utilities Review — Best Remote Access For IT Teams
Remote Utilities is a bit unique compared to some of the other tools on our list. This software is built specifically for IT help desks.
The tool gives your team total control over your IT infrastructure.
Here’s an overview of the software’s noteworthy highlights:
Download on Windows, Mac, Linux, iOS, and Android
File transfer mode
Two-factor authentication (2FA)
Unattended access to remote servers and workstations
Remote access using LAN or VPN
Deploy the program in an active directory network
Proxy server support
You can use a single PC on your LAN as a gateway to peers on the same network
Easy to scale as large as you need it to be
No mandatory, automatic, or unexpected upgrades
Custom configurations, even for the most demanding IT requirements
Again, Remote Utilities isn’t designed for the average Joe or small business owners. This solution is for IT teams and users with more advanced needs. It’s a little bit more complex than some of the other tools on our list, but it gets the job done for technically inclined users.
Pricing starts at $99 with up to 20 endpoints per tech.
#4 – Zoho Assist Review — Best For Customer Support
Zoho Assist is a web-based remote support solution for businesses. It’s the best way to provide your customers with support through on-demand remote access.
The software also has the capability to manage unattended access sessions for in-house devices on PCs, laptops, servers, and mobile devices.
Zoho Assist is trusted by businesses across a wide range of industries. Whether your company is large or small, this software can accommodate your needs.
Let’s take a closer look at the features, benefits, and noteworthy highlights of Zoho Assist:
On-demand remote support for troubleshooting with no prior installation
Integrated voice and video chat for enhanced customer support
Unattended remote access inside and outside your LAN
Mass deployment options available (supports Windows and Mac)
Secure file transfers with SSL 256-bit AES encryption
Multiple monitor support and automatically detect active monitors
Reboot and reconnect remote desktops from anywhere with a single click
The software is great for customer support, IT help desks, and outsourced MSP support.
Plans start at $8 per month for a single technician. The unattended access solution must be purchased separately from the remote support software. This also starts at $8 per month and includes 25 unattended computers. You can try Zoho Assist for free with a 15-day trial; no credit card required.
#5 – LogMeIn Pro Review — Best For Anytime File and Application Access
If you’re looking for a simple way to access files and apps on your computer from anywhere, LogMeIn Pro is the clear winner. The software is easy to use, secure, and extremely reliable.
It’s a popular choice for SMBs across all industries.
Let’s take a closer look at the software’s features to see why it comes so highly recommended:
Simple step-by-step setup instructions for easy deployment
Access your remote desktop as if you were in front of the screen
Unlimited users and instant collaboration
Free access to LastPass to store and manage all passwords
Multiple monitor display view on a 1:1 local screen
Remote printing functionality
1 TB of file storage to access and share from anywhere
Quick access to frequently visited websites, cloud apps, and desktop apps
Remote access on the go with the LogMeIn Pro mobile app
Plans for individual users start at $30 per month. This gives you access to two computers. To access up to ten computers, you’ll need a small business license, starting at $129 per month.
Summary
Which remote access software is the best? It depends on what you’ll be using it for.
Between Parallels Access, TeamViewer, Remote Utilities, Zoho Assist, and LogMeIn Pro, I know that one of these tools can accommodate your needs.
Just use the methodology I described earlier in the guide to help you choose the right option for your business. There’s something for everyone on my list.
The post Best Remote Access Software appeared first on Neil Patel.
Original content source: https://ift.tt/2HT5WKN via https://neilpatel.com The post, Best Remote Access Software, has been shared from https://ift.tt/3itwzmb via https://ift.tt/2r0Go64
0 notes