#tutorial camtasia studio
Explore tagged Tumblr posts
Visit Tumblr Blog
Explore Tumblr blogs with no restrictions, modern design and the best experience.
Last Seen Tumblr Blogs


Fun Fact
Tumblr.com rank in the US is 25.
Note
hi!! i love all the gifs you make of older games (even reminding me of games i used to play but since forgotten. ive gotten some nice memories back. thank you so much for that! <3). ive kinda been wanting to get into gif making myself, but all the resources i find dont list what program is used or the program doesnt give good results. i was wondering what program(s) you use to make your gifs and how you like how they come out vs how you wish they come out? i tried looking for a faq but couldnt find one. if you do have it listed somewhere my apologies!
Aaaw I'm super glad to hear that!! I also love replaying games I used to play as a kid, it brings so many good memories hehe ✨💖✨💖
I actually made a tutorial on my process a couple of months ago! (I should put it on my pin LMAO), but to keep it short, for gif editing I use Photoshop 2020, and for recording I use various programs depending on what I'm making a gif of (DesMuMe for DS games, OBS studio or Camtasia Studio 9 for other games). Having a hq recording is the very first step to make a nice gif, if the quality is bad you won't be able to make it better no matter what.
The second most important step is knowing the limits. You have almost total freedom to make gorgeous gifs... if you are not going to post them anywhere. But if you want to show them on Tumblr you have to take into account that there's a limit of 10MB for the file size and 540px for the image's width (Photoshop also has a limit of 500 frames in total). When you've made enough gifs you kinda intuitively know when something is going to be too big or require a lot of editing, but generally, the more information there's in a gif, the heavier it will be. Long gifs, gifs with lots of colors, gifs with lots of details, etc. will cause the biggest problems and those are the gifs that will not come out like you wanted.
I know there are people out there who make incredible gifs with cool layouts and pretty effects, but those take a lot of patience and determination and I have none of those "OTL Nowadays I mostly focus on DS games because they're the easiest to make and don't cause many problems, so my expectations are pretty much equal to the end result. But when I make gifs of Wii, 3DS or PC games I have to lower my expectations a lot, and more often than not I can't even make what I want because I have to sacrifice the quality.
So yeah, depending on what you want to make a gif of, lowering your expectations and learning to work within the tight limits it's going to be part of the process :( But there are many workarounds to get your gifs to look as closely as you can to your expectations, it just takes more patience! At the end of that tutorial I wrote a couple of recommendations to reduce the file size, so make sure to check it out and see if it helps!
And don't feel discouraged!! Making gifs is not very pleasant at the beginning because the process is tedious and not very intuitive but once you get used to it and know your abcs the results are very rewarding ❤💕❤
#asks#and ofc if you need help with anything more specific feel free to send another ask or dm me! i'm always glad to help 💞💞💞
15 notes
·
View notes
Text
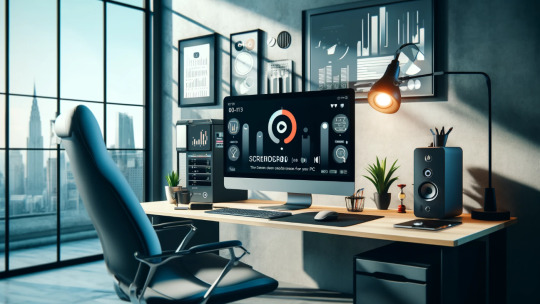
The Best Screen Recorders with Audio for Your PC
Recording your screen along with audio can be a game-changer for creating tutorials, recording gameplay, or conducting online classes. Having the right screen recorder that captures both video and audio seamlessly is essential for producing high-quality content. Let’s explore some of the best options available, highlighting ScreenRec for its efficiency and ease of use, along with other noteworthy tools.
What Makes a Great Screen Recorder with Audio?
When selecting a screen recorder with audio capabilities, consider the following:
Ease of Use: The tool should be intuitive and user-friendly.
Video and Audio Quality: High-definition video and clear audio without lag or desynchronization.
Editing Features: Tools for basic to advanced editing of your recordings.
Sharing Options: Easy and secure sharing capabilities.
Cost: Evaluate the balance between features offered and affordability.
Top Screen Recorders with Audio for PC
ScreenRec: ScreenRec stands out for its simplicity and powerful features. It allows you to capture high-quality video and audio effortlessly. One of its best features is instant sharing through a secure cloud link, which is perfect for quick communication and collaboration. ScreenRec is free, with unlimited recording time once you create a free account, making it a budget-friendly choice. Its user-friendly interface ensures that even non-tech-savvy users can start recording with ease. Additionally, ScreenRec encrypts all recordings, ensuring that your data remains secure.
OBS Studio: Open Broadcaster Software (OBS) Studio is a free and open-source screen recording tool known for its extensive features and customizability. It's particularly popular among gamers and live streamers for its ability to handle multiple sources and live stream directly to platforms like Twitch and YouTube. OBS Studio supports high-quality video and audio recording but comes with a steeper learning curve due to its vast array of features.
Camtasia: Camtasia is a premium screen recording tool that offers a comprehensive suite of editing features, such as annotations, transitions, and effects. It's perfect for creating polished, professional videos. Camtasia supports both screen and audio recording, making it a great choice for producing detailed tutorials and marketing videos. Despite its higher price tag, its advanced capabilities make it a worthwhile investment for those who need detailed editing options.
Bandicam: Bandicam is favored for its ability to record high-quality video, particularly for gameplay. It supports high FPS recording and includes features like real-time drawing and webcam overlay. Bandicam also supports audio recording, capturing both system sound and microphone input. It’s ideal for users who prioritize video quality and detailed recording options.
ShareX: ShareX is a free, open-source screen recorder that offers various capture methods, including full screen, window, and region. It also provides a range of editing and sharing tools. ShareX supports audio recording, though setting it up might require some additional steps compared to more user-friendly tools like ScreenRec. ShareX is suitable for users who appreciate customization and don’t mind a bit of a learning curve.
Why ScreenRec Stands Out
ScreenRec excels in providing a seamless recording experience with minimal setup. Its user-friendly interface ensures that even those who aren't tech-savvy can start recording with ease. The instant sharing feature, combined with secure cloud storage, ensures that your recordings are always accessible and easy to distribute. For users needing a reliable, no-cost solution that doesn’t compromise on features, ScreenRec is an excellent choice.
Final Thoughts
Choosing the right screen recorder with audio capabilities depends on your specific needs. If you’re looking for a simple, effective, and free tool, ScreenRec is highly recommended. For more advanced features and professional editing, Camtasia and Bandicam are excellent options. OBS Studio and ShareX provide powerful features for free, though they come with a learning curve. Regardless of your choice, having a reliable screen recorder will enhance your productivity and communication.
5 notes
·
View notes
Text
How to Make Money on YouTube Without Showing Your Face
YouTube has become a lucrative platform for content creators, but not everyone is comfortable being on camera. If you’re shy, prefer privacy, or simply want to focus on content rather than personality, you can still upload your video on YouTube and earn money. Many successful YouTubers make six-figure incomes without ever revealing their identity. Whether you want to create educational content, animations, or automated videos, there are plenty of ways to generate revenue without showing your face.
In this guide, we’ll explore different types of faceless YouTube channels, how to create engaging content, and effective strategies to monetize your videos.
Why Start a Faceless YouTube Channel?
Starting a YouTube channel without appearing on camera comes with several advantages:
Privacy and Anonymity – You don’t have to worry about public attention or criticism.
Lower Production Costs – No need for expensive cameras, lighting, or makeup.
Time Efficiency – No need to rehearse or record multiple takes of yourself speaking.
Scalability – You can create multiple automated channels without personal involvement.
With the right approach, you can create a successful YouTube business while staying behind the scenes.
Best Types of Faceless YouTube Channels
There are countless ways to create engaging content without showing your face. Here are some of the most popular faceless YouTube channel ideas:
1. Animation and Whiteboard Videos
Animation videos are highly engaging and work well for storytelling, education, and explainer videos. You can use tools like:
Doodly – Whiteboard animation software.
Toonly – Cartoon animation maker.
Animaker – Drag-and-drop animation platform.
2. Compilation and Top 10 Videos
Many successful YouTube channels focus on compiling interesting clips, facts, or news stories. Popular niches include:
Top 10 lists (mysteries, sports, celebrities, history, etc.)
Fails and funny moments
Motivational speeches and quotes
3. Stock Footage and B-Roll Videos
You can create content using stock footage from websites like:
Pexels – Free stock videos.
Storyblocks – Paid stock footage for YouTube videos.
Envato Elements – A vast library of video assets.
Simply add voiceovers or captions to create engaging content.
4. Meditation and Relaxing Music Channels
Meditation, sleep, and relaxation music channels generate millions of views with minimal effort. You can create these videos by:
Using royalty-free music from sites like Pixabay or Epidemic Sound.
Combining calming visuals with relaxing soundscapes.
Uploading long-form videos (1-10 hours) for better watch time.
5. Podcast-Style and Voiceover Channels
If you enjoy talking but don’t want to show your face, podcast-style videos work great. You can:
Discuss trending topics, tech news, or self-improvement tips.
Use AI voiceover software like Speechelo or ElevenLabs.
Feature guest interviews without appearing on screen.
6. Screen Recording and Tutorial Videos
You can create valuable content by recording your screen. Popular topics include:
Tech tutorials (how to use software, coding, gaming guides).
Finance and investment tips.
Online courses and educational content.
Use tools like OBS Studio or Camtasia for high-quality screen recordings.
How to Create High-Quality Faceless YouTube Videos
Creating engaging content without showing your face requires a different approach. Here’s how to make your videos stand out:
1. Use High-Quality Editing Software
Editing plays a crucial role in keeping viewers engaged. Some top editing tools include:
Adobe Premiere Pro – Industry-standard video editing software.
Final Cut Pro – Great for Mac users.
DaVinci Resolve – A powerful free alternative for high-quality editing.
2. Optimize Video Titles, Thumbnails, and Descriptions
Since you won’t be on camera, your title, thumbnail, and description must capture attention. Follow these tips:
Use bold fonts and contrasting colors on thumbnails.
Write click-worthy titles with curiosity-driven hooks.
Use SEO-friendly descriptions and tags.
3. Add Subtitles and Captions
Many people watch YouTube without sound. Adding captions makes your videos accessible and improves watch time. Use tools like:
Rev.com – Human-generated captions.
Otter.ai – AI-generated captions.
YouTube’s auto-caption feature.
4. Use Engaging Background Music
Since there’s no face-to-face interaction, background music helps set the tone. Use royalty-free music from:
YouTube Audio Library – Free music for creators.
Epidemic Sound – Paid library with high-quality tracks.
Artlist – Premium background music selection.
How to Upload Your Video on YouTube and Earn Money
Once you’ve created high-quality content, it’s time to upload and monetize your videos. Here’s how to maximize your earnings:
1. Join the YouTube Partner Program (YPP)
To qualify for monetization, you need:
1,000 subscribers.
4,000 watch hours in the past 12 months.
Once approved, you can earn from Google AdSense ads displayed on your videos.
2. Use Affiliate Marketing
Affiliate marketing is a great way to earn extra income by promoting products related to your niche. Here’s how:
Sign up for affiliate programs like Amazon Associates or ClickBank.
Include product links in your video descriptions.
Earn commissions when viewers make purchases.
3. Get Sponsorships and Brand Deals
Many brands are willing to pay creators for sponsored videos. To attract sponsorships:
Create high-quality, niche-focused content.
Grow your audience and engagement.
Reach out to brands or join influencer marketing platforms like Grapevine or FameBit.
4. Sell Digital Products or Courses
If you create educational content, consider selling:
E-books and PDFs related to your niche.
Online courses on platforms like Teachable or Udemy.
Exclusive content via Patreon or YouTube Memberships.
5. License Your Videos
If you create high-quality footage, companies and media outlets may pay to use your content. You can list your videos on:
Storyblocks.
Shutterstock.
Pond5.
Tips to Grow a Faceless YouTube Channel Faster
Success on YouTube takes time, but these strategies can help you grow faster:
Upload consistently (at least 1-2 videos per week).
Engage with your audience through pinned comments and community posts.
Collaborate with other faceless YouTubers.
Use analytics to track performance and optimize content.
Conclusion
You don’t need to be on camera to succeed on YouTube. By focusing on high-quality content, smart monetization strategies, and SEO optimization, you can upload your video on YouTube and earn money without ever showing your face. Whether you choose animation, stock footage, or screen recordings, the opportunities for faceless YouTube channels are endless. Start today, experiment with different content types, and build a profitable channel while staying behind the scenes.
Related Articles:
For further reading, explore these related articles:
How to Upload Your Video on YouTube as an Independent Artist
How to Upload Your Video on YouTube Without a Label
How to Upload Your Video on YouTube with No Upfront Fees
Upload Your Video on YouTube Quickly – A Beginner’s Ultimate Guide
For additional resources on music marketing and distribution, visit DMT Records Private Limited.
1 note
·
View note
Text
How to Record Your Screen
Screen recording has become an essential skill, whether you're creating tutorials, capturing gameplay, or sharing presentations. With the right tools and techniques, recording your screen is easier than ever. This guide will walk you through the process, ensuring smooth and professional results.
To get started, decide whether to use built-in options or third-party software. Most devices, including Windows PCs and Macs, have built-in screen recording tools. For advanced features like annotations or customizable settings, consider third-party apps such as OBS Studio or Camtasia. Once your tool is chosen, configure your settings, including resolution, frame rate, and audio sources.
Start your recording, ensuring you capture the desired content without interruptions. Use hotkeys for efficiency and stay organized with a clear script or plan. After recording, save and edit your video to polish the final product.
By mastering these steps, you can create high-quality screen recordings that effectively communicate your message, whether for personal or professional use.
Read more :
0 notes
Text
Camtasia Studio 9 Video Editing Full Bangla Tutorial 2021 step by step |... - Welcome to SEO HIRE ME & Here is future
bKash To BRAC Bank Money Transfer,bKash to Bank Account Fund Transfer, How to Transfer Money form Bkash to Bank Account,বিকাশ টু ব্যাংক একাউন্ট
0 notes
Link
#Courses#Tutorials#Webinars#Website#Incredible#Video#Sales#50#modern#Internet#Business#Health#Finance#Sports#Languages#8000+#250+#500+#stock#graphics#icons#animations#music#image#Animation#Presentations#Built-in#Facebook#Twitter#Pinterest
0 notes
Link
0 notes
Video
🎓😎 В этом видео мы рассмотрим общий вид основных панелей программы Camtasia Studio 2019, чтобы получить представление об её интерфейсе.🍀👉🏻 Вступительное ознакомительное видео по программе Camtasia Studio.👍🏻Поддержите видео просмотрами, комментариями и лайками на канале.
#camtasia#camtasia studio 2019#camtasia tutorial#как создать видеоурок#как записать скринкаст#скринкаст#screencast#как записать видео с экрана#видео с экрана
1 note
·
View note
Note
Would you be able to share some of your gif making process/programs you use to make them? They look great! 💕
Omg thank you,,, 🥺💕💖💕 And yes ofc! I'm going to write down everything I can think of about my gif making process but if I forget anything/you have questions about something specific let me know! ✨
(Long post ahead)
Emulators & Recording
I use different emulators and recording programs, depending on the game I want to play/record:
DesMuMe: This is the one I use for DS games, and it comes with a neat “Record AVI” feature under the “File” tab. Just click it, choose a location for the file and click OK (make sure the Compressor is set to “Full frames (No compression)”). Recordings have a limit of 2 minutes/2GB, but when it reaches it, the program will automatically create a new file and keep recording until it reaches 2 minutes, and the process will repeat (the next recordings will have “part_X” in the name file). When you’re done recording, just lick on File > Stop AVI. Also! The recordings will always have the original resolution. My DesMuMe is set to be 2x its size with a gap between the screens, but all recordings are 256x384 pixels with no gap.
VisualBoyAdvance: Like DesMuMe but for GBA games. Also has a recording feature in Tools > Record > Start AVI recording. The resolution of the video will be that of the original game but I think there’s no limit on how long the recording can be. I’d still recommend stopping and restarting the recording every 5 minutes or so.
Other games & OBS Studio: For 3DS games I use Citra, and Dolphin for Wii ones. They both have Recording features but I don’t use them because they create weird files. Instead, I record them with OBS Studio. Open the program, click on "Start Recording" and then on "Stop Recording" when you’re done. Pretty simple, just remember OBS records your screen so obviously if your emulator window is minimized it won’t record it. You can change your OBS settings to only record the emulator window but I’m too lazy to tinker with OBS so I just record the whole screen lol. There’s always a slight loss of quality with OBS. If you’re recording games with 3DS models then it won’t be too noticeable, but I do not recommend using OBS for pixel/pixelated games like Nintendo DS and Game Boy ones.
Misc: Before OBS, I used to use Camtasia Studio 8. Also does the trick, but instead of saving a .mp4 file it creates its own type of file and it requires you to manually export it as a .mp4 (it's a hassle). It has some editing features too, which OBS does not as far as I can tell. Also, besides DesMuMe I have MelonDS. Highly recommend it if you need to use the multiplayer option (to trade pokemons between games for example) and most importantly for the better mic feature (you WON’T get past the Nintendogs tutorial on DesMuMe). Also the 3D model graphics are of higher quality, but it doesn’t have a recording feature so you will have to rely on OBS and as I said it lowers the quality.
As for video file types, both .avi and .mp4 are allowed in Photoshop. However, .mkv (mostly used for TV shows and movie files) is not, so if you want to edit, say, an anime episode in that format you’ll need to convert it to .mp4. I use Format Factory for that, although I think here’s a slight quality loss.
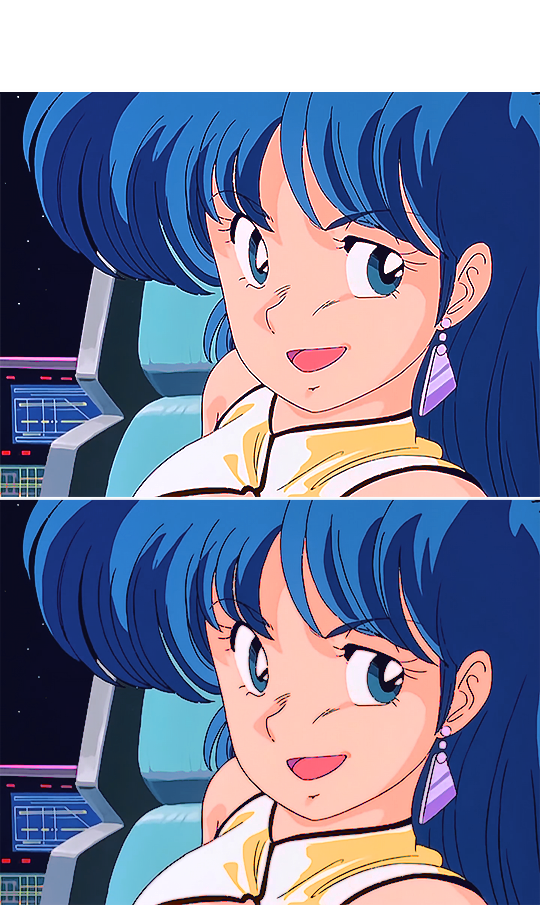
Here's a comparison of a pixel game recorded with OBS vs with DesMuMe. It's tiny but it will have you shaking the screen violently when you notice it.
OBS recording vs. DesMuMe recording
Do not delete or move the video file until you’re done making gifs of it. Even if you save the file as a .psd, you will get an error message if the video file is gone from its original location and you'll have to start over again.
Editing (I)
I exclusively use Photoshop 2020. If you use CSP, GIMP or other editing program you’ll have to find the equivalent features or look at other tutorials, because I’m only familiar with Photoshop. Other PS versions should have either the same or similar features. Here are the steps I usually follow (names might be wrong because my PS is in Spanish “OTL):
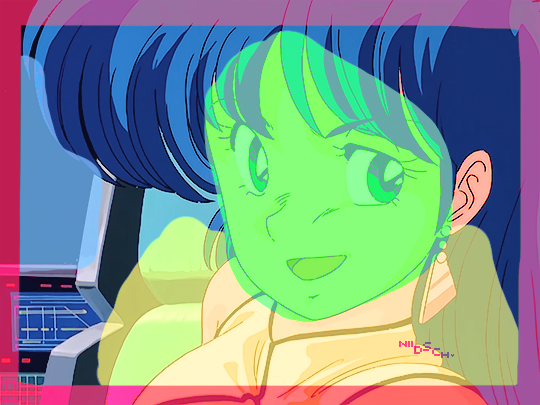
Importing: Drag and drop your file into PS. You should have your Timeline window on the bottom part. If you import a .mp4 or .avi file you should get the Video Timeline, which is what we will work with. If you export a .gif you will get the Frame Animation Timeline; in that case you need to convert it to a single timeline. Click on “Convert to Timeline Video”, then select all the layers (click on Layer 1 and then hold Shift+Click on the last layer) and then right-click on the last layer > “Convert to Intelligent Object”. This is what your PS window should look like for both cases:
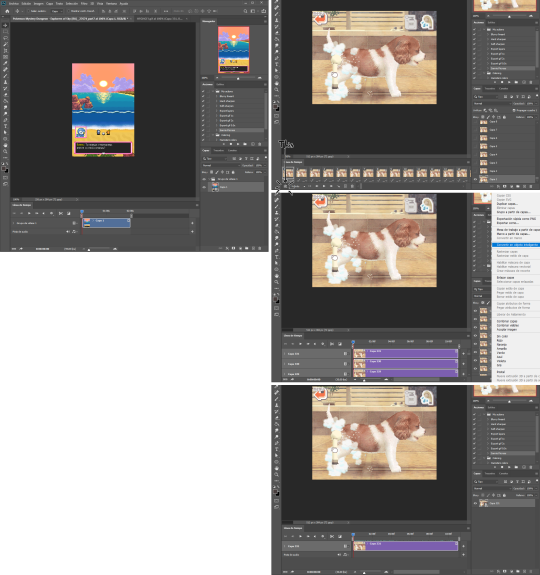
avi/mp4 file (has a Video Timeline) vs. gif file (has a Frame Animation Timeline)
Cutting and resizing: Often your file will either be the wrong size or have unnecessary parts. To resize your video, go to Image > Image Size (NOT Canvas size) and change the resolution. For good gif quality, the image resolution should always be 540 pixels wide (Tumblr’s image size), height doesn’t really matter. PS will change the height proportionally if you change the width. So, for example, a 1440x1080 video will be 540x405 after the conversion. Similarly, you can crop out parts with the Selection tool + Image > Crop. Making pixel games bigger requires a different method (more on this later).
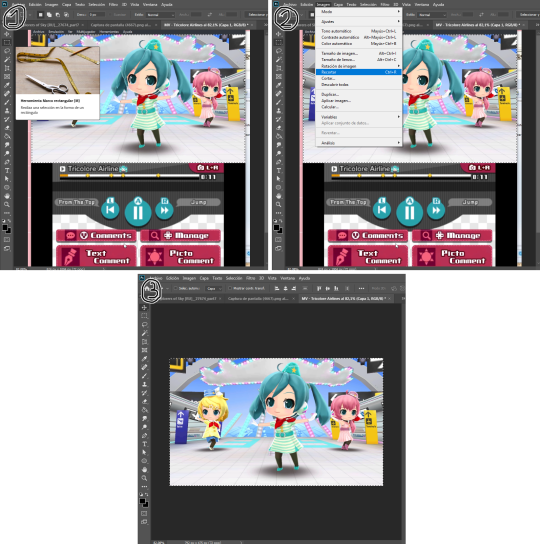
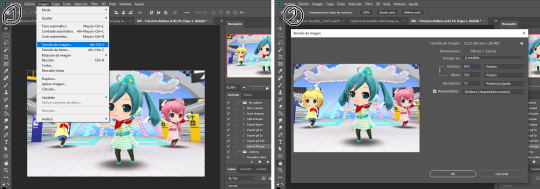
Cropping vs. Resizing
Cutting the timeline: Your gif will likely be too long, or you might need to stitch two parts together. In the Timeline window, move the vertical red line to the part where you want to make the cut. You can precisely move frame by frame with the arrows next to the play button. You can also zoom in and out the timeline with the slider at the bottom. Once you’ve placed the red line on the part where you want to make a cut, click on the scissors. You’ll get two layers – delete the one you don’t need and repeat until your gif is the right length. Similarly, you can click on either end of the timeline and drag it left and right to extend/reduce the length, but it’s less precise. I recommend moving the gif layer out of the video group in the Layer window, especially if you’re going to stitch parts together or add new layers that aren’t Color adjustment layers (like your watermark). If you do so, you’ll notice that each layer occupies a different line in the timeline, while if it’s in a group, it will all be in the same line (this means that all layers will be one after the other, you won’t be able to overlay them).

Cutting the timeline (1-3) + Moving the gif layer out of the video group (4)
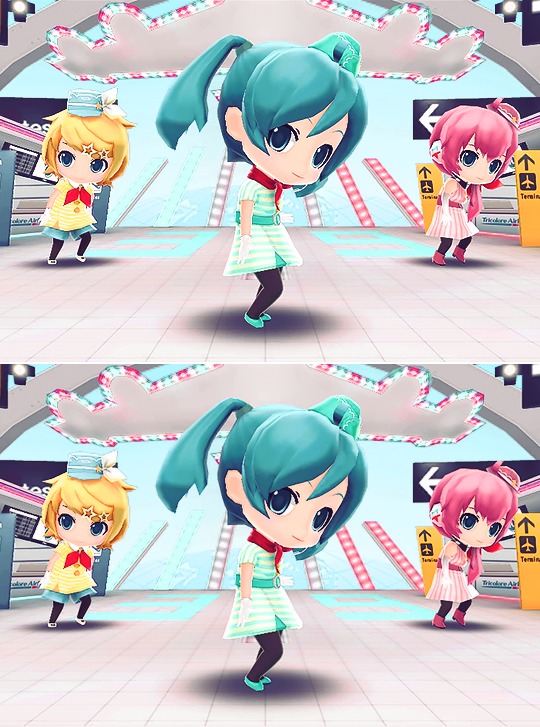
Color adjustments: The fun part! You can get hella crazy with this one. If you want to go for really fancy stuff, I recommend checking out @/usergif, they have lots of tutorials and gifsets you can use as inspiration. I am however a simple man and will mostly use the same tools: Sharpen, Hue/Saturation, Gradient Map and Curves.

Soft sharpen in the Filters tab + Curves, Hue/Saturation and Gradient Map in the Layer window
Editing (II)
Can't make a bullet list of a bullet list so here's each adjustment layer explained. Note that this part is very personal so feel free to tinker with the settings for each tool until you get what you like:
Sharpen: Used only with non pixel media, aka for 3D models and series/movies. It makes the image look sharper. You'll notice that the video layer can have two icons: a movie film or a folded paper (in the "Import" section, the Pokémon gif has a movie film icon, while the converted Nintendogs gif has a folded paper icon). If your layer has the former, the sharpen tool will only be applied to one frame. To avoid that, right-click on the layer > Convert to intelligent object. Resizing the image will also do the trick. Filters are always applied to the layer, they don't create a new one (this is what the rest of the following adjustments will do). As for settings, this is what I usually have:
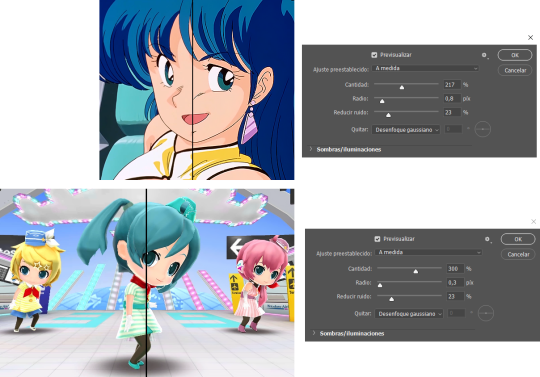
Two types of Sharpen settings (original on the left)
Hue/Saturation: Changes both the global colors and specific hues. To do the latter, open the menu right above all three sliders (by default it's set to "All") and then choose the color you want to change. Be careful! Sometimes you might accidentally edit the wrong hue, for ex a bluish green if you are editing blue hues. If you want to see what parts of the gif you're targeting, set the saturation to the max. Colors play a heavy role on gif size: the more diverse and brighter the color palette, the bigger the file. Gif size will be the ruin of your gif making process, so don't go too overboard with this. More on gif size later, but for now, I recommend "unifying" the color palette (aka making some hues similar).
Two examples of Hue/Saturation adjustments (Original above)
Gradient map: Adds a gradient overlay to the image. When you open the Gradient Map window, click on the gradient and you'll be able to edit it or create a new one. To do so, click on the tiny boxes with colors (only the lower ones, the upper ones won't work), then on the slightly bigger box to change the hue. To add a color, click anywhere below the gradient; to move the colors around, drag the tiny boxes and move them, and to edit the limit between each hue, drag the tiny diamond. The way gradient maps work is by editing the colors from lighter (right) to darker (left). So if you have blue on the right of the gradient, light hues will be blue, and if you have pink on the left of the gradient, dark hues will be pink, with mid tones being a mix of pink and blue (either purple, or bluish purple or pinkish purple). The image will look weird when you add a gradient map, but don't mind that for now. Just create the gradient you want and click OK. Now, select the new layer that has been created and play with the blending modes and the opacity of the layer until you get something you like. For blending modes, I usually go for the ones in the second and third sections. To edit either the Hue/Saturation layer or the Gradient Map one, click on the black and white icons (left to the mask, aka the white box) in the Layer window.
Video showing how Gradient map works

Two examples of Gradient maps, with a readjustment of the Hue/Saturation layer (Original above)
Curves: Edits the light, dark and mid tones. Click any point in the curve/line and then drag it around to see what it does. You can make more than one point in the curve. Afterwards, change the blending mode and the opacity.
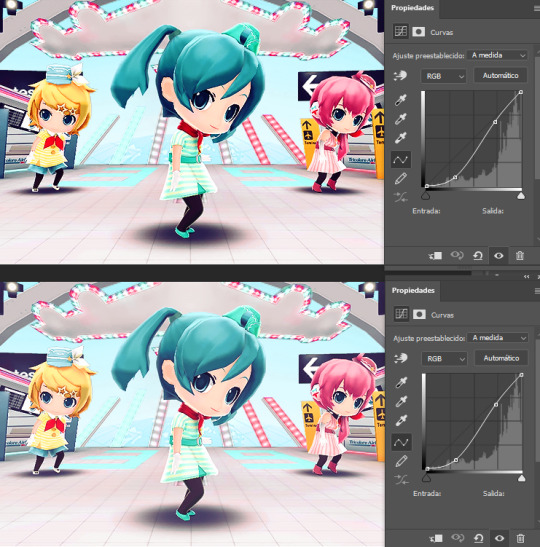
An example of a Curve and the same example with the Curves layer at 40%
Gaussian blur: Sometimes I add a blurry/fuzzy effect to certain gifs. To do so, duplicate the gif layer (right-click > Duplicate layer), then, while selecting the new layer, go to Filters > Gaussian blur and pick a small numer (0,4-1). Click OK, set the blending mode of the new layer to Darken and lower the opacity.
Two examples of images with Gaussian blur applied (Original above)
Watermark: Add a watermark to your image. Click on the Text tool, create a text box, pick the font, the size, the color and the placement, and then click the ✔ button. Change the blending mode and opacity of the text layer. Personally, I have a .png image of my watermark that I just import to the gif and then edit, instead of creating a text box everytime. Regarding watermarks, I get that they are annoying but it's going to be far more annoying when someone reposts your gif without credit or crops the watermark out. Tumblr sucks when it comes to reporting this kind of stuff and you deserve to have your work respected (you've spent time and effort on this!!), so I highly recommend putting a watermark on your gifs. If you want to avoid having someone crop it, put it towards the middle of the image and not in a place that can be edited easily. Also, I usually save gifs without a watermark and add it afterwards.
Red: Danger zone, can get cropped easily. Blue: Also Danger zone, can be edited out. Green: Too obtrusive. Yellow: Perfect place, can't be edited out and it's not on the main focus of the image
Exporting
This is the "hell on earth" part. To export a gif, go to File > Export > Save for Web (Legacy), then once it loads (may take some time), play the gif a couple of times to make sure it looks good and save it. These are my settings:
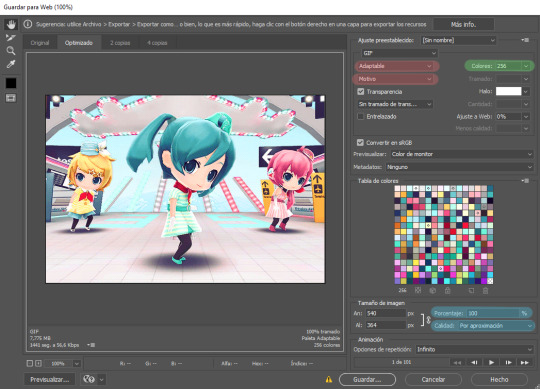
Settings for the Save for Web (Legacy). You'll only need to tinker with the settings on the right.
However, there's one thing to keep in mind: Tumblr has a size limit of 10MB per gif, meaning your gif won't be uploaded if it's larger than that, and you'll be surprised how easily you can surpass that limit. Also, gifs can't be longer than 500 frames, aka 8 seconds (to check the duration of your gif, zoom in in the Timeline Window, you can see the seconds at the top). Here are some pointers regarding gif size:
Pixel games and anime have a smaller size than life-action and 3D models: This is because the former have limited color palettes and the latter has way more colors. For example, Pokémon Mystery Dungeon or Sailor Moon will rarely pose problems, but Arcane, Breaking Bad, Nintendogs or Baldur's Gate 3 will.
The more complex the animation/motion, the bigger the size: This is because complex animations/motions, like a fight, have more unique frames than, say, someone moving their head up and down and nothing else, and that means there's more information to store.
The longer the gif/the bigger the resolution, the bigger the size: Kind of self-explanatory, longer gifs or gifs with big resolutions means more information stored in the file.
Bright and diverse color palettes increase the gif size: As explained in the first point, more colors means more information and thus a bigger file size.
The more it exceeds the limit, the bigger the changes you'll have to make: If it's 10.5MB you can get that number down easily. If it's like 20MB, you might need to cut the gif in half.
How do you solve this? There are a couple of methods:
Make the gif shorter: In the Timeline window, cut parts of your gif until it's short enough. If you don't want to delete certain parts, you can divide your gif in two separate ones.
Make the colors less bright/unify the color palette with an Hue/Saturation layer: If you haven't done this in the editing process and your gif exceeds 10MB, it's time to edit the gif colors.
Reduce the color palette: In the Save for Web (Legacy), you'll see that there's "Colors: 256" on the left (marked in green in the screenshot). 256 is the max amount of colors you can have, but you can reduce it. PS will automatically get rid of colors that have a smaller presence first (for example, in the anime gif above, if I reduced the colors it would get rid of the reds and magentas before the yellows or the blues).
Change the settings in the Save for Web (Legacy) window: Besides the color palette, there's a setting on the right side, marked in red in the screenshot above (the first one). I have it set to "Adaptable", which is the highest setting, but you can change it to "Perceptual", "Selective" or "Restrictive". This will lower the quality and thus the size, but sometimes it might mess up the gif. Similarly, you can change the setting below that one (set to "Motive" in the screenshot) to "Noise", "Difusion" or none at all to change the quality and size.
Optimize the gif: I use ezgif.com for this. Click on "Optimizer", upload your gif, make the Compression level smaller, click on "Optimize" and then save your gif. This will inevitably lower the quality, so I usually don't go lower than 35. Also, try to get your gif right below the 10MB limit, so if a compression level of 20 gets your gif to 9.5MB but a 15 gets it down to 9.9MB, choose 15. ezgif also has other cool features like one to slow down your gif's speed, so check it out!
Don't make gifs of media that causes problems: If you regularly find yourself being frustrated with gifs of X media exceeding the size limit, you might need to find something else. It sucks to think that you might not be able to make gifs of your favourite piece of media, but gif making should be fun, not ruin your day. Of course, it's up to you to decide how much effort you're willing to put on a gif, but don't overexert yourself either.
The Save for Web (Legacy) window is also where you can make your gif bigger in the case of pixel/pixelated games like Pokémon Mystery Dungeon or Nintendogs. In the "Image Size" section, set the quality to "Nearest Neighbor" and the percentage to 200% to double its size (it will be somewhat close to 540 pixels wide). You can make the gif three, four or even more times its size wih this method.
Closing thoughts and results
Managing a gif blog would require a whole new post with some advice so I'll leave that out for now. There are other things I've also left out like actions (highly recommend learning about them) but these are the basics methinks. Again, if you have any questions, my ask box is open ✨
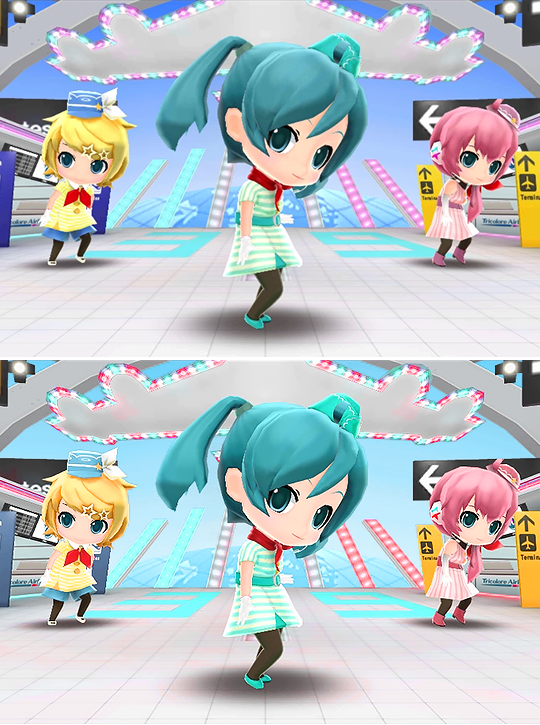
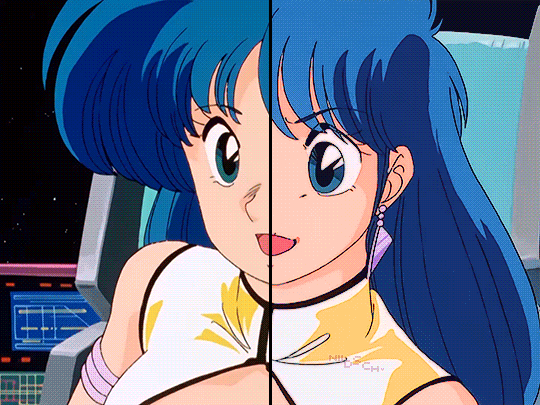
And here are the gifs with a comparison to the original 🎉
Sharpen, Hue/Saturation, Gradient map and Gaussian blur

Sharpen, Hue/Saturation, Gradient map, Curves and Gaussian blur
Hue/Saturation and Gradient Map
#ysiposting#whew this took a while#now if you'll excuse me I'm going back to studying for exams. regrettably
34 notes
·
View notes
Text
Camtasia Studio 9 Video Editing Full Bangla Tutorial 2021 step by step |... - Welcome to SEO HIRE ME & Here is future
Camtasia Studio 9 Video Editing Full Bangla Tutorial 2021 step by step by step by trainer Mazibul
0 notes
Video
Camtasia #Bangla_tutorial পর্বের আমাদের নতুন ভিডিও। আশা করি Camtasia শিক্ষার্থী ভাই ও বোনদের আমাদের ভিডিও টি খুবেই ভালো লাগবে।
#Camtasia Studio (Full Course)- Bangla Tutorial for Beginner#camtasia tutorial 2020#camtasia tutorial bangla#camtasia tutorial for beginners#camtasia video editing tutorial bangla#Camtasia Studio 9 Video Editing Full Bangla Tutorial#how to edit videos
0 notes
Video
Camtasia Studio 9 Active [ Camtasia Crack Life Time 2020
0 notes
Text
Speedpaint Tutorial
Hi i want to make a little tutorial of how to make a speedpaint/timelapse
I will talk about programs, music and editing, this will be a long post (kinda) so i will leave all the tutorial under the cut so it won’t take all the space on your screen
1-Programs
There is a lot of programs to record and editing, i personally use Camtasia Studio (both recording and editing) and OBS/Streamlabs OBS (recording)
Camtasia:
Camtasia can record the screen, microphone and the audio from your computer, plus, you can edit videos on there; is a little limited if you want to make really complex videos and can be laggy if your computer isn't powerful enough. Camtasia have a cost of $300 USD approx (one-time purchase), the license let you have the program installed in 2 devices at once, so you can split the license with a friend if both of you want them
Again, can be really laggy (Camtasia 8 work better) and the recording can be really heavy, 3 GB just for half an hour sometimes, that's why i would recommend you using this just for basic editing; for recording however i recommend:
OBS/Streamlabs OBS:
OBS is a free program commonly used for streaming, but it have an option for recording the screen Unlike Camtasia, OBS let you choose between record the whole screen or just record the program you are using, this can let you use other programs, navigate thru internet or just record specific parts and not worry about having to cut it out later, unfortunally OBS doesn’t have and option to pause the recording you have to stop it and press record again
Depending of how you configure the options on OBS, the recording can be really heavy so keep an eye on that
If you just want to make simple speedpaint videos:
I would recommend you to use OBS and Movie maker, both of them are free and don’t let a watermark on the video Despite of the reputation of Movie maker, is a good program for simple editing and for my knowledge is on the microsoft store so you can download there (i think, i have never use the microsoft store)
Please do not use VSDC
The program isn’t a malware itself, but gets hacked a lot So be safe and remain away from that program
2- Music
This point doesn't have too much mystery, basically:
If you dont care about copyright, you can use any song really, however depending of the song, the video can get limited in some countries on youtube/facebook/Vimeo
If you do care about copyright, here are some channels with copyright free music, just keep in mind that you need to put the credits on somewhere on the video or in the description
NoCopyrightSounds (channel on youtube)
BreakingCopyright — Royalty Free Music (channel on youtube)
Kevin Macleod (music author)
If you really want to use a song with copyright you can also use a remixed version, sometimes remixes don't get copyright claimed
3- Editing
Depending on the program you can have more or less options but
For the speed, it depends on how fast you want it to be, just pay attention on how it looks
For exporting i will recommend you to keep it between 480p-1080p
Neko-rina made a tutorial of how they export their videos, and even if it a good tutorial and show you how to export high quality videos, that can result in heavy videos that take some time in upload to youtube
Extra
You may see some timelapse videos on my accounts, that is an option of Clip studio paint, it record and speed up be itself and only lets you choose between 15, 30, 60 seconds or full timelapse that is between 60 seconds to 5 minutes approx
9 notes
·
View notes
Photo

Camtasia Tutorial | Part 5 | Audio Effects & Clip Speed | Video Editing Course | Urdu Hindi ویڈیو ایڈیٹنگ سیکھنے کے لئے یہاں کلک کریں
#Audio Effects#Best video editor for Youtubers#Camtasia 9#Camtasia studio#Clip Speed#Course#Guidance#Guidelines#How#how to edit youtube videos#How to Pakistan#How to Use Camtasia Studio#learn video editing#Professional Video Editor#syed abdulwahab sherazi#Technique#Tips#to#Training#Tutorial#Video editing
1 note
·
View note
Link
Camtasia Studio 9 Crack + Serial KEY Free Download
0 notes
Video
youtube
My first tutorial on XNALara XPS.
You will learn all about the installation, interface of XPS, as well as downloading and importing models, posing, rendering and post-processing them in-software. Enjoy! Translation of subtitles by BMFreed
#xna posing studio#xnalara#xna lara#xnalara xps#xps#xps posing studio#tutorial#youtube#camtasia#camtasia studio 8#lara croft#chloe#tomb raider#life is strange#posing#adobe premiere#adobe premier pro#dante#DMC#devil may cry#angry birds
8 notes
·
View notes