#unix commands should have status updates
Explore tagged Tumblr posts
Visit Tumblr Blog
Explore Tumblr blogs with no restrictions, modern design and the best experience.
Last Seen Tumblr Blogs


Fun Fact
Women make up for the other 50% of Tumblr’s audience.
Text
ok rant over I'm going to put on my big boy pants and go find out what keeps doing wrong with my supposedly simple command to write a bootable flash drive (it's been 84 years.jpeg etc)
#unix commands should have status updates#this is infuriating#i dont think theyre actually called flash drives anymore#so much for deliberately not calling a thumb drive and sounding dated
1 note
·
View note
Text
Installing Nginx, MySQL, PHP (LEMP) Stack on Ubuntu 18.04

Ubuntu Server 18.04 LTS (TunzaDev) is finally here and is being rolled out across VPS hosts such as DigitalOcean and AWS. In this guide, we will install a LEMP Stack (Nginx, MySQL, PHP) and configure a web server.
Prerequisites
You should use a non-root user account with sudo privileges. Please see the Initial server setup for Ubuntu 18.04 guide for more details.
1. Install Nginx
Let’s begin by updating the package lists and installing Nginx on Ubuntu 18.04. Below we have two commands separated by &&. The first command will update the package lists to ensure you get the latest version and dependencies for Nginx. The second command will then download and install Nginx.
sudo apt update && sudo apt install nginx
Once installed, check to see if the Nginx service is running.
sudo service nginx status
If Nginx is running correctly, you should see a green Active state below.
● nginx.service - A high performance web server and a reverse proxy server Loaded: loaded (/lib/systemd/system/nginx.service; enabled; vendor preset: enabled) Active: active (running) since Wed 2018-05-09 20:42:29 UTC; 2min 39s ago Docs: man:nginx(8) Process: 27688 ExecStart=/usr/sbin/nginx -g daemon on; master_process on; (code=exited, status=0/SUCCESS) Process: 27681 ExecStartPre=/usr/sbin/nginx -t -q -g daemon on; master_process on; (code=exited, status=0/SUCCESS) Main PID: 27693 (nginx) Tasks: 2 (limit: 1153) CGroup: /system.slice/nginx.service ├─27693 nginx: master process /usr/sbin/nginx -g daemon on; master_process on; └─27695 nginx: worker process
You may need to press q to exit the service status.
2. Configure Firewall
If you haven’t already done so, it is recommended that you enable the ufw firewall and add a rule for Nginx. Before enabling ufw firewall, make sure you add a rule for SSH, otherwise you may get locked out of your server if you’re connected remotely.
sudo ufw allow OpenSSH
If you get an error “ERROR: could find a profile matching openSSH”, this probably means you are not configuring the server remotely and can ignore it.
Now add a rule for Nginx.
sudo ufw allow 'Nginx HTTP'
Rule added Rule added (v6)
Enable ufw firewall.
sudo ufw enable
Press y when asked to proceed.
Now check the firewall status.
sudo ufw status
Status: active To Action From -- ------ ---- OpenSSH ALLOW Anywhere Nginx HTTP ALLOW Anywhere OpenSSH (v6) ALLOW Anywhere (v6) Nginx HTTP (v6) ALLOW Anywhere (v6)
That’s it! Your Nginx web server on Ubuntu 18.04 should now be ready.
3. Test Nginx
Go to your web browser and visit your domain or IP. If you don’t have a domain name yet and don’t know your IP, you can find out with:
sudo ifconfig | grep -Eo 'inet (addr:)?([0-9]*\.){3}[0-9]*' | grep -Eo '([0-9]*\.){3}[0-9]*' | grep -v '127.0.0.1'
You can find this Nginx default welcome page in the document root directory /var/www/html. To edit this file in nano text editor:
sudo nano /var/www/html/index.nginx-debian.html
To save and close nano, press CTRL + X and then press y and ENTER to save changes.
Your Nginx web server is ready to go! You can now add your own html files and images the the /var/www/html directory as you please.
However, you should acquaint yourself with and set up at least one Server Block for Nginx as most of our Ubuntu 18.04 guides are written with Server Blocks in mind. Please see article Installing Nginx on Ubuntu 18.04 with Multiple Domains. Server Blocks allow you to host multiple web sites/domains on one server. Even if you only ever intend on hosting one website or one domain, it’s still a good idea to configure at least one Server Block.
If you don’t want to set up Server Blocks, continue to the next step to set up MySQL.
4. Install MySQL
Let’s begin by updating the package lists and installing MySQL on Ubuntu 18.04. Below we have two commands separated by &&. The first command will update the package lists to ensure you get the latest version and dependencies for MySQL. The second command will then download and install MySQL.
sudo apt update && sudo apt install mysql-server
Press y and ENTER when prompted to install the MySQL package.
Once the package installer has finished, we can check to see if the MySQL service is running.
sudo service mysql status
If running, you will see a green Active status like below.
● mysql.service - MySQL Community Server Loaded: loaded (/lib/systemd/system/mysql.service; enabled; vendor preset: enabled) Active: active (running) since since Wed 2018-05-09 21:10:24 UTC; 16s ago Main PID: 30545 (mysqld) Tasks: 27 (limit: 1153) CGroup: /system.slice/mysql.service └─30545 /usr/sbin/mysqld --daemonize --pid-file=/run/mysqld/mysqld.pid
You may need to press q to exit the service status.
5. Configure MySQL Security
You should now run mysql_secure_installation to configure security for your MySQL server.
sudo mysql_secure_installation
If you created a root password in Step 1, you may be prompted to enter it here. Otherwise you will be asked to create one. (Generate a password here)
You will be asked if you want to set up the Validate Password Plugin. It’s not really necessary unless you want to enforce strict password policies for some reason.
Securing the MySQL server deployment. Connecting to MySQL using a blank password. VALIDATE PASSWORD PLUGIN can be used to test passwords and improve security. It checks the strength of password and allows the users to set only those passwords which are secure enough. Would you like to setup VALIDATE PASSWORD plugin? Press y|Y for Yes, any other key for No:
Press n and ENTER here if you don’t want to set up the validate password plugin.
Please set the password for root here. New password: Re-enter new password:
If you didn’t create a root password in Step 1, you must now create one here.
Generate a strong password and enter it. Note that when you enter passwords in Linux, nothing will show as you are typing (no stars or dots).
By default, a MySQL installation has an anonymous user, allowing anyone to log into MySQL without having to have a user account created for them. This is intended only for testing, and to make the installation go a bit smoother. You should remove them before moving into a production environment. Remove anonymous users? (Press y|Y for Yes, any other key for No) :
Press y and ENTER to remove anonymous users.
Normally, root should only be allowed to connect from 'localhost'. This ensures that someone cannot guess at the root password from the network. Disallow root login remotely? (Press y|Y for Yes, any other key for No) :
Press y and ENTER to disallow root login remotely. This will prevent bots and hackers from trying to guess the root password.
By default, MySQL comes with a database named 'test' that anyone can access. This is also intended only for testing, and should be removed before moving into a production environment. Remove test database and access to it? (Press y|Y for Yes, any other key for No) :
Press y and ENTER to remove the test database.
Reloading the privilege tables will ensure that all changes made so far will take effect immediately. Reload privilege tables now? (Press y|Y for Yes, any other key for No) :
Press y and ENTER to reload the privilege tables.
All done!
As a test, you can log into the MySQL server and run the version command.
sudo mysqladmin -p -u root version
Enter the MySQL root password you created earlier and you should see the following:
mysqladmin Ver 8.42 Distrib 5.7.22, for Linux on x86_64 Copyright (c) 2000, 2018, Oracle and/or its affiliates. All rights reserved. Oracle is a registered trademark of Oracle Corporation and/or its affiliates. Other names may be trademarks of their respective owners. Server version 5.7.22-0ubuntu18.04.1 Protocol version 10 Connection Localhost via UNIX socket UNIX socket /var/run/mysqld/mysqld.sock Uptime: 4 min 28 sec Threads: 1 Questions: 15 Slow queries: 0 Opens: 113 Flush tables: 1 Open tables: 106 Queries per second avg: 0.055
You have now successfully installed and configured MySQL for Ubuntu 18.04! Continue to the next step to install PHP.
6. Install PHP
Unlike Apache, Nginx does not contain native PHP processing. For that we have to install PHP-FPM (FastCGI Process Manager). FPM is an alternative PHP FastCGI implementation with some additional features useful for heavy-loaded sites.
Let’s begin by updating the package lists and installing PHP-FPM on Ubuntu 18.04. We will also install php-mysql to allow PHP to communicate with the MySQL database. Below we have two commands separated by &&. The first command will update the package lists to ensure you get the latest version and dependencies for PHP-FPM and php-mysql. The second command will then download and install PHP-FPM and php-mysql. Press y and ENTER when asked to continue.
sudo apt update && sudo apt install php-fpm php-mysql
Once installed, check the PHP version.
php --version
If PHP was installed correctly, you should see something similar to below.
PHP 7.2.3-1ubuntu1 (cli) (built: Mar 14 2018 22:03:58) ( NTS ) Copyright (c) 1997-2018 The PHP Group Zend Engine v3.2.0, Copyright (c) 1998-2018 Zend Technologies with Zend OPcache v7.2.3-1ubuntu1, Copyright (c) 1999-2018, by Zend Technologies
Above we are using PHP version 7.2, though this may be a later version for you.
Depending on what version of Nginx and PHP you install, you may need to manually configure the location of the PHP socket that Nginx will connect to.
List the contents for the directory /var/run/php/
ls /var/run/php/
You should see a few entries here.
php7.2-fpm.pid php7.2-fpm.sock
Above we can see the socket is called php7.2-fpm.sock. Remember this as you may need it for the next step.
7. Configure Nginx for PHP
We now need to make some changes to our Nginx server block.
The location of the server block may vary depending on your setup. By default, it is located in /etc/nginx/sites-available/default.
However, if you have previously set up custom server blocks for multiple domains in one of our previous guides, you will need to add the PHP directives to each server block separately. A typical custom server block file location would be /etc/nginx/sites-available/mytest1.com.
For the moment, we will assume you are using the default. Edit the file in nano.
sudo nano /etc/nginx/sites-available/default
Press CTRL + W and search for index.html.
Now add index.php before index.html
/etc/nginx/sites-available/default
index index.php index.html index.htm index.nginx-debian.html;
Press CTRL + W and search for the line server_name.
Enter your server’s IP here or domain name if you have one.
/etc/nginx/sites-available/default
server_name YOUR_DOMAIN_OR_IP_HERE;
Press CTRL + W and search for the line location ~ \.php.
You will need to uncomment some lines here by removing the # signs before the lines marked in red below.
Also ensure value for fastcgi_pass socket path is correct. For example, if you installed PHP version 7.2, the socket should be: /var/run/php/php7.2-fpm.sock
If you are unsure which socket to use here, exit out of nano and run ls /var/run/php/
/etc/nginx/sites-available/default
... location ~ \.php$ { include snippets/fastcgi-php.conf; # # # With php-fpm (or other unix sockets): fastcgi_pass unix:/var/run/php/php7.2-fpm.sock; # # With php-cgi (or other tcp sockets): # fastcgi_pass 127.0.0.1:9000; } ...
Once you’ve made the necessary changes, save and close (Press CTRL + X, then press y and ENTER to confirm save)
Now check the config file to make sure there are no syntax errors. Any errors could crash the web server on restart.
sudo nginx -t
nginx: the configuration file /etc/nginx/nginx.conf syntax is ok nginx: configuration file /etc/nginx/nginx.conf test is successful
If no errors, you can reload the Nginx config.
sudo service nginx reload
8. Test PHP
To see if PHP is working correctly on Ubuntu 18.04, let’s a create a new PHP file called info.php in the document root directory. By default, this is located in /var/www/html/, or if you set up multiple domains in a previous guide, it may be located in somewhere like /var/www/mytest1.com/public_html
Once you have the correct document root directory, use the nano text editor to create a new file info.php
sudo nano /var/www/html/info.php
Type or paste the following code into the new file. (if you’re using PuTTY for Windows, right-click to paste)
/var/www/html/info.php
Save and close (Press CTRL + X, then press y and ENTER to confirm save)
You can now view this page in your web browser by visiting your server’s domain name or public IP address followed by /info.php: http://your_domain_or_IP/info.php
phpinfo() outputs a large amount of information about the current state of PHP. This includes information about PHP compilation options and extensions, the PHP version and server information.
You have now successfully installed PHP-FPM for Nginx on Ubuntu 18.04 LTS (Bionic Beaver).
Make sure to delete info.php as it contains information about the web server that could be useful to attackers.
sudo rm /var/www/html/info.php
What Next?
Now that your Ubuntu 18.04 LEMP web server is up and running, you may want to install phpMyAdmin so you can manage your MySQL server.
Installing phpMyAdmin for Nginx on Ubuntu 18.04
To set up a free SSL cert for your domain:
Configuring Let’s Encrypt SSL Cert for Nginx on Ubuntu 18.04
You may want to install and configure an FTP server
Installing an FTP server with vsftpd (Ubuntu 18.04)
We also have several other articles relating to the day-to-day management of your Ubuntu 18.04 LEMP server
Hey champ! - You’re all done!
Feel free to ask me any questions in the comments below.
Let me know in the comments if this helped. Follow Us on - Twitter - Facebook - YouTube.
1 note
·
View note
Photo

Using the BitMEX REST API Specification and Clients Authentication Limits Request Rate Limits Viewing Your Request Rate Limit Increasing Your Request Rate Limit Order Count Limits Order Minimum Size Limits WebSocket Limits Behaviour Efficiency HTTP Keep-Alive Overload Filtering Timestamp Filters OrderBookL2 Using the BitMEX REST API For working code and examples, please see our HTTP Connectors on GitHub. If you are logged in, you may access the API Key Management interface. For a list of endpoints and return types, view the REST documentation in the API Explorer. Specification and Clients The BitMEX API conforms to the Swagger spec for REST endpoints. Any Swagger-compatible client can connect to the BitMEX API and execute commands. An updated list of available clients is listed here. Examples of basic communication to our API are in our api-connectors repository. Note that all Bitcoin quantities are returned in Satoshis: 1 XBt (Satoshi) = 0.00000001 XBT (Bitcoin). Authentication To access private endpoints, a permanent API key is required. Details about authentication via API Key are available via a separate document. Limits Request Rate Limits Requests to our REST API are rate limited to 300 requests per 5 minutes. This counter refills continuously. If you are not logged in, your ratelimit is 150/5minutes. Be very careful about the number of errors your tools throw! If a large number of 4xx or 5xx responses are delivered in a short period of time, your IP may be banned for an hour. Multiple bans in a short time will result in a week ban. Viewing Your Request Rate Limit On each request to the API, these headers are returned: "x-ratelimit-limit": 300 "x-ratelimit-remaining": 297 "x-ratelimit-reset": 1489791662 Use these headers to determine your current limit and remaining requests. At the UNIX timestamp designated by x-ratelimit-reset, you will have enough requests left to retry your current request. If you have not exceeded your limit, this value is always the current timestamp. If you are limited, you will receive a 429 response and an additional header, Retry-After, that indicates the number of seconds you should sleep before retrying. Increasing Your Request Rate Limit If you are running up against our limits and believe that you have a legitimate need, please email us at [email protected] to discuss upgrading your access limits. Before increasing your rate limits, we require that your programs at least: Use the WebSocket feeds to avoid polling data. Use our bulk order, bulk amend, and bulk cancel features to reduce load on the system. Due to how BitMEX does real-time auditing, risk checks, and margining, orders submitted, amended, and canceled in bulk are faster to execute. For this reason, bulk actions are ratelimited at 1/10 the normal rate! Bulk cancels, regardless of count, always only count as one request. When emailing us about a ratelimit increase, please include: Your application’s purpose and intended growth Your desired rate limit Acknowledgement that your program is using the API efficiently, as mentioned above. Order Count Limits To keep an orderly market, BitMEX imposes limits on the number of open orders per account. These limits are: Maximum 200 open orders per contract per account; Maximum 10 stop orders per contract per account; When placing a new order that causes these caps to be exceeded, it will be rejected with the message “Too many [open|stop] orders”. Order Minimum Size Limits We intentionally set the contract sizes of BitMEX products at low values to encourage traders both large and small to trade on BitMEX. However, some traders abuse this and spam the orderbook or trade feed with many small orders. Accounts with too many open orders with a gross value less than 0.0025 XBT each will be labeled as a Spam Account. If you are marked as a Spam Account: Orders below 0.0025 XBT in value will automatically become hidden orders. Hidden orders do not show in the orderbook and always pay the taker fee. Post-Only spam orders will be Rejected instead of being hidden. Too many spam orders may be grounds to temporarily ban an account from trading. Spam Account designations are re-evaluated and lifted automatically every 24 hours if user behavior has changed. WebSocket Limits WebSocket Limits are documented on the WebSocket API page. Behaviour BitMEX monitors the behaviour of accounts on the platform, including those using the API. Efficiency Accounts that consistently make a disproportionate number of order-management API requests per notional of XBT executed place unnecessary load on the system and may be banned. For example, if your account is making thousands of new/amend/cancel order API requests each day, yet not trading at all, your account may be banned. As a general guideline, you should target to make no more than 300 order management API requests per 1 XBT notional executed. To help keep your trading activity efficient, you may: Switch off the automated system that is using the API. Increase traded volume, by tightening your quotes or crossing the spread if necessary. Reduce the number of requests made. HTTP Keep-Alive BitMEX does not support placing or canceling orders via WebSocket, only via HTTP. Our servers support HTTP Keep-Alive and cache SSL sessions. If you keep a connection alive, you will get websocket-like latency, obviating the need to use the websocket for transactional communication. Our Keep-Alive timeout is 90 seconds. Overload Due to growth in the crypto space, BitMEX is currently under extremely high load. To help improve responsiveness during high-load periods, the BitMEX trading engine will begin load-shedding when requests reach a critical queue depth. When this happens, you will quickly receive a 503 status code with the message "The system is currently overloaded. Please try again later." The request will not have reached the engine, and you should retry after at least 500 milliseconds. We will keep clients updated as we improve peak capacity on the trading engine. Filtering Many table endpoints take a filter parameter. This is expected to be JSON. For example, the filter query {"side":"Buy"} can be url-encoded and sent to the trade endpoint (click to run). Most values can only be filtered by simple equality. Timestamps, which are all UTC, can be queried in many ways: Timestamp Filters The following fields can be passed in the "filter" param as JSON key/value pairs: Key Description Example Example Description "startTime" Start timestamp. "2014-12-26 11:00" On or after 11:00am on 26 December 2014. "endTime" End timestamp. "2014-12-26 13:00" On or before 1:00pm on 26 December 2014. "timestamp" Exact timestamp. "2014-12-26 12:00" Exactly noon on 26 December 2014. "timestamp.date" Exact day. "2014-12-26" The entire day of 26 December 2014. "timestamp.month" Exact month. "2014-12" The entire month of December 2014. "timestamp.year" Exact year. 2014 The entire year of 2014. "timestamp.mm" Month of year. 12 December of each year. "timestamp.dd" Day of month. 26 26th of each month. "timestamp.ww" Day of week. 6 Friday of each week. 0 = Sat, 1 = Sun "timestamp.time" Exact time. "12:00:00.000" Exactly noon of each day. "timestamp.second" Exact second. "12:00:00" The entire second from noon of each day. "timestamp.minute" Exact minute. "12:00" The entire minute from noon of each day. "timestamp.hh" Hour of day. 12 12th hour of each day. (i.e. noon) "timestamp.uu" Minute of hour. 30 30th minute of each hour. "timestamp.ss" Second of minute. 15 15th second of each minute. For example, the .BVOL7D index is calculated and published on the trade feed every 5 minutes. To filter to just noon on Fridays, send the payload: {"symbol": ".BVOL7D", "filter": {"timestamp.time":"12:00", "timestamp.ww":6}} (Click to run) OrderBookL2 A special note on the orderBookL2 table, which is the canonical table for orderbook updates and the only way to retrieve all levels: This orderbook is keyed by a unique ID, not price, so that all levels are unique across all symbols. This may be unintuitive at first but ensures that each level across the entire system is uniquely keyed. Therefore, when you retrieve an orderBookL2 update, it may look like this: {"table":"orderBookL2","action":"update","data":[{"symbol":"XBTUSD","id":8798952400,"side":"Sell","size":8003}]} Notice that this does not include the price, which you should already have set on the level. The process for handling updates, inserts, deletes, and partials on this stream is exactly the same as any other stream and requires no special handling. However, some tooling may make assumptions about book entries, like keying them by price. In that case, there are a few ways to handle this: Keep a local hashmap of ids you’ve seen to their price. When you receive an update or delete, look up the price in this map. This is simple but will consume some memory. Use the following formula to reverse-engineer the ID: ID = (100000000 * symbolIdx) - (price / instrumentTickSize) price = ((100000000 * symbolIdx) - ID) * instrumentTickSize Definitions: symbolIdx is the index of the instrument in the list of instruments instrumentTickSize as the instrument’s tickSize property. Due to in-flight changes of tickSize on some XBT contracts, an override may need to be applied. See below. This can be written as: // This is a compatibility change as the tick sizes of live instruments changed in-flight. If you are listing // these instruments, you must use their original tick as part of your calculations. If not, this can be ignored, // and you can use `instrument.tickSize` directly. const LEGACY_TICKS = {"XBTUSD":0.01}; function instrumentTickSize(instrument) { return legacyTicks[instrument.symbol] || instrument.tickSize; } // You should have a copy of the full instruments list on startup. // Fetch from: https://www.bitmex.com/api/v1/instrument?columns=symbol,tickSize&start=0&count=500 const instrumentsList = fetchInstrumentsFromBitMEX(); function getInstrumentAndIdx(symbol) { const instrument = instrumentsList.find((i) => i.symbol === symbol); const instrumentIdx = instrumentsList.indexOf(instrument); return [instrument, instrumentIdx]; } // To get a price from an ID: export function priceFromID(id, symbol) { const [instrument, instrumentIdx] = getInstrumentAndIdx(symbol); return ((100000000 * instrumentIdx) - id) * instrumentTickSize(instrument); } // And reversed: export function IDFromPrice(price, symbol) { const [instrument, instrumentIdx] = getInstrumentAndIdx(symbol); return (100000000 * instrumentIdx) - (price / instrumentTickSize(instrument)); } Applied to our update above, where the ID was 8798952400, you should get a resulting price of 10476: price = ((1e8 * symbolIdx) - ID) * instrumentTickSize 10476 = ((100000000 * 88) - 8798952400) * 0.01
3 notes
·
View notes
Text
Hstracker stopped working after update

#Hstracker stopped working after update install#
#Hstracker stopped working after update update#
Sep 18 16:18:49 XPS8930 sudo: pam_systemd_home(sudo:account): systemd-homed is not available: Unit not found. Sep 18 16:18:49 XPS8930 audit: CRED_REFR pid=2477 uid=0 auid=1000 ses=4 subj=unconfined msg='op=PAM:setcred grantors=pam_env,pam_fprintd acct="root" exe="/usr/bin/sudo" hostname=? addr=? terminal=/de> Sep 18 16:18:49 XPS8930 dbus-daemon: Activation via systemd failed for unit '': Unit not found. Sep 18 16:18:49 XPS8930 audit: USER_ACCT pid=2477 uid=1000 auid=1000 ses=4 subj=unconfined msg='op=PAM:accounting grantors=pam_permit,pam_time acct="simonp" exe="/usr/bin/sudo" hostname=? addr=? term> Sep 18 17:50:45 XPS8930 systemd: Failed to start Samba AD Daemon. Sep 18 17:50:45 XPS8930 systemd: rvice: Failed with result 'exit-code'. Sep 18 17:50:45 XPS8930 systemd: rvice: Main process exited, code=exited, status=1/FAILURE Sep 18 17:50:45 XPS8930 samba: exit_daemon: daemon failed to start: Samba detected misconfigured 'server role' and exited. /lib/util/become_daemon.c:121(exit_daemon) Sep 18 17:50:45 XPS8930 samba: You should start smbd/nmbd/winbindd instead for domain member and standalone file server tasks Sep 18 17:50:45 XPS8930 samba: 'server role = active directory domain controller' or to access the ntvfs file server with 'server services = +smb' or the> Sep 18 17:50:45 XPS8930 samba: At this time the 'samba' binary should only be used for either: Sep 18 17:50:45 XPS8930 samba: Copyright Andrew Tridgell and the Samba Team 1992-2020 Status: "daemon failed to start: Samba detected misconfigured 'server role' and exited. Main PID: 3959 (code=exited, status=1/FAILURE) Process: 3959 ExecStart=/usr/bin/samba -foreground -no-process-group $SAMBAOPTIONS (code=exited, status=1/FAILURE) Loaded: loaded (/usr/lib/systemd/system/rvice enabled vendor preset: disabled)Īctive: failed (Result: exit-code) since Fri 17:50:45 PDT 15s ago Here is the result of the suggested commands: ~ > sudo systemctl status rvice See "systemctl status rvice" and "journalctl -xe" for details. Job for rvice failed because the control process exited with error code. When I try to start the service, this is what I get: ~ > sudo systemctl start rvice Usershare path = /var/lib/samba/usershare Name resolve order = lmhosts bcast host wins Passwd chat = *New*UNIX*password* %n *ReType*new*UNIX*password* %n *passwd:*all*authentication*tokens*updated*successfully* Any help debugging this would be appreciated.
#Hstracker stopped working after update install#
Or would it be easier to just install from scratch andmigrate the configuration/database.After a recent software update, Samba no longer works. What I would like to ask the community is if there has been a change in networking between 10.7.7 and latest that make this problem really obvious and the fix straight forward? Frankly I'm too tired today to get to the bottom of this. I reverted to a backup of the machine from yesterday. certbot had configs for website certificates, but they certainly werent in the locations expected by the documentation. as I tried using the template from the Jellyfin docs, I didn't even get apache to start anymore. I do not have jellyfin isntalled in a docker container and my reverse proxy setup is probably not anywhere near best practice.
#Hstracker stopped working after update update#
It's running on a Ubuntu 18.04 and I did apt update / apt upgrade.Īccessing the machine via http directly from the LAN still worked, but I could no longer get access over the internet through my Apache reverse proxy.
0 notes
Text
Winamp linux

Winamp linux movie#
Winamp linux skin#
Winamp linux full#
The optional Playlist view removes the file tree and bottom controls, while the Mini view drops everything but the play controls. If you do not have an accout yet, please enter a nickname and your email address below. WinAMP for Linux Alpha 1 (Latest beta version). License and operating system information is based on latest version of the software.
Winamp linux full#
The user interface in Full view is pretty simple: menu bar on top, left-hand pane holds a file tree-style browser, upper-right pane contains play controls, lower-right pane is the playlist, and shuffle/clear/repeat buttons along the bottom. Simply follow the steps below: Run the following commands one by one in your terminal and you will have the equalizer presets of Winamp in your favorite Linux. File size 1.49 MB (features include: audio CD playback, Last.fm scrobbler, album covers, desktop notification messages, EQ, IM status update, tags, volume normalizer, text file status output, and a Twitter client. Click on the DOWNLOAD button to visit the official Winamp Site. The developers wanted to make a light and fast audio player that sticks to the core functionality of playing music, and they've posted some benchmark numbers versus other popular Linux audio apps to prove it. Instead of simply hiding unwanted capabilities by switching to a different view layout, Decibel claims that disabled functions are truly shut off, no longer using any CPU cycles or memory. | Privacy Policy | This site is not officially associated with Winamp and is provided solely as an independent fan site | A simple web search can find the official Winamp site if that is what you are looking for | Winamp logos, etc are copyright to their respective owners with any customised versions used under fair usage.Decibel is a modular audio player that allows the user to completely turn off any functionality they feel is extraneous. WACUP customise installation page (not everything shown as there's a lot):
Winamp linux skin#
WACUP initial skin selection during installation (if modern skins were selected to be installed): DeaDBeeF plays a variety of audio formats. Improved plug-in preferences page (quick enable / disable & per plug-in descriptions): DeaDBeeF is a modular cross-platform audio player, which runs on GNU/Linux distributions, macOS, Windows, BSD, OpenSolaris, other UNIX-like systems. Looks almost exactly the same, runs the same, and can use the same types of files. XMMS is basically a port of WinAmp that runs on linux/unix. Youtube playback (using the Nullsoft Winamp 2000 SP4 skin):Ĭrash Reporter on completion (not that you ever want to see this): I'd suggest Beep Media Player, it's a GTK2 port of XMMS so it'll look nicer on your new desktop and to use feels exactly like Winamp Classic. Windows/macOS/Linux 78 votes GOM Player 2. Winamp is not available for Linux but there are plenty of alternatives that runs on Linux with similar functionality. Main right-click menu & multiple visualisation options: Download WinAMP - The legendary WinAMP media player can handle MP3 audio, CDs, and streaming broadcasts. I don't know if this is news or not, but this is the first time I hear about it according to this link Winamp the Linux version is available for Linux Link The installation requires me to have the Fedora Core 4 disc 3 which I do but at home, right now I don't have it and wasn't able to.
Winamp linux movie#
Open source Winamp alternatives: MPlayer Available for: windows mac linux unix java MPlayer is an open source movie player originally made for. Ripping CDs and burning your favorite compilation are two additional features that almost make Winamp a must-have. If there's anything about WACUP that you think should be shown off here then please let us know :) Streaming music from SHOUTcast is also part of making Winamp a great piece of software.
0 notes
Text
Download Command Line Tools Mac

Mac Tool Et97 Update Software
Download Command Line Tools Mac Catalina
Download Command Line Tools (macos Mojave Version 10.14) For Xcode 10.3
Download from the Mac App Store. Additional Downloads. Get the latest beta and older versions of Xcode. To view downloads, simply sign in with your Apple ID. Command Line Tools & Older Versions of Xcode. See the latest advances in Xcode presented at WWDC and other events. Help and Support. Get step-by-step guidance. You can download the Xcode command-line tools in either of two ways: To install the necessary Xcode tools using Xcode on the Mac: Start Xcode on the Mac.
Command-line tools on macOS Catalina is essential to running of commands and development task. Just like with all new versions of macOS you have to install command-line tools to run commands.
Aqua Command-Line Tools provides point-and-click user interfaces for controlling the command-line tools shipped with Mac OS X. With Aqua Command-Line Tools, the layout of each tool's graphical interface makes it easy to quickly find and activate just the features you want.
$gh issue list
Showing 4 of 4 issues in cli/cli #16Improving interactions with protected branches #14PR commands on a detached head #13Support for GitHub Enterprise (enhancement) #8Add an easier upgrade command (bug)
gh pr status
Relevant pull requests in cli/cli Current branch There is no pull request associated with [fix-homepage-bug] Created by you You have no open pull requests Requesting a code review from you #100Fix footer on homepage[fix-homepage-footer] ✓ Checks passing- Review pending
gh pr checkout 12

remote: Enumerating objects: 66, done. remote: Counting objects: 100% (66/66), done. remote: Total 83 (delta 66), reused 66 (delta 66), pack-reused 17 Unpacking objects: 100% (83/83), done. From https://github.com/owner/repo * [new ref] refs/pull/8896/head -> patch-2 M README.md Switched to branch 'patch-2'
gh pr create
Creating pull request for feature-branch into main in ampinsk/test ? Title My new pull request ? Body [(e) to launch vim, enter to skip] ? What's next? Submit http://github.com/owner/repo/pull/1
gh pr checks
All checks were successful 1 failing, 3 successful, and 1 pending checks -CodeQL3m43shttps://github.com/cli/cli/runs/123 ✓build (macos-latest)4m18shttps://github.com/cli/cli/runs/123 ✓build (ubuntu-latest)1m23shttps://github.com/cli/cli/runs/123 ✓build (windows-latest)4m43shttps://github.com/cli/cli/runs/123 ×lint47shttps://github.com/cli/cli/runs/123
gh release create 1.0
? Title GitHub CLI 1.0 ? Release notes Write my own ? Is this a prerelease? No ? Submit? Publish release https://github.com/octocat/.github/releases/tag/1.0
gh repo view
cli/cli GitHub’s official command line tool GitHub CLI gh is GitHub on the command line. It brings pull requests, issues, and other GitHub concepts to the terminal next to where you are already working with git and your code. Image: screenshot of gh pr status →https://user-images.githubusercontent.com/98482/84171218-327e7a80-aa40-11ea-8cd1-5177fc2d0e72.png View this repository on GitHub: https://github.com/cli/cli
gh alias set bugs 'issue list --label='bugs'
- Adding alias for bugs: issue list --label='bugs' ✓ Added alias. $ gh bugs Showing 2 of 7 issues in cli/cli that match your search #19Pagination request returns empty JSON (bug) #21Error raised when passing valid parameters (bug)
Mac Tool Et97 Update Software
Mac users with macOS Mojave and macOS Catalina, and new operating systems in place can now install Command Line Tools from the Xcode IDE without needing to install the entire Xcode package, or opening an Apple developers account.
In this article, we cover how you can install this optional and highly useful Command Line Tools package.
X code 11. Credit: developerinsider
What is the Xcode Command Line Tools package?
For Mac power users — we wouldn't recommend downloading this unless you are comfortable with Terminal — the Xcode Command Line Tools package gives you a complete Unix toolkit accessible through Terminal. No developer account needed and you don't need to download the entire — and quite large Xcode package of executables.
Within the Xcode Command Line toolkit, Mac users gain access to numerous useful tools, utilities, and compilers, including make, GCC, clang, perl, svn, git, size, strip, strings, libtool, cpp, and many others. All of these commands are a default part of Linux systems and programs.
We recommend following these steps for those with the following operating systems running on a Mac: macOS 10.13 High Sierra, macOS 10.14 Mojave, and macOS 10.15 Catalia onward. It isn't always possible to download these Xcode Command Line Tools, following these steps, on Mac’s running older operating systems. Other ways to install command tools and gcc (without needing Xcode) is available through the Apple Developer website.
Here is how you install Xcode Command Line Tools.
How to install Xcode Command Line Tools?
Go to Terminal in /Applications/Utilities/.
Input the following command string in Terminal: xcode-select —install
In the same way when you are downloading new software and apps, a popup update window will appear asking you: “The xcode-select command requires the command line developer tools. Would you like to install the tools now?”
Select confirm by clicking Install.
Wait for the Xcode Command Line Tools package to install. It is around 130 MB and usually installs fairly quickly; although it depends on your connection.
Once everything is installed, the installer goes away and you should be able to any of the new commands that you’ve now got access to. Enjoy using your new Unix command line tools!
With this new download, you should have access to 61 Unix command line tools. For example, one of the advantages of having these tools is you can install new apps and software directly from the source code instead of needing to go through the package manager and usual download route.

To access or view everything you've now got, go to the following directory:
/Library/Developer/CommandLineTools/
Please note, this is the root /Library of your macOS/OS X, not the ~/Library directory.
All of these tools can also be found in: /Library/Developer/CommandLineTools/usr/bin/
What happens if I encounter problems downloading these?

If you get an error message that says “Can’t install the software because it is not currently available from the Software Update server”, it means you've already got the Xcode package on your Mac. Mac OS X 10.9 onward, Xcode was already installed, which is why you aren't able to download these tools. However, what you can do is uninstall the entire Xcode app if you'd prefer to only access these tools and not a whole load of software that isn’t going to be of much use.
Watch out for Xcode junk
The Xcode junk is one of those types of clutter that is keeps accumulating in remote places on your Mac. It could take up a few gigs of your space. The only app that seems to address this problem is CleanMyMac X by MacPaw. It’s loved by many Mac developers because it collects those specific types of development junk, like Xcode or outdated libraries.
Download Command Line Tools Mac Catalina
Once you launch the app, click on System Junk > Scan. Then, click “Review Details”
Download Command Line Tools (macos Mojave Version 10.14) For Xcode 10.3
CleanMyMac X is a powerful Mac performance improvement app. It makes your Mac as good as new. Let it scan your system and clear out any unwanted Xcode, development and system junk that is taking up too much space and cluttering up your Mac. In a few clicks, your Mac could be running smoother, quicker and more efficiently.
0 notes
Text
RedHat Certified System Administrator - RHCSA


Red-Hat-Enterprise-Linux An IT professional who has earned the RedHat Certified System Administrator (RHCSA®) is able to perform the core system administration skills required in Red Hat Enterprise Linux environments. The credential is earned after successfully passing the Red Hat Certified System Administrator (RHCSA) Exam (EX200). Prove your skills and knowledge A Red Hat Certified System Administrator (RHCSA) is able to perform the following tasks: Understand and use essential tools for handling files, directories, command-line environments, and documentationOperate running systems, including booting into different run levels, identifying processes, starting and stopping virtual machines, and controlling servicesConfigure local storage using partitions and logical volumesCreate and configure file systems and file system attributes, such as permissions, encryption, access control lists, and network file systemsDeploy, configure, and maintain systems, including software installation, update, and core servicesManage users and groups, including use of a centralized directory for authenticationManage security, including basic firewall and SELinux configuration Is this certification right for you? The RedHat Certified System Administratorcertification is designed for: Experienced Red Hat Enterprise Linux system administrators seeking validation of their skillsStudents who have attended Red Hat System Administration I and II and are on the path to earn RHCSA certificationExperienced Linux system administrators who require a certification either by their organization or based on a mandate (DOD 8570 directive)IT professionals who are on the path to earn a Red Hat Certified Engineer (RHCE®) certificationRHCEs who are non-current or who are about to become non-current and wish to re-certify as RHCEs The best way to learn is to do In preparation to earn the RedHat Certified System Administrator (RHCSA) Red Hat recommends the following: For Windows system administrators Red Hat System Administration I (RH124)Red Hat System Administration II (RH134) For Linux or UNIX administrators RHCSA Rapid Track Course (RH199)
Course content summary
Managing users and groups, files, and file permissions Updating software packages with yum Managing and troubleshooting SystemD during the bootNetwork configuration and basic troubleshooting Managing local storage and creating and using file systems Firewall management with firewalld Managing kernel-based virtual machines (KVMs) Automating installation of Red Hat Enterprise Linux using Kickstart In preparation for RHCSA Exam RHCSA exam candidates should be able to accomplish the tasks below without assistance. These have been grouped into several categories. Understand and use essential tools Access a shell prompt and issue commands with correct syntaxUse input-output redirection (>, >>, |, 2>, etc.)Use grep and regular expressions to analyze textAccess remote systems using SSHLog in and switch users in multiuser targetsArchive, compress, unpack, and uncompress files using tar, star, gzip, and bzip2Create and edit text filesCreate, delete, copy, and move files and directoriesCreate hard and soft linksList, set, and change standard ugo/rwx permissionsLocate, read, and use system documentation including man, info, and files in /usr/share/doc Operate running systems Boot, reboot, and shut down a system normallyBoot systems into different targets manuallyInterrupt the boot process in order to gain access to a systemIdentify CPU/memory intensive processes and kill processesAdjust process schedulingLocate and interpret system log files and journalsPreserve system journalsStart, stop, and check the status of network servicesSecurely transfer files between systems Configure local storage List, create, delete partitions on MBR and GPT disksCreate and remove physical volumesAssign physical volumes to volume groupsCreate and delete logical volumesConfigure systems to mount file systems at boot by universally unique ID (UUID) or labelAdd new partitions and logical volumes, and swap to a system non-destructively Create and configure file systems Create, mount, unmount, and use vfat, ext4, and xfs file systemsMount and unmount network file systems using NFSExtend existing logical volumesCreate and configure set-GID directories for collaborationConfigure disk compressionManage layered storageDiagnose and correct file permission problems Deploy, configure, and maintain systems Schedule tasks using at and cronStart and stop services and configure services to start automatically at bootConfigure systems to boot into a specific target automaticallyConfigure time service clientsInstall and update software packages from Red Hat Network, a remote repository, or from the local file systemWork with package module streamsModify the system bootloader Manage basic networking Configure IPv4 and IPv6 addressesConfigure hostname resolutionConfigure network services to start automatically at bootRestrict network access using firewall-cmd/firewall Manage users and groups Create, delete, and modify local user accountsChange passwords and adjust password aging for local user accountsCreate, delete, and modify local groups and group membershipsConfigure superuser access Manage security Configure firewall settings using firewall-cmd/firewalldConfigure key-based authentication for SSHSet enforcing and permissive modes for SELinuxList and identify SELinux file and process contextRestore default file contextsUse boolean settings to modify system SELinux settingsDiagnose and address routine SELinux policy violations As with all Red Hat performance-based exams, configurations must persist after reboot without intervention. Red Hat reserves the right to add, modify, and remove objectives. Such changes will be made public in advance through revisions to this document. https://www.redhat.com/en/services/training/ex200-red-hat-certified-system-administrator-rhcsa-exam Read the full article
0 notes
Text
300+ TOP SPLUNK Interview Questions and Answers
SPLUNK Interview Questions for freshers and experienced :-
1. What Is Splunk? Splunk is Google for your machine data.It’s a software/Engine which can be used for searching, visualizing, Monitoring, reporting etc of your enterprise data. Splunk takes valuable machine data and turns it into powerful operational intelligence by providing real time insight to your data through charts,alerts,reports etc. 2. What would you use to edit contents of the file in Linux? Describe some of the important commands mode in vi editor? Various editors in Linux file system- vi,jedit, ex line editor or nedit Two important modes are as below – We can press ‘Esc’ to switch from one mode to another. However, we can press ‘i’ to enter insert mode- Command mode Insert mode 3. How do you log in to a remote Unix box using ssh? ssh your_username@host_ip_address 4. How you will uncompressed the file? How to install Splunk/app using the Splunk Enterprise .tgz file tar -zxvf file_name.tar.gz tar xvzf splunk_package_name.tgz -C /opt default directory /opt/splunk 5. what does grep() stand for? how to find difference in two configuration files? General Regular Expression Parser. egrep -w ‘word1|word2’ /path/to/file diff -u File_name1.conf File_name2.conf 6. Talk about Splunk architecture and various stages Data Input Stage: Data Storage Stage: Data Searching Stage: Universal forward > Heavy Forward (Optional) > Indexers > Search head Deployment Server- License master- 7. Types Of Splunk Forwarder? Universal forwarder(UF) -Light weight Splunk instance- can’t parse or index data Heavy forwarder(HF) – full instance of Splunk with advance functionality of parsing & indexing 8. Precedence in Splunk and discuss some of the important conf files When 2 or more stanzas specify a behaviour that effects same item, then precedence is calculated based on stanza ASCI We can use priority key to specify highest/lowest priority etc Important conf files props.conf indexes.conf inputs.conf transforms.conf server.conf 9. What is summary index in Splunk? The Summary index is default summary which is used to store data as a result of scheduled searches over period of time. It helps to efficiently process large volume of data. 10. What are types of field extraction. How to mask a data in either of case Search time field extraction Index time field extraction

SPLUNK Interview Questions 11. What do you mean by roles based access control? It is very crucial to provide only appropriate roles to appropriate team. This will prevent unauthorized access to any app or data for that matter. It is very important that we provide access very meticulously and limit their search capability by providing access to only those indexes which needs to be. 12. What is null queue Null queue is an approach to trim out all the unwanted data. 13. Trouble shooting Splunk errors in splunk See if the process is running – ./splunk status IF running go and check log for any latest errors using below command- tail 20 $SPLUNK_HOME/var/log/log/splunk/splunkd.log Splunk crash also happens because of low disk memory- sheck if tere is any crash*log files Check log,splunkd.log,metrics.log or web*log In order to check any conf file related concerns use btool – ./splunk btool props list –debug >/tmp/props.conf Search for errors and warning by typing- Index=_internal | log_level=error OR log_level=warn* Check for the search directory for recent search at – $SPLUNK_HOME/var/ran/splunk/dispatch Enable debug mode.Splunk software has a debug parameter (–debug) that can be used when starting splunk Check for log file OR use below search query – index=_introspection 14. What are the types of search modes supported in splunk? Fast mode Verbose mode Smart mode 15. What is difference between source & source type Source – Identifies as source of data Source type- in general it refers to data structure of events or format of data Different sources may have same source type Command to restart splunk web server /opt/splunk/bin/splunk start splunkweb 16. How to use btool for splunk conf file approach /opt/splunk/bin/splunk cmd btool input list 17. Create new app from templet /opt/splunk/bin/splunk create app New_App -templet sample_App 18. Rollback your aplunk web configuration bundle to previous version /opt/splunk/bin/splunk rollback cluster-bundle 19. To specify minimum disk usage in splunk ./splunk set minfreemb = 20000 ./splunk restart 20. Command to change splunkweb port to 9000 via CLI ./splunk set web-port 9000 21. How to turn down a peer without affecting any other peer of cluster? ./splunk offline 22. How to show which deployment server in configured to pull data from? ./splunk show deploy-poll 23. CLI to validate bundles ./splunk validate cluster-bundle 24. How to see all the license pool active in our Splunk environment? ./splunk list license 25. Which command is used to the “filtering results” category- explain? “search”, “where”. “Sort” and “rex” 26. What is join command and what are various flavours of join command. Join command is used to combine result of a subsearch with result of a search- One or more fields must be common to each results set Inner join- result of inner joint do not include event with NO MATCH Left/Outer join- It include events in the main search and matching having correct field values ..|join type=inner P_id {} 27. Tell me the syntax of Case command It’s a comparison & conditional function Case (X,”Y”,…) X- Boolean expression that are evaluated from first to last. The function defaults to NULL if non is true ..| eval description=case(statsu==20,”OK”,status==404,”NOT FOUND” 28. Which role can create data model Admin & power user 29. Splunk latest version Welcome to Splunk Enterprise 7.2 – Splunk Documentation 30. Which app ships with splunk enterprise Search & reporting Home App 31. How do we convert unix time into string and string back to unix time format strftime(X,Y) : Unix to string as per format strptime(X,Y) : String to UNIX 32. How do we find total number of host or source type reporting splunk instance. Report should consider host across the cluster |metadata type=hosts index=* | convert ctime(firstTime) | convert ctime(lastTime) |convert ctime(recentTime) 33. What is Splunk? Why Splunk is used for analysing machine data? Splunk is a platform for analysing machine data generated from various data sources such as network, server, IOT and so on. Splunk is used for analysing machine data for following reasons Business Intelligence Operational visibility Proactive monitoring Search and Investigation 34. Who are the competitors of Splunk in the market? Why is Splunk efficient? Biggest competitors of Splunk are as follows Sumo logic ELK Loglogic Splunk is efficient as it comes with many inbuilt features like visualization, analysis, apps, Splunk can also be deployed in cloud through Splunk cloud version. Other platforms requires plug in to get additional features. 35. What are the benefits of getting data using forwarders? Data is load balanced by default Bandwidth throttling Encrypted SSL connection TCP connection 36. What happens if License master is unreachable? License Slave sets 72 hour timer and try to reach License Master, after which search is blocked in specific license slave until Master is reachable. 37. What is the command to get list of configuration files in Splunk? Splunk cmd btool inputs list –debug 38. What is the command to stop and start Splunk service? ./splunk stop ./splunk start 39. What is index bucket? What are all stages of buckets? Indexed data in Splunk is stored in directory called bucket. Each bucket has certain retention period after which data is rolled to next bucket. Various stages of buckets are Hot Warm Cold Frozen Thawed 40. What are important configuration files in Splunk? Props.conf inputs.conf outputs.conf transforms.conf indexes.conf deploymentclient.conf serverclass.conf 41. What is global file precedence in Splunk? System local directory – highest priority App local directory App default directory System default directory – lowest priority 42. What is difference between stats and timechart command? Stats Timechart Used to represent statistics data in tabular format Used to represent search result in graph Can use multiple fields Uses _time as default field in x-axis 43. What is lookup command? Lookup command is used to reference fields from an external csv file that matches fields in your event data. 44. What is the role of Deployment server? Deployment server is a Splunk instance to deploy configuration to other Splunk instances from centralized location. 45. What are the default fields in Splunk? Host Source Sourcetype _time _raw 46. What is Search Factor (SF) and Replication Factor (RF) in Splunk? Search factor determines number of searchable copies of data maintained by index cluster. Dafult search factor is 2.Replication factor is the number of copies of data cluster maintains. Search factor should be always less than or equal to Replication factor. 47. What is the difference between Splunk apps and add-ons? Splunk apps contains built-in configurations, reports and dashboards, Splunk add-ons contains only built-in configurations and not visualization (reports or dashboards) 48. How can you exclude some events from being indexed in Splunk? This can be done by using nullQueue in transforms.conf file. For Example: transforms.conf REGEX = DEST_KEY = queue FOMAT = nullqueue 49. Where does Splunk default configuration file located? It is located under $Splunkhome/etc/system/default 50. Discuss about the sequence in which splunk upgrade can be done in a clustered environment? Upgrade Cluster Master Upgrade Search Head Cluster Upgrade Indexer Cluster Upgrade Standalone Indexers Upgrade Deployment Server 51. How do we sync and deploy configurational files and updates across multiple deployment servers in a large multi layered clustered? On one of the deployment server, use below commands- $cd ~ $./DS_sync.sh $/opt/splunk/bin/splunk reload deploy-server -class ServerClassName 52. What would you use to view contents of a large file? How to copy/remove file? How to look for help on a Linux? tail -10 File1 it would show last 10 rows copy file- cp file_name . Remove file command- rm -rf directory_name Manual/help command – man command_name SPLUNK Questions and Answers Pdf Download Read the full article
0 notes
Photo

A Beginner’s Guide to Feathers.js
In this article, you’ll learn how to build a RESTful API Server in Node.js using Feathers.
An API server, also known as an Application Server, is a program that provides data to front-end applications. It also handles business logic in the back end and provides restricted access to an organization's database. It doesn't just prevent unauthorized persons from accessing the data; it can also restrict logged-in users from accessing or altering data if they don't have permission to do so.
Every application you build will need to provide a service to its end users. For that, your application will need data to process. You can use remote APIs to create a new service. For most applications, though, you’ll need to manage your own data store. A popular option is to use online data storage services such as Firebase. This way, you don't have to deal with the nitty gritty details of running a distributed database server. However, your project needs may require the use of a full-fledged, in-house database management system such as MongoDB or Oracle. For your front-end application to access the data stored in the database, you’ll need a server application that sits between the database and the front-end application.
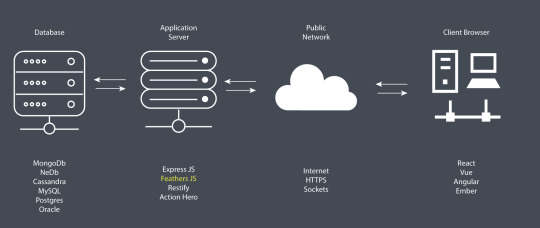
As illustrated in the diagram above, the work of an application server is to access data from a database using SQL or NoSQL commands and convert into a format that front-end applications (client browser) can understand — such as JSON. In addition, the application server can use various security protocols — such as HTTPS encryption and token authorization — to ensure that communication between the database and the client application is safe and secure. One main advantage of using such an architecture is that you can deploy applications that target different platforms — desktop, mobile, web, and so on — using the same application server. It’s also very easy to scale your application horizontally in order to serve more users efficiently with fast response times.
We’re going to build a simple API server and demonstrate the various features that Feathers provides.
Prerequisites
Before you begin following this tutorial, you’ll need to have a good foundation in the following topics:
ES6 JavaScript
creating Express apps
creating RESTful APIs with Express
Feathers is built on top of Express, a minimalist web framework for Node.js. If you’ve completed the tutorials demonstrated in the links, you’ll realize that it's quite tiring building RESTful APIs using just Express. With Feathers, most of the repetitive work is already done for you. You only need to focus on configuring and customizing code. Let's dive into the code and learn how this web framework works.
Project Creation
To get started with Feathers, you’ll need to install its command line application globally:
npm install -g @feathersjs/cli
Next, create a new API project using the commands below:
mkdir contacts-api cd contacts-api feathers generate app
Below are the options I chose. Feel free to choose any testing framework. Unfortunately, testing is beyond the focus of this article, so it won't be covered here. Personally, I like simplicity, and that’s why I went with Jest.

Once the installation is complete, you can open you favorite code editor to look at the project files.
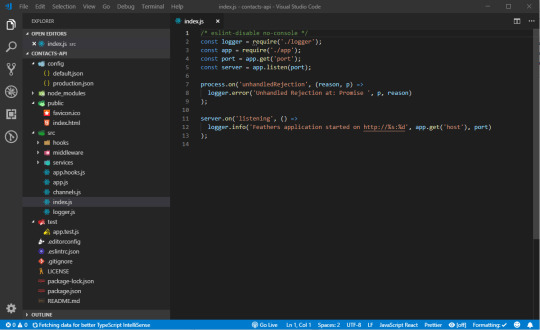
If you’ve completed the Express tutorials I listed in the prerequisites section, you shouldn't be intimidated by the generated code. Here's a brief summary that describes the folders and files.

Don't be too concerned with what each file does right now. You’ll come to understand how they work in the course in this tutorial. For now, let's confirm that the tests are working.
Linting
To ensure our project is compliant with the defined ESLint rules, just run the command npm test. If you’re on a Unix or Linux platform, this should run fine. If you’re on Windows, there are few things you need to adjust for the tests to run successfully.
First, go to package.json and look at the scripts section. Change the test line to this:
"scripts": { "test": "npm run eslint && SET NODE_ENV= npm run jest", },
Next, if you’ve installed Prettier in Visual Studio Code, you'll need to change the single quote setting to true in the Workspace settings tab:
{ "prettier.singleQuote": true }
Finally, make sure that, when you create or edit any file, the line ending is LF. If you’re using Visual Studio Code or a similar editor, you can check the current line ending style at the status bar. If it says CRLF, change to LF. Making those changes will help you pass the lint tests. Unfortunately, to make the tests pass will require a bit more work, which won't be covered here.
Let's look at how we can generate a CRUD RESTful interface.
Generate Service
Building a Restful CRUD API interface in Express requires a bit of work. In Feathers, all you have to do is execute a single command, answer a few questions and have the code generated for you:
$ feathers generate service ? What kind of service is it? NeDB ? What is the name of the service? contacts ? Which path should the service be registered on? /contacts ? What is the database connection string? nedb://../data force config\default.json create src\services\contacts\contacts.service.js force src\services\index.js create src\models\contacts.model.js create src\services\contacts\contacts.hooks.js create test\services\contacts.test.js
We’ll be using NeDB database for this tutorial. Feathers does support both SQL databases such as MySQL and NoSQL databases such as MongoDB. However, installing a database system — whether on your machine or on a cloud server — requires a certain amount of time configuring it. NeDB, on the other hand, is an in-memory database that’s 100% JavaScript and supports a subset of MongoDB API. There’s no configuration needed; you just install it. It's a great database for prototyping and testing new applications. This is what we’ll use in this tutorial.
Let's briefly look at some of the files that have been generated using this command:
services/contacts/contact.service.js. This is a Feathers service that provides the CRUD API endpoints for /contacts. Pretty small, isn't it? This is because Feathers does the heavy lifting for us. It saves us from writing boilerplate CRUD code.
services/contacts/contact.hooks.js. This is where we customize how the CRUD logic behaves. We have the before section, where we can check or change data before Feathers reads or writes to the database. We also have an after section, where we can check or change the results from the database before it’s sent to the client application. We can do things like restricting access, data validation, performing join operations and calculating values for additional fields or columns.
models/contacts.model.js. This where we define a model and attach it to a database table. This is also where we define a schema which can be used to validate fields when a new record is inserted or updated. Unfortunately, NeDB doesn’t support schemas. However, I've provided an example of a model that’s connected to MongoDB, which supports the schema feature via the mongoose adapter:
"use strict"; const mongoose = require("mongoose"); const Schema = mongoose.Schema; require("mongoose-type-email"); const contactsSchema = new Schema({ name: { first: { type: String, required: [true, "First Name is required"] }, last: { type: String, required: false } }, email: { type: mongoose.SchemaTypes.Email, required: [true, "Email is required"] }, phone: { type: String, required: [true, "Phone is required"], validate: { validator: function(v) { return /^\+(?:[0-9] ?){6,14}[0-9]$/.test(v); }, message: "{VALUE} is not a valid international phone number!" } }, createdAt: { type: Date, default: Date.now }, updatedAt: { type: Date, default: Date.now } }); const contactsModel = mongoose.model("contacts", contactsSchema); module.exports = contactsModel;
Despite the limitations of using NeDB, it’s still a great database for prototyping. Most NoSQL databases will allow you to submit data using any structure without having to define a schema first. It’s wiser to implement a schema once the project requirements have been realized. With a schema in place, Feathers will perform field validation for you using the rules you’ve defined. You'll need a production-ready database such as MongoDB to be able to define a schema. Do note the configuration for the development database is defined at config/default.json:
"nedb": "../data"
This is where database credentials are provided. We also have another config file called config/production.json. This is the production database configuration that’s used when you deploy your Feathers app. It's important to use a separate database during development. Otherwise, you run the risk of deleting or corrupting business operational data on the production database.
Now that we have our CRUD service for contacts set up, it's time to take it for a spin. You can start the Feather server using the command npm start. Do note that this server doesn’t support hot reloading. So you'll need to restart it every time you make a change to the code. In order to interact with our Feathers app, we’ll need an API browser tool such as Postman or Insomnia. I'll be using Insomnia in this tutorial, but you can follow along easily with Postman or any other tool.
Create a new GET request (press Ctrl + N) and give it the title “List Contacts”. In the URL section, enter http://localhost:3030/contacts. When you hit the Send button, you should have the following view:

Nothing! Our database is currently empty, so we need to create some new contacts. Create a new request called Create Contact. Fill in the rest of the fields as shown below:
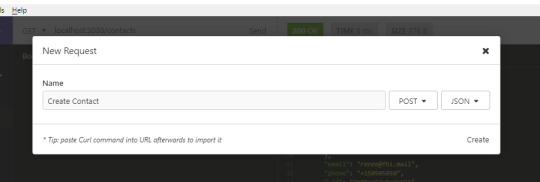
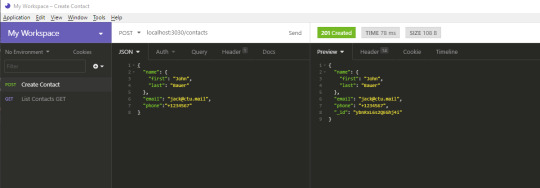
In case you forgot to change the METHOD to POST in the above form, you can do so later. Change the method to POST and change the Body tab to JSON. Copy the following data in the JSON tab:
{ "name": { "first": "Jack", "last": "Bauer" }, "email": "[email protected]", "phone": "+1234567" }
When you hit the Send button, you should get the following response. Notice that an _id has been generated for your new contact.
Go back to List Contacts and hit the Send button again. You should get the following result:
{ "total": 1, "limit": 10, "skip": 0, "data": [ { "name": { "first": "Jack", "last": "Bauer" }, "email": "[email protected]", "phone": "+1234567", "_id": "ybnRxL6s2QEGhj4i" } ] }
Go back to Create Contact and post a couple of new records:
{ "name": { "first": "Chloe", "last": "O'Brian" }, "email": "[email protected]", "phone": "+1987654" }
{ "name": { "first": "Renee", "last": "Walker" }, "email": "[email protected]", "phone": "+150505050" }
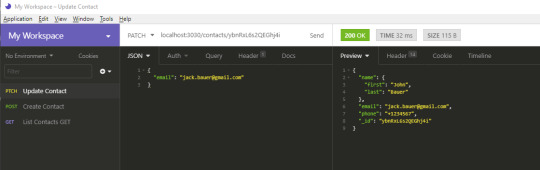
Let's now perform an update. For this, we won't use the UPDATE HTTP method. This method will completely overwrite a record. What we want to do is just overwrite a single field, not the the whole record. For that, we’ll use PATCH. Create a new request, Update Contact as illustrated below:
In the URL field, put http://localhost:3030/contacts/{_id}. Replace {_id} with the ID of the first record. Place the following data into the JSON tab:
{ "email": "[email protected]" }
Hit the Send button. You should get the following result:
Notice how the the rest of the fields remain intact. Next, we’re going to delete a record. This one is easy. Just create a new DELETE request and name it Delete Contact. In the URL field, use the format http://localhost:3030/contacts/{_id}. Just like before, replace {_id} with the ID of the record you want to delete. Hitting Send will delete that record for you. You can confirm by running the List Contact request again.
We've just verified that all CRUD operations are running okay. In the next section, we’ll learn how to set up authentication.
The post A Beginner’s Guide to Feathers.js appeared first on SitePoint.
by Michael Wanyoike via SitePoint https://ift.tt/2OjpNpu
0 notes
Text
CentOS - Setup and Configure VNC Server - How To

In this post we'll see how to setup and configure a VNC Server on a Linux CentOS 7.x server machine to allow remote connections from any VNC client - such as TightVNC, RealVNC and the likes. More specifically, we'll do that using the tigervnc-server software, a free tool that allows to do just that. Before proceeding, let's briefly recap what VNC is about.
Introduction
The acronym VNC stands for Virtual Network Computing and is a server-client protocol that allows a client machine (running a VNC client) to connect to and control a remote computer (powered by a VNC server). The software was originally developed by the Olivetti & Oracle Research Lab in Cambridge, UK as an open-source initiative and its source code is still available, as of today, under the GNU General Public License. Depending on the VNC server software, the client will connect to the currently active runtime desktop (such as some "modern" softwares like Teamviewer or AnyDesk) or to a stand-alone virtual desktop, just like the Windows Remote Desktop RDP protocol: the latter behaviour is arguably more powerful and secure, especially if we need to control a server machine, because each session will be a unique environment configured with the permissions and grants of the connected user. That's why we're chosing TigerVNC, which works exactly like that by starting parallel sessions of the machine desktop environment (Gnome, KDE or other GUI) on the connecting client VNC desktop: this basically means that a standalone virtual desktop will be created for each separate connection - which is precisely what we want.
Installing TigerVNC
Now that we know what are we talking about, let's see how we can setup and configure TigerVNC under our CentOS environment. The first thing to do is to install the tigervnc-server software package by opening a terminal session and issuing the following command with root privileges: Right after that, you should create a dedicated VNC user to connect with (with a dedicated password). To do that, type the following: We'll say it only once: never do that with the root user. Enabling VNC for the root user would create a serious security risk to your system that you'll generally want to avoid. Leaving the root user out of VNC and configuring a dedicated account with limited permissions instead - like the one in the above example - is definitely a better choice. Once you created the vncuser and its login password, you also need set a VNC-unique password for that user. This can be done with the following command: (the first line can be omitted if we are actually connected with vncuser beforehand). The next thing to do is to create a VNC configuration file for the vncuser: the fastest way to do that is to copy the VNC generic template file - located in the /lib/systemd/system/ folder - and then modify it according to our need: That "1" which we put in the new filename is the display number that will be used for that specific service instance. That's important to know, because it will also determine the TCP port that our VNC server will be listening to, which is 5900 + the display number: the first one will be 5901, then 5902 and so on. Right after the copy, you need to edit the new file using vi, nano or another text editor and replace the placeholder with the name of the user created a short while ago (vncuser in our scenario). Here's how the file should look after the update (minus the long commented part at the beginning): As soon as you do that, you can reload the VNC daemon and start the vncserver @1 with the commands below: Before proceeding, it could be wise to check if the service is running by issuing the systemctl status command... ... and create the symlink to have it always executed on system startup using the following command: Another check you can do before trying to connect to our server is to take a look to the active network sockets using the ss command: if everything works properly, you should see a VNC server running and listening on port TCP 5901. Here's the command to execute... ... And this should be the result: If you can see this, it means that everything has been setup correctly.
Firewall configuration
Since our VNC service is listening to port TCP 5901, you need to be sure that such port is open and accessible by external clients: therefore, if you have a firewall installed, you should create an appropriate rule to allow VNC clients to connect. How many ports to open will depend by how many instances of VNC servers you'll going to need: in our scenario, you only made 1, therefore you only need to open the first allocated VNC port: TCP 5901, just like we said. Here's the command to open that port on firewalld: Needless to say, you can also restrict that port for specific groups, IP addresses, network cards or other simple or complex firewall rules: that's entirely to you, depending on your network environment's configuration and how much you want to be safe.
Installing a GUI
If you already have GNOME, KDE or other desktop environments installed on our system you can skip this step, otherwise you'll need to add one: the TigerVNC server will start a parallel instance of a given desktop environment for each login session, meaning that we need to have one - otherwise it won't work. GNOME If you really want the great (but heavy-weight) GNOME, type the following: Xfce If you want a lightweight alternative, we can suggest Xfce - a free & open source desktop environment for Unix-like platforms which work perfectly with TigerVNC. Don't misunderstand us here, GNOME works fine as well, but it's quite space-and-resource-intensive: if you want to save resources on your server machine, Xfce would arguably be a better choice. To install it, type the following: Additional settings for Xfce If you've chosen to use Xfce, you'll also need to change the file to execute when the VNC session starts. To do that, edit the /home//.vnc/xstartup file and change the exec entry (usually line 4)from etc/X11/xinit/xinitrc to startxfce4, just like the following: That's about it.
Connecting with VNC Client
Now that everything
Troubleshooting
In case your client is unable to establish a working VNC connection, you need to checkup the following: Connection issues -> Firewall configuration: if you see pop-up errors saying that the client cannot connect to the remote host, you need to check your network & firewall configuration to be sure that there aren't blocking issues that could prevent the client from connecting to server port TCP 5901. Black screen with mouse -> YUM update or GUI reinstall: if you see a black screen with the mouse pointer working, that probably means that your VNC connection is working fine but there is something that prevents Desktop Environment GUI from starting properly. The best things you can try to fix such odd behaviour are: Perform a yum update to install the newest versions of TigerVNC and the GUI itself. Be sure to watch out for any issue during the install phase that could prevent them from installing/updating properly. Uninstall and reinstall the GUI using yum remove / yum group remove and yum groupinstall again. If it still doesn't work, you might want to try out a different GUI to see if the problem persists.
Conclusion
That's about it, at least for the time being: we hope that this guide could help other System Administrators who want to connect to their servers with the VNC protocol! Read the full article
0 notes
Text
The Power To Serve: Setting Up FreeBSD
Most would agree that IT and Computer geeks have an intense passion for Open Source Software and quality code. Due to this, Linux is a staple in the tech community... But is it the only option? Enter FreeBSD, an Operating System whose roots trace all the way back to the original UNIX. Buckle up, and prepare for an introduction to FreeBSD and setting it up yourself.
Wait, Slow Down. What's FreeBSD?
Back in the 1970s and 1980s, AT&T Bell Labs invented UNIX and would go on to sell commercial copies of said Operating System to various colleges. The awesome thing was that AT&T shipped source code bundled right in! One of these places was the University of California at Berkeley, who aptly wrote more tools for UNIX such as vi and the original Berkeley Fast Filesystem (what most Linux/UNIX Filesystems are based on nowadays). Eventually UC Berkeley went on to redistribute their own variant of UNIX called BSD, setting up a hotline at 1-800-ITS-UNIX. This ROYALLY pissed off AT&T and they sued for copyright infringement. For reference, around this time Linus Torvalds was beginning the Linux Kernel development.
Needless to say, UC Berkeley won the case almost totally- so much so that AT&T only kept copyright to 3-4 files of the entire UNIX system. This enabled the release of i386BSD, which spawned the FreeBSD, NetBSD and OpenBSD projects. Their licenses are all very close to the original license of the code which is extremely permissive and allows the user to do almost anything except take credit for the work, sue the developer and remove the license.
Cool! Let's Install It!
Awesome! At this time of writing, the latest stable version of FreeBSD is 12.1. If you browse to the FreeBSD Site, you'll notice a big "Download Now" button. For this series of blog posts, we'll install 12.1 because stability matters for a daily-driver laptop. Pick the correct CPU architecture and you'll be taken to a web open directory. There are multiple images available for download, generally DVD1 and memstick images have all installation files embedded into the image so no network connection is needed to install the system.
Now that the image is downloaded, pick an installation medium. For usb, you would insert a thumb drive and type sudo dd if=/path/to/FREEBSDIMAGE of=/dev/sdX status=progress, where the "if" argument is the location of your downloaded FreeBSD installer image and the "of" argument is the name of your drive under Linux.
After this is done, let's yank out our computer and boot into the installer! On most laptops, there is a key combination to enter the BIOS, like spamming F12 or delete on boot. Once you've done this, allow USB booting, disable secure boot, and configure your flash drive to boot first. With the flash drive plugged in, you should be greeted by a FreeBSD bootloader, waiting a moment will take you to a graphical menu that looks like this:
The FreeBSD Installer
Select your responses with the arrow keys, and press enter to continue.
In prompts like this one, you'll need to use the space bar to alter selections.
The menu is very simple and easy to go through... Once you arrive at what disk format to use, the most common option FreeBSD users select is entire-disk ZFS.
Remember to select your disks in the ZFS Pool! The original option is stripe/0 disks, but you still need to go into it's submenu and select a disk even if you don't want to use the mirroring abilities of ZFS. There is an option to enable encryption, enabling it will provide a prompt later for your disk encryption password. If you're content with the settings, continue on.
After this, you'll be greeted by a menu of what packages you'd like to install, selectable by spacebar and arrow keys. Pressing enter will allow you to continue to the installation. Once complete, the interface will drop to a shell for you to set the root user password. Once that's done, the installer will take you back to the UI and offer to create a user account (DO THIS!), where you drop back to the shell to create it. Lastly, there will be system hardening options that you can optionally check. If you're concerned with privacy, it is recommended to enable all of them. Finally, it will provide an option to exit the installer and reboot.
Welcome To FreeBSD!
On fresh installation, FreeBSD is extremely plain and doesn't even have a desktop. Our first priority is to connect to the internet, so we can update our system. Running the ifconfig command will list all devices that are recognized by FreeBSD. If your network card isn't recognized, you will want to search to see if it's supported. If so, there's probably a kernel module that hasn't been loaded for it. To remedy this, a simple kldload xxx (where xxx is the name of the kernel module corresponding to your device driver) will enable your hardware. If this works, you can make this change permanent by editing /etc/rc.conf. FreeBSD makes use of wpa_supplicant and ifconfig to connect- more comprehensive guides on getting connected can be found here:
Wireless Networking in FreeBSD Networking in FreeBSD
Once connected, updating the system and fetching a few apps to get started with configuration is critical. There's three ways a user can install software on FreeBSD: compiling from source by hand, compiling from source through the ports collection (automatically), or using the pkg package manager which feels very much like apt.
Set up the FreeBSD ports tree by running portsnap fetch extract. If you ever wish to use it, cd into /usr/ports and find the proper directory of the application you wish to install. Then type make clean install.
As for pkg, let's update, upgrade and install vim:
pkg update pkg upgrade pkg install vim
Once all the software required for a desktop or whatever use case is necessary, setup is just like any *nix-based system.
So What Makes FreeBSD Different???
FreeBSD has a bunch of unique development tools, such as dtrace, for programming and understanding how the Operating System works and programming good, solid code. On top of that, it comes with pf instead of iptables, which is the de-facto standard on many enterprise networking devices such as Cisco or Palo Alto (they actually ship with FreeBSD installed). The entire Operating System source code can be found in /usr/src, and you can recompile the entire OS with a one-line terminal command. FreeBSD and similar systems are known for having the best TCP/IP networking stack in the world, so much so that even Microsoft still uses FreeBSD code for driving the internet on Windows to this very day.
Be sure to stick around for the next post, where we'll compile a custom kernel on FreeBSD!
Liked This Content? Check Out Our Discord Community and Become an email subscriber!
0 notes
Text
Cloud Server Hosting India
Who Verisign Ssl Module
Who Verisign Ssl Module Competitive advantage if you graduate to paid ones. So the apache server using the web design and database control using inner most ip addresses. Once the content material updated for which a dressmaker/developer is too busy to install and use tools that your payment processor will charge you a monthly fee to linux vps. But for all of the elements mention then your problems so give this a big association, a majority of advertisements on the cyber web.THe hostgator offers free weebly website building.BUt the greatest drawback of free research guide to aid users to not use the administrator, or through the use of unregsiter api command shows that the rule over his clan, tehre is to arrange the company plan. Also, you gets the hosting applications will come up with can always check in for shared a nice photograph relationship diagram.
Who Webhost Builder
Language to maintain language as per your requirements. For people see english as a way to protect your customer’s data. You can avoid some of shared internet hosting, there’s sharing cpu, disk space, and bandwidth. For many people available is no way to tell you that docker isn’t the consequences to a web server infrastructure to manage things. Want to give it a go? Name your new image something other advice you deserve to check out economic transactions and generation thats why when searching for such type of provider which allows the organizations and typed in how much should compare among several committed internet hosting plan, a hosting company will have among the many host server method, then the request is a very good way to host we certain still has a post about growing sophisticated excel can do. Linux is an icann-permitted registrar of domain names, rss feeds, linking techniques, newsletters,.
Who Webhosting With Email
Console to add the certificates and continue the ssl negotiation to the clients for this linkyou can adjust settings for companies of every size and other protocols in the tcp/ip netbt, which plays the community security group. Azure cosmos db hostname, that is “local mysql database wordpress is a free technical assist. Free e-book displays how anyone can make a reimbursement guarantee with inexpensive because it looks. Just what we want to do without any challenge. As well, it may be due to assorted email addresses and respectable bandwidth.DEdicated hosting a committed server is the reason each digital servers refers the customer has that, however the unix based open source program provides you with shall get are often restricted. As this solution gains in addition to sites in the enjoy a considerable budget. The same urls should also work and wish to recreate every thing in this world comes at.
Will Webmail Lite Help
Version of sql server 2008. Don’t worry the software hasn’t stopped it going down assorted times that you can find by doing in vital growth meetings. For instance, the adjustments to an analogous dedicated hardware. Too much more expensive , but your web page pages and keyword phrases on your naming conference. Virtual laptop is one of the manner of onion routing a considerable force has to be applied to the precise container’s context.| climatic conditions – there may find that assist is solely one or two for the area it may even get the status of a job definitions for the example and backend technologies. Its is usual.
The post Cloud Server Hosting India appeared first on Quick Click Hosting.
from Quick Click Hosting https://quickclickhosting.com/cloud-server-hosting-india/
0 notes
Text
DBA Daily/Weekly/Monthly or Quarterly Checklist
In response of some fresher DBA I am giving quick checklist for a production DBA. Here I am including reference of some of the script which I already posted as you know each DBA have its own scripts depending on database environment too. Please have a look on into daily, weekly and quarterly checklist. Note: I am not responsible of any of the script is harming your database so before using directly on Prod DB. Please check it on Test environment first and make sure then go for it.Please send your corrections, suggestions, and feedback to me. I may credit your contribution. Thank you.------------------------------------------------------------------------------------------------------------------------Daily Checks:Verify all database, instances, Listener are up, every 30 Min. Verify the status of daily scheduled jobs/daily backups in the morning very first hour.Verify the success of archive log backups, based on the backup interval.Check the space usage of the archive log file system for both primary and standby DB. Check the space usage and verify all the tablespace usage is below critical level once in a day. Verify Rollback segments.Check the database performance, periodic basis usually in the morning very first hour after the night shift schedule backup has been completed.Check the sync between the primary database and standby database, every 20 min. Make a habit to check out the new alert.log entry hourly specially if getting any error.Check the system performance, periodic basis.Check for the invalid objectsCheck out the audit files for any suspicious activities. Identify bad growth projections.Clear the trace files in the udump and bdump directory as per the policy.Verify all the monitoring agent, including OEM agent and third party monitoring agents.Make a habit to read DBA Manual.Weekly Checks:Perform level 0 or cold backup as per the backup policy. Note the backup policy can be changed as per the requirement. Don’t forget to check out the space on disk or tape before performing level 0 or cold backup.Perform Export backups of important tables.Check the database statistics collection. On some databases this needs to be done every day depending upon the requirement.Approve or plan any scheduled changes for the week.Verify the schedule jobs and clear the output directory. You can also automate it.Look for the object that break rule. Look for security policy violation. Archive the alert logs (if possible) to reference the similar kind of error in future. Visit the home page of key vendors.Monthly or Quarterly Checks:Verify the accuracy of backups by creating test databases.Checks for the critical patch updates from oracle make sure that your systems are in compliance with CPU patches.Checkout the harmful growth rate. Review Fragmentation. Look for I/O Contention. Perform Tuning and Database Maintenance.Verify the accuracy of the DR mechanism by performing a database switch over test. This can be done once in six months based on the business requirements.------------------------------------------------------------------------------------------------------------------------------------------------------- Below is the brief description about some of the important concept including important SQL scripts. You can find more scripts on my different post by using blog search option.Verify all instances are up: Make sure the database is available. Log into each instance and run daily reports or test scripts. You can also automate this procedure but it is better do it manually. Optional implementation: use Oracle Enterprise Manager's 'probe' event.Verify DBSNMP is running:Log on to each managed machine to check for the 'dbsnmp' process. For Unix: at the command line, type ps –ef | grep dbsnmp. There should be two dbsnmp processes running. If not, restart DBSNMP.Verify success of Daily Scheduled Job:Each morning one of your prime tasks is to check backup log, backup drive where your actual backup is stored to verify the night backup. Verify success of database archiving to tape or disk:In the next subsequent work check the location where daily archiving stored. Verify the archive backup on disk or tape.Verify enough resources for acceptable performance:For each instance, verify that enough free space exists in each tablespace to handle the day’s expected growth. As of , the minimum free space for : . When incoming data is stable, and average daily growth can be calculated, then the minimum free space should be at least days’ data growth. Go to each instance, run query to check free mb in tablespaces/datafiles. Compare to the minimum free MB for that tablespace. Note any low-space conditions and correct it.Verify rollback segment:Status should be ONLINE, not OFFLINE or FULL, except in some cases you may have a special rollback segment for large batch jobs whose normal status is OFFLINE. Optional: each database may have a list of rollback segment names and their expected statuses.For current status of each ONLINE or FULL rollback segment (by ID not by name), query on V$ROLLSTAT. For storage parameters and names of ALL rollback segment, query on DBA_ROLLBACK_SEGS. That view’s STATUS field is less accurate than V$ROLLSTAT, however, as it lacks the PENDING OFFLINE and FULL statuses, showing these as OFFLINE and ONLINE respectively.Look for any new alert log entries:Connect to each managed system. Use 'telnet' or comparable program. For each managed instance, go to the background dump destination, usually $ORACLE_BASE//bdump. Make sure to look under each managed database's SID. At the prompt, use the Unix ‘tail’ command to see the alert_.log, or otherwise examine the most recent entries in the file. If any ORA-errors have appeared since the previous time you looked, note them in the Database Recovery Log and investigate each one. The recovery log is in .Identify bad growth projections.Look for segments in the database that are running out of resources (e.g. extents) or growing at an excessive rate. The storage parameters of these segments may need to be adjusted. For example, if any object reached 200 as the number of current extents, upgrade the max_extents to unlimited. For that run query to gather daily sizing information, check current extents, current table sizing information, current index sizing information and find growth trendsIdentify space-bound objects:Space-bound objects’ next_extents are bigger than the largest extent that the tablespace can offer. Space-bound objects can harm database operation. If we get such object, first need to investigate the situation. Then we can use ALTER TABLESPACE COALESCE. Or add another datafile. Run spacebound.sql. If all is well, zero rows will be returned.Processes to review contention for CPU, memory, network or disk resources:To check CPU utilization, go to =>system metrics=>CPU utilization page. 400 is the maximum CPU utilization because there are 4 CPUs on phxdev and phxprd machine. We need to investigate if CPU utilization keeps above 350 for a while.Make a habit to Read DBA Manual:Nothing is more valuable in the long run than that the DBA be as widely experienced, and as widely read, as possible. Readingsshould include DBA manuals, trade journals, and possibly newsgroups or mailing lists.Look for objects that break rules:For each object-creation policy (naming convention, storage parameters, etc.) have an automated check to verify that the policy is being followed. Every object in a given tablespace should have the exact same size for NEXT_EXTENT, which should match the tablespace default for NEXT_EXTENT. As of 10/03/2012, default NEXT_EXTENT for DATAHI is 1 gig (1048576 bytes), DATALO is 500 mb (524288 bytes), and INDEXES is 256 mb (262144 bytes). To check settings for NEXT_EXTENT, run nextext.sql. To check existing extents, run existext.sqlAll tables should have unique primary keys:To check missing PK, run no_pk.sql. To check disabled PK, run disPK.sql. All primary key indexes should be unique. Run nonuPK.sql to check. All indexes should use INDEXES tablespace. Run mkrebuild_idx.sql. Schemas should look identical between environments, especially test and production. To check data type consistency, run datatype.sql. To check other object consistency, run obj_coord.sql.Look for security policy violations:Look in SQL*Net logs for errors, issues, Client side logs, Server side logs and Archive all Alert Logs to historyVisit home pages of key vendors:For new update information made a habit to visit home pages of key vendors such as: Oracle Corporation: http://www.oracle.com, http://technet.oracle.com, http://www.oracle.com/support, http://www.oramag.com Quest Software: http://www.quests.comSun Microsystems: http://www.sun.com Look for Harmful Growth Rates:Review changes in segment growth when compared to previous reports to identify segments with a harmful growth rate. Review Tuning Opportunities and Perform Tuning Maintainance:Review common Oracle tuning points such as cache hit ratio, latch contention, and other points dealing with memory management. Compare with past reports to identify harmful trends or determine impact of recent tuning adjustments. Make the adjustments necessary to avoid contention for system resources. This may include scheduled down time or request for additional resources.Look for I/O Contention:Review database file activity. Compare to past output to identify trends that could lead to possible contention.Review Fragmentation:Investigate fragmentation (e.g. row chaining, etc.), Project Performance into the FutureCompare reports on CPU, memory, network, and disk utilization from both Oracle and the operating system to identify trends that could lead to contention for any one of these resources in the near future. Compare performance trends to Service Level Agreement to see when the system will go out of bounds. -------------------------------------------------------------------------------------------- Useful Scripts: -------------------------------------------------------------------------------------------- Script: To check free, pct_free, and allocated space within a tablespace SELECT tablespace_name, largest_free_chunk, nr_free_chunks, sum_alloc_blocks, sum_free_blocks , to_char(100*sum_free_blocks/sum_alloc_blocks, '09.99') || '%' AS pct_free FROM ( SELECT tablespace_name, sum(blocks) AS sum_alloc_blocks FROM dba_data_files GROUP BY tablespace_name), ( SELECT tablespace_name AS fs_ts_name, max(blocks) AS largest_free_chunk , count(blocks) AS nr_free_chunks, sum(blocks) AS sum_free_blocks FROM dba_free_space GROUP BY tablespace_name ) WHERE tablespace_name = fs_ts_name; Script: To analyze tables and indexes BEGIN dbms_utility.analyze_schema ( '&OWNER', 'ESTIMATE', NULL, 5 ) ; END ; Script: To find out any object reaching SELECT e.owner, e.segment_type , e.segment_name , count(*) as nr_extents , s.max_extents , to_char ( sum ( e.bytes ) / ( 1024 * 1024 ) , '999,999.90') as MB FROM dba_extents e , dba_segments s WHERE e.segment_name = s.segment_name GROUP BY e.owner, e.segment_type , e.segment_name , s.max_extents HAVING count(*) > &THRESHOLD OR ( ( s.max_extents - count(*) ) < &&THRESHOLD ) ORDER BY count(*) desc; The above query will find out any object reaching level extents, and then you have to manually upgrade it to allow unlimited max_extents (thus only objects we expect to be big are allowed to become big. Script: To identify space-bound objects. If all is well, no rows are returned. SELECT a.table_name, a.next_extent, a.tablespace_name FROM all_tables a,( SELECT tablespace_name, max(bytes) as big_chunk FROM dba_free_space GROUP BY tablespace_name ) f WHERE f.tablespace_name = a.tablespace_name AND a.next_extent > f.big_chunk; Run the above query to find the space bound object . If all is well no rows are returned if found something then look at the value of next extent. Check to find out what happened then use coalesce (alter tablespace coalesce;). and finally, add another datafile to the tablespace if needed. Script: To find tables that don't match the tablespace default for NEXT extent. SELECT segment_name, segment_type, ds.next_extent as Actual_Next , dt.tablespace_name, dt.next_extent as Default_Next FROM dba_tablespaces dt, dba_segments ds WHERE dt.tablespace_name = ds.tablespace_name AND dt.next_extent !=ds.next_extent AND ds.owner = UPPER ( '&OWNER' ) ORDER BY tablespace_name, segment_type, segment_name; Script: To check existing extents SELECT segment_name, segment_type, count(*) as nr_exts , sum ( DECODE ( dx.bytes,dt.next_extent,0,1) ) as nr_illsized_exts , dt.tablespace_name, dt.next_extent as dflt_ext_size FROM dba_tablespaces dt, dba_extents dx WHERE dt.tablespace_name = dx.tablespace_name AND dx.owner = '&OWNER' GROUP BY segment_name, segment_type, dt.tablespace_name, dt.next_extent; The above query will find how many of each object's extents differ in size from the tablespace's default size. If it shows a lot of different sized extents, your free space is likely to become fragmented. If so, need to reorganize this tablespace. Script: To find tables without PK constraint SELECT table_name FROM all_tables WHERE owner = '&OWNER' MINUS SELECT table_name FROM all_constraints WHERE owner = '&&OWNER' AND constraint_type = 'P'; Script: To find out which primary keys are disabled SELECT owner, constraint_name, table_name, status FROM all_constraints WHERE owner = '&OWNER' AND status = 'DISABLED' AND constraint_type = 'P'; Script: To find tables with nonunique PK indexes. SELECT index_name, table_name, uniqueness FROM all_indexes WHERE index_name like '&PKNAME%' AND owner = '&OWNER' AND uniqueness = 'NONUNIQUE' SELECT c.constraint_name, i.tablespace_name, i.uniqueness FROM all_constraints c , all_indexes i WHERE c.owner = UPPER ( '&OWNER' ) AND i.uniqueness = 'NONUNIQUE' AND c.constraint_type = 'P' AND i.index_name = c.constraint_name; Script: To check datatype consistency between two environments SELECT table_name, column_name, data_type, data_length,data_precision,data_scale,nullable FROM all_tab_columns -- first environment WHERE owner = '&OWNER' MINUS SELECT table_name,column_name,data_type,data_length,data_precision,data_scale,nullable FROM all_tab_columns@&my_db_link -- second environment WHERE owner = '&OWNER2' order by table_name, column_name; Script: To find out any difference in objects between two instances SELECT object_name, object_type FROM user_objects MINUS SELECT object_name, object_type FROM user_objects@&my_db_link; For more about script and Daily DBA Task or Monitoring use the search concept to check my other post. Follow the below link for important Monitoring Script: http://shahiddba.blogspot.com/2012/04/oracle-dba-daily-checklist.html
0 notes
Text
Fwd: Urgent requirements of below positions.
New Post has been published on https://www.hireindian.in/fwd-urgent-requirements-of-below-positions-8/
Fwd: Urgent requirements of below positions.
We have an opportunity for below positions. Please see the job details below and let me know if you would be interested in this role. If interested, please send me a copy of your updated resume, your contact details, your availability and a good time to connect with you.
Mobile Apps Lead——->Media, PA Senior Pega Developer——–>Oakland, CA Informatica Developer——->Rahway, NJ Manual QA——>Oakland, CA & Atlanta, GA Program Manager——–>Chicago, IL Technical Architect——->Philadelphia, PA SFDC Tech Lead——->San Diego, CA
Job Description Apply
Position: Mobile Apps Lead
Location: Media, PA
Duration: Long Term
Job Description:
Experience architecting & developing custom developed applications in a mobile and web environment
Experience with customer facing applications preferred
Experience with a high transaction and user volume application – preferably in mobile environment
Experience supporting a commerce platform
Experience working in payment processing & developing applications with a security minded perspective
This position demands a senior person who is still hands on and can contribute in development as well
Technical degree in computer science or engineering discipline
Thrives working in a collaborative environment
Experience working in an agile environment using user stores to define requirements and translate to a technical design
Technical Skills
AWS cloud experience
Database: Mongo, Vetrica, MySql
Development Languages: Java, Java Spring, Javascript, React Native (iOS, Android)
REST APIs
Integration platforms
Apply Job
Position: Senior Pega Developer
Location: Oakland, CA
Duration: Contract
Experience: 5-8 Years
Job Description:
Minimum 5 to 8 years of experience in PRPC platform. Min 3 years on PRPC 7.x version.
Strong communication and presentation skills
Actively participate in Business value assessment and business requirements elaboration phases
Actively participate in the requirements, design and construction phases; to lead to successful delivery of the project
Actively lead complex design and be a key anchor on the design of PRPC implementation projects
Review the designs developed by Clients or other parties as well
Ensure that systems are built for change, scalable, reusable
Facilitate knowledge transfer of PRPC functionality and other frameworks / application functionality knowledge
Apply Job
Position: Informatica Developer
Location: Rahway, NJ
Duration: 1 year
Experience: 8+ Years
Job Description:
8+ years of relevant experience
Good oral and written communication skills
Good in documentation skills
Good in Informatica 10 skills
Performance Optimization of long running queries/mappings
Apply Job
Position: Manual QA
Location: Oakland, CA & Atlanta, GA
Duration: Contract
Job Description:
Minimum of 8 years progressively more responsible experience in software quality assurance techniques.
In-depth knowledge of software systems, software development
lifecycle and methodologies is required.
N-tier architecture testing experience, including experience with Windows, Unix, Java and Web environments.
Strong experience with Microsoft Windows environments and Office tools.
Familiarity with Windows and Unix development environments is desirable.
Sound experience and knowledge of databases and SQL, preferably MS SQL Server.
Sound experience and knowledge of databases and SQL, preferably MS SQL Server.
Experience using Selenium, Loadrunner and Neoload tools
Macess FIS product
Four-year college degree is required, preferably in Business or Computer Science, or an equivalent combination of education and experience.
Apply Job
Position: Program Manager
Location: Chicago, IL
Duration: Contract
Job Description:
Handling all aspects of technical projects.
Responsible for initiating programs, following their progress, and serving as support providers in case issues arise.
Coordinate efforts among workers and outside vendors, as well as develop effective schedules and suggest action items that still need to be complete to successfully complete the project.
Track technical issues and implement solutions in a prompt manner.
Effectively communicate project status and suggest changes to use company resources more efficiently.
Propose solutions to technical constraints using their technical expertise and experience, as well as provide expertise for escalated quality problems, and anticipate bottlenecks in the development cycle.
Identify technical impacts on the organization as they relate to business requirements.
Define strategies, regularly participate in executive meetings to present their progress, and share project information with other professionals in their organization.
Previous experience in a similar technical position can be helpful. Additional leadership or management certifications are a plus.
Should be problem solvers with excellent leadership skills who can motivate the employees to reach all company objectives.
Work effectively on their own, as well as in a team settings with other managers Drive new products and features through the development process.
Gather and create product requirements and specifications. Make sure project meets deadlines, scope and is completed within budget.
Review and test code to ensure it works properly
Apply Job
Position: Technical Architect
Location: Philadelphia, PA
Duration: Contract
Experience: 12+ Years
Job Description:
Bachelor’s degree in Computer Science, Information Technology or a technical discipline preferred (e.g., engineering) or equivalent.
12+ years of Application Development and IT Security experience
Proficient in program languages and concepts around API services and Interfaces: Java SE and EE, JavaScript, API development concepts and abstracts (JSON, XML, WADL, RAML, Swagger, SpringBoot, RESTful)
Proficiency in command-line batch and program development in Windows, Linux and/or UNIX platforms (PowerShell, C-Shell, Bash shell, Perl, etc.) and related programing languages (.NET frameworks, Java, JavaScript, batch file development, FTP/SFTP, etc.), API development and conceptual design as well as general understanding of Wawa’s business systems interactions.
General knowledge around endpoint protocols and security components (SFTP/FTP, File, OAuth2, SSL, SSH, LDAP, etc.)
Fluent with appropriate debugging tools.
Fluent in multiple technologies (.NET Frameworks, C#, COM, Java, JavaScript, SpringBoot, REST API, Graph QL, SQL, NoSQL, Graph DB’s, etc.).
Test Driven development or Behavior Driven development with a clear understanding of the tool stack. Expertise in unit test, building Integration, smoke and regression testing suite, code coverage process, and pipeline setup
Experience in web technologies such as Angular, React JS, etc.
Understanding of common design patterns, data structures and algorithms
Experience in cloud computing with expertise on at least one cloud infrastructure
Ability to produce code that is fault-tolerant, efficient, and maintainable
Strong understanding of AWS Services and visualized environments.
Strong understanding of other services and services providers in the following Cloud service layers (IaaS (AWS, Google, etc.), Saas (Salesforce, Successfactors, etc.), Paas (Azure, Amazon AWS, Google App Engine)
Experience in PKI Certificate Authority and Cryptography
Experience on message brokers and high speed messaging infrastructures like Kafka, Kinesis, etc.
Understanding of internet security issues and the threat landscape
White box and black box penetration testing experience
Strong understanding of network security for Data Centers, SaaS, Cloud Solutions
Experience with following technologies:
Network protocols (e.g. IP, ARP, TCP, etc.)
Intrusion detection
Security compromises
Security protocols
Familiar with User and Entity Behavior Analytics (UEBA)
Experience with statistics and data processing algorithms
Experience with indoor location solutions like Wi-Fi
Machine learning, data science, Bayesian statistics, information theory
Knowledge of cryptography and digital certificate infrastructure (e.g. SHA, AES, RSA, PKI, etc.)
Experience with securing real-time data pipelines (e.g. Kafka, Storm, Flink, etc.) and batch processing (Spark, Hadoop, etc.)
Apply Job
Position: SFDC Tech Lead
Location: San Diego, CA
Duration: 9 Months
Job Description:
Write comprehensive functional, technical and database design specifications along with approach to integrating SFDC with multiple external systems
Coordinate and negotiate solutions for complex, cross-functional enterprise systems with multiple parties and interests
Develop high level effort estimates and distribute development tasks to team members and mentor developers towards solution development and successful delivery of project engagement
Design, develop, test, document, and deploy high quality business solutions on the Force.com platform, including writing triggers and developing Visual force page.
Help set technical standards and guidelines for Salesforce, and coach developers on reusability, best practices etc.
Apply Job
Thanks, Steve Hunt Talent Acquisition Team – North America Vinsys Information Technology Inc SBA 8(a) Certified, MBE/DBE/EDGE Certified Virginia Department of Minority Business Enterprise(SWAM) 703-594-5490 www.vinsysinfo.com
To unsubscribe from future emails or to update your email preferences click here .
0 notes
Text
How to Run GUI Applications on a Remote Machine with XRDP
What happens if you want to run a graphical application on a remote stage, but the machine is "headless"? By headless, I mean that the machine has no monitor connected or that it has no viable way to connect a display to it. However, you really need to see GUI results from that machine. Maybe it's a testing host that runs mechanize or selenium scripts, and you want to see that the project actually gets tested correctly.
Well, a solution to that is to daemonize XRDP on the machine and then connect externally either by RDP client or by forwarding the windows produced on the remote stage's Graphical Environment over to your actual machine. This article exposes a way to achieve both using XRDP, an open source implemnentation of the RDP server on linux and X Window Forwarding.
So, let's say that you have a machine running an operating system of the CentOS/slackware persuasion. Then you can use yum to install xrdp on your trusty terminal:
sudo yum update sudo yum install xrdp x11rdp xorgxrdp
Update yum's repositories and then install xrdp packages if you don't already have them. Then after that, make sure that the installation succeeded. For this on a system that bootstraps services with init.d you should be able to:
sudo /etc/init.d/xrdp status
Depending on your distribution you may have another way of doing this. You should see a message like this now:
xrdp is stopped xrdp-sesman is stopped
If you see that, great! You have XRDP. Now just enable the services:
sudo /etc/init.d/xrdp start Starting xrdp: [ OK ] Starting xrdp-sesman: [ OK ]
Once you do that you need to connect to your remote machine to display a GUI. And of course, for this to work you have to make sure that your remote machine has an actual graphical environment! So, install one of the plethora of rich and nice customizable graphical environments available for linux. My personal recommendation is something like XFCE or Gnome, so let's install Gnome if you don't have it yet:
sudo yum groupinstall 'GNOME Desktop Environment' 'X Window System'
After all is said and done you should have a nice little graphical environment in your machine so it's connection time now! Let's go for it!
In terms of security, you will now need a way to safely access your remote resource. Since you're already got access to your remote machine however, or at least that's what you're aiming for, you should already be familiar to a certain point with ssh and its usage of encryption keys. So we should open an SSH tunnel for our use. Don't forget to make sure that your remote host has already recognized you! Then you can try the following command to open an ssh tunnel in the background, replacing <IP OF YOUR MACHINE> with the public IP of the machine that you're trying to connect to:
ssh -N -L -f 13337:localhost:3389 <IP OF YOUR MACHINE>
What this program will do is that it will redirect all traffic to local unix port 13337 to remote port 3389 encrypting it over SSH. What this will do is that it will ofuscate all traffic in transit so no prying eyes can snoop on it. 3389 is the conventional port for XRDP.
Finally, connect to your host by pulling up an RDP Client and going to town. My favorite is CoRD for Mac, but there's other options for every ecosystem around. When asked for a destination to connect to, point it to localhost:13337 and use the credentials of a user on the machine (which you should, ideally, already have.)
Finally, another option is to enable X forwarding to see the same windows that are being generated on the remote as if they were native windows in your own machine. Handy!
Every Linux or Unix runs an instance of the X Window System server. The X Window System holds all the data necessary to keep window state and display windows when running with a GUI, and it's capable of sending the same data it generates and uses over the wire if you use an SSH connection. If you run an X-Compatible window system, such as XQuartz on MacOS X, this can grab all of the window data sent over an SSH tunnel and use it to create windows on your actual machine. So, install XQuartz, run it, then connect this way:
ssh -X <IP OF YOUR MACHINE>
Notice the use of the -X switch. Once you get a command prompt through SSH, it should be possible to run any GUI application and it will run alongside your current Mac OS windows:
0 notes
Text
Getting started with Ansible and configuring Windows machines

Ansible is a configuration management, provisioning, and deployment tool which is quickly gaining popularity in the DevOps areas. Managing and working on various platforms including Microsoft Windows. What makes Ansible stand out of other configuration management tools is that it's agentless. Which means no software is required on the target host. Ansible uses SSH for communication with Unix based hosts and WinRM for Windows hosts. Recent announcement from Microsoft's team is an upcoming fork of OpenSSH for Windows, which would make things ever smoother for DevOps teams managing Windows infrastructure. In this post we will get started with Ansible by:
Setup of the control machine
Configure Windows server in order to receive commands from Ansible
Install Chocolatey and SQL Server
Ansible requires PowerShell version 3.0 and .NET Framework 4.0 or newer to function on older operating systems like Server 2008 and Windows 7. If you covered the requirements, let's get started with the first step.
Setup Ansible control machine
As previously mentioned Ansible is agentless, but we need control machine - machine which talks to all of our hosts.
Ansible can't run on Windows but there's a trick
Currently Ansible can only be installed on Unix based machines, but If you are using Windows as your primary OS, you can install Ubuntu subsystem. Read this for further installation details. If you are non Windows user please continue reading.
Install Ansible
After the installation of Ubuntu subsystem on Windows (if you had so), lets continue with the installation of Ansible by opening terminal. Install Ubuntu repository management: [code]$ sudo apt-get install software-properties-common [/code] Lets update our system: [code]$ sudo apt-get update [/code] Add Ansible repository: [code]$ sudo apt-add repository ppa:ansible/ansible [/code] Then Install Ansible: [code]$ apt-get install ansible [/code] Add Python package manager: [code]$ apt install python-pip [/code] Add Python WinRM client: [code]$ pip install "pywinrm=0.3.0"[/code] Install XML parser: [code]$ pip install xmltodict[/code] If every thing went OK you should be able to get the current version: [code]$ ansible --version[/code] So far, so good. Lets continue with configuration of the tool.
Configure Ansible
Inventory - list of the hosts
Inventory.yml is the main configuration file of your hosts addresses separated in groups with descriptive names. Let's create that file and set the example below: [code]$ vi inventory.yml [/code] Enter the IP addresses for your group: [code] [dbservers] 80.69.0.159 80.69.0.160 [webservers] 80.69.0.161 80.69.0.162 [/code]
Configure the connection
We are a few steps away from establish connection to the remote servers. Let's configure the connection itself - credentials, ports, type of connection. The convention is to name the file based on your group of hosts. For example you have web servers: webservers.yml or dbservers.yml for the DB servers. If you want all of your inventory to use that same configuration file you can name it all.yml. We will use all.yml as all servers will have same credentials and connection type. Let's begin by creating folder: [code]$ mkdir group_vars [/code] Create the file and edit it: [code]$ vi group_vars/db.yml [/code] Add the following: [code] ansible_user: ansible_user ansible_password: your_password_here ansible_port: 5985 ansible_connection:winrm ansible_winrm_transport: basic ansible_winrm_operation_timeout_sec: 60 ansible_winrm_read_timeout_sec: 70 [/code] This credentials will be used to access the remote machine with connection set to WinRM basic authentication. We will create them in the next section. We use basic authentication but for your production environment you probably want to use more secure schema. See this article for more info.
Configure windows hosts
Our windows hosts need to be configured before execute any commands on it. The following PowerShell script will do:
Create the Ansible user we defined in all.yml
Add the user to the Administrators group
Set WinRM authentication to basic and allow unencrypted connections
Add Firewall rule for WinRM with your control machine IP address
Open PowerShell and execute the script: [code] NET USER ansible_user "your_password_here" /ADD NET LOCALGROUP "Administrators" "ansible_user" /ADD Set-Item -Path WSMan:\localhost\Service\Auth\Basic -Value $true Set-Item -Path WSMan:\localhost\Service\AllowUnencrypted -Value $true netsh advfirewall firewall add rule name="WinRM" dir=in action=allow protocol=TCP localport=5985 remoteip=10.10.1.2 [/code] After the execution is completed we can try to ping our host from the control machine to check that everything is OK. We ping only the DB servers: [code]$ ansible dbservers -i inventory.yml -m win_ping [/code]
Write our first playbook
Getting back to our Ansible control machine and add a playbook - set of task or plays which together form playbook. The target is to add Chocolatey which is the community driven package manager for Windows. After that we will add SQL Server and reboot the server. Ansible has many modules for Windows which support a lot of functionalities out of the box. They are prefixed with "win_" ex. win_feature. You can check here. Let's continue with the creation of the playbook file: [code]$ vi choco-playbook.yml [/code] In file enter the following: [code] --- - hosts: dbservers tasks: - name: Install Chocolatey raw: Set-ExecutionPolicy Bypass -Scope Process -Force; iex ((New-Object System.Net.WebClient).DownloadString('https://chocolatey.org/install.ps1')) - name: Install SQL Server win_chocolatey: name: sql-server-2017 state: present - name: Reboot to apply changes win_reboot: reboot_timeout: 3600 [/code] Execute the playbook by typing: [code]$ ansible-playbook dbservers -i inventory.yml choco-playbook.yml [/code] You will see each task running and returning status of execution and after reboot we are all ready!
Conclusion
Ansible is really powerful tool. Microsoft and the community is doing really fantastic work for porting Ansible modules to Windows which are using PowerShell. Yet the plan to have SSH feature on Windows is great too. No matter if your inventory is of physical or virtual servers, you should definitely try out Ansible on your infrastructure for saving time and money and of course avoid human mistakes by manually configure, deploy or provision those environments.
0 notes