#using otis_inf's camera tools
Explore tagged Tumblr posts
Visit Tumblr Blog
Explore Tumblr blogs with no restrictions, modern design and the best experience.
Last Seen Tumblr Blogs


Fun Fact
In 2020, 44% of users from Denmark used Tumblr daily.
Text
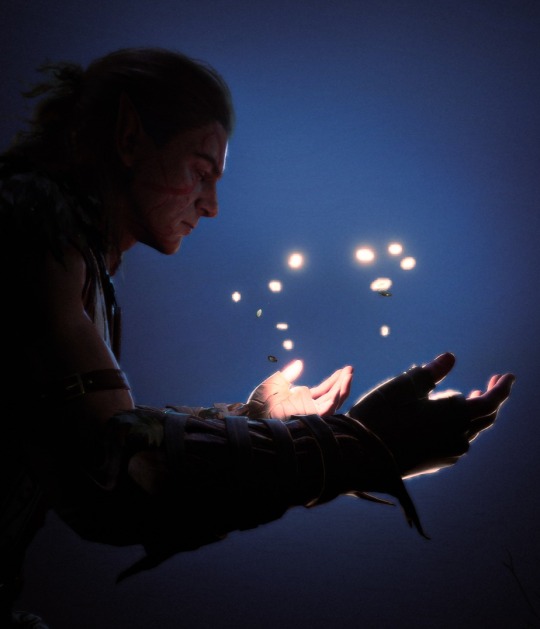
Oak Father, hear me, aid me. Force open the jaws of Darkness. Make passage for your vessel of Light.
#baldur's gate 3#bg3#halsin#bg3 photography#virtual photography#using otis_inf's camera tools#reg wishes she had magic
1K notes
·
View notes
Text

#alanwakeedit#alan wake#alex casey#alan wake 2#*#mk.op#mk.edit#mk.photo#otis_inf cam shots#reshade tools used#posting this one on its own cause i went for a different coloring/vibe for the rest of what i took on this setpiece#but my absolute favorite thing to do with the camera has been this like#dollhouse type effect that i only just started with the hotel#it is fascinating how much i've learned on this playthrough so far
56 notes
·
View notes
Text

dragon age: the veilguard | varric tethras 2/?
#varric tethras#dragon age the veilguard#datv#da4#dragon age#thank u otis_inf's camera tools for the ability to move the camera in cutscenes so i can have some nice ones of varric#and thank past me for deciding to buy the game on pc instead of ps5 so i can use otis_inf's camera tools lol#varric#dav#da#i made this
79 notes
·
View notes
Text
Gaming GIF Tutorial (2025)
Here is my current GIF making process from video game captures!

PART 1: Capturing Video
The best tip I can give you when it comes to capturing video from your games, is to invest in an injectable photomode tools - I personally use Otis_Inf's cameras because they are easy to use and run smoothly. With these tools, you can not only toggle the UI, but also pause cutscenes and manually change the camera. They are great for both screenshots and video recording!
As for the recording part, I personally prefer NVIDIA's built-in recording tools, but OBS also works well in my experience when NVIDIA is being fussy.
PART 2: Image Conversion
Do yourself a huge favour and download PotPlayer. It is superior to VLC in more ways than one in my opinion, but is especially helpful for its Consecutive Image Capturer tool.
Open the video recording in PotPlayer, and use CTRL + G to open the tool. If this is your first time, be sure to set up a folder for your image captures before anything else! Here are the settings I use, albeit the "Every # frame" I change from time to time:
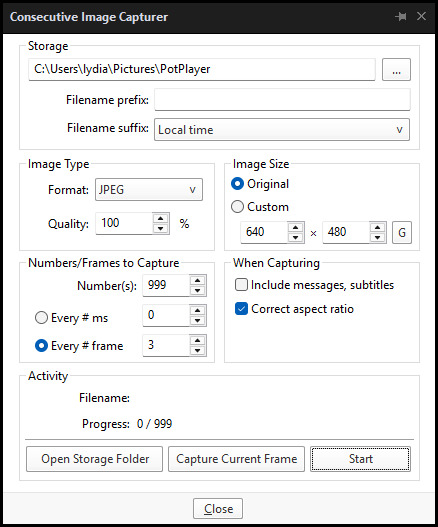
When you're ready, hit the "Start" button, then play the part of the video you want to turn into a GIF. When you're done, pause the video, and hit the "Stop" button. You can then check the images captured in your specified storage folder.
(TIP: Start the video a few seconds a head and stop a few seconds after the part you want to make into a GIF, then manually delete the extra images if necessary. This will reduce the chance of any unwanted cut-offs if there is any lagging.)
PART 3: Image Setup
Now, this part I personally always do in GIMP, because I find its "Open as Layers" and image resizing options 100% better and easier to use than Photoshop. But you don't have to use GIMP, you can do this part in Photoshop as well if you prefer.
Open the images each as an individual layer. Then, crop and/or scale to no more than 540px wide if you're uploading to Tumblr.
(TIP: This might just be a picky thing on my end, but I like to also make sure the height is a multiple of 10. I get clean results this way, so I stick to it.)
If you use GIMP for this part, export the file as .psd when done.
PART 4: Sharpening
If you use GIMP first, now it's time to open the file in Photoshop.
The very first thing I always do is sharpen the image using the "Smart Sharpen" filter. Because we downsized the image, the Smart Sharpen will help it look more crisp and naturally sized. These are the settings I mostly use, though sometimes I change the Amount to 200 if it's a little too crunchy:

Here's a comparison between before and after sharpening:


Repeat the Smart Sharpen filter for ALL the layers!
PART 5: Timeline
First, if your timeline isn't visible, turn it on by click on Windows > Timeline. Then, change the mode from video to frame:

Click "Create Frame Animation" with the very bottom layer selected. Then, click on the menu icon on the far-right of the Timeline, and click "Make Frames from Layers" to add the rest of the frames.
Make sure the delay should be 0 seconds between frames for the smoothest animation, and make sure that the looping is set to forever so that the GIF doesn't stop.
Part 5: Editing
Now that the GIF is set up, this is the part where you can add make edits to the colours, brightness/contrast, add text, etc. as overlays that will affect all the layers below it.
Click on the very top layer so that it is the one highlighted. (Not in the timeline, in the layers box; keep Frame 1 highlighted in the timeline!)
For this example, I'm just going to adjust the levels a bit, but you can experiment with all kinds of fun effects with time and patience. Try a gradient mask, for example!
To test your GIF with the applied effects, hit the Play button in the Timeline. Just remember to always stop at Frame 1 again before you make changes, because otherwise you may run into trouble where the changes are only applied to certain frames. This is also why it's important to always place your adjustment layers at the very top!
Part 6: Exporting
When exporting your GIF with plans to post to Tumblr, I strongly recommend doing all you can to keep the image size below 5mb. Otherwise, it will be compressed to hell and back. If it's over 5mb, try deleting some frames, increasing the black parts, or you can reduce to number of colours in the settings we're about to cover below. Or, you can use EZGIF's optimization tools afterwards to reduce it while keeping better quality than what Tumblr will do to it.
Click on File > Export > Save for Web (Legacy). Here are the settings I always use:

This GIF example is under 5mb, yay! So we don't need to fiddle with anything, we can just save it as is.
I hope this tutorial has offered you some insight and encouragement into making your own GIFs! If you found it helpful, please reblog!
140 notes
·
View notes
Text
BG3 Virtual Photography Supplement: Mods and Resources
Here's some popular and useful mods I use for virtual photography! I will try to update this as I find more. You may find these useful with the rest of my tutorial:
Chapter 0: Overview
Chapter 1: Script Extender Debug Console
Chapter 2: Scene Manipulation
Chapter 2.5: More Scene Manipulation
Chapter 3: Otis_Inf Camera Tools
Supplement: Mods and Resources
Tools
EasyCheat - Teleport to locations near and far, summon armor and items for your characters, clean the dirt off. All at the press of a button!
Lighty Lights - An incredible tool but terribly finicky. Actively being worked on.
Native Camera Tweaks - A Native Mod that allows you to unlock the camera pitch and zoom in and out of combat. It's handy for photo stuff but generally useful.
WASD Character Movement - another Native mod for WASD movement. More precise placement of characters in the field.
Remove Broken Objects - can help clean up sets.
Scribe Object Inspector and Event Logging - sometimes you need to find the IDs of objects in the game. This is an easy way to do it.
Polyamory Mod - can be useful for flag checking but I haven't used it recently. But it may have use for some.
Characters
Full Custom Companions (Hirelings) - have full custom control over hirelings. Great if you wanna add more Tavs to your shots! Have done family portraits for my Tav's family this way, it's so fun!
Recruit any NPC - Make an NPC a playable character. Can be really handy sometimes if you don't wanna do code transformations.
Appearance Edit Enhanced - if you're not using this already, you should be. Modify your characters at any time. Works great with the Custom Hirelings mod.
Transmogs and Spelltheft - identity theft! Another mod that lets you copy the appearance of characters. There was some special case scenario that I used an old version of this but I don't recall what that is anymore. Listing it here anyway.
Ring of Metamorphosis - Another mod for changing your character into several known characters and also INVISIBLE. Being invisible is extremely useful when you start conversations for facial expressions but you don't want another character in the way of a shot.
Effects
Pretty Particles - I've only used this once but if you combine it with Depth of Field, you can use it to get some really pretty bokeh effects. Also, blood and sweat in varying degrees/combinations.
No Annoying VFX - a series of mods that will remove the effects that you may not want for a shot. Like casting glows, glowing armor, UI indicators, among other things.
Posing
Hugs - Hug your companions!! Great for a quick and cute hug that doesn't require any coding.
Kisses - Kiss your companions using anybody animations! For best results cast the spells on a body type that matches up.
Replayable Romance Scenes - what it says on the tin. Romance scenes playable through casting a spell. These cutscenes play in new locations.
Stay Still In Camp and Play Idle Animations Everywhere - basically what it says. Once you switch from a companion to Tav, they won't run back to their tent. They also have some idle animations that are new.
Sit Happens - spawn chairs to sit!
Emotes - Poses and Toggle Walk - TONS of poses to use in the open world. Extremely useful for non-cinematic shots.
Cutscenes
Cut Scene Edits for Better Screenshots - A mod by Moxi that allows for cutscenes to be modified slightly - including forced clothing when you want something custom (shirtless Astarion, for example), removing Karlach's glow from her cutscene, among other things. Take a read through.
Musical Instrument Yeet - Sometimes the instruments pop up in a kiss cutscene and it is really distracting. Remove them with this!
Resources
Moxi's Research Directory - TONS of resources for finding character UUIDs, some copy-pastes ready to modify for scenes, cool locations like Private Camp Rooms and how to get there, Teleport commands. HANDY!
Google Spreadsheet of Tags - for scripting purposes.
Google Spreadsheet of Dialogue Lines - for finding cutscenes you want to script and play.
A few useful ScriptExtender commands.
An In Depth list of Osiris Commands - for advanced use.
LaughingLeader's list of Osiris Commands - another resource for commands.
#mog's bg3 virtual photography tutorial#bg3#bg3 virtual photography#baldur's gate iii#baldur's gate 3#bg3 photomode#bg3 photography#mog's vp tag
104 notes
·
View notes
Text


OH SHIT! IT'S US! Dude! You're so loud! Camera Tools by Otis_Inf
67 notes
·
View notes
Text


Devil May Cry 5 mod screencaps
Available for anyone who wants to use them, no credit needed but super appreciated. All these caps are 1920x1080. I took these myself using mods, and with the free camera tool by Otis_inf on Patreon. If there are any issues, please feel free to let me know!
In this folder, you will find:
Dante in a henley
Dante in his DMC4 outfit without his jacket
Dante in Leon Kennedy's RE6 outfit
Nero in his DMC4 appearance
Nero in a white jacket
Nero without his jacket
Nico in Claire Redfield's RE2 noir outfit
Nico with a ponytail
Trish with Eva's hair and a leather jacket
Urizen as Lady D
V with white hair
Vergil with a glowing coat
X_Camera stuff (tonnnnns of photos I've taken of most of the characters using the free camera tool; these caps include a massive V overhaul mod that I didn't take other photos of, but can be found in here)
X_Dante's Office (photos of Dante's office I've taken using the free camera tool)
X_DMC Van (photos of Nico's van I've taken using the free camera tool
Folders can be found [ here ] Buy me a [ ko-fi ] if you’d like!
#I took these years ago and figured I'd share while I'm finishing up sorting the DMC anime#Devil May Cry#dmc dante#dmc nero#dmc lady#dmc vergil#dmc nico#dmc v#dmc urizen#dmc trish
30 notes
·
View notes
Text
Baldurs Gate 3 High Quality Screenshot Tutorial 2.0
Hi everyone, I decided I wanted to make a more specific and slightly more in-depth tutorial on how I take screenshots in Baldur's Gate 3. For this tutorial, you will need ReShade and Otis_INF'S Photomode Mod. If you do not want to download these for whatever reason, my older tutorial covers alternative ways to get some nice screenshots.
1. ReShade (skip if you already have ReShade downloaded)
For this step, you're going to want to download ReShade. ReShade is important to this tutorial as it's going to allow you to take screenshots of your game in higher resolutions. To do this, find a ReShade preset you like on the Nexus. (You can find lots of them by just typing in "reshade" in the search bar). From there, most mod authors will explain how to download ReShade in their mod description and get it working for your game.
Once you successfully have Reshade installed, a bar of text will appear at the top of your screen, prompting you to press 'home.' This will put you through a mini-tutorial if just installed it.
2. Photomode Mod
For this mod, you'll need to subscribe to a patreon to get access. Installing it is really simple, just unzip the zip file and put its contents in a folder, then run the tool once you have BG3 running.
Personally, I choose to re-map all the controls to different keys on my keyboard as I find it makes it much, much easier for me to use. Specifically, I re-map the movement, camera tilt, and starting the photomode controls. FOV is also really important to pay attention to, so make sure you like the controls for that as well.
Make sure to test the camera mod to make sure it's working before moving on to the next step.
3. High Resolution Screenshots (Hotsampling)
Hotsampling simply means that we're going to briefly make our game run in a resolution much higher than what we usually would, which often times means your game window will end up looking huge and run off your screen.
To do this, we need to make sure a few things are in place before trying to hotsample, or the screenshot won't be captured properly.
Go through this checklist to ensure hotsampling will work:
• If you have more than one monitor, you have to make sure your monitor is set to show only on one screen. (This setting is found in Displays on Windows)
• Make sure BG3 is set to borderless windowed mode
• In ReShade, go to the settings tab. Ensure you have a key set up for taking screenshots, and that you know the folder your screenshots will be saved to. It's essential to use ReShade to take screenshots, nothing else will work. Use ReShade's screenshot key.
Once you make sure you have the above done, go to the photomode mod, and click on the hotsampling tab. From here, you can change the resolution of your game. Typically, I take my screenshots in 3,840x2,160 or 5,760x3,240 if I want a very clear image. Those are just 2x and 3x my monitor's resolution (1920x1080), so you can adjust if your monitor is different. Once your chosen resolution is set, your BG3 window will likely run way off your screen and potentially make your computer lag. (This means it's working). Make sure your BG3 window is active, then hit the screenshot key you set earlier in ReShade. This screenshot should now appear in the folder that's set for screenshots in ReShade. (It typically defaults to the folder where your game is installed).
4. Extra fine-tuning
There are a couple of ways to enhance screenshots in BG3 even further.
The first way is through using ICGS Depth of field. This tool will allow your sceenshots to minic depth of field the same way cameras IRL can do it it—it makes for some beautiful screenshots, and I'm seriously impressed by how well it replicates that look. The author gives a tutorial on how to get it working—I know it seems complicated, but follow it step-by-step and play around, it'll come to you very soon!
The other tool that I just found recently is Relight for ReShade. This tool allows you to add some lighting on a character, which I thought was so cool. Here's a tutorial for this, too.
5. Post-Processing
This step is entirely up to your own creativity, but I just thought I'd share Photopea as a good, free software (that you don't even need to download) to help you edit your photos. It basically works exactly like photoshop!
Ok that's it for all but I think I will continue to update this post and add to it whenever I find anything helpful :)
& Thank you to all the wonderful mod authors out there for creating all this software and allowing us to take beautiful images, it makes me so happy !!
152 notes
·
View notes
Note
How'd you make Cal dance?
I found Cal’s dance animations (seen here and here) using the UUU camera tools created by Otis_Inf. Its Pose Editor has a dropdown to play individual character animations: there are leftover movements from JFO, and some unused animations that were developed but never made it into the final game.
Based on context, I’d guess the dancing (there are a few variations) were idle animations that would’ve triggered while playing music in Pyloon’s. Cut content happens for many different reasons - maybe we’ll see them in-game in Jedi 3?
46 notes
·
View notes
Text
How to create your OC in RDR2 story mode!

So I've been asked how I create my OC in screenshots and figured I'd to a tutorial on how to do this.
It's a long one, with visual references, so I'll stick this under the cut to spare those of you not interested in this kind of thing. It's divided into 2 parts:
Mods
Creating your OC and getting it ready for animating/creating a scene
I will create a separate tutorial post on how to animate characters as this will be way too long otherwise.
Part 1: Install the required mods
Rampage Trainer
So we can change models, add animations etc. https://www.nexusmods.com/reddeadredemption2/mods/233 (Read the requirements and install information thoroughly as we need ScriptHook for this mod to work)
Outfit Changer
So we can outfit our models, also has all the items from RDO https://www.rdr2mods.com/downloads/rdr2/scripts/12-rdr-2-outfit-changer/
Animation dictionary list for Rampage Trainer By default Rampage comes with only a very limited amount of animations, so we want to fix that. 1. Download the full animation list here: https://github.com/kaphzi/RDR2_stuff/blob/main/PedAnimList.txt 2. Move it into your RampageFiles/Lists folder to replace the original PedAnimList.txt
Optional mods:
RDR2 2025 Enhanced Edition Reshade
This is just a personal preference but I like the overall aesthetic which means i don't have to edit my screenshots, also having ReShade installed means i can save higher quality screenshot files and add DoF https://www.nexusmods.com/reddeadredemption2/mods/5549
Otis_Inf RDR2 photomode tools https://opm.fransbouma.com/Cameras/rdr2.htm
I use this exclusively for all my screenshots and recordings but it costs money (once-off via Patreon)
Photo Mode Enhancer https://www.rdr2mods.com/downloads/rdr2/scripts/8-photo-mode-enhancer/
A free alternative which is still heaps better than the standard photomode in RDR2
Notes
If this is your first time installing mods: I highly recommend you take a screenshot of your RDR2 folder so you can reference what it should look like with mods disabled and have a mods backup folder somewhere easily accessible to you so you can always reference which mods you are using. (In case of mod issues or you want to switch to online mode)
Here is a handy tutorial if you are new to RDR2 modding: https://youtu.be/msrGfWySX_0?si=N1FfbUbTwzfAPJUi
If you already have other mods installed: Outfit Changer does not work with WhyEm’s DLC and has issues with other online content mods like Red Dead Offline and Online Content Unlocker, so make sure you turn them off.
If you installed the mods correctly you should hear 3 beeping sounds when you launch the game.

Part 2: Creating your OC in story mode
So you’ve loaded up the game and the mods are working fine, so lets start creating our OC in-game!
Mod Settings F5 - Opens Rampage Trainer
F2 - Opens Outfit Changer
Step 1: Create your character
Open Rampage (F5) and go to Player > Wardrobe
Select Model Changer
Go down to Search for Peds and select Search for a Ped

Enter mp_female or mp_male (for this tutorial we will be using female)
Select the model and it will load looking a bit strange with missing limbs, that’s fine we will add these with outfit changer soon.

Go back to Wardrobe and select Walk Styles
Select Brave (this fixes the fatigued stance the models seem to load with)

Step 2: Add model parts and clothing
Close Rampage (F5) and open Outfit Changer (F2)
The first things we want to add to the model before we start building an outfit are Head, Torso, and Legs - write down the values for later use (in case you accidentally delete or overwrite the config files or the game crashes while doing this step)
I would personally leave hair until we have fine-tuned our face later or pick a hairstyle that doesn't obscure the face.


These aren't going to look the best straight away (if you’ve ever made a character in RDO we know how hard it is to make a decent character) but we will tweak the body model later in rampage trainer. Now we can start building the outfit.
Select "Change Ped Components MP Female" (or male depending on which model you chose)
Once you’re happy with the base model and outfit, save it in the Save Current Outfit option so we don’t have to build this base model and outfit again next time we log in. You can save multiple outfits so have fun!

Step 3: Fine tuning our character’s look
This is where something like Otif camera tools come in handy so we can really get the camera up close while we work on the face.
Open Rampage (F5) and go to Player > Wardrobe
Select Meta Tag Expressions

Tweak these to your heart's desire and trust the process! When you’re happy with the final outcome I would write down any changes you made so you can recreate your character in future, at present there is no way to save these meta tag expressions that I'm aware of so you have to do this every time you want to use your OC!
You can now go back to the Outfit Changer and add whatever hairstyle and hat you want. (Don't forget to save!)

Step 4: Setting up finalised character to use
Now, we need to clone our character so it’s its own character to use and pose how we like.
Go back to Rampage trainer and in the Player menu, scroll down to ‘Clone Player’ and select. Voila! There is your OC!

Now let's change back to Arthur. Back in the Player > Wardrobe > Model Changer menu, select Reset

Now we can change Arthur to another character much like we did when we changed them to the mp_female model or we can spawn in other peds.
I normally like to leave Arthur as is and then spawn in other Peds.
Additional: Spawning in other characters to create a scene.
In this example I’m going to spawn in Micah to create a scene with.
Go to Spawner > Peds > Spawner Settings
Make sure Frozen is ticked


Go back to the Ped Spawner and select ‘Search Peds’
Just enter in Micah and enter


From the list select CS_MICAHBELL and our stinky lil' man will spawn in

So, to use these characters we’ve added, we need to add them to the Ped Database so we can select them and switch to them any time we want.
There’s a few ways to do this but this is how i like to do it:
Back in the Spawner menu, go to Objects
Go to Cam Settings turn off Take Player With Cam
Go back and click to turn on Creator Cam


Now we can use our mouse to move the characters around, yay!
This is what we’ll be using to position our characters in scenes easily.
We need to add our OC and Micah to the database so we can use them with their own context menus, so lets right click on our character to select them and then click E to add them to the database, do the same for any other characters you want to use.
Back in our Spawner Ped menu, if we go to Ped Database, we should now see mp_female and CS_MICAHBELL in there
Scroll to a character in the list, and click them to get to their own context menus


To change Micah’s outfit for example, we would make sure we had selected them in the database so we can access their context menu and in the Outfit Variation section, choose one we like. Now that we’ve created our characters for a scene and added them to the database so we can use them via their own context menus, we can move on to animating them. How to animate your characters: https://www.tumblr.com/hello-mishki/781576015936995328/how-to-create-your-oc-in-rdr2-story-mode-part-ii?source=share

23 notes
·
View notes
Text
NOT A DRILL!
Playing Dragon Age Inquisition? Want to take beautiful screenshots? Always wanted to try Otis’ amazing premium photomode tools?
Well now you can for FREE 💚
Frans Bouma has released his tools for DAI for free, and it supports IGCSDOF 💕
IGCSDOF is a superior depth of field solution. It requires Frans’ photomode tools to work, alongside ReShade.
It comes as the igcsconnector ReShade addon and a complimentary igcsdof ReShade shader.
Any dof you see in my Cyberpunk, BG3 or RDR2 shots use IGCSDOF.
It doesn’t work like the dof shaders you’re used to. You access it via the addon tab. You can’t use it in real time. You have to set up your shot, and then set up IGCSDOF.
When you turn it on, you won’t see any blur at all. You’ll see two versions of the scene layered on each other. The distance between the overlap of these 2 images determines the strength of blur.
There are lots of options for bokeh shape, CA, and quality.
Once you’ve selected the settings you want, you ‘render’ the image. This will take anything from a few seconds to a few minutes (or more!) depending on the quality you chose, the game fps, and how powerful your PC is.
Once the image is rendered you’ll see the blur as it’s meant to be. Then you take the shot, and end the IGCSDOF session.
It sounds complex, and it can be to begin with. But you quickly get the hang of it.
And trust me, it is very definitely worth it. The quality of the dof is miles ahead of regular dof shaders. It treats glass and other transparent objects correctly, and edges aren’t haloed.
Now’s your chance to give it a try! IGCSDOF/IGCS connector is always free, but Frans’ camera tools, that are required to use it, usually require a patreon subscription (worth it imo).
But now you can try them in Dragon Age Inquisition for free!
128 notes
·
View notes
Text


Hugged Karlach!!! I felt this was important to share.
#i'll be collecting hugs like achievements in this game#bg3 spoilers#baldur's gate 3#bg3#karlach#tav#gnome tav#bg3 photography#virtual photography#using otis_inf's camera tools#reg wishes she had magic
81 notes
·
View notes
Text


#alanwakeedit#alan wake#alan wake 2#saga anderson#*#mk.op#mk.edit#mk.gifs#otis_inf cam shots#reshade tools used#inspired by my dream last night#and though i can't seem to change the lighting i did reshade the camera blur away#the like ingame lighting i mean of course#you can really do all sorts of things with reshade tho it's great
108 notes
·
View notes
Note
hi im sorry im super dumb how are ur screenshots so hq !?
Hi anon!
Thank you for the ask! Don't be sorry, it's a fair question and not dumb at all! :>
I don't think there is anything special in my process of taking screenshots, honestly. I use all the commonly known tools like otis_inf camera tools, IGCS Depth of Field add-on, Reshade with addon support and fiddle around with Reshade presets/settings a lot (for better or for worse, I'm learning as I go).
I could do a more in-depth post on the tools and techniques I use if there is interest, but for the sake of brevity: hotsampling is the key. My monitor's native resolution is 2k, but I use the hotsampling feature to temporarily upscale the resolution and take all my screenshots in 4k (3840x2160) or 4.5k (4480x2520), so that the outcome looks higher quality.
hope this answers your question <3
9 notes
·
View notes
Note
what's ur pc specs and how do u get your virtual photography shots to look so good and hd?
These are my specs!
NVIDIA GeForce RTX 4070 13th Gen Intel® Core i5-13400F 32 GB RAM MSI monitor - 2560 x 1440, 165Hz
I usually do the highest possible graphics settings in my games and use raytracing.
I use Otis_Inf's camera tools and reshade for my screenshots! I use the hotsampling feature, which basically will "fake" a higher resolution of your game. So my native resolution is 2K (2560x1440), but I want 4K screenshots, so I will hot sample 4480x2520 so that the outcome looks much higher quality.
I also subscribe to Pascal Gilcher's patreon to get the "ReLight" add-on for ReShade (you can add new lights to the game and place them where you want).
Using the IGCS depth of field add-on also greatly improves the quality of a screenshot :)
I have some tutorials here for BG3 virtual photography and these tools, but I use the same process for every game!
21 notes
·
View notes
Text
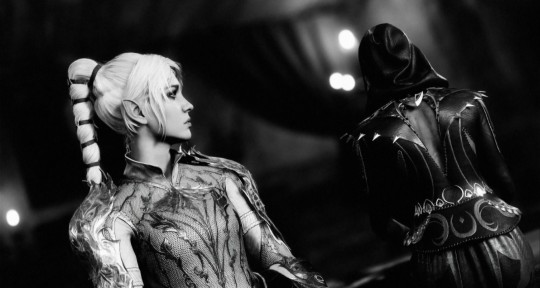
BG3 Photomode Tutorial #2: Scene Manipulation
Chapter 0: Overview
Chapter 1: Script Extender Debug Console
Chapter 2: Scene Manipulation
Chapter 2.5: More Scene Manipulation
Chapter 3: Otis_Inf Camera Tools
Supplement: Mods and Resources
I'm going to cover just the things that I use the most and how I find more scenes. There might be better processes out there with the new mod tools, but I will just share what works for me. There's more advanced topics covered by Moxi as well.

Above is an example of (without any mods except Script Extender):
Using Shadowheart's Act 1 wine-drinking cutscene with Minthara taking Shadowheart's role.
Playing it in Act 3
Playing it in a place that is not normally accessible
You will be able to pull out most scenes in the game, replace the actors, and understand how to troubleshoot common issues.
I'll share some general advice on how to make the most of these scenes - it's not an exact science (that I know of) but sometimes you get lucky and it works out.
Warning: This is going to be very finicky and you may not pick it up right away. And that's okay! You don't NEED this, but try to revisit it once in a while, because it opens up a LOT of opportunities. This will also still be useful once Patch 8 is out.
First, let me put the code before you that I used to create the above screenshot. This is code you can paste into Script Extender Debug Console. If you don't know what that is, click here.
Osi.QRY_StartDialogCustom_Fixed("CAMP_GoblinHuntCelebration_SD_ROM_NightWithShadowheart_924fb8e6-8622-bc02-43c8-77c80ddc1d3e", "S_GOB_DrowCommander_25721313-0c15-4935-8176-9f134385451b",Osi.DB_Avatars:Get(nil)[1][1], 1,1,-1,1)
This is a lot, but let me break it down again:
Green is the command used to play cutscenes along with some additional parameters. This will never change.
Red is the first parameter: the name and UUID (big string of numbers/letters) of Shadowheart's cutscene.
Note that this parameter is ALWAYS surrounded by quotation marks (").
Purple is the second parameter: name and UUID of Minthara's character model. It is the first actor in the list, which is Shadowheart's role in this instance.
Note that when you use a character model and string combination like this, it's ALWAYS surrounded by quotation marks (").
Blue is the third parameter: Tav's role. There's a couple methods for finding Tav, but this is what I use.
Note that [1][1] is the Lead Tav. If you have a 2nd player in a multiplayer session, they'll use [2][1]. Not sure what that would be with a third, but it's probably [3][1].
If you want to change the actors, you absolutely can. Tav's role can be played by a companion with a Tav in Shadowheart's role. I don't recommend having two companions in a cutscene (using name/UUID). But there's workarounds, such as transforming Tav to look like a companion.
What To Expect
There's certain side effects to replacing companions with other models. There are methods to resolve these issues, but I generally don't bother unless I am looking for something specific.
They will not voice the dialog lines, won't open their mouths to say the lines.
They will have expressions on their face that go along with those linse.
They will not have very little body language in some cases (biggest issue with this).
If you run the command in the same Act where the cutscene normally takes places, your characters will be teleported to that location and it will play out in that location with new actors you set up in the command.
If you run the command anywhere else, it will play ~generally~ in the area you played it - they may get teleported some distance away to start. This can be difficult to control but is sometimes worth it.
How to Maintain Voice and Body Language while Changing Appearance

Sometimes you may want to keep the body language from the original actor's cutscene because you want to keep a hand gesture and expression in the shot. But you want them to still look like Tav/another companion.
The short version is: You need to take the ORIGINAL actor of the role and make your Tav look like them before you play the cutscene. There's two commands you can plug in to the Script Extender Debug Console to make that happen. Let's say for the header image, I want Shadowheart to look like Minthara and maintain her body language while talking. First I need Shadowheart to take on Minthara's appearance so we're going to use a transformation command:
Osi.Transform("S_Player_ShadowHeart_3ed74f06-3c60-42dc-83f6-f034cb47c679", "S_GOB_DrowCommander_25721313-0c15-4935-8176-9f134385451b","884b16b1-e4e1-474a-8de4-fb1836491f01");
Breaking it down again:
Green is the command and the third/final parameter which dictates that we're going to transform a character using a certain kind of rule - something like the rules that define Disguise Self.
Pink is first parameter, which determines who will be transformed. In this case, Shadowheart will undergo the transformation.
Purple is the second parameter, which is what the transformation will look like. In this case, Shadowheart will be transformed to look like Minthara.
We also need her gear. You could just swap their inventories, but there's also a command for that, minus the dye information.
Osi.CopyCharacterEquipment("S_Player_ShadowHeart_3ed74f06-3c60-42dc-83f6-f034cb47c679", "S_GOB_DrowCommander_25721313-0c15-4935-8176-9f134385451b")
Similar deal here, but let's break it down once more:
Green is the command for copying character equipment.
Pink is the first parameter, which is the recipient of the equipment. Shadowheart will be the recipient of the equipment.
Purple is the second parameter, which is the source of the equipment. In this case, we're copying Minthara's equipment over to Shadowheart.
Once again, Dye isn't carried over, so you'll need to do that before playing the cutscene.
Note that once you've done this, you now need to play the cutscene with the original Companion that you've now made a doppleganger of Minthara:
Osi.QRY_StartDialogCustom_Fixed("CAMP_GoblinHuntCelebration_SD_ROM_NightWithShadowheart_924fb8e6-8622-bc02-43c8-77c80ddc1d3e", "S_Player_ShadowHeart_3ed74f06-3c60-42dc-83f6-f034cb47c679",Osi.DB_Avatars:Get(nil)[1][1], 1,1,-1,1)
Note that this is exactly the same as the first command in the post, except now Shadowheart replaces Minthara in the second parameter slot.

You now have Minthara speaking Shadowheart's lines and being fully expressive and gesturing as though she were Shadowheart herself.
This tutorial is already getting long, so I'll cut it off there. Next time I'll cover how you can find the names and IDs of cutscenes based on a bit of dialog from the scene you're looking for.
#posting this when I'm quite tired so I hope it makes sense#mog's bg3 virtual photography tutorial#bg3 photomode#bg3 photography#bg3#bg3 virtual photography#baldur's gate iii#baldur's gate 3#mog's vp tag
84 notes
·
View notes