#uvs 0.5
Text

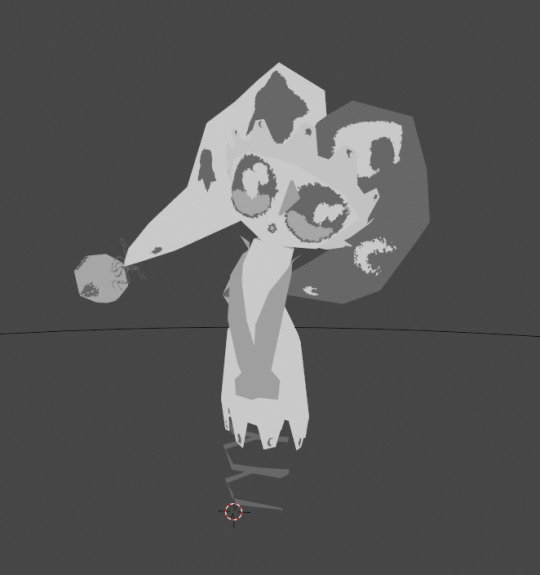
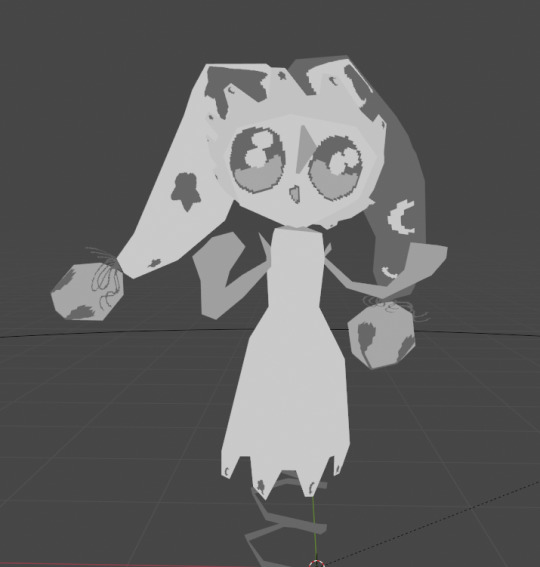
70s, 80s, & 90s Stuff Pack Default Replacement Hair Edits (Male Edition)
Do you ever just scroll past EA stuff pack hairs without a second glance? Or try one out and there's just something off and then end up using a better looking/higher poly cc instead?
Let's try to fix that!
Starting with the men's collection of hairs we have the ~decades~ pack.
Along with a slight re-size, I heavily edited the Grown Out style to reduce clipping and gaps. It's so low poly that yes, it is just gonna be like that(tm)
The Mid messy style had this weird gap on the top of the hair and I've ELIMINIATED IT. GONE. I also edited the UV a little to make the strands a little fuller :)

Details:
Default replacement for teen to elder males.
You must have the expansion pack installed for these to work as they only replace what exists!
Place in your overrides folder to install. :)
Only replaces the meshes and whatnot.
(I have @ifcasims's default textures installed and they're neat!)
Any default replacement retextures will still work.
Compressorized | Lazy Custom Thumbs (using the previews above -- you can customize or delete these if you'd like with s3pe 🙃)
Notes:
Have the same polycounts as the originals with all new LODs with exact (+/- 2) polycounts.
Any default replacements or default recategorization mods will not work with these mods! Anything that edits the CASP resources, basically. Please reach out if you have any questions.
Thank you all for the feedback and respective peoples. Special shoutout to @zg-simblr for helping me get this out!
Download default replacements here:
Grown Out (0.5 MB) : https://simfileshare.net/download/4652693/
Mid Messy (0.8 MB): https://simfileshare.net/download/4652691/
Non-default standalone versions are also available here: http://simfileshare.net/folder/217251/
(requires respective expansion or stuff pack installed)
Featured sim is a made-over version of Sunlit Tides's Suzuki Hinata.
#s3cc#ts3cc#dl: default replacement#dl: hair#just realized I used a diff preview for the second hair............... oh well lol
154 notes
·
View notes
Text


Munich Gem Show Finds Sale (October 28, ‘23) Item #30
$32 each - Free EU & US shipping on orders over $60
Approx. 0.3” - 0.5” rare “golden Enhydro” petroleum in quartz. These crystals are higher quality (bigger/more petroleum inside) than I’ve stocked in the past and they glow very brightly under UV light
One will be randomly selected for you.
*Only 13 pieces available*
To claim items and order, please read and follow the system I have set up. You can read the rules here!
44 notes
·
View notes
Note
RIGHT like Okay make your vampires turn into cinders within 0.5 seconds if you wanna but Dracula when well-fed after noon wanders around stalking people in the steets, lifting giant crates, and jumping off windows like a panther. He is depowered and cannot become mist or animal (the moon is traditionally a source of magic) and it's the only time when you can kill him, but he doesn't burn, he shouldn't be getting killed by the sun in your Dracula movie 😭
Seriously! One UV lamp and you can turn 90% of those knockoffs into dust
11 notes
·
View notes
Text
How I made a writhing flesh monster material in Unreal Engine

I started with a basic flesh texture from Texturecan.

I created a copy of my usual master material and plugged the texture as normal like so:

Here is where it gets a bit more complciated but not by much. I wanted to add movement to this texture, some normal displacement and a writhing effect. Here is what I did:

To create movement, I put in a world position node outputed on the XYZ axis to a subtract node on the B input. The A input received an Object Position. Basically, this is data representing the location of the object with this material on it in world-space. It is used to find the radial distance from the camera to a pixel In simple term, this tells the material where the object is in the scene. Here is a visualisation from the Unreal documentation to make this clear.

Moving on, the Object Position and World Position are connected to a subtract node. It's purpose is to take in two inputs, subtracts the second input from the first, and outputs the difference. This is connected to a multiply and scalar parameter set to 0.5. This will be our settings to input movement size. Now we are able to create displacement.
Now we will create a Constant 3 Vecotr and connect it via a multiply to a Time node. This literally adds the passage of time to a material. This will determine our movement speed once we connect the multiply output to another multiply which has a scalar parameter on the B input which I set to 8.0. Now our underlayer is writhing! Oh boy!
This multiply that we just created and the multiply from the scalar parameter that creates the size of our movement form earlier will be connected to an Add node. Let's create a Noise node to plug into the World Position input. Now our slime ball should look like this. This will be a nice layer mask for our original texture from texturecan.

I prefer to have it inverted though so let's add a one minus node and plug that into a multiply with a scalar parameter that we will name Intensity Offset and set to 1.0. Now we can control the shape of our noise. From your Noise node output, pull a multiply and plug in another constant 3 vector and set your slime to be whatrever colour you want. This entire node setup should be plugged into World Position Offset.
Now let's move on to the Normal part of the material. From the UV output of the Normal texture from Texturecan, add a tiling system. Mine is a material function which I highly recommend you create, it streamlines the creation of material and pays off as your project grows. Here is what mine looks like. It's super simple. If you do not create a material function. Simply drag the Multiply output into the UVs of the Normal

Then, from the RGB output of the Normal texture, create a component mask with Red and Green ticked on. COnnect this to a multiply and create a scalar parameter to control the intensity. Set it to 1.0.
From the multiply, create an append node to combine channels together and create a vector which has more channels than the original so that you can plug from the B input of the append to the B output of the normal texture. This way we reordered the channels to get the blue channel back after maskign it for our scalar parameter. This whole node set up gets plugged into and Add which connects to the whole movement set up we made earlier via the end of the multiply we made earlier. Then the A output of the add gets plugged directly into the Normal input of our main texture.
And there you have it. Now enjoy your horrifying flesh monster texture in all it's glory!

#unreal engine#material shader#shader magic#3d modelling#3d animation#game art#texturing#video game#horror game#control#alan wake
3 notes
·
View notes
Note
hiii!!! i love your posts so much 🥺🥺😭😭 how do you get texture on sims in blender like that? (i. e. leather jacket or skin texture) your sims look so real
thanks! here's a basic rundown of just the textures (again i really want to do an updated, in depth render tutorial, i just keep having problems w it). i'm gonna work under the assumption you know how to set up a basic material! tons of tutorials on that. unless they start telling you to use a mix shader and a transparent shader and all that. don't listen to them (ask me if you don't know there's a better way lmao)
so first i always rip sims with hq textures - if you click the button once on simripper it should remember next time and you won't have to do it again.
then i make a bump map in photoshop just by taking that diffuse map, and in photoshop (i don't know how it would be done in other photo editors) i set it to grayscale and change it to 16 bits per channel instead of 8. to be totally honest, changing it to 16 bits doesn't make much of a difference w sims but it's good practice for any 3d modelling

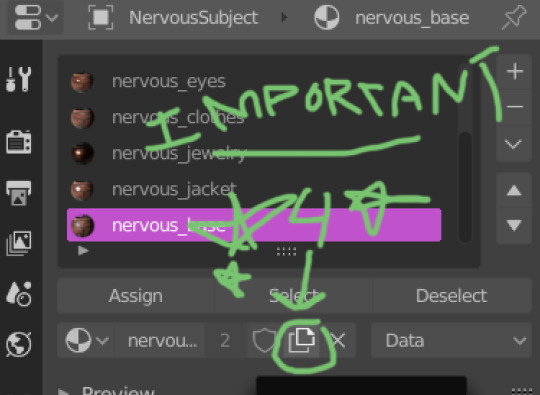
then in blender, click your sim, click the beach ball looking tab to go to materials, and you can see i've got a bunch, but when it opens there'll just be the default. i name that [sim name]_base always. it's really important to name these because sometimes there's a ton.
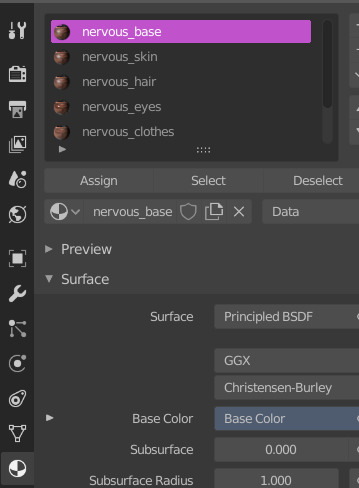
then i make a bunch of copies of it like this

rename it whatever, like [sim name]_skin.
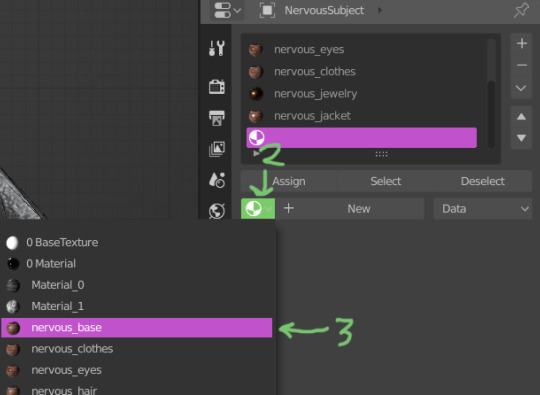
now take your sim into edit mode in blender and in your second window open uv editor and click this button
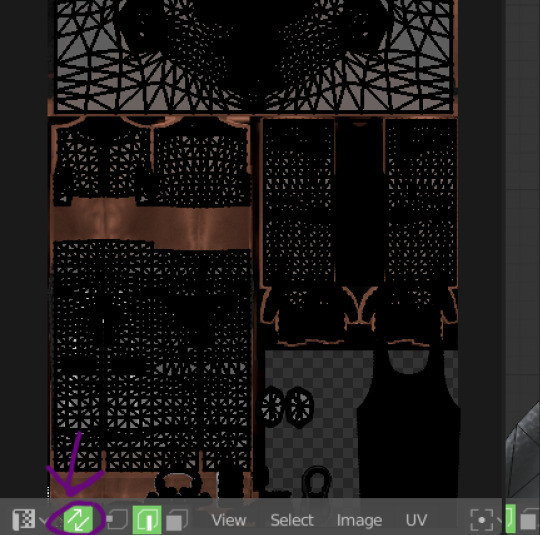
it's sync selection, meaning you can click from the uv map instead of the sim which is a lot easier. select all the skin (and while we're at it, click mesh, clean up, and merge by distance to get rid of the seams!)
click the skin material you made with all skin selected and click assign.
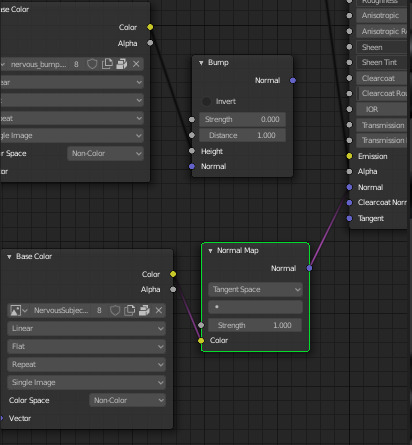
now in the second window go to material editor. get an image texture and put in that bump map. set it non-color!!!!! and then get a bump node and connect the bump to the normal slot of the principled bsdf and connect the color of the bump node to the height slot of the bump. and then your sim will look insane but that's ok
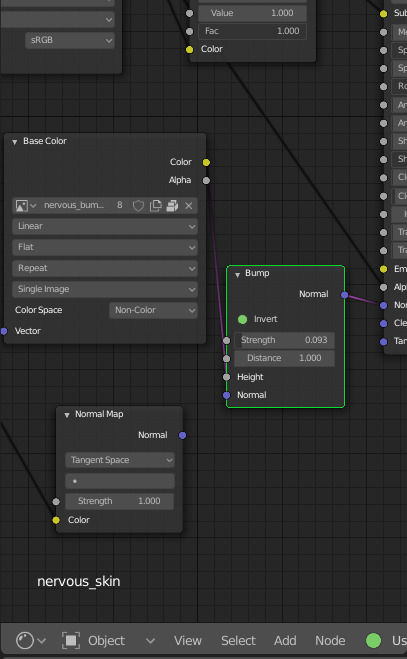
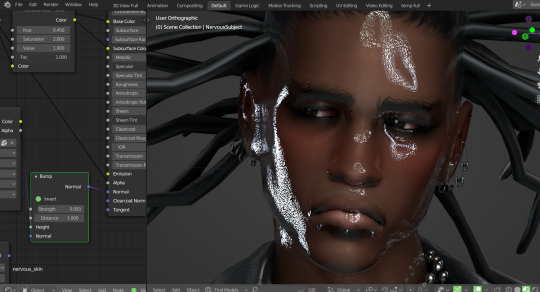
roughness on the principled bsdf determines how shiny the thing will be - 1 is completely matte 0 is completely reflective. i'm setting the skin to 0 for this example, but obviously the number you want will depend on your render. here is nervous's skin with no bump map:

and here it is with a bump map and a reeeeally low strength. still looks weird because you probably wouldn't want the skin roughness set to 0, but i just wanted to demonstrate what the bump map does. (in this render i just had the roughness set to the default 0.5)
now for clothes, i usually use the normal map that comes when you rip your sim. most clothes have them, but i somehow had the literal worst luck in the world not a stitch of clothing he was wearing had a normal map like HUH. but here's how you'd set that up. ESPECIALLY make sure you set it to non color this time or it won't work at all.
so for nervous's jacket i actually used the bump map with an even smaller strength. i don't recommend this bc it looks weird, but because i wanted it to shine, it looked even weirder with no normal map. i am not in love with how the jacket looks actually but c'est la vie.
and i turned down the roughness low because it's leather, for the rest of his clothes i made the roughness 1!
#i hope you can follow this i am really really bad at written tutorials i would much rather do a video tutorial#but i can't right now 😐#ts4 tutorial#ask#anon
32 notes
·
View notes
Text
(Left) Mirko: So, if you're considered an Admiral, then prove it to me!
(right) X-Mirko: Order of the queen, I must destroy you

Let's see who's the most powerful version of Mirko Akaisen, in this scene I was wondering, in the episode of S2 OF UV, what if the navy part of the royal guard was called to join in the battle?
The First round of UV 0.5, Mirko vs X-Mirko
#undertale#undertale au#oc#herostale#deltarune#bosozoku#admiral#inspiration#ryokugyu#navy#underverseoc#underverse
2 notes
·
View notes
Text
Simulated lag artifacting
The blender render preview has a lot of artifacting in it that doesn't show up in the final render. But I think it's very pretty and I'd like to be able to use it in my final animations. I've been told that this can be done with shader nodes. But I don't really understand shader nodes. I understand characters and animation, but the math of 3D art is often too much for me.
Nonetheless, someone on another site showed me a potential 'simulated lag artifacting' shader. I mentioned that on here and fellow tumblr user @berozova asked to see it.
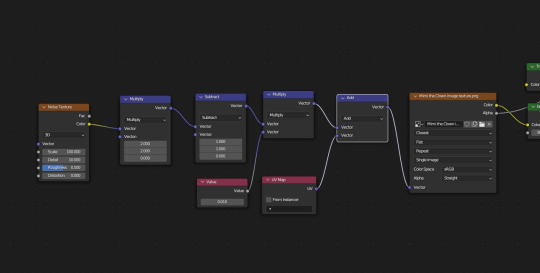
Here is a screenshot of the shader nodes. I admit, this sort of thing is beyond me.
As it was explained to me, and as best as I can repeat that explanation, the noise texture connected to vector math add connected to the vector of my image texture node causes the pixel distribution of the noise texture to be randomly moved up and down in a pixel noise pattern.
But, it only moves each pixel up on the x and y axis from the starting point of 0. We want it to go below 0 as well as above, so that the noise is centered, because otherwise it's pushing the texture slightly diagonally.
That multiply and subtract bit changes a range of 0 to 1 into a range of -1 to 1. Think about it:
1 x 2 - 1 = 1
0 x 2 - 1 = -1
0.5 x 2 - 1 = 0
It's a simple bit of math that converts a range of 0 to 1 into a range of -1 to 1.
That Value node is in there because the effect is too intense without multiplying it by a fraction. The UV Map node is there I think because we want this applied to the UV coordinates and not to the texture directly? Because it's the UV coordinates that determine where the texture is applied to the mesh?
I hope I haven't fudged a crucial detail here. But that is as best as I understand it for now.
Here is the result, on my character Mimi. I feel bad for her making her do all these experiments. I think she's just happy for attention and play, but as her parent I do worry of course. Now, as you can see, there is a runny watery effect to the textures, similar to what you can see when previewing your animation in blender. But there are some crucial differences.

If you look up close to her face, you see that it's not just the edge of the eyes that are getting watery and runny. But pixel noise is just spreading around randomly as well. And if you look at the bells on the ends of her clown hat, some white lines have randomly appeared there. I checked my texture image, and there are no white pixels around the bell texture at all. It's all either dark grey or transparency.
The second issue becomes clearer when we directly compare to the intended thing we're trying to simulate.

This is the render preview of my animated Mimi. As you can see, it's not just the textures that are being warped, but also the mesh itself. This completes the watery effect. If you only warp the textures, then you have the runny textures contrasted against the sharp crisp clear mesh.
This is a funny effect, isn't it? To me, it almost looks like an afterimage. But surely that's impossible? I enjoy animating my characters with low framerate and constant interpolation. If an afterimage were produced from that, then you would expect to see some significant distance between the two images, wouldn't you?
Overall, I would like to learn how to control the watery effect, but I'm going to put these experiments down for now. I have other things I want to get done, including other 3D art experiments. (I'm currently trying to figure out shape key animations in godot and also creating multiple distinct shape key animations associated with a single mesh!)
Thank you for your help Mimi!
As I said, I don't think she's bothered by being made watery, with or without unwanted texture bleed. But I am responsible for her and I have to make sure to take care of her.
7 notes
·
View notes
Note
Hm. Meau had a trauma and the 0.5 ancient mew is still real, unless I'm misinterpreting what you said and Noe is actually still on fact that 0.5 but if not my brain immediately said Meau had some sort of miscarriage in the past likely caused by the human that betrayed her and the kitten was ancient mewlike as Meau had less like dna damage/more energy to give and put into it making them physically yes an ancient mew (maybe a little less grand) but not alive not truely fully one, maybe even the world rules of only one also either set in motion to stop it leading to the betrayal or would've stopped the successful birth anyways.
Tho obviously if they passed they're not alive they can't still count as a 0.5 unless their body is preserved somewhere in ice maybe or with giratina not living a full life but a half life in the distortion world similar to UV like a shadow almost of life.
Idk I'm thinkies!!
Nah, Noe is that 0.5, again we’ll se exactly why and how early into his arc. Basically when he reveals his own origin everything should become clear.
Though there’s a few other things in this theory that certainly won’t age well… such a shame ;>
14 notes
·
View notes
Text
whatever man until uve had a shepherds pie after the world's coldest gloomiest walk home from school u haven't lived. that shit will fill you up in 0.5 seconds. Best sleep of your life
13 notes
·
View notes
Text
The most crackhead idea I’ve ever had in the shower:
I Rate Different Articles of PPE That I’ve Worn Based on How Much Gender They Provide
1. Goggles
Starting this off strong at a solid 0/10.
The “sexy science circles” that they leave behind and my high school bio teacher advocated for are not sexy at all. Don’t even talk to me about gender when it’s being killed off along with bacteria and shit in the UV cabinet at the back of the classroom.
2. Glasses
This one’s slightly better at a 3/10.
They actually did shit and weren’t completely uncomfortable. They’re just hell to wear over another pair of glasses and/or while simultaneously wearing a mask, but they give mad scientist vibes, and that’s gender.
3. Rubber and/or latex gloves
5/10.
The snap when you don a pair is gender. The sweat from my hands after I’ve been wearing it for hours is not. And the smell…
4. Thermal/cryo gloves
I’d give them a bulky 0.5/10.
They get the job done, but the gender they provide is none.
5. Aprons
Sigh. -11/10.
They’re just horrible. Literally terrifying because who knows what guts have been on them. Especially the ones you find in the back of a high school lab classroom.
6. The lab coats the university gives us for chem classes that are made of fucking thin cloth-paper because the university is cheap as fuck
4/10 is all I can give.
They tear before gender can be found in them. Yellow stains on the sleeves from who knows what is definitely not gender, and neither is velcro.
7. Actual lab coats
9999999999/10 FINALLY
Just walk really fast in them. Fucking fantastic. Hold an Erlenmeyer flask and wear glasses for maximum gender.
11 notes
·
View notes
Text

Ich habe 1.655 Mal im Jahr 2022 etwas gepostet
102 Einträge erstellt (6%)
1.553 Einträge gerebloggt (94%)
Blogs, die ich am häufigsten gerebloggt habe:
@lanadelreyly
@gemsofgreece
@fy-yongsun
@cheddarholt
@sitcom-gifs
Ich habe 152 meiner Einträge im Jahr 2022 getaggt
#bts fanfic – 52 Einträge
#bts – 42 Einträge
#bts au – 39 Einträge
#bts imagines – 30 Einträge
#bts scenarios – 27 Einträge
#yoongi au – 26 Einträge
#suga au – 26 Einträge
#yoongi fluff – 26 Einträge
#jeon soyeon – 26 Einträge
#female rapper – 25 Einträge
Longest Tag: 73 characters
#i fcking need this to be my wedding dress idc that i don't even have a bf
Meine Top-Einträge im Jahr 2022:
#5
lonely hearts club ✨ || kth au [ONGOING] masterlist

maybe single parents are meant to be members of the lonely hearts club.
© 2022 | eleni_cherie
»»»
❝lonely hearts club
do you want to be with somebody like me? ❞
»»»
genre: fluff, angst, single parents au, romcom, strangers to friends to lovers
list of all chapters: 0.1 | 0.2 | 0.3 | 0.4 | 0.5 | 0.6 | 0.7 | 0.8 | 0.9 | 1.0 | 1.1 | 1.2 | 1.3 | 1.4 | 1.5 | 1.6 | 1.7 | 1.8 | 1.9 | 2.0 | 2.1 | 2.2 | 2.3 | finale
started publishing: 11th october 2022
-publishing multiple chapters every week!
finished: -
words: between 1.2k - 4k, chapters get longer as it goes :)
»»»
COPYRIGHT. ALL RIGHTS RESERVED.
IDEA/STORY VERY LOOSELY INSPIRED BY THE SONG “LONELY HEARTS CLUB” BY MARINA.
PROTAGONISTS:
KIM TAEHYUNG AS HIMSELF; SINGLE DAD
SARAH HYLAND AS CASSANDRA; SINGLE MUM
ALTERNATIVE UNIVERSE. CHARACTERS NOT NECESSARILY LIKE THE REAL PERSONS. NOT FREE FROM LINGUISTIC ERRORS - ENGLISH IS NOT MY NATIVE LANGUAGE.
DON’T BE A GHOST READER. LIKE & SHARE THIS STORY IF YOU LIKE IT :))
DEDICATED TO MYSELF BC I REALLY WANTED A GOOD TAE SINGLE DAD AU BUT COULDN’T FIND THAT MANY LOL. AND TO EVERYONE WHO’S READING THIS FANFIC!!
CHECK OUT MY OTHER STORIES AS WELL:
polaris ✨ bts • kth
private affair ✨ ksj
8 mile ✨ myg
-Elenixx
57 Anmerkungen – Gepostet 12. Oktober 2022
#4
my halloween costume this year. wwdits stans will get it
100 Anmerkungen – Gepostet 2. September 2022
#3
Vollständigen Eintrag ansehen
149 Anmerkungen – Gepostet 19. Juli 2022
#2

vote on 2022mama.com/vote (50%) 🚨 it'll be THE LAST DAESANG we can give our boys for the next years❗
if you hit ip limit: turn wifi router off/on, switch shortly to airplane mode and back, use mobile data or try a different browser/the app.
also stream YET TO COME on MAMA's Spotify playlist 1x per day per acc and the GRAMMY NOMINATED MV on Youtube!
🎧 Spotify (30%) 2022mama.com/vote/spotify
📺YouTube (10%) youtu.be/kXpOEzNZ8hQ
it gets embarrassing really. yes, the others get help from other fandoms and cheat by using vpn and buying votes, but considering what a huge fandom we are, this constant struggle and that we can't widen the gap more than 25k before it starts decreasing again, is embarrassing. period.
EDIT:
They OUTVOTED US TODAY AGAIN!
not bc the votes more but bc we voted LESS than yesterday!
Vollständigen Eintrag ansehen
204 Anmerkungen – Gepostet 17. November 2022
Meine #1 des Jahres 2022
glad I was in the part of my generation that was influenced by marina's tfj + eh, lana's btd + uv, arctic monkeys' am, the neighborhood, ahs murder house w evan peters as tate langdon + coven, skins uk w kaya scodelario as effy stonem & hannah murray as cassie ainsworth and angsty wattpad fanfics
283 Anmerkungen – Gepostet 26. Februar 2022
Hol dir deinen Tumblr-Jahresrückblick 2022 →
#tumblr2022#Jahresrückblick#Mein Tumblr-Jahresrückblick 2022#Dein Tumblr-Jahresrückblick#year in review#my 2022 tumblr year in review#your tumblr year in review
2 notes
·
View notes
Text

Double Beam UV-Vis Spectrophotometer 245 mm
Labtron Double Beam UV-Vis Spectrophotometer features a wavelength range of 190 to 1100 nm with spectral bandwidth options of 0.5 to 6.0nm Its rigid 16 mm aluminum base ensures stability, while the double beam grating system offers high accuracy and reliable performance.
0 notes
Text
Automated NGS Library Preparation System 24V

Labnics Automated NGS Library Preparation System is SBS-compatible and offers a pipetting range of 0.5 to 200µl. The unit uses air displacement for high precision of CV ≤1.2% and accuracy of ±1.0%, supports 8/96 channels, and features UV sterilization.
0 notes
Text
Ahşap Kompozit Malzemelerin Isı ve Nem Direnci: Teknik Özellikler

Ahşap kompozit malzemeler, doğal ahşap liflerinin plastik polimerlerle birleştirilmesiyle oluşturulan yenilikçi yapı malzemeleridir. Bu malzemeler, geleneksel ahşabın estetik görünümünü ve sıcaklığını korurken, plastiğin dayanıklılığını ve bakım kolaylığını sunar. Özellikle dış mekan uygulamalarında giderek daha fazla tercih edilen ahşap kompozitlerin en önemli özelliklerinden biri, ısı ve nem direncidir. Bu makalede, ahşap kompozit malzemelerin ısı ve nem direncine ilişkin teknik özellikleri detaylıca inceleyeceğiz.
Isı Direnci
Ahşap kompozit malzemelerin ısı direnci, hem yüksek sıcaklıklara dayanma kabiliyetini hem de ısı yalıtım özelliklerini kapsar.
Termal Genleşme: Ahşap kompozitler, sıcaklık değişimlerine maruz kaldıklarında genleşme ve büzülme gösterirler. Ancak bu genleşme oranı, saf plastik malzemelere göre çok daha düşüktür. Tipik bir ahşap kompozit malzemenin doğrusal termal genleşme katsayısı 2-4 x 10^-5 mm/mm/°C arasındadır. Bu, malzemenin sıcaklık değişimlerinde boyutsal stabilitesini korumasını sağlar.
Isı İletkenliği: Ahşap kompozitlerin ısı iletkenlik katsayısı genellikle 0.15-0.35 W/mK arasındadır. Bu değer, saf ahşaba (0.1-0.2 W/mK) yakın, ancak çoğu metalden (örneğin alüminyum: 205 W/mK) çok daha düşüktür. Düşük ısı iletkenliği, ahşap kompozitlerin iyi bir ısı yalıtımı sağladığını gösterir.
Cam Geçiş Sıcaklığı: Ahşap kompozitlerin cam geçiş sıcaklığı, kullanılan polimer matrisine bağlı olarak değişir. Genel olarak, bu sıcaklık 80-100°C arasındadır. Bu sıcaklığın üzerinde, malzeme yumuşamaya başlar ve mekanik özellikleri değişir.
Maksimum Kullanım Sıcaklığı: Çoğu ahşap kompozit malzeme, sürekli olarak -20°C ile +60°C arasındaki sıcaklıklarda kullanılabilir. Kısa süreli maruziyetlerde bu aralık genişleyebilir.
Nem Direnci
Ahşap kompozitlerin nem direnci, geleneksel ahşaba göre çok daha yüksektir. Bu özellik, dış mekan uygulamalarında tercih edilmelerinin başlıca nedenlerinden biridir.
Su Emme Oranı: Ahşap kompozitlerin 24 saatlik su emme oranı genellikle %0.5-3 arasındadır. Bu oran, işlenmemiş saf ahşabın su emme oranından (%50'ye kadar çıkabilir) çok daha düşüktür. Düşük su emme oranı, malzemenin boyutsal stabilitesini korumasını ve çürümeye karşı dirençli olmasını sağlar.
Nem Genleşmesi: Ahşap kompozitlerin nem kaynaklı genleşmesi, saf ahşaba göre çok daha azdır. Tipik bir ahşap kompozit malzemenin kalınlık yönündeki nem genleşmesi %0.5-1.5 arasındadır.
Nem Direnci Testi: ASTM D1037 standardına göre yapılan nem direnci testlerinde, ahşap kompozitler genellikle yüksek performans gösterir. Bu test, malzemenin yüksek nem koşullarında (90% bağıl nem) uzun süre (genellikle 21 gün) bekletilmesini ve ardından boyutsal değişiminin ve mekanik özelliklerinin ölçülmesini içerir.
Mantar ve Küf Direnci: Ahşap kompozitler, içerdikleri plastik bileşenler sayesinde mantar ve küf oluşumuna karşı oldukça dirençlidir. ASTM G21 standardına göre yapılan testlerde, çoğu ahşap kompozit malzeme en yüksek direnç seviyesi olan 0 veya 1 derecesini alır.
Isı ve Nem Direncini Etkileyen Faktörler
Kompozisyon: Ahşap lifleri ve plastik oranı, malzemenin ısı ve nem direncini doğrudan etkiler. Genel olarak, plastik oranı arttıkça nem direnci artar, ancak ısı direnci azalabilir.
Katkı Maddeleri: UV stabilizatörler, antioksidanlar ve diğer katkı maddeleri, malzemenin ısı ve nem direncini artırabilir.
Üretim Yöntemi: Ekstrüzyon veya kalıplama gibi farklı üretim yöntemleri, malzemenin nihai özelliklerini etkileyebilir.
Yüzey İşlemleri: Bazı ahşap kompozitler, ek su itici veya ısı yalıtımı sağlayan kaplamalarla işlenebilir.
Uygulama Alanlarına Göre Özellikler
Dış Mekan Zemin Kaplamaları: Dış mekan deck uygulamalarında kullanılan ahşap kompozitler, genellikle %1'den az su emme oranına ve -30°C ile +70°C arasında sıcaklık dayanımına sahip olmalıdır.
Cephe Kaplamaları: Cephe kaplamalarında kullanılan ahşap kompozitler, yüksek UV direncine ve düşük termal genleşme katsayısına sahip olmalıdır.
İç Mekan Uygulamaları: İç mekan uygulamalarında kullanılan ahşap kompozitler, daha düşük nem direncine sahip olabilir, ancak yangın geciktirici özelliklere sahip olmaları önemlidir.
Ahşap kompozit malzemelerin ısı ve nem direnci, bu malzemeleri birçok uygulama alanında ideal bir seçenek haline getirmektedir. Geleneksel ahşaba göre daha stabil ve dayanıklı olan ahşap kompozitler, aynı zamanda çevre dostu özellikleriyle de öne çıkar. Ancak, spesifik uygulamalar için doğru ahşap kompozit türünü seçmek önemlidir. Malzemenin kompozisyonu, üretim yöntemi ve ek işlemler, nihai ürünün ısı ve nem direncini önemli ölçüde etkileyebilir. Bu nedenle, projenizin gereksinimlerine uygun özelliklere sahip ahşap kompozit malzemeyi seçmek için üretici spesifikasyonlarını dikkatle incelemek ve gerektiğinde uzman görüşü almak önemlidir.
@gunerkan
web tasarım
#ahşap#kompozit#deck#ahşapkompozit#ahşapkompozitdeck#ahşapkompozitizmir#ahşapkompozitpergola#ahşapkompozitcephe#ahşapkompozitçit#ahşapkompozitkorkuluk#ahşapkompozitmerdiven#ahşapkompozitprefabrikev#ahşapkompozitzeminkaplama#havuzkenarıdeck#ahşapkompozithavuzkenarı#ahşapkompozitkaplama#therrawood#wpc#izmir
0 notes
Text
UV Visible Spectrophotometer 2.0 nm

Labnic UV-Visible Spectrophotometer offers reliable performance with a single-beam optical system, 2.0 nm spectral bandwidth, and a 190-1100 nm range with ±0.5 nm accuracy. It ensures precise measurements, early contamination detection and a compact design to save space.
0 notes
Text

I love it! They're not perfect but that's because of the heat gun. I love them regardless. The colours look better than I thought, especially the pastels.
The first test was a simple ruler (and what made me realise my fine liners smudge), just so that I can work out how much the plastic shrinks. And that's by 2.3x the original size. And yes that's not the right notation but I'm doing lazy maths.
Second test was Prismacolors and they turned out nicely. You can definitely see how the pencils layered but that's okay. I think that's just a matter of colouring better on my part.
On the third test the thin strands are Copic markers which got darker (I did a test with a really pale marker and from the looks of it I'll need to avoid those in the future since they are far too sheer). The squares are chalk pastels and they look far better than I thought. They're not as opaque as the coloured pencils but they still look nice.
On the fourth test I was checking how different thicknesses of my uni-pin fine liners would show up (0.1, 0.2, 0.3, 0.5, 0.8 and a brush pen), and they actually all look really cute!
And of course Sukuna's forehead marking from some scrap left over. It's the size of my thumbnail, it's so small but I love it.
Which now I just need to think of a neat way to seal what I make. I know there is UV resin but work in my bedroom, so that might be out. Clear nail polish might work for the time being.
... though the UV resin is tempting... I think my mum still has an old nail curing UV light thingy...
1 note
·
View note
Last Seen Blogs

peregrino1
de tudo um pouco

jstaff87-blog
Jackie's tips for Fitness & Beauty

yuutaokkutsu
yuu

cheadarchesse
sex-positive prude
cativan-do
Because I'm not perfect