#vector versus raster
Explore tagged Tumblr posts
Visit Tumblr Blog
Explore Tumblr blogs with no restrictions, modern design and the best experience.
Last Seen Tumblr Blogs


Fun Fact
The average Tumblr user visits about 67 pages every month.
Text
Chapter 13 & 14
Review answers
1 How do you add a second fill or stroke to artwork?
You could click add new stroke button or new fill button
2 Name two ways to apply an effect to an object.
Clicking the object then clicking the effect button on the effect menu or you going to the properties and clicking the effect button
3 When you apply a Photoshop (raster) effect to vector artwork, what happens to the artwork?
It generate pixels
4 Where can you access the options for effects applied to an object?
Going to the properties panel and clicking the effect link
5 What’s the difference between applying a graphic style to a layer versus applying it to selected artwork?
When graphic style the layers are not effected
Review questions 14
1 What are three benefits of using symbols?
You can edit one symbol to update all instances.
Using symbols reduces file size.
It is much faster to apply symbol instances.
2 How do you edit an existing symbol?
Go to the symbol panel and double clicking
3 What is a dynamic symbol?
It is changing the appearance of instances without editing the symbol
4 In Illustrator, what type of content can you save in a library?
Color, fill , strokes and objects
5 Explain how to embed a linked library graphic asset.
Drag from the libraries panel into the document so a link is created in the library asset.
0 notes
Text
Adobe Illustrator Classroom in a Book Chapter 13 & 14 Exercises - VCDM Visual Literacy: Elements of Design, Color and Typography
Chapter 13 Review Questions
How do you add a second fill or stroke to artwork?
2. Name two ways to apply an effect to an object.
3. When you apply a Photoshop (raster) effect to vector artwork, what happens to the artwork?
4. Where can you access the options for effects applied to an object?
5. What's the difference between applying a graphic style to a layer versus applying it to selected artwork?
My Responses
To add a second fill or stroke to artwork, click the Add New Stroke button or Add New Fill button at the bottom of the Appearance panel. We didn't cover this in the lesson, but you can also choose Add New Stroke/Add New Fill from the Appearance panel menu. A stroke is added to the top of the appearance list. It has the same color and stroke weight as the original.
2. You can apply an effect to an object by selecting the object and then choosing the effect from the Effect menu. You can also apply an effect by selecting the object, clicking the Choose An Effect button (fx.) in the Properties panel or the Add New Effect button (fx) at the bottom of the Appearance panel, and then choosing the effect from the menu that appears.
3. Applying a Photoshop effect to artwork generates pixels rather than vector data. Photoshop effects include all of the effects in the bottom portion of the Effect menu and the Drop Shadow, Inner Glow, Outer Glow, and Feather commands in the Effect > Stylize submenu. You can apply them to either vector or bitmap objects.
4. You can edit effects applied to selected artwork by clicking the effect link in the Properties panel or Appearance panel to access the effect options.
5. When a graphic style is applied to a single object, other objects on that layer are not affected. For example, if a triangle object has a Roughen effect applied to its path and you move it to another layer, it retains the Roughen effect.
After a graphic style is applied to a layer, everything you add to the layer has that style applied to it. For example, if you create a circle on Layer 1 and then move that circle to Layer 2, which has a Drop Shadow effect applied, the circle adopts that effect.
Chapter 14 Review Questions
What are three benefits of using symbols?
2. How do you edit an existing symbol?
3. What is a dynamic symbol?
4. In Illustrator, what type of content can you save in a library?
5. Explain how to embed a linked library graphic asset.
My Responses
Three benefits of using symbols are as follows:
You can edit one symbol to update all instances.
Using symbols reduces file size.
It is much faster to apply symbol instances.
2. To update an existing symbol, double-click the symbol icon in the Symbols panel, double-click an instance of the symbol on the artboard, or select the instance on the artboard, and then click the Edit Symbol button in the Properties panel. Then you can make edits in Isolation mode.
3. When a symbol is saved as dynamic, you can change certain appearance properties of instances using the Direct Selection tool without editing the original symbol.
4. Currently in Illustrator, you can save colors (fill and stroke), type objects, graphic assets, and type formatting.
5. By default, when a graphic asset is dragged from the Libraries panel into a document, a link is created to the original library asset. To embed a graphic asset, select the asset in the document and click Embed in the Properties panel. Once embedded, the graphic will no longer update if the original library asset is edited.
1 note
·
View note
Text
Chapter 13 Review Questions
1. How do you add a second fill or stroke to artwork? Go to the Appearance panel (Window > Appearance), then click on the "Add New Fill" or "Add New Stroke" button at the bottom of the panel. You can add multiple fills and strokes and style them individually.
2. Name two ways to apply an effect to an object.
Go to the Effect menu and choose an effect (e.g., Stylize, Distort & Transform, etc.).
Use the Appearance panel to add and manage effects directly to fills, strokes, or the whole object.
3. When you apply a Photoshop (raster) effect to vector artwork, what happens to the artwork? The vector artwork is rasterized, meaning it’s converted into pixels for that effect, losing some scalability and vector clarity.
4. Where can you access the options for effects applied to an object? In the Appearance panel, you can see all applied effects. Double-clicking on an effect name lets you edit its settings.
5. What’s the difference between applying a graphic style to a layer versus applying it to selected artwork?
Applying it to a layer affects all objects on that layer, even future ones.
Applying it to selected artwork affects only the chosen object(s).
0 notes
Text

This week's textbook chapter talked about typography on screen and how with more and more advances in technology more designs are being made for many different types of screen sizes and resolutions that designers must adapt and think about when creating their designs. All of the same rules for designing for print carry over when designing for screen however the text talks about some additional challenges and how to effectively structure type on digital platforms. One of the most important things talked about in this chapter I think is the difference between raster and vector type and graphics. This was a difference I didn't notice up until last semester when I went to hand letter something in Procreate but found when I brought it into Illustrator and expanded its size it became pixelated. Since then I have learned that some programs such as Procreate are raster based meaning depending on the resolution and size of the artwork it will become pixelated when it is enlarged versus vector-based graphics made on programs like Illustrator that won't pixelate and will maintain their smooth edges when enlarged. This makes using a vector program like Illustrator or InDesign better when working with type, especially for the web. Another important thing mentioned in the chapter was the importance of scale, weight, and typefaces on the legibility of on-screen typography. The book recommends that we use sans-serif fonts as they appear clearer and simpler on a digital screen. This week in class we finished and critiqued our UCDA Design Initiative Poster exploring the prompt Immerse. Learning to use AR and Adobe Aero for this project was really daunting but through a lot of trial and error and watching lots of YouTube tutorials I was able to get a decent enough grasp on the software to build a very simple animation in which my 3D inflated shapes came down and bounced up at different times as if they were balloons. I mimicked the same effect with my type made from spray foam I scanned in as a texture put into 3D shapes as well. I wanted to make the entire message of the poster very lighthearted, playful, and just inspiring people to create and experience the fun and imaginative world of art. I also added some smaller text that adds some more context to my poster because of the feedback I got. I changed the wording of this text multiple times to find something I felt fit, as I wanted to have the word immerse in there somewhere but not make it too straightforward and on the nail.
1 note
·
View note
Text
Vector graphic display from back in the day. Interestingly, I used one of these in the 80’s.
Vector graphics is a different way of painting light onto a phosphorescent surface from the method most commonly used these days in modern LCD and LED monitors and displays.
Vector graphics focuses on painting lines, while raster graphics focuses on painting dots.
Choice of how to represent or display data (e.g. text, windows, pictures) depends on the available display technologies, the average amount of data to be displayed, the amount of time, energy, and storage it takes to convert the data from one form to a form needed to drive the display, and the amount of time it takes to actually paint the converted data onto the physical device.
It used to be that displaying a map and some text, like that shown in the photo above, was far more efficient to do by only using vertexes and painting the lines between the vertices, efficient in time, energy, data density. The achievable refresh rate was very low, but at the time, calculating the light/dark state of every paintable point on a visible display was extremely processing intense. Calculating a limited number of vertices versus all possible points was more achievable.
As computer resources in terms of speed and storage improved, there finally came a point where calculating the state of every point on a display more than 20 times a second was easily and affordable available to almost all computers. That’s when raster graphics and displays became the standard.

290 notes
·
View notes
Text
Raster Versus Vector Graphics.
Raster graphics and vector graphics are two different types of digital images. Raster graphics are made up of pixels, which are tiny squares of color that are arranged in a grid to form an image. Vector graphics, on the other hand, are made up of lines and curves that are defined by mathematical equations.

One of the main differences between raster and vector graphics is that raster graphics are resolution-dependent, meaning that the quality of the image can be affected by the resolution at which it is displayed. When a raster graphic is enlarged, the pixels that make up the image become more noticeable, which can make the image appear pixelated or blurry. Vector graphics, on the other hand, are resolution-independent, meaning that they can be scaled up or down without losing quality.
Another difference is that raster graphics are best suited for images with a lot of detail, such as photographs, while vector graphics are better for simple, geometric shapes and lines.
In general, raster graphics are more widely used than vector graphics, but both types have their own specific uses and can be useful in different contexts.
#raster#raster to vector conversion and we art#vector#illustrationartists#vector vs raster#rastervsvector#vector versus raster#vectorart#drawthisinyourstyle#illustrationart#illust#tumblrpost#illustrators on tumblr#tumblr things
0 notes
Text

Yet another signal processing option to show sample output from: Phosphrotron by Eric Souther & Laura McGough
Phosphortron is a video instrument that emulates the phosphor trails found in analog cathode ray tube (CRT) oscilloscopes and television monitors. The instrument uses a computer vision technique called frame difference, which compares the current frame versus the previous frame and analyzes change based on a threshold pixel by pixel. The trail duration function controls how long previous information stays on screen before fading away the simulated phosphors. Edge detection is utilized in conjunction with frame difference, to isolate and accentuate the outlines to loosen the raster image towards the simulated aesthetics of vector drawing.
See more about the app: https://www.ericsouther.com/toolmaking-1
Eric is also one of a pair of developers, along with Jason Bernagozzi, for the powerful Signal Culture video processing apps: http://signalculture.org/appclub.html
#glitch#glitch art#video#video art#artists on tumblr#Phosphrotron#crt#phosphor trails#image processing#Signal Culture#MG#markgee85
3 notes
·
View notes
Text
What is a vector image
You may read — Make money using facebook
On the off chance that you have at any point had any visual depiction done, you have presumably been presented to the term vector realistic and had these sorts of inquiries. Try not to stress, this is something worth being thankful for. We should begin with the essentials so you know "what is a vector image !"
You can reduce computerized craftsmanship down into two fundamental classifications: Raster illustrations and Vector designs.
Raster graphics
The vast majority know about .jpg pictures—like those you would get from your advanced camera. On the off chance that you have at any point zoomed in close on or exploded a .jpg picture excessively huge, you may have seen that the picture becomes hazy and the shadings transform into little squares or dabs. The little dabs are called pixels and this sort of picture is called raster realistic. On the off chance that you have at any point needed to alter a computerized photograph you realize how tedious changing only the humblest thing can be.
Vector graphic
So what is distinctive about a vector image? You see many vector designs a day and presumably don't understand it. Most logos are vector documents. All the more explicitly, a vector realistic is fine art composed of focuses, lines, and bends that depend on numerical conditions, instead of a strong shaded square pixel.
This implies that regardless of how huge or little or how close you focus on the picture, the lines, bends, and focuses stay smooth. There won't ever be spiked lines or haziness with this sort of picture, regardless of the amount it is developed. Additionally tones are isolated into any kind/size of shape (versus a lot of little squares making a shaded region), which makes changing tones inside these designs as simple as the snap of a catch.
Why this matters…
So since you understand what a vector is realistic, you need to realize why it's significant. In the realm of visual computerization, vector designs are a major piece of most printed or distributed materials. Logos, for instance, ought to consistently have a vector image. Those smooth lines and shapes produce the best quality pieces of literature, having a strong, reliable tone and fresh, clear content. You can utilize your vector logo exploded gigantic on a board or made more modest for your pens and letterhead. Symbol and more delineated looking craftsmanship is likewise acceptable to have in vector documents.
Vector illustrations make a plan project a lot simpler and quicker. In the event that you have these documents available, they can save your visual architect a great deal of time, which thus will set aside your cash, and produce a better outcome.
For the ordinary client, vector designs are something you will seldom utilize on the off chance that you don't have the product to open them (like Adobe items and QuarkXPress). The vast majority will allude to vector illustrations as an .eps record. They may likewise use a.ai augmentation for Illustrator records. While you may not at any point actually utilize these records or even have the projects to open them, it is vital NOT to erase your vector picture documents. On the off chance that you at any point plan on having visual computerization work done or need your logo put on limited time things you will be requested vector illustrations records.
Marketing is confusing
Not exclusively will we assess your business and make a custom playbook, we will invest energy with you 1:1 to assist you with understanding where you need assistance and gain clearness in what step you need to take next with the end goal for you to succeed and permit your business to make the opportunity you need..
To get free vector image visit the link
1 note
·
View note
Text
Illustrator vectorize image

#Illustrator vectorize image how to#
The feature is available for both Vectornator for iPad and Mac. In Vectornator, you can seamlessly convert imported raster digital images into vector shapes with our powerful and updated Auto Trace feature.
#Illustrator vectorize image how to#
©️ Disney Micky Mouse – Vectorized with the Vectornator's Auto Trace feature.įor a more detailed explanation, visit our Learning Hub ➞ Happy Vectornating! How to Vectorize an Image in Vectornator Then, just tap the Auto Trace button, and BOOM! Your image will be transformed into vector shapes. The Auto Trace panel will appear at the top of the Style Tab instantly.įrom there, you can adjust the two sliders to change how detailed your new vector image will be. Make sure that the image layer is unlocked by using the Layers Tab. Just open your image as a new document in Vectornator, or import it onto an existing Artboard. It has a powerful Auto Trace tool that can transform images from raster pixels into vectored shapes, just like Illustrator! But with Vectornator, the process is much simpler. Thankfully, there's another option: Vectornator! Vectornator is a vector graphic design platform for Mac, iPad, and iOS. Second, it's very complicated, and figuring out how to navigate all the ins and outs of its image tracing process can be very difficult, even with a guide like this! First, it's an expensive platform, which puts it out of reach for a lot of people. How to Vectorize your Image Faster Next TimeĪdobe Illustrator is good at transforming raster images into vector images, but there are some issues with it. Then you can use the Export feature to save your vector image in the file type that you want. Use the File drop-down menu to save your project. Once you've adjusted your vectorized image to your satisfaction using the presets, tracing options, and Pen Tool, it's time to save your new vector project. This will finalize the image trace and transform your raster image into vectored shapes. Once you're happy with how the preview looks, click on "Expand". From here, you can access a variety of tracing options, which will allow you to alter the colors of your image trace, as well as the level of detail. First, open the Image Trace panel from the Window drop-down menu. The next step is to fine-tune your vectorized image. The image trace will begin immediately but might take a few seconds to complete. The colors of your image will depend on the option you pick. There is also the grayscale option, which will use only shades of gray for your image, as well as the silhouette option, which creates a black and white image. There are many options related to the number of colors you want in your final image, including 3-color, 16-color, and high- and low-fidelity photo. Next, decide which preset option you want to use to create your image. Ideally, you should create a new document with an artboard that is the same dimensions as the image you intend to vectorize, but this isn't necessary. Creating a New Documentįirst, you'll need to create a new document in Illustrator. However, for a vector image, you'll need to use a graphic design program that is designed to work with files that are in a vector format. Programs like these can easily work with the colored pixels that make up a raster image. For instance, if you need to work on or alter raster images, you'll need to use a program like Adobe Photoshop or Procreate. You might have some raster graphics (like PNGs) that you want to turn into vectors in Adobe Illustrator so they are high fidelity and easier to work with.ĭifferent programs need to be used for raster graphics versus vector graphics. It's perfect for website mockups or print designs where you need an image with no physical dimensions but rather just a scalable shape with few colors. AI files.)Īs a computer-generated image, an SVG file is a vector graphic that can be infinitely enlarged without any loss of quality and still remain sharp and crisp. ( Spoiler for later - Illustrator isn't the only program that can open. AI files are vector-based, and are for Adobe Illustrator. PSD files are raster-based, and are for Adobe Photoshop EPS format, which saves an additional bitmap image of your file, which is useful for some websites and programs that show a preview of your image.Īdobe has their own file types related to their raster and vector editing platforms: You can also choose to save your files in. PNG are raster files, while file types like. This means they're much easier to scale without losing quality.įile types like. Vector graphics on the other hand are composed of shapes and lines. Raster graphics are images that have been saved as a bitmap, which is made up of pixels.
0 notes
Text
Pdf to word converter google docs

#Pdf to word converter google docs how to
#Pdf to word converter google docs pdf
#Pdf to word converter google docs manual
#Pdf to word converter google docs free
It offers a choice to focus on page layout or text flow. As far as paid options go, Adobe Acrobat Pro is the gold standard.
#Pdf to word converter google docs pdf
Another easy option if you are a Google user, and don’t need the graphics in the document, is to open the PDF in Google Docs and then download it as Microsoft Word. Close but could be improved by replacing the font with something closer.
#Pdf to word converter google docs how to
See the article above about font mapping to learn more about how to get the best font matches. However, if the font in the PDF is not available, the converter will use a substitution. For simple to moderately complex documents, this is a good solution. The most obvious place to start is to open the PDF directly in Microsoft Word from the “File, Open…” menu. Ideally, the PDF to Word converter that you choose will provide a WYSIWYG result with editable text streams, accurately placed images, and fall within your budget. They convert all graphics in the document, bitmap and vector alike, into raster images. The solutions available today for converting PDF to Word do not generate editable vector graphics. Watch an example of a PDF to Word Conversion with Readiris 17 Convert PDF to Word with Graphics as Bitmap Images You can also try an online service like ConvertPDF.Today. From the “File” menu, choose “Save as text.” For multifile and batch extraction, try PDF FLY or a command-line tool like the PDF Conversion Server.
#Pdf to word converter google docs free
Acrobat Reader, which is free and installed on most PCs, includes this as a standard feature. Strip PDF Text. Stripping or scraping text extracts the plain text without fonts or formatting. If you don’t, it will use a close substitute. It will be displayed with the correct font size and font, as long as you have the named font on your system. It may sound simple, but there are choices to be made when extracting text from PDF files.Ĭopy and Paste text from PDF to Word. If you need to transfer limited text, you can copy and paste it from PDF to Word. Types of PDF to Word Conversions Extracting Text from PDF Files
Buy, subscribe or use a PDF conversion service.
#Pdf to word converter google docs manual
How well a tool meets your requirements versus how much manual clean-up you will need to do.Once you determine what you need from your PDF to Word conversions, rank the utilities to help you choose. Convert PDF to Word with editable graphics.Strip text from PDF without formatting or placement.Transfer just a selected portion of text.For example, a business chart can be selected in Word and then saved as a “Picture.” This picture can be opened in PowerPoint and resized, recolored, or exploded to drive home the presenter’s case.ĭetermine What You want in the Converted PDF Word Fileīefore choosing a solution, determine what you need from the PDF conversion. Repurpose graphics without creating them anew.To ensure the integrity of your branding, convert the logo to curves so you can use it anywhere without compromise. Many logos use standard fonts, but the designer may customize their shape and adjust the kerning.Unlike bitmap images, you can enlarge vector graphics without losing definition.Why Preserve Vector Graphics when Converting PDF to Word? See how the bitmap loses fidelity when enlarged while the vector remains sharp and clear at any size. Example of raster versus vector graphics. Any time spent transforming the graphics will pay off in quality and reader experience. Convert the document and its pictures separately. To optimize or change the graphics in your PDF files when converting them, we recommend a parallel process. Once done, there is no going back to the richer vector format. Unfortunately, during the conversion process, every single program that converts PDF to Word downgrades the graphics into bitmap objects, even if they start as vector graphics. Options to Convert PDF to Wordīefore we look at ways to extract text from PDFs or convert them to Word, we need to face a fact. Plus, being able to change layers, objects, text, colors, and line weights is a powerful and often-needed capability. They are usually smaller which improves load time. When you do this, the graphics are resolution independent and look great on any size display. We make both end-user and developer tools capable of converting these graphics into their most editable format.įor graphics that start as images, like scanned pages, this would be an exact copy of the PDF in a bitmap format like JPEG, PNG, BMP, or TIFF.įor computer-generated PDF files (vector PDF), it’s usually possible to convert the logos, drawings, infographics, and diagrams into editable vector formats. We don’t make PDF to DOCX converters ourselves, but with 30 years of experience in PDF conversion, we can offer some solid recommendations on how to choose the right tool for your job.Īt Visual Integrity, we focus on the graphics in PDF files. Solutions are abundant for converting PDF to Word.
0 notes
Text
Vector Versus Raster
Vector versus raster
So, Before going ahead let us first discuss.
What is a raster?
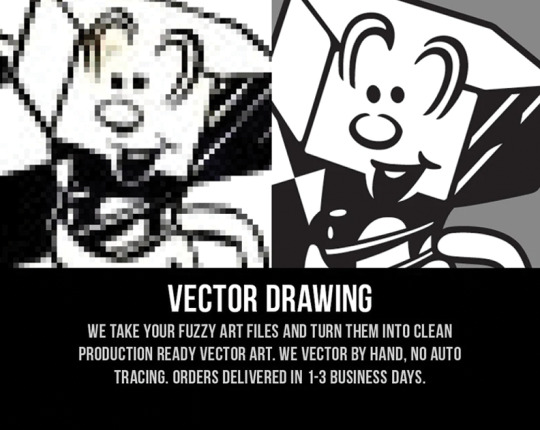
A raster image is generally lower in resolution and created using pixels. If you zoom in on the image, you will see that the image pixel is breaking.
Basically, in everyday life, we use raster Images Ex Picture we clicked on Mobile Phone is an example of a Raster Image.
On, in layman’s terms picture which has pixels are called a raster image.
As you can see in the above picture one is a raster and one is a vector.
File Formats of Raster files.

In the above image you can see the file formats supported by raster there are many others, But these are the main ones.
Now, what is Vector?
numerically characterized mathematical shapes that are normally produced utilizing drawing or representation projects like Adobe Illustrator. Vector workmanship is included lines, items, and fills. The characterized shapes are developed from numerical conditions that are put away inside the document. Vector craftsmanship involves both size and heading.
Vector graphics are points, lines, curves, and shapes that are based on mathematical formulas. When you scale a vector image file, it isn’t a low resolution and there’s no loss of quality, so it can be sized to however large or small you need it to be.

This, above image, is an example of a vector image as you can see even after zooming it doesn’t get pixelated because it is a vector file.
File Formats Supported by vector
In the above image you can see the file formats supported by vector there are many others, But these are the main ones.
If you want to know more about vectorization Click Here.
Comments are down below if you like the article.
#vector versus raster#vector vs raster#vectorversusraster#vectorvsraster#vector#raster#andweart#andweart.com#vectorization#illustrator#vectorart#graphic art#graphic design#vector work#rastervsvector
1 note
·
View note
Photo

Illustration Photo: Gariep-Dam. This image has been processed in a way that highlights vegetation in shades of green and water bodies in black. The water on the east side of the Gariep Dam appears in royal blue owing to a large quantity of sediments coming from the Orange River, therefore appearing brighter than the water flowing out of the west side of the dam. The Orange River plays an important role in the South African economy by providing water for irrigation and hydroelectric power. It rises in the Drakensberg mountains in Lesotho, flowing westwards through South Africa to the Atlantic Ocean. (credits: European Space Agency / contains modified Copernicus Sentinel data (2020), processed by ESA, CC BY-SA 3.0 IGO)
AI models to Support Irrigation Management from Earth Observation data
The ideal project is an AI Solution based on AI technologies, where the scenarios demonstrate the reusability and effectiveness value of the resources and services brought by AU4Copernicus, while they also cover the four high impact value areas of the first wave of open calls (Security, Agriculture, Health and Environment and Health). Applicants should be technology providers and their use cases to be addressed to people involved in the fields of industry and research, being government’s employees or just being citizens.
Challenge: Support irrigation management
While most water services are allocated, regulated and measured, it is not the case for the irrigation sector. However, with the expansion of irrigation systems and the increasing trend towards more frequent and severe droughts, there is a real need to know the amount of water consumed and whether it is used efficiently. Monitoring the amount of water in agricultural soils allows not only to increase water savings but also to get better crop production. Currently, this information is generally extracted from flow meters and soil moisture probes, but with the impressive proportion of land dedicated to agriculture, it is not possible to install these systems everywhere. In this context, remote sensing offers an efficient and reliable means of collecting data, above all soil moisture and plant evapotranspiration.
Scope
The solution in response to this challenge shall be to provide innovative AI models to support irrigation management from Earth Observation data.
Dateset sources
Sentinel-1 and Sentinel-2 data, other satellite data, in situ measurements for calibration, Land Cover, Meteorological data, Administrative Divisions dataset (GADM). Any other data can be used if relevant for the call scope. In this case, the data must be accessible (free of charge or not) so a possible operational use of the solution is guaranteed.
Output and coverage
The expected output is a service (available through API) or a tool (dockerized) that can be executed in different AoIs to generate maps presenting variables related to irrigation(e.g., soil moisture, evapotranspiration, etc.) (as vector and/or raster). Note: AoI can be selected by the bidders but the methodology shall be applicable in other AoIs. Although it is expected to have higher performance in specific areas, a good generalization capability to other areas will be considered an asset.
AI4Copernicus Services
The following bootstrapping services will be made available:
● Standard pre-processing chains for time-series of Sentinel-2 data products
● Gap filling techniques for reconstructing time series taking into account cloud cover and irregular acquisitions in different areas.
Expected Impact (technical social, economic, environmental, policy etc.):
Technical
● Develop AI techniques to estimate and monitor water use at single field level to significantly enhance the accuracy of present systems.
● Generate accurate, efficient and reliable products to collect data based on remote sensing techniques in the agricultural sector to support irrigation systems
Socio-economic
● Information regularly extracted on the water use and comparisons among the productivities of different fields with respect to the irrigation strategy enable the definition of best practice for improving productivity. ● Improving the effectiveness of the irrigation system has huge effects on food security and on the productivity of producing crops.
● Increased investment in micro-irrigation technologies
Environmental
● Better management of irrigation, water resources
● Increased awareness in relation to water resources
Policy
● Demonstrated adoption of the results of using data incentive technologies AI in an area that is central in the policy of the European Commission
● Help farmers to be aware of the quantity of water consumed and to optimize crop production versus the amount of used water.
● Water use and related impact on the production is a fundamental information for irrigation departments to manage periods of water scarcity, provide equity in water supplies, and to guide investment in micro-irrigation technologies for better irrigation management.
● Enhance informed decision-making capabilities of public authorities
Application Deadline: 30th September 2021
Check more https://adalidda.com/posts/Y4oxbDSpkkjdESR3d/ai-models-to-support-irrigation-management-from-earth
0 notes
Text
Graphery SVG
I’ve compared SVG and Canvas before. If you’re trying to decide between them, read that. I’d say the #1 difference between them is vector (SVG) versus raster (Canvas). But the #2 difference is how you work with them. SVG is declarative, as in, literal elements that express what they are through attributes and content. Canvas is imperative, as in, you script instructions for it to follow.
Canvas is a JavaScript API, so it may jive well with JavaScript developers or environments where the UI being built is otherwise JavaScript-based. But SVG is in the (and has a) DOM, and the DOM has APIs too! That means you can script SVG if you like. It’s just, arguably, not particularly convenient. I just saw Graphery SVG which is clearly an attempt to rectify that.
How you’d script the creation of a pink rectangle with standard DOM APIs:
const div = document.querySelector('#drawing'); const svg = document.createElementNS('http://www.w3.org/2000/svg', 'svg'); svg.setAttribute('width', '100%'); svg.setAttribute('height', '100%'); div.appendChild(svg); const rect = document.createElementNS('http://www.w3.org/2000/svg', 'rect'); rect.setAttribute('x', '10'); rect.setAttribute('y', '10'); rect.setAttribute('width', '90'); rect.setAttribute('height', '90'); rect.setAttribute('fill', '#F06'); svg.appendChild(rect);
With Graphery SVG:
const svg = gySVG().width('100%').height('100%'); const rect = svg.add('rect').x(10).y(10).width(90).height(90).fill('#f06'); svg.attachTo('#drawing');
Gotta love that chaining. High five, jQuery.
Direct Link to Article — Permalink
The post Graphery SVG appeared first on CSS-Tricks.
You can support CSS-Tricks by being an MVP Supporter.
Graphery SVG published first on https://deskbysnafu.tumblr.com/
0 notes
Photo

New Post has been published on https://magzoso.com/tech/the-flux-beamo-is-a-1500-laser-cutter-with-simple-but-powerful-software/
The Flux beamo is a $1,500 laser cutter with simple but powerful software
Laser cutters are in a fun place right now. Gone are the days when the cheapest machines were tens of thousands of dollars, and when the “compact” models were roughly the size of a freezer. They’ve gotten affordable enough, and small enough, that a DIY home hobbyist can add it to their toolset without taking out a second mortgage or needing much more than some desk space… but they’re still a rare enough machine that saying “I’ve got a laser cutter!” makes people look at you like you’re a friggin’ wizard.
One of the latest entries into this space is beamo, a compact, 30W laser cutter and engraver built by Flux — a Taiwan-based team you might remember for raising $1.6 million on Kickstarter with its Flux Delta 3D printer/scanner/engraver back in 2014.
As with Delta, Flux is turning to Kickstarter for the launch of beamo. They sprinted past their goal of $25,000 pretty quickly, currently sitting at roughly $350,000 raised with a little over a week to go. The early-bird models are going for $849, with the company pinning the final MSRP at $1,500. Shipping/taxes aren’t included in those prices, and can cost a couple hundred bucks, so factor that in to any purchasing decisions.
While I tend to be a bit hesitant when it comes to crowdfunded hardware (having been burned too many times by products that either never arrived or did arrive only to be total garbage), Flux has been down this road before; in addition to Delta, it also crowdfunded and shipped Beambox (a slightly bigger, pricier, but more powerful laser cutter) just a few months back. In the case of beamo, it seems like the Kickstarter is primarily meant to help get the word out, rather than literally “kickstarting” the process. Production is already underway, and units are already rolling off the line.
Flux sent me one of those early units to check out for a few weeks. I haven’t had it long enough to do what I’d call a “review”; with things like laser cutters with their myriad moving parts and… you know, lasers, new issues can pop up months after you open the box, as components wear and maintenance is required. So consider this more of a “first impressions” kind of thing.
My first impressions, though, are good.
For reference, I’d classify myself laser experience as… moderate. More than most people you’d randomly ask, I’d wager, but less than if it were my job. I’ve put a hundred hours or so into training/creating with those aforementioned freezer-sized pro lasers, making everything from custom etched pint glasses, to bespoke Christmas ornaments, to personalized rubber stamps over the years. I tend to look for excuses to shoot lasers at things.
Getting it running
My beamo unit came ready to go right out of the box, mirrors aligned, moving parts all lubed up. I plugged it in, set up some basic ventilation, ran through about 10 minutes of software installation and configuration and started firing away. It all just worked on the first shot.
Speaking of ventilation: you’ll need it. Laser cutting is basically a tiny, super controlled fire… and that means smoke. Depending on what you’re cutting, that smoke can be super noxious. Cutting wood? It won’t smell too bad, but it’s still not something you want in your lungs on the regular. Etching a logo into felt? It’ll smell like you’re burning a trash can full of hair. Beamo uses a 200CFM exhaust fan to pull smoky air out of the machine, dumping it out through a 4″ exhaust hose that you’ll need to run through a window (or, if you’re feeling extra fancy, a dryer exhaust-style vent through a wall.) Expect to need about 8″ of clearance between the machine and any wall behind it for the exhaust hose and its bends, unless the path to the window is a straight shot.
The exhaust system is decent, but you’ll probably need to fiddle with how the hose runs to get it just right. If you’re venting through a window, you’ll want to figure out a way of sealing up the open gaps around the hose to limit any fumes that might float back into the room. Put time into getting it right. If the room still smells smokey hours after you’ve cut, you’ll want to keep working on your ventilation. You don’t want to breath that stuff in, especially if you’re running the laser more than occasionally.
Beamo’s built-in touchscreen. You’ll mostly control it over Wi-Fi, but you can access some basic functionality and monitor job progress here.
If you’re new to laser cutting, you should also put the time into learning what you shouldn’t put in these machines. Some materials are safe to laser cut, but tend to catch on fire easily. Some materials will just melt and screw up your machine. Other things (PVC!) will straight up emit chlorine gas when you hit them with a laser. If you’re moving beyond the basics of cutting thin wood/acrylic/cardboard or engraving glass, research it.
So what SHOULD you cut? Woods are a good go-to (though you’ll want to limit it to less oily stuff — because, again, fire). Cardboard is fun to cut for things like spray paint stencils. Leather is good, with practice, and you can do all sorts of really neat stuff with acrylic. You can’t cut glass, but you can engrave it; same goes for rubber, though that’s one you’ll want to source from a place that sells materials known to be laser safe.
The thickness of the material you can cut tends to be limited by a laser’s wattage, while height/width is generally limited by the size of the work area. At 30W, beamo’s laser can slice its way through wood about 1/8″ thick; its work area, meanwhile, comes in at 11.81″ x 8.27″. You can make a lot of cool stuff within those bounds, but be aware of them — buying a bunch of material only to get it home and realize you’re a few watts short of a complete cut is a bummer. If you foresee needing deeper cuts or bigger pieces, beefier lasers exist without too massive a leap in price. As examples: Flux’s other laser cutter, the $2,500 Beambox, bumps the laser up to 40W and the work area up to 15.7″ x 14.7″; the $2,500 base model from competitor Glowforge comes in at 40W with a work area of roughly 11″ x 19.5″.
(One potential advantage of beamo over the company’s previously released Beambox: whereas Beambox requires you to regularly fill up a water cooling reservoir to keep it running, beamo’s water cooling is closed-loop, so the same water just keeps circulating. I’m interested to see how this holds up over time.)
Fire the lasers!
Got everything plugged in, ventilation set up and your materials purchased? Time to cut! Well, almost.
You’ll mostly be controlling beamo through Beam Studio, a free piece of software provided by Flux for Windows, macOS and Ubuntu. As far as laser cutting software goes, I’m really quite pleased with it so far.
Beam Studio is super straightforward, but darn powerful for a free companion app. If you’re looking to cut out basic shapes, etch text or lay down some bezier curves, it can do it. Want to etch a picture of your dog into some wood to make a keychain? Just drop an image onto the work area, scale as desired, then move a slider to tweak the black/white threshold until it looks right. You can work in layers, setting up a raster layer to be etched and then a vector layer to cut it out immediately after.
Beamo has a built-in camera system, allowing you to quickly scan the work bed before dragging and dropping your designs wherever you want them. The first time you connect to beamo, you’ll be asked to calibrate the camera — a process that was considerably simpler than I expected. Put a piece of paper on the work bed, and beamo will fire a quick test pattern into it. Beam Studio will then snap a picture of what it just etched, projecting an overlay of where it thinks the test pattern is versus its scan. Nudge the overlay around until everything is perfectly stacked, and you’re set. You’ll want to re-run this alignment process every once in a while (it’s quick) if you need precise placement.
The camera system here really is incredibly useful. After about 30 minutes with beamo, I was doing things that are at best annoying on camera-less cutters — things like etching a design, cutting it out, then immediately flipping the cut piece and etching on the other side without worrying about precarious placement. I just rescanned the work bed, dragged the image where I wanted it on the freshly cut side B, and fired away.
The camera is quick, but not instant. Scanning the entire work area takes about 60 seconds. If you only need a certain area scanned (like, say, the top half of the work area, or the rough area around something you’ve already cut), fortunately, that’s an option. Just drag the scanning boundary box accordingly.
If you need to do something beyond what the free software can handle (or if you just prefer working in apps like CorelDraw or Illustrator), Beam Studio can import JPGs, PNGs and SVGs.
While more capable than I expected, the software isn’t without its quirks. Beam Studio will try to keep you updated with a progress ticker, but don’t rely on it too much for predicting timing. I’ve had projects shoot up to 40% in the first 30 seconds, only to take five minutes for the rest to complete. There was an occasion or two where the software threw out an error in Mandarin that I didn’t want to dismiss without a quick pass through Google Translate… but for the most part, it was solid, stable and fun to use.
In its base configuration, beamo’s laser is manually focused, meaning you’ll need to focus things by hand each time you place new material inside the machine. Fortunately, focusing it is super straightforward: put material in, rotate a piece of acrylic attached to the laser head, lower the laser head until the acrylic is just barely touching the material, then lock the laser head back in place and lift the acrylic out of the way.
Flux says that it’ll ship a $250 add-on module that introduces autofocus to the mix, but I didn’t get to test that. They’re also working on a $499 rotary add-on that will let you etch designs onto cylindrical items (think shot/pint glasses), but out of the box, it’s flat stuff only.
As with every single laser I’ve ever worked with, working with a new material — or even, sometimes, the same material from a different source — requires some fiddling. You’ll be tweaking the speed at which the laser moves, the power of the laser and how many passes it makes over the same path; you want to keep the power low enough to minimize scorching and maximize the life of the laser, while making sure you’ve done enough repeat passes to cut completely through. Beam Studio comes with a bunch of presets for different materials that can get you pretty close (and you can save your own favorites, once you’ve found them), but expect to experiment a little when you’re working with a new material for the first time. Buy extra material.
As for noise: operating with fans running full force, it’s not what I’d call “quiet,” but it’s not so loud that it’s uncomfortable to sit next to. The company’s specs pin it at around 65 db — louder than your average conversation, but a bit quieter than, say, a vacuum. The fans do whir endlessly when the machine is idling, so you’ll probably want to cut the power between cutting sessions.
If for some reason you need to open the lid while the laser is operating, beamo’s built-in automatic kill switch will cut power to the laser to protect your eyes. Close the lid again and the job can be resumed right from where you left off. While the company says that the acrylic lid provides sufficient eye protection for beamo’s 30W Class 1 laser (though they note that you shouldn’t stare right at the laser beam, lid or not), I absolutely recommend picking up and wearing a pair of CO2 laser safety goggles, especially when it comes time to pop the machine open and do any maintenance. Speaking of…
Foreseeable maintenance
Maintenance is an inevitable part of owning a laser cutter. As noted, I’ve only had the laser set up for a few weeks and everything came well configured, so I haven’t had to go digging under the hood yet. If something suddenly breaks on me during my time with the cutter, I’ll update this post accordingly. But either way, maintenance will be part of the process for owners.
Even if nothing breaks unexpectedly, some of the parts involved are “consumable” and thus expected to wear down with use. The lens, mirror and laser tube, for example, are expected to last about a year with regular use, according to the company’s estimates. The team says those parts should cost about $19, $9 and $139 to replace, respectively, and you’ll be able to buy them through their online store. Plan ahead for those recurring costs, and make sure you’re comfortable with the idea of eventually tearing the machine apart before you dive in.
You’ll also need to keep things clean to keep them operating well. Burning stuff dirties the optics, and dirty optics lead to weaker cuts and faster wear. You’ll want to pop the work bed out regularly to get rid of any debris, and keep all the moving bits lubed. There’s more to keeping a laser cutter working well than say, an inkjet printer.
Overall, though, so far so good. The machine looks pretty great on a table; it’s not quite as shiny and Apple-y as a Glowforge, but it should blend into a home office or studio pretty easily. It’s light enough to be easily moved by two people, and took me all of a few minutes to get up and running. If you don’t mind the occasional software hiccup, can figure out sufficient ventilation, are mostly working on projects that fit within beamo’s wattage/work area capabilities and are down to get under the hood for maintenance, beamo seems like a solid machine so far.
0 notes
Text
How Much Does Logo Design Cost in 2019?
When considering how to design a logo, one of the most common questions has nothing to do with the creation of a brand element. It’s about pricing. How much does a logo design cost?
The answer is pretty complicated and depends on a lot of factors. Today, we’re going to look into logo design costs (and benefits of a professional design). Even if we can’t narrow down an exact price for you, this guide can serve as a starting point.
It should help you get a feel for the different price brackets of the options you could choose, and set off on the right path!
How Much Does Logo Design Cost?

The cost of a logo design hinges on a couple of variables:
Logo package or full brand design
Who creates the logo – DIY, logo creator software, freelance designer, agency?
Number of revisions and timeline
There can be other considerations as well, but knowing these answers provides a solid point of reference.
The first big consideration is whether you need just a logo mark or a full brand design. The latter is a comprehensive project that probably eliminates do-it-yourself options. A brand design includes a logo as well as palettes for color, typography, voice and style. This is a more in-depth project that will likely require a professional designer.
If you are looking for a logo only, there are DIY and low-cost options, but those can come with limitations.
Basic Logo Design Costs

Low-cost logo design options are often the most limited in scope, use (you might only get a raster version of the design and a single revision) and design aside from the do-it-yourself option.
Do-it-yourself: $0, but there’s time, software and know-how to consider
Contest sites or crowdsourcing: $5 to $500
Logo templates or generators: $5 to $100
Professional logo design costs can vary a lot in range, depending on your needs, market and size and experience of the person or agency you hire for the job.
Most larger organizations or companies send out a request for proposals to get logo pitches and pricing from groups before taking on such a project. (But any size business can do so.) That way you know exactly what you are getting – and what it will cost – before the project starts. Although this can add some time to your overall timeline, it’s the ideal place to start.
Beginner freelancer: $200 to $1,000
Experienced freelancer: $1,500 to $10,000
Small agency: $5,000 to $35,000
Regional agency: $7,500 to $50,000
National agency: $25,000+
It’s important to note variations in price regionally. If things generally cost more in your market (say you live in New York versus Omaha), then you can expect the same general difference in logo design prices as well.
Low-Cost Logo Design Options Compared
With such variation in price, how do you know which logo design route is best for you? It really depends on the level of service you want.
Low-cost design options can have lots of hidden costs, so make sure to read the fine print before you get started.
Low-cost design options are typically limited — and limiting — in scope. (We’re not going to get into DIY logo design here since it is a beast of its own.)
The biggest “catch” with these options can be that as you ask for revisions or editable vectors or single-color files, the cost goes up. Low-cost design options can have lots of hidden costs, so make sure to read the fine print before you get started.
The other consideration with low-cost options is that you won’t be working personally with a designer. There isn’t a lot of back-and-forth communication.
With contest sites or crowdsourcing, you’ll submit some general ideas for a logo design and get some options to choose from. You can create “contests” or voting to help a community decide what they like best. These low-cost options don’t often provide a lot in terms of flexibility once the design is done. (Hopefully you see something you really like.)
With logo template generators or tools, you almost create a design yourself. You start with a set of premade parts and add type and colors to create a design. You can see ideas before you start and have to piece parts together. Often, there is an upcharge for vector files with these tools.
Professional Logo Design Options Compared

One of the biggest factors in overall cost for a logo design project is time.
When it comes to logo design, working with a professional provides a level of service that you probably can’t get with some lower-cost options.
Expect to have design meetings and conversations and work through the design with someone from a team or an individual freelancer.
One of the biggest factors in overall cost for a logo design project is time. How many revisions do you need? How many logo sizes or options or shapes (alternative versions)? Do you also need a guide for logo use and style?
All of these things can impact price. And there’s so much more that goes into it as well. Apex Creative has a great guide that explains everything that goes into a logo design. Some of those things include:
Value of designer’s (or design team’s) expertise and education
Value of the time, software, and equipment used to create the logo
Time – the creative process does not happen in an instant
How to fit the logo into the rest of your brand
Lasting value and equity of the brand design/logo
If you want to work with someone to create a logo design and have more options, this is probably the best route to take.
Professional Logo Design and Branding

If you need a complete brand package, expect to spend more than if you need a logo alone. A professional brand design or redesign can vary widely in cost, depending on your needs.
This type of project will get the creative forces of a team if you hire an agency for the rebranding and might develop concepts or ideas that you would not think of alone. The big thing you are getting here is the collective time and brainpower of people who are experts in creative thinking.
Typically, a full brand redesign with a professional firm or agency falls into the range of $25,000 to $100,000. This often includes strategy and brand and identity design (including a logo).
Conclusion
When it comes to logo design, don’t expect to get as lucky as Nike. (That famous logo design cost Phil Knight just $35 in 1971.)
But a logo design doesn’t have to break the bank either. Start with a clear expectation of what you want and need from a design and the kind of process that works for you. A budget design is the perfect solution for some, while others expect a team effort to find the perfect fit. All that really matters in the end is that you feel like you got the right design for your brand.
from Design Shack http://bit.ly/2XY83jr
The following blog article How Much Does Logo Design Cost in 2019? is republished from http://bit.ly/2E5KfTB
from http://bit.ly/2L8nIeg
0 notes
Link
Raster Versus Vector
This is a good explanation with visuals that show the differences between raster files and vector files. It also goes into a bit more detail about print resolutions and screen resolutions.
0 notes