#version control software free
Explore tagged Tumblr posts
Visit Tumblr Blog
Explore Tumblr blogs with no restrictions, modern design and the best experience.
Last Seen Tumblr Blogs


Fun Fact
Tumblr.com is the 103rd most visited website in the world.
Text
Torvalds interview
#github#git#computing history#linus torvalds#linux#software engineering#open source#free tools#2000s#q and a#version control
1 note
·
View note
Text
The US Copyright Office frees the McFlurry

I'll be in TUCSON, AZ from November 8-10: I'm the GUEST OF HONOR at the TUSCON SCIENCE FICTION CONVENTION.

I have spent a quarter century obsessed with the weirdest corner of the weirdest section of the worst internet law on the US statute books: Section 1201 of the Digital Millennium Copyright Act, the 1998 law that makes it a felony to help someone change how their own computer works so it serves them, rather than a distant corporation.
Under DMCA 1201, giving someone a tool to "bypass an access control for a copyrighted work" is a felony punishable by a 5-year prison sentence and a $500k fine – for a first offense. This law can refer to access controls for traditional copyrighted works, like movies. Under DMCA 1201, if you help someone with photosensitive epilepsy add a plug-in to the Netflix player in their browser that blocks strobing pictures that can trigger seizures, you're a felon:
https://lists.w3.org/Archives/Public/public-html-media/2017Jul/0005.html
But software is a copyrighted work, and everything from printer cartridges to car-engine parts have software in them. If the manufacturer puts an "access control" on that software, they can send their customers (and competitors) to prison for passing around tools to help them fix their cars or use third-party ink.
Now, even though the DMCA is a copyright law (that's what the "C" in DMCA stands for, after all); and even though blocking video strobes, using third party ink, and fixing your car are not copyright violations, the DMCA can still send you to prison, for a long-ass time for doing these things, provided the manufacturer designs their product so that using it the way that suits you best involves getting around an "access control."
As you might expect, this is quite a tempting proposition for any manufacturer hoping to enshittify their products, because they know you can't legally disenshittify them. These access controls have metastasized into every kind of device imaginable.
Garage-door openers:
https://pluralistic.net/2023/11/09/lead-me-not-into-temptation/#chamberlain
Refrigerators:
https://pluralistic.net/2020/06/12/digital-feudalism/#filtergate
Dishwashers:
https://pluralistic.net/2021/05/03/cassette-rewinder/#disher-bob
Treadmills:
https://pluralistic.net/2021/06/22/vapescreen/#jane-get-me-off-this-crazy-thing
Tractors:
https://pluralistic.net/2021/04/23/reputation-laundry/#deere-john
Cars:
https://pluralistic.net/2023/07/28/edison-not-tesla/#demon-haunted-world
Printers:
https://pluralistic.net/2022/08/07/inky-wretches/#epson-salty
And even printer paper:
https://pluralistic.net/2022/02/16/unauthorized-paper/#dymo-550
DMCA 1201 is the brainchild of Bruce Lehmann, Bill Clinton's Copyright Czar, who was repeatedly warned that cancerous proliferation this was the foreseeable, inevitable outcome of his pet policy. As a sop to his critics, Lehman added a largely ornamental safety valve to his law, ordering the US Copyright Office to invite submissions every three years petitioning for "use exemptions" to the blanket ban on circumventing access-controls.
I call this "ornamental" because if the Copyright Office thinks that, say, it should be legal for you to bypass an access control to use third-party ink in your printer, or a third-party app store in your phone, all they can do under DMCA 1201 is grant you the right to use a circumvention tool. But they can't give you the right to acquire that tool.
I know that sounds confusing, but that's only because it's very, very stupid. How stupid? Well, in 2001, the US Trade Representative arm-twisted the EU into adopting its own version of this law (Article 6 of the EUCD), and in 2003, Norway added the law to its lawbooks. On the eve of that addition, I traveled to Oslo to debate the minister involved:
https://pluralistic.net/2021/10/28/clintons-ghost/#felony-contempt-of-business-model
The minister praised his law, explaining that it gave blind people the right to bypass access controls on ebooks so that they could feed them to screen readers, Braille printers, and other assistive tools. OK, I said, but how do they get the software that jailbreaks their ebooks so they can make use of this exemption? Am I allowed to give them that tool?
No, the minister said, you're not allowed to do that, that would be a crime.
Is the Norwegian government allowed to give them that tool? No. How about a blind rights advocacy group? No, not them either. A university computer science department? Nope. A commercial vendor? Certainly not.
No, the minister explained, under his law, a blind person would be expected to personally reverse engineer a program like Adobe E-Reader, in hopes of discovering a defect that they could exploit by writing a program to extract the ebook text.
Oh, I said. But if a blind person did manage to do this, could they supply that tool to other blind people?
Well, no, the minister said. Each and every blind person must personally – without any help from anyone else – figure out how to reverse-engineer the ebook program, and then individually author their own alternative reader program that worked with the text of their ebooks.
That is what is meant by a use exemption without a tools exemption. It's useless. A sick joke, even.
The US Copyright Office has been valiantly holding exemptions proceedings every three years since the start of this century, and they've granted many sensible exemptions, including ones to benefit people with disabilities, or to let you jailbreak your phone, or let media professors extract video clips from DVDs, and so on. Tens of thousands of person-hours have been flushed into this pointless exercise, generating a long list of things you are now technically allowed to do, but only if you are a reverse-engineering specialist type of computer programmer who can manage the process from beginning to end in total isolation and secrecy.
But there is one kind of use exception the Copyright Office can grant that is potentially game-changing: an exemption for decoding diagnostic codes.
You see, DMCA 1201 has been a critical weapon for the corporate anti-repair movement. By scrambling error codes in cars, tractors, appliances, insulin pumps, phones and other devices, manufacturers can wage war on independent repair, depriving third-party technicians of the diagnostic information they need to figure out how to fix your stuff and keep it going.
This is bad enough in normal times, but during the acute phase of the covid pandemic, hospitals found themselves unable to maintain their ventilators because of access controls. Nearly all ventilators come from a single med-tech monopolist, Medtronic, which charges hospitals hundreds of dollars to dispatch their own repair technicians to fix its products. But when covid ended nearly all travel, Medtronic could no longer provide on-site calls. Thankfully, an anonymous hacker started building homemade (illegal) circumvention devices to let hospital technicians fix the ventilators themselves, improvising housings for them from old clock radios, guitar pedals and whatever else was to hand, then mailing them anonymously to hospitals:
https://pluralistic.net/2020/07/10/flintstone-delano-roosevelt/#medtronic-again
Once a manufacturer monopolizes repair in this way, they can force you to use their official service depots, charging you as much as they'd like; requiring you to use their official, expensive replacement parts; and dictating when your gadget is "too broken to fix," forcing you to buy a new one. That's bad enough when we're talking about refusing to fix a phone so you buy a new one – but imagine having a spinal injury and relying on a $100,000 exoskeleton to get from place to place and prevent muscle wasting, clots, and other immobility-related conditions, only to have the manufacturer decide that the gadget is too old to fix and refusing to give you the technical assistance to replace a watch battery so that you can get around again:
https://www.theverge.com/2024/9/26/24255074/former-jockey-michael-straight-exoskeleton-repair-battery
When the US Copyright Office grants a use exemption for extracting diagnostic codes from a busted device, they empower repair advocates to put that gadget up on a workbench and torture it into giving up those codes. The codes can then be integrated into an unofficial diagnostic tool, one that can make sense of the scrambled, obfuscated error codes that a device sends when it breaks – without having to unscramble them. In other words, only the company that makes the diagnostic tool has to bypass an access control, but the people who use that tool later do not violate DMCA 1201.
This is all relevant this month because the US Copyright Office just released the latest batch of 1201 exemptions, and among them is the right to circumvent access controls "allowing for repair of retail-level food preparation equipment":
https://publicknowledge.org/public-knowledge-ifixit-free-the-mcflurry-win-copyright-office-dmca-exemption-for-ice-cream-machines/
While this covers all kinds of food prep gear, the exemption request – filed by Public Knowledge and Ifixit – was inspired by the bizarre war over the tragically fragile McFlurry machine. These machines – which extrude soft-serve frozen desserts – are notoriously failure-prone, with 5-16% of them broken at any given time. Taylor, the giant kitchen tech company that makes the machines, charges franchisees a fortune to repair them, producing a steady stream of profits for the company.
This sleazy business prompted some ice-cream hackers to found a startup called Kytch, a high-powered automation and diagnostic tool that was hugely popular with McDonald's franchisees (the gadget was partially designed by the legendary hardware hacker Andrew "bunnie" Huang!).
In response, Taylor played dirty, making a less-capable clone of the Kytch, trying to buy Kytch out, and teaming up with McDonald's corporate to bombard franchisees with legal scare-stories about the dangers of using a Kytch to keep their soft-serve flowing, thanks to DMCA 1201:
https://pluralistic.net/2021/04/20/euthanize-rentier-enablers/#cold-war
Kytch isn't the only beneficiary of the new exemption: all kinds of industrial kitchen equipment is covered. In upholding the Right to Repair, the Copyright Office overruled objections of some of its closest historical allies, the Entertainment Software Association, Motion Picture Association, and Recording Industry Association of America, who all sided with Taylor and McDonald's and opposed the exemption:
https://arstechnica.com/tech-policy/2024/10/us-copyright-office-frees-the-mcflurry-allowing-repair-of-ice-cream-machines/
This is literally the only useful kind of DMCA 1201 exemption the Copyright Office can grant, and the fact that they granted it (along with a similar exemption for medical devices) is a welcome bright spot. But make no mistake, the fact that we finally found a narrow way in which DMCA 1201 can be made slightly less stupid does not redeem this outrageous law. It should still be repealed and condemned to the scrapheap of history.
Tor Books as just published two new, free LITTLE BROTHER stories: VIGILANT, about creepy surveillance in distance education; and SPILL, about oil pipelines and indigenous landback.

If you'd like an essay-formatted version of this post to read or share, here's a link to it on pluralistic.net, my surveillance-free, ad-free, tracker-free blog:
https://pluralistic.net/2024/10/28/mcbroken/#my-milkshake-brings-all-the-lawyers-to-the-yard
Image: Cryteria (modified) https://commons.wikimedia.org/wiki/File:HAL9000.svg
CC BY 3.0 https://creativecommons.org/licenses/by/3.0/deed.en
#pluralistic#dmca 1201#dmca#digital millennium copyright act#anticircumvention#triennial hearings#mcflurry#right to repair#r2r#mcbroken#automotive#mass question 1#us copyright office#copyright office#copyright#paracopyright#copyfight#kytch#diagnostic codes#public knowledge
2K notes
·
View notes
Text
How I ditched streaming services and learned to love Linux: A step-by-step guide to building your very own personal media streaming server (V2.0: REVISED AND EXPANDED EDITION)
This is a revised, corrected and expanded version of my tutorial on setting up a personal media server that previously appeared on my old blog (donjuan-auxenfers). I expect that that post is still making the rounds (hopefully with my addendum on modifying group share permissions in Ubuntu to circumvent 0x8007003B "Unexpected Network Error" messages in Windows 10/11 when transferring files) but I have no way of checking. Anyway this new revised version of the tutorial corrects one or two small errors I discovered when rereading what I wrote, adds links to all products mentioned and is just more polished generally. I also expanded it a bit, pointing more adventurous users toward programs such as Sonarr/Radarr/Lidarr and Overseerr which can be used for automating user requests and media collection.
So then, what is this tutorial? This is a tutorial on how to build and set up your own personal media server using Ubuntu as an operating system and Plex (or Jellyfin) to not only manage your media, but to also stream that media to your devices both at home and abroad anywhere in the world where you have an internet connection. Its intent is to show you how building a personal media server and stuffing it full of films, TV, and music that you acquired through indiscriminate and voracious media piracy various legal methods will free you to completely ditch paid streaming services. No more will you have to pay for Disney+, Netflix, HBOMAX, Hulu, Amazon Prime, Peacock, CBS All Access, Paramount+, Crave or any other streaming service that is not named Criterion Channel. Instead whenever you want to watch your favourite films and television shows, you’ll have your own personal service that only features things that you want to see, with files that you have control over. And for music fans out there, both Jellyfin and Plex support music streaming, meaning you can even ditch music streaming services. Goodbye Spotify, Youtube Music, Tidal and Apple Music, welcome back unreasonably large MP3 (or FLAC) collections.
On the hardware front, I’m going to offer a few options catered towards different budgets and media library sizes. The cost of getting a media server up and running using this guide will cost you anywhere from $450 CAD/$325 USD at the low end to $1500 CAD/$1100 USD at the high end (it could go higher). My server was priced closer to the higher figure, but I went and got a lot more storage than most people need. If that seems like a little much, consider for a moment, do you have a roommate, a close friend, or a family member who would be willing to chip in a few bucks towards your little project provided they get access? Well that's how I funded my server. It might also be worth thinking about the cost over time, i.e. how much you spend yearly on subscriptions vs. a one time cost of setting up a server. Additionally there's just the joy of being able to scream "fuck you" at all those show cancelling, library deleting, hedge fund vampire CEOs who run the studios through denying them your money. Drive a stake through David Zaslav's heart.
On the software side I will walk you step-by-step through installing Ubuntu as your server's operating system, configuring your storage as a RAIDz array with ZFS, sharing your zpool to Windows with Samba, running a remote connection between your server and your Windows PC, and then a little about started with Plex/Jellyfin. Every terminal command you will need to input will be provided, and I even share a custom #bash script that will make used vs. available drive space on your server display correctly in Windows.
If you have a different preferred flavour of Linux (Arch, Manjaro, Redhat, Fedora, Mint, OpenSUSE, CentOS, Slackware etc. et. al.) and are aching to tell me off for being basic and using Ubuntu, this tutorial is not for you. The sort of person with a preferred Linux distro is the sort of person who can do this sort of thing in their sleep. Also I don't care. This tutorial is intended for the average home computer user. This is also why we’re not using a more exotic home server solution like running everything through Docker Containers and managing it through a dashboard like Homarr or Heimdall. While such solutions are fantastic and can be very easy to maintain once you have it all set up, wrapping your brain around Docker is a whole thing in and of itself. If you do follow this tutorial and had fun putting everything together, then I would encourage you to return in a year’s time, do your research and set up everything with Docker Containers.
Lastly, this is a tutorial aimed at Windows users. Although I was a daily user of OS X for many years (roughly 2008-2023) and I've dabbled quite a bit with various Linux distributions (mostly Ubuntu and Manjaro), my primary OS these days is Windows 11. Many things in this tutorial will still be applicable to Mac users, but others (e.g. setting up shares) you will have to look up for yourself. I doubt it would be difficult to do so.
Nothing in this tutorial will require feats of computing expertise. All you will need is a basic computer literacy (i.e. an understanding of what a filesystem and directory are, and a degree of comfort in the settings menu) and a willingness to learn a thing or two. While this guide may look overwhelming at first glance, it is only because I want to be as thorough as possible. I want you to understand exactly what it is you're doing, I don't want you to just blindly follow steps. If you half-way know what you’re doing, you will be much better prepared if you ever need to troubleshoot.
Honestly, once you have all the hardware ready it shouldn't take more than an afternoon or two to get everything up and running.
(This tutorial is just shy of seven thousand words long so the rest is under the cut.)
Step One: Choosing Your Hardware
Linux is a light weight operating system, depending on the distribution there's close to no bloat. There are recent distributions available at this very moment that will run perfectly fine on a fourteen year old i3 with 4GB of RAM. Moreover, running Plex or Jellyfin isn’t resource intensive in 90% of use cases. All this is to say, we don’t require an expensive or powerful computer. This means that there are several options available: 1) use an old computer you already have sitting around but aren't using 2) buy a used workstation from eBay, or what I believe to be the best option, 3) order an N100 Mini-PC from AliExpress or Amazon.
Note: If you already have an old PC sitting around that you’ve decided to use, fantastic, move on to the next step.
When weighing your options, keep a few things in mind: the number of people you expect to be streaming simultaneously at any one time, the resolution and bitrate of your media library (4k video takes a lot more processing power than 1080p) and most importantly, how many of those clients are going to be transcoding at any one time. Transcoding is what happens when the playback device does not natively support direct playback of the source file. This can happen for a number of reasons, such as the playback device's native resolution being lower than the file's internal resolution, or because the source file was encoded in a video codec unsupported by the playback device.
Ideally we want any transcoding to be performed by hardware. This means we should be looking for a computer with an Intel processor with Quick Sync. Quick Sync is a dedicated core on the CPU die designed specifically for video encoding and decoding. This specialized hardware makes for highly efficient transcoding both in terms of processing overhead and power draw. Without these Quick Sync cores, transcoding must be brute forced through software. This takes up much more of a CPU’s processing power and requires much more energy. But not all Quick Sync cores are created equal and you need to keep this in mind if you've decided either to use an old computer or to shop for a used workstation on eBay
Any Intel processor from second generation Core (Sandy Bridge circa 2011) onward has Quick Sync cores. It's not until 6th gen (Skylake), however, that the cores support the H.265 HEVC codec. Intel’s 10th gen (Comet Lake) processors introduce support for 10bit HEVC and HDR tone mapping. And the recent 12th gen (Alder Lake) processors brought with them hardware AV1 decoding. As an example, while an 8th gen (Kaby Lake) i5-8500 will be able to hardware transcode a H.265 encoded file, it will fall back to software transcoding if given a 10bit H.265 file. If you’ve decided to use that old PC or to look on eBay for an old Dell Optiplex keep this in mind.
Note 1: The price of old workstations varies wildly and fluctuates frequently. If you get lucky and go shopping shortly after a workplace has liquidated a large number of their workstations you can find deals for as low as $100 on a barebones system, but generally an i5-8500 workstation with 16gb RAM will cost you somewhere in the area of $260 CAD/$200 USD.
Note 2: The AMD equivalent to Quick Sync is called Video Core Next, and while it's fine, it's not as efficient and not as mature a technology. It was only introduced with the first generation Ryzen CPUs and it only got decent with their newest CPUs, we want something cheap.
Alternatively you could forgo having to keep track of what generation of CPU is equipped with Quick Sync cores that feature support for which codecs, and just buy an N100 mini-PC. For around the same price or less of a used workstation you can pick up a mini-PC with an Intel N100 processor. The N100 is a four-core processor based on the 12th gen Alder Lake architecture and comes equipped with the latest revision of the Quick Sync cores. These little processors offer astounding hardware transcoding capabilities for their size and power draw. Otherwise they perform equivalent to an i5-6500, which isn't a terrible CPU. A friend of mine uses an N100 machine as a dedicated retro emulation gaming system and it does everything up to 6th generation consoles just fine. The N100 is also a remarkably efficient chip, it sips power. In fact, the difference between running one of these and an old workstation could work out to hundreds of dollars a year in energy bills depending on where you live.
You can find these Mini-PCs all over Amazon or for a little cheaper on AliExpress. They range in price from $170 CAD/$125 USD for a no name N100 with 8GB RAM to $280 CAD/$200 USD for a Beelink S12 Pro with 16GB RAM. The brand doesn't really matter, they're all coming from the same three factories in Shenzen, go for whichever one fits your budget or has features you want. 8GB RAM should be enough, Linux is lightweight and Plex only calls for 2GB RAM. 16GB RAM might result in a slightly snappier experience, especially with ZFS. A 256GB SSD is more than enough for what we need as a boot drive, but going for a bigger drive might allow you to get away with things like creating preview thumbnails for Plex, but it’s up to you and your budget.
The Mini-PC I wound up buying was a Firebat AK2 Plus with 8GB RAM and a 256GB SSD. It looks like this:

Note: Be forewarned that if you decide to order a Mini-PC from AliExpress, note the type of power adapter it ships with. The mini-PC I bought came with an EU power adapter and I had to supply my own North American power supply. Thankfully this is a minor issue as barrel plug 30W/12V/2.5A power adapters are easy to find and can be had for $10.
Step Two: Choosing Your Storage
Storage is the most important part of our build. It is also the most expensive. Thankfully it’s also the most easily upgrade-able down the line.
For people with a smaller media collection (4TB to 8TB), a more limited budget, or who will only ever have two simultaneous streams running, I would say that the most economical course of action would be to buy a USB 3.0 8TB external HDD. Something like this one from Western Digital or this one from Seagate. One of these external drives will cost you in the area of $200 CAD/$140 USD. Down the line you could add a second external drive or replace it with a multi-drive RAIDz set up such as detailed below.
If a single external drive the path for you, move on to step three.
For people with larger media libraries (12TB+), who prefer media in 4k, or care who about data redundancy, the answer is a RAID array featuring multiple HDDs in an enclosure.
Note: If you are using an old PC or used workstatiom as your server and have the room for at least three 3.5" drives, and as many open SATA ports on your mother board you won't need an enclosure, just install the drives into the case. If your old computer is a laptop or doesn’t have room for more internal drives, then I would suggest an enclosure.
The minimum number of drives needed to run a RAIDz array is three, and seeing as RAIDz is what we will be using, you should be looking for an enclosure with three to five bays. I think that four disks makes for a good compromise for a home server. Regardless of whether you go for a three, four, or five bay enclosure, do be aware that in a RAIDz array the space equivalent of one of the drives will be dedicated to parity at a ratio expressed by the equation 1 − 1/n i.e. in a four bay enclosure equipped with four 12TB drives, if we configured our drives in a RAIDz1 array we would be left with a total of 36TB of usable space (48TB raw size). The reason for why we might sacrifice storage space in such a manner will be explained in the next section.
A four bay enclosure will cost somewhere in the area of $200 CDN/$140 USD. You don't need anything fancy, we don't need anything with hardware RAID controls (RAIDz is done entirely in software) or even USB-C. An enclosure with USB 3.0 will perform perfectly fine. Don’t worry too much about USB speed bottlenecks. A mechanical HDD will be limited by the speed of its mechanism long before before it will be limited by the speed of a USB connection. I've seen decent looking enclosures from TerraMaster, Yottamaster, Mediasonic and Sabrent.
When it comes to selecting the drives, as of this writing, the best value (dollar per gigabyte) are those in the range of 12TB to 20TB. I settled on 12TB drives myself. If 12TB to 20TB drives are out of your budget, go with what you can afford, or look into refurbished drives. I'm not sold on the idea of refurbished drives but many people swear by them.
When shopping for harddrives, search for drives designed specifically for NAS use. Drives designed for NAS use typically have better vibration dampening and are designed to be active 24/7. They will also often make use of CMR (conventional magnetic recording) as opposed to SMR (shingled magnetic recording). This nets them a sizable read/write performance bump over typical desktop drives. Seagate Ironwolf and Toshiba NAS are both well regarded brands when it comes to NAS drives. I would avoid Western Digital Red drives at this time. WD Reds were a go to recommendation up until earlier this year when it was revealed that they feature firmware that will throw up false SMART warnings telling you to replace the drive at the three year mark quite often when there is nothing at all wrong with that drive. It will likely even be good for another six, seven, or more years.

Step Three: Installing Linux
For this step you will need a USB thumbdrive of at least 6GB in capacity, an .ISO of Ubuntu, and a way to make that thumbdrive bootable media.
First download a copy of Ubuntu desktop (for best performance we could download the Server release, but for new Linux users I would recommend against the server release. The server release is strictly command line interface only, and having a GUI is very helpful for most people. Not many people are wholly comfortable doing everything through the command line, I'm certainly not one of them, and I grew up with DOS 6.0. 22.04.3 Jammy Jellyfish is the current Long Term Service release, this is the one to get.
Download the .ISO and then download and install balenaEtcher on your Windows PC. BalenaEtcher is an easy to use program for creating bootable media, you simply insert your thumbdrive, select the .ISO you just downloaded, and it will create a bootable installation media for you.
Once you've made a bootable media and you've got your Mini-PC (or you old PC/used workstation) in front of you, hook it directly into your router with an ethernet cable, and then plug in the HDD enclosure, a monitor, a mouse and a keyboard. Now turn that sucker on and hit whatever key gets you into the BIOS (typically ESC, DEL or F2). If you’re using a Mini-PC check to make sure that the P1 and P2 power limits are set correctly, my N100's P1 limit was set at 10W, a full 20W under the chip's power limit. Also make sure that the RAM is running at the advertised speed. My Mini-PC’s RAM was set at 2333Mhz out of the box when it should have been 3200Mhz. Once you’ve done that, key over to the boot order and place the USB drive first in the boot order. Then save the BIOS settings and restart.
After you restart you’ll be greeted by Ubuntu's installation screen. Installing Ubuntu is really straight forward, select the "minimal" installation option, as we won't need anything on this computer except for a browser (Ubuntu comes preinstalled with Firefox) and Plex Media Server/Jellyfin Media Server. Also remember to delete and reformat that Windows partition! We don't need it.
Step Four: Installing ZFS and Setting Up the RAIDz Array
Note: If you opted for just a single external HDD skip this step and move onto setting up a Samba share.
Once Ubuntu is installed it's time to configure our storage by installing ZFS to build our RAIDz array. ZFS is a "next-gen" file system that is both massively flexible and massively complex. It's capable of snapshot backup, self healing error correction, ZFS pools can be configured with drives operating in a supplemental manner alongside the storage vdev (e.g. fast cache, dedicated secondary intent log, hot swap spares etc.). It's also a file system very amenable to fine tuning. Block and sector size are adjustable to use case and you're afforded the option of different methods of inline compression. If you'd like a very detailed overview and explanation of its various features and tips on tuning a ZFS array check out these articles from Ars Technica. For now we're going to ignore all these features and keep it simple, we're going to pull our drives together into a single vdev running in RAIDz which will be the entirety of our zpool, no fancy cache drive or SLOG.
Open up the terminal and type the following commands:
sudo apt update
then
sudo apt install zfsutils-linux
This will install the ZFS utility. Verify that it's installed with the following command:
zfs --version
Now, it's time to check that the HDDs we have in the enclosure are healthy, running, and recognized. We also want to find out their device IDs and take note of them:
sudo fdisk -1
Note: You might be wondering why some of these commands require "sudo" in front of them while others don't. "Sudo" is short for "super user do”. When and where "sudo" is used has to do with the way permissions are set up in Linux. Only the "root" user has the access level to perform certain tasks in Linux. As a matter of security and safety regular user accounts are kept separate from the "root" user. It's not advised (or even possible) to boot into Linux as "root" with most modern distributions. Instead by using "sudo" our regular user account is temporarily given the power to do otherwise forbidden things. Don't worry about it too much at this stage, but if you want to know more check out this introduction.
If everything is working you should get a list of the various drives detected along with their device IDs which will look like this: /dev/sdc. You can also check the device IDs of the drives by opening the disk utility app. Jot these IDs down as we'll need them for our next step, creating our RAIDz array.
RAIDz is similar to RAID-5 in that instead of striping your data over multiple disks, exchanging redundancy for speed and available space (RAID-0), or mirroring your data writing by two copies of every piece (RAID-1), it instead writes parity blocks across the disks in addition to striping, this provides a balance of speed, redundancy and available space. If a single drive fails, the parity blocks on the working drives can be used to reconstruct the entire array as soon as a replacement drive is added.
Additionally, RAIDz improves over some of the common RAID-5 flaws. It's more resilient and capable of self healing, as it is capable of automatically checking for errors against a checksum. It's more forgiving in this way, and it's likely that you'll be able to detect when a drive is dying well before it fails. A RAIDz array can survive the loss of any one drive.
Note: While RAIDz is indeed resilient, if a second drive fails during the rebuild, you're fucked. Always keep backups of things you can't afford to lose. This tutorial, however, is not about proper data safety.
To create the pool, use the following command:
sudo zpool create "zpoolnamehere" raidz "device IDs of drives we're putting in the pool"
For example, let's creatively name our zpool "mypool". This poil will consist of four drives which have the device IDs: sdb, sdc, sdd, and sde. The resulting command will look like this:
sudo zpool create mypool raidz /dev/sdb /dev/sdc /dev/sdd /dev/sde
If as an example you bought five HDDs and decided you wanted more redundancy dedicating two drive to this purpose, we would modify the command to "raidz2" and the command would look something like the following:
sudo zpool create mypool raidz2 /dev/sdb /dev/sdc /dev/sdd /dev/sde /dev/sdf
An array configured like this is known as RAIDz2 and is able to survive two disk failures.
Once the zpool has been created, we can check its status with the command:
zpool status
Or more concisely with:
zpool list
The nice thing about ZFS as a file system is that a pool is ready to go immediately after creation. If we were to set up a traditional RAID-5 array using mbam, we'd have to sit through a potentially hours long process of reformatting and partitioning the drives. Instead we're ready to go right out the gates.
The zpool should be automatically mounted to the filesystem after creation, check on that with the following:
df -hT | grep zfs
Note: If your computer ever loses power suddenly, say in event of a power outage, you may have to re-import your pool. In most cases, ZFS will automatically import and mount your pool, but if it doesn’t and you can't see your array, simply open the terminal and type sudo zpool import -a.
By default a zpool is mounted at /"zpoolname". The pool should be under our ownership but let's make sure with the following command:
sudo chown -R "yourlinuxusername" /"zpoolname"
Note: Changing file and folder ownership with "chown" and file and folder permissions with "chmod" are essential commands for much of the admin work in Linux, but we won't be dealing with them extensively in this guide. If you'd like a deeper tutorial and explanation you can check out these two guides: chown and chmod.

You can access the zpool file system through the GUI by opening the file manager (the Ubuntu default file manager is called Nautilus) and clicking on "Other Locations" on the sidebar, then entering the Ubuntu file system and looking for a folder with your pool's name. Bookmark the folder on the sidebar for easy access.

Your storage pool is now ready to go. Assuming that we already have some files on our Windows PC we want to copy to over, we're going to need to install and configure Samba to make the pool accessible in Windows.
Step Five: Setting Up Samba/Sharing
Samba is what's going to let us share the zpool with Windows and allow us to write to it from our Windows machine. First let's install Samba with the following commands:
sudo apt-get update
then
sudo apt-get install samba
Next create a password for Samba.
sudo smbpswd -a "yourlinuxusername"
It will then prompt you to create a password. Just reuse your Ubuntu user password for simplicity's sake.
Note: if you're using just a single external drive replace the zpool location in the following commands with wherever it is your external drive is mounted, for more information see this guide on mounting an external drive in Ubuntu.
After you've created a password we're going to create a shareable folder in our pool with this command
mkdir /"zpoolname"/"foldername"
Now we're going to open the smb.conf file and make that folder shareable. Enter the following command.
sudo nano /etc/samba/smb.conf
This will open the .conf file in nano, the terminal text editor program. Now at the end of smb.conf add the following entry:
["foldername"]
path = /"zpoolname"/"foldername"
available = yes
valid users = "yourlinuxusername"
read only = no
writable = yes
browseable = yes
guest ok = no
Ensure that there are no line breaks between the lines and that there's a space on both sides of the equals sign. Our next step is to allow Samba traffic through the firewall:
sudo ufw allow samba
Finally restart the Samba service:
sudo systemctl restart smbd
At this point we'll be able to access to the pool, browse its contents, and read and write to it from Windows. But there's one more thing left to do, Windows doesn't natively support the ZFS file systems and will read the used/available/total space in the pool incorrectly. Windows will read available space as total drive space, and all used space as null. This leads to Windows only displaying a dwindling amount of "available" space as the drives are filled. We can fix this! Functionally this doesn't actually matter, we can still write and read to and from the disk, it just makes it difficult to tell at a glance the proportion of used/available space, so this is an optional step but one I recommend (this step is also unnecessary if you're just using a single external drive). What we're going to do is write a little shell script in #bash. Open nano with the terminal with the command:
nano
Now insert the following code:
#!/bin/bash CUR_PATH=`pwd` ZFS_CHECK_OUTPUT=$(zfs get type $CUR_PATH 2>&1 > /dev/null) > /dev/null if [[ $ZFS_CHECK_OUTPUT == *not\ a\ ZFS* ]] then IS_ZFS=false else IS_ZFS=true fi if [[ $IS_ZFS = false ]] then df $CUR_PATH | tail -1 | awk '{print $2" "$4}' else USED=$((`zfs get -o value -Hp used $CUR_PATH` / 1024)) > /dev/null AVAIL=$((`zfs get -o value -Hp available $CUR_PATH` / 1024)) > /dev/null TOTAL=$(($USED+$AVAIL)) > /dev/null echo $TOTAL $AVAIL fi
Save the script as "dfree.sh" to /home/"yourlinuxusername" then change the ownership of the file to make it executable with this command:
sudo chmod 774 dfree.sh
Now open smb.conf with sudo again:
sudo nano /etc/samba/smb.conf
Now add this entry to the top of the configuration file to direct Samba to use the results of our script when Windows asks for a reading on the pool's used/available/total drive space:
[global]
dfree command = /home/"yourlinuxusername"/dfree.sh
Save the changes to smb.conf and then restart Samba again with the terminal:
sudo systemctl restart smbd
Now there’s one more thing we need to do to fully set up the Samba share, and that’s to modify a hidden group permission. In the terminal window type the following command:
usermod -a -G sambashare “yourlinuxusername”
Then restart samba again:
sudo systemctl restart smbd
If we don’t do this last step, everything will appear to work fine, and you will even be able to see and map the drive from Windows and even begin transferring files, but you'd soon run into a lot of frustration. As every ten minutes or so a file would fail to transfer and you would get a window announcing “0x8007003B Unexpected Network Error”. This window would require your manual input to continue the transfer with the file next in the queue. And at the end it would reattempt to transfer whichever files failed the first time around. 99% of the time they’ll go through that second try, but this is still all a major pain in the ass. Especially if you’ve got a lot of data to transfer or you want to step away from the computer for a while.
It turns out samba can act a little weirdly with the higher read/write speeds of RAIDz arrays and transfers from Windows, and will intermittently crash and restart itself if this group option isn’t changed. Inputting the above command will prevent you from ever seeing that window.
The last thing we're going to do before switching over to our Windows PC is grab the IP address of our Linux machine. Enter the following command:
hostname -I
This will spit out this computer's IP address on the local network (it will look something like 192.168.0.x), write it down. It might be a good idea once you're done here to go into your router settings and reserving that IP for your Linux system in the DHCP settings. Check the manual for your specific model router on how to access its settings, typically it can be accessed by opening a browser and typing http:\\192.168.0.1 in the address bar, but your router may be different.
Okay we’re done with our Linux computer for now. Get on over to your Windows PC, open File Explorer, right click on Network and click "Map network drive". Select Z: as the drive letter (you don't want to map the network drive to a letter you could conceivably be using for other purposes) and enter the IP of your Linux machine and location of the share like so: \\"LINUXCOMPUTERLOCALIPADDRESSGOESHERE"\"zpoolnamegoeshere"\. Windows will then ask you for your username and password, enter the ones you set earlier in Samba and you're good. If you've done everything right it should look something like this:

You can now start moving media over from Windows to the share folder. It's a good idea to have a hard line running to all machines. Moving files over Wi-Fi is going to be tortuously slow, the only thing that’s going to make the transfer time tolerable (hours instead of days) is a solid wired connection between both machines and your router.
Step Six: Setting Up Remote Desktop Access to Your Server
After the server is up and going, you’ll want to be able to access it remotely from Windows. Barring serious maintenance/updates, this is how you'll access it most of the time. On your Linux system open the terminal and enter:
sudo apt install xrdp
Then:
sudo systemctl enable xrdp
Once it's finished installing, open “Settings” on the sidebar and turn off "automatic login" in the User category. Then log out of your account. Attempting to remotely connect to your Linux computer while you’re logged in will result in a black screen!
Now get back on your Windows PC, open search and look for "RDP". A program called "Remote Desktop Connection" should pop up, open this program as an administrator by right-clicking and selecting “run as an administrator”. You’ll be greeted with a window. In the field marked “Computer” type in the IP address of your Linux computer. Press connect and you'll be greeted with a new window and prompt asking for your username and password. Enter your Ubuntu username and password here.

If everything went right, you’ll be logged into your Linux computer. If the performance is sluggish, adjust the display options. Lowering the resolution and colour depth do a lot to make the interface feel snappier.

Remote access is how we're going to be using our Linux system from now, barring edge cases like needing to get into the BIOS or upgrading to a new version of Ubuntu. Everything else from performing maintenance like a monthly zpool scrub to checking zpool status and updating software can all be done remotely.

This is how my server lives its life now, happily humming and chirping away on the floor next to the couch in a corner of the living room.
Step Seven: Plex Media Server/Jellyfin
Okay we’ve got all the ground work finished and our server is almost up and running. We’ve got Ubuntu up and running, our storage array is primed, we’ve set up remote connections and sharing, and maybe we’ve moved over some of favourite movies and TV shows.
Now we need to decide on the media server software to use which will stream our media to us and organize our library. For most people I’d recommend Plex. It just works 99% of the time. That said, Jellyfin has a lot to recommend it by too, even if it is rougher around the edges. Some people run both simultaneously, it’s not that big of an extra strain. I do recommend doing a little bit of your own research into the features each platform offers, but as a quick run down, consider some of the following points:
Plex is closed source and is funded through PlexPass purchases while Jellyfin is open source and entirely user driven. This means a number of things: for one, Plex requires you to purchase a “PlexPass” (purchased as a one time lifetime fee $159.99 CDN/$120 USD or paid for on a monthly or yearly subscription basis) in order to access to certain features, like hardware transcoding (and we want hardware transcoding) or automated intro/credits detection and skipping, Jellyfin offers some of these features for free through plugins. Plex supports a lot more devices than Jellyfin and updates more frequently. That said, Jellyfin's Android and iOS apps are completely free, while the Plex Android and iOS apps must be activated for a one time cost of $6 CDN/$5 USD. But that $6 fee gets you a mobile app that is much more functional and features a unified UI across platforms, the Plex mobile apps are simply a more polished experience. The Jellyfin apps are a bit of a mess and the iOS and Android versions are very different from each other.
Jellyfin’s actual media player is more fully featured than Plex's, but on the other hand Jellyfin's UI, library customization and automatic media tagging really pale in comparison to Plex. Streaming your music library is free through both Jellyfin and Plex, but Plex offers the PlexAmp app for dedicated music streaming which boasts a number of fantastic features, unfortunately some of those fantastic features require a PlexPass. If your internet is down, Jellyfin can still do local streaming, while Plex can fail to play files unless you've got it set up a certain way. Jellyfin has a slew of neat niche features like support for Comic Book libraries with the .cbz/.cbt file types, but then Plex offers some free ad-supported TV and films, they even have a free channel that plays nothing but Classic Doctor Who.
Ultimately it's up to you, I settled on Plex because although some features are pay-walled, it just works. It's more reliable and easier to use, and a one-time fee is much easier to swallow than a subscription. I had a pretty easy time getting my boomer parents and tech illiterate brother introduced to and using Plex and I don't know if I would've had as easy a time doing that with Jellyfin. I do also need to mention that Jellyfin does take a little extra bit of tinkering to get going in Ubuntu, you’ll have to set up process permissions, so if you're more tolerant to tinkering, Jellyfin might be up your alley and I’ll trust that you can follow their installation and configuration guide. For everyone else, I recommend Plex.
So pick your poison: Plex or Jellyfin.
Note: The easiest way to download and install either of these packages in Ubuntu is through Snap Store.
After you've installed one (or both), opening either app will launch a browser window into the browser version of the app allowing you to set all the options server side.
The process of adding creating media libraries is essentially the same in both Plex and Jellyfin. You create a separate libraries for Television, Movies, and Music and add the folders which contain the respective types of media to their respective libraries. The only difficult or time consuming aspect is ensuring that your files and folders follow the appropriate naming conventions:
Plex naming guide for Movies
Plex naming guide for Television
Jellyfin follows the same naming rules but I find their media scanner to be a lot less accurate and forgiving than Plex. Once you've selected the folders to be scanned the service will scan your files, tagging everything and adding metadata. Although I find do find Plex more accurate, it can still erroneously tag some things and you might have to manually clean up some tags in a large library. (When I initially created my library it tagged the 1963-1989 Doctor Who as some Korean soap opera and I needed to manually select the correct match after which everything was tagged normally.) It can also be a bit testy with anime (especially OVAs) be sure to check TVDB to ensure that you have your files and folders structured and named correctly. If something is not showing up at all, double check the name.
Once that's done, organizing and customizing your library is easy. You can set up collections, grouping items together to fit a theme or collect together all the entries in a franchise. You can make playlists, and add custom artwork to entries. It's fun setting up collections with posters to match, there are even several websites dedicated to help you do this like PosterDB. As an example, below are two collections in my library, one collecting all the entries in a franchise, the other follows a theme.

My Star Trek collection, featuring all eleven television series, and thirteen films.

My Best of the Worst collection, featuring sixty-nine films previously showcased on RedLetterMedia’s Best of the Worst. They’re all absolutely terrible and I love them.
As for settings, ensure you've got Remote Access going, it should work automatically and be sure to set your upload speed after running a speed test. In the library settings set the database cache to 2000MB to ensure a snappier and more responsive browsing experience, and then check that playback quality is set to original/maximum. If you’re severely bandwidth limited on your upload and have remote users, you might want to limit the remote stream bitrate to something more reasonable, just as a note of comparison Netflix’s 1080p bitrate is approximately 5Mbps, although almost anyone watching through a chromium based browser is streaming at 720p and 3mbps. Other than that you should be good to go. For actually playing your files, there's a Plex app for just about every platform imaginable. I mostly watch television and films on my laptop using the Windows Plex app, but I also use the Android app which can broadcast to the chromecast connected to the TV in the office and the Android TV app for our smart TV. Both are fully functional and easy to navigate, and I can also attest to the OS X version being equally functional.
Part Eight: Finding Media
Now, this is not really a piracy tutorial, there are plenty of those out there. But if you’re unaware, BitTorrent is free and pretty easy to use, just pick a client (qBittorrent is the best) and go find some public trackers to peruse. Just know now that all the best trackers are private and invite only, and that they can be exceptionally difficult to get into. I’m already on a few, and even then, some of the best ones are wholly out of my reach.
If you decide to take the left hand path and turn to Usenet you’ll have to pay. First you’ll need to sign up with a provider like Newshosting or EasyNews for access to Usenet itself, and then to actually find anything you’re going to need to sign up with an indexer like NZBGeek or NZBFinder. There are dozens of indexers, and many people cross post between them, but for more obscure media it’s worth checking multiple. You’ll also need a binary downloader like SABnzbd. That caveat aside, Usenet is faster, bigger, older, less traceable than BitTorrent, and altogether slicker. I honestly prefer it, and I'm kicking myself for taking this long to start using it because I was scared off by the price. I’ve found so many things on Usenet that I had sought in vain elsewhere for years, like a 2010 Italian film about a massacre perpetrated by the SS that played the festival circuit but never received a home media release; some absolute hero uploaded a rip of a festival screener DVD to Usenet. Anyway, figure out the rest of this shit on your own and remember to use protection, get yourself behind a VPN, use a SOCKS5 proxy with your BitTorrent client, etc.
On the legal side of things, if you’re around my age, you (or your family) probably have a big pile of DVDs and Blu-Rays sitting around unwatched and half forgotten. Why not do a bit of amateur media preservation, rip them and upload them to your server for easier access? (Your tools for this are going to be Handbrake to do the ripping and AnyDVD to break any encryption.) I went to the trouble of ripping all my SCTV DVDs (five box sets worth) because none of it is on streaming nor could it be found on any pirate source I tried. I’m glad I did, forty years on it’s still one of the funniest shows to ever be on TV.
Part Nine/Epilogue: Sonarr/Radarr/Lidarr and Overseerr
There are a lot of ways to automate your server for better functionality or to add features you and other users might find useful. Sonarr, Radarr, and Lidarr are a part of a suite of “Servarr” services (there’s also Readarr for books and Whisparr for adult content) that allow you to automate the collection of new episodes of TV shows (Sonarr), new movie releases (Radarr) and music releases (Lidarr). They hook in to your BitTorrent client or Usenet binary newsgroup downloader and crawl your preferred Torrent trackers and Usenet indexers, alerting you to new releases and automatically grabbing them. You can also use these services to manually search for new media, and even replace/upgrade your existing media with better quality uploads. They’re really a little tricky to set up on a bare metal Ubuntu install (ideally you should be running them in Docker Containers), and I won’t be providing a step by step on installing and running them, I’m simply making you aware of their existence.
The other bit of kit I want to make you aware of is Overseerr which is a program that scans your Plex media library and will serve recommendations based on what you like. It also allows you and your users to request specific media. It can even be integrated with Sonarr/Radarr/Lidarr so that fulfilling those requests is fully automated.
And you're done. It really wasn't all that hard. Enjoy your media. Enjoy the control you have over that media. And be safe in the knowledge that no hedgefund CEO motherfucker who hates the movies but who is somehow in control of a major studio will be able to disappear anything in your library as a tax write-off.
1K notes
·
View notes
Text

Relics of the Sanguine Rose - A vampire-gothic themed cursor Windows, made with pixel art.
I wanted to make my own cursor with a vampire or goth theme in mind. So here we go, these cursors are finally made. It's a complete set (except for the uncustomizable stuff like zoom and grabbing hands), includes that fully animated moving "busy" hourglass and left-handed versions for those who are using left hand.
I made them specifically for windows but feel free to convert the cursors that work for MacOS or Linux.
About the size:
Windows automatically make cursors become 32x32 in size (thats the default size), and if you try to resize the cursor in the Windows 11/10 mouse settings (in "Settings" not from the control panel). It would revert to one of Windows' default cursor look if you try using the resizing sliders. The cursors are originally made 128x128 (like large size cursor), but Windows automatically put it to 32x32 (or other sizes if you adjust the scale from setting)

Yep... that's moving hourglass alright, good to look at while your program waits.
Softwares used:
Clip Studio Paint (drawing them)
GIMP 3.0 (making the png's become .cur files)
RealWorld Cursor Editor (adjustments and such)
Download links (its free, like free beer... or blood for vampires):
Google Drive |
#hydrangea shelter cursors#web resources#resources#webcore#custom cursor#pixel art#pixel graphics#vampire aesthetic#gothic#free to use#f2u#f2u graphics#cursor#cursors#web graphics#cursor pack
195 notes
·
View notes
Note
I just read your TF2 bot post and I’m fascinated. It has left me with a few questions though. Why/how were bots a problem for so long? What was the main incentive for botting (is it botting or boting??) Was it just to be an asshole? What’s your favorite baked good? Have a lovely day and don’t worry about answering my questions if you’re not in the mood :]
The bots were a problem for so long because Valve just didn't care, sorry to say. They just let it happen. I'm not sure when they started coming in in force, maybe after the Jungle Inferno update like six years ago? But they just kept pouring in and Valve just ignored it. It's really shameful how bad they let it get, honestly. They just kept putting out community updates like nothing was wrong.
Eventually after a lot of community pressure a year ago (#savetf2) they tweeted saying they were aware of the problem and then nothing happened. Then there was ANOTHER community movement this June (#fixtf2), and THEN at the end of June they ACTUALLY did something, which is why everyone was so shocked and skeptical at the time. Like the bots got so bad, it's hard to get across just how bad it got if you weren't playing at the time. It was bad. To suddenly go from that to totally bot-free was unbelievable. Frankly I'm still shocked they're gone! No one knows why Valve's acting now or how they're doing it (personally, I think they must have been working on these anti-bot measures for a while... maybe even since their initial tweet, but no one knows), but I hope they keep it up. I can finally teach people how to play in peace!
As for why they'd do this, yeah, it's just to be jerks. They just want to make people miserable. They have websites on Neocities you can find under the tf2 tag (I was looking through it for sites to link to my tf2 site) and they state themselves that they just like making people mad. I don't think they actually hate TF2 so much as they love the power rush from destroying something so famous that so many people love. Kind of a power-trip/control thing, with a dose of being desperate for attention. A lot of the more notorious bot hosters had twitters or youtube accounts where they invited people to rage at them uselessly, they loved it. They've also formed communities around botting and trolling people, so they have kind of a social investment in it (although they were quick to turn on each other when they suspected someone was a mole). Some of them sell their bot software or "bot immunity" for money but I think that was just pocket change, I don't think that was a real motivator.
After having free reign for so long, they reacted violently to the community movement in June. They were positive that nothing would happen to them, so they kept doing more and more outrageous things to prove it. They DDoS'd and DMCA'd the site for the petition multiple times, they doxxed and swatted one of the main bot fighters, they impersonated figureheads and posted illegal links to things, like they were really stepping over the line and gloating about it. They were extremely confident and to be fair, who could blame them? Valve's negligence let them get away with it for years. To suddenly have that power taken away from them without warning made them absolutely furious. They're still seething about it right now and plotting ways to get back in, but they haven't found one yet. It's a matter of pride for them at this point I think, that and a childish tantrum about not being able to ruin other people's fun anymore. Them targeting a baby game version of TF2 (TC2) also points to it being a power trip. If they can't ruin TF2 anymore then by god they've got to ruin SOMEthing!
Even now I'm not sure Valve can hold the line and I keep checking TF2 Casual every now and then to look for bots, haha. It's just hard to believe! I greatly enjoy hearing about bot hosters raging about it and suffering though, they deserve nothing less. Die mad about it!!!
In terms of baked goods though I like all kinds, although right now I'm thinking about brownies so I'll say that. |D
#asks and answers#in-between-nothing#team fortress 2#savetf2#fixtf2#valve is also still banning cheaters so they seem to still be paying attention#but for how long is the question#one bot hoster actually got arrested and sent to prison for 20 years for csem but that predates the recent movements#they really are all garbage people
236 notes
·
View notes
Text
I saw people do this and I also wanted too. So here is my take on: Trying to predict the vibe of the Starbound smp characters based on the first 3 songs spotify shuffle gives me from the playlists.
Heyhay’s Character:
Saturn by Sleeping at Last
Overwhelmed by Royal & the Serpent
Anti-Gravity by RUNAGROUND
Sheltered Person / Student / Character who has lost either their Mentor / Parent figure or a Partner who taught them about the star
Either the person died in a tragic event, or it was a rough and ugly break up
They either witnessed the event that took the other person, or something happened now they must deal with that trauma
There is a lot of expectations on them now and they have to deal with the pressure and anxiety of that
Jamie’s Character:
Long Way Home by Jukebox The Ghost
The Chain – 2004 Remastered by Fleedwood Mac
Dog Days Are Over by Florence + The Machine
Have a Relationship to another Character. Either Siblings, or a lost Love that forgot them. They however didn’t and now they have found that person again. Something happened in the past and the two characters got split up in the past
They are bound to something either an organization or something similar and the other characters got Out while Jamies Character was still bound to it
Jamies Character is now also getting free and running from it. Finally getting free from it / getting out of that sad space finding a new safe space
Puffin’s Character:
Tell That Devil by Jill Andrews
Keep Yourself Alive by Queen
Nobody’s Soldier by Hozier
Badass, Angry, Troublemaker, Fighter, Ex – Soldier,
Freshly out of a bad relationship with a person (platonic od whatever) and now over it and fighting people about it
Abraxas’ Character:
Echo by CIRCRUSH
Control by Halsey
Props & Mayhem by Pierce The Veil
Destruction arc, trying to figure our who you are
My best guess is a robot or Android who is rebelling against their programming and what they are meant to do / recently gained consciousness and is now struggling against the person who made them / is controlling them
Maybe even a Software. If Starbound plays on a space ship the AI of the ship itself
Connor’s Character:
Speedracer by Teenage Dads
Make Your Own Kind Of Music by Cass Elliott
Plastic Love by Gabi Belle
The Captain of a Spaceship be that their own or (if starbound plays on one) the captain of that ship
Its either that or they are doing the space equivalent to street racing be that legal or not
Maybe a bit off a hippie
I could also see them having their own space ship and doing odd and questionable jobs for money while being a hippe and having their fun at the extend of the love of other people
Metta’s Character:
- I will be so real. I have no clue. I got Nowhere to Run – Single Version by Martha Reeves & The Vandellas and Pepper Steak (From “OFF”) by GaMetal after one another and the vibes are so different. I am excited to see this blorbo but I could not predic anything
Olive Mothmoon’s character:
September (Instrumental) by Sparky Deathcap
Strange Sight Reprise by KT Tunstall
The Moon Will Sing by The Crane Wives
Very calm vibes
Someone other people find comfort in. Who still has wonder, believes in the bigger thing
Full of the Excitement and getting to learn new things
Never really questioned what they learned by a other person
In the shadow of another person. Going to learn what they themselves are capable of
Zenni’s Character:
Hard Times by Paramore
Ain’t it Fun by Paramore
Razzmatazz by I DON’T KNOW HOW BUT THEY FOUND ME
Awkward, introvert, clumsy
Not doing great
Trying their best, on their own
#I was trying my best#this was surprisingly hard to do#I am so excited for this smp#starbound smp#bound smp#boundsmp
84 notes
·
View notes
Note
what's up with GShade what kind of drama could a Shader have
to the best of my memory: the lead developer of gshade started to get very controlling and arrogant about their software and how people used it. one common annoyance was that when there was an update released, the software would very intrusively bug you about updating right then and there and it was a headache to have to constantly manually remove the notice from your screen. i believe the crux of the drama was that a young modder took it upon themselves to mod and release a version of Gshade, or just some kind of additional software, that bypassed the annoying update notifications. and when the lead gshade dev found this out they sneakily implemented new code into gshade that would force shutdown someone’s computer if gshade detected that they were using this mod.
after the initial wave of controversy their reputation basically tanked overnight once people found this out. understandably so, as this was in very literal terms implementing hidden malware into the software. a bunch of shader preset creators started working on adapting their presets for reshade immediately after. i know i personally switched over to reshade immediately myself. it was such an easily avoidable mess haha.
also if i’ve gotten any of these details incorrect please feel free to correct me or elaborate in the replies, it’s been a while since i’ve looked into this drama and i’m literally just recounting it off the dome :)
328 notes
·
View notes
Text
The main reason to use Firefox and Linux and other free and open source software is that otherwise the big tech monopolies will fuck you as the customer over in search of profits. They will seek to control how you use their products and sell your data. When a company dominates the market, things can only get worse for ordinary people.
Like take Google Chrome for example, which together with its chromium reskins dominate the web browser market. Google makes a lot of money from ads, and consequently the company hates adblockers. They already are planning to move to manifest V3, which will nerf adblockers significantly. The manifest V3 compatible chrome version of Ublock Orgin is a "Lite" version for a reason. Ublock's Github page has an entire page explaining why the addon works best in Firefox.
And Google as we speak are trying to block adblockers from working on Youtube, If you want to continue blocking Youtube ads, and since Youtube ads make the site unuseable you ought to want that, it makes the most sense to not use a browser controlled by Google.
And there is no reason to think things won't get worse. There is for example nothing stopping Google from kicking adblockers off their add-on stores completely. They do regard it as basically piracy if the youtube pop-ups tell us anything, so updating the Chrome extensions terms of service to ban adblocking is a natural step. And so many people seem to think Chrome is the only browser that exists, so they are not going to switch to alternatives, or if they do, they will switch to another chrominum-based browser.
And again, they are fucking chromium itself for adblockers with Manifest V3, so only Firefox remains as a viable alternative. It's the only alternative to letting Google control the internet.
And Microsoft is the same thing. I posted before about their plans to move Windows increasingly into the cloud. This already exists for corporate customers, as Windows 365. And a version for ordinary users is probably not far off. It might not be the only version of Windows for awhile, the lack of solid internet access for a good part of the Earth's population will prevent it. But you'll probably see cheap very low-spec chromebookesque laptops running Windows for sale soon, that gets around Windows 11's obscene system requirements by their Windows being a cloud-based version.
And more and more of Windows will require Internet access or validation for DRM reasons if nothing else. Subscription fees instead of a one-time license are also likely. It will just be Windows moving in the direction Microsoft Office has already gone.
There is nothing preventing this, because again on the desktop/laptop market Windows is effectively a monopoly, or a duopoly with Apple. So there is no competition preventing Microsoft from exercising control over Windows users in the vein of Apple.
For example, Microsoft making Windows a walled garden by only permitting programs to be installed from the Microsoft Store probably isn't far off. This already exists for Win10 and 11, it's called S-mode. There seem to be more and more laptops being sold with Windows S-mode as the default.
Now it's not the only option, and you can turn it off with some tinkering, but there is really nothing stopping Microsoft from making it the only way of using Windows. And customers will probably accept it, because again the main competition is Apple where the walled garden has been the default for decades.
Customers have already accepted all sorts of bad things from Microsoft, because again Windows is a near-monopoly, and Apple and Google are even worse. That’s why there has been no major negative reaction to how Windows has increasingly spies on its users.
Another thing is how the system requirements for Windows seem to grow almost exponentially with each edition, making still perfectly useable computers unable to run the new edition. And Windows 11 is the worst yet. Like it's hard to get the numbers of how many computers running Win10 can't upgrade to Win11, but it's probably the majority of them, at least 55% or maybe even 75%. This has the effect of Windows users abandoning still perfectly useable hardware and buying new computers, creating more e-waste.
For Windows users, the alternative Windows gives them is to buy a new computer or get another operating system, and inertia pushes them towards buying another computer to keep using Windows. This is good for Windows and the hardware manufacturers selling computers with Windows 11 pre-installed, they get to profit off people buying Windows 11 keys and new computers, while the end-users have to pay, as does the environment. It’s planned obsolescence.
And it doesn’t have to be like that. Linux distros prove that you can have a modern operating system that has far lower hardware requirements. Even the most resource taxing Linux distros, like for example Ubuntu running the Gnome desktop, have far more modest system requirements than modern Windows. And you can always install lightweight Linux Distros that often have very low system requirements. One I have used is Antix. The ballooning Windows system requirements comes across as pure bloat on Microsoft’s part.
Now neither Linux or Firefox are perfect. Free and open source software don’t have a lot of the polish that comes with the proprietary products of major corporations. And being in competition with technology monopolies does have its drawbacks. The lacking website compatibility with Firefox and game compatibility with Linux are two obvious examples.
Yet Firefox and Linux have the capacity to grow, to become better. Being open source helps. Even if Firefox falls, developers can create a fork of it. If a Linux distro is not to your taste, there is usually another one. Whereas Windows and Chrome will only get worse as they will continue to abuse their monopolistic powers over the tech market.
846 notes
·
View notes
Note
Hello. Regarding computer literacy among the younger ones, is there a good argument against the idea that "kids should not be forced to learn outdated '90's technology"?
yeah, a really good one: you don't make phone apps on a phone, you make them on a computer. kids are being walled into a deliberately limited and commercialized version of tools that make the modern world, denied a chance to learn how the machines they use every day work and, through that, the tools they could use to create more freely and powerfully than they'll get in walled gardens and with limited-application always-online apps.
it is the spectre of death for open source and DRM free software, and it denies kids the chance to control their digital lives.
270 notes
·
View notes
Text
Tech Tuesday: Curtis Everett
Summary: Curtis decides to take the next step and ask if you're willing to meet offline.
A/N: Reader is female. No physical descriptors used.
Warnings: Meeting someone from online, Mentions of past bad experiences. Please let me know if I missed any.
Previous
Series Masterlist

"So, what all has been going on with your computer? Did you bring it with you?" Curtis tries to keep his tone calm. He's been eager to meet you in person for months but has worked hard to make sure you feel safe to do so and that means not pushing you into it. He tries to keep his excited fidgeting to a minimum but he's worried it just makes him look even more suspicious. He's so used to keeping his features schooled into a scowl, but that's the last thing he wants to do to you.
"Basically it'll go for a while but then start freezing, stuttering and I have to force it to shut down before I can do anything else," you answer while sipping your coffee. You can't believe his eyes are as blue as the photo he sent. "I tried to see if it was because I was running some heavy duty games and maybe I was using too much RAM. I cleaned up so many programs, uninstalled a bunch of games I don't play anymore, but it just keeps happening."
Curtis rubs his beard as he thinks. "It might be a hardware issue. It's not my strong suit, but I can still take a look. At the very least I can ask my buddy, Mace, for help. He's a whiz with the hardware and could probably get you a good deal if any upgrades are needed."
"Oh yeah, you've talked about him before," you reassure yourself. Having him mention another stranger worried you but Mace has been brought up several times before, especially when Curtis mentioned getting upgraded tech.
"You definitely don't have to meet him," Curtis affirms. "He can be a real grump. And coming from me, that's saying something." He gives a light chuckle as he sips his coffee.
"Snow, I work at a hospital," you counter. "Ain't no kind of grump I haven't had to deal with before." You give Curtis a look that says 'I'm stronger than you'.
Curtis smiles fully, "absolutely fair, Heart." He struggles a little bit to not turn shy. That look, that strength, that self-assured smile has him weak in the knees. "Still," he coughs, trying to regain control of himself. "Still, uh, when...did you bring the computer with you? Would this be an okay time to take a look at it?"
"Friend of mine at the library is keeping an eye on it for me." Best to let him know you've got allies nearby. He hasn't really given anything to make you worry about, but his reactions to your safety protocols could be telling. Of course, if you were expecting him to look scared or upset at this news, Curtis happily defied those expectations as his eyes lit up.
"Oh, that's really smart! We can borrow one of their laptops to run some tests. That way my laptop's settings won't mess with your computer."
You smile, genuinely, for the first time all day. Curtis is very different and you couldn't be happier about it.
"Don't you need your diagnostic software?"
"If it's called for, sure. The basic versions are free to download and they'll help me pick up if it's actually a software issue. Plus, the libraries regularly wipe downloads after use, right?"

"Okay, everything's plugged in so let's get this running and see what happens."
After looking over the hardware Curtis had found no obvious reasons for the failure so you had gone to your friend and loaned out one of the laptops. Curtis's computer bag had an impressive collection of tools, wires and connectors. You always appreciate when a person is prepared.
He works in relative silence and it gives you the chance to really look at him. He's definitely handsome, as Cassandra pointed out when she loaned you laptop. You weren't normally one for lip piercings but it seemed to work well on him, even though it was partially hidden by his beard.
The quiet between you two isn't so uncomfortable. It's how you spent a lot of time when you started gaming together. Talking over comms almost always resulted in a bunch of idiots either hitting on you, calling you a 'fake gamer,' lobbing insults at you, or all three at the same time. Snowpiercer was one of the few gamers who didn't care that you were a girl gamer. For him it was about how well you worked together. Given that the two of you could get high scores without having to talk over comms, it was no wonder the two of you started playing together more and more.
Even after you'd started voice chatting while playing, there was always a level of respect. Something you hadn't gotten from Chase.
Curtis gets out of the chair and gets a closer look at each of the fans, stopping at the one closest to the heat sink. "There it is," he intones. "This fan is dying. It's easy to miss because, by the time you know something's wrong, the whole computer's shut down and all the fans are stopped."
"Well, at least it's an easy fix," you comment. "Thanks for taking a look at it."
"Not a problem at all," he assures. "I'm happy to help."
You smile, "are you always this nice?"
"No," he shakes his head. "Definitely not. I'm not an ass, but I'm definitely not this nice to everyone."
"I'm honored."
He chuckles at that. "Like I said, I'm happy to help you out. You're the best teammate I've ever had and it just isn't as fun paying without you."
"I appreciate that, Curtis. So, what do I owe you?"
"Nothing."
"Don't do that to me, Snow. You know how I feel about owing people." It was a wound from Chase that had yet to heal. His use of favors as manipulation made you wary of anyone who said you don't owe anything.
Curtis sighs and nods. "Tell you what, there are some pastries at that coffee shop we were at that I avoided because I didn't want you to see me covered in crumbs. Wouldn't make for a good first impression." You smile at the thought. "Just get me a couple of those while I shut everything down here and return the laptop?"
"Deal." You stand to get moving but turn to him before you leave, "and thank you, again. Not just for the computer fix, but for...for respecting the boundaries."
He looks at you with those gorgeous blue eyes, "not a problem."
Next
Tech Tuesday Masterlist
Tagging @alicedopey; @delicatebarness; @ellethespaceunicorn; @icefrozendeadlyqueen; @jaqui-has-a-conspiracy-theory;
@late-to-the-party-81; @lokislady82 ; @peyton-warren @ronearoundblindly; @stellar-solar-flare
#tech tuesday#tech tuesday: curtis everett#curtis everett x reader#curtis everett x nurse!reader#curtis everett x female!reader
55 notes
·
View notes
Note
Hi lovely, you've probably gotten so many notifications from me the past few days and I'm sorry but just loving all your content 😍 Your art is gorgeous and I've recently started S7 of Supernatural for the first time, so seeing your posts has been making my brain whirr in the happiest of ways!
I'm also so curious, how are you able to make GIFs? I've been on this hellsite forever at this point and never got around to learning that. Unless it's a state secret of course.
Oh, and I see you dropped this! 👑 That's better!

I will wear it proudly :')

Thank you so much for liking what I do! I wish you the best on your watch through, you have some really great stuff ahead (and some terrible, terrible things. Love this mess of a show!)
My gif making process is no secret. I've only started doing it recently and I'm still fighting with whether i compromise resolution or color grading for file size. But I'm tryin! There are no doubt better resources than me for this, but I'll walk through what I do.
**Side note, there are sites online that will let you upload clips and turn them into gifs for you. I've never really liked these for security purposes, but I'm sure things have gotten better since I've last messed with them.
Personally I go a little overboard, but I like having control of everything:
For all the stills / videos / gifs I pull, I use DaVinci Resolve. There is a free version of the application and its sick - I've never needed the paid version for the silly little edits I do in my spare time.
DaVinci Resolve looks very scary if you've never used video editing software before, but its actually pretty intuitive once you get the hang of it (not that I always know what I'm doing!) There are a bunch of great videos online that will walk you through how to use it as well.
Basic process:
Upload video into a project.
Mark in (start) and Mark out (end) the part of the video you want to make into a gif. I use the markers as I watch something and "cut" the video where needed.
Fuss with the export settings, select the part of the video you cut, and render!
If you are me, check the file size and immediately swear because you've forgotten to change the resolution again (I should just save it as a preset but I'm stubborn.)
Rinse, repeat!
As for getting videos, you can grab stuff from youtube if you want to clip a scene from anything on there. That's how I isolated the stupid tim and eric bit on my post about 'when i see Cas' lol. I use the CNVMP3 webpage to grab youtube videos and I've never had an issue with it.
Otherwise, all of my Supernatural specific stuff comes from my own blu-ray discs. I've gone through an arduous process of digitizing my physical media so I can watch it easier.
I can send you down the rabbit hole by suggesting MakeMKV and Handbrake applications, both free, if you have physical media you want to edit. I found reddit threads that taught me how to use them after a few google searches on the topic.
I'm very long winded, but hopefully that answers any questions! Thank you for the ask (and for the crown!)
#my stupid little frog brain#if i spelt something wrong shh i'm trying my best#hello internet friends
26 notes
·
View notes
Note
hi hello! as a live show taper, do you have an advice for where to start for someone interested in learning to tape? with the new tour announcement it seems like i'll be able to go to a bunch of shows in an area that's kinda light on tapers, so it would be really neat if i can learn enough to get some decent quality tapes from this tour, but as someone with no background in audio stuff it all seems a bit overwhelming from the outside!!
SO YOU WANT TO BE A LIVE SHOW TAPER: an overview by your favorite amateur tMG taper!
Before we start: my top resources here are the Taper's Section forum (yes, a real old-school forum!) and the taping thread in the unofficial tMG community discord server (it's an older thread, will have to scroll down to it in the tmg-forum section). I really hate to be the "join my discord server to get your answers" guy, but it's genuinely a great space to talk to some really knowledgeable regular tMG tapers and get a lot of good specific advice.
You can get really intense about taping really fast. It depends on how much time and money you're able to invest into it, and there are a million factors wrt approach, gear, investment, etc. For this post, I'm just going to do an overview of what I would recommend for a beginner-friendly setup that's not too big of an investment and is a step above a cell phone recording.
Gear: I love my PCM-A10 recorders because I can connect them to my phone and control and monitor them remotely, but the price tag isn't very beginner friendly - you'll likely find A10s going for ~$150 on eBay. Also, the ideal use case for an A10 is with external mics or to pull soundboard, not as an all-in-one to just set and forget. You'll want to look for something like a Zoom H2* or H2n, which are a smallish all-in-one recorder and can go for less than $50 on eBay if you do a little searching. (*Note: the H2 has a known issue where it stops and restarts with a small gap once it hits a limit, but you can patch that out by following this tutorial with this updated firmware link.)
Recording during the show: unless you have permission to tape, which is a whole nother can of worms, you'll have to get your recorder past security. Usually if you hide or disguise it somehow in your bag you can get away just fine. If you're in the front row for the show, you can usually discreetly prop up your recorder on the barrier or just set it somewhere that it won't move. If you can stay relatively still and not sing into it, putting it in a chest pocket on a shirt or jacket is also a good option. I always try to capture everything from the moment the lights dim, so I usually start my recording a little early and just chop off the excess at the beginning, but if you're worried about storage space or anything you can just try to be really aware and hit record as soon as the lights go down.
Processing: At a minimum, you'll need to name the file, chop it into tracks, and populate metadata. I do this in Audacity (free) and it takes less than an hour once you get a workflow down. However, you can also go crazy with processing if you want to - I do EQ and mixing in Reaper (free trial version) and audio repair and de-click in iZotope (paid software). You can do some fairly basic EQ work pretty easily in Reaper and it can make a decent difference with how the audio sounds - I typically do parallel compression and chop the low end in order to bring the vocals up a little bit and balance out any boominess. My order of operations is mixing (if applicable)/EQ > repair > tracking/metadata. I know EQ sounds complicated, but it's really just fiddling with some standard presets until you like how it sounds.
Uploading to the LMA: The Live Music Archive is specifically for decent quality lossless tapes - cell phone tapes are fine to upload to the Internet Archive as "community audio", but the LMA is supposed to be higher quality. WAV or FLAC is your lossless format, I always work with WAV throughout the whole process. There's a fairly standard convention for file naming, page info, etc that I think there's a tutorial on somewhere but I'm also happy to go into that if need be. It'll take a little bit to upload the files, so I usually just leave it running on my computer overnight. After uploading, it automatically derives the upload into different file types before it can be streamed or downloaded.
Congrats, you've done a tape! I'm happy to go into significantly more detail on any part of this, whether here or in the discord server - feel free to send further asks or drop me a DM and I'll do my best to answer, I just wanted to keep this post as a relatively high-level overview. Thanks for asking, I'm always thrilled when people express an interest in taping!
#txt#transmissions from lyric#resources#tmg#the mountain goats#long post#ask#WHEW ok i think that's all my tags!#thank you SO MUCH for asking i'm so excited anytime folks express an interest in getting into taping :)#and i am SO sorry that this took me literal months to answer! i hope it's still soon enough to be of use!
16 notes
·
View notes
Text
How to position facial features for the Our Life sprites
Idk how many people need this tutorial (especially since I kinda sat on it for like a month...whoops) but I noticed people were starting to make more sprite edits and videos using the in-game sprites and I thought having this tutorial might help for those of you who don't know exactly how to place the expression layers for the sprite.
Part 1: What am I talking about?
Ok so some of you may be reading the post title and thinking "what the hell does that mean?". For those who are unaware, if you decompile OL1 and OL2, you can find the sprites used for the characters in the game. These files are generally in character folders that contain all the bits for each sprite as well as several versions of the sprite itself in different outfits. All these base sprites files look a little like this

You may have noticed the glaringly obvious detail that Qiu here is missing most of their face. That's because there are several seperate images used for their eyebrows, eyes and mouth. The reason they're all seperated like this is to give more creative freedom over expressions than what would be allowed if there were just already a set number of sprites with set expressions
However, if you want to make a spite edit video, that means you have to piece all the expression layers over the sprite and, since the expression layers don't have the same canvas size as the sprite, you have to actually place them on the face yourself. This can lead to stuff like this.

If you're looking at this and thinking it doesn't look quite right, you're correct. This is the issue you're noticing

This is generally what happens when you try placing expression layers by eye, you end up sort of assuming you've got the right spot when you're actually slightly wrong. And this is gif just shows the facial features in the wrong spot vertically
So, I've explained the problem, now how do you fix it? It's simple actually.
Part 2: The actual tutorial part
What you'll need:
The sprites and expression layers you need (this tutorial assumes you already have the game decompiled. If you don't and have no idea how to do so, here's a tutorial for just that)
An editing software that has a tranform tool such as Photopea, Photoshop, GIMP, etc.
Step 1: Open up the sprite you want to use in your image editing software of choice and import in all the expression layers you want to use
Step 2: Open up the transform tool on your editing software. Where this is may vary, on Photopea and Photoshop you can open up either through the shortcut alt+control+t or clicking on edit in the top bar and selecting Free Transform from the menu. If you don't know where the transform tool is in your software, I'd suggest looking it up

(A showcase of where the tranform tool is in Photopea and Photoshop)

(What the transform box should look like
Step 2.5 (This might be photopea specific, idk if other software does this): If your transformation tool box looks like this, cancel out of the tool (using the little x button on the top bar) and then open the transformation tool back up again. Make sure you're not selecting multiple layers and also make sure you didn't open the tool with the transformation controls tick box from the top bar. If none of that works, just delete the layer and grab it from your folder again and try again

Step 3: With the transform tool still open on your desired layer, move the layer so that it snaps against the corner of your canvas. Your image editing software should automatically have layer snapping enabled but, if not, I suggest looking up how to turn it on. If it doesn't have this, the best suggestion I have would just be to make sure the corner of the transform tool's box and the corner of the canvas allign. Zoom in if need be. You then repeat this process for the other expression layers (and any other layers that aren't automatically allighned like the blush layers or the tear layers)

(Notice the red lines that show up when it snaps against the corner)
Step 4: Export your sprite file because that's it, you did it! Now you have a sprite with the layers placed in the right spots! Isn't that great!

...(maybe I should've chosed a happier expression for this...)
Anyways, I hope this helps!
63 notes
·
View notes
Text

The more persistent control you have over a device, the more you and the device adapt to each other, becoming a more effective group organism. The higher the input and output bandwidth of the interface (i.e., the greater the number of distinct ways you can interact with it / it can respond to you), the faster the system can adapt.
So, the horse metaphor makes perfect sense: your desktop ships with a real keyboard on which you can probably do 300 WPM without blocking part of the display, and has a display that can hold half a dozen legible non-overlapping windows. If you have a screwdriver, you can open it up and replace basically any part. Even without a screwdriver, you can generally out of the box persistently dramatically change the UI settings to fit the needs of your environment (light vs dark mode, font size and style). You can stick linux on & that opens up a lot more. On a desktop computer, it's possible for a motivated 10 year old of average intelligence to progress from normal computer use to writing non-trivial application software for their own use within a couple years -- I am proof, & I'm far from alone.
Tablets are on the opposite end of the spectrum: simplified, locked down. The user does not collaborate with the tablet; instead, the tablet has only those affordances that channel the user's behavior into habits the developers of the tablet software consider desirable.
Mobile & web achieved the dream of proprietary software people: user-facing software that the user can't even disassemble because the important parts aren't accessible; since they did this through physical distance rather than the legal system, they can profit from other people's open source software too, circumventing many of the restrictions intended to keep improvements folded back into the community or to limit commercial use. But the side effect of this is that it gives professional computer touchers much more control over regular people's computers: not only can you not fix bugs in someone else's web app yourself, but you can't refuse to upgrade to a version that's a worse fit for your purposes. Where desktop computing encouraged the development of communities of amateur computer hobbyists who, together, would adapt or create alternatives to things that didn't work right (as well as creating lots of interesting, funny, unnecessary stuff that can only be classified as Art -- little games and toys, elaborate shitposts, weird mods and skins), mobile does not. The only thing you need to make your desktop computer do something brand new is a desktop computer, the software development tools & documentation that ship with the OS, and some free time -- you don't even need an internet connection; developing for web or mobile also functionally requires a desktop, on top of your mobile device for mobile (and if it's an iPhone you gotta have a Mac & pay Apple $99/year), & for web you need to pay for hosting and a domain name.
12 notes
·
View notes
Text
Alright. I'm making this post because I was unpleasantly surprised to find Microsoft had forcibly downloaded an """"ai assistant"""" onto my computer (called Copilot), and because finding a site that actually told me how to kill it for good -- in clear, truly step-by-step terms -- was way harder than it needed to be.
Preface: this is only relevant if you're running Windows 11.
Here is your target:

If you see this logo on your taskbar -- or... have Edge installed on Windows 11 -- you've got Copilot. You can't delete it on its own, Microsoft has integrated it into the OS as best they can. The most you can do is disable it (instructions for which are at the very end of this post).
So... to REALLY get rid of it you need to uninstall Microsoft Edge, because it's a part of/reliant on Edge. A lot of bells and whistles of Windows are also reliant on Edge, like widgets, but I never use those. I use my PC almost exclusively for gaming, and I don't want this slimy "ai" shit on my computer. I use Firefox anyway. Edge can go die as far as I'm concerned.
Here's the actual steps, copy-pasted from a website that took me way too long to find. It also really makes my browser chug for some reason, which is why I'm copy-pasting the whole thing. If you still want to look at the site itself, put it in reader view as fast as you can (link to site).
1.) Open Microsoft Edge, type "edge://settings/help" in the address bar, and then press Enter.
2.) Click "About Microsoft Edge" at the bottom of the left-hand pane. Copy the version number at the top of the screen, under Microsoft Edge.
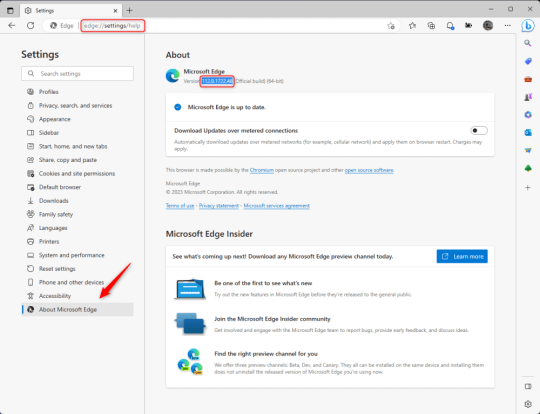
3.) Press Windows Key + S to open Windows Search.
4.) Type "Command Prompt", right-click the result, and then select "Run as Administrator".
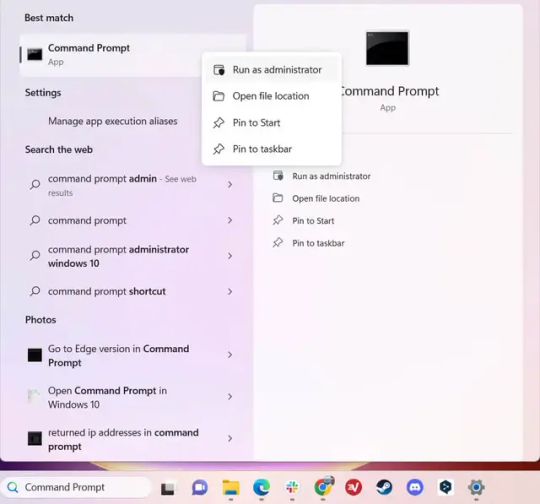
5.) The User Account Control (UAC) prompt will appear. Click "Yes".
6.) Navigate to Edge’s “Installer” directory by using the cd command. Depending on which directory your Command Prompt opens in by default, you may need to use the "cd .." command to go back a level or two.
Once ready, run this command:
cd “Program Files (x86)\Microsoft\Edge\Application\Version Number\Installer”
Replace "Version Number" with your actual version number copied earlier.
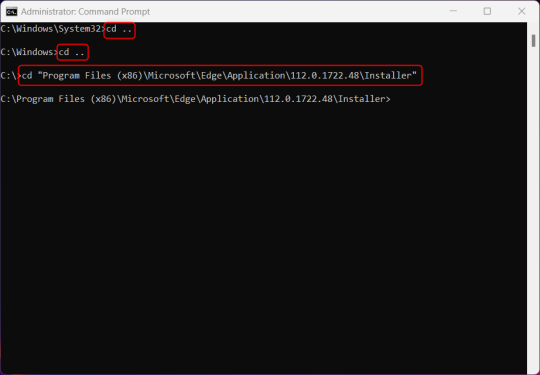
7.) Next, run this command to uninstall Microsoft Edge:
setup –uninstall –force-uninstall –system-level
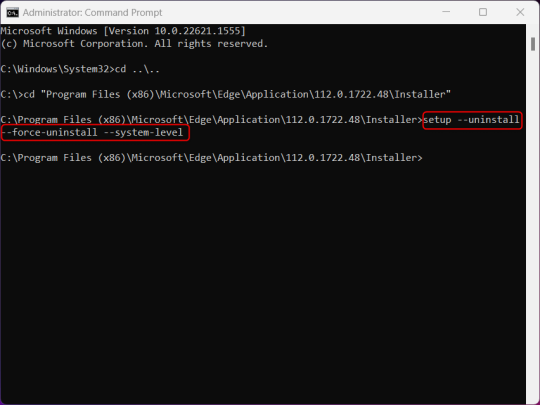
((It will look like nothing happened! Don't worry!))
8.) Restart your PC for the changes to take place.
((HOWEVER, Windows will try to reinstall it the next time your PC updates (or whenever it feels like it lol) so there's a second half to this))
1.) Press Windows Key + R to open Run.
2.) Type "regedit" in the text box and click OK to open the Registry Editor.
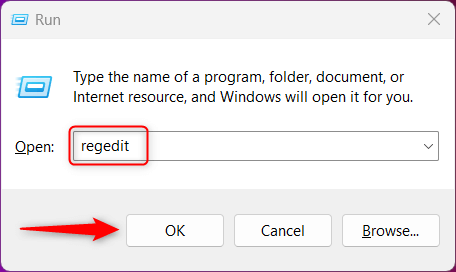
3.) The User Account Control (UAC) prompt will appear. Click "Yes".
4.) In the Registry Editor, navigate to HKEY_LOCAL_MACHINES\SOFTWARE\Microsoft.
5.) Right-click the "Microsoft" folder, hover your cursor over "New", and then select "Key".
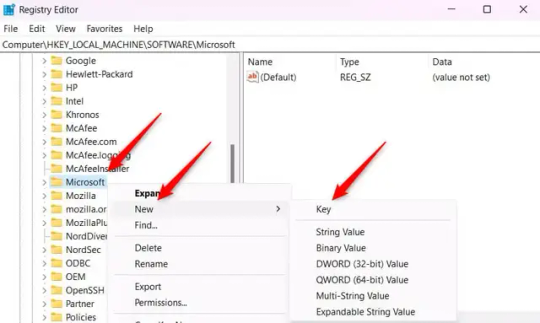
6.) Rename the new Key to "EdgeUpdate".
7.) Right-click EdgeUpdate, hover your cursor over "New", and then select "DWORD (32-bit) Value".

8.) Right-click the new value, which is currently named "New Value #1".
9.) Select "Rename" from the context menu.
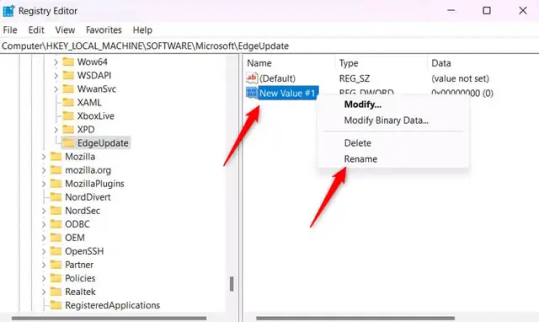
10.) Rename the value to "DoNotUpdateToEdgeWithChromium".
11.) Right-click the newly-named DoNotUpdateToEdgeWithChromium value and select "Modify" from the context menu.
12.) The Edit DWORD (32-bit) Value window will appear. Change the Value data to "1" and then click OK.
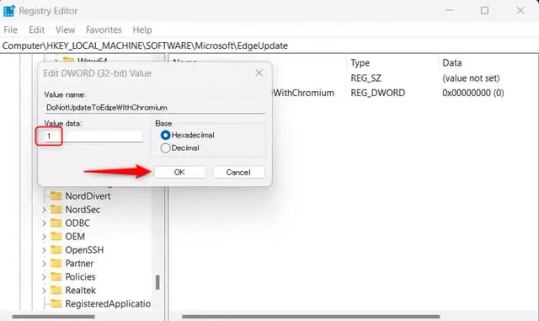
((You are now free. If you ever run into a really serious, unavoidable issue with your OS that's clearly a result of Edge being gone, you can redownload it like a regular app. But you should be fine.))
((And, if for some reason you want still want Edge around but just want the copilot thing gone, here's what you do:
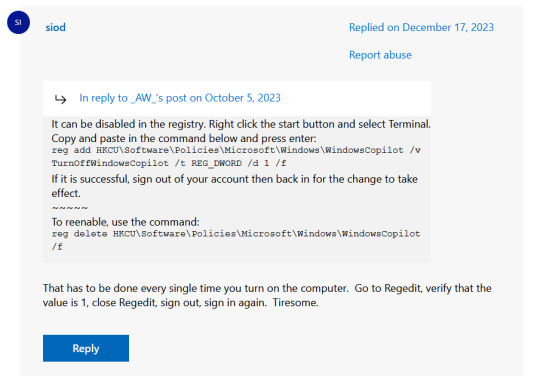
The command, for ease of copy-pasting: reg add HKCU\Software\Policies\Microsoft\Windows\WindowsCopilot /v TurnOffWindowsCopilot /t REG_DWORD /d 1 /f
You can't actually truly delete Copilot (without deleting Edge), only disable it. And as the reply says, you do have to do this every time you turn the computer on. I haven't tested that myself, but I believe it. I assume/hope that excludes just waking the computer up after it goes to sleep, but I don't know for sure.))
120 notes
·
View notes
Text
Virtual Photography Process
I got an ask that I posted by accident before being ready, so I'm going to make this a post I suppose fmdlksg Anon was asking about my Reshade Preset for Cyberpunk and what my VP process is, so here it is!
Anon, I don't quite have a VP process. Not in a trademark way anyway. My VP varies wildly across the years and generally speaking I just go with the vibe I feel at the moment!
I've had phases where I would barely do any post-processing at all and only rely on heavy Reshade, I had phases where I'd do some minor color tweaking and add a lot of effects like dust and sparks, and my current one where I do pretty much all my color tweaking in post-process and only really use light Reshade to sharpen the image and make colors pop a bit.

My current Reshade is a tweaked version of a friend's preset. I have an average rig, don't have any Fancytracing, so Reshade is mostly there to sharpen the image, deepen the colors and try to compensate for my GPU's limitations. I forgot to use Otis DOF for this example, but nowadays I don't use any Reshade DOF, and rely only on Otis'. I also only use Otis lights because I can control what each light does a little better than AMM lights, but I used AMM lights a lot when I first was VPing.
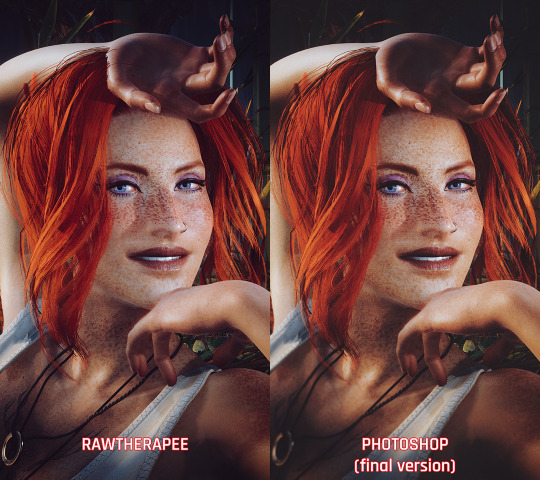
It's when the game's closed that I have my fun with colors!
I do my coloring on RawTherapee, which is a free Lightroom. Mostly I make use of the Film Simulation, sometimes layering multiple, sometimes using only one.
I then move to Photoshop which is my last stop and my "correction" phase. I have a huge library of actions and gradient maps I paw around for any last coloring (specially making shadows more matte and less defined), tweak contrast/brightness, and add some blurring and noise (beloved).

I probably have actions/gradient posts reblogged on my repository blog (@halkuonn), I can't point you to a single place because I've been dragging these around for over a decade and across at least 3 computers...
Honestly, don't get too attached to a single workflow with your VP. VP is art and art is meant to be a creative outlet, if you start putting too many rules and step by steps on your personal workflow, you'll probably get frustrated fast.
My current workflow is way lengthier than how I took some of my older VP, but that's because I feel like doing it. I don't necessarily feel like it's better or worse, it's just a different way I've been doing stuff and having fun with VP.

This is from 2022 - I wasn't using Otis Freecam, relied on AMM Lights, and did some mild/low post-processing - things like making the shadows a little bit more purple with Color Balance, and adding A LOT of blur manually because I didn't know how to use any of the DOF shaders. I was using Pinky's Preset back then.

This is from 2023 - the fuck it we ball era. This has like... 0 post-processing. I wasn't using Otis DOF (I don't think it existed yet), but I was already using Otis Lights learned to use the DOF shaders. The only thing I was doing for post-processing is add Noise and slap my signature (which this one doesn't even have lmao). I already had a new Reshade preset from my friend, but didn't really tweak any of it.

From this year! I still wasn't using RawTherapee a lot, but it was the start of my "I'm going to do everything in post-processing" era, with shadows not as dark/contrasted and everything a bit hazy.
So yeah! Don't stress about having a single workflow, or the best workflow, or even the most appropriate Reshade. For me the less I try to be biblical about my VP process, the more I enjoy taking it, and in turn the more satisfied I am with the results.
If you want more of a tutorial, I can try?? doing one?? but really the only thing I have been consistently doing with my VP all these years is slapping some extra blur and adding Noise on PS.
Hope this helps or at least provides some software recommendations / process ideas though!
26 notes
·
View notes