#voronoi fracture
Explore tagged Tumblr posts
Visit Tumblr Blog
Explore Tumblr blogs with no restrictions, modern design and the best experience.
Last Seen Tumblr Blogs


Fun Fact
US Tumblr user growth rate is estimated to slow down to 4.1%.
Text
Creating Destruction-Ready Car 3D Models for Real-Time Physics Engines

In the ever-evolving world of 3D modeling games, realism isn’t just about detailed textures or lifelike lighting—it’s about interactivity, immersion, and responsiveness. One of the most complex yet rewarding challenges in this field is crafting destruction-ready vehicle models that can seamlessly integrate into real-time physics engines. Whether you're working on a high-octane racing game, a war-themed shooter, or an open-world sandbox, ensuring your car 3D model reacts to collisions, explosions, and terrain in a believable way is a major asset.
Why Destruction Matters in 3D Modeling Games
They want to see the world react—wheels flying off in a crash, doors crumpling on impact, and glass shattering realistically. That’s why AAA studios and indie developers alike are investing in destruction-ready 3D game assets and 3D hard surface modeling pipelines. Understanding the Basics of Destruction-Ready Modeling
Before diving into the workflow, it’s important to define what makes a model "destruction-ready." Unlike static models, destruction-ready car 3D models must be segmented into multiple mesh parts, each of which responds to collisions, forces, or triggers in the game engine.
Key requirements include:
Modular Mesh Design: Bumpers, doors, windows, wheels, and panels should be separated from the main chassis.
Accurate Pivot Points: Each detachable part should have logical pivot points to allow natural movements like swinging, detaching, or rotating.
Pre-Fractured Geometry: Some elements, like glass or metal panels, can be pre-fractured using tools like Voronoi shatter to simulate cracks.
Weight-Optimized Topology: The model should be optimized for real-time rendering, striking a balance between detail and performance.
These elements ensure that your 3D vehicle modeling pipeline supports realistic, real-time physics interactions.
Hard Surface Modeling Techniques for Vehicle Destruction
Vehicle modeling falls squarely under Hard Surface Modeling, a discipline focused on man-made objects with sharp edges and mechanical structure.
1. Use Non-Destructive Workflow
Model each component (doors, wheels, hood) separately. This modular approach allows for easy damage scripting and animation later in the game engine. Programs like Blender, Maya, or 3ds Max allow you to model destructible elements while maintaining low polycounts.
2. Detail the Interior Framework
Even though players may not always see the inner structure of your 3D game assets, interior modeling adds depth during destruction. This includes roll cages, engine blocks, and framework supports.
3. Add Break Points
Incorporate stress points where destruction is likely—hinges, joints, and bolts. These points will guide where and how a part breaks during gameplay, aiding the realism of your 3D environment modeling.
Integrating Vehicle Models into 3D Game Environments
Destruction is not just about the vehicle—it’s about how the 3D game environment reacts with it. Terrain, obstacles, and ambient props all contribute to the physical interactions that cause and affect destruction.
Real-Time Physics Engines
Engines like Unreal Engine and Unity come with built-in physics systems such as Chaos and NVIDIA PhysX. You can import your modular 3D vehicle modeling components and apply rigid body physics, constraints, and joint mechanics.
Environmental Factors
Colliders and Terrain Mapping: Make sure the 3D game environment features accurate colliders that respond to vehicle contact.
Destructible Props: Include props 3D models like fences, cones, and crates that react when vehicles crash into them.
Weather Effects: Rain, snow, or mud can influence the physics parameters, adding additional challenge and realism.
Texture and Material Considerations
Realism in destruction isn’t just about geometry—it also relies heavily on material behaviors.
Metal: Use masks and shaders to simulate bending and scratches.
Glass: Transparent materials with crack maps can be animated to fracture dynamically.
Rubber and Plastic: Deform under pressure, especially for bumpers or tires.
Make sure your textures are PBR (Physically Based Rendering) compliant and optimized for your 3D modeling games pipeline.
Animation and Simulation
Beyond just breaking apart, vehicles need animated reactions. Doors flying open, suspensions bouncing, and exhaust parts trailing behind are small animations that add up.
Use simulation tools like:
Rigid Body Simulation: For non-flexible parts.
Soft Body Physics: For bumpers or suspension components.
Cloth and Debris Systems: For tarps, flags, or particle-based effects during destruction.
Game engines also let you blend between intact and damaged states using blend shapes or LOD switching, essential for performance in large 3D game environments.
Optimizing for Performance
Real-time physics is resource-intensive. For 3D modeling games targeting consoles or mobile devices, optimization is crucial.
Use Level of Detail (LOD) models.
Bake destruction animations for repetitive effects.
Limit physics-based destruction to high-impact zones.
Smart optimization ensures your 3D game environment remains smooth and responsive even with multiple vehicle interactions.
Real-World Use Cases
Games like Wreckfest, BeamNG.drive, and Mad Max have set high standards for vehicle destruction. Indie developers also use destruction mechanics in mobile games, where lightweight 3D game assets and simplified damage logic still create compelling experiences.
Conclusion
It’s an interdisciplinary task that touches every stage of 3D modeling games development—from concept to code. Whether you're building a car 3D model, adding props 3D models for dynamic scenery, or optimizing 3D game assets for performance, integrating destruction realism elevates your game’s immersion. With the right tools, physics logic, and artistic mindset, you can create vehicle models that look great and crash, crumple, and explode with satisfying realism.
#3d modeling services#3d game assets#hard surface modeling#props 3d model#3d vehicle modeling#3d modeling games
0 notes
Text
Wall Smash 3
youtube
I found this tutorial which looked perfect; the wall destruction looked very realistic and involved layering the wall to look like it was made up of brick and plasterboard stuck together. I didn't realise it at first but this tutorial was much more complex and came with its own set of issues as I worked through step by step.

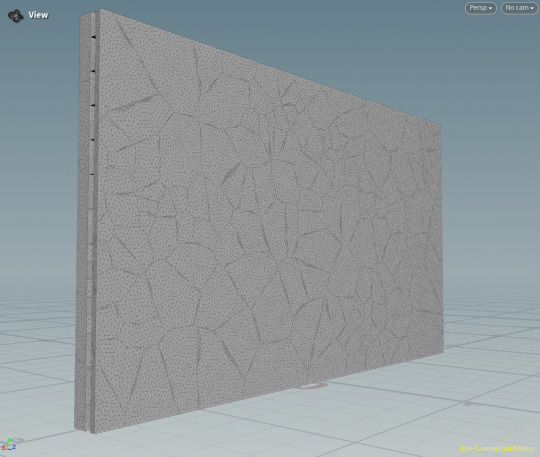
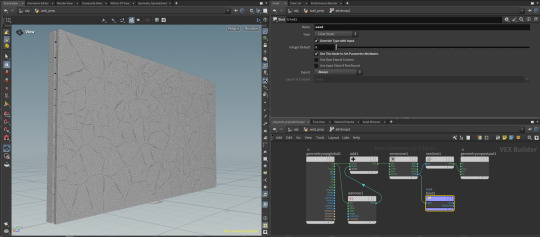
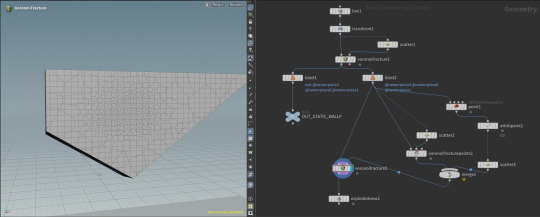
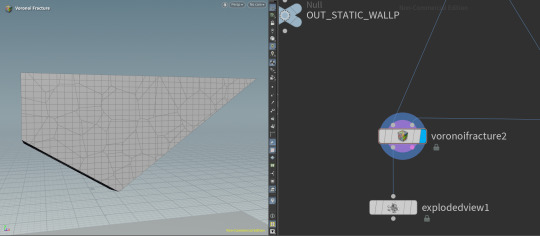
These are the segments of the wall cut into pieces using voronoi fractures, scatter nodes but also an attribvop which I used to create a noise node to randomise the cracking of the wall to make it appear less artificial.
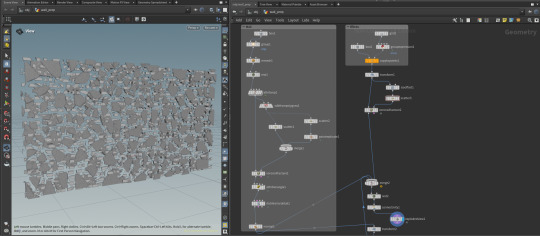
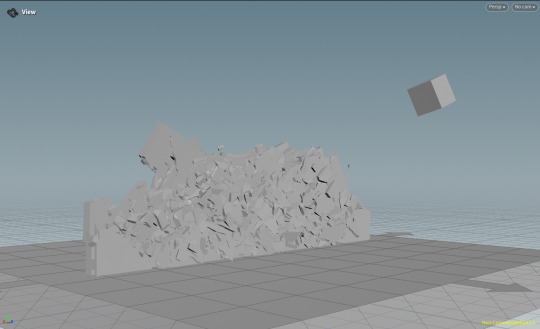
This is the wall in the exploded view to show all of the segments randomised by the noise node in the attribvop. During this process I used a lot of attribwrangle nodes which seem to be a way to give more control to the user as they are used for VEXpressions which are windows in which Python code can be written to alter the connected nodes with more control.
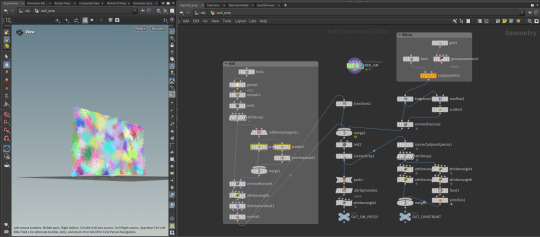
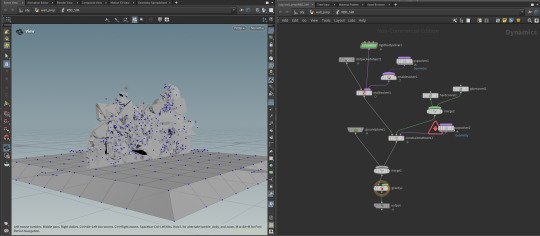
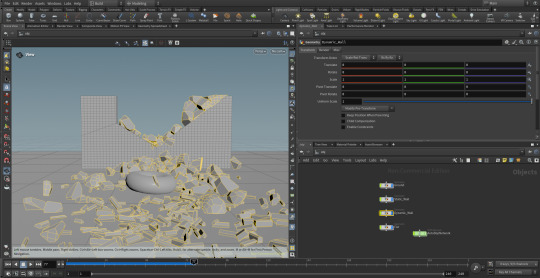
This is the same node tree further along in the process however this is where I started to come into some issues with this tutorial. I had a decent understanding of what each node was doing because the tutorial explained it all fairly well but it was at this stage around 24 minutes into the tutorial that I noticed that my wall didn't look the same as the one in the tutorial. The wall on the left shows coloured webbed segments which were randomly generated and would end up becoming larger segments of the wall which would break as larger pieces with smaller rubble in between. These webs were supposed to separate from the wider web and become 3D segments for each colour however my wall remained as one solid web.
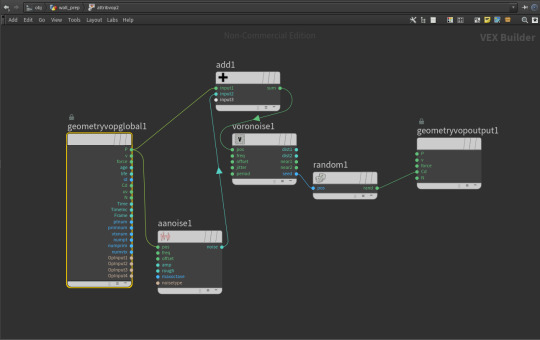

I continued following along with the tutorial because I hoped that it was just a part of the process and that Houdini Apprentice was again operating differently however I noticed that other people had similar issues in the comments and that he forgot to include the addition of a bind node (inside the second attribvop) which would have separated and bound each coloured web as its own segment of the wall. There were also some other differences due to the tutorial being on an older version of Houdini so some things had changed in the software which made things more difficult than they already were.
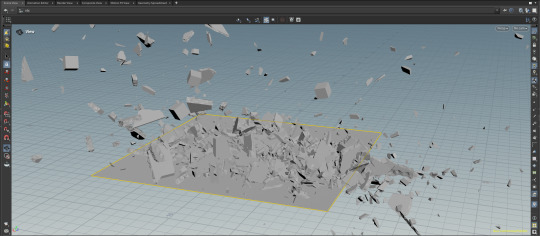
Things weren't working as they were supposed to despite me retroactively adding the bind node and any time I played the animation the wall would crumble under the gravity and I couldn't figure out why because there were so many areas in which I could have made a mistake or where the tutorial may have missed something else out.

The SOP solvers and DOP networks were functioning the same way in my version of Houdini as it was in the tutorial and it got to the point that I could no longer follow along because I was too inexperienced in Houdini and I had clearly bitten off more than I could chew.
I had to cut my losses which is a shame because the destruction capabilities of this tutorial would have looked great in the final composition as it created a wall which reacted naturally to destruction rather than pre-building the destruction within the wall at focused points. Hopefully in the future I will be able to figure this out and revisit these kind of tutorials in Houdini because the software is really impressive.
0 notes
Text

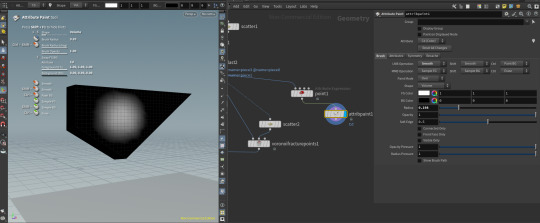
5/4プロシージャル超基礎。
ジオメトリの外側の境界とオリジナルのメッシュをattribute transfer でブレンドして、fit01関数でCd valueのmin とmaxからdensity scatterを作成できる様にした。ジオメトリとscatterをvoronoi fractureに接続し、foreach でピースを作成。
0 notes
Text
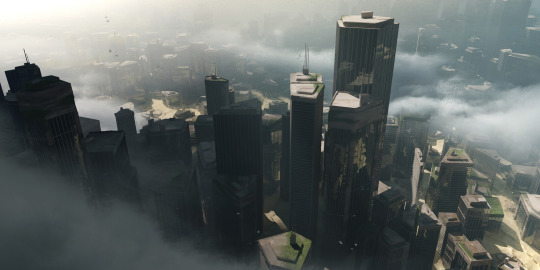
Now that the main cinematic is complete, I wanted to come back to this piece that I did earlier:

I really liked this art piece and felt it could be improved (also needs a paint over). However, thinking more ambitiously I thought about using this piece to create a 3D platform which I could use to create multiple sci-fi cityscapes from in the future. If I could do the technical stuff now, it would make my life easier later on.
The first thing that needed to be improved in my opinion was the city itself. Currently, it is made using cubes that are instanced in a particular way as so:
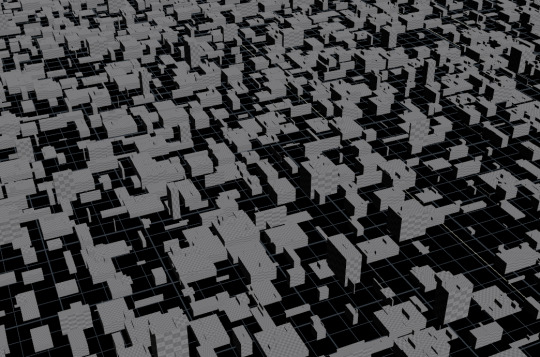
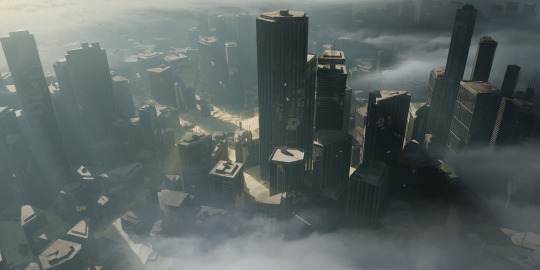
This however looks very grid like and unrealistic. I wanted to re-create this system to have various shaped buildings.
After watching many tutorials online, I figured out a way to achieve this goal using the Voronoi nodes in Houdini.
Here I have a plane which I cut into a grid, and then cut again with a Voronoi fracture. I then used some maths to calculate and delete small faces that are smaller than a particular size of my choice. The result is as follows:
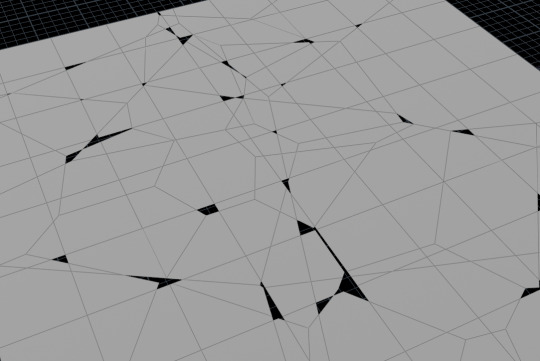
I'm then able to further subdivide this geometry and extrude it, whilst randomizing the height. This allows me to have a city that is fully procedural, but more realistic and less "gridlike" as compared to before.
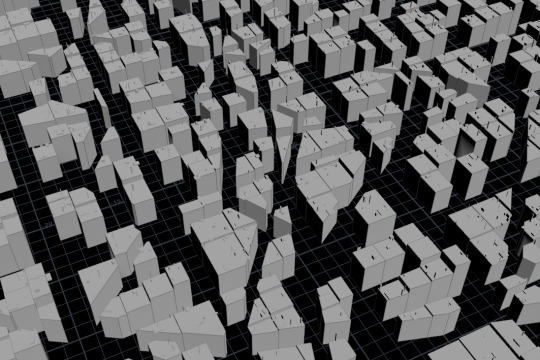
I'm hoping with this setup I can create many amazing cityscapes in the future.
One of the video's that helped me achieve this goal was this video by O, song. He explains the basics about how to use the fracture Voronoi nodes in Houdini:
youtube
Furthermore, this website had tons of useful information that helped me as well:
It contains many different Houdini techniques and I found it to be a valuable learning resource. Reading through all of the techniques on the page, I felt like I had increased my Houdini knowledge substantially.
Further Notes
One of my main inspirations for this Voronoi style of buildings/cities is the work of Quentin Mabille, specifically his Procedural City piece.

Mabille employs a similar approach to mine, utilizing a Voronoi pattern on a grid structure to create building shapes that are remarkably close to real-life structures. This technique allows for generating complex architectural forms that mimic the randomness and diversity seen in actual urban environments. Like Max Hay (from my earlier blog post), Mabille leverages these advanced methods to enhance the realism and detail in her cityscape artworks.
Mabille also provides a video bellow of his process, which I watched and learned a lot from:
youtube
One further point I liked about Mabille is that he also uses Houdini in his art. He will be one Artist I keep my eye out for from now on.
Resources
Mabille, Q. (2022). Procedural City [Digital Art]. Available at: https://www.artstation.com/artwork/r9RDyE (Accessed 25th March 2024)
QuentinMabille. (2022). Why i learned Houdini - Procedural City [Online Video]. Available at: https://www.youtube.com/watch?v=gGkrVoiRfqo (Accessed 25th March 2024)
Song, O. (2023). Scatter by Density, Voronoi Fracture – Houdini Attributes and VOPs ep. 7. Available at: https://www.youtube.com/watch?v=17X9bL8KGTQ [Accessed: 25th March 2024].
Tokeru. (n.d). Houdini. Available at: https://tokeru.com/cgwiki/Houdini.html [Accessed: 25th March 2024]
0 notes

Video
youtube
How to Rigid Body in Voronoi Fracture with Cinema 4D
0 notes
Text
Cinema 4D Tutorial | Simulation | Voronoi fracture | Rigged body | Free FX Class S3 Class 1 | বাংলা
Free Fx Class Session 3 class 1 has been published on the channel.3D modeling and simulation for VFX will be covered in this class if you like to improve your self on the field of 3D Modeling and Simulation; This Video Will be the best Choice for you to begin with if you face any problem or if you have any Suggestions to improve the classes then feel free to comment in the comment section in the video on YouTube
0 notes
Text

Superficiem disiungitur II DIGITAL ARCHIVE Superficiem disiungitur I Superficiem disiungitur II Superficiem disiungitur III
#voronoi#fractured#cinema4d#c4d#loop#landscape#fragmented#objkt#perfect loop#displaced#looped#animation#animated#motion#background#relaxing#backgrounds#visuals#visual content
69 notes
·
View notes
Photo

pretty things
4 notes
·
View notes
Photo

“これで、破片が地面に当たって崩れるシミュレーションができました。 ここでは見やすいように破片に色をつけてます。“
#transparent#cursing the gif tree#Voronoi diagrams#fracture#simulation#science cube#fruits edit#drop test#sloppy editing#No More Retake#Houdini
158 notes
·
View notes
Video
tumblr
28.02.18 Multiself
#c4d#cinema4d#c4dtoa#arnoldrender#3d animator#3D#render#3D render#graphic design#cgi#cgi art#cgi animation#digital art#voronoi#fracture#motion graphics#motion design#mograph#3d animation
38 notes
·
View notes
Text
Wall Smash Test 2
youtube
After learning about Houdini's capabilites I decided to try it out for the first time to see if I could make something similar myself. Only Houdini Apprentice was available for free so I started off with that.
youtube
This was the tutorial I followed for the wall destruction because although it differed slightly, it should be something I could use to created realistic destruction.
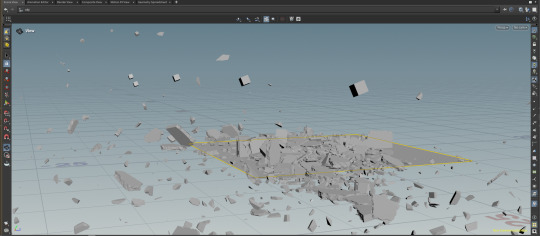
This video shows all the different stages of the destruction that I made using the tutorial. I decided to use a torus instead of a sphere because the final intention is to have the giant robot hand which is shaped like a lego hand so I thought it would work better. I tried fiddling about with different velocity and density settings and the final one felt like it was about right for my idea.
Here's some of the early stages of the process, I was brand new to Houdini so I had to get used to the node based workflow which I liked once I figured out what things actually did. I noticed at this stage that the version I was using was different to the one in the tutorial and started to have some difficulties when painting the focal point of the voronoi fracture which would make the painted section divide into the smallest pieces.
youtube


I came into another roadblock in that Houdini apprentice did not have the Glue adjacent option in the Rigid Bodies menu which was very important to holding the individual pieces of the wall together before they come in contact with the torus. The bottom image is from the tutorial and the third icon from the right (the orange and white PVA bottle) is what was missing in the apprentice version. I had to try and work around this by creating my own Glue Constraint Network using the tutorial above but as I hadn't used Houdini before it took a while to figure this out and it didn't work perfectly.
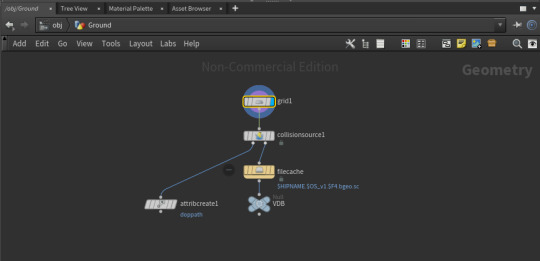
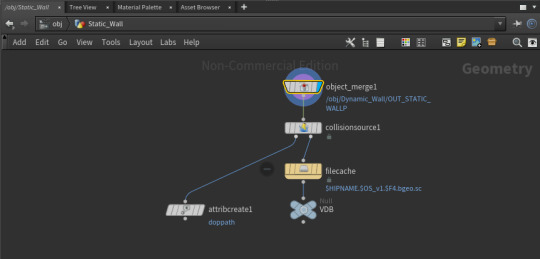
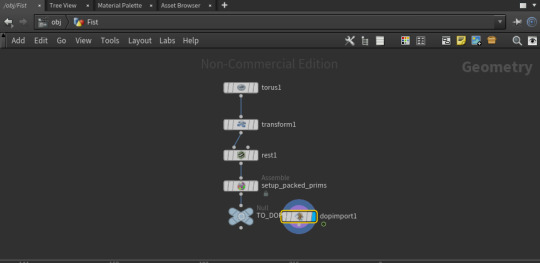
These are what's inside three of the OBJ nodes after the DOP network was created.
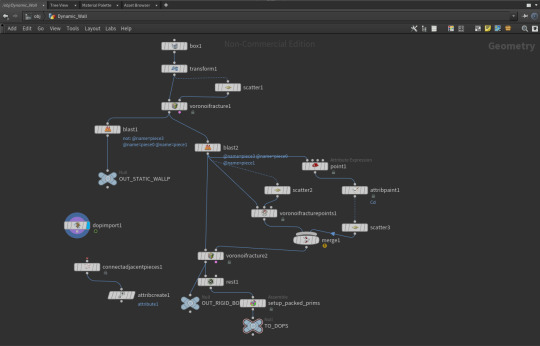
This is the inside of the Dynamic Wall node which broke the wall into segments using the Voronoi fracture and two blast nodes which separated the pieces that was going to be destroyed from the rest of the wall. The attribpaint node was used to choose an area of the wall segment which would be broken apart the most and the scatter nodes were used to randomise and choose the amount of fragments within the painted area and the last Voronoi Fracture created the fragments from the points plotted using the scatter nodes.
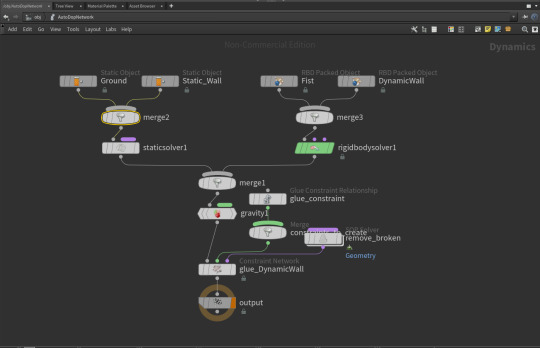
This is the inside of the DOP network which is created to control the destruction of the wall. The Static objects are exactly that; these nodes are for the portions of wall which act as colliding surfaces but don't break apart themselves. The RBD objects are the torus and the Dynamic wall which both play a role in the destruction and the constraint networks dictate how the RBD objects interact with one another. The glue constraint is used to hold the individual pieces together until the torus collides with the wall and then the SOP solver acts as a controller for the Dynamic wall when the resting state is changed.
I started to get lost later on in the tutorial due to the disparate interfaces between Houdini Apprentice and the one used in the tutorial but I reached a stage which was usable for my project although I wanted to see if there were any other tutorials which were better suited.
0 notes
Video
tumblr
#Cinema4D #C4D #Maxon #VRay #CGI #Render #Sunlight #Polyhedron #Fracture #Voronoi
3 notes
·
View notes
Photo

53 notes
·
View notes
Video
youtube
Cinema 4D R21 Logo Animation Tutorial with Voronoi Fracture
#Cinema 4D R21 Logo Animation Tutorial with Voronoi Fracture#Cinema 4D R21#Logo Animation Tutorial#Voronoi Fracture#animation#cinema 4d#fracture#Voronoi#Logo Animation#Logo#Tutorial
0 notes
Photo

Hybrid Conglomerates V1.0 webinar: Cinema 4D + Corona Renderer with @ayoub_ahmad_ - Register Now, link in bio or: https://designmorphine.com/education/hybrid-conglomerates-v1-0 - Hybrid Conglomerates V1.0 will focus on using Hybrid 3D modeling techniques by mixing between procedural & polygonal modeling tools to create complex architectural models. This webinar will introduce participants to polygonal and hard surface modeling techniques and creating complex geometry with them. we will be using noise shaders, Voronoi fracture, and atom array with the volume modeling tools to create organic structures. . . . . #3dmodeling #cinema4d #3dmodel #design #parametricdesign #architecture #maxon #superarchitects #coronarender #nextarch #architecturelovers #generativeart #computationaldesign #architecturefactor #generativedesign #parametricarchitecture #3dart #next_top_architects #desigmorphine #architecturestudent #nftart #proceduralart #nft #digitalart #parametric #architectureporn #floorplans #architecture_hunter #nftartist #nftart @c4dmaxon @maxonvfx @coronarenderer (at 𝓣𝓱𝒆 𝓤𝒏𝒊𝓿𝒆𝒓𝒔𝒆) https://www.instagram.com/p/CZHpneHpYoz/?utm_medium=tumblr
#3dmodeling#cinema4d#3dmodel#design#parametricdesign#architecture#maxon#superarchitects#coronarender#nextarch#architecturelovers#generativeart#computationaldesign#architecturefactor#generativedesign#parametricarchitecture#3dart#next_top_architects#desigmorphine#architecturestudent#nftart#proceduralart#nft#digitalart#parametric#architectureporn#floorplans#architecture_hunter#nftartist
19 notes
·
View notes