#vue tutorial hello world
Explore tagged Tumblr posts
Visit Tumblr Blog
Explore Tumblr blogs with no restrictions, modern design and the best experience.
Last Seen Tumblr Blogs


Fun Fact
Tumblr is available in 18 languages.
Photo

VueFire: CRUD Application with Vue.js and Firebase VueFire: CRUD Application with Vue.js and Firebase Want to learn how to integrate Firebase and Vuefire into your Vue.js applications? This video does just that ... source
#application#crud#firebase#vue crud#vue crud firebase#vue fire#vue firebase crud#vue firebase example#vue firebase tutorial#vue tutorial hello world#vue.js firebase#vue.js vuefire#vuefire#vuefire tutorial#vuefire vuejs#VueFire: CRUD Application with Vue.js and Firebase#vuejs#vuejs firebase#vuejs firebase tutorial
0 notes
Text
Blazor WebAssembly on Azure Static Web Apps
Many apps today are just static files on the front end - HTML and JavaScript - with something powerful on the server side. They aren't "static apps" as they have very dynamic front end experiences, but they are static in that their HTML isn't dynamically generated.
As such, you don't need to spend the money on an Azure Web App when an Azure Static Web App will do! These apps get free SSL certs, custom domains, web hosting for static content, and fit into a natural git-based workflow for publishing. You can build modern web applications with JavaScript frameworks and libraries like Angular, React, Svelte, Vue, or using Blazor to create WebAssembly applications, with an Azure Functions back-end or publish static sites with frameworks like Gatsby, Hugo, VuePress.
But there's big news out of Ignite this week, with Azure Static Web Apps now supporting Blazor applications. You can develop and deploy a frontend and a serverless API written entirely in .NET.
To get started "hello world style" there is a GitHub repository template that's a starting point. It's a basic web app with a client that uses Blazor and .NET that is run on the client-side in your browser using WebAssembly.
Called it! It's almost a decade later and yes, JavaScript (and WebAssembly) is the assembly language for the web!
So the client runs in the browser written in C#, the server runs as a serverless Azure Function (meaning no identifiable VM, and it just scales as needed) also written in C#, and this client and server share a data model between Blazor and Functions also written in...wait for it...C#.
An app like this can basically scale forever, cheaply. It can put the browser to work (which was basically hanging out waiting for anglebrackets anyway) and when it needs data, it can call back to Functions, or even Azure CosmosDB.
Be sure to check out this complete Tutorial: Building a static web app with Blazor in Azure Static Web Apps! All you need is a GitHub account and any free Azure Account.
If you want more guided learning, check out the 12 unit module on Microsoft Learn. It shouldn't take more than an hour and you'll learn how to Publish a Blazor WebAssembly app and .NET API with Azure Static Web Apps.
Resources
Guided Tutorial - Publish a Blazor WebAssembly app and .NET API with Azure Static Web Apps
Quickstart: Building your first static web app
Blog: ASP.NET Blog post announcement - Blazor and Static Web Apps
How To: Chris Noring's How to deploy Blazor apps
What are Azure Static Web Apps?
Also be sure to check out the Day 2 Microsoft Ignite Keynote by yours truly! The app I made and demo in the keynote? Made with Blazor and Azure Static Web Apps, natch! The keynote is happening in three time zones so you can see it at a time that works for you...or on-demand!
Sponsor: Upgrade from file systems and SQLite to Actian Zen Edge Data Management. Higher Performance, Scalable, Secure, Embeddable in most any programming language, OS, on 64-bit ARM/Intel Platform.
© 2020 Scott Hanselman. All rights reserved.


Blazor WebAssembly on Azure Static Web Apps published first on https://deskbysnafu.tumblr.com/
0 notes
Text
Blazor WebAssembly on Azure Static Web Apps
Many apps today are just static files on the front end - HTML and JavaScript - with something powerful on the server side. They aren't "static apps" as they have very dynamic front end experiences, but they are static in that their HTML isn't dynamically generated.
As such, you don't need to spend the money on an Azure Web App when an Azure Static Web App will do! These apps get free SSL certs, custom domains, web hosting for static content, and fit into a natural git-based workflow for publishing. You can build modern web applications with JavaScript frameworks and libraries like Angular, React, Svelte, Vue, or using Blazor to create WebAssembly applications, with an Azure Functions back-end or publish static sites with frameworks like Gatsby, Hugo, VuePress.
But there's big news out of Ignite this week, with Azure Static Web Apps now supporting Blazor applications. You can develop and deploy a frontend and a serverless API written entirely in .NET.
To get started "hello world style" there is a GitHub repository template that's a starting point. It's a basic web app with a client that uses Blazor and .NET that is run on the client-side in your browser using WebAssembly.
Called it! It's almost a decade later and yes, JavaScript (and WebAssembly) is the assembly language for the web!
So the client runs in the browser written in C#, the server runs as a serverless Azure Function (meaning no identifiable VM, and it just scales as needed) also written in C#, and this client and server share a data model between Blazor and Functions also written in...wait for it...C#.
An app like this can basically scale forever, cheaply. It can put the browser to work (which was basically hanging out waiting for anglebrackets anyway) and when it needs data, it can call back to Functions, or even Azure CosmosDB.
Be sure to check out this complete Tutorial: Building a static web app with Blazor in Azure Static Web Apps! All you need is a GitHub account and any free Azure Account.
If you want more guided learning, check out the 12 unit module on Microsoft Learn. It shouldn't take more than an hour and you'll learn how to Publish a Blazor WebAssembly app and .NET API with Azure Static Web Apps.
Resources
Guided Tutorial - Publish a Blazor WebAssembly app and .NET API with Azure Static Web Apps
Quickstart: Building your first static web app
Blog: ASP.NET Blog post announcement - Blazor and Static Web Apps
How To: Chris Noring's How to deploy Blazor apps
What are Azure Static Web Apps?
Also be sure to check out the Day 2 Microsoft Ignite Keynote by yours truly! The app I made and demo in the keynote? Made with Blazor and Azure Static Web Apps, natch! The keynote is happening in three time zones so you can see it at a time that works for you...or on-demand!
Sponsor: Upgrade from file systems and SQLite to Actian Zen Edge Data Management. Higher Performance, Scalable, Secure, Embeddable in most any programming language, OS, on 64-bit ARM/Intel Platform.
© 2020 Scott Hanselman. All rights reserved.


Blazor WebAssembly on Azure Static Web Apps published first on http://7elementswd.tumblr.com/
0 notes
Text
VueJS & Firebase Cloud Firestore Stripped-Back - Tutorial Part 1
In this tutorial series we will explain how to start developing with the Vuejs framework & Firebase Cloud Firestore to build full-stack web applications. We’ll start from scratch by stripping everything back to the basics - no CLIs, build tools or bundlers, just a HTML page, an editor and a browser so you can get to grips with building apps with Vue & Firebase more quickly and be productive faster.
VueJS
Vuejs is now one of the big 3 Javascript frameworks in the web client ecosystem. However it’s not developed or backed by a huge corporation, it was developed by one individual, Evan You. The proliferation of JS frameworks in recent years has led to the term “Javascript Fatigue” where developers have become weary of all of the new and self-proclaimed “latest and greatest” open source frameworks. It is in this environment that Vue has emerged through all of the noise to become a major player alongside Angular and React (both backed by huge technology companies, Google and Facebook respectively). That Vue has achieved such a status in this environment backed by one individual highlights just how Vue has hit a chord with developers and is filling a gap that isn’t being met by Angular, React or other competitors like Ember and Aurelia.
Evan You is an ex-Googler who was familiar with AngularJS (often referred to as Angular 1) and used it for internal projects at Google that he was working on. He set out to achieve a framework that delivered the benefits of AngularJS but was more lightweight, faster and better suited to smaller apps that didn’t require the heavy-lifting of the huge apps that AngularJS was originally built to develop such as their Adwords platform and their internal CRM system. What he produced was a beautifully simple solution and it quickly attracted adoption as the front-end framework of choice for many PHP developers, particularly from the Laravel community.
Despite promising early adoption in some quarters, Vue may well have stayed a “me-too” framework in the ecosystem had it not been for Google’s decision to redevelop their AngularJS framework from scratch. Angular (often referred to as Angular 2) was such a departure from the original AngularJS framework that it introduced a fundamental shift in approach and required developers to learn many new concepts just to build basic apps. Developers were kept in limbo between AngularJS and Angular for almost 2 years, with many alphas and then betas and many breaking changes and missing pieces to deal with during the transition and then no easy migration path for their existing code and apps.
There’s no doubt that, as a new framework in it’s own right, Angular is a fantastic, powerful, all-in-one next generation framework but it isn’t “Angular” as millions of developers know it. Perhaps the biggest mistake Google made was in not launching their next-gen framework under new branding. In any event and unfortunately for Google, Angular 2 was too big a change for many developers and while uptake was initially high, it hasn’t achieved the type of ongoing adoption or love as AngularJS or React and it’s clear that Vue, with many obvious similarities to the original Angular, has arrived just in time to sweep up and become a magnet for disgruntled Angular devs.
In addition, the droves of developers jumping in to the Javascript ecosystem over the past years, in their evaluation of an appropriate framework, are choosing Vue in vast numbers due to how easy it is to learn and how quickly they can start building apps. I would say that the best word to describe Vue to developers choosing a framework is “approachable” - it seductively invites you in and once there you find it’s so intuitive and simple to get productive, covering all of the bases you need, that once you’re in you tend to stick with it. For me personally I actually enjoy spending my days developing around Vue, I cannot say the same for Angular unfortunately.
In 2018, Vue is set to gain even greater momentum and overtake Angular into second place in the Javascript framework popularity chart. The main reason for this may be that the massively popular Ionic mobile and PWA framework is about to release a version that decouples it from Angular and enables developers to build apps with Ionic using any framework (or none at all). It’s interesting that this is likely to be a tipping point for Vue to achieve critical mass and yet is due to the Ionic team’s concern that Angular isn’t seeing the level of adoption anticipated and continuing to hitch their wagon to Angular is likely to hamper their own growth.
To address this, in Ionic 4, they’ve developed a framework-agnostic, web component-based edition of their mobile framework. When you look online it’s fairly clear that the majority of the delight at Ionic’s shift away from Angular is coming from those who want to use Ionic with Vue. Personally I only stuck with Angular because of Ionic despite my preference for Vue and since their announcement of Ionic 4, I have thrown myself fully into Vue. The sweet spot that Vue hits between Angular and React is in delivering a more lightweight and simple approach than Angular, focussing first and foremost on being a view renderer like React but providing optional elements that are officially supported and developed by the Vue core team, such as routing that can be easily dropped in to your app. This is what is meant when Vue is called a “progressive framework”, you can start by using as little or as much of the framework as you need, progressively using more of it’s subsidiary elements as required. Another advantage to using Vue is that it’s lightweight enough to use it in one part of your app and progressively expand it to other parts when you’re ready, for example if you have existing app in vanilla Javascript, jQuery or another framework that you want to change over to Vue piece by piece.
As mentioned, Vue’s biggest advantage is it’s simplicity and approachability. While other frameworks require knowledge of build systems, CLIs, Node, NPM etc just to start building an “Hello World” app, with Vue you can strip everything right back, open up an HTML file in an editor and get started simply without needing to spend time learning anything else. While you’ll likely want to move over to the full modern JS development environment as you get more involved, it isn’t required to get started.
Firebase Cloud Firestore
So Vue is a fantastic front-end framework but to build even the most trivial worthwhile app, we need a back-end and a data store. Like with using Vue, we want to use something that delivers simplicity and approachability yet gives us the power to build advanced apps as you become more experienced. For this project Firebase Cloud Firestore is a no-brainer to use as the database back-end. Like Vue, we can just get started using Firebase with just a basic HTML page - no need for CLIs and build tools to just start building something.
I first used Firebase back in 2014, when they were a small, private company shortly before they were acquired by Google. At the time Firebase was not a platform but a hosted realtime database and I fell in love with it immediately - for prototyping it was perfect and it’s realtime capabilities were just awe-inspiring at the time.
However Firebase did have some serious limitations that made it unsuitable for me to use as the back-end database in a production app. It didn’t allow server-side code, so all of your logic was exposed on the client and it’s database querying facilities were extremely limited. Also, as a No-SQL document database, organising relational-style data into something that was manageable without joins and queries required denormalisation and duplication of data, something which is anathema to those coming from a SQL-based relational database background. I felt it was a real shame as, despite these limitations, it was very impressive and working with it’s Javascript API was a joy.
After Google’s acquisition, Firebase was expanded into a full serverless platform allowing for storage, cloud messaging, hosting, authentication, analytics and much much more. What had been “Firebase” became the Realtime Database element of the platform. Fortunately Google started to address the limitations that I and many other developers had found with the original Firebase. First server-side code, in the form of Cloud Functions, was added which enables you to put more of your sensitive business logic code onto the server.
More recently Google introduced an alternative database to the original realtime database which they call Cloud Firestore. Cloud Firestore addresses many, but not all, of the issues with the realtime database in terms of querying and organisation of data. It still provides the full realtime capabilities that we know and love and is still a No-SQL database based on documents. However you can now organise them into Collections (similar to relational DB Tables) which enables you to perform much more advanced queries. You can have specifically defined fields each of which can have a specific type. One of these types is the Reference type which lets you store links between documents on different collections to enable a form of join. In addition Cloud Firebase enables offline usage so the user can continue to use your app even if access to the server isn’t available. There are still limitations, remembering it’s not a relational database, and full joins are not possible and neither are aggregate queries such as SUM, COUNT etc. However with 90% of the issues I had with the original Firebase realtime database now dealt with through Cloud Functions and Cloud Firestore, Firebase is now an excellent choice as the back-end, serverless platform and data store for building full-scale production apps.
OK so enough talk about the what and why, let’s get going with the how and write some code. We’re going to start, as we’ve talked about, with a single HTML page. Choose your OS, code editor and browser of choice (I’m using VSCode on OSX and highly recommend using Chrome as your browser).
Open up your editor and select to create a new file in a new folder. Just call the new file index.html. Once you’ve done this, start with a skeleton html page as shown below :
<html>
<head> <title>VueJS & Firebase From Scratch</title> </head>
<body>
</body>
<script>
</script>
<html>
The first thing we’ll need to do is to import the VueJS library. We can do this with a CDN link (see below) which is placed below the closing body tag and before the opening script tag :
<script src="https://cdn.jsdelivr.net/npm/vue"></script>
This recommended CDN link is correct at the time of writing however may change in future. To ensure it’s correct, once you’ve inserted this link into your page, save it and open it up in Google’s Chrome browser (select File from Chrome’s menu and select Open File … to navigate and select your newly created index.html file). The page will show as blank in any case however right-click on the page and select Inspect from the pop-up menu and click the Console tab. If this displays nothing eg there are no error messages then you’re good however if you do get an error complaining about the vue library then browse to https://vuejs.org/v2/guide/ and look for the link displayed under Getting Started.
We’re ready to build our app! The first thing we need to do is to create the Vue Instance Object that will be used as the core of your app.
<script> var app = new Vue({ el : '#app' }) </script>
This creates a new Vue instance that we can reference throughout our html template and which contains all of the data and methods that we’ll create to develop the app. Some call it the View Model however we’ll stick to calling it the Instance Object. We simply create a new object called app from Vue and pass in an object with all of the information about our app. To begin with, we only declare a single property in this object which is el, short for element, and we assign #app. This tells Vue that any reference to an element that has the id of app is to be controlled by our Vue Instance Object.
In our html template we can now simply create a container html tag and assign it the id of app. All of the content within that tag is then controlled automatically by our Vue instance object. (Please note that any content in bold from here on in denotes new or changed content.)
<body>
<div id=‘app’>
</div>
</body>
Please note : Unlike AngularJS, with Vue you cannot assign the reference to the Instance Object on the body tag, you have to create your own container tag to assign it to, as in this case we’re assigning it to a div container.
Great but we’re not actually doing anything yet. Now we want to give our app some life. To do this we’ll give the app a name and display it as a title and we’ll do this as data held on the Instance object rather than write it directly on the template. To do this we’ll need to add another property called data to our instance object. The data property is an object which contains any variables you want to reference in your template or elsewhere in your app. In this case we’ll create a variable called appTitle and assign it a name. The app we’re going to build is an employee tracker that is going to be so indispensable to it’s users that it will be like magic!
<script> var app = new Vue({ el : '#app’, data : { appTitle : ‘EmployeeMagic’ } }) </script>
We can now use the data binding features of Vue to display our new app title in our page template.
<body>
<div id=“app”>
<h1>{{ appTitle }}</h1>
</div>
</body>
Save and refresh your page in Chrome and you’ll see EmployeeMagic as your app header. The double curly braces are pretty standard in most frameworks these days to denote data-binding (also called interpolation). The content inside the double-curlies is interpreted by Vue and the required content is displayed at that point in the template. In this case Vue recognises that we have a variable called appTitle in data in our Instance Object and replaces it in our template with the value contained in the variable. There are many benefits of data-binding, the main one being that any change in the variable in our instance object is automatically reflected in our template without any additional effort on our part.
So far so good but it’s a little plain-Jane so let’s add the Bootstrap library link for a bit more aesthetic to it without any extra effort. The link used below for then Bootstrap CDN was current at the time of writing however check the Bootstrap website if you have trouble with the link :
<header> <title>EmployeeMagic</title>
<link rel="stylesheet" href="https://maxcdn.bootstrapcdn.com/bootstrap/4.0.0-beta.3/css/bootstrap.min.css"/>
</header>
Let’s say however we want to add a margin around the app so it’s not displaying right up against the edge all the time. To do this we’ll need to add some CSS styling however we can take advantage of a cool Vue feature which lets us set our styles programatically.
Let’s add another variable to our data object which is specifically for styles, let’s call it mainStyle. This will be an object so that we can assign as many different CSS style settings as we like. For now we just want to assign a margin of 20 pixels :
<script> var app = new Vue({ el : ‘#app’, data : { appTitle : ‘EmployeeMagic’, mainStyle : { ‘margin’ : ‘20px’ } } }) </script>
Now we need to tell Vue where to use that styling property in our template. We’ll create a new container div tag to wrap around the rest of our app. In that tag we need to tell Vue to assign the styling we’ve defined in mainStyle. To do this we can use a Vue directive called v-bind:style and assign it the name of style object we want to use.
<body>
<div id=“app”>
<div v-bind:style=“mainStyle”>
<h1>{{ appTitle }}</h1>
</div>
</div>
</body>
Save and refresh in Chrome and you’ll see the margin has been applied. I personally love this feature of Vue and there are lots more you can do to apply styling which we’ll cover later in the tutorial.
It’s interesting to note that when using directives such as v-bind:style, Vue offers a more shorthand way by dropping the v-bind. If Vue just sees :style it knows what to do, so we could have used ...
<div :style=“mainStyle”>
... instead. Throughout these tutorials I’ll continue to use the more verbose version to show the full directives consistently however where a new directive is shown, I’ll also highlight the shorthand version. Generally if you see v-bind followed by a colon and the command, you can drop the v-bind although there are exceptions that we’ll cover in a future part of the tutorial.
We’ve so far covered what VueJS and Firebase Cloud Firestore are, why we’re using them as the framework and platform for this app, and the basics of setting up a simple HTML page to build our employee tracker app, setting up our Vue object, basic data-binding and styling using a Vue directive.
In the next 4 parts of this tutorial we’ll focus on each element of CRUD (Create, Read or Retrieve, Update and Delete) so in part 2 we’ll deal with Creating records to store in our Firebase Cloud Firestore.
Hope you can join me in Part 2 :)
You can download the completed code for this part of the tutorial on Github using the repo below and select the part1 folder. https://github.com/MancDev/VueFire
1 note
·
View note
Photo

How to Build a Tic Tac Toe Game with Svelte
Svelte is a next generation way of building user interfaces.
While frameworks like React, Vue and Angular do the bulk of their work in the browser, Svelte takes it to the next level. It does its work when you build the app and it compiles your Svelte app to efficient vanilla JavaScript. So you get the best of both worlds. You write your code in Svelte which makes it easy to read, re-use and all the other benefits you get when you use a framework, and it makes for a blazing-fast web app as it complies down to vanilla JavaScript so that you don’t have the overhead of the JavaScript framework you’re using.
Svelte allows you to write less code. It also doesn’t use the concept of the Virtual DOM popularized by React. It instead surgically updates the DOM when the state of the app changes so the app starts fast and stays fast.
Prerequisites
For this tutorial, you need a basic knowledge of HTML, CSS and JavaScript.
You must also have installed the latest version of Node.js.
We’ll also be using npx, which comes installed by default with Node.js.
Throughout this tutorial we’ll be using yarn. If you don’t have yarn already installed, install it from here.
To make sure we’re on the same page, these are the versions used in this tutorial:
Node 12.10.0
npx 6.11.3
yarn 1.17.3
Getting Started with Svelte
In this tutorial, we’ll be building a Tic Tac Toe game in Svelte. By the end, you’ll be able to get up and running quickly with Svelte and get started in building your own apps in Svelte.
To get started, we must scaffold our app using degit. degit is more or less the same as git clone, but much quicker. You can learn more about it here.
Go ahead and make a new project by typing the following in the terminal:
$ npx degit sveltejs/template tic-tac-toe-svelte
npx lets you use the degit command without installing it globally.
Before npx, we would have to do the two following steps to achieve the same result:
$ npm install --global degit $ degit sveltejs/template tic-tac-toe-svelte
Thanks to npx, we don’t bloat our global namespace, and we always use the latest version of degit.
degit clones the repo https://github.com/sveltejs/template into a tic-tac-toe-svelte folder.
Go ahead into the tic-tac-toe-svelte directory and install the dependencies by typing the following in the terminal:
$ cd tic-tac-toe-svelte $ yarn
Now run the application by typing the following in the terminal:
$ yarn dev
Now open up the browser and go to http://localhost:5000 and you should see the following:
If you go into the src/ folder, you’ll see two files, App.svelte and main.js. main.js is the entry point of a Svelte app.
Open up the main.js and you should see the following:
import App from './App.svelte'; const app = new App({ target: document.body, props: { name: 'world' } }); export default app;
The above file imports App.svelte and instantiates it using a target element. It puts the component on the DOM’s document.body. It also passes name props to the App component. This prop will be accessed in App.svelte.
Components in Svelte are written using .svelte files which contain HTML, CSS and JavaScript. This will look familiar if youse worked with Vue.
Now open up App.svelte and you should see the following:
<script> export let name; </script> <style> h1 { color: purple; } </style> <h1>Hello {name}!</h1>
Firstly, we have the script tag inside, in which we have a named export called name. This should be similar to the prop mentioned in main.js.
Then we have a style tag that lets us style all the elements in that particular file, which is scoped to that file only so there’s no issue of cascading.
Then, at the bottom, we have an h1 tag, inside which we have Hello {name}!. The name in curly brackets will be replaced by the actual value. This is called value interpolation. That’s why Hello world! is printed on the screen.
Basic Structure of a Svelte Component
All .svelte files will basically have the following structure:
<script> /* Javascript logic */ </script> <style> /* CSS styles */ </style> <!-- HTML markup -->
The HTML markup will have some additional Svelte-specific syntax, but the rest is just plain HTML, CSS and JavaScript.
Making Tic Tac Toe in Svelte
Let’s get started with building our Tic Tac Toe game.
Replace main.js with the following:
import App from './App.svelte' const app = new App({ target: document.body, }) export default app
We’ve basically removed the props property from App component instantiation.
Now replace App.svelte with the following:
<script> const title = "Tic Tac Toe"; </script> <svelte:head> <title>{title}</title> </svelte:head> <h1>{title}</h1>
Here, we initialize a constant variable title with a string Tic Tac Toe.
Then, in the markup below, we use a special Svelte syntax, svelte:head, to set the title property in the head tag.
This is basically similar to doing this:
<head> <title>Tic Tac Toe</title> </head>
But the advantage of using the svelte:head syntax is that the title can be changed at runtime.
We then use the same title property in our h1 tag. It should now look like this:
Now create two other files in the src/ directory named Board.svelte and Square.svelte.
Open Square.svelte and paste in the following:
<script> export let value; </script> <style> .square { flex: 1 0 25%; width: 50px; height: 70px; background-color: whitesmoke; border: 2px solid black; margin: 5px; padding: 5px; font-size: 20px; text-align: center; } .square:hover { border: 2px solid red; } </style> <button class="square">{value}</button>
Basically, we’re creating a button and styling it.
Now open up Board.svelte and paste the following:
<script> import Square from "./Square.svelte"; let squares = [null, null, null, null, null, null, null, null, null]; </script> <style> .board { display: flex; flex-wrap: wrap; width: 300px; } </style> <div class="board"> {#each squares as square, i} <Square value={i} /> {/each} </div>
Here we’ve imported the Square component. We’ve also initialized the squares array, which will contain our X and 0’s data which is currently null.
The post How to Build a Tic Tac Toe Game with Svelte appeared first on SitePoint.
by Akshay Kadam via SitePoint https://ift.tt/2pOPORx
0 notes
Link
VS Code: Produtividade Infinita Front-End Web + [EBOOK FREE] ##UdemyFrancais ##udemykupon #Code #EBook #Free #Frontend #Infinita #Produtividade #Web VS Code: Produtividade Infinita Front-End Web + [EBOOK FREE] Alcance a produtividade infinita com o Visual Studio Code em mais de 100 aulas, contemplando CENTENAS de dicas, através de mais de 6 horas de aula! Nosso curso é baseado no livro "VS Code - Produtividade Infinita" disponível para compra na Amazon, também de nossa autoria, para garantir um conteúdo completo e profissional! PS: Uma versão digital do livro estará disponível para download de forma gratuita nos materiais disponibilizados nesse curso! Aprenda a se tornar ainda mais produtivo com: HTML CSS TYPESCRIPT JAVASCRIPT ANGULAR REACT VUE Em todos os setores do mercado, o principal favor na hora de avaliação é justamente a produtividade. Na programação não é diferente, tanto que um dos métodos de se avaliar a qualidade de um programador é chamado de KLOC/H, ou em português, Milhares de Linha de Código por Hora.Infelizmente, esse método não é dos melhores, pois mil linhas de Hello World tem um peso em menor do que mil linhas de machine learning, por exemplo. Sendo assim, o que muitas empresas fazem é passar tarefas em uma Sprint (intervalo de tempo para se concluir tais tarefas) e analisa se o desenvolvedor conseguiu ou não suprir a necessidade imposta pelos gerentes do projeto. Ou seja, querendo ou não, a avaliação é perante a sua produtividade! Neste curso vamos abordar justamente sobre isso: A Produtividade! Você receberá mais de 100 dicas de como melhorar sua produtividade utilizando o VS Code para as mais diversas situações do cotidiano, seguido de mais centenas de dicas próprias para linguagens específicas, abordando mais de 25 linguagens usadas no VS Code! Todas as dicas estão atualizadas referentes ao ano de 2019, reunindo a opnião, configuração e dicas de dezenas de especialistas no mercado! 👉 Activate Udemy Coupon 👈 Free Tutorials Udemy Review Real Discount Udemy Free Courses Udemy Coupon Udemy Francais Coupon Udemy gratuit Coursera and Edx ELearningFree Course Free Online Training Udemy Udemy Free Coupons Udemy Free Discount Coupons Udemy Online Course Udemy Online Training 100% FREE Udemy Discount Coupons https://www.couponudemy.com/blog/vs-code-produtividade-infinita-front-end-web-ebook-free/
0 notes
Text
Using Vue.js To Create An Interactive Weather Dashboard With APIs
Using Vue.js To Create An Interactive Weather Dashboard With APIs
Souvik Sarkar
2019-02-01T13:00:18+01:002019-02-01T11:48:39+00:00
(This is a sponsored article.) In this tutorial, you will build a simple weather dashboard from scratch. It will be a client-end application that is neither a “Hello World” example, nor too intimidating in its size and complexity.
The entire project will be developed using tools from the Node.js + npm ecosystem. In particular, we will be heavily relying on the Dark Sky API for the data, Vue.js for all the heavy lifting, and FusionCharts for data visualization.
Prerequisites
We expect that you are familiar with the following:
HTML5 and CSS3 (we will also be using the basic features provided by Bootstrap;
JavaScript (especially ES6 way of using the language);
Node.js and npm (the basics of the environment and package management is just fine).
Apart from the ones mentioned above, it would be great if you have familiarity with Vue.js, or any other similar JavaScript framework. We don’t expect you to know about FusionCharts — it’s so easy to use that you will learn it on the fly!
Expected Learnings
Your key learnings from this project will be:
How to plan about implementing a good dashboard
How to develop applications with Vue.js
How to create data-driven applications
How to visualize data using FusionCharts
In particular, each of the sections take you a step closer to the learning goals:
An Introduction To The Weather Dashboard
This chapter gives you an overview of different aspects of the undertaking.
Create The Project
In this section, you learn about creating a project from scratch using the Vue command-line tool.
Customize The Default Project Structure
The default project scaffolding that you get in the previous section is not enough; here you learn the additional stuff needed for the project from a structural point of view.
Data Acquisition And Processing
This section is the meat of the project; all the critical code for acquiring and processing data from the API is showcased here. Expect to spend maximum time on this section.
Data Visualization With FusionCharts
Once we have all the data and other moving parts of the project stabilized, this section is dedicated towards visualizing the data using FusionCharts and a bit of CSS.
1. The Dashboard Workflow
Before we dive into the implementation, it is important to be clear about our plan. We break our plan into four distinct aspects:
Requirements
What are our requirements for this project? In other words, what are the things that we want to showcase through our Weather Dashboard? Keeping in mind that our intended audience are probably mere mortals with simple tastes, we would like to show them the following:
Details of the location for which they want to see the weather, along with some primary information about the weather. Since there are no stringent requirements, we will figure out the boring details later. However, at this stage, it is important to note that we will have to provide the audience a search box, so that they can provide input for the location of their interest.
Graphical information about the weather of their location of interest, such as:
Temperature variation for the day of query
Highlights of today’s weather:
Wind Speed and Direction
Visibility
UV Index
Note: The data obtained from the API provides information regarding many other aspects of the weather. We choose not to use all of them for the sake of keeping the code to a minimum.
Structure
Based on the requirements, we can structure our dashboard as shown below:
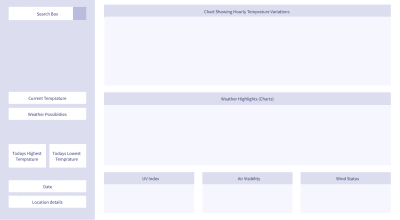
(Large preview)
Data
Our dashboard is as good as the data we get, because there will be no pretty visualizations without proper data. There are plenty of public APIs that provide weather data — some of them are free, and some are not. For our project, we will collect data from the Dark Sky API. However, we will not be able to poll the API endpoint from the client end directly. Don’t worry, we have a workaround that will be revealed just at the right time! Once we get the data for the searched location, we will do some data processing and formatting — you know, the type of technicalities that helps us pay the bills.
Visualization
Once we get clean and formatted data, we plug it in to FusionCharts. There are very few JavaScript libraries in the world as capable as FusionCharts. Out of the vast number of offerings from FusionCharts, we will use only a few — all written in JavaScript, but works seamlessly when integrated with the Vue wrapper for FusionCharts.
Armed with the bigger picture, let’s get our hands dirty — it’s time to make things concrete! In the next section, you will create the basic Vue project, on top of which we will build further.
2. Creating The Project
To create the project, execute the following steps:
Install Node.js + npm
(If you have Node.js installed on your computer, skip this step.)
Node.js comes with npm bundled with it, so you don’t need to install npm separately. Depending on the operating system, download and install Node.js according to the instructions given here.
Once installed, it’s probably a good idea to verify if the software is working correctly, and what are their versions. To test that, open the command-line/terminal and execute the following commands:
node --version npm --version
Install packages with npm
Once you have npm up and running, execute the following command to install the basic packages necessary for our project.
npm install -g vue@2 vue-cli@2
Initialize project scaffolding with vue-cli
Assuming that the previous step has gone all well, the next step is to use the vue-cli — a command-line tool from Vue.js, to initialize the project. To do that, execute the following:
Initialize the scaffolding with webpack-simple template.
vue init webpack-simple vue_weather_dashboard
You will be asked a bunch of questions — accepting the defaults for all but the last question will be good enough for this project; answer N for the last one.

(Large preview)
Keep in mind that although webpack-simple is excellent for quick prototyping and light application like ours, it is not particularly suited for serious applications or production deployment. If you want to use any other template (although we would advise against it if you are a newbie), or would like to name your project something else, the syntax is:
vue init [template-name] [project-name]
Navigate to the directory created by vue-cli for the project.
cd vue_weather_dashboard
Install all the packages mentioned in the package.json, which has been created by the vue-cli tool for the webpack-simple template.
npm install
Start the development server and see your default Vue project working in the browser!
npm run dev
If you are new to Vue.js, take a moment to savor your latest achievement — you have created a small Vue application and its running at localhost:8080!

(Large preview)
Brief Explanation Of The Default Project Structure
It’s time to take a look at the structure inside the directory vue_weather_dashboard, so that you have an understanding of the basics before we start modifying it.
The structure looks something like this:
vue_weather_dashboard |--- README.md |--- node_modules/ | |--- ... | |--- ... | |--- [many npm packages we installed] | |--- ... | |--- ... |--- package.json |--- package-lock.json |--- webpack.config.js |--- index.html |--- src | |--- App.vue | |--- assets | | |--- logo.png | |--- main.js
Although it might be tempting to skip getting familiar with the default files and directories, if you are new to Vue, we strongly recommend at least taking a look at the contents of the files. It can be a good educational session and trigger questions that you should pursue on your own, especially the following files:
package.json, and just a glance at its cousin package-lock.json
webpack.config.js
index.html
src/main.js
src/App.vue
A brief explanation of each of the files and directories shown in the tree diagram are given below:
README.md
No prize for guessing — it is primarily for humans to read and understand the steps necessary for creating the project scaffolding.
node_modules/
This is the directory where npm downloads the packages necessary for kickstarting the project. The information about the packages necessary are available in the package.json file.
package.json
This file is created by the vue-cli tool based on the requirements of the webpack-simple template, and contains information about the npm packages (including with their versions and other details) that must be installed. Take a hard look at the content of this file — this is where you should visit and perhaps edit to add/delete packages necessary for the project, and then run npm install. Read more about package.json here.
package-lock.json
This file is created by npm itself, and is primarily meant for keeping a log of things that npm downloaded and installed.
webpack.config.js
This a JavaScript file that contains the configuration of webpack — a tool that bundles different aspects of our project together (code, static assets, configuration, environments, mode of use, etc.), and minifies before serving it to the user. The benefit is that all things are tied together automatically, and the user experience enhances greatly because of the improvement in the application’s performance (pages are served quickly and loads faster on the browser). As you might encounter later, this is the file that needs to be inspected when something in the build system does not works the way it is intended to be. Also, when you want to deploy the application, this is one of the key files that needs to be edited (read more here).
index.html
This HTML file serves as the matrix (or you can say, template) where data and code is to be embedded dynamically (that’s what Vue primarily does), and then served to the user.
src/main.js
This JavaScript file contains code that primarily manages top/project level dependencies, and defines the topmost level Vue component. In short, it orchestrates the JavaScript for the entire project, and serves as the entry point of the application. Edit this file when you need to declare project-wide dependencies on certain node modules, or you want something to be changed about the topmost Vue component in the project.
src/App.vue
In the previous point, when we were talking about the “topmost Vue component”, we were essentially talking about this file. Each .vue file in the project is a component, and components are hierarchically related. At the start, we have only one .vue file, i.e. App.vue, as our only component. But shortly we will add more components to our project (primarily following the structure of the dashboard), and link them in accordance to our desired hierarchy, with App.vue being the ancestor of all. These .vue files will contain code in a format that Vue wants us to write. Don’t worry, they are JavaScript code written maintaining a structure that can keep us sane and organized. You have been warned — by the end of this project, if you are new to Vue, you may get addicted to the template — script — style way of organizing code!
Now that we have created the foundation, it’s time to:
Modify the templates and tweak the configuration files a bit, so that the project behaves just the way we want.
Create new .vue files, and implement the dashboard structure with Vue code.
We will learn them in the next section, which is going to be a bit long and demands some attention. If you need caffeine or water, or want to discharge — now is the time!
3. Customizing The Default Project Structure
It’s time to tinker with the foundation that the scaffolded project has given us. Before you start, ensure that the development server provided by webpack is running. The advantage of running this server continuously is that any changes you make in the source code — one you save it and refresh the web page — it gets immediately reflected on the browser.
If you want to start the development server, just execute the following command from the terminal (assuming your current directory is the project directory):
npm run dev
In the following sections, we will modify some of the existing files, and add some new files. It will be followed by brief explanations of the content of those files, so that you have an idea of what those changes are meant to do.
Modify Existing Files
index.html
Our application is literally a single page application, because there is just one webpage that gets displayed on the browser. We will talk about this later, but first let’s just make our first change — altering the text within the <title> tag.
With this small revision, the HTML file looks like the following:
<!DOCTYPE html> <html lang="en"> <head> <meta charset="utf-8"> <!-- Modify the text of the title tag below --> <title>Vue Weather Dashboard</title> </head> <body> <div id="app"></div> <script src="/dist/build.js"></script> </body> </html>
Take a moment to refresh the webpage at localhost:8080, and see the change reflected on the title bar of the tab on the browser — it should say “Vue Weather Dashboard”. However, this was just to demonstrate you the process of making changes and verifying if it’s working. We have more things to do!
This simple HTML page lacks many things that we want in our project, especially the following:
Some meta information
CDN links to Bootstrap (CSS framework)
link to custom stylesheet (yet to be added in the project)
Pointers to the Google Maps Geolocation API from <script> tag
After adding those things, the final index.html has the following content:
<!DOCTYPE html> <html lang="en"> <head> <meta http-equiv="Content-Type" content="text/html;charset=utf-8" /> <meta http-equiv="X-UA-Compatible" content="IE=edge"> <meta name="viewport" content="width=device-width, initial-scale=1, shrink-to-fit=no"> <link rel="stylesheet" href="//maxcdn.bootstrapcdn.com/bootstrap/4.0.0/css/bootstrap.min.css"> <link rel="stylesheet" type="text/css" href="src/css/style.css"> <title>Weather Dashboard</title> <script src="https://maps.googleapis.com/maps/api/js?key=AIzaSyC-lCjpg1xbw-nsCc11Si8Ldg2LKYizqI4&libraries=places"></script> </head> <body> <div id="app"></div> <script src="/dist/build.js"></script> </body> </html>
Save the file, and refresh the webpage. You might have noticed a slight bump while the page was getting loaded — it is primarily due to the fact that the page style is now being controlled by Bootstrap, and the style elements like fonts, spacing, etc. are different from the default we had earlier (if you are not sure, roll back to the default and see the difference).

(Large preview)
Note: One important thing before we move on — the URL for the Google Maps API contains a key which is a property of FusionCharts. For now, you can use this key to build the project, as we don’t want you to get bogged down by these type of minute details (which can be distractions while you are new). However, we strongly urge you to generate and use your own Google Maps API key once you have made some progress and feel comfortable to pay attention to these tiny details.
package.json
At the time of writing this, we used certain versions of the npm packages for our project, and we know for sure that those things work together. However, by the time you are executing the project, it is very much possible that the latest stable versions of the packages that npm downloads for you are not the same as we used, and this might break the code (or do things that are beyond our control). Thus, it is very important to have the exact same package.json file that was used to build this project, so that our code/explanations and the results you get are consistent.
The content of the package.json file should be:
{ "name": "vue_weather_dashboard", "description": "A Vue.js project", "version": "1.0.0", "author": "FusionCharts", "license": "MIT", "private": true, "scripts": { "dev": "cross-env NODE_ENV=development webpack-dev-server --open --hot", "build": "cross-env NODE_ENV=production webpack --progress --hide-modules" }, "dependencies": { "axios": "^0.18.0", "babel": "^6.23.0", "babel-cli": "^6.26.0", "babel-polyfill": "^6.26.0", "fusioncharts": "^3.13.3", "moment": "^2.22.2", "moment-timezone": "^0.5.21", "vue": "^2.5.11", "vue-fusioncharts": "^2.0.4" }, "browserslist": [ "> 1%", "last 2 versions", "not ie
We encourage you to go through the new package.json, and figure out what are functions of different objects in the json. You may prefer changing the value of the “author” key to your name. Also, the packages mentioned in the dependencies will reveal themselves at the right time in the code. For the time being, it’s sufficient to know that:
babel-related packages are for properly handling the ES6 style code by the browser;
axios deals with Promise-based HTTP requests;
moment and moment-timezone are for date/time manipulation;
fusioncharts and vue-fusioncharts are responsible for rendering charts:
vue, for obvious reasons.
webpack.config.js
As with package.json, we suggest you to maintain a webpack.config.js file that is consistent with the one we used for building the project. However, before making any changes, we recommend you to carefully compare the default code in the webpack.config.js, and the code we have provided below. You will notice quite a few differences — google them and have a basic idea of what they mean. Since explaining webpack configurations in depth is out of the scope of this article, you are on your own in this regard.
The customized webpack.config.js file is as follows:
var path = require('path') var webpack = require('webpack') module.exports = { entry: ['babel-polyfill', './src/main.js'], output: { path: path.resolve(__dirname, './dist'), publicPath: '/dist/', filename: 'build.js' }, module: { rules: [ { test: /\.css$/, use: [ 'vue-style-loader', 'css-loader' ], }, { test: /\.vue$/, loader: 'vue-loader', options: { loaders: { } // other vue-loader options go here } }, { test: /\.js$/, loader: 'babel-loader', exclude: /node_modules/ }, { test: /\.(png|jpg|gif|svg)$/, loader: 'file-loader', options: { name: '[name].[ext]?[hash]' } } ] }, resolve: { alias: { 'vue$': 'vue/dist/vue.esm.js' }, extensions: ['*', '.js', '.vue', '.json'] }, devServer: { historyApiFallback: true, noInfo: true, overlay: true, host: '0.0.0.0', port: 8080 }, performance: { hints: false }, devtool: '#eval-source-map' } if (process.env.NODE_ENV === 'production') { module.exports.devtool = '#source-map' // http://vue-loader.vuejs.org/en/workflow/production.html module.exports.plugins = (module.exports.plugins || []).concat([ new webpack.DefinePlugin({ 'process.env': { NODE_ENV: '"production"' } }), new webpack.optimize.UglifyJsPlugin({ sourceMap: true, compress: { warnings: false } }), new webpack.LoaderOptionsPlugin({ minimize: true }) ]) }
With changes made to the project’s webpack.config.js, it’s imperative that you stop the development server which is running (Ctrl + C), and restart it with the following command executed from the project’s directory after installing all the packages mentioned in the package.json file:
npm install npm run dev
With this, the ordeal of tweaking the configurations and ensuring that the right packages are in place ends. However, this also marks the journey of modifying and writing code, which is a bit long but also very rewarding!
src/main.js
This file is the key to top-level orchestration of the project — it is here that we define:
What the top level dependencies are (where to get the most important npm packages necessary);
How to resolve the dependencies, along with instructions to Vue on using plugins/wrappers, if any;
A Vue instance that manages the topmost component in the project: src/App.vue (the nodal .vue file).
In line with our goals for the src/main.js file, the code should be:
// Import the dependencies and necessary modules import Vue from 'vue'; import App from './App.vue'; import FusionCharts from 'fusioncharts'; import Charts from 'fusioncharts/fusioncharts.charts'; import Widgets from 'fusioncharts/fusioncharts.widgets'; import PowerCharts from 'fusioncharts/fusioncharts.powercharts'; import FusionTheme from 'fusioncharts/themes/fusioncharts.theme.fusion'; import VueFusionCharts from 'vue-fusioncharts'; // Resolve the dependencies Charts(FusionCharts); PowerCharts(FusionCharts); Widgets(FusionCharts); FusionTheme(FusionCharts); // Globally register the components for project-wide use Vue.use(VueFusionCharts, FusionCharts); // Instantiate the Vue instance that controls the application new Vue({ el: '#app', render: h => h(App) })
src/App.vue
This is one of the most important files in the entire project, and represents the topmost component in the hierarchy — the entire application itself, as a whole. For our project, this component will do all the heavy lifting, which we will explore later. For now, we want to get rid of the default boilerplate, and put something of our own.
If you are new to Vue’s way of organizing code, it would be better to get an idea of the general structure within the .vue files. The .vue files comprises of three sections:
Template
This is where the HTML template for the page is defined. Apart from the static HTML, this section also contains Vue’s way of embedding dynamic content, using the double curly braces .
Script
JavaScript rules this section, and is responsible for generating dynamic content that goes and sits within the HTML template at appropriate places. This section is primarily an object that is exported, and consists of:
Data
This is a function itself, and usually it returns some desired data encapsulated within a nice data structure.
Methods
An object that consists of one or more functions/methods, each of which usually manipulates data in some way or the other, and also controls the dynamic content of the HTML template.
Computed
Much like the method object discussed above with one important distinction — while all the functions within the method object are executed whenever any one of them is called, the functions within the computed object behaves much more sensibly, and executes if and only if it has been called.
Style
This section is for CSS styling that applies to the HTML of the page (written within template) — put the good old CSS here to make your pages beautiful!
Keeping the above paradigm in mind, let’s minimally customize the code in App.vue:
<template> <div id="app"> <p>This component’s code is in </p> </div> </template> <script> export default { data() { return { filename: 'App.vue' } }, methods: { }, computed: { }, } </script> <style> </style>
Remember that the above code snippet is simply for testing out that App.vue is working with our own code in it. It will later go on through a lot of changes, but first save the file and refresh the page on the browser.
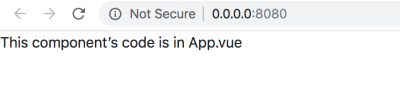
(Large preview)
At this point, it’s probably a good idea to get some help in tooling. Check out the Vue devtools for Chrome, and if you don’t have much problems in using Google Chrome as your default browser for development, install the tool and play around with it a bit. It will come in extremely handy for further development and debugging, when things becomes more complicated.
Additional Directories And Files
The next step would be to add additional files, so that the structure of our project becomes complete. We would add the following directories and files:
src/css/ — style.css
src/assets/ — calendar.svg — vlocation.svg — search.svg — winddirection.svg — windspeed.svg
src/components/ — Content.vue — Highlights.vue — TempVarChart.vue — UVIndex.vue — Visibility.vue — WindStatus.vue
Note: Save the hyperlinked .svg files in your project.
Create the directories and files mentioned above. The final project structure should like look (remember to delete folders and files from the default structure that are now unnecessary):
vue_weather_dashboard/ |--- README.md |--- node_modules/ | |--- ... | |--- ... | |--- [many npm packages we installed] | |--- ... | |--- ... |--- package.json |--- package-lock.json |--- webpack.config.js |--- index.html |--- src/ | |--- App.vue | |--- css/ | | |--- style.css | |--- assets/ | | |--- calendar.svg | | |--- location.svg | | |--- location.svg | | |--- winddirection.svg | | |--- windspeed.svg | |--- main.js | |--- components/ | | |--- Content.vue | | |--- Highlights.vue | | |--- TempVarChart.vue | | |--- UVIndex.vue | | |--- Visibility.vue | | |--- WindStatus.vue
There might be some other files, like .babelrc, .gitignore, .editorconfig, etc. in the project’s root folder. You may ignore them safely for now.
In the following section, we will add minimal content to the newly added files, and test whether they are properly working.
src/css/style.css
Although it will not be of much use immediately, copy the following code to the file:
@import url("https://fonts.googleapis.com/css?family=Roboto:300,400,500"); :root { font-size: 62.5%; } body { font-family: Roboto; font-weight: 400; width: 100%; margin: 0; font-size: 1.6rem; } #sidebar { position: relative; display: flex; flex-direction: column; background-image: linear-gradient(-180deg, #80b6db 0%, #7da7e2 100%); } #search { text-align: center; height: 20vh; position: relative; } #location-input { height: 42px; width: 100%; opacity: 1; border: 0; border-radius: 2px; background-color: rgba(255, 255, 255, 0.2); margin-top: 16px; padding-left: 16px; color: #ffffff; font-size: 1.8rem; line-height: 21px; } #location-input:focus { outline: none; } ::placeholder { color: #FFFFFF; opacity: 0.6; } #current-weather { color: #ffffff; font-size: 8rem; line-height: 106px; position: relative; } #current-weather>span { color: #ffffff; font-size: 3.6rem; line-height: 42px; vertical-align: super; opacity: 0.8; top: 15px; position: absolute; } #weather-desc { font-size: 2.0rem; color: #ffffff; font-weight: 500; line-height: 24px; } #possibility { color: #ffffff; font-size: 16px; font-weight: 500; line-height: 19px; } #max-detail, #min-detail { color: #ffffff; font-size: 2.0rem; font-weight: 500; line-height: 24px; } #max-detail>i, #min-detail>i { font-style: normal; height: 13.27px; width: 16.5px; opacity: 0.4; } #max-detail>span, #min-detail>span { color: #ffffff; font-family: Roboto; font-size: 1.2rem; line-height: 10px; vertical-align: super; } #max-summary, #min-summary { opacity: 0.9; color: #ffffff; font-size: 1.4rem; line-height: 16px; margin-top: 2px; opacity: 0.7; } #search-btn { position: absolute; right: 0; top: 16px; padding: 2px; z-index: 999; height: 42px; width: 45px; background-color: rgba(255, 255, 255, 0.2); border: none; } #dashboard-content { text-align: center; height: 100vh; } #date-desc, #location-desc { color: #ffffff; font-size: 1.6rem; font-weight: 500; line-height: 19px; margin-bottom: 15px; } #date-desc>img { top: -3px; position: relative; margin-right: 10px; } #location-desc>img { top: -3px; position: relative; margin-left: 5px; margin-right: 15px; } #location-detail { opacity: 0.7; color: #ffffff; font-size: 1.4rem; line-height: 20px; margin-left: 35px; } .centered { position: fixed; top: 45%; left: 50%; transform: translate(-50%, -50%); } .max-desc { width: 80px; float: left; margin-right: 28px; } .temp-max-min { margin-top: 40px } #dashboard-content { background-color: #F7F7F7; } .custom-card { background-color: #FFFFFF !important; border: 0 !important; margin-top: 16px !important; margin-bottom: 20px !important; } .custom-content-card { background-color: #FFFFFF !important; border: 0 !important; margin-top: 16px !important; margin-bottom: 0px !important; } .header-card { height: 50vh; } .content-card { height: 43vh; } .card-divider { margin-top: 0; } .content-header { color: #8786A4; font-size: 1.4rem; line-height: 16px; font-weight: 500; padding: 15px 10px 5px 15px; } .highlights-item { min-height: 37vh; max-height: 38vh; background-color: #FFFFFF; } .card-heading { color: rgb(33, 34, 68); font-size: 1.8rem; font-weight: 500; line-height: 21px; text-align: center; } .card-sub-heading { color: #73748C; font-size: 1.6rem; line-height: 19px; } .card-value { color: #000000; font-size: 1.8rem; line-height: 21px; } span text { font-weight: 500 !important; } hr { padding-top: 1.5px; padding-bottom: 1px; margin-bottom: 0; margin-top: 0; line-height: 0.5px; } @media only screen and (min-width: 768px) { #sidebar { height: 100vh; } #info { position: fixed; bottom: 50px; width: 100%; padding-left: 15px; } .wrapper-right { margin-top: 80px; } } @media only screen and (min-width:1440px) { #sidebar { width: 350px; max-width: 350px; flex: auto; } #dashboard-content { width: calc(100% — 350px); max-width: calc(100% — 350px); flex: auto; } }
src/assets/
In this directory, download and save the .svg files mentioned below:
calendar.svg
location.svg
search.svg
winddirection.svg
windspeed.svg
src/components/Content.vue
This is what we call a dumb component — a placeholder, that is there just to maintain the hierarchy, and essentially passes on data to its child components.
Remember that there is no technical bar for writing all our code in the App.vue file, but we take the approach of splitting up the code by nesting the components for two reasons:
To write clean code, which aids readability and maintainability;
To replicate the same structure that we will see on screen, i.e., the hierarchy.
Before we nest the component defined in Content.vue within the root component App.vue, let’s write some toy (but educational) code for Content.vue:
<template> <div> <p>This child components of Content.vue are:</p> <ul> <li v-for="child in childComponents"></li> </ul> </div> </template> <script> export default { data () { return { childComponents: ['TempVarChart.vue', 'Highlights.vue'] } }, methods: { }, computed: { }, } </script> <style> </style>
In the code, carefully observe and understand the following:
Within the <script> tag (where we obviously write some JavaScript code), we define an object that is exported (made available to other files) by default. This object contains a function data(), that returns an array object called childComponents, with its elements being names of the component files that should be nested further.
Within the <template> tag (where we write some HTML template), the thing of interest is the <ul>.
Within the unordered list, each list item should be names of the intended child components, as defined in the array object childComponents. Moreover, the list should automatically extend till the last element of the array. Seems like we should write a for-loop, isn’t it? We do that by using the v-for directive provided by Vue.js. The v-for directive:
Acts as an attribute of the <li> tag, iterates through the array, renders the names of the child components where the iterator is mentioned within the brackets (where we write the text for the list items).
The code and the explanation above forms the basis of your subsequent understanding of how the script and the template are interrelated, and how we can use the directives provided by Vue.js.
We have learnt quite a lot, but even after all these, we have one thing left to learn about seamlessly connecting components in hierarchy — passing data down from the parent component to its children. For now, we need to learn how to pass some data from src/App.vue to src/components/Content.vue, so that we can use the same techniques for the rest of the component nesting in this project.
Data trickling down from the parent to the child components might sound simple, but the devil is in the details! As briefly explained below, there are multiple steps involved in making it work:
Defining and the data
For now, we want some static data to play with — an object containing hard-coded values about different aspects of weather will just be fine! We create an object called weather_data and return it from the data() function of App.vue. The weather_data object is given in the snippet below:
weather_data: { location: "California", temperature: { current: "35 C", }, highlights: { uvindex: "3", windstatus: { speed: "20 km/h", direction: "N-E", }, visibility: "12 km", }, },
Passing the data from the parent
To pass the data, we need a destination where we want to send the data! In this case, the destination is the Content.vue component, and the way to implement it is to:
Assign the weather_data object to a custom attribute of the <Content> tag
Bind the attribute with the data using the v-bind: directive provided by Vue.js, which makes the attribute value dynamic (responsive to changes made in the original data).
<Content v-bind:weather_data=“weather_data”></Content>
Defining and passing the data is handled at the source side of the handshake, which in our case is the App.vue file.
The code for the App.vue file, at its current status, is given below:
<template> <div id="app"> <p>This component’s code is in </p> <Content v-bind:weather_data="weather_data"></Content> </div> </template> <script> import Content from './components/Content.vue' export default { name: 'app', components: { 'Content': Content }, data () { return { filename: 'App.vue', weather_data: { location: "California", temperature: { current: "35 C", }, highlights: { uvindex: "3", windstatus: { speed: "20 km/h", direction: "N-E", }, visibility: "12 km", }, }, } }, methods: { }, computed: { }, } </script> <style> </style>

(Large preview)
With the data defined and passed from the source (parent component), it is now the child’s responsibility to receive the data and render it appropriately, as explained in the next two steps.
Receiving the data by the child
The child component, in this case Content.vue, must receive the weather_data object send to it by the parent component App.vue. Vue.js provides a mechanism to do so — all you need is an array object called props, defined in the default object exported by Content.vue. Each element of the array props is a name of the data objects it wants to receive from its parent. For now, the only data object that it is supposed to receive is weather_data from App.vue. Thus, the props array looks like:
<template> // HTML template code here </template> <script> export default { props: ["weather_data"], data () { return { // data here } }, } </script> <style> // component specific CSS here </style>
Rendering the data in the page
Now that we have ensured receiving the data, the last task we need to complete is to render the data. For this example, we will directly dump the received data on the web page, just to illustrate the technique. However, in real applications (like the one we are about to build), data normally goes through lots of processing, and only the relevant parts of it are displayed in ways that suits the purpose. For example, in this project we will eventually get raw data from the weather API, clean and format it, feed the data to the data structures necessary for the charts, and then visualize it. Anyway, to display the raw data dump, we will just use the brackets that Vue understands, as shown in the snippet below:
<template> <div id="pagecontent"> // other template code here </div> </template>
It’s now time to assimilate all the bits and pieces. The code for Content.vue — at its current status — is given below:
<template> <div id="pagecontent"> <p>This child components of Content.vue are:</p> <ul> <li v-for="child in childComponents"></li> </ul> </div> </template> <script> export default { props: ["weather_data"], data () { return { childComponents: ['TempVarChart.vue', 'Highlights.vue'] } }, methods: { }, computed: { }, } </script> <style> #pagecontent { border: 1px solid black; padding: 2px; } </style>
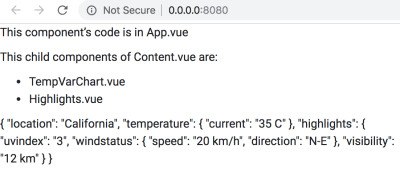
(Large preview)
After making the changes discussed above, refresh the webpage on the browser and see how it looks. Take a moment to appreciate the complexity that Vue handles — if you modify the weather_data object in App.vue, it gets silently conveyed to Content.vue, and eventually to the browser displaying the webpage! Try by changing the value for the key location.
Although we have learned about props and data binding using static data, we will be using dynamic data collected using web APIs in the application, and will change the code accordingly.
Summary
Before we move on to the rest of the .vue files, let’s summarize what we have learnt while we wrote the code for App.vue and components/Content.vue:
The App.vue file is what we call the root component — the one that sits at the top of the component hierarchy. The rest of the .vue files represents components that are its direct child, grandchild, and so on.
The Content.vue file is a dummy component — its responsibility is to pass on the data to levels below and maintain the structural hierarchy, so that our code remains consistent with the philosophy “*what we see is what we implement*”.
The parent-child relationship of component does not happen out of thin air — you must register a component (either globally or locally, depending on the intended usage of the component), and then nest it using custom HTML tags (whose spellings are the exact same as that of the names with which the components has been registered).
Once registered and nested, data is passed on from parent to child components, and the flow is never reverse (bad things will happen if the project architecture allows backflow). The parent component is the relative source of the data, and it passes down relevant data to its children using the v-bind directive for the attributes of the custom HTML elements. The child receives the data intended for it using props, and then decides on its own what to do with the data.
For the rest of the components, we will not indulge in detailed explanation — we will just write the code based on the learnings from the above summary. The code will be self-evident, and if you get confused about the hierarchy, refer to the diagram below:
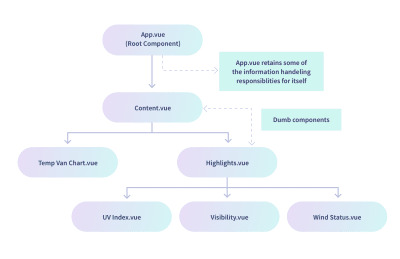
(Large preview)
The diagram says that TempVarChart.vue and Highlights.vue are the direct child of Content.vue. Thus, it might be a good idea to prepare Content.vue for sending data to those components, which we do using the code below:
<template> <div id="pagecontent"> <p>This child components of Content.vue are:</p> <ul> <li v-for="child in childComponents"></li> </ul> <temp-var-chart :tempVar="tempVar"></temp-var-chart> <today-highlights :highlights="highlights"></today-highlights> </div> </template> <script> import TempVarChart from './TempVarChart.vue' import Highlights from './Highlights.vue' export default { props: ["weather_data"], components: { 'temp-var-chart': TempVarChart, 'today-highlights': Highlights }, data () { return { childComponents: ['TempVarChart.vue', 'Highlights.vue'], tempVar: this.weather_data.temperature, highlights: this.weather_data.highlights, } }, methods: { }, computed: { }, } </script> <style> </style>
Once you save this code, you will get errors — don’t worry, it is expected. It will be fixed once you have the rest of the component files ready. If it bothers you not to be able to see the output, comment out the lines containing the custom element tags <temp-var-chart> and <today-highlights>.
For this section, this is the final code of Content.vue. For the rest of this section, we will reference to this code, and not the previous ones that we wrote for learning.
src/components/TempVarChart.vue
With its parent component Content.vue passing on the data, TempVarChart.vue must be set up to receive and render the data, as shown in the code below:
<template> <div id="tempvarchart"> <p>Temperature Information:</p> </div> </template> <script> export default { props: ["tempVar"], data () { return { } }, methods: { }, computed: { }, } </script> <style> </style>
src/components/Highlights.vue
This component will also receive data from App.vue — its parent component. After that, it should be linked with its child components, and relevant data should be passed on to them.
Let’s first see the code for receiving data from the parent:
<template> <div id="highlights"> <p>Weather Highlights:</p> </div> </template> <script> export default { props: ["highlights"], data () { return { } }, methods: { }, computed: { }, } </script> <style> </style>
At this point, the web page looks like the image below:

(Large preview)
Now we need to modify the code of Highlights.vue to register and nest its child components, followed by passing the data to children. The code for it is as follows:
<template> <div id="highlights"> <p>Weather Highlights:</p> <uv-index :highlights="highlights"></uv-index> <visibility :highlights="highlights"></visibility> <wind-status :highlights="highlights"></wind-status> </div> </template> <script> import UVIndex from './UVIndex.vue'; import Visibility from './Visibility.vue'; import WindStatus from './WindStatus.vue'; export default { props: ["highlights"], components: { 'uv-index': UVIndex, 'visibility': Visibility, 'wind-status': WindStatus, }, data () { return { } }, methods: { }, computed: { }, } </script> <style> </style>
Once you save the code and see the web page, you are expected to see errors in the Developer Console tool provided by the browser; they appear because although Highlights.vue is sending data, nobody is receiving them. We are yet to write the code for the children of Highlights.vue.
Observe that we have not done much of the data processing, i.e, we have not extracted the individual factors of weather data that goes under the Highlights section of the dashboard. We could have done that in the data() function, but we preferred to keep Highlights.vue a dumb component that just passes on the entire data dump it receives to each of the children, who then own their own extracts what is necessary for them. However, we encourage you to try out extracting data in the Highlights.vue, and send relevant data down to each child component — it’s a good practice exercise nonetheless!
src/components/UVIndex.vue
The code for this component receives the data dump of highlights from Highlights.vue, extracts the data for UV Index, and renders it on the page.
<template> <div id="uvindex"> <p>UV Index: </p> </div> </template> <script> export default { props: ["highlights"], data () { return { uvindex: this.highlights.uvindex } }, methods: { }, computed: { }, } </script> <style> </style>
src/components/Visibility.vue
The code for this component receives the data dump of highlights from Highlights.vue, extracts the data for Visibility, and renders it on the page.
<template> <div id="visibility"> <p>Visibility: </p> </div> </template> <script> export default { props: ["highlights"], data () { return { visibility: this.highlights.visibility, } }, methods: { }, computed: { }, } </script> <style> </style>
src/components/WindStatus.vue
The code for this component receives the data dump of highlights from Highlights.vue, extracts the data for Wind Status (speed and direction), and renders it on the page.
<template> <div id="windstatus"> <p>Wind Status:</p> <p>Speed — ; Direction — </p> </div> </template> <script> export default { props: ["highlights"], data () { return { speed: this.highlights.windstatus.speed, direction: this.highlights.windstatus.direction } }, methods: { }, computed: { }, } </script> <style> </style>
After adding the code for all the components, take a look at the web page on the browser.
(Large preview)
Not to dishearten, but all these toiling was just to link the components in hierarchy, and test out whether data flow is happening between them or not! In the next section, we will throw away most of the code we have written so far, and add a lot more pertaining to the actual project. However, we will certainly retain the structure and nesting of the components; the learnings from this section will allow us to build a decent dashboard with Vue.js.
4. Data Acquisition And Processing
Remember the weather_data object in App.vue? It had some hard-coded data that we used to test whether all the components are working correctly, and also to help you learn some basic aspects of Vue application without getting bogged down in the details of real-world data. However, it’s now time that we shed our shell, and step out into the real world, where data from the API will dominate most of our code.
Preparing Child Components To Receive And Process Real Data
In this section, you will get code dump for all the components except App.vue. The code will handle receiving real data from App.vue (unlike the code we wrote in the previous section to receive and render dummy data).
We strongly encourage to read the code of each component carefully, so that you form an idea of what data each of those components are expecting, and will eventually use in visualization.
Some of the code, and the overall structure, will be similar to the ones you have seen in the previous structure — so you will not face something drastically different. However, the devil is in the details! So examine the code carefully, and when you have understood them reasonably well, copy the code to the respective component files in your project.
Note: All the components in this section are in the src/components/ directory. So each time, the path will not be mentioned — only the .vue file name will be mentioned to identify the component.
Content.vue
<template> <div style="position: relative;"> <temp-var-chart :tempVar="tempVar"></temp-var-chart> <today-highlights :highlights="highlights"></today-highlights> </div> </template> <script> import TempVarChart from './TempVarChart.vue'; import Highlights from './Highlights.vue'; export default { props: ['highlights', 'tempVar'], components: { 'temp-var-chart': TempVarChart, 'today-highlights': Highlights }, } </script>
The following changes have been made from the previous code:
In the <template>, text and data within has been removed, since we are now just receiving data and passing down to the children, with no rendering specific this component.
In the export default {}:
The props have been changed to match the data objects that will be send by the parent: App.vue. The reason for changing the props is that App.vue itself will display some of the data it acquires from the weather API and other online resources, based on the search query of the user, and pass on the rest of the data. In the dummy code we wrote earlier, App.vue was passing on the entire dummy data dump, without any discrimination, and the props of Content.vue was set up accordingly.
The data() function now returns nothing, as we are not doing any data manipulation in this component.
TempVarChart.vue
This component is supposed to receive detailed temperature projections for the rest of the current day, and eventually display them using FusionCharts. But for the time being, we will display them only as text on the webpage.
<template> <div> </div> </template> <script> export default { props: ["tempVar"], components: {}, data() { return { }; }, methods: { }, }; </script> <style> </style>
Highlights.vue
<template> <div> <uv-index :highlights="highlights"></uv-index> <visibility :highlights="highlights"></visibility> <wind-status :highlights="highlights"></wind-status> </div> </template> <script> import UVIndex from './UVIndex.vue'; import Visibility from './Visibility.vue'; import WindStatus from './WindStatus.vue'; export default { props: ["highlights"], components: { 'uv-index': UVIndex, 'visibility': Visibility, 'wind-status': WindStatus, }, data () { return { } }, methods: { }, computed: { }, } </script> <style> </style>
The changes made from the previous code are:
In the <template>, the text and the data within has been removed, because this is a dumb component, just like Content.vue, whose only job is to pass on the data to children while maintaining the structural hierarchy. Remember that dumb components like Highlights.vue and Content.vue exists to maintain the parity between the visual structure of the dashboard, and the code we write.
UVIndex.vue
The changes made to the previous code are as follows:
In the <template> and <style>, the div id has been changed to uvIndex, which is more readable.
In the export default {}, the data() function now returns a string object uvIndex, whose value is extracted from the highlights object received by the component using props. This uvIndex is now temporarily used to display the value as text within the <template>. Later on, we will plug in this value to the data structure suitable for rendering a chart.
Visibility.vue
<template> <div> <p>Visibility: </p> </div> </template> <script> export default { props: ["highlights"], data () { return { visibility: this.highlights.visibility.toString() } }, methods: { }, computed: { }, } </script> <style> </style>
The only change made in this file (with respect to its previous code) is that the definition of the visibility object returned by the data() function now contains toString() at its end, since the value received from the parent will be a floating point number, which needs to be converted into string.
WindStatus.vue
<template> <div> <p>Wind Speed — </p> <p>Wind Direction — , or degree clockwise with respect to true N as 0 degree.</p> </div> </template> <script> export default { props: ["highlights"], data () { return { windSpeed: this.highlights.windStatus.windSpeed, derivedWindDirection: this.highlights.windStatus.derivedWindDirection, windDirection: this.highlights.windStatus.windDirection } }, methods: { }, computed: { }, } </script> <style> </style>
The changes made to the previous code are as follows:
Throughout the file, windstatus has been renamed as windStatus, to promote readability and also to be in sync with the the highlights object that App.vue provides with actual data.
Similar naming changes have been made for the speed and direction — the new ones are windSpeed and windDirection.
A new object derivedWindDirection has come into play (also provided by App.vue in the highlights bundle).
For now, the received data is rendered as text; later, it will be plugged in to the data structure necessary for visualization.
Testing With Dummy Data
Resorting to dummy data repeatedly might be a bit frustrating for you, but there are some good reasons behind it:
We have made a lot of changes to the code of each component, and it’s a good idea to test whether those changes are breaking the code. In other words, we should check that whether the data flow is intact, now that we are about to move to more complex parts of the project.
The real data from the online weather API will need lot of massaging, and it might be overwhelming for you to juggle between the code for data acquisition and processing, and the code for smooth data flow down the components. The idea is to keep the quantum of complexity under control, so that we have a better understanding of the errors we might face.
In this section, what we do is essentially hardcode some json data in the App.vue, which will obviously be replaced with live data in the near future. There are a lot of similarity between the dummy json structure, and the json structure we will use for the actual data. So it also provides you a rough idea of what to expect from the real data, once we encounter it.
However, we admit that this is far from the ideal approach one might adopt while building such a project from scratch. In the real world, you will often start with the real data source, play around with it a bit to understand what can and should be done to tame it, and then think about the appropriate json data structure to capture the relevant information. We intentionally shielded you from all those dirty work, since it takes you farther from the objective — learning how to use Vue.js and FusionCharts to build a dashboard.
Let’s now jump into the new code for App.vue:
<template> <div id="app"> <dashboard-content :highlights="highlights" :tempVar="tempVar"></dashboard-content> </div> </template> <script> import Content from './components/Content.vue' export default { name: 'app', components: { 'dashboard-content': Content }, data () { return { tempVar: { tempToday: [ {hour: '11.00 AM', temp: '35'}, {hour: '12.00 PM', temp: '36'}, {hour: '1.00 PM', temp: '37'}, {hour: '2.00 PM', temp: '38'}, {hour: '3.00 PM', temp: '36'}, {hour: '4.00 PM', temp: '35'}, ], }, highlights: { uvIndex: 4, visibility: 10, windStatus: { windSpeed: '30 km/h', windDirection: '30', derivedWindDirection: 'NNE', }, }, } }, methods: { }, computed: { }, } </script> <style> </style>
The changes made to the code with respect to its previous version are as follows:
The name of the child component has been changed to dashboard-content, and accordingly the custom HTML element in the <template> has been revised. Note that now we have two attributes — highlights and tempVar — instead of a single attribute that we used earlier with the custom element. Accordingly, the data associated with those attributes have also changed. What’s interesting here is that we can use the v-bind: directive, or its shorthand : (as we have done here), with multiple attributes of a custom HTML element!
The data() function now returns the filename object (that existed earlier), along with two new objects (instead of the old weather_data): tempVar and highlights. The structure of the json is appropriate for the code we have written in the child components, so that they can extract the data pieces they need from the dumps. The structures are quite self-explanatory, and you can expect them to be quite similar when we deal with live data. However, the significant change that you will encounter is the absence of hardcoding (obvious, isn’t it) — we will leave the values blank as the default state, and write code to dynamically update them based on the values we will receive from the weather API.
You have written a lot of code in this section, without seeing the actual output. Before you proceed further, take a look at the browser (restart the server with npm run dev, if necessary), and bask in the glory of your achievement. The web page that you should see at this point looks like the image below:

(Large preview)
Code For Data Acquisition And Processing
This section is going to be the meat of the project, with all the code to be written in App.vue for the following:
Location input from the user — an input box and a call-to-action button is sufficient;
Utility functions for various tasks; these functions will be called later in various parts of the component code;
Getting detailed geolocation data from Google Maps API for JavaScript;
Getting detailed weather data from the Dark Sky API;
Formatting and processing the geolocation and weather data, which will be passed on to the child components.
The subsections that follows illustrates how we can implement the tasks laid out for us in the above points. With some exceptions, most of them will follow the sequence.
Input From The User
It’s quite obvious that the action starts when the user provides the name of the place for which the weather data needs to be displayed. For this to happen, we need to implement the following:
An input box for entering the location;
A submit button that tells our application that the user has entered the location and it’s time to do the rest. We will also implement the behavior when processing starts upon hitting Enter.
The code we show below will be restricted to the HTML template part of App.vue. We will just mention the name of the method associated with the click events, and define them later in the methods object of the <script> in App.vue.
<div id="search"> <input id="location-input" type="text" ref="input" placeholder="Location?" @keyup.enter="organizeAllDetails" > <button id="search-btn" @click="organizeAllDetails"> <img src="./assets/Search.svg" width="24" height="24"> </button> </div>
Placing the above snippet in the right place is trivial — we leave it to you. However, the interesting parts of the snippet are:
@keyup.enter="organizeAllDetails"
@click="organizeAllDetails"
As you know from the earlier sections, @ is Vue’s shorthand for the directive v-on:, which is associated with some event. The new thing is “organizeAllDetails” — it’s nothing but the method that will fire once the events (pressing Enter or clicking the button) happens. We are yet to define method, and the puzzle will be complete by the end of this section.
Text Information Display Controlled By App.vue
Once the user input triggers the action and lots of data is acquired from the APIs, we encounter the inevitable question — “What to do with all these data?”. Obviously some data massaging is required, but that does not answer our question fully! We need to decide what’s the end use of the data, or more directly, which are the entities that receives different chunks of the acquired and processed data?
The child components of App.vue, based on their hierarchy and purpose, are the frontline contenders for the bulk of the data. However, we will also have some data that does not belong to any of those child components, yet are quite informative and makes the dashboard complete. We can make good use of them if we display them as text information directly controlled by App.vue, while the rest of the data are passed on to the child for getting displayed as pretty charts ultimately.
With this context in mind, let’s focus on the code for setting the stage of using text data. It’s simple HTML template at this point, on which the data will eventually come and sit.
<div id="info"> <div class="wrapper-left"> <div id="current-weather"> <span>°C</span> </div> <div id="weather-desc"></div> <div class="temp-max-min"> <div class="max-desc"> <div id="max-detail"> <i>▲</i> <span>°C</span> </div> <div id="max-summary">at </div> </div> <div class="min-desc"> <div id="min-detail"> <i>▼</i> <span>°C</span> </div> <div id="min-summary">at </div> </div> </div> </div> <div class="wrapper-right"> <div class="date-time-info"> <div id="date-desc"> <img src="./assets/calendar.svg" width="20" height="20"> </div> </div> <div class="location-info"> <div id="location-desc"> <img src="./assets/location.svg" width="10.83" height="15.83" style="opacity: 0.9;" > <div id="location-detail" class="mt-1"> Lat: <br> Long: </div> </div> </div> </div> </div>
In the above snippet, you should understand the following:
The stuff inside — they are Vue’s way of inserting dynamic data in the HTML template, before it renders in the browser. You have encountered them before, and there is nothing new or surprising. Just keep in mind that these data objects stems from the data() method in the export default() object of App.vue. They have default values that we will set according to our requirements, and then write certain methods to populate the objects with real API data.
Don’t worry for not seeing the changes on the browser — the data is not defined yet, and it’s natural for Vue to not render things that it does not know. However, once the data is set (and for now, you can even check by hard-coding the data), the text data will be controlled by App.vue.
The data() Method
The data() method is a special construct in the .vue files — it contains and returns data objects that are so crucial for the application. Recollect the generic structure of the <script> part in any .vue file — it roughly contains the following:
<script> // import statements here export default { // name, components, props, etc. data() { return { // the data that is so crucial for the application is defined here. // the data objects will have certain default values chosen by us. // The methods that we define below will manipulate the data. // Since the data is bounded to various attributes and directives, they // will update as and when the values of the data objects change. } }, methods: { // methods (objects whose values are functions) here. // bulk of dynamic stuff (the black magic part) is controlled from here. }, computed: { // computed properties here }, // other objects, as necessary } </script>
So far, you have encountered the names of some of the data objects, but are a lot more. Most of them are relevant for the child components, each of which handles a different aspect of the weather information dump. Given below is the entire data() method that we will need for this project — you will have a fair idea about what data we are expecting from the APIs, and how we are disseminating the data, based on the nomenclature of the objects.
data() { return { weatherDetails: false, location: '', // raw location from input lat: '', // raw latitude from google maps api response long: '', // raw longitude from google maps api response completeWeatherApi: '', // weather api string with lat and long rawWeatherData: '', // raw response from weather api currentWeather: { full_location: '', // for full address formatted_lat: '', // for N/S formatted_long: '', // for E/W time: '', temp: '', todayHighLow: { todayTempHigh: '', todayTempHighTime: '', todayTempLow: '', todayTempLowTime: '' }, summary: '', possibility: '' }, tempVar: { tempToday: [ // gets added dynamically by this.getSetHourlyTempInfoToday() ], }, highlights: { uvIndex: '', visibility: '', windStatus: { windSpeed: '', windDirection: '', derivedWindDirection: '' }, } }; },
As you can see, in most cases the default value is empty, because that will suffice at this point. Methods will be written for manipulating the data and filling it up with appropriate values, before it is rendered or passed on to the child components.
Methods in App.vue
For .vue files, the methods are generally written as values of keys nested in the methods { } object. Their primary role is to manipulate the data objects of the component. We will write the methods in App.vue keeping the same philosophy in mind. However, based on their purpose, we can categorize the methods of App.vue into the following:
Utility methods
Action/Event oriented methods
Data acquisition methods
Data processing methods
High level glue methods
It’s important that you understand this — we are presenting the methods to you on a platter because we have already figured out how the APIs work, what data they give, and how we should use the data in our project. It’s not that we pulled the methods out of thin air, and wrote some arcane code to deal with the data. For the purpose of learning, it’s a good exercise to diligently read and understand the code for the methods and data. However, when faced with a new project that you have to build from scratch, you must do all the dirty work yourself, and that means experimenting a lot with the APIs — their programmatic access and their data structure, before glueing them seamlessly with the data structure that your project demands. You will not have any hand holding, and there will be frustrating moments, but that’s all part of maturing as a developer.
In the following subsections, we will explain each of the method types, and also show the implementation of the methods belonging to that category. The method names are quite self-explanatory about their purpose, and so is their implementation, which we believe you will find to be easy enough to follow. However, before that, recollect the general scheme of writing methods in .vue files:
<script> // import statements here export default { // name, components, props, etc. data() { return { // the data that is so crucial for the application is defined here. } }, methods: { // methods (objects whose values are functions) here. // bulk of dynamic stuff (the black magic part) is controlled from here. method_1: function(arg_1) { }, method_2: function(arg_1, arg_2) { }, method_3: function(arg_1) { }, ……. }, computed: { // computed properties here }, // other objects, as necessary } </script>
Utility Methods
The utility methods, as the name suggests, are methods written primarily for the purpose of modularizing repetitive code used for fringe tasks. They are called by other methods when necessary. Given below are the utility methods for App.vue:
convertToTitleCase: function(str) { str = str.toLowerCase().split(' '); for (var i = 0; i
// To format the “possibility” (of weather) string obtained from the weather API formatPossibility: function(str) { str = str.toLowerCase().split('-'); for (var i = 0; i
// To convert Unix timestamps according to our convenience unixToHuman: function(timezone, timestamp) { /* READ THIS BEFORE JUDGING & DEBUGGING For any location beyond the arctic circle and the antarctic circle, the goddamn weather api does not return certain keys/values in each of this.rawWeatherData.daily.data[some_array_index]. Due to this, console throws up an error. The code is correct, the problem is with the API. May be later on I will add some padding to tackle missing values. */ var moment = require('moment-timezone'); // for handling date & time var decipher = new Date(timestamp * 1000); var human = moment(decipher) .tz(timezone) .format('llll'); var timeArray = human.split(' '); var timeNumeral = timeArray[4]; var timeSuffix = timeArray[5]; var justTime = timeNumeral + ' ' + timeSuffix; var monthDateArray = human.split(','); var monthDate = monthDateArray[1].trim(); return { fullTime: human, onlyTime: justTime, onlyMonthDate: monthDate }; },
// To convert temperature from fahrenheit to celcius fahToCel: function(tempInFahrenheit) { var tempInCelcius = Math.round((5 / 9) * (tempInFahrenheit — 32)); return tempInCelcius; },
// To convert the air pressure reading from millibar to kilopascal milibarToKiloPascal: function(pressureInMilibar) { var pressureInKPA = pressureInMilibar * 0.1; return Math.round(pressureInKPA); },
// To convert distance readings from miles to kilometers mileToKilometer: function(miles) { var kilometer = miles * 1.60934; return Math.round(kilometer); },
// To format the wind direction based on the angle deriveWindDir: function(windDir) { var wind_directions_array = [ { minVal: 0, maxVal: 30, direction: 'N' }, { minVal: 31, maxVal: 45, direction: 'NNE' }, { minVal: 46, maxVal: 75, direction: 'NE' }, { minVal: 76, maxVal: 90, direction: 'ENE' }, { minVal: 91, maxVal: 120, direction: 'E' }, { minVal: 121, maxVal: 135, direction: 'ESE' }, { minVal: 136, maxVal: 165, direction: 'SE' }, { minVal: 166, maxVal: 180, direction: 'SSE' }, { minVal: 181, maxVal: 210, direction: 'S' }, { minVal: 211, maxVal: 225, direction: 'SSW' }, { minVal: 226, maxVal: 255, direction: 'SW' }, { minVal: 256, maxVal: 270, direction: 'WSW' }, { minVal: 271, maxVal: 300, direction: 'W' }, { minVal: 301, maxVal: 315, direction: 'WNW' }, { minVal: 316, maxVal: 345, direction: 'NW' }, { minVal: 346, maxVal: 360, direction: 'NNW' } ]; var wind_direction = ''; for (var i = 0; i = wind_directions_array[i].minVal && windDir
Although we haven’t implemented it, you can take out the utility methods from the .vue file, and put it in a separate JavaScript file. All you need to do is import the .js file at the start of the script part in the .vue file, and you should be good to go. Such approach works really well and keeps the code clean, especially in big applications where you might use lots of methods that are better grouped together based on their purpose. You can apply this approach to all of the method groups listed in this article, and see the effect itself. However, we suggest you do that exercise once you have followed the course presented here, so that you have the big picture understanding of all the parts working in complete sync, and also have a working piece of software which you can refer to, once something breaks while experimenting.
Action/Event Oriented Methods
These methods are generally executed when we need to take an action corresponding to an event. Depending on the case, the event might be triggered from an user interaction, or programmatically. In the App.vue file, these methods sit below the utility methods.
makeInputEmpty: function() { this.$refs.input.value = ''; },
makeTempVarTodayEmpty: function() { this.tempVar.tempToday = []; },
detectEnterKeyPress: function() { var input = this.$refs.input; input.addEventListener('keyup', function(event) { event.preventDefault(); var enterKeyCode = 13; if (event.keyCode === enterKeyCode) { this.setHitEnterKeyTrue(); } }); },
locationEntered: function() { var input = this.$refs.input; if (input.value === '') { this.location = "New York"; } else { this.location = this.convertToTitleCase(input.value); } this.makeInputEmpty(); this.makeTempVarTodayEmpty(); },
One interesting thing in some of the above code snippets is the use of $ref. In simple terms, it’s Vue’s way of associating the code statement containing it, to the HTML construct it is supposed to affect (for more information, read the official guide). For example, the methods makeInputEmpty() and detectEnterKeyPress() affects the input box, because in the HTML of the input box we have mentioned the value of the attribute ref as input.
Data Acquisition Methods
We are using the following two APIs in our project:
Google Maps Geocoder API
This API is for getting the coordinates of the location that the user searches. You will need an API key for yourself, which you can get by following the documentation in the given link. For now, you can use the API key used by FusionCharts, but we request you not to abuse it and get a key of your own. We refer to the JavaScript API from the index.html of this project, and we shall use the constructors provided by it for our code in the App.vue file.
The Dark Sky Weather API
This API is for getting the weather data corresponding to the coordinates. However, we won’t be using it directly; we will wrap it within an URL that redirects through one of the FusionCharts’s server. The reason is that if you send a GET request to the API from an entirely client-end application such as ours, it results in the frustrating CORS error (more information here and here).
Important Note: Since we have used Google Maps and Dark Sky APIs, Both these APIs have their own API keys which we have shared with you in this article. This will help you focus on client-side developments rather than the headache of backend implementation. However, we recommend you to create your own keys, because our APIs keys will come with limits and if these limits exceed you won't be able to try the application by yourself.
For Google Maps, go to this article to get your API key. For Dark Sky API, visit https://darksky.net/dev to create your API key and respective endpoints.
With the context in mind, let’s see the implementation of the data acquisition methods for our project.
getCoordinates: function() { this.locationEntered(); var loc = this.location; var coords; var geocoder = new google.maps.Geocoder(); return new Promise(function(resolve, reject) { geocoder.geocode({ address: loc }, function(results, status) { if (status == google.maps.GeocoderStatus.OK) { this.lat = results[0].geometry.location.lat(); this.long = results[0].geometry.location.lng(); this.full_location = results[0].formatted_address; coords = { lat: this.lat, long: this.long, full_location: this.full_location }; resolve(coords); } else { alert("Oops! Couldn't get data for the location"); } }); }); },
/* The coordinates that Google Maps Geocoder API returns are way too accurate for our requirements. We need to bring it into shape before passing the coordinates on to the weather API. Although this is a data processing method in its own right, we can’t help mentioning it right now, because the data acquisition method for the weather API has dependency on the output of this method. */ setFormatCoordinates: async function() { var coordinates = await this.getCoordinates(); this.lat = coordinates.lat; this.long = coordinates.long; this.currentWeather.full_location = coordinates.full_location; // Remember to beautify lat for N/S if (coordinates.lat > 0) { this.currentWeather.formatted_lat = (Math.round(coordinates.lat * 10000) / 10000).toString() + '°N'; } else if (coordinates.lat 0) { this.currentWeather.formatted_long = (Math.round(coordinates.long * 10000) / 10000).toString() + '°E'; } else if (coordinates.long
/* This method dynamically creates the the correct weather API query URL, based on the formatted latitude and longitude. The complete URL is then fed to the method querying for weather data. Notice that the base URL used in this method (without the coordinates) points towards a FusionCharts server — we must redirect our GET request to the weather API through a server to avoid the CORS error. */ fixWeatherApi: async function() { await this.setFormatCoordinates(); var weatherApi = 'https://csm.fusioncharts.com/files/assets/wb/wb-data.php?src=darksky&lat=' + this.lat + '&long=' + this.long; this.completeWeatherApi = weatherApi; },
fetchWeatherData: async function() { await this.fixWeatherApi(); var axios = require('axios'); // for handling weather api promise var weatherApiResponse = await axios.get(this.completeWeatherApi); if (weatherApiResponse.status === 200) { this.rawWeatherData = weatherApiResponse.data; } else { alert('Hmm... Seems like our weather experts are busy!'); } },
Through these methods, we have introduced the concept of async-await in our code. If you have been a JavaScript developer for some time now, you must be familiar with the callback hell, which is a direct consequence of the asynchronous way JavaScript is written. ES6 allows us to bypass the cumbersome nested callbacks, and our code becomes much cleaner if we write JavaScript in a synchronous way, using the async-await technique. However, there is a downside. It takes away the speed that asynchronous code gives us, especially for the portions of the code that deals with data being exchanged over the internet. Since this is not a mission-critical application with low latency requirements, and our primary aim is to learn stuff, the clean code is much more preferable over the slightly fast code.
Data Processing Methods
Now that we have the methods that will bring the data to us, we need to prepare the ground for properly receiving and processing the data. Safety nets must be cast, and there should be no spills — data is the new gold (OK, that might be an exaggeration in our context)! Enough with the fuss, let’s get to the point.
Technically, the methods we implement in this section are aimed at getting the data out of the acquisition methods and the data objects in App.vue, and sometimes setting the data objects to certain values that suits the purpose.
getTimezone: function() { return this.rawWeatherData.timezone; },
getSetCurrentTime: function() { var currentTime = this.rawWeatherData.currently.time; var timezone = this.getTimezone(); this.currentWeather.time = this.unixToHuman( timezone, currentTime ).fullTime; },
getSetSummary: function() { var currentSummary = this.convertToTitleCase( this.rawWeatherData.currently.summary ); if (currentSummary.includes(' And')) { currentSummary = currentSummary.replace(' And', ','); } this.currentWeather.summary = currentSummary; },
getSetPossibility: function() { var possible = this.formatPossibility(this.rawWeatherData.daily.icon); if (possible.includes(' And')) { possible = possible.replace(' And', ','); } this.currentWeather.possibility = possible; },
getSetCurrentTemp: function() { var currentTemp = this.rawWeatherData.currently.temperature; this.currentWeather.temp = this.fahToCel(currentTemp); },
getTodayDetails: function() { return this.rawWeatherData.daily.data[0]; },
getSetTodayTempHighLowWithTime: function() { var timezone = this.getTimezone(); var todayDetails = this.getTodayDetails(); this.currentWeather.todayHighLow.todayTempHigh = this.fahToCel( todayDetails.temperatureMax ); this.currentWeather.todayHighLow.todayTempHighTime = this.unixToHuman( timezone, todayDetails.temperatureMaxTime ).onlyTime; this.currentWeather.todayHighLow.todayTempLow = this.fahToCel( todayDetails.temperatureMin ); this.currentWeather.todayHighLow.todayTempLowTime = this.unixToHuman( timezone, todayDetails.temperatureMinTime ).onlyTime; },
getHourlyInfoToday: function() { return this.rawWeatherData.hourly.data; },
getSetHourlyTempInfoToday: function() { var unixTime = this.rawWeatherData.currently.time; var timezone = this.getTimezone(); var todayMonthDate = this.unixToHuman(timezone, unixTime).onlyMonthDate; var hourlyData = this.getHourlyInfoToday(); for (var i = 0; i
getSetUVIndex: function() { var uvIndex = this.rawWeatherData.currently.uvIndex; this.highlights.uvIndex = uvIndex; },
getSetVisibility: function() { var visibilityInMiles = this.rawWeatherData.currently.visibility; this.highlights.visibility = this.mileToKilometer(visibilityInMiles); },
getSetWindStatus: function() { var windSpeedInMiles = this.rawWeatherData.currently.windSpeed; this.highlights.windStatus.windSpeed = this.mileToKilometer( windSpeedInMiles ); var absoluteWindDir = this.rawWeatherData.currently.windBearing; this.highlights.windStatus.windDirection = absoluteWindDir; this.highlights.windStatus.derivedWindDirection = this.deriveWindDir( absoluteWindDir ); },
High Level Glue Methods
With the utility, acquisition, and processing methods out of our way, we are now left with the task of orchestrating the entire thing. We do that by creating high level glue methods, that essentially calls the methods written above in a particular sequence, so that the entire operation is executed seamlessly.
// Top level for info section // Data in this.currentWeather organizeCurrentWeatherInfo: function() { // data in this.currentWeather /* Coordinates and location is covered (get & set) in: — this.getCoordinates() — this.setFormatCoordinates() There are lots of async-await involved there. So it's better to keep them there. */ this.getSetCurrentTime(); this.getSetCurrentTemp(); this.getSetTodayTempHighLowWithTime(); this.getSetSummary(); this.getSetPossibility(); },
// Top level for highlights organizeTodayHighlights: function() { // top level for highlights this.getSetUVIndex(); this.getSetVisibility(); this.getSetWindStatus(); },
// Top level organization and rendering organizeAllDetails: async function() { // top level organization await this.fetchWeatherData(); this.organizeCurrentWeatherInfo(); this.organizeTodayHighlights(); this.getSetHourlyTempInfoToday(); },
mounted
Vue provides instance lifecycle hooks — properties that are essentially methods, and gets triggered when the instance lifecycle reaches that stage. For example, created, mounted, beforeUpdate, etc., are all very useful lifecycle hooks that allows the programmer to control the instance at a much more granular level than that would have been possible otherwise.
In the code of a Vue component, these lifecycle hooks are implemented just like you would for any other prop. For example:
<template> </template> <script> // import statements export default { data() { return { // data objects here } }, methods: { // methods here }, mounted: function(){ // function body here }, } </script> <style> </style>
Armed with this new understanding, take a look at the code below for the mounted prop of App.vue:
mounted: async function() { this.location = "New York"; await this.organizeAllDetails(); }
Complete Code For App.vue
We have covered a lot of ground in this section, and the last few sections have given you things in bits and pieces. However, it’s important that you have the complete, assembled code for App.vue (subject to further modifications in subsequent sections). Here it goes:
<template> <div id="ancestor"> <div class="container-fluid" id="app"> <div class="row"> <div id="sidebar" class="col-md-3 col-sm-4 col-xs-12 sidebar"> <div id="search"> <input id="location-input" type="text" ref="input" placeholder="Location?" @keyup.enter="organizeAllDetails" > <button id="search-btn" @click="organizeAllDetails"> <img src="./assets/Search.svg" width="24" height="24"> </button> </div> <div id="info"> <div class="wrapper-left"> <div id="current-weather"> <span>°C</span> </div> <div id="weather-desc"></div> <div class="temp-max-min"> <div class="max-desc"> <div id="max-detail"> <i>▲</i> <span>°C</span> </div> <div id="max-summary">at </div> </div> <div class="min-desc"> <div id="min-detail"> <i>▼</i> <span>°C</span> </div> <div id="min-summary">at </div> </div> </div> </div> <div class="wrapper-right"> <div class="date-time-info"> <div id="date-desc"> <img src="./assets/calendar.svg" width="20" height="20"> </div> </div> <div class="location-info"> <div id="location-desc"> <img src="./assets/location.svg" width="10.83" height="15.83" style="opacity: 0.9;" > <div id="location-detail" class="mt-1"> Lat: <br> Long: </div> </div> </div> </div> </div> </div> <dashboard-content class="col-md-9 col-sm-8 col-xs-12 content" id="dashboard-content" :highlights="highlights" :tempVar="tempVar" ></dashboard-content> </div> </div> </div> </template> <script> import Content from './components/Content.vue'; export default { name: 'app', props: [], components: { 'dashboard-content': Content }, data() { return { weatherDetails: false, location: '', // raw location from input lat: '', // raw latitude from google maps api response long: '', // raw longitude from google maps api response completeWeatherApi: '', // weather api string with lat and long rawWeatherData: '', // raw response from weather api currentWeather: { full_location: '', // for full address formatted_lat: '', // for N/S formatted_long: '', // for E/W time: '', temp: '', todayHighLow: { todayTempHigh: '', todayTempHighTime: '', todayTempLow: '', todayTempLowTime: '' }, summary: '', possibility: '' }, tempVar: { tempToday: [ // gets added dynamically by this.getSetHourlyTempInfoToday() ], }, highlights: { uvIndex: '', visibility: '', windStatus: { windSpeed: '', windDirection: '', derivedWindDirection: '' }, } }; }, methods: { // Some utility functions convertToTitleCase: function(str) { str = str.toLowerCase().split(' '); for (var i = 0; i < str.length; i++) { str[i] = str[i].charAt(0).toUpperCase() + str[i].slice(1); } return str.join(' '); }, formatPossibility: function(str) { str = str.toLowerCase().split('-'); for (var i = 0; i < str.length; i++) { str[i] = str[i].charAt(0).toUpperCase() + str[i].slice(1); } return str.join(' '); }, unixToHuman: function(timezone, timestamp) { /* READ THIS BEFORE JUDGING & DEBUGGING For any location beyond the arctic circle and the antarctic circle, the goddamn weather api does not return certain keys/values in each of this.rawWeatherData.daily.data[some_array_index]. Due to this, console throws up an error. The code is correct, the problem is with the API. May be later on I will add some padding to tackle missing values. */ var moment = require('moment-timezone'); // for handling date & time var decipher = new Date(timestamp * 1000); var human = moment(decipher) .tz(timezone) .format('llll'); var timeArray = human.split(' '); var timeNumeral = timeArray[4]; var timeSuffix = timeArray[5]; var justTime = timeNumeral + ' ' + timeSuffix; var monthDateArray = human.split(','); var monthDate = monthDateArray[1].trim(); return { fullTime: human, onlyTime: justTime, onlyMonthDate: monthDate }; }, fahToCel: function(tempInFahrenheit) { var tempInCelcius = Math.round((5 / 9) * (tempInFahrenheit — 32)); return tempInCelcius; }, milibarToKiloPascal: function(pressureInMilibar) { var pressureInKPA = pressureInMilibar * 0.1; return Math.round(pressureInKPA); }, mileToKilometer: function(miles) { var kilometer = miles * 1.60934; return Math.round(kilometer); }, deriveWindDir: function(windDir) { var wind_directions_array = [ { minVal: 0, maxVal: 30, direction: 'N' }, { minVal: 31, maxVal: 45, direction: 'NNE' }, { minVal: 46, maxVal: 75, direction: 'NE' }, { minVal: 76, maxVal: 90, direction: 'ENE' }, { minVal: 91, maxVal: 120, direction: 'E' }, { minVal: 121, maxVal: 135, direction: 'ESE' }, { minVal: 136, maxVal: 165, direction: 'SE' }, { minVal: 166, maxVal: 180, direction: 'SSE' }, { minVal: 181, maxVal: 210, direction: 'S' }, { minVal: 211, maxVal: 225, direction: 'SSW' }, { minVal: 226, maxVal: 255, direction: 'SW' }, { minVal: 256, maxVal: 270, direction: 'WSW' }, { minVal: 271, maxVal: 300, direction: 'W' }, { minVal: 301, maxVal: 315, direction: 'WNW' }, { minVal: 316, maxVal: 345, direction: 'NW' }, { minVal: 346, maxVal: 360, direction: 'NNW' } ]; var wind_direction = ''; for (var i = 0; i < wind_directions_array.length; i++) { if ( windDir >= wind_directions_array[i].minVal && windDir <= wind_directions_array[i].maxVal ) { wind_direction = wind_directions_array[i].direction; } } return wind_direction; }, // Some basic action oriented functions makeInputEmpty: function() { this.$refs.input.value = ''; }, makeTempVarTodayEmpty: function() { this.tempVar.tempToday = []; }, detectEnterKeyPress: function() { var input = this.$refs.input; input.addEventListener('keyup', function(event) { event.preventDefault(); var enterKeyCode = 13; if (event.keyCode === enterKeyCode) { this.setHitEnterKeyTrue(); } }); }, locationEntered: function() { var input = this.$refs.input; if (input.value === '') { this.location = "New York"; } else { this.location = this.convertToTitleCase(input.value); } this.makeInputEmpty(); this.makeTempVarTodayEmpty(); }, getCoordinates: function() { this.locationEntered(); var loc = this.location; var coords; var geocoder = new google.maps.Geocoder(); return new Promise(function(resolve, reject) { geocoder.geocode({ address: loc }, function(results, status) { if (status == google.maps.GeocoderStatus.OK) { this.lat = results[0].geometry.location.lat(); this.long = results[0].geometry.location.lng(); this.full_location = results[0].formatted_address; coords = { lat: this.lat, long: this.long, full_location: this.full_location }; resolve(coords); } else { alert("Oops! Couldn't get data for the location"); } }); }); }, // Some basic asynchronous functions setFormatCoordinates: async function() { var coordinates = await this.getCoordinates(); this.lat = coordinates.lat; this.long = coordinates.long; this.currentWeather.full_location = coordinates.full_location; // Remember to beautify lat for N/S if (coordinates.lat > 0) { this.currentWeather.formatted_lat = (Math.round(coordinates.lat * 10000) / 10000).toString() + '°N'; } else if (coordinates.lat < 0) { this.currentWeather.formatted_lat = (-1 * (Math.round(coordinates.lat * 10000) / 10000)).toString() + '°S'; } else { this.currentWeather.formatted_lat = ( Math.round(coordinates.lat * 10000) / 10000 ).toString(); } // Remember to beautify long for N/S if (coordinates.long > 0) { this.currentWeather.formatted_long = (Math.round(coordinates.long * 10000) / 10000).toString() + '°E'; } else if (coordinates.long < 0) { this.currentWeather.formatted_long = (-1 * (Math.round(coordinates.long * 10000) / 10000)).toString() + '°W'; } else { this.currentWeather.formatted_long = ( Math.round(coordinates.long * 10000) / 10000 ).toString(); } }, fixWeatherApi: async function() { await this.setFormatCoordinates(); var weatherApi = 'https://csm.fusioncharts.com/files/assets/wb/wb-data.php?src=darksky&lat=' + this.lat + '&long=' + this.long; this.completeWeatherApi = weatherApi; }, fetchWeatherData: async function() { await this.fixWeatherApi(); var axios = require('axios'); // for handling weather api promise var weatherApiResponse = await axios.get(this.completeWeatherApi); if (weatherApiResponse.status === 200) { this.rawWeatherData = weatherApiResponse.data; } else { alert('Hmm... Seems like our weather experts are busy!'); } }, // Get and set functions; often combined, because they are short // For basic info — left panel/sidebar getTimezone: function() { return this.rawWeatherData.timezone; }, getSetCurrentTime: function() { var currentTime = this.rawWeatherData.currently.time; var timezone = this.getTimezone(); this.currentWeather.time = this.unixToHuman( timezone, currentTime ).fullTime; }, getSetSummary: function() { var currentSummary = this.convertToTitleCase( this.rawWeatherData.currently.summary ); if (currentSummary.includes(' And')) { currentSummary = currentSummary.replace(' And', ','); } this.currentWeather.summary = currentSummary; }, getSetPossibility: function() { var possible = this.formatPossibility(this.rawWeatherData.daily.icon); if (possible.includes(' And')) { possible = possible.replace(' And', ','); } this.currentWeather.possibility = possible; }, getSetCurrentTemp: function() { var currentTemp = this.rawWeatherData.currently.temperature; this.currentWeather.temp = this.fahToCel(currentTemp); }, getTodayDetails: function() { return this.rawWeatherData.daily.data[0]; }, getSetTodayTempHighLowWithTime: function() { var timezone = this.getTimezone(); var todayDetails = this.getTodayDetails(); this.currentWeather.todayHighLow.todayTempHigh = this.fahToCel( todayDetails.temperatureMax ); this.currentWeather.todayHighLow.todayTempHighTime = this.unixToHuman( timezone, todayDetails.temperatureMaxTime ).onlyTime; this.currentWeather.todayHighLow.todayTempLow = this.fahToCel( todayDetails.temperatureMin ); this.currentWeather.todayHighLow.todayTempLowTime = this.unixToHuman( timezone, todayDetails.temperatureMinTime ).onlyTime; }, getHourlyInfoToday: function() { return this.rawWeatherData.hourly.data; }, getSetHourlyTempInfoToday: function() { var unixTime = this.rawWeatherData.currently.time; var timezone = this.getTimezone(); var todayMonthDate = this.unixToHuman(timezone, unixTime).onlyMonthDate; var hourlyData = this.getHourlyInfoToday(); for (var i = 0; i < hourlyData.length; i++) { var hourlyTimeAllTypes = this.unixToHuman(timezone, hourlyData[i].time); var hourlyOnlyTime = hourlyTimeAllTypes.onlyTime; var hourlyMonthDate = hourlyTimeAllTypes.onlyMonthDate; if (todayMonthDate === hourlyMonthDate) { var hourlyObject = { hour: '', temp: '' }; hourlyObject.hour = hourlyOnlyTime; hourlyObject.temp = this.fahToCel(hourlyData[i].temperature).toString(); this.tempVar.tempToday.push(hourlyObject); /* Since we are using array.push(), we are just adding elements at the end of the array. Thus, the array is not getting emptied first when a new location is entered. to solve this problem, a method this.makeTempVarTodayEmpty() has been created, and called from this.locationEntered(). */ } } /* To cover the edge case where the local time is between 10 — 12 PM, and therefore there are only two elements in the array this.tempVar.tempToday. We need to add the points for minimum temperature and maximum temperature so that the chart gets generated with atleast four points. */ if (this.tempVar.tempToday.length <= 2) { var minTempObject = { hour: this.currentWeather.todayHighLow.todayTempHighTime, temp: this.currentWeather.todayHighLow.todayTempHigh }; var maxTempObject = { hour: this.currentWeather.todayHighLow.todayTempLowTime, temp: this.currentWeather.todayHighLow.todayTempLow }; /* Typically, lowest temp are at dawn, highest temp is around mid day. Thus we can safely arrange like min, max, temp after 10 PM. */ // array.unshift() adds stuff at the beginning of the array. // the order will be: min, max, 10 PM, 11 PM. this.tempVar.tempToday.unshift(maxTempObject, minTempObject); } }, // For Today Highlights getSetUVIndex: function() { var uvIndex = this.rawWeatherData.currently.uvIndex; this.highlights.uvIndex = uvIndex; }, getSetVisibility: function() { var visibilityInMiles = this.rawWeatherData.currently.visibility; this.highlights.visibility = this.mileToKilometer(visibilityInMiles); }, getSetWindStatus: function() { var windSpeedInMiles = this.rawWeatherData.currently.windSpeed; this.highlights.windStatus.windSpeed = this.mileToKilometer( windSpeedInMiles ); var absoluteWindDir = this.rawWeatherData.currently.windBearing; this.highlights.windStatus.windDirection = absoluteWindDir; this.highlights.windStatus.derivedWindDirection = this.deriveWindDir( absoluteWindDir ); }, // top level for info section organizeCurrentWeatherInfo: function() { // data in this.currentWeather /* Coordinates and location is covered (get & set) in: — this.getCoordinates() — this.setFormatCoordinates() There are lots of async-await involved there. So it's better to keep them there. */ this.getSetCurrentTime(); this.getSetCurrentTemp(); this.getSetTodayTempHighLowWithTime(); this.getSetSummary(); this.getSetPossibility(); }, organizeTodayHighlights: function() { // top level for highlights this.getSetUVIndex(); this.getSetVisibility(); this.getSetWindStatus(); }, // topmost level orchestration organizeAllDetails: async function() { // top level organization await this.fetchWeatherData(); this.organizeCurrentWeatherInfo(); this.organizeTodayHighlights(); this.getSetHourlyTempInfoToday(); }, }, mounted: async function() { this.location = "New York"; await this.organizeAllDetails(); } }; </script>
And finally, after so much of patience and hard work, you can see the data flow with its raw power! Visit the application on the browser, refresh the page, search for a location in the application’s search box, and hit Enter!
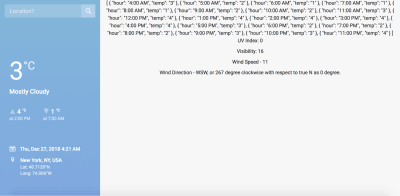
(Large preview)
Now that we are done with all the heavy lifting, take a break. The subsequent sections focus on using the data to create charts that are beautiful and informative, followed by giving our ugly looking application a much deserved grooming session using CSS.
5. Data Visualization With FusionCharts
Fundamental Considerations For Charts
For the end user, the essence of a dashboard is essentially this: a collection of the filtered and carefully curated information on a particular topic, conveyed through visual/graphic instruments for quick ingestion. They don’t care about the subtleties of your data pipeline engineering, or how aesthetic your code is — all they want is a high-level view in 3 seconds. Therefore, our crude application displaying text data means nothing to them, and it’s high time we implement mechanisms to wrap the data with charts.
However, before we dive deep into the implementation of charts, let’s consider some pertinent questions and the possible answers from our perspective:
What type of charts are appropriate for the type of data we are dealing with?
Well, the answer has two aspects — the context, and the purpose. By context, we mean the type of data, and it’s overall fit in the scheme of bigger things, bounded by the scope and audience of the project. And by purpose, we essentially mean “what we want to emphasize on?”. For example, we can represent today’s temperature at different times of the day by using a Column chart (vertical columns of equal width, with height proportional to the value the column represents). However, we are rarely interested in the individual values, but rather the overall variation and trend throughout the data. To suit the purpose, it is in our best interest to use a Line chart, and we will do that shortly.
What should be kept in mind before selecting a charting library?
Since we are doing a project predominantly using JavaScript based technologies, it’s a no-brainer that any charting library that we choose for our project should be a native of the JavaScript world. With that basic premise in mind, we should consider the following before zeroing down on any particular library:
Support for the frameworks of our choice, which in this case, is Vue.js. A project can be developed in other popular JavaScript frameworks like React, or Angular — check the support of the charting library for your favorite framework. Also, support for other popular programming languages like Python, Java, C++, .Net (AS and VB), especially when the project involves some serious backend stuff, must be considered.
Availability of charts types and features, since it is almost impossible to know beforehand what will be final shape and purpose of the data in the project (especially if the requirements are regulated by your clients in a professional setting). In this case, you should cast your net wide, and choose a charting library that has the widest collection of charts. More importantly, to differentiate your project from others, the library should have have enough features in the form of configurable chart attributes, so that you can fine-tune and customize most aspects of the charts and the right level of granularity. Also, the default chart configurations should be sensible, and the library documentation has to be top notch, for reasons that’s obvious to professional developers.
Learning curve, support community, and balance must also be taken into consideration, especially when you are new to data visualization. On one end of the spectrum, you have proprietary tools like Tableau and Qlickview that costs a bomb, has smooth learning curve, but also comes with so many limitations in terms of customizability, integration, and deployment. On the other end there is d3.js — vast, free (open source), and customizable to its core, but you have to pay the price of a very steep learning curve to be able to do anything productive with the library.
What you need is the sweet spot — the right balance between productivity, coverage, customizability, learning curve, and off course, cost. We nudge you to take a look at FusionCharts — the world’s most comprehensive and enterprise-ready JavaScript charting library for the web and mobile, that we will be using in this project for creating charts.
Introduction To FusionCharts
FusionCharts is used worldwide as the go-to JavaScript charting library by millions of developers spread across hundreds of countries around the globe. Technically, it’s as loaded and configurable as it can be, with support for integrating it with almost any popular tech stack used for web based projects. Using FusionCharts commercially requires a license, and you have to pay for the license depending on your use case (please contact sales if you are curious). However, we are using FusionCharts in this projects just to try out a few things, and therefore the non-licensed version (comes with a small watermark in your charts, and a few other restrictions). Using the non-licensed version is perfectly fine when you are trying out the charts and using it in your non-commercial or personal projects. If you have plans to deploy the application commercially, please ensure that you have a license from FusionCharts.
Since this is a project involving Vue.js, we will need two modules that needs to be installed, if not done earlier:
The fusioncharts module, because it contains everything you will need for creating the charts
The vue-fusioncharts module, which is essentially a wrapper for fusioncharts, so that it can be used in a Vue.js project
If you have not installed them earlier (as instructed in the third section), install them by executing the following command from the project’s root directory:
npm install fusioncharts vue-fusioncharts --save
Next, ensure that the src/main.js file of the project has the following code (also mentioned in section 3):
import Vue from 'vue'; import App from './App.vue'; import FusionCharts from 'fusioncharts'; import Charts from 'fusioncharts/fusioncharts.charts'; import Widgets from 'fusioncharts/fusioncharts.widgets'; import PowerCharts from 'fusioncharts/fusioncharts.powercharts'; import FusionTheme from 'fusioncharts/themes/fusioncharts.theme.fusion'; import VueFusionCharts from 'vue-fusioncharts'; Charts(FusionCharts); PowerCharts(FusionCharts); Widgets(FusionCharts); FusionTheme(FusionCharts); Vue.use(VueFusionCharts, FusionCharts); new Vue({ el: '#app', render: h => h(App) })
Perhaps the most critical line in the above snippet is the following:
Vue.use(VueFusionCharts, FusionCharts)
It instructs Vue to use the vue-fusioncharts module for making sense of many things in the project that are apparently not explicitly defined by us, but is defined in the module itself. Also, this type of statement implies global declaration, by which we mean that anywhere Vue encounters anything strange in the code of our project (things that we have not explicitly defined about using FusionCharts), it will at least look once in the vue-fusioncharts and fusioncharts node modules for their definitions, before throwing up errors. If we would have used FusionCharts in an isolated part of our project (not using it in almost all of the component files), then perhaps local declaration would have made more sense.
With that, you are all set to use FusionCharts in the project. We will be using quite a few variety of charts, the choice being dependent on the aspect of the weather data that we want to visualize. Also, we will get to see the interplay of data binding, custom components, and watchers in action.
General Scheme For Using Fusioncharts In .vue Files
In this section, we will explain the general idea of using FusionCharts for creating various charts in the .vue files. But first, let’s see the pseudocode that schematically illustrates the core idea.
<template> <div> <fusioncharts :attribute_1="data_object_1" :attribute_2="data_object_2" … … ... > </fusioncharts> </div> </template> <script> export default { props: ["data_prop_received_by_the_component"], components: {}, data() { return { data_object_1: "value_1", data_object_2: "value_2", … … }; }, methods: {}, computed: {}, watch: { data_prop_received_by_the_component: { handler: function() { // some code/logic, mainly data manipulation based }, deep: true } } }; </script> <style> // component specific special CSS code here </style>
Let’s understand different parts of the above pseudocode:
In the <template>, within the top level <div> (that’s pretty much mandatory for the template HTML code of every component), we have the custom component <fusioncharts>. We have the definition of the component contained in the vue-fusioncharts Node module that we have installed for this project. Internally, vue-fusioncharts relies on the fusioncharts module, which have also been installed. We imported the necessary modules and resolved their dependencies, instructed Vue to use the wrapper globally (throughout the project) in the src/main.js file, and therefore there is no lack of definition for the custom <fusioncharts> component that we have used here. Also, the custom component has custom attributes, and each of the custom attribute is bound to a data object (and in turn, their values), by the v-bind directive, for which the shorthand is the colon (:) symbol. We will learn about the attributes and their associated data objects in a greater detail, when we discuss some of the specific charts used in this project.
In the <script>, first you declare the props that the component is supposed to receive, and then go on defining the data objects that are bounded to the attributes of <fusioncharts>. The values assigned to the data objects are the values that the attributes of <fusioncharts> pulls in, and the charts are created on the basis of those pulled in values. Apart from these, the most interesting part of the code is the watch { } object. This is a very special object in Vue’s scheme of things — it essentially instructs Vue to watch over any changes happening to certain data, and then take actions based on how the handler function for that data has been defined. For example, we want Vue to keep a watch on the prop received, i.e., data_prop_received_by_the_component in the pseudocode. The prop becomes a key in the watch { } object, and the value of the key is another object — a handler method that describes what needs to be done whenever the prop changes. With such elegant mechanisms to handle the changes, the app maintains its reactivity. The deep: true represents a boolean flag that you can associate with watchers, so that the object being watched is watched rather deeply, i.e., even the changes made in the nested levels of the object are tracked.
(For more information on watchers, consult the official documentation).
Now that you are equipped with an understanding of the general scheme of things, let’s dive into the specific implementations of the charts in the .vue component files. The code will be pretty self-explanatory, and you should try to understand how the specifics fit in the general scheme of things described above.
Implementation Of Charts In .vue Files
While the very specifics of the implementation varies from one chart to another, the following explanation is applicable for all of them:
<template>
As explained previously, the <fusioncharts> custom component has several attributes, each of them being bound to corresponding data object defined in the data() function by using the v-bind: directive. The attribute names are quite self-explanatory for what they mean, and figuring out the corresponding data objects is also trivial.
<script>
In the data() function, the data objects and their values are what makes the charts work, because of the binding done by the v-bind (:) directives used on the attributes of <fusioncharts>. Before we dive deep into the individual data objects, it’s worth mentioning some general characteristics:
The data objects whose values are either 0 or 1 are boolean in nature, where 0 represents something not available/turned off, and 1 represents availability/turned on state. However, be cautious that non-boolean data objects can also have 0 or 1 as their values, besides other possible values — it depends on the context. For example, containerbackgroundopacity with its default value as 0 is boolean, whereas lowerLimit with its default value as 0 simply means the number zero is its literal value.
Some data objects deals with CSS properties like margin, padding, font-size, etc. — the value has an implied unit of “px” or pixel. Similarly, other data objects can have implicit units associated with their values. For detailed information, please refer to the respective chart attributes page of FusionCharts Dev Center.
In the data() function, perhaps the most interesting and non-obvious object is the dataSource. This object has three main objects nested within it:
chart: This object encapsulates lots of chart attributes related to the configuration and cosmetics of the chart. It is almost a compulsory construct that you will find in all the charts you will create for this project.
colorrange: This object is somewhat specific to the chart under consideration, and is mainly present in charts that deals with multiple colors/shades to demarcate different sub-ranges of the scale used in chart.
value: This object, again, is present in charts that has a specific value that needs to be highlighted in the range of the scale.
The watch { } object is perhaps the most crucial thing that makes this chart, and the other charts used in this project, spring to life. The reactivity of the charts, i.e., the charts updating themselves based on the new values resulting from a new user query is controlled by the watchers defined in this object. For example, we have defined a watcher for the prop highlights received by the component, and then defined a handler function to instruct Vue about the necessary actions that it should take, when anything changes about the object being watched in the entire project. This means that whenever App.vue yields a new value for any of the object within highlights, the information trickles down all the way down to this component, and the new value is updated in the data objects of this component. The chart being bound to the values, also gets updated as a result of this mechanism.
The above explanations are quite broad strokes to help us develop an intuitive understanding of the bigger picture. Once you understand the concepts intuitively, you can always consult the documentation of Vue.js and FusionCharts, when something is not clear to you from the code itself. We leave the exercise to you, and from the next subsection onward, we will not explain stuff that we covered in this subsection.
src/components/TempVarChart.vue
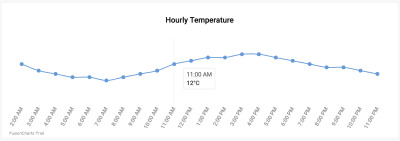
(Large preview)
<template> <div class="custom-card header-card card"> <div class="card-body pt-0"> <fusioncharts type="spline" width="100%" height="100%" dataformat="json" dataEmptyMessage="i-https://i.postimg.cc/R0QCk9vV/Rolling-0-9s-99px.gif" dataEmptyMessageImageScale=39 :datasource="tempChartData" > </fusioncharts> </div> </div> </template> <script> export default { props: ["tempVar"], components: {}, data() { return { tempChartData: { chart: { caption: "Hourly Temperature", captionFontBold: "0", captionFontColor: "#000000", captionPadding: "30", baseFont: "Roboto", chartTopMargin: "30", showHoverEffect: "1", theme: "fusion", showaxislines: "1", numberSuffix: "°C", anchorBgColor: "#6297d9", paletteColors: "#6297d9", drawCrossLine: "1", plotToolText: "$label<br><hr><b>$dataValue</b>", showAxisLines: "0", showYAxisValues: "0", anchorRadius: "4", divLineAlpha: "0", labelFontSize: "13", labelAlpha: "65", labelFontBold: "0", rotateLabels: "1", slantLabels: "1", canvasPadding: "20" }, data: [], }, }; }, methods: { setChartData: function() { var data = []; for (var i = 0; i < this.tempVar.tempToday.length; i++) { var dataObject = { label: this.tempVar.tempToday[i].hour, value: this.tempVar.tempToday[i].temp }; data.push(dataObject); } this.tempChartData.data = data; }, }, mounted: function() { this.setChartData(); }, watch: { tempVar: { handler: function() { this.setChartData(); }, deep: true }, }, }; </script> <style> </style>
src/components/UVIndex.vue
This component contains an extremely useful chart — the Angular Gauge.
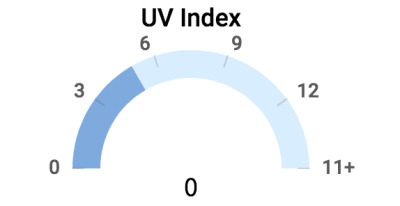
(Large preview)
The code for the component is given below. For detailed information on the chart attributes of Angular Gauge, refer to FusionCharts Dev Center page for Angular Gauge.
<template> <div class="highlights-item col-md-4 col-sm-6 col-xs-12 border-top"> <div> <fusioncharts :type="type" :width="width" :height="height" :containerbackgroundopacity="containerbackgroundopacity" :dataformat="dataformat" :datasource="datasource" ></fusioncharts> </div> </div> </template> <script> export default { props: ["highlights"], components: {}, data() { return { type: "angulargauge", width: "100%", height: "100%", containerbackgroundopacity: 0, dataformat: "json", datasource: { chart: { caption: "UV Index", captionFontBold: "0", captionFontColor: "#000000", captionPadding: "30", lowerLimit: "0", upperLimit: "15", lowerLimitDisplay: "1", upperLimitDisplay: "1", showValue: "0", theme: "fusion", baseFont: "Roboto", bgAlpha: "0", canvasbgAlpha: "0", gaugeInnerRadius: "75", gaugeOuterRadius: "110", pivotRadius: "0", pivotFillAlpha: "0", valueFontSize: "20", valueFontColor: "#000000", valueFontBold: "1", tickValueDistance: "3", autoAlignTickValues: "1", majorTMAlpha: "20", chartTopMargin: "30", chartBottomMargin: "40" }, colorrange: { color: [ { minvalue: "0", maxvalue: this.highlights.uvIndex.toString(), code: "#7DA9E0" }, { minvalue: this.highlights.uvIndex.toString(), maxvalue: "15", code: "#D8EDFF" } ] }, annotations: { groups: [ { items: [ { id: "val-label", type: "text", text: this.highlights.uvIndex.toString(), fontSize: "20", font: "Source Sans Pro", fontBold: "1", fillcolor: "#212529", x: "$gaugeCenterX", y: "$gaugeCenterY" } ] } ] }, dials: { dial: [ { value: this.highlights.uvIndex.toString(), baseWidth: "0", radius: "0", borderThickness: "0", baseRadius: "0" } ] } } }; }, methods: {}, computed: {}, watch: { highlights: { handler: function() { this.datasource.colorrange.color[0].maxvalue = this.highlights.uvIndex.toString(); this.datasource.colorrange.color[1].minvalue = this.highlights.uvIndex.toString(); this.datasource.annotations.groups[0].items[0].text = this.highlights.uvIndex.toString(); }, deep: true } } }; </script>
src/components/Visibility.vue
In this component, we use a Horizontal Linear Gauge to represent the visibility, as shown in the image below:
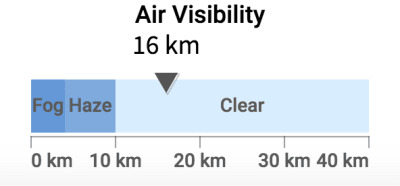
(Large preview)
The code for the component is given below. For an in depth understanding of the different attributes of this chart type, please refer to FusionCharts Dev Center page for Horizontal Linear Gauge.
<template> <div class="highlights-item col-md-4 col-sm-6 col-xs-12 border-left border-right border-top"> <div> <fusioncharts :type="type" :width="width" :height="height" :containerbackgroundopacity="containerbackgroundopacity" :dataformat="dataformat" :datasource="datasource" > </fusioncharts> </div> </div> </template> <script> export default { props: ["highlights"], components: {}, methods: {}, computed: {}, data() { return { type: "hlineargauge", width: "100%", height: "100%", containerbackgroundopacity: 0, dataformat: "json", creditLabel: false, datasource: { chart: { caption: "Air Visibility", captionFontBold: "0", captionFontColor: "#000000", baseFont: "Roboto", numberSuffix: " km", lowerLimit: "0", upperLimit: "40", showPointerShadow: "1", animation: "1", transposeAnimation: "1", theme: "fusion", bgAlpha: "0", canvasBgAlpha: "0", valueFontSize: "20", valueFontColor: "#000000", valueFontBold: "1", pointerBorderAlpha: "0", chartBottomMargin: "40", captionPadding: "30", chartTopMargin: "30" }, colorRange: { color: [ { minValue: "0", maxValue: "4", label: "Fog", code: "#6297d9" }, { minValue: "4", maxValue: "10", label: "Haze", code: "#7DA9E0" }, { minValue: "10", maxValue: "40", label: "Clear", code: "#D8EDFF" } ] }, pointers: { pointer: [ { value: this.highlights.visibility.toString() } ] } } }; }, watch: { highlights: { handler: function() { this.datasource.pointers.pointer[0].value = this.highlights.visibility.toString(); }, deep: true } } }; </script>
src/components/WindStatus.vue
This component displays the wind speed and direction (wind velocity, if you are physics savvy), and it is very difficult to represent a vector using a chart. For such cases, we suggest representing them with the aid of some nice images and text values. Since the representation we have thought about is entirely dependent on CSS, we will implement it in the next section that deals with the CSS. However, take a look at what we are aiming to create:
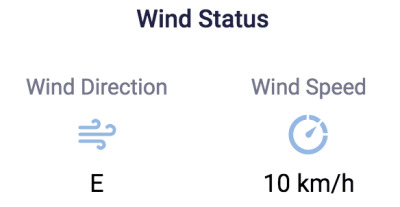
(Large preview)
<template> <div class="highlights-item col-md-4 col-sm-6 col-xs-12 border-top"> <div> <div class="card-heading pt-5">Wind Status</div> <div class="row pt-4 mt-4"> <div class="col-sm-6 col-md-6 mt-2 text-center align-middle"> <p class="card-sub-heading mt-3">Wind Direction</p> <p class="mt-4"><img src="../assets/winddirection.svg" height="40" width="40"></p> <p class="card-value mt-4"></p> </div> <div class="col-sm-6 col-md-6 mt-2"> <p class="card-sub-heading mt-3">Wind Speed</p> <p class="mt-4"><img src="../assets/windspeed.svg" height="40" width="40"></p> <p class="card-value mt-4"> km/h</p> </div> </div> </div> </div> </template> <script> export default { props: ["highlights"], components: {}, data() { return {}; }, methods: {}, computed: {} }; </script>
Wrapping Up With Highlights.vue
Recall that we have already implemented code with CSS for all the components — except Content.vue and Highlights.vue. Since Content.vue is a dumb component that just relays data, the minimal styling it needs has already been covered. Also, we have already written appropriate code for styling the sidebar and the cards containing the charts. Therefore, all we are left to do is add some stylistic bits to Highlights.vue, which primarily involves using the CSS classes:
<template> <div class="custom-content-card content-card card"> <div class="card-body pb-0"> <div class="content-header h4 text-center pt-2 pb-3">Highlights</div> <div class="row"> <uv-index :highlights="highlights"></uv-index> <visibility :highlights="highlights"></visibility> <wind-status :highlights="highlights"></wind-status> </div> </div> </div> </template> <script> import UVIndex from "./UVIndex.vue"; import Visibility from "./Visibility.vue"; import WindStatus from "./WindStatus.vue"; export default { props: ["highlights"], components: { "uv-index": UVIndex, "visibility": Visibility, "wind-status": WindStatus, }, }; </script>
Deployment And Source Code
With the charts and style in order, we are done! Take a moment to appreciate the beauty of your creation.

(Large preview)
It’s now time for you to deploy your application, and share it with your peers. If you don’t have much idea about deployment and expect us to help you, look here about our take on deployment ideas. The linked article also contains suggestions on how to remove the FusionCharts watermark at the left bottom of every chart.
If you mess up somewhere and want a reference point, the source code is available on Github.

(ms, ra, il)
0 notes
Text
Differences Between Static Generated Sites And Server-Side Rendered Apps
About The Author
Front-end developer based in Lagos, Nigeria. He enjoys converting designs into code and building things for the web.
More about
Timi
…
Statically generated sites or pre-rendering and server-side rendered applications are two modern ways to build front-end applications using JavaScript frameworks. These two modes, yet different, are often mixed up as the same thing and in this tutorial, we’re going to learn about the differences between them.
JavaScript currently has three types of applications that you can build with: Single Page Applications (SPAs), pre-rendering/static generated sites and server-side rendered applications. SPAs come with many challenges, one of which is search engine optimization (SEO Company). Possible solutions are to make use of Static Site Generators or Server-Side Rendering (SSR).
In this article, I’m going to explain them alongside listing their pros and cons so you have a balanced view. We’re going to look at what static generated/pre-rendering is as well as frameworks such as Gatsby and VuePress that help in creating statically generated sites. We’re also going to look at what server-side rendered (SSR) applications are as well as frameworks like Nextjs and Nuxtjs that can help you create SSR applications. Finally, we’re going to cover the differences between these two methods and which of them you should use when building your next application.
Note: You can find all the code snippets in this article on GitHub.
What Is A Static Site Generator?
A Static Site Generator (SSG) is a software application that creates HTML pages from templates or components and a given content source. You give it some text files and content, and the generator will give you back a complete website, and this completed website is referred to as a static generated site. What this means is that your site pages are generated at build time and your site content does not change unless you add new contents or components and “rebuild” or you have to rebuild your site if you want it to be updated with new content.
How static site generation works (Large preview)
This approach is good for building applications that the content does not change too often — sites that the content does not have to change depending on the user, and sites that do not have a lot of user-generated content. An example of such a site is a blog or a personal website. Let’s look at some advantages of using static generated sites.
PROS
Fast website: Since all of your site’s pages and content have been generated at build time, you do not have to worry about API calls to the server for content and this makes your site very fast.
Easy to deploy: After your static site has been generated, you would be left with static files, and hence, it can be easily deployed to platforms like Netlify.
Security: Static generated site are solely composed of static files, the risk of being vulnerable to cyber attacks is minimal. This is because static generated sites have no database, attackers cannot inject malicious code or exploit your database.
You can use version control software (e.g git) to manage and track changes to your content. This can come in handy when you want to roll back changes you made to the content on your site.
CONS
Content can become stale if it changes too quickly.
To update its content, you have to rebuild the site.
Build time would increase depending on the size of the application.
Examples of static site generators are GatsbyJS and VuePress. Let us take a look at how to create static sites using these two generators.
Gatsby
According to their official website,
“Gatsby is a free and open-source framework based on React that helps developers build blazing-fast websites and apps.”
This means developers familiar with React would find it easy to get started with Gatsby.
To use this generator, you first have to install it using NPM:
npm install -g gatsby-cli
This will install Gatsby globally on your machine, you only have to run this command once on your machine. After this installation is complete, you can create your first static site generator using the following command.
gatsby new demo-gatsby
This command will create a new Gatsby project that I have named demo-gatsby. When this is done, you can start up your app server by running the following command:
cd demo-gatsby
gatsby develop
Your Gatsby application should be running on localhost:8000.
Gatsby default starter page (Large preview)
The folder structure for this app looks like this;
--| gatsby-browser.js --| LICENSE --| README.md
--| gatsby-config.js
--| node_modules/ --| src/
----| components
----| pages
----| images
--| gatsby-node.js --| package.json --| yarn.lock
--| gatsby-ssr.js --| public/
----| icons
----| page-data
----| static
For this tutorial, we’re only going to look at the src/pages folder. This folder contains files that would be generated into routes on your site.
To test this, let us add a new file (newPage.js) to this folder:
import React from "react"
import { Link } from "gatsby"
import Layout from "../components/layout"
import SEO Company from "../components/SEO Company"
const NewPage = () => ( <Layout> <SEO Company title="My New Page" /> <h1>Hello Gatsby</h1> <p>This is my first Gatsby Page</p> <button> <Link to='/'>Home</Link> </button> </Layout>
)
export default NewPage
Here, we import React from the react package so when your code is transpiled to pure JavaScript, references to React will appear there. We also import a Link component from gatsby and this is one of React’s route tag that is used in place of the native anchor tag ( <a href='#'>Link</a>). It accepts a to prop that takes a route as a value.
We import a Layout component that was added to your app by default. This component handles the layout of pages nested inside it. We also import the SEO Company component into this new file. This component accepts a title prop and configures this value as part of your page’s metadata. Finally, we export the function NewPage that returns a JSX containing your new page’s content.
And in your index.js file, add a link to this new page we just created:
import React from "react"
import { Link } from "gatsby"
import Layout from "../components/layout"
import Image from "../components/image"
import SEO Company from "../components/SEO Company"
const IndexPage = () => ( <Layout> <SEO Company title="Home" /> <h1>Hi people</h1> <p>Welcome to your new Gatsby site.</p> <p>Now go build something great.</p> <div style=> <Image /> </div> <Link to="/page-2/">Go to page 2</Link> {/* new link */} <button> <Link to="/newPage/">Go to New Page</Link> </button> </Layout>
)
export default IndexPage
Here, we import the same components that were used in newPage.js file and they perform the same function in this file. We also import an Image component from our components folder. This component is added by default to your Gatsby application and it helps in lazy loading images and serving reduced file size. Finally, we export a function IndexPage that returns JSX containing our new link and some default content.
Now, if we open our browser, we should see our new link at the bottom of the page.
Gatsby landing page with new link (Large preview)
And if you click on Go To New Page, it should take you to your newly added page.
New gatsby page (Large preview)
VuePress
VuePress is a static site generator that is powered by Vue, Vue Router and Webpack. It requires little to no configuration for you to get started with it. While there are a number of tools that are static site generators, VuePress stands out from amongst the pack for a single reason: its primary directive is to make it easier for developers to create and maintain great documentation for their projects.
To use VuePress, you first have to install it:
//globally
yarn global add vuepress # OR npm install -g vuepress //in an existing project
yarn add -D vuepress # OR npm install -D vuepress
Once the installation process is done, you can run the following command in your terminal:
# create the project folder
mkdir demo-vuepress && cd demo-vuepress # create a markdown file
echo '# Hello VuePress' > README.md # start writing
vuepress dev
Here, we create a folder for our VuePress application, add a README.md file with # Hello VuePress as the only content inside this file, and finally, start up our server.
When this is done, our application should be running on localhost:8080 and we should see this in our browser:
VuePress landing page (Large preview)
VuePress supports VueJS syntax and markup inside this file. Update your README.md file with the following:
# Hello VuePress
_VuePress Rocks_
> **Yes!**
_It supports JavaScript interpolation code_
> ****
<p v-for="i of ['v','u', 'e', 'p', 'r', 'e', 's', 's']"></p>
If you go back to your browser, your page should look like this:
Updated Vuepress page (Large preview)
To add a new page to your VuePress site, you add a new markdown file to the root directory and name it whatever you want the route to be. In this case, I’ve gone ahead to name it Page-2.md and added the following to the file:
# hello World
Lorem ipsum dolor sit amet, consectetur adipisicing elit, sed do eiusmod
tempor incididunt ut labore et dolore magna aliqua. Ut enim ad minim veniam,
quis nostrud exercitation ullamco laboris nisi ut aliquip ex ea commodo
consequat.
And now, if you navigate to /page-2 in your browser, we should see this:
A “Hello World” page in VuePress (Large preview)
What Is Server-Side Rendering? (SSR)
Server-Side Rendering (SSR), is the process of displaying web-pages on the server and passing it to the browser/client-side instead of rendering it in the browser. Server-side sends a fully rendered page to the client; the client’s JavaScript bundle takes over and allows the SPA framework to operate.
This means if you have an application that is server-side rendered, your content is fetched on the server side and passed to your browser to display to your user. With client-side rendering it is different, you would have to navigate to that page first before it fetches data from your server meaning your user would have to wait for some seconds before they’re served with the content on that page. Applications that have SSR enabled are called Server-side rendered applications.
How SSR works (Large preview)
This approach is good for building complex applications that require user interaction, rely on a database, or where the content changes very often. This is because content on these sites changes very often and the users need to see the updated content as soon as they’re updated. It is also good for applications that have tailored content depending on who is viewing it and applications where you need to store user-specific data like email and user preference while also catering for SEO Company. An example of this is a large e-commerce platform or a social media site. Let us look at some of the advantages of server-side rendering your applications.
Pros
Content is up to date because it fetches content on the go;
Your site loads fast because it fetches its content on the server-side before rendering it to the user;
Since in SSR JavaScript is rendered server-side, your users’ devices have little relevance to the load time of your page and this leads to better performance.
CONS
More API calls to the server since they’re made per request;
Cannot deploy to a static CDN.
Further examples of frameworks that offer SSR are Next.js and Nuxt.js.
Next.js
Next.js is a React.js framework that helps in building static sites, server-side rendered applications, and so on. Since it was built on React, knowledge of React is required to use this framework.
To create a Next.js app, you need to run the following:
npm init next-app
# or
yarn create next-app
You would be prompted to choose a name your application, I have named my application demo-next. The next option would be to select a template and I’ve selected the Default starter app after which it begins to set up your app. When this is done, we can now start our application
cd demo-next
yarn dev # or npm run dev
Your application should be running on localhost:3000 and you should see this in your browser;
Next.js landing page (Large preview)
The page that is being rendered can be found in pages/index.js so if you open this file and modify the JSX inside the Home function, it would reflect in your browser. Replace the JSX with this:
import Head from 'next/head'
export default function Home() { return ( <div className="container"> <Head> <title>Hello Next.js</title> <link rel="icon" href="/favicon.ico" /> </Head> <main> <h1 className="title"> Welcome to <a href="https://nextjs.org">Next.js!</a> </h1> <p className='description'>Nextjs Rocks!</p> </main> <style jsx>{` main { padding: 5rem 0; flex: 1; display: flex; flex-direction: column; justify-content: center; align-items: center; } .title a { color: #0070f3; text-decoration: none; } .title a:hover, .title a:focus, .title a:active { text-decoration: underline; } .title { margin: 0; line-height: 1.15; font-size: 4rem; } .title, .description { text-align: center; } .description { line-height: 1.5; font-size: 1.5rem; } `}</style> <style jsx global>{` html, body { padding: 0; margin: 0; font-family: -apple-system, BlinkMacSystemFont, Segoe UI, Roboto, Oxygen, Ubuntu, Cantarell, Fira Sans, Droid Sans, Helvetica Neue, sans-serif; } * { box-sizing: border-box; } `}</style> </div> )
}
In this file, we make use of Next.js Head component to set our page’s metadata title and favicon for this page. We also export a Home function that returns a JSX containing our page’s content. This JSX contains our Head component together with our main page’s content. It also contains two style tags, one for styling this page and the other for the global styling of the app.
Now, you should see that the content on your app has changed to this:
Updated landing page (Large preview)
Now if we want to add a new page to our app, we have to add a new file inside the /pages folder. Routes are automatically created based on the /pages folder structure, this means that if you have a folder structure that looks like this:
--| pages
----| index.js ==> '/'
----| about.js ==> '/about'
----| projects
------| next.js ==> '/projects/next'
So in your pages folder, add a new file and name it hello.js then add the following to it:
import Head from 'next/head'
export default function Hello() { return ( <div> <Head> <title>Hello World</title> <link rel="icon" href="/favicon.ico" /> </Head> <main className='container'> <h1 className='title'> Hello <a href="https://en.wikipedia.org/wiki/Hello_World_(film)">World</a> </h1> <p className='subtitle'>Lorem ipsum dolor sit amet, consectetur adipisicing elit. Voluptatem provident soluta, sit explicabo impedit nobis accusantium? Nihil beatae, accusamus modi assumenda, optio omnis aliquid nobis magnam facilis ipsam eum saepe!</p> </main> <style jsx> {` .container { margin: 0 auto; min-height: 100vh; max-width: 800px; text-align: center; } .title { font-family: "Quicksand", "Source Sans Pro", -apple-system, BlinkMacSystemFont, "Segoe UI", Roboto, "Helvetica Neue", Arial, sans-serif; display: block; font-weight: 300; font-size: 100px; color: #35495e; letter-spacing: 1px; } .subtitle { font-weight: 300; font-size: 22px; color: #526488; word-spacing: 5px; padding-bottom: 15px; } `} </style> </div> )
}
This page is identical to the landing page we already have, we only changed the content and added new styling to the JSX. Now if we visit localhost:3000/hello, we should see our new page:
A “Hello World ” page in Next.js (Large preview)
Finally, we need to add a link to this new page on our index.js page, and to do this, we make use of Next’s Link component. To do that, we have to import it first.
# index.js
import Link from 'next/link' #Add this to your JSX
<Link href='/hello'>
<Link href='/hello'> <a>Next</a>
</Link>
This link component is how we add links to pages created in Next in our application.
Now if we go back to our homepage and click on this link, it would take us to our /hello page.
Nuxt.js
According to their official documentation:
“NUXt is a progressive framework based on Vue.js to create modern web applications. It is based on Vue.js official libraries (vue, vue-router and vuex) and powerful development tools (webpack, Babel and PostCSS). NUXt’s goal is to make web development powerful and performant with a great developer experience in mind.”
It is based on Vue.js so that means Vue.js developers would find it easy getting started with it and knowledge of Vue.js is required to use this framework.
To create a NUXt.js app, you need to run the following command in your terminal:
yarn create nUXt-app <project-name>
# or npx
npx create-nUXt-app <project-name>
This would prompt you to select a name along with some other options. I named mine demo-nUXt and selected default options for the other options. When this is done, you can open your app folder and open pages/index.vue. Every file in this folder file is turned into a route and so our landing page is controlled by index.vue file. So if you update it with the following:
<template> <div class="container"> <div> <logo /> <h1 class="title"> Hello NUXt </h1> <h2 class="subtitle"> NUXt.js ROcks! </h2> <div class="links"> <a href="https://nUXtjs.org/" target="_blank" class="button--green" > Documentation </a> <a href="https://github.com/nUXt/nUXt.js" target="_blank" class="button--grey" > GitHub </a> </div> </div> </div>
</template>
<script>
import Logo from '~/components/Logo.vue'
export default { components: { Logo }
}
</script>
<style>
.container { margin: 0 auto; min-height: 100vh; display: flex; justify-content: center; align-items: center; text-align: center;
}
.title { font-family: 'Quicksand', 'Source Sans Pro', -apple-system, BlinkMacSystemFont, 'Segoe UI', Roboto, 'Helvetica Neue', Arial, sans-serif; display: block; font-weight: 300; font-size: 100px; color: #35495e; letter-spacing: 1px;
}
.subtitle { font-weight: 300; font-size: 42px; color: #526488; word-spacing: 5px; padding-bottom: 15px;
}
.links { padding-top: 15px;
}
</style>
And run your application:
cd demo-nUXt
# start your applicatio
yarn dev # or npm run dev
Your application should be running on localhost:3000 and you should see this:
NUXt.js landing page (Large preview)
We can see that this page displays the content we added in to index.vue. The router structure works the same way Next.js router works; it renders every file inside /pages folder into a page. So let us add a new page (hello.vue) to our application.
<template> <div> <h1>Hello World!</h1> <p>Lorem ipsum dolor sit amet, consectetur adipisicing elit. Id ipsa vitae tempora perferendis, voluptate a accusantium itaque vel ex, provident autem quod rem saepe ullam hic explicabo voluptas, libero distinctio?</p> </div>
</template>
<script>
export default {};
</script>
<style>
</style>
So if you open localhost:3000/hello, you should see your new page in your browser.
“Hello World” page in NUXtjs (Large preview)
Taking A Closer Look At The Differences
Now that we have looked at both static-site generators and server-side rendering and how to get started with them by using some popular tools, let us look at the differences between them.
Static Sites GeneratorsServer-Side RenderingCan easily be deployed to a static CDNCannot be deployed to a static CDNContent and pages are generated at build timeContent and pages are generated per requestContent can become stale quicklyContent is always up to dateFewer API calls since it only makes it at build timeMakes API calls each time a new page is visited
Conclusion
We can see why it is so easy to think both static generated sites and server-side rendered applications are the same. Now that we know the differences between them are, I would advise that we try to learn more on how to build both static generated sites and server-side rendered applications in order to fully understand the differences between them.
Further Resources
Here are some useful links that are bound to help you get started in no time:
“Getting Started With Gatsby,” Gatsby official website
“Getting Started With VuePress,” VuePress official website
“VuePress: Documentation Made Easy,” Ben Hong, Smashing Magazine
“Getting Started With Next.js,” Next.js by Vercel official website
“Why Do People Use A Static-Site Generator?,” Quora
“Static Site Generator,” Gatsby official website
“An Introduction To VuePress,” Joshua Bemenderfer, DigitalOcean
“What Is Server-Side Rendering?,” Edpresso, Educative.io
“What Is A Static Site Generator? And 3 Ways To Find The Best One ,” Phil Hawksworth, The Netlify Blog
“The Benefits Of Server Side Rendering Over Client Side Rendering,” Alex Grigoryan, Medium
(ks, ra, il)
Website Design & SEO Delray Beach by DBL07.co
Delray Beach SEO
source http://www.scpie.org/differences-between-static-generated-sites-and-server-side-rendered-apps/
source https://scpie1.blogspot.com/2020/07/differences-between-static-generated.html
0 notes
Text
Differences Between Static Generated Sites And Server-Side Rendered Apps
About The Author
Front-end developer based in Lagos, Nigeria. He enjoys converting designs into code and building things for the web.
More about
Timi
…
Statically generated sites or pre-rendering and server-side rendered applications are two modern ways to build front-end applications using JavaScript frameworks. These two modes, yet different, are often mixed up as the same thing and in this tutorial, we’re going to learn about the differences between them.
JavaScript currently has three types of applications that you can build with: Single Page Applications (SPAs), pre-rendering/static generated sites and server-side rendered applications. SPAs come with many challenges, one of which is search engine optimization (SEO Company). Possible solutions are to make use of Static Site Generators or Server-Side Rendering (SSR).
In this article, I’m going to explain them alongside listing their pros and cons so you have a balanced view. We’re going to look at what static generated/pre-rendering is as well as frameworks such as Gatsby and VuePress that help in creating statically generated sites. We’re also going to look at what server-side rendered (SSR) applications are as well as frameworks like Nextjs and Nuxtjs that can help you create SSR applications. Finally, we’re going to cover the differences between these two methods and which of them you should use when building your next application.
Note: You can find all the code snippets in this article on GitHub.
What Is A Static Site Generator?
A Static Site Generator (SSG) is a software application that creates HTML pages from templates or components and a given content source. You give it some text files and content, and the generator will give you back a complete website, and this completed website is referred to as a static generated site. What this means is that your site pages are generated at build time and your site content does not change unless you add new contents or components and “rebuild” or you have to rebuild your site if you want it to be updated with new content.
How static site generation works (Large preview)
This approach is good for building applications that the content does not change too often — sites that the content does not have to change depending on the user, and sites that do not have a lot of user-generated content. An example of such a site is a blog or a personal website. Let’s look at some advantages of using static generated sites.
PROS
Fast website: Since all of your site’s pages and content have been generated at build time, you do not have to worry about API calls to the server for content and this makes your site very fast.
Easy to deploy: After your static site has been generated, you would be left with static files, and hence, it can be easily deployed to platforms like Netlify.
Security: Static generated site are solely composed of static files, the risk of being vulnerable to cyber attacks is minimal. This is because static generated sites have no database, attackers cannot inject malicious code or exploit your database.
You can use version control software (e.g git) to manage and track changes to your content. This can come in handy when you want to roll back changes you made to the content on your site.
CONS
Content can become stale if it changes too quickly.
To update its content, you have to rebuild the site.
Build time would increase depending on the size of the application.
Examples of static site generators are GatsbyJS and VuePress. Let us take a look at how to create static sites using these two generators.
Gatsby
According to their official website,
“Gatsby is a free and open-source framework based on React that helps developers build blazing-fast websites and apps.”
This means developers familiar with React would find it easy to get started with Gatsby.
To use this generator, you first have to install it using NPM:
npm install -g gatsby-cli
This will install Gatsby globally on your machine, you only have to run this command once on your machine. After this installation is complete, you can create your first static site generator using the following command.
gatsby new demo-gatsby
This command will create a new Gatsby project that I have named demo-gatsby. When this is done, you can start up your app server by running the following command:
cd demo-gatsby gatsby develop
Your Gatsby application should be running on localhost:8000.
Gatsby default starter page (Large preview)
The folder structure for this app looks like this;
--| gatsby-browser.js --| LICENSE --| README.md --| gatsby-config.js --| node_modules/ --| src/ ----| components ----| pages ----| images --| gatsby-node.js --| package.json --| yarn.lock --| gatsby-ssr.js --| public/ ----| icons ----| page-data ----| static
For this tutorial, we’re only going to look at the src/pages folder. This folder contains files that would be generated into routes on your site.
To test this, let us add a new file (newPage.js) to this folder:
import React from "react" import { Link } from "gatsby" import Layout from "../components/layout" import SEO Company from "../components/SEO Company" const NewPage = () => ( <Layout> <SEO Company title="My New Page" /> <h1>Hello Gatsby</h1> <p>This is my first Gatsby Page</p> <button> <Link to='/'>Home</Link> </button> </Layout> ) export default NewPage
Here, we import React from the react package so when your code is transpiled to pure JavaScript, references to React will appear there. We also import a Link component from gatsby and this is one of React’s route tag that is used in place of the native anchor tag ( <a href='#'>Link</a>). It accepts a to prop that takes a route as a value.
We import a Layout component that was added to your app by default. This component handles the layout of pages nested inside it. We also import the SEO Company component into this new file. This component accepts a title prop and configures this value as part of your page’s metadata. Finally, we export the function NewPage that returns a JSX containing your new page’s content.
And in your index.js file, add a link to this new page we just created:
import React from "react" import { Link } from "gatsby" import Layout from "../components/layout" import Image from "../components/image" import SEO Company from "../components/SEO Company" const IndexPage = () => ( <Layout> <SEO Company title="Home" /> <h1>Hi people</h1> <p>Welcome to your new Gatsby site.</p> <p>Now go build something great.</p> <div style=> <Image /> </div> <Link to="/page-2/">Go to page 2</Link> {/* new link */} <button> <Link to="/newPage/">Go to New Page</Link> </button> </Layout> ) export default IndexPage
Here, we import the same components that were used in newPage.js file and they perform the same function in this file. We also import an Image component from our components folder. This component is added by default to your Gatsby application and it helps in lazy loading images and serving reduced file size. Finally, we export a function IndexPage that returns JSX containing our new link and some default content.
Now, if we open our browser, we should see our new link at the bottom of the page.
Gatsby landing page with new link (Large preview)
And if you click on Go To New Page, it should take you to your newly added page.
New gatsby page (Large preview)
VuePress
VuePress is a static site generator that is powered by Vue, Vue Router and Webpack. It requires little to no configuration for you to get started with it. While there are a number of tools that are static site generators, VuePress stands out from amongst the pack for a single reason: its primary directive is to make it easier for developers to create and maintain great documentation for their projects.
To use VuePress, you first have to install it:
//globally yarn global add vuepress # OR npm install -g vuepress //in an existing project yarn add -D vuepress # OR npm install -D vuepress
Once the installation process is done, you can run the following command in your terminal:
# create the project folder mkdir demo-vuepress && cd demo-vuepress # create a markdown file echo '# Hello VuePress' > README.md # start writing vuepress dev
Here, we create a folder for our VuePress application, add a README.md file with # Hello VuePress as the only content inside this file, and finally, start up our server.
When this is done, our application should be running on localhost:8080 and we should see this in our browser:
VuePress landing page (Large preview)
VuePress supports VueJS syntax and markup inside this file. Update your README.md file with the following:
# Hello VuePress _VuePress Rocks_ > **Yes!** _It supports JavaScript interpolation code_ > **** <p v-for="i of ['v','u', 'e', 'p', 'r', 'e', 's', 's']"></p>
If you go back to your browser, your page should look like this:
Updated Vuepress page (Large preview)
To add a new page to your VuePress site, you add a new markdown file to the root directory and name it whatever you want the route to be. In this case, I’ve gone ahead to name it Page-2.md and added the following to the file:
# hello World Lorem ipsum dolor sit amet, consectetur adipisicing elit, sed do eiusmod tempor incididunt ut labore et dolore magna aliqua. Ut enim ad minim veniam, quis nostrud exercitation ullamco laboris nisi ut aliquip ex ea commodo consequat.
And now, if you navigate to /page-2 in your browser, we should see this:
A “Hello World” page in VuePress (Large preview)
What Is Server-Side Rendering? (SSR)
Server-Side Rendering (SSR), is the process of displaying web-pages on the server and passing it to the browser/client-side instead of rendering it in the browser. Server-side sends a fully rendered page to the client; the client’s JavaScript bundle takes over and allows the SPA framework to operate.
This means if you have an application that is server-side rendered, your content is fetched on the server side and passed to your browser to display to your user. With client-side rendering it is different, you would have to navigate to that page first before it fetches data from your server meaning your user would have to wait for some seconds before they’re served with the content on that page. Applications that have SSR enabled are called Server-side rendered applications.
How SSR works (Large preview)
This approach is good for building complex applications that require user interaction, rely on a database, or where the content changes very often. This is because content on these sites changes very often and the users need to see the updated content as soon as they’re updated. It is also good for applications that have tailored content depending on who is viewing it and applications where you need to store user-specific data like email and user preference while also catering for SEO Company. An example of this is a large e-commerce platform or a social media site. Let us look at some of the advantages of server-side rendering your applications.
Pros
Content is up to date because it fetches content on the go;
Your site loads fast because it fetches its content on the server-side before rendering it to the user;
Since in SSR JavaScript is rendered server-side, your users’ devices have little relevance to the load time of your page and this leads to better performance.
CONS
More API calls to the server since they’re made per request;
Cannot deploy to a static CDN.
Further examples of frameworks that offer SSR are Next.js and Nuxt.js.
Next.js
Next.js is a React.js framework that helps in building static sites, server-side rendered applications, and so on. Since it was built on React, knowledge of React is required to use this framework.
To create a Next.js app, you need to run the following:
npm init next-app # or yarn create next-app
You would be prompted to choose a name your application, I have named my application demo-next. The next option would be to select a template and I’ve selected the Default starter app after which it begins to set up your app. When this is done, we can now start our application
cd demo-next yarn dev # or npm run dev
Your application should be running on localhost:3000 and you should see this in your browser;
Next.js landing page (Large preview)
The page that is being rendered can be found in pages/index.js so if you open this file and modify the JSX inside the Home function, it would reflect in your browser. Replace the JSX with this:
import Head from 'next/head' export default function Home() { return ( <div className="container"> <Head> <title>Hello Next.js</title> <link rel="icon" href="/favicon.ico" /> </Head> <main> <h1 className="title"> Welcome to <a href="https://nextjs.org">Next.js!</a> </h1> <p className='description'>Nextjs Rocks!</p> </main> <style jsx>{` main { padding: 5rem 0; flex: 1; display: flex; flex-direction: column; justify-content: center; align-items: center; } .title a { color: #0070f3; text-decoration: none; } .title a:hover, .title a:focus, .title a:active { text-decoration: underline; } .title { margin: 0; line-height: 1.15; font-size: 4rem; } .title, .description { text-align: center; } .description { line-height: 1.5; font-size: 1.5rem; } `}</style> <style jsx global>{` html, body { padding: 0; margin: 0; font-family: -apple-system, BlinkMacSystemFont, Segoe UI, Roboto, Oxygen, Ubuntu, Cantarell, Fira Sans, Droid Sans, Helvetica Neue, sans-serif; } * { box-sizing: border-box; } `}</style> </div> ) }
In this file, we make use of Next.js Head component to set our page’s metadata title and favicon for this page. We also export a Home function that returns a JSX containing our page’s content. This JSX contains our Head component together with our main page’s content. It also contains two style tags, one for styling this page and the other for the global styling of the app.
Now, you should see that the content on your app has changed to this:
Updated landing page (Large preview)
Now if we want to add a new page to our app, we have to add a new file inside the /pages folder. Routes are automatically created based on the /pages folder structure, this means that if you have a folder structure that looks like this:
--| pages ----| index.js ==> '/' ----| about.js ==> '/about' ----| projects ------| next.js ==> '/projects/next'
So in your pages folder, add a new file and name it hello.js then add the following to it:
import Head from 'next/head' export default function Hello() { return ( <div> <Head> <title>Hello World</title> <link rel="icon" href="/favicon.ico" /> </Head> <main className='container'> <h1 className='title'> Hello <a href="https://en.wikipedia.org/wiki/Hello_World_(film)">World</a> </h1> <p className='subtitle'>Lorem ipsum dolor sit amet, consectetur adipisicing elit. Voluptatem provident soluta, sit explicabo impedit nobis accusantium? Nihil beatae, accusamus modi assumenda, optio omnis aliquid nobis magnam facilis ipsam eum saepe!</p> </main> <style jsx> {` .container { margin: 0 auto; min-height: 100vh; max-width: 800px; text-align: center; } .title { font-family: "Quicksand", "Source Sans Pro", -apple-system, BlinkMacSystemFont, "Segoe UI", Roboto, "Helvetica Neue", Arial, sans-serif; display: block; font-weight: 300; font-size: 100px; color: #35495e; letter-spacing: 1px; } .subtitle { font-weight: 300; font-size: 22px; color: #526488; word-spacing: 5px; padding-bottom: 15px; } `} </style> </div> ) }
This page is identical to the landing page we already have, we only changed the content and added new styling to the JSX. Now if we visit localhost:3000/hello, we should see our new page:
A “Hello World ” page in Next.js (Large preview)
Finally, we need to add a link to this new page on our index.js page, and to do this, we make use of Next’s Link component. To do that, we have to import it first.
# index.js import Link from 'next/link' #Add this to your JSX <Link href='/hello'> <Link href='/hello'> <a>Next</a> </Link>
This link component is how we add links to pages created in Next in our application.
Now if we go back to our homepage and click on this link, it would take us to our /hello page.
Nuxt.js
According to their official documentation:
“NUXt is a progressive framework based on Vue.js to create modern web applications. It is based on Vue.js official libraries (vue, vue-router and vuex) and powerful development tools (webpack, Babel and PostCSS). NUXt’s goal is to make web development powerful and performant with a great developer experience in mind.”
It is based on Vue.js so that means Vue.js developers would find it easy getting started with it and knowledge of Vue.js is required to use this framework.
To create a NUXt.js app, you need to run the following command in your terminal:
yarn create nUXt-app <project-name> # or npx npx create-nUXt-app <project-name>
This would prompt you to select a name along with some other options. I named mine demo-nUXt and selected default options for the other options. When this is done, you can open your app folder and open pages/index.vue. Every file in this folder file is turned into a route and so our landing page is controlled by index.vue file. So if you update it with the following:
<template> <div class="container"> <div> <logo /> <h1 class="title"> Hello NUXt </h1> <h2 class="subtitle"> NUXt.js ROcks! </h2> <div class="links"> <a href="https://nUXtjs.org/" target="_blank" class="button--green" > Documentation </a> <a href="https://github.com/nUXt/nUXt.js" target="_blank" class="button--grey" > GitHub </a> </div> </div> </div> </template> <script> import Logo from '~/components/Logo.vue' export default { components: { Logo } } </script> <style> .container { margin: 0 auto; min-height: 100vh; display: flex; justify-content: center; align-items: center; text-align: center; } .title { font-family: 'Quicksand', 'Source Sans Pro', -apple-system, BlinkMacSystemFont, 'Segoe UI', Roboto, 'Helvetica Neue', Arial, sans-serif; display: block; font-weight: 300; font-size: 100px; color: #35495e; letter-spacing: 1px; } .subtitle { font-weight: 300; font-size: 42px; color: #526488; word-spacing: 5px; padding-bottom: 15px; } .links { padding-top: 15px; } </style>
And run your application:
cd demo-nUXt # start your applicatio yarn dev # or npm run dev
Your application should be running on localhost:3000 and you should see this:
NUXt.js landing page (Large preview)
We can see that this page displays the content we added in to index.vue. The router structure works the same way Next.js router works; it renders every file inside /pages folder into a page. So let us add a new page (hello.vue) to our application.
<template> <div> <h1>Hello World!</h1> <p>Lorem ipsum dolor sit amet, consectetur adipisicing elit. Id ipsa vitae tempora perferendis, voluptate a accusantium itaque vel ex, provident autem quod rem saepe ullam hic explicabo voluptas, libero distinctio?</p> </div> </template> <script> export default {}; </script> <style> </style>
So if you open localhost:3000/hello, you should see your new page in your browser.
“Hello World” page in NUXtjs (Large preview)
Taking A Closer Look At The Differences
Now that we have looked at both static-site generators and server-side rendering and how to get started with them by using some popular tools, let us look at the differences between them.
Static Sites Generators Server-Side Rendering Can easily be deployed to a static CDN Cannot be deployed to a static CDN Content and pages are generated at build time Content and pages are generated per request Content can become stale quickly Content is always up to date Fewer API calls since it only makes it at build time Makes API calls each time a new page is visited
Conclusion
We can see why it is so easy to think both static generated sites and server-side rendered applications are the same. Now that we know the differences between them are, I would advise that we try to learn more on how to build both static generated sites and server-side rendered applications in order to fully understand the differences between them.
Further Resources
Here are some useful links that are bound to help you get started in no time:
“Getting Started With Gatsby,” Gatsby official website
“Getting Started With VuePress,” VuePress official website
“VuePress: Documentation Made Easy,” Ben Hong, Smashing Magazine
“Getting Started With Next.js,” Next.js by Vercel official website
“Why Do People Use A Static-Site Generator?,” Quora
“Static Site Generator,” Gatsby official website
“An Introduction To VuePress,” Joshua Bemenderfer, DigitalOcean
“What Is Server-Side Rendering?,” Edpresso, Educative.io
“What Is A Static Site Generator? And 3 Ways To Find The Best One ,” Phil Hawksworth, The Netlify Blog
“The Benefits Of Server Side Rendering Over Client Side Rendering,” Alex Grigoryan, Medium
(ks, ra, il)
Website Design & SEO Delray Beach by DBL07.co
Delray Beach SEO
source http://www.scpie.org/differences-between-static-generated-sites-and-server-side-rendered-apps/
source https://scpie.tumblr.com/post/622561623204315136
0 notes
Text
Best Vue.js Rich-Text Editor Ever tiptap - VueJs
Best Vue.js Rich-Text Editor Ever tiptap – VueJs
Best Vue.js Rich-Text Editor Ever tiptap – VueJs
[ad_1]
In this video I discuss tiptap a rich text editor for Vue.js. In this video I discuss all the features of tip tap and how to add it to your next project. I create a brand new Vue.js app and we create a rich text editor with strikeout, bold and italics. #vuejs
Check out my last video on a Udemy course – https://youtu.be/yl0MRLPdkT8
Check out…
View On WordPress
#Erik Hanchett#Program With Eric#Program with Erik#Vue 2019#vue js project#Vue rich-text editor#Vue.js#Vue.js 2019#Vue.js hello world#Vue.js libraries#Vue.js plugins#vue.js todo app#vue.js tutorial#Vue.js tutorial for beginners#Vue.js tutorial plugins#Vue.js tutorial tiptap#vue.js tutorial tiptap bold
0 notes
Text
Differences Between Static Generated Sites And Server-Side Rendered Apps
About The Author
Front-end developer based in Lagos, Nigeria. He enjoys converting designs into code and building things for the web.
More about
Timi
…
Statically generated sites or pre-rendering and server-side rendered applications are two modern ways to build front-end applications using JavaScript frameworks. These two modes, yet different, are often mixed up as the same thing and in this tutorial, we’re going to learn about the differences between them.
JavaScript currently has three types of applications that you can build with: Single Page Applications (SPAs), pre-rendering/static generated sites and server-side rendered applications. SPAs come with many challenges, one of which is search engine optimization (SEO Company). Possible solutions are to make use of Static Site Generators or Server-Side Rendering (SSR).
In this article, I’m going to explain them alongside listing their pros and cons so you have a balanced view. We’re going to look at what static generated/pre-rendering is as well as frameworks such as Gatsby and VuePress that help in creating statically generated sites. We’re also going to look at what server-side rendered (SSR) applications are as well as frameworks like Nextjs and Nuxtjs that can help you create SSR applications. Finally, we’re going to cover the differences between these two methods and which of them you should use when building your next application.
Note: You can find all the code snippets in this article on GitHub.
What Is A Static Site Generator?
A Static Site Generator (SSG) is a software application that creates HTML pages from templates or components and a given content source. You give it some text files and content, and the generator will give you back a complete website, and this completed website is referred to as a static generated site. What this means is that your site pages are generated at build time and your site content does not change unless you add new contents or components and “rebuild” or you have to rebuild your site if you want it to be updated with new content.
How static site generation works (Large preview)
This approach is good for building applications that the content does not change too often — sites that the content does not have to change depending on the user, and sites that do not have a lot of user-generated content. An example of such a site is a blog or a personal website. Let’s look at some advantages of using static generated sites.
PROS
Fast website: Since all of your site’s pages and content have been generated at build time, you do not have to worry about API calls to the server for content and this makes your site very fast.
Easy to deploy: After your static site has been generated, you would be left with static files, and hence, it can be easily deployed to platforms like Netlify.
Security: Static generated site are solely composed of static files, the risk of being vulnerable to cyber attacks is minimal. This is because static generated sites have no database, attackers cannot inject malicious code or exploit your database.
You can use version control software (e.g git) to manage and track changes to your content. This can come in handy when you want to roll back changes you made to the content on your site.
CONS
Content can become stale if it changes too quickly.
To update its content, you have to rebuild the site.
Build time would increase depending on the size of the application.
Examples of static site generators are GatsbyJS and VuePress. Let us take a look at how to create static sites using these two generators.
Gatsby
According to their official website,
“Gatsby is a free and open-source framework based on React that helps developers build blazing-fast websites and apps.”
This means developers familiar with React would find it easy to get started with Gatsby.
To use this generator, you first have to install it using NPM:
npm install -g gatsby-cli
This will install Gatsby globally on your machine, you only have to run this command once on your machine. After this installation is complete, you can create your first static site generator using the following command.
gatsby new demo-gatsby
This command will create a new Gatsby project that I have named demo-gatsby. When this is done, you can start up your app server by running the following command:
cd demo-gatsby gatsby develop
Your Gatsby application should be running on localhost:8000.
Gatsby default starter page (Large preview)
The folder structure for this app looks like this;
--| gatsby-browser.js --| LICENSE --| README.md --| gatsby-config.js --| node_modules/ --| src/ ----| components ----| pages ----| images --| gatsby-node.js --| package.json --| yarn.lock --| gatsby-ssr.js --| public/ ----| icons ----| page-data ----| static
For this tutorial, we’re only going to look at the src/pages folder. This folder contains files that would be generated into routes on your site.
To test this, let us add a new file (newPage.js) to this folder:
import React from "react" import { Link } from "gatsby" import Layout from "../components/layout" import SEO Company from "../components/SEO Company" const NewPage = () => ( <Layout> <SEO Company title="My New Page" /> <h1>Hello Gatsby</h1> <p>This is my first Gatsby Page</p> <button> <Link to='/'>Home</Link> </button> </Layout> ) export default NewPage
Here, we import React from the react package so when your code is transpiled to pure JavaScript, references to React will appear there. We also import a Link component from gatsby and this is one of React’s route tag that is used in place of the native anchor tag ( <a href='#'>Link</a>). It accepts a to prop that takes a route as a value.
We import a Layout component that was added to your app by default. This component handles the layout of pages nested inside it. We also import the SEO Company component into this new file. This component accepts a title prop and configures this value as part of your page’s metadata. Finally, we export the function NewPage that returns a JSX containing your new page’s content.
And in your index.js file, add a link to this new page we just created:
import React from "react" import { Link } from "gatsby" import Layout from "../components/layout" import Image from "../components/image" import SEO Company from "../components/SEO Company" const IndexPage = () => ( <Layout> <SEO Company title="Home" /> <h1>Hi people</h1> <p>Welcome to your new Gatsby site.</p> <p>Now go build something great.</p> <div style=> <Image /> </div> <Link to="/page-2/">Go to page 2</Link> {/* new link */} <button> <Link to="/newPage/">Go to New Page</Link> </button> </Layout> ) export default IndexPage
Here, we import the same components that were used in newPage.js file and they perform the same function in this file. We also import an Image component from our components folder. This component is added by default to your Gatsby application and it helps in lazy loading images and serving reduced file size. Finally, we export a function IndexPage that returns JSX containing our new link and some default content.
Now, if we open our browser, we should see our new link at the bottom of the page.
Gatsby landing page with new link (Large preview)
And if you click on Go To New Page, it should take you to your newly added page.
New gatsby page (Large preview)
VuePress
VuePress is a static site generator that is powered by Vue, Vue Router and Webpack. It requires little to no configuration for you to get started with it. While there are a number of tools that are static site generators, VuePress stands out from amongst the pack for a single reason: its primary directive is to make it easier for developers to create and maintain great documentation for their projects.
To use VuePress, you first have to install it:
//globally yarn global add vuepress # OR npm install -g vuepress //in an existing project yarn add -D vuepress # OR npm install -D vuepress
Once the installation process is done, you can run the following command in your terminal:
# create the project folder mkdir demo-vuepress && cd demo-vuepress # create a markdown file echo '# Hello VuePress' > README.md # start writing vuepress dev
Here, we create a folder for our VuePress application, add a README.md file with # Hello VuePress as the only content inside this file, and finally, start up our server.
When this is done, our application should be running on localhost:8080 and we should see this in our browser:
VuePress landing page (Large preview)
VuePress supports VueJS syntax and markup inside this file. Update your README.md file with the following:
# Hello VuePress _VuePress Rocks_ > **Yes!** _It supports JavaScript interpolation code_ > **** <p v-for="i of ['v','u', 'e', 'p', 'r', 'e', 's', 's']"></p>
If you go back to your browser, your page should look like this:
Updated Vuepress page (Large preview)
To add a new page to your VuePress site, you add a new markdown file to the root directory and name it whatever you want the route to be. In this case, I’ve gone ahead to name it Page-2.md and added the following to the file:
# hello World Lorem ipsum dolor sit amet, consectetur adipisicing elit, sed do eiusmod tempor incididunt ut labore et dolore magna aliqua. Ut enim ad minim veniam, quis nostrud exercitation ullamco laboris nisi ut aliquip ex ea commodo consequat.
And now, if you navigate to /page-2 in your browser, we should see this:
A “Hello World” page in VuePress (Large preview)
What Is Server-Side Rendering? (SSR)
Server-Side Rendering (SSR), is the process of displaying web-pages on the server and passing it to the browser/client-side instead of rendering it in the browser. Server-side sends a fully rendered page to the client; the client’s JavaScript bundle takes over and allows the SPA framework to operate.
This means if you have an application that is server-side rendered, your content is fetched on the server side and passed to your browser to display to your user. With client-side rendering it is different, you would have to navigate to that page first before it fetches data from your server meaning your user would have to wait for some seconds before they’re served with the content on that page. Applications that have SSR enabled are called Server-side rendered applications.
How SSR works (Large preview)
This approach is good for building complex applications that require user interaction, rely on a database, or where the content changes very often. This is because content on these sites changes very often and the users need to see the updated content as soon as they’re updated. It is also good for applications that have tailored content depending on who is viewing it and applications where you need to store user-specific data like email and user preference while also catering for SEO Company. An example of this is a large e-commerce platform or a social media site. Let us look at some of the advantages of server-side rendering your applications.
Pros
Content is up to date because it fetches content on the go;
Your site loads fast because it fetches its content on the server-side before rendering it to the user;
Since in SSR JavaScript is rendered server-side, your users’ devices have little relevance to the load time of your page and this leads to better performance.
CONS
More API calls to the server since they’re made per request;
Cannot deploy to a static CDN.
Further examples of frameworks that offer SSR are Next.js and Nuxt.js.
Next.js
Next.js is a React.js framework that helps in building static sites, server-side rendered applications, and so on. Since it was built on React, knowledge of React is required to use this framework.
To create a Next.js app, you need to run the following:
npm init next-app # or yarn create next-app
You would be prompted to choose a name your application, I have named my application demo-next. The next option would be to select a template and I’ve selected the Default starter app after which it begins to set up your app. When this is done, we can now start our application
cd demo-next yarn dev # or npm run dev
Your application should be running on localhost:3000 and you should see this in your browser;
Next.js landing page (Large preview)
The page that is being rendered can be found in pages/index.js so if you open this file and modify the JSX inside the Home function, it would reflect in your browser. Replace the JSX with this:
import Head from 'next/head' export default function Home() { return ( <div className="container"> <Head> <title>Hello Next.js</title> <link rel="icon" href="/favicon.ico" /> </Head> <main> <h1 className="title"> Welcome to <a href="https://nextjs.org">Next.js!</a> </h1> <p className='description'>Nextjs Rocks!</p> </main> <style jsx>{` main { padding: 5rem 0; flex: 1; display: flex; flex-direction: column; justify-content: center; align-items: center; } .title a { color: #0070f3; text-decoration: none; } .title a:hover, .title a:focus, .title a:active { text-decoration: underline; } .title { margin: 0; line-height: 1.15; font-size: 4rem; } .title, .description { text-align: center; } .description { line-height: 1.5; font-size: 1.5rem; } `}</style> <style jsx global>{` html, body { padding: 0; margin: 0; font-family: -apple-system, BlinkMacSystemFont, Segoe UI, Roboto, Oxygen, Ubuntu, Cantarell, Fira Sans, Droid Sans, Helvetica Neue, sans-serif; } * { box-sizing: border-box; } `}</style> </div> ) }
In this file, we make use of Next.js Head component to set our page’s metadata title and favicon for this page. We also export a Home function that returns a JSX containing our page’s content. This JSX contains our Head component together with our main page’s content. It also contains two style tags, one for styling this page and the other for the global styling of the app.
Now, you should see that the content on your app has changed to this:
Updated landing page (Large preview)
Now if we want to add a new page to our app, we have to add a new file inside the /pages folder. Routes are automatically created based on the /pages folder structure, this means that if you have a folder structure that looks like this:
--| pages ----| index.js ==> '/' ----| about.js ==> '/about' ----| projects ------| next.js ==> '/projects/next'
So in your pages folder, add a new file and name it hello.js then add the following to it:
import Head from 'next/head' export default function Hello() { return ( <div> <Head> <title>Hello World</title> <link rel="icon" href="/favicon.ico" /> </Head> <main className='container'> <h1 className='title'> Hello <a href="https://en.wikipedia.org/wiki/Hello_World_(film)">World</a> </h1> <p className='subtitle'>Lorem ipsum dolor sit amet, consectetur adipisicing elit. Voluptatem provident soluta, sit explicabo impedit nobis accusantium? Nihil beatae, accusamus modi assumenda, optio omnis aliquid nobis magnam facilis ipsam eum saepe!</p> </main> <style jsx> {` .container { margin: 0 auto; min-height: 100vh; max-width: 800px; text-align: center; } .title { font-family: "Quicksand", "Source Sans Pro", -apple-system, BlinkMacSystemFont, "Segoe UI", Roboto, "Helvetica Neue", Arial, sans-serif; display: block; font-weight: 300; font-size: 100px; color: #35495e; letter-spacing: 1px; } .subtitle { font-weight: 300; font-size: 22px; color: #526488; word-spacing: 5px; padding-bottom: 15px; } `} </style> </div> ) }
This page is identical to the landing page we already have, we only changed the content and added new styling to the JSX. Now if we visit localhost:3000/hello, we should see our new page:
A “Hello World ” page in Next.js (Large preview)
Finally, we need to add a link to this new page on our index.js page, and to do this, we make use of Next’s Link component. To do that, we have to import it first.
# index.js import Link from 'next/link' #Add this to your JSX <Link href='/hello'> <Link href='/hello'> <a>Next</a> </Link>
This link component is how we add links to pages created in Next in our application.
Now if we go back to our homepage and click on this link, it would take us to our /hello page.
Nuxt.js
According to their official documentation:
“NUXt is a progressive framework based on Vue.js to create modern web applications. It is based on Vue.js official libraries (vue, vue-router and vuex) and powerful development tools (webpack, Babel and PostCSS). NUXt’s goal is to make web development powerful and performant with a great developer experience in mind.”
It is based on Vue.js so that means Vue.js developers would find it easy getting started with it and knowledge of Vue.js is required to use this framework.
To create a NUXt.js app, you need to run the following command in your terminal:
yarn create nUXt-app <project-name> # or npx npx create-nUXt-app <project-name>
This would prompt you to select a name along with some other options. I named mine demo-nUXt and selected default options for the other options. When this is done, you can open your app folder and open pages/index.vue. Every file in this folder file is turned into a route and so our landing page is controlled by index.vue file. So if you update it with the following:
<template> <div class="container"> <div> <logo /> <h1 class="title"> Hello NUXt </h1> <h2 class="subtitle"> NUXt.js ROcks! </h2> <div class="links"> <a href="https://nUXtjs.org/" target="_blank" class="button--green" > Documentation </a> <a href="https://github.com/nUXt/nUXt.js" target="_blank" class="button--grey" > GitHub </a> </div> </div> </div> </template> <script> import Logo from '~/components/Logo.vue' export default { components: { Logo } } </script> <style> .container { margin: 0 auto; min-height: 100vh; display: flex; justify-content: center; align-items: center; text-align: center; } .title { font-family: 'Quicksand', 'Source Sans Pro', -apple-system, BlinkMacSystemFont, 'Segoe UI', Roboto, 'Helvetica Neue', Arial, sans-serif; display: block; font-weight: 300; font-size: 100px; color: #35495e; letter-spacing: 1px; } .subtitle { font-weight: 300; font-size: 42px; color: #526488; word-spacing: 5px; padding-bottom: 15px; } .links { padding-top: 15px; } </style>
And run your application:
cd demo-nUXt # start your applicatio yarn dev # or npm run dev
Your application should be running on localhost:3000 and you should see this:
NUXt.js landing page (Large preview)
We can see that this page displays the content we added in to index.vue. The router structure works the same way Next.js router works; it renders every file inside /pages folder into a page. So let us add a new page (hello.vue) to our application.
<template> <div> <h1>Hello World!</h1> <p>Lorem ipsum dolor sit amet, consectetur adipisicing elit. Id ipsa vitae tempora perferendis, voluptate a accusantium itaque vel ex, provident autem quod rem saepe ullam hic explicabo voluptas, libero distinctio?</p> </div> </template> <script> export default {}; </script> <style> </style>
So if you open localhost:3000/hello, you should see your new page in your browser.
“Hello World” page in NUXtjs (Large preview)
Taking A Closer Look At The Differences
Now that we have looked at both static-site generators and server-side rendering and how to get started with them by using some popular tools, let us look at the differences between them.
Static Sites Generators Server-Side Rendering Can easily be deployed to a static CDN Cannot be deployed to a static CDN Content and pages are generated at build time Content and pages are generated per request Content can become stale quickly Content is always up to date Fewer API calls since it only makes it at build time Makes API calls each time a new page is visited
Conclusion
We can see why it is so easy to think both static generated sites and server-side rendered applications are the same. Now that we know the differences between them are, I would advise that we try to learn more on how to build both static generated sites and server-side rendered applications in order to fully understand the differences between them.
Further Resources
Here are some useful links that are bound to help you get started in no time:
“Getting Started With Gatsby,” Gatsby official website
“Getting Started With VuePress,” VuePress official website
“VuePress: Documentation Made Easy,” Ben Hong, Smashing Magazine
“Getting Started With Next.js,” Next.js by Vercel official website
“Why Do People Use A Static-Site Generator?,” Quora
“Static Site Generator,” Gatsby official website
“An Introduction To VuePress,” Joshua Bemenderfer, DigitalOcean
“What Is Server-Side Rendering?,” Edpresso, Educative.io
“What Is A Static Site Generator? And 3 Ways To Find The Best One ,” Phil Hawksworth, The Netlify Blog
“The Benefits Of Server Side Rendering Over Client Side Rendering,” Alex Grigoryan, Medium
(ks, ra, il)
Website Design & SEO Delray Beach by DBL07.co
Delray Beach SEO
source http://www.scpie.org/differences-between-static-generated-sites-and-server-side-rendered-apps/
0 notes
Quote
You might be good at writing as a writer. and willing to get awarded for your writing. Before moving forward, I thoughts that you must to know more information about online writing income. I request to you that, Please read full article to get full information and realization about online writing income.
Contents
1. Why Writing is important
2. Where to Write
3. How to Write
Why Writing is important Writing online and getting paid is important for you because it helps to increase your income sum in long term. Better you write better you earn, because as your writing skill develops you will be on demand in writing business and your income will increase drastically. Significance of writingWriting helps to refine your thought about particular things. and make you a more defined and logical person with time. While writing on any topic related to global issue, political issue and personal issue. You come with better solution each time. More you write more will be your accurate decision and thinking. Demands of online writer is booming day by day. due to bigger shifting of global markets towards online mode. there are many jobs and opportunities for content writing, freelance writing, guest writing and proof writing and many more.
Where to WriteIn present global scenario you can write on many platform and domain. Now world has been changed now it is easier to express your thoughts on social networking sites, blogs, and websites. But here I will give a list of tones of websites or blogs where you can write and earn simultaneously.
Website Topics Payment Remark Wow women on Writing Women empowerment, Women related content Through PayPal ($50 - $100) Advantage to female writer, Backlinks through Author Profile Strong Whispers Lifestyle, Environmental and Social Issues. And Wide Range of topic Those are relevant. Paypal Payment ($50 - $150) negotiable earning Earning are negotiable you can earn more than payment range. Link Able Business, Finance, Marketing, health, sports, technology, retail and more Paypal Payment ($100 - $750) Only for native English Authors UxBooth UX design, user experience related topics like wireframes, prototyping, IA (eg. Balsamiq, UX Pin, Axure, etc.) PayPal Payment ($100 - $150) They also offers competitive stipend. Required experienced author having knowledge of UX in past. Cracked Humorous topics written with creativity from any popular domain. $100/article after publishing 5 article $200/article and also $100 bonus for featured article. You don't need to have previous experience apply with some sample of writing. Watch Culture List-driven written features. But also consider Quizzes, Galleries, Video submissions or News pieces. $25 - $500 The system is based on a per views basis, rewarding the very best writers whose content matches what their audience wants to read. Once you're registered on the site and set up as a contributor you'll be able to access our content creation suite. DeveloperTutorials Developer Tutorial publishes programming and design guides keeping their audience up-to-date on new and emerging technologies and techniques. ($30 - $50) through PayPal. Tutorials are required to be a minimum of 1000 words Pay rates depend on factors such as the quality of the tutorial/article and the demand for the topic it covers B. Michellepippin Focused article over small businesses increase their profits, influence, or impact. and business and marketing content. $ 50 - $ 150 through PayPal Apply with short article sample. Sitepoint Sitepoint writers are generally web professionals with a passion for development and design. Payment is flexible based on feature of content. Apply through online form environment developed by sitepoint. Metro Parents Related to mix of fun and substantive local stories of interest to local parents. $50 - $75 through PayPal Contact through email. Be sure to include the name and phone number of sources at the end of the story, Scotchtutorials on a host of web development-related topics that include: React, Vue, Angular, Javascript, Node, CSS, Python, Laravel, etc. $150/article They generally responds in two week to relevent applicants. Music tuts+Envato blog network entity, and they are looking for writers with music or audio background/experience to contribute $50/accepted articleQuick Tips” (a mini-tutorial of around 500 words or a screencast of under 5 minutes). You can apply through form environment. Codetuts+in-depth web development tutorials, both front-end and back-end web development $100 - $250 based on article featureApply through here BitchMediathoughtful feminist response to mainstream media and popular culture. Not specified or negotiable payment Apply through submittable platform. Tenderly Vegan lifestyle, vegetarians, future vegans, delicious food, vegan recipes, vegan travel, saving the planet, vegan culture and activism. $200 / accepted article Currently they are not accepting new writers but they offers opportunities to get selected for tenderly by medium partner programme Funds for Writers Based on writing niche mainly focuses on improving writing skills. $50 for original content Submit your manuscript to [email protected] Writers weeklyonline publication that is distributed to paying subscribers. Focuses to writing improvements. $60/article Submit a query only with credits by using our contact form. Make a Living Online Money by writing $75-$150/published articleEmail blog editor Evan Jensen at [email protected]. ListVerse Write in List form of any niche content $100/ article and $1000 for most traffick getting article on blog. Submit through submission form. Back2Collegenews and information resource for adult re-entry students pursuing professional development or an advanced degree. $55/article Submit through contact form MoneyPantryEarning and saving money $30-$150 depending upon several factors Submit through submission form BetterHumans Self improvements $500 for approx. 3000 words article. Submit through medium add to publication section. Vector tuts+How to use Adobe Illustrator, Adobe InDesign, Inkscape, Sketch app, and CorelDRAW and drawing tutorials $50-$200 depending on various factors Send your information at [email protected] The Change AgentAdult education $50 /article You get information here Dollar Stretcher Living frugally $0.1/words of article could be written upto 800 words maximum Submit at [email protected] Greatist Mental Health, Relationships, Wellness, Life. $125/article They expect articles to be between 1,000 – 1,500 words and want articles to be submitted via Google Docs. DropZone Articles about skydiving, skydiving gear, and anything skydiving-related. $50 - $100 Submit at [email protected] Design Tuts+ Print Design, Typography, Microsoft Word, and most Adobe design software. $250/ accepted article Pitch your idea here A Fine Parent Writing Based on Parenting $75/ article Please send the full completed article as a Google Drive document to [email protected] Real Python In-depth tutorials about python, web development, data science, productivity, psychology, career, and a lot more. $300/ article Apply through this Google form Smashing Magazine User experience, to Photoshop, to Mobile, to design patterns, to e-commerce, to accessibility, and anything else $200/ article Start by contacting them by theirs contact form Photoshop tutorials Tips and trick about Photoshop $50-$300 on various factors Submit through this link Snel.com Web hosting and others Web related topics €39 - €69 Submit here Clubhouse How to guides, in-depth tutorials, analysis of the software team, career advice, and thought leadership pieces related to software development $350-$600 Apply here Write Naked Articles that can help other writers succeed. $75 / accepted articles Get more information here Great Escape Publishing Travel experience $150 /article Get more information here or email - [email protected] Income DiaryRelated to building an online business: this includes articles about making money online, getting traffic, social media, web design, conversion optimization $500/accepted article Submit here LongreadsFreelance writing jobs related to any topics $500/accepted articles EMAIL at [email protected] Informed CommentRelates to politics or foreign policy, Middle Eastern and South Asian politics and US foreign policy, human rights, women’s rights, workers’ rights, religious discrimination, religion, energy, and climate change. $100 through PayPal Submit here through comment form Smith Sonianscience, history, art, popular culture, and innovation. $0.60/word Apply from here Travel+ Leisure Travel guide $1/word Apply from here WanderfulHelping and empowering women to travel the world. $50/word Submit here Transition Abroad Inspirational yet practical planning guides for cultural immersion travel, work, study, living, volunteering abroad and much more $75 - $150/word Submit here Budget Travel Travel destinations, culture, tips, and adventure $1/words Submit here Entheos Web design and development for Entheos. Articles can be about Photoshop, Dreamweaver, HTML5, CSS, Illustrator, Fireworks, and web design Not mentioned Apply here Foreign Policy Foreign policy and global affairs. They accept articles on issues about politics, culture, finance, business, and world events as long as it relates to foreign policy. $1/words Submit your sample through this formElite Personal FinancePersonal finance, saving money, making money online, credit cards, loans, identity theft, business, and many more topics. $100/accepted articles Submit through this form The DiplomatTopics including defense and intelligence, popular culture, arts, environment, human security and development, as well as geo-political trends in the Asia-Pacific region Not mentioned Apply through this form Copy hackersCopywriting and conversion optimization. $325/ accepted article Apply through their contact form Belt Magzine Anything related to the Rust Belt region $50 - $500/ Article Submit you sample here SemaphoreSoftware development-related tutorials $200 / accepted article Submit here Godaddy GarageEntrepreneurship, website design, website development, WordPress, freelancing, and more. $150/ article Submit here Digital ocean Ubuntu, CentOS, Debian, Fedora, or any of the other Linux ecosystem. $300 - $400 /article Submit here PleskWeb development-related topics. Articles can be about WordPress, website security, Javascript frameworks, DevOps, Docker & Plesk, and much more. $50 - $200 / article Submit here A list apart Web and software development and some tutorials $100/ articles Apply from this contact form LinodeTutorials about Linode, Linux, and cloud infrastructure. $300/Article Submit here Global command Well-informed essays, well-researched opinion pieces, and reviews of films, TV, books, music, or art at a national or international level. $50 / Post accepted Apply from here RankPay SEO, content marketing, and social media $50/Post accepted Apply from this link Craft Your Content writing and language, grammar, the business of writing, and staying creative and productive. The $150/accepted post Submit through this link Yoga International yoga and meditation $50 - $200 Submit here Greater good Science articles with a mix of storytelling. $350/accepted article Submit here International Living Living and retirement plan Upto $400 Apply through this contact form Providence Christian faith and theology with national security, foreign policy, political theory, defense, terrorism, and a lot of other political/policy related issues $100 - $ 1000/ accepted articles Apply through this link Metal Floss Articles designed to help people improve their knowledge and brain capability Not specified Apply through this link The Progressive Political issues Not specified Submit your article here Salon.comCulture, politics, science and health, food, technology, the economy, and news. Not specified Submit here Serious EatsRelated to food, cooking, and eating $100/ accepted article Apply through this form Funny times Politics, business, religion or anything as long as it’s humor. $60/ accepted article Apply through this form Source journalism code/web development and they are looking for case studies, project introductions, and walk-throughs of tools developed in and for newsrooms. $200 - $500 Submit through their contact form Sql Server central SQL tutorials and expertise $150 For more detail go here Hongkiat web design/development, technology, design inspiration, and social commerce $50 / accepted post For more detail go here Working Mother looking for pieces that have direct practical implications for career-focused moms. Not mentioned For more details go here Just Parents relevance to parents and pregnant couples Not mentioned Apply through their contact form Desert USA Travel, wildlife, geology, desert lore and cultural/natural history of the North American Desert regions. $50/ accepted article Apply here Edubirdie Writing improvement and writing services Not specified Apply here How to Write Writing and getting paid is not easier as many nobs think. Because it demand interest and proficiency in you. Regular learning and improving your writing skills should be the your goal. Because there are many writer already present and established in their niche and domain. So, to beat them you have to improve your writing skills. I would advice you to develope interest in particular niche and after gaining success in that you should to move in multiple or more niche.
Back to Content ↑
http://www.mrabhisheksuman.com/2020/02/best-paid-websites-for-writing-online.html
0 notes
Quote
Web Development is a field that is probably not going anywhere in the next 5-10-15 years. This strong assumption comes with the facts about how quick web is moving, the improvements in hardware people have with them (fast and smart mobile phones), and cloud-based applications which allows to do the heavy lifting in the cloud and use the browser as a bridge to connect powerful backend servers with less capable and powerful frontends. This makes it the best bet to learn web development right now if you're looking to learn something.
Not only would it open a plethora of opportunities for you as an individual, but you'll also be able to code and deploy complete projects end-to-end which can be consumed by almost everyone on the planet. Since most people have browsers with them anyway, every person is just a single URL away from your web-app and something you've coded - compare this with a desktop application or a hardware-based product. It's just not that scalable compared to the web. Alright! Now that we've established the fact that the web is the best way to go about right now if you want to learn something, let's see how to learn web development.
The web is vast - start small and keep it small
You would've seen a huge amount of available JavaScript frameworks and libraries like React, Angular, Vue, Ember, jQuery, XYZ, etc. Some very common questions I get as a YouTuber posting web development content is on the following lines:
Should I learn X?
Is X better than Y?
What is the scope of Z?
Always remember 2 things about technology, especially about the web:
Your tech stack almost always never matters. If you're good enough with your language/framework, you'll win every time.
You never need to learn everything. Never. Be a jack of all, and surely master of one.
To summarize this section, you need to think very small when you start, as it is super easy to get carried away with that hot framework in the market or trying to race ahead by dropping old tech and adapting new tech without doing proper research.
Start with HTML and CSS
I cannot stress this enough. It pains me to see a ton of people asking me questions when they're working on their React projects when the answer lies in some fact which shows how weak their HTML or CSS skills are. JavaScript was only a browser scripting language, and although it's much more now, it doesn't change the fact that on the web it compliments the HTML and CSS parts.
With advancements in web standards, there's so much achievable in CSS alone that for a lot of things, JavaScript is not even required. Animations? You got it. Drag-drop? HTML can handle that. Layouts? Checkout the flexbox or grid CSS API! There are so many things you can learn about HTML and CSS! Just don't rush into JavaScript because of the reason that cool kids like Angular are waiting out there for you. Those libraries and frameworks are not going anywhere. Take your time.
Going deep or wide?
There are 2 approaches when you learn web development - go wide or go deep. Going wide means you start learning many things together. This might work for some people, and this might not work for others. You might overwhelm yourself with tutorials, exercises, videos, blogs, etc. and give up. Going deep means you start learning one thing and try to learn as much as you can about it. This has its own set of pros and cons. You might get bored, give up because you don't see results.
So what's the solution? The answer is, surprisingly, doing none. Choose a small tech stack - like HTML/CSS/JavaScript, and go moderately deep into all three. This has a couple of advantages:
You don't get bored, all three have relatively different purposes and ways of writing.
You can blend all three, and create and see something meaningful quickly without months of effort - which is usually required by all other languages like C/C++. This would keep you motivated to work more
Do not choose React, ..or Angular, ..or Vue
When people start to work with JavaScript, there's an urge to pick up a library like React, pick up a UI system like Material UI and just go ahead and start building awesome stuff. Unfortunately, it's nothing more than shooting yourself in the face. You can never, ever, create intermediate to advanced projects with these frameworks if you're not done with basics in JavaScript. And applying JavaScript takes some time. Notice I used the word applying, and not learning in the previous sentence. There's a huge difference between learning something and applying something you learned. Create a small but working project with HTML/CSS/JavaScript, and when you do, create one more, and then, create one more. At every step, keep on increasing the complexity of the project, and the expectations too, until your codebase becomes unmanageable. The point you've arrived at now, I would call this the boundary of superior learning.
You see, frameworks exist to offload repetitive work from you. They do not exist so that you can don't care at all what's going on under the hood and rely on the fact that it's all magic. The first time you choose a framework like React or Angular for your projects should be when you're confident that you can create that project without React or Angular too.
Master of one
Now, when you're good with HTML/CSS/JavaScript, it's time to move on to industry standards. The truth is, no matter how good of a JavaScript developer you may be, you would often need to work with modern frameworks like React - and just with your JavaScript knowledge, you cannot immediately master it. It'll take time - to learn and understand the terminology, the concepts, how it works under the hood. It's time to take up a framework and master it. How? You might ask. The answer is simple - it's up to you. Try "Hello World" or maybe a bit more complex project in all frameworks you see out there (mostly Angular, Vue or React) and see which one vibes the most with you. Pick that one and don't look back.
Create unlimited projects with it, and aim to do something which you don't already know how to do - this is the best way to push yourself out of your comfort zone and learn new things about a thing you thought you already know.
Jack of others
It's equally important to keep an eye on other candidates too. It not only involves direct competitors of your "favorite" framework out there but also some worthy web development tools too. You don't have to "master" the tools as such because a lot of times they're just one-time setup with regular maintenance, but it's always nice to keep them on your checklist of skills.
This could include several things - unit testing with jest, end-2-end testing with cypress, webpack, babel, parcel, a bit of devops, Linux shell scripting, server deployments, etc.
You can always learn the basics of these skills quickly as they've been around for a long time - so they have a lot of help material available with them.
Move on
Trust me, it's a funny feeling but once you develop many projects and write a lot of code with your favorite stack, you start feeling like anything could be done. At this point, you can take up a job and keep doing it - it's completely fine. Or, you can level up your skills through the roof - move on. Web. is. vast. You're done with HTML/CSS/JavaScript/React/Angular/Vue? Move to servers - learn about server deployment, NGiNX, HAProxy, load balancing, setting up cloud infrastructure, firewalls, autoscaling, etc. Done with that too? Move on to WebAssembly - language for the next iteration of the web. Done with that too? Err, I don't know then, maybe move on to other programming areas, or cooking?
Conclusion
In today's world, it's so easy to not repeat the mistakes I did while learning web development myself, because all those mistakes are now public for everyone to read! You have so many resources and I've myself been working on one for web developers to learn! Here's my YouTube channel where I teach how to program awesome things and here's the codedamn platform - the actual platform which allows you to become a great developer by blending a bunch of videos, articles, and exercises! Let me know what you think about this article
http://damianfallon.blogspot.com/2020/04/the-right-way-to-learn-front-end-web.html
0 notes
Photo

How to Build a News App with Svelte
Svelte is a new JavaScript UI library that's similar in many ways to modern UI libraries like React. One important difference is that it doesn't use the concept of a virtual DOM.
In this tutorial, we'll be introducing Svelte by building a news application inspired by the Daily Planet, a fictional newspaper from the Superman world.
About Svelte
Svelte makes use of a new approach to building users interfaces. Instead of doing the necessary work in the browser, Svelte shifts that work to a compile-time phase that happens on the development machine when you're building your app.
In a nutshell, this is how Svelte works (as stated in the official blog):
Svelte runs at build time, converting your components into highly efficient imperative code that surgically updates the DOM. As a result, you're able to write ambitious applications with excellent performance characteristics.
Svelte is faster than the most powerful frameworks (React, Vue and Angular) because it doesn't use a virtual DOM and surgically updates only the parts that change.
We'll be learning about the basic concepts like Svelte components and how to fetch and iterate over arrays of data. We'll also learn how to initialize a Svelte project, run a local development server and build the final bundle.
Prerequisites
You need to have a few prerequisites, so you can follow this tutorial comfortably, such as:
Familiarity with HTML, CSS, and JavaScript (ES6+),
Node.js and npm installed on your development machine.
Node.js can be easily installed from the official website or you can also use NVM for easily installing and managing multiple versions of Node in your system.
We'll be using a JSON API as a source of the news for our app, so you need to get an API key by simply creating an account for free and taking note of your API key.
Getting Started
Now, let's start building our Daily Planet news application by using the degit tool for generating Svelte projects.
You can either install degit globally on your system or use the npx tool to execute it from npm. Open a new terminal and run the following command:
npx degit sveltejs/template dailyplanetnews
Next, navigate inside your project's folder and run the development server using the following commands:
cd dailyplanetnews npm run dev
Your dev server will be listening from the http://localhost:5000 address. If you do any changes, they'll be rebuilt and live-reloaded into your running app.
Open the main.js file of your project, and you should find the following code:
import App from './App.svelte'; const app = new App({ target: document.body, props: { name: 'world' } }); export default app;
This is where the Svelte app is bootstrapped by creating and exporting an instance of the root component, conventionally called App. The component takes an object with a target and props attributes.
The target contains the DOM element where the component will be mounted, and props contains the properties that we want to pass to the App component. In this case, it's just a name with the world value.
Open the App.svelte file, and you should find the following code:
<script> export let name; </script> <style> h1 { color: purple; } </style> <h1>Hello {name}!</h1>
This is the root component of our application. All the other components will be children of App.
Components in Svelte use the .svelte extension for source files, which contain all the JavaScript, styles and markup for a component.
The export let name; syntax creates a component prop called name. We use variable interpolation—{...}—to display the value passed via the name prop.
You can simply use plain old JavaScript, CSS, and HTML that you are familiar with to create Svelte components. Svelte also adds some template syntax to HTML for variable interpolation and looping through lists of data, etc.
Since this is a small app, we can simply implement the required functionality in the App component.
In the <script> tag, import the onMount() method from "svelte" and define the API_KEY, articles, and URL variables which will hold the news API key, the fetched news articles and the endpoint that provides data:
<script> export let name; import { onMount } from "svelte"; const API_KEY = "<YOUR_API_KEY_HERE>"; const URL = `https://newsapi.org/v2/everything?q=comics&sortBy=publishedAt&apiKey=${API_KEY}`; let articles = []; </script>
onMount is a lifecycle method. Here’s what the official tutorial says about that:
Every component has a lifecycle that starts when it is created and ends when it is destroyed. There are a handful of functions that allow you to run code at key moments during that lifecycle. The one you'll use most frequently is onMount, which runs after the component is first rendered to the DOM.
Next, let's use the fetch API to fetch data from the news endpoint and store the articles in the articles variable when the component is mounted in the DOM:
<script> // [...] onMount(async function() { const response = await fetch(URL); const json = await response.json(); articles = json["articles"]; }); </script>
Since the fetch() method returns a JavaScript Promise, we can use the async/await syntax to make the code look synchronous and eliminate callbacks.
The post How to Build a News App with Svelte appeared first on SitePoint.
by Ahmed Bouchefra via SitePoint https://ift.tt/2nlTHvT
0 notes
Text
An Introduction to Web Components
Front-end development moves at a break-neck pace. This is made evident by the myriad articles, tutorials, and Twitter threads bemoaning the state of what once was a fairly simple tech stack. In this article, I’ll discuss why Web Components are a great tool to deliver high-quality user experiences without complicated frameworks or build steps and that don’t run the risk of becoming obsolete. In subsequent articles of this five-part series, we will dive deeper into each of the specifications.
This series assumes a basic understanding of HTML, CSS, and JavaScript. If you feel weak in one of those areas, don’t worry, building a custom element actually simplifies many complexities in front-end development.
Article Series:
An Introduction to Web Components (This post)
Crafting Reusable HTML Templates
Creating a Custom Element from Scratch (Coming soon!)
Encapsulating Style and Structure with Shadow DOM (Coming soon!)
Advanced Tooling for Web Components (Coming soon!)
What are Web Components, anyway?
Web Components consist of three separate technologies that are used together:
Custom Elements. Quite simply, these are fully-valid HTML elements with custom templates, behaviors and tag names (e.g. <one-dialog>) made with a set of JavaScript APIs. Custom Elements are defined in the HTML Living Standard specification.
Shadow DOM. Capable of isolating CSS and JavaScript, almost like an <iframe>. This is defined in the Living Standard DOM specification.
HTML templates. User-defined templates in HTML that aren’t rendered until called upon. The <template> tag is defined in the HTML Living Standard specification.
These are what make up the Web Components specification.
HTML Imports is likely to be the fourth technology in the stack, but it has yet to be implemented in any of the big four browsers. The Chrome team has announced it an intent to implement them in a future release.
Web Components are generally available in all of the major browsers with the exception of Microsoft Edge and Internet Explorer 11, but polyfills exist to fill in those gaps.
Referring to any of these as Web Components is technically accurate because the term itself is a bit overloaded. As a result, each of the technologies can be used independently or combined with any of the others. In other words, they are not mutually exclusive.
Let’s take a quick look at each of those first three. We’ll dive deeper into them in other articles in this series.
Custom elements
As the name implies, custom elements are HTML elements, like <div>, <section> or <article>, but something we can name ourselves that are defined via a browser API. Custom elements are just like those standard HTML elements — names in angle brackets — except they always have a dash in them, like <news-slider> or <bacon-cheeseburger>. Going forward, browser vendors have committed not to create new built-in elements containing a dash in their names to prevent conflicts.
Custom elements contain their own semantics, behaviors, markup and can be shared across frameworks and browsers.
class MyComponent extends HTMLElement { connectedCallback() { this.innerHTML = `<h1>Hello world</h1>`; } } customElements.define('my-component', MyComponent);
See the Pen
Custom elements demo by Caleb Williams (@calebdwilliams)
on CodePen.
In this example, we define <my-component>, our very own HTML element. Admittedly, it doesn’t do much, however this is the basic building block of a custom element. All custom elements must in some way extend an HTMLElement in order to be registered with the browser.
Custom elements exist without third-party frameworks and the browser vendors are dedicated to the continued backward compatibility of the spec, all but guaranteeing that components written according to the specifications will not suffer from breaking API changes. What’s more, these components can generally be used out-of-the-box with today’s most popular frameworks, including Angular, React, Vue, and others with minimal effort.
Shadow DOM
The shadow DOM is an encapsulated version of the DOM. This allows authors to effectively isolate DOM fragments from one another, including anything that could be used as a CSS selector and the styles associated with them. Generally, any content inside of the document’s scope is referred to as the light DOM, and anything inside a shadow root is referred to as the shadow DOM.
When using the light DOM, an element can be selected by using document.querySelector('selector') or by targeting any element’s children by using element.querySelector('selector'); in the same way, a shadow root’s children can be targeted by calling shadowRoot.querySelector where shadowRoot is a reference to the document fragment — the difference being that the shadow root’s children will not be select-able from the light DOM. For example, If we have a shadow root with a <button> inside of it, calling shadowRoot.querySelector('button') would return our button, but no invocation of the document’s query selector will return that element because it belongs to a different DocumentOrShadowRoot instance. Style selectors work in the same way.
In this respect, the shadow DOM works sort of like an <iframe> where the content is cut off from the rest of the document; however, when we create a shadow root, we still have total control over that part of our page, but scoped to a context. This is what we call encapsulation.
If you’ve ever written a component that reuses the same id or relies on either CSS-in-JS tools or CSS naming strategies (like BEM), shadow DOM has the potential to improve your developer experience.
Imagine the following scenario:
<div> <div id="example"> <!-- Pseudo-code used to designate a shadow root --> <#shadow-root> <style> button { background: tomato; color: white; } </style> <button id="button">This will use the CSS background tomato</button> </#shadow-root> </div> <button id="button">Not tomato</button> </div>
Aside from the pseudo-code of <#shadow-root> (which is used here to demarcate the shadow boundary which has no HTML element), the HTML is fully valid. To attach a shadow root to the node above, we would run something like:
const shadowRoot = document.getElementById('example').attachShadow({ mode: 'open' }); shadowRoot.innerHTML = `<style> button { color: tomato; } </style> <button id="button">This will use the CSS color tomato <slot></slot></button>`;
A shadow root can also include content from its containing document by using the <slot> element. Using a slot will drop user content from the outer document at a designated spot in your shadow root.
See the Pen
Shadow DOM style encapsulation demo by Caleb Williams (@calebdwilliams)
on CodePen.
HTML templates
The aptly-named HTML <template> element allows us to stamp out re-usable templates of code inside a normal HTML flow that won’t be immediately rendered, but can be used at a later time.
<template id="book-template"> <li><span class="title"></span> — <span class="author"></span></li> </template> <ul id="books"></ul>
The example above wouldn’t render any content until a script has consumed the template, instantiated the code and told the browser what to do with it.
const fragment = document.getElementById('book-template'); const books = [ { title: 'The Great Gatsby', author: 'F. Scott Fitzgerald' }, { title: 'A Farewell to Arms', author: 'Ernest Hemingway' }, { title: 'Catch 22', author: 'Joseph Heller' } ]; books.forEach(book => { // Create an instance of the template content const instance = document.importNode(fragment.content, true); // Add relevant content to the template instance.querySelector('.title').innerHTML = book.title; instance.querySelector('.author').innerHTML = book.author; // Append the instance ot the DOM document.getElementById('books').appendChild(instance); });
Notice that this example creates a template (<template id="book-template">) without any other Web Components technology, illustrating again that the three technologies in the stack can be used independently or collectively.
Ostensibly, the consumer of a service that utilizes the template API could write a template of any shape or structure that could be created at a later time. Another page on a site might use the same service, but structure the template this way:
<template id="book-template"> <li><span class="author"></span>'s classic novel <span class="title"></span></li> </template> <ul id="books"></ul>
See the Pen
Template example by Caleb Williams (@calebdwilliams)
on CodePen.
That wraps up our introduction to Web Components
As web development continues to become more and more complicated, it will begin to make sense for developers like us to begin deferring more and more development to the web platform itself which has continued to mature. The Web Components specifications are a set of low-level APIs that will continue to grow and evolve as our needs as developers evolve.
In the next article, we will take a deeper look at the HTML templates part of this. Then, we’ll follow that up with a discussion of custom elements and shadow DOM. Finally, we’ll wrap it all up by looking at higher-level tooling and incorporation with today’s popular libraries and frameworks.
Article Series:
An Introduction to Web Components (This post)
Crafting Reusable HTML Templates
Creating a Custom Element from Scratch (Coming soon!)
Encapsulating Style and Structure with Shadow DOM (Coming soon!)
Advanced Tooling for Web Components (Coming soon!)
The post An Introduction to Web Components appeared first on CSS-Tricks.
via CSS-Tricks https://ift.tt/2OaDD9U
0 notes
Text
An Introduction to Web Components
Front-end development moves at a break-neck pace. This is made evident by the myriad articles, tutorials, and Twitter threads bemoaning the state of what once was a fairly simple tech stack. In this article, I’ll discuss why Web Components are a great tool to deliver high-quality user experiences without complicated frameworks or build steps and that don’t run the risk of becoming obsolete. In subsequent articles of this five-part series, we will dive deeper into each of the specifications.
This series assumes a basic understanding of HTML, CSS, and JavaScript. If you feel weak in one of those areas, don’t worry, building a custom element actually simplifies many complexities in front-end development.
Article Series:
An Introduction to Web Components (This post)
Crafting Reusable HTML Templates (Coming soon!)
Creating a Custom Element from Scratch (Coming soon!)
Encapsulating Style and Structure with Shadow DOM (Coming soon!)
Advanced Tooling for Web Components (Coming soon!)
What are Web Components, anyway?
Web Components consist of three separate technologies that are used together:
Custom Elements. Quite simply, these are fully-valid HTML elements with custom templates, behaviors and tag names (e.g. <one-dialog>) made with a set of JavaScript APIs. Custom Elements are defined in the HTML Living Standard specification.
Shadow DOM. Capable of isolating CSS and JavaScript, almost like an <iframe>. This is defined in the Living Standard DOM specification.
HTML templates. User-defined templates in HTML that aren’t rendered until called upon. The <template> tag is defined in the HTML Living Standard specification.
These are what make up the Web Components specification.
HTML Imports is likely to be the fourth technology in the stack, but it has yet to be implemented in any of the big four browsers. The Chrome team has announced it an intent to implement them in a future release.
Web Components are generally available in all of the major browsers with the exception of Microsoft Edge and Internet Explorer 11, but polyfills exist to fill in those gaps.
Referring to any of these as Web Components is technically accurate because the term itself is a bit overloaded. As a result, each of the technologies can be used independently or combined with any of the others. In other words, they are not mutually exclusive.
Let’s take a quick look at each of those first three. We’ll dive deeper into them in other articles in this series.
Custom elements
As the name implies, custom elements are HTML elements, like <div>, <section> or <article>, but something we can name ourselves that are defined via a browser API. Custom elements are just like those standard HTML elements — names in angle brackets — except they always have a dash in them, like <news-slider> or <bacon-cheeseburger>. Going forward, browser vendors have committed not to create new built-in elements containing a dash in their names to prevent conflicts.
Custom elements contain their own semantics, behaviors, markup and can be shared across frameworks and browsers.
class MyComponent extends HTMLElement { connectedCallback() { this.innerHTML = `<h1>Hello world</h1>`; } } customElements.define('my-component', MyComponent);
See the Pen
Custom elements demo by Caleb Williams (@calebdwilliams)
on CodePen.
In this example, we define <my-component>, our very own HTML element. Admittedly, it doesn’t do much, however this is the basic building block of a custom element. All custom elements must in some way extend an HTMLElement in order to be registered with the browser.
Custom elements exist without third-party frameworks and the browser vendors are dedicated to the continued backward compatibility of the spec, all but guaranteeing that components written according to the specifications will not suffer from breaking API changes. What’s more, these components can generally be used out-of-the-box with today’s most popular frameworks, including Angular, React, Vue, and others with minimal effort.
Shadow DOM
The shadow DOM is an encapsulated version of the DOM. This allows authors to effectively isolate DOM fragments from one another, including anything that could be used as a CSS selector and the styles associated with them. Generally, any content inside of the document’s scope is referred to as the light DOM, and anything inside a shadow root is referred to as the shadow DOM.
When using the light DOM, an element can be selected by using document.querySelector('selector') or by targeting any element’s children by using element.querySelector('selector'); in the same way, a shadow root’s children can be targeted by calling shadowRoot.querySelector where shadowRoot is a reference to the document fragment — the difference being that the shadow root’s children will not be select-able from the light DOM. For example, If we have a shadow root with a <button> inside of it, calling shadowRoot.querySelector('button') would return our button, but no invocation of the document’s query selector will return that element because it belongs to a different DocumentOrShadowRoot instance. Style selectors work in the same way.
In this respect, the shadow DOM works sort of like an <iframe> where the content is cut off from the rest of the document; however, when we create a shadow root, we still have total control over that part of our page, but scoped to a context. This is what we call encapsulation.
If you’ve ever written a component that reuses the same id or relies on either CSS-in-JS tools or CSS naming strategies (like BEM), shadow DOM has the potential to improve your developer experience.
Imagine the following scenario:
<div> <div id="example"> <!-- Pseudo-code used to designate a shadow root --> <#shadow-root> <style> button { background: tomato; color: white; } </style> <button id="button">This will use the CSS background tomato</button> </#shadow-root> </div> <button id="button">Not tomato</button> </div>
Aside from the pseudo-code of <#shadow-root> (which is used here to demarcate the shadow boundary which has no HTML element), the HTML is fully valid. To attach a shadow root to the node above, we would run something like:
const shadowRoot = document.getElementById('example').attachShadow({ mode: 'open' }); shadowRoot.innerHTML = `<style> button { color: tomato; } </style> <button id="button">This will use the CSS color tomato <slot></slot></button>`;
A shadow root can also include content from its containing document by using the <slot> element. Using a slot will drop user content from the outer document at a designated spot in your shadow root.
See the Pen
Shadow DOM style encapsulation demo by Caleb Williams (@calebdwilliams)
on CodePen.
HTML templates
The aptly-named HTML <template> element allows us to stamp out re-usable templates of code inside a normal HTML flow that won’t be immediately rendered, but can be used at a later time.
<template id="book-template"> <li><span class="title"></span> — <span class="author"></span></li> </template> <ul id="books"></ul>
The example above wouldn’t render any content until a script has consumed the template, instantiated the code and told the browser what to do with it.
const fragment = document.getElementById('book-template'); const books = [ { title: 'The Great Gatsby', author: 'F. Scott Fitzgerald' }, { title: 'A Farewell to Arms', author: 'Ernest Hemingway' }, { title: 'Catch 22', author: 'Joseph Heller' } ]; books.forEach(book => { // Create an instance of the template content const instance = document.importNode(fragment.content, true); // Add relevant content to the template instance.querySelector('.title').innerHTML = book.title; instance.querySelector('.author').innerHTML = book.author; // Append the instance ot the DOM document.getElementById('books').appendChild(instance); });
Notice that this example creates a template (<template id="book-template">) without any other Web Components technology, illustrating again that the three technologies in the stack can be used independently or collectively.
Ostensibly, the consumer of a service that utilizes the template API could write a template of any shape or structure that could be created at a later time. Another page on a site might use the same service, but structure the template this way:
<template id="book-template"> <li><span class="author"></span>'s classic novel <span class="title"></span></li> </template> <ul id="books"></ul>
See the Pen
Template example by Caleb Williams (@calebdwilliams)
on CodePen.
That wraps up our introduction to Web Components
As web development continues to become more and more complicated, it will begin to make sense for developers like us to begin deferring more and more development to the web platform itself which has continued to mature. The Web Components specifications are a set of low-level APIs that will continue to grow and evolve as our needs as developers evolve.
In the next article, we will take a deeper look at the HTML templates part of this. Then, we’ll follow that up with a discussion of custom elements and shadow DOM. Finally, we’ll wrap it all up by looking at higher-level tooling and incorporation with today’s popular libraries and frameworks.
Article Series:
An Introduction to Web Components (This post)
Crafting Reusable HTML Templates (Coming soon!)
Creating a Custom Element from Scratch (Coming soon!)
Encapsulating Style and Structure with Shadow DOM (Coming soon!)
Advanced Tooling for Web Components (Coming soon!)
The post An Introduction to Web Components appeared first on CSS-Tricks.
An Introduction to Web Components published first on https://deskbysnafu.tumblr.com/
0 notes