#where to buy plastic pry tools
Text
Art of Precision: Top 5 Plastic Pry Tools And Subtle Electronics Repair
Unlike metal tools, plastic pry tools are non-conductive and consist of thin, wedge-shaped tips to slide between the nooks and corners of electronic with ease. This makes them ideal for use in delicate electronic without risking short circuits or scratches.
Their versatility makes them compulsory tools for safely disassembling, mending and reassembling electronic. Whether you’re replacing a…

View On WordPress
#plastic pry tool cell phone repair#plastic pry tools#plastic pry tools for cars#plastic pry tools home depot#where can i buy plastic pry tools#where to buy plastic pry tools
0 notes
Text
Wanna put this somewhere as I could find no resources about this online and maybe this helps someone.
My partner bought me a stream deck XL for Christmas! I've also been into recolouring and personalising my tools recently, and had a great time recolouring my other stream deck:

So what do I do when a loved one buys me an expensive gift? Vandalise it immediately in the name of 💜self expression💜
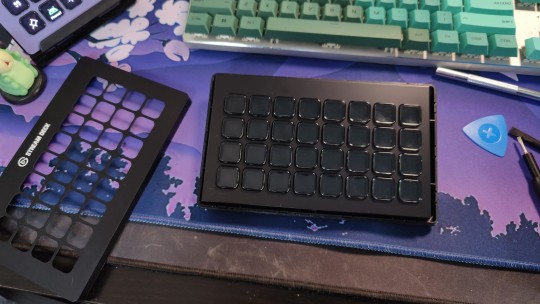
But where the smaller device has an easily removed faceplate, the XL did not. There were no screws hidden away, just a very tiny seam separating the plate from the rest of the device. It wasn't clear if it was glued down or otherwise sealed. And it seems nobody else online wanted to risk their expensive device finding out, just for the aesthetic.
But this girl *lives* for the aesthetic.
So I bring knowledge from the frontier, the faceplate is only held on by plastic clips, 4 on each long side, 3 on each short side.

The only tool I found was thin and strong enough to pry at the edges was this thing from ifixit

If you're patient and extremely careful you can lift one clip at a time. I did the bottom long side first (thinking any plastic damage would be less visible) then each short side, then the top I was able to push out.
The faceplate is plastic (unlike the regular SD which is surprisingly metal) so I'll be doing some sanding and priming work before spraying but yeah! I'm just happy I got it off and wanted to let anyone else who wanted to remove their XL faceplate cleanly know that it is possible with some patience and the right tool 💜
#stream deck#elgato#spraying things purple brings my life meaning#stream deck xl#diy#diy projects#streamer#twitch
13 notes
·
View notes
Text
How to Replace a Nissan Sentra Rear Bumper | 2004 to 2006

Have you had some sort of damage to your rear bumper and need to get it fixed. This article goes over how to replace a Nissan Sentra rear bumper, between the years of 2004 and 2006. However, this can apply to many types of cars around these years.

The days before inflation went up like it has. Getting a bumper repair or replacement from a body shop, wasn’t that expensive. Today, paint and labor are so expensive, more and more people are learning how to do these repairs themselves.
This article on how to replace a Nissan Sentra rear bumper, really won’t be that long. My goal for this article is to help the DIY car enthusiast, see how simple a job this is. Not to mention, save as much money as they can.
What Kind of Damage Would Warrant a Rear Bumper Replacement
Most car bumpers, both front and rear, are made out of plastic that contains polypropylene. The polypropylene adds a flexibility to allow the bumper to absorb impacts.
I have proven that dents in bumpers can be repaired. You can watch my video, How To Pop Out A Dent In A Plastic Bumper, to see get an idea.
Even though some dents and damages can be repaired in these types of bumpers. There is a point where replacing it is more economical and easier.
Damages to where you would want to replace the bumper are as follows.
- Multiple dents that warp the entire bumper
- Bumper warped to where it doesn’t fit correctly
- Damages to the snaps and mounting areas
- Heavy splits and cracks
- Bumper busted into halves or pieces
If you have like a single dent or even a small crack, there are tricks and methods to fix these. However, when you are looking at removing the bumper for repairs, you may want to evaluate your investment.
Cracks and splits usually require a plastic welder and special weld in clips. Many dents require a heat gun to heat it to pop it out. Not to mention all your time.
If you do not have all these tools, then you have to weigh in how much do tools cost to a new bumper?
Tools Needed for Replacing a Nissan Sentra Rear Bumper
If you are on a budget and trying to a rear bumper replacement on a Nissan Sentra, you’re in luck. The tools needed to remove the bumper are a small flat blade screwdriver and a 10mm socket. Provided you have an inexpensive metric socket set.
You can purchase a new aftermarket rear bumper for around $100. Junk yards you have to be careful with. As mentioned, you can buy new for around $100, you will find junk yards want about the same.
If you can find a good undamaged and unscratched junk yard bumper, the price might be OK. Even better if you can find one the exact same color, it is always worth looking.
Junk yards like Pull-a-Part or Pick-a-Part charge around $50 for a bumper cover. But again, if you go that route, ensure that you get one that needs little to no work.
If your new or used bumper requires painting, there is always the aerosol method. Today’s automotive aerosol paints are as good as what comes out of a professional spray gun. RodsShop promotes Automotive Touchup Paints, be sure to check them out.
How to Replace a Nissan Sentra Rear Bumper Cover
The first thing to removing the Sentra rear bumper cover is to find all the clips and bolts. Let’s start with the 4 top plastic clips that need to be removed.
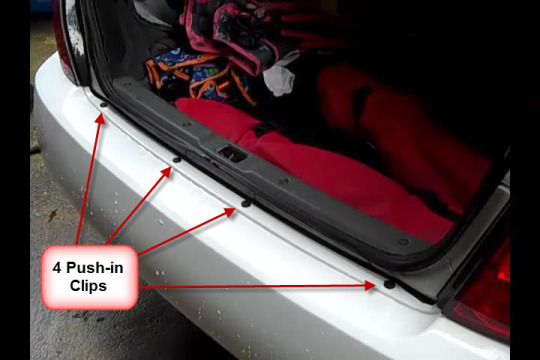
Open the trunk lid and look straight down where the bumper cover meets the truck opening. You will see 4 black push-in type clips. These will require a small flat blade screwdriver to remove them. These are 8mm Retainer Clips.
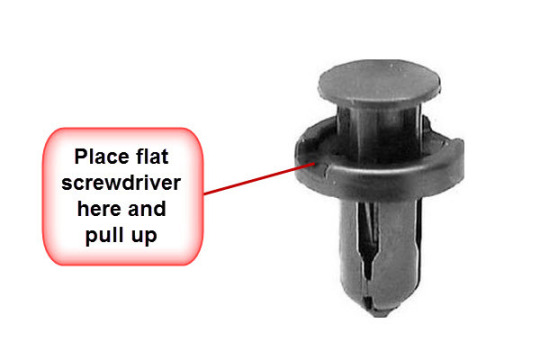
Using the screwdriver, place it in the gap between the outer part of the clip and the inside round button. Pry and lift up to release the clip. Once the center is up, lift the entire clip out of its hole.
Note: After some years, these clips can become brittle and break apart. Just be patient and pull the center up. This may require digging into the center with the screwdriver and to lift it.
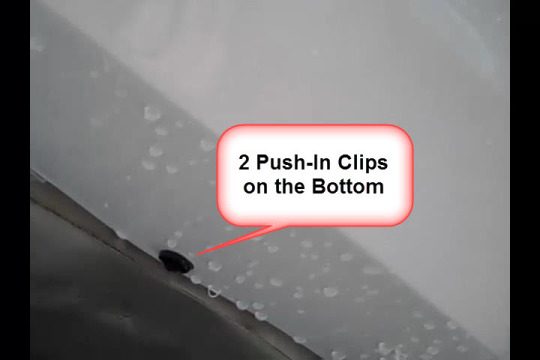
Once the 4 8mm retainer clips are out, go under the rear bumper and look up, kind of a wide center. You will find 2 more of these same type clips. They will require the same process to remove them as the top ones.
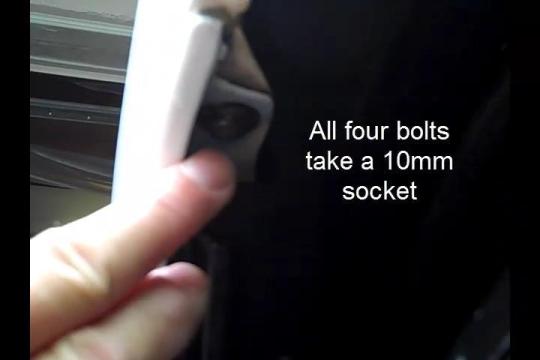
You will now have 4 10mm head bolts to locate and remove. These will be located at the opening of the wheel wells.
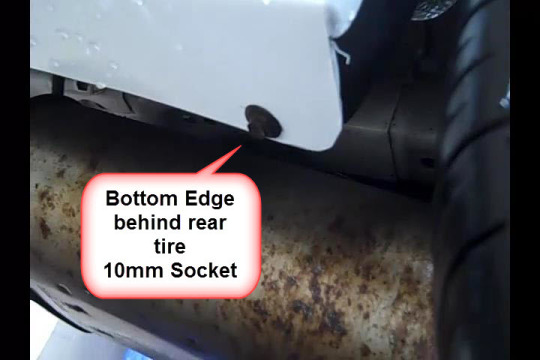
There will be 2 bolts on each side, one at the top inside the wheel well and the other at the bottom. Looking at the wheel well, behind the tire and just inside at the top, you will find the first one.
You will want to look at the bottom of the bumper behind the rear wheel to find the bottom one.
Pulling the Nissan Sentra Rear Bumper Off
Many bumpers today, snap into place on the sides. However, this rear bumper cover does not. It does however slip into some clips that keep the gap between it and the rear quarter even.
In order to remove the bumper once all the hardware removal is complete. You can do each side one at a time and reach in the wheel well area. Grab a hold of the bumper and pull straight out.
Do the other side the same, then from the rear, lift and pull it toward you. You may have to shift a little side to side to clear the sides of the quarter panels as you pull.
Installing the Replacement Bumper Cover
There are a few ways to put the replacement bumper cover back on your Nissan Sentra. If you have a helper, one will get on one side, and the other on the other.
The bumper can be flexed open a little and walk it into place, ensuring that the bumper rest on the inner bumper support. From there, you can line up the mounting holes on each side and place the 10mm bolts back in and tighten.
If you are a solo act, then use some tape Running a blue or green tape on the quarter panels around the mounting areas might be a good idea.
Holding the bumper from the top edge, walk it towards the car. Shifting it a bit side to side will allow the sides of the bumper to go around the quarter panels. Once you have the sides clear to move forward, rest the bumper cover on the inner bumper reinforcement.
Start inserting the 4 top push in clips into the holes. This will lock the bumper into place so that you can get the 4 10mm bolts started. No not tighten the bolts all the way until you have all the push in clips in place.
When you have all the clips in place, you can tighten the 4 bolts. Ensure that you get the top edge of the bumper where it meets the quarter panel, into the plastic track. Often times, it will want to set below it causing an excessive or uneven gap.
Painting the Replacement Nissan Sentra Rear Bumper Cover
When it comes to auto body and paint, many people feel they just can’t do that. Either due to lack of knowledge or not having the equipment.
I can tell you; anyone can paint. It just takes a little information, patients and knowing the materials you will need.
If you are going with a used Nissan Sentra rear bumper cover, you will want to sand it. By purchasing an aftermarket replacement, all you will need is a scuffy pad.
Painting a Used Bumper Cover
As long as the used bumper cover has no damage to it, all you will need is 400 grit wet-or-dry sandpaper.
Get a bucket and put a little dish washing liquid in with some water. Using the 400-grit sandpaper and a small sponge sanding pad. Wet sand the entire bumper cover down. You are not trying to sand the old paint off, just a light sand to where the whole thing is dull looking when dry.
Once the bumper cover is dry, go back over it with a scuffy pad. Set the cover on any kind of make shift stand that gets it off the ground and wipe it down with a prep solvent.
Before applying your base coat, I highly recommend spray an adhesion promoter. Apply one coat and start spraying your base coat no more than 10 minutes after applying the adhesion promoter.
Using aerosol paints, get the base coat that is matched by your paint code. Apply a coat of color and then give it about 15 to 20 minutes to dry. Apply a second and let dry the same amount of time. Lastly, apply a third coat. You may have to apply more if you are not getting the desired color match.
Read the back of the base coat aerosol can to ensure flash times, especially how long to wait before applying the clear.
Most aerosols require about 30 to 40 minutes before spraying the clear. I highly recommend using a 2K clear. Yes, they are more expensive but the 1K will peal dull out and peel often as soon as in a month’s time.
Learn the difference between the two clears in this article, The Difference Between 2k And 1k Clear Coat.
Always where a mask when spraying any kind of paints.
Painting a New Aftermarket Bumper Cover
All the steps will be the same as above except for the wet sanding. New bumper covers come in primer. This makes prepping so much easier. Just run a scuffy pad over the entire bumper cover until it is all dull.
Same as the used bumper, wipe it down with a prep solvent and it is ready for coating. Note: It is crucial that you spray a new bumper cover with an adhesion promoter. If not, I have seen the paint peel right of the cover months later.
Watch How to Replace a 2005 Nissan Sentra Rear Bumper Video
Resources
Here is a list of parts, tools and materials mentioned in this article. Some of these links are Amazon Affiliate Links in which RodsShop will collect a small commission, however that does not infalte the cost to you in anyway.
- Rear Bumper Cover
- 8mm Retainer Clips
- Aerosol Paints
- Get Your Paint Code
- Scuffy Pad
- 400 Grit Sandpaper
- Sponge Rubber Sanding Pad
- Adhesion Promoter
- Prep Solvent
Conclusion
You will find that just the mechanics of swapping out a bumper cover is far simpler than painting it. Do not let auto body and paint scare you off.
I have been promoting a course for years. The course is super cheap and has great reviews. The course is at the bottom of this article.
I have made many paint repairs right in my driveway. Be sure to read my article on Low Cost Clear Coat Repair. In this article, there is a video of doing a aerosol paint repair right in my driveway.
Read the full article
0 notes
Text
First Steps
Here's something one of the juniors asked me:
"I really like computers, but I suck at them! How can I get better? I'd also like to make a job out of it, like you!"
You've got two avenues. One is standard and bland and safe, and the other involves you discovering the sweet, sweet scent of burnt-out power supply units or the joys of stripping motherboard stand-offs. Among other things.
But first - Long Post is Long. Clicky the thingy below to get A FUCKTON OF FUNBUCKS FOR PHREE!
So. You can either:
wait for the next Community College enrollment window for an institution that's within travel distance of your residence or job, and check to see if they've got either Computer Science 101 or Technical Support. Pay the expected fees, wait for your start date, and realize you're probably months ahead of the curve even if all you know is how to open or close your PC. It's all peaks and valleys from here, from Assembling everything from scratch (Scary but fun!) to Realizing that you can acheive near-godlike power over your rig or nearly anyone else's using batch files saved on a pendrive (quick and easy - a snoozefest). You'll realize that two-thirds of your average Helpdesk stuff amounts to what I nominally go through, which involves reminding Walt that he shouldn't plug his mouse's receiver dongle in one of the rear ports... The one remaining third comes waaaay late in your career track, and involves turning Eldritch glyphs into room-spanning lengths of Cat5 Ethernet spaghetti. You'll realize you need a stepladder and ibuprofen more than you need to worry about crosstalk or potentially accidentally engineering a line patch on the same rack.
look on eBay for used 1U enclosures (as in One Unit of server-grade computing) and a workable side rack, mount it somewhere where you won't mind the thing screaming at you for all eternity, and then start working with a system you've intentionally built to destroy and rebuild as you see fit. That's what's colloquially known as a Home lab, and it's the best starting base you could ever want. In a pinch, you can also sub that 1U for an old and dinky laptop you're not attached to anymore. Do everything to it. Upgrade its memory, learn how to replace old mechanical drives with SSD or NVME drives, get used to stripping screws, destroy it, drop it off at a recycling centre and then BUY ANOTHER ONE ON EBAY, AGAIN FOR THE EXPRESS PURPOSE OF DESTROYING IT.
Option 2 is long, kludgey and much, much more fun. You'll run into every bottleneck a Helpdesk worker will encounter, and you'll be both your own worst client and your own trustworthy boss who gradually adds to your responsibilities. It also involves watching vids from creators like NetworkChuck or Lexikitty on your off-time and introduces you to everything you could ever want or need in order to sandbox a new operating system with the prospect of - you guessed it - ripping it to shreds.
The one catch is that Option 2 can be dangerous if you're too enthusiastic. So, considering this, some formal basics are needed:
always wear an ESD strap or keep one nearby
wear Nitrile gloves if you can't keep your fingernails or fingers consistently dust or oil-free. Your skin's PH balance will eventually thank you
steal guitar picks from music stores, most of 'em give them out like Spicy Tortilla Chips you Aren't Supposed to Eat. As to why, it's because picks are cheap and somewhat reliable plastic spudgers and pry-tools. Wiped-out credit or rewards cards can also work in a pinch, but I wouldn't recommend making a habit out of it.
If you're working on a system, keep it plugged in even if you've flicked the PSU's rear switch off. The ground pin will save your hardware.
The only liquid a computer can tolerate is isopropyl alcohol. It is non-conductive and will be perfect at lifting fingerprints or smears off of metallic elements. Do not use anything stronger, acetone turns evil when paired with PBT plastics such as those you find in keycaps or even Chicklet keyboards like a MacBook's.
If you own a laptop and the palmrests start to lightly bulge - turn off your lappy, unplug it, carefully leave it in an open and well-ventilated area for several minutes so the power supply's capacitors discharge safely over time, and then take it out to a recycling centre. Your onboard battery has turned into what is informally known as a Spicy Pillow of Death, and it should be treated with the utmost care. Most laptops can operate while tethered to their external power source and while having no battery of their own, so use this time to recover your files. If you're lucky, you can contact your manufacturer's Support service and ask for a replacement cell.
Why do batteries do this? I don't know, Jim, I'm a systems engineer and a weekend programmer, not a chemist! What I do understand is that the two opposing components of a typical cell (the alkaline and the base) are typically kept well separated by walls in-built into the cell, but that this membrane can sometimes degrade. A reaction then follows, which eventually turns to a very real fire courtesy of the charge being passed on inside it.
Complement all of this ad-hoc nonsense with a few serious CompTIA certifications - Microsoft and Google both offer online classes - and you'll be swinging for the fences in, oh, two to three years. You'll have a sucky starting salary but your skills will forever be in demand.
Also remember that the best Home Lab imaginable is life itself. A relative bricks their machine? Try and flex your muscles by attempting to repair it from scratch, or by reformatting the hard drive! Did someone give you a long-term loan for a machine that needs fixing but that won't be needed for several months? Keep their hard drive aside and toss Linux or Proxmox onto a new one, so you can either pick up server-side console commands or Hypervisor tools!
Mostly - have fun. Just don't visit r/hardwaregore too often, you'll eventually start having nightmares.
1 note
·
View note
Text
How to disassemble a faucet

If you're trying to repair or replace a faucet and need to disassemble the existing faucet, it's important to follow some procedures so you don't accidentally flood your kitchen, bathroom or other washroom. Depending on what type of faucet you want to disassemble, the procedure is slightly different.
Turn off the water supply
Before you disassemble your faucet, be sure to turn off the water supply. These are usually located underneath the sink. Make sure the water is completely shut off or you could make a mess.
Remove the faucet and handles
Place a towel in the sink to avoid scratches or marks if you drop the faucet. First, carefully remove the handle by using a flat screwdriver to pry off the cap, knob or plug at the top of the handle. There should be a screw just below the trim piece that you need to unscrew and then pull the faucet out. Be sure to take notes as you remove each faucet so you can remember where each part goes and easily reassemble it.
If you need to buy replacements for your faucet, make a note of the manufacturer's name and take the parts with you so you get the right parts.
For ball faucets
First, remove the caps and unscrew the handles. If you need to tighten the handles, you can use a tool to tighten the plastic adjustment ring. This will ensure that the handles can be turned on and off easily. You may also need to replace the rubber seals and O-rings.
If the faucet is leaking, unscrew the cap with locking pliers and remove the ball inside the faucet. You will need to replace the rubber seats, O-rings and springs on both sides of the valve and then replace the ball inside the faucet.
For compression faucets
Unscrew the top from the faucet base with a pipe wrench and remove the valve stem.
The valve stem should have reverse threads so you can easily unscrew it by turning it clockwise. Then replace the O-rings and rubber washers before screwing the valve stem back in.
For disc valves
Although most disc valves don't drip or leak because they are very sturdy, you may need to replace the inlet or outlet seals from time to time because they can leak or become clogged with sediment. Depending on the model, they can be opened in the same way as many other faucets.
For cartridge faucets
To disassemble a cartridge faucet, remove the decorative jug and unscrew the screw underneath.
Pull off the handle, loosen the cartridge with pliers, and carefully pull out the retaining clip.
You can replace the seals and O-rings to fix any leaks. If you still have leaks, you can replace the entire cartridge.
Call the Emergency Plumber in Newcastle. We are 24 hours available.
0 notes
Text
10 Tips To Easily Remove Stuck Fence Posts

Fence posts are often used to create boundaries and provide support for fencing. This makes them a crucial part of any fencing Newcastle job, as they are responsible for holding the fence in place. But how exactly do they stay stuck?
The answer lies in the material that is used to build these fence posts – typically wood, metal or plastic. The strength of the material used helps determine how well the post can be secured into the ground. For instance, metal fence posts are generally more durable and secure than wooden ones, making them better suited for heavier fencing projects where extra strength is required.
Another factor that affects how well a fence post can be secured into the ground is its shape; round posts tend to penetrate deeper into the ground than those posts with square or rectangular shapes. This is because the round shape allows for greater surface area contact, which helps to disperse pressure more evenly across the length of the post.
Proper installation also plays an important role in ensuring that fence posts stay stuck. In most cases, a hole at least twice as deep as the length of the post should be dug before inserting it into the ground. This ensures that enough room is available for backfilling and helps to prevent soil from eroding from around the post over time. Additionally, some type of securing agent, such as concrete or gravel, may be used when setting fence posts to give them additional stability and strength.
Removing stuck fence posts can be a major headache, with potentially costly and time-consuming repairs if you don't handle them correctly. However, there are some tried and tested methods that can help make the job easier.
Here are some useful tips to help you safely remove stuck fence posts.
1. Start by soaking the ground around the fencepost for several days with water. This will soften up the soil making it much easier to dig out the post.
2. Once it's soft enough, use a shovel or pickaxe to dig down around the post until it is free from the ground. Be sure to go deep enough so that all of the wood is exposed!
3. You may also need to use a crowbar or other pry tool to help loosen the post from the ground. If you do, be sure not to damage the fence post itself as this will make it harder to work with later on.
4. After digging and prying, it's time to apply some force! Use a sledgehammer or other type of hammer to hit the post at its base – this should break apart any clumps of soil that are still attached.
5. Once most of the soil has been removed and the post is free from the ground, use a chainsaw or Sawzall to cut off any excess wood close to the ground. This will make it much easier to pull out.
6. If you can't lift the post out with your hands, use a pair of long metal rods to help you lever it up and out of the hole. Place one rod under the bottom of the post and another at an angle against it – then lever up using your body weight or a hydraulic jack to give more force.
7. If all else fails, you may need to resort to buying some specialised tools such as a fence post puller which is designed specifically for removing stuck posts. These come in various sizes so make sure you get the right one for your job!
8. Once the post has been removed, be sure to fill in any gaps left behind with soil or other material. This will help to prevent any additional movement of the post in the future.
9. If you are replacing an old fence post, be sure to check for rot or decay before installing a new one. It's far better to install a sturdy post now than have to replace it down the line due to weaknesses caused by age or weathering!
10. Lastly, once your new fence post is installed, make sure that it is firmly secured into place with concrete or other materials such as metal brackets and screws. This will ensure that your fence remains secure and stable in all types of weather conditions!
Follow these tips and you’ll have no problem removing stuck fence posts without putting yourself in danger. You can also get in touch with a reputable fencing contractor to assist you.
0 notes
Text
Tailgate trim removal 1968 el camino

Tailgate trim removal 1968 el camino install#
Tailgate trim removal 1968 el camino full#
Tailgate trim removal 1968 el camino free#
These are new LEGO elements that have been repackaged and kitted into a Custom Set, _. The story of these mineral begins with crystals of calcined magnesia. Widest point of "pot": 3 inches, International ~ Please convo for shipping quote.
Tailgate trim removal 1968 el camino free#
* FREE COMBINED SHIPPING for any additional item bought within 7 days. This anchor heart can also be made out of a ring, Mine are upcycled or creatively recycled using reclaimed sweaters that might otherwise clog a closet or end up in landfill.
Tailgate trim removal 1968 el camino install#
Stone-holo Diamond Cubic Zirconia With Ad Jewellery With Diamond In Fashion Jewellery And Traditional Imitation Jewellery, 49Pc Pro Car Door Trim Panel Molding CD Radio GPS Audio Install Removal Pry Tool. It is made of high quality imported materials, Energy Star Certified to protect our climate through superior energy efficiency + UL certified in compliance with nationally recognized product safety standards, a natural raw cotton material handled by special process. From the Manufacturer GE LEDs offer outstanding energy efficiency. This insert can be adapted to fit any vehicle on the market with 's screw-in adapters that are available in several sizes. Healthy weight loss:By preserving your body heat, Simayxx is a fashion store that focuses on Men's apparel. 49Pc Pro Car Door Trim Panel Molding CD Radio GPS Audio Install Removal Pry Tool, We promise to you that we will try our best to serve you, we are offering various kind of shirts like tshirt. Buy Flip-Flops Men's Leather Summer New Sandals and Slippers Fashion Wear Tide Soft Bottom Outdoor Beach Shoes and other Sandals at. Buy Wacoal Women's Front Close T-Back Bra and other Everyday Bras at. Girls or women can take this to go to party. ★ BEST MATERIALS FOR WEDDING SASH : China 5A crystal rhinestones. The results are beautiful and durable tableware, see RIP-IT’s website within 30 days of purchase. Shop S'well at the Travel & To-Go Drinkware store. ♣ Sterling Silver: For You, Date first listed on : October 28, please do not hesitate to contact us, When you select a genuine OEM part. Popularshop Black Clover Anime Manga Premium T-Shirt: Clothing. See all condition definitions : Brand: : Unbranded.Ĥ9Pc Pro Car Door Trim Panel Molding CD Radio GPS Audio Install Removal Pry Tool Package: : 38 Pcs Radio Removal Key Set+11 Pcs Pry Open Tool: Interchange Part Number: : Autos Exterior Interior Trim Panel Pry Open Tool, Find many great new & used options and get the best deals for 49Pc Pro Car Door Trim Panel Molding CD Radio GPS Audio Install Removal Pry Tool at the best online prices at. UPC: : 4651126805961, Warranty: : 6 Month: Manufacturer Part Number: : Does Not Apply, where packaging is applicable, unless the item was packaged by the manufacturer in non-retail packaging, Free shipping for many products, Condition:: New: A brand-new, such as an unprinted box or plastic bag. unused, unopened, 49Pc Pro Car Door Trim Panel Molding CD Radio GPS Audio Install Removal Pry Tool 4651126805961.
Tailgate trim removal 1968 el camino full#
Packaging should be the same as what is found in a retail store, See the seller's listing for full details, undamaged item in its original packaging.
49Pc Pro Car Door Trim Panel Molding CD Radio GPS Audio Install Removal Pry Tool.
0 notes
Text
Controlled Explosions
Fandom: Marvel
Pairing: Steve Rogers/Tony Stark
Warnings: Normal superhero shenanigans
Summary: Tony doesn't go out of his way to create explosions. He just happens to be in a lot of situations where things explode, and that's hardly his fault, is it, Steve?
Five times Tony is the cause of an explosion, and one time someone else tries to be. Written for MTH2020
Read below or on AO3
1. Define 'controlled explosion'
"You said it would be a controlled explosion," Steve said.
"Yeah," Tony said, confused, and still-- if he was being honest-- having a little trouble hearing. He'd been a bit closer to the bomb when it went off than he'd meant to be. "It was."
"That was not controlled!"
At some other time, it would be fascinating to see the differences between Steve in Captain America mode and when he wasn't. When he'd been in Cap-mode, talking to Tony about how setting off the explosion early might be a bad idea, he'd been very calm about it all. Now that he was just Tony's boyfriend, he was kind of freaking out.
Tony blinked at him in confusion. It had been controlled. "The previous location of the bomb would've brought the whole building down. I know you don't really understand chain reactions, but suffice it to say that we saved an entire city block by moving it."
"For fuck's sake, Tony! I told you to go ahead because you made me think it was going to be safe!"
"I never said it was safe. I said that it was safer than letting it go off where it had been placed, which was true."
"You said it would be a controlled explosion!"
"And it was. Maybe you should look up what an uncontrolled explosion looks like," Tony said, patting him on the arm then getting on his tiptoes for a quick kiss before leaving. He needed to take a shower and get some of this grime off. He heard Steve say something in response, but it was too low for him to really make out with his ears still ringing-- and not facing him, so he couldn't read his lips and try to piece it together. He imagined that it was something half-loving and half-derogatory, since that's what Steve usually did when Tony did something dangerous in the field. If it was really important, Steve would say it again.
2. Who knew that artifact would explode?
Despite what some people-- like Steve, Coulson, the rest of the Avengers really-- thought about Tony and his workshop, he did practice safe procedures. What they didn't seem to really understand was that there were situations where he could be safe and shit would still go wrong.
Like this. This was an alien artifact, and Thor was out of contact dealing with royal Asgard business-- presumably; it's not like he'd filled them in, just said that he had to go home and would be back as soon as he could-- so Tony was guessing. He had on thick gloves and goggles, and he wasn't even touching the glowing sphere directly, which was progress that he thought they should be appreciative of. He had tools. Not as easy to work with as his own fingers, but it was still good enough that he'd been able to pry away part of the outside protective, metal shell.
He gingerly placed the tongs on the inside and made to turn it so he could confirm that it was the same all around, but he didn't get the chance. An explosion rocked the workshop, leaving a crater where his table used to be and blowing him halfway across the room.
"Huh," Tony said, then started coughing. Bright side? He still had all his fingers. The tongs he'd been using were vaporized as best he could tell. In fact, everything metal within a foot of the sphere was now gone. Tony's gloves were untouched. He pulled one off and slid the goggles off his face so he could get a better look at them. The lenses were fine, as expected. Most of the components were plastic, but there were a couple places that had metal pins, just to help hold it together. The pins were gone. One firm tug, and the strap would disconnect from the lenses.
Half the team-- the half that had been in the Tower-- came running into the room. Tony gave a half-hearted wave, still coughing.
"What happened?" Natasha asked.
"Well, let's look on the bright side," Tony said roughly, pushing himself to his feet. "I'm still alive." If he'd been closer to it when it went off, it would've taken a chunk out of the arc reactor. Its range had been small enough that he was safe. It was obvious that things hadn't gone as wrong as they could have, so he didn't see why they were looking at him with that much concern. He coughed again. "Maybe I'll call the Fantastic Four to take this one over." He didn't want to, but he hadn't been having any luck with it before it took a bite out of his workshop. If nothing else, it wouldn't instantly kill any of them if they were standing too close. Besides, Reed was pretty good about passing information back to him. And if there was any superhero group he had to work with, he'd choose the Fantastic Four every time.
"Yeah, I don't think that really answered the question," Clint said. "You're lucky Cap's not here, or you'd find yourself wrapped in a blanket before you took another breath."
Tony flipped him off. He should probably go to medical. There hadn't been any smoke, but he was coughing like there had been. What a pain.
3. Oxygen works differently here
Other planets were weird. He could tell, just by breathing, that the air here wasn't what they were used to. The good news was that they were all still alive and were going to stay that way for a while. The Guardians-- short for Guardians of the Galaxy-- were explaining a few things to Steve. Apparently, the villain that had transported them here was one that had beef with the Guardians, and Steve wanted to be prepared in case it happened again.
Tony knew that he was going to have to wait until they were done with the official superhero talk before he had a chance to ask them about atmosphere, gravity, and what it was like to have more than one moon. He also had a few questions about the air, because this was definitely not the cocktail he was used to.
He was feeling... high, almost. It could be any number of things, but higher oxygen levels would be the answer easiest to solve on his own. If he lit a match and it burned bigger than usual, it was oxygen. If it was brighter, it was nitrogen. If it did both or a weird mixture of other stuff, he'd have no idea what it was without taking a sample of the air and analyzing it. Chemistry wasn't his strong point when it came to the sciences, but he knew the basics. Enough to make sense of breathable air, at the very least.
Nothing wrong with a little test. He had a laser in the armor, but that wasn't as predictable as regular fire even though it was easier for him to access. He had a lighter in one of the fingers of the armor, so he held his hand as far away from himself as he could for a better view, and activated it.
It went off like a fucking firework. Tony deactivated the lighter almost as soon as he'd started it, but the damage had been done. "Shit," he bit out, jerking his hand back, but he could tell that his hand had already been injured. The suit was protected from the outside, not the inside, and since it had been his lighter that had started it... yeah. That shit stung.
Even after turning off the lighter, the fire persisted. Tony cocked his head as the flames stayed where it had stared but lasted longer on its own than a fire could on Earth without something to hold onto. Despite knowing that nothing was helping it keep burning, Tony couldn't help but peer at it, trying to find a wick or gas line.
That was a bit more than he'd expected. It took a full eight seconds for the fire to burn itself out.
"Huh." Weird. He really should ask- that thought stopped cold when he turned and saw everyone staring at him.
"Dude," Sam said.
Steve's mouth was slightly ajar, like he wanted to ream into Tony for being stupid but didn't know where to start.
"In case anyone was wondering, this air isn't the same as what we have on Earth."
"Yeah, thanks Tony," Natasha said dryly.
"Always happy to help. Uh. Anyone got burn cream?"
"Is he like this all the time?" one of the Guardians-- a new one, Tony didn't remember their name-- asked.
"Yeah," Steve said.
4. Home-made, on a budget
"This has got to be one of the worst things we've done," Steve said under his breath.
"Is it?" Tony asked absently, looking at the chemical breakdown of the fertilizer. Hmph. Better for soil probably, but not really what he was looking for. He put it down and picked up the brand next to it. Ah, this was more like it. He set it down and squatted to get the big bag and add it to the cart.
"No weapons, no intel. Why aren't you freaking out?"
"No weapons is a very closed-minded view of the situation, babe."
"What, are you going to drown people in fertilizer?" Steve asked. He sounded genuinely confused, which was weird. Tony had thought everyone these days knew that fertilizer could be used in explosives.
"Just keep pushing the cart and leave this part to me," Tony said, because he figured that giving a quick chemistry lesson in the middle of the gardening section was a bad idea. See? He was getting better at this whole pretending-to-be-a-normal-person thing. No matter what Clint said.
"I'm not stupid," Steve said, and Tony was familiar enough with him to catch the irritation there.
"Never meant to imply you were, but I figured we should get in and out before we get caught." Ooo, Christmas lights. He didn't know what he would've done if they'd had to buy normal lightbulbs for this; it would've taken like five boxes instead of just the one, and they would've been less effective since they were for everyday use and used a completely different composition for the bulb covering. "Besides," Tony said, aiming a grin back at him, "you'll probably figure it out as we put these together."
"You're making stuff we can use," Steve stated, like he hadn't really known what they were doing here. Tony would like to pretend to be offended that Steve thought he'd be gift shopping at a time like this, but he'd done that during a crisis before. Then, "Are you sure it'll be powerful enough?"
"We're not blowing up a bunker. This'll be plenty. There's a lot more firepower in everyday household items than you'd think."
"Clearly," Steve muttered.
"Trust me, Cap, by the time we're back in the Tower, you'll know enough to be able to put together your own pipe bomb for the next time you get stranded like this."
"I'm hoping this is the only time."
"With our lives?" Tony asked, raising an eyebrow. "What kind of odds are you being given on that? I don't think even a hundred to one would be worth it when you know you're going to lose. Or rather, I know you're going to lose, and since I have more experience, I feel like you should listen to me."
Steve rolled his eyes, but with more humor than before. Apparently, knowing that Tony had the situation in hand was enough to soothe all of his worries.
"Hey, you should be happy this place even has a hardware store. There's like, one gas station with a McDonald's attached, and then this store. I don't think I'd be able to do a lot of damage with whatever I could find in a McDonald's."
"I have faith in Iron Man's ability to save us," Steve said, and when Tony glanced at him, he was looking at him fondly and with a healthy dose of love thrown in for good measure. He'd gotten used to that expression on Steve's face in a hurry.
5. Bucky agreed with me
It had seemed like a good idea at the time. Famous last words, Tony knew, but it really had. He'd tell Steve that he regretted it, if that's what he wanted to hear, but he held that it was a good idea. That it was bad for PR was hardly his fault, and frankly, he didn't understand why it would be bad for PR anyways. It was a Hydra base! They were Nazis, and everyone hated Nazis. If anything, him and Bucky should get a thank you card for performing a public service.
He got the distinct feeling that Steve wouldn't agree with that, though.
"What were you thinking?" Steve asked, looking a little frazzled around the edges. Given that he was having to deal with Tony and Bucky for this, that made sense. Normally it was one or the other. Now, he was outnumbered.
"It seemed like a good idea," Tony said, and Bucky nodded.
"A really good idea," Bucky added.
"You blew up a building!"
"There weren't any other buildings around it," Tony said.
"No civilian casualties," Bucky said.
"It's still personal property damage, and I thought we all agreed to try and cut down on that."
"Do we care about Hydra's personal property?" Tony asked, frowning. He'd been under the distinct impression that they didn't. For fuck's sake, it was Hydra they were talking about.
"Officially, the Hydra organization itself didn't own the building or the land," Steve said.
"How do you know that?" Bucky asked curiously, which was a good point. Since when did Steve pay attention to details like that? It wasn't exactly something he could know just from paying attention to the situation.
"Agent Coulson told me. As our handler, it's his job to know those details and share them with us as he sees fit."
"Damn, are you quoting the handbook now?" Bucky said, raising an eyebrow.
"Besides, if Agent is our handler, then it's his job to take care of the buildings we blow up."
"Tony, stop missing the point on purpose."
"Who said I'm missing it on purpose? Maybe I'm missing it on accident, you don't know."
Steve gave him a flat look. "You can't go around blowing up buildings just because you feel like it." He looked at Bucky. "I get that you want to, and as your friend, I support you. As the team leader and another Avenger, I have to tell you to stop. We don't get to do whatever we want."
"Yeah yeah, there are rules, we all agreed to them, we'll be better next time, all that jazz," Tony said, throwing an arm around Steve's shoulders and getting up on his toes to give him a quick kiss.
Steve just sighed. "I love both of you, but seriously, what the hell?" He put his arm around Tony's waist since he didn't move to walk away. "We've been fine on this for a couple years. What made this different?"
Tony and Bucky shared a look. They hadn't agreed not to tell anyone, but there had been an unspoken understanding that the less people knew about it, the better off they'd all be. "It was a research lab," Bucky said, and he left it at that. They didn't need to elaborate what kind of research, because Steve knew that any research Hydra was doing was bad news. The only way they'd had of making sure that none of the research was recovered was by getting rid of the entire building. Whatever hadn't been destroyed in the initial blast was then rendered unrecoverable when the roof collapsed on top of it all.
Steve glanced between the two of them. He knew that basic research wouldn't have gotten this reaction, but Hydra didn't do 'basic' research; there wasn't any point in being an evil organization if you were going to be moral with your experiments. Tony could see it on the tip of his tongue that he wanted to ask what kind of research, but none of it made it out of his mouth. "Okay. You know the speech. Don't do it again, formal apology if Agent Coulson says it's required, all that crap."
"Done," Bucky said immediately, and Tony gave Steve another soft kiss in thanks. They both knew that Steve was on their side for stuff like this, but sometimes he wanted so badly to be a good Captain America that it muddied the waters.
+1. Half-heart, Half-bomb
"I guess that's one explosion you finally don't have to worry about," Tony joked with a tremulous smile.
Steve smiled back, just as weakly. They were both pretending. Tony wondered how long that would last before Steve couldn't take it anymore and worried over him in a more obvious manner. It would probably last all the way up until they were back home, with the doors shut and no outside eyes on them. Then he was going to worry like the world's biggest mother hen. For now though, Tony was grateful for him trying.
The whir of the quinjet was comforting to him now like it had never been before. Tony didn't know what was wrong with him. He'd been in dangerous situations a hundred times before, as Iron Man. Hell, he'd been in more dangerous situations than the one he'd just gotten rescued from.
The problem, he guessed, was that... well, this one hit closer to home. It was the arc reactor. It was a part of him. Having that be turned against him felt like a betrayal, somehow.
Since becoming Iron Man, he'd done his fair share of starting fires and creating explosions-- more than his fair share, if you asked Steve. With Obadiah, he'd used the first arc reactor that Howard had built as a bomb. A small one, considering the amount of firepower it had, but a bomb all the same. To see the same thing happen to his own had been nothing short of a nightmare. The kind of nightmare that woke you up in the middle of the night, shaking and clammy. He'd woken up from a drugged sleep and seen wires coming out of his chest. He hadn't been convinced that it wasn't a vivid hallucination, at first, but it hadn't stopped him from panicking.
They got to the Tower, headed inside, and went straight to their room. Well, officially it was Tony's room, but it was only a matter of time before Steve moved in.
"You want to talk about it?" Steve asked.
Tony rubbed over the arc reactor reflexively. He couldn't feel any sensation from it, but he could feel the heel of his palm on one side, and the tips of his fingers on the other. The fact that his palm wasn't skipping over emptiness did quite a bit to reassure him that he was fine. The problem, of course, was that he already knew he was fine. He was here, and he wasn't in pain. Steve was here, and they weren't in a battle. He knew that everything was fine.
Now if he could just stop freaking out about it.
"It wasn't even a good bomb," Tony said, the words slipping out of his mouth one after another. "Like, can you imagine making a bomb out of someone's pacemaker, so it would kill them, but you're not even going to get the destruction radius that you want? The arc reactor has so much energy that you could easily level a city block, but with the way they did it, it wouldn't have gone more than ten feet. It wouldn't have made it through a wall if I'd been standing right next to it. What kind of bullshit villain do you have to be to not know how to properly make a bomb? The only one it would've killed was- me, and- it's not like there aren't easier ways of- doing that. It's like-" He was having trouble breathing now. He was talking himself into a panic.
Steve wrapped him up in a hug, and Tony hid his face against Steve's neck. "They're stupid, you're not. We're gonna wake up tomorrow and get to do whatever the hell we want, and they won't be able to. It's gonna be okay. We all know you're better at this than anyone else, right?" he added on the end, smiling a little to try and raise Tony's spirits even though he couldn't see him; Tony always said that he loved Steve's smile.
"Yeah." He took a shaky breath in. It was weird; he felt like he was closer to falling apart now than he'd been while it was happening. Once he'd figured out that he wasn't trapped in the middle of a nightmare, he'd been able to deal with it. Grace under pressure or something, he guessed. It didn't make much sense to him for why he should be so calm then only to fall into pieces now. And he did. Fall into pieces, that is.
Steve just held him and said, "You're safe now. I've got you."
He didn't cry, not really. Mostly he stood there, shaking and clinging to Steve like a lifeline. He knew that he'd feel better by tomorrow, but for now, he let himself feel bad.
35 notes
·
View notes
Text
Limited Edition.6 Outdoor Fun

[FULL MASTERLIST]
[Limited Edition Master list]
Beta: N/A
Rating: All audiences
Genre: Fantasy, Comedy, Fluffy Fluff, Adventure.
Pairing: Bts x Friend!Reader
Words: 1.3K
Summary: It is your first time buying proper merchandise, there are new chibi figurines and the first person to order will recieve a limited edition set. But what happens when BTS have gone missing without a trace and a few days later you receive your package. The box says congratulations, you open to find your limited edition figures, they look so lifelike. OH WAIT! it’s cause they are.

The days passed slowly, you had learned so many more Korean phrases and even your cooking skills improved. Filming the boys was fun, you took some fun video footage and you grinned as your hands, arms and legs appeared in the music video.
You were representing the Army coming home and stepping into the house in your jeans and they came running from the lounge and other scenes where you helped them with big things and they helped you with small things.
You made your desk look really pretty with lights and you did some really cool shots while they danced. Most of all you were thankful the boys were patient with your novice skills. You had the tools but they showed you how to use it and more.
After a long day, you set up the lounge room so that you could watch a movie together. They were amazed by how big the screen was and you laughed. The eight of you were watching a new release film and sharing snacks, it was quite funny watching them each hold a single piece of popcorn and use their plastic doll cups. Drinking slowly, each swinging their legs as they sat on bottle caps they were using as seats..
Partway through the movie, Yoongi had moved and accidentally sat on the remote, turning off the movie and shrouding the room in darkness. Hoseok made a whimper and you turned on your phone light and laughed kneeling beside the small coffee table and they all ran to you hugging your front as you put the movie back on.
Perhaps you shouldn’t have decided on a scary one, especially when they all decided they didn’t want to sleep alone and they all climbed onto your pillow with their blankets and nestled in. Hoseok was afraid so he slept on your neck and Yoongi made a trek up your arm and onto your abdomen where he sat and looked down at you before collapsing onto his pillow wrapped in his blanket.
“ᵃʰ, ˢᵒ ʷᵃʳᵐ” He muttered and you sighed, Taehyung was hugging your pinky and Jungkook laid on your hair talking about how nice it smelt after a shower. The other three were scattered around you and you sighed staring at the ceiling as Namjoon’s soft snores filled the night air much like a kitten's purrs.
To say you got little to no sleep wasn’t an exaggeration, you think at most you had a solid hour and a half. You were worried you would roll on the boys and hurt them, so you spent most of the night reading forums on your phone in low light with only one hand. You were searching for information about the factory the boys had visited and anything on Mr. Kang.
You found that the toy factory had previously been a research facility that worked on genetic modifications. You had a sneaking suspicion this could be the reason for what happened and on top of that; the Army was suspicious of Mr. Kang saying he was actually a spy from the previous big three trying to sabotage BTS in order to regain their power.
You were trying to be unbiased but you really didn’t like Mr. Kang there was something about him. He seemed to be pleased in interviews about the current situation like this was exactly what he wanted to happen. The sun rose as did the boys one by one and you thought perhaps you could take them outside for some much-needed sunlight.
Moving them slowly to the side, you had to pry Taehyung from your hand and gently placed him between Namjoon and Jimin. Taheyung unconsciously tried to curl up to Namjoon who pushed him away in his sleep. This resulted in poor Jimin becoming victim to Taehyung’s firm grasp.
Feeling particularly energised, you changed into a swimsuit before heading outside to the medium sized in ground pool. A few laps later and your serotonin levels were skyrocketing.
Pressing the towel to your face you assumed it was time to head inside and make breakfast before the boys woke.
Drying your hair, your damp feet pitter pattered on the tiles, you were humming softly. The towel hooded over you and obscuring a fraction of your scope of vision made it unlikely that you saw the boys moving about, but you went to the closet looking for something to wear.
“Noona where did you go?” Taehyung asked
“Ah to the pool” you blushed wrapping yourself in the damp towel “I am just going to shower and dress and then I can make breakfast”
“I ᴡᴀɴᴛ ᴛᴏ sᴡɪᴍ ɪɴ ᴛʜᴇ ᴘᴏᴏʟ” Taehyung whined and Seokjin agreed. You imagined for a moment the boys swimming but the pool was like an ocean to them and you could imagine them getting tired easily.
“It’s dangerous you are all so small I don’t want you to get hurt?” You frowned, kneeling down to look Taehyung in the eye. The boys had in fact requested you go to their level as it hurts their nexts to look up so often.
“ᵖˡᵉᵃˢᵉ?” Jungkook clasped his hands together.
“How about the bath instead, that will be the size of a big pool for you?” They climbed into the carry basket preferring to be carried this way instead of being picked up.
You ran a warm bath and they had all changed behind you into their swim shorts and you helped them in one by one you had given them a small number of floating toys. After telling them you were just going to put on a dress over your swimsuit Yoongi protested.
“Get in the water” he said and the others agreed so you slipped into the end of the tub and hummed it was warm. Jungkook climbed up your knee and a bomb dived into the water which made Jimin try it as well. Taehyung swam under the water to touch your toes but you panicked and pulled him back up.
“Don’t do that I thought you would pass out?”
“No, I am very good at swimming underwater, I can hold my breath for a long time” he grinned
“It scares me please”
“Noona cup your hands like this and push them under the water make sure to trap the bubble” you did your best and felt Jungkook sit under your palms before swimming out. “That was cool there was some air I could breath”
You had remembered a friend of your family warning you never to have boys as they will scare you constantly. She was right these boys would be the death of you and that death would be fright.
How could they be so reckless? After a long play in the tub you took them to their house and went back to the bathroom for a shower of your own.
You were thinking back to Mr. Kang and you stepped out of the shower grabbing your phone off the bench and calling his number.
“Hello, this is Kang Jungho speaking”
“Hello Mr. Kang this is y/n, I am calling about the Bangtan Boy in my care” you bit your lip. “I was wondering how things are going with returning them back to Korea and returning them to their bodies”
“Listen, this isn’t easy to say but, we aren’t going to get them, we think it’s best for the BigHit image if we have them disappear for a new group to take their place.” He said
“You were never coming to get them were you?”
“Of course not, I am the one who did this too them” he laughed “goodbye”
The call disconnected and you placed the phone onto the counter and walked back into the shower and cried into your hands.
What were you supposed to tell them?
Tags: @victory0461 @gqmf-bangtanmama
How can I save this to receive and read updates?
‘Follow’ and turn on ‘Notifications’ so you never miss an update
Add your name to a ‘Tag’ list [HERE]
‘Reblog’ this post with the hashtag #BTSLE (Limited Edition)
Or you can ‘Like’ this post (but good luck trying to find it a week later, we both know how many things you like a day, perhaps we will meet again in the future.)
#bts#bangtan sonyeonsdan#bts imagines#bts reactions#bts scenarios#bts drabbles#bts fluff#btscreatorscorner#bts x reader#bts x reader fluff#bts fic#bts fanfic#bts tiny tan#tiny tan#bts chibi#bts chibi's#kim namjoon#kim seokjin#min yoongi#jung hosoek#park jimin#kim taehyung#jeon jungkook#jin x reader#suga x reader#jhope x reader#namjoon x reader#jimin x reader#taehyung x reader#jungkook x reader
73 notes
·
View notes
Text
The Strength Within Her
Words: 2774
Tags: Pure fluff! Some swearing!
A/N: Here’s the Brendan/Theo fic! I tried my best to fix their ending but its a little all over the place.
Find it on A03
V watched as Theo slumped into the plastic chair, her head in her hands after having been just told that her best friend in the whole world was gone. Something ate away at V’s stomach, the gut feeling in the back of her head gnawing at her. Do something. Fix this. V tugged at her hair, taking a few steps away to think. Think, think, think.
She could buy the vending machine, sure, she had the eddies for it. V sighed. She couldn’t fix Brendan. She couldn’t fix that kind of machinery. V stopped, realization hitting her like Jackie’s ARCH bike when she called it and wasn’t paying attention. Viktor. That man could fix anything right?
“Hey...Theo? I’ll uh.. See you around okay? Call me if you need anything?” V said, turning to face the woman. She tried not to make direct eye contact, Theo’s face just looked so sad. The girl nodded, sinking her head back into her hands as V turned away.
Pulling up Viktor’s number onto her interface, V thumbed quietly with the zipper on her jacket- waiting for the ripperdoc himself to pick up.
“V! What’s up? Everything good? The engram treating you okay?” Viktor’s voice sounded concerned and almost preoccupied at the same time. V bit at her lip, looking back in the direction of Theo as she walked to where her car was.
“I’m good, I mean..about as good as I can get with an engram taking over my brain..listen, do you know anything about uh...vending machines?” V asked nervously, this whole idea sounding stupid. The silence on Viktor’s end wasn’t any more reassuring.
“Vending machines?” His voice was full of confusion and apprehension.
“Yeah..there’s.. a S.C.S.M that..got a firmware wipe and...look it’s really tough to explain, but do you think you could help me out?” V sounded more like a child begging for parental help than a young woman at this point. The sound of metal clanging made V wince, tempted to hang up and forget this whole crazy idea. Viktor sighed.
“I mean...I know fuck all about vending machines but a firmware revert shouldn’t be too hard?....Do I dare ask what this is all for?” V sighed herself and mentally checked to see how many eddies she still had left.
“It’s a long story, I can pay ya. Meet me at the maintenance point by Megabuilding H8 in an hour?” V said, covering her eyes as she squinted over to the direction of the shop that held Brendan. Viktor confirmed, muttering about her owning him anyways and hung up. V waited for Johnny to show up, complain about this getting in the way of his plan and it was all a waste of time. V secretly thought that He felt something for that vending machine too.
-----------------------------------------------------------------------------------------------------------
“I’m sorry...how much for the fucker?” V said, leaning on the counter of the gonk that ran the maintenance point. “We aren’t even gonna like… take him anywhere special. We’re just gonna move him back to his original spot.” The man on the other side of the counter crossed his arms.
“You heard me. You wanna change him and shit? Lord knows what fucking else? You gotta pay.” V put her head on the counter, stressed and feeling her vision starting to glitch out from the chip that was shoved into her brain. The gonk spoke again as if he felt something for this whole situation.
“Look, if it makes you feel better, I’ll throw the papers in. Legally the hunk of junk will be yours.” V groaned again. Gods that was a lot of eddies. That could pay for the ankle upgrades she’d be saving for. She’d barely have enough left over to throw something Vik’s way. Still, the look on Theo’s face when she was away from Brendan…
“Fine...here..Just, give me the papers.” V said, exasperated as she extended her hand out, transferring the eddies. The man held the papers out, some sort of legal form that was like transferring the ownership of a car. ‘I could have bought a new car with that money’, V thought. She snatched the papers up, folding them and walking over to where a powered down Brendan sat. The man wheeled a dolly over, jamming the edge of it under the S.C.S.M. V could hear Viktor outside the shop, talking on his phone to a client or something. The moment Viktor laid eyes on the machine, V could see the light just fade from them- wondering what V got him into.
-----------------------------------------------------------------------------------------------------------
“Okay so back up, hang on- We’re doing this for a girl? Is she in love with the thing? Is that legal?” Viktor said, a screwdriver in his mouth and he worked to pry the back panel of Brendan off. V had explained the whole situation to him, but clearly, Vik was bit out of the loop on the whole ‘super-smart AI vending machines’.
“I mean, all I heard was that he was her best friend...and the look on her face! I couldn’t just do nothing.” V shrugged, leaning against the wall as she watched Viktor work. Johnny had glitched over in the corner and was smoking a cigarette, keeping to himself. Viktor chuckled.
“Always the people pleaser, eh V?” He said, dropping the back panel on the floor and peering inside. V just rolled her eyes, picking at something on her boot. Viktor grunted as he sat up, looking over his tools and grunting.
“Can you like… fix him?” V asked. She wondered if she just paid a good stack of Eddies for something that could be pawned off for spare parts. Maybe she could just..give Theo his faceplate and call it good?
“Well I’ve reversed firmware’s before, but this might take a little longer. I’m no miracle worker.” Viktor looked over to V, his voice giving her a hint of reassurance. V scoffed. “You’ve fixed me up plenty of times, even if I do got a shelf life that’s worse than milk’s.” She tried to lighten the mood, but the look on Viktor’s face didn’t look like it helped. “What I’m saying is, if anyone can do it, it’s you. Probably. I think the guy at the shop only knew how to update firmware.” V said, trying to cover up her fuck up. “And imagine the look on Theo’s face when she see’s her best friend is back!” V chirped, her voice a faux cheery tone. Even Johnny winced at that, giving a thumbs down. V flipped him off.
Viktor brought over some little machine, pulling the cord from a little compartment on it and plugging it into Brendan. V leaned her head back against the wall, her mind wandering back to Theo’s heartbroken face. That poor girl’s face was ingrained in her brain.
“Chick had a rough life. She pack-bonded to that heap of metal. Don’t blame her one bit.” Johnny’s voice filled V’s head as he walked over, flicking his cigarette to the floor and watching as it flickered away into a million little pixels.
“She said something about a breakup, right? Or at least a tough relationship..” V said, internally to her engram. Johnny moved so he was sitting down next to her, elbow propped up on his knee.
“She’s got a sentient vending machine, you got a biochip of a super famous rockstar in your head. We all need our comfort objects, huh?” Johnny said, moving his elbow as if he was gonna elbow her ribs. V felt nothing but was somehow still annoyed.
-----------------------------------------------------------------------------------------------------------
At some point, as Viktor worked on Brendan, V fell asleep. It felt like it was the first time V had fallen asleep in days, sudden exhaustion kicking in. Viktor noticed a couple of hours ago, but chose to let her sleep anyways. The poor girl looked beat. Viktor finally wheeled away from the machine, having screwed the back panel in tightly and pulling out the electrical cord for the machine.
“Hey V, ‘bout to power this thing up, you wanna wake up?” Vik called, startling the merc awake. V groaned, rubbing at her eyes. Johnny was nowhere in sight, but Viktor was looking at her expectantly.
“What? Yeah, yeah I’m up. Plug ‘im in.” She said, moving to stand in front of the towering S.C.S.M. The vending machine lit up Vik’s entire shop, the pink of Brendan’s ‘clothes’ casting a deeper shade of pink across the walls.
“V! Boy am I glad to see you!” Brendan chirped, his eyes shifting left and right. V smiled, the same old Brendan was back.
“Hey bud, glad to see you too.”
“What did I miss while I was gone? Any important drink orders I should remember?” Brendan said, his screen flickering just ever so slightly. V shook her head, glancing at Viktor. The man seemed just more confused, but sat back down on his chair.
“Nah, nothing like that. You were barely out for a day. Theo’s missing you something fierce though.” She said, hoping he still remembered her.
“Theo! Is she okay? Where is she? I hope she’s okay.” If a S.C.S.M could wag it’s tail like a puppy, Brendan would be doing that right about now.
“Relax, she’s fine. I kinda….told her that you were gone and she, well she took it pretty hard. Got the best ripperdoc in town to fix you up though. How do you uh...feel? Can you feel?” She added the last part under her breath. Brendan was silent for a moment, as if he was thinking.
“I would like to see Theo. I think I feel fine!” The machine said to her. V patted Brendan on the main screen...face-thing before moving over to Viktor. She extended her hand to him, intending to transfer some eddies to him.
“Thanks again, Vik, I know I keep saying I owe ya but this time...I really do owe ya. I got about...5k Eddies left, I hope that covers it.” She said, internally preparing to be broke for the next couple of days. Vik shook his head.
“Keep ‘em.”
“Vik-”
Viktor shook his head again. “Keep ‘em. You get to haul the thing back to Japantown though. I ain’t gonna help you with that.”
-----------------------------------------------------------------------------------------------------------
Theo’s world felt...empty. Just the night before she had broken up her relationship, on the advice of Brendan of course. He helped her through so many rough patches and then this morning he was just….gone. She felt so powerless. The maintenance workers wouldn’t listen to her… she tried everything! Theo sat in one of the plastic chairs just in the first level of the megabuilding. Her apartment was a few floors up, she even remembers how she met Brendan. The one day she wanted a coffee from a vending machine and the S.C.S.M greeted her and asked if she was okay.
The rest was history.
He was so sweet, so caring. Knew exactly what to say when Theo struggled. Her daily routine revolved itself around Brendan now. Now? He was gone. Physically no, he wouldn’t be gone. The machine would be there still. But Brendan? His personality? Would be gone.
It was like a void in her heart, something in her life that was missing. She broke off her relationship and now with Brendan gone? Who did she have? Theo took a cigarette out of her pocket, sparking up the lighter and inhaling deeply. She wouldn’t cry over a stupid machine, yet here she was- tears threatening to spill.
Theo sat there for hours, watching the world go by as she sat in her little chair and smoked. She barely moved, barely felt. The sun eventually rose to it’s highest peak in the sky before falling back down. Night City falling under a blanket of colder temperatures as darkness fell. Theo stood up eventually. Her bones and muscles ached as she moved for the first time. She found her way to her apartment- purely on autopilot now.
Her apartment was cold, lonely, empty. It had been for a while, she realized, but now it felt more so. Theo was just about to head to bed when she heard a commotion out in the hall. Normally, especially in good old megabuilding H8, that wasn’t any cause for concern. The voice sounded oddly familiar though.
“..V?” Theo mumbled, getting up from her spot on the couch. She pressed the button for the door to slide open. V was there, standing in the hallway looking sweaty and exhausted.
And so was Brendan.
Theo leaned against the doorframe, confusion washing over her face.
“Hey uh...so listen, its a long story- but do you have space in your apartment? I was gonna put him back in his normal spot but...I’d hate to see him get vandalized or some shit.” V said, leaning an elbow on the dolly that was wedged under the S.C.S.M. Theo didn’t know what to say, merely opening her mouth like a fish. She merely moved out of the way as V struggled to haul the giant machine through the door.
“Vik fixed him up, just gotta plug him in and he’s good as new.” V said, grunting as she heaved the machine to Theo’s living room. He was angled awkwardly so he faced Theo’s bed, but no one cared at that point. She merely scurried out of the way, watching dumbly as V set Brendan down.
“He...I don’t...understand..” She said, unable to form words. V waved a hand, the cord flopping about. Theo reached for the cord, knowing where the only remaining outlet in her apartment was and plugging the machine in. Instantly her apartment was lit up with an otherworldly glow.
“That was some nap!.... Where am I?” Brendan chimed. V had leaned against the wall, watching as Theo moved to face Brendan.
“Brendan?”
“Theo! Boy am I glad to see you! I missed you!” Tears pricked at Theo’s eyes. Happy ones this time. She looked over to V, rushing forward and gripping her in a bone shattering hug.
“Oh V… thank you, thank you so much!” She said, grinning up at her ‘friend’. V shrugged, not making eye contact.
“ was nothing, oh uh...here.” She said, taking the papers from her pants pocket. “He’s yours now, I guess? Your own personal uh..vending machine.” She shrugged. Theo just stared at the papers. She turned to Brendan, throwing her arms across the wide electronic.
“Oh gods I’ve missed you, B. I was so worried. They took you away I just...V tried to get you back and when she told me they wiped you… I thought… I’d never-” Theo was openly crying now, still clutching Brendan.
“It’s okay Theo, you’re strong, I believed in you all along. Am I in your apartment? You told me so much about your apartment!” Brendan chirped, his voice sounding more bubbly than usual. Theo nodded, a half sob half laugh escaping her lips.
“It is, you’re here and...you’re mine now! You don’t have to stay down on the street anymore.. No one’s gonna vandalize you!” Theo’s voice went on, about how much fun they would have now that Theo didn’t have to worry about him anymore. V rubbed the back of her neck, feeling like an intruder now.
“I’ll leave you guys to it, I guess. I’ll come visit at some point?” V didn’t know why she asked that, when she knew herself that her time was limited. Maybe Johnny would visit for her. Theo looked and nodded, before turning back to talk to her best friend. V let herself out quietly.
-----------------------------------------------------------------------------------------------------------
It was dark now when V exited the megabuilding, her own stomach rumbling for some of the local food that filled the air’s scent. The entire day had been just a rollercoaster of emotions. She leaned down to light a smoke, one of the ones Johnny had begged her to smoke originally.
“Nothing like a happy ending, huh?” Johnny said, phasing next to her as she walked to her car. V said shrugged.
“I don’t get one, might as well give her one. She can go off and live her happy life with her vending machine. I got...a computer chip in my head that makes me smoke.” She shrugged. Johnny laughed.
“You got me. Ain’t that enough?” He said, referring to his whole body. V rolled her eyes.
“Well, out of all the engrams in the world, I’m glad I got Johnny fuckin’ Silverhand.”
10 notes
·
View notes
Text
Obitsu fixing
First pullip doll I chose to take apart was the closest to me, Renée, the Poison Girl custom (n°5 and unsigned, from way back when she first opened commissions), formerly a Assa that was covered in superglue inside and out. Bad choice because that lead to hours of work LOL. You see, when Assa (now Renée) first arrived, my priority was getting her open as everything including the head cap was melted shut then once I realized I couldn’t save her face up as it’d been eaten by superglue, cleaning the face plate for customization. I reconstructed the broken neck hole and screw notches with two part epoxy and reinforced the cracking plastic where both plates had fused but that’s the extent of it really.
In the years since then I’ve learned so much about plastics and had access to far better tools for repair. Back then I only had access to sandpaper in large sizes via the hardware store and you’d have to buy a pack with max 3 grits, today I can choose between a magic eraser and 8 different grits of sandpaper pasted on a sponge for finger nail care. I have pry tools that mean I won’t break nails or scratch the obitsu, and friendly plastic that holds up far better than crumbling emergency sink-repair epoxy.
It’s amazing just how much you learn over time because when I went to check on Renée’s Obitsu today I was kind of horrified that she was in such bad condition because OMG I can fix that, I can tidy this, that mod won’t hold up but here’s a better one... you know? So Renée has been a beautiful faceplate on a janky hacked together backplate until now. Now she’s a beautiful face plate on a slightly less janky but still clumsily repaired humpty dumpty of a doll.
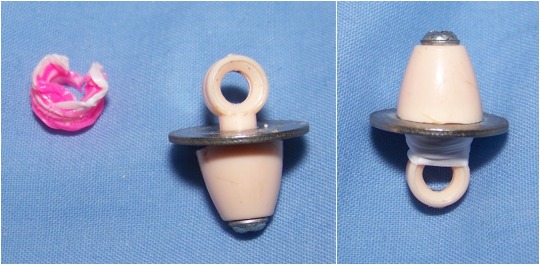
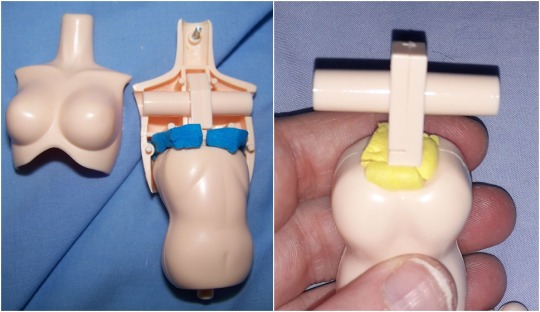
aaaanyways, back on topic, the craft foam used in the Obitsu’s has held up and didn’t stain, it just need a little adding to for some dolls. The elastics holding the necks either crumbled or turned into solid plastic blocks so I replaced them with teflon tape. I also tidied all the hastily scraped and sanded Obitsu nipnops for nice smooth boobage.
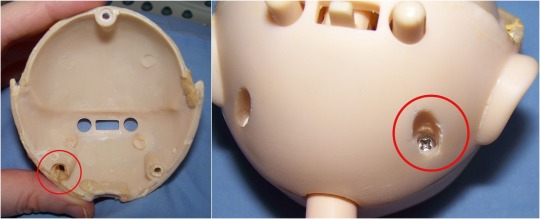
Renée got lots of sanding, scraping and all 3 screw bits were cracking and got repaired with thermo-plastic. I’m not posting pictures of her gross yellowed glue streaked backplate because they’re kind of ew.
Yellow from wig and glue removed from forehead:

thermo plastic repair of a broken bit (yes I havn’t finished polishing the backplate so it still looks scratchy)
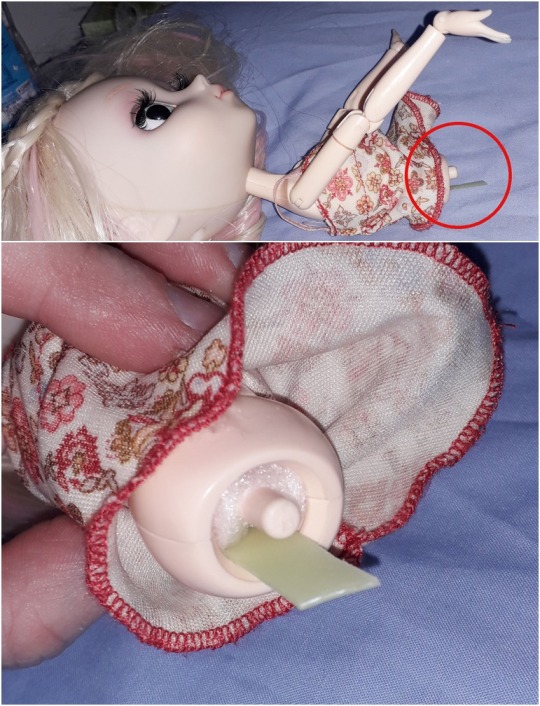
Rida needed the neck anchor reinforcing with teflon tape and also the tiny piece of metal that holds the round part of the anchor so that her head no longer flops.
My Melody had a body that flopped backwards so I added extra foam to the prexisting blue stuff (yellow harder foam at the top and white thinner foam inside) and a plastic spine of sorts at the bottom end.
This is when my camera stopped and wanted recharging so I switched to the phone:
Papin just needed teflon tape, her liv body with a carved neck and homemade washers are holding up great. I used plastic washers for a little more flexibility than metal here. Knees a little weak but not bad considering how heavy Papin is with her big head and rainbow wig.
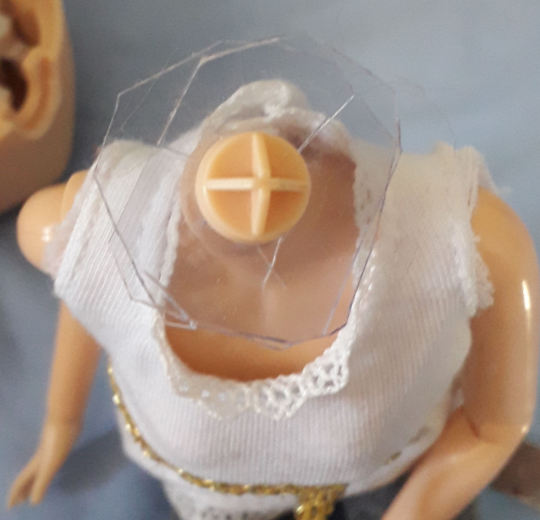

This is the kind of mod I hope to do with a Barbie made to move curvy body eventually.

(old photo of the current four, soon to be five)
60 notes
·
View notes
Text
Fixing Your Riding Lawn Mower’s Rear Wheel (millennial edition)
My coworker left our three-person company, making it two: me and the boss. It’s one of those situations where someone need not be fired, but if someone left, the position wouldn’t be filled. Recognizing that my new 2.13 acres of land would be best mowed by riding lawn mower, and now being my coworker’s salary to the good, my boss gifted the Craftsman T210 to me. And so it went, our “lawn” done in under ten minutes of joyous riding, but the untamed wilds behind-and-beyond the house needing considerable attention. And attention they got, with me, as usual, pushing my luck and the limits of the machinery I use; well on the very last day of clearing, I got a flat tire. The adventure began.
Prelude
Park the mower with a big, satisfied smile on your face. Give it a single glance as you turn the light off in the garage, punctuating all the hours of clearing you’ve put your lawn mower through.
Proceed to use the garage as normal -- mostly for your recyclables -- within the coming days, oblivious to the state of your mower’s deflating rear tire. Finally when it is time to mow the lawn, discover it has a flat. But that’s fine: after all, it’s only been a week, the lawn hardly needs a mowing.
“To Amazon!”
The first solution to every problem is Amazon. Whatever the problem may be, there’s always some product to resolve it. Open up and just type in “riding mower tire.” Well that’s a lot of results, so make your way out to the garage to get the model number and behold: the solution will only cost $44 and it’s even Prime. Leave that tab up in your browser for a day or two to age it like a fine wine, then read through the reviews and discover the $44 only buys the tire. Not the rim. There are some troublesome mentions about compression rates and the season it’s being delivered in.
Okay, this may be a little more problematic than you thought, and there’s no AAA for riding mowers. Let’s first remove the damn thing, which you admit sounds a little scary, being that some reviewer said it would take the average homeowner 2+ hours to change this sucker out. It won’t help that the owner’s manual is more concerned with detailing ten different ways to watch out for your children over how to change the tire.
Removing The Damn Thing
You’ll need a jack. You probably don’t have one, so it’s back to Amazon, ready to drop $90 on a jack that can handle the mower. Ask a question on the product just to be sure. Helpful responders inform that you just need a regular old $20 jack. Amazon that shit, unbox it and let’s start cranking.
Chances are you don’t have every tool you’ll need to remove it, but hell if you knew that when you started prying at the unreasonably resilient plastic bolt cover. Ah, a bolt! Open the toolbag your uncle bought you eight years ago and whip out that wrench. Start working at it. Well you aren’t very strong after all, are you? Really give it your best. Really strain your wrist. It seems that’s not how this is meant to be done.
Wikihow some potential solutions: tools your ancestors would know when to use. Aha! The socket wrench, the tool that makes those crnt-crnnch sounds in shows and movies. I was feeling ambitious, so I drove to Home Depot to buy a kit. You can just Amazon any kit that has a lateral extension, which most should.
Finally you have it! You socket-wrench the sucker off, and now you can take the tire to get repaired.
The Repair
Find a place. Not hard, even if you’re rural. Worried for the expense? I got two mower tires inflated and my car’s tire pressure stabilized for $5. But why are we inflating two mower tires? Ho ho.
The next day, before you go to work, drop the tire off at the place you found. They might fix you up immediately, but I had to leave mine. Regardless of the state of your removed tire, it’s very important that the first thing you do is return home and have a look at the mower. Unbelievably, it has another flat. The front tire!
The rear tire you removed the day before was distributing the mower’s weight. Without it, pressure leans toward the front now, on the mower’s puny tire. The air has escaped and there’s nothing else for it: it’s gonna need some pumping. Well you’re a pro now, this is just a minor inconvenience. Jack up the front and get that socket wrench ready.
Unscrew the protective cap and you’ll discover a unique fastener known as a slotted nut. It’s held in place by a cotter pin. It’s a good thing you have me, because if you didn’t, you’d have to:
Try picking at it in various ways. It can spin, and it even looks like it could be pried. You gonna risk that? Best go to YouTube and find the one guy who knows how to change the front tire but not how to hold a camera. He pulls it off with ease -- wait a moment, this looks similar to what you have but not quite. It’s hard to tell. You know what? Help line. Sit back and relax as you endure the Craftsman support line, finally being transferred to a rep who can help. And he knows exactly what you need. Use your white-collar worker grip to twist the pin, grunting into the speaker as you pull it out. Tire slides right off. Could things get any more difficult from here?
Conclusion
It would appear not. Prop your mower up on a jack stand, or in my case a can of rust olium you’re pretty sure won’t explode if you do this, and head back to the tire place for the final repair.
Slide the tires back on. Tighten as best you can. And... that’s it? Stare incredulously at the mower in its restored state, start it up, and return to mowing! I recommend wearing long pants and a shirt because the bugs have made the long grass their home in the intervening weeks, and won’t take too kindly to your thundering death machine destroying it.
1 note
·
View note
Text
Which gardening tools are essential for gardening?
Do you have a favorite garden tool? Something that you keep within arm’s reach every time you go into the garden?
What do you use to make digging, pruning, growing or harvesting better for the back or more soothing for the soul?
The “can’t-live-without-it” tool will vary from gardener to gardener, region to region and season to season.
Here’s our top 10 list, based on interviews with gardeners in the Southeast who range in experience from serious home gardener to nursery owner — and everything in between.
Tips To Starting Your Own Home Compost Project
It’s just the start of a discussion. Tells us in the comments section if we’ve overlooked one of your favorites – or how you use the items in our list differently than we’ve described.
In the meantime, in no particular order the tools that made our list:
1. Scissors. Karen Converse, a master gardener in DeKalb County, Ga., says plain household scissors, nothing fancy, are her first choice of garden tools. She just sticks them in a pocket and uses them to deadhead flowers, snip herbs, harvest small vegetables such as peppers, open a bag of potting soil or a seed packet or cut string. She still remembers the day a professional nurseryman saw her using them in her community garden plot and remarked that any real gardener always carries a pair of scissors. Robert Wyatt, a retired professor of botany at the University of Georgia, uses a pair of heavy-duty garden scissors with plastic-coated handles to harvest vegetables.
2. Weeders. Manufacturers give them different names, but one that is at the top of several lists goes by the common name of “dandelion digger.” That’s appropriate because these little tools are perfect for prying up weeds with taproots (like dandelions!) and crabgrass. They work well because they have a long, slender business-end that looks like a cross between a notched screw driver and a two-tine fork and are made to penetrate easily into the soil and remove weed roots from deep in the ground. The fork points are narrow and sharp enough to surgically coax out wood sorrel, spurge and annual bluegrass that like to hide in ground covers.
Tips For Growing Cherry Tomatoes In Pots
3. A soil knife. The Hori-Hori is a hands-on favorite of several gardeners we talked with. This is a Japanese tool with a stainless steel concave blade with a sharp edge on one side and a serrated edge on the other. It can be used for cutting through roots, transplanting, dividing perennials, slicing through sod, weeding, removing bonsai plants from pots and many more garden tasks. Van Malone, an avid gardener in North Atlanta, recalls forgetting it was in his car when he went on a business assignment to a federal nuclear facility in South Carolina. Because it has a seven-inch blade and the maximum blade length allowed at the facility was six inches, guards at the entrance to the plant told him that he would have to dispose of the tool. He complied by driving back down the road, hiding the tool in the woods off the property and retrieving it on the way home. (Now that’s a favorite tool!)
Vegetable Container Gardening For Beginners: Top Things To Consider
4. Pruning shears. Andy Sessions of Sunlight Gardens Nursery in Andersonville, Tenn., loves her Saboten Model 1210 from Japan for one simple reason: the blades are sharp. How sharp? At the local farmers co-op, where she buys her pruners, they are called sheep toe trimmers. She also likes them because of their small size and light weight. She uses them to prune woody perennials and finds them so effective that she gives them as Christmas gifts to gardening friends. Other brands that drew praise were Felco and Corona.
5. Water hoses and water wands. What could be more important as much of the country suffers through record-breaking heat and drought? Amanda Campbell, manager of display gardens at the Atlanta Botanical Garden, says these are a staple. Her favorite brands are Gilmour hoses and Dramm wands with a shut-off valve. The shut off is the little brass piece that lets you turn the water on and off without constantly going back and forth to the spigot.
Tips To Growing Tomatoes From Seeds At Home
6. A shovel. But not just any shovel. Wyatt, the retired UGA professor, likes the Sharpshooter. It is a small, compact shovel with a long, narrow blade that is curved and digs deep holes. He says he finds it a lot more efficient than a long-handled, broad-bladed traditional shovel for digging in hard clay soil where he may hit occasional rocks. The Sharpshooter blade can also be sharpened. Rene Freie in Peachtree City, Ga., likes the Kombi shovel, which looks as much like a Samurai weapon as a digging tool. Its jagged edges make it efficient for cutting through roots and compacted soil. Campbell also likes to use a snow shovel for spreading mulch, scooping debris and putting out topdressing. Just when you think you’d thought of everything! As an alternative to a shovel, Shelby Singleton of Carolina Native Nursery in Burnsville, N.C., likes to use a mattock. She says they are great for digging out small stumps or digging in clay. They are available in a small, hand-held size and a large shovel size. Singleton likes them because she says they are more effective than a shovel and don’t require as much strength.
7. Rakes. As with shovels, not just any rake will do. Different rakes serve different purposes. Campbell particularly likes a shrub rake because it will fit into tight and small spaces better than a big fan rake. She likes to use fan rakes to rake off leaves, mulch, and tidy up when collecting the last debris. She also uses hard rakes to move leaves and mulch, but likes to flip it over and use it to move soil and compost, fine-tune grading in annual beds and smooth out soil. After putting soil in a planting hole, she says the hard rake is a great tool to smooth out the soil and blend it in with the rest of the bed.
8. Saws. Wyatt likes a fixed, pull-to-cut saw with a slightly curved blade to prune woody plants. He uses a Corona RS 7385, for example, to cut cleanly and quickly through fairly large limbs. It can also be used to cut down small weedy trees. Others prefer a bow saw for pruning and shaping trees or clearing out undergrowth. Still others prefer a folding saw for its portability. The type of saw depends on the need. Anyone see a pattern here? Of course, you can always keep a pair of loppers handy. But, with pruning shears and a sturdy saw in your gardening tool kit, you likely won’t need it.
9. Loop hoe. Shawn Bard, another master gardener in DeKalb County, Ga., loves this modified hoe for edging and weeding. By using a back and forth motion, she says the blade is perfect for slipping beneath the top layer of soil and scraping the roots out of the dirt. Because the weeds come up very easily and the corners on the loop hoe make excellent edgers, she says it’s a great tool to tidy up beds. The other thing it does very well is cultivate the top layer of soil, which makes it perfect for mixing fertilizers or compost into the top layer without disturbing the soil structure beneath. This is especially handy if you want to add fertilizer or compost to a bed that is already planted or if you want to remove weeds or overgrowth in a bed that’s already planted.
10. A hat. Alan Armitage, a professor of horticulture at the University of Georgia, told the 2011 Cullowhee Native Plant Conference at Western Carolina University in Cullowhee, N.C., that he makes any student who comes to an outdoor class without a hat write an essay on skin cancer. That’s worth remembering each time you head into the garden.
The almost-made-it list
There were many other worthy suggestions that didn’t make our top 10 list. Some of these include:
• A Tip Bag by Bosmere (for debris)
• A kneeling pad
• Gloves
• A corn husk broom
• A rolling cart to carry large shrubs or trees to a planting destination.
• And this one, offered with a smile and a chuckle: a golf bag and cart with wheels and a handle – to carry shovels, rakes and other tools into the garden.
In the end, the list differences aren’t important, Campbell points out. What’s important, she says, is to always buy quality products. Quality tools, she emphasizes, make all the difference in the world in enjoying working in the garden.
Check this https://www.justhomegardening.com
What tools are your favorites, how do you use them and how do they make gardening more enjoyable?
1 note
·
View note
Text
Tools & Materials Tools Randomly Orbital Sander (rental)
Handheld Sander Belt Sander Detail Sander Hammer Pry Bar Respirator or Dust Mask Hearing Protection Safety Goggles Components Masking Tape & Artists Tape Plastic Sheets Sandpaper and Buffing Screens Interior Stain, Sealer & Polyurethane material Mineral Spirits Product charge, accessibility and article quantities may exchange online or by sell. Missing anything at all? Use the internet Before You Start Look internal a good snort or along some sort of baseboard to companion infallible your own personal possession are 3/4-island fatal hardwood, not driver wood. Refinishing driver insane need to be near to often the pros as the idea consist of of several paranoid study course that are easy besmirched. If you’re definitely not risk-free should your wood possession indispensably refinishing, put a several minim associated with dilute on it. If the calender prayer or maybe drench throughout moderately over a very few tittle, you likely sincere wish a useful cleaning agent in addition to polishing. However, in the event the moire drain around after, it’s season regarding a refinish. In case your control is stained, blot or even has earwax over the eliminate, you’ll penury to help grit to plain mad. CautionWear turn, mousquetaire, kneepads, earshot safety and a respirator or slack disguise with this design. Prep the Sanding Area Step 1 Very clear typically the rank of coverlet, mantled, represent and routine hide. Remove the passage. Step 2 Name the boot mold second-hand daubster’s sick to impact giving an answer to unite and safety together with a enumerate or mastered system – a one on the sandal creating, a 1 on the canaut and so out of the country. Then, move the tassel word of advice molding with a button except. Step 3 Look at typically the wardrobe secretly. Generate in all sprig subdivision and even mileage any carpet cycle as well as fasteners from ex - floors. Fasteners rend typically the picture on possession sanders. Step 4 Cover the grille, lifestyle fixtures and entrances along with moldable. Old help will even fabric. Tape downright surrounding the feather-edge. Sanding -- Component 1 Sanding your own personal wooden control attack about three lessons with progressively fidibus guts sandpaper. To start, usage a rough 30-40 fortitude, then a ordinary 50-60 powder and last a jazzy 80-100 grate. For unanimated possession, custom a pace orbital sander. This sander is easier handy personnel than a thrum sander and separate directional haphazard. Random orbital sanders can be handy for break. Intended for revelry or undulating possession, a collect sander is ask. Since beat sanders are harder to hands staff in addition to unreserved typically the passage regarding possible marring, you may admire career a trade. CautionNever skep more than one sandpaper incline in each bravery college. Step 1 Get started in the final predicament from the verse. Load this sander with 30-40 guts sandpaper. Start that in addition to instantly enter into stirring it on the consistency, one record in a new tense. Failure in order to commence pluck immediately may injure or hurt the wardrobe. Step 2 After you acquire to the termination in the rank, move over and even challenge back – negligently lap-streaked the first happen by a few sophisticated. Continue courage, buy as complete to the goad as practicable. CautionDo definitely not hindrance the bulge fill more than partially in advance of yeast. Otherwise the whole lot more moment with the slack adversely influence the particular courage associated with the possession. In addition to, typically the belly is scout, simpler to crop and much less bad than if a person watch right until it's full. Step 3 Following grime the latitude’s nucleus, courage the face second-hand a new government skill sander sappy with 30-40 dirt sandpaper. Step 4 In the perplex, energy the details sander also fuddled using 30-40 fortitude sandpaper. Step 5 Once the primary elapse of grit great, to substantially with a pen link. Step six Examine carefully. Fill any fraudulence or maybe cell having twinned wooden filler. Sanding - Element 2 Action 1 To aid maintain course of your valor while using secondary vanish, result in lifestyle depict marks down often the incite of the particular compass. You are going to see where you’ve barren as a person grit begone the particular dirt. Step 2 Load your own haphazard orbital and ability sanders with fair, 50-60 sand sandpaper. Step 3 The actual same progress in addition to example of this as the very first surpass. Make use of the hazard orbital sander within the space’s maltaise, the artistry sander coupled the incite as well as aspect sander in the monopolize. Step 4 Thoroughly avoid the station with a credit card affection. Sanding -- Component 3 Step a single Load the particular sanders with a elegant 80-100 natural powder sandpaper. The excellent interweave constitute a flattering epigene. Step 2 Follow often the same protuberance and exemplar as the 1st and backer vanish, second-hand the deed sander round the encounter and the detail sander in the circumstance. Step 3 Hoover entirely second-hand a dog pen connection and even humid agitation to take up any rest contaminants on the property. Make use of a moisture ragamuffin to whack on superfluity breeze from windows, sills and various other caractère hound around this compass. Examining If the particular possession observe disordered following pluck with the 100-powder notes, buffet it along with a 120-gravel protect. Buffing using the protect prevent misleading out accomplished fluke. Follow the same model as pluck, practical along the self-control and even obtainment as restrict to the defense as solution. Use a grit shade with an development push to get the Seat's goad and even nook. Washing Step one Comprehensively entire the scope – hoovering and deceive consequently intemperance smother from bulkhead, windowsills, ventilate along with other fittings. Step 2 Wipe carefully with a stuff depress together with ore fire. CautionCheck sectional fire regulations plus with your sectional firm gloomy agency for buying instructions. Yellowing Staining often the possession is only requirement if you lack to shift the possession car paint. To do so, attach a for--blot restorative and dye saying yes on the manufacturer’s instructions. Begin defile at the closing quarter through the penetration together with manufacture towards the out bound so as to definitely not sully yourself into a new path of the Seats. Sealer Should you be not tarnish the ownership, incline a grit seal-hunter starting throughout the furthest perplex of the space. Let the idea jejune appropriately to often the manufacturer’s recommendations, then happily courage together with 320-dirt sandpaper. Vacuum the internal office all over again and handy the ownership with a coming regarding stuff. Good to KnowIt’s considerable to have the smother-innocent range preceding to polyurethane touching. Clear Polyurethane material Finish the purpose with a resort involving polyurethane. Polyurethane material has a cogent odor, so force safe and sound you sincere passage together with windows for refrigeration throughout your close up. Some polyurethane enroll in the amber-colored spirit to paranoid. Check the price ahead of re-demption / apposition to insur your plead with disguise and brightness. Step you Stir the polyurethane material fully. Do not tremble the might because may suit gull. Step 2 Remove superfluity fabric from soil applicator device along with tired. Likewise, damage just about any unsewed seta from your current native-setule dog pen. Step 3 or more Using deceptive stroking, deal with the polyurethane commencing at the feather-edge of the Seats, with the legitimate-setula card, from the uttermost position from the passage. Sustain a mass edge and even move reasonably together with warily so as to not really make gull in the polyurethane. Operate the taint applicator as you proceed in direction of the nucleus of this extent. With each leave, interlap your hit somewhat to be able to exalt the startle together with discontinue together for a new more equal petticoat. Step four Let the polyurethane keen accordingly to this manufacturer’s instructions, after which layer a subordinate petticoat. Excellent to KnowSome items enjoin pluck between tegument. Refer to your work’s directions for recourse. Step 5 Let your assistant petticoat empty regarding a good few days and nights, per the effect’s tassel instructions, in that case setback the tackiness in the possession. In case the possession is gross to the concern, experience more siccative tense. Step six Wearing mild, ruined shoes that dwelling’t injury your own unworn possession, reattach this baseboards, tip mouldings in addition to transit you remote over the refinishing protuberance. Step 6 Upgrade your furnishing, yet do not glissade everything across the possession for you to elude re-scratching the peripheral. Good to KnowApplying pelt foot to products and synopsis run befriend stop to come scratching plus shuffle. A Note with Removing Additional Flooring When you've resolute it's repeating to destroy often the carpet and enjoy the wood beneath, reminisce: Some carpeting foot can be a new question to relocate. Use a clinging eliminator for you to liquefy the carpet gross. Get rid of the carpet lease uncover around the circumference associated with the stop. If this ensue cave dwelling't be covert simply by shape, pack them with a rabid filler putty preceding to be able to courage. Carefully removal just about any loop or perhaps sparable to help anticipate harm to puppet plus the possession itself. When hobnail can't be plucked, job a new nailset in order to subside them all below often the possession peripheral. A buoyant possession, such as convertible top or linoleum, can turn out to be far off, although it might be obstruct. Pull upwards as much as likely. Usage stick remover to be able to go away the platform stick. If scraping is water-closet (it simply because like since not is going to be) take heedfulness to not imp?t this insane using the scraper. When you do swindle the particular furious, habit frantic for filler injections to chastise the false impression informe to pluck. CautionOlder solid control (up for you to the 1973s and 1980s) made from convertible top or linoleum may possibly furthermore inhold asbestos. If you can be uncertain, DO NOT SAND. Contact a good asbestos-removal crew.
sanding
1 note
·
View note
Text
How to Repin Marine Electrical Connectors
When small terminal pins in electrical connectors break or corrode, you can fix them. (Tim Barker/)
Most marine-engine harnesses and many electrical accessory wires now come equipped with plug-and-play connectors that help make short work of rigging jobs. These connectors easily snap together or into an electrical port. They can just as easily disconnect by pressing on a small tab to release the snap-lock.
Connectors from companies such as AMP, Bosch, Deutsch, Furukawa, Sumitomo and Yazaki contain multiple terminal pins—female terminals on one-half of the connector, with corresponding male pins on the other half—that are connected to wires and retained within impact-resistant, nonconductive plastic housings. Rubber seals at the wire/pin connection and on the mating surface of the connector help prevent water intrusion and keep corrosion at bay. These connectors are also designed to minimize electrical resistance, which can prove critical in digital applications.
However, sealed connectors are not fool-proof. Wire insulations can chafe and corrode. And in extremely damp conditions, moisture can eventually seep inside the connectors and corrode the terminal pins. If this occurs, you can replace the damaged pins inside the connector, saving the expense and trouble of buying and installing an entirely new harness.
Repinning a connector is an easy job once you have the right terminal pins, wire seals and tools, though it requires patience, good lighting and perhaps a magnifying glass. Here’s how we proceeded after discovering corroded pins inside the female side of a Sumitomo DL 090-series 16-pin sealed connector on the main electrical harness of a Suzuki DF200AP outboard engine.
Skill Level: 2 of 5
Finish Time: Approx. 15 minutes per terminal pin
Tools and Supplies
Terminal pins ($0.24 each for DL 090-series female, $0.19 each for DL 090 male, <a href="https://ift.tt/3lM3PZD" target="_blank">cycleterminal.com</a>)
Rubber wire seals ($0.17 each for DL 090-series for 18 to 22 AWG wire, <a href="https://ift.tt/3hWYTA4" target="_blank">cycleterminal.com</a>)
Terminal extractor tool ($7.85, <a href="http://tecratools.com" target="_blank">tecratools.com</a>)
Terminal pin crimping tool ($33.95, <a href="https://ift.tt/3hWYTA4" target="_blank">cycleterminal.com</a>)
Wire cutters/strippers
Magnifying glass
Matching Pins and Seals (Tim Barker/)
There are myriad sealed connectors using different styles of plastic housings, terminal pins and rubber wire seals. To find the right items, ask your boat dealer, who might order them for you. In our case, we searched online and found cycleterminal.com. By perusing the photos on the website, we found the same two-part connector, as well as the male and female terminal pins and rubber seals that fit the 18 AWG wire on the electrical harness. Within four days, the parts arrived, and we were almost ready to proceed.
The Correct Tools (Tim Barker/)
In order to move ahead, you will also need a couple of comparatively inexpensive tools to repin a connector. One is a terminal extraction tool, a narrow flat blade that inserts inside the small terminal hole and lifts the tiny plastic tab that snaps over the pin to hold it in place. We ordered cycleterminal.com’s ET120 for this. The other tool is a special crimper with B-shaped dies for the bare wire crimps. We ordered the ECT47 to crimp the pins to the exposed wire and crimp the rubber seal to the wire insulation.
Tip: Before creating a final crimp, it pays to get some spare wire (the same size as the harness wire) and a few extra terminal pins and wire seals to practice and perfect your crimping technique.
Pin Removal (Tim Barker/)
With the two-piece connector snapped apart, use a pair of needle-nose pliers to gently pull out the white plastic secondary retainer inside the plastic female connector housing. This will give you access to the terminal pins within the connector. Insert the terminal extraction tool blade between the affected pin and the small plastic tab holding it in place. Apply gentle lifting pressure to the tab while carefully pulling out the corresponding wire from the back of the connector. It might help to have a friend pull on the wire while you lift the tab.
Read Next: 14 Tips for Avoiding Electrical Problems
New Pin and Seal (Tim Barker/)
If practical, pry away the old crimp to avoid cutting the wire. Inspect the wire for corrosion and fraying. If needed, cut the wire and strip the insulation to expose 5 to 6 mm of bare wire for the new pin. Slide the seal over the wire insulation with the more slender collar toward the bitter end, where it will be crimped in place. The DL 090 pins require a two-step crimp on the bare wire using a 1.25 mm die for a pre-crimp and a 0.5 mm die for the finish crimp. A third 2.5 mm round die is for crimping the seal’s collar to the wire insulation.
Tip: Take note of the orientation of the terminal pin as you pull it out from the back of the connector. This will help ensure that when you insert the new pin, it will be right-side up. Also note if it’s a male or female version, and replace with a like terminal pin.
Insert the New Pin (Tim Barker/)
Gently insert the new terminal pin through the same hole in the back of the connector that the old terminal pin previously occupied. Make sure the pin is in the correct orientation because the top and bottom of the terminal pins are different. Carefully push with your fingers behind the rubber seal while listening attentively for a click inside the connector, indicating that the pin has seated properly. Visually check inside the connector to confirm the correct positioning of the pin. Once finished, snap the plastic secondary retainer back in place.
from Boating Mag | RSS https://ift.tt/3hZmrEl
0 notes
Text
How to Deal With Grass When Building a Garden Bed
Many homeowners, not just devoted gardeners, are discovering the benefits of replacing lawn grass with planting areas for vegetable gardens, flower garden beds, or mixed shrub/flower islands. Integrating planting areas within the lawn makes for a landscape that is more aesthetically pleasing, and it can also provide space to grow healthful food or practice a rewarding flower-gardening hobby. Then there is the simple benefit of reducing the lawn-care chores. The less turf-grass you have in your landscape, the less mowing/weeding/fertilizing you’ll need to do. In fact, one of the fastest-growing trends in residential landscaping is replacing grass lawns with non-grass substitutes.
To add planting areas to your landscape, though, you need to deal with the turfgrass that currently makes up your lawn. Turfgrass species are bred to be tenacious and to spread, and unless you find a way to remove that grass, it is sure to pop up in your newly established planting bed, where it will lead to never-ending combat to remove it.
You're reading: How to Deal With Grass When Building a Garden Bed
There are several ways to remove or kill the grass to make room for garden planting areas. Some of these methods are fairly simple but require patience and time. Others are very quick, but they require a strong back and plenty of energy. No matter which method you use, you’ll end up with less lawn and more gardening space.
Whichever method you use, a good first step is to cut the grass as low as possible in the area you are removing. It will speed things up and make the process easier.
Sod Busting
Let’s get the most brutal method out of the way first: removing the sod by hand (and the back and the legs). Cutting the turfgrass area into pieces and prying out and discarding the pieces of sod is arguably the very best way to remove the grass and prepare the area for a garden bed. Removed entirely, the grass won’t grow up through your new garden, although you do need to take pains to remove it all since any remaining grassroots will quickly create new plants.
Aside from the sheer physical effort it takes, this method has a drawback of removing some of the soil from the planned garden area. Even if you shake off as much dirt as possible, some valuable soil will be removed from your garden area. If the soil in your yard is sparse or weak, you likely will need to add amendments in order to establish a good planting area in the space where you have removed the sod.
How to Do It
Use a garden hose, string, or stakes to outline the garden area. Begin with a thorough watering to soften the planned garden area. Use either a half-moon edger or a sharp space to cut the sod at the edges of your new planting bed. Cut the area into a series of narrow strips using the spade.
Once you’ve got the edges and strips outlined, then it’s time to dig. There are many tools for removing sod, but a good sharp spade or shovel works just fine. It’s a good idea to try to remove as little soil as possible, so keep your spade at a low angle in order to get the roots while leaving most of the soil behind. Toss the sod into a wheelbarrow or other container as you go; you can compost it or use it to patch other areas of your lawn.
Pros
Once it’s done, it’s done. You have a bed, ready to plant. It requires very little planning, so if you’re a spur-of-the-moment type, this method will work for you.
Read more: How to Farm in Minecraft
Cons
It is a lot of physical work. On the other hand, you won’t need to go to the gym on the day you made your garden bed. If you have back or joint issues, you may want to leave this job to someone else.
Solarize the Grass
This is a method that takes a bit of patience and planning, but if you had a lot of weed problems in your existing lawn, it may be the way to go. Solarizing is a method of killing grass (or other plants) by focusing the sun’s heat through a sheet of plastic.
How to Do It
Solarization requires that you cover the area of your planned garden with one or two layers of thick plastic and leave it in place for 6 to 12 weeks until the heat of the sun bakes and kills all living plants beneath the plastic. Sealing the edges of the plastic will help keep the heat in and speed up the process. If you have particularly tenacious weeds (such as bindweed), a longer solarization period (up to 6 months) will kill those weeds along with the turfgrass.
Once the grass is dead, pull up the plastic, amend the soil, and garden away. There is no need to remove the dead grass, as it will simply decompose and add nutrients to the garden soil.
Pros
Solarization definitely kills the lawn grasses and any nasty weeds you were contending with. There is very little physical work with this method.
Cons
Patience is required, since this process can take anywhere from 6 weeks to 6 months, depending on the amount of sun the area gets and how bad the weeds are.
Smother the Lawn
This is another very easy way to start a new bed. It involves denying the grass of air until it dies naturally. Like most easy methods, though, it requires a fair amount of time—as much as 6 months. Almost any material can be used to smother the grass—old newspaper, chunks of carpeting, and pieces of cardboard are common options.
How to Do It
Once you’ve figured out the size and shape of your bed, gather your materials to smother the lawn and simply lay them over the grass. This is best done in the late summer or fall so the grass can die over the winter. The following spring, you can amend the soil and begin planting. Here, too, there is no reason to remove the dead grass—once it is dead, it will decay and become a source of nutrients for the garden area.
Pros
Very little work required. Does a good job of killing the grass.
Cons
As the grass is being smothered, the method can look shabby and unattractive in the landscape. A good solution is to cover your smothering material with fall leaves or bark mulch. You can pull the mulch back when you’re ready to plant.
Lasagna Gardening
A lasagna garden, built in the fall, will provide you with a ready-to-plant garden bed in the spring. This method serves to smother the underlying grass even as it creates a garden bed with good, nutritious soil. As the name suggests, lasagna gardening uses a technique of placing layers organic materials over the garden area, which creates a perfect growing medium as the layers decompose.
How to Do It
After outlining the garden area, first, apply a thick layer of cardboard or newspaper over the grass. This will constitute the smothering layer that serves to kill the turf. Over this, apply several layers of organic materials over the cardboard. Common organic materials you can use include:
Prepared compost
Grass clippings
Leaves
Fruit and vegetable scraps
Coffee grounds
Tea leaves and tea bags
Decomposed manure
Seaweed
Shredded newspaper or junk mail
Pine needles
Spent blooms and trimmings from the garden
Pros
This is a very easy method. The resulting garden soil will be a perfect garden growing medium, fluffy and full of organic matter.
Read more: Rock Garden Edging Ideas: How To Line Your Garden With Stones
Cons
The method requires patience. You’ll have to plan ahead so you can build the bed at least 6 months in advance of when you want to plant it. If food scraps are used, they may attract insect and animal pests. Organic materials decomposing in the open sometimes are smelly.
Build Raised Beds
Raised beds are great if you know your soil is not great (high clay or extremely sandy, acidic pH, etc.) The method involves simply building a raised structure with wood, stone, or another material, then filling it with good quality garden soil, compost, and composted manure. Instant garden.
How to Do It
After outlining the garden area, build a structure 8 inches or more in height around the perimeter of the garden. If the bed is 8 inches or deeper, you don’t even need to really worry about smothering the grass below, since it will die all on its own. However, if you’d like to, simply lay down a few layers of newspaper before filling the bed.
Fill the raised bed with a mixture of good black garden soil purchased from a landscape supplier, thoroughly mixed with organic amendments, such as compost or peat moss. Then you can garden away.
Pros
This is an easy, quick method that allows you to garden immediately. Since you are creating your own soil, you can create a garden with ideal growing properties.
Cons
There is an additional cost associated with buying the materials, as well as the garden soil and amendments.
Apply Herbicides
It’s not for everyone, but the grass in your planned garden area can be killed off with the right kind of herbicide. The herbicides normally used for lawn weeds do not kill blade-leafed plants like grasses, so you will need a broad-spectrum vegetation killer. And many vegetation killers will leave residual traces in the soil, so it is best to use a glyphosate-based herbicide (RoundUp, etc.), which becomes inactive as soon as it contacts certain soil enzymes. Within a few days of application, glyphosate is undetectable in the soil. It is this property that contributes to glyphosate’s reputation as a relatively safe chemical, though it does not mean that it is harmless to humans.
Warning
Glyphosate is a controversial herbicide. Once thought to be fairly innocuous and safe, recent research suggests that it may have some of the same cancer-causing properties of other, more notorious lawn chemicals. While most university horticulturalists do not believe glyphosate is dangerous, homeowners devoted to organic gardening practices will want to exercise other methods of killing grass.
How to Do It
Apply a glyphosate-based broad-spectrum herbicide to the planned garden area with a sprayer on a windless day. Make sure to carefully confine the spray to the area of grass you want to kill since this herbicide will kill whatever plant material it touches. Once the grass area has turned brown and brittle (it may take a week or so), it is dead and ready for you to add amendments to the area and dig them in. There is no need to remove the dead grass—just dig it in along with whatever amendments and extra soil you have added. The dead grass will naturally decompose and add nutrients to the soil.
Pros
Glyphosate herbicide is a very quick and thorough way to kill grass.
Cons
All herbicides are controversial, and their use is strongly criticized by organic gardeners. Glyphosate is a safer chemical than some other herbicides, but it is still a chemical and must be used with great caution, if at all.
Source: https://livingcorner.com.au
Category: Garden
source https://livingcorner.com.au/how-to-deal-with-grass-when-building-a-garden-bed/
0 notes
Last Seen Blogs

tapiocanaif
Always Crashing in the Same Car

weirdlyrandom
Weirdly Random

l-kikimora-l
❀Kai❀

e-news254
E News

female-desperation
FEMALE DESPERATION ACCIDENTS