#where you can sew/weave/embroider/whatever
Text
becoming a data hoarder of crochet/knitting/sewing/embroidery patterns and books on my pc, laptop and phone. an ungodly amount fr.
#also finding good patterns for like 2 dollars at thrift stores and getting books out from the library has been VERY helpful#and so many have maker spaces#where you can sew/weave/embroider/whatever#the one at my local library is mega cool#cos the council realized the suburb next to mine (mine is too small to have a village center like the others so theirs is ours)#had been promised a new mall makeover and a new pool and a new bunch of stuff#and hadnt been given anything in like. decades.#and is also a suburb where a lot of working class and low income families live#so they went ''okay we should. do something and actually support this section''#and thats how we got our new million dollar suburb center building with a new library/cafe/preschool/pool/maker space#and suddenly people have a reason to stay in the area and spend more time at shops and have a study space#available right next to a park and a place for community and information!!!#and everyone is happier and spending more money at the surrounding shops because theyre visiting more often#like that whole project took 2 years but it was so worth it the maker space rules its got a recording booth and a 3dprintet and an engraver#a loom and all these other woodcraft/textile stuff#and i see teenagers from the 3 surrounding schools coming in to record music and/or rent out instruments!#and do carving and sewing and book clubs!!#and have a place to study!#when i was in hs we would walk down to the mall get sushi and sit in a field bcos there was nothing to do#now people from the same high school i have can access all this stuff!#and more online to print out#and partake in healthy hobbies and its like fuck!!! it makes me so happy!!!#all this to say if anyone wants a pattern for smth i can probs find a free one/one costing a few dollars by an indie creator
7 notes
·
View notes
Text

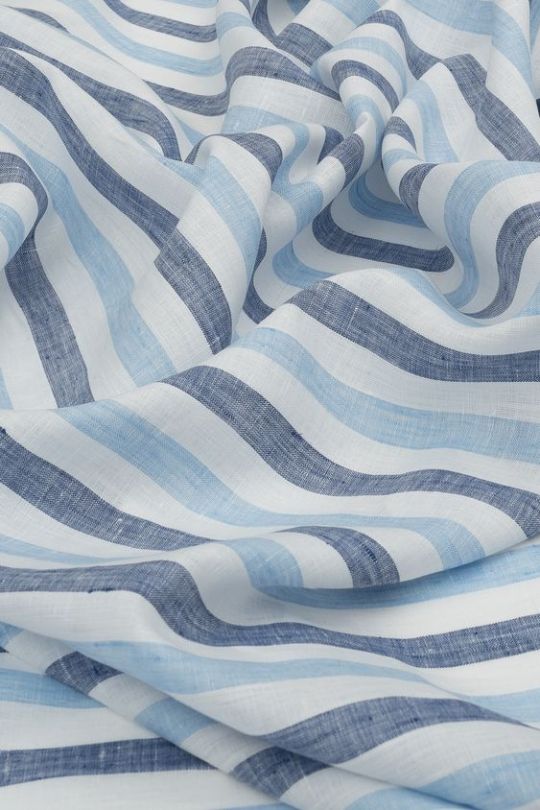
where to buy linen fabric
Welcome to de Linum online fabric store, offering ethical and eco-friendly European Flax linen fabrics. de Linum is the best place to buy premium quality flax linen fabrics at an affordable price in Australia. We have more than 100 varieties of pure linen, including stripes, checks, embroidered and printed linen fabric
Buy Designer White Check Linen Cotton Blend online from Australia’s leading linen store de Linum. Finest and pure linen made from premium flax fibres and is milled by premier Irish linen mill with Oeko tex certification.
White Zephyr 100% Linen Fabric A classic mid to heavyweight white linen for those timeless wardrobe-essentials. Smooth to the touch with a medium drape, there are slight slubs that add to its natural look and feel. Like all linens, wash and wear will soften the fabric further. As it is white, the lining may be required
Buy 100% Linen Fabric at wholesale rates online. At de Linum, we source our linen fabrics from European Flax®, OEKO-TEX®, SAI SA8000® certified (Standard 100- tested for harmful substances) mills.
Buy Embroidered Linen fabrics online from Australia’s leading linen store de Linum. Finest and pure linen blend fabrics made from 100% Linen, woven from European Flax.
Yes, you can do embroidery on linen fabric. In fact, linen is the perfect fabric for hand embroidery in particular because the nature of the weave allows you to put the needle and thread through easily. A finished piece of embroidered linen looks absolutely gorgeous. You can cut the fabric to whatever shape and size
Buy Dark Grey Linen Cotton Blend online from Australia’s leading linen store de Linum. Finest and pure linen made from premium flax fibres and is milled by premier Irish linen mill with Oeko tex certification
Why Is Linen Fabricv Expensive
The cost of linen fabric varies considerably depending on the quality. However, superior quality linen can be quite expensive, and there are a couple of reasons for this higher price. First, manufacturing linen is a time-consuming and laborious process, which is the main factor that drives its higher price.
Here’s a behind-the-scenes look at how linen is made.
Harvesting Flax Plant
The flax plant is ready to be harvested about 90 days after the seeds are planted. When it’s time for harvesting, the flax plant cannot simply be cut. The entire plant must be uprooted intact from the ground. This helps obtain the maximum length of the fibre, which is key to manufacturing high-quality linen. Uprooting each plant is tedious work and takes a whole lot of time.

With 1.75 metres of de Linum’s sheer blossom printed 100% french flax linen in hand and Style Arc’s Anita Peasant Blouse pattern, I began my newest sewing project. My goal was to create a considered, intentional garment - a trans-seasonal piece that could be worn for work and pleasure, and I am so pleased with how the final product hit the mark.
Upon receiving my fabric I immediately notice the smooth hand feel of the fibre, complemented by the almost gauze texture. The delicate blossom print was the perfect romantic compliment to my existing wardrobe of earthy neutrals.
When I received the gorgeous light khaki linen blend fabric from de Linum I was so happy to see how beautifully crisp and structured the fabric felt. It would be perfect for my Aje inspired structured puff sleeve mini dress.
I started off with my trusty raglan sleeve pattern block which I slashed and spread (the front, back and sleeves) to achieve the volume. I probably could have done with a little less volume but that's the price I pay for not making a toile first…
After gathering and assembling the bodice I somehow winged the neck facing which isn't perfect from the inside but it does the job!
I turned the back opening in for the button plackets and then turned the hem up to make the elastic casings.
History of linen is dated back to ancient civilisations. In fact, linen and its use has been associated with great civilisations.
In ancient Egypt, Linen was used for making elite clothing, and religious purposes. It is believed that mummies of pharaohs were wrapped in pure white linen. They must have considered linen to be the best for mummification due to its purity and longevity.
Sacred texts including Holy bible mentions about linen and it shows its historic significance. Bible has 58 mentions about pure linen.
0 notes
Note
Have you read Spin the Dawn by Elizabeth Lim? Idk what Era precisely it's meant to be, but I'm curious if anyone in the Chinese fashion sphere has anything to say about the clothes making/designing portions of the book, re: what clothes making was really like, the job of a royal tailor/tailors in general (were they common, or did most people make their own clothes? Was it a respected job?), that kind of thing! Thank you for your work on this blog!
I don't usually read fantasy novels like Spin the Dawn but I can say a thing or two about clothing production in imperial China. The state of dressmaking was different for each era and I can only talk a little bit about the Ming and Qing. Obviously I don't know the complete details of every stage of production for clothing, I'll just share some things that I do have knowledge on. Most of my information came from Rachel Silberstein's book A Fashionable Century: Textile Artistry and Commerce in the Late Qing, which could be read on JSTOR.
Royal dressmaking
Clothing that was meant for royal use was seldom created by one person alone, but rather the combined efforts of specialists and professionals in different areas. The designs would be made by artists in court, then textiles used for the clothing would be commissioned from state owned textile workshops, then sent to tailors to be sewn into garments and then to embroiderers if embroidery was required. Embroidery wasn't always necessary, since for most of the Ming fashionable and prestigious clothing was made from fabrics with woven patterns (e.g. brocades, damasks) instead of embroidered ones; embroidery would not become the dominant form of decoration until the Ming-Qing transition in the mid 17th century. Normal people wouldn't be able to purchase fabrics from the imperial workshops, but imperial workshops have been on the decline since the late Ming and commercial workshops were producing quality fabrics on a par with those from the imperial ones. Imperial workshop also frequently sublet their work to commercial ones.
As to the design aspect, formal court dress was heavily regulated as to what patterns and garments could be used for what occasion, so there wasn’t much room for artistic liberty. It was on informal clothing that more creativity could be exercised; embroiderers could choose what patterns and motifs go on garments and tailors could experiment with different proportions.

Source
Women’s 吉服 jifu formal ensemble from the Qianlong era. The patterns and their placement for such formal garments were fixed.

Source
Guangxu era informal 氅衣 changyi. The final appearance of this garment was still the combined efforts of many people, e.g. the weavers decided on the purple color, the tailor decided on the proportion and the embroiderers the floral motifs etc..
Home dressmaking
Common people prior to the 17th century mostly made their own clothes, particularly by the female members of the household. It was very common to make clothing from scratch i.e. the growing of cotton or grooming of silkworms, to fabric weaving, sewing and embroidering. It was considered a part of women's education to learn how to weave fabrics and sew garments together, but this doesn't mean that the entire dressmaking process was confined to women or one person either; men, who were expected to do farm work, would grow the crops necessary for the weaving of fabrics, and often assisted in the weaving process. Since the majority of the Chinese population lived in the countryside, many families produced fabrics from raw materials they made on their own farms and made clothes from said fabrics. Because of the difficulty in weaving brocaded fabrics by oneself, home dressmakers who couldn't afford to buy ready woven fabrics prior to the late Ming had to limit themselves to plain fabrics. In the late Ming and early Qing, the rise of embroidery as the dominant method of decoration meant that fashionable patterns became available to less wealthy people who couldn't afford to buy expensive brocaded fabrics, since they could reproduce all the fashionable patterns with just needle, thread and spare time. Embroidery books showing popular patterns and motifs were widely available and could be purchased cheaply. With that said, that doesn't mean that the entirety of a garment had to be made from scratch; many decorations and notions could be bought from shops, like trimmings, ribbons, buttons and prefabricated embroidery appliques. The seamstress would just need to buy the fabric, decorations and notions and put them together as one garment. In the Qing, women seldom went out of the house, and they relied on vendors or middlemen for vendors who brought products to their homes for sale. For women at the time, being a skilled weaver, seamstress or embroiderer was a highly desirable trait, not just because it symbolized "female virtue" whatever that means, but also because it provided work opportunities. Women who were otherwise not employed could take commissions from commercial weaving, tailoring or embroidery workshops as a side income.
Commercial dressmaking
Since the 17th century, the textile industry was increasingly commercialized and it since became more viable to purchase ready woven fabrics from commercial workshops, especially for people in urban areas. These were usually owned by rural families as a side income, and they would often hire landless people to work in their manufactories. I don't know if owning a textile manufactory was a respected job (probably not, considering the literati's hatred for everything commercial) but these people did make serious money. Family operating businesses were often co-owned by wife and husband. Embroidery workshops making prefabricated embroidered appliques and tailor shops making ready to wear garments were also quite common, often relying on middlemen for delivering orders and negotiating prices between the workshop and individual embroiderers/seamstresses in the countryside. In Qing tailor shops, it was often the case that only menswear could be purchased ready to wear, whereas womenswear was made to measure or by the wearer herself. Within tailor shops, there were many subdivisions of labor, like some people did pattern drafting, some people cut pattern pieces and some people assembled the garments. The status of commercial tailors has historically been low, mostly because of the Confucian ruling class’ disdain for consumption, luxury and anything non-self sustaining.

Source
Ca. 1780s export painting showing weaving women.
Feminist tangent
In the Qing, most home weaving and embroidering were done by women, but the commercial workshops were male dominated and their guilds prohibited entry for women, because commercial dressmaking had become a lucrative business and men didn’t want to share employment with women. Male employees in workshops were considered artisans and better paid, whereas women who had to work at home were considered unskilled labor and paid less. Most commercial tailors in the Qing were also male, for reasons similar to why embroidery was male dominated. Whereas women commonly sewed clothes for themselves and their families, they were often prohibited from becoming professional tailors working in workshops or joining a guild. It’s that bogus thing where handicrafts are “women’s work” but when men see how profitable they are they suddenly become “artistic” and limited to men.
Commercial tailors, who were male, were seen as a cultural abomination for doing what was historically seen as “women’s work” for profit. In order to elevate themselves to a higher, more respected status, they chose to throw women under the bus and revise the history of all things historically considered “women’s work” to make them more male centered. An example of this was the 露香园 Luxiang Yuan or Dew Fragrance Garden, a renowned Suzhou embroidery workshop built up by three generations of women of the Gu family, who owned the estate and was the namesake of their style of embroidery, 顾绣 guxiu or Gu embroidery. The male family head at the time, Gu Mingshi, later became the patron saint of the Suzhou embroiderer’s guild founded in 1867. The reason why Gu Mingshi was worshipped instead of the three women who made Gu embroidery famous was largely because male members of the Suzhou embroiderer’s guild needed historical justification for their exclusion of women and erasure of women’s contributions. Apparently late 19th century scholars also complained about this misogyny so this isn’t a new understanding.

Source
Gu embroidery by Han Ximeng, one of the three OG Gu women.
With all of this said, it doesn’t mean that women stopped working in commercial embroidery; women were actually the backbone of the industry, they just didn’t get any recognition from official, male written guild records and such. Many people in the 19th century observed that while the resident embroiderers in commercial workshops were men, a lot of their work was sublet to independent female embroiderers in the countryside, who were not credited on the finished product or advertising.
Now I’m kinda inspired to make a whole rant about working women in the Qing and their representation (or lack thereof) in the Republican era, but there are some 20 unanswered asks sitting in my ask box so maybe later😅
332 notes
·
View notes
Text
Sunsets - Thomas Hewitt x GN!Reader
WORD COUNT: 1019
WARNINGS: disgusting fluff. thomas is a sweetheart who i love
Thomas was great at sewing. It was something you had come to notice and love with each passing day. While his skin masks weren’t your favorite thing, you’d be lying if you said they weren’t done well. Thomas took his time with the masks, sometimes taking days to finish one, and each one came out better than the last.
With hands as large as his, and with his primary job being the person to butcher bodies, you wouldn’t have expected him to be able to do something as tedious and small as sewing but here you are. You were sitting in the chair next to the window of the room you had convinced Luda Mae to make his sewing room, somewhere he could do less bloody projects. He was sitting at his desk, hunched over, working on a project that’s held his attention for the last few days.
He lets out a grunt and you know he’s just stabbed his finger accidently. You crane your neck in a weak attempt to see what he was working on but he had it positioned so unless you were standing right next to him you wouldn’t be able to see it. Sighing, you lean back in the chair and stare out the window. It had been a pretty easy going day and both you and Thomas had finished your chores early.
Luda Mae, ever the saint, had let you and Thomas have the rest of the day off and had even scolded Hoyt for complaining. It seemed she thought you and Thomas deserved a break. A creak catches your attention and you turn towards Thomas as he stands from his desk. He turns towards you, his hands behind his back, holding whatever it was he had been working on.
“You finished it?” You ask as he walks towards you and he nods. You grin up at him; he wasn’t wearing his mask. It had taken a lot of coaxing and compliments for him to do so in front of you, but he had it off more often than not and it meant so much to you. “Can I see it?”
“Maybe,” He says, his voice hoarse. He had begun to talk more, though you knew it hurt his throat a bit too much to replace his signing. He gives you a teasing smile and you scrunch your face up.
He wanted to ask very, very, very nicely. “Please, Thomas?” You beg, dragging out your please. He laughs and nods. You scoot to the edge of your seat and bounce your leg in anticipation. A shy smile spreads across his face and his hands come to the front of him and you gasp at the item in his hands.
A scrap of fabric, which just so happened to be your favorite color, with an intricate sunset sewn into it. Different shades of red, orange, pink, purple, and blue weaved together and you couldn’t even tell where a stitch began or ended. It was perfect. “Thomas, this is amazing! You did this for me?”
“Yes. When we kissed,” He says, letting you hold the fabric. He looks to the ground, his large fingers playing with a loose thread on his shirt. You can feel tears prick at your eyes. The first time you kissed Thomas it was on the porch in summer. You were out with a cold glass of lemonade sitting on the swinging seat watching the sun sink below the horizon. The sky was ablaze in color and Thomas had signed something about how pretty it was and you kissed him. It didn’t last long because Hoyt came out and wolf-whistled at you two which embarrassed Thomas just enough to go back inside. He came out a few moments later and kissed you again, gently, before rushing back in.
It was such a long time ago you had almost forgotten the rush of emotions you had felt in that moment. But this embroidered piece? It brought them all back to the surface. “What’s wrong?” Thomas asks, his hand coming to your cheek to brush off the hot tears with his thumb. You lean into his touch, your eyes staying on the sunset.
“Nothing. It’s just… this is so thoughtful, Tommy. I love it. So much.” He grins and you can just barely make out the blush spreading across his cheeks. You stand up, standing on your tippy toes to give him a kiss and pulling him in for a hug. He hums, resting his chin on the top of your head.
“Aw, well look at you two,” You and Thomas break apart at Luda Mae’s voice. She was standing in the doorway, her hands clasped together and a big smile. Thomas rubs the back of his neck in embarrassment; no matter how many times she caught the two of you in a lovey-dovey, tooth-rotting sweet moment, it still got him all clammed up. “Well, dinner’s all done. Hoyt helped me set up. Come on and eat when you two are ready; fair warning, the boys are already stuffing their faces.”
She sends a wink your way and turns on her heel, walking down the hallway. Thomas pulls you back in for a hug and squeezes you tightly. “Really liked it?” He asks, his voice barely a whisper. You grin, squeezing him back just as tightly.
“Really. C’mon, let’s go eat before Monty and Hoyt take it all,” He laughs, letting you go and grabbing your hand in his. He leads you out of the room and down the hall before you stop him for just a second outside the dining room. “Do you think you could sew this onto a shirt of mine? I wanna be able to wear it around.”
He grins and nods, kissing the top of your head, ushering you into the room. You grin as he pulls your chair out for you, ignoring the teasing words of Monty. Thomas was the best thing that has ever happened to you.
That night, when you and Thomas crawled into bed together and snuggled up, you dream of sunsets and lemonade.
#queued post#s1mping4slashers writing#s1mping4slashers works#s1mping4slashers masterlist#Thomas Hewitt#texas chainsaw massacre#the texas chainsaw massacre 2#the texas chainsaw massacre franchise#the texas chainsaw massacre#luda mae hewitt#monty hewitt#hoyt hewitt#slashers#slasher x reader#gn!reader#slasher fic#slasher oneshot#slasher imagines#slasher one-shot#slasher one shot#slasher x you#slasher x y/n
162 notes
·
View notes
Photo
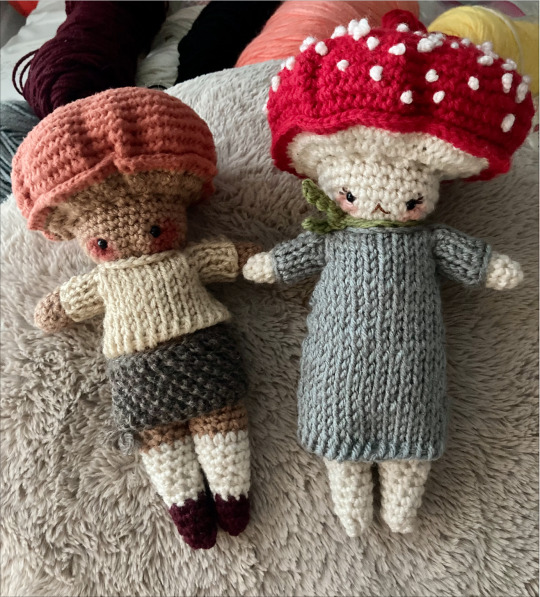
Mushroom pals crochet pattern below!
Quick lil disclaimer: this pattern has only been tested by me so far. You might run into a mistake or two while following the pattern because of this. Feel free to message me if you have any feedback for how the pattern is written or if you find a mistake you’d like me to fix!
Difficulty: Beginner-Intermediate. Mostly beginner amigurumi and tunisian concepts but shaping and mixing tunisian/standard crochet may be difficult for those just learning to crochet.
Finished Size: 8-ish inches tall
Materials:
*i used DK yarn for the stem, cap, socks, and shoes of the mushroom but sport weight/baby yarn would be nice for clothing. feel free to mix and match colors to make a super cool mushroom. i focused on earth tones because i have a ton of earthy scraps to get rid of but you can make your pals bright, or base them off of your favorite mushroom, or whatever you like!
- 1/4 ball of cap color (i used orange to make Galerina autumnalis, red for amanita)
- 1/4 ball of stem color
- scraps of shoe color (optional, if you want shoes)
- sock color (optional, depends how tall/if you want socks)
- small amounts of outfit colors (amount depends what you make but outfits don’t take much)
- small amounts of accessory colors (amount depends on if you want accessories, doesn’t take much yarn)
- scraps of yarn/thread, felt, etc to decorate cap (optional)
- G/6/4.25 mm hook
- yarn needle
- wadding/stuffing
- safety eyes/yarn/thread for eyes and face (i used 6mm safety eyes and embroidery thread. materials you use depend on if you want a face and what you have on hand)
- powder blush (optional, for cheeks)
Abbreviations (US Crochet Terms):
ch = chain
st = stitch
yo = yarn over
sl = slip stitch
sc = single crochet
inc = increase
dec = decrease
fo = finish off
Special Techniques
Tunisian Crochet - knit stitch is used for sweaters, simple stitch used for a skirt. Tunisian is easier for me and works up faster than knitting. Not every piece of clothing in this pattern requires tunisian crochet, just the sweaters in the picture.
Running stitch - used to cinch head into shape after stuffing
Ladder stitch - used to stitch pieces and clothing together
French knot - optional, for decorating cap
Satin stitch - optional, for decorating cap (would work well for gills)
Mushroom Pal Doll
Head (in stem color):
Start with magic ring
1. sc 6 in ring (6)
2. *sc inc* 6 times (12)
3. *sc inc, sc* 6 times (18)
4. *sc inc, sc 2* 6 times (24)
5. *sc inc, sc 3* 6 times (30)
6-9. sc in each st (30). After finishing row 9, place eyes between rows 5 & 6, about 6 stitches apart. If you’d like your pal to have a face, go ahead and embroider that now.
10. *sc inc* 30 times (60)
11. *sc inc, sc* 30 times (90). FO, weave in ends.
Cap (in cap color):
Start with magic ring
1. sc 10 in ring (10)
2. *sc inc* 10 times (20)
3. *sc inc, sc* 10 times (30)
4. *sc inc, sc 2* 10 times (40)
5. *sc inc, sc 3* 10 times (50)
6. *sc inc, sc 4* 10 times (60)
7. *sc inc, sc 5* 10 times (70)
8. *sc inc, sc 6* 10 times (80)
9. *sc inc, sc 7* 10 times (90)
10-13. sc in each st (90). Don’t FO yet. After completing row 13, decorate your cap as desired. You can add french knots or felt for spots, embroider gills, etc. Go wild homie.
14. Line up the edges of the head and cap. Join the pieces by sc in every stitch of both head and cap, stuffing when you’re 3/4 of the way through. Stuff to desired firmness. Cap will be a little bit gathered and the head will lose shape as you stuff. FO and weave in ends.
Using a strand of stem color and your yarn needle, sew a running stitch between rows 10 and 11 of the head starting at the back of the head. The running stitch should be where the head flares into the gills of the mushroom cap. Pull the ends of the yarn tightly to cinch the head into shape. Use 2-3 square knots to secure, then bury the ends of the thread.
Body (stem color)
ch 12, sl to join into circle
1-3. sc in each ch/st (12)
4. *sc inc, sc* 6 times (18)
5-10. sc in each (18)
11. *sc inc, sc 2* 6 times (24)
12-15. sc in each (24). Don’t FO -- leg #1 will be worked directly into body.
Leg 1 (cont. from body, stem color)
*color change suggestions listed for sock lengths
16. Sc in first 12 stitches of body (12)
17. Sc in first stitch to make a circle and in each stitch after (12)
18-21. Sc in each stitch. Switch to sock color at row 19 for thigh-highs. Switch to sock color after completing row 21 for knee-highs.
22. *sc dec, sc* 4 times (8) Switch to sock color for ankle socks.
23-26. sc in each (8). Switch to shoe color after completing row 23 if you want shoes.
27. *sc dec* 4 times (4). FO, stitch bottom of shoe closed with tail and bury the end. Stuff leg through top of body -- I used a chopstick to help stuff since the leg is thin.
Leg 2 (stem color)
Join yarn to body near inner thigh of leg 1 and ch 1. Crochet over tail or weave in. Repeat leg 1.
Arms (x2)
start with magic ring
1. sc 4 in ring (4)
2. *sc, inc* 2 times (6)
3-10. sc in each (6). FO, leaving a long tail to sew onto body. Stuff to desired firmness and stitch top closed.
Construction
1. If you haven’t already, finish stuffing the body to desired firmness. The crotch of the mushroom friend is still open, so stitch that closed with a piece of stem color yarn.
2. Use a ladder stitch to attach head to body. I stitched the body to row 3 of the head.Your pal will be top-heavy! Clothing will help stabilize.
3. Sew the arms to the sides of the body. I chose to attach them between rows 1 & 2 of the body.
Clothing
*clothing instructions are a little bit ambiguous bc you have to decide on sizes, colors, and shapes. some pieces are mix and match, some have bases and interchangeable sleeves/lengths.
***************************************************************************************
Shirt/Dress Base
ch 24, sl to join
1. Sc in first 7. Ch 4, skip 5 chains. Sc in next 7. Ch 4, sl to first st. Ch 1. Skipped chains are armholes. (14 st, 8ch.)
2. *Sc in first 7. Sc in each ch of ch 4* 2 times. (22)
3. sc in each (22)
4. *sc inc, sc* 11 times (33)
5. sc in each (33). Repeat to desired length (shirt, tunic, dress, etc.) then finish FO. Weave in ends.
Shirt/Dress Sleeves (normal)
*Play with colors to make a raglan top/dress
Join in the “armpit” area of the shirt
1. Sc in each ch around (9)
2. Sc in each st (9). Repeat to desired length, then FO.
Shirt/Dress Sleeves (puffy)
*scrunch sleeve at top for puffiness to be puffy
Join in the “armpit” area of the shirt
1. *sc inc* 9 times (18)
2-4. sc in each (18)
5. *sc dec* 9 times (9)
6. sc in each (9). Repeat to desired length, then FO.
***************************************************************************************
Knitted Sweater/Dress Body Panel (x2) (on both mushrooms in picture)
*tunisian knit stitch used
1. Draw up a loop in each ch (10 loops). Return pass.
2. YO. Knit stitch in next 8 vertical bars. YO. Knit stitch in last vertical bar (12 loops). Return Pass.
3. Knit stitch in each vertical bar (12 loops). Return Pass.
4. YO. Knit stitch in next 10 vertical bars. YO. Knit stitch in last vertical bar (14 loops). Return pass.
5. Knit stitch in each vertical bar (14 loops). Return pass.
6. YO. Knit stitch in next 12 vertical bars. YO. Knit stitch in last vertical bar (16 loops). Return pass.
7. Knit stitch in each vertical bar (16 loops). Return pass.
8. YO. Knit stitch in next 14 vertical bars. YO. Knit stitch in last vertical bar (18 loops). Return pass.
9. Knit stitch in each vertical bar (18 loops). Return Pass.
10. YO. Knit stitch in next 16 vertical bars. YO. Knit stitch in last vertical bar (20 loops). Return pass.
11. Knit stitch in each vertical bar (20 loops). Return pass. Repeat to desired length.
Final row: sl in each vertical bar and around the corners. FO, leaving a long tail to sew sides together. Block your work if you need to.
When both panels are completed, ladder stitch the sides together up to row 6. Weave in the ends.
Knitted Sweater Sleeves (x2)
*tunisian knit stitch used
join yarn at the corner of the sweater panel -- front panel for the right sleeve, back panel for the left
1. Using the sides of the sweater pieces, pull up 8 loops. Return pass.
2-5. Knit stitch in each vertical bar (8 loops). Return pass.
6. Sc in each vertical bar. FO, leaving long tail.
Once both sleeves are completed, put the sweater on the mushroom friend. Ladder stitch the sleeves closed around the arm of the mushroom friend. Stitch the top corners of the sweater pieces together.
***************************************************************************************
Skirt
Ch 26 for a tight skirt. Add more chains for looser fit. Sl to make a loop and ch 1
1. sc in each ch (26)
2. sc in each st (26). Repeat to desired length. FO.
***************************************************************************************
Textured Skirt (on orange capped mushroom in picture)
*tunisian simple stitch used
Ch desired length of skirt
1. Pull up a loop in each chain. Return pass.
2. Simple stitch in each vertical bar. Return pass. Repeat to desired width -- I used 26 total rows for a tight skirt but you can make yours looser.
***************************************************************************************
Shorts/Capris/Pants
*essentially the same concept as legs but slightly scaled up
Ch 26. Sl to make a loop
1. Sc in each ch (26)
2-6. Sc in each stitch (26)
7. Sc in first 13 stitches (13)
8. Sc in first stitch to make a loop. Sc in each stitch to end. (13)
9. Sc in each stitch (13). Repeat to desired length. For flared pants, add increases at row 12.
For leg 2, join yarn to inner thigh of unworked side of pants, then repeat pants pattern from row 7 on. Stitch the crotch of the pants closed before putting on mushroom.
***************************************************************************************
Romper/Jumpsuit
Begin by making shorts/pants. After finishing, join yarn to the back of pants in the beginning ch.
1-6. Sc in each ch/st (26). After completing row 6, ch 1 and turn.
7. Sc in 13 stitches. Ch 1, turn.
8. Sc dec, sc 9, sc dec. Ch 1, turn. (11)
9. Sc dec, sc 7, sc dec. Ch 1, turn. (9)
10. Sc dec, sc 5, sc dec. Ch 1, turn. (7)
11. Sc in each stitch across. FO.
Join yarn to back and repeat from row 7 for back. Put the romper on your pal and stitch the top corners together to form arm holes.
Sleeves (regular)
*worked in the round, around the arm
1. Sc in the sides of each row of romper top. You should end up with 10-12 stitches.
2. Sc in each stitch. Repeat to desired length, FO.
Sleeves (puffy)
*worked in the round, around the arm
1. Sc inc in the sides of each row of romper top. You should end up with 20-24 stitches.
2-3. Sc in each stitch.
4. *sc dec* 10-12 times.
5. Sc in each stitch. Repeat to desired length, FO. Scrunch sleeve for maximum puff.
***************************************************************************************
Overalls
Begin with shorts, pants, or skirt
Ch 11
1. Sc in 2nd chain from hook and each ch to end (10)
2-6. Sc in each stitch (10). FO.
Sew panel to top of pants/shorts/skirt, making sure the middle of the panel is aligned with the front middle of the bottoms. Make a second panel for the back if desired. For straps, join yarn in top corner of the panel and ch to desired length -- either to connect to back panel or to connect to back of bottoms.
***************************************************************************************
Backpack/Purse Base
Start with magic ring
1. Sc 5 in ring (5)
2. *sc inc, sc* repeat 2 times. Sc in last stitch (7)
3. *Sc inc, sc* repeat 2 times. Sc inc in last stitch (10)
4-9. sc in each (10). FO.
For purse strap, ch desired length and sc across ch. Attach ends of the strap to top of purse base. Weave in all ends.
For backpack straps, ch desired length to fit over arms and shoulders and sl across. Attach straps to backpack base. Weave in ends.
***************************************************************************************
That’s it! Now you have your own mushroom pal.
This pattern is available for free here because I don’t believe in gatekeeping crafts but if you’d like to show me some love, buy me a kofi and support my yarn habit!
Happy crafting!
#crochet#diycrochet#crochet pattern#handmade#diycraft#crafts#crafting#mushroom#mushrooms#fungus#fungi#plushie#crochet plushie#cottagecore#cottageblr
322 notes
·
View notes
Text
Mayans Take Their Kids Trick-or-Treating | Headcanon
Didn't include Miguel and Nestor because I was trying to keep this one MC-centric, but lemme know if you want HC for those two!
I meant for this to be shorter, but then I got carried away with all the fluffy feels, so...

Bishop: This year, your son is old enough to decide what he wants to be for Halloween, and he wants to be Spiderman – Bishop has been reading the comics with him before bed for the last couple of months for some father/son bonding time. Your son doesn’t ask either of you to dress up; he’s just excited to have both of you to himself at the same time. He walks down the sidewalk between the two of you, holding your hands and discussing the pros and cons of different types of candy. You catch Bishop gazing over at you a few times, a small, proud smile playing on his lips as he spends his evening with his family.
Taza: Taza’s not super into Halloween, but he tags along for the memories, wanting to commemorate your son’s first Halloween. You have your son decked out in a handmade owl costume that Taza helped you think up, and you carry him in your arms. He’s too young to really know what’s going on, but his gummy smile never leaves his face. You make Taza take a million pictures, but you’re also sure to hand the camera to Bishop periodically to get some good pictures of all three of you.
Tranq: Tranq is in full dad mode for Halloween, his twin girls in elaborate costumes: one as a bumblebee and one as a butterfly. They walk on either side of him, each gripping one of his hands and every once in a while he lifts his arms to swing them, making them squeal. And since his girls have him wrapped around their fingers, the three of you were even able to convince him to don a pair of wings himself. You can’t help but giggle at the sight, the glittery white wings comically small on him. You follow along behind them taking a million pictures, dressed in your ladybug costume, still amazed that you were able to find such an incredible man.
Angel: You are all in on Halloween and having a kid, to you, means getting to relive a kid’s Halloween experience. Your son wants to be a pirate and so you spent a couple weekends hand-sewing your and his coordinating pirate costumes. Sometimes, Angel would come home late from the club to find you hunched over the kitchen table with a needle and thread and his heart would swell with admiration at what a good mom you are. Angel does not dress up, but you successfully bribe him (with some treats of his own later *wink*) to at the very least don a pirate hat and carry a fake sword attached to his belt. Angel hangs back and grins like a fool all night, watching his girl and his son enjoy themselves, divvying up candy and posing for silly pictures.
EZ: EZ has been reading Me, Frida with your daughter, and so she practically begs to dress up as Frida Kahlo. The three of you had even taken a Saturday to scour Santo Padre for appropriate huipil and skirts and made a day of it, getting tacos and ice cream and of course, stopping at the bookstore. You pin her hair up and weave colorful flowers into it. As you trick-or-treat, EZ is almost as excited as your daughter, the pair of them happily explaining her costume to anyone who asks (and EZ’s eyes twinkle with pride as he watches her nerd out). You hang back and take pictures, adoring your little daddy’s girl, who still comes running back to you to beg for a piece of candy here and there.
Creeper: Creeper takes a backseat and goes along with whatever you have planned for you guys’ first Halloween with a kid, just wanting your son to have a good time. You pick out a cute dragon costume, which Creep totally gets behind. The two of you don’t dress up, but Creeper carries his tiny dragon all night, showing him off to his brothers like a proud papa. When the little man gets cranky, you head home so Creeper can take his time putting his son to bed before the two of you curl up on the couch for a more adult kind of Halloween party.
Coco: Coco doesn’t fully dress up, but puts on a wizard’s hat at his daughter’s request, to coordinate with her tiny witch costume. Letty joins in, both you and her dressed in glow-in-the-dark skeleton unitards. Letty takes the reins, walking her little sister up to front doors and helping remind her what to say when the door opens. You get some great pictures of your daughter looking up adoringly at her big sister. Coco hangs back a little at first, chain smoking nervously, not sure how to involve himself and always a little worried about messing up. You remind him that just by being here he’s building memories with her, and gently encourage him. Your daughter winds up walking between Coco and Letty, holding their hands and begging her dad for candy. He, of course, gives in, and she’s eaten a quarter of the bag before you even get home.
Gilly: Much like Tranq, Gilly is living his best big soft dad life, carrying his kiddo when she gets too tired to walk anymore, the pink tulle of her princess dress heaped in his arms. You get a priceless picture of Gilly wearing a giant grin, cradling his sleeping daughter against his kutte, her tiara slipping and a piece of half-eaten chocolate clutched in her chubby little fist. You all head home a little early, ready to put the princess to bed and relax on the couch with a scary movie and some popcorn for a little Halloween fun of your own.
Riz: Riz helps you brainstorm ideas for costumes, always wanting to be involved where his daughter is concerned. Even though she’s old enough to have some opinions about what she wants to dress up as, she asked for help deciding and her parents were going to give it. Until she comes home from kindergarten one day demanding to dress up as a biker. Riz laughs and scoops her up, his face completely delighted. On Halloween, she is decked out in a black, child-size kutte that you embroidered skulls and roses on the back of, and a sparkly green open-face helmet. She insists that her papa also wears his kutte, and the three of you walk hand-in-hand all night while she tries to sneak Starburst from her candy bag.
#mayans mc#mayans fx#mayans mc headcanons#mayans mc imagine#mayans x reader#mayans mc x reader#bishop losa#taza romero#tranq loza#angel reyes#ez reyes#creeper vargas#coco cruz#gilly lopez#riz ariza#mayans headcanons
292 notes
·
View notes
Text
the verdict is in, here’s the hive worm pattern you all wanted, but first i have two conditions:
1. tag me if you post pictures or dm me if you don’t want to post your work, i just want to see your creations
2. this one feels a little bit selfish but please don’t sell any worms you make, i put a lot of time and effort into making these and the pattern that i feel it wouldn’t be fair to me for someone else to profit from that work
now, with that out of the way, here’s the pattern all written out because i couldn’t figure out how to attach a pdf to a tumblr post and my google drive has my full name attached to it so i also couldn’t link that. anyway my dms are open if you have any questions
Materials
Yarn:
Body - Lily Sugar’n Cream Chocolate Ombre*
Spines - Lily Sugar’n Cream Warm Brown*
Eyes - Lily Sugar’n Cream Hot Green
Hook:
I9 / 5.50mm (yes technically this is the wrong size for the yarn I used)
Yarn needle
Fiberfill or whatever stuffing you prefer
Note: As you’ve seen in my pictures, my worms are green and brown rather than brown and white, that’s because I used Rit Apple Green dye to dye the body and spine yarn to colors to be more similar to the in-game hive worms. Obviously you don’t have to go that extreme and you can always substitute out my yarn and hook choices for material you’re more comfortable with since size doesn’t really matter here, make your worms as big or as small as you like. The above materials list is to simply give you an idea of what I used.
Notation
Sc - single crochet
Sc2tog - single crochet two stitches together
Numbers in parentheses indicate number of stitches in that round
Body
Chain 2
Sc 6 in second stitch (6) this will start your work in the round
Sc 2 in each stitch (12)
Sc 2 in first stitch, sc in next stitch, 6 times (18)
Sc 2 in first stitch, sc in next 2 stitches, 6 times (24)
Sc 1 round (24)
Sc 2 in first stitch, sc in next 3 stitches. 6x (30)
Sc 2 in first stitch, sc in next 4 stitches. 6x (36)
Sc 2 in first stitch, sc in next 5 stitches. 6x (42)
Sc 2 in first stitch, sc in next 6 stitches. 6x (48)
Sc 1 round (48)
Sc 2 in first stitch, sc in next 7 stitches. 6x (54)
Sc 1 round (54)
Sc 2 in first stitch, sc in next 8 stitches. 6x (60)
Sc 2 rounds (60)
Sc 2 in first stitch, sc in next 9 stitches. 6x (66)
Sc 2 rounds (66)
Sc 2 in first stitch, sc in next 10 stitches. 6x (72)
Sc 3 rounds (72)
Sc 2 in first stitch, sc in next 5 stitches, repeat 11 times (84) mark start of round
Sc 9 rounds (84)
Here is where you’ll take the color you’ve chosen for the eyes and your yarn needle and “embroider” on the three eyes. I simply made sure the top eye was in line with the marker you would have just placed, but around two inches closer to the front. The straight stitch worked best and all I really did was layer and stagger my stitches until the eyes looked right.
Sc2tog, sc in next 12, 6x (78) mark start of round
Sc 8 rounds (78)
Sc2tog, sc in next 11. 6x (72) mark start of round
Sc 8 rounds (72)
Sc2tog, sc in next 10. 6x (66)
Sc 1 round
Sc2tog, sc in next 9. 6x (60)
Sc 2 rounds (60)
Sc2tog, sc in next 8. 6x (54)
Sc 1 round (54)
Sc2tog, sc in next 7. 6x (48)
Sc 1 round (54)
Sc2tog, sc in next 6. 6x (42)
Sc 1 round (42)
Roughly here is where you should begin to stuff the worm and continue to stuff it through the final few rounds.
Sc2tog, sc in next 5. 6x (36)
Sc 1 round
Sc2tog, sc in next 4. 6x (30)
Sc2tog, sc in next 3. 6x (24)
Sc2tog 6 times. (12)
Sc2tog 6 times. (6)
Sc first and third stitches together to seal off
Bind off and weave in your end.
Tail Spikes (Make 2)
Chain 2
Sc 5 in second stitch (5)
Sc 5 rounds (5)
Sc 2 in first stitch, sc in next 4 (6)
Sc 2 rounds (6)
Sc 2 in first stitch, sc in next stitch, 3 times (9)
Sc 5 rounds (9)
Sc 2 in first stitch, sc in next 2 stitches, 3 times (12)
Sc 5 rounds (12)
Sc 2 in first stitch, sc in next 2 stitches, 4 times (16)
Sc 5 rounds (16)
Bind off with an end long enough that you can use it to sew the tail to the body, also stuff these pieces enough that they can be bent into shape and will hold that shape
Body Spines, 6 total
Note: The body spines are two medium and four smaller ones. The two medium ones take the following pattern all the way through. The four smaller ones follow the pattern until the marked round.
Chain 2
SC 4 in second stitch (4)
Sc 2 in first stitch, sc in next stitch, 2 times (6)
Sc 1 round (6)
Sc 2 in first stitch, sc in next stitch, 3 times (9)
Sc 1 round (9)
Sc 2 in first stitch, sc in next 2 stitches, 3 times (12)
Sc 1 round (12)
Sc 2 in first stitch, sc in next 3 stitches, 3 times (15)
Sc 1 round (15) *bind off here for small spines*
Sc 2 in first stitch, sc in next 4 stitches, 3 times (18)
Sc 1 round
Bind off with long tail for attaching and fill with enough fiberfill for them to hold their shape.
Assembly
Remember those three rounds you marked earlier on the body? Those are going to act as mid-point guides for attaching the spines. Each marker is roughly about how far apart along the length of the body the spines should be place. I recommend starting at the front end with the two larger body spines, their placement should be roughly in line with the bottom two eyes (the midpoint of each should align) and the marker should sit halfway between them (in line with the top eye). Once those are sewn on using the yarn hook, or your preferred method of attaching them, you can sew on the other four using a similar method and lining them up with the first two.
The tail pieces are a bit trickier since there’s really nothing to line them up with. I still don’t have a good method for this other than trial and error until it looks like you’ve got them in their proper location. They are more on the sides of the worm rather than the top, like the body spines.
25 notes
·
View notes
Photo
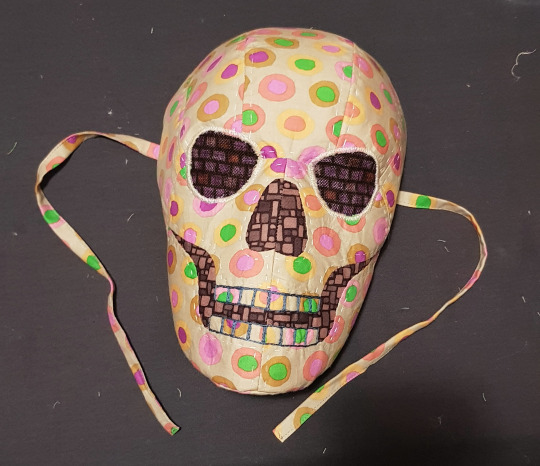
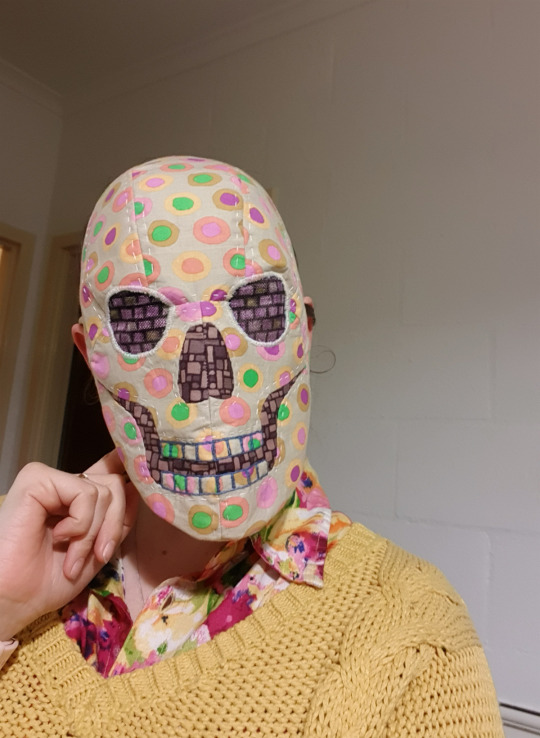
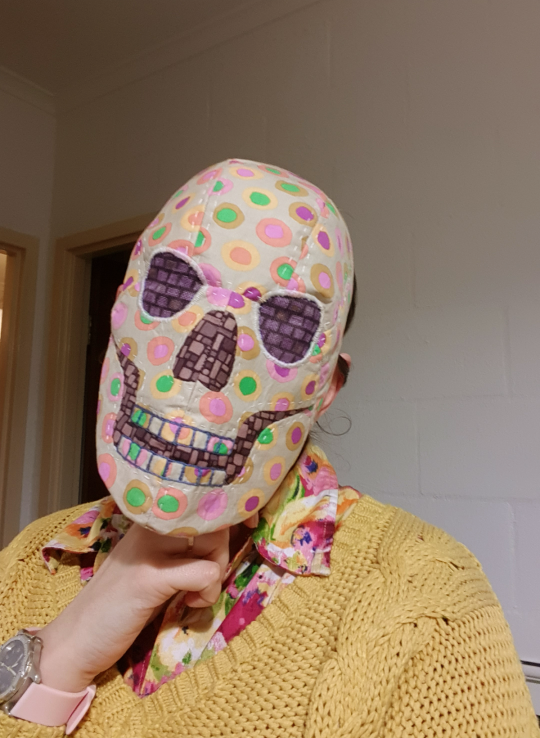
Hand sewn skull mask! Because if death is coming for us all we may as well be jaunty about it!
(feat. me trying to do normal person selfie poses while wearing a mask that looks like a skull got the pox)
This should theoretically work as a practical mask, since it has two layers of fabric plus interfacing, and does go under the chin, but as always, no promises. Be sensible, stay home if you can.
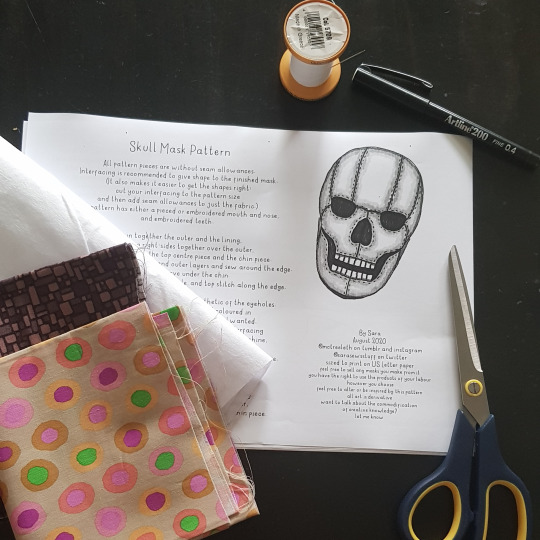
Pattern and instruction under the cut.
The pattern is available here as a six-page PDF for US letter sized paper, but it should also print fine on A4 paper, since it has fairly generous margins. There are limited instructions and layout diagrams included in it, so you really only need to print pages 3-6.
I highly recommend making a paper version of the lining to check on the sizing, as this mask tucks up under the chin more than the Plague Doctor Mask did.
For this version of the mask I used about a fat-eighth of fabric each for the outer and lining, and a bit less than that of heavy-weight non-woven fusible interfacing. The embroidery was done using four strands of regular sewing thread, and the assembly was about half hand-sewn and half machine-sewn.
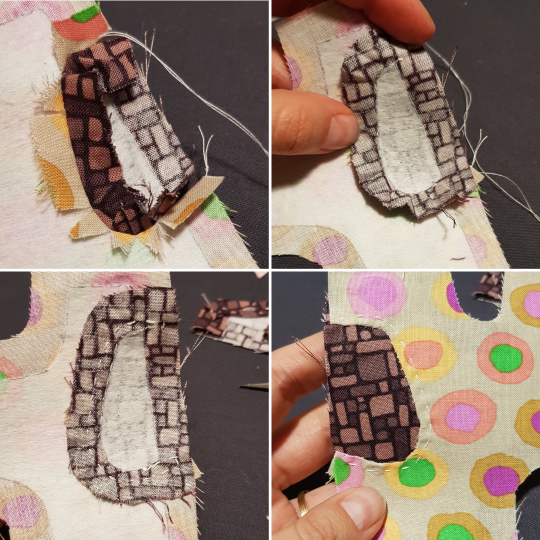
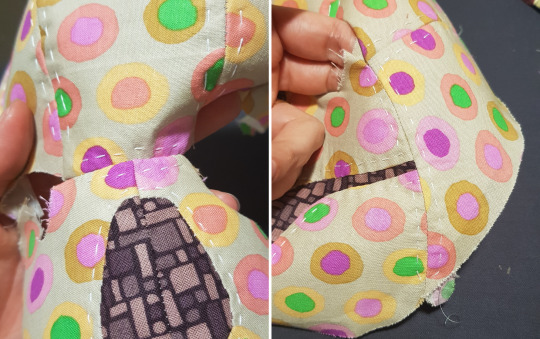
The contrast areas of the nose and the mouth can be either pieced or embroidered. If you choose to piece them, I strongly recommend piecing them by hand. I show a technique similar to English Paper Piecing here, that uses fusible interfacing to help hold the shapes while you hand sew..
First, trace and cut the interfacing pieces, going by the guide in the pattern as to whether you are piecing the face or embroidering. Fuse the interfacing to the outer fabrics with enough space between for seam allowances, and cut each piece with seam allowances.

If you are embroidering the nose and mouth, sew together the face and jaw parts using the techniques below, and fill in the shaded areas of the nose and mouth with whatever stitch you prefer.
If you are piecing the nose and mouth, fold the seam allowance of the curved side of the nose piece to the edge of the interfacing and loosely tack it down. Clip the inner curve of the face piece where the nose goes and loosely tack down the seam allowance of that piece. I use a piece of masking tape on the back to hold the nose piece in place, and then hand stitch the two pieces together using a slip stitch (also known as a ladder stitch) from the front.
(Note: the reason the pieces look completely differently sized in the top left photo is that I was holding the face piece up closer to the camera. It fits neatly together as per the top right photo.)

Carefully remove the masking tape, trying not to pull too many threads, and unpick the tack stitches. Unfold the seam allowance of the nose piece outward over the clipped seam of the face piece, and sew it down using a running or other decorative stitch. Repeat for the other side.
Clip, fold and tack the top edge of the jaw piece. Align the interfacing corner of the lower pointy part of the mouth piece to the place it fits in the jaw piece, and pin to fit. From the front, slip stitch the two pieces together, and stitch the seams down the same as for the nose. Do the same to join the mouth piece to the face piece. Repeat for the other side.

Sew the centre seam to join the two face pieces together, and embroider the teeth. For some reason I forgot to take photos of the embroidery at the top and bottom of the teeth, and the continuation of the running stitches above and below them. But they are all just aesthetic things that that you can see on the finished one.

I also forgot to take a photo of the top pieces being assembled, but they are pretty straightforward – join the five forehead pieces together according to the layout on the pattern, and do the same decorative top-stitching as for all the other bits.
Join the top forehead piece to the face at the top of the nose between the eyes and down each of the cheeks, and do the same decorative stitches.
Join the chin piece to the bottom of the jaw. The outside piecing is done!
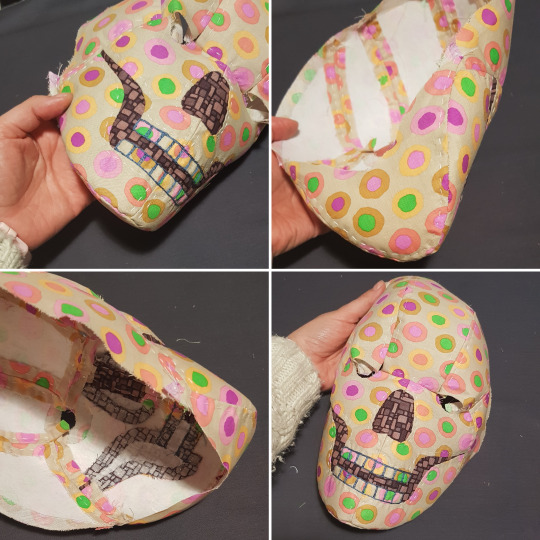
Trace the lining pieces onto the fabric, and sew them together according to the layout on the pattern, so that it matches the shape of the outside. I pressed the seams of the face open, but not the chin, because that would have been too hard.

Pin the straps to the sides of the outer, facing inward, and put the lining over the top of it so that the right sides are together. Stitch around the outside edges, and clip the curve on the underside of the chin. Turn the whole thing right side out through one of the eyeholes, flip the lining into the outer, and top-stitch over the edge.

Trim the eyeholes and baste the two layers together. If you are putting in effort, I would suggest cutting bias binding from your outer fabric and neatly hand sewing it around the eyehole edges. But I just basted it and used the machine to do a zigzag satin stitch around the edges in a thread that was a pretty close colour.
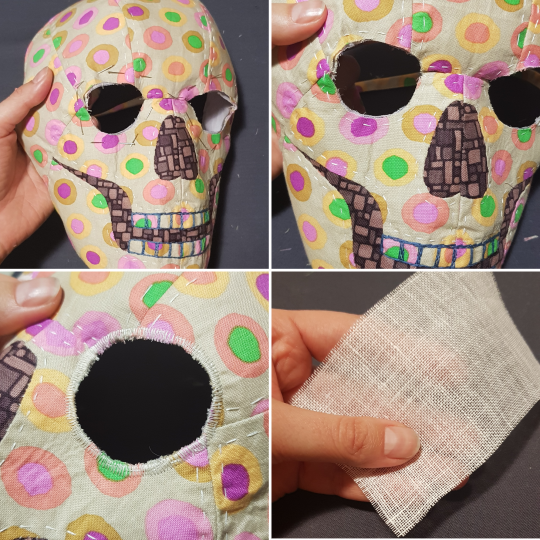
You can leave the eyeholes empty, but it is spookier when your eyes are hidden. I coloured in some very loose weave linen with fabric markers to match the fabric I used for the mouth and nose (roughly, I did pretty a bad job), cut it into circles and sealed the edges with some glue, and hand sewed them in, hiding the hand stitches in the zigzag stitch. The visibility is actually pretty good!

And there you go! Skull mask!

From left to right, Poxxie, Paisley (who is not actually paisley), Patchie, and their friend Fredrickson Paperman.
As before, I am not going to charge anything for this pattern, nor am I going to place restrictions on what you do with the items you make. I do not control your right to profit from your work. All art is derivative, and you making your own version transforms this pattern. Don’t let assertions of intellectual property rights be another way you are alienated from your labour. If you decide to sell your work, demand fair remuneration for your time and skills. Someone offering to pay for the materials is not enough. If you have decided to take an activity you love and turn it into work, make it worthwhile.
On the flip side, please don’t try to sell this bit of writing or the PDF of the pattern or these photographs. They are free for you and for everyone else. Resist society’s message that you should try to profit from your every action, and especially resist the notion that true success is achieved by profiting from anyone else’s labour.
If you want to discuss this stuff further, I would love that! I am researching the commodification of creative knowledge for my PhD, focusing on quilt patterns and designs. Message me @mctreeleth on tumblr and instagram or @sarasewsstuff on twitter for my uni email.
And if you do make one, tag me in it or send me a picture! I love seeing them!
#fabric mask#skull mask#sewn mask#handmade mask#sewing pattern#sewing#quarantine craft#once again I am posting a pattern at a ridiculous hour of the morning#but this time i am in bed with my dogs at least#oop no Cedric just got up bye bud#oh well George is still snuggled up with me#George and Ceddie are the bestest and most cutestest boys#honestly I am just putting that there because I found out that some people reuse all the tags from the source#and I love it when people compliment my dogs#oop Ced's back hi bud!
294 notes
·
View notes
Text
Wow. It’s been a while.
Things got really busy with doctor’s appointments and general exhaustion. I am better now! I had a lumpectomy on November 14th and radiation therapy for the entire month of January – my last day of radiation was also W. A. Mozart’s birthday, so there was a lot to celebrate. It wasn’t until about two weeks or so ago that I realized exactly how tired I had been because all of a sudden I wasn’t that tired. I still am tired, and my joints are creaky, but that’s the tamoxifen. But hey, as far as I know I do not have cancer, and that’s a win.
I’ve tried to keep up with practicing and making things, but tendonitis struck again. I’ve had it since about this past September in my left elbow, and I did not do what I was supposed to do (rest, heat, NSAIDs), but kept practicing both cello and gamba. The result was that I stopped cello the end of October until mid January, and I stopped gamba in the first half of December until the very end of January. I couldn’t button my sweater or braid my hair anymore, and I still can’t believe I let it get that bad. It’s sooo much better now, but it’s still there, so I’m being careful and doing what I need to do to make it better.
This also meant that all that hand work I was doing wasn’t possible anymore. Spinning for any huge length of time made it worse. Knitting has been right out for months and months. Combing wool was only possible in about 3 minute chunks. And then my friend Lee started a make-a-thing-daily project and invited everyone to join in. Her process of choice this time was embroidery.
Well!
I have been itching to embroider for some time, and Lee’s rules seemed simple enough: gather all your materials ahead of time, set the bar so low you can roll over it (quick and dirty, Kate, quick. and. dirty.), and do not fret about what you are making. Quantity over quality. Okay, okay, so I naturally fret over quality. Always. But I also recognize this is a thing that I need to maybe let go of now and then. So. A daily thing for February. The Short Month! Yes, I thought, I can do this.
I found all my embroidery floss and hoops and needles. And I began.

Week 1. These are Very Small, which keeps to the quick-and-dirty principle.
I had no patterns – so I just doodled. And doodled. Some I like, some not so much. But I did start to look at embroidery online and got to thinking about flowers.
Week 2, plus one. Moar doodles!
I re-learned how to do French knots, I learned the bullion stitch, and I learned that some of the yarns I spin are perfectly suitable for embroidering with. The purple flower (there’s a bit of charcoal on that one from the frame – the frames were laser cut, and so had carbon on the edges) is a silk/merino blend I spun up, as well as the purple in the octagonal frame. The grey sheep/mouse (it was supposed to be a sheep, but didn’t quite work) is a bit of Gotland I’d spun.
Week 3, plus a bit? Feeesh, flowers, and…more flowers?
I am really enamored of French knots. And embroidered flowers. And in rayon floss! I really wanted silk yarn (because who wouldn’t?), but all I could get quickly and on the cheap was rayon, so I settled (for now). The tree I’m especially happy with – that one is all in cotton floss, but from three colors I kept pulling out and staring hard at. I’d been looking at pictures online of tiny, gorgeous embroidered flowering trees made from satin stitches and French knots. Eventually, I knew I’d get to it. And I did. And I’m happy with it. And I think this particular tree with this particular color scheme will inspire Something Else (stay tuned?). The dandelion was a doodle to see if I could do it. I have a skein of variegated yellow cotton and I thought, “O, that reminds me of dandelions.”
I’m telling you, I have so much appreciation for those professional embroiderers who can create depth with needle and thread just through the use of color and stitch direction.
Late in the game, I ran out of white linen, so reached for a scrap of blue. But you know, it just wasn’t working. I love this shade, but I just wasn’t happy with how the colors of the floss were working with it.
Well. In any case, you’ll notice that there are fewer than 29 embroideries. I framed the last batch (Week 3 and a bit) yesterday, and while trying to start another wee embroidery to catch up on the last day of the month, I realized that the tendonitis really did not like it. I practiced a ridiculous amount of cello yesterday (yay, Vivaldi [except I can’t play it yet]), but the thing that made the tendonitis really painful was holding the embroidery hoop. Argh. The embroidery can wait. There will be other months, and an almost endless supply of floss and handspun yarn.
This is not to say that I did not make nothing prior to February. Spinning did aggravate the tendonitis, but as long as I did it in small chunks and took care, I spun. The spinning also helped with the mental stuff going on – a repetitive task that I don’t have to think overly much about and at the end, I get soft, squishy yarn. That I can squish.
I’ll try to go in order.
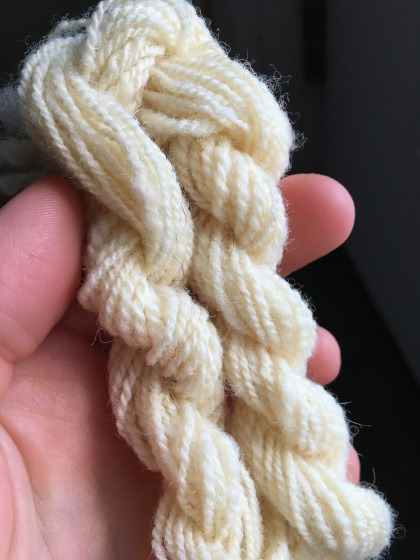
This was a bit of dyed Leicester Longwool and I got from a destash pile at one of the spinning guild meetings that I spun up in late December. I’m pretty happy with it. It was very easy and very mindless to spin, and there was a lot of it. I believe this is 8 ounces – each skein is 4 ounces. The only thing about this project was that the dye still hasn’t finished washing out, and I washed that skein about four times. I had used some cotton weaving yarn as ties on the skeins, and those picked up some of the dye, which leads me to believe the dyer used fiber reactive dyes rather than an acid dye. Which is aggravating. It would explain the lack of luster one would expect in this breed of wool. So, I’ll have to be careful when washing whatever project I use this for. (I’ll likely get a dye magnet or another fresher bottle of Synthropol to remove the rest of the excess dye.)
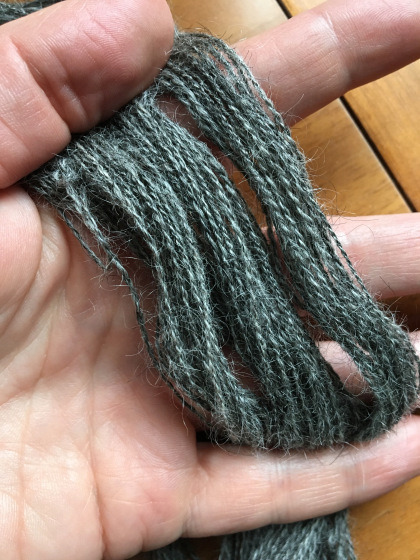
At some point, I realized I needed to start making progress on the Shetland fleeces. Because I have way too many fleeces and need to get through them! Especially if I want to buy more fleeces to make into more fabulous yarn to weave fabulous cloth. I’d been spinning samples for a bit (pretty sure this was January), and this one was one I was reasonably happy with. It’s got a bit more twist than I think the Shetland really wants, but I would absolutely weave with it. And let me tell you, Shetland is a joy to spin. It almost spins itself, it’s so very soft, and it’s so very lustrous. Can you see the shine?!

FLUFFFFFFY SHETLAND!
I tried another sample of the Shetland, this time with slightly less twist, and look at the difference! It’s much puffier than the stuff in the previous photo, and it’s so, so squishy. I loves it, I do. I want so much to weave with this, but I’ve had two people (experts in weaving and spinning, actually) tell me that this yarn is Really Suitable for Knitting. Sigh. I mean, it’s a sample. I can’t quite knit yet (tendonitis), but I might be able to weave it into a sample. Maybe. A tiny one.
Honestly, I love that yarn. I have never loved yarn I’ve spun so much as I love this one.
At some point in January, I decided to try out R.H. Lindsay Wool Merchants. I follow them on social media, and some of their pictures of wool are just so delicious. They sell wholesale, but they’ll also sell by the pound to whoever wants it. And I did. They’d posted a picture of super bouncy Dorset/Polypay roving from New England sheep. For $8.50/lb. I ordered two pounds. (The shipping was nearly that much, so I did briefly consider getting three pounds – I have no where to put it!) It came lickity-split and I pulled some of that off to spin:
Super springy! Super bouncy!
Yep. That’s pretty springy and bouncy! I gotta say, I really like this. You can’t beat the price, even with the shipping, and the roving is not carbonized. There were bits of VM in there, which I very happily picked out.
And then!
Look at that luster! Look at the color! Ooooh! Aaaaah!
I’m putting in a full size photo of the Gotland. I mean, how could I not?
This was my first attempt at spinning it. It’s not easy to spin. This is from commercially prepared roving that had sat in storage for some time, so was compressed some. There’s no crimp, there’s no wave. It’s a bit like spinning mohair, except it’s a bit less slippery. Getting the right amount of twist was a challenge, but I am pretty happy with this. It’s a two ply and if I can, I’ll weave a tiny sample out of this and full it to see what happens. But, on the other hand, I have more roving, and really what I should do is spin up the rest of it, and weave that into a sample, but cut the sample into three pieces, and go to town with experimental fulling. “Why all the trouble?” I hear you ask. The answer is that I want so much to sew myself a grey wool coat, and, believe it or not, I cannot find the right grey wool. It’s either not the right color, not the right weight, or some combination of wool and synthetic fibers. Or some combination of those three. And it pisses me off. So, I’ll just weave my own cloth, and spin the yarn if I have to. Dammit.
I know this is a huge project. I’d like to get it done in the next three years (before I’m 50).
Here’s another snap of that yarn:

I guess all that practicing spinning really paid off. I seem to be improving!
And then!
My friend Rachel (over at Spotted Sheep Studio) found some Gammelnorsk fleeces. I bet you had no idea there was a breed called Gammelnorsk, did you? Well. There is. And it’s rare. And she found a person in Norway who raises this breed, and got to buy a bag of fleeces from her. And Rachel and I stool around in the Webs parking lot after a spinning meeting opening the bag and smelling the delightful fumes of Norwegian barnyard and lanolin. And, of course, fondling the Gammelnorsk fleeces. The colors are amazing.
This breed is a dual coated breed, which means it has hair and a downy undercoat (tog and thel, respectively). I do not know much more than this, but Rachel is a fount of knowledge and will impart all her wisdom if I ask – also I’m going to be helping to prepare these fleeces for spinning, and then spinning. So I’ll have to know.
And the very last picture I have to show you is a bit of yarn I spun up yesterday. I have been learning about spinning and preparing the fibers via some Interweave videos. And so I tried coming the alpaca batts I have, because who doesn’t want alpaca top? Well. The batts are made from garbage alpaca. Or they were carded into oblivion, I’m not sure. In any case, the batts are only suitable for felting. The fibers are way too short for even spinning yarn. I even tried to card it and spin it. So aggravating. So, then I decided to turn my attention to a red Spelsau batt that Rachel’s husband brought back from a recent trip to Norway for me (and Rachel too, you should have seen her haul!). I tried combing a bit, and I got some top off it, but I think this batt is really suitable for carding. However, the color is AMAZING. Behold:
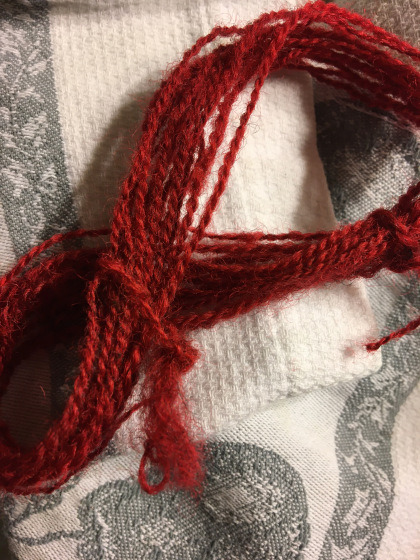
And lo! The Perfect Red!
And you know what? No dye came out of this when I washed it. None. Not even a little.
I love this red so much I want to roll around in it.
Really, what makes it so gorgeous is that it’s a tan or brown fleece that has been dyed red. The brown deepens the color and brings it over to the orangey side rather than the blue side. I’m thinking about experimenting with dyeing some of that brown Shetland – I have a white fleece too, but man, this red…
I’m still here. Wow. It's been a while. Things got really busy with doctor's appointments and general exhaustion. I am better now!
7 notes
·
View notes
Text
Exactly how to Iron on Patches to Clothing and also Backpacks!.
Custom Embroidered Name Patch
Despite whether you have actually selected to outline a patch for your group's attire or only a name for your line of outfit, you're going to either require to determine exactly how to Iron on Patches or stitch them on.
This stays continuous for both weaved patches, the kind with elevated surfaces, or woven patches which are level as well as have a more complicated type of plan.
Regardless of what sort of patch or name you pick, you have the option of an Iron on Patches, which is slim concrete that merges the item of attire with the help of a suitable old family unit iron. You recognize exactly how to iron garments, you can figure out exactly how to Iron on Patches
Here's the most suitable method to put Iron on Patches on your garments, regardless of whether it's a thing of gown like a jean layer or one more article of texture like a knapsack.
One of the most efficient technique to Iron on Patches.
Iron on Patches is a quick and basic technique to add your brand-new mark or spot. However, you should never use Iron on Patches for anything constructed out of cowhide or nylon; it'll destroy your thing, and also it's furthermore remarkably harmful.
Thankfully you can stitch on Iron on Patches at whatever point you require, so if your patch gets old one way or another, or diminishes from a considerable procedure of dynamic utilize, you can simply in advance and also sew it on anyway. It really helps hold the embroidery with each other!
1. Preparation the Clothes.
Prior to you break out the iron or the spot, you'll need to assess the vestment or whatever it is the patch takes place.
You ought to guarantee its spotless as well as free of wrinkles. Utilize that iron on the off possibility that you require to! You require an extensively smooth, completely dry, as well as tidy surface area.
Examine the tag of the item of garments to ensure it can even be ironed. Take into consideration where you require to place the patch before you turn anything on.
A sign or seal should go on the front pocket or high up on among the sleeves by the shoulder. You as of now have different spots, effort as well as discover an area where this one will emerge.
2. Establish the Temperature.
Locate the proper setting on your iron for your sort of garments. You need to make the iron as warm as practical for that sort of structure.
in instance you doubt, cozy it to somewhere in the variety of 138 and also 152 degrees Celsius (which is 280-305 levels F). Inspire somebody to motivate you in situation you do not know about this part.
3. Iron the Area.
Because you have actually uncovered the suitable area for your new spot, iron that place with a low, round motion for 10 to 15 seconds. This will certainly make it possible for warm to up the area, making it substantially extra conducive to softening the spot onto the appearance.
Location the patch over the warmed up area as well as cover it with a little thin bit of structure. A hand towel is fantastic, just like a cells or a pillowcase, which you can slide more than one end of your Iron on Patches board.
Guarantee you're making use of a level completely dry surface area with a great deal of room!
4. Iron the Patch.
Currently iron it established, taking factor to consider not to relocate the patch by any type of stretch of the imagination. Use a moderate, round motion simply as you did previously. Take as much time as required and don't get distressed.
Do this for around 10 to 15 seconds for a woven spot, and around 30 seconds for a weaved patch or applique. Then get rid of the Iron on Patches.
5. Inspect the Patch.
Remove the cover as well as fastidiously investigate the patch on the appearance-- watch, it's hot! The spot ought to stick to the structure the range with no closures turning up.
If not, put the little textile back to finish every little thing and rework the treatment for concerning an added 30 secs. Don't make use of a round activity this time around.
6. Iron the Opposite.
At the factor when the spot gets on securely, transform the clothing over meticulously.
Area the structure on the back of the dress where the spot is as well as rework the procedure.
By doing this, you're liquefying the paste from behind as well as ensuring that it sticks entirely the range into the clothing. Around 15 seconds should certainly do below.
7. Provide It A chance to cool.
One more time, leave the structure and examine your piece of outfit.
On the off possibility that the spot produces a perception of being securely on, and it should, let it cool for around one minute before doing whatever else. Remember, it's extremely hot!
On the off possibility that for factors unknown the patch isn't remaining the range on, you may require to investigate sewing it on, yet you shouldn't have that issue.
You recognize someone who has a company cozy maker you can just make use of among those. Ensure an expert does it! They should just require to hold it in that press regarding half as long.
8. Check it out!
At the factor when your item of garments or backpack go back to space temperature, just ahead and also attempt it on as you would in your regular daily existence. Regard exactly how well the patch holds up when you join a little physical movement.
That this is a video games uniform, which will certainly see a considerable measure of activity, you may need to sew it in around the edges. Make sure to make use of a string that is indistinguishable shielding from the spot in the event that you do.
In the event that it's an item of clothing that obtains a ton of usage and also must be cleaned regularly, keep an eye out for indicators of the spot coming free and also stitch it where basic. Generally, this isn't an issue with well-crafted Iron on Patches, however every item of attire is distinct as well as has an alternate make use of, so it's ideal to keep an eye out for it.
1 note
·
View note
Text

A Silmarillion fanfic, chapter 1 of 2
Sequel to Eagerness and Unrest (Tumblr link, AO3 link)
Summary: The Noldor settle in Mithrim, Alasselië the seamstress among them. After many years they welcome back their king, though he is much changed, and more changes follow once he recovers.
This fic revolves around the experiences of both Alasselië and Maedhros as they come to grips with the changes in their lives, but there is no romance between them.
Genre: General; Rating: Teenage audiences and up; Warning for mentions of torture and trauma; Word count: ~2,400
Some keywords: the Noldor, First Age, family, some angst, trauma, aftermath of torture, canon compliant (because the OCs live between the cracks of canon)
A/N: I've decided to post more of Alasselië's story even though it is not as well written, in my opinion, as my more recent fics – I wrote most of this two years ago.
This will make more sense if you read Eagerness and Unrest first (links above). The names in this are unfortunately confusing anyway. The narrative switches from Quenya names to Sindarin names as the characters change their names.
(AO3 link)
*
Chapter I // 'Then the brothers of Maedhros – fortified a great camp in Hithlum'
After the initial battles are over and the people who followed Fëanáro and now follow his sons have made up camp by the shore of Lake Mithrim, Alasselië settles into living in this new land and gradually finds her own place in it. It turns out that her place is helping her father as he creates organisation from among chaos, and it is also spinning, weaving and needlework as always, though these are in Hithlum different than they were in Aman.
She becomes her father's assistant almost by accident, as Quildalacon is becoming overwhelmed by all that needs to be done. It is no little task to establish a new household in a new settlement that is in the beginning only a sea of tents, with their people in disorder, grieved and worried by the capture of their new leader, Nelyafinwë, so soon after the death of Fëanáro.
So there is plenty of work for her alongside her father, and she takes on responsibility for organising and overseeing many of the tasks that fall to female servants. And together with others she works to figure out how to keep them all warm in the cold climate as their supplies dwindle. As soon as they get new supplies of wool from the grey elves who inhabited this land before the Noldor, there is more spinning and weaving to do than there are skilled pairs of hands.
What needlework there is is very different from what Alasselië is accustomed to. In Aman, she designed and created ceremonial robes and extravagant dresses for festivals. Her greatest talents lay in making those elegant garments of luxurious materials and embroidering them with vivid, complicated patterns. But taught by her mother practically since she was an infant, she is competent in all manner of work involving thread of any kind, and here in the great camp in the cold, rainy north there is more need for other craft than fine clothes. So now she sews hardy, practical garments and mends them when they rip and become tattered. They waste nothing in that early time of sparse resources.
As time goes by their situation stabilises in all ways, many tents becoming simple buildings, and austerity gradually gives way to a pale shadow of their former splendour. Alasselië is delighted to get opportunities for fine work again. Her heart has missed making beautiful things, and she puts all her skill and passion into the new fine clothes that are commissioned from her by Canafinwë and his brothers who want to make sure that they still look like princes though they are exiles in a cold land surrounded by mists and mountains of shadow.
Otherwise she avoids the sons of Fëanáro as much as she can, for they are of course the worst affected by their brother's terrible fate, and their fiery spirits are apt to burst into flames at any moment. Canafinwë tries to keep his brothers in check, but several of them challenge his decisions and chafe against his leadership constantly. Their disagreement about what should be done about Nelyafinwë is the main cause of contention.
Just as Canafinwë attempts to stop his brothers from doing anything rash and stupid, Alasselië and her father work to keep Hendunáron from going to pieces.
Like some of Fëanáro's sons, Alasselië's brother who was a close friend to Nelyafinwë thinks that something should be done to save him – that this impunity of their foe cannot be allowed to stand, that Nelyafinwë should not be left to agony; that even if there is nothing else to be done, their king's body should be recovered. But Hendunáron does not rebel against Canafinwë, the leader whom Nelyafinwë appointed before going to parley with Moringotto.
As years go by, all at the Fëanorian camp indeed think that Nelyafinwë must be dead by now. After all, the alternative is too terrible to think of.
*
During this time of waiting Alasselië together with the other Noldor learns Sindarin, the language of the grey-elves. Like others she and her brother choose new Sindarin names for themselves. Hendunáron translates his name as Baralindir which has very much the same meaning, a man who has fire in his eyes. Their father Quildalacon takes a longer time getting accustomed to the fact that Sindarin is their principal language now, but eventually he chooses Dinalagos as his new name.
Alasselië's own name which means 'thread of joy' seems like mockery on some days, yet it is the name her mother gave her, and she would keep it if she had no other reason than that.
So she names herself Merelaineth in Sindarin, 'joyous spinner'. It is the closest equivalent that she can construct with her still very imperfect Sindarin that also sounds pleasant to her ear. And she is now called Meren for short as she was Alassë before, and that feels like a comfort.
*
Years after everyone on the southern shore of the lake has given up hope of ever seeing their king again, alive or dead, one day Findekáno – Fingon, now – stumbles to the Fëanorian camp, exhausted and dirty, carrying Nelyafinwë.
Those who see them first think that Nelyafinwë is dead, for the maimed, blood-stained and emaciated figure in Fingon's arms looks more like a corpse than a living, breathing person. But as Fingon makes his way through the camp, amidst the throng of people who silently gather to watch and make way in amazement and respect, the ravaged figure in his arms rouses and moans in pain.
The crowd exclaims as their grief turns into pity and horror. Fingon just readjusts Nelyafinwë's position in his arms, mutters something to him, and keeps going. Many men come forward and offer to take his burden from him, or help him, at least, for Fingon himself looks like one who has been through torment. But he shakes his head and carries on tenaciously, even when three of Nelyafinwë's brothers run in, having been alerted that their cousin has brought their brother back.
Merelaineth is at work inside the building where Fëanor's sons keep their headquarters, and she doesn't know of Nelyafinwë's return until she sees him carried in and rushed through the great hall to a bedroom, his brothers yelling for a healer. One is quickly found, and Meren and others go to look for more.
For it is clear that the skills of every healer at the Fëanorian camp will be needed if Nelyafinwë is to be brought back to some semblance of health. All who saw him are horrified at the state of him, all the vicious scars and the bone-thin figure and the bleeding stump where his right hand used to be. They know, though, that they cannot even begin to imagine what he must have gone through during the many, many years he was Morgoth's prisoner.
It is a miracle that he is alive at all, and some whisper that must a be a mercy from the Valar, a sign that they have not turned their back on the Noldor after all. All wish to help him, to do whatever little they can to help their king recover. Dinalagos and Meren do their part by holding counsel with the cooks, organising first weak and then nutritious broths to be sent to Nelyafinwë as often as he can get it down, and later, when he is a little better, making sure that whatever is served to him is already cut up to bite-sized pieces that can be eaten with one hand only.
Baralindir is overjoyed that Nelyafinwë is alive, though he has not seen him yet as for months only healers and his brothers are admitted to his room; but Merelaineth one day overhears Curufin speaking to Celegorm as she is stacking linen in a cupboard and the two sons of Fëanor walk past it without noticing her.
'It would have been better if he had died there', says Curufin, and Celegorm makes a noise of assent. Meren's heart aches for her king.
It takes many, many weeks before Nelyafinwë's brothers stop being grave when they go to see him and graver when they come back, and months pass before he leaves his room and comes among his people. When he does, he is very quiet, and greatly changed in appearance. His right arm is in a sling, his blazing hair is shorn short and there are half-healed scars as well as old ones on all parts of him that are visible. Meren thinks that there must be countless more under his clothes.
*
Soon after Nelyafinwë has recovered enough to start taking on his duties and reassuming leadership, Maglor comes to Meren and asks her to make Nelyafinwë some new clothes: 'For he has nothing at the moment that fits.'
She says that she will be happy to sew the clothes, and enquires cautiously after measurements. it would be easier to make clothes for Nelyafinwë for the first time in a long time, if she had his current measurements.
As she half expected, Maglor says, awkwardly though he is usually silver-tongued and smooth, that measurements aren't available.
Meren nods quickly, understanding that Nelyafinwë would not want the disturbance , and says that it's quite all right, she's made clothes without measurements before and the results should be acceptable. She promises to get started right away and have the first garments ready soon.
Maglor thanks her more courteously than he needs to – this is her job, after all.
That night when Nelyafinwë makes his daily appearance among the people of his household after dinner, Alasselië studies him with her trained seamstress' eye, taking care to not dwell on his injuries and concentrating instead on his size and proportions. Still thin and unwell-looking, he is nevertheless an impressive figure, and standing straighter every day.
She starts by making (with some assistance so that the garments are finished soon) one complete, simple outfit: an undershirt, a tunic and breeches and a robe that can be worn over them.
Of her own initiative, she also makes a cloak that is wider than usual. She has noticed Nelyafinwë covering his maimed side with his cloak when he can. As an especially wide cloak for a very tall man, it is the largest cloak she has ever made.
When she finishes the first set of clothes one afternoon she decides to take them to Nelyafinwë's room himself, as he usually is out at this time of the day and doesn't keep so tightly to isolation any more anyway. Balancing the pile of garments on one arm, she knocks on the door of his room and announces herself and her business, and is surprised when Nelyafinwë's voice bids her to let herself in.
As she steps in he gets up from the desk where he has apparently been writing. His left hand – only hand – is covered in ink spots, proof that he is still clumsy at writing with it. He looks at her like he's still wondering what she's doing there, though not impolitely.
'I am sorry to disturb you, my lord, I expected you would be out. I have brought the new clothes that were requested.' She looks around and then goes to lay them out on a big chest beside the bed. Nelyafinwë comes to look at the clothes and touches briefly the big fur-lined cloak, neatly folded.
'Did my brother ask for this too? He didn't mention.'
'No, my lord. It was my addition. Days are cold here.' She decides not to mention the extra width. He will make use of it if he wishes.
'Yes, they are, aren't they? Colder even than in Formenos. You were there, weren't you?' He is looking at her, frowning . 'I'm sorry, I cannot recall your name. You're Hendunáron's sister, and your father is now my seneschal, but your name escapes me at the moment. Many things do', and he smiles a little crooked smile that brings the scars on his face into stark relief. It seems that marks left by Morgoth's torment do not heal well even on an elf born in the Blessed Realm.
'I was Alasselië in Aman, and now I am called Merelaineth.'
'Ah, of course', he says, running his hand through his hair that is now just long enough for it. 'It is no matter that I can't remember names, since everyone took on a new one while I... was gone. I will have to think of one for myself too, and work on learning the language.'
'It is fortunately not very difficult', Meren offers. 'Or so most of us have found.'
'That is good to hear.' He turns to look at the clothes on the chest. 'Thank you for the clothes, Merelaineth, and for the cloak especially. It seems you have the same gift for noticing what needs to be done as your father does.'
'Thank you, my lord. I have been working together with him here in Mithrim, in addition to the needlework.'
'And very important work it is, part of keeping order here. Order right now is essential', he says, the good leader that he is proving to be now that he is recovering and reassuming his responsibilities. Meren knows that ever since he rose from his sickbed, he has been doing his part in keeping order both by leading his own people and by pursuing reconciliation with Fingolfin's.
Meren thanks him for his kind words and briefly debates with herself whether she should offer to wait while he tries the clothes on for size, as those she sews for usually do – but can he even dress himself? Should she offer to do it for him? It wouldn't be the first time she has dressed a man, as a professional seamstress, but she is fairly certain that he doesn't want to be dressed by someone who is a virtual stranger and a woman besides. Maglor, sensitive to the emotions and moods of others, hadn't wanted her to even take Nelyafinwë's measurements.
So Meren just tells him to send the clothes back to her if they are the wrong size, and she will make alterations. She also promises to make more for him as soon as she can, and she curtsies, and she goes.
*
A/N: The next chapter will be posted soon. It will feature narrative from Maedhros' POV.
#silmarillion fanfiction#tolkien fanfiction#maedhros#alasselië aka merelaineth#noldor#my fics#on the grey fields of mithrim#elesianne's fics
7 notes
·
View notes
Text
Megaman Crochet Doll
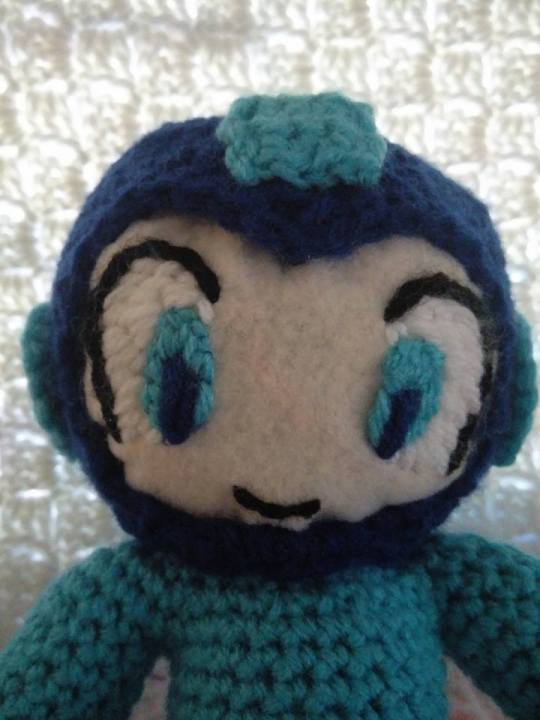


I made this last year as an anniversary gift for my husband after one year of marriage! It’s... my first attempt at doing my own doll/amigurumi pattern, so it’s not perfekt and it’s written kind of badly because I wasn’t sure exactly how to keep track of all my rows... but... Here we go!
You will need two colours of blue yarn, light and dark.
You can crochet the head in a skin-tone or, as I did, use felt and embroider the face onto that.
You will also need tiny pieces of red and yellow felt for the effects on the feet and buster arm.
Whenever doing sc2tog, I've used the invisible decrease. Which is putting your hook through the front loop of the next stitch, then without yarning over putting your hook through the front loop of the next stitch. Yarn over and pull through two loops, yarn over and pull through last two loops to finish the sc2tog.
-----
Using dark blue
Left Arm --Make 1
6sc in magic circle
6sc
6sc
2sc in each sc ( 12 sc )
2sc, 2sc in next stitch. rep around ( 16 sc )
16sc
16sc
16sc
16sc
16sc
2sc, sc2tog ( 12sc )
change to light blue
12sc
12sc
12sc
12sc [ stuff with stuffing! ]
-----
Right Arm --Make 1
6sc in magic circle
2sc in each sc ( 12 stitches )
12sc
12sc
12sc
12sc
12sc
12sc
12sc
12sc
change colour
12sc
12sc
12sc
12sc
12sc
12sc [ stuff with stuffing! ]
-----
Legs --Make 2
6sc in magic circle
2sc in each sc ( 12 stitches )
1sc in next sc, 2sc in next stitch. rep around ( 18 stitches )
18sc
18sc
18sc
18sc
18sc
18sc
1sc, 1sc, *sc2tog, 1sc, 1sc. rep from* ( 14 stitches )
change colour
14sc
14sc
14sc
14sc
14sc [ stuff with stuffing! ]
-----
Attach dark blue to side of one leg with slst. ch1 and sc in same stitch. sc in next 6 stitches, ch3, attach to other leg with sc. sc all the way around... hdc in each ch3 chain. sc in last 7 sc in first leg. ( 34 stitches )
34sc
8sc, sc2tog, 13sc, 2sc in next sc, 3sc, 2sc in next sc, 6sc ( 35 stitches )
7sc, sc2tog, 7sc, sc2tog, 15sc, sc2tog ( 32 stitches )
15sc, sc2tog, 13sc, sc2tog ( 30 stitches )
30sc
change colours
21sc, sc2tog twice, 5sc ( 28 stitches )
28sc
28sc
14sc, sc2tog, 3sc, sc2tog twice, 3sc, sc2tog ( 24 stitches )
4sc, sc2tog, 2sc, sc2tog, 14sc ( 22 stitches )
22sc
22sc
2sc ( to kind of restart where your row starts )
[ admittedly, I sort of gave up on the actual rows here... ]
2sc in next stitch, 10sc, 2sc in next stitch, 10sc (24 stitches )
1sc, 2sc in next stitch, 11sc, 2sc in next stitch, 10sc ( 26 stitches )
2sc, sc to left arm, 5sc across arm, sc2tog, 4sc across arm, sc back to body, 12sc, sc to right arm, 5sc across arm, sc2tog, 4sc across arm, sc back to body, 12sc
sc2tog ( will be one body and one arm stitch ), 3sc, sc2tog, 3sc, sc2tog, 11sc, sc2tog ( will be one body and one arm stitch ), 3sc, sc2tog, 3sc, sc2tog, 5scm 9yy, sc2tog, 4sc
sc2tog, 2sc, ( insert hook in next loop, yo and pull up a loop ) 3 times, yo and pull through all four loops. 2sc, sc2tog, 2sc, sc2tog, 1sc, sc2tog, 2sc, sc2tog, 2sc, ( insert hook in next loop, yo and pull up a loop ) 3 times, yo and pull through all four loops. 2sc, sc2tog, 4sc, sc2tog, 3sc
sc2tog 3 times, 2sc, sc2tog, 1sc, sc2tog, 2sc, sc2tog 3 times, 2sc, sc2tog, 1sc, sc2tog
1sc, ( insert hook in next loop, yo and pull up a loop ) 3 times, 1sc, sc2tog, 1sc, sc2tog, 1sc, ( insert hook in next loop, yo and pull up a loop ) 3 times, 1sc, sc2tog, 1sc, sc2tog [ stuff with stuffing! ]
change colours to your peachy skin tone or continue with whatever colour if using felt for the face
at this point you should have 11 stitches
2dc in next stitch ( 12 stitches )
2dc in each stitch around ( so you'll have 24 stitches )
1dc, 2sc in next stitch. rep around ( 36 stitches )
1dc, 1dc, 2sc in next stitch. rep around ( 48 stiches )
48sc
48sc
48sc
48sc
48sc
1dc, 1dc, 1dc, 2sc in next stitch. rep around ( 60 stiches )
60sc
60sc
60sc
1dc, 1dc, 1dc, sc2tog. rep around ( 48 stiches )
48sc
48sc
1dc, 1dc, sc2tog. rep around ( 36 stiches )
1dc, sc2tog. rep around ( 24 stitches )
sc2tog. rep around ( 12 stitches ) [ stuff with stuffing! ]
sc2tog. rep around ( 6 stitches )
fasten off, leaving a long stitch. with a needle or your hook, loop the tail around each of the sc stitches and pull very tight, closing the hole at the top
Helmet
8sc in magic circle
2sc in each sc ( 16 stitches )
1sc, 2sc in next stitch. rep around ( 24 stitches )
1sc, 1sc, 2sc in next stitch. rep around ( 32 stitches )
1sc, 1sc, 1sc, 2sc in next stitch. rep around ( 40 stitches )
1sc, 1sc, 1sc, 1sc, 2sc in next stitch. rep around ( 48 stitches )
1sc, 1sc, 1sc, 1sc, 1sc, 2sc in next stitch. rep around ( 56 stitches )
48sc
48sc
1sc, 1sc, 1sc, 1sc, 1sc, sc2tog. rep around ( 48 stitches )
5sc, 3hdc, 2dc, 1tdc, ch3, slst in third chain from hook, 1tdc in same stitch as first tdc, 2dc, 3hdc, 8sc, sc2tog, 2sc, sc2tog, 2sc, sc2tog, 1sc, sc2tog, 2sc, sc2tog, 2sc, sc2tog, 3sc ( 44 stitches )
11sc, slst into 2nd ch in chain, ch2, sc in next tdc, 12sc, sc2tog, 3sc, sc2tog, 3sc, sc2tog, 3sc, sc2tog, 10sc
turn, ch1, insert hook in first sc, yo and pull through, insert hook in next sc, yo and pull through, yo and pull through all loops on hook, 27sc, insert hook in next sc, yo and pull through, insert hook in next sc, yo and pull through, yo and pull through all loops on hook
turn, ch1, insert hook in first sc, yo and pull through, insert hook in next sc, yo and pull through, yo and pull through all loops on hook, 25sc, insert hook in next sc, yo and pull through, insert hook in next sc, yo and pull through, yo and pull through all loops on hook
turn, ch1, 10sc, sc2tog, 2sc, sc2tog, 10sc
turn, ch1, 2sc in first sc, 2sc in next sc, sc2tog, 17sc, sc2tog, 2sc in next sc, 2sc in next sc
turn, ch1, 2sc in first sc, 2sc in next sc, sc2tog twice, 4scsc, sc2tog, 3sc, sc2tog, 4sc, sc2tog twice, 2sc in next sc, 2sc in next sc
turn, ch1, 2sc in first sc, 2sc in next sc, sc2tog three times, 9sc, sc2tog three times, 2sc in next sc, 2sc in next sc
turn, ch1, 2sc in first sc, 2sc in next sc, sc2tog two times, 11sc, sc2tog two times, 2sc in next sc, 2sc in next sc
turn, ch1, 2sc in first sc, 2sc in next sc, sc2tog three times, 7sc
sc2tog three times, 2sc in next sc, 2sc in next sc
put the helmet on the doll head.
DO NOT TURN ch4 and slst to first sc of row
this is a little bit difficult, since you're doing it with the helmet on the head...
4sc, sc2tog, 2sc, sc2tog twice, 2sc, sc2tog, 4sc, 5sc over ch4, slst to first sc. fasten off and weave in your tail.
Helmet fx --Make 2
in light blue, 6sc in magic circle
2sc in each sc ( 12 stitches )
1sc, 2sc in next sc. rep around ( 18 stitches )
slst into next sc and fasten off, leaving long tail to sew onto helmet
Helmet fx
ch5
sc in second chain from hook, sc across ( 4 stitches )
3-5 turn, ch1, 4sc, fasten off, leaving long tail to sew onto helmet
Helmet fx
ch5
sc in second chain from hook, sc across ( 4 stitches )
3-28 turn, ch1, 4sc, fasten off, leaving long tail to sew onto helmet
sew all helmet fx onto the helmet
do the face however you like. :D
for the "red" parts on the bottom of the feet and the blaster arm and the little "ear" spots on the helmet, I used red felt that I used E6000 to attach to the doll. I also attached four little squares of yellow felt to the blaster for the little gauge there.
#crochet#crochet patterns#crochet pattern#free crochet patterns#free crochet pattern#free crochet doll pattern#free amigurumi#free crochet amigurumi pattern#amigurumi pattern#free amigurumi pattern#megaman#free megaman pattern#megaman doll#crochet megaman#crochet megaman doll#crochet megaman pattern#free crochet megaman pattern#lillypuffart
43 notes
·
View notes
Text
6 Local Search Marketing DIY Tips for the Crafting Industry
Posted by MiriamEllis
Think crafting is kids’ stuff? Think again. The owners of quilting, yarn, bead, fabric, woodworking, art supply, stationers, edible arts, and related shops know that:
The crafting industry generated $44 billion in 2016 in the US alone.
63% of American households engage in at least one crafting project annually, while more than one in four participate in 5+ per year.
The top three craft store chains in the country (Michaels, JOANN, Hobby Lobby) operate nearly 3,000 locations, just among themselves.
There are an estimated 3,200 US storefronts devoted to quilting alone. Thousands more vend everything from the stuff of ancient arts (knitting, with a 1,000-year history) to the trendy and new (unicorn slime, which, yes, is really a thing).
Our local search marketing industry has devoted abundant time to advising major local business categories over the past couple of decades, but crafting is one substantial retail niche we may have overlooked. I’d like to rectify this today.
I feel personally inspired by craft store owners. Over the years, I’ve learned to sew, quilt, embroider, crochet, knit, and bead, and before I became a local search marketer, I was a working fine artist. I even drafted a sewing pattern once that was featured in a crafting magazine. Through my own exploration of arts and crafts, I’ve come to know so many independent business owners in this industry, and have marketed several of them. These are gutsy people who take risks, work extremely hard for their living, and often zestfully embrace any education they can access about marketing.
Today, I’m offering my six best marketing tips for craft retailers for a more successful and profitable 2020.
First, a quick definition of local search marketing
Your store is your location. Your market is made up of all of your customers’ locations. Anything you do to promote your location to the market you serve is considered local search marketing. Your market could be your neighborhood, your city, or a larger local region. Local search marketing can include both offline efforts, like hanging eye-catching signage or getting mentioned in local print news, and online efforts, like having a website, building listings on local business listing platforms, and managing customer reviews.
Whatever you do to increase local awareness about your location, interact online with customers, bring them through your front door, serve them in-store, and follow up with them afterwards in an ongoing relationship counts. You’re already doing some of this, and in the words of Martha Stewart, “It’s a good thing.” But with a little more attention and intention, these six tips can craft even greater success for your business:
1. Take a page from my Google scrapbook
To engage in local search marketing is to engage with Google. Since they first started mapping out communities and businesses in 2004, the search engine giant has come to dominate the online local scene. There are other important online platforms, but to be in front of the maximum number of potential customers and to compete for rankings in Google’s local search results, your crafting business needs to:
Read the Guidelines for representing your business on Google and follow them to the letter. This set of rules tells you what you can and can’t do in the Google My Business product. Listing your business incorrectly or violating the guidelines in any way can result in listing suspension and other negative outcomes.
Create your free Google My Business listing once you’ve read the guidelines. Here’s Moz’s cheat sheet to all of the different fields and features you can fill out in your listing. Fill out as many fields as you possibly can and then Google will take you through the steps of verifying your listing.
Reckon with Google’s power. As our scrapbook says, Google owns your Google My Business listing, but you can take a lot of control over some of its contents. Even once you’ve verified your listing, it’s still open to suggested edits from the public, questions, reviews, user-uploaded photos and other activities. Main takeaway: your GMB listing is not a one-and-done project. It’s an interactive platform that you will be monitoring and managing from here on out.
2. Weave a strong web presence
Your Google My Business listing will likely be the biggest driver of traffic to your craft store, but you’ll want to cast your online net beyond this. Once you feel confident about the completeness and ongoing management of your GMB listing, there are 4 other strands of Internet activity for you to take firm hold of:
Your website
At bare minimum, your website should feature:
Your complete and accurate name, address, phone number, email, and fax number
Clear written driving directions to your place of business from all points of entry
A good text description of everything you sell and offer
An up-to-date list of all upcoming classes and events
Some high-quality photos of your storefront and merchandise
A more sophisticated website can also feature:
Articles and blog posts
Full inventory, including e-commerce shopping
Customer reviews and testimonials
Online classes, webinars and video tutorials
Customer-generated content, including photos, forums, etc.
The investment you make in your website should be based on how much you need to do to create a web presence that surpasses your local competitors. Depending on where your store is located, you may need only a modest site, or may need to go further to rank highly in Google’s search engine results and win the maximum number of customers.
Your other local listings
Beyond Google, your business listings on other online platforms like Yelp, Facebook, Bing, Apple Maps, Factual, Foursquare, and Infogroup can ensure that customers are encountering your business across a wide variety of sites and apps. Listings in these local business information indexes are sometimes referred to as “structured citations” and you have two main choices for building and maintaining them:
You can manually build a listing on each important platform and check back on it regularly to manage your reviews and other content on it, as well as to ensure that the basic contact info hasn’t been changed by the platform or the public in any way.
You can invest in local listings management software like Moz Local, which automates creation of these listings and gives you a simple dashboard that helps you respond to reviews, post new content, and be alerted to any emerging inaccuracies across key listing platforms, all in one place. This option can be a major time saver and deliver welcome peace of mind.
Structured citation management is critical to any local business for two key reasons. Firstly, it can be a source of valuable consumer discovery and new customers for your shop. Secondly, it ensures you aren’t losing customers to frustrating misinformation. One recent survey found that 22% of customers ended up at the wrong location of a business because online information about it was incorrect, and that 80% of them lost trust in the company when encountering such misinformation. Brick-and-mortar stores can’t afford to inconvenience or lose a single customer, and that’s why managing all your listings for accuracy is worth the investment of time/money.
Your unstructured citations
As we’ve just covered, a formal listing on a local business platform is called a “structured citation.” Unstructured citations, by contrast, are mentions of your business on any type of website: local online news, industry publications, a crafter’s blog, and lists of local attractions all count.
Anywhere your business can get mentioned on a relevant online publication can help customers discover you. And if trusted, authoritative websites link to yours when they mention your business, those links can directly improve your search engine rankings.
If you’re serving a market with little local competition, you may not need to invest a ton of time in seeking out unstructured citation opportunities. But if a nearby competitor is outranking you and you need to get ahead, earning high-quality mentions and links can be the best recipe for surpassing them. All of the following can be excellent sources of unstructured citations:
Sponsoring or participating in local events, organizations, teams, and causes
Hosting newsworthy happenings that get written up by local journalists
Holding contests and challenges that earn public mention
Joining local business organizations
Cross promoting with related local businesses
Getting featured/interviewed by online crafting magazines, fora, blogs, and videos
Read The Guide to Building Linked Unstructured Citations for Local SEO for more information.
Your social media presence
YouTube, Instagram, Pinterest, Facebook, Twitter, crafting forums...choices abound! How much time and where you invest in social media should be determined by two things:
What your local competition is doing
Where your potential customers spend social time
If your shop is literally the only game in town, you may not need to win at social to win business, but if you have multiple competitors, strategic social media investments can set you apart as the most helpful, most popular local option.
In your social efforts, emphasize sharing, showing and telling — not just selling. If you keep this basic principle in mind, the DIY revolution is at your fingertips, waiting to be engaged. One thing I’ve learned about crafters is that they will travel. Quilting retreats, knitting tours, and major craft expos prove this.
If you or a staff member happen to create one of the most-viewed videos on YouTube for the three-needle bind off or crafting felt succulents, it could inspire travelers to put your shop on their bucket list. One of my favorite knitters in the world films the English/Swedish language Kammebornia podcast which is so idyllic, it would certainly inspire me to visit the island of Gotland if I were ever anywhere nearby. Think what you can do via social media to make your shop an aspirational destination for even non-local customers.
3. Abandon fear of ripping out mistakes (and negative reviews)
As the old adage goes, “Good knitters are good rippers.” When you drop a stitch in an important project, you have to know how to see it, patiently rip out stitches back to it, and correct the mistake as skillfully as you can. This exact same technique applies to managing the reviews customers leave you online. When your business “drops the ball” for a customer and disappoints them, you can often go back and correct the error.
Reviews = your business’ reputation. It’s as simple (and maybe scary) as that. Consider these statistics about the power of local business reviews:
87% of consumers read local business reviews (BrightLocal)
27% of people who look for local information are actually seeking reviews about a particular store. (Streetfight Mag)
30% of consumers say seeing business owners’ responses to reviews are key to them judging the company. (BrightLocal)
73.8 percent of customers are either likely or extremely likely to continue doing business with a brand that resolves their complaints. (GatherUp)
To be competitive, your craft store must earn reviews. Many business owners feel apprehensive about negative reviews, but the good news is:
You can “rip out” some negative reviews simply by responding well to them. The owner response function actually makes reviews conversational, and a customer you’ve made things right with can edit their initial review to a more positive one.
Most consumers expect a business to receive some negative reviews. Multiple surveys find that a perfect 5 star rating can look suspicious to shoppers.
If you continuously monitor reviews, either manually or via convenient software like Moz Local that alerts you to incoming reviews, there is little to fear, because customers are more forgiving than you might have thought.
For a complete tutorial, read How to Get a Customer to Edit Their Negative Review. And be sure you are always doing what’s necessary to earn positive reviews by delivering excellent customer service, keeping your online listings accurate, and proactively asking customers to review you on Google and other eligible platforms.
4. Craft what online can’t — 5 senses engagement
Consider these three telling statistics:
Over half of consumers prefer to shop in-store to interact with products. (Local Search Association)
80% of U.S. disposable income is spent within 20 miles of home (Access Development)
By 2021, mobile devices alone will influence $1.4 trillion in local sales. (Forrester)
There may be no retailer left in America who hasn’t felt the Amazon effect, but as a craft shop owner, you have an amazing advantage so many other industries lack. Crafters want to touch textiles and fibers before buying, to hold fabrics up to their faces, to see true colors, and handle highly tactile merchandise like beads and wood. When it comes to fulfilling the five senses, online shopping is miles behind what you can provide face-to-face.
And it’s not just customers’ desire to interact with products that sets you apart — it’s their desire to interact with experts. As pattern designer Amy Barickman of Indygo Junction perfectly sums it up:
“To survive and thrive, brick-and-mortar stores must now provide experiences that cannot be replicated online.”
The expertise of your staff, the classes you hold, and tie-in services you offer, the sensory appeal of your storefront, the time you take to build relationships with customers all contribute to creating valued interactions which the Internet just can’t replace.
This advantage ties in deeply with the quality of your staff hiring and training practices. One respected survey found that 57% of customer complaints stem from employee behavior and poor service. Specifically in the crafting industry, staff who are expert with the materials being sold are worth their weight in gold. Be prepared to assist both seasoned crafters and the new generations of customers who are just now embracing the creative industries.
Play to your strengths. In every way that you market your business, emphasize hands-on experiences to draw people off their computers and into your store. In every ad you run, blog post you write, phone call you answer, listing you build, invite people to come in to engage all five senses at your place of business. Soft lighting and music, a tea kiosk, fragrant fresh flowers, some comfy chairs, and plenty of tactile merchandise are all within your reach, making shopping a pleasure which customers will want to enjoy again and again.
5. Learn to read your competitors’ patterns
Need to know: there are no #1 rankings on Google. Google customizes the search engine results they show to each person, based on where that person is physically located at the time they look something up on their phone or computer. You can walk or drive around your city, performing the identical search, and watch the rankings change in the:
Local Packs
Maps
Organic results
If you’re doing business in an area with few competitors, you may only need to be aware of one or two other companies. But when competition is more dense and diverse, or you operate multiple locations, the need for competitive analysis can grow exponentially. And for each potential customer, the set of businesses you’re competing with changes, based on that customer’s location.
How can you visualize and strategize for this? You have two options:
If competition is quite low, you can manually find your true local competitors with this tutorial. It includes a free spreadsheet for helping you figure out which businesses are ranking for your most desired searches for the customers nearest you. This is a basic, doable approach for very small businesses.
If your environment is competitive or you are marketing a large, enterprise craft store brand, you can automate analysis with software. Local Market Analytics from Moz, for example, is designed to do all the work of finding true competitors for you. This groundbreaking product multi-samples searchers’ locations and helps you analyze your strongest and weakest markets. Currently, Local Market Analytics focuses on organic results, and it will soon include data on local pack results, too.
Once you’ve completed this first task, you have one more step ahead if you find that some of your competitors are outranking you. You’ll want to stack up your metrics against theirs to analyze why they are surpassing you. Good news: we’ve got another tutorial and free spreadsheet for this project! What emerges from the work is a pattern of strengths and weaknesses that signal why Google is ranking some businesses ahead of others.
Knowing who your competitors are and gathering metrics about why they may be outranking you is what empowers you to create a winning local search marketing strategy. Whether you find you need more reviews, a stronger website, or some other improvement, you’ll be working from data instead of making random guesses about how to grow your business.
6. Open your grab bag
Every craft store and craft fair has its grab bags, and who can resist them? I’d like to close out this article by spilling a trove of marketing goodies into your hands. Sort through them and see if there’s a fresh idea in here that could really work for your business to take it to the next level.
Be more! This year, Michaels has partnered with UPS at 1,100 locations in a convenience experiment. You run a craft store, but could it be more? Is there something lacking in your local market that your shop could double as? A meeting house, a lending library, an adult classroom, a tea shop, a Wi-Fi spot, a holiday boutique, a place for live music?
Tie in! Your quilt shop can support apparel sewers with a few extra solids, textiles, and some fun patterns. Your yarn shop can find a nook for needle arts. Your woodshop could offer wooden needles for knitting and crochet, wooden hoops for embroidery, wood buttons, stamps, and a variety of wood boxes for crafters. You may sell everything needed for beading jewelry, but do you have the necessary supplies to bead clothing? Crafters are hungry for local resources for every kind of project, especially in rural areas, suburbs, and other communities where there are few businesses.
Teach! There are so many arts and crafts that are incredibly challenging to learn without being shown, face-to-face. Not everyone is lucky enough to have a grandparent or parent to demo exactly how you do a long tail cast on or master the dovetail joint. If you want to sell merchandise, show how to use it. Look at JOANN, which just unveiled its new concept store in Columbus, Ohio, centered on a “Creators Studio”. One independent fabric shop near me devotes half its floorspace to classes for children — the next generation of customers!
Email! Don’t make the mistake of thinking email is old school. Statistics say that 47% of marketers point to email marketing as delivering the highest ROI and 69% of consumers prefer to receive local business communications via email. If you’re one of the 50% of small business owners who hasn’t yet taken the leap of creating an email newsletter, do it!
Survey! Don’t guess what to stock or how to do business. Directly ask your customers via email, social media, and in-store surveys what they really want. I’ve seen businesses abandon scented products because they found they were deterring migraine-prone shoppers. I’ve seen others implement special ordering services to source hard-to-access items in-store instead of letting consumer drift away to the online world. Giving the customer what they want is the absolute key to your store’s success.
Go green! Whether it’s powering your shop with solar, supporting upcycling crafts, or stocking organic and sustainable inventory, embrace and promote every green practice you can engage in. Numerous studies cite the younger generations as being particularly defined by responsible consumption. Demonstrate solidarity with their aspirations in the way you operate and market.
Doers, makers, creators, crafters, artisans, artists… your business exists to support their drive to embellish personal and public life. When you need to grow your business, you’ll be drawing from the same source of inspiration that all creative people do: the ability to imagine, to envision a plan, to color outside the lines, to gather the materials you need to make something great.
Local search marketing is a template for ensuring that your business is ready to serve every crafter at every stage of their journey, from the first spark of an idea, to discovery of local resources, to transaction, and beyond. I hope you’ll take the template I’ve sketched out for you today and make it your own for a truly rewarding 2020.
Sign up for The Moz Top 10, a semimonthly mailer updating you on the top ten hottest pieces of SEO news, tips, and rad links uncovered by the Moz team. Think of it as your exclusive digest of stuff you don't have time to hunt down but want to read!
via Blogger https://ift.tt/2M2pDPu
#blogger #bloggingtips #bloggerlife #bloggersgetsocial #ontheblog #writersofinstagram #writingprompt #instapoetry #writerscommunity #writersofig #writersblock #writerlife #writtenword #instawriters #spilledink #wordgasm #creativewriting #poetsofinstagram #blackoutpoetry #poetsofig
0 notes
Text
6 Local Search Marketing DIY Tips for the Crafting Industry
Posted by MiriamEllis
Think crafting is kids’ stuff? Think again. The owners of quilting, yarn, bead, fabric, woodworking, art supply, stationers, edible arts, and related shops know that:
The crafting industry generated $44 billion in 2016 in the US alone.
63% of American households engage in at least one crafting project annually, while more than one in four participate in 5+ per year.
The top three craft store chains in the country (Michaels, JOANN, Hobby Lobby) operate nearly 3,000 locations, just among themselves.
There are an estimated 3,200 US storefronts devoted to quilting alone. Thousands more vend everything from the stuff of ancient arts (knitting, with a 1,000-year history) to the trendy and new (unicorn slime, which, yes, is really a thing).
Our local search marketing industry has devoted abundant time to advising major local business categories over the past couple of decades, but crafting is one substantial retail niche we may have overlooked. I’d like to rectify this today.
I feel personally inspired by craft store owners. Over the years, I’ve learned to sew, quilt, embroider, crochet, knit, and bead, and before I became a local search marketer, I was a working fine artist. I even drafted a sewing pattern once that was featured in a crafting magazine. Through my own exploration of arts and crafts, I’ve come to know so many independent business owners in this industry, and have marketed several of them. These are gutsy people who take risks, work extremely hard for their living, and often zestfully embrace any education they can access about marketing.
Today, I’m offering my six best marketing tips for craft retailers for a more successful and profitable 2020.
First, a quick definition of local search marketing
Your store is your location. Your market is made up of all of your customers’ locations. Anything you do to promote your location to the market you serve is considered local search marketing. Your market could be your neighborhood, your city, or a larger local region. Local search marketing can include both offline efforts, like hanging eye-catching signage or getting mentioned in local print news, and online efforts, like having a website, building listings on local business listing platforms, and managing customer reviews.
Whatever you do to increase local awareness about your location, interact online with customers, bring them through your front door, serve them in-store, and follow up with them afterwards in an ongoing relationship counts. You’re already doing some of this, and in the words of Martha Stewart, “It’s a good thing.” But with a little more attention and intention, these six tips can craft even greater success for your business:
1. Take a page from my Google scrapbook
To engage in local search marketing is to engage with Google. Since they first started mapping out communities and businesses in 2004, the search engine giant has come to dominate the online local scene. There are other important online platforms, but to be in front of the maximum number of potential customers and to compete for rankings in Google’s local search results, your crafting business needs to:
Read the Guidelines for representing your business on Google and follow them to the letter. This set of rules tells you what you can and can’t do in the Google My Business product. Listing your business incorrectly or violating the guidelines in any way can result in listing suspension and other negative outcomes.
Create your free Google My Business listing once you’ve read the guidelines. Here’s Moz’s cheat sheet to all of the different fields and features you can fill out in your listing. Fill out as many fields as you possibly can and then Google will take you through the steps of verifying your listing.
Reckon with Google’s power. As our scrapbook says, Google owns your Google My Business listing, but you can take a lot of control over some of its contents. Even once you’ve verified your listing, it’s still open to suggested edits from the public, questions, reviews, user-uploaded photos and other activities. Main takeaway: your GMB listing is not a one-and-done project. It’s an interactive platform that you will be monitoring and managing from here on out.
2. Weave a strong web presence
Your Google My Business listing will likely be the biggest driver of traffic to your craft store, but you’ll want to cast your online net beyond this. Once you feel confident about the completeness and ongoing management of your GMB listing, there are 4 other strands of Internet activity for you to take firm hold of:
Your website
At bare minimum, your website should feature:
Your complete and accurate name, address, phone number, email, and fax number
Clear written driving directions to your place of business from all points of entry
A good text description of everything you sell and offer
An up-to-date list of all upcoming classes and events
Some high-quality photos of your storefront and merchandise
A more sophisticated website can also feature:
Articles and blog posts
Full inventory, including e-commerce shopping
Customer reviews and testimonials
Online classes, webinars and video tutorials
Customer-generated content, including photos, forums, etc.
The investment you make in your website should be based on how much you need to do to create a web presence that surpasses your local competitors. Depending on where your store is located, you may need only a modest site, or may need to go further to rank highly in Google’s search engine results and win the maximum number of customers.
Your other local listings
Beyond Google, your business listings on other online platforms like Yelp, Facebook, Bing, Apple Maps, Factual, Foursquare, and Infogroup can ensure that customers are encountering your business across a wide variety of sites and apps. Listings in these local business information indexes are sometimes referred to as “structured citations” and you have two main choices for building and maintaining them:
You can manually build a listing on each important platform and check back on it regularly to manage your reviews and other content on it, as well as to ensure that the basic contact info hasn’t been changed by the platform or the public in any way.
You can invest in local listings management software like Moz Local, which automates creation of these listings and gives you a simple dashboard that helps you respond to reviews, post new content, and be alerted to any emerging inaccuracies across key listing platforms, all in one place. This option can be a major time saver and deliver welcome peace of mind.
Structured citation management is critical to any local business for two key reasons. Firstly, it can be a source of valuable consumer discovery and new customers for your shop. Secondly, it ensures you aren’t losing customers to frustrating misinformation. One recent survey found that 22% of customers ended up at the wrong location of a business because online information about it was incorrect, and that 80% of them lost trust in the company when encountering such misinformation. Brick-and-mortar stores can’t afford to inconvenience or lose a single customer, and that’s why managing all your listings for accuracy is worth the investment of time/money.
Your unstructured citations
As we’ve just covered, a formal listing on a local business platform is called a “structured citation.” Unstructured citations, by contrast, are mentions of your business on any type of website: local online news, industry publications, a crafter’s blog, and lists of local attractions all count.
Anywhere your business can get mentioned on a relevant online publication can help customers discover you. And if trusted, authoritative websites link to yours when they mention your business, those links can directly improve your search engine rankings.
If you’re serving a market with little local competition, you may not need to invest a ton of time in seeking out unstructured citation opportunities. But if a nearby competitor is outranking you and you need to get ahead, earning high-quality mentions and links can be the best recipe for surpassing them. All of the following can be excellent sources of unstructured citations:
Sponsoring or participating in local events, organizations, teams, and causes
Hosting newsworthy happenings that get written up by local journalists
Holding contests and challenges that earn public mention
Joining local business organizations
Cross promoting with related local businesses
Getting featured/interviewed by online crafting magazines, fora, blogs, and videos
Read The Guide to Building Linked Unstructured Citations for Local SEO for more information.
Your social media presence
YouTube, Instagram, Pinterest, Facebook, Twitter, crafting forums...choices abound! How much time and where you invest in social media should be determined by two things:
What your local competition is doing
Where your potential customers spend social time
If your shop is literally the only game in town, you may not need to win at social to win business, but if you have multiple competitors, strategic social media investments can set you apart as the most helpful, most popular local option.
In your social efforts, emphasize sharing, showing and telling — not just selling. If you keep this basic principle in mind, the DIY revolution is at your fingertips, waiting to be engaged. One thing I’ve learned about crafters is that they will travel. Quilting retreats, knitting tours, and major craft expos prove this.
If you or a staff member happen to create one of the most-viewed videos on YouTube for the three-needle bind off or crafting felt succulents, it could inspire travelers to put your shop on their bucket list. One of my favorite knitters in the world films the English/Swedish language Kammebornia podcast which is so idyllic, it would certainly inspire me to visit the island of Gotland if I were ever anywhere nearby. Think what you can do via social media to make your shop an aspirational destination for even non-local customers.
3. Abandon fear of ripping out mistakes (and negative reviews)
As the old adage goes, “Good knitters are good rippers.” When you drop a stitch in an important project, you have to know how to see it, patiently rip out stitches back to it, and correct the mistake as skillfully as you can. This exact same technique applies to managing the reviews customers leave you online. When your business “drops the ball” for a customer and disappoints them, you can often go back and correct the error.
Reviews = your business’ reputation. It’s as simple (and maybe scary) as that. Consider these statistics about the power of local business reviews:
87% of consumers read local business reviews (BrightLocal)
27% of people who look for local information are actually seeking reviews about a particular store. (Streetfight Mag)
30% of consumers say seeing business owners’ responses to reviews are key to them judging the company. (BrightLocal)
73.8 percent of customers are either likely or extremely likely to continue doing business with a brand that resolves their complaints. (GatherUp)
To be competitive, your craft store must earn reviews. Many business owners feel apprehensive about negative reviews, but the good news is:
You can “rip out” some negative reviews simply by responding well to them. The owner response function actually makes reviews conversational, and a customer you’ve made things right with can edit their initial review to a more positive one.
Most consumers expect a business to receive some negative reviews. Multiple surveys find that a perfect 5 star rating can look suspicious to shoppers.
If you continuously monitor reviews, either manually or via convenient software like Moz Local that alerts you to incoming reviews, there is little to fear, because customers are more forgiving than you might have thought.
For a complete tutorial, read How to Get a Customer to Edit Their Negative Review. And be sure you are always doing what’s necessary to earn positive reviews by delivering excellent customer service, keeping your online listings accurate, and proactively asking customers to review you on Google and other eligible platforms.
4. Craft what online can’t — 5 senses engagement
Consider these three telling statistics:
Over half of consumers prefer to shop in-store to interact with products. (Local Search Association)
80% of U.S. disposable income is spent within 20 miles of home (Access Development)
By 2021, mobile devices alone will influence $1.4 trillion in local sales. (Forrester)
There may be no retailer left in American who hasn’t felt the Amazon effect, but as a craft shop owner, you have an amazing advantage so many other industries lack. Crafters want to touch textiles and fibers before buying, to hold fabrics up to their faces, to see true colors, and handle highly tactile merchandise like beads and wood. When it comes to fulfilling the five senses, online shopping is miles behind what you can provide face-to-face.
And it’s not just customers’ desire to interact with products that sets you apart — it’s their desire to interact with experts. As pattern designer Amy Barickman of Indygo Junction perfectly sums it up:
“To survive and thrive, brick-and-mortar stores must now provide experiences that cannot be replicated online.”
The expertise of your staff, the classes you hold, and tie-in services you offer, the sensory appeal of your storefront, the time you take to build relationships with customers all contribute to creating valued interactions which the Internet just can’t replace.
This advantage ties in deeply with the quality of your staff hiring and training practices. One respected survey found that 57% of customer complaints stem from employee behavior and poor service. Specifically in the crafting industry, staff who are expert with the materials being sold are worth their weight in gold. Be prepared to assist both seasoned crafters and the new generations of customers who are just now embracing the creative industries.
Play to your strengths. In every way that you market your business, emphasize hands-on experiences to draw people off their computers and into your store. In every ad you run, blog post you write, phone call you answer, listing you build, invite people to come in to engage all five senses at your place of business. Soft lighting and music, a tea kiosk, fragrant fresh flowers, some comfy chairs, and plenty of tactile merchandise are all within your reach, making shopping a pleasure which customers will want to enjoy again and again.
5. Learn to read your competitors’ patterns
Need to know: there are no #1 rankings on Google. Google customizes the search engine results they show to each person, based on where that person is physically located at the time they look something up on their phone or computer. You can walk or drive around your city, performing the identical search, and watch the rankings change in the:
Local Packs
Maps
Organic results
If you’re doing business in an area with few competitors, you may only need to be aware of one or two other companies. But when competition is more dense and diverse, or you operate multiple locations, the need for competitive analysis can grow exponentially. And for each potential customer, the set of businesses you’re competing with changes, based on that customer’s location.
How can you visualize and strategize for this? You have two options:
If competition is quite low, you can manually find your true local competitors with this tutorial. It includes a free spreadsheet for helping you figure out which businesses are ranking for your most desired searches for the customers nearest you. This is a basic, doable approach for very small businesses.
If your environment is competitive or you are marketing a large, enterprise craft store brand, you can automate analysis with software. Local Market Analytics from Moz, for example, is designed to do all the work of finding true competitors for you. This groundbreaking product multi-samples searchers’ locations and helps you analyze your strongest and weakest markets. Currently, Local Market Analytics focuses on organic results, and it will soon include data on local pack results, too.
Once you’ve completed this first task, you have one more step ahead if you find that some of your competitors are outranking you. You’ll want to stack up your metrics against theirs to analyze why they are surpassing you. Good news: we’ve got another tutorial and free spreadsheet for this project! What emerges from the work is a pattern of strengths and weaknesses that signal why Google is ranking some businesses ahead of others.
Knowing who your competitors are and gathering metrics about why they may be outranking you is what empowers you to create a winning local search marketing strategy. Whether you find you need more reviews, a stronger website, or some other improvement, you’ll be working from data instead of making random guesses about how to grow your business.
6. Open your grab bag
Every craft store and craft fair has its grab bags, and who can resist them? I’d like to close out this article by spilling a trove of marketing goodies into your hands. Sort through them and see if there’s a fresh idea in here that could really work for your business to take it to the next level.
Be more! This year, Michaels has partnered with UPS at 1,100 locations in a convenience experiment. You run a craft store, but could it be more? Is there something lacking in your local market that your shop could double as? A meeting house, a lending library, an adult classroom, a tea shop, a Wi-Fi spot, a holiday boutique, a place for live music?
Tie in! Your quilt shop can support apparel sewers with a few extra solids, textiles, and some fun patterns. Your yarn shop can find a nook for needle arts. Your woodshop could offer wooden needles for knitting and crochet, wooden hoops for embroidery, wood buttons, stamps, and a variety of wood boxes for crafters. You may sell everything needed for beading jewelry, but do you have the necessary supplies to bead clothing? Crafters are hungry for local resources for every kind of project, especially in rural areas, suburbs, and other communities where there are few businesses.
Teach! There are so many arts and crafts that are incredibly challenging to learn without being shown, face-to-face. Not everyone is lucky enough to have a grandparent or parent to demo exactly how you do a long tail cast on or master the dovetail joint. If you want to sell merchandise, show how to use it. Look at JOANN, which just unveiled its new concept store in Columbus, Ohio, centered on a “Creators Studio”. One independent fabric shop near me devotes half its floorspace to classes for children — the next generation of customers!
Email! Don’t make the mistake of thinking email is old school. Statistics say that 47% of marketers point to email marketing as delivering the highest ROI and 69% of consumers prefer to receive local business communications via email. If you’re one of the 50% of small business owners who hasn’t yet taken the leap of creating an email newsletter, do it!
Survey! Don’t guess what to stock or how to do business. Directly ask your customers via email, social media, and in-store surveys what they really want. I’ve seen businesses abandon scented products because they found they were deterring migraine-prone shoppers. I’ve seen others implement special ordering services to source hard-to-access items in-store instead of letting consumer drift away to the online world. Giving the customer what they want is the absolute key to your store’s success.
Go green! Whether it’s powering your shop with solar, supporting upcycling crafts, or stocking organic and sustainable inventory, embrace and promote every green practice you can engage in. Numerous studies cite the younger generations as being particularly defined by responsible consumption. Demonstrate solidarity with their aspirations in the way you operate and market.
Doers, makers, creators, crafters, artisans, artists… your business exists to support their drive to embellish personal and public life. When you need to grow your business, you’ll be drawing from the same source of inspiration that all creative people do: the ability to imagine, to envision a plan, to color outside the lines, to gather the materials you need to make something great.
Local search marketing is a template for ensuring that your business is ready to serve every crafter at every stage of their journey, from the first spark of an idea, to discovery of local resources, to transaction, and beyond. I hope you’ll take the template I’ve sketched out for you today and make it your own for a truly rewarding 2020.
Sign up for The Moz Top 10, a semimonthly mailer updating you on the top ten hottest pieces of SEO news, tips, and rad links uncovered by the Moz team. Think of it as your exclusive digest of stuff you don't have time to hunt down but want to read!
6 Local Search Marketing DIY Tips for the Crafting Industry
Theo dõi các thông tin khác tại: https://foogleseo.blogspot.com
6 Local Search Marketing DIY Tips for the Crafting Industry posted first on https://foogleseo.blogspot.com/ #FoogleSEO #luongthuyvy Nguồn: http://bit.ly/2MgqwnZ #luongthuyvy
0 notes
Text
6 Local Search Marketing DIY Tips for the Crafting Industry
Posted by MiriamEllis
Think crafting is kids’ stuff? Think again. The owners of quilting, yarn, bead, fabric, woodworking, art supply, stationers, edible arts, and related shops know that:
The crafting industry generated $44 billion in 2016 in the US alone.
63% of American households engage in at least one crafting project annually, while more than one in four participate in 5+ per year.
The top three craft store chains in the country (Michaels, JOANN, Hobby Lobby) operate nearly 3,000 locations, just among themselves.
There are an estimated 3,200 US storefronts devoted to quilting alone. Thousands more vend everything from the stuff of ancient arts (knitting, with a 1,000-year history) to the trendy and new (unicorn slime, which, yes, is really a thing).
Our local search marketing industry has devoted abundant time to advising major local business categories over the past couple of decades, but crafting is one substantial retail niche we may have overlooked. I’d like to rectify this today.
I feel personally inspired by craft store owners. Over the years, I’ve learned to sew, quilt, embroider, crochet, knit, and bead, and before I became a local search marketer, I was a working fine artist. I even drafted a sewing pattern once that was featured in a crafting magazine. Through my own exploration of arts and crafts, I’ve come to know so many independent business owners in this industry, and have marketed several of them. These are gutsy people who take risks, work extremely hard for their living, and often zestfully embrace any education they can access about marketing.
Today, I’m offering my six best marketing tips for craft retailers for a more successful and profitable 2020.
First, a quick definition of local search marketing
Your store is your location. Your market is made up of all of your customers’ locations. Anything you do to promote your location to the market you serve is considered local search marketing. Your market could be your neighborhood, your city, or a larger local region. Local search marketing can include both offline efforts, like hanging eye-catching signage or getting mentioned in local print news, and online efforts, like having a website, building listings on local business listing platforms, and managing customer reviews.
Whatever you do to increase local awareness about your location, interact online with customers, bring them through your front door, serve them in-store, and follow up with them afterwards in an ongoing relationship counts. You’re already doing some of this, and in the words of Martha Stewart, “It’s a good thing.” But with a little more attention and intention, these six tips can craft even greater success for your business:
1. Take a page from my Google scrapbook
To engage in local search marketing is to engage with Google. Since they first started mapping out communities and businesses in 2004, the search engine giant has come to dominate the online local scene. There are other important online platforms, but to be in front of the maximum number of potential customers and to compete for rankings in Google’s local search results, your crafting business needs to:
Read the Guidelines for representing your business on Google and follow them to the letter. This set of rules tells you what you can and can’t do in the Google My Business product. Listing your business incorrectly or violating the guidelines in any way can result in listing suspension and other negative outcomes.
Create your free Google My Business listing once you’ve read the guidelines. Here’s Moz’s cheat sheet to all of the different fields and features you can fill out in your listing. Fill out as many fields as you possibly can and then Google will take you through the steps of verifying your listing.
Reckon with Google’s power. As our scrapbook says, Google owns your Google My Business listing, but you can take a lot of control over some of its contents. Even once you’ve verified your listing, it’s still open to suggested edits from the public, questions, reviews, user-uploaded photos and other activities. Main takeaway: your GMB listing is not a one-and-done project. It’s an interactive platform that you will be monitoring and managing from here on out.
2. Weave a strong web presence
Your Google My Business listing will likely be the biggest driver of traffic to your craft store, but you’ll want to cast your online net beyond this. Once you feel confident about the completeness and ongoing management of your GMB listing, there are 4 other strands of Internet activity for you to take firm hold of:
Your website
At bare minimum, your website should feature:
Your complete and accurate name, address, phone number, email, and fax number
Clear written driving directions to your place of business from all points of entry
A good text description of everything you sell and offer
An up-to-date list of all upcoming classes and events
Some high-quality photos of your storefront and merchandise
A more sophisticated website can also feature:
Articles and blog posts
Full inventory, including e-commerce shopping
Customer reviews and testimonials
Online classes, webinars and video tutorials
Customer-generated content, including photos, forums, etc.
The investment you make in your website should be based on how much you need to do to create a web presence that surpasses your local competitors. Depending on where your store is located, you may need only a modest site, or may need to go further to rank highly in Google’s search engine results and win the maximum number of customers.
Your other local listings
Beyond Google, your business listings on other online platforms like Yelp, Facebook, Bing, Apple Maps, Factual, Foursquare, and Infogroup can ensure that customers are encountering your business across a wide variety of sites and apps. Listings in these local business information indexes are sometimes referred to as “structured citations” and you have two main choices for building and maintaining them:
You can manually build a listing on each important platform and check back on it regularly to manage your reviews and other content on it, as well as to ensure that the basic contact info hasn’t been changed by the platform or the public in any way.
You can invest in local listings management software like Moz Local, which automates creation of these listings and gives you a simple dashboard that helps you respond to reviews, post new content, and be alerted to any emerging inaccuracies across key listing platforms, all in one place. This option can be a major time saver and deliver welcome peace of mind.
Structured citation management is critical to any local business for two key reasons. Firstly, it can be a source of valuable consumer discovery and new customers for your shop. Secondly, it ensures you aren’t losing customers to frustrating misinformation. One recent survey found that 22% of customers ended up at the wrong location of a business because online information about it was incorrect, and that 80% of them lost trust in the company when encountering such misinformation. Brick-and-mortar stores can’t afford to inconvenience or lose a single customer, and that’s why managing all your listings for accuracy is worth the investment of time/money.
Your unstructured citations
As we’ve just covered, a formal listing on a local business platform is called a “structured citation.” Unstructured citations, by contrast, are mentions of your business on any type of website: local online news, industry publications, a crafter’s blog, and lists of local attractions all count.
Anywhere your business can get mentioned on a relevant online publication can help customers discover you. And if trusted, authoritative websites link to yours when they mention your business, those links can directly improve your search engine rankings.
If you’re serving a market with little local competition, you may not need to invest a ton of time in seeking out unstructured citation opportunities. But if a nearby competitor is outranking you and you need to get ahead, earning high-quality mentions and links can be the best recipe for surpassing them. All of the following can be excellent sources of unstructured citations:
Sponsoring or participating in local events, organizations, teams, and causes
Hosting newsworthy happenings that get written up by local journalists
Holding contests and challenges that earn public mention
Joining local business organizations
Cross promoting with related local businesses
Getting featured/interviewed by online crafting magazines, fora, blogs, and videos
Read The Guide to Building Linked Unstructured Citations for Local SEO for more information.
Your social media presence
YouTube, Instagram, Pinterest, Facebook, Twitter, crafting forums...choices abound! How much time and where you invest in social media should be determined by two things:
What your local competition is doing
Where your potential customers spend social time
If your shop is literally the only game in town, you may not need to win at social to win business, but if you have multiple competitors, strategic social media investments can set you apart as the most helpful, most popular local option.
In your social efforts, emphasize sharing, showing and telling — not just selling. If you keep this basic principle in mind, the DIY revolution is at your fingertips, waiting to be engaged. One thing I’ve learned about crafters is that they will travel. Quilting retreats, knitting tours, and major craft expos prove this.
If you or a staff member happen to create one of the most-viewed videos on YouTube for the three-needle bind off or crafting felt succulents, it could inspire travelers to put your shop on their bucket list. One of my favorite knitters in the world films the English/Swedish language Kammebornia podcast which is so idyllic, it would certainly inspire me to visit the island of Gotland if I were ever anywhere nearby. Think what you can do via social media to make your shop an aspirational destination for even non-local customers.
3. Abandon fear of ripping out mistakes (and negative reviews)
As the old adage goes, “Good knitters are good rippers.” When you drop a stitch in an important project, you have to know how to see it, patiently rip out stitches back to it, and correct the mistake as skillfully as you can. This exact same technique applies to managing the reviews customers leave you online. When your business “drops the ball” for a customer and disappoints them, you can often go back and correct the error.
Reviews = your business’ reputation. It’s as simple (and maybe scary) as that. Consider these statistics about the power of local business reviews:
87% of consumers read local business reviews (BrightLocal)
27% of people who look for local information are actually seeking reviews about a particular store. (Streetfight Mag)
30% of consumers say seeing business owners’ responses to reviews are key to them judging the company. (BrightLocal)
73.8 percent of customers are either likely or extremely likely to continue doing business with a brand that resolves their complaints. (GatherUp)
To be competitive, your craft store must earn reviews. Many business owners feel apprehensive about negative reviews, but the good news is:
You can “rip out” some negative reviews simply by responding well to them. The owner response function actually makes reviews conversational, and a customer you’ve made things right with can edit their initial review to a more positive one.
Most consumers expect a business to receive some negative reviews. Multiple surveys find that a perfect 5 star rating can look suspicious to shoppers.
If you continuously monitor reviews, either manually or via convenient software like Moz Local that alerts you to incoming reviews, there is little to fear, because customers are more forgiving than you might have thought.
For a complete tutorial, read How to Get a Customer to Edit Their Negative Review. And be sure you are always doing what’s necessary to earn positive reviews by delivering excellent customer service, keeping your online listings accurate, and proactively asking customers to review you on Google and other eligible platforms.
4. Craft what online can’t — 5 senses engagement
Consider these three telling statistics:
Over half of consumers prefer to shop in-store to interact with products. (Local Search Association)
80% of U.S. disposable income is spent within 20 miles of home (Access Development)
By 2021, mobile devices alone will influence $1.4 trillion in local sales. (Forrester)
There may be no retailer left in American who hasn’t felt the Amazon effect, but as a craft shop owner, you have an amazing advantage so many other industries lack. Crafters want to touch textiles and fibers before buying, to hold fabrics up to their faces, to see true colors, and handle highly tactile merchandise like beads and wood. When it comes to fulfilling the five senses, online shopping is miles behind what you can provide face-to-face.
And it’s not just customers’ desire to interact with products that sets you apart — it’s their desire to interact with experts. As pattern designer Amy Barickman of Indygo Junction perfectly sums it up:
“To survive and thrive, brick-and-mortar stores must now provide experiences that cannot be replicated online.”
The expertise of your staff, the classes you hold, and tie-in services you offer, the sensory appeal of your storefront, the time you take to build relationships with customers all contribute to creating valued interactions which the Internet just can’t replace.
This advantage ties in deeply with the quality of your staff hiring and training practices. One respected survey found that 57% of customer complaints stem from employee behavior and poor service. Specifically in the crafting industry, staff who are expert with the materials being sold are worth their weight in gold. Be prepared to assist both seasoned crafters and the new generations of customers who are just now embracing the creative industries.
Play to your strengths. In every way that you market your business, emphasize hands-on experiences to draw people off their computers and into your store. In every ad you run, blog post you write, phone call you answer, listing you build, invite people to come in to engage all five senses at your place of business. Soft lighting and music, a tea kiosk, fragrant fresh flowers, some comfy chairs, and plenty of tactile merchandise are all within your reach, making shopping a pleasure which customers will want to enjoy again and again.
5. Learn to read your competitors’ patterns
Need to know: there are no #1 rankings on Google. Google customizes the search engine results they show to each person, based on where that person is physically located at the time they look something up on their phone or computer. You can walk or drive around your city, performing the identical search, and watch the rankings change in the:
Local Packs
Maps
Organic results
If you’re doing business in an area with few competitors, you may only need to be aware of one or two other companies. But when competition is more dense and diverse, or you operate multiple locations, the need for competitive analysis can grow exponentially. And for each potential customer, the set of businesses you’re competing with changes, based on that customer’s location.
How can you visualize and strategize for this? You have two options:
If competition is quite low, you can manually find your true local competitors with this tutorial. It includes a free spreadsheet for helping you figure out which businesses are ranking for your most desired searches for the customers nearest you. This is a basic, doable approach for very small businesses.
If your environment is competitive or you are marketing a large, enterprise craft store brand, you can automate analysis with software. Local Market Analytics from Moz, for example, is designed to do all the work of finding true competitors for you. This groundbreaking product multi-samples searchers’ locations and helps you analyze your strongest and weakest markets. Currently, Local Market Analytics focuses on organic results, and it will soon include data on local pack results, too.
Once you’ve completed this first task, you have one more step ahead if you find that some of your competitors are outranking you. You’ll want to stack up your metrics against theirs to analyze why they are surpassing you. Good news: we’ve got another tutorial and free spreadsheet for this project! What emerges from the work is a pattern of strengths and weaknesses that signal why Google is ranking some businesses ahead of others.
Knowing who your competitors are and gathering metrics about why they may be outranking you is what empowers you to create a winning local search marketing strategy. Whether you find you need more reviews, a stronger website, or some other improvement, you’ll be working from data instead of making random guesses about how to grow your business.
6. Open your grab bag
Every craft store and craft fair has its grab bags, and who can resist them? I’d like to close out this article by spilling a trove of marketing goodies into your hands. Sort through them and see if there’s a fresh idea in here that could really work for your business to take it to the next level.
Be more! This year, Michaels has partnered with UPS at 1,100 locations in a convenience experiment. You run a craft store, but could it be more? Is there something lacking in your local market that your shop could double as? A meeting house, a lending library, an adult classroom, a tea shop, a Wi-Fi spot, a holiday boutique, a place for live music?
Tie in! Your quilt shop can support apparel sewers with a few extra solids, textiles, and some fun patterns. Your yarn shop can find a nook for needle arts. Your woodshop could offer wooden needles for knitting and crochet, wooden hoops for embroidery, wood buttons, stamps, and a variety of wood boxes for crafters. You may sell everything needed for beading jewelry, but do you have the necessary supplies to bead clothing? Crafters are hungry for local resources for every kind of project, especially in rural areas, suburbs, and other communities where there are few businesses.
Teach! There are so many arts and crafts that are incredibly challenging to learn without being shown, face-to-face. Not everyone is lucky enough to have a grandparent or parent to demo exactly how you do a long tail cast on or master the dovetail joint. If you want to sell merchandise, show how to use it. Look at JOANN, which just unveiled its new concept store in Columbus, Ohio, centered on a “Creators Studio”. One independent fabric shop near me devotes half its floorspace to classes for children — the next generation of customers!
Email! Don’t make the mistake of thinking email is old school. Statistics say that 47% of marketers point to email marketing as delivering the highest ROI and 69% of consumers prefer to receive local business communications via email. If you’re one of the 50% of small business owners who hasn’t yet taken the leap of creating an email newsletter, do it!
Survey! Don’t guess what to stock or how to do business. Directly ask your customers via email, social media, and in-store surveys what they really want. I’ve seen businesses abandon scented products because they found they were deterring migraine-prone shoppers. I’ve seen others implement special ordering services to source hard-to-access items in-store instead of letting consumer drift away to the online world. Giving the customer what they want is the absolute key to your store’s success.
Go green! Whether it’s powering your shop with solar, supporting upcycling crafts, or stocking organic and sustainable inventory, embrace and promote every green practice you can engage in. Numerous studies cite the younger generations as being particularly defined by responsible consumption. Demonstrate solidarity with their aspirations in the way you operate and market.
Doers, makers, creators, crafters, artisans, artists… your business exists to support their drive to embellish personal and public life. When you need to grow your business, you’ll be drawing from the same source of inspiration that all creative people do: the ability to imagine, to envision a plan, to color outside the lines, to gather the materials you need to make something great.
Local search marketing is a template for ensuring that your business is ready to serve every crafter at every stage of their journey, from the first spark of an idea, to discovery of local resources, to transaction, and beyond. I hope you’ll take the template I’ve sketched out for you today and make it your own for a truly rewarding 2020.
Sign up for The Moz Top 10, a semimonthly mailer updating you on the top ten hottest pieces of SEO news, tips, and rad links uncovered by the Moz team. Think of it as your exclusive digest of stuff you don't have time to hunt down but want to read!
6 Local Search Marketing DIY Tips for the Crafting Industry
Theo dõi các thông tin khác tại: https://foogleseo.blogspot.com
6 Local Search Marketing DIY Tips for the Crafting Industry posted first on foogleseo.blogspot.com from https://chauhuongtran.blogspot.com/2019/12/6-local-search-marketing-diy-tips-for.html
0 notes
Text
6 Local Search Marketing DIY Tips for the Crafting Industry
Posted by MiriamEllis
Think crafting is kids’ stuff? Think again. The owners of quilting, yarn, bead, fabric, woodworking, art supply, stationers, edible arts, and related shops know that:
The crafting industry generated $44 billion in 2016 in the US alone.
63% of American households engage in at least one crafting project annually, while more than one in four participate in 5+ per year.
The top three craft store chains in the country (Michaels, JOANN, Hobby Lobby) operate nearly 3,000 locations, just among themselves.
There are an estimated 3,200 US storefronts devoted to quilting alone. Thousands more vend everything from the stuff of ancient arts (knitting, with a 1,000-year history) to the trendy and new (unicorn slime, which, yes, is really a thing).
Our local search marketing industry has devoted abundant time to advising major local business categories over the past couple of decades, but crafting is one substantial retail niche we may have overlooked. I’d like to rectify this today.
I feel personally inspired by craft store owners. Over the years, I’ve learned to sew, quilt, embroider, crochet, knit, and bead, and before I became a local search marketer, I was a working fine artist. I even drafted a sewing pattern once that was featured in a crafting magazine. Through my own exploration of arts and crafts, I’ve come to know so many independent business owners in this industry, and have marketed several of them. These are gutsy people who take risks, work extremely hard for their living, and often zestfully embrace any education they can access about marketing.
Today, I’m offering my six best marketing tips for craft retailers for a more successful and profitable 2020.
First, a quick definition of local search marketing
Your store is your location. Your market is made up of all of your customers’ locations. Anything you do to promote your location to the market you serve is considered local search marketing. Your market could be your neighborhood, your city, or a larger local region. Local search marketing can include both offline efforts, like hanging eye-catching signage or getting mentioned in local print news, and online efforts, like having a website, building listings on local business listing platforms, and managing customer reviews.
Whatever you do to increase local awareness about your location, interact online with customers, bring them through your front door, serve them in-store, and follow up with them afterwards in an ongoing relationship counts. You’re already doing some of this, and in the words of Martha Stewart, “It’s a good thing.” But with a little more attention and intention, these six tips can craft even greater success for your business:
1. Take a page from my Google scrapbook
To engage in local search marketing is to engage with Google. Since they first started mapping out communities and businesses in 2004, the search engine giant has come to dominate the online local scene. There are other important online platforms, but to be in front of the maximum number of potential customers and to compete for rankings in Google’s local search results, your crafting business needs to:
Read the Guidelines for representing your business on Google and follow them to the letter. This set of rules tells you what you can and can’t do in the Google My Business product. Listing your business incorrectly or violating the guidelines in any way can result in listing suspension and other negative outcomes.
Create your free Google My Business listing once you’ve read the guidelines. Here’s Moz’s cheat sheet to all of the different fields and features you can fill out in your listing. Fill out as many fields as you possibly can and then Google will take you through the steps of verifying your listing.
Reckon with Google’s power. As our scrapbook says, Google owns your Google My Business listing, but you can take a lot of control over some of its contents. Even once you’ve verified your listing, it’s still open to suggested edits from the public, questions, reviews, user-uploaded photos and other activities. Main takeaway: your GMB listing is not a one-and-done project. It’s an interactive platform that you will be monitoring and managing from here on out.
2. Weave a strong web presence
Your Google My Business listing will likely be the biggest driver of traffic to your craft store, but you’ll want to cast your online net beyond this. Once you feel confident about the completeness and ongoing management of your GMB listing, there are 4 other strands of Internet activity for you to take firm hold of:
Your website
At bare minimum, your website should feature:
Your complete and accurate name, address, phone number, email, and fax number
Clear written driving directions to your place of business from all points of entry
A good text description of everything you sell and offer
An up-to-date list of all upcoming classes and events
Some high-quality photos of your storefront and merchandise
A more sophisticated website can also feature:
Articles and blog posts
Full inventory, including e-commerce shopping
Customer reviews and testimonials
Online classes, webinars and video tutorials
Customer-generated content, including photos, forums, etc.
The investment you make in your website should be based on how much you need to do to create a web presence that surpasses your local competitors. Depending on where your store is located, you may need only a modest site, or may need to go further to rank highly in Google’s search engine results and win the maximum number of customers.
Your other local listings
Beyond Google, your business listings on other online platforms like Yelp, Facebook, Bing, Apple Maps, Factual, Foursquare, and Infogroup can ensure that customers are encountering your business across a wide variety of sites and apps. Listings in these local business information indexes are sometimes referred to as “structured citations” and you have two main choices for building and maintaining them:
You can manually build a listing on each important platform and check back on it regularly to manage your reviews and other content on it, as well as to ensure that the basic contact info hasn’t been changed by the platform or the public in any way.
You can invest in local listings management software like Moz Local, which automates creation of these listings and gives you a simple dashboard that helps you respond to reviews, post new content, and be alerted to any emerging inaccuracies across key listing platforms, all in one place. This option can be a major time saver and deliver welcome peace of mind.
Structured citation management is critical to any local business for two key reasons. Firstly, it can be a source of valuable consumer discovery and new customers for your shop. Secondly, it ensures you aren’t losing customers to frustrating misinformation. One recent survey found that 22% of customers ended up at the wrong location of a business because online information about it was incorrect, and that 80% of them lost trust in the company when encountering such misinformation. Brick-and-mortar stores can’t afford to inconvenience or lose a single customer, and that’s why managing all your listings for accuracy is worth the investment of time/money.
Your unstructured citations
As we’ve just covered, a formal listing on a local business platform is called a “structured citation.” Unstructured citations, by contrast, are mentions of your business on any type of website: local online news, industry publications, a crafter’s blog, and lists of local attractions all count.
Anywhere your business can get mentioned on a relevant online publication can help customers discover you. And if trusted, authoritative websites link to yours when they mention your business, those links can directly improve your search engine rankings.
If you’re serving a market with little local competition, you may not need to invest a ton of time in seeking out unstructured citation opportunities. But if a nearby competitor is outranking you and you need to get ahead, earning high-quality mentions and links can be the best recipe for surpassing them. All of the following can be excellent sources of unstructured citations:
Sponsoring or participating in local events, organizations, teams, and causes
Hosting newsworthy happenings that get written up by local journalists
Holding contests and challenges that earn public mention
Joining local business organizations
Cross promoting with related local businesses
Getting featured/interviewed by online crafting magazines, fora, blogs, and videos
Read The Guide to Building Linked Unstructured Citations for Local SEO for more information.
Your social media presence
YouTube, Instagram, Pinterest, Facebook, Twitter, crafting forums...choices abound! How much time and where you invest in social media should be determined by two things:
What your local competition is doing
Where your potential customers spend social time
If your shop is literally the only game in town, you may not need to win at social to win business, but if you have multiple competitors, strategic social media investments can set you apart as the most helpful, most popular local option.
In your social efforts, emphasize sharing, showing and telling — not just selling. If you keep this basic principle in mind, the DIY revolution is at your fingertips, waiting to be engaged. One thing I’ve learned about crafters is that they will travel. Quilting retreats, knitting tours, and major craft expos prove this.
If you or a staff member happen to create one of the most-viewed videos on YouTube for the three-needle bind off or crafting felt succulents, it could inspire travelers to put your shop on their bucket list. One of my favorite knitters in the world films the English/Swedish language Kammebornia podcast which is so idyllic, it would certainly inspire me to visit the island of Gotland if I were ever anywhere nearby. Think what you can do via social media to make your shop an aspirational destination for even non-local customers.
3. Abandon fear of ripping out mistakes (and negative reviews)
As the old adage goes, “Good knitters are good rippers.” When you drop a stitch in an important project, you have to know how to see it, patiently rip out stitches back to it, and correct the mistake as skillfully as you can. This exact same technique applies to managing the reviews customers leave you online. When your business “drops the ball” for a customer and disappoints them, you can often go back and correct the error.
Reviews = your business’ reputation. It’s as simple (and maybe scary) as that. Consider these statistics about the power of local business reviews:
87% of consumers read local business reviews (BrightLocal)
27% of people who look for local information are actually seeking reviews about a particular store. (Streetfight Mag)
30% of consumers say seeing business owners’ responses to reviews are key to them judging the company. (BrightLocal)
73.8 percent of customers are either likely or extremely likely to continue doing business with a brand that resolves their complaints. (GatherUp)
To be competitive, your craft store must earn reviews. Many business owners feel apprehensive about negative reviews, but the good news is:
You can “rip out” some negative reviews simply by responding well to them. The owner response function actually makes reviews conversational, and a customer you’ve made things right with can edit their initial review to a more positive one.
Most consumers expect a business to receive some negative reviews. Multiple surveys find that a perfect 5 star rating can look suspicious to shoppers.
If you continuously monitor reviews, either manually or via convenient software like Moz Local that alerts you to incoming reviews, there is little to fear, because customers are more forgiving than you might have thought.
For a complete tutorial, read How to Get a Customer to Edit Their Negative Review. And be sure you are always doing what’s necessary to earn positive reviews by delivering excellent customer service, keeping your online listings accurate, and proactively asking customers to review you on Google and other eligible platforms.
4. Craft what online can’t — 5 senses engagement
Consider these three telling statistics:
Over half of consumers prefer to shop in-store to interact with products. (Local Search Association)
80% of U.S. disposable income is spent within 20 miles of home (Access Development)
By 2021, mobile devices alone will influence $1.4 trillion in local sales. (Forrester)
There may be no retailer left in America who hasn’t felt the Amazon effect, but as a craft shop owner, you have an amazing advantage so many other industries lack. Crafters want to touch textiles and fibers before buying, to hold fabrics up to their faces, to see true colors, and handle highly tactile merchandise like beads and wood. When it comes to fulfilling the five senses, online shopping is miles behind what you can provide face-to-face.
And it’s not just customers’ desire to interact with products that sets you apart — it’s their desire to interact with experts. As pattern designer Amy Barickman of Indygo Junction perfectly sums it up:
“To survive and thrive, brick-and-mortar stores must now provide experiences that cannot be replicated online.”
The expertise of your staff, the classes you hold, and tie-in services you offer, the sensory appeal of your storefront, the time you take to build relationships with customers all contribute to creating valued interactions which the Internet just can’t replace.
This advantage ties in deeply with the quality of your staff hiring and training practices. One respected survey found that 57% of customer complaints stem from employee behavior and poor service. Specifically in the crafting industry, staff who are expert with the materials being sold are worth their weight in gold. Be prepared to assist both seasoned crafters and the new generations of customers who are just now embracing the creative industries.
Play to your strengths. In every way that you market your business, emphasize hands-on experiences to draw people off their computers and into your store. In every ad you run, blog post you write, phone call you answer, listing you build, invite people to come in to engage all five senses at your place of business. Soft lighting and music, a tea kiosk, fragrant fresh flowers, some comfy chairs, and plenty of tactile merchandise are all within your reach, making shopping a pleasure which customers will want to enjoy again and again.
5. Learn to read your competitors’ patterns
Need to know: there are no #1 rankings on Google. Google customizes the search engine results they show to each person, based on where that person is physically located at the time they look something up on their phone or computer. You can walk or drive around your city, performing the identical search, and watch the rankings change in the:
Local Packs
Maps
Organic results
If you’re doing business in an area with few competitors, you may only need to be aware of one or two other companies. But when competition is more dense and diverse, or you operate multiple locations, the need for competitive analysis can grow exponentially. And for each potential customer, the set of businesses you’re competing with changes, based on that customer’s location.
How can you visualize and strategize for this? You have two options:
If competition is quite low, you can manually find your true local competitors with this tutorial. It includes a free spreadsheet for helping you figure out which businesses are ranking for your most desired searches for the customers nearest you. This is a basic, doable approach for very small businesses.
If your environment is competitive or you are marketing a large, enterprise craft store brand, you can automate analysis with software. Local Market Analytics from Moz, for example, is designed to do all the work of finding true competitors for you. This groundbreaking product multi-samples searchers’ locations and helps you analyze your strongest and weakest markets. Currently, Local Market Analytics focuses on organic results, and it will soon include data on local pack results, too.
Once you’ve completed this first task, you have one more step ahead if you find that some of your competitors are outranking you. You’ll want to stack up your metrics against theirs to analyze why they are surpassing you. Good news: we’ve got another tutorial and free spreadsheet for this project! What emerges from the work is a pattern of strengths and weaknesses that signal why Google is ranking some businesses ahead of others.
Knowing who your competitors are and gathering metrics about why they may be outranking you is what empowers you to create a winning local search marketing strategy. Whether you find you need more reviews, a stronger website, or some other improvement, you’ll be working from data instead of making random guesses about how to grow your business.
6. Open your grab bag
Every craft store and craft fair has its grab bags, and who can resist them? I’d like to close out this article by spilling a trove of marketing goodies into your hands. Sort through them and see if there’s a fresh idea in here that could really work for your business to take it to the next level.
Be more! This year, Michaels has partnered with UPS at 1,100 locations in a convenience experiment. You run a craft store, but could it be more? Is there something lacking in your local market that your shop could double as? A meeting house, a lending library, an adult classroom, a tea shop, a Wi-Fi spot, a holiday boutique, a place for live music?
Tie in! Your quilt shop can support apparel sewers with a few extra solids, textiles, and some fun patterns. Your yarn shop can find a nook for needle arts. Your woodshop could offer wooden needles for knitting and crochet, wooden hoops for embroidery, wood buttons, stamps, and a variety of wood boxes for crafters. You may sell everything needed for beading jewelry, but do you have the necessary supplies to bead clothing? Crafters are hungry for local resources for every kind of project, especially in rural areas, suburbs, and other communities where there are few businesses.
Teach! There are so many arts and crafts that are incredibly challenging to learn without being shown, face-to-face. Not everyone is lucky enough to have a grandparent or parent to demo exactly how you do a long tail cast on or master the dovetail joint. If you want to sell merchandise, show how to use it. Look at JOANN, which just unveiled its new concept store in Columbus, Ohio, centered on a “Creators Studio”. One independent fabric shop near me devotes half its floorspace to classes for children — the next generation of customers!
Email! Don’t make the mistake of thinking email is old school. Statistics say that 47% of marketers point to email marketing as delivering the highest ROI and 69% of consumers prefer to receive local business communications via email. If you’re one of the 50% of small business owners who hasn’t yet taken the leap of creating an email newsletter, do it!
Survey! Don’t guess what to stock or how to do business. Directly ask your customers via email, social media, and in-store surveys what they really want. I’ve seen businesses abandon scented products because they found they were deterring migraine-prone shoppers. I’ve seen others implement special ordering services to source hard-to-access items in-store instead of letting consumer drift away to the online world. Giving the customer what they want is the absolute key to your store’s success.
Go green! Whether it’s powering your shop with solar, supporting upcycling crafts, or stocking organic and sustainable inventory, embrace and promote every green practice you can engage in. Numerous studies cite the younger generations as being particularly defined by responsible consumption. Demonstrate solidarity with their aspirations in the way you operate and market.
Doers, makers, creators, crafters, artisans, artists… your business exists to support their drive to embellish personal and public life. When you need to grow your business, you’ll be drawing from the same source of inspiration that all creative people do: the ability to imagine, to envision a plan, to color outside the lines, to gather the materials you need to make something great.
Local search marketing is a template for ensuring that your business is ready to serve every crafter at every stage of their journey, from the first spark of an idea, to discovery of local resources, to transaction, and beyond. I hope you’ll take the template I’ve sketched out for you today and make it your own for a truly rewarding 2020.
Sign up for The Moz Top 10, a semimonthly mailer updating you on the top ten hottest pieces of SEO news, tips, and rad links uncovered by the Moz team. Think of it as your exclusive digest of stuff you don't have time to hunt down but want to read!
from The Moz Blog https://ift.tt/34uxWdg
via IFTTT
0 notes
Last Seen Blogs