#windows 10 windows 11 partition windows 11 create partition partition create hard disk partition how to create partition windows 10 partitio
Explore tagged Tumblr posts
Visit Tumblr Blog
Explore Tumblr blogs with no restrictions, modern design and the best experience.
Last Seen Tumblr Blogs


Fun Fact
Hackers stole 65M passwords from Tumblr in 2013.
Video
youtube
How to Create Partition in Windows 10 & Windows 11 | Create New Drive (2...
#youtube#partition#newPartition#createpartition#newdrive#post#india#drive#windows 10 windows 11 partition windows 11 create partition partition create hard disk partition how to create partition windows 10 partitio
0 notes
Text
How to Move Windows to Another Drive [2024 Updated] - Technology Org
New Post has been published on https://thedigitalinsider.com/how-to-move-windows-to-another-drive-2024-updated-technology-org/
How to Move Windows to Another Drive [2024 Updated] - Technology Org
Whether you’ve snagged a new SSD or aim to switch to a roomier drive, the real question is “How to move windows to another drive?” But worry not. This guide shares the complete knowledge of transferring Windows, aka “cloning,” to a new drive with three methods without losing data.
We’ve also shared the prep steps in the drive cloning process and dished out insights on the effort and time each method demands, empowering you to make a savvy decision. So, let’s transfer Windows to a new hard drive now!
Part 1: When Do You Need to Move Windows to Another Drive?
You may need to transfer Windows to new hard drive, such as a larger one, to fix the insufficient disk space issue. Or want to move Windows to another drive, like an SSD, due to the advantages it offers over HDDs, such as:
Ensure a notably faster and more efficient startup with quick data reading and writing speeds.
Offers faster data access speeds, providing quicker application loading and heightened system responsiveness.
Have no moving parts, thus reducing the risk of mechanical failures.
Provide shock resistance for increased durability.
Contributes to energy efficiency due to lower power consumption.
Part 2: Preparation Before Moving Windows to Another Drive
Before you move Windows 11 to another drive or downgrade to an older OS version, preparing beforehand is wise to prevent boot errors. Here’s what you need to do:
Backup Your Data – Back up your valuable data on the target disk, as the Windows migration involves rewriting the entire disk.
Get a Larger Drive – Choose a new disk with more capacity than your current drive and keep 30% to 40% of free space on the system disk. This is to maintain high-level computer performance and stability.
Set Up the New Disk – Install the new disk using a SATA Cable to your PC, then initialize it to MBR or GPT (the same disk type as the source OS drive). If the target drive is old, clear all existing data and partitions.
Choose an OS Migration Tool – Select an efficient tool according to your technical knowledge to move Windows installation to another drive.
Part 3: Three Methods to Move Windows to Another Drive
We’ve delved into three ways to move Windows 10 to another drive. You can either use a cloning tool to copy the OS from an HDD to an SSD or create a system image and recover it on an SSD. Another choice is to go for the easiest route with a third-party Partition Manager tool. Check out the detailed steps below, which we’ve shared in detail for each method:
Method 1: 4DDiG Partition Manager
Time
25 -30 minutes
Ease of Use
Beginner-friendly
Tools
4DDiG Partition Manager and your new drive
Drawback
Priced at $9.9 on Christmas Sale
For beginners, the top choice is 4DDiG Partition Manager, which provides a one-click solution to move Windows installation to another drive without reinstalling the system. This versatile tool also efficiently clones your entire hard drive for seamless data backup, so there is no need to prepare a bootable USB. More than just that, it provides many more benefits, such as:
Recover deleted, repair RAW, and restore formatted partitions.
Repairs bad sectors and offers comprehensive disk care.
Resize, merge, split, create, delete, and format partitions to optimize disk space.
Transfer windows to new hard drive without losing any data.
Follow the instructions below to move Windows 11 to another drive with the help of this tool:
Step 1: Install the tool on your computer and connect the new drive to your PC.
Step 2: Launch the tool, click “Start,” and choose the new drive as the target disk.
Step 3: Confirm the source disk (selected by default) and acknowledge the overwrite warning by clicking “Sure” and “Start.”
Step 4: Based on the drive size, it will take some time to transfer Windows to new hard drive. You can check the migration speed, elapsed time, and related data in the meanwhile. Press “Finish” when the OS transfer is complete.
Method 2: Windows System Image Tool
Time
40-50 minutes
Tools
Windows inbuilt System Image tool, bootable USB, and new drive
Ease of Use
Medium
Cost
Free
Drawbacks
Time-consuming backup and setup; carries a risk of data loss or corruption.
For professional users who don’t mind the manual steps, another effective method involves using a Windows System Image to move Windows 10 to another drive. Start by creating a system image backup, then a recovery USB, and finally, restore the system image to a new drive. Here’s how to move Windows to another drive with detailed steps using the Windows System Image tool:
Step 1: Create a System Image Backup
Connect an empty external drive (SSD or HDD) to your computer.
Open “Control Panel” and head to “System and Security.”
Choose “Backup and Restore,” select “Create a system image,” then tap “Start backup.”
Choose a destination drive with enough space for the system image backup and click “Next.”
Opt for either “Let Windows choose” or “Let me choose” to select what to backup. Click “Next.”
Finally, tap “Save settings and run backup��� to generate the system image.
Step 2: Create a Recovery USB
Plug in a USB to your computer.
In the Control Panel, type “ Create a recovery drive” and click on it to open.
Mark “Back up system files to the recovery drive.” Hit “Next.”
Choose the USB as the target, click “Next,” and follow the onscreen instructions to complete the process.
Step 3: Move Windows to Another Drive
Turn off your computer, open its case, and remove the old hard drive.
Connect the recovery USB and external drive to your PC with the system image backup instead.
Reboot the system, press F2/Del for BIOS, and set the PC to boot from the USB recovery drive.
On the “Windows Setup” screen, click “Next,” set language, keyboard, etc., then click “Next.”
Head to “Repair your computer” and choose “Troubleshoot.”
Select “Advanced options,” then tap“System Image Recovery.”
The newest backup will appear; if it fails, pick the right one from the external drive and click “Next.”
Check “Format and repartition disks” and click “Next.”
Confirm by clicking “Yes” and “Finish” to move Windows installation to another drive.
Wait for the system recovery to finish, reboot, and Windows will start automatically.
Method 3: Clonezilla
Time
4-5 hours for a 1TB drive
Tools
Clonezilla, bootable USB, and external drive
Ease of Use
Difficult
Cost
Free
Drawbacks
Time-consuming; Requires advanced tech skills; Cloning can fail due to bad disk sectors.
Another option to move Windows 11 to another drive is by cloning the entire disk. You can do this through an open and free-source cloning tool like Clonezilla. It will clone the OS, applications, and data from your disk, so you don’t need a backup. You can also use Clonezilla as a backup tool to clone your disk data before using the System Image or 4DDiG tool. Here’s how to transfer Windows to new hard drive with Clonezilla:
Step 1: Reduce Partition Size (Optional)
You must reduce the partition size if you’re using Clonezilla to move Windows to another drive that is smaller. But if the destination drive is equal to or larger than the source drive, skip this step. Here’s what to do to reduce partition size:
Press the “Windows + R” keys and type in “diskmgmt.msc.” Press Enter to open Disk Management.
Right-click the main volume (C:) and select “Shrink Volume.”
Adjust the volume size to shrink and tap “Shrink.”
After shrinking, you’ll see unallocated space. Right-click on the unallocated space and select “New Simple Volume” to create a new partition or leave it unallocated for the cloning process.
Step 2: Download Clonezilla and Prepare a Bootable USB
Visit the Clonezilla download page, choose the ISO option, and click “Download.”
Visit the Rufus website and download the latest version of the tool to create a bootable USB.
Launch the tool, select your USB, click “Select,” choose the Clonezilla ISO, click “Open,” and hit Start.
Step 3: Clone Windows to Another Drive
Connect your new drive to your computer.
Boot your computer using the bootable USB. When Clonezilla loads, hit “Enter” for default settings.
Choose your language, select “Don’t touch keymap,” and start Clonezilla.
Opt for “Beginner mode,” pick “disk_to_local_disk local_disk_to_local_disk_clone,” and press “Enter.”
Choose the source and target drives and decide whether to check or skip the source file system.
Choose “reboot/shut down/etc” when everything is finished.
Confirm the cloning process by typing Y thrice. Press “Enter” each time. This is to confirm everything’s good with the cloning process, data overwrite in cloning, and getting the boot loader cloned (for a bootable Windows drive). Next, the software will move Windows 10 to another drive by cloning.
Conclusion
In our comprehensive guide on how to move Windows to another drive, we’ve covered three methods catering to diverse technical skills. If you’re not tech-savvy, the ultimate choice is 4DDiG Partition Manager.
This user-friendly tool is a time and effort-saver, offering a one-click Windows OS migration to SSD sans the hassle of reinstalling. It’s also efficient at cloning your entire hard drive for data backup, eliminating the need for a bootable USB.
#2024#applications#back up#backup#Christmas#clone#comprehensive#computer#control panel#data#data backup#data loss#delete#efficiency#energy#energy efficiency#Featured technology news#GPT#hard drive#hdd#how#how to#insights#ISO#it#keyboard#language#loader#management#merge
0 notes
Text
El Capitan Bootcamp Windows 10
For more information about using Windows on your Mac, open Boot Camp Assistant and click the Open Boot Camp Help button. If you're using an iMac (Retina 5K, 27-inch, Late 2014) or iMac (27-inch, Late 2013) or iMac (27-inch, Late 2012) with a 3TB hard drive and macOS Mojave or later, learn about an alert you might see during installation.
Install Windows 10 El Capitan Boot Camp
El Cap seems to have nuked my Bootcamp created Windows 10 partition and it won't let me install one outright. I get the 'This is GPT partition style' error, and I'm not sure how to fix it under El Capitan.
Aug 23, 2021 Windows 10, 64-bit Windows 7 SP1, 64-bit. OS X El Capitan (10.11) eDrawings 2017. Apple Mac ® based machines running Windows using Boot Camp are not supported.
A mid-2011 iMac or similar running OSX El Capitan; An 8GB or larger USB drive; An ISO containing Windows 10 (I used Windows 10 Enterprise) 50GB free disk space, 100GB recommended; Step 1: Disable El Capitan's System Integrity Protection. El Capitan ships with a new OS X feature: System Integrity Protection (SIP), also known as 'rootless' mode.
Aug 18, 2015 Aug 18, 2015. One serious bug should be considered when trying to do this. El Capitan boot camp assistant will fail to remove your Windows partition if you don't want that Windows installation. And you will likely end up with backing up your Mac OS X and format the whole disk to bring everything back to normal.

Is it possible to play Genshin Impact on Mac

Developed by miHoYo Limited, Genshin Impact is an open-world role-playing action released almost a month ago. From the beginning, a pair of twins is set to arrive on the land called Teyvat, a fictional place with lots of artifacts and mysteries yet to be unlocked. However, the impact of an unknown god keeps one of them trapped from leaving the place. This is where the adventure begins. Emerge yourself into a magic world full of epic bosses to beat through and reach a long-lost sibling of the main character. Perceive the power of all elements laid down in the world to defeat the most perilous and challenging monsters throughout the game. You can also unite with 3 more players to travel and explore the ubiquitous beauty of Teyvat together. Genshin Impact is a great anime-like video game accompanied by color-saturated graphics attained thanks to the Unity engine. Despite the game can be officially played across PS4, IOS, Android, and Windows for free, we will help extend this list to cover Mac users as well.
System Requirements
MinimalRecommendedOS: Windows 7 SP1 64-bit, Windows 8.1 64-bit or Windows 10 64-bitOS: Windows 7 SP1 64-bit, Windows 8.1 64-bit or Windows 10 64-bitProcessor: Intel Core i5 equivalent or higherProcessor: Intel Core i7 equivalent or higherRAM: 8 GBRAM: 16 GBVideo card: NVIDIA GeForce GT 1030 and higherVideo card: NVIDIA GeForce GTX 1060 6 GB and higherDirectX: from 11 versionDirectX: from 11 versionDisc space: 30 GBDisc space: 30 GB
Play Genshin Impact on Mac with Parallels
Genshin Impact requires lots of PC resources, but if you have a powerful Mac computer (iMac, iMac Pro, or Mac Pro) Parallels Desktop can be a solution. This is software for Windows virtualization on Mac with the full support of DirectX and GPUs. It allows you to install Windows 10 on Mac with a couple of clicks and switch between MacOS and Windows instantly. You can run Windows just like on a regular PC, install Steam and enjoy the Genshin Impact game on Mac.
Play Genshin Impact on Mac with Vortex.gg or Nvidia Geforce Now
Vortex.gg or Nvidia Geforce Now don’t have Genshin Impact in their catalog yet, however, there are thousands of requests from users to add it. Since it is one of the most popular games, this can be brought to life soon.
If you have an old Mac or it cannot satisfy Genshin Impact game system requirements, there is an easy solution. Cloud gaming provides you sufficient cloud resources for a fixed fee. All you need is a small client program and a good internet connection starting from 15 Mbits/s. There are several great services, that provide such an opportunity, among the best are Vortex.gg and Nvidia Geforce Now. Both services may have Genshin Impact in their game catalog soon, and you can play on any Mac computer (starting from MacOS 10.10) and even Android!
Play Genshin Impact on Mac with BootCamp
This method is simple but time-consuming. If your Mac meets the system requirements above, this is probably the best way to play Genshin Impact for now. You need to set up a dual boot of Windows and Mac via BootCamp. BootCamp allows users to choose the system to work in on startup, however, you won’t be able to switch between systems like in Parallels. You will need to reboot your machine every time you switch from Mac to Windows and vice versa. Remember that Mac is just a computer, that uses common processors, RAM, disks, and other components. So you can install Windows on Mac by allocating disc space of a minimum of 64 Gb (to be able to run Windows and a couple of games). To set up Windows via BootCamp, please, do the following:
For OS X El Capitan 10.11 or later
Mention, that for MacOS versions prior to OS X El Capitan 10.11 you will need to create bootable Windows USB.
Download Windows ISO file
Open Boot Camp Assistant (Go to Applications >Utilities)
Define the Windows partition size choose downloaded Windows ISO file
Format Windows partition and go through all Windows installation steps
When Windows boots for the first time follow on-screen instructions to install Boot Camp and Windows support software (drivers)
One such finding relates to how El Capitan handles the installation of Windows through the Boot Camp Assistant. Apple's OS X El Capitan is finally here and Mac owners are installing the software in droves. Oct 05, 2015 Installing Windows 10 on OS X El Capitan is not very complicated, but there are a few pitfalls. This tutorial will show you how to successfully install Windows 10 on a MacBook Pro.
What you need to install Windows 10 on Mac
MacBook introduced in 2015 or later
MacBook Air introduced in 2012 or later
MacBook Pro introduced in 2012 or later
Mac mini introduced in 2012 or later
iMac introduced in 2012 or later1
iMac Pro (all models)
Mac Pro introduced in 2013 or later
The latest macOS updates, which can include updates to Boot Camp Assistant. You will use Boot Camp Assistant to install Windows 10.
64GB or more free storage space on your Mac startup disk:
Your Mac can have as little as 64GB of free storage space, but at least 128GB of free storage space provides the best experience. Automatic Windows updates require that much space or more.
If you have an iMac Pro or Mac Pro with 128GB of memory (RAM) or more, your startup disk needs at least as much free storage space as your Mac has memory.2
An external USB flash drive with a storage capacity of 16GB or more, unless you're using a Mac that doesn't need a flash drive to install Windows.

A 64-bit version of Windows 10 Home or Windows 10 Pro on a disk image (ISO) or other installation media. If installing Windows on your Mac for the first time, this must be a full version of Windows, not an upgrade.
If your copy of Windows came on a USB flash drive, or you have a Windows product key and no installation disc, download a Windows 10 disk image from Microsoft.
If your copy of Windows came on a DVD, you might need to create a disk image of that DVD.
How to install Windows 10 on Mac
To install Windows, use Boot Camp Assistant, which is included with your Mac.
1. Use Boot Camp Assistant to create a Windows partition
Open Boot Camp Assistant, which is in the Utilities folder of your Applications folder. Then follow the onscreen instructions.
Boot Camp Windows In Mac Pro 3 1 El Capitan Update
If you're asked to insert a USB drive, plug your USB flash drive into your Mac. Boot Camp Assistant will use it to create a bootable USB drive for Windows installation.
When Boot Camp Assistant asks you to set the size of the Windows partition, remember the minimum storage-space requirements in the previous section. Set a partition size that meets your needs, because you can't change its size later.
2. Format the Windows (BOOTCAMP) partition
When Boot Camp Assistant finishes, your Mac restarts to the Windows installer. If the installer asks where to install Windows, select the BOOTCAMP partition and click Format. In most cases, the installer selects and formats the BOOTCAMP partition automatically.
3. Install Windows
Unplug any external devices that aren't necessary during installation. Then click Next and follow the onscreen instructions to begin installing Windows.
4. Use the Boot Camp installer in Windows
After Windows installation completes, your Mac starts up in Windows and opens a ”Welcome to the Boot Camp installer” window. Follow the onscreen instructions to install Boot Camp and Windows support software (drivers). You will be asked to restart when done.
If the Boot Camp installer never opens, open the Boot Camp installer manually and use it to complete Boot Camp installation.
If you have an external display connected to a Thunderbolt 3 port on your Mac, the display will be blank (black, gray, or blue) for up to 2 minutes during installation.
How to switch between Windows and macOS
Restart, then press and hold the Option (or Alt) ⌥ key during startup to switch between Windows and macOS.
Learn more
If you have one of these Mac models using OS X El Capitan 10.11 or later, you don't need a USB flash drive to install Windows:
MacBook introduced in 2015 or later
MacBook Air introduced in 2015 or later3
MacBook Pro introduced in 2015 or later3
iMac introduced in 2015 or later
iMac Pro (all models)
Mac Pro introduced in late 2013
To remove Windows from your Mac, use Boot Camp Assistant, not any other utility.
For more information about using Windows on your Mac, open Boot Camp Assistant and click the Open Boot Camp Help button.
1. If you're using an iMac (Retina 5K, 27-inch, Late 2014) or iMac (27-inch, Late 2013) or iMac (27-inch, Late 2012) with a 3TB hard drive and macOS Mojave or later, learn about an alert you might see during installation.
2. For example, if your Mac has 128GB of memory, its startup disk must have at least 128GB of storage space available for Windows. To see how much memory your Mac has, choose Apple menu > About This Mac. To see how much storage space is available, click the Storage tab in the same window.
3. These Mac models were offered with 128GB hard drives as an option. Apple recommends 256GB or larger hard drives so that you can create a Boot Camp partition of at least 128GB.
Boot Camp Windows In Mac Pro 3 1 El Capitan Free
Krausewich wrote:
I loaded Windows 7 onto my machine through bootcamp, then upgraded to Windows 10, then installed a bunch of software, then restarted into the Mac environment before loading the Bootcamp WindowsSupport files.
Your 2008 MP does not support W10. There are no Apple-certified drivers for W10 on your model as stated in Use Windows 10 on your Mac with Boot Camp - Apple Support . The only MP which supports W10 is the 2013 Cylinder.
If I set the startup disk to the Windows partition it restarts to a black screen with a blinking cursor, no doubt because the BIOS mediator was not installed.
The BIOS mediator is the EFI firmware on your MP. It does not need to be installed. It was already there when you were running W7.
Everything is there as it is supposed to be as I can see it through the MAC finder... just can't boot into it. AAARGH !!
Boot Camp Windows In Mac Pro 3 1 El Capitan De
I thought to boot up with the Windows 10 iso disk and reinstall the OS, but I am afraid I will overwrite everything I loaded or perhaps corrupt the dll's or registry entries.
We can try to resurrect the Windows installation. I presume you have a W7 backup somewhere before you started the W10 upgrade. Is this a single-disk MP? From OSX Terminal, please post the output of
Boot Camp Windows In Mac Pro 3 1 El Capitan Download
diskutil list
diskutil cs list
Install Windows 10 El Capitan Boot Camp
Oct 22, 2016 9:49 PM
1 note
·
View note
Text
Mac Disk Utility Sd Card Waiting For Partitions To Activate

“Can’t format SD card” is a mysteriously annoying error. Most of the time it is quite difficult to deduce the reason for the error; the SD card can be damaged or corrupted. How to tackle such an issue, if you cannot format it, SD card is of no use. Hence, we bring you this comprehensive content on how to fix the error “Can’t format SD Card” on Mac and Windows.
Mac Disk Utility Waiting For Partitions To Activate
Mac Disk Utility Sd Card Waiting For Partitions To Activate Sd Card
Mac Waiting for partitions to activate for disk utility. 5 months ago Mac Waiting for partitions to activate for disk utility. Put a new hard drive into my mac and im booting with a usb, boot is fine but its not letting me erase the drive to GUID without 'waiting for partitions to activate'. Mac Waiting for partitions to activate for disk utility put a new hard drive into my mac and im booting with a usb, boot is fine but its not letting me erase the drive to GUID without 'waiting for partitions to activate'.
Note: With deeper investigation, this format error was found to be more prevalent in SanDisk SD cards. Even SanDisk users can make perfect use of this article to fix the error.

Why Can’t I Format My SD card?
“Why can’t I format my SD card on my computer, camera, or phone?”
When you experience this specific error you won’t be able to format your SD card not only on your computer but also on any other device. It is because.
Memory card is write protected
Memory card is severely damaged
For example, if you clone SD card with multiple partitions, the disk layout on the target disk will be the same as the SD card. Align partitions to 1MB: this feature is checked by default. If you choose an SSD or advanced format disk on your PC as the target disk, check the option for better performance. Nov 11, 2007 MacRumors attracts a broad audience of both consumers and professionals interested in the latest technologies and products. We also boast an active community focused on purchasing decisions and technical aspects of the iPhone, iPod, iPad, and Mac platforms. While these cards may come formatted in a Windows-specific or universal format for Macs and PCs, you can reformat to “Mac OS X Extended” (HFS+) in Disk Utility, and use them just like any.
If your SD card is write-protected, you cannot make any changes to your SD card. That includes formatting the SD card. However, you can disable write protection and fix the error
But, if the error is because your SD card is severely damaged your first priority must be recovering data from the SD card. When your SD is severely damaged, it will reach to an extent where it can’t even mount a file system. When you format an SD card it means mounting a new file system that tracks the storage on your SD card. So damage or corruption is the reason why your SD card is not formatting.
When your SD card is experiencing such an error, you cannot even access the drive and restore the data from it.
“Considering the fact that SD cards are majorly used on cameras, and they store the most important memories, not just the data. This is all the more reason why recover the files from corrupted SD cards becomes a priority before fixing it.”
Now to the actual question, what is the best possible way to recover data from an SD card that is not supported to format. Remo data recovery software, the best software to recover photos from SD cards, with more than 10 million downloads can be the key. More than data recovery Remo has an impressive and unique feature that will enable users to create an identical image of any severely damaged storage drive. By creating an identical image, you are creating an exact copy of all the files existing on your severely damaged SD card.
Why Should I Create an Image of My SD card?
With the help of Remo, you can also directly recover data from a damaged SD without creating an image. But considering the factors (bad sectors, virus infections) and the severity of the damage, creating an image of SD will yield exceptional results.
This means no matter how severely your SD card is damaged, you can still recover the data from it. You can find a detailed explanation of how to create an exact image of the SD card which is unable to format.
How to Create an Image of an SD card that Won’t Format?
Download and install Remo data recovery Software. Launch the application and follow the steps that are mentioned below.
From the home screen, select the recover partition option where you can see your SD card listed with other drives that are existing on your computer.
Select the SD card and from the top right corner click on options (one with 3 horizontal lines) and select the save image option. This will prompt a save as a window, select the desired location, file name, and click on save to create an exact image of your SD card.
Since you are creating an image of an entire SD card, make sure the location you are saving your image has enough storage space.
After creating the image file, you can extract files, photos, or videos that are existing on your SD card from that image file. This is the most convenient method to recover the data from severely damaged SD card.
How to Fix “Micro SD Card Cannot format” Error?
As previously mentioned, two main reasons for this error are write-protected SD card and Severely damaged SD card. The following are instructions on how to fix this error.
Unlock the Micro SD card
Micro SD card is locked is one of the terminology used for a write-protected SD Card. As discussed earlier, when a micro SD card is locked or write-protected you cannot make any changes since it works in read-only mode. You can disable the write protection on the SD card to fix the error.
An SD card can be severely damaged due to

High-level bad sectors (Here you can know more about uncorrectable sectors)
Severe virus infection
The best method to fix an SD card that won’t format is by force formatting the SD card using CMD.
How to Force Format an SD Card?
Open Command Prompt by right-clicking Start >Command Prompt (Admin)or search cmd from Start
Type: diskpart to bring up DiskPart utility
Type: list disk and hit Enter
Type: select disk 1 and hit Enter (Replace 1 with the drive number of your SD card)
Type: clean and hit Enter
Type: create partition primary and hit Enter
Type: select disk 1 and hit Enter (Replace 1 with the drive number of SD card)
Type: active to make the SD card partition activate
Type: format fs = NTFS or format fs = fat32 and hit Enter
Type: assign letter = F
After this, type exit to finish the process
Mac Disk Utility Waiting For Partitions To Activate
After force formatting the SD you need to fix the Bad sectors using the CHKDSK on SD card.
CHKDSK format SD card
CHKDSK is one of the most prominent utilities on windows that will help you fix all the bad sectors that exist on your SD card. The following are the instructions on how to do it.
Right-click on Start to select Command Prompt (Admin) or click Start and type: cmd > click exe to bring up Command Prompt
Sign in as an administrator and type: chkdsk E: /f /r and hit Enter; (Replace E: with the drive letter of your SanDisk SD card)
Wait for the process to complete (Process time might vary based on the size of SD card)
Exit CMD and enter Disk Management tool, find SD card, right-click on it, and select Format volume
Reset file system and drive letter of the SD card, click OK to confirm the format action
Both the aforementioned methods can be used on all brands of SD card such as SanDisk, Sony, Kingston, Transcend, etc. It also works on all formats of SD cards such as Micro SD, SD, SDHC, SDXC.
How to Fix if SD card Won’t Format on Camera
Generally, when you insert an SD card into a camera sometimes it will prompt to format the SD card. This will fix any errors in incompatible file system errors. However, in this particular case, even that won’t fix the error.
Even to fix the error that the SD card will not format on camera you need to use the methods mentioned above. Make sure you use the perfectly working SD card adapter or card reader while connecting it to a computer or laptop.

How to Fix if SD Card Can’t Format on Mac or Android
You can use the same methods mentioned above to fix SD card not readable or format error on Android. However, in the case of Mac, there is no specific fix other than unlocking the SD card or disabling the write protection on Mac. Nevertheless, the most crucial aspect to remember is to recover the data from the SD before fixing it. Remo Recover is also available on Mac. Hence, you can even download Remo on your Mac and successfully recover the data from it.
Finally, if you are unable to fix the error, it means that your SD card is unfixable. If your SD card is still under warranty time, better contact the brand, and claim to exchange the memory card. But, don’t forget to recover your most precious data from the SD card before exchanging it.
Mac Disk Utility Sd Card Waiting For Partitions To Activate Sd Card
P.S most SD card brands won’t recover data for you.
1 note
·
View note
Text
How to create virtual machine (VM) in virtualbox
(Step a: You might have to change some bios settings on your computer; to do this, look up “[your computer’s or motherboard’s brand] bios”, follow the instructions to access the bios settings, and change the setting named something similar to “Virtualization Technology” to enabled)
Step 1: Download and install VirtualBox from www.virtualbox.org.
Step 2: Download an operating system (OS), I recommend https://manjaro.org/download/, specifically the KDE Plasma edition.
Step 3: Click “New” in the VirtualBox window.
Step 4: When the New window pops up, input the name of the virtual machine (I usually just name it whatever OS I’m running).
Step 4a: Choose the “Type”; if you’re using my suggestion from step 2, then you’ll select Linux.
Step 4b: Choose the “Version”; if you’re using my suggestion, you’ll select Arch Linux (64-bit). Click next.
Step 5: Choose how much memory, RAM, you want to VM to be able to use. The default is generally enough, though if I’m able, I’ll often set it to 2gb (2048mb). Click next.
Step 6: Now you’ll be asked to create the hard disk storage space for the VM. Click Create.
Step 6a:Keep the default selection on this new window, and click Next.
Step 6b: Keep the default here, too, and click Next.
Step 6c: Here, you’ll decide where the data for the VM is stored; make sure you keep it somewhere where you have room. The default is generally good enough, unless you’re using a secondary storage device, in which case you’ll have to specify that.
Step 6d: Now you’ll decide how much storage to allocate for the VM; the default might be enough, but I usually give it between 16 and 30GB just to be on the safe side. Click Create when you’ve decided.
Step 7: With the VM created, click Run.
Step 8: A window will pop up asking you what you want to boot from. Navigate to your downloads folder and select the file you downloaded in step 2. It should end in .iso
Step 8a: If the file you dowloaded in Step 2 was an archive (.zip) you’ll have to uncompress it before doing step 8.
Step 9: From here on, I will be assuming you took my suggestion in Step 2. If you didn’t (say, going with Ubuntu), then you’ll want to search “[distro you chose] installation” in your preferred search engine and follow the instructions.
Step 9a: You can change some settings here on the boot screen, but you’ll be choosing these later so it doesn’t really matter right now, so simply hit the enter key.
Step 9b: The OS will now boot, and when the desktop shows up, so should a window called Manjaro Hello. At the bottom of this window, there should be a button called Launch Installer. Click that.
Step 9c: The installation process is rather straight forward. Choose your location. Choose your keyboard layout.
Step 9d: After choosing your location and keyboard layout, you’ll come to a section called Partitions. The default, Erase disk, is what you’ll want to go with. Don’t worry, when you’re running a VM nothing you do in the VM will have any effect on your actual computer, so you won’t actually be erasing all your data. (Think of it as an extension of the phrase “what happens in Vegas, stays in Vegas”)
Step 9e: With the partition decided, you’ll now set up your user account. This part is rather straight forward, and everything is rather well explained.
Step 9f: The next section is called summary, and as the name implies, it gives you a summary of your choices. Read it over and make sure you did everything as you wanted. Click install.
Step 10: With that done, you’ll now have to wait a bit while the OS installs. When it’s done, you’ll have to reboot the VM.
Step 10a: If, when it launches again, the boot screen looks like it did in the beginning, shut down the VM, go to “Settings > Storage” and under the heading Controller: IDE there should be something along the lines of “Manjaro-plasma” with a CD beside it. Click that, and under Attributes, there should be a section called Optical Drive. Click the little CD next to the drop down, and a little tooltip should pop up. Select the bottom option, “Remove disk from virtual drive”. With that done, click “OK” at the bottom of the window. Now, restart the VM.
Step 11: From here, it’s all up to you! Mess around, and familiarise yourself with the operating system and desktop environment (DE; in this case, KDE Plasma).
If this guide doesn’t help, you can also just search for help on your favoured search engine, or youtube, or ask for help.
33 notes
·
View notes
Text
Disk management tools are essential for managing and maintaining your hard disk drives. They allow for disk optimization and defragmentation, disk repair, diagnostics partitioning, and formatting.
For Windows users, managing and maintaining your hard disk is easier than ever. Windows includes a set of disk management tools (known as disk management) that gives you full control of your hard disk drives. To access these, press the Windows key, type in "disk management" and select the first result. You'll then see a graphical representation of all these disks. Connected to your computer.
If you're using a Mac, the process of accessing and using are slightly different. To open the disk utility, open the finder window and select applications>utilities > disk utility. You'll then see a list of disks connected to your computer along the left side.
Whether you're using Windows or Mac, disk management tools can help you manage your hard disk drive.
Accessing and using disk management
1. Accessing disk management
Accessing disk management is simple. All you have to do is press the Windows key + R to open the run dialog box and type diskmgmt.msc and then hit enter. This will open the disk management window.
Alternatively, you can access the disk management by going to the control panel, clicking on "system and security" and then selecting "create and format hard disk partition"
2. Using disk management.
Once you access the disk management, you will see a list of all available disks and volumes on your computer. Each disk and volume will be listed and will have an associated status-healthy, inactive, failed, etc. You can then use the options in disk management to perform various disk-management tasks.
Here are some tasks that you can perform on disk management.
Create and delete partitions
Format and level partitions
Create and delete simple /dynamic volumes
Change the drives letter of a volume
Check the error
Set up drives for dual boot
Tips and best practices
Using disk management is easy, however, it is important to remember that disk management is a powerful tool. Always be careful when making changes and always have a valid backup of your data before making any significant changes.
One thing to remember is that the changes you make in disk management are permanent, so if you make a mistake it can cause serious issues. So double-check your work Before making any changes.
The most common way to open disk management is through the computer management utility.
Here are the steps on how to open the disk management in windows.
1. Open the control panel.
Click the bottom-left start button to open the start menu search the control panel in the search box and select the control panel in the results.

What is a control panel?
control panel is a component of Microsoft Windows that provides the ability to view and change the system setting.
2. Select the system and security.
Always remember that system and security are only found in windows 11, 10, 8, and 7.
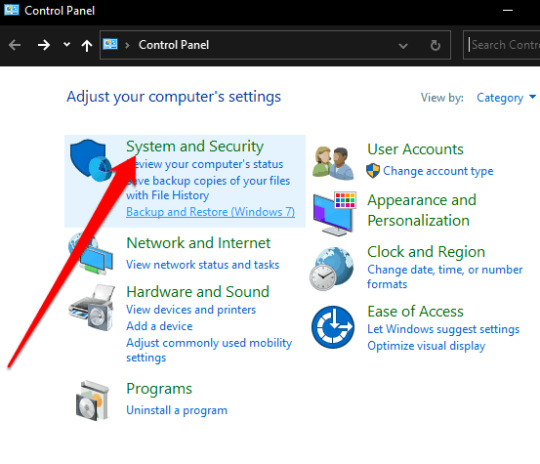
What are systems and security?
system security controls and safeguards that an organization takes to ensure its networks and resources are safe from downtime, interference, or malicious instruction.
3. Select windows tools (windows 11) or administrative tools.
You might scroll down to see it because it's located near the bottom of the window.
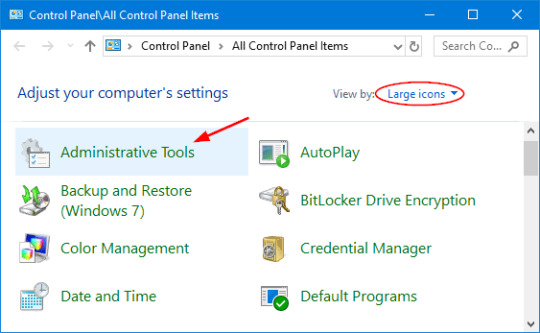
What are administrative tools?
administrative tools is a folder in the windows 10 control panel. These folders contain tools for the systems administrators and advanced users.
4. double-click Computer Management.
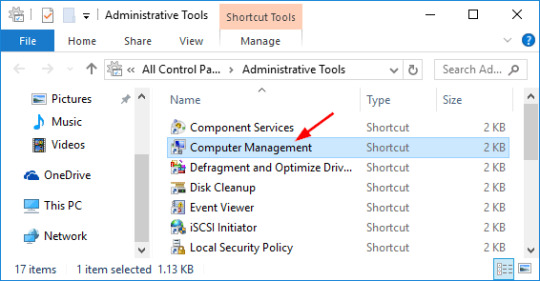
5. Choose Disk Management on the left side of the window.

disk management is located under Storage. But if you don't see it listed, you might need to select the plus or arrow icon to the left of the storage icon.
Disk management might take several seconds to load, but it will eventually appear on the right side of the computer management window.
After you have finished all the processes and steps you can now partition a hard drive, format a hard drive, change a drive's letter, or do whatever you need to do in the windows disk manager tool.
Other ways to open disk management
you can simply type the command in any version of windows to open the disk management.
This method might be a lot faster for you if you're used to a command prompt.

1 note
·
View note
Text
CREATING A BOOTABLE FLASH DRIVE USING CMD
What is a Bootable USB?
An ordinary USB storage device (such as a USB stick or external hard drive) that has an operating system's "ISO image" stored on it is referred to as a "bootable USB."
An optical disc, such as a CD or DVD, can be stored as an archive file called an ISO image. This might be a CD for installing Windows, for instance.
Normally, your computer boots from the operating system stored on your internal hard drive whenever you turn it on. However, you can start your computer using the USB's ISO image by using the bootable USB.
This can come in handy if you ever need to install, restore, or recover your computer's operating system. (source: SoftwareKeep)
Requirements
These are the requirements before you proceed. Make sure you have the following:
ISO of choice (e.g. Windows 10, Windows 7)
Flash Drive (4GB minimum)
How to create a Bootable Device using CMD?
1. First, plug your flash drive. Make sure your device is connected to the computer.
2. Find the Command Prompt (CMD) and click Run as Administrator.
3. Once CMD is running, type diskpart and hit enter key on the keyboard.
4. Then type list disk and hit enter key then you'll see the list of your disk.
5. Identify which of the disk is your device then type select disk x (disk number of your device. e.g. select disk 1) and hit enter.
6. Type clean and click enter key then wait until you're notified that your device is cleaned.
7. Next thing to do is type create partition primary and hit enter key. Then type select partition 1 and hit enter.
8. Once partition is selected, type format=ntfs quick and hit enter.
9. Type active.
10. Type exit twice to exit the command prompt.
11. Go to File Explorer and find your ISO of choice. Open the ISO and copy all the file to your device (your device will change its name and its normal so you don't have to worry).
12. Eject your flash drive and your device is now ready.
Video Demonstration:
youtube
1 note
·
View note
Text
Virtualization is the reigning king. The smooth, soft talking, low lying beast is carrying all of the load with grace, with elegance and with amazing longevity. It reigns in the cloud, in the on premise purring hardware and everywhere you can imagine. So let us look at Hyper-V, one of the virtualization technologies that sparks the hearts of many technological hearts and how it can be installed in the new Windows server 2022. Hyper-V is a Microsoft Product that is used to accomplish hardware virtualization. Virtualization as you know basically allows you to run several virtual machines (software computer) on the same hardware. These virtual machines behave exactly like a native/normal computer allowing you to install applications on top of an operating system. Microsoft asserts that Hyper-V runs each virtual machine in its own isolated space, which means you can run more than one virtual machine on the same hardware at the same time. We shall now get into the business of installing Hyper-V and get to see how it works. Let us go step by step together. Step 1: Start Server Manager Hit your Windows keyboard key and search for “Server Manager” and fire it up. Step 2: Add Roles and Features The moment your Server Manager is kicking in the pool, click on “Add Roles and Features” and then click on “Next” on the first Window/Wizard that shows up as illustrated. Step 3: Role-based or feature-based installation On the next Window for “Select installation type”, choose Role-based or feature-based installation radio button and gladly hit “Next”. Step 4: Choose the Destination Server Choose the server you would wish to install Hyper-V in on this window and hit “Next” after that. Step 5: Select Hyper-V Server Role The window that follows after Step 4 gives you a list of many roles you can add to your server. Since we are in need of Hyper-V, go ahead and choose “Hyper-V” box. Click “Next” after you are done. Step 6: Add Features Clicking on Next on Step 5 will pull up a small pop-up window. On it, simply click on “Add Features”tab and then click “Next” when it is all ready. Step 7: Hit “Next” on the next two consecutive windows There is nothing much to add on the next two windows that will ensue, so simply slide through by clicking on “Next”. Hit “Next” again Step 8: Create Virtual Switches Virtual Switches make it possible for Virtual Machines to talk to each other. We are going to create one in this step and Link it with a physical network. Choose one or more of the Physical Networks available on your Physical Host Server. Step 9: Virtual Machine Migration The configuration of this step depends on whether you have a cluster or not. We are going to leave the defaults in this step since it is a standalone host and just hit “Next”. If you have a cluster and you like this feature, simply click select it by clicking on the radio button illustrated by the red arrow. Step 10: Default Stores In this step, we are going to specify where Hyper-V stores virtual hard disk files and virtual machine configuration files. You can specify the locations or partitions that you prefer here. Once you are done, the “Next” button will be waiting for you to click on. Step 11: Confirm your installation selections Confirm if everything you would wish to be installed appears on the list that appears on this window. If all is okay, click on “Install”. You should see the installation progress as shared below. Step 12: Reboot the server once done installing The installation progress will process and once it is complete, click on “Close” and then reboot/restart your server. And we should be successfully done! Completion Note We now have Hyper-V installed and running. You are free to start up Windows and Linux virtual machines to start running your applications on them. That said, we hope the guide was easy to follow and you enjoyed it as we intended it to be. Thank you for your heart warming support always.
Check out related guides below for your enjoyment. Install and Configure Hyper-V on Windows Server 2019
0 notes
Text
What is windows media creation tool

#What is windows media creation tool how to
#What is windows media creation tool for mac
#What is windows media creation tool install
#What is windows media creation tool full
#What is windows media creation tool windows 10
If you can find another PC running a system you want, you can directly clone the system partition to a USB, and migrate it from the USB to your computer. In addition, AOMEI Partition Assistant provides another feature named “Migrate OS to SSD”.
#What is windows media creation tool install
So we can conclude that Windows Media Creation Tool is a good utility to upgrade and install a new system on your PC, and it is more appropriate to create a portable Windows OS when you need to run 2 different systems on your computer. And if you want run Windows on Mac, you might need to click the Apple icon to enter system Preference and select the USB as the startup disk. Also, you will need to enter BIOS to set the bootable USB as the boot device. When the process is fished, you can insert this USB to boot up other computers. Ensure you have backed up all the data you need, and click “Yes” to continue. And choose the USB to install Windows To Go, and it will warn you that the data on the USB will be erased. ✍Note: If you don’t have it, you can also choose “Create Windows To Go with current system” that allows you to create a portable media by the system of the PC. Then select a Windows installation file, and click “Next”.
#What is windows media creation tool for mac
Click “Create Windows To Go for personal computer”, and if you want to run Windows on Mac PC, you can tick the “Create Windows To Go for Mac computer”. Open AOMEI Partition Assistant, click “All Tools” > “Windows To Go Creator”.
#What is windows media creation tool how to
Besides, AOMEI Partition Assistant supports you to boot a Windows system on a Mac book.Īnd you can click the following button to download the demo version and see how to use it. With the Windows bootable USB inserted, your PC will run a certain system from it without installation.
#What is windows media creation tool full
It installs a full Windows system on a USB or external hard drive. But actually there is an easier way to run another Windows system- Creating a Windows bootable USB via AOMEI Partition Assistant Professional. So you have known how to use the Windows Media Creation Tool to install Windows 10, 8, 7, and you can use the created Windows installation USB to create a Windows system you want. How to create a Windows bootable media to run Windows 11, 10, 8, 7? Choose appropriate language and follow the installation instructions. And the Windows installation program will be launched. When you enter the Boot tab, and choose “Change Boot Order” and set the USB as the boot device, and click “F10” to save the change.Ħ. Insert the created Windows installation USB to another PC, and power on the PC, when you see the first screen, tap the function key to enter BIOS setup.ĥ. Then the program will be started, when it is over, you can insert it to another PC to install Windows 10Ĥ. You can choose a media to load, here we choose "USB flash drive", and click "Next". ✍Note: You also choose the “Upgrade this PC now” to directly upgrade your system of this PC.ģ. Choose “Create installation media” and click “Next”. Download the Windows Media Creation Tool from Microsoft, and launch it.Ģ. Create a Windows installation mediaīefore getting started, please make the following preparations:Ī USB flash drive with at least 8GB storage spaceīack up files on the PC and your USB, because all the data on the computer and USB will be deleted.ġ.
#What is windows media creation tool windows 10
Next, we take installing Windows 10 via Windows Media Creation Tool as an example to show you how it works. And here are the steps and screenshots of how to use Windows Media Creation Tool to install Windows 10, 8, 7 on your PC.īackup files on the device to cloud storage or another external hard drive if there is any important data on it How to Use Windows Media Creation Tool to install Windows 10, 8, 7? It is very helpful when you need a brand new Windows installation on your PC, like you want to run some software that can only work with certain Windows OS. With this tool, you can create a Windows installation USB with a system ISO file to install Windows 10, 8, 7 on a computer, or directly upgrade your system to the latest version. Windows Media Creation Tool is an installing and upgrading utility developed for Windows systems by Microsoft.
0 notes
Text
How to make a flash drive bootable windows xp

HOW TO MAKE A FLASH DRIVE BOOTABLE WINDOWS XP HOW TO
HOW TO MAKE A FLASH DRIVE BOOTABLE WINDOWS XP INSTALL
HOW TO MAKE A FLASH DRIVE BOOTABLE WINDOWS XP UPGRADE
HOW TO MAKE A FLASH DRIVE BOOTABLE WINDOWS XP WINDOWS 10
HOW TO MAKE A FLASH DRIVE BOOTABLE WINDOWS XP SOFTWARE
You need to click the SELECT button to choose the ISO file you have downloaded, specify the partition scheme and volume label. Step 3: This tool will detect your USB flash drive. Step 2: Run this ISO to USB burning tool, and then plug your USB flash drive to your PC. Here, go to get Rufus from its official website.
HOW TO MAKE A FLASH DRIVE BOOTABLE WINDOWS XP SOFTWARE
Step 1: Start USB bootable software freeload for all Windows. It is thought as one of best, free, open-source and easy-to-use Windows 11/Windows 10 USB tool since it can create bootable USB for different kinds of operating systems. To create bootable USB from ISO, some of you may choose to use USB bootable software like Rufus.
HOW TO MAKE A FLASH DRIVE BOOTABLE WINDOWS XP INSTALL
If you don’t want to install the latest Windows 10/11, you can search for the ISO file you need on the internet and then download it. Next, continue the operations by following the wizard. In Choose which media to use page, please choose ISO file. To do this, you can also use Media Creation Tool. In addition, you can choose to download an ISO file of Windows 10/11 first of all and then use USB bootable software to burn the file to your drive. Way 2: Download ISO File and Burn Windows ISO to USB Step 9: After a few minutes, your USB flash drive is ready. Step 8: The tool is creating Windows 10/11 media, just be patient to wait. Step 7: The tool is downloading Windows 10/11 to your selected USB. Here, the professional backup software, MiniTool ShadowMaker, will be helpful to back up files with ease. Thus, you had better back up them to another safe location to keep these files. Note: The files on the USB drive will be deleted. Please ensure your USB has 8 GB capacity at least. Here you can directly choose the former option and make bootable USB from ISO. Step 5: In the following page, you can see two options: USB flash drive and ISO file. Also, you can uncheck the option Use the recommendation for this PC and re-specify these details. Step 4: Then this tool will capture the language, Windows edition and architecture details from your Windows installation. Step 3: Then, choose the Create installation media (USB flash drive, DVD or ISO file) for another PC option and click the Next button to continue. Step 2: This is an independent executable file that doesn't need installation, so you can simply run the tool and create bootable USB from ISO. To create bootable usb from iso Windows 11, go to this page and click Download Now from Create Windows 11 Installation Media.
HOW TO MAKE A FLASH DRIVE BOOTABLE WINDOWS XP WINDOWS 10
Step 1: Go to Windows 10 download page and click Download tool now to get MediaCreationTool.exe. Just follow the step-by-step guide to make bootable USB from ISO. Microsoft offers you a utility called Media Creation Tool, allowing you to download a Windows 10 ISO file compatible with your PC or directly create a bootable USB drive so as to install Windows 10. And here, we will show you 2 common ways for Windows bootable USB creation. When searching for “make bootable USB” on Google, you will find many ways. How to Create Bootable USB from ISO Windows 10/11
HOW TO MAKE A FLASH DRIVE BOOTABLE WINDOWS XP HOW TO
In this post, we will show you how to download the ISO image, burn ISO to USB and create USB boot disk from ISO for Windows 10/11 installation. If so, refer to this article - Fix USB Flash Drive Not Recognized & Recover Data – How To Do to get the solutions. Tip: Sometimes your USB flash drive cannot be detected by Windows after connecting it to your computer. Thankfully, you can use a USB flash drive. Though it is nothing hard, the method is clunky, expensive and no-so user-friendly when considering the CD/DVD writer and the cost of an actual CD/DVD disc. To install the operating system or to create a rescue disc, it is a choice to burn the operating system into a CD or DVD disc. Additionally, to boot the non-working PC and perform a repair, you also need a Windows repair disc or USB drive. Or, when getting a new PC without OS, you need to make a clean install. But there may be some who may want to go for a clean install by using a Windows ISO image.īesides, when there is something wrong with the operating system, you may also choose to reinstall Windows.
HOW TO MAKE A FLASH DRIVE BOOTABLE WINDOWS XP UPGRADE
Therefore, most of you may have reserved a copy of the Windows 10/11 upgrade for your computers. It’s Necessary to Create Bootable USB from ISO Windows 10/11Īs to Windows 10/11 OS, it has got more popularity due to its advantages, for example, reliability, better user experience, safety, etc.
Suggestion: Back up Windows & Restore System.
How to Create Bootable USB from ISO Windows 10/11.
It’s Necessary to Create Bootable USB from ISO Windows 10/11.
0 notes
Text
Magic window

#Magic window full version#
#Magic window full version#
Continuous product quality and security update.Īs reliable free partition magic software, EaseUS partition magic software has helped millions of people manage their disks easily and quickly. You can now freeload the professional partition magic full version for Windows to help you resize partition, extend system disk, update HDD, and migrate OS to SSD with ease.Powerful product development and search team.Risk-free, no virus or malware infection.Execute most basic partitioning tasks, like create, format, merge, split, convert disk partitions.Support all Windows operating systems, including the latest Windows 11, and even old Windows XP.And here is a list that you can check through and define if the current tool suits your need: To ensure that all Windows users could apply the partition magic software to execute all disk management tasks, it's essential that you learn what is an all-in-one partition magic software for Windows 11/10 users. All-in-one Free Partition Magic for Windows 11/10 And this is what we are about to discuss and recommend the best Windows partition magic tool to assist you in performing disk partitioning operations successfully. Powerful partition magic software for Windows 11/10/7 is exactly what you need. So how do you effectively manage hard drive partitions on Windows 11/10/8.1/8 or even older Windows computers? Windows 10 and Windows 11 have the biggest operating system users and the demand for making use of disk space, managing partitions are also increasing. With the growth of Windows 11 and Windows 10 owners, the market share statistic of the Windows operating system has dramatically changed over the world.
0 notes
Text
Wd my passport mac compatibility

#Wd my passport mac compatibility for free
#Wd my passport mac compatibility how to
#Wd my passport mac compatibility for mac os
#Wd my passport mac compatibility upgrade
#Wd my passport mac compatibility full
Wireless Phones are not eligible for return. The FAA to be registered for outdoor use. So let’s be careful out there!Īs of Decemall drones, regardless of purchaseĭate, between 0.55 lb (8.82 oz, 250 g, 0.25 kg) and 55 lb take-off weight are required by Unfortunately, we cannot accept returns with damage due to pilot error. Micro Center is happy to honor its customary 30-day return policy for Aerial Drone returns due to product defect or customer dissatisfaction. Software system requirements are typically found on the Product information specification page. It is recommended that you familiarize yourself with the system requirements before making your purchase. Using the software may require the use of a computer or other device that must meet minimum system requirements. If you need to return software, a game or a movie, remember that you may not retain any copies - it’s not legal, and it’s not nice.Īll Digital Download sales are final and are not eligible for return or refund under the Micro Center Return Policy. This article explains reformatting is required for macOS compatibility. It is not recognized in System Information or Desk Utility. My new Mac is not recognizing the external hard drive.
#Wd my passport mac compatibility for mac os
Reformatting Required for Mac OS Compatibility. I just got a new Macbook Pro with Retina Display (OS X 10.10 Yosemite) and I tried to connect my old WD My Passport Essential (USB 3.0) Model WDBACY5000A.
#Wd my passport mac compatibility how to
Merchandise must be in new condition, with original carton / UPC, and all packaging / accessories / materials. My Passport, My Book, & WD External USB Drive FAQ How to Partition and Format a WD Drive on Windows and macOS. All other products may be returned within 30 days of purchase. May be returned within 15 days of purchase. Select the WD My Passport for Mac drive in the left sidebar. *If you are a Micro Center Insider or if you have provided us with validated contact information (name, address, email address), you won’t even need your receipt.ĭesktop / notebook computers, tablets, processors, motherboards, digital cameras, camcorders and projectors, 3D printers, 3D scanners, and CD/DVD duplicators /rebates/2fen-ap2fproducts2fportable-drives2fwd-my-passport-for-mac-usb-3-0-hdd&. Go to Finder > Applications > Utilities > Disk Utility.
#Wd my passport mac compatibility full
If you need to return an item, simply bring it back to any Micro Center store for a full refund or exchange. motto, battle cry, war cry, rallying cry or call to arms.
#Wd my passport mac compatibility for free
If an item you have purchased from us is not working as expected, please visit one of our in-store Knowledge Experts for free help, where they can solve your problem or even exchange the item for a product that better suits your needs. Create awesome headlines with our title generator including blog topics. However, if you need help or need to return an item, we’re here for you! We guarantee your satisfaction on every product we sell with a full refund - and you won’t even need a receipt.* We want you to be satisfied with your Micro Center purchase.
#Wd my passport mac compatibility upgrade
An incredible programming bundle can compensate for normal execution and upgrade the general client experience, particularly while managing something like reinforcement.ĭISCLAIMER: The Times of India’s journalists were not involved in the production of this article.PC Parts options - 11 groups of items - 40 total selectionsĮlectronics options - 12 groups of items - 60 total selectionsĪccessories options - 10 groups of items - 50 total selections Software: Programming is regularly the primary differentiator between the different outer hard plate stockpiling gadgets arrangements available. Your Budget: Outside hard plate drives are somewhat more costly than their inside partners and your allotted financial plan will assist you with concluding whether you ought to go for a work area-headed arrangement or for a more versatile one. Size of the drive: Assuming you are only from time to time going to move the outer stockpiling gadget, it’s a good idea to put resources into an outside work area drive which is bulkier than a versatile form but will furnish with more capacity limit at some random cost. Storage size: Obviously, how much capacity is required is going to figure out what arrangement you will pick as a rule, external hard disk drives carry the best blend of cost and capacity limit. Things to consider before buying external hard drive for MAC: This external hard drive from Lenovo features a circuit for surge protection that ensures efficient data transmission has anti-static design and guarantees data security. This external hard drive assures you of data transfer with USB 3.0 connectivity 10 times faster. Designed with mobility in mind, the Lenovo F309 USB3.0 1TB External Hard Disk is sure to be your laptop’s best companion.
0 notes
Text
Sd card reader not working macbook air

Sd card reader not working macbook air how to#
Sd card reader not working macbook air mac os x#
Sd card reader not working macbook air install#
Sd card reader not working macbook air password#
Sd card reader not working macbook air plus#
So, just take the first portion of your device name and use it for the -rawdisk parameter. The reason for this is that the s1 portion of the device name denotes a partition but I want to create a pointer to the entire device (mine has 2 partitions). Note, when I ran the mount command above, my device name was /dev/disk1 s1 but in this command I did not include the trailing s1 portion. You need to run sudo VBoxManage internalcommands createrawvmdk -filename. Now, you need to create a VirtualBox vmdk file that points to the SD card so that you can mount it as a device in a virtual machine. Do not click the eject button, just the Unmount button. Next, open up Disk Utility, click on the the mounted partition from the card (NO NAME in my case), and then click the Unmount button at the top. You don’t want to get this wrong so make sure it’s right! For a sanity check you could always run mount before inserting the card and then after, to see the difference. In my case, it was /dev/disk1s1 (NO NAME matches the title that showed up in Finder when I inserted the card so this is a hint as to which one is the one I am looking for) listed at the bottom of the mount command. Take note of the SD card device that shows up. Below are the steps I had to take to get it working.įirst, insert the SD card into the reader, open a terminal window and type mount. It wasn’t as easy as I thought because, for some reason, getting VirtualBox to pass the SD card reader to a virtual machine as a virtual device is not quite easy. Since I own a MacBook Air and it can’t read ext3 natively (not that I know of at least) I thought I would just just spin up a virtual machine in VirtualBox, mount the SD card from the Raspberry Pi, make the change and be done.
Sd card reader not working macbook air how to#
The only way I know how to do this is to mount the root partition from the context of another machine and then edit the /etc/shadow file.
Sd card reader not working macbook air password#
Somehow I forgot the password to one of my Raspberry Pi boxes and needed to reset it.
Sd card reader not working macbook air mac os x#
You can use Migration Assistant software (built into Mac OS X) to transfer all personal files, settings and applications to another Mac computer.Mount SD card in VirtualBox from Mac OS X Host Now you can access and recover needed files. If the SSD is in good working condition your Mac should detect it. Select the right enclosure for your laptop and mount the SSD.Ĭonnect the enclosure to another Mac computer via provided USB 3.0 cable.
Sd card reader not working macbook air install#
Do not try to install a third party SSD into this enclosure or you will damage the drive. IMPORTANT NOTE: The OWC Envoy enclosure has been specifically designed for use ONLY with the factory SSD found installed in Apple MacBook Air. The SSD removed from a 2010/2011 model will not fit into 2012 or 2013-Current year enclosure and vice versa. SSDs installed in MacBook Air (2010/2011), MacBook Air (2012) and MacBook Air (2013/2014/2015/2017) models are different, even though they look similar. Remove one Torx T5 screw securing the SSD.įor data access and recovery you will need a special external enclosure for Apple SSD drives. Remove 10 pentalobe screws from the bottom cover.
Sd card reader not working macbook air plus#
MacBook Air 11-inch or 13-inch (2010/2011, 2012, 2013- Current models)įor the following procedure you will need Torx T5 screwdriver and 5-Point Torx Plus (Pentalobe compatible) screwdriver. If everything is connected properly and the hard drive not failing, it should be detected by the Mac. In order to connect the hard drive adapter to another Mac computer you will need a SATA to USB cable.Ĭonnect the cable to the hard drive adapter and plug it into another working Mac computer. The hard drive is almost ready for data recovery. You have to make sure that the cable is plugged correctly and contacts on the cable are aligned with the contacts on the connector. Note that contacts on the cable are facing downwards. Make sure the cable is plugged all the way down into the connector.ĭo not bent the cable because it can be easily damaged. I had some trouble inserting the cable because it was too tight. Now connect the second end of the flat cable to the hard drive. Lock the connector by sliding the retainer to the shown direction. Note that contacts on the cable are facing upwards. In order to access data on the hard drive I’ll be using a 24 Pin SATA LIF Macbook Air SSD HDD SATA Adapter.
0 notes
Text
Easeus partition master professional edition key

#EASEUS PARTITION MASTER PROFESSIONAL EDITION KEY HOW TO#
#EASEUS PARTITION MASTER PROFESSIONAL EDITION KEY CRACKED#
#EASEUS PARTITION MASTER PROFESSIONAL EDITION KEY ACTIVATION KEY#
#EASEUS PARTITION MASTER PROFESSIONAL EDITION KEY UPDATE#
#EASEUS PARTITION MASTER PROFESSIONAL EDITION KEY HOW TO#
Activate EaseUS Partition Master with Serial Key + How to UseĪfter getting the genuine license code, you can use it to activate EaseUS Partition Master and apply it for disk partitioning flexibly. It enables you to create, resize, move, copy, merge, delete partitions, clone disk partitions, convert MBR to GPT, or GPT to MBR for free.Īll these basic features are free and functional. If you prefer to use 100% free software to manage partitions, EaseUS Partition Master Free Editions is able to help. 100% Free - Get Valid EaseUS Partition Master Note: Don't trust the sales or retailers on Amazon, eBay, or other non-business partners of EaseUS software.
#EASEUS PARTITION MASTER PROFESSIONAL EDITION KEY ACTIVATION KEY#
If you prefer free but official access to get an activation key for EaseUS Partition Master, you may visit the EaseUS website () to grab a chance to get a free license code on Valentines' Day, Mothers' Day, Fathers' Day, Thanksgiving, Halloween, Black Friday, Christmas, etc. And some business partners may also invite EaseUS to do some discount sales on their websites. Sometimes, EaseUS software will add big events or holiday sales, offering huge discounts for different EaseUS products. 24*7 Tech Support via Email & Live Chat.100% Working with All Features in Activated EaseUS Partition Master.Free & Official Access - Get Activation Keys from EaseUS Sales Page or Business Partners Click the follow button to download the latest genuine EaseUS Partition Master on your Windows computers:ģ0% OFF # 2. Once again, we sincerely suggest you use genuine software and authorized license codes.Īs a wise and rational user, your best choice is to download a hard disk partition tool provided by the responsible software manufacturer. Being a wise user, you should resist any potential actions that may danger your data security and personal privacy.
#EASEUS PARTITION MASTER PROFESSIONAL EDITION KEY CRACKED#
No matter how you cracked EaseUS Partition Master, you'll have to face the potential risks on your computer.
No Support: Technical support is absent in the cracked EaseUS Partition Master.
Instability: Invalid keys may stop working and unstable software may crash anytime.
#EASEUS PARTITION MASTER PROFESSIONAL EDITION KEY UPDATE#
Inability to Update Software: Cracked software is an inability to receive new updates, no new features available.
Virus Infection: Cracked programs contain viruses or bundled malware, which may cause serious problems on your devices.
Confidential Information Leak: Your privacy, like personal data, won't be secured by the cracked software.
Check out the Good and Bad using EaseUS Partition Master Crack, and you'll get what you should do: The Good and Bad using EaseUS Partition Master CrackĪs a matter of fact, you can benefit nothing from using cracked software. This sounds pretty good, right? But once you downloaded the crack file, you put your data and device in danger. It claims that you only need to download a crack file from a given link, and you can use the EaseUS Partition Master for free. When you Google "EaseUS Partition Master crack", you could find many pages that offer download links to the cracked version software. And why we don't recommend you to use cracked software. In this part, you'll know the good and the bad of using a cracked EaseUS Partition Master. Windows 11/10/8/7 100% Secure Overview of EaseUS Partition Master Crack
0 notes