#xcode11
Text
Ip messenger for mac

#Ip messenger for mac mac os x#
#Ip messenger for mac software#
#Ip messenger for mac code#
#Ip messenger for mac download#
Version2 Signed Application ( for Gatekeeper in OS X 10.9.5 or later ).Implementations Changed ( Xcode11, 10.12 Deprecated APIs, etc ).OS Requirement is now macOS 10.12 Sierra or later.Fix a bug that Retrying send message ommited when you send message to multi users.Icons support Retina Display (exclude Application Icon).Support Dark Mode (macOS 10.14 Mojave or later).Apple Notalized Application(Apple Notary Services, for macOS 10.15 Catalina or later).
#Ip messenger for mac download#
Fixed a issue that caused the app to lock when the attachment download was complete, on macOS 10.12 Sierra.
Fixed a issue that the broadcast registered with the host name may not be displayed even after reloading.
Send/Receive Window Default Font changed.
Fixed issue that sometimes duplicated user in user list.
Support Send/Receive Attachment List encryption.
Support display inline images (Capture/Clipboard image from Windows ver, display only).
Fixed a problem in which user names would be garbled when communicating with ipmsg compatible clients running on Chinese or Korean Windows.
Fixed an issue where the user list could be deselected when refreshing.
Fixed issue where communication with the Windows version could cause the user to appear multiple or the app to crash.
Improved garbled characters with older versions of IPMsg and compatible messengers on Chinese or Korean Windows.
Fixed an issue where the sender user could not be selected in the initial display of the reply window.
#Ip messenger for mac mac os x#
IN NO EVENT SHALL G.Ishiwata BE LIABLE FOR ANY DIRECT, INDIRECT, INCIDENTAL, SPECIAL, EXEMPLARY, OR CONSEQUENTIAL DAMAGES (INCLUDING, BUT NOT LIMITED TO, PROCUREMENT OF SUBSTITUTE GOODS OR SERVICES LOSS OF USE, DATA, OR PROFITS OR BUSINESS INTERRUPTION) HOWEVER CAUSED AND ON ANY THEORY OF LIABILITY, WHETHER IN CONTRACT, STRICT LIABILITY, OR TORT (INCLUDING NEGLIGENCE OR OTHERWISE) ARISING IN ANY WAY OUT OF THE USE OF THIS SOFTWARE, EVEN IF ADVISED OF THE POSSIBILITY OF SUCH DAMAGE.ĭownload for macOS 10.12 Sierra or Later v0.13.2įrom OS X 10.8 Mountain Lion to OS X 10.11 El Capitan v0.11.5įrom Mac OS X 10.5 Leopard to Mac OS X 10.7 Lion v0.11.3įrom Mac OS X 10.2 Jaguar to Mac OS X 10.3 Panther v0.9.0+
#Ip messenger for mac software#
THIS SOFTWARE IS PROVIDED BY G.Ishiwata ”AS IS” AND ANY EXPRESS OR IMPLIED WARRANTIES, INCLUDING, BUT NOT LIMITED TO, THE IMPLIED WARRANTIES OF MERCHANTABILITY AND FITNESS FOR A PARTICULAR PURPOSE ARE DISCLAIMED.
Neither the name of the G.Ishiwata nor the names of its contributors may be used to endorse or promote products derived from this software without specific prior written permission.
Redistributions in binary form must reproduce the above copyright notice, this list of conditions and the following disclaimer in the documentation and/or other materials provided with the distribution.
#Ip messenger for mac code#
Redistributions of source code must retain the above copyright notice, this list of conditions and the following disclaimer.
Redistribution and use in source and binary forms, with or without modification, are permitted provided that the following conditions are met: This software is licensed according to the BSD Licence.
0.10.0 supports Mac OS X 10.5 Leopard or later.
Compatible with MS-Windows version 3.00 or later
Support multi-Language communication via UTF8.
Added User search field on Send Window.
IP Messenger is now Developer ID-signed Application.
Maintenance release for Gatekeeper in OS X 10.8 Mountain Lion.
IP Messenger is now Version2 Developer ID-signed Application.
Maintenance release for Gatekeeper in OS X 10.9.5 or later (include 10.10 Yosemite).
64bit Application, Apple Notarized Application. “IP Messenger for macOS” is a pop up style message communication software for multi platforms.
0 notes
Link
Want to try my book before you buy? See videos for all the chapters here.
0 notes
Video
youtube
Get button click inside UITableViewCell Using | Protocol | Closure | Add...
#uibutton in uitableviewcell click event#uibutton in uitableviewcell click event in swift 5 hindi#UIButton And UITableViewCell in swift iOS hindi#UIButton action in UITableViewCell hindi#Get button click inside UITableViewCell#how to get the indexpath.row when a button in a cell is tapped?#button click in uitableviewcell#uitableviewcell with button action#get button click inside uitableviewcell swift 4#yogeshpatelios#yogesh#yogeshpatel#Xcode#xcode11#swif#swift 4#swiftt 5#beginners swift tutorials#uitableview#uitableviewcell#uibutton
0 notes
Text
Line Update Mac

We can find mac address (physical address) of a computer using the command ‘getmac‘. This can be used to get mac address for remote computers also. Below are few examples on how to use this command. It works on XP, Vista, Windows 7, Server 2003 and Server 2008 operating systems.
Get mac addresses from CMD
Head to the “Updates” tab to see a list of available updates. You can opt to update each app individually, or click “Update All” instead. If you want your Mac App Store apps to update automatically, launch the App Store, then click on “App Store” in the top-left corner of the screen. Introducing the End of the Line Update, featuring a whopping thirteen-and-a-half-minute long animated short, new cosmetics, a new taunt from the short, and an update page, all thought up and designed by the TF2 community. This can be used to get mac address for remote computers also. Below are few examples on how to use this command. It works on XP, Vista, Windows 7, Server 2003 and Server 2008 operating systems. Get mac addresses from CMD. Just run the command getmac to get the mac addresses. Find an example below. Select the “Update Options” button. In the drop-down menu that appears, select “Enable Updates.” Microsoft Office will now automatically update with each release. Enable Automatic Updates on Mac. To turn on automatic updates for Microsoft Office on Mac, open Word, and select the “Help” tab in the system menu bar (not the Word menu bar).
Just run the command getmac to get the mac addresses. Find an example below.
This command does not show mac addresses for the network connections which are disabled. You can run ncpa.cpl and check which NICs are disabled. Further, I have received comments that this command does not help identify the mac address for a specific device. For example, if I need to get the mac address for my WiFi card, output of getmac command is not helpful. We can use ipconfig command to deal with this.
Get mac address of a remote computer
We can retrieve the mac addressses for a remote computer using nbtstat command.
Example:
Alternatively, We can run the below command to retrieve the mac addresses of a remote computer.
remote_computer : Full name of the remote computer or IP address
username and password are of the account on the remote computer.
Example:
If you do not want to specify the password, you can skip /p parameter. You will be prompted to enter the password and the command execution will take place after that.
Errors:
Using getmac command we can retrieve the mac addresses of the machines running windows OS only. If you try this for a Linux machine you would get the error “The RPC server is unavailable.”
If you provide incorrect password, the command would fail with the error message “Logon failure: unknown user name or bad password.”
Also Read:
Windows CMD commands reference
Xcode is the tool developers use to build apps for the Apple ecosystem – MacOS, iOS, and all things Apple.
This guide will walk you through how to successfully install Xcode onto your Mac, from start to finish.
Here are some handy tips to know before you get started:
Xcode only runs on a mac. If you are on a PC, sadly you won't be able to use Xcode.
You'll need a good, stable internet connection. The latest version is around 8 gigabytes in size.
Be sure to have at least 30 gigabytes of free space on your computer. The latest .xip file (v11.4.1 at the time of writing) is ~8 gigabytes zipped. When you unzip it, that's another 17 gigabytes. Then you'll need the command line tool, which is yet another 1.5 gigabytes.
Here's an overview of the steps to install Xcode
Download Xcode
Install the command line tool
Open the new version
Delete files
Note that I have listed some Terminal commands in the steps below. These commands can be typed into your present working directory. This means that you don't need to navigate to any particular folder.
If you really want to, you can first type cd before typing the commands in the below steps. This will return you back to the home folder.
Step #1: Download Xcode
There are two ways to do this. For the latest version and a theoretically 'easy' installation, you can use the App Store. I don't recommend this option.
I prefer to use the developer site. This comes with the bonus option of being able to download any version you'd like.
Option #1: Download via the App Store for the latest version (not my preferred option)
In theory, this should be a seamless and pain-free process. But if the installation fails for any reason on the last step, it is very hard to troubleshoot.
There are a few reasons for failure, and no easy way to know which is the underlying cause. If you do encounter a failure, you will need to re-download the entire file again each time you try to fix the failure. As the latest version is 8 gigabytes, I didn't much enjoy this approach.
Line Update Pc Download
But if you're feeling brave, here are the steps:
Open the App Store on your mac
Sign in
Search for Xcode
Click install or update
Option 2: Download via the Developer site for a specific version (my preferred option)

Head to the 'more' section of the Apple developer website
Sign in with your iTunes account id
Type in the version that you'd like, and download the Xcode_x_x_x.xip file. Keep in mind that Xcode 11.4.1 is 8 gigabytes, so this will take awhile depending on your internet connection.
Once the file is downloaded, click on .xip to extract it. Your laptop will extract it to the same folder you downloaded it to. This extraction process is automatic. You don't need to do anything more after you click on the .xip file. This step will take a few minutes.
[Optional] Once extracted, rename the application to “Xcode11.x.x” if you are using multiple versions.
Drag application to the Applications folder
[Optional] Set the new Xcode version as the default. Open Terminal and type sudo xcode-select -switch /Applications/Xcodex.x.x.app . Replace x.x.x with the version number. For example: Xcode11.4.1.app. You will need to enter in your computer admin password. I'm pretty sure this will update the default Xcode version for all users on your computer, so best to check with other users first
Step #2: Install the command line tool (CLT)
If you have multiple users on your computer, you will need to update the CLT for each user.
Download .dmg
To update the CLT, go to app developer website and download the command line tool .dmg.
If you have never installed Xcode before, you may be able to update with your Terminal by typing in xcode-select --install instead of visiting the developer website.
But if you have an existing version of Xcode installed on your machine, you'll probably see this error:
This means you'll need to go to the developer website instead.
Update Line ใน Mac ไม่ ได้
Installing the CLT
When the .dmg has finished downloaded, double click the file to open it. This will open a little window that looks like this:
Double click the box and follow the prompts to install the CLT. It will take a few minutes to complete.
It may ask you at the end of the installation whether you want to move this to the trash bin. When it does this, it's talking about moving the .dmg file to the trash bin. Since you should no longer need this file. I always say yes to this.
Step #3: Open Xcode
Open the Applications folder and open the new version of Xcode. If you renamed Xcode, make sure you open the correct application
Xcode may prompt you to install additional components. Click install. This will take a few minutes.

Update Mac Command Line
While it's installing, check that your default Xcode version is the one you just downloaded:
Open Terminal
Type brew config
You should see “CLT” and “Xcode” versions, as well as everything else. This should reflect the version that you have just downloaded. In my case, I downloaded Xcode 11.4.1.
Update Line ใน Mac
Once the components are installed, Xcode will launch. You should be able to pick up your old projects and continue where you left off seamlessly*.
*Note that if you use any proxy tools, such as Charles, you will need to re-install those certificates in your simulator again.
If you encounter any errors while trying to build or run a project, check which device you are trying to launch. The new version may not remember the device you were using before. If so, click on the device and choose 'Add additional simulators' from the drop down menu to add the device you want.
Command Line Tools Update Mac
Step #4. Delete the files
If you don't need the older versions of Xcode on your computer, you can uninstall them and get some hard drive space back.
Command Line Update Mac
You can also delete the .xip file of the version you just downloaded, as well as the CLT.dmg file.
That's everything. I hope this has helped you successfully install Xcode. Have fun with it!
0 notes
Text
Multiple Commands produce error React Native with XCode11
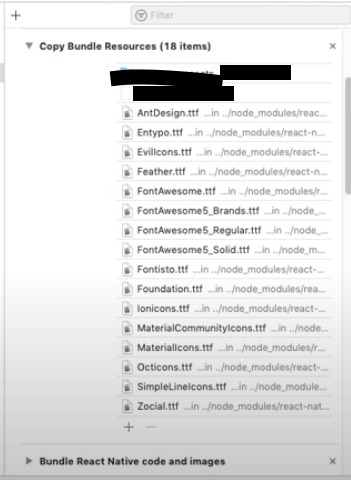
I had earlier installed react-native-vector-icons in my Project and used the below command to link it:
react-native link
The “multiple commands produce” error seems is caused by the new autolinking feature in React Native 0.60 or above – the line use_native_modules! in ios/Podfile means when you do pod install, any pods found in node_modules are automatically linked.
So when you do pod…
View On WordPress
0 notes
Photo

Learn iOS App development using Swift in Telugu | Session - 1 | Introduction | HiTech Abbayi http://ehelpdesk.tk/wp-content/uploads/2020/02/logo-header.png [ad_1] Learn iOS App development using ... #androiddevelopment #angular #c #css #dataanalysis #datascience #deeplearning #development #docker #hitechabbayi #ios13 #ios13features #iosdevelopment #java #javascript #learnios #learniosappdevelopmentintelugu #learniosdevelopment #learniosintelugu #learniosswift #learnswiftintelugu #machinelearning #node.js #objectivec #python #react #swift #swiftui #swiftyui #telugu #telugumovies #telugutechchannels #telugutechnews #telugutechtricks #telugutechupdates #telugutechworld #telugutechtv #telugututorials #top10telugutechchannels #toptentelugutechchannels #tricksandhacksintelugu #unity #webdevelopment #xcode11
0 notes
Link
Reality Composer is an advanced version of AR where a developer can create a scene, object, frame-set, import, and export images. Reality composers available in XCode11 and read more about Features of Reality Composer with example.
0 notes
Photo

本紹介:大重さんの SwiftUI本 予約開始「詳細! SwiftUI iPhoneアプリ開発入門ノート iOS 13 + Xcode11対応」 SwiftUIって今までのUI構築とはだいぶ変わりそう?とうことで、大重さんのiPhoneアプリ開発の本が予約開始されています。2019/12/21の発売予定のようです。
0 notes
Link
Earlier this month by many accounts in the companies big developer conference, Apple’s new SwiftUI development framework was the hit and with these new Xcode11 beta 2 that can help coders put it through its momentums with new functionalities.
0 notes
Text
國產系統大有可為 從鴻蒙看未來操作系統的大潮
訪問:
華為商城
根據華為的介紹,鴻蒙OS亮點多多。和目前市面上流行的操作系統相比,鴻蒙擁有很多與眾不同的設計,例如微內核、跨平台、多終端生態共享等等。而人們對於鴻蒙的期望顯然是非常高的,不少朋友都希望國產操作系統能夠在市場上殺出一條血路,鴻蒙OS的出現,令人看到了這股希望之光。
在移動互聯網時代,技術和商機千變萬化。通過操作系統變革、在市場攻城略地的,早有前人。例如大家熟悉的iOS、安卓和Windows,在近年來都進行了大刀闊斧的修改,以變求勝求生。那麼操作系統近年來都有怎樣的革新大潮?鴻蒙OS將會有怎樣的廣闊前景?這就來以鴻蒙作為切入點,來談談操作系統的一些發展趨勢吧。
微內核是大勢所趨?
說起鴻蒙最吸引人的一個亮點,可能就是“微內核”了。目前我們熟知的操作系統的運行通常擁有一個內核,內核一般會提供進程管理、資源調度、數據存取等操作系統所需的基本功能。不同的操作系統,它們的內核設計不盡相同,在技術開發和用戶體驗方面的表現,也存在顯著差別。
雖然有的朋友對系統內核這一概念感到陌生,但實際上,大家日常使用電腦手機時,就已經能切身感受到不同內核帶來的影響。例如同樣是開放授權的操作系統,安卓和Windows的安裝升級體驗就大有不同——用戶不能為手機隨意安裝安卓系統,升級往往也需要經由各家OEM廠商;而Windows則每台PC都可以安裝,且升級也能由微軟統一推送。為什麼會由這樣的差別?內核就是原因之一。
安卓基於Linux打造,而Linux是一個宏內核的結構,Linux的驅動和內核緊密整合在一起。要適配某種硬件,得先把驅動整合進Linux內核當中,因此手機想要升級系統,需要廠商把驅動整合到系統當中,再把系統推送給用戶;而Windows則屬於有點接近微內核的混合內核結構,內核和驅動是分離的(Vista後絕大多數驅動只運行在User層中),且微軟提供了標準驅動模型(例如WDDM圖形驅動),因此可以靈活適配各類硬件,升級維護更方便。

安卓系統架構圖,可見大量驅動都整合在Linux內核當中
由此可見,內核的差異,可以令系統在升級維護方面的表現截然不同。宏內核整合了更多功能,而微內核則將功能拆分、模塊化。而移動互聯網時代的到來,硬件形態變得越來越百花齊放,想要在不同硬件上建立起統一的平台生態,組裝更靈活、更輕量的微內核可能是更好的選擇。
實際上,近年來系統內核的微型化屢見不鮮。例如安卓8.0開始推行Project Treble,將驅動和內核剝離開,理想情況下用戶無需等待廠商的驅動適配,也可以通過單獨升級系統分區更新到最新版安卓;而谷歌的尚未推向市場的Fuchsia系統則更進一步,使用全新微內核“Zircon”,而根據目前的消息,谷歌打算將Fuchsia打造成為一個跨平台的系統,除了適配手機平台,還能夠在物聯網上征戰。
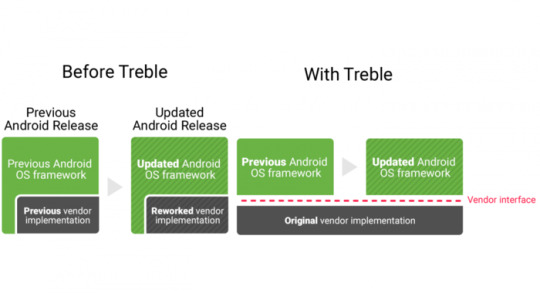
安卓8.0後引入Project Treble,將OS框架剝離
除了安卓,歷史更悠久的Windows也在發生變化。 Windows本來就比Linux更接近微內核,而為了進一步適應移動互聯網,微軟還打算讓Windows變得更加模塊化,例如讓Shell和內核分離,打造出Windows Core這樣的能夠適配物聯網的系統。得益於Windows Core模塊化的特性,微軟可以開發出多個Shell,來適配折疊屏、Hololens等設備,Windows在移動市場是否能捲土重來,或許就在此一舉。
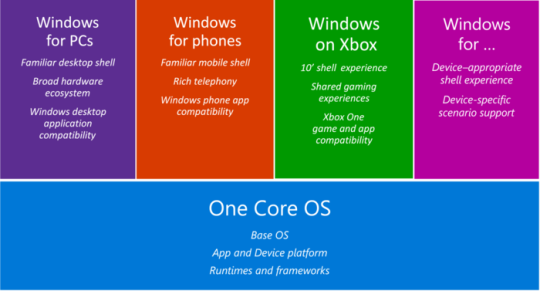
Windows將會進一步分離內核,以適配更多設備
可見,得益於擴展性強、維護方便等特點,微內核在近年來的確備受業界青睞;華為的鴻蒙OS採用微內核,順應了當下移動互聯網和物聯網的發展潮流,前景可期。
2跨平台之路要走多遠?
跨平台之路要走多遠?
華為鴻蒙OS所面向的並不僅僅是手機平台,還將會應用在手錶、車機、PC乃至其他設備上。微內核可以令系統更容易運行在更多平台上,但要打通平台之間的生態,所需要的不僅僅是相同的內核。例如,系統的應用層是否能兼容同樣或者近似的應用?而如果能兼容,該應用的界面是否能適配不同的設備?要知道同樣是iOS,iPhone和iPad的APP尚不能相互完美適配,跨平台的應用生態要如何營造,一直是業界苦苦鑽研的難題。
鴻蒙OS可以適配多種硬件,應用一次編譯即可多端部署在各種運行鴻蒙的硬件上
而跨平台應用生態的營造,正是華為鴻蒙OS的另一大亮點。根據開發者大會上的介紹,鴻蒙OS支持多語言統一編譯,通過分佈式架構Kit提供屏幕佈局控件以及交互的自動適配,且編程可視化。開發者只需要一次開發,就可以將應用部署在多終端的鴻蒙OS上,不同的設備可以實現共享生態。

鴻蒙OS的APP在不同尺寸屏幕上UI可自動適配
換言之,為鴻蒙OS開發應用,並不需要細細適配每一個平台,通過統一編譯,應用就可以實現多設備的兼容,UI也能自適應。而這個課題,在業界中其實灼手可熱。不少大拿例如微軟、蘋果乃至谷歌,都在這方面做了不少努力,這也正是未來操作系統的發展大趨勢之一。
例如大家都非常熟悉的微軟,相信用戶們都已經從無處不在的磁貼UI中,感受到了微軟為應用跨平台所做出的努力。實際上,微軟的跨平台戰略並非是這幾年才開始起步,早在Windows Mobile年代,微軟就已經推出了跨平台的開發技術——.NET。如果一個應用基於.NET,那麼它就擁有了同時運行在移動平台和桌面平台、乃至更多平台的可能。而發展到現在,.NET為Windows 10主推的跨平台框架UWP提供了強力支撐。
和很多仍是空中樓閣的概念不同,為跨平台而生的UWP應用已經在Windows系統中較大範圍實裝了;而UWP應用的發展歷程雖然磕磕碰碰,但也令人感到它前途無限。 UWP應用已經有了一套比較成熟、而且仍在發展的開發規範,通過.NET Standard for UWP以及XMAL,應用的代碼和UI能夠在多平台共享,開發者可以比較輕鬆地構造出跨平台的UWP應用。

微軟UWP框架可謂是APP跨平台大規模應用的先行者之一了
另外,Windows對應用的開發、移植也非常友好。例如UWP支持多種語言包括C++、C#乃至HTML和JavaScript這樣的腳本語言,一次開發編譯即可兼容PC、Xbox和其他IoT設備;而微軟之前的Project Islandwood和Project Astoria更是提供了將iOS應用和安卓應用轉換成UWP應用的工具,不過轉制APP的質量並不如原生開發的好,也難以支持跨平台等特性,目前該項目已擱置。

微軟努力的方向:用Windows和UWP適配所有設備
和微軟相比,蘋果系統所需要兼容的硬件更少,但蘋果的跨平台生態在某些方面,甚至要比微軟更加成熟。在跨平台應用上,蘋果的態度是比較克制的,例如同樣是iOS,iPhone和iPad的APP並不能相互適配,而多年來iOS和macOS之間的應用兼容,更是無從談起——但現在,這一切正發生改變。
蘋果在WWDC 2019開發者大會上,公佈了SwiftUI,這是一套專供於蘋果生態的UI開發框架。我們知道之前蘋果曾經推出Swift編程語言,而這套SwiftUI則可以使用聲明式Swift語法,僅通過一組工具和API,來適配iPhone、iPad、Mac、Apple TV等平台。換言之,或許蘋果各套系統的差異日後會越來越大,例如從iOS中分化出iPad OS,但通過SwiftUI,開發者反而能夠更容易為蘋果生態編寫出跨平台的APP。結合Xcode11,iOS APP可以編譯成為macOS軟件,macOS兼容iOS APP,已經指日可待。

SwiftUI可以為不同的蘋果系統統一構建APP
SwiftUI還為開發者提供了可視化的編程界面,在編寫代碼的同時,可以觀察到應用UI的變化,進一步減輕了應用適配的壓力。這種設計是大勢所趨,例如來自谷歌的開發工具Flutter,也使用了類似的機制。
SwiftUI提供了可視化的編程界面
谷歌在跨平台上的野心是不言而喻的,它推出的Flutter移動UI框架比SwiftUI出現得更早。 Flutter使用谷歌Dart語言,可以跨平台為iOS、安卓、網頁和桌面的應用構建UI,開發者只需要學會使用Flutter,即可跨平台編寫應用。 Flutter包含了安卓和iOS的組件庫,為APP搭建起了適配不同系統API的橋樑,目前一些跨平台的APP例如大家熟知的閒魚,已經使用Flutter來編寫。
Google Flutter,跨平台、可視化設計的開發工具
而Flutter顯然是谷歌構建跨平台的全新系統Fuchsia中不可或缺的一環。 Flutter是Fuchsia系統的御用開發工具,而Flutter的推廣大大有利於開發者們將應用從其他系統遷移到Fuchsia系統上。而Fuchsia系統本身也使用了可適配不同尺寸屏幕的可變形UI,谷歌之前還發布了Fuchsia UI的Demo,體驗後可以得知這套UI起碼同時適配手機和平板是沒問題的。另外,Fuchsia已經公開了代碼倉庫,每日都在飛速更新,可以說谷歌的跨平台生態已經是只欠東風了。
讓我們再把目光投向華為的鴻蒙OS。可見,鴻蒙OS的概念是非常先進的,它支持多語言統一編譯開發,應用一次編譯即可兼容多平台,交互界面自適配,編程可視化……這和UWP、SwiftUI、Flutter有著不謀而合之處。可以說,鴻蒙OS的跨平台生態營造理念是符合當下大趨勢的,我們值得對此抱以信心。
3對於鴻蒙OS,我們可以期待什麼?
對於鴻蒙OS,我們可以期待什麼?
在華為的開發者大會上,我們已經初步了解到了鴻蒙OS的信息。作為國產操作系統衝擊主流消費市場的先行者,鴻蒙OS注定必須非同凡響。鴻蒙OS是否能斬棘披荊,殺出一條血路?數年前人們仍嘲笑著羸弱的K3V2,而現在麒麟980已經在一片讚許聲中登上了世界之巔;對於同樣出自華為的鴻蒙OS,我們或許可以期待更多。
鴻蒙OS擁有一些競爭對手難以企及的優勢。華為是一家研發能力強、硬件造詣高、市場表現好的企業。華為在消費市場產品豐富,且能自主研發關鍵元件,對生態鏈的把控也堪稱嚴密,這足以給鴻蒙OS提供茁壯成長的土壤。
華為在消費市場的表現非常強勁,自身也擁有出色的硬件設計水平
這其實是很多企業求之不得的優厚條件,強如微軟谷歌,由於缺乏自研硬件的實力,對生態的控制多少都力不從心——Windows在移動平台折戟沉沙,由於無法借助硬件平台確立優勢地位,主推的UWP應用遲遲未能成為主流;而安卓生態也被鬆散聯盟中的OEM廠商們弄得四分五裂,Nexus/Pixel沒有成為強勢的硬件支點,谷歌不得不另起爐灶打磨Fuchsia。對硬件控制最為嚴密的蘋果,生態營造最為出色,然而蘋果終是追求硬件高利潤、只打造少量精品產品的企業,蘋果系統注定無法成為大多數人的選擇。
華為已經把握住了移動互聯網時代極為關鍵的5G技術,也掌握了眾多芯片的設計技術;同時華為在消費市場的深耕,也已經開花結果——華為目前是移動市場市佔率最高的廠商之一。華為在通訊、硬件上的造詣,可以為鴻蒙OS提供強有力的支持,例如用網絡��實時部署操作系統的模塊、或者用特別設計的芯片去提升微內核進程間通訊效率等;而鴻蒙OS和海量的華為產品一起,所能產生的化學反應,更是令人無限遐想。

鴻蒙OS擁有龐大的硬件群,不會巧婦難為無米之炊
而鴻蒙OS顯然已經開始了它的征途——鴻蒙OS已經搭載到了華為的新產品“智慧屏”之上,由此可見,鴻蒙OS的成熟度已經足以支撐起一款可以真正投入到市場當中的產品。在未來,鴻蒙OS或許會出現在更多的華為和生態鏈合作夥伴的產品當中,屆時鴻蒙OS會呈現出怎樣的姿態?大家都對此拭目以待。
人們對於鴻蒙OS寄予厚望,而鴻蒙OS目前猶抱琵琶半遮面,並未將全貌展現給人們。我們可以通過開發者大會獲悉鴻蒙OS的一些概念信息,而對於開發者來說,近期對於鴻蒙OS最大的期待,可能就是相關的開發文檔、代碼庫的公開了。
一款操作系統想要在市場上征戰,完善的開發文檔必不可少。無論是微軟UWP、蘋果SwiftUI還是谷歌的Flutter,目前都有較為完善的官方開發文檔可參考,甚至還提供了高質量的開發工具。而跨平台應用生態的營造是鴻蒙OS的重頭大戲,開發者對相關的開發工具自然會望眼欲穿。
開發者更期盼的是相應的開發文檔,微軟、谷歌和蘋果都已經拿出了真傢伙
另外,華為在開發者大會上表示,鴻蒙OS會是開源的操作系統,這使得開發者們對它的源碼額外感興趣。很多操作系統的成功,都得益於有開源社區在源源不斷地輸送力量。儘管鴻蒙OS仍未有具體代碼上傳,但它已經收穫了開源社區的大量關注。鴻蒙OS的構成細節到底是怎樣的?它又會採用怎樣的開源協議?這一切都令人翹首以待。
目前,鴻蒙OS已經在智慧屏上實裝,可以說鴻蒙OS並非是鏡花水月。在近期,我們可以期待鴻蒙OS開發工具、源代碼的公佈;在遠期,我們則可以期待華為能充分利用軟硬件的整合優勢,讓鴻蒙OS在市場上發光發熱。華為已經腳踏實地取得了很多矚目的成績,對於鴻蒙OS,我們大可懷抱期冀。
後話
移動互聯網仍在蓬勃發展,一款操作系統想要獲取成功,既需要自身的奮鬥,也需要符合歷史進程。 Windows乘上了X86兼容機普及的浪尖,而安卓順應iOS掀起的觸屏風暴扶搖直上,它們都取得了耀眼的成就;而缺乏基本盤、硬實力或者不得其時者,如WebOS、FireFox OS、 MeeGo、黑莓OS等,則只能紛紛淪為歷史的過客。
鴻蒙OS的理念無疑是先進且符合時代發展大潮的,而作為5G時代締造者之一的華為,則可以成為鴻蒙OS最有力的後盾。如無意外,這幾年鴻蒙OS就會較為廣泛地服務於大眾市場上,國產系統大有可為!
.
from 國產系統大有可為 從鴻蒙看未來操作系統的大潮
via KKNEWS
0 notes
Text
A tweet
Costumbres sanas. Recuerda hoy, antes de actualizar Xcode en el Mac App Store, que debes renombrar el actual Xcode a Xcode11. Clave para librerías o proyectos que aún no hayas podido actualizar.
Ambas versiones co-existen sin problema alguno. pic.twitter.com/uqfmbVnXJf
— Apple Coding (@Apple_Coding) September 16, 2020
0 notes
Text
How to Download iOS 13.4 Developer Beta 6 on Your iPhone
iOS 13.4 is launching soon and need a third-party developer to install the iOS 13.4 version beta 6 on your iPhone. As always, Apple has first released the developer version to diagnose any issues and fix them before the official release. Here is how you can avail of it:
New in iOS 13.4 beta 6
On 18 March 2020, Apple released a new upgrade version of iOS 13.4 version beta 6 for its developers. To download and install the iOS 13.4 beta 6 in your device, follow the steps.
How to Get back up of your iPhone
How to install iOS 13.4 beta 6 using iTunes
How to install iOS 13.4 beta 6 using a profile
How to get started with the 13.4 beta 6
1) How to backup your iPhone
Getting backup is one of the best ideas before downloading or installing iOS 13.4 beta 6. Here are the steps on how to get back up of your iPhone:
Attach your iPhone with your Macbook or Windows Computer.
Open iTunes.
Tap on the iPhone logo that appears in the menu bar.
Assure to backup is set as This PC, and enabled “Encrypted backup.”
Tao on “Back up Now,” and add a password to secure your backup.
Tap on “Back up Application” when asked.
Tap Command, to start Preference. Or visit the iTunes menu bar and then tap on “Preferences.”
Tap on the “Device” tab.
Control-tap on the Backup and select Archive.
2) How to install iOS 13.4 beta 6 using iTunes
Here are the steps on how to install iOS 13.4 beta 6 using iTunes:
Visit developers.apple.com on Macbook.
Hit the “Discover” tab.
Tap on the “Operating system” option that appears on the top of the screen.
Hit “Download“
Sign in with your developer ID and password.
Visit to the iOS 13.4 beta 6 option and then download the image that you have restored.
Hit on the iOS restore an image that similar to your device that you have installed.
Tap Application that appears on the top in the list of beta software.
Hit the “Download” option near the Xcode11, and wait for some moments.
Launch iTunes in your Application folder.
Attach your iPhone with your Macbook.
Tap on the iPhone icon that shows in the iTunes, and you might be entering the password of your device.
Holding the “Option” button on your Macbook keyboard and then tap “Check for Updates.
Tap “Download in the sidebar, or the location where you wish to download.
Hit iOS 13 restore the image.
Tap Open.
3) How to install iOS 13.4 beta 6 using a profile
Here are the steps on how to install iOS 13.4 beta 6 using a profile:
Visit developer.apple.com on your iPhone.
Tap the “Discover” tab.
Hit the “Operating system” option that appears on the top of your screen.
Hit Download.
Sign in with Developer ID and password.
Visit to the iOS 13.4 beta 6 option and then download the image that you have restored on your iPhone.
Hit Close.
Launch Settings.
Tap “Profile Downloaded.”
Hit “Install” here you gave to enter a password.
Agree with the result and tap Install, when the upper corner and once in the bottom of the corner.
Tap Restart to apply Changes that you have done on your iPhone.
To install beta 6 by itself, you only need to visit system Preferences:
Start settings on the Home screen.
Hit General.
Tap Software Updates.
When the Updates shown on your screen, hit “Download and Install.”
Put Your Password.
Hit Agree to confirm Term and Condition.
4) How to get started with the 13.4 beta 6
Here are the steps on how to get started with the 13.4 beta 6:
Hit Continue.
Input your Apple account password. iCloud will be showing the updates on your screen.
Tap Get Started.
After complete this above process, iOS 13.4 beta 6 versions will be installed into your device.
Source:-https://devinsmith007.wordpress.com/2020/03/24/how-to-download-ios-13-4-developer-beta-6-on-your-iphone/
0 notes
Video
youtube
iOS Swift 5 Tutorial: Superview and Subviews in iOS Hindi 2020.
#superview#subviews#swift#swift5#hindi#superview in swift#subviews in swift#ios#xcode#xcode11#swift 5 tutorial#2020#yogeshpatel#yogeshpatelios
0 notes
Text
How to Install iPadOS 13.3 Developer Beta 3 on iPad?
The iPadOS 13.3 beta released on November 20, 201 and it is loaded with all-new features. It is easily available but it’s a bit complex to install it. In this blog, we will share all the information regarding the latest iPadOS 13.3 beta 3. If you are a developer and you are keen to test it, then follow this blog.
Latest in iPadOS 13.3
The third beta version of iPadOS 13.3 has been released. There are several new functions that have been added to this beta. If you are a developer and are waiting to test it, then follow the blog to get the steps to install it.
Archiving the Backup of your iPad
The first step for every upgrade or install process requires backup, so before proceeding further make sure you backup the iPad device you are using. Although the process for installing iPadOS 13.3 beta 3 to your iPad is very safe but it is still recommended to always do a backup before this kind of process. Here are the steps to backup your iPad.
Sync the iPad either with Mac or Windows PC.
iTunes will open automatically.
Choose the iPad option from the Menu bar.
Set the backup to the option of This Computer.
Select the Backup option.
Back up all the apps if it suggests.
Tap Command and go for Preferences.
Now, select the Devices option.
Select your Backup and tap the option for Archive.
Installing the iPadOS beta via iTunes
Open the developer.apple.com on Mac.
Choose the option of”Discover”.
Select any one operating systems options.
Choose Download.
Input all your Login details of your developer account.
Download the Restore images from the IPadOS beta panel.
Choose the desired IpadOS restore image for your device.
Select Applications appearing on the top of beta software.
Choose the Download option in Xcode11.
Wait till the Xcode completes the downloading.
Now, launch iTunes.
Sync your iPad to the Mac.
Choose the iPad icon \shown inside iTunes. Input the iPad password if it asks.
Locate the Check for Update tab in the option key and select it.
Tap on Downloads.
Open the iPadOS restore image.
Choose the Open option.
Installing the iPadOS beta via Developer Account
In order to proceed with this method, you need to have a developer account with Apple. You need to purchase this account from Apple.
With the Apple developer account, you can easily download iPadOS betas straightly to your iPad, no Mac, no other resources required. Follow these steps, if you want to install it this way:
Open the developer.apple.com on your iPad.
Select the “Discover” option.
Choose any operating system button available at the top of the display screen.
Then select the Download option.
Input all your developer accounts details to further the login process.
Move to the iPadOS 13 beta part and choose download.
After this, the process will begin.
Select Close.
Launch the Settings.
Choose the Profile Downloaded option.
Select Install, if asks for your Password input it.
Tap the Restart to execute the changes to your iPad.
After you have created a developer account, you need to visit the software update section on the iPad. Follow below:
Open the settings and go to the General option.
Select the Software update.
Select the Download and install option after the update shows on the screen.
Input your iPad passcode.
Select Agree for the Terms and Conditions of Apple.
Once again you need to choose to Agree for the confirmation.
Let the process be complete, your iPad will restart a couple of times. Wait till it completes.
Starting iPadOS beta
After you have successfully installed the iPadOS on your iPad. There is a simple login procedure you have to follow. To login do:
Select the Continue option.
Input the password of our Apple ID. It will take a bit of time as the settings of the iCloud will update.
Select the Get Started option.
Now you can test the iPadOS beta as it is successfully installed on your iPad.
Ashley Miller is a Mcafee product expert and has been working in the technology industry since 2002. As a technical expert, she has written technical blogs, manuals, white papers, and reviews for many websites such as mcafee.com/activate.
Source: https://mcafeecomactivate334980539.wordpress.com/2019/11/26/how-to-install-ipados-13-3-developer-beta-3-on-ipad/
0 notes
Photo

Learn iOS Development FOR FREE - Best courses and tutorials http://ehelpdesk.tk/wp-content/uploads/2020/02/logo-header.png [ad_1] Challenge: Start 100 days of Swi... #androiddevelopment #angular #appdevelopment #appstore #c #css #dataanalysis #datascience #deeplearning #design #dev #developer #development #docker #ios #ios13 #ios13beta #ios13beta7 #ios13features #iosappdevelopment #iosbootcamp #iosdeveloper #iosdevelopment #iosinternship #iossdk #iphone #iphonex #iphonexr #java #javascript #learniosdevelopment #machinelearning #node.js #prototyping #python #react #responsive #restapi #sketch #swift #swiftdevelopers #swiftdevelopment #swiftdevelopmentforbeginners #ui #uidesign #uiuxdesign #uiux #unity #ux #uxdesign #webdevelopment #xcode #xcode11
0 notes
Last Seen Blogs

loestrin24fe
Loestrin 24 Fe

bolt-from-the-dark
THE ACTUAL AUDACITY
-FFXIV BLOG-


toulipe
Olivia

beastlyheart
fire meet gasoline