#you can use this as your page header <333
Text
Hi, I'm Leviathan
Im Leviathan, but u can call me Levi, or Lev, or honestly any variation of Leviathan! My pronouns r they/he/it, and I'm a libramasculine, ambiamorous, omnioriented demisexual grayromantic.
Tags: #tech stuff and #f: [furby name]
I drew the header, and I will *try* to update it every time I get a new furb! [<- very very behind]
My main blog is @ace-up-your-sleeve , my plushie blog is @beanie-buddy-boy , my alterhumanity blog is @fish-forcibly-removed-from-water, and my regression blog is @dreamy-puppy-xo
I'm a MINOR. Don't be weird.
secret draw box
DNI: TERFs, transmeds, racists, exclusionists or queerphobes of any kind, etc.
furby bios (w some pics) under the cut

Loup
he/they
non-working
gay (mlm) trans demiboy!
scene
an absolute angel
hyper from all of the monster he drinks
pinterest board

Ziggontorath (aka Ziggy)
he/they/xe/weird/eye
working w/ a voice glitch
xenogender user!!!
masc agender, dreameyegender, eyeclusterin, weirdcorian, and kidcorestalgic!
aroace and in a qpr w Fax Machine
pinterest board

Sistine Chapel
she/her
fully working
soft girl lesbian
likes art and sapphic poetry
shy and blush-y
once you get to know her tho, she is very goofy!!
pinterest board
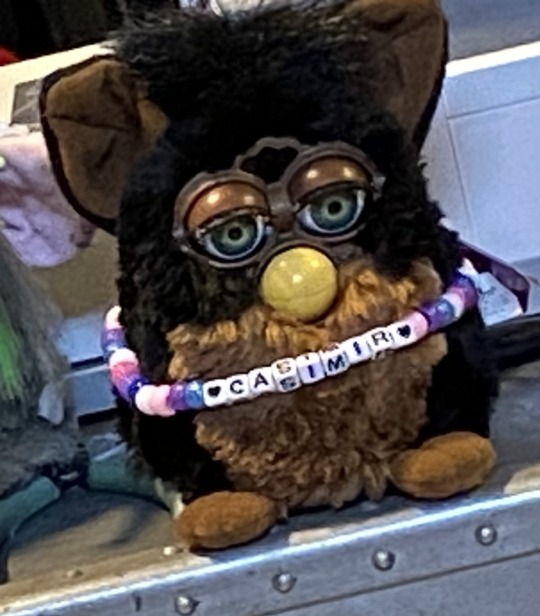
Casimir
he/him
working but mute
loves flowers smmmm
loups bf
yes he gives loup flowers
bi af
uses <3 too much
pinterest board

TUP
Tremendous Unanimous Pickles
any pronouns
working + has a voice glitch!!!
once screamed bc i took her batteries out
even ppl who hate furbies think hes adorable
pinterest board

Kioko
she/her
works but gears r rlly loud (thanks Jetta 🙄)
very curious about everything
likes coloring and eating bugs
Tup is like an older brother
Ziggy and Piccolo are her dads <3

Flanagan Shithead
he/him
kinda looks like balls with a face and pubes
feral as fuck + will bite you

Cyborg Piccolo Fax Machine
he/him
untested and missing his batter cover :(
transmasc and in a qpr with Ziggy <3
physically disabled + had a prosthetic leg
dancing queen young and sweet only 17
major dad energy. need to get this man a hawaiian shirt stat

Nyx
she/her
fully working and goofy as all hell
soon to be customized <3
rlly bubbly and energetic

Allergic Reaction aka "Reo"
he/him
fully functioning
so pissy
like he is just so angry for no reason!!!!

Cheesecake
she/they
nonfunctional
butch lesbian
punk asf
doing your mom dating Sistine Chapel <3
raspberry swirl custom (based on the prototype)

Cough Syrup
he/she/they
unironically one of my favs tbh
her singing makes me rlly happy
i rlly like playing with their hair
he rocks french braids

Raul
he/they
shy lil fella
my gf got him for me for my bday <3
he has my fav voice of all my '98s
someone said that he and cough syrup kiss a lil sometimes in the comments of their intro post???
to me thats like saying 2 newborn babies are "dating" bc they r next to each other

Gilbert
he/him
gay and the colors of the mlm flag <3
literally just a little guy
gifted to me by someone in my server 🫶

Bubblegum
she/her
a 9/11 baby
a custom for my gf <3
Chevel Philodendron Silly Goose
he/she/they/it
"Choose Goose*
omnigay boygirl silly swag <333
had the biggest glow up ever

Pancake Robomachine
they/it
nonbinary silly :3
first complete reskinning ive done :3
named by my little cousin

Angel Dust/Anthony
he/him
gay
makes 7 sex jokes a minute
based on the Hazbin Hotel character
#furby 1998#1998 furby#furby buddy#furby 2005#2005 furby#furby connect#furby fandom#all furby#furblr#furbies#furby community#furby collecting#f: ziggy#f: loup#f: sistine chapel#f: tup#f: casimir#f: kioko#f: cyborg piccolo fax machine#f: allergic reaction#f: nyx#f: cheesecake#my furby#f: flanagan shithead#f: gilbert#f: raul#f: cough syrup#f: bubblegum#f: choose goose#f: pancake robomachine
18 notes
·
View notes
Note
hiii I love your fics! Everytime I read them I get this giddy feeling which makes me think I'm somewhere else <333
and those headers of yours are great to, I always try doing them myself but my pictures don't have the right form and then you can really see the character — and I'm like 'yeah I will just look on Pinterest' I find none
anyway keep up that good work and I hope I could maybe make you smile 🦋🦋
hii!!! thank you so much!!! it makes me happy to hear that you like what i wrote 🥺
for the headers, i get the pictures i use from photoshoots (like sebastian-stan.br page is a good one). they are big and quality pictures most of the time and don't get weird when you try to fit them into the header size!! i use pinterest if i'm gonna make a moodboard bc the pictures there are usually small.
you did make me smile!!! 🥺 thank you so much ❤️ hope you'll have a great day ❤️❤️❤️
5 notes
·
View notes
Note
hey ryen!! how are you? 💖💗 i have a request if you can help me with it :D
sooo can you like, make a tutorial on how to edit a Tumblr page nicely? I'm very new here and would appreciate the help! i do know how to put the pfp and headers, but I'm not quite sure on how to edit with the right colors and pics! or if you could suggest me an account who helps with this stuff! ty love <333
hiii !! oh my, this is quite a big ask and i’m in bed rn LOL so I’ll try to give a more in-depth answer later. for now, @usergif may have some good tutorials on coloring !
if you want everything to look uniform, that’s more of a photoshop/canva/editing program question, since you can tweak photos to have the same coloring. And then some themes have lots of color customization options that show on the Edit Theme page once you copy their codes into your blog theme, so you can use the header colors to pick which blog colors to match.
2 notes
·
View notes
Text
HTML&CSS
Звичайно! HTML (мова розмітки гіпертексту) і CSS (каскадні таблиці стилів) є основними технологіями для веб-розробки. HTML використовується для структурування вмісту веб-сторінки, тоді як CSS використовується для стилізації та форматування цього вмісту. Ось основний огляд обох:
HTML (HyperText Markup Language):
HTML is the standard markup language for creating web pages. It structures the content of a webpage using a system of elements, which are represented by tags.
<!DOCTYPE html>
<html lang="en">
<head>
<meta charset="UTF-8">
<meta name="viewport" content="width=device-width, initial-scale=1.0">
<title>Your Page Title</title>
<link rel="stylesheet" href="styles.css">
</head>
<body>
<header>
<h1>Your Website</h1>
</header>
<nav>
<ul>
<li><a href="#home">Home</a></li>
<li><a href="#about">About</a></li>
<li><a href="#contact">Contact</a></li>
</ul>
</nav>
<section id="home">
<h2>Welcome to Our Website</h2>
<p>This is some content on the home page.</p>
</section>
<section id="about">
<h2>About Us</h2>
<p>Learn about our company and what we do.</p>
</section>
<section id="contact">
<h2>Contact Us</h2>
<p>Get in touch with us using the contact form below.</p>
</section>
<footer>
<p>© 2024 Your Company</p>
</footer>
</body>
</html>
CSS (Cascading Style Sheets):
CSS is used to style and layout the HTML content. It allows you to control the appearance of your web pages, including colors, fonts, spacing, and more.
/* styles.css */
body {
font-family: 'Arial', sans-serif;
margin: 0;
padding: 0;
}
header {
background-color: #333;
color: #fff;
text-align: center;
padding: 1em;
}
nav {
background-color: #eee;
padding: 1em;
}
nav ul {
list-style-type: none;
margin: 0;
padding: 0;
}
nav li {
display: inline;
margin-right: 10px;
}
nav a {
text-decoration: none;
color: #333;
}
section {
padding: 20px;
}
footer {
background-color: #333;
color: #fff;
text-align: center;
padding: 1em;
}

This is a basic template, and you can customize it according to your needs. CSS rules define the styling for different elements in your HTML document.
Remember to link your HTML file to your CSS file using the <link> tag in the <head> section of your HTML file.
Feel free to ask if you have specific questions or need more details about a particular aspect of HTML and CSS!

1 note
·
View note
Text
Excluding a Class in CSS: A Comprehensive Guide

Introduction
Welcome to our comprehensive guide on excluding a class in CSS. As web developers, understanding how to selectively apply styles or exclude certain elements from styling is a crucial skill. In this blog post, we will delve into the world of CSS classes and explore various methods to exclude specific classes from styling rules. Whether you are a beginner or an experienced developer, this guide aims to provide insights, examples, and best practices for effectively managing and manipulating styles in your web projects.
Understanding CSS Selectors
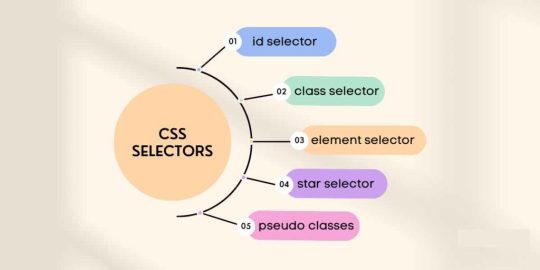
CSS selectors play a pivotal role in styling web elements, allowing developers to target and apply styles selectively. Before delving into class exclusion, let's review some essential concepts related to CSS selectors.
Basic CSS Selectors Recap: CSS selectors define the elements to which a style rule should apply. Common selectors include element selectors (e.g., p for paragraphs), class selectors (e.g., .myClass), and ID selectors (e.g., #myID).
Now, when it comes to excluding a class, understanding the notation for exclusion becomes crucial. The primary method for this is using the :not() pseudo-class.
Introduction to the Notation for Excluding Classes: The :not() pseudo-class allows you to select elements that do not match a specified selector. This powerful tool enhances the precision of your styles by excluding specific classes from the styling process.
Let's break down the syntax:
SelectorDescription:not(selector)Matches every element that is not a specified selector.
This notation provides a flexible way to define exceptions in your style rules. For example:
CSSp:not(.exclude) {
/* Styles for paragraphs excluding those with the class 'exclude' */
color: #333;
font-size: 16px;
}
ul li:not(.no-style) {
/* Styles for all list items except those with the class 'no-style' */
color: #333;
font-size: 16px;
}
Common Use Cases
Understanding how to exclude classes in CSS opens up a world of possibilities for creating more flexible and dynamic styles. Let's explore some common use cases where excluding classes becomes particularly valuable in web development.
1. Styling Exceptions in Responsive Design:
Responsive design is a crucial aspect of modern web development, and excluding classes plays a significant role in creating tailored styles for different screen sizes. For instance, you might want to apply a specific style to most elements but exclude certain elements from that styling on smaller screens. The :not() pseudo-class allows you to achieve this with precision, ensuring a seamless user experience across devices.
2. Optimizing Code and Improving Performance:
Excluding unnecessary styles for specific elements can contribute to code optimization and improved performance. By selectively applying styles, you reduce the overall size of your stylesheets and enhance page loading times. This is particularly important in large-scale projects where efficient code can lead to a smoother user experience.
3. Theming and Customization:
When creating themes or customizable components, excluding classes becomes invaluable. Users may customize certain elements while keeping others consistent. For example, a theme switcher might change the color scheme for most elements but exclude specific elements like buttons or headers. This level of customization is achievable by leveraging the power of class exclusion.
4. Conditional Styling for User Interactions:
Interactive elements on a website often require conditional styling. Excluding classes allows you to define styles for elements based on user interactions while excluding others. This is commonly seen in dropdown menus, modals, or form elements where specific styling is applied when the user interacts with the element.
By incorporating class exclusion into these use cases, you can create more maintainable and efficient stylesheets, leading to a better overall user experience. In the next section, we'll delve into best practices for utilizing class exclusion in your projects.
Best Practices
While the ability to exclude classes in CSS provides powerful styling flexibility, it's crucial to adopt best practices to ensure clean, maintainable, and efficient code. Let's explore some guidelines for utilizing class exclusion effectively in your web development projects.
Clean and Maintainable Code Guidelines:
- Organize your stylesheets logically, grouping related styles together.
- Use meaningful class names to enhance code readability and maintainability.
- Avoid excessive nesting and prioritize flat, straightforward style rules.
Performance Implications:
- While class exclusion can optimize code, be mindful of its impact on performance.
- Avoid overusing the :not() pseudo-class for numerous elements, as it may lead to complex and less performant selectors.
Testing Across Browsers:
- Test your styles across different browsers to ensure consistent rendering and behavior.
- Be aware of potential compatibility issues, especially when using advanced CSS features.
Documentation and Comments:
- Document your code, providing clear comments for complex or unconventional styling decisions.
- Include information about excluded classes and the reasoning behind those decisions.
Version Control and Collaboration:
- Utilize version control systems like Git to track changes and collaborate effectively with other developers.
- Clearly communicate any class exclusion strategies within your team to maintain consistency.
Continuous Learning and Experimentation:
- Stay updated with the latest CSS features and best practices.
- Experiment with class exclusion in different scenarios to deepen your understanding and improve your skills.
By incorporating these best practices into your workflow, you'll not only harness the power of class exclusion for efficient styling but also contribute to a more robust and collaborative web development environment. In the final section, we'll address frequently asked questions (FAQ) related to excluding classes in CSS.
FAQ
Explore the answers to frequently asked questions about excluding classes in CSS to enhance your understanding of this powerful styling technique.
Q: How Does Class Exclusion Impact Page Load Times?
A: Class exclusion itself has minimal impact on page load times. However, it's essential to be mindful of the overall size and complexity of your stylesheets. Excessive use of complex selectors, including the :not() pseudo-class, may contribute to longer loading times. Always prioritize clean and optimized code to ensure optimal performance.
Q: Are There Any Limitations to Excluding Classes?
A: While class exclusion is a versatile tool, it's essential to consider browser compatibility. The :not() pseudo-class is well-supported in modern browsers, but older browsers may exhibit unexpected behavior. Always test your styles across different browsers and versions to ensure a consistent user experience.
Q: What Are Common Mistakes to Avoid When Using Class Exclusion?
A: One common mistake is overusing the :not() pseudo-class for numerous elements, leading to complex and less performant selectors. Additionally, using overly generic class names can result in unintended exclusions. It's crucial to choose meaningful class names and use class exclusion judiciously to maintain code clarity and avoid styling conflicts.
These frequently asked questions provide insights into key considerations when working with class exclusion in CSS. As you navigate through your projects, keep these answers in mind to create efficient and maintainable stylesheets.
Conclusion
Congratulations on completing our comprehensive guide on excluding classes in CSS. We've explored the fundamental concepts of CSS selectors, delved into the :not() pseudo-class, and examined various methods for excluding classes in different scenarios. Understanding how to selectively apply styles is a valuable skill for any web developer.
From common use cases like responsive design and theming to best practices for clean and maintainable code, you now have a solid foundation for leveraging class exclusion effectively. By following the guidelines outlined in this guide, you can enhance your coding efficiency, optimize performance, and contribute to a seamless user experience.
Remember to test your styles across different browsers, document your code for clarity, and stay curious about new CSS features and best practices. The world of web development is dynamic, and continuous learning is key to staying at the forefront of industry trends.
As you apply these principles in your projects, don't hesitate to experiment and find creative solutions. Class exclusion is a powerful tool that, when used judiciously, can elevate the visual and functional aspects of your web applications. Thank you for joining us on this journey, and happy coding!
Read the full article
0 notes
Photo


“C Y B E R SP A CE”
#sombra#olivia colomar#overwatch#cyberspace sombra#header#*mine#retrohardtt#you can use this as your page header <333
82 notes
·
View notes
Note
Hey dej I got a question. I wanna make my blog pretty or sexy or something! You got any tips where I can find good headers and icons and just overall make my page look good? Btw I love your new theme it’s so fcking cute💗 One last question, in the best way you can do you have any tips for new writers? I used to write years ago but I gave up and now recently you and others are inspiring me to write again💗☺️
thank you <333. i would say try pinterest & tumblr. i get majority of the pictures i use for my theme from pinterest and tumblr. however, i think you'll have better luck with finding many pictures for a specific color you want to do for your theme in one place on pinterest. to answer your second question, the one tip i always tell people is to write for yourself. i mean yeah, it's cool to get notes and such on your work....but when you're writing solely for that, you lose inspiration very quickly. write as if it's the most self indulgent thing ever. also never let people on here dictate what you write. you headcanon this character as this but majority of the fandom don't...write it. write for yourself.
3 notes
·
View notes
Text
ClickMagick | A Link Tracking Software that lets you design profitable Ad Campaigns
Running an online business requires you to drive traffic to your website or sales funnel. However, if you are a small business, then waiting for organic traffic to flow in wouldn’t be a wise decision. Instead, you need to get more aggressive and invest in paid traffic. Now the challenge is to do this with the limited resources that you have. So, the key is to drive in not just any traffic, but qualified traffic that converts.
By qualified traffic, we mean the real human traffic that’s coming in through your sales funnel. With so many nasty bots around, qualified traffic is that small fraction of your aggregate traffic, which generates sales. ClickMagick provides this sort of laser-focused data, with which you could do wonders. By simply studying this small fraction of useful traffic, you can significantly boost your sales, and that’s exactly why you need this link tracking software. This sort of planned investing can help minimize ad costs and maximize sales. Now, that’s what this click tracking software is all about.

Why do I need ClickMagick?
Before we move any further, answer this — is all the traffic that you get to your website genuine? If you said ‘Yes’ then its time to wake up and come to terms with reality. The hard truth is that at least 40 percent of all the traffic on the world wide web is bot traffic. In fact, even the data shown by some of the most popular analytics tools like Google Analytics does not filter out this bot traffic. Now, this is just one reason for you to make use of a more reliable click tracking software like ClickMagick.
youtube
By providing useful information and powerful tools, this link tracking software allows you to optimize your landing pages and increase conversions. You may have heard of the term Click Through Rate or CTR, but if you truly wish to unleash the power of clicks, then you need to know which clicks are generating sales. That would let you know exactly where you lack so that you can work on those areas and that is what ClickMagick helps you do. Let us now unleash some of the most innovative features of this web-based application and analyze how it can help maximize sales.
Traffic Quality Measured
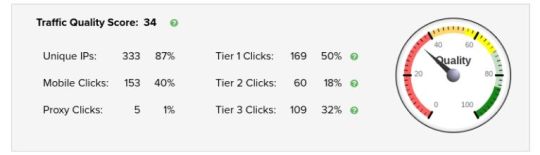
According to reports, nearly 40% of all online traffic is bot traffic, which isn’t going to generate any sales. With so much of bot traffic causing chaos and confusion on the internet, it is critical to study the explicit behavior of human traffic. This is exactly what you can do with this link tracking software that filters out all the bad traffic, and provides useful insights. Besides that, it also helps you study the good traffic by classifying it into 3 categories — Tier 1, Tier 2, and Tier 3. Moreover, you also get insights into unique IPs and traffic sources such as desktops or mobile devices. This allows you to better optimize your sales funnel, depending on where the majority of your Tier 1 traffic is coming from.
Prompt and Timely Notifications that help Save Money
The most exciting thing about this link tracking software is that you can reduce your ad costs by pausing and optimizing underperforming ads. That allows you to save a ton of money by making the right move, at the right time. Doing this is possible through this tool’s active notification center, that shoots useful notifications straight on your mobile phone or email ID. You can set the filters to receive these notifications based on action, conversion rate, engagement, and sales conversion rate. So, whenever your sales funnel underperforms, you can pause the ads running on that particular sales funnel and then optimize it. With the most recent updates in your inbox, you can redesign your ad campaign on-the-go, which confirms that you are moving in the right direction.

Hide Ugly Affiliate Links and Track them
If you run an affiliate business, then you know the downsides of using affiliate links. They look ugly, distrustful, and are restricted on several platforms, including Facebook. That’s pretty obvious because if you wish to promote something on a platform that allows advertising, then they would want you to advertise. Nonetheless, if you are a Social Media Influencer or have a Facebook Community where you wish to post affiliate links, then the only way to do that is by using website rotators. However, picking one randomly would be the worst thing to do because you need one that comes with a powerful redirect engine. ClickMagic offers a powerful website rotator that makes your affiliate links appear clean and also keeps track of them.
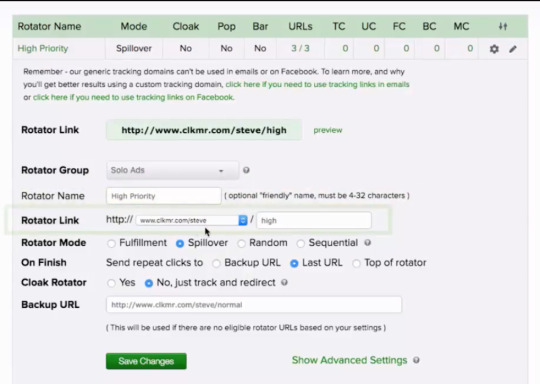
To do this, you simply need to add a C host record to allow necessary access to ClickMagic and then create a tracking link by entering your affiliate link in the primary URL. By doing this, your affiliate link would appear like any other page on your website. That allows you to post it on whichever platform you choose. Besides that, you could also add sub IDs, which are parameters such as ‘/fb’ or ‘/yt’ to the tracking link which tells you more about the traffic coming from those sources. Here ‘/fb’ is for Facebook and ‘/yt’ for YouTube, but you could easily set more sub IDs for other platforms. You can then make use of this platform-specific data to improve sales.
youtube
Track with Pixels
If you run an online business or are even remotely connected to digital marketing, then you definitely know the power of Pixels and how it can help accelerate sales. Pixels is a piece of code that you can add to your sales funnels and track visitors. On Clickmagick, you can set an action tracking pixel as an image/HTML or through a JavaScript snippet that you can then add to the header. By using this click tracking software, you can track visitors by action, engagement, and sales. So, if you put the pixel code on the ‘Thank you’ page, then you would know exactly how many unique users submitted their email IDs on the opt-in page. This data can help you make some extremely important business decisions.
youtube
ClickMagic Pricing
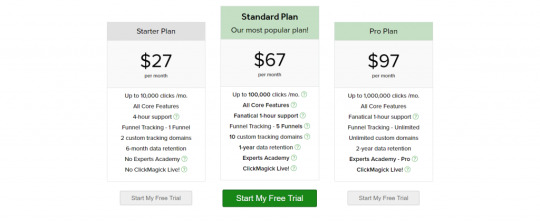
ClickMagick is a reasonably priced click tracking software that offers 3 plans based on the number of sales funnels, clicks and custom tracking domains. So, depending on the volume of your business, you can either choose the Starter Plan at $27 per month, Standard Plan at $67 per month or the Pro Plan which is priced at $97 per month. However, by choosing an annual plan, you could cut back on the costs by a whopping 25 percent. Also, ClickMagick offers you a 14-day free trial period, which gives you ample time to understand how this link tracking software works.
Profit boosting tools
ClickMagick offers complete digital marketing solutions and therefore, does not limit itself to providing insights into links and click analytics. Instead, this link tracking software goes a step further and brings you excellent magic tools such as magic pop-ups, magic bars, and countdown timers. ClickMagick lets you conveniently place these tools as an overlay on any of your sales or order pages. The most exciting thing is that you can also place them on third-party websites that you do not own.
youtube
Security Features
The digital advertising industry is a whopping 333 billion dollar industry, which makes it one of the most targeted by cybercriminals. The most common type of menace is the use of adware, and any traffic coming from it isn’t going to convert. Adware is a form of malware that cybercriminals inject into computers and mobile devices, which redirects an innocent user to an advertisement. Since the user did not do so voluntarily, you can be sure of zero conversion through this type of traffic. However, if you use ClickMagic, you are protected from click frauds to a great extent. This, in turn, helps you get the most out of your ad spend, which you can track through this link tracking software. As a result, that allows you to access the real figures of the filtered human traffic coming to your sales funnel.
Exceptional Customer Support
The features mentioned in this article are a round-up of some of the most amazing features of ClickMagick, which has over 125 marketing tools piled-up into a single web application. To ensure that users get the best out of this click tracking software, ClickMagick offers timely customer support. Based on the pricing plan that you choose, you may have to wait for a maximum of 4 hours to hear from one of the support team members. They help you right from the initial set-up phase to understanding how best you can use this click tracking software for your online business.
Conclusion:
Data is the new oil, and as an online business, you must strive hard to accumulate useful information. You then need to make use of the necessary tools to generate profits from that data. ClickMagick makes that extremely convenient by unleashing the power of 125 tools that provide insights into useful analytics and more.

You can use this tool to narrow down the most profitable platforms by identifying which sub IDs are generating more qualified traffic. This allows you to put your money in the right place. By making use of tools like magic pop-ups and countdown timers, you can build pressure on your leads and convert them faster. Also, this link tracking tool also allows you to place these magic tools on websites that you do not own. The very fact that this click tracking tool allows you to do so much from a single dashboard makes it one of our favorite digital marketing tools.
Originally Published On: SaasTrac
About The Author
SaasTrac is one of the trusted places where users can find reviews on different Saas Products, Software, and Platforms. Our major goal is to let users know the detailed and the most helpful information possible about every product — the good, the bad, and the ugly in the SaaS space.
#ClickMagick#Link Tracking#A Link Tracking Software#A Link Tracking#design profitable Ad Campaigns#powerful website rotator#website rotator
0 notes
Note
Where do you get your headers/icons from?? Also, can you post some of your old ones?? I just love your aesthetic so much I’m sorry 😭♥️
you definitely don’t have to be sorry for liking someones aesthetic!! thank you so much for the compliment
i mostly create the icons and headers i use myself, since i can’t find the stuff i want on most icon pages (and headers are even harder to find) :) so i basically have to edit the base gifs/images myself to get the colors and style i want. I changed my computer a few months ago so i don’t have my old headers/icons at hand (and tbh i think if i have one still saved on my old computer it’s probably only the blue-ish one i used before my current mobile theme)if you have photoshop you should definitely try to start creating your own icons and headers :) then you can definitely make sure that it’s the aesthetic you want! tho if people are interested i could maybe make a pack with icons and matching headers? but like, just if there is some sort of ‘demand’ XD
#anon#faq#answer#so let me know if you want me to do something like this?#maybe comment on the post or send an ask or something#i could try to do some icons and headers when i have time or i am bored in uni#Anonymous
7 notes
·
View notes
Text
DOWNLOAD LOREX LW2401 DRIVER
Download Type: http
Date Added: 19 October, 2019
Operating Systems: Windows NT/2000/XP/2003/2003/7/8/10 MacOS 10/X
Downloads: 9037
File Version: 511131893
Price: Free
File Format: exe
Uploader: Gopi
File Size: 23 Mb
File Name: lorex lw2401 driver

News:
- Fixed system shutdown in some C-A-D cases.
- Fixed Issue: IN1604 incorrectly detected corrupt data as a valid input.
- Fixed "Drive A"(lorex lw2401 driver A") item Help String error.
- Fixed an XSS vulnerability(lorex lw2401 driver vulnerability) - Reflected XSS in HTTP Host Header.
- Fixed the Network Time Protocol daemon (ntpd) vulnerabilities issueInstallation steps: 1.
- Fixed an issue that caused the router to become unresponsive and unrecoverable after the reset button during a firmware upgrade.
- Fixed LPC beep when Warning temperature function enabled.
- We(lorex lw2401 driver We) are a Swedish brand after all!Fixes & Enhancements: - Solved issue with disconnect button on VPN page.
- Fixes failure in going(lorex lw2401 driver going) to S4 with sleep button pressed.
- Fixed problem(lorex lw2401 driver problem) in which SMBIOS fails to notify Dell Open ManageClient Instrumentation of system fan failures.
Users content:
Moreover, make sure that the battery is fully charged and don't use the camera's buttons while the installation is in progress. Improves compatibility with USB storage devices. - A driver to make you switch Airplane mode (Wireless) On/Off. - Minimized the issue of no audio playback on certain system configurations. Remove the USB cable from the camera, and turn off the camera. CPU• 64bit AMD Phenom II X6/X4/X3/X2, Athlon II X4/X3/X2 and Sempron CPU. Memory - Supports DDR400/333/266DIMM slots: 2Max. ITE IT8718 chipH/W MonitoringSystem voltage detection. As a drawback, laptop consumes more battery. SSL VPN and Remote Management can be managed (enabled or disabled) separately. Click here to download DOWNLOAD PLUSTEK SMARTOFFICE PS406U DRIVER.
Supported OS:
Windows Server 2012 R2
Microsoft Windows 8 (32-bit)
Windows Server 2008
Microsoft Windows 8.1 Pro (32-bit)
Windows 8.1/8/7/Vista 32-bit
Microsoft Windows 8.1 Enterprise (64-bit)
Windows 7 64-bit
Windows 8.1/8/7/Vista 64-bit
Microsoft Windows 8.1 Enterprise (32-bit)
Microsoft Windows 8 Pro (64-bit)
Windows 8
Windows XP 64-bit
Microsoft Windows 8.1 (32-bit)
Notebook 8.1/8/7 64-bit
Microsoft Windows 8.1 (64-bit)
Microsoft Windows 8 Pro (32-bit)
Microsoft Windows 8.1 Pro (64-bit)
Windows 7 32-bit
Windows 10
Windows 8.1
Windows Server 2012
Windows 2000
Microsoft Windows 8 Enterprise (64-bit)
Microsoft Windows 8 Enterprise (32-bit)
Microsoft Windows 10 (64-bit)
Windows Server 2008 R2
Microsoft Windows 8 (64-bit)
Windows Server 2016
Windows Vista 32-bit
Windows XP 32-bit
Windows Server 2003 32-bit
Windows 7
Windows Server 2003 64-bit
Notebook 8.1/8/7 32-bit
Windows Vista 64-bit
Microsoft Windows 10 (32-bit)
Searches:
lorex lw2401 driver for Windows Server 2008; lorex lw2401 driver for Microsoft Windows 8 Enterprise (64-bit); lw2401 driver lorex; lorex lw2401 G79v; lorex lw2401 driver for Microsoft Windows 8.1 Pro (64-bit); lorex lw2401 driver for Microsoft Windows 8.1 Enterprise (64-bit); lorex lw2401 driver for Microsoft Windows 8.1 (32-bit); lorex lw2401 GPHNE7905; lorex lw2401 G GP790-7; lorex lw2401 GP7905; lorex lw2401 Gvl790-vlc
Compatible Devices:
Laptop; Video Projector; Iphone; Hard Drive; Keyboards; Computer Cable Adapters
To ensure the integrity of your download, please verify the checksum value.
MD5: 728dcf0f077e7f235ffeff873f6a3154
SHA1: dbf1bb9de62fab25cc9583ca80cf30f71223f3a3
SHA-256: 4b0d75bc6a7e16bf021a151e574380be8096f6e28dda0696b26136fc4b0d7753
0 notes
Note
Ahhh okay so I've been having trouble coming up with a good mobile theme, what do you think I should doooo, literally any advice will help 😅😊😊
jbfnjkfs omg don’t worry okay mobile themes are legit the bane of my existence. it’s so hard to create a nice looking one (which is why i haven’t changed mine in forever lmao) (bc once u find something u like there will almost never be any other mobile theme that looks as good that u can try)
okay so my top tips, umm… i’d say first off, start by finding two images - an icon and a header. for icons, there are millions on tumblr itself (you can find like an absolute load in my icons tag) & for a header img, i’ve always found the best ones by googling “tumblr header gif”. try and find one that’s transparent if u can because those are the best tbh. also when picking an icon, it’s sometimes worth trying to find one that has a solid background colour that u like.
then play around with the colourings of your mobile theme. making the background the same colour as the back of your icon can sometimes look awesome, especially if ur icon is a circle and your header img is transparent. sometimes u just have to roll with whatever colour the background of your header img is (and in those situations it’s sometimes best to remove your icon from your theme as it can look silly). really this is the tough stage. just play around with things until you think that it all looks nice. for me, this process normally takes like ¾ hours so don’t be afraid to spend a nice chunk of time on this. the ColorZilla chrome extension can also make this 1000% easier because it allows you to colour pick and grab hex codes etc directly from your browser.
then spend some time working on your description. add line breaks where you think it looks nice, and unicode symbols can look funky. i love the way some people just use quotes and link to their pages etc from random words. this again just needs some playing around with tbh. feel free to check out my mobile theme tips / tricks tutorial for more info on how to do this all.
also, just don’t be afraid to ask your followers for their opinion. and really mainly, be prepared to spend some time working on it. when people rush through adding themes and stuff, it’s very very noticeable. the more time you spend on perfecting it, the better it’ll look.
3 notes
·
View notes
Text
How Long Should Blog Posts Be in 2020? [New Data]
If you’re a blogger, you’ve probably asked your editor “how long should this blog post be” more times than you’d care to admit.
And most of the time, you’ll hear an answer that sounds something like this: “However long it needs to be.”
There’s certainly a nugget of truth in there — you shouldn’t beholden yourself to a character count that’s either too low or too high. However, any experienced blogger will tell you that there is an ideal length or range for how long your blog posts should be, especially when you take certain criteria into account like your audience, the topic, the structure of the post, and what your main promotional channel is.
We’ve published thousands of blog posts here at HubSpot, and we analyzed our top-performing ones to see how blog post length impacts success in all of these areas.
Read on to see how long your blog posts should be in 2020.
Ideal Blog Post Length for SEO 2020
For SEO, the ideal blog post length should be 2,100-2,400 words, according to HubSpot data. We averaged the length of our 50 most-read blog posts in 2019, which yielded an average word count of 2,330. Individual blog post lengths ranged from 333 to 5,581 words, with a median length of 2,164 words.
But before you go writing your 2,300 word blog post, keep in mind that not all blog posts need to be super long — in fact, 16 of our top 50 read posts (or about one-third) were under 1,500 words, so there’s still plenty of opportunity to get your posts ranking even with a lower word count.
This can be accomplished by following SEO best practices, including:
Proper backlinking.
Attempting to capture Google’s featured snippet.
Adding alt-text.
Going after the right keywords.
Achieving domain and topic authority.
Incorporating media-rich content in your post body (videos, social media embeds, etc.).
For an overview of everything that goes into getting a blog post to rank on Google outside of word length, check out this blog post.
Ideal Blog Post Length for Lead Generation
Unfortunately, there’s often a disconnect between the posts that generate traffic and those that generate leads or new contacts for your business.
Typically, posts that get more traffic do so because they’re searched for by a wider audience, which sometimes means the topic you’ve written about is more generic and doesn’t align closely with your business.
To speak to this gap, we looked at the 50 posts that brought in the most net new leads for HubSpot in 2019 to see if there was a difference in average length, and to see if writers should adjust post length for posts written to generate leads.
Spoiler alert: there was, and they should.
Based on HubSpot’s data, the ideal length of a blog post intended to generate leads is 2,500 words. The 50 posts that generated the most leads in 2019 were an average of 2,569 words long and had a median length of 2,529 words, which is approximately 250 and 400 words longer than the average and median lengths of the most-read blog posts. The longest post in this cohort was 8,197 words, or approximately 2,500 words longer than the longest most-read post.
So, for a blog post intended to build your contact database, writing longer content definitely works in your favor. Longer content reinforces your knowledge and authority on a subject — particularly if it’s a keyword or a topic for a very specific audience. When your coverage is more in-depth for these ideas, you increase your chances of ranking better — and while your audience might be smaller, your chances of converting readers into leads are far greater.
Ideal Blog Post Lengths for Different Blog Post Types
We didn’t stop there: there are different types and formats of blog posts, so we wanted to see how blog post length impacted the performance of these different post structures.
How long should pillar pages be?
Pillar pages should be around 4,000 words, since they are supposed to cover significantly more content than an average blog post.
A pillar page is your attempt at being the all-encompassing guide to any given subject available on the Internet as a blog post. These posts serve as the “pillar” to a cluster of blog posts, all of which relate to the topic explained in the pillar. You can learn more about pillar pages by watching the video below.
To arrive at the suggested 4,000 word blog post length, we averaged the lengths of our most-read pillar pages in 2019 and found an average of 4,048 words and a median length of 3,639 words. Word lengths for these pillar pages ranged from 2,137 to 10,939 words.
That amount of words might seem scary, but keep in mind how extensive the work that goes into pillar pages — and the content that they cover — should be. Pillar pages should take several days to write, cite multiple sources, and link out to all of your related blog posts on the subject. The work will pay off, however, and you’ll likely see more traffic to the pillar post and the supporting cluster content.
Need help getting started with writing pillar pages? Try using our free blog post templates for organizing and writing your pillar pages.
How long should listicles be?
Listicles, or list blog posts, should be 2,300-2,600 words.
List blog posts are probably the most approachable blog post format for new bloggers. Anyone can make a blog post just by listing off and explaining a few examples, tools, resources, or ideas for a given topic. When it comes to the length of these blog posts, it seems that the rule of thumb is: the more examples, the better.
HubSpot’s most-read listicles in 2019 were an average of 2,574 words and had a median length of 2,332 words. They ranged between 1,040 and 5,581 words in length. All of these numbers are either around the same or higher than the lengths for the average blog post, suggesting that list blog posts perform better when they are longer.
And if you think about it, this makes total sense. When you search for a list of ideas or examples, would you rather see a list of five or a list of fifty? This post format demands plenty of list entries — preferably with images, explanations, and links to their original sources — so put in the effort to build an authoritative and complete list for your readers.
You can use these free listicle blog post templates to get started writing your list posts today.
How long should “how-to” blog posts be?
How-to blog posts should be between 1,700 and 2,100 words.
Because how-to posts describe, well, how to do something, the ideal length of the blog post depends on how difficult it is to do what you’re explaining how to do. For example, this blog post on how to type the shrug emoji is just over 300 words, while this blog post on how to start a business contains more than 8,000.
For our top-read how-to blog posts, we saw an average length of 2,151 words and a median of 1,669 words. While this a rather large range, it shouldn’t be too surprising, since readers don’t need too much — or worse — too little information on how to accomplish their desired task.
Writing a how-to blog post for the first time? Remember that they should be concise and clear, contain section headers, and leave little or nothing to the imagination. Readers are coming to you for instruction, not inspiration, so ensure the post succinctly covers your chosen topic. You can also use this how-to blog post template if you need help organizing and writing the post.
How long should “what is” blog posts be?
“What is” posts, or blog posts that answer a question (such as the one you’re reading right now), should be between 1,300 and 1,700 words (which this one is!).
This type of post is definitely the poster child for making blog posts “as long as they need to be.” When readers search for what, who, or when something is, they typically want a quick answer or explanation. Based on our data, bogging readers down with too much unnecessary information doesn’t always equate to more views — 30% of the HubSpot’s most-read “what is” posts are less than 1,000 words.
If you need help structuring these posts and keeping them short, try using these blog post templates.
Minimum Blog Post Length
Technically, there is no official minimum for blog post length, though Yoast recommends at least 300 words. That said, HubSpot data suggests writing longer posts should be the rule rather than the exception for your blog. This practice will help your website build authority in the eyes of search engines, which can help shorter blog posts rank better.
“Generally, it’s easier for longer content to rank,” says Aja Frost, HubSpot’s Head of Content SEO. “But unless you’re publishing hundreds of [blog] pages with less than 100 words, you won’t get dinged for thin content.”
While longer blog posts tend to perform the best, that’s not to say that every single blog post you publish must be more than 2,000 words. If you feel you’ve covered your topic well enough in 300, 800, or 1,000 words, then so be it.
Getting Started With Your Blog Posts
Now that you know how long your blog posts should be, it’s time to start writing! We’ve compiled a list of resources you can start utilizing today to make your blog more successful.
Source link
source https://www.kadobeclothing.store/how-long-should-blog-posts-be-in-2020-new-data/
0 notes
Text
Blogger full settings, Feedburner email subscription, Google Analytics tutorial (series 8)
Blogger full settings, Feedburner email subscription, Google Analytics tutorial
We all know the blogger is a writing place which is show our creativity. Many awesome creative people don't sustain a long time to their blogger profession. It don't main that, they don't have enough knowledge about the particular topic. In the behind that, they don't set up their blog properly. For that, I share with you full setting in blogger & some tips & tricks.
At first open blogger dashboard, go to the setting option, seven parts have setting option,
1. Basic
2. Post comments & Sharing
3. Email
4. Language & Formatting
5.Search Preferences
6 Others
7. User setting
Blogger full settings, Feedburner email subscription, Google Analytics tutorial (series 8)
1. Basic
we describe basic information in belong...
Title
Give a title in which visitors identify blog types. try to give blog title according to URL.
Description
Write a descriptive about the blog (500 Characters Max). Try to write tags related descriptions. It helps blog in Google ranking.
Privacy: Yes
Add your blog to our listings? Click "Yes" bottom
Let search engines find your blog? Click "Yes' bottom
finally, click "save changes"
Blog Adress: also set up a third peart URL from a paid server.
Https Redirect: Click "yes" bottom. Its mains blog is secure.
Blog Authors: find blog Gmail id. your could also add more Gmail account & monitor this blog.
Blog Reader: public- all visitors read this blog content.
private- only the author read this blog content.
2. Posts, Comments, and sharing
Posts
Show at most: give 100 on the main page
Post TEmplate: not important
Showcase Images with lightbox: yes
Comments
comment Location: give your choose
Who can comment: give your choose
comment Moderation: give your choose (Always)
Show word verification: click Yes bottom
Comment form Message: Not important
3. Email
Posting using email: choose as you like (save email as draft post)
Comment Notification Email: not important
Email posts to: not important
4. Language
language: select your writing language which is content language
Enable transliteration: select your mother tongue
Formating
Time zone: as your wish
Date header format: as your wish
5. Search Preferences
Meta Tags
Description: give your blog keyword 150 (Characters Max). go to Ubersuggest & give blog title. It suggests several keyword. choose your relevant keywords.
Errors & Redirections:
Custom page not found: copy the belong code & enter it edit option
<style type="text/css"> #error-404 { border: 20px solid #1B1B1B; border-radius: 240px 240px 240px 240px; height: 240px; margin: 0 auto 40px; text-align: center; transition: all 0.8s ease 0s; width: 240px; } #error-404:hover { border-color: #333; } #error-404 span { color: #FA4C29; font-size: 100px; font-weight: bold; line-height: 240px; } .large-heading { font-size: 48px; line-height: 1.2em; } .light-heading { font-weight: 400; } .status-msg-bg { background-color: transparent; } .sidebar-wrapper, .page-header { display: none; } .main-wrapper { margin-right: 0; } .outer-wrapper { min-height: 0; } .status-msg-border { border: 0 none; } </style> <div id="error-404"> <span>404</span>
</div> <h2 class="large-heading" style="text-align: center;">Page not found.</h2>
<h3 class="light-heading" style="text-align: center;">Sorry, the page you were looking for on this blog does not exist.<br>You will be redirected shortly to the homepage.</h3>
<script type = "text/javascript">
BSPNF_redirect = setTimeout(function() {
location.pathname= "/"
}, 5000);
</script>
youtube
Blogger full settings, Feedburner email subscription, Google Analytics tutorial (series 8)
Custom Redirects: not important
Crawlers and indexing
Google search console
Don't worry about this (Warning! Use with caution. Incorrect use of these features can result in your blog being ignored by search engines). Click the edit option & open the Google search console page. Click the "start' option. give your blog URL & continue.
Go to the search console dashboard & select 'sitemaps'. add a new sitemap . for that go to
XML sitemap for blogger. Paste the full URL of your Blogger (Blogspot) blog including HTTP:// & click the "Generate Sitemap". generate a code & copy from (alom.xml..............last). Go to the search console 's sitemaps & show it success. copy the generate code & paste the 'custom robots txt' in blogger. finally save it.
it needs to index your blog more than time & google processes it automatically.
Custom robots header tags
Enable custom robots header tags: click YEs
Home page:
Click: all & noodp
Archive and Search pages:
click: noindex & noodp
Default for Posts and Pages:
click: all & noodp
Monetization
Enable custom ads.txt content: Yes
Custom ads.txt
click the "?" symbol & learn more. find publisher id. copy this code & paste this gap & save it.
6.Other
Import & back up
Content (pages, posts & comments): import anything for computer.save content in back up content
Delete blog
Remove your blog
site feed
allow blog feed: select as you like (full)
Post feed Redirect URL: give blog URL
Post Feed Footer: Not important
Enable Title links & enclosure Links: yea
Adult Content
Adult Content: depend on you (No)
Google Analytics
Analytics Web Property ID
google analytics is free google produce. It is an analytic website of traffic monitor. sign up here & fill up the requirement.
Account Name: Give blog title or owner name
website Name:
website URL: select HTTP/HTTPS according to BLog URL
Industry category:
Reporting Time Zone:
It is easy work done it properly
Finally, click getting track id. than open a new face. select your country & click I accept option.
at the finishing google analytic give a tracking id & copy it. then paste the 'Analytics Web Property ID'.
7.General
user profile: edit it as you wish
Use blogger draft: Yes
Language
Language on blogger.com
Blogger full settings, Feedburner email subscription, Google Analytics tutorial (series 8)
Create subscribe bottom (Feedburner)
feedburner is another google product. create a subscribe bottom in blogger like youtube.visitor submit their email & notification your update status by mail.
Go to Feedburner- Google & open "my feeds" page.
Copy your blogger URL & paste the gap (My Feeds say)
Click the right & 'next' bottom.Click again next bottom (Identify Feed Source)
Click the first option & next (Welcome!)
Click again next (Congrats!)
Click next bottom (Configure Your)
Click next bottom (Congrats! Your FeedBurner)
Click next bottom (Get More Gusto)
Click the 'publicize & select the 'email subscriptions
Click the 'active' option
finally get a HTML code & code it.Go to your blogger dashboard 7 select the 'layout'. open 'add a gadget'. select again 'HTML/JavaScript'. Paste the code & save. create your subscribe feed.
via Blogger https://ift.tt/31BWn73
0 notes
Text
Build a Decentralized Web Chat in 15 Minutes
In this 15 minute tutorial we’re going to build a simple decentralized chat application which runs entirely in a web browser.
All you will need is a text editor, a web browser, and a basic knowledge of how to save HTML files and open them in the browser.
We’re going to use Bugout, a JavaScript library that takes care of the peer-to-peer networking and cryptography.
If you just want the files, download index.html in this repo.
Ok, let’s get started!
Start with the HTML boilerplate
To keep this tutorial simple we’re going to do everything in one .html file using pure Javascript. We’re not going to use any build tools, minifiers, language transpilers, etc. You’ll probably need those things when you build something more complicated but for the purposes of this tutorial we’ll stick with good old fashioned HTML and JavaScript.
The first thing we need is a basic boilerplate web page into which we can start building our application. We also need a simple function to output text on the screen. Here’s the HTML you can use to get started:
<!DOCTYPE html> <html> <head> <meta charset="utf-8"> <meta content="width=device-width, initial-scale=1" name="viewport"> <title>Bugout chat tutorial</title> <style> body { background-color: #333; font-size: 1.5em; padding: 0em 0.25em; } pre { color: #fff; white-space: pre-wrap; word-wrap: break-word; text-shadow: 0 0 10px #ccc; } </style> <script> function log(message) { document.getElementById("log").textContent += message + "\n"; } </script> </head> <body> <pre id="log"></pre> </body> <script> log("Hello world!"); /***** Your code goes here! *****/ </script> </html>
Go ahead and save the snippet above into a file called index.html and then open that file in your web browser.
You should see the words “Hello world!” in white text at the top of the screen.
Great, we are up and running with a basic web page and a log() function which will print text on the screen.
Import Bugout
Now let’s get the Bugout library imported so we can use it to connect peoples’ browsers together in a peer-to-peer style. We’ll load the library directly from its GitHub page.
Add this <script> tag into the <head> section of the HTML just before the closing </head> tag:
<script src="https://chr15m.github.io/bugout/bugout.min.js" type="application/javascript"></script>
Save your index.html file again and hit refresh in the browser. If you know how to use the developer console you can check the network tab to verify the bugout.min.js file getting loaded in. If you don’t, don’t worry just skip this step and move on.
Make a Bugout object
Let’s make a Bugout object that we can use to talk to other browsers. Add the following code at the end of the file in the script tag after it says “Your code goes here!”:
var b = Bugout(); log(b.address() + " [ me ]");
Now when you hit reload you should see “Hello world!” like before and on the next line you should see the address of this Bugout instance. It will look something like this: bKpdPiLJjPmwrYWoZYXVWbJFcEMUpfh6BN [ me ].
You might notice this address looks a bit like a Bitcoin address. That’s because Bugout uses a similar type of cryptographic technique to create its address from an internal cryptographic keypair. Cryptography is how Bugout nodes can be sure they are receiving information from the node they think they are receiving it from. On the network Bugout nodes can find and identify eachother using these addresses.
Connect your Bugout instance
Now that we have a Bugout instance running in our web page, how do we connect it to other Bugout instances running in pages on other people’s computers?
In real life when you want to meet up with somebody you share the address of the place to meet. Computers are the same. Any time you want to connect two computer programs together over a network you need some type of address. For example to get to this web page you followed a link to its URL, and your computer loaded this page from that address.
Bugout instances connect to addresses called “identifiers” which you can think of as room names. The first argument passed to the Bugout() instance is the identifier or room name that you want it to connect to.
If you don’t supply a room name argument the Bugout instance will connect to it’s own .address() by default. That means it will listen out for other Bugout instances connecting back to it. Other instances can connect by passing your Bugout instance’s .address() in as their first argument.
For our chat room we want to connect all the Bugout instances together in one room. We do that by using the same room name as the first argument.
Update the code to pass an argument "bugout-chat-tutorial" as the room name. We’ll also install an event handler which will fire every time we see another Bugout instance connecting to the same room using b.on("seen").
Replace the line var b = Bugout(); with the following code. Leave the address logging line in there.
var b = Bugout("bugout-chat-tutorial"); b.on("seen", function(address) { log(address + " [ seen ]"); });
When you refresh the page now you may see other Bugout instances connecting – those are other people doing this same tutorial! You can open the index.html in another tab or browser and after a few seconds in both windows you should see the two Bugout instances discover eachother and output ...ADDRESS... [ seen ] with eachother’s address.
Receiving messages
Now that we have Bugout instances connecting we can send data between them. Let’s handle receiving messages first. When our Bugout instance receives a message we want to add it straight to the log so we can see what messages people are sending to the room.
Add this snippet of JavaScript below the Bugout instantiation code you added before:
b.on("message", function(address, message) { log(address + ": " + message); });
This code will log every message our Bugout instance receives with the address of the sender.
If you refresh the page at this point you may start to see messages coming in from anybody else who has done this tutorial and is sending messages since you are in the same room called "bugout-chat-tutorial".
Sending messages
Sending a message is just as easy. We can use b.send("Hello world!"); to send a message to the room or b.send(address, "Hello you."); to send to a specific Bugout instance. If you use the second method the transmission will be encrypted with a key supplied by the receiving instance (if the other party is online).
But before we add the sending functionality we need a way for users to type in the messages they want to send, so let’s take a little user-interface detour.
Get user input
We need some kind of input for users to type messages they want to send.
First create an input they can type into. Add the following tag just below the <pre id="log"> tag:
<pre id="input" contenteditable="true"></pre>
Now add some styling to make it clear this is an input that the user can type into. Add this to the <style> section of the header:
#input { border-bottom: 1px solid #ccc; background-color: #383838; padding: 0.25em; outline: 0; } #input::before { content: "> "; }
Finally, we can hook this all up. We’ll add an event handler which will send the message the user has typed as soon as they hit the enter key. Add this to the JavaScript tag after the other code you have added so far:
document.getElementById("input").onkeydown = function(ev) { if (ev.keyCode == 13) { if (b.lastwirecount) { b.send(ev.target.textContent); ev.target.textContent = ""; } ev.preventDefault(); } }
There’s a couple of extra things to note here. We’re checking for key code 13 (the enter key) and we’re also checking lastwirecount to make sure we only send a message once we have seen another Bugout instance to send to. So you will need to have two different copies of index.html loaded in different tabs or browsers to make this work.
Refresh again and once you see the [ seen ] messages you can start typing messages between the windows. You might even see messages coming from other people doing this tutorial.
So that’s it, our super minimal decentralized chat client is done. Enjoy!
If this tutorial was useful and you want to know more about the decentralized stuff I am building you can find me here:
Subscribe to my newsletter
Follow me on Twitter at @mccrmx
Send me an email (I freelance too)
Follow the cryptography/decentralization tag on my blog
Find out more
You can find out more about Bugout on the GitHub project page. You can also npm install it if that’s your thing.
There is also API documentation where you can look up all Bugout methods, events, and properties.
If you want a more fleshed out decentralized web chat inspired by IRC then check out dirc.
Go further
Astute readers will have some questions at this point.
Isn’t WebRTC signalling still centralized?
What happens to the messages when somebody goes offline?
How can do we handle identities when there’s no central server?
For some possible solutions to the last question you can check my post on decentralized identity linking.
I’m actively working on the first two questions. If you want to find out more and keep up with what I’m building you can find me at the links above.
I would love to hear from you about the decentralized things you are building too!
The post Build a Decentralized Web Chat in 15 Minutes appeared first on David Walsh Blog.
Build a Decentralized Web Chat in 15 Minutes published first on https://deskbysnafu.tumblr.com/
0 notes
Photo


“P I N K”
Please Like, Reblog, or give credit if you use! <333
[If you’d like an Overwatch related (pride) edit, send it into my askbox!!!]
#mercy#angela ziegler#overwatch#pink mercy#BCRF#header#*mine#biiiidragons#retroshimada#you can use this as your page header <333
321 notes
·
View notes
Text
Build a Decentralized Web Chat in 15 Minutes
In this 15 minute tutorial we’re going to build a simple decentralized chat application which runs entirely in a web browser.
All you will need is a text editor, a web browser, and a basic knowledge of how to save HTML files and open them in the browser.
We’re going to use Bugout, a JavaScript library that takes care of the peer-to-peer networking and cryptography.
If you just want the files, download index.html in this repo.
Ok, let’s get started!
Start with the HTML boilerplate
To keep this tutorial simple we’re going to do everything in one .html file using pure Javascript. We’re not going to use any build tools, minifiers, language transpilers, etc. You’ll probably need those things when you build something more complicated but for the purposes of this tutorial we’ll stick with good old fashioned HTML and JavaScript.
The first thing we need is a basic boilerplate web page into which we can start building our application. We also need a simple function to output text on the screen. Here’s the HTML you can use to get started:
<!DOCTYPE html> <html> <head> <meta charset="utf-8"> <meta content="width=device-width, initial-scale=1" name="viewport"> <title>Bugout chat tutorial</title> <style> body { background-color: #333; font-size: 1.5em; padding: 0em 0.25em; } pre { color: #fff; white-space: pre-wrap; word-wrap: break-word; text-shadow: 0 0 10px #ccc; } </style> <script> function log(message) { document.getElementById("log").textContent += message + "\n"; } </script> </head> <body> <pre id="log"></pre> </body> <script> log("Hello world!"); /***** Your code goes here! *****/ </script> </html>
Go ahead and save the snippet above into a file called index.html and then open that file in your web browser.
You should see the words “Hello world!” in white text at the top of the screen.
Great, we are up and running with a basic web page and a log() function which will print text on the screen.
Import Bugout
Now let’s get the Bugout library imported so we can use it to connect peoples’ browsers together in a peer-to-peer style. We’ll load the library directly from its GitHub page.
Add this <script> tag into the <head> section of the HTML just before the closing </head> tag:
<script src="https://chr15m.github.io/bugout/bugout.min.js" type="application/javascript"></script>
Save your index.html file again and hit refresh in the browser. If you know how to use the developer console you can check the network tab to verify the bugout.min.js file getting loaded in. If you don’t, don’t worry just skip this step and move on.
Make a Bugout object
Let’s make a Bugout object that we can use to talk to other browsers. Add the following code at the end of the file in the script tag after it says “Your code goes here!”:
var b = Bugout(); log(b.address() + " [ me ]");
Now when you hit reload you should see “Hello world!” like before and on the next line you should see the address of this Bugout instance. It will look something like this: bKpdPiLJjPmwrYWoZYXVWbJFcEMUpfh6BN [ me ].
You might notice this address looks a bit like a Bitcoin address. That’s because Bugout uses a similar type of cryptographic technique to create its address from an internal cryptographic keypair. Cryptography is how Bugout nodes can be sure they are receiving information from the node they think they are receiving it from. On the network Bugout nodes can find and identify eachother using these addresses.
Connect your Bugout instance
Now that we have a Bugout instance running in our web page, how do we connect it to other Bugout instances running in pages on other people’s computers?
In real life when you want to meet up with somebody you share the address of the place to meet. Computers are the same. Any time you want to connect two computer programs together over a network you need some type of address. For example to get to this web page you followed a link to its URL, and your computer loaded this page from that address.
Bugout instances connect to addresses called “identifiers” which you can think of as room names. The first argument passed to the Bugout() instance is the identifier or room name that you want it to connect to.
If you don’t supply a room name argument the Bugout instance will connect to it’s own .address() by default. That means it will listen out for other Bugout instances connecting back to it. Other instances can connect by passing your Bugout instance’s .address() in as their first argument.
For our chat room we want to connect all the Bugout instances together in one room. We do that by using the same room name as the first argument.
Update the code to pass an argument "bugout-chat-tutorial" as the room name. We’ll also install an event handler which will fire every time we see another Bugout instance connecting to the same room using b.on("seen").
Replace the line var b = Bugout(); with the following code. Leave the address logging line in there.
var b = Bugout("bugout-chat-tutorial"); b.on("seen", function(address) { log(address + " [ seen ]"); });
When you refresh the page now you may see other Bugout instances connecting – those are other people doing this same tutorial! You can open the index.html in another tab or browser and after a few seconds in both windows you should see the two Bugout instances discover eachother and output ...ADDRESS... [ seen ] with eachother’s address.
Receiving messages
Now that we have Bugout instances connecting we can send data between them. Let’s handle receiving messages first. When our Bugout instance receives a message we want to add it straight to the log so we can see what messages people are sending to the room.
Add this snippet of JavaScript below the Bugout instantiation code you added before:
b.on("message", function(address, message) { log(address + ": " + message); });
This code will log every message our Bugout instance receives with the address of the sender.
If you refresh the page at this point you may start to see messages coming in from anybody else who has done this tutorial and is sending messages since you are in the same room called "bugout-chat-tutorial".
Sending messages
Sending a message is just as easy. We can use b.send("Hello world!"); to send a message to the room or b.send(address, "Hello you."); to send to a specific Bugout instance. If you use the second method the transmission will be encrypted with a key supplied by the receiving instance (if the other party is online).
But before we add the sending functionality we need a way for users to type in the messages they want to send, so let’s take a little user-interface detour.
Get user input
We need some kind of input for users to type messages they want to send.
First create an input they can type into. Add the following tag just below the <pre id="log"> tag:
<pre id="input" contenteditable="true"></pre>
Now add some styling to make it clear this is an input that the user can type into. Add this to the <style> section of the header:
#input { border-bottom: 1px solid #ccc; background-color: #383838; padding: 0.25em; outline: 0; } #input::before { content: "> "; }
Finally, we can hook this all up. We’ll add an event handler which will send the message the user has typed as soon as they hit the enter key. Add this to the JavaScript tag after the other code you have added so far:
document.getElementById("input").onkeydown = function(ev) { if (ev.keyCode == 13) { if (b.lastwirecount) { b.send(ev.target.textContent); ev.target.textContent = ""; } ev.preventDefault(); } }
There’s a couple of extra things to note here. We’re checking for key code 13 (the enter key) and we’re also checking lastwirecount to make sure we only send a message once we have seen another Bugout instance to send to. So you will need to have two different copies of index.html loaded in different tabs or browsers to make this work.
Refresh again and once you see the [ seen ] messages you can start typing messages between the windows. You might even see messages coming from other people doing this tutorial.
So that’s it, our super minimal decentralized chat client is done. Enjoy!
If this tutorial was useful and you want to know more about the decentralized stuff I am building you can find me here:
Subscribe to my newsletter
Follow me on Twitter at @mccrmx
Send me an email (I freelance too)
Follow the cryptography/decentralization tag on my blog
Find out more
You can find out more about Bugout on the GitHub project page. You can also npm install it if that’s your thing.
There is also API documentation where you can look up all Bugout methods, events, and properties.
If you want a more fleshed out decentralized web chat inspired by IRC then check out dirc.
Go further
Astute readers will have some questions at this point.
Isn’t WebRTC signalling still centralized?
What happens to the messages when somebody goes offline?
How can do we handle identities when there’s no central server?
For some possible solutions to the last question you can check my post on decentralized identity linking.
I’m actively working on the first two questions. If you want to find out more and keep up with what I’m building you can find me at the links above.
I would love to hear from you about the decentralized things you are building too!
The post Build a Decentralized Web Chat in 15 Minutes appeared first on David Walsh Blog.
Build a Decentralized Web Chat in 15 Minutes published first on https://appspypage.tumblr.com/
0 notes
Last Seen Blogs

juandavidms
Little Monkey

carrieleeblg
Отдушина графоманки

odnaht
🌹

healthfitnesszen
Untitled

slutforstyles
Jay loves H