#zabbix mysql server
Explore tagged Tumblr posts
Visit Tumblr Blog
Explore Tumblr blogs with no restrictions, modern design and the best experience.
Last Seen Tumblr Blogs


Fun Fact
Tumblr has been banned in Indonesia for providing people with access to pornographic content.
Text
Cách đảm bảo Cloud Server hoạt động ổn định 24/7
Cloud Server đóng vai trò quan trọng trong vận hành doanh nghiệp, giúp lưu trữ và xử lý dữ liệu một cách linh hoạt. Tuy nhiên, để đảm bảo Cloud Server hoạt động ổn định 24/7, bạn cần áp dụng các chiến lược tối ưu và quản lý hiệu quả. Dưới đây là những giải pháp quan trọng giúp duy trì hiệu suất Cloud Server ở trạng thái tốt nhất.
Tối ưu hóa tài nguyên Cloud Server
Lựa chọn gói Cloud Server phù hợp
Một trong những yếu tố quan trọng để đảm bảo Cloud Server hoạt động liên tục là chọn gói dịch vụ phù hợp với nhu cầu sử dụng. Hãy xác định:
Dung lượng RAM, CPU có đáp ứng nhu cầu xử lý hay không?
Băng thông có đủ để hỗ trợ lượng truy cập lớn?
Khả năng mở rộng có linh hoạt hay không?
Cân bằng tải (Load Balancing)
Khi lượng truy cập tăng đột biến, việc cân bằng tải giúp phân phối lưu lượng hợp lý giữa các máy chủ, giảm nguy cơ gián đoạn dịch vụ. Một số công cụ hỗ trợ cân bằng tải phổ biến như:
Nginx
HAProxy
AWS Elastic Load Balancer
Đảm bảo tính bảo mật cho Cloud Server
Cấu hình Firewall và hệ thống bảo mật
Cloud Server cần được bảo vệ khỏi các cuộc tấn công mạng thông qua:
Cấu hình Firewall để kiểm soát lưu lượng truy cập.
Sử dụng VPN hoặc hệ thống xác thực đa yếu tố (MFA) để bảo vệ quyền truy cập.
Sao lưu dữ liệu định kỳ
Việc sao lưu dữ liệu thường xuyên giúp đảm bảo an toàn khi có sự cố xảy ra. Bạn có thể sử dụng:
Snapshot backup
Cloud backup (AWS S3, Google Cloud Storage)
Sao lưu tự động theo lịch trình
Giám sát hiệu suất và khắc phục sự cố kịp thời
Sử dụng công cụ giám sát
Để Cloud Server hoạt động ổn định 24/7, bạn cần sử dụng các công cụ giám sát để theo dõi hiệu suất hệ thống:
Prometheus: Giám sát tài nguyên và cảnh báo khi có vấn đề.
Zabbix: Theo dõi mức sử dụng CPU, RAM, Disk.
Datadog: Giúp theo dõi toàn diện từ hạ tầng đến ứng dụng.
Thiết lập cảnh báo tự động
Hệ thống cảnh báo giúp bạn phát hiện và xử lý sự cố kịp thời. Một số phương thức cảnh báo phổ biến:
Email thông báo khi CPU hoặc RAM vượt mức cho phép.
Tin nhắn SMS khi phát hiện truy cập bất thường.
Tích hợp cảnh báo với Slack, Telegram để thông báo ngay lập tức.
Cập nhật và bảo trì hệ thống định kỳ
Cập nhật phần mềm và hệ điều hành
Để tránh lỗ hổng bảo mật, Cloud Server cần được cập nhật thường xuyên:
Cập nhật hệ điều hành (Linux, Windows Server)
Nâng cấp phần mềm web server (Apache, Nginx, MySQL,...)
Vá lỗi bảo mật từ nhà cung cấp
Kiểm tra hiệu suất định kỳ
Bạn nên thực hiện kiểm tra hiệu suất định kỳ bằng cách:
Đánh giá tốc độ xử lý request
Phân tích log để tìm lỗi hệ thống
Thử nghiệm khả năng chịu tải với các công cụ như Apache JMeter, k6
Kết luận
Để đảm bảo Cloud Server hoạt động ổn định 24/7, bạn cần kết hợp nhiều giải pháp từ tối ưu tài nguyên, bảo mật hệ thống, giám sát hiệu suất đến cập nhật định kỳ. Việc thực hiện các biện pháp này không chỉ giúp giảm thiểu rủi ro gián đoạn dịch vụ mà còn nâng cao hiệu suất hoạt động của doanh nghiệp. Nếu bạn đang tìm kiếm một giải pháp Cloud Server chất lượng, hãy lựa chọn nhà cung cấp uy tín và có dịch vụ hỗ trợ 24/7 để đảm bảo vận hành liên tục.
Tìm hiểu thêm: https://vndata.vn/cloud-server/
0 notes
Text
How to Optimize Your Offshore SSD VPS for Maximum Efficiency
Having a well-optimized Offshore SSD VPS Hosting Solution is crucial for maintaining high performance, security, and cost-effectiveness. By implementing the right strategies, you can maximize the efficiency of your SSD VPS Servers while ensuring a seamless experience for your users. Here’s a step-by-step guide to help you achieve optimal performance.

1. Select the Right Operating System
Choosing an efficient OS like Linux (Ubuntu, CentOS, or Debian) can reduce resource consumption and improve server stability. Opt for minimal installations to avoid unnecessary processes that slow down your Offshore VPS Hosting Services.
2. Keep Software and System Updated
Regular updates enhance security and efficiency. Ensure your Offshore VPS Hosting Solutions receive the latest OS patches, security fixes, and software upgrades to maintain peak performance.
3. Optimize SSD Performance
Since SSDs provide high-speed storage, enabling TRIM support and reducing unnecessary write operations will extend their lifespan and enhance server performance. Using a lightweight file system like ext4 or XFS can further optimize storage efficiency.
4. Implement Caching Mechanisms
Caching reduces server load and speeds up content delivery. Tools like Memcached, Redis, or Varnish can significantly improve the responsiveness of your SSD VPS Servers by storing frequently accessed data.
5. Use a Lightweight Web Server
Switching to a high-performance web server like Nginx or LiteSpeed can enhance efficiency by handling more simultaneous connections with fewer resources. This optimization is essential for Offshore VPS Hosting Services that deal with heavy traffic.
6. Optimize Database Queries
Inefficient database queries can slow down your server. Use indexing, query caching, and database optimization tools to ensure fast and efficient data retrieval. MySQL tuning with InnoDB adjustments can also improve performance.
7. Strengthen Security Measures
Securing your Offshore SSD VPS Hosting Solutions is critical. Use firewalls (like UFW or CSF), SSH key authentication, and regular malware scans to prevent vulnerabilities and unauthorized access.
8. Leverage a Content Delivery Network (CDN)
A CDN reduces latency and speeds up global content delivery by caching and distributing resources across multiple locations. This reduces the direct load on your Offshore VPS Hosting Solutions.
9. Monitor Resource Usage
Tracking CPU, memory, and disk space usage is essential for identifying bottlenecks. Use monitoring tools like Nagios, Zabbix, or htop to ensure your SSD VPS Servers operate efficiently.
10. Optimize Bandwidth Usage
Reduce data transfer costs and improve performance by enabling Gzip or Brotli compression, minimizing HTTP requests, and optimizing website images. This ensures efficient bandwidth usage for your Off shore SSD VPS Hosting Solutions.
Conclusion
By applying these optimization techniques, you can enhance the efficiency, security, and performance of your Offshore SSD VPS Hosting Solutions. A well-maintained VPS ensures smooth operation, better user experience, and cost savings. Start implementing these strategies today to get the most out of your hosting solution!
0 notes
Text
Raspberry Pi Zero 2 WH: Monitoring einrichten mit Zabbix
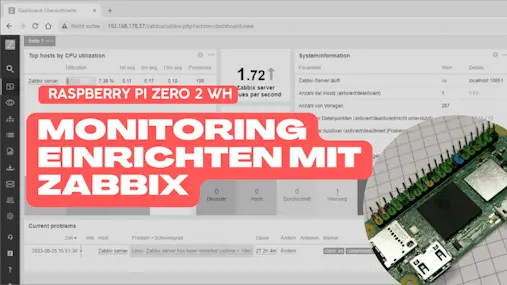
In diesem Artikel demonstriere ich, wie das Monitoring-System Zabbix auf dem Raspberry Pi Zero 2 WH etabliert wird. Der Raspberry Pi Zero 2 WH, ein Einplatinencomputer, mag weniger Leistung haben als sein größeres Pendant, doch er eignet sich optimal für diese Aufgabe.

Den Raspberry Pi Zero 2 WH habe ich bereits in diversen Beiträgen verwendet und dir bereits auch gezeigt wie man darauf in Python programmiert und eine Kamera anschließt. - Vorstellung des neuen Raspberry Pi Zero 2 W - Vergleich – Raspberry Pi Zero 2 W mit Pi Zero WH - Raspberry Pi Zero 2 W als Pi-hole einrichten Hier soll es nun darum gehen wie du das Monitoring Tool Zabbix einrichtest. Den kleinen Einplatinencomputer Raspberry Pi Zero 2 bekommst du in zwei Versionen, zum einen mit Header und einmal ohne, dieses erkennst du an der Bezeichnung. Die Bezeichnung für "mit Header" ist WH und für ohne einfach nur W. Ansonsten gibt es keine weiteren Unterschiede. Bei BerryBase.de bekommst du spezielle 2x40 Pin Header zum Auflöten, welche farbige Markierungen hat und damit kannst du sehr einfach die Pins beim Aufbau von Prototypen erkennen.

Raspberry Pi Zero 2 W mit farbigen 40 Pin GPIO Header

Raspberry Pi Zero WH & Zero 2 W
Technische Daten des Raspberry Pi Zero 2 WH
Nachfolgend die technischen Daten des Raspberry Pi Zero 2 WH: BeschreibungWertCPUBroadcom BCM2710A1, quad-core 64-bit SoC (Arm Cortex-A53 @ 1GHz)Speicher512 MB LPDDR2 SDRAMWi-Fi & Bluetooth2.4GHz IEEE 802.11b/g/n Drahtlos LAN, Bluetooth 4.2, BLESchnittstellen1 × USB 2.0 mit OTG Unterstützung, HAT-kompatibler 40 Pin I/O Header, Mini HDMI Anschluss, Composite Video Anschluss über Lötaugen, CSI-2 Kamera Anschluss,H.264, MPEG-4 decode (1080p30); H.264 encode (1080p30) OpenGL ES 1.1, 2.0 graphicsSpannungsversorgungMicro-USB Buchse,Leistungsaufnahme*Idle - 0,62 W Stress & WiFi - 2,12 WAbmaße (L x B x H)65 mm x 30 mm x 5 mmTechnische Daten des Raspberry Pi Zero 2 W
Vorbereiten des Raspberry Pi Zero 2 WH
Bevor wir Zabbix installieren können, müssen wir auf einer SD-Karte ein Betriebssystem installieren. Hier wähle ich das aktuelle Raspberry Pi OS (Raspbian GNU/Linux 11 (bullseye)). Dieses kannst du sehr einfach mithilfe des Raspberry Pi Imager installieren.

Installieren von Rasberry Pi OS mit dem Imager auf eine SD-Karte
Hinweis
Das Tool Zabbix läuft gemäß Eintrag im Handbuch erst auf leistungsstarken Systemen mit min. 8 GB RAM und zwei Kernen. Von diesen Anforderungen ist der Raspberry Pi Zero 2 WH weit entfernt und daher bin ich selber einmal gespannt, inwieweit das Tool läuft. Im Nachfolgenden werden die Befehle in Fettschrift gekennzeichnet!
Installieren von MySQL auf dem Raspberry Pi Zero 2 WH
Bevor wir Zabbix installieren, müssen wir noch die MySQL Datenbank einrichten. Wie du auf dem Raspberry Pi eine MySQL Datenbank sowie Apache2 installierst, habe ich dir bereits im Beitrag Raspberry PI : Einrichten eines MySQL Datenbankservers erläutert. Für den Pi Zero ist dieses genauso und daher gebe ich dir hier lediglich kurz und knapp die Befehle dazu. In meinem Fall war bereits der Apache2 Server installiert und konfiguriert, somit entfällt hier dieser Abschnitt aus dem verlinkten Beitrag. sudo apt install mariadb-server Per Default ist der MySQL Server ohne Zugangsberechtigungen und mit Beispieldaten eingerichtet. Dieses stellt ein großes Sicherheitsrisiko dar. Hier sollte man mit nachfolgendem Befehl dem Benutzer root ein Passwort vergeben und die Beispieldaten löschen. sudo mysql_secure_installation Damit ist der Datenbankserver eingerichtet und wir können mit der eigentlichen Installation von Zabbix beginnen.
Installation von Zabbix
Die Installation von Zabbix ist sehr einfach, denn über der Seite https://www.zabbix.com/de/download kann man sich die benötigten Befehle erstellen lassen. Zunächst wählt man die Version, welche man installieren möchte und danach die Konfiguration des Raspberry.

Als Ergebnis erhält man eine Liste von Befehlen, welche man 1:1 kopieren und auf dem Raspberry Pi mit root rechten ausführen kann. Schritt 1: herunterladen des Paketes Als Erstes wird das Installationspaket heruntergeladen pi@raspberrypi:~ $ wget https://repo.zabbix.com/zabbix/6.4/raspbian/pool/main/z/zabbix-release/zabbix-release_6.4-1+debian11_all.deb --2023-08-25 14:21:56-- https://repo.zabbix.com/zabbix/6.4/raspbian/pool/main/z/zabbix-release/zabbix-release_6.4-1+debian11_all.deb Auflösen des Hostnamens repo.zabbix.com (repo.zabbix.com)… 2604:a880:2:d0::2062:d001, 178.128.6.101 Verbindungsaufbau zu repo.zabbix.com (repo.zabbix.com)|2604:a880:2:d0::2062:d001|:443 … verbunden. HTTP-Anforderung gesendet, auf Antwort wird gewartet … 200 OK Länge: 3740 (3,7K) Wird in »zabbix-release_6.4-1+debian11_all.deb« gespeichert. Schritt 2: installieren des Paketes Wenn das Installationspaket heruntergeladen wurde, dann muss dieses installiert werden. pi@raspberrypi:~ $ sudo dpkg -i zabbix-release_6.4-1+debian11_all.deb Vormals nicht ausgewähltes Paket zabbix-release wird gewählt. (Lese Datenbank ... 106615 Dateien und Verzeichnisse sind derzeit installiert.) Vorbereitung zum Entpacken von zabbix-release_6.4-1+debian11_all.deb ... Entpacken von zabbix-release (1:6.4-1+debian11) ... zabbix-release (1:6.4-1+debian11) wird eingerichtet ... Schritt 3: neues einlesen der Paketquellen Durch das Paket von Zabbix sind neue Paketquellen ins System eingetragen worden, diese müssen nun noch eingelesen werden. pi@raspberrypi:~ $ sudo apt update Holen:1 http://archive.raspberrypi.org/debian bullseye InRelease Holen:2 http://raspbian.raspberrypi.org/raspbian bullseye InRelease Holen:3 https://repo.zabbix.com/zabbix/6.4/raspbian bullseye InRelease Holen:4 http://raspbian.raspberrypi.org/raspbian bullseye/main armhf Packages Holen:5 https://repo.zabbix.com/zabbix/6.4/raspbian bullseye/main Sources Holen:6 https://repo.zabbix.com/zabbix/6.4/raspbian bullseye/main armhf Packages Es wurden 13,3 MB in 13 s geholt (990 kB/s). Paketlisten werden gelesen… Fertig Abhängigkeitsbaum wird aufgebaut… Fertig Statusinformationen werden eingelesen… Fertig Alle Pakete sind aktuell. Schritt 4: installieren von Zabbix Server,Frontend etc. Wenn die Quellen des Paketmanagers aktualisiert wurden, können wir nun die benötigten Pakete für Zabbix herunterladen. apt install zabbix-server-mysql zabbix-frontend-php zabbix-apache-conf zabbix-sql-scripts zabbix-agent Schritt 5: einrichten der Datenbank Als Erstes müssen wir uns an die Datenbank anmelden. Im Schritt vor der Zabbis Installation haben wir dem Benutzer root ein neues Passwort vergeben, dieses müssen wir hier eingeben. pi@raspberrypi:~ $ mysql -u root -p Enter password: Welcome to the MariaDB monitor. Commands end with ; or g. Your MariaDB connection id is 42 Server version: 10.5.19-MariaDB-0+deb11u2 Raspbian 11 Copyright (c) 2000, 2018, Oracle, MariaDB Corporation Ab and others. Type 'help;' or 'h' for help. Type 'c' to clear the current input statement. MariaDB > Mit den vorbereiteten Befehlen von der Webseite können wir sehr einfach die Datenbank einrichten und brauchen wie erwähnt nur die Befehle nacheinander ausführen. Zum einen erstellen wir die Datenbank, danach den Benutzer und weisen diesem die Rechte auf das Schema zu. Zum Abschluss wird ein globaler Parameter gesetzt und wir können dann uns mit quit abmelden. MariaDB > create database zabbix character set utf8mb4 collate utf8mb4_bin; Query OK, 1 row affected (0,060 sec) MariaDB > create user zabbix@localhost identified by 'password'; Query OK, 0 rows affected (0,040 sec) MariaDB > grant all privileges on zabbix.* to zabbix@localhost; Query OK, 0 rows affected (0,004 sec) MariaDB > set global log_bin_trust_function_creators = 1; Query OK, 0 rows affected (0,002 sec) MariaDB > quit Bye pi@raspberrypi:~ $ Abschließend wird jetzt die Datenbank eingerichtet, dazu existiert ein Skript welches entpackt und ausgeführt werden muss. Aber Achtung es werden während dem Ausführen wird keine Ausgabe erzeugt, d.h. hier ist Geduld gefragt. Das Passwort ist hier "password". pi@raspberrypi:~ $ zcat /usr/share/zabbix-sql-scripts/mysql/server.sql.gz | mysql --default-character-set=utf8mb4 -uzabbix -p zabbix Enter password: pi@raspberrypi:~ $ Nun noch den globalen Parameter wieder zurück setzen. pi@raspberrypi:~ $ mysql -uroot -p Enter password: Welcome to the MariaDB monitor. Commands end with ; or g. Your MariaDB connection id is 52 Server version: 10.5.19-MariaDB-0+deb11u2 Raspbian 11 Copyright (c) 2000, 2018, Oracle, MariaDB Corporation Ab and others. Type 'help;' or 'h' for help. Type 'c' to clear the current input statement. MariaDB > set global log_bin_trust_function_creators = 0; Query OK, 0 rows affected (0,000 sec) MariaDB > quit Bye pi@raspberrypi:~ $ Schritt 6: setzen des Passwortes für die Datenbank in der Konfiguration Beim konfigurieren der Datenbank haben wir dem Benutzer zabbix das Passwort "password" gegeben. dieses müssen wir nun in der Serverkonfiguration setzen. Ich nutze hier das Tool nano welches deutlich einfacher zu bedienen ist als vim. pi@raspberrypi:/etc/zabbix $ sudo nano zabbix_server.conf In der Zeile, wo der Benutzer definiert ist, fügen wir jetzt darunter den Eintrag für das Passwort hinzu. DBPassword=password Schritt 7: Starten des Zabbix Servers Damit ist die installation und konfiguration abgeschlossen und wir können nun das System einmal neustarten. pi@raspberrypi:/etc/zabbix $ systemctl restart zabbix-server zabbix-agent apache2 ==== AUTHENTICATING FOR org.freedesktop.systemd1.manage-units === Legitimierung ist zum Neustarten von »zabbix-server.service« notwendig. Authenticating as: ,,, (pi) Password: ==== AUTHENTICATION COMPLETE === ==== AUTHENTICATING FOR org.freedesktop.systemd1.manage-units === Legitimierung ist zum Neustarten von »zabbix-agent.service« notwendig. Authenticating as: ,,, (pi) Password: ==== AUTHENTICATION COMPLETE === ==== AUTHENTICATING FOR org.freedesktop.systemd1.manage-units === Legitimierung ist zum Neustarten von »apache2.service« notwendig. Authenticating as: ,,, (pi) Password: ==== AUTHENTICATION COMPLETE === pi@raspberrypi:/etc/zabbix $ systemctl enable zabbix-server zabbix-agent apache2 Synchronizing state of zabbix-server.service with SysV service script with /lib/systemd/systemd-sysv-install. Executing: /lib/systemd/systemd-sysv-install enable zabbix-server ==== AUTHENTICATING FOR org.freedesktop.systemd1.reload-daemon === Legitimierung ist zum erneuten Laden des systemd-Zustands notwendig. Authenticating as: ,,, (pi) Password: ==== AUTHENTICATION COMPLETE === ==== AUTHENTICATING FOR org.freedesktop.systemd1.reload-daemon === Legitimierung ist zum erneuten Laden des systemd-Zustands notwendig. Authenticating as: ,,, (pi) Password: ==== AUTHENTICATION COMPLETE === Synchronizing state of zabbix-agent.service with SysV service script with /lib/systemd/systemd-sysv-install. Executing: /lib/systemd/systemd-sysv-install enable zabbix-agent ==== AUTHENTICATING FOR org.freedesktop.systemd1.reload-daemon === Legitimierung ist zum erneuten Laden des systemd-Zustands notwendig. Authenticating as: ,,, (pi) Password: ==== AUTHENTICATION COMPLETE === ==== AUTHENTICATING FOR org.freedesktop.systemd1.reload-daemon === Legitimierung ist zum erneuten Laden des systemd-Zustands notwendig. Authenticating as: ,,, (pi) Password: ==== AUTHENTICATION COMPLETE === Synchronizing state of apache2.service with SysV service script with /lib/systemd/systemd-sysv-install. Executing: /lib/systemd/systemd-sysv-install enable apache2 ==== AUTHENTICATING FOR org.freedesktop.systemd1.reload-daemon === Legitimierung ist zum erneuten Laden des systemd-Zustands notwendig. Authenticating as: ,,, (pi) Password: ==== AUTHENTICATION COMPLETE === ==== AUTHENTICATING FOR org.freedesktop.systemd1.reload-daemon === Legitimierung ist zum erneuten Laden des systemd-Zustands notwendig. Authenticating as: ,,, (pi) Password: ==== AUTHENTICATION COMPLETE === ==== AUTHENTICATING FOR org.freedesktop.systemd1.manage-unit-files === Legitimierung ist notwendig für die Verwaltung von Systemdiensten und Einheitendateien. Authenticating as: ,,, (pi) Password: ==== AUTHENTICATION COMPLETE === Created symlink /etc/systemd/system/multi-user.target.wants/zabbix-server.service → /lib/systemd/system/zabbix-server.service. ==== AUTHENTICATING FOR org.freedesktop.systemd1.reload-daemon === Legitimierung ist zum erneuten Laden des systemd-Zustands notwendig. Authenticating as: ,,, (pi) Password: ==== AUTHENTICATION COMPLETE === pi@raspberrypi:/etc/zabbix $
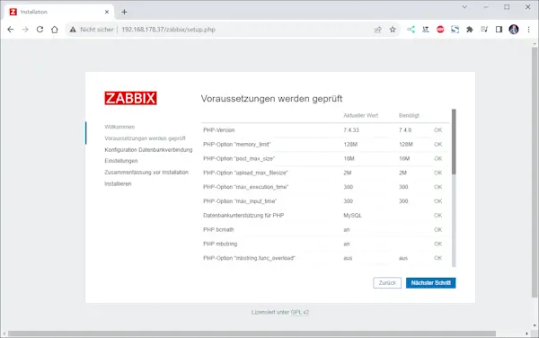
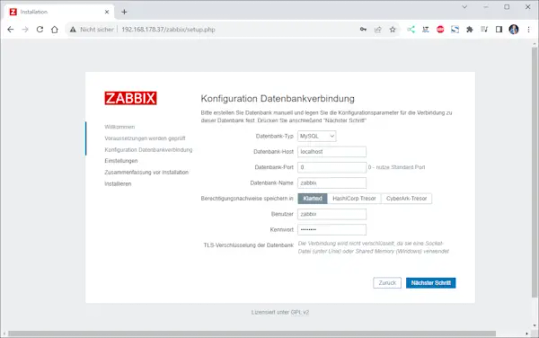
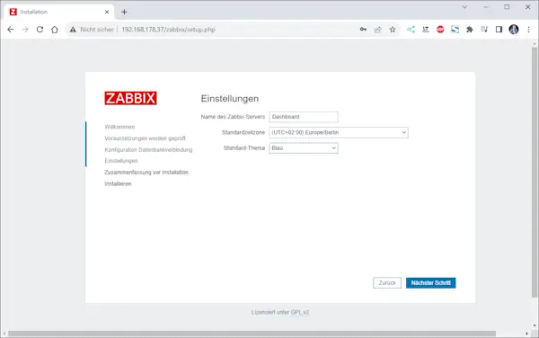
Abschließende Konfiguration über das Webinterface
Nachdem die Installation & Konfiguration abgeschlossen ist, können wir das Webfrontend über http:///zabbix öffnen. Hier können wir noch etwas an den gesetzten Einstellungen ändern und auch das Theme wählen. Wenn die Einstellungen getroffen sind und der Wizard beendet ist kannst du dich dann anmelden.


Anmelden an Zabbix
Mit dem letzten Wizard ist nun die Konfiguration abgeschlossen und es kann sich angemeldet werden. Der Benutzername ist "Admin" und das Passwort ist "zabbix".

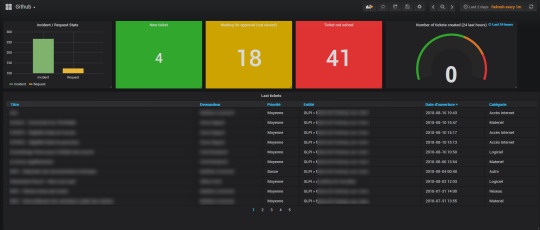
Nach der erfolgreichen Anmeldung, ist ein vorkonfiguriertes Dashboard mit einigen Feldern vorhanden. Je nach zuvor eingestelltem Theme kann dieses sich bei dir etwas anders darstellen.

Abschluss & Ausblick
Wir haben nun Zabbix erfolgreich auf dem Raspberry Pi Zero 2 WH installiert und konfiguriert. Im nächsten Beitrag werde ich dir zeigen wie du ein Gerät (in Zabbix als Host bezeichnet) einrichtest und überwachst. Da es sich auf meinem Blog hauptsächlich um Mikrocontroller und deren Programmierung dreht werde ich hier einen ESP32 nutzen welcher über seine GPIOs Signale von externen Sensoren/Aktoren aufnimmt und an das System Zabbix sendet. Read the full article
0 notes
Text
How to install Zabbix Monitoring Tool on a Linux System
How to install Zabbix Monitoring Tool on a Linux System
Zabbix is a high-performance monitoring tool for servers, apps, and network devices that is free and open source. It collects system metrics using agents. It also monitors typical services like SMTP and HTTP, and it enables host monitoring using SNMP, TCP, and ICMP checks. It is intended to monitor thousands of servers, virtual machines, and network devices in real time. It stores data in a…

View On WordPress
#Access Zabbix Dashboard#Database for Zabbix#database information#Linux server#Mariadb#Monitoring tool#MySQL#server monitoring#Zabbix agents
0 notes
Link
Now I have to show how to check my zabbix mysql service. Another tutorial how to monitoring mysql service via zabbix. Zabbix is very important tools for
0 notes
Text
How to Install Zabbix Server 5.0
How to Install Zabbix Server 5.0
In this article, we are going to see How to install Zabbix Server 5.0 on Linux Operating System. Zabbix is an open-source device management platform for a range of IT components including networks, servers, virtual machines ( VMs), and cloud providers. Zabbix provides monitoring metrics including network use, CPU load, and disk space consumption, among others. Configuration of the Zabbix…
View On WordPress
#Apache#CentOS#lamp stack#MySQL#PHP#php 7.4#RHEL#RHEL 7#Ubuntu#zabbix#zabbix agent#zabbix database#zabbix frontend#zabbix mysql server#zabbix server#zabbix server 5
0 notes
Link
0 notes
Link
0 notes
Text
Welcome to our guide on how to install Zabbix Server 5.0 on CentOS 7 Server. Our previous guide was on the installation of How to Install Zabbix Server on Ubuntu. Zabbix is a powerful open source monitoring solution used to monitor server applications, systems, Network devices, Hardware appliances, IoT devices, e.t.c. Its backend is written in C and Java while the user web interface written in PHP. Zabbix Architecture (Server & Client) Zabbix works in a Client/Server model. The server communicates to the native software agents available for various Operating systems like Linux, NIX, and Windows. For systems without an agent, generic monitoring protocols such as Simple Network Management Protocol (SNMP) or Intelligent Platform Management Interface (IPMI) can be used. Install Zabbix Server 5.0 on CentOS 7 Zabbix Server depends on the following software applications: Apache web server PHP with required extensions MySQL/ MariaDB database server MySQL or MariaDB can be a remote server, but php and httpd need to be installed on the Zabbix server. It is possible to run Apache web server in reverse proxy mode. It is recommended to have SELinux in permissive mode unless you know how to fix its issues: sudo setenforce 0 sudo sed -i 's/^SELINUX=.*/SELINUX=permissive/g' /etc/selinux/config Step 1: Install and Configure Apache httpd server Install Apache web server on CentOS 7 server by running the command: sudo yum -y install httpd vim After installing Apache, configure basic security by allowing Prod ServerTokens only on./etc/httpd/conf/httpd.conf Add the following line at the end of the file: $ sudo vim /etc/httpd/conf/httpd.conf ServerSignature Off ServerTokens Prod The directive ServerTokens configures what is returned as the Server HTTP response. Valid options are Full | OS | Minimal | Minor | Major | Prod. Set ServerName: $ sudo vim /etc/httpd/conf/httpd.conf ServerName zabbix.example.com Set Server Admin to receive an email in case of issues. $ sudo vim /etc/httpd/conf/httpd.conf ServerAdmin [email protected] Restart apache web service after making the changes: sudo systemctl restart httpd If you have a firewalld firewall installed and enabled, allow access to port 443 and 80: sudo firewall-cmd --add-service=http,https --permanent sudo firewall-cmd --reload Step 2: Install MariaDB Database server Install MariaDB database server on CentOS 7 server using our guide: How to Install MariaDB 10.x on CentOS 7 Once Database server is installed, you need to create a database for Zabbix user: export zabbix_db_pass="StrongPassword" mysql -uroot -p Users > Admin > Password > Change Password Configure Monitoring Target host Now that we have our Zabbix server ready for monitoring, you can start configuring first monitoring target host. By default, Zabbix server is added to monitoring. To add other host devices, login to Zabbix admin dashboard with the username admin and click on Configuration > Hosts. After a few minutes, monitoring data will start flowing in, to check host graphs go to Monitoring > Screens > Server name.
0 notes
Text
Linux memory monitor

LINUX MEMORY MONITOR INSTALL
LINUX MEMORY MONITOR SOFTWARE
LINUX MEMORY MONITOR FREE
Zabbix collects metrics from systems using Zabbix agent, SNMP and IPMI agents. It can check standard networking services such as HTTP, FTP, SMTP, and so on.
LINUX MEMORY MONITOR SOFTWARE
Zabbix is an enterprise-level opensource monitoring software to monitor the real-time track of networks, servers, and applications. To display the CPU usage, disk, and networks, in short, use the following command.
LINUX MEMORY MONITOR INSTALL
To install collectl in your system, use the following command. Collectl - Performance monitoring toolĬollectl is a command-line performance monitoring tool to gather information on system resources such as CPU usage, disk, memory, network, and more. It contains a feature that allows it to send notifications to the appropriate authorities when there is a problem or when the error has been resolved. It is compatible with all Unix-like operating systems, and there are 500 different plugins available to monitor your system as needed. Munin is an open-source web-based network monitoring program. For Ubuntu users, use the following command to install Monit. You may see the system status via the command line or HTTP web server. This program can restart the failed services, and the app can send an alert email including the fault details so that urgent action may be taken. It also monitors services like Apache, MySQL, Mail, FTP, Nginx, SSH, and so on.
LINUX MEMORY MONITOR FREE
Monit is a free open-source utility for proactively monitoring and managing system processes, applications, files, directories, and filesystems. To display the memory map of process ID, use the following command. You need to add PID along with pmap command to display the memory map of the given process. The pmap command is used to display the memory map of a process. pmap - Display the memory map of a process To display all information about CPU that mpstat can display, type $ mpstat -A 15. It shows reports for each available processor, starting with processor 0. Mpstat command is used to display processor-related statistics. mpstat - Display processor related statistics To display the network counter using sar, use the following command. To display the swap status, use the '-S- command along with sar command. Similarly, to display CPU average load, use the '-q' option with sar command. To display I/O device status, use the '-d' option along with sar command. Use -A option along with sar command to display detailed information about the I/O Devices, CPU, Memory, and Network statistics. On CentOS/RHEL/Fedora/Rocky Linux and AlmaLinux You can install the package using the following command. The SAR package is not found by default in the Linux system, but you can install the Sysstat package as SAR is part of sysstat. Aside from real-time system monitoring, SAR may also gather performance data in the background on an ongoing basis and analyze it to look for bottlenecking issues. System Activity Report (SAR) is a real-time system monitoring tool.
0 notes
Text
19 cursos de alto nível por R$29,00 mensais
19 cursos de alto nível por R$29,00 mensais
19 cursos de alto nível por R$29,00 mensais
Aprenda:
Linux+ LPIC-1: Exame 101/103
Linux+ LPIC-1: Exame 102/104
Firewall com Iptables
Firewall com Pfsense
Segurança em Linux
Firewall com Modsecurity
Monitoramento com Zabbix
Monitoramento com Nagios
Cloudcomputing
AWS Básico
Docker
DNS Bind 9
Nginx
Mysql Tunning
Samba 4
Squid Proxy
Zimbra E-Mail
Bacula Backup
Apache Web Server
Agarre essa grande…
View On WordPress
1 note
·
View note
Text
AWS DevOps Engineer
New Post has been published on https://www.tuempleord.do/2021/06/25/aws-devops-engineer/
AWS DevOps Engineer

We are looking for an experienced AWS DevOps Engineer to manage enterprise class cloud infrastructure. As one of our dedicated DevOps, you’ll have a unique opportunity to work with an extremely talented team and be part of innovative tech projects. Also, you will shape what our DevOps landscape looks like for the future.
Requirements: Interpreted lang experience. Any of: PHP, Perl, Python, Ruby, etc. Configuration lang: JSON, YAML. Network admin experience (Linux or Windows): Networking, TCP/IP deep understanding, OSI Model Knowledge, Routing tables, Firewall rules, DNS configuration, CDN knowledge, Troubleshooting skills, SOAP, REST API knowledge/experience, Deep understanding of client-server architecture (Web services), Monitoring tools (nagios, zabbix, sensu, elasticsearch). GIT Experience. Network design tools: MS Visio, Lucid chart or similar. DBA experience: Postgres, MySQL. Experience with serverless services – Docker experience – CI/CD experience – Kubernetes knowledge (Desired). Terraform, or a different automation tool – CloudCraft, – Certified [AWS, Azure, GPC] Cloud Solutions Architect (Desired). Experience in any shell scripting languages like: Bash, Powershell. English is a requirement, as you will be working directly with US-based clients.
You will be accountable for the following responsibilities: Write Terraform configurations to represent the AWS infrastructure state in code Represent the actual infrastructure in network/topology/services diagrams in each environment (Development, QA, Production) Plan and conduct game days to test and enhance the code and diagrams Propose the best practice approaches in terms of architecture design, security, naming conventions, governance, etc Support CI/CD lifecycle Take ownership of the AWS environment assigned
Correo Electrónico: [email protected]
0 notes
Text
Grafana Metabase

If you’ve ever done a serious web app, you’ve certainly met with a requirement for its monitoring, or tracking various application and runtime metrics. Exploring recorded metrics lets you discover different patterns of app usage (e.g., low traffic during weekends and holidays), or, for example, visualize CPU, disk space and RAM usage, etc. As an example, if the RAM usage graph shows that the usage is constantly rising and returns to normal only after the application restart, there may be a memory leak. Certainly, there are many reasons for implementing application and runtime metrics for your applications.
There are several tools for application monitoring, e.g. Zabbix and others. Tools of this type focus mainly on runtime monitoring, i.e., CPU usage, available RAM, etc., but they are not very well suited for application monitoring and answering questions like how many users are currently logged in, what’s the distribution of server response times, etc.
When comparing Grafana and Metabase, you can also consider the following products. Prometheus - An open-source systems monitoring and alerting toolkit. Tableau - Tableau can help anyone see and understand their data. Connect to almost any database, drag and drop to create visualizations, and share with a click.
Here's what people are saying about Metabase. Super impressed with @metabase! We are using it internally for a dashboard and it really offers a great combination of ease of use, flexibility, and speed. Paavo Niskala (@Paavi) December 17, 2019. @metabase is the most impressive piece of software I’ve used in a long time.
时间序列,日志与设备运行数据分析选 Grafana;企业��产经营数据分析则可以选 Superset。 Metabase. Metabase 目前在 GitHub 上受欢迎程度仅次于 Superset,Metabase 也是一个完整的 BI 平台,但在设计理念上与 Superset 大不相同。. Kibana and Metabase are both open source tools. Metabase with 15.6K GitHub stars and 2.09K forks on GitHub appears to be more popular than Kibana with 12.4K GitHub stars and 4.81K GitHub forks.
In this post, I’ll show you, how to do real time runtime and application monitoring using Prometheus and Grafana. As an example, let’s consider Opendata API of ITMS2014+.
Prometheus
Our monitoring solution consists of two parts. The core of the solution is Prometheus, which is a (multi-dimensional) time series database. You can imagine it as a list of timestamped, named metrics each consisting of a set of key=value pairs representing the monitored variables. Prometheus features relatively extensive alerting options, it has its own query language and also basic means for visualising the data. For more advanced visualisation I recommend Grafana.
Prometheus, unlike most other monitoring solutions works using PULL approach. This means that each of the monitored applications exposes an HTTP endpoint exposing monitored metrics. Prometheus then periodically downloads the metrics.
Grafana
Grafana is a platform for visualizing and analyzing data. Grafana does not have its own timeseries database, it’s basically a frontend to popular data sources like Prometheus, InfluxDB, Graphite, ElasticSearch and others. Grafana allows you to create charts and dashboards and share it with others. I’ll show you that in a moment.
Publishing metrics from an application
In order for Prometheus to be able to download metrics, it is necessary to expose an HTTP endpoint from your application. When called, this HTTP endpoint should return current application metrics - we need to instrument the application. Prometheus supports two metrics encoding formats - plain text and protocol buffers. Fortunately, Prometheus provides client libraries for all major programming languages including Java, Go, Python, Ruby, Scala, C++, Erlang, Elixir, Node.js, PHP, Rust, Lisp Haskell and others.
As I wrote earlier, let’s consider ITMS2014+ Opendata API, which is an application written in Go. There is an official Prometheus Go Client Library. Embedding it is very easy and consists of only three steps.
Free microsoft office download for mac full version. The first step is to add Prometheus client library to imports:
The second step is to create an HTTP endpoint for exposing the application metrics. In this case I use Gorilla mux and Negroni HTTP middleware:
We are only interested in line 2, where we say that the /metrics endpoint will be processed by Prometheus handler, which will expose application metrics in Prometheus format. Something very similar to the following output:
In production, you would usually want some kind of access control, for example HTTP basic authentication and https:
Although we have only added three lines of code, we can now collect the application’s runtime metrics, e.g., number of active goroutines, RAM allocation, CPU usage, etc. However, we did not expose any application (domain specific) metrics.
In the third step, I’ll show you how to add custom application metrics. Let’s add some metrics that we can answer these questions:
which REST endpoints are most used by consumers?
how often?
what are the response times?
Grafana Metabase On Pc
Whenever we want to expose a metric, we need to select its type. Prometheus provides 4 types of metrics:
Counter - is a cumulative metric that represents a single numerical value that only ever goes up. A counter is typically used to count requests served, tasks completed, errors occurred, etc.
Gauge - is a metric that represents a single numerical value that can arbitrarily go up and down. Gauges are typically used for measured values like temperatures or current memory usage, but also “counts” that can go up and down, like the number of running goroutines.
Histogram - samples observations (usually things like request durations or response sizes) and counts them in configurable buckets. It also provides a sum of all observed values.
Summary - is similar to a histogram, a summary samples observations (usually things like request durations and response sizes). While it also provides a total count of observations and a sum of all observed values, it calculates configurable quantiles over a sliding time window.
In our case, we want to expose the processing time of requests for each endpoint (and their percentiles) and the number of requests per time unit. As the basis for these metrics, we’ve chosen the Histogram type. Let’s look at the code:
We’ve added a metric named http_durations_histogram_seconds and said that we wanted to expose four dimensions:
code - HTTP status code
version - Opendata API version
controller - The controller that handled the request
action - The name of the action within the controller
For the histogram type metric, you must first specify the intervals for the exposed values. In our case, the value is response duration. On line 3, we have created 36 exponentially increasing buckets, ranging from 0.0001 to 145 seconds. In case of ITMS2014+ Opendata API we can empirically say that most of the requests only last 30ms or less. The maximum value of 145 seconds is therefore large enough for our use case.
Finally, for each request, we need to record four dimensions we have defined earlier and the request duration.Here, we have two options - modify each handler to record the metrics mentioned above, or create a middleware that wraps the handler and records the metrics. Obviously, we’ve chosen the latter:
As you can see, the middleware is plugged in on line 8 and the entire middleware is roughly 20 lines long. On line 27 to 31, we fill the four dimensions and on line 32 we record the request duration in seconds.
Configuration
Since we have everything ready from the app side point of view, we just have to configure Prometheus and Grafana.
A minimum configuration for Prometheus is shown below. We are mainly interested in two settings, how often are the metrics downloaded (5s) and the metrics URL (https://opendata.itms2014.sk/metrics).
A minimal Grafana configuration:
Note: As we can see, a NON TLS port 3000 is exposed, but don’t worry there is a NGINX in front of Grafana listening on port 443, secured by Let’s Encrypt certificate.
Monitoring
Finally, we get to the point where we have everything we need. In order to create some nice charts it is necessary to:
Open a web browser and log into Grafana
Add Prometheus data source
Create dashboards
Create charts
An example of how to create a chart showing the number of HTTP requests per selected interval is shown on the following figure.
Similarly, we’ve created additional charts and placed them in two dashboards as shown on the following figures.
Summary
In this post, we have shown that the application and runtime monitoring may not be difficult at all.
Prometheus client libraries allow us to easily expose metrics from your applications, whether written in Java, Go, Ruby or Python. Prometheus even allows you to expose metrics from an offline applications (behind corporate firewalls) or batch applications (scripts, etc.). In this case, PUSH access can be used. The application then pushes metrics into a push gateway. The push gateway then exposes the metrics as described in this post.
Grafana can be used to create various charts and dashboards, that can be shared. Even static snapshots can be created. This allows you to capture an interesting moments and analyze them later.
Reports and Analytics
Powerful Enterprise Grade Reporting Engine
Elegant SQL interface for people who need a little more power
Widgets for Creating Bar Chars, Pie Charts, Line Graphs
Multiple Dashboards with different personal widgets
Create, organize, and share dashboards with others
Dashboards
Open Source
Completely Open Sources
Community Contribution Available
Simple to Use even for beginners
Install on premises or in the Cloud
Free and Simple to Use
Integrations
Integration with any Data Source in SQL
PostgreSQL, MySQL, Maria DB
Oracle, MS SQL or IBM DB2
Ready Plugins Available
Metabase Vs Grafana
Altnix Advantage

Metabase Consulting Services
Altnix provides Professional services for Consulting on Metabase products. Following items are covered:
Consulting Services for Metabase business intelligence tool
Best practices and guidelines on how to adopt the Metabase business intelligence tool
Architecture Design for Metabase
Technology Roadmap for Metabase adoption at your organization
Solution Design on using Metabase business intelligence tool
Metabase Implementation and Deployment
Altnix will implement Metabase based business intelligence and Analytics solution keeping in mind the business requirements. Implementation includes the following:
Integration with different databases and data sources
Extract Transform Load (ETL) Design
Designing Queries to be used in Metabase
Widgets and Dashboards design in Metabase
Reports Design in Metabase
Development and Design Implementation
UAT and Testing Activities
Production Implementation and Go Live
Warranty Support Period Included
Metabase Customization
Grafana Metabase On Twitter
Altnix will customize your Metabase installation so that it is a better fit for your business environment.
Creating new visualizations and dashboards as per customer needs
Creating custom reports and charts as per customer needs
Adding new scripts, plug-ins, and components if needed
Third-Party Integration
Altnix will integrate Metabase business intelligence tools with other third-party tools to meet several use cases.
Ticketing systems such as LANDesk, BMC Remedy, Zendesk, and ((OTRS)) Community Edition
ITSM Tools such as ((OTRS)) Community Edition, GLPi Network Editon, ServiceNow, and HP Service Manager
Monitoring tools such as Zabbix, Nagios, OpenNMS, and Prometheus
IT Automation Tools such as StackStorm, Ansible, and Jenkins

24x7 AMC Support Services
Altnix offers 24x7 support services on an AMC or per hour basis for new or existing installations on the Metabase Business intelligence tool. Our team of experts are available round the clock and respond to you within a predefined SLA.
Case Studies

Knute Weicke
Security Head, IT
Fellowes Inc, USA
Altnix was an instrumental partner in two phases of our Security ISO needs. The first being a comprehensive developed Service/Ticketing system for our global offices. The second being that of an Asset Management tool that ties all assets into our Ticketing systems to close a gap that we had in that category. They are strong partners in working towards a viable solution for our needs
The Altnix team was very easy to work with and resolved our needs in a timely manner. Working with Altnix, allowed us to focus on our core business while they handled the technical components to help streamline our business tools. We have found a strategic partner in Altnix
Johnnie Rucker
General Manager
Encore Global Solutions, USA
White Papers
0 notes
Text
Here at ComputingPost, we like exploring various network and system monitoring tools. So far we have covered the basic setup and usage of Zabbix, telegraf/InfluxDB, Grafana, and Prometheus. Zabbix functionality is similar to Cacti, though Cacti is more fit for network graphing. In this guide, we’ll look at how to install and configure Cacti on Ubuntu 20.04|18.04 Linux server. What is Cacti? Cacti is a completely open-source network monitoring and graphing tool that was designed as a front-end application for the industry-standard data logging tool RRDtool. Cacti harness the power of RRDTool’s data storage and graphing functionality. Some good features of Cacti include: Fast polling of metrics Support for multiple data acquisition methods Support for advanced graph templating User management functionality with ACL Cacti provide an intuitive and easy to use web interface which can be used for small LAN installations up to complex networks with thousands of servers and networking devices. Install Cacti Server on Ubuntu 20.04/18.04 Cacti has a number of dependencies that need to be installed and configured before you can deploy Cacti server itself. This guide will cover the installation of these dependencies one by one: Step 1: Update system and upgrade all packages We always start with server packages upgrade to avoid any dependency issues: sudo apt update sudo apt upgrade -y You can reboot the server after upgrade: sudo reboot Step 2: Install php and required modules We now need to install php and some php modules required by cacti. Run the following commands to get everything and installed. sudo apt -y install apache2 php php-mysql,curl,net-socket,gd,intl,pear,imap,memcache,pspell,tidy,xmlrpc,snmp,mbstring,gmp,json,xml,common,ldap sudo apt install libapache2-mod-php The most important module is php-snmp and php-mysql. Make sure they are installed. You can check your php version using the command: $ php -v PHP 7.4.3 (cli) (built: Nov 25 2021 23:16:22) ( NTS ) Copyright (c) The PHP Group Zend Engine v3.4.0, Copyright (c) Zend Technologies with Zend OPcache v7.4.3, Copyright (c), by Zend Technologies Update PHP parameters: sudo vim /etc/php/*/apache2/php.ini Set correct timezone: date.timezone = "Africa/Nairobi" Update memory limit: memory_limit = 512M Also adjust Maximum execution time of each script: max_execution_time = 300 Restart Apache Web server Step 3: Configure Apache Web server Ensure Apache web server is installed: sudo apt install apache2 After installing Apache, configure basic security by allowing Prod ServerTokens only. sudo vim /etc/apache2/conf-enabled/security.conf Change line 25 ServerTokens Prod This directive configures what you return as the Server HTTP response. Valid options are Full | OS | Minimal | Minor | Major | Prod. Set ServerName: $ sudo vim /etc/apache2/apache2.conf ServerName cacti.example.com Set Server Admin to receive an email in case of issues. $ sudo vim /etc/apache2/apache2.conf ServerAdmin [email protected] If you have ufw enabled, open http and https ports on the firewall. $ sudo ufw allow http Rule added Rule added (v6 $ sudo ufw allow https Rule added Rule added (v6) You need to restart apache web service after making these changes: sudo systemctl restart apache2 Step 4: Install and Configure MariaDB Database Run the following commands to install MariaDB server on Ubuntu:s sudo apt install mariadb-server -y Tune MariaDB database for Cacti Add the following settings under [mysqld]: $ sudo vim /etc/mysql/mariadb.conf.d/50-server.cnf [mysqld] innodb_file_format=Barracuda innodb_large_prefix=1 collation-server=utf8mb4_unicode_ci character-set-server=utf8mb4 innodb_doublewrite=OFF max_heap_table_size=128M tmp_table_size=128M join_buffer_size=128M innodb_buffer_pool_size=1G innodb_flush_log_at_timeout=3 innodb_read_io_threads=32 innodb_write_io_threads=16 innodb_io_capacity=5000 innodb_io_capacity_max=10000
innodb_buffer_pool_instances=9 Comment out other settings on local #around line 116 #character-set-server = utf8mb4 #collation-server = utf8mb4_general_ci Restart mariadb service sudo systemctl restart mariadb To check any of these settings, use mysql select statement, e.g. $ sudo mysql -u root MariaDB [(none)]> select @@tmp_table_size; +------------------+ | @@tmp_table_size | +------------------+ | 134217728 | +------------------+ 1 row in set (0.00 sec) MariaDB [(none)]> exit Bye Or MariaDB [(none)]> show variables like 'join_buffer_size'; Once Database server installation is done, you need to create a database for Cacti: $ sudo mysql -u root -p CREATE DATABASE cacti DEFAULT CHARACTER SET utf8 COLLATE utf8_unicode_ci ; GRANT ALL PRIVILEGES ON cacti.* TO 'cacti_user'@'localhost' IDENTIFIED BY 'strongpassword'; GRANT SELECT ON mysql.time_zone_name TO cacti_user@localhost; ALTER DATABASE cacti CHARACTER SET utf8mb4 COLLATE utf8mb4_unicode_ci; FLUSH PRIVILEGES; EXIT; Test database connection: $ mysql -u cacti_user -p Enter password: strongpassword MariaDB [(none)]> show databases; +--------------------+ | Database | +--------------------+ | cacti | | information_schema | +--------------------+ 2 rows in set (0.00 sec) MariaDB [(none)]> \q Setup mysql timezone for cacti database user $ sudo su - $ mysql_tzinfo_to_sql /usr/share/zoneinfo | mysql -u root -p mysql Enter password: Warning: Unable to load '/usr/share/zoneinfo/leap-seconds.list' as time zone. Skipping it. Step 5: Install SNMP and Cacti on Ubuntu 20.04/18.04 The last package installation step is for Cacti and snmp packages. Cacti depend on Snmp and rrdtool tool for its functions. Install these packages using the command: sudo apt install snmp snmpd snmp-mibs-downloader rrdtool When asked to select the web server, choose Apache. Clone Project from github: $ sudo apt install git $ git clone -b 1.2.x https://github.com/Cacti/cacti.git Cloning into 'cacti'... remote: Enumerating objects: 75698, done. remote: Counting objects: 100% (1608/1608), done. remote: Compressing objects: 100% (496/496), done. remote: Total 75698 (delta 1155), reused 1536 (delta 1105), pack-reused 74090 Receiving objects: 100% (75698/75698), 127.92 MiB | 7.02 MiB/s, done. Resolving deltas: 100% (56327/56327), done. Updating files: 100% (3621/3621), done. After cloning the Cacti repository, move the files into the /var/www/html directory: sudo mv cacti /var/www/html Let’s now pre-populate the database used by cacti: sudo mysql -u root cacti < /var/www/html/cacti/cacti.sql With the database populated we can go ahead and create the config.php file in /var/www/html/cacti/include: sudo mv /var/www/html/cacti/include/config.php.dist /var/www/html/cacti/include/config.php Modify Cacti configuration file and make sure to change the database settings as needed: $ sudo vim /var/www/html/cacti/include/config.php $database_type = 'mysql'; $database_default = 'cacti'; $database_hostname = 'localhost'; $database_username = 'cacti_user'; $database_password = 'strongpassword'; Step 6: Configure SNMP Start by enabling the loading of MIBs by commenting out the following line on /etc/snmp/snmp.conf sudo vim /etc/snmp/snmp.conf Change mibs : to # mibs : Configure SNMP community name by editing /etc/snmp/snmpd.conf sudo vim /etc/snmp/snmpd.conf Enable full access from localhost: rocommunity MyCacti localhost Disable public access by commenting below lines: rocommunity public default -V systemonly rocommunity6 public default -V systemonly To # rocommunity public default -V systemonly # rocommunity6 public default -V systemonly Restart snmpd service: sudo systemctl restart snmpd Validate snmp configurations using snmpwalk command line tool: $ sudo snmpwalk -v 2c -c MyCacti localhost system SNMPv2-MIB::sysDescr.0 = STRING: Linux ubuntu 5.4.0-73-generic #82-Ubuntu SMP Wed Apr 14 17:39:42 UTC 2021 x86_64 SNMPv2-MIB::sysObjectID.0 = OID: NET-SNMP-MIB::netSnmpAgentOIDs.10
DISMAN-EVENT-MIB::sysUpTimeInstance = Timeticks: (1964) 0:00:19.64 SNMPv2-MIB::sysContact.0 = STRING: Me SNMPv2-MIB::sysName.0 = STRING: ubuntu SNMPv2-MIB::sysLocation.0 = STRING: Sitting on the Dock of the Bay SNMPv2-MIB::sysServices.0 = INTEGER: 72 SNMPv2-MIB::sysORLastChange.0 = Timeticks: (6) 0:00:00.06 SNMPv2-MIB::sysORID.1 = OID: SNMP-FRAMEWORK-MIB::snmpFrameworkMIBCompliance SNMPv2-MIB::sysORID.2 = OID: SNMP-MPD-MIB::snmpMPDCompliance SNMPv2-MIB::sysORID.3 = OID: SNMP-USER-BASED-SM-MIB::usmMIBCompliance SNMPv2-MIB::sysORID.4 = OID: SNMPv2-MIB::snmpMIB SNMPv2-MIB::sysORID.5 = OID: SNMP-VIEW-BASED-ACM-MIB::vacmBasicGroup SNMPv2-MIB::sysORID.6 = OID: TCP-MIB::tcpMIB SNMPv2-MIB::sysORID.7 = OID: IP-MIB::ip SNMPv2-MIB::sysORID.8 = OID: UDP-MIB::udpMIB SNMPv2-MIB::sysORID.9 = OID: SNMP-NOTIFICATION-MIB::snmpNotifyFullCompliance SNMPv2-MIB::sysORID.10 = OID: NOTIFICATION-LOG-MIB::notificationLogMIB SNMPv2-MIB::sysORDescr.1 = STRING: The SNMP Management Architecture MIB. SNMPv2-MIB::sysORDescr.2 = STRING: The MIB for Message Processing and Dispatching. SNMPv2-MIB::sysORDescr.3 = STRING: The management information definitions for the SNMP User-based Security Model. SNMPv2-MIB::sysORDescr.4 = STRING: The MIB module for SNMPv2 entities SNMPv2-MIB::sysORDescr.5 = STRING: View-based Access Control Model for SNMP. SNMPv2-MIB::sysORDescr.6 = STRING: The MIB module for managing TCP implementations SNMPv2-MIB::sysORDescr.7 = STRING: The MIB module for managing IP and ICMP implementations SNMPv2-MIB::sysORDescr.8 = STRING: The MIB module for managing UDP implementations SNMPv2-MIB::sysORDescr.9 = STRING: The MIB modules for managing SNMP Notification, plus filtering. SNMPv2-MIB::sysORDescr.10 = STRING: The MIB module for logging SNMP Notifications. SNMPv2-MIB::sysORUpTime.1 = Timeticks: (6) 0:00:00.06 SNMPv2-MIB::sysORUpTime.2 = Timeticks: (6) 0:00:00.06 SNMPv2-MIB::sysORUpTime.3 = Timeticks: (6) 0:00:00.06 SNMPv2-MIB::sysORUpTime.4 = Timeticks: (6) 0:00:00.06 SNMPv2-MIB::sysORUpTime.5 = Timeticks: (6) 0:00:00.06 SNMPv2-MIB::sysORUpTime.6 = Timeticks: (6) 0:00:00.06 SNMPv2-MIB::sysORUpTime.7 = Timeticks: (6) 0:00:00.06 SNMPv2-MIB::sysORUpTime.8 = Timeticks: (6) 0:00:00.06 SNMPv2-MIB::sysORUpTime.9 = Timeticks: (6) 0:00:00.06 SNMPv2-MIB::sysORUpTime.10 = Timeticks: (6) 0:00:00.06 Remember to replace MyCacti with the name of your community string. Step 7: Configure Cacti Server on Ubuntu 20.04/18.04 Set Cacti directory permissions: sudo chown -R www-data:www-data /var/www/html/cacti Create systemd unit file for Cacti: sudo tee /etc/systemd/system/cactid.service + (Add device) Fill server details and scroll down and click “Save” button. Step 10: Using Cacti Spine Poller The spine is a multi-thread, high-speed data collection tool that acts as a replacement for cmd.php for Cacti. You can install and use it by following the guide in the link below: How To Install Cacti Spine poller on Ubuntu
0 notes
Text
システム監視ソフト新版「Zabbix 4.4」、エージェントの刷新や、Webフック型の障害通知など | IT Leaders
from https://it.impressbm.co.jp/articles/-/18673
[新製品・サービス]
システム監視ソフト新版「Zabbix 4.4」、エージェントの刷新や、Webフック型の障害通知など
2019年10月10日(木)日川 佳三(IT Leaders編集部)
ラトビア共和国のZabbixの日本支社であるZabbix Japanは2019年10月10日、システム/ネットワーク監視ソフトの新版「Zabbix 4.4」を発表した。新版では、エージェントソフトを刷新したほか、障害検知時にWebフック型でHTTPで通知できるようにした。ZabbixはLinux上で動作するオープンソース(OSS)であり、ダウンロードして利用できる。
Zabbixは、オープンソース(OSS)のシステム/ネットワーク監視ソフトである(関連記事:システム監視ソフト新版「Zabbix 4.2」、プロキシでのデータ集約で大規模監視の負荷を軽減)。専用のエージェントソフト(各種UNIX/LinuxやWindowsで稼働)を用いたサーバー監視、SNMP監視、リモートログイン(SSH)とコマンド実行によるサーバー監視、ポート監視(ネットワークサービスの死活監視)など、各種の方法で監視できる。
新版では、サーバー監視用のエージェントソフトを刷新し、「Zabbix Agent 2」とした。従来のエージェントはC言語で開発していたが、新エージェントはGO言語で開発している。新エージェントは、プラグイン機能、柔軟な監視タイミングの設定、監視データの一括送信による効率良い監視、といった特徴がある。柔軟性と拡張性、性能に優れているとしている。
新版ではまた、障害検知時に実行するカスタム通知機能として、外部にHTTPリクエストを送信するWebフックの機能を搭載した。これにより、外部スクリプトを作成することなく、HTTPベースのAPIを備えたチケット管理システムやチャットサービスなどに対してZabbixから直接障害通知を送信できるようになった。JavaScriptによって通知処理をカスタマイズできる。
監視データの保存先として、時系列データベースであるPostgreSQLのTimescaleDBを公式にサポートした。大量の監視データを保存する場合はデータベースの負荷が問題となるが、TimescaleDBを使うことで、データベースの複雑なチューニングや管理を行うことなく、効率よくデータを保存できるとしている。
Webダッシュボードにおいては、新しく棒グラフのウィジェットを利用できるようにした(画面1)。既存のヴィジェットも、表示方法を新しく追加し、障害の表示をより分かりやすく行えるようにしたとしている。このほか、ウィジェットの設定を簡単に行えるようにしたほか、より多くのウィジェットを横に並べられるようにするなど、画面周りを改善した。

画面1:Zabbix 4.4では画面を改善し、棒グラフを表示できるようにした(出典:Zabbix Japan) 拡大画像表示
公式のシステム監視テンプレートも増やした。既存のLinuxおよびWindowsのテンプレートをアップデートしたほか、新たにNginx、Apache HTTP Server、RabbitMQ、MySQL/MariaDB、PostgreSQLを監視するためのテンプレートを追加した。より簡単にアプリケーションを監視できるようになる。
https://it.impressbm.co.jp/mwimgs/b/7/400/img_b724dffdfd08c57a618d48ad17f435bc62342.jpg
0 notes
Text
Cursos de alto nível por 99,00 mensais

Prá que pagar por curso que te dá apenas aulas? Muito mais do que aulas, aqui você tem simulados, livro, servidores em cloud, flashcards, mapas mentais, palavras-cruzadas, guias de estudo e glossário em vídeo dos comandos. - Linux+ LPIC-1: Exame 101 - Linux+ LPIC-1: Exame 102 - Linux LPIC-2: Exame 201 - Linux LPIC-2: Exame 202 - Firewall com Iptables - Firewall com Pfsense - Segurança em Linux - Firewall com Modsecurity - Monitoramento com Zabbix - Monitoramento com Nagios - Cloudcomputing - AWS Básico - Docker - DNS Bind 9 - Nginx - Mysql Tunning - Samba 4 - Squid Proxy - Zimbra E-Mail - Bacula Backup - Apache Web Server Agarre essa grande oportunidade de se tornar um engenheiro de software em Linux, investindo menos de R$3,30 por dia. Aprenda muito mais sobre Linux em nosso curso online. Você pode fazer a matrícula aqui. Gostou? Compartilhe :-) Read the full article
0 notes