99% handsewing hanfu; amateur | 無聊的時候做漢服 有問題可以問 (雖然不知道有沒有講中文的人用tumblr) | questions welcome
Don't wanna be here? Send us removal request.
Statistics
We looked inside some of the posts by yi-gege and here's what we found interesting.
Average Info
Notes Per Post
1K
Likes Per Post
926
Reblog Per Post
252
Reply Per Post
11
Time Between Posts
1 month
Number of Posts By Type
Photo
7
Note
1
Text
4
Last Seen Tumblr Blogs


Fun Fact
There are dozens of funny blogs to kill time on Tumblr.
Photo
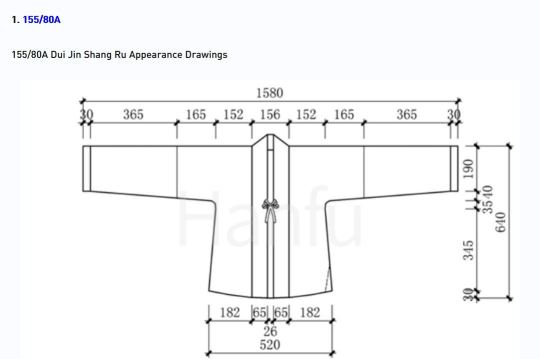
对襟上襦 | Dui Jin Shang Ru Instructions Part 2
Source: https://www.newhanfu.com/15638.html#Qi_Xiong_Shang_Ru_qi_xiong_shang_ru
Part 1: https://www.tumblr.com/blog/view/yi-gege/655982888358166528?source=share
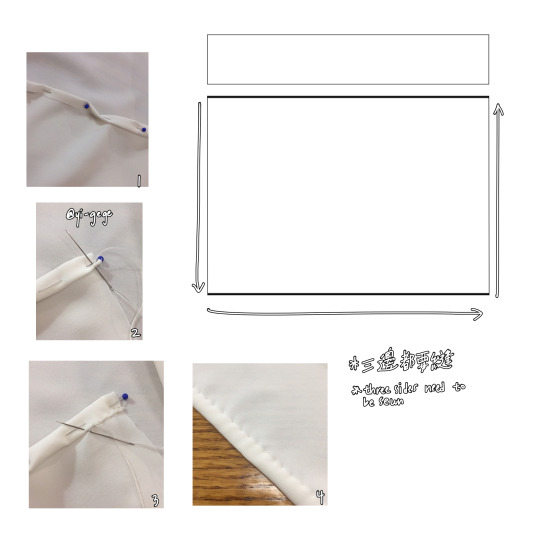
第四步 | Step 4
做完第三步之後 在另一半生用一樣的方法把袖子跟袖口連到另一半身。
把两半对好,確定兩個正面是在對面的。在下面剪出一個小三角形的形狀。
缝在一起。要在三角形開始的地方停。
要记得留够的布让你自己能够处理边边 除非你有一个拷边机
縫完要燙。
Once you have completed step 3 (see link), do the same process on the other side of the body to connect the other arm and cuff piece.
When that is completed, fold the two body pieces in half, right sides together, leaving yourself enough seam allowance to seal the seam (I prefer at least 1 cm seam allowance to be able to fold both halves in and sew that shut, but it may be easier for you to do more, or simply use a serger). Cut a slit in the side as in the title picture, and then sew the two halves together (A and B). Stop where the slit begins.
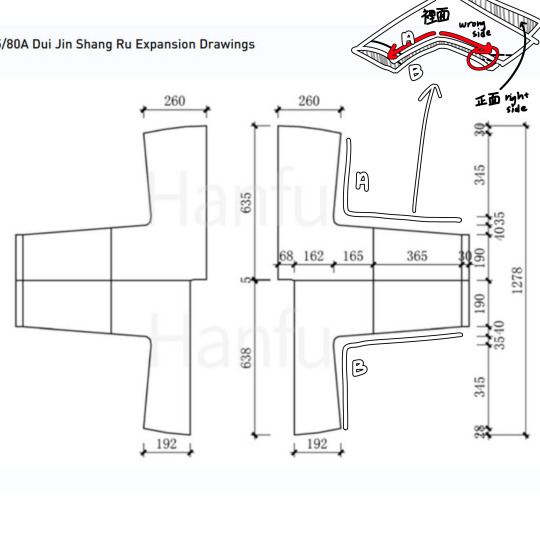
把三角形拉成一条直的线 往内折两次 然后缝下去
Sew the slit as you would a plackett. i.e., sew the seam that you have folded up until the slit you have cut begins, pull the slit so that it lies in a straight line, fold it inside twice, and sew straight across. Take care of the raw edges and iron.
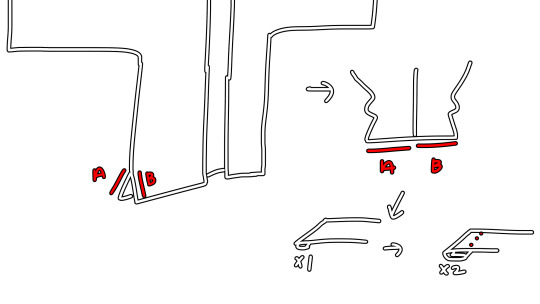
如果你發現腋窩那邊不平的話把裡面哪裡的縫份剪幾次 然後處理剪過的地方。
To get rid of the puckering around the armpit, cut small slits on the inside seam allowance around the curve, and back stitch the places you have cut to prevent unraveling.

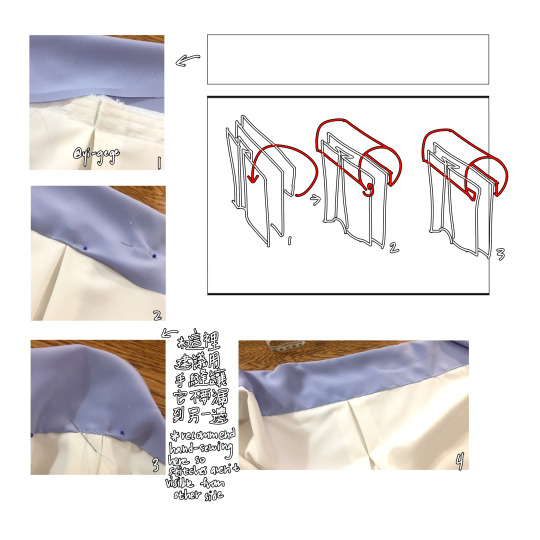
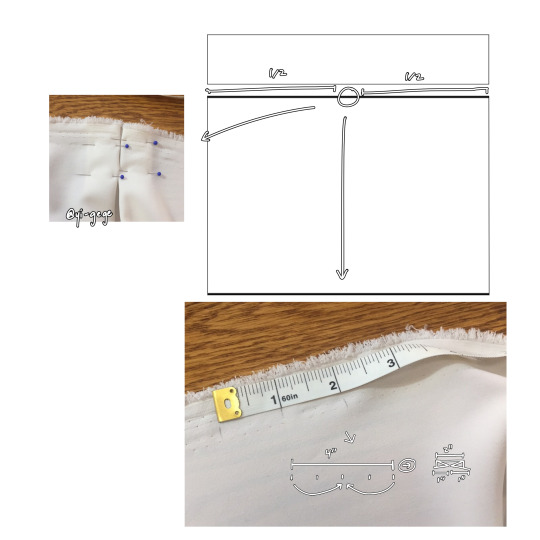
第五步 | Step 5 Connecting the Body Pieces
我們到這裡全部的邊邊(除了背的那一條線跟領子)應該都處理好了。把兩片生體從背的那一條線縫在一起 確認縫的時候是兩個正面在彭對方。處理好縫份。
At this time, all raw edges except for the collar and back should be finished. Place the two body pieces on top of each other, lining up the seam that will go in the middle of the back with its mirror. Sew the two pieces together. Take care of the raw seam.

把領子的那一片折一版熨燙好。正面應該在外面。
熨燙後把他打開然後再來把領子縫上脖子。脖子現在應該有一個長方形的形狀。在90°往下跑的兩條左邊跟右邊的線的角角剪一點點。跟縫袖口的三角形一樣把一整條啦成直線,把領子的哪一片放上去(正面是在碰對方的)然後縫。繼續把他往內則一半, 然後把最後面的縫份往內則然後縫起來。我喜歡在這裡用手縫所以外面看不到你縫得閒但如果你沒辦法的話那用機器也沒關係。
最後面在領導裡面胸口的大概的位子縫兩條線讓你以後呢個夠把兩半綁在一起就好了。我那裡也喜歡用手縫 一樣的原因。燙好之後應該就完成了。
Then, connect the collar. To prep, first iron the collar piece in half longways, with the wrong sides touching. Then, open it back up.
Cut slits on the two side of the neck where the cloth starts to curve to come around the front of the body (the 90 degree angles of the neck piece), stretch it so that it lies straight, line up the collar piece right sides together, and sew straight across. Make sure that the cut slits are not exposed on the outside.
Similar to how we connected the cuffs, fold the collar in along the ironed line, pinning it so that it doesn’t move. Then, fold the seam allowance in and then stitch it shut. I prefer to hand sew this so that there are no seams visible on the outside, but if you are unable to or don’t want to, it is fine to top stitch it with the machine.
The Dui Jin Shan should be finished after you sew two ties to the inside of the collar, around the chest. I like to hand sew here for the same reason as before.

143 notes
·
View notes
Photo
对襟上襦 | Dui Jin Shang Ru Instructions Part 2
Source: https://www.newhanfu.com/15638.html#Qi_Xiong_Shang_Ru_qi_xiong_shang_ru
Part 1: https://www.tumblr.com/blog/view/yi-gege/655982888358166528?source=share
第四步 | Step 4
做完第三步之後 在另一半生用一樣的方法把袖子跟袖口連到另一半身。
把两半对好,確定兩個正面是在對面的。在下面剪出一個小三角形的形狀。
缝在一起。要在三角形開始的地方停。
要记得留够的布让你自己能够处理边边 除非你有一个拷边机
縫完要燙。
Once you have completed step 3 (see link), do the same process on the other side of the body to connect the other arm and cuff piece.
When that is completed, fold the two body pieces in half, right sides together, leaving yourself enough seam allowance to seal the seam (I prefer at least 1 cm seam allowance to be able to fold both halves in and sew that shut, but it may be easier for you to do more, or simply use a serger). Cut a slit in the side as in the title picture, and then sew the two halves together (A and B). Stop where the slit begins.
把三角形拉成一条直的线 往内折两次 然后缝下去
Sew the slit as you would a plackett. i.e., sew the seam that you have folded up until the slit you have cut begins, pull the slit so that it lies in a straight line, fold it inside twice, and sew straight across. Take care of the raw edges and iron.
如果你發現腋窩那邊不平的話把裡面哪裡的縫份剪幾次 然後處理剪過的地方。
To get rid of the puckering around the armpit, cut small slits on the inside seam allowance around the curve, and back stitch the places you have cut to prevent unraveling.
第五步 | Step 5 Connecting the Body Pieces
我們到這裡全部的邊邊(除了背的那一條線跟領子)應該都處理好了。把兩片生體從背的那一條線縫在一起 確認縫的時候是兩個正面在彭對方。處理好縫份。
At this time, all raw edges except for the collar and back should be finished. Place the two body pieces on top of each other, lining up the seam that will go in the middle of the back with its mirror. Sew the two pieces together. Take care of the raw seam.
把領子的那一片折一版熨燙好。正面應該在外面。
熨燙後把他打開然後再來把領子縫上脖子。脖子現在應該有一個長方形的形狀。在90°往下跑的兩條左邊跟右邊的線的角角剪一點點。跟縫���口的三角形一樣把一整條啦成直線,把領子的哪一片放上去(正面是在碰對方的)然後縫。繼續把他往內則一半, 然後把最後面的縫份往內則然後縫起來。我喜歡在這裡用手縫所以外面看不到你縫得閒但如果你沒辦法的話那用機器也沒關係。
最後面在領導裡面胸口的大概的位子縫兩條線讓你以後呢個夠把兩半綁在一起就好了。我那裡也喜歡用手縫 一樣的原因。燙好之後應該就完成了。
Then, connect the collar. To prep, first iron the collar piece in half longways, with the wrong sides touching. Then, open it back up.
Cut slits on the two side of the neck where the cloth starts to curve to come around the front of the body (the 90 degree angles of the neck piece), stretch it so that it lies straight, line up the collar piece right sides together, and sew straight across. Make sure that the cut slits are not exposed on the outside.
Similar to how we connected the cuffs, fold the collar in along the ironed line, pinning it so that it doesn’t move. Then, fold the seam allowance in and then stitch it shut. I prefer to hand sew this so that there are no seams visible on the outside, but if you are unable to or don’t want to, it is fine to top stitch it with the machine.
The Dui Jin Shan should be finished after you sew two ties to the inside of the collar, around the chest. I like to hand sew here for the same reason as before.

#对襟上襦/Dui Jin Shang Ru Instructions#Dui Jin Shang Ru#对襟上襦#hanfu#chinese hanfu#hanfu making#hand sewing#sewing#sewing pattern#sewing tutorial#hanfu sewing pattern#diy hanfu
143 notes
·
View notes
Note
Hello! Do you know what sort of hanfu this is? I’d like to make something similar but I can’t find the right patterns as I don’t know what to search for?

Hi! Thank you for sending this question. While I can’t say I’m an expert on it, from what I’m seeing, I would say that it looks like a regular cross-collar hanfu with long sleeves, commonly seen in the jin dynasty.
The skirt seems to be a separate piece with very large pleats, about the width of her hand including the thumb.
I would guess that it is something similar to a sanjian qun (三襉裙) or just one with very large box pleats based on looks. Find an explanation of it here: https://www.newhanfu.com/34515.html
The tie in the front is just stylistic based on the way the stylist tied it. You can find patterns for that by searching or on the site I use, https://www.newhanfu.com/guide-turorial although you may need to make an account to be able to view the full content of certain posts.
Good luck!!
77 notes
·
View notes
Text
不好意思最近沒有發新的東西因為每一步都要解釋 我很累.....雖然我還在私下縫衣服
希望我能找到發帖的能量!~~~
3 notes
·
View notes
Photo

对襟上襦 | Dui Jin Shang Ru Instructions Part 1
Source: https://www.newhanfu.com/15638.html#Qi_Xiong_Shang_Ru_qi_xiong_shang_ru
Part 2: https://www.tumblr.com/blog/view/yi-gege/692861026162606080?source=share
Note:
請大家去網站上找自己的尺碼~ | please go to the website to find your size to make
點擊進圖片會比較清楚 | Click the image for higher quality
第一步 | Step 1

把布往上折兩次 縫好 我知道有可能感覺這一步通常是最後才做得,但我建議你們先做 因為等一下會變成非常困難的
紅線是你需要縫的方向(如果你是手工縫 的 :用機器就沒差別)
縫完燙好 !! 做這個 每一步都要熨燙 我保證,這會有很大的差別
Fold the cloth up twice and sew it. I know it may seem that this is usually the last step, but I recommend doing this first, or else it will become very difficult later
The red lines are the direction to sew if you are handsewing. If you are using machine, it doesn’t matter.
After sewing, iron it!! When making this, you should iron after every step. I swear it makes a big difference.
第二步 | Step 2

你在同一個地方倒縫幾次就不需要打個結
我把整個接縫直接倒縫
兩邊一樣縫(左手和右手)
在 燙!!
I am backstitching instead of tying a knot
Sew the two sides the same way (left and right arm)
I backstitch the whole seam
Iron again!!

毛縫處理好: 兩邊向內折,縫
在 燙!!
Take care of the raw seam: fold both sides inside and sew
Iron again!!
第三步 | Step 3

這解釋可能要解釋到基督的降臨所以請看圖片就好了
左手和右手 一樣
This will take a long time to explain, so please look at the picture.
Again, do the same to both sides.
#对襟上襦/Dui Jin Shang Ru Instructions#Dui Jin Shang Ru#对襟上襦#hanfu#chinese hanfu#diy hanfu#hanfu sewing#hanfu sewing pattern#hanfu making#sewing#sewing pattern
152 notes
·
View notes
Text
Mo Xiong/抹胸 Part 3
Part 1:
https://yi-gege.tumblr.com/post/654717883460517888/mo-xiong%E6%8A%B9%E8%83%B8-source
Part 2:
https://yi-gege.tumblr.com/post/654854947574251520/mo-xiong%E6%8A%B9%E8%83%B8-part-2
完成主要部分 | Finishing the main body
你們知道我花了多少時間傷腦筋因為我不知道這個要放什麼名字嗎?天啊
有顏色的 那 一 條 布翻過來縫到前面
雖然這很像縫裙子的方式, 從外面縫的地方是外面,不是裡面 因為你穿的時候會把 上面那條布翻出來 露出裡面
縫好後熨燙一下。
Flip the colored strip of cloth over and sew it to the front
While this is very similar to sewing the high-waisted skirt, the part that is sewn from the outside is different--it is the outside, not the inside. This is because when you wear this, you will flip the top band down, exposing the seam on the inside.
Iron it after you finish sewing.
弦 | Ties
因為這是我第一次做這個,我亂猜 繩子應該多寬 後來覺得弦太細了
我建議你們把它弄粗一點 ~1/2in
用普通布做繩子 穿的時間可能會讓你感覺太緊 不舒服 所以你也可以用一根細的鬆緊帶作為繩子
那麼長度呢 我在視頻中看到 那個姐姐 把 繩子 從後面 拉到前面 的時間 繩子還能夠到達她的 膝蓋上
大家都應該知道如何做吧? 縫好後把裡面翻出來
縫好後熨燙一下。
Because this is my first time making this, I guessed the thickness of the ties, but I think I made the too thin.
I think I would recommend a thickness of 1/2 inch.
Making the ties out of cloth might make it feel too tight when worn for some people, so you can also use a thin elastic as the ties.
For the length, you can see that the sister in the video, when she pulls the ties from the back to the front, the ties still reach the tops of her knees.
Everyone should know how to make this, right? After sewing, flip it inside out.
Iron it after sewing.
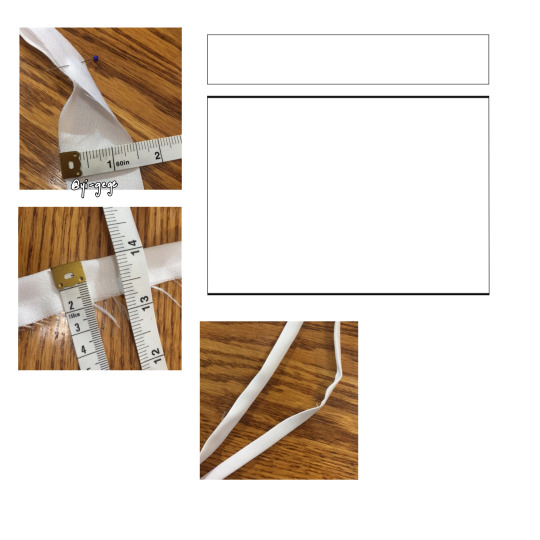
繩子縫上!! | Sewing the ties on
縫好後,旁邊應該只凸出一點點
When you are done sewing, sides should only stick out a little bit.

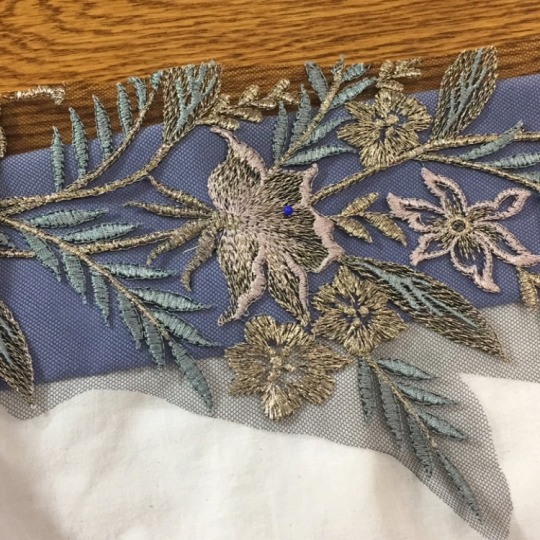
刺繡 | Embroidery
這不是必需的,因為並非所有 的 抹胸 都有刺繡
我買了刺繡,剪下網布,縫在布上
還 有 ,有些 抹胸上面 比較細 一點 所以 看 看 你喜歡什麼
This is not necessary, since not all moxiong have embroidery, but I bought embroidery, cut out the lace, and sewed it on.
Also, not all moxiong top band are as thick as I made it; I’ve seen some with thinner upper bands. It depends on what you like.
完成了!
Finished!
#Mo Xiong#moxiong#Mo Xiong/抹胸#抹胸#hanfu#hanfu making#diy hanfu#chinese hanfu#sewing#hanfu sewing#hanfu sewing pattern#Mo Xiong/抹胸 Instructions#sewing pattern
110 notes
·
View notes
Text
Mo Xiong/抹胸 Part 2
Part 1:
https://yi-gege.tumblr.com/post/654717883460517888/mo-xiong%E6%8A%B9%E8%83%B8-source
Part 3:
https://yi-gege.tumblr.com/post/654910337288650753/mo-xiong%E6%8A%B9%E8%83%B8-part-3
處理毛邊 | Raw Edges
布上的毛邊向內折兩次; 縫上 可以按照我在照片裡面的方式或者可以使用任何其他方式,只要它被縫合
Fold the raw edges over twice and sew, either using the stitch I used in the picture or any other way, as long as it has been sewn down.
中褶 | Middle Pleat
先找白色布的正中間 畫一條線 再把它左右邊各畫2in的線
畫完的時候把左邊跟右邊最旁邊的線對到中間的線上面
Draw a line to mark the middle of the body and mark two inches on either side. Fold the lines on the left and right to the line in the middle (this is the side that will show on the outside).
把布縫在一起 | Attaching the pieces
因為我的布很薄,所以我又加了一層,但你不必
像照片裡面一樣把布疊起來: 注意布的方向
細 的 那塊布左右應該比大布長一點因為大塊的布已經把毛邊處理好了
Because my cloth was thin, I added another layer, but you don’t need to. Layer the cloth like in the picture and sew along the top. Make sure of the way the cloth is facing.
Your top strip should be a little longer on the sides than the bottom, since the top still has its raw edges.
#hanfu#diy hanfu#hanfu making#sewing#moxiong#Mo Xiong/抹胸#Mo Xiong#抹胸#hanfu sewing pattern#sewing pattern#chinese hanfu#hanfu sewing#Mo Xiong/抹胸 Instructions
85 notes
·
View notes
Photo


Mo Xiong/抹胸 Instructions Part 1
Source:
https://www.youtube.com/watch?v=A836ZJ0AqlQ
Part 2:
https://yi-gege.tumblr.com/post/654854947574251520/mo-xiong%E6%8A%B9%E8%83%B8-part-2
Part 3:
https://yi-gege.tumblr.com/post/654910337288650753/mo-xiong%E6%8A%B9%E8%83%B8-part-3
我這個是大概看他拿在手裡的時候的長度 後來大概猜我需要多少
就注意他拿起來的時候兩隻手在肩膀 還有掉在旁邊的部分就大概中間的一半
重點就是能夠綁在身上 後面也該好好的蓋住
現在上面那一條紫色的布比下面的還長只是因為那個紫色的布是我裙子做完剩下(縫完的時候會把它變兩個一樣的長度)
I roughly took a guess at the length based on the picture; notice that she holds it shoulder to shoulder, and the part that hangs down is roughly half the length of the part in the middle. The important part is that it should be able to wrap around you properly.
The purple cloth is longer right now because it is left over from my skirt, but I will make them the same length later.
因為他上面有顏色的那一片會折下去蓋住一些布你要把下面白色的布做成從最上面到最下面的長度不要想說可以比較短因為上面有多一條
是那上面有顏色的一條不會加什麼長度的
請大家大概調到自己的身材的需要
Because the top colored band folds over the top of the main body, the main body has to be the entire length. The colored part will not add length.
Please, everybody, make it roughly to fit your own body.
最後一點:如果大家想要中間摺成照片裡面那樣子 看看你們要折多少可是我這裡要折2.54cm
就注意需要加多少長度
Last point: if you want to fold a pleat like in the photograph, depending on how large you want the pleat, add more length to the body. I am making a 1″ box pleat, so I am adding 4″ to the length.
#hanfu#chinese hanfu#diy hanfu#hanfu making#hanfu sewing pattern#sewing#sewing pattern#Mo Xiong/抹胸#Mo Xiong#抹胸#Mo Xiong/抹胸 Instructions
100 notes
·
View notes
Photo

Jiao Ling Shang Ru (交领上襦) | Cross-Collared Ru Instructions
Source:
https://www.newhanfu.com/15638.html
^^look to the site for more sizes
Notes:
上面的4號也要小心處理因為那裡有三個縫見到對方:是有一點困難的
我也會建議小片的東西先畫在紙上再貼上不剪出來。那些小片的東西直接畫在布上很困難的(我在講的就是1根2號的小片)
我畫不清楚那一個領帶要怎麼縫上去 以後再縫一件的時候好好拍��解釋 也會解釋怎麼處理好縫份
請看上面的網站找自己需要的尺寸
Be careful when sealing the seam where three seams at the top of the shoulder converge, as it is bulky and takes careful working (next to the number 4 on the top).
I would also recommend drawing small pieces 1 and 2 on paper before cutting, as they are difficult to draw directly on cloth.
I cannot draw clearly how to attach the collar, but when I make another top in the future I will take a picture and explain it, as well as how to seal the raw edges.
#cross-collared ru#diy hanfu#sewing#chinese hanfu#Jiao Ling Shang Ru (交领上襦)#Jiao Ling Shang Ru#交领上襦#Cross-Collared Ru Instructions#sewing pattern#hanfu sewing#hanfu sewing pattern#hanfu#hanfu making
88 notes
·
View notes
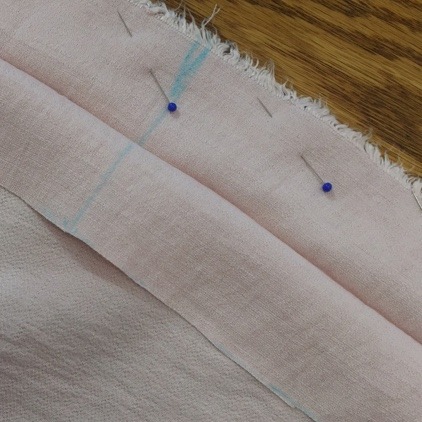
Photo

(cotton voile; left)


Qiyao Ruqun/齐腰襦裙
正在加多一點布在我上個月做的裙子上 因為那個布是有人送我的所以有一點不夠寬 當然被送這麼大一塊布也是很幸福的
Currently adding a little more cloth to the skirt that I made last month, because the cloth was given as a gift and not enough. Of course, being gifted such a large piece of cloth is still a bliss.
100 notes
·
View notes
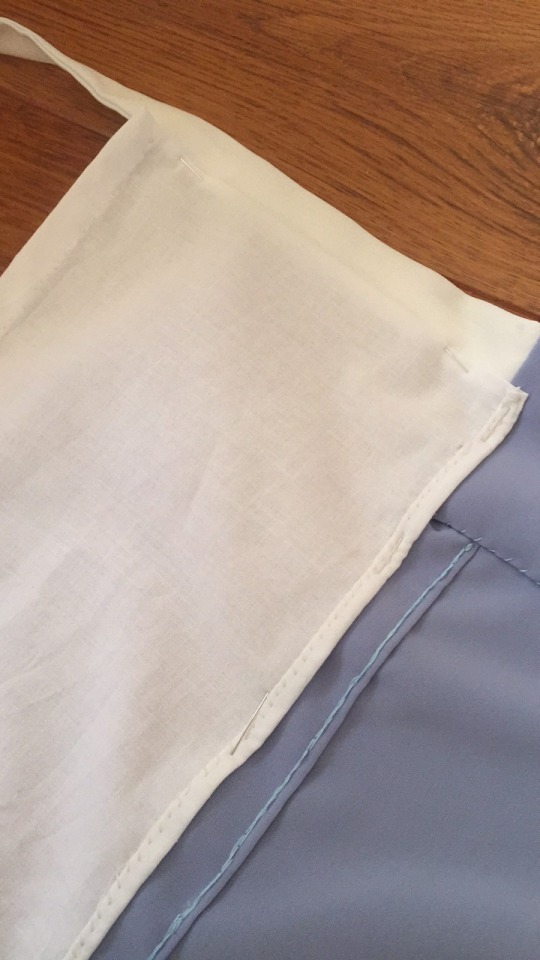
Photo
Qiyao Ruqun/齐腰襦裙
正在加多一點布在我上個月做的裙子上 因為那個布是有人送我的所以有一點不夠寬 當然被送這麼大一塊布也是很幸福的
Currently adding a little more cloth to the skirt that I made last month, because the cloth was given as a gift and not enough. Of course, being gifted such a large piece of cloth is still a bliss.
#diy hanfu#chinese hanfu#hanfu#sewing#handsewing#Qiyao Ruqun/齐腰襦裙#漢服#hanfu making#qun#qiyao ruqun#齐腰襦裙
100 notes
·
View notes
Text
Currently using patterns available on https://www.newhanfu.com/guide-turorial | making blog for troubleshooting and tutorial on the patterns
上面的鏈接是 我縫衣服用 的 網站^^
因為 網站上有某些東西沒有說明所以我希望我能幫忙一點,或者只是記錄我在做什麼
88 notes
·
View notes