#hanfu making
Text
Question about diexie dai (belt)
I received the following question from @aarghc about diexie dai. As I'm not familiar with belt construction, perhaps some other readers might be able to provide insights?:
I'm trying to understand the structure of 蹀躞带 dié xiè dai belts. There are many pictures where the hanging straps are clearly one layer, but here (https://fuckyeahchinesefashion.tumblr.com/post/664758617722994688/%E8%B9%80%E8%BA%9E%E5%B8%A6-di%C3%A9-xi%C3%A8-dai-by-cromartie) and other places where you see them hanging pouches from the belt, the hanging straps are 2 layered. From a modern construction perspective it would make sense for there to be snaps on the hanging straps to attach to the pouches but if not, then it looks like it's just friction holding the pouches to the belts? That's now how I'd like to secure my wallet. 8-) Might you or your readers have any insights on Chinese utility belt construction? 8-)
#diexie#belts#hanfu accessories#hanfu#hanfu making#DIY#reference#ask#reply#aarghc#chinese fashion#chinese clothing#china
60 notes
·
View notes
Photo
对襟上襦 | Dui Jin Shang Ru Instructions Part 2
Source: https://www.newhanfu.com/15638.html#Qi_Xiong_Shang_Ru_qi_xiong_shang_ru
Part 1: https://www.tumblr.com/blog/view/yi-gege/655982888358166528?source=share
第四步 | Step 4
做完第三步之後 在另一半生用一樣的方法把袖子跟袖口連到另一半身。
把两半对好,確定兩個正面是在對面的。在下面剪出一個小三角形的形狀。
缝在一起。要在三角形開始的地方停。
要记得留够的布让你自己能够处理边边 除非你有一个拷边机
縫完要燙。
Once you have completed step 3 (see link), do the same process on the other side of the body to connect the other arm and cuff piece.
When that is completed, fold the two body pieces in half, right sides together, leaving yourself enough seam allowance to seal the seam (I prefer at least 1 cm seam allowance to be able to fold both halves in and sew that shut, but it may be easier for you to do more, or simply use a serger). Cut a slit in the side as in the title picture, and then sew the two halves together (A and B). Stop where the slit begins.
把三角形拉成一条直的线 往内折两次 然后缝下去
Sew the slit as you would a plackett. i.e., sew the seam that you have folded up until the slit you have cut begins, pull the slit so that it lies in a straight line, fold it inside twice, and sew straight across. Take care of the raw edges and iron.
如果你發現腋窩那邊不平的話把裡面哪裡的縫份剪幾次 然後處理剪過的地方。
To get rid of the puckering around the armpit, cut small slits on the inside seam allowance around the curve, and back stitch the places you have cut to prevent unraveling.

第五步 | Step 5 Connecting the Body Pieces
我們到這裡全部的邊邊(除了背的那一條線跟領子)應該都處理好了。把兩片生體從背的那一條線縫在一起 確認縫的時候是兩個正面在彭對方。處理好縫份。
At this time, all raw edges except for the collar and back should be finished. Place the two body pieces on top of each other, lining up the seam that will go in the middle of the back with its mirror. Sew the two pieces together. Take care of the raw seam.

把領子的那一片折一版熨燙好。正面應該在外面。
熨燙後把他打開然後再來把領子縫上脖子。脖子現在應該有一個長方形的形狀。在90°往下跑的兩條左邊跟右邊的線的角角剪一點點。跟縫袖口的三角形一樣把一整條啦成直線,把領子的哪一片放上去(正面是在碰對方的)然後縫。繼續把他往內則一半, 然後把最後面的縫份往內則然後縫起來。我喜歡在這裡用手縫所以外面看不到你縫得閒但如果你沒辦法的話那用機器也沒關係。
最後面在領導裡面胸口的大概的位子縫兩條線讓你以後呢個夠把兩半綁在一起就好了。我那裡也喜歡用手縫 一樣的原因。燙好之後應該就完成了。
Then, connect the collar. To prep, first iron the collar piece in half longways, with the wrong sides touching. Then, open it back up.
Cut slits on the two side of the neck where the cloth starts to curve to come around the front of the body (the 90 degree angles of the neck piece), stretch it so that it lies straight, line up the collar piece right sides together, and sew straight across. Make sure that the cut slits are not exposed on the outside.
Similar to how we connected the cuffs, fold the collar in along the ironed line, pinning it so that it doesn’t move. Then, fold the seam allowance in and then stitch it shut. I prefer to hand sew this so that there are no seams visible on the outside, but if you are unable to or don’t want to, it is fine to top stitch it with the machine.
The Dui Jin Shan should be finished after you sew two ties to the inside of the collar, around the chest. I like to hand sew here for the same reason as before.


#对襟上襦/Dui Jin Shang Ru Instructions#Dui Jin Shang Ru#对襟上襦#hanfu#chinese hanfu#hanfu making#hand sewing#sewing#sewing pattern#sewing tutorial#hanfu sewing pattern#diy hanfu
136 notes
·
View notes
Text
I GOT MY HANFU PATTERNS!!!!
I've got my work cut out for me though, because the instructions are in chinese and that's certainly a language I don't know xDD
But I'm glad, they really do look nice and detailed. These are the three pants I got, one almost translated thanks to google translate (the last parts are giving me a headache though).

105 notes
·
View notes
Text

@yi-gege this is the skirt I made- it’s too full I think, I was scared I’d make it too narrow, and the material tends to hold its shape more than a lot of the Hanfu you see, (the material is cotton) but the general idea is there…
60 notes
·
View notes
Link
Finally posted the last video of the Zhou Zishu commission I worked on. Please enjoy it!
#hanfu inspired#word of honor#word of honor cosplay#zhou zishu#zhou zishu cosplay#chinese hanfu#hanfu making#cosplay youtube#making hanfu#youtube#cosplay wip#周子舒#天涯客#faraway wanderers#山河令#faraway wanderers cosplay#chinese drama cosplay#new youtube videos
12 notes
·
View notes
Text
So… getting the buttons, button holes and bottom hem in the right place was the worst part of this whole project.
I lost count of how many try-ons were done and buttons sewn. Plus I ended up putting two darts in the front as the hem was sticking out in a very strange way.
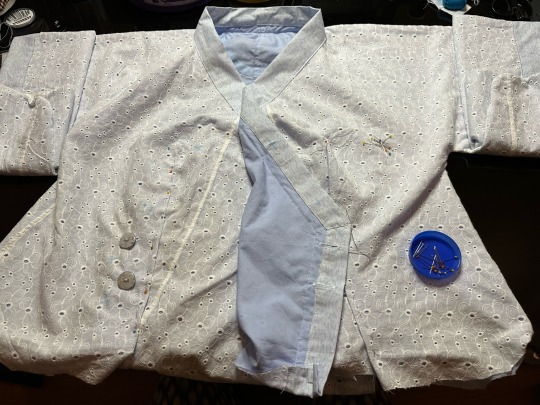
But it was finally done after several evenings of fiddling and unpicking.
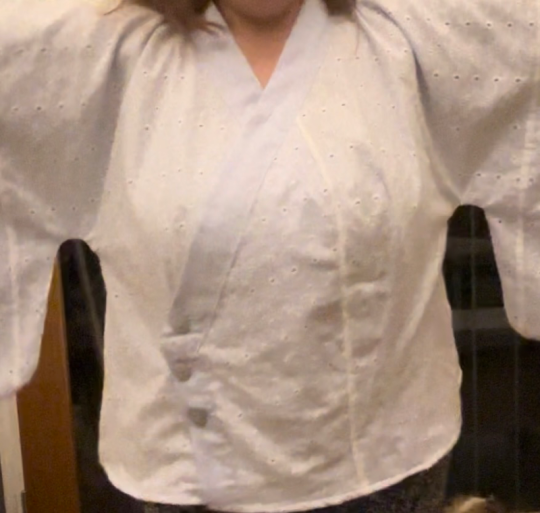
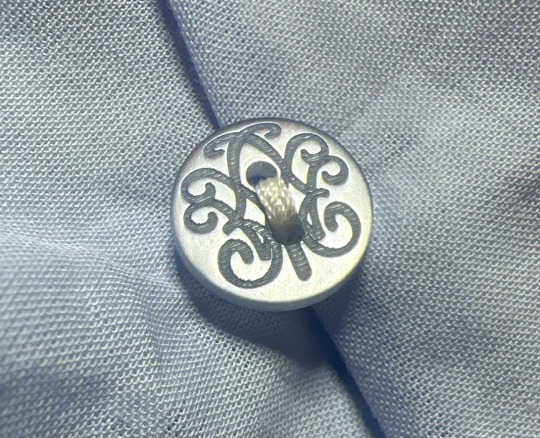
I love these tiny buttons I’ve found for the inside..
#handmade clothing#handmade hanfu#hanfu making#sewing at home#clothing making#im making this up as i go#sewing clothing#chinese inspired clothing#hanfu#hanfu inspired modern jacket#hanfu inspired
1 note
·
View note
Text
Making a mamianqun (馬面裙; lit. horse face skirt). Mamianqun can be traced back to the Song Dynasty and was in vogue from the Ming and Qing Dynasties until the Republican era. The skirt consists of two overlapping sections of fabric sewn together, each with a pleated section and skirt panels on either side. The skirt panels are overlapped to create the front and back of the skirt. This design allowed greater freedom of movement.
A note: Mamianqun are women's wear, but with the hanfu revival movement, men nowadays wear it too.
[eng by me]
#douyin#arts#hanfu#clothing#imparting culture#traditional craft methods#creator: 鲁磊#see the thing op blows on to make a fire?#i think i might post his video of making that at some point
3K notes
·
View notes
Text
Bonus 6: Dress-up
[First] Prev <–-> Next
#better drawn mdzs#mdzs#bonus comic#lan wangji#wei wuxian#Its the dawn of a new arc! Which means a new day! And new outfits for our duo as chosen by all of you!#Bte; mxtx never said lwj *wasn't* wearing lingerie under his hanfu the entire time so....#It makes him feel confident! And he enjoys it! AND he looks good in it.#wwx has NOT yet noticed. He keeps looking away to give lwj privacy while he changes. This is slightly devastating to lwj#at the end of the day he's wearing it for himself but he would like to be acknowledged.#I had a blast drawing this one! Lots of reference searching but I find that part kind of fun too.#I originally was going to have references to all the outfit options but oh man it got cluttered.#I did NOT trust myself to colour in the floor. My markers are getting dry & i wasn't sure about colours.#Thank you all for support with the polls! And for all the very sweet fan art and outfit propaganda!#This one is for all the people who wanted to vote for bikini lwj. Blows you a kiss (platonic).
860 notes
·
View notes
Text
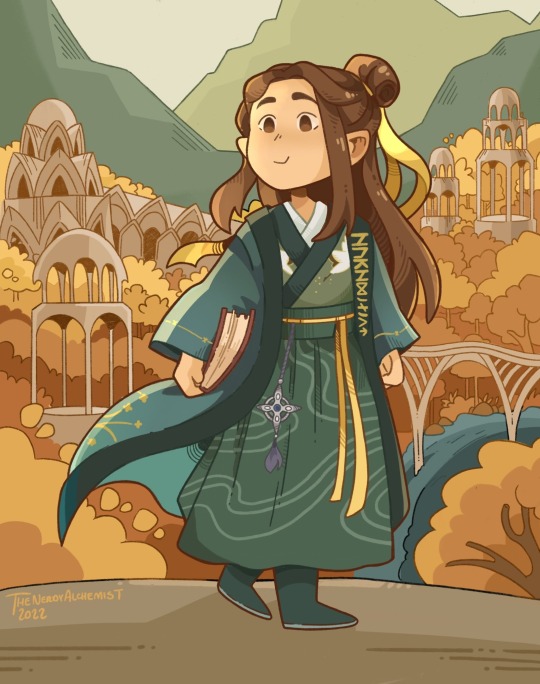

Commissions I've gotten of my Rings of Power Elrond redesign! They are from @thenerdyalchemist and @pigpenandpaper
#tolkien#lord of the rings#rings of power#the rings of power#silmarillion#elrond#hanfu#they make my heart happy every time i look at them <3
175 notes
·
View notes
Text
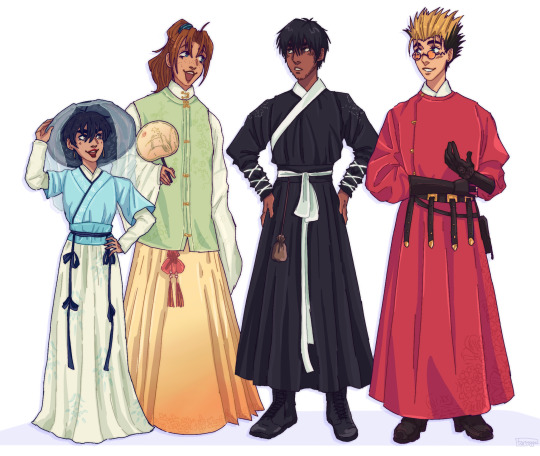
messing around with trigun hanfu designs for fun ∠( ᐛ 」∠)_
#meryl stryfe#milly thompson#nicholas d. wolfwood#vash the stampede#trigun#my art#PLSSS don’t think too hard abt the logistics or historical accuracy of this LMAO#i just wanted 2 see them in hanfu tbh….#i tried matching the designs w their og outfits…wah#if i revisit them in the future there is a 98% chance im gonna change up the designs LOL#I HAVE A LOT TO SAY ABT THESE DESIGNS KINDA maybe i will make a separate post#wow i just realized meryl is so small here. i love her
347 notes
·
View notes
Photo

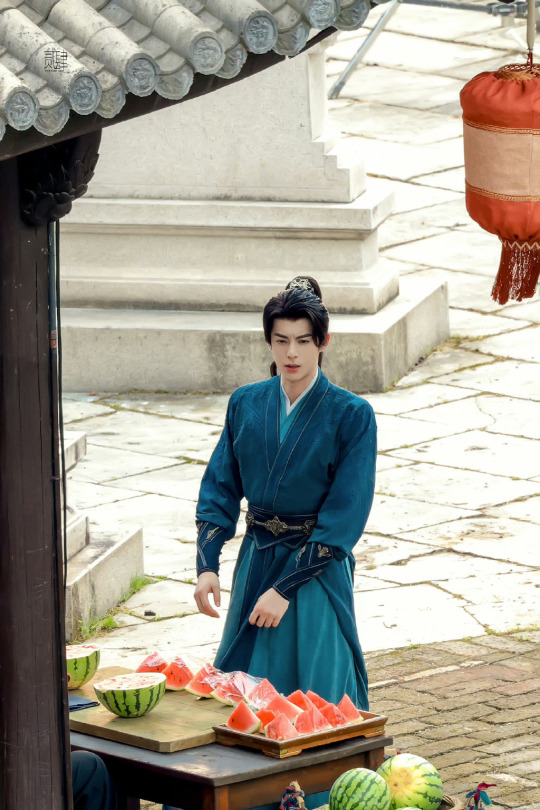

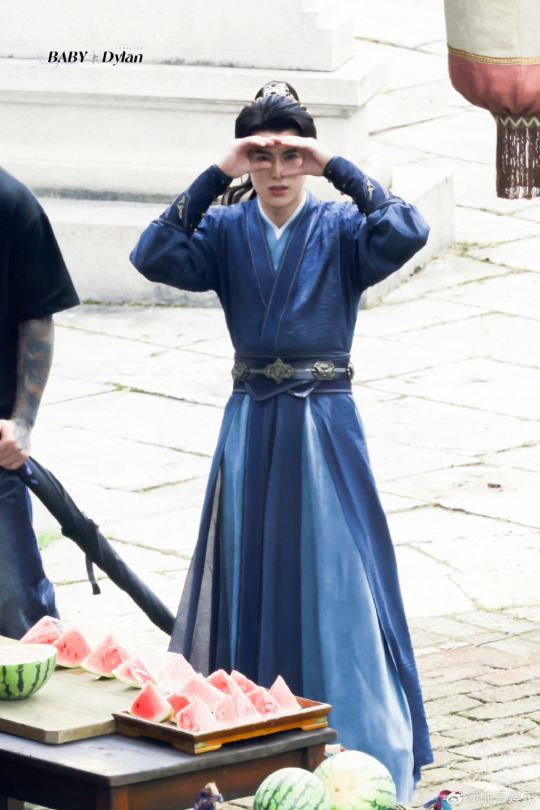
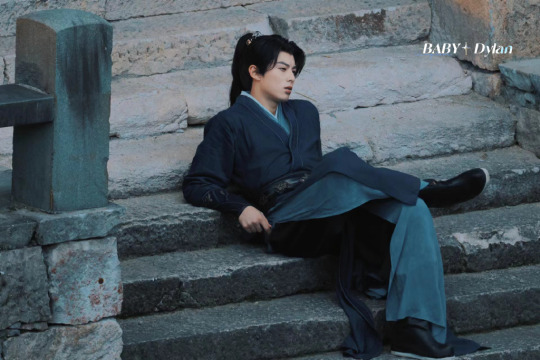
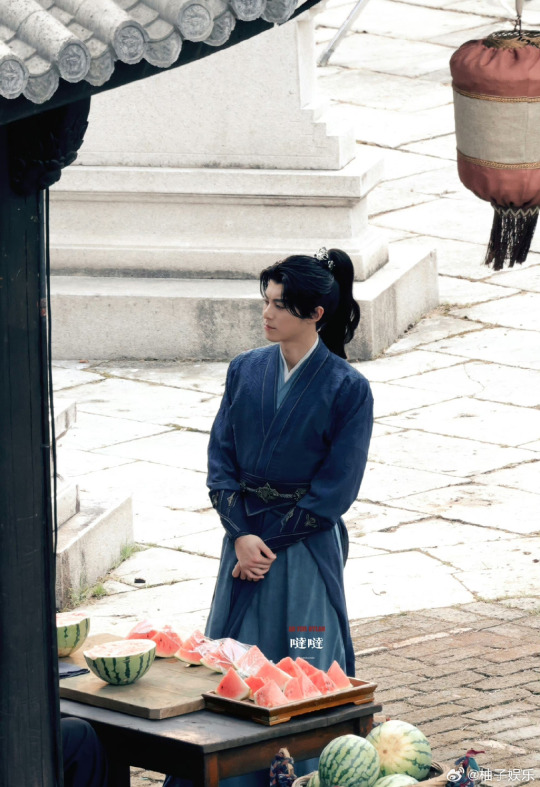
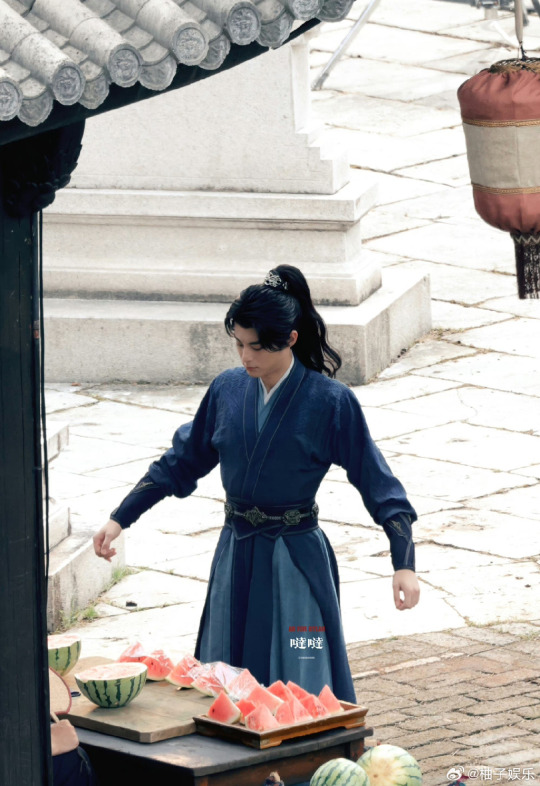


王鹤棣wang hedi at the set of chinese costume drama 大奉打更人da feng da geng ren
#china#hanfu#fashion#chinese fashion#guzhuang#you know 大奉打更人 is a 男频小说#meaning the author and the protagonist are both male#and that often means#the novel is likely to have a lot of stereotypical content about women#scriptwriters may improve the content to avoid criticism#but i wouldn't get my hopes up too high#look at three bodies#there are a lot of misogynistic lines#the only women friendly 男频小说 i know is 诡秘之主#Lord of the Mysteries#the last pic is dong fang qing cang of course#to make a comparison#wang hedi#dylan wang
269 notes
·
View notes
Note
Hello! Do you know what sort of hanfu this is? I’d like to make something similar but I can’t find the right patterns as I don’t know what to search for?

Hi! Thank you for sending this question. While I can’t say I’m an expert on it, from what I’m seeing, I would say that it looks like a regular cross-collar hanfu with long sleeves, commonly seen in the jin dynasty.
The skirt seems to be a separate piece with very large pleats, about the width of her hand including the thumb.
I would guess that it is something similar to a sanjian qun (三襉裙) or just one with very large box pleats based on looks. Find an explanation of it here: https://www.newhanfu.com/34515.html
The tie in the front is just stylistic based on the way the stylist tied it. You can find patterns for that by searching or on the site I use, https://www.newhanfu.com/guide-turorial although you may need to make an account to be able to view the full content of certain posts.
Good luck!!
74 notes
·
View notes
Text
So I made a Mamianqun!
I've been wanting to make a one for so long. Then I saw this fabric in an outlet that sells faulty fabrics discarded from factories, where you can find some unusual stuff that you can't find in regular shops.
This fabric is supposed to have this print all over, but got only printed at the bottom. If you squint you can see faded print marks on the middle section too. The moment I saw this I immediately thought of a mamianqun because a lot of mamianqun come with bottom print 😍.
However do not copy me in this, because I only thought of the pattern and not the fact that the fabric is too bulky and heavy especially for dress with humongous volume. It does not make for for the nicest, crispiest pleats as you can see in the pictures below. Also this is gonna be such a pain to wash and dry.
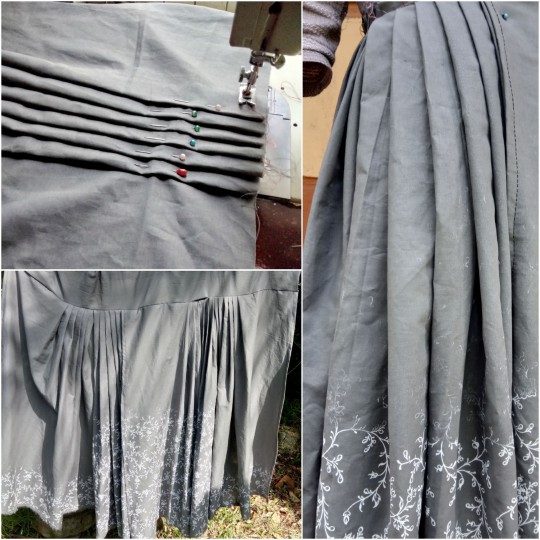
But I will give myself a pat on the back because this is my first attempt, and for someone who has never taken a formal sewing class nor is able to properly follow any instructional guide because I'm scatterbrained like that, I think I did a pretty swell job! ☺
Even though it took me a whole damn day and numerous frustrating unpicking and redoing over and over again, lol.
Though I am not able to provide you a guide (because like I said, I myself am incapable of following any), I used the following four sources to get an idea about what I am trying to do to begin with. I studied these four, then attempted it myself and figured it out gradually as I went, through trial and error.
.
1. This helped me understand the overall geometry of the garment.
2. This gave me clear visual aid about what the end product should look like.
3. This doll-size mamianqun video was simple and gave a very good and non-complex demo of the process.
youtube
4. This helped me with understanding how to attach the waistband.
youtube
.
The modifications I added myself are:
Making the waistband a button-up. As the skirt was already so heavy, I thought a long strip of a tie would make it even more difficult to handle. But at the same time it is not easy to secure something like this so it wouldn't accidentally fall apart. So I used two sturdy buttons from the front, and another button in the back, from inside (you can't see it)
Adding pockets! In the 3rd source I posted above, at the 0:41 mark you see that there's this one huge pleat that gets folded inwards, right?

And I thought, two simple vertical and horizontal stitches from inside can turn them to pockets, so why not!
The final product! Yayyy!
(Don't look at the imperfections, they are shy ok!)
.
More posts by me
722 notes
·
View notes
Text

Love this- anyone know of a similar style pattern or what this style of hanfu is called so I can search for it? I’d like to make one similar…
4 notes
·
View notes
Link
Finally posted the first part of making Zhou Zishu cosplay on YouTube. This video is showing how I made the under garments and tunic of this commission. The next video will be about the over coat. It is really hard to flim making hanfu since some of the pieces can be really large. Also compared to the over coat the under layers can be a little boring to look at. I hope you guys enjoy this ^_^
#hanfu#chinese hanfu#hanfu making#word of honor#zhou zishu#making hanfu#Zhou Zishu cosplay#cosplay wip#chinese drama costume#cosplay youtube#youtube#周子舒#山河令#word of honor cosplay#guzhuang#word of honor costume#youtube vlogs#faraway wanderers#Faraway Wanderers cosplay#天涯客
10 notes
·
View notes
Text
I hate collars.
I though this one would be ok, but no. Even a straight strip of cloth was an absolute pain. Took three tries and two unpickings to get it to lay reasonably flat.
This process took three whole evenings.
First attempt.. I even tacked it down carefully, not relying on just pins.

(Yes, I used my ironing ham to help hold the shape I wanted around the neckline. Didn’t help.)
So bumpy….

I found the easiest way was to iron the collar strip first. Put in the two folds to hide the raw edges, and measure out the middle fold so the right side was the same width all along. This also helped stiffen the fabric and hold it straight and prevent weird wrinkles when I machined it into place.
The entire length of collar fabric was already stiffened with iron-on interfacing. But ironing in the folds really helped with stabalising the entire thing.
Finally!
Yes there were two ‘weird’ spots. I unpicked the seam and re-did it on the machine. Problem solved!
Next time this whole process should be much easier.
This was also the point I decided to turn this project into the jacket, and intend to re-make this whole garment as a top in a different fabric to match the skirt I’m planning. I must be either mad, or a masochist.
#attaching a collar#collars are hell#hanfu making#hanfu-inspired modern jacket#custom clothing#clothing making#handmade barment#handmade clothes#sewing clothing#sewing a jacket
0 notes
Last Seen Blogs

iqlimaputri
Untitled
youraveragenicaddict
poetry kills me
torturemytummy
tummy go brrrrrrr

aphr0divoir
anna

allslotonline68
สล็อตออนไลน์68