
Statistics
We looked inside some of the posts by yoursaptarshi and here's what we found interesting.
Average Info
Notes Per Post
3
Likes Per Post
2
Reblog Per Post
1
Reply Per Post
0
Time Between Posts
15 days
Number of Posts By Type
Text
13
Link
3
Photo
1
Last Seen Tumblr Blogs


Fun Fact
The “We are the 99%” Tumblr blog became the slogan for the Occupy Wall Street movement.
Text
7 Reasons Why You Should Buy the M2 MacBook Air

The 13-inch and 15-inch M2 MacBook Air models are Apple's newer entry-level laptops that come with a modern design, an M2 chip, MagSafe, and more. The MacBook Air has been Apple's most popular laptop for many years, and many reviewers praised the M1 MacBook Air that came out in 2020 as the perfect notebook for most people. Apple silicon unlocked the MacBook's potential, and we now see that taken to a new level with the M2 MacBook Air models. So, here are all the reasons we think the 13-inch and 15-inch M2 MacBook Air models are worth buying.
1. The Modern Design
Apple has updated many of its products with a squared-edge design. It started with the iPad Pro and eventually made its way to the MacBook Pro in 2021. Now, both the 13-inch and 15-inch M2 MacBook Air resemble the current MacBook Pro's design. The design is refreshing since the last time we got a design overhaul for the MacBook Air was in 2018. The M2 version takes the MacBook Air's design in a new direction since it's the first MacBook Air without a wedge-shaped design. Fortunately, the new design still allows the 13-inch and 15-inch M2 MacBook Air to be relatively thin and light. They also feature slimmer bezels and a notch for more screen real estate.
2. Aggressive Pricing
Even though the redesigned MacBook Air lost its legendary $999 price tag, the 13-inch version is still competitively priced for a high-quality laptop at $1,099. And for those who need slightly better graphics performance and storage, you can get the 512GB variant for $1,399. If screen real estate is a concern for you, you'll be happy to know that Apple offers the base 15-inch M2 MacBook Air at $1,299. That model is perfect for those who want a big laptop without having to spend big money on a 14-inch or 16-inch MacBook Pro.
3. Value for Money

It's no secret that Apple silicon chips deliver stellar performance. The base M2 chip can handle everyday tasks like web browsing, media consumption, email, and more without breaking a sweat. You can also use creative applications for basic workflows and get solid performance. While the M2 is not a giant leap over the M1, it does provide an 18% faster CPU, a 35% faster GPU, and other improvements. The performance of the 13-inch and 15-inch MacBook Air is particularly impressive for laptops that lack an internal fan to cool things down.
4. The Longevity
One tradeoff you make when you purchase an older device at a reduced cost is that it won't receive updates for as long as a new device. Apple has said it will support Intel Macs for years, but they have a more limited lifespan for software updates compared to Apple silicon Macs. Apple already cut off support for multiple Intel Macs with macOS Ventura in 2022. Apple silicon Macs not only provide incredible performance, but they will receive software updates for many years to come.
5. Port Selection

Image Credit: Apple While the M2 MacBook Air didn't receive an HDMI port or an SD card slot like the high-end MacBook Pros, it did get MagSafe. The addition of MagSafe provides an arguably better charging solution and frees up another USB-C port on the laptop. Having a MagSafe port allows you to connect more peripherals to your MacBook Air since you don't have to use a USB-C port to charge. Besides MagSafe, the redesigned MacBook Air models also sport a headphone jack that supports high-impedance headphones. Older models, like the M1 MacBook Air, only had USB-C ports and a regular headphone jack, which could be limiting, especially if you needed to charge your MacBook and use the ports for other functions.
6. Unmatched Battery Life
Apple laptops had solid battery life when using Intel processors, but Apple silicon has changed the game. The M2 MacBook Air line gets an estimated 15 hours of web browsing and 18 hours of movie playback, according to Apple. The laptops can last well on a single charge throughout the day while doing regular tasks such as web browsing, emailing, or word processing. Compared to Windows laptops, these machines are way ahead in the battery department. Furthermore, you can get a 70W power adapter that can fast-charge the M2 MacBook Air if you select it during checkout for an additional $20 with the base model 13-inch model. Apple offers the 70W charger for free with the higher-spec models.
7. Improved FaceTime Camera
A high-quality webcam is nice to have in the age of remote working or learning, where we rely on video calls often. The MacBook Air features a much-improved 1080p FaceTime camera, while the M1 MacBook Air and M2 MacBook Pro still have a 720p camera. The difference is very noticeable during FaceTime and Zoom calls. MacBooks in the past have had poor webcam quality, but the M2 MacBook Air line offers an exceptional camera.
How Does It Compare to the Mac Lineup?
Apple's MacBook lineup has become crowded since the introduction of the M2 MacBooks. Apple didn't discontinue the M1 MacBook Air, so it sits right below the 13-inch M2 Air at $999. The 13-inch and 15-inch M2 MacBook Air models are ideal machines for most people, offering the best combination of new features and design changes the MacBook Pro first received in 2021 while keeping the price relatively low. While there are multiple reasons to avoid the base model M2 MacBook Air, the $1,399 13-inch model is the sweet spot since it comes with an M2 chip with more GPU cores and a 512GB SSD. The argument for the M2 MacBook Air line becomes more complex when you upgrade the hardware. For instance, if you select the $1,399 13-inch model and add 16GB of RAM, the computer ends up costing $1,599, which is just $400 less than the 14-inch MacBook Pro. Additionally, the 15-inch MacBook Air with 512GB of storage and 16GB of RAM comes in at $1,699, just $300 below the 14-inch MacBook Pro.

While the M2 chip is more powerful than the base M1 chip, it isn't as capable as the other chips in the M2 family, like the M2 Pro and M2 Max chips. The MacBook Pro also features an excellent ProMotion display and has fans for demanding tasks. So, if you are concerned about the fanless design or are looking for more power, you should definitely consider the 14-inch MacBook Pro instead. However, the MacBook Air has been, and still is, the perfect laptop for regular users since it's relatively affordable, features a premium design, and offers excellent performance that can handle everyday usage. Both the M2 MacBook Air models also deliver excellent battery life that can last a full day.
The M2 MacBook Air Models Are Well-Rounded Machines
The 13-inch and 15-inch M2 MacBook Air models are well-rounded laptops. They feature a great design, impressive performance for the price, great battery life, and more. These machines are excellent entry-level Macs and are perfect for most Mac users. So, if you're in the market for a long-lasting MacBook to do regular daily tasks, look no further. source Read the full article
0 notes
Text
The 7 Best Tools and Resources for When You're Rethinking Your Job
You've been in your job for a while and might wonder if it's time for a change. You're unsure whether a new role or company is the answer. Finding a new job or career can be scary because you may have to start from scratch and re-establish yourself in a new company or role. There is an abundance of resources available on the internet that can help you figure out the next move in your career. Whether you want to hire a career counselor, take a career test, or expand your network, many tools and resources can help you clarify your career path.

If you're wondering if there's a career you're better suited for but not sure what that might be, taking The Career Test is an excellent way to gain some clarity. The test uses your answers about your personality, background, ambitions, and interests to match you with suitable occupations using artificial intelligence. It should only take 15 minutes to answer the 100 questions in the test. Once you complete it, a payment is required to access your results. You have three payment options, depending on how much support you need. For $19.90, you can get your career report. If you would like to take a personality test since the test developers believe that your career type is linked to your personality and an analysis of your results, the cost is $24.90. You can get the test results and the analysis without the personality test for $19.90. If you're unsure if The Career Test is worth it, the site posts that the test has a 98.9% satisfaction rate. You may want to take a personality test independently to learn more about yourself. If that's the case, you might be interested in learning about online personality tests to help you know yourself better.
2. Find Networking Events on Eventbrite

Regardless of the industry you're working in, chances are good you can find a networking event on Eventbrite. Attending networking events can help you meet people and make connections that lead you to your next opportunity. The events you find on Eventbrite can be in person or virtual. Some events are free, and others have a charge to attend. Attending industry networking events can inform you about upcoming changes, so you can figure out if you need to learn a new skill to position yourself for future opportunities. You can also attend events in new industries you're interested in to see if it's a good enough fit to make the switch. You can use networking events to open yourself to options you might not have considered. If you keep an open mind and are willing to share your struggles and goals with others, you may meet someone who can help point you in the right direction. Networking is essential for career advancement. Even if you're an introvert, you need to find a way to get comfortable with networking. You may be interested in learning some networking tips for career advancement.

Working with a career counselor is another excellent way to help you determine the next step in your career. Career counselors are trained to guide you on the path that can give you the desired job. Career counselors can help you develop and put into action decisions and plans related to your career goals. Your work with a counselor can include creating strategies, learning techniques, and taking assessments tailored to your needs. Your work with a career counselor can introduce you to options you may not have considered or even knew existed. If you're skeptical about the value of working with a professional, you might be interested in learning some reasons to hire a career counselor and where you can find one.
4. Expand Your Knowledge With Coursera

Maybe you're rethinking your job because you're not feeling challenged. Whether you want to get a certification or learn new skills, you can find a course that teaches you that in Coursera. You can take Coursera courses on your phone or laptop, leveraging your commute time if you're not driving to work. Whether you're looking for free classes, certifications, or a degree, you can find it on Coursera. Upgrading your skills is a great way to direct your energy positively. Employers like to see their employees upgrading their skills, and some companies may cover some, if not all, of the costs. If you want to upgrade your skills but don't have a budget to invest in classes, there are other platforms where you can find courses. You may be interested in learning about the best free online learning platforms for any subject or skill level.
5. Make Sure You Can Afford to Make a Change Financially With Mint

Changing your job or career can mean taking a pay cut or starting at an entry-level position. If you're considering quitting your job to go back to school to upgrade your skills, you want to ensure you can afford it. You also want to be realistic about how quickly you will find a job after training. You'll want to review your finances and see how to make it work. Using an app like Mint can help you get a clear picture of your spending, bank balances, budget, and credit score under one roof. You may need to track your spending to reduce some debt and put money aside for savings, and Mint is an excellent tool to help you do that. Budgeting isn't something everyone looks forward to doing, regardless of how necessary it may be. If you're looking for options beyond Mint, you may be interested in learning about the best budgeting apps to get your finances in order.
6. Keep Your Mind Positive With Calm

Feeling uneasy about your job can leave you feeling frustrated and anxious. You know you want things to change, but you're unsure what that change should look like. Your brain can feel like it's going 100 miles an hour, searching for an answer to make you feel less stressed. Calm has meditation music, videos that guide you through mindful movement and gentle stretching, and audio programs taught by mindfulness experts. Creating a positive mindset can help you shift your perspective on your current job or clarify the path you should be on instead. If you're looking for mindset resources, you may be interested in learning how to master the stoic mindset for self-care and happiness.
7. Do a Self-Evaluation

You may want to self-evaluate to prepare for your next performance review. Doing a self-evaluation is an excellent opportunity to be honest with yourself about your progress and performance at work and the areas you need to improve. You can learn how to write self-evaluations on Built In and find templates online. You can have open-ended questions or rate yourself on various aspects of your job or a combination of the two; the vital thing is, to be honest. When doing your self-evaluation, be sure to celebrate your wins, admit your weaknesses, and acknowledge there are areas you need to improve. Once you've completed your self-evaluation, you can ask a trusted friend, colleague, or family member to review it, checking for grammatical errors and typos. If your self-evaluation indicates that your next performance review won't be good, it's best to be proactive. You may want to learn how to respond to a bad performance review in preparation.
Consider It a Wake-Up Call
There's a reason you're rethinking your job. It may be that you've outgrown the position or the company. Maybe it's because the industry has changed, and it no longer excites you. Whatever the reason is, your uneasiness is a call for you to do something about your situation. It's up to you to decide what you're going to do. You can take assessments to see if you're still a match for your job, or you can hire a career counselor. There are numerous ways for you to remedy your situation and find contentment in your professional life again. source Read the full article
0 notes
Text
Joe Biden’s Big AI Plan Sounds Scary—but Lacks Bite

“We intend that the actions we are taking domestically will serve as a model for international action, understanding that AI developed in one nation can impact the lives and livelihoods of billions of people around the world,” Harris said Monday. “Fundamentally, it is our belief that technology with global impact requires global action.”Devilish DetailAhead of Biden’s address, WIRED sat down with Arati Prabhakar, director of the White House Office of Science and Technology Policy. She was quick to bat away a question about who has the president’s ear on generative AI. “Let's start at the beginning,” she offered. “This is the biggest action anyone's ever taken anywhere in the world on AI, and the president's driven it from the beginning.”Prabhakar also didn’t much want to talk about how a law designed for wartime could be casually used to enact new tech regulation. “The Defense Production Act has been used in times of crisis when we face significant national security issues,” Prabhakar said, noting its use to speed up delivery of vaccines and PPE during the pandemic.But is the US—WIRED asked in countless ways—in a national crisis caused by AI on the level of a war or global pandemic?“The national security issues are not the whole story but one part that does require paying attention to,” Prabhakar said. “That's the reason for using the Defense Production Act for the very specific purpose of getting notification and disclosure related to powerful model development beyond where we are today.” It’s a nice theory that could end up being put to the test in court, if companies challenge this new use case for a law generally tapped only in emergencies.Congressional MessPrabhakar steered the conversation back toward more everyday AI but ended up highlighting other limitations of Biden’s latest executive action. “The vast majority of actions in this executive order are about how we use the AI technologies that are already out in the world responsibly,” she said. “How do we make sure they don't violate Americans' privacy? How do we make sure that we don't embed bias that changes, you know, where people can live and whether they get a loan or whether they go to jail or not?”Great questions—but changing the rules for privacy or mandating, say, the universal watermarking of AI-altered images for private companies requires legislation from Congress. Indeed, even as his White House is going all out to sell the expansive new executive order as a historic first, Biden admits that the order falls short of what the changes wrought by this ever-evolving technology demand. “This executive order represents bold action, but we still need Congress to act,” Biden said. source Read the full article
0 notes
Text
What to Do if the Ethernet Keeps Disconnecting on Windows 10 & 11

A major benefit of using an Ethernet connection over Wi-Fi is the improved and consistent network performance. However, this may not always be the case. Your Ethernet connection may occasionally let you down when it disconnects for no apparent reason on your Windows 10 or 11 PC. Before you give up on your Ethernet connection and switch to a wireless one, try the following tips to fix the problem.
1. Disconnect and Reconnect the Ethernet Cable
A loose or damaged Ethernet cable is one of the most common causes of this issue. Hence, you should first disconnect the Ethernet cable and reconnect it. While you are at it, make sure to inspect the cable for any cuts or damage. If the cable or the connector appears to be damaged, try using a different one.
Another thing you should do is clean the Ethernet port on both your computer and router to ensure a secure fit for the cable. If there are multiple ports, try connecting the cable to another port and see if it resolves the issue.
2. Restart Your Router or Modem
This is another basic fix you need to try to resolve any issues with your internet. Rebooting your router or modem should help clear any memory and other issues affecting its performance.

While you are at it, you can consider restarting your PC as well. After that, see if the Ethernet connection on your Windows 10 or 11 PC still disconnects randomly.
3. Enable Automatic DHCP
If you set incorrect IP information on Windows, your Ethernet connection may become unstable and frequently disconnect. To prevent this, you can enable the Automatic (DHCP) option in Windows. Here's how to do that: - Press Win + I to open the Settings app. - Head to Network & internet > Ethernet. - Click the Edit button next to the IP assignment. - Use the drop-down menu to select Automatic (DHCP) and click the Save button.

Once you complete the above steps, Windows will allow automatically obtain the IP address and other network settings from your router.
4. Run the Network Adapter Troubleshooter
Running the Network Adapter troubleshooter in Windows can help fix all kinds of network-related issues, including this one. It will scan your system for any common problems that may have been causing the Ethernet to disconnect and reconnect randomly. To run the Network Adapter troubleshooter: - Press Win + I to open the Settings app. - In the System tab, click on Troubleshoot. - Select Other troubleshooters. - Click the Run button next to the Network Adapter.

Follow the on-screen prompts to finish running the troubleshooter and check if the Ethernet still disconnects after that.
5. Disable and Re-Enable the Ethernet Adapter Driver
Temporary issues with your Ethernet adapter can also cause your connection to keep dropping. Most of the time, you can fix such issues by simply disabling and re-enabling the Ethernet adapter. Here are the steps for the same. - Right-click on the Start icon and select Device Manager from the list. - Double-click Network adapters to expand it. - Right-click the Ethernet driver and select Disable device from the resulting menu. - Select Yes to confirm. - Right-click the Ethernet driver again and select Enable device.

Can’t find your Ethernet driver in the Device Manager? Check our guide on how to restore the missing network adapter on Windows.
6. Prevent Windows From Turning Off the Ethernet Driver
In order to conserve power, your Windows computer turns off your USB devices and network adapter when they are not in use. This could be the reason why Windows may be disconnecting your Ethernet connection. To prevent this, you need to change the power management settings for your Ethernet driver. Here’s how you can go about it. - Press Win + S to access the search menu. - Type device manager in the text box and select the first result that appears. - Expand Network adapters. - Double-click on your Ethernet driver to open its properties. - Switch to the Power Management tab. - Clear the Allow the computer to turn off this device to save power checkbox. - Hit OK.

7. Update the Ethernet Driver
A malfunctioning Ethernet driver can also lead to such anomalies. This usually happens when the Ethernet driver is outdated or incompatible. You can try updating the problematic Ethernet driver to see if that resolves the issue. To do so, use these steps: - Press Win + R to open the Run dialog box. - Type devmgmt.msc in the box and press Enter. - In the Device Manager window, expand Network adapters. - Right-click on the problematic driver and select Update driver. - Select the Search automatically for drivers option. - Click on Search for updated drivers on Windows Update.

After updating the Ethernet driver, check if the issue still occurs.
8. Disable Proxy or VPN Services
Are you using a proxy server or VPN service to hide your online activities? If so, issues with your proxy or VPN server can cause problems with your Ethernet connection. To check for this possibility, you can temporarily turn off your proxy server or VPN connection and see if that restores normalcy.
9. Disable Your Antivirus Program
Many third-party antivirus programs have firewall and network protection features that can sometimes interfere with your network connection. This can cause your Ethernet connection to become unstable or stop working. You can temporarily disable your antivirus program to see if this resolves the issue. Right-click on the antivirus icon on the taskbar and select Disable > Disable until computer is restarted.

If this resolves your problem, you may need to reconfigure your antivirus program and fix any irregularities. Alternatively, you can switch to a more reliable antivirus program. If you need help picking one, check out our guide on the best antivirus programs for Windows.
10. Reset Network Settings
If the above tips do not work, you can reset your PC's network settings as a last resort. This will restore your PC's network settings to their default values, resolving any issues. Note that this process will delete all of your saved Wi-Fi networks and custom DNS settings. If you are okay with this, refer to our guide on resetting network settings in Windows and follow the steps outlined there.
Enjoy a Stable Ethernet Connection on Windows
Whether you rely on a wired connection for gaming, video conferencing, or simply browsing the web, dealing with frequent Ethernet disconnections on Windows can ruin your experience. In most cases, it’s either a faulty Ethernet cable or outdated drivers that cause such issues. In any case, one of the tips mentioned above should help solve the problem, and you should be able to enjoy a stable internet connection. source Read the full article
0 notes
Text
14 Things to Include on Your Freelance Writing Website

Freelance writing is a popular starting point for people looking to become their own boss. To attract new clients and show off your expertise, having a website can be a great help. When making a freelance writing website, knowing what to include can overwhelm beginners. And while you might think you need a masterpiece, the reality is that a simple site with a few pages will be more than good enough. In this article, you'll discover several things you should include in your freelance writing website—divided between the essentials and nice-to-haves.
Which Platform Should You Use for Your Freelance Writing Website?
WordPress, Squarespace, and Wix are three popular website-building platforms for freelance writers. However, there are also more niche tools like Ghost. WordPress allows users more capability options, with various themes and more control over search engine optimization (SEO) for each webpage. If you use WordPress, consider reading these tips on securing your WordPress website. Squarespace is friendly for beginner website builders; the platform looks after SEO for you, and creating pages is easy. Wix also makes creating web pages easy, but it's worth noting that you can't transfer Wix content between templates. The choice is ultimately yours. Try a few out and see which one works the best for you. And if you're not sure where to start, consider reading this comparison between Wix and Squarespace.
The Essentials That You Should Include on Your Freelance Writing Website
The following items are things you'll absolutely want to include on your website. They can make a huge impact when it comes to landing new clients. 1. A Professional Web Domain Address If you're serious about freelance writing and want clients to take you seriously, getting a professional web domain is a good idea. You don't need to think of a creative or witty business name; your own name will work just fine. You've got plenty of choices for buying a web domain. Squarespace and WordPress.com both offer you a free domain for one year with some of their plans, after which you'll need to pay an annual fee. Alternatively, you can use a hosting service. Bluehost and GoDaddy are both common options. 2. How You'll Help Your Clients Achieve Their Goals On your freelance writing website's homepage, you should talk about how you can help potential clients. Talk about your specialty writing areas and the results your services will get for them. If you don't have much experience, don't worry. The value you provide might be as simple as freeing up some extra time for them to focus on other business areas.
On your homepage, you should also include a picture of yourself. Whether it's a click-through to your services page or contact form, a call-to-action is also a wise addition. When writing the copy for your homepage, keep it as short as possible. 3. An About Page While clients want to know about the results you can provide for them, they also want to work with a person.
On your About page, you can get a little more creative. Talk about your journey to becoming a freelancer, why you chose to start writing, and the problems you've overcome. You can also share some facts about yourself, and plenty of personal pictures too. 4. Contact Details Once you've wowed potential clients, you'll want to make it easy for them to get in touch with you. Adding a Contact page to your website is the simplest way to do this. On your Contact page, you can include a simple form for users to fill out. Adding links to your social media profiles is another way to help others reach you, and can also be useful for growing your online presence.

If you don't include a contact form, you should add your email address. You can also add a map showing where your office is, and include your mobile number if you want. But don't feel pressured to include either of these if you'd rather not have people know where you live or work. 5. Testimonials When you're just getting started as a freelance writer, convincing others to invest in your services can be difficult. The best way to sell yourself is through social proof from others. Think back to people who have been impressed with your work in the past. Former bosses, colleagues, and university lecturers are good places to start when asking for short testimonials.
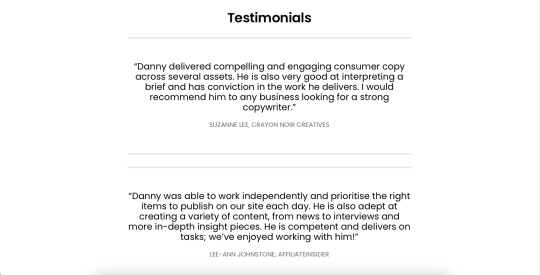
When including them on your website, you can either add them to a separate page or onto your homepage. Don't worry about getting lengthy paragraphs; a short quote will work just fine. 6. A Writing Portfolio When pitching to clients and searching for jobs, having a few samples of your writing on hand is essential. Beyond proving that you're good at what you do, having samples will also save you time creating pieces when others ask. Like testimonials, you can choose to add your writing portfolio to a separate page or on your homepage.

If you've never written for another company before, create your own portfolio pieces. Think of a topic you know well, do your research, and get typing. You can also learn how to become a more organized writer if you need to sit down and create samples. 7. A Privacy Policy

Data privacy is becoming more and more important online, and several jurisdictions have implemented privacy laws that businesses operating in those regions must comply with. For example, the EU uses the General Data Protection Regulation (GDPR). Many websites have a privacy policy, and you should consider using one on your freelance writing site as well. You can include information about how and why you collect data, along with identifying the different analytics tools you use and more. You should also give users a contact address so that they can get in touch with any concerns or questions they may have. 8. A Services Page When you build a freelance writing business, it's essential that you remove the barrier between clients deciding whether they want to work with you or not. Adding a Services page on your website can allow others to determine whether you'd be a good fit, especially if you offer more than one service. Your Services page doesn't need to go into a huge amount of detail. You can briefly identify what you offer (e.g. blog writing or social media copywriting), before providing some samples of your work. Then, link to your Contact page. 9. Information About the Types of Clients You Work With

Considering how broad the world of business is, it's essential that you narrow down who you serve and make it clear that you're aiming to help them. Somewhere on your site, you should include information about the types of clients you work with—such as SaaS companies or technology publications. You can add this information wherever you want, but it's a good idea to have it on your homepage.
Nice-to-Haves
Besides the essentials, you might want to add a range of things as your freelance writing business grows. Below is a list of nice-to-haves that you can add once you've nailed the basics and gained a little more experience and confidence. 10. A Blog Section Blogging is a great way to increase your SEO ranking and demonstrate your authority on a particular topic. Every blog post you publish is also a portfolio piece. Therefore, you'll simultaneously increase the number of writing samples you can show to others.

When picking a blogging niche, feel free to talk about whatever you want. You can discuss trending industry topics, your experiences as a freelancer, or something completely different. If you feel like adding a blog section on your site will make it less cohesive, consider setting up a profile on a platform like Medium instead. 11. Logos for Current and Past Clients Once you've got some big-name clients under your belt, adding their logos to your website can be useful for convincing others to hire you. If you have already worked for a reputable company as an employee, adding their logo(s) to your website is also a good idea. Before including any company logos on your website, remember to ask. Although many businesses will have no objections, some might not want you to. 12. Your Own Company Logo Although it's by no means essential for freelance writers, having a company logo can make you look more professional. You can use free software like Canva if you aren't a professional graphic designer. Alternatively, you can hire a graphic designer or ask a friend. Don't spend a huge amount of time on your logo, though, as the task is not as high-leverage as reaching out to clients and writing. 13. Your Rates

Once you have a solid portfolio, and you've also built some expertise in a particular area, you'll want to filter out the clients you work with. One easy way to limit the people who work with you is by adding how much you charge onto your website. This will eliminate those awkward "we can't afford you" conversations and raise the quality of projects you get. Remember, though, that you're not tied to your rates forever. If you're still getting more work than you can handle, raise them further. Similarly, if your work has slowed down, don't feel ashamed of lowering them. 14. A Newsletter Sign-Up Page As your freelance writing business grows, you might find that others interested in your content will start coming to your website and following you online. To keep your audience informed and engaged, consider starting a newsletter. Create a simple widget on your website where they can opt into your updates. You can manage your newsletter campaigns in Mailchimp and on numerous other platforms.
Attract New Clients With Your Freelance Writing Website
Many new freelance writers spend too much time worrying about the microscopic details. As a result, they never get started. Your website only needs the basics to begin with. Clients want to know how you can help them, a little about you, and that you're a good writer. And, of course, they also want a way to get in touch with you quickly. Start with the essentials and slowly build out from there. And remember: you can change your site's content later if you don't like it. source Read the full article
0 notes
Text
How to Disable Copilot on Windows 11
Windows Copilot, Microsoft's new AI assistant, can assist you with a variety of tasks, such as answering questions, changing system settings, and creating AI images. However, if you're not a fan of Copilot or simply don't need it, you can remove its taskbar icon or disable it entirely on your Windows 11 PC. Here, we'll show you how.
How to Remove the Copilot Icon From the Windows 11 Taskbar
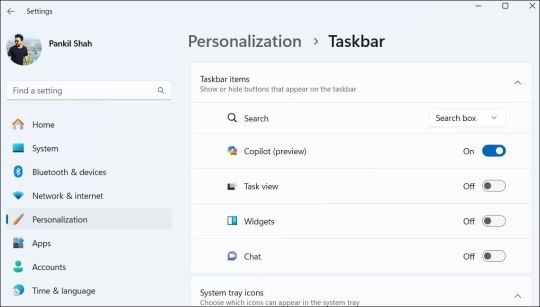
By default, the Copilot icon appears in the Windows 11 taskbar. However, if you prefer not to have it there but still want to use it occasionally, it's easy to hide the Copilot icon. Simply right-click anywhere on an empty spot on your taskbar and select Taskbar settings. In the Settings window that appears, turn off the toggle next to Copilot.
This should remove the Copilot icon from the taskbar. You can still access Copilot by pressing the Win + C keyboard shortcut in Windows 11.
How to Completely Disable Copilot via Group Policy Settings
Although hiding the Copilot is quite easy, it does not turn it off completely, and you might inadvertently access it. Fortunately, you can turn off Copilot completely via the Local Group Policy Editor on PCs running the Professional, Education, or Enterprise edition of Windows 11. - Press Win + S to access the search menu. - Type gpedit.msc in the search box and select the first result that appears. - Select Yes when the User Account Control (UAC) prompt appears. - Use the left pane to navigate to User Configuration > Administrative Templates > Windows Components > Windows Copilot. - Double-click the Turn off Windows Copilot policy on your right. - Select the Enabled option. - Hit Apply followed by OK.
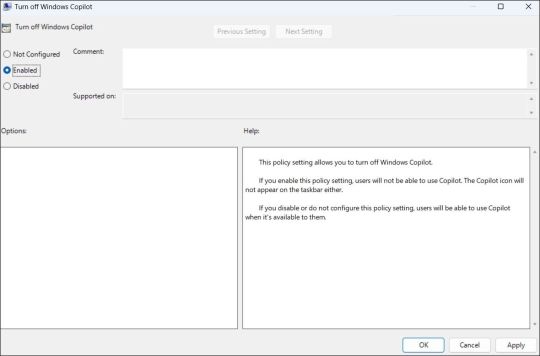
Once you complete the above steps, Copilot will be disabled on your Windows 11 PC and you won't be able to access it even with the keyboard shortcut. If you want to re-enable Copilot later, repeat the above steps and set the Turn off Windows Copilot policy to Not configured or Disabled.
How to Completely Disable Copilot by Modifying Registry Files
Another way to disable Copilot on Windows 11 involves modifying registry files. However, since editing the registry can be risky, you should follow the steps carefully. Also, be sure to back up all the registry files or create a restore point. This will allow you to restore the registry files in case something goes wrong. Once you’ve done that, here’s what you need to do to disable Copilot via the Registry Editor: - Press Win + R to open the Run dialog. - Type regedit in the text box and press Enter to open the Registry Editor. - Select Yes when the User Account Control (UAC) prompt appears. - Use the left pane to navigate to HKEY_CURRENT_USER > Software > Policies > Microsoft > Windows. - Right-click the Windows key and select New > Key. Name it WindowsCopilot. - Right-click on the WindowsCopilot DWORD, go to New, and select DWORD (32-bit) Value from the submenu. Name the DWORD TurnOffWindowsCopilot. - Double-click the TurnOffWindowsCopilot DWORD, type 1 in the text field, and click OK. - Restart your PC for the changes to take effect.
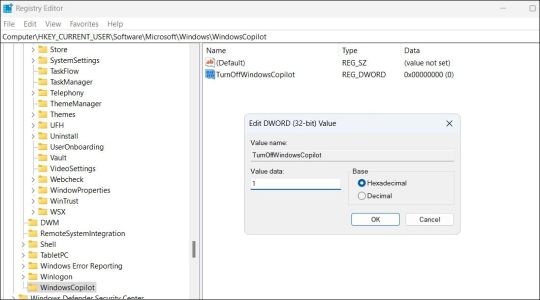
And that’s about it. Windows Copilot will be disabled on your PC. To re-enable it in the future, repeat the above steps and set the TurnOffWindowsCopilot DWORD value to 0. You can also delete the TurnOffWindowsCopilot DWORD instead.
Get Rid of Copilot on Windows 11
While Windows Copilot is a powerful tool, not everyone may want to use it. Fortunately, it’s possible to get rid of it. The above steps will help you achieve your goal, whether you want to keep Copilot out of sight or turn it off entirely. source Read the full article
3 notes
·
View notes
Text
9 Challenges Every Software Developer Faces and How to Tackle Them

Starting a new job as a software developer is an exciting prospect, but it also presents its own set of challenges. You’ll have to learn and understand many things to excel in this role, which may not have been covered in courses or training. Furthermore, potential issues can emerge during the project execution, potentially leading to product failure, so understanding how to solve such issues is paramount. This article will outline nine problems every software developer faces and provide tips on how to fix them.
1. Adapting to New Technologies
As a software developer, it is important to understand that each employer has their own unique and non-negotiable system for carrying out tasks. Therefore, familiarizing yourself with the company's technology infrastructure is a top priority, whether you are a new or experienced developer. However, this can pose challenges, such as acclimating to unfamiliar programming languages and tools. Fortunately, by dedicating enough time, receiving support, and gaining experience, you can overcome these hurdles and effectively use the company’s technology. Frequently using programming languages and tools improve your skills, and you can also ask for help with particularly difficult problems.
2. Working With Pre-Existing Code
During your software development training, you definitely learned to build projects with your code from scratch. However, as a software developer, you will be expected to work with pre-existing and large-scale codebases. This can be overwhelming, especially if you don't understand the code’s function. When faced with the challenge of working with large code bases, it's important to approach them step by step. One possible strategy is carefully reading through any available documentation for insight or seeking guidance when needed. You could also join an open-source project with extensive code bases to gain valuable experience handling pre-existing code. Before joining, remember to look for a license, source code sharing, an active community, and other characteristics of a good open-source project.
3. Dealing With Evolving Requirements
Software requirements may change for several reasons, like the client's needs, market trends, or technological advancements. This can be frustrating for developers who invest hours creating specific features only to discover that their efforts are no longer necessary due to changes in requirements. Thus, establishing clear communication with the client is essential to overcoming this challenge. You can achieve this by asking about their specific requirements and keeping a record of these needs for future reference. Additionally, working with product design teams to define and agree on the project's scope is crucial. If possible, create a prototype and iterate upon it to help confirm or refine the agreed-upon requirements.
4. Debugging and Quality Assurance

As part of your job, debugging the system is essential to guarantee its smooth operation. However, resolving bugs can be time-consuming, especially when dealing with extensive codebases. While skipping the code review process or resorting to quick but unsafe solutions may seem attractive, it's not recommended since it can lead to project failure. Whenever you encounter a bug, utilize all resources available to you until your code is bug-free. You can search for the specifics of the error message online, check the console, or use a debugger. If it proves too difficult, don't hesitate to seek the assistance of a colleague, as they may be able to pinpoint the source of the problem easily. Furthermore, it's better to prevent bugs than to fix them. Always follow good coding practices like using descriptive names, giving each function one purpose, and deleting unnecessary code. You will simplify troubleshooting by following these tips for writing cleaner and better code.
5. Ensuring the Security of Software Systems
These days, many apps collect sensitive information from users, like usernames, email addresses, passwords, and credit card numbers. As a software developer, prioritizing cybersecurity when writing code is crucial. Still, this can be challenging as it adds complexity to the project, making newer developers more likely to overlook potential security loopholes. Unfortunately, hackers often exploit these vulnerabilities. Understanding the major challenges of application security and how to address them is crucial to preventing breaches. Also, be mindful of the potential security issues that could arise and take steps against them. For example, you could establish validated inputs to prevent malicious code injections.
6. Integrating Systems and Applications

Many companies integrate various software systems, technologies, and modern APIs into their products. Unfortunately, this can sometimes result in difficulties and negative consequences like poor quality, delays, or project failure. For instance, integrating a system that uses a different data format than the software you're working on could cause data loss or corruption. This can ultimately lead to system crashes or malfunctions. To avoid these issues, conducting thorough research into the technology you want to integrate into your software is important. After researching, testing the technology to ensure smooth compatibility with your software is recommended. If any issues arise, it is important to explore other options and brainstorm creative solutions to solve the problem.
7. Communication and Collaboration
Teamwork and collaboration among software developers require effective communication. However, this can be challenging, especially when working with individuals from diverse backgrounds, where language barriers and cultural differences can impede progress. Additionally, each team member may have different objectives and working styles. These differences could limit collaboration if not acknowledged and respected. As such, respecting these differences and using appropriate tools to support communication is the key to overcoming these challenges. GitHub is an excellent tool for this purpose, and its collaborative features enable project sharing and working with a general codebase. However, to maximize this tool and enhance effective collaboration, you must understand how to write Git commit messages. In addition to this knowledge, you must have strong social skills and emotional intelligence. Most importantly, understanding teamwork and being a team player is crucial for success as a software developer.
8. Time and Meeting Deadlines

As a software developer, your day could be filled with numerous tasks. With so much to do and limited time, it's common to struggle with prioritizing your tasks effectively. The situation doesn't get any easier as you advance in your career since you'll be expected to do more within the same timeframe. However, with effective time management techniques, these challenges can be overcome. You can create a list of tasks in order of priority and address the most important ones first. If you need help, don't hesitate to ask for it, and even inform your manager if necessary. Additionally, you can incorporate time management tools like Todoist or Paymo to assist you. These simple time management apps can save you lots of time depending on your time management needs.
9. Constant Updates and Technological Advancement
Software development always changes as new technologies emerge and old ones become outdated. Therefore, the tools and software you use will remain useful for a short while before getting replaced by updated versions. Staying up-to-date is the key to remaining relevant in software development. You can stay current by reading tech publications, following thought leaders on social media, attending tech events, and joining communities.
Overcome These Hurdles by Following These Strategies
To get further exposure to development issues and broaden your perspective, contributing to open-source software or coding projects is vital. With them, you can improve your ability to detect and tackle programming problems effectively while cultivating the soft skills you need. source Read the full article
0 notes
Text
How to Change the Date Created, Date Modified, and Other File Attributes on Windows

Windows keeps a record of when a file was created, who authored it, and when it was last modified. This information is known as file attributes and can be used to sort files by date, author name, and other parameters. The problem is that sharing a file with your teacher or supervisor at work entails sharing all of this information, putting your job or grades at risk. To prevent this, you can modify these attributes. If you don't want the receiver to know the actual file attributes, here's how to remove or modify them.
How to Change the Date Created, Date Accessed, and Date Modified Attributes Using PowerShell
File Explorer doesn't allow changing critical attributes, such as the date a document was created, accessed, or modified. With PowerShell, a command-line interface utility built into Windows, you can modify them. However, the process to change the attributes with PowerShell is a bit complex. If you don't have any experience using PowerShell, you can use a third-party app, Attribute Changer, to change the attributes, as explained in the next section. If running a few commands in PowerShell isn't a big deal (for instance, you already know the best PowerShell commands), follow the steps outlined below to change the created, modified, or accessed dates. First, type "PowerShell" in Windows Search, right-click on PowerShell, and select Run as administrator. This gives the utility administrative access to make the desired changes without any restriction.
Then, navigate to the directory where the file or folder you want to change the attributes of is located. Type cd.. to move back one folder in the given path, and cd folder_name to move to the next folder. For example, our desired folder is located at the following location: C:UsersehtasDocumentsFiles However, in PowerShell, we were in the "System 32" subfolder of the main folder "Windows." Therefore, to return to the main directory "C," we've executed cd.. twice. Then, we used the cd folder_name command three times to get to the directory where we wanted to be.

Therefore, use both commands to reach the folder you want to modify attributes for. After landing in your desired directory, type the following command after inserting the file name and your preferred date of creation: $(Get-Item File-name).creationtime=$(Get-Date "mm/dd/yyyy") If PowerShell doesn't present any errors and takes you to the same directory again, that confirms that the attributes have been successfully changed.

Likewise, you can change the date modified and the date accessed by typing the following two commands: $(Get-Item File-Name).lastaccesstime=$(Get-Date "mm/dd/yyyy") $(Get-Item File-Name).lastwritetime=$(Get-Date "mm/dd/yyyy")

Before changing the attributes, here is how a file's created, modified, and accessed dates looked:

After changing them with PowerShell, here are the updated dates:

Windows makes real-time changes to attributes. Therefore, don't modify or access the file after making changes since it will change the modified and accessed dates again.
How to Modify the Date Created, Date Accessed, and Date Modified Using Attribute Changer
The Attribute Changer app is one of the third-party attribute changer apps that lets users change file attributes, including when a file was created, modified, or accessed. If changing the file attributes using PowerShell is challenging for you, here are the steps to modify them using this third-party app: - Go to the official PETGES website. - Download the full setup of Attribute Changer; do not download the portable version, as it may not function properly. - Once the software has been downloaded, run the setup file and follow the onscreen instructions to install it. - Restart your device if the software asks you to; otherwise, there's no need. - Navigate to the folder containing the file whose attributes you wish to modify. - Right-click the file and select Change Attribute from the context menu to open the software. If you're using Windows 11, you may need to click Show more options to reveal this option in the context menu.

- Once the application opens, check the box beside Modify date and time stamps to make the date field editable. - Change the date and time when a file was first created and the last time you accessed or modified it according to your preference.

- Once you've made your changes, click Apply to make them permanent. - Click Yes in the confirmation pop-up, and the file attributes will be changed successfully. In the same way that we changed the attributes of a file, you can also change the attributes of a folder using Attribute Changer. Using third-party tools to modify attributes requires you to grant apps permission to access the file. Therefore, if the documents you want to modify the dates for are confidential, don't use third-party apps to change the attributes; instead, use the official methods offered by Windows.
How to Remove Other File Attributes Using File Explorer
While File Explorer does not permit modifying critical attributes such as Date Created, Date Modified, and Date Accessed, it does permit users to remove specific attributes such as the author, copyright information, revision number, etc. To remove attributes that are possibly removable using File Explorer, follow the below steps: - Navigate to the folder where you want to change the attributes. - Right-click on it and select Properties from the context menu. - Navigate to the Details tab at the top of the window. - Click the Remove Properties and Personal Information link.

- To remove all possible properties automatically, check the circle beside Create a copy with all possible properties removed. This will create a duplicate of the file at the exact location after deleting all possible attributes.

- To remove selected properties, check the circle beside Remove the following properties from this file, select the attributes you want to remove, and click OK.
Modify Your File's Attributes With Ease
Modifying file attributes is a great way to hide author information, revision numbers, and other details, such as when a file was created, modified, or accessed. Hopefully, you now better understand the different ways to modify file attributes. Using PowerShell is the easiest and most recommended method to change them. If you find it complicated or want more control over how the attributes are changed, you can use the Attribute Changer. If you take this route, be aware of the privacy risks involved. source Read the full article
0 notes
Text
How to Disable Integrated Graphics on Windows (and When You Should)

Your Windows computer probably has integrated graphics, especially if it's a laptop. The problem with this type of GPU, which is built into the motherboard, is that it's usually less powerful than a dedicated GPU. So, if you have a dedicated GPU, which is usually more powerful, it makes sense that you might want it to take over the graphical performance of your computer. In this guide, we're going to show you how to disable integrated graphics on your Windows computer.
How to Check If You Have A Dedicated GPU
Before you disable your integrated GPU (iGPU), you need to verify that your computer has a dedicated GPU installed and that it's working properly. To do that, right-click an empty part of the Taskbar and select Task Manager.
In Task Manager, select the Performance tab on the left and look at the number of GPUs available for your PC on the right. If there is more than one, then the other one is the dedicated GPU. In our case, GPU 1 is the dedicated GPU, and if we click on it and scroll to the bottom, we can see that it says Dedicated GPU Memory in the rightmost panel.

After you confirm you have an extra GPU on your computer, you can disable the iGPU.
How To Turn Off Your Windows Computer’s Integrated Graphics
You can disable your iGPU in the Device Manager. To do that press Win + R to open Windows Run. Type devmgmt.msc in the text box and hit the Enter key to open Device Manager.

Expand the Display adapters section, right-click your integrated GPU, and select Disable device.

In the prompt that appears, confirm you want to disable the iGPU by clicking on Yes. That should turn off the integrated graphics on your Windows computer so that the system relies on the dedicated graphics.
Should You Turn Off Integrated Graphics?
While dedicated GPUs tend to be more powerful than iGPUs and can boost your computer's graphical performance, that is not always the case. So the decision to disable your integrated graphics is dependent on whether you have stronger dedicated graphics, and if you'll be running a lot of graphics-intensive applications, such as games and design software. As we covered in our integrated vs. dedicated GPU guide, dedicated GPUs are ideal for more intense operations. On the other hand, if you're not running anything graphics-intensive applications, or you need to reduce power consumption on a laptop, you don't need to disable the iGPU. Also, your Windows system might support switchable graphics, which allows it to decide which GPU to use depending on the application you're running. However, this may cause the iGPU to bottleneck the dedicated GPU in some scenarios if they're both running applications and there aren't enough system resources to go around.
Use Your Dedicated Graphics Card When You Need It
All in all, you're better off using your dedicated graphics card, especially if you are into graphically demanding applications. But if your computer doesn't have a dedicated GPU, disabling integrated graphics is not an option. The decision depends on what you're ultimately trying to achieve on your Windows computer. source Read the full article
0 notes
Text
How to Open Command Prompt on a Mac

We understand if you're not a huge of your Mac's simple graphical user interface. Not everyone has to like or agree on everything, and it's natural that this would hold in your tech choices as well. This is where a simple command line tool can help you. Although macOS doesn't have Windows' Command Prompt, a proper replacement exists in the form of Terminal. It has been in use since the early days of Macintosh computers. So, let's look at how you can open it.
Terminal Is the Mac Equivalent of Command Prompt
As we said above, Macs don't have Command Prompt, and that's because it's a Windows program specifically. However, this doesn't mean macOS doesn't have a command-line utility at all. The built-in Terminal app on your Mac serves as the default command-line interpreter in macOS. Like Command Prompt on Windows, it accepts keyboard commands to carry out different tasks on your Mac. However, these similarities can be deceiving. That's because Terminal is built on a Unix-based environment, while the Command Prompt completely operates on a Windows one. Similarly, because Terminal runs on a Unix-based environment, the syntax that follows is also Unix-like. For example, it uses commands that are preceded by hyphens, like below: sudo This command, for instance, gives you the summary for the sudo command.
How to Open Terminal on Your Mac
Like any other application on your Mac, there are many ways to open Terminal in macOS. Indeed, depending on your workflow, you can choose a method that's more suitable for you. Here, in this case, we'll stick with the most straightforward one, which is using Spotlight search on your Mac. Let's see how: - Open Spotlight by pressing Cmd + Space on your keyboard. - Type "terminal" in the search box and select the best match.

That's it—the Terminal will be launched, and you will be free to use the Terminal app however you like. If you have a Finder window open, you can also navigate to Applications > Utilities to find Terminal along with the rest of the apps that live in the macOS Utilities folder.
Opening the Mac's Version of Command Prompt Is Easy
Launching the Command Prompt, or Terminal as it's called in macOS, is pretty straightforward. As you can see, a simple Spotlight search on your Mac will get the job done without any hassles. However, this is only one of the methods. You are free to try other ways to open the Terminal app if you need more options that may better suit your workflow. source Read the full article
0 notes
Text
What Is Pinterest and How Do You Use It?
Pinterest has been around for a while, but not everyone has used it. Even more, not everyone knows what it truly is. Pinterest allows you to do more than look at images. You can find recipes that your family will love. You can look up images to inspire your next tattoo. You can even upload your own idea pins to share with the world. This raises the question—what exactly is Pinterest, and how do you use it? In this article, you’ll learn the basics of Pinterest and how to create your own boards and pins.
What Is Pinterest?

Ultimately, Pinterest is an image-pinning website. Its picture-collecting capabilities are designed to curate and share visual ideas while also connecting like-minded people. Since its launch to the public in 2012, the website has grown to be used for so many different things. You can use Pinterest as a social networking tool—though, not everyone does. You can even use it as a way to promote your posts from other social media sites. For example, adding a YouTube video pin to Pinterest with a link to the video itself. However, it's more common to use it as a source of inspiration to collect ideas on all types of things like fashion, DIY projects, art, and even popular trends. Even better, many of the images have links that are attached to articles, so you’ll have more material if you find something that interests you. Pinterest helps you quickly find the visual resources you need, whatever your project may be. The ease of it along with its user-friendly interface is why it remains popular. You can literally spend hours just scrolling.
How Does Pinterest Work?

Pinterest consists of several different elements that you should be aware of to use it to its full potential. 1. Your Home Feed When you first log in, either as a new or returning user, you'll see an endless, scrolling wall of pictures related to your interests. This endless wall of photos is called your Home Feed, and the Home Feed—much like other social networking sites—is where posts from people you follow are aggregated.

The big difference here is that it's largely visual with just titles for words. It’s designed to allow you to continuously scroll while being able to take in as many pins as possible. It's important to note that the subject matter on your Home Feed will change as the algorithm learns what kind of topics you're currently interested in. For example, if you wanted to make a cake, you would type "chocolate cake" into the search bar to find pictures of them. Along with showing different images of chocolate cake, Pinterest's algorithm will decide to show you other forms of cake on your Home Feed, like cupcakes or tutorials for designing a cake. 2. The Search Bar At the top of your screen, you'll see the search bar. By typing a keyword into this bar, you can look up particular tags or topics that might not be showing up on your feed. Before typing a word, Pinterest gives you your most recent searches along with some "Ideas for You" and "Popular on Pinterest" suggestions.
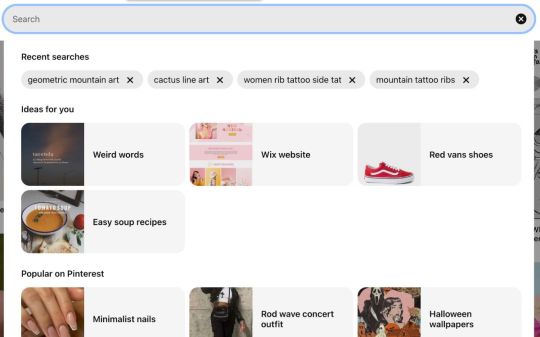
Once you start typing, Pinterest will suggest other topics that may be related to it and also people you follow whose name is similar to the typed-out word.

3. Your Pins The next most important part of Pinterest is your ability to "pin" or save pinned items. Pinning basically means that you're storing a collection of images together into what Pinterest calls Boards. When you see an image you want to save to a board, either from your Home Feed or from your search results, all you have to do is simply pin it. To save a pin, you can either hover over the image or click on it to see more details. First, choose the board you want the pin to be placed in then click the Save button.

To create a pin, simply click on Create in the upper toolbar. You have the option to create an idea pin or a pin. Select Pin.

Add all the required information including the title, image, description, and link if there is one. Select the board you want to place your pin in and click Save. 4. Your Boards Boards are where you store individual pins, either for private use or for the public to see what you’ve gathered together. Typically, each board will have a theme that the pins within correspond with.

To create a board, click on your profile picture in the upper right-hand corner. On the next page, you’ll see your profile page with all your boards and everything you’ve ever pinned. Click on the + sign. Select Board.

From there, you can create a board with a specific theme or purpose and set it to private or public. 5. Your Profile Your profile is where anyone who clicks on your name can see your public boards, your avatar, and your links. They can also see your total follower count and the number of people you're following.

Take note that the followers versus the following relationship can vary from user to user, as people either use Pinterest for personal interest or social networking. You can find entire companies creating an ecosystem of curated boards on their profile pages—so naturally, they would have more followers. There's also an option to upgrade to a professional business account, which gives you access to analytics tools and the ability to pitch ads through the network.
Be Careful When Using Images From Pinterest!

Pinterest is an incredibly fun, easy, and stress-free way of looking for inspiration on the internet. However, it should be noted that Pinterest is not a good way to find stock images to use on your blog or website. Many of the images still have their copyrights attached. If you save these images to your computer and then re-upload them for your own use without seeking permission to do so, you could find yourself in a lot of trouble. Instead, it's best to use one of the several royalty-free photo websites available.
Start Using Pinterest for All Your Inspirational Needs
Pinterest can be used in so many different ways, but it all boils down to inspiring its users. Whether you’re on the hunt for your next renovation project or simply admiring art in the form of tiles, Pinterest can motivate you to be creative. Try logging into Pinterest to see what the algorithm has in store for you. source Read the full article
0 notes
Text
How to Factory Reset Windows 11 Without the Admin Password
A factory reset can help you fix critical problems and improve your system performance. You can factory reset your PC using the Recovery option in the Settings app. However, to do this, you need to log in with an administrator account. But what if you have forgotten your administrator password or can't boot into your PC? For situations like this, Windows 11 offers a few alternative ways to factory reset your computer. You can factory reset Windows 11 without the admin password from the lock screen or by using a bootable Windows installation media. Let's explore the two ways you can bypass a Windows admin password and reset your PC.
1. How to Factory Reset Windows 11 Without a Password From the Login Screen
If your computer can boot normally but can't log in, you can reset your Windows 11 computer from the login screen. To do this, you'll need to boot into the Windows Recovery Environment (WinRE) to access Windows Advanced Startup Options. It consists of many troubleshooting tools, including the Reset this PC option that allows you to perform a reset without logging into your computer. Also, useful if you need to reinstall Windows 11 without deleting your personal files. This process will, however, remove your apps and settings. It is important to understand that you can reset the forgotten Windows administrator password using a nifty Linux hack and other workarounds. Only proceed with the steps below if your end goal is to factory reset your computer and not reset the forgotten admin password. To factory reset Windows 11 without an admin password using the Windows Recovery Environment: - Turn on your PC and wait for the login screen to appear.In the bottom right corner, click on the Power options. It will show the Restart and Shutdown options. Don't click either just yet.
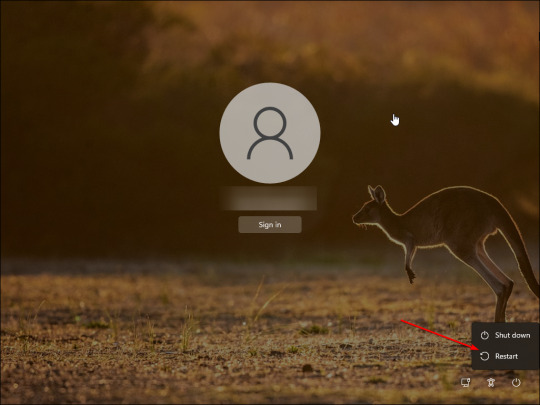
- Press and hold the Shift key on your keyboard and click the Restart button. If required, click on Restart Anyway to force restart your PC. Release the Shift key when you see the "please wait" screen. - Your PC will now restart and enter the Windows Recovery Environment. - In the Choose an option screen, click on the Troubleshoot option. - In the Troubleshoot screen, click on Reset this PC.
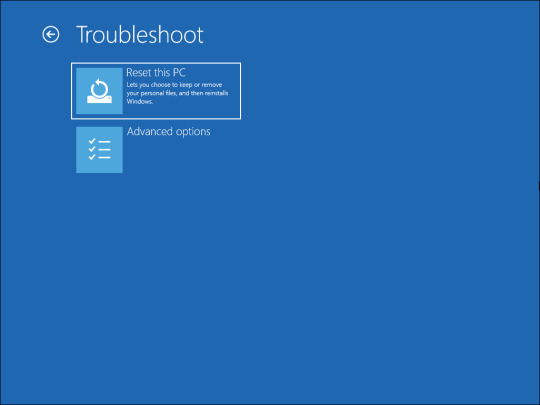
- In the Reset this PC screen, you will be presented with two options. The Keep my files option will remove all the third-party apps and settings from your PC, but keep your personal files such as documents, media, etc. If you want to remove everything, then select Remove everything. - Next, you will be presented with two options again to reinstall Windows. If you select Cloud Download, Windows will first download the required operating system files and then perform a reinstall. In comparison, Local Reinstall will use the existing system files from the device to reinstall Windows.
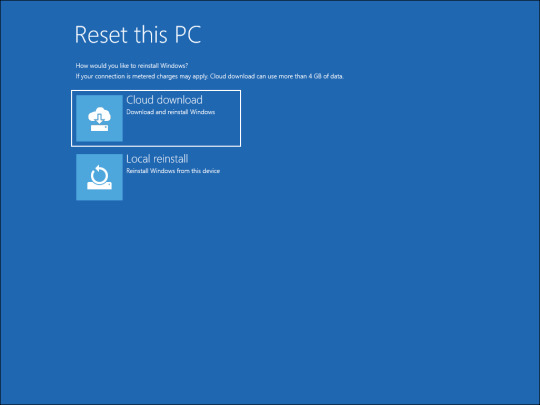
- To speed up the process, select Local reinstall. If that does not work, you can use the Cloud download option.

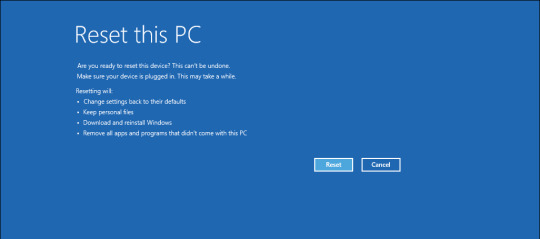
- In the Are you ready to reset this device screen, click on the Reset button to confirm the action and start the reset process. During the process, Windows will first reset your device to remove all the data, unless you have selected the Keep my files option, and then reinstall the operating system. It may take a while to complete the process, so leave your device idle and connected to the power outlet. If the reset process fails and requests additional system files, use the Cloud download option to perform a reset and try again. This often happens if your existing Windows installation is missing critical system files or corrupted.

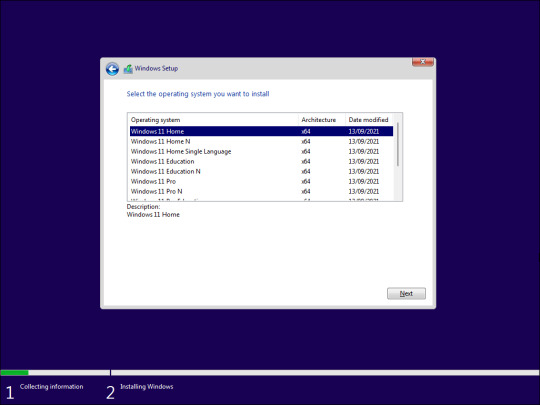
Using the Reset This PC option should help you bypass the Windows login password and reset the PC. However, if that does not work, you can clean install the Windows OS using a bootable USB drive. This is useful if you can't boot into Windows or the system image is damaged beyond repair. The Windows clean install process will wipe the hard drive erasing all the data. Make sure you have a backup of any important data before proceeding with the steps below. To clean install Windows 11, you'll need an installation media. So, create a Windows 11 bootable USB drive. Once you have the bootable drive ready, proceed with the below steps. - Connect your Windows 11 installation media to the PC. - Restart your PC and start pressing the F8, F9 or Esc key to open the Boot menu. In the Boot menu, select your USB flash drive as the boot drive and press Enter. If your computer does not support Boot Menu, you’ll have to change the boot order by accessing the BIOS or UEFI menu. - Next, in the Window setup screen, select your language, time, currency format, and your preferred keyboard layout. - Click Next to continue. - Next, click the Install Now button.
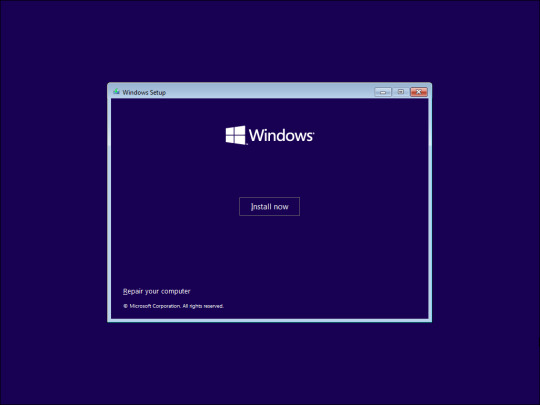
- On the Activate Windows page, click the I don’t have a product key link. - Next, select the Windows 11 edition you want to install. If not, select the default option and click Next.
- Accept the terms and click Next.
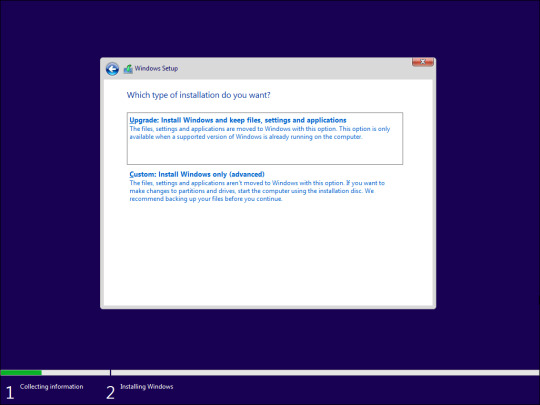
- The setup wizard will detect your existing Windows installation and offer you to Upgrade. However, the upgrade option will keep your apps, settings, and admin password. So, select Custom: Install Windows only (advanced). - Select your installation drive and click Next. Follow on-screen instructions to complete the installation. Windows will wipe your installation drive and install a fresh copy of the Windows OS. After the restart, Microsoft will prompt you to log in with your Microsoft account to complete the setup. If you have a Microsoft account, log in using the credentials and complete the setup. If you prefer to create and use a local user account instead, read our guide on how to install and set up Windows 11 without an internet connection and create one that way.
Factory Reset a Windows Computer Without an Admin Password
Although you can factory reset the PC to bypass the admin password, setting up your system from scratch is cumbersome. To avoid this hassle, consider using a password manager. It not only stores difficult and long passwords and syncs them across devices but also protect them from hacker and other prying eyes with encryption. source Read the full article
0 notes
Text
0 notes
Link
Here is a fix if your Roku TV remote is not working!
#roku tv remote#tech#technology#technoblade#techlover#techie#techno#technofamily#roku#entertainmnet#tv
0 notes
Link
Is your phone getting filled? Here are some best android cleaners.
0 notes
Link
Looking for the best sites to download Android APKs? Look no further! Check out our top picks for reliable and safe APK downloads. Say goodbye to sketchy sites and hello to hassle-free downloading.
0 notes
Photo


In a world where communication has become increasingly important, it's no surprise that messaging apps have become an essential tool for staying connected with friends, family, and colleagues. Among the many messaging apps available, Telegram has emerged as a popular choice for people all over the world. Here are just a few reasons why Telegram is worth using.
0 notes