#and it could use editing expanding etc
Explore tagged Tumblr posts
Visit Tumblr Blog
Explore Tumblr blogs with no restrictions, modern design and the best experience.
Last Seen Tumblr Blogs


Fun Fact
Celebrities use Tumblr as well.
Text
Doctor Who as a Post-Colonial Metaphor
Recently I've been thinking a lot about how beautifully Doctor Who reflects the state of post-colonial British identity, and tumblr seems like the appropriate place to share my ramblings. So let’s see if I can explain in a way that makes sense.
I must start by putting on my obnoxious little film degree hat and reminding everyone that sci-fi is one of those genres that is highly political (as most things are, but scifi even moreso). It turns out it's pretty easy to get a sense of people's fears and anxieties by asking them to envision the future, and that's what sci-fi media does; it uses contemporary cultural standards and ideas to create a vision of what futuristic/advanced science and technology might look like, and how people might respond to it. In doing so, it ends up taking the social and political temperature of the time and place in which it's created.
As such, it's very, very common for scholars to analyze sci-fi media through this lens; even Frankenstein, arguably the first science fiction novel ever written, is often interpreted as reflecting cultural fears regarding swiftly advancing science and technology during the early stages of the industrial revolution. The Day The Earth Stood Still (1951) is another great, very blatant example of how sci-fi and politics can interact. In this movie, a Jesus-like alien ascends to Earth during the Cold War to warn the human race about their imminent nuclear annihilation. It seems corny to us now, but it's actually a great movie and I would highly reccomend it. It's rumored that the US Department of Defense read the script and Did Not Like It because the themes were too anti-war.
In other words, despite often being viewed as too “pop,” too goofy, and too unserious to have any deep meaning, pretty much any scifi story can be analyzed within an inch of its life using a meta social/political lens. It's not the only way to interpret sci-fi, but it's by far the most common. One must simply ask, “what does this vision of science, technology, and/or the future say about us as we are now?”
But anyway. Doctor Who. Disclaimer: I haven't watched the classic series so I'll focus on 2005 onward (still post-colonial so it still holds up, lol). If you've seen Classic and you'd like to chip in, please do.
Genre-wise, Doctor Who is more-or-less a space-western, a subgenre of sci-fi that incorporates Western elements—exploring new frontiers, engaging with unfamiliar civilizations, rogue figures, etc. Star Trek is the peak example of this, but there are many, many others.
Of course, the Western genre is dripping with colonialism due to its historical setting of the American West, and the racist depictions of Indigenous peoples. Space-westerns, consequently, also tend to address colonial topics. Sometimes space westerns are just as racist as normal westerns, but sometimes they use the genre reflexively, to question colonial ideals. A more progressive space-western might be more willing to “humanize” the alien cultures they meet, asking questions like, "how does one ethically engage with foreign societies?" or "When is it appropriate to intervene in a conflict?" etc.
Althought these kinds of questions come up regularly in Doctor Who, especially regarding its anti-war messaging (Time War etc.). These themes become doubly interesting when you use them to inform your interpretation of The Doctor, both as a character and as a symbol.
Consider this: The Doctor is the embodiment of an ancient and immensely powerful being with a bloody history. Their kill-count is quite literally somewhere in the quadrillions. Although they are a self-proclaimed pacifist, they are still constantly a perpetrator of death and destruction throughout the series. The Doctor, despite repeatedly and loudly choosing peace, can never seem to keep their hands clean of chaos and suffering. Doctor Who is about an entity that destroys everything they touch, sometimes on purpose, sometimes not. As an allegory for grappling with the legacy of British imperialism, I'd say it's pretty on the nose.
In this sense, not only is Doctor Who a show about colonialism, it is also a show about identity in the wake of colonialism. It's even in the name: "Doctor Who?" Who is the Doctor? What is their responsibility to the universe? What does it mean to be ancient and powerful and drenched in the blood of millions? How do they move on, become better, without falling into the same traps? What does it mean to be British?
These questions come up over and over throughout the new series, from the destruction of Gallifrey, to the Timelord Victorious, to A Good Man Goes to War, the Flux (arguably), and many, many other smaller plotlines I could mention. Even in the latest series with Ncuti Gatwa, the focus on adoption and family is in a similar vein—where does the Doctor come from? What does it even mean to be “from” a place? How much do your origins truly contribute to who you are and who you become?
How the companions fall within this framework is also interesting; if the Doctor is a stand-in for the nation as an entity, then the Doctor's companion, the everyday British person, is the stand-in for the populace. The companions are ever-changing, ever-evolving, constantly renegotiating their relationship with the Doctor. The companion's ultimate challenge is to find how they fit into the narrative of the Doctor's life, and try their best to come out the other end with a happy ending (ha).
Of course, Doctor Who is owned by the BBC, meaning it is quite literally nationally subsudized TV. As a result, althought the show is actually VERY critical in some places, the Doctor is usually ultimately sympathetic; their good intentions tend to forgive a lot of the problems they've caused. The companion is usually charmed by the Doctors' seemingly endless tragedy of a life. This is a country's state-owned media company working with it's own self-image--it's inherently a work of self-reflection, and perhaps of self-obsession, too.
It would be easy to be cynical about Doctor Who as a product of the BBC, which is state-funded (but notably not owned or directly controlled by the government!). However, I tend to think that just writing it off as propaganda because of this is doing the show a disservice. Yes, there is an inherent privilege and self-centeredness to endlessly forgiving the Doctor, but that's also kind of the whole point; it's a show about coming to terms with one's horrible past. It's a show about learning to formulate a new sense of self. To demand that Doctor Who to be less self-obsessed, to not be about British identity when it is in fact a British show for Brits about Brits, is just a bit unrealistic.
Instead, I choose to believe that Doctor Who can and does use its privilege for good more often than not. The creators tend to be very progressive (as sci-fi so often is) and they can get away with a lot of very progressive messages in the guise of a silly sci-fi show for families. Most recently, I would point to s14e3: Boom, s14e5: Dot and Bubble as examples of thinly veiled rants about the evils of capitalism, war, racism, social media, etc. To ignore or dismiss Doctor Who because it has some form of institutional backing would be doing the actual stories and writers a disservice.
Finally, let me leave you with one last point; One consistancy throughout the new series that I find very charming is the positive effect the companions always have on the Doctor. Companions come and go, which is sad, but they're each special in their own little way, and they each change the Doctor, wearing them down a little at a time. The Doctor is consistently at their worst when they are alone, removed from the people that make them want to be better.
Very often the companion's parting message for the Doctor is "don't be alone.” This can be extrapolated to mean: don't forget we exist. Don't forget to be kind. Even if you can't help your legacy, even if you can't wash the blood off your hands, you can always keep striving to be better. Keep someone around to remind you to be better. And the Doctor, more often than not, does. Because ultimately it is the companions, us the people, that make the Doctor who they are.
It’s this special brand of relentless optimism, this indomitable belief in the goodness of people and the power of that goodness that always brings me back to Doctor Who, one way or another, despite all its flaws.
Edit 11/29: corrected some info about the BBC per the comments!
#once again pls classic fans chip in#I know I missed some points#and it could use editing expanding etc#but this is the gist of it#I just need to get it out#I love Doctor who 🥲#and I love sci-fi as a field#it’s so interesting#I wrote a college paper about bill and Ted’s excellent adventure it was great#doctor who#Peter capaldi#Matt smith#David tennant#jodie whittaker#chris eccleston#ncuti gatwa#RTD#russel t davies#steven moffat#chris chibnall#film analysis#media analysis#essays#essay#media criticism#colonialism#post colonialism#post colonial#media rants#my stuff
37 notes
·
View notes
Text
𝓽hings to do instead of scrolling ౨ৎ


summer is here, school is over and you have way too much free time on your hands. so unless you want to spend your whole days with your eyes locked on a screen, here's an in- depth guide on what to do this summer, or whenever!!
learn a new language - trust me, speaking more than one language is a skill that everyone should have, and it always comes in handy. you can watch tv shows, movies or youtube videos in your target language, read beginner books, use apps (not duolingo though.. ) and even just listen to music!! just expose yourself to the language as much as you can, even better if you know anyone you can have conversations with. you could also learn sign language!!
journal or scrapbook - writing down your feelings really helps understanding your own self more. you can try doing shadow work to really dive deep, or just write whatever you feel in that moment. it doesn't have to become a chore, and remember, write for yourself and not as if someone else was going to read!! as for scrapbooking, just print out some nice photos and decorate the pages with stickers, drawings, fun colored paper.. whatever you want, just be creative!!
make art - it doesn't have to look perfect, remember that all art is beautiful in its own way. even if you think you're not good at it, just create, it will help you feel better & you'll also get better with time!! you can draw, paint, sculpt, do pottery, etc. you don't have to follow any guidelines, just buy a random sketchbook, bring out your inner child and do whatever you feel like doing
learn how to play an instrument - this can be a bit expensive, but if you have any instrument in your house that you've never used, it might be a great time to start learning it!! you don't necessarily need to take classes, you can easily find tutorials on youtube, even though it might be harder to learn by yourself. but making music is a really fun activity & good for the soul
reading and writing - i will never recommend reading enough !! everyone should read. it helps you learn new things, understand different perspectives, expand your vocabulary, and so much more. i know books can be expensive, but you can always try to buy them at flea markets, or ask a friend/family member to lend you some. and just in case, there are always some sites where you can read books online for free, like zlibrary!! you can read before going to bed instead of staying on your phone (which is sooo bad for your sleep), at the beach while tanning or outside while getting some fresh air. and if reading books inspires you, you can try to write something!! i'm not saying you have to write a 600 page book, but you can try to write small stories, or poetry, and who knows, someday you might actually write a book! if you want to get published, there are some small literary magazines you can find on social media that publish the works of small writers, it can be a great way to start. you can also always post your works here on tumblr, substack, or any social media platform!! you could also try to write the story for a movie and start screenwriting, if you're into cinematography
research interesting topics - now that school isn't forcing you to study things that maybe you don't care about, you can study whatever you want !! remember, knowledge is power, and with the internet, you basically have the world in your hands. you can watch a youtube video, read a book, or simply research on websites (make sure they're reliable though). you can also take online courses!! i might make a post on ideas for what to research??
start a new hobby - your life can't only be made of school/work, sleep, and a screen. you need hobbies that you actually like and that make you feel good. some of these can be: baking and cooking, crocheting, knitting, embroidery, jewelry making, nail art, makeup, photography, editing, blogging/vlogging, coloring, candle making, soap making, perfume making, modeling, origami, sewing, making diy stuff, chess, puzzles, acting, singing, flower arranging, meditating, lego building, trying new hairstyles or outfits, doing animations, discovering new music, sudoku, the things i previously wrote, and probably a million other activities i can't think of right now
stay active - moving you body is good for both your physical and mental health, i'm sure we all know that. you can go on walks or runs in the nature with your headpones on, or do any sport that you like- some ideas: swimming, dancing (ballet, hip hop, modern, ecc) , tennis, martial arts (judo, karate, taekwondo, ecc), volleyball, basketball, athletics, gymnastics, football, archery, fencing, table tennis, boxing, surfing, rowing, hockey, horseback riding, softball, golf, biking, figure skating, rollerblading, skating.. you don't need to do it competitively (unless you want to), as long as you're having fun and moving your body. you can also do workouts, like yoga or pilates, at home or outdoors, or go hiking.
watch movies, tv shows, or documentaries - it can always be a good learning experience, or just something fun and relaxing that isn't mindlessly scrolling. a bonus: after you've watched something, write a very long, detailed and in-depth review in your journal. you can also post it wherever you want (like letterboxd, to fight all the one liners)
hang out - with friends, family, or even by yourself !! (i know, i know, it can be scary). you can do anything, as long as you're with the right people everything is fun, but here's some ideas: have a picnic, go to the beach, go to a water park, have a baking contest, do temporary tattoos, go to a concert, go out to eat, do a one day trip, go on a road trip, take a walk in the nature, go hiking, go to a trampoline park, go to an amusement park, visit a museum, go thrifting or shopping, have a board games night, try out a new cute cafe or bakery, do an escape room, have a karaoke night, have a movie marathon, and so much more!!
i hope this helped!! ♡
#pinkpilatesprincess#self care#it girl#productivity#summer#that girl#girlblog#clean girl#wellness#pink pilates aesthetic#coquette#girlblogging#advice#wonyoungism#self improvement#dream girl#self love#health#hobbies#journaling#self care tips#summer goals#lifestyle#aestethic#it girl energy#glow up#wonyoung
1K notes
·
View notes
Text


Downtown Roles Mod Tutorial - TS3 - Mature Gameplay Ideas
NSFW 18+ mature content / a long read ��
TLDR: this is a compilation/recommendation list of mods, a tutorial on how to set up NPCs, and how to tie it all together to add some mature gameplay to your save. 😈
Misukisu/Virtual Artisan had a “Downtown Roles” mod that sadly does not work anymore for the latest versions of TS3. Her mod basically allowed players to add role sims to community lots so your sims could have more NPCs to interact with, making the lots feel more alive in a mature "downtown" sort of way.
I was inspired by her mod and I want to share how you can recreate and expand her mod’s functions with Nraas Register and Arsil’s Custom Generic Role mod. Some players might already know how these mods work, but it was a new discovery for me. I didn’t know how useful role sims could be! It got the gears in my dirty mind turning.
The main purpose of this mod list/tutorial: to add role sims to community lots for your main sims to interact with, while they’re out on the town. These will be sims outside of your household. Their main “job” is to hang out at the lot. You can let the game generate new sims to fill these roles, or assign existing sims in the town to fill the roles.
Examples of role sims you can create:
A regular patron at a dive bar for your sim to befriend or make enemies with.
A sexy single sim at a beach, gym, pool, bar or club for your sim to mingle and hook up with.
An escort at a brothel for your sim to woohoo with (Passion mod).
A client for your sim to sell drugs/weapons to (MonocoDoll Vile Ventures mod and Arms Dealing mod) - I have not tested this but in theory it should work.
You can add multiple role sims on each lot. You could have a number of partygoers on a club lot/a number of escorts on a brothel lot/a number of mobsters or criminals on a warehouse lot who will always be there when your sim visits.
Why role sims?
Townies are unpredictable - you never know which lot they’ll show up on, and how long they’ll stay. Role sims will consistently be there as the supporting characters in your main sim’s story.
Having consistent NPCs at certain locations around town can help with story-driven gameplay scenarios.
You can move a household of your own sims into town and assign them to fill various roles. See pretty NPCs around town!
If you let the game generate new sims for the roles, then it saves you the hassle of setting up new households yourself. You can always edit them later in CAS.
Limitations:
According to Arsil, it seems like sims who are already employed (such as most townies) will be removed from their jobs if they are assigned to be role sims. So I would avoid using any employed townies for this unless you are ok with that. Use unemployed residents instead.
I believe the role sim cannot leave the lot during the designated work hours. Your sim cannot form a group with them and go to another venue. However, you can invite the sim over or hang out afterwards from the relationship panel.
Mods Needed:
Nraas Master Controller + Integration Module
Nraas Register
Arsil‘s Custom Generic Role mod (both the floor marker and the desk)
Passion (if you want your sim to be able to have sex with the role sims on the lot or have the role sims dance on the stripper pole)
MonocoDoll’s Vile Ventures mod (if you want to create NPC clients for your sim to sell to)
MonocoDoll’s Arms Dealing mod (if you want to create NPC clients for your sim to sell to)
How to Set Up:
Step 1: Install the mods listed above. Then, open the save file you want to add some downtown sleaze to.
Step 2: Find a community lot you want to add role sims to. This could be a bar, nightclub, brothel/motel/strip club, a run-down warehouse or block of buildings, casino, etc. I have downloaded many lots from Flora2 at ModtheSims and @simsmidgen here on Tumblr that fit the gritty urban vibe.
Step 3: Enter Build/Buy mode. You can do this from Live mode.
Press Ctrl + Shift + C, enter this cheat: testingcheatsenabled true
Press the Shift key and click on the ground of the community lot.
Click on “Build on this lot”.
You can also enter Edit Town mode to renovate the community lot.
Step 4: Place Arsil’s Custom Generic Role floor marker or desk on the lot. Place one for each role sim you want to create. They are located in Build Mode -> Community Objects -> Misc. If the desk looks out of place, use the floor marker instead.
Step 5: In Live mode, click on the object -> Settings to set:
The name of the role (clubgoer/stripper/escort/mobster/etc.)
The “work” hours the sim will be on the lot for
The days off
The motives to freeze or not (I recommend freezing all the motives to avoid interactions being interrupted/sims complaining due to low motives)
If the sim you want to assign to the role already lives in town, click on the object -> Nraas -> Register -> Select -> Choose criteria -> select the sim from the list. I would avoid choosing any employed townies as they may lose their job when switching to this role. Choose unemployed residents to avoid conflicts.
Remove assigned roles: click on the object to remove the sim from the role.
Step 6: In Live mode, click on City Hall -> Nraas -> Register
Allow immigration: choose whether you want new sims to be moved into town to take the roles (enable this if you want the game to generate new sims for the roles)
Allow immigration = False: if you set this option to false, then a new option called "Find Empty Roles" should appear. You can then assign any sim to the role object you placed, from City Hall.
Allow resident assignment: choose whether you want existing unemployed townies to be randomly assigned to fill the roles (I recommend to disable this. I had Buster Clavell show up to work at my strip club. NO!)
Pay per hour: I'm not sure how to adjust the pay for each custom role but you can just leave it at the default or change it globally
Remove roles: click on the object to remove the sim from the role, or click on City Hall -> Nraas -> Register -> Global Roles -> Remove by sim
Step 7: In Live mode, give the game some time to generate the role sims. Visit the community lot and have a look at your new role sims. The role sims should autonomously interact with other sims and objects on the lot. Using Nraas Master Controller, you can take the sim into CAS to give them a makeover, edit their traits, or replace them with a sim from your sim bin.
Step 8: Make your sim interact with the shiny new role sims and play out the storylines you always wished were possible. Public hookups, functioning brothels, selling drugs and guns - this is what The Sims 3 was made for, baby!!!
Related Mods:
Arsil’s Exotic Dancer Stage - if you have a club community lot, you can use this mod to hire dancers. You can use role sims to add other NPCs to the club such as guests, shady business sims, or non-dancer sex workers.
Nraas Relativity - this handy mod can slow down the speed of time so your sim can spend more time doing their "activities"
Nraas Woohooer - if you don’t want the explicit sex animations from Passion, you could use this mod instead to provide more woohoo options.
Passion - for brothels/strip clubs, this mod will add sex animations and the ability to have role sims dance on the stripper pole.
MonocoDoll’s Vile Ventures mod and Arms Dealing mod - you can use role sims to create more clients for your sim to sell drugs and weapons to, like different individuals/gangs/mobs. You could have different clients hanging out at different spots in the city.
LazyDuchess Lot Population - this mod populates community lots with townies, and they can interact with the role sims you’ve created.
Service Sims Out on the Town - this pushes service sims to visit community lots, to add even more variety to your crowds.
Conclusion
If you made it to the end, thank you for reading. Please let me know if you try out this style of gameplay, and if you have ideas for more role sims and community lots to make. This tutorial was NSFW-oriented but you could easily adapt it to create NPCs for SFW community lots.
589 notes
·
View notes
Text
How I ditched streaming services and learned to love Linux: A step-by-step guide to building your very own personal media streaming server (V2.0: REVISED AND EXPANDED EDITION)
This is a revised, corrected and expanded version of my tutorial on setting up a personal media server that previously appeared on my old blog (donjuan-auxenfers). I expect that that post is still making the rounds (hopefully with my addendum on modifying group share permissions in Ubuntu to circumvent 0x8007003B "Unexpected Network Error" messages in Windows 10/11 when transferring files) but I have no way of checking. Anyway this new revised version of the tutorial corrects one or two small errors I discovered when rereading what I wrote, adds links to all products mentioned and is just more polished generally. I also expanded it a bit, pointing more adventurous users toward programs such as Sonarr/Radarr/Lidarr and Overseerr which can be used for automating user requests and media collection.
So then, what is this tutorial? This is a tutorial on how to build and set up your own personal media server using Ubuntu as an operating system and Plex (or Jellyfin) to not only manage your media, but to also stream that media to your devices both at home and abroad anywhere in the world where you have an internet connection. Its intent is to show you how building a personal media server and stuffing it full of films, TV, and music that you acquired through indiscriminate and voracious media piracy various legal methods will free you to completely ditch paid streaming services. No more will you have to pay for Disney+, Netflix, HBOMAX, Hulu, Amazon Prime, Peacock, CBS All Access, Paramount+, Crave or any other streaming service that is not named Criterion Channel. Instead whenever you want to watch your favourite films and television shows, you’ll have your own personal service that only features things that you want to see, with files that you have control over. And for music fans out there, both Jellyfin and Plex support music streaming, meaning you can even ditch music streaming services. Goodbye Spotify, Youtube Music, Tidal and Apple Music, welcome back unreasonably large MP3 (or FLAC) collections.
On the hardware front, I’m going to offer a few options catered towards different budgets and media library sizes. The cost of getting a media server up and running using this guide will cost you anywhere from $450 CAD/$325 USD at the low end to $1500 CAD/$1100 USD at the high end (it could go higher). My server was priced closer to the higher figure, but I went and got a lot more storage than most people need. If that seems like a little much, consider for a moment, do you have a roommate, a close friend, or a family member who would be willing to chip in a few bucks towards your little project provided they get access? Well that's how I funded my server. It might also be worth thinking about the cost over time, i.e. how much you spend yearly on subscriptions vs. a one time cost of setting up a server. Additionally there's just the joy of being able to scream "fuck you" at all those show cancelling, library deleting, hedge fund vampire CEOs who run the studios through denying them your money. Drive a stake through David Zaslav's heart.
On the software side I will walk you step-by-step through installing Ubuntu as your server's operating system, configuring your storage as a RAIDz array with ZFS, sharing your zpool to Windows with Samba, running a remote connection between your server and your Windows PC, and then a little about started with Plex/Jellyfin. Every terminal command you will need to input will be provided, and I even share a custom #bash script that will make used vs. available drive space on your server display correctly in Windows.
If you have a different preferred flavour of Linux (Arch, Manjaro, Redhat, Fedora, Mint, OpenSUSE, CentOS, Slackware etc. et. al.) and are aching to tell me off for being basic and using Ubuntu, this tutorial is not for you. The sort of person with a preferred Linux distro is the sort of person who can do this sort of thing in their sleep. Also I don't care. This tutorial is intended for the average home computer user. This is also why we’re not using a more exotic home server solution like running everything through Docker Containers and managing it through a dashboard like Homarr or Heimdall. While such solutions are fantastic and can be very easy to maintain once you have it all set up, wrapping your brain around Docker is a whole thing in and of itself. If you do follow this tutorial and had fun putting everything together, then I would encourage you to return in a year’s time, do your research and set up everything with Docker Containers.
Lastly, this is a tutorial aimed at Windows users. Although I was a daily user of OS X for many years (roughly 2008-2023) and I've dabbled quite a bit with various Linux distributions (mostly Ubuntu and Manjaro), my primary OS these days is Windows 11. Many things in this tutorial will still be applicable to Mac users, but others (e.g. setting up shares) you will have to look up for yourself. I doubt it would be difficult to do so.
Nothing in this tutorial will require feats of computing expertise. All you will need is a basic computer literacy (i.e. an understanding of what a filesystem and directory are, and a degree of comfort in the settings menu) and a willingness to learn a thing or two. While this guide may look overwhelming at first glance, it is only because I want to be as thorough as possible. I want you to understand exactly what it is you're doing, I don't want you to just blindly follow steps. If you half-way know what you’re doing, you will be much better prepared if you ever need to troubleshoot.
Honestly, once you have all the hardware ready it shouldn't take more than an afternoon or two to get everything up and running.
(This tutorial is just shy of seven thousand words long so the rest is under the cut.)
Step One: Choosing Your Hardware
Linux is a light weight operating system, depending on the distribution there's close to no bloat. There are recent distributions available at this very moment that will run perfectly fine on a fourteen year old i3 with 4GB of RAM. Moreover, running Plex or Jellyfin isn’t resource intensive in 90% of use cases. All this is to say, we don’t require an expensive or powerful computer. This means that there are several options available: 1) use an old computer you already have sitting around but aren't using 2) buy a used workstation from eBay, or what I believe to be the best option, 3) order an N100 Mini-PC from AliExpress or Amazon.
Note: If you already have an old PC sitting around that you’ve decided to use, fantastic, move on to the next step.
When weighing your options, keep a few things in mind: the number of people you expect to be streaming simultaneously at any one time, the resolution and bitrate of your media library (4k video takes a lot more processing power than 1080p) and most importantly, how many of those clients are going to be transcoding at any one time. Transcoding is what happens when the playback device does not natively support direct playback of the source file. This can happen for a number of reasons, such as the playback device's native resolution being lower than the file's internal resolution, or because the source file was encoded in a video codec unsupported by the playback device.
Ideally we want any transcoding to be performed by hardware. This means we should be looking for a computer with an Intel processor with Quick Sync. Quick Sync is a dedicated core on the CPU die designed specifically for video encoding and decoding. This specialized hardware makes for highly efficient transcoding both in terms of processing overhead and power draw. Without these Quick Sync cores, transcoding must be brute forced through software. This takes up much more of a CPU’s processing power and requires much more energy. But not all Quick Sync cores are created equal and you need to keep this in mind if you've decided either to use an old computer or to shop for a used workstation on eBay
Any Intel processor from second generation Core (Sandy Bridge circa 2011) onward has Quick Sync cores. It's not until 6th gen (Skylake), however, that the cores support the H.265 HEVC codec. Intel’s 10th gen (Comet Lake) processors introduce support for 10bit HEVC and HDR tone mapping. And the recent 12th gen (Alder Lake) processors brought with them hardware AV1 decoding. As an example, while an 8th gen (Kaby Lake) i5-8500 will be able to hardware transcode a H.265 encoded file, it will fall back to software transcoding if given a 10bit H.265 file. If you’ve decided to use that old PC or to look on eBay for an old Dell Optiplex keep this in mind.
Note 1: The price of old workstations varies wildly and fluctuates frequently. If you get lucky and go shopping shortly after a workplace has liquidated a large number of their workstations you can find deals for as low as $100 on a barebones system, but generally an i5-8500 workstation with 16gb RAM will cost you somewhere in the area of $260 CAD/$200 USD.
Note 2: The AMD equivalent to Quick Sync is called Video Core Next, and while it's fine, it's not as efficient and not as mature a technology. It was only introduced with the first generation Ryzen CPUs and it only got decent with their newest CPUs, we want something cheap.
Alternatively you could forgo having to keep track of what generation of CPU is equipped with Quick Sync cores that feature support for which codecs, and just buy an N100 mini-PC. For around the same price or less of a used workstation you can pick up a mini-PC with an Intel N100 processor. The N100 is a four-core processor based on the 12th gen Alder Lake architecture and comes equipped with the latest revision of the Quick Sync cores. These little processors offer astounding hardware transcoding capabilities for their size and power draw. Otherwise they perform equivalent to an i5-6500, which isn't a terrible CPU. A friend of mine uses an N100 machine as a dedicated retro emulation gaming system and it does everything up to 6th generation consoles just fine. The N100 is also a remarkably efficient chip, it sips power. In fact, the difference between running one of these and an old workstation could work out to hundreds of dollars a year in energy bills depending on where you live.
You can find these Mini-PCs all over Amazon or for a little cheaper on AliExpress. They range in price from $170 CAD/$125 USD for a no name N100 with 8GB RAM to $280 CAD/$200 USD for a Beelink S12 Pro with 16GB RAM. The brand doesn't really matter, they're all coming from the same three factories in Shenzen, go for whichever one fits your budget or has features you want. 8GB RAM should be enough, Linux is lightweight and Plex only calls for 2GB RAM. 16GB RAM might result in a slightly snappier experience, especially with ZFS. A 256GB SSD is more than enough for what we need as a boot drive, but going for a bigger drive might allow you to get away with things like creating preview thumbnails for Plex, but it’s up to you and your budget.
The Mini-PC I wound up buying was a Firebat AK2 Plus with 8GB RAM and a 256GB SSD. It looks like this:

Note: Be forewarned that if you decide to order a Mini-PC from AliExpress, note the type of power adapter it ships with. The mini-PC I bought came with an EU power adapter and I had to supply my own North American power supply. Thankfully this is a minor issue as barrel plug 30W/12V/2.5A power adapters are easy to find and can be had for $10.
Step Two: Choosing Your Storage
Storage is the most important part of our build. It is also the most expensive. Thankfully it’s also the most easily upgrade-able down the line.
For people with a smaller media collection (4TB to 8TB), a more limited budget, or who will only ever have two simultaneous streams running, I would say that the most economical course of action would be to buy a USB 3.0 8TB external HDD. Something like this one from Western Digital or this one from Seagate. One of these external drives will cost you in the area of $200 CAD/$140 USD. Down the line you could add a second external drive or replace it with a multi-drive RAIDz set up such as detailed below.
If a single external drive the path for you, move on to step three.
For people with larger media libraries (12TB+), who prefer media in 4k, or care who about data redundancy, the answer is a RAID array featuring multiple HDDs in an enclosure.
Note: If you are using an old PC or used workstatiom as your server and have the room for at least three 3.5" drives, and as many open SATA ports on your mother board you won't need an enclosure, just install the drives into the case. If your old computer is a laptop or doesn’t have room for more internal drives, then I would suggest an enclosure.
The minimum number of drives needed to run a RAIDz array is three, and seeing as RAIDz is what we will be using, you should be looking for an enclosure with three to five bays. I think that four disks makes for a good compromise for a home server. Regardless of whether you go for a three, four, or five bay enclosure, do be aware that in a RAIDz array the space equivalent of one of the drives will be dedicated to parity at a ratio expressed by the equation 1 − 1/n i.e. in a four bay enclosure equipped with four 12TB drives, if we configured our drives in a RAIDz1 array we would be left with a total of 36TB of usable space (48TB raw size). The reason for why we might sacrifice storage space in such a manner will be explained in the next section.
A four bay enclosure will cost somewhere in the area of $200 CDN/$140 USD. You don't need anything fancy, we don't need anything with hardware RAID controls (RAIDz is done entirely in software) or even USB-C. An enclosure with USB 3.0 will perform perfectly fine. Don’t worry too much about USB speed bottlenecks. A mechanical HDD will be limited by the speed of its mechanism long before before it will be limited by the speed of a USB connection. I've seen decent looking enclosures from TerraMaster, Yottamaster, Mediasonic and Sabrent.
When it comes to selecting the drives, as of this writing, the best value (dollar per gigabyte) are those in the range of 12TB to 20TB. I settled on 12TB drives myself. If 12TB to 20TB drives are out of your budget, go with what you can afford, or look into refurbished drives. I'm not sold on the idea of refurbished drives but many people swear by them.
When shopping for harddrives, search for drives designed specifically for NAS use. Drives designed for NAS use typically have better vibration dampening and are designed to be active 24/7. They will also often make use of CMR (conventional magnetic recording) as opposed to SMR (shingled magnetic recording). This nets them a sizable read/write performance bump over typical desktop drives. Seagate Ironwolf and Toshiba NAS are both well regarded brands when it comes to NAS drives. I would avoid Western Digital Red drives at this time. WD Reds were a go to recommendation up until earlier this year when it was revealed that they feature firmware that will throw up false SMART warnings telling you to replace the drive at the three year mark quite often when there is nothing at all wrong with that drive. It will likely even be good for another six, seven, or more years.

Step Three: Installing Linux
For this step you will need a USB thumbdrive of at least 6GB in capacity, an .ISO of Ubuntu, and a way to make that thumbdrive bootable media.
First download a copy of Ubuntu desktop (for best performance we could download the Server release, but for new Linux users I would recommend against the server release. The server release is strictly command line interface only, and having a GUI is very helpful for most people. Not many people are wholly comfortable doing everything through the command line, I'm certainly not one of them, and I grew up with DOS 6.0. 22.04.3 Jammy Jellyfish is the current Long Term Service release, this is the one to get.
Download the .ISO and then download and install balenaEtcher on your Windows PC. BalenaEtcher is an easy to use program for creating bootable media, you simply insert your thumbdrive, select the .ISO you just downloaded, and it will create a bootable installation media for you.
Once you've made a bootable media and you've got your Mini-PC (or you old PC/used workstation) in front of you, hook it directly into your router with an ethernet cable, and then plug in the HDD enclosure, a monitor, a mouse and a keyboard. Now turn that sucker on and hit whatever key gets you into the BIOS (typically ESC, DEL or F2). If you’re using a Mini-PC check to make sure that the P1 and P2 power limits are set correctly, my N100's P1 limit was set at 10W, a full 20W under the chip's power limit. Also make sure that the RAM is running at the advertised speed. My Mini-PC’s RAM was set at 2333Mhz out of the box when it should have been 3200Mhz. Once you’ve done that, key over to the boot order and place the USB drive first in the boot order. Then save the BIOS settings and restart.
After you restart you’ll be greeted by Ubuntu's installation screen. Installing Ubuntu is really straight forward, select the "minimal" installation option, as we won't need anything on this computer except for a browser (Ubuntu comes preinstalled with Firefox) and Plex Media Server/Jellyfin Media Server. Also remember to delete and reformat that Windows partition! We don't need it.
Step Four: Installing ZFS and Setting Up the RAIDz Array
Note: If you opted for just a single external HDD skip this step and move onto setting up a Samba share.
Once Ubuntu is installed it's time to configure our storage by installing ZFS to build our RAIDz array. ZFS is a "next-gen" file system that is both massively flexible and massively complex. It's capable of snapshot backup, self healing error correction, ZFS pools can be configured with drives operating in a supplemental manner alongside the storage vdev (e.g. fast cache, dedicated secondary intent log, hot swap spares etc.). It's also a file system very amenable to fine tuning. Block and sector size are adjustable to use case and you're afforded the option of different methods of inline compression. If you'd like a very detailed overview and explanation of its various features and tips on tuning a ZFS array check out these articles from Ars Technica. For now we're going to ignore all these features and keep it simple, we're going to pull our drives together into a single vdev running in RAIDz which will be the entirety of our zpool, no fancy cache drive or SLOG.
Open up the terminal and type the following commands:
sudo apt update
then
sudo apt install zfsutils-linux
This will install the ZFS utility. Verify that it's installed with the following command:
zfs --version
Now, it's time to check that the HDDs we have in the enclosure are healthy, running, and recognized. We also want to find out their device IDs and take note of them:
sudo fdisk -1
Note: You might be wondering why some of these commands require "sudo" in front of them while others don't. "Sudo" is short for "super user do”. When and where "sudo" is used has to do with the way permissions are set up in Linux. Only the "root" user has the access level to perform certain tasks in Linux. As a matter of security and safety regular user accounts are kept separate from the "root" user. It's not advised (or even possible) to boot into Linux as "root" with most modern distributions. Instead by using "sudo" our regular user account is temporarily given the power to do otherwise forbidden things. Don't worry about it too much at this stage, but if you want to know more check out this introduction.
If everything is working you should get a list of the various drives detected along with their device IDs which will look like this: /dev/sdc. You can also check the device IDs of the drives by opening the disk utility app. Jot these IDs down as we'll need them for our next step, creating our RAIDz array.
RAIDz is similar to RAID-5 in that instead of striping your data over multiple disks, exchanging redundancy for speed and available space (RAID-0), or mirroring your data writing by two copies of every piece (RAID-1), it instead writes parity blocks across the disks in addition to striping, this provides a balance of speed, redundancy and available space. If a single drive fails, the parity blocks on the working drives can be used to reconstruct the entire array as soon as a replacement drive is added.
Additionally, RAIDz improves over some of the common RAID-5 flaws. It's more resilient and capable of self healing, as it is capable of automatically checking for errors against a checksum. It's more forgiving in this way, and it's likely that you'll be able to detect when a drive is dying well before it fails. A RAIDz array can survive the loss of any one drive.
Note: While RAIDz is indeed resilient, if a second drive fails during the rebuild, you're fucked. Always keep backups of things you can't afford to lose. This tutorial, however, is not about proper data safety.
To create the pool, use the following command:
sudo zpool create "zpoolnamehere" raidz "device IDs of drives we're putting in the pool"
For example, let's creatively name our zpool "mypool". This poil will consist of four drives which have the device IDs: sdb, sdc, sdd, and sde. The resulting command will look like this:
sudo zpool create mypool raidz /dev/sdb /dev/sdc /dev/sdd /dev/sde
If as an example you bought five HDDs and decided you wanted more redundancy dedicating two drive to this purpose, we would modify the command to "raidz2" and the command would look something like the following:
sudo zpool create mypool raidz2 /dev/sdb /dev/sdc /dev/sdd /dev/sde /dev/sdf
An array configured like this is known as RAIDz2 and is able to survive two disk failures.
Once the zpool has been created, we can check its status with the command:
zpool status
Or more concisely with:
zpool list
The nice thing about ZFS as a file system is that a pool is ready to go immediately after creation. If we were to set up a traditional RAID-5 array using mbam, we'd have to sit through a potentially hours long process of reformatting and partitioning the drives. Instead we're ready to go right out the gates.
The zpool should be automatically mounted to the filesystem after creation, check on that with the following:
df -hT | grep zfs
Note: If your computer ever loses power suddenly, say in event of a power outage, you may have to re-import your pool. In most cases, ZFS will automatically import and mount your pool, but if it doesn’t and you can't see your array, simply open the terminal and type sudo zpool import -a.
By default a zpool is mounted at /"zpoolname". The pool should be under our ownership but let's make sure with the following command:
sudo chown -R "yourlinuxusername" /"zpoolname"
Note: Changing file and folder ownership with "chown" and file and folder permissions with "chmod" are essential commands for much of the admin work in Linux, but we won't be dealing with them extensively in this guide. If you'd like a deeper tutorial and explanation you can check out these two guides: chown and chmod.

You can access the zpool file system through the GUI by opening the file manager (the Ubuntu default file manager is called Nautilus) and clicking on "Other Locations" on the sidebar, then entering the Ubuntu file system and looking for a folder with your pool's name. Bookmark the folder on the sidebar for easy access.

Your storage pool is now ready to go. Assuming that we already have some files on our Windows PC we want to copy to over, we're going to need to install and configure Samba to make the pool accessible in Windows.
Step Five: Setting Up Samba/Sharing
Samba is what's going to let us share the zpool with Windows and allow us to write to it from our Windows machine. First let's install Samba with the following commands:
sudo apt-get update
then
sudo apt-get install samba
Next create a password for Samba.
sudo smbpswd -a "yourlinuxusername"
It will then prompt you to create a password. Just reuse your Ubuntu user password for simplicity's sake.
Note: if you're using just a single external drive replace the zpool location in the following commands with wherever it is your external drive is mounted, for more information see this guide on mounting an external drive in Ubuntu.
After you've created a password we're going to create a shareable folder in our pool with this command
mkdir /"zpoolname"/"foldername"
Now we're going to open the smb.conf file and make that folder shareable. Enter the following command.
sudo nano /etc/samba/smb.conf
This will open the .conf file in nano, the terminal text editor program. Now at the end of smb.conf add the following entry:
["foldername"]
path = /"zpoolname"/"foldername"
available = yes
valid users = "yourlinuxusername"
read only = no
writable = yes
browseable = yes
guest ok = no
Ensure that there are no line breaks between the lines and that there's a space on both sides of the equals sign. Our next step is to allow Samba traffic through the firewall:
sudo ufw allow samba
Finally restart the Samba service:
sudo systemctl restart smbd
At this point we'll be able to access to the pool, browse its contents, and read and write to it from Windows. But there's one more thing left to do, Windows doesn't natively support the ZFS file systems and will read the used/available/total space in the pool incorrectly. Windows will read available space as total drive space, and all used space as null. This leads to Windows only displaying a dwindling amount of "available" space as the drives are filled. We can fix this! Functionally this doesn't actually matter, we can still write and read to and from the disk, it just makes it difficult to tell at a glance the proportion of used/available space, so this is an optional step but one I recommend (this step is also unnecessary if you're just using a single external drive). What we're going to do is write a little shell script in #bash. Open nano with the terminal with the command:
nano
Now insert the following code:
#!/bin/bash CUR_PATH=`pwd` ZFS_CHECK_OUTPUT=$(zfs get type $CUR_PATH 2>&1 > /dev/null) > /dev/null if [[ $ZFS_CHECK_OUTPUT == *not\ a\ ZFS* ]] then IS_ZFS=false else IS_ZFS=true fi if [[ $IS_ZFS = false ]] then df $CUR_PATH | tail -1 | awk '{print $2" "$4}' else USED=$((`zfs get -o value -Hp used $CUR_PATH` / 1024)) > /dev/null AVAIL=$((`zfs get -o value -Hp available $CUR_PATH` / 1024)) > /dev/null TOTAL=$(($USED+$AVAIL)) > /dev/null echo $TOTAL $AVAIL fi
Save the script as "dfree.sh" to /home/"yourlinuxusername" then change the ownership of the file to make it executable with this command:
sudo chmod 774 dfree.sh
Now open smb.conf with sudo again:
sudo nano /etc/samba/smb.conf
Now add this entry to the top of the configuration file to direct Samba to use the results of our script when Windows asks for a reading on the pool's used/available/total drive space:
[global]
dfree command = /home/"yourlinuxusername"/dfree.sh
Save the changes to smb.conf and then restart Samba again with the terminal:
sudo systemctl restart smbd
Now there’s one more thing we need to do to fully set up the Samba share, and that’s to modify a hidden group permission. In the terminal window type the following command:
usermod -a -G sambashare “yourlinuxusername”
Then restart samba again:
sudo systemctl restart smbd
If we don’t do this last step, everything will appear to work fine, and you will even be able to see and map the drive from Windows and even begin transferring files, but you'd soon run into a lot of frustration. As every ten minutes or so a file would fail to transfer and you would get a window announcing “0x8007003B Unexpected Network Error”. This window would require your manual input to continue the transfer with the file next in the queue. And at the end it would reattempt to transfer whichever files failed the first time around. 99% of the time they’ll go through that second try, but this is still all a major pain in the ass. Especially if you’ve got a lot of data to transfer or you want to step away from the computer for a while.
It turns out samba can act a little weirdly with the higher read/write speeds of RAIDz arrays and transfers from Windows, and will intermittently crash and restart itself if this group option isn’t changed. Inputting the above command will prevent you from ever seeing that window.
The last thing we're going to do before switching over to our Windows PC is grab the IP address of our Linux machine. Enter the following command:
hostname -I
This will spit out this computer's IP address on the local network (it will look something like 192.168.0.x), write it down. It might be a good idea once you're done here to go into your router settings and reserving that IP for your Linux system in the DHCP settings. Check the manual for your specific model router on how to access its settings, typically it can be accessed by opening a browser and typing http:\\192.168.0.1 in the address bar, but your router may be different.
Okay we’re done with our Linux computer for now. Get on over to your Windows PC, open File Explorer, right click on Network and click "Map network drive". Select Z: as the drive letter (you don't want to map the network drive to a letter you could conceivably be using for other purposes) and enter the IP of your Linux machine and location of the share like so: \\"LINUXCOMPUTERLOCALIPADDRESSGOESHERE"\"zpoolnamegoeshere"\. Windows will then ask you for your username and password, enter the ones you set earlier in Samba and you're good. If you've done everything right it should look something like this:

You can now start moving media over from Windows to the share folder. It's a good idea to have a hard line running to all machines. Moving files over Wi-Fi is going to be tortuously slow, the only thing that’s going to make the transfer time tolerable (hours instead of days) is a solid wired connection between both machines and your router.
Step Six: Setting Up Remote Desktop Access to Your Server
After the server is up and going, you’ll want to be able to access it remotely from Windows. Barring serious maintenance/updates, this is how you'll access it most of the time. On your Linux system open the terminal and enter:
sudo apt install xrdp
Then:
sudo systemctl enable xrdp
Once it's finished installing, open “Settings” on the sidebar and turn off "automatic login" in the User category. Then log out of your account. Attempting to remotely connect to your Linux computer while you’re logged in will result in a black screen!
Now get back on your Windows PC, open search and look for "RDP". A program called "Remote Desktop Connection" should pop up, open this program as an administrator by right-clicking and selecting “run as an administrator”. You’ll be greeted with a window. In the field marked “Computer” type in the IP address of your Linux computer. Press connect and you'll be greeted with a new window and prompt asking for your username and password. Enter your Ubuntu username and password here.

If everything went right, you’ll be logged into your Linux computer. If the performance is sluggish, adjust the display options. Lowering the resolution and colour depth do a lot to make the interface feel snappier.

Remote access is how we're going to be using our Linux system from now, barring edge cases like needing to get into the BIOS or upgrading to a new version of Ubuntu. Everything else from performing maintenance like a monthly zpool scrub to checking zpool status and updating software can all be done remotely.

This is how my server lives its life now, happily humming and chirping away on the floor next to the couch in a corner of the living room.
Step Seven: Plex Media Server/Jellyfin
Okay we’ve got all the ground work finished and our server is almost up and running. We’ve got Ubuntu up and running, our storage array is primed, we’ve set up remote connections and sharing, and maybe we’ve moved over some of favourite movies and TV shows.
Now we need to decide on the media server software to use which will stream our media to us and organize our library. For most people I’d recommend Plex. It just works 99% of the time. That said, Jellyfin has a lot to recommend it by too, even if it is rougher around the edges. Some people run both simultaneously, it’s not that big of an extra strain. I do recommend doing a little bit of your own research into the features each platform offers, but as a quick run down, consider some of the following points:
Plex is closed source and is funded through PlexPass purchases while Jellyfin is open source and entirely user driven. This means a number of things: for one, Plex requires you to purchase a “PlexPass” (purchased as a one time lifetime fee $159.99 CDN/$120 USD or paid for on a monthly or yearly subscription basis) in order to access to certain features, like hardware transcoding (and we want hardware transcoding) or automated intro/credits detection and skipping, Jellyfin offers some of these features for free through plugins. Plex supports a lot more devices than Jellyfin and updates more frequently. That said, Jellyfin's Android and iOS apps are completely free, while the Plex Android and iOS apps must be activated for a one time cost of $6 CDN/$5 USD. But that $6 fee gets you a mobile app that is much more functional and features a unified UI across platforms, the Plex mobile apps are simply a more polished experience. The Jellyfin apps are a bit of a mess and the iOS and Android versions are very different from each other.
Jellyfin’s actual media player is more fully featured than Plex's, but on the other hand Jellyfin's UI, library customization and automatic media tagging really pale in comparison to Plex. Streaming your music library is free through both Jellyfin and Plex, but Plex offers the PlexAmp app for dedicated music streaming which boasts a number of fantastic features, unfortunately some of those fantastic features require a PlexPass. If your internet is down, Jellyfin can still do local streaming, while Plex can fail to play files unless you've got it set up a certain way. Jellyfin has a slew of neat niche features like support for Comic Book libraries with the .cbz/.cbt file types, but then Plex offers some free ad-supported TV and films, they even have a free channel that plays nothing but Classic Doctor Who.
Ultimately it's up to you, I settled on Plex because although some features are pay-walled, it just works. It's more reliable and easier to use, and a one-time fee is much easier to swallow than a subscription. I had a pretty easy time getting my boomer parents and tech illiterate brother introduced to and using Plex and I don't know if I would've had as easy a time doing that with Jellyfin. I do also need to mention that Jellyfin does take a little extra bit of tinkering to get going in Ubuntu, you’ll have to set up process permissions, so if you're more tolerant to tinkering, Jellyfin might be up your alley and I’ll trust that you can follow their installation and configuration guide. For everyone else, I recommend Plex.
So pick your poison: Plex or Jellyfin.
Note: The easiest way to download and install either of these packages in Ubuntu is through Snap Store.
After you've installed one (or both), opening either app will launch a browser window into the browser version of the app allowing you to set all the options server side.
The process of adding creating media libraries is essentially the same in both Plex and Jellyfin. You create a separate libraries for Television, Movies, and Music and add the folders which contain the respective types of media to their respective libraries. The only difficult or time consuming aspect is ensuring that your files and folders follow the appropriate naming conventions:
Plex naming guide for Movies
Plex naming guide for Television
Jellyfin follows the same naming rules but I find their media scanner to be a lot less accurate and forgiving than Plex. Once you've selected the folders to be scanned the service will scan your files, tagging everything and adding metadata. Although I find do find Plex more accurate, it can still erroneously tag some things and you might have to manually clean up some tags in a large library. (When I initially created my library it tagged the 1963-1989 Doctor Who as some Korean soap opera and I needed to manually select the correct match after which everything was tagged normally.) It can also be a bit testy with anime (especially OVAs) be sure to check TVDB to ensure that you have your files and folders structured and named correctly. If something is not showing up at all, double check the name.
Once that's done, organizing and customizing your library is easy. You can set up collections, grouping items together to fit a theme or collect together all the entries in a franchise. You can make playlists, and add custom artwork to entries. It's fun setting up collections with posters to match, there are even several websites dedicated to help you do this like PosterDB. As an example, below are two collections in my library, one collecting all the entries in a franchise, the other follows a theme.

My Star Trek collection, featuring all eleven television series, and thirteen films.

My Best of the Worst collection, featuring sixty-nine films previously showcased on RedLetterMedia’s Best of the Worst. They’re all absolutely terrible and I love them.
As for settings, ensure you've got Remote Access going, it should work automatically and be sure to set your upload speed after running a speed test. In the library settings set the database cache to 2000MB to ensure a snappier and more responsive browsing experience, and then check that playback quality is set to original/maximum. If you’re severely bandwidth limited on your upload and have remote users, you might want to limit the remote stream bitrate to something more reasonable, just as a note of comparison Netflix’s 1080p bitrate is approximately 5Mbps, although almost anyone watching through a chromium based browser is streaming at 720p and 3mbps. Other than that you should be good to go. For actually playing your files, there's a Plex app for just about every platform imaginable. I mostly watch television and films on my laptop using the Windows Plex app, but I also use the Android app which can broadcast to the chromecast connected to the TV in the office and the Android TV app for our smart TV. Both are fully functional and easy to navigate, and I can also attest to the OS X version being equally functional.
Part Eight: Finding Media
Now, this is not really a piracy tutorial, there are plenty of those out there. But if you’re unaware, BitTorrent is free and pretty easy to use, just pick a client (qBittorrent is the best) and go find some public trackers to peruse. Just know now that all the best trackers are private and invite only, and that they can be exceptionally difficult to get into. I’m already on a few, and even then, some of the best ones are wholly out of my reach.
If you decide to take the left hand path and turn to Usenet you’ll have to pay. First you’ll need to sign up with a provider like Newshosting or EasyNews for access to Usenet itself, and then to actually find anything you’re going to need to sign up with an indexer like NZBGeek or NZBFinder. There are dozens of indexers, and many people cross post between them, but for more obscure media it’s worth checking multiple. You’ll also need a binary downloader like SABnzbd. That caveat aside, Usenet is faster, bigger, older, less traceable than BitTorrent, and altogether slicker. I honestly prefer it, and I'm kicking myself for taking this long to start using it because I was scared off by the price. I’ve found so many things on Usenet that I had sought in vain elsewhere for years, like a 2010 Italian film about a massacre perpetrated by the SS that played the festival circuit but never received a home media release; some absolute hero uploaded a rip of a festival screener DVD to Usenet. Anyway, figure out the rest of this shit on your own and remember to use protection, get yourself behind a VPN, use a SOCKS5 proxy with your BitTorrent client, etc.
On the legal side of things, if you’re around my age, you (or your family) probably have a big pile of DVDs and Blu-Rays sitting around unwatched and half forgotten. Why not do a bit of amateur media preservation, rip them and upload them to your server for easier access? (Your tools for this are going to be Handbrake to do the ripping and AnyDVD to break any encryption.) I went to the trouble of ripping all my SCTV DVDs (five box sets worth) because none of it is on streaming nor could it be found on any pirate source I tried. I’m glad I did, forty years on it’s still one of the funniest shows to ever be on TV.
Part Nine/Epilogue: Sonarr/Radarr/Lidarr and Overseerr
There are a lot of ways to automate your server for better functionality or to add features you and other users might find useful. Sonarr, Radarr, and Lidarr are a part of a suite of “Servarr” services (there’s also Readarr for books and Whisparr for adult content) that allow you to automate the collection of new episodes of TV shows (Sonarr), new movie releases (Radarr) and music releases (Lidarr). They hook in to your BitTorrent client or Usenet binary newsgroup downloader and crawl your preferred Torrent trackers and Usenet indexers, alerting you to new releases and automatically grabbing them. You can also use these services to manually search for new media, and even replace/upgrade your existing media with better quality uploads. They’re really a little tricky to set up on a bare metal Ubuntu install (ideally you should be running them in Docker Containers), and I won’t be providing a step by step on installing and running them, I’m simply making you aware of their existence.
The other bit of kit I want to make you aware of is Overseerr which is a program that scans your Plex media library and will serve recommendations based on what you like. It also allows you and your users to request specific media. It can even be integrated with Sonarr/Radarr/Lidarr so that fulfilling those requests is fully automated.
And you're done. It really wasn't all that hard. Enjoy your media. Enjoy the control you have over that media. And be safe in the knowledge that no hedgefund CEO motherfucker who hates the movies but who is somehow in control of a major studio will be able to disappear anything in your library as a tax write-off.
1K notes
·
View notes
Text
HOW TO START IMPLEMENTING CHANGE + STAY MOTIVATED


HAVE A REASON. It is going to be hard to start inputting change in your life if you do not even have a reason why. That reason also has to come from within, not from any other externalities (friends, school, work, family). This reason has to make you strive to be better.
If you’re unsure about your reason, write down times when you feel your happiest and when you feel your lowest, then notice any common themes.
BUILD DISCIPLINE. Discipline is the ability to be productive without hesitation or distractions. The only way to build it, is to practice it. Do the things you need/want to do, regardless of how you feel in the present.
Just remember, that you always feel better after committing to yourself.
MAKE YOUR PLAN SUSTAINABLE. Your routines and habits you want to implement, need to be at arm’s length for you. While I do believe in challenging yourself if your mind perceives that specific activity as ‘too hard’, it is going to make you avoid that task.
This is a reaction from your ego coming out of your comfort zone because it is so unfamiliar it wants to protect if anything ‘bad’ happens e.g. failure, loss of control and criticism.
Reminder, that part of you is not bad at all nor is it holding you back. It is the part of you that wants to keep you safe. For your ego to allow you to do tasks out of your comfort zone, it needs to be simple and easy. Then from there, you can build it up to your ideal habit or routine.
MAKE YOUR ENVIRONMENT INTENTIONAL. Your mind, space and the people around you need to be decluttered and serve a purpose. For your mind, avoid feeding it with an overload of information especially if you are not going to apply it. Minimise social media use and journaling instead of looking for a quick fix.
Your space, specifically your bedroom has to be the best place for you to grow. Everything in your room needs to serve a purpose, it has to be kept clean to ensure mind clarity and place intentional items around to support your goals (mantras, workout mat, water bottle, instruments).
The people around you have to support you and your journey. I don’t believe in the ‘value’ or ‘worth’ people have, but rather what you think of them. Someone could be the most overachieving and productive person ever, so they may inspire you, but what if they don’t wish the best for you? People who will support you regardless are the best resource ever.
BE FLEXIBLE. The ability to edit your habits or routine when needed so you can stick to a schedule or adapt to change is a powerful but underrated skill. Anything in life can happen, but if we want to stick to our goals, we need to develop flexibility.
The best way to develop flexibility is to try everything. For example, meditation. Do 5, 10, 15, and 20 minutes, try it in the morning, afternoon or evening, do a guided one or do it by yourself. To get flexible in a habit, you need to expand your capabilities in that habit.
ALWAYS SOMETHING RATHER THAN NOTHING. Typically during the day, we procrastinate because we want the challenging task to be perfect or we believe there’s not enough time/resources to do it.
However, just having that small progress each day is always better than nothing. One sentence is better than none, one healthy meal is better than none, 2 minutes of exercise is better than none etc.
HAVE GOALS THAT YOU LIKE. The reason so many people dislike doing their habits or routines is because it’s not stuff that’s enjoyable for them. It’s habits and routines that they got online from someone completely different.
Choose your favourite way of exercising, read your favourite books(even graphic ones!) and journal the way you want. If the steps to becoming your best self are steps that you dislike, then it is not your best self.
IDENTIFY THE WAY YOU SELF-SABOTAGE. If you are struggling to implement change, chances are there are small self-destructive behaviours that are in your routines that hold you back.
This could be major procrastination, doom-scrolling, an addiction or binge eating. You either have to completely extract these habits from your life or you can do these things in moderation.
TAKE REGULAR BREAKS. If you are being productive back-to-back and not allowing yourself to cool down, your motivation will deplete quickly. Have around 1-2 hours in your day doing anything you like.
If needed, after each task, take 5-10 minutes for yourself. However, do avoid your phone for these periods and try to be present in whatever you do here.
HAVE SOFT DAYS. Days in which you do not have to do anything hardcore or intense, and you’re just living. While yes, be somewhat productive but nothing too intense.
This can be your reset, detox or self care days, or all of them combined!
#becoming that girl#that girl#clean girl#just girly things#green juice girl#becoming her#it girl#dream girl guide#dream girl journey#glow up#glow up era#wonyoungism#pink pilates princess#girlboss#hot girl era#wellness era#lazy girl era#health and wellness#productivity aesthetic#productivitytips#productive#being productive#dream girl#dream life
3K notes
·
View notes
Text

During Azris Week 2024, the ship reached 300 fics. Since then, we have reached 650+ fics!! And this doesn’t include all of the wonderful art that’s been created since then. This ship has really grown in the last year, and we’re so happy you’re all here.
This year, we have a few new prompts, as well as some of the most popular from Azris Week 2024. Remember, the prompts are only guidelines - you can create something that fits strictly with the prompt or something that only barely relates. Many of the prompts complement each other, as well as having multiple interpretations. Anything is on the table, but do review the rules below before you post.
Prompts
Day 1: Creature Feature
There are many creatures in Prythian, and many more outside of canon. You can return to the “familiars” idea from last year, or you can create something totally new. Expand your interpretation of who or what a creature is and see where it takes you.
Day 2: Slice of Life
A favorite from Azris Week 2024. So much of this enemies-to-lovers ship is full of strike, pain, and betrayal. But what about the quiet moments?
Day 3: Contact
Another favorite from Azris Week 2024. How do Eris and Azriel communicate? Through letters or texts, maybe, or through heavy gazes and the brush of fingers on exposed skin - and have they always spoken to each other this way?
Day 4: Read Between the Lines
Azriel and Eris are also not known for their straightforward communication, nor are they frequently on the same page together. How do they - or you - read between the lines to see what could be?
Day 5: Favorite Trope/AU
Only one bed? Check. Swordplay as innuendo? Check. Or maybe a love story that takes place in a world neither in Prythian or on planet Earth? Hell yeah.
Day 6: Safe For Work
A challenge to write something sexy or sexually charged that you could read at work. But also - Azriel and Eris are very much NOT safe for their work or many other people’s jobs either. You can combine the two or leave them separate.
Day 7: Free Day
This is self-explanatory.
Rules
1) Be respectful. We’re here to celebrate Azris and appreciate the creations made in their honor. This is a positive, inclusive space which won’t stand for bashing of any kind.
2) Please direct any event-related questions to this account, not to the mods individually.
3) Tag us and use #azrisweek2025 when posting here or on Instagram so that we can reblog/repost. If you are posting a work to AO3, there will be a collection to add it to during the event week.
4) Creations of all kinds are welcome and encouraged! Fics, fanart, mood boards, headcanons, incorrect quotes, edits, playlists, etc. We will not be promoting AI-generated/altered images or fanworks.
5) A caveat to the previous rule. This event won’t tolerate characters being warped to fit heteronormative roles and/or relationship stereotypes. For example (thanks to @cauldronblssd for putting it so clearly) fem Eris or Azriel as queer identities or gender non-conforming characters, yes. Fem Eris or Azriel as a substitute for a straight woman, no. With this in mind, we reserve the right to use our discretion and not engage with content, regardless of how it is tagged, if said content perpetuates harmful stereotypes.
(Header by @acourtofladydeath)
#azrisweek2025#azris#azris supremacy#azriel shadowsinger#eris vanserra#pro azriel#pro eris vanserra#acotar fandom
159 notes
·
View notes
Text
Writing Tips - Beating Perfectionism
1. Recognising writing perfectionism. It’s not usually as literal as “This isn’t 100% perfect and so it is the worst thing ever”, in my experience it usually sneaks up more subtly. Things like where you should probably be continuing on but if you don’t figure out how to word this paragraph better it’s just going to bug you the whole time, or where you’re growing demotivated because you don’t know how to describe the scene 100% exactly as you can imagine it in your head, or things along those lines where your desire to be exact can get in the way of progression. In isolated scenarios this is natural, but if it’s regularly and notably impacting your progress then there’s a more pressing issue
2. Write now, edit later. Easier said than done, which always infuriated me until I worked out how it translates into practice; you need to recognise what the purpose of this stage of the writing process is and when editing will hinder you more than help you. Anything up to and including your first draft is purely done for structural and creative purposes, and trying to impose perfection on a creative process will naturally stifle said creativity. Creativity demands the freedom of imperfection
3. Perfection is stagnant. We all know that we have to give our characters flaws and challenges to overcome since, otherwise, there’s no room for growth or conflict or plot, and it ends up being boring and predictable at best - and it’s just the same as your writing. Say you wrote the absolute perfect book; the perfect plot, the perfect characters, the perfect arcs, the perfect ending, etc etc. It’s an overnight bestseller and you’re discussed as a literary great for all time. Everyone, even those outside of your target demographic, call it the perfect book. Not only would that first require you to turn the perfect book into something objective, which is impossible, but it would also mean that you would either never write again, because you can never do better than your perfect book, or you’ll always write the exact same thing in the exact same way to ensure constant perfection. It’s repetitive, it’s boring, and all in all it’s just fearful behaviour meant to protect you from criticism that you aren’t used to, rather than allowing yourself to get acclimated to less than purely positive feedback
4. Faulty comparisons. Comparing your writing to that of a published author’s is great from an analytical perspective, but it can easily just become a case of “Their work is so much better, mine sucks, I’ll never be as good as them or as good as any ‘real’ writer”. You need to remember that you’re comparing a completely finished draft, which likely underwent at least three major edits and could have even had upwards of ten, to wherever it is you’re at. A surprising number of people compare their *first* draft to a finished product, which is insanity when you think of it that way; it seems so obvious from this perspective why your first attempt isn’t as good as their tenth. You also end up comparing your ability to describe the images in your head to their ability to craft a new image in your head; I guarantee you that the image the author came up with isn’t the one their readers have, and they’re kicking themselves for not being able to get it exactly as they themselves imagine it. Only the author knows what image they’re working off of; the readers don’t, and they can imagine their own variation which is just as amazing
5. Up close and too personal. Expanding on the last point, just in general it’s harder to describe something in coherent words than it is to process it when someone else prompts you to do so. You end up frustrated and going over it a gazillion times, even to the point where words don’t even look like words anymore. You’ve got this perfect vision of how the whole story is supposed to go, and when you very understandably can’t flawlessly translate every single minute detail to your satisfaction, it’s demotivating. You’re emotionally attached to this perfect version that can’t ever be fully articulated through any other medium. But on the other hand, when consuming other media that you didn’t have a hand in creating, you’re viewing it with perfectly fresh eyes; you have no ‘perfect ideal’ of how everything is supposed to look and feel and be, so the images the final product conjures up become that idealised version - its no wonder why it always feels like every writer except you can pull off their visions when your writing is the only one you have such rigorous preconceived notions of
6. That’s entertainment. Of course writing can be stressful and draining and frustrating and all other sorts of nasty things, but if overall you can’t say that you ultimately enjoy it, you’re not writing for the right reasons. You’ll never take true pride in your work if it only brings you misery. Take a step back, figure out what you can do to make things more fun for you - or at least less like a chore - and work from there
7. Write for yourself. One of the things that most gets to me when writing is “If this was found and read by someone I know, how would that feel?”, which has lead me on multiple occasions to backtrack and try to be less cringe or less weird or less preachy or whatever else. It’s harder to share your work with people you know whose opinions you care about and whose impressions of you have the potential of shifting based on this - sharing it to strangers whose opinions ultimately don’t matter and who you’ll never have to interact with again is somehow a lot less scary because their judgements won’t stick. But allowing the imaginary opinions of others to dictate not even your finished project, but your unmoderated creative process in general? Nobody is going to see this without your say so; this is not the time to be fussing over how others may perceive your writing. The only opinion that matters at this stage is your own
8. Redirection. Instead of focusing on quality, focusing on quantity has helped me to improve my perfectionism issues; it doesn’t matter if I write twenty paragraphs of complete BS so long as I’ve written twenty paragraphs or something that may or may not be useful later. I can still let myself feel accomplished regardless of quality, and if I later have to throw out whole chapters, so be it
9. That’s a problem for future me. A lot of people have no idea how to edit, or what to look for when they do so, so having a clear idea of what you want to edit by the time the editing session comes around is gonna be a game-changer once you’re supposed to be editing. Save the clear work for when you’re allocating time for it and you’ll have a much easier and more focused start to the editing process. It’ll be more motivating than staring blankly at the intimidating word count, at least
10. The application of applications. If all else fails and you’re still going back to edit what you’ve just wrote in some struggle for the perfect writing, there are apps and websites that you can use that physically prevent you from editing your work until you’re done with it. If nothing else, maybe it can help train you away from major edits as you go
#perfectionism#perfection#writing#writers#writeblr#bookblr#book#writers on tumblr#writerscommunity#writers of tumblr#writer#my writing#how to write#on writing#creative writing#write#writing tips#writblr#female writers#queer writers#writer things#writer stuff#writing is hard#writing advice#writing life#writer problems#writerscreed#writersnetwork#writerblr#writersociety
1K notes
·
View notes
Text
Image credit "Fishing" By yonaz
So in last night's 3.5 edition D&D game, my players had a chance to do some ice fishing and one player called out for one of my ad hoc mini-games (I do this a lot haha). I wanted something simple, a combo of character skill and some luck, and so in short order ended up with this very quick mini-game you can easily employ.
:
Quick Disclaimer: These fishing mini-game mechanics may not be entirely original and could resemble systems from other games I just can't recall. For my part, I'm posting this FOR sharing. Feel free to use, adapt, or modify them in your own games as you see fit. No ownership or exclusivity is claimed over this idea—enjoy and share as you wish!
:
Fishing Mini-Game (D&D 3.5 Edition)
Step 1: Build the Fishing Pool
The player rolls a number of d6 equal to their relevant skill modifier (Survival or Profession (Fisher)).
Example: A character with a +10 in Survival rolls 10d6 and sets these dice aside as their "Fishing Pool".
Fishing Pool Example Roll: 1, 1, 2, 3, 3, 4, 4, 5, 5, 6.
Step 2: Perform the Fishing Check
The player then rolls 5d6 as their "Fishing Check" for one hour of fishing.
Example Roll: 1, 2, 4, 4, 6.
Step 3: Match for Combos
The player now attempts to match the dice results from their Fishing Pool with their Fishing Check results to form combos. The number of dice used in the combo determines the size of the fish:
Small Fish: Match 2 dice from the Fishing Pool with the Fishing Check.
Medium Fish: Match 3 dice from the Fishing Pool with the Fishing Check.
Large Fish: Match 5 dice from the Fishing Pool with the Fishing Check.
Example Combo:
If the player's Fishing Pool has dice showing 1, 2, 4, 4, and 6, they could match all 5 dice with their Fishing Check, catching a Large Fish.
Step 4: Fish Weight and Rations
Once the fish is caught, the total weight of the edible parts of the fish is determined by summing the values of the dice used in the combo.
Example: For a Large Fish (1, 2, 4, 4, 6), the total weight is 1+2+4+4+6 = 17 kg.
To calculate the number of rations provided by the fish:
1 kg = 2,000 calories (or half a ration).
Rations Formula: Divide the total weight of the fish by 2.
Example: 17 kg / 2 = 8.5 kg or 8 rations (we round down).
Step 5: Continue or Stop
After catching a fish, remove the dice used from the Fishing Pool.
If the player still has at least 2 dice left in their Fishing Pool, they can attempt to catch another fish using the same Fishing Check results. Otherwise, they are done for that hour.
That's all that we did and they loved it!
But since then we've considered how future games or others might expand on it with special roll combos, items, locations, setting conditions, Aid Other, etc. So here are some...
Optional Add-Ons and Considerations
Multiple Attempts Per Hour:
If the player rolls exceptionally well on their Fishing Pool, they may be able to attempt fishing multiple times in an hour. To keep this simple, I'd say if they are able to clear the first Pool entirely, they get a brand new roll, a whole new Pool as if starting fishing over, but they keep their previous catches.
Modifiers and Conditions:
You could introduce conditions that affect the Fishing Pool or Fishing Check rolls:
Good Fishing Spot: +1d6 to the Fishing Pool.
Bad Weather/Overfished Area: -1d6 (or more) to the Fishing Pool or disadvantage (see 5e, we use this idea quite a bit even in our 3.5e games) on Fishing Check rolls.
Magic/Luck Items: Grant rerolls or bonus dice to the Fishing Pool or allow rerolls of the Fishing Check.
Special Fish Combos:
Occasionally, you could allow rare or magical fish (or larger species) that provide bonuses or other effects; perhaps these are possible if the combos use specific die results:
Giant Fish: Requires a match of dice with identical values, but double the weight result (ex: a medium fish that used 5,5,5 would be a Giant of its type, and grant 15x2 or 30 kg of edible parts!).
Magical Fish: Grants temporary bonuses, like extra HP or special buffs, when consumed. (ex. A combo of sequential rising values, like 1,2,3,4,5, would grant a Magical Large fish)
Fishing Tools and Bait:
Fishing equipment or bait could modify the rolls:
Better Rods/Lines: Allow rerolls or add extra dice to the Fishing Pool.
Special Bait/Lures: Increases chances of catching better or more fish (ex. set any one die result to 6; or allow player to select the value of any one die, etc.).
Aid Other
Another player can choose to assist Player A if they are proficient in the same associated skill (Survival or Profession (Fisher), etc based on your setting):
Player B (helper) rolls for the associated skill.
If the result of their skill check (rolled like any other skill check) is 10-19, Player A gains 1 extra die in their fishing Pool.
If the result of their skill check is 20 or higher, Player A gains 2 extra dice in their fishing Pool.
Player A can then use these extra dice to help form better combos when matching against their Fishing Check.
Let me know if you use this mini-game in your D&D sessions, or revamp it for the tabletop rpg/edition you play!
I'd love to hear your stories of the biggest catch, or lamenting that one LEGENDARY CATCH that got away!
And check out Tabletop Gaming Resources for more art, tips, and tools for your game!
#mini-game#mini game#mini games#homebrew#3.5e homebrew#3.5 edition#fishing#survival#fish#profession#skill challenge#steal this idea#tabletop rpg#rpg#tabletop gaming#pen & paper#roleplayer#roleplaying games#games#inspiration.pen & paper games#dnd#d&d#pathfinder#dungeons & dragons#dungeons and dragons#fantasy rpg#d&d 3.5e#d&d 3.5#mechanics#game mechanics
244 notes
·
View notes
Text
Season 2 is Delivering us MORE Weyler & more Heartache!
So this is actually a surprise..I didn't expect sneak peak at all today, but here we are.
Alright the first thing I wanna say is what I've seen a lot of people point out, and I agree.
Hunter Doohan being the only person non Addams family related interviewed is VERY interesting.
And I believe that is only done when someone is a MAIN character/plot point within a series. This means a lot of this season more than likely is going to be centered around him, maybe even a 50/50 split with Wednesday is he really does appear in every episode this season as some rumors have said.
I think this is a really good sign that for one, Tyler won't be offed at the end of this season, and two we are guaranteed to get more Weyler even beyond season 2.
Now let me talk about something else a few people have noticed and pointed out and let me expand on it and give your my perspective as a film minor graduate and a Journalism graduate.
From what I've learned over time and in classes a big reason in editing to splice together scenes in a trailer/teaser/sneak peak etc..is to either misdirect completely, to avoid any spoilers, OR to foreshadow and hint at the correlations between these characters in scenes.
Now I'm not saying that's 100% what the film directors are doing in this video..but it is a MAJOR possibility.
To explain what I'm talking about is there is a edited clip of Gomez and Morticia dancing together and not only does this kind of mirror Wednesday dancing with Tyler and the Rave N as a couple..But this also reflects their relationship.
Tyler and Wednesday's relationship is much like a tango..calculated,sexy, a little chaotic..but absolutely beautiful.
So the fact they have this scene interlaced with the scene of Wednesday visiting Tyler at Willowhill..that could allude to Tyler having a further connection to the Addams family in the future.
But also proving that Wednesday and Tyler are still to some degree dance partners, only this time they're going to be partners in teaming up to stop whatever it is going on.


Now before this scene even happened.
We find out some more interesting things like..
Wednesday goes to the Galpin residence.

And it has been completely vandalized because the whole town now knows that Tyler was the Hyde.
And Oh boy..
This scene scares me for a lot of reasons because for one..
Is Donovan still living here?
And if he is..Donovan must be in an absolute horrid state of mind because every day he walks out of his home he is immediately met with a that huge sign in red, "EVIL LIVES HERE" as just a reminder at how he failed his son..
But I would lie to add maybe a brighter point of view to this scene that I also have learned over time and as a lover of film and literature. And that is a little thing called red herrings.
And actually I would say this scene might be a good sign for Tyler's character because I would say more than half the time a main characters goes somewhere where someone is accused of being horrible, and graffiti is all around their home.. 9/10 times the character in question actually turns out to be a good guy or simply misunderstood...so in this case..Tyler is just being misunderstood like most of us has said for years.
Now I'm going to back pedal a bit and talk about more that scares me about Wednesday visiting the Galpin house hold.
Now I'm not saying I'm a film expert/writer...but this would 100% be the scene where if I was a writer and wanted to off a character it would be when the main character goes to their house and finds them deceased..
I have said many times I think Donovan might die and I thought Wednesday would be the one to find him..well that could very well be that scene.

While she's there, she also might have a vision of Francoise Galpin...
We also find out that it looks like the Addams are moving into the Gates mansion and I actually am mad at myself for not seeing this coming..but this is perfect for a lot of reasons..but the main one i'm gonna focus on is that someone said Wednesday might have visions of what happened to Tyler at that mansion..
What if she sees the bathtub scream?
And realizes that he truly didn't want to go through with what Laurel was doing. Maybe that's why she eventually decides to go see Tyler because she believes there's still something worth saving within Tyler.
Anyway I'm gonna wrap it up, but this is getting very interesting.
#tyler galpin#wednesday netflix#wednesday addams#weyler#wednesday x tyler#wyler#tyler x wednesday#shipping
88 notes
·
View notes
Text
ᴡᴇʟᴄᴏᴍᴇ ᴛᴏ ᴛʜᴇ ʙɪʀᴅɪᴇ ᴀᴜ
(aka "y/n called birdie" ifykyk)


the birdie au is a reader-insert (wip) narrative + collection of one-shots centered on the slow-burn romance between ellie williams and the reader (nicknamed "birdie" in universe). here's what you need to know:

"ʙɪʀᴅɪᴇ" ᴡᴀꜱ ᴀ ᴄʜɪʟᴅʜᴏᴏᴅ ɴɪᴄᴋɴᴀᴍᴇ ᴛʜᴀᴛ ꜱᴛᴜᴄᴋ
your name isn't birdie - it's your nickname. to avoid using y/n, however, you have a nickname your grandfather used and now most people refer to you by. it's made very clear in the narrative that this is only a nickname, though your actual name is purposefully never stated.
so who are you? well, you. but your in-universe backstory goes like this:
your grandfather was a doctor in chicago before the outbreak who avoided initial infection out of pure luck - he had taken the week off and so not come into contact with infected patients. when the outbreak began, he and his daughter (your mother) were moved to the nascente QZ where FEDRA soon exploited his skills
you were born in 2009 in the chicago QZ. in 2012, civil war in the QZ broke out between the liberation groups and FEDRA. sometime between 2012 and 2016, your mother and father were killed in the crossfire. prior to that point they had been planning to escape, and now your grandfather took you (between 3-7) and escaped, heading west
by 2017 you had made it jackson, where the first settlement was being established and fortified. they had need of a doctor and so you two were welcome to stay. when they town expanded and the population grew, they helped convert an old walk-in clinic into a tiny hospital your grandfather oversaw. another settler was an experienced nurse (Tara) and joined him there, and you were practically raised there in the clinic watching them.
you learned most things on the fly in the clinic, and when you grew older, your grandfather decided to train you to one day take his place. the jackson public library and local school had textbooks and test prep books and materials he used to teach you the foundations of chemistry, biology, and practical medicine so you could begin assisting in the clinic.
by the time you were 14, you often manned the reception desk checking people in and writing down their concerns to take to your grandfather for triage. that's how you met ellie for the first time when she and joel arrived in jackson.
working in the clinic while other kids were outside, bonding and training and hanging out around campfires, you didn't have that many friends - but you had your dog, brontë, and you were pretty content with that. but after an initially hostile interaction and a forced apology from ellie, the two of you became something approaching friends.
bonus: brontë


brontë was born in the kennels as part of a litter (all named after old writers) meant to become patrol dogs. however, she was the runt with one underdeveloped back leg that was likely to need amputation. when you were 13, you overheard your grandfather being asked to put her down since she couldn't be a patrol dog and you begged and pleaded with him to be able to keep her. the leg had to go because it unbalanced her and made it difficult for her to walk, and so he caved and agreed to do the procedure and keep her on the condition that you were responsible for taking care of her. since then, she's been your closest companion and follows you everywhere, including the clinic - where she's a hit with the little kids. she's goofy, affectionate, and loyal, and you wouldn't trade her for the world.


a note about inclusivity; though i am writing the reader as 1) afab and 2) using she/her pronouns, i am making a concentrated effort to avoid any other physical description about appearance/body size/etc. that being said, i've never written a reader-insert as long as i intend this to be and i probably will slip up at least once! if you notice that (and since i don't have a beta reader), please *respectfully* notify me and i'll edit it out. :)
#ellie williams#the last of us#ellie williams x reader#tlou part 2#tlou hbo#ellie x reader#birdie au
55 notes
·
View notes
Text
Kuroshitsuji Wiki now on wiki.gg!
As of today (February 24, 2025), the Kuroshitsuji Wiki has left Fandom Wiki and moved officially to wiki.gg! The new wiki can be found here!

From now on, only this wiki will be updated, not the Fandom one.
Why did this happen?
Please read these posts to learn all the reasons why the wiki was ultimately moved.
TL;DR: Fandom's latest policy auto-blocked the word "fag," making a good portion of the wiki uneditable. Fandom, as a site and wiki farm, has become increasingly bad and hostile over the years for many, many other reasons too.
What is new?
Amongst others:
More information: I revised/expanded some pages during the onboarding phase. Not as many as I wanted to, but some nonetheless! I also revamped the layout of the arc pages, though the summaries are still works in progress. I've started adding voice actors to the episode pages (Season 1 is finished, the rest will follow). Ch108 was mistakenly sorted into the Blue Cult Arc though it still belongs to the Emerald Witch Arc; this was fixed. Etc.

(Screenshot from Harcourt's Fandom article. That was a pitiable section orz (Clayton and Cheslock were not better off, embarrassingly.))
More themes/skins: On Fandom, you could only switch between light and dark mode. I put together four different themes for the new wiki, two of which commemorate S4 and S5 :) I hope they are to your liking!
Link hover previews: If you hover over a link now, you get a little preview of the page!

A better, prettier mobile experience: Colours and customisations are now retained on mobile. The references section now looks normal and does not send you on an endless scrolling spree. References actually pop up when you click on them. Etc.
Less ads!!!: THE #1 grievance people have with Fandom Wiki. wiki.gg has very few ads (and they are unintrusive ads too) on both desktop and mobile. If you are logged in, there are no ads whatsoever.
The move of one particular spoiler page (information under the cut)
(And some more things that might be too boring to list here, heh.)
And, of course, the freedom from Fandom and its horrible whims. Pages containing the word "fag" can now be edited again :)

(The little trivia that started it all: I wanted to add it to Diedrich's page and move on to a gazillion other things when I got the notice that my edit was blocked by Fandom's spam filter. It's finally on his page! It only took four months and one site migration...)
What can I do?
You can help out the new wiki by...
... never going on the Fandom Wiki again. Every visit there only strengthens its SEO. Please do not edit the old wiki anymore too, and do not vandalise it now even if it's tempting. Edits only push it more. (Because of Fandom's shitty forking policy, the old wiki cannot be deleted, unfortunately.)
... adding the wiki.gg redirect and Indie Wiki Buddy browser extensions. They send/redirect you to the independent alternative of a Fandom Wiki if such an option exists. (This, of course, helps other wikis that moved too, not just KuroWiki.)
... by sharing the news. "How's the weather?" "Pretty nice, but have you heard that the Kuroshitsuji Wiki moved?"
... by editing. If you want, please feel free to come and edit the wiki! If you used to have a Fandom Wiki account, you can reclaim it here (help for how to do that), or create a new wiki.gg account.
... or by simply visiting and using the new wiki.
I'm so happy the migration is finally done. I hope you like the new wiki, and thank you so much for all the lovely words you had regarding this migration and for all your help!^^ I'll go and continue editing the wiki with new joy and getting to the gazillion things I planned but haven't been able to do during the onboarding.*
*wikis are just never done...

And hello...

:)
----
Regarding that one spoiler page (Ch129 onwards, if you know you know):
The article for Smile's older twin brother, the original and actual Ciel Phantomhive is called "Ciel Phantomhive" (with the quotation marks) on the Fandom Wiki. He's called "Ciel" in articles too.
This was done because when he showed up in Ch129, it was not 100% confirmed yet whether that was Smile's twin, not just a clone or whatnot. A month later, it was confirmed that this was indeed Ciel's twin the actual Ciel. However, the article's name stayed. This had the advantage that the real Ciel's page would not appear when you typed in Ciel in the search bar.

wiki.gg's search function is better than Fandom's though and, here, if you type in Ciel, the search bar suggests pages that contain that word, not just start with it.

(I, unfortunately, forgot to take a screenshot before renaming the page...)
This is better illustrated with the search results for butler:

Innocently typing in Ciel into the search bar would have sent people to the spoiler, and that would be very shitty, wouldn't it? Especially with the influx of anime-onlys.
(I've also seen people complain about the quotation marks too. And, for whatever reason, that way of referring to him made it to Wikipedia???)

The quotation marks messed up the image migration too. Files with quotation marks in their names were the only ones that weren't transferred "properly" (the quotation marks were removed during the migration. Ch130 Ciel and Ciel.png is a horrid file name).

Anyway, I ended up renaming real Ciel's page to Lord Phantomhive. Real Ciel Phantomhive or Ciel Phantomhive (real) would have had the same search results as "Ciel Phantomhive" after all. There could not be a given name in the title.
"Lord Phantomhive" is the title he held as an earl's first son. Also, the fact that Tanaka, apparently, used to refer to Smile as "Lord Ciel"/"Ciel-sama" (Ch19) before the fire and now only calls him "Young Master" was one piece of evidence often brought forward for the Two Ciels Theory when it was still a theory. And, despite Undertaker's words that "Earl Phantomhive is still alive":

"Earl Phantomhive" fell through as an option too. (And because people might have searched for it looking for Smile, and because "Earl Phantomhive" is also Vincent.)
In articles, the real Ciel is either called "the real Ciel" or "Lord Ciel" or "the older brother/twin" or such. I hope I made the distinction between the twins clear enough in the texts.
#kuroshitsuji#black butler#ciel phantomhive#sebastian michaelis#kuroshitsuji spoilers#kuro wiki migration#fandom wiki migration#tired but happy <3#this ordeal is ooooooover orz#oh and if you type in blackbutler.wiki.gg you get to the wiki too!#kuroshitsuji wiki#black butler wiki
117 notes
·
View notes
Text
The Suit-Making Metaphor
[Written in January, 2024] The cold eventually got bad enough that the Grandma, the kids and I fled to a hotel while Matt stayed at the house with the dogs. We were fortunate to be able to that of course, and sharing a room in a nice warm hotel was not suffering by any stretch of the imagination. Even so, it was stressful. We brought ipads, paints, books and needlework to keep the kids entertained and alleviate some anxiety, but time also had to be made for school work—especially as they would be going back to class just in time for finals. We made lists of their classes, what they had to study, what we could help with and what questions would need to be put to their teachers.
Henry’s 16 now (!!) and instead of an exam, his Humanities final was a personal essay. We chatted a bit about his writing process, what he liked about what he had done so far and what was frustrating for him. Though he had a terrific topic, he’d written and rewritten his opening paragraph several times and wasn’t making any real progress.
Been there, buddy.
As we talked, I stumbled on a metaphor that I found helpful, and so I’m going to try and share with you roughly what I said to him, and perhaps some of you will find it helpful too.
I get it, I do. It’s exactly my inclination as well. But writing like this-- where you try to perfect everything as you go, effectively writing the third draft before you finish the first--it’s like trying to make a suit from the top to the bottom. You can’t make a suit like that. You can’t start with the collar and get that perfected and then move to the shoulder. You can’t topstitch the upper part of the button placket before the bottom even exists. And even if you could figure how to do it that way, your suit isn't going to fit. Because that’s just not the best way to make a suit. Finishing the thing from top to bottom is not the best way to write, either. You start by choosing your fabric—your topic. What material are you going to craft the suit from? What’s the subject of the essay? You want to write about your relationship to various monsters. That’s terrific! That’s like a nice wool; there’s heft there—memories and feelings and personal details that resonate as truths; it should make a rich and interesting suit. Now, instead of cutting out the collar immediately, let’s choose a pattern. We need a pattern to help us cut the wool into the proper shapes. The pattern is the very basic structure of your essay. How might you organize your thoughts and feelings about monsters? The order isn’t as important as the categories. For the suit jacket, we’ll need right front, left front, sleeves, collar, lining etc. For the essay, what monsters do you want to write about? King Kong, the Rancor, the Minotaur and Bernard the Bull. Perfect. Cutting the pattern pieces out is equivalent to gathering your thoughts on each monster. Write freely about each one, taking the time to remember in as much detail as possible where you first encountered each monster, how old you were, etc. Go through each of your senses to help you recall the moment. What did you see? Smell? Taste? Feel? Who was with you? How did you feel in your body? How did you feel in your heart? Include everything that jumps out at you, you can always edit it down later. In our metaphor, this step is not just cutting out the pieces but also taking the time to transfer the pattern marks. You might not need them all, but you're sure to make a finer suit if you have them all available. Once you have the pieces, the next step is to see how they fit together. Read through each monster and look for connections. Is there an order that suggests itself? Rearrange and then edit and expand to highlight those connections. The first pass of this is basting stitches—loose connections just to test the fit—once you’re happy with the shape you can go ahead and lay in seams. Here is where our parallels start to fall apart: For the suit, you’ll want to do all the finishing touches—the handstitching, buttons, pressing, etc.—and then try it on and style it. But in writing your essay, these steps are reversed—styling is crafting the last paragraph, bringing the piece to a close. Your essay doesn’t have to wrap up neatly, in fact, you don’t want it to be too matchy-matchy. Just as an outfit’s style is improved by personal idiosyncrasies, a piece of writing is enriched by the author's capacity to engage with complexity and ambiguity. With the styling done--when you really know what it is you're trying to say--now you can go back with needle and thread and do that hand-stitching: tighten the prose where you can, polish rhythms, word choice, grammar and voice. With the whole of the thing in front of you, you now have what you need to do the kind of “third draft” finishing work that was impossible to begin with.
This might be the very definition of beating a metaphor to death, but I surprised myself with it. It was as revelatory for me as it was for Henry--probably more so.
And with that, I need to get back to those now-422 emails.
Cheers,
Kelly Sue
PS New creator-owned book coming out late fall this year--first launch in a decade or so, I think? I do need to figure out this whole newsletter/blog conundrum sooner rather than later. Advice and opinions welcome.
233 notes
·
View notes
Text
About the entanglement of "science" and Empire. About how children are encouraged participate in these imperial "scripts".
Was thinking about this recent thing:
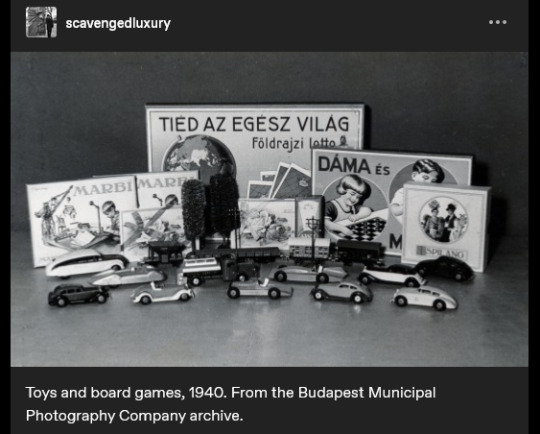
The caption reads: "Toys and board games, 1940." And I think the text on the game-box in the back says something like "the whole world is yours", maybe? (Use of appeals to science/progress in imperial narratives is a thing already well-known, especially for those familiar with Victorian era, Edwardian era, Gilded Age, early twentieth century, etc., in US and Europe.)
And was struck, because I had also recently gone looking through other posts about the often-strange imagery of children's material in late nineteenth- and early twentieth-century US/Europe. And was disturbed/intrigued by this thing:
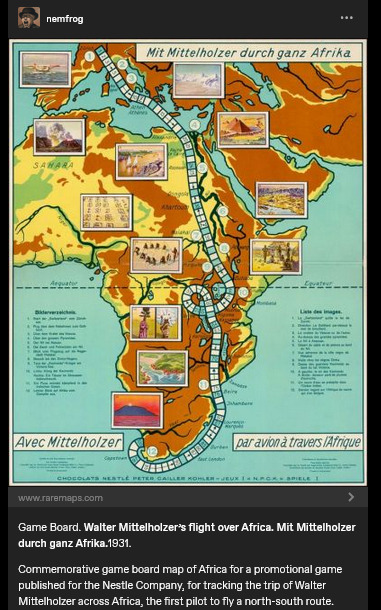
Caption here reads: "Game Board. Walter Mittelholzer's flight over Africa. [...] 1931. Commemorative game board map of Africa for a promotional game published for the N*stle Company, for tracking the trip of Walter Mittelholzer across Africa, the first pilot to fly a north-south route."
Hmm.
I went to learn more about this: Produced in Switzerland. "Africa is for your consumption and pleasure. Brought to you by the N#stle Company!" (See the name-dropping of N#stle at the bottom of the board.) A company which, in the preceding decade, had shifted focus to expand its cacao production (which would be dependent on tropical plantations). Adventure, excitement, knowledge, science, engineering prowess, etc. For kids! (In 1896, Switzerland had hosted a "human zoo" at the Swiss Second National Exhibition in Geneva, where the "Village Noir" exhibit put living people on display; they were over two hundred people from Senegal, who lived in a "mock village" in Geneva's central square.)
Another, from a couple decades earlier, this time English-language.
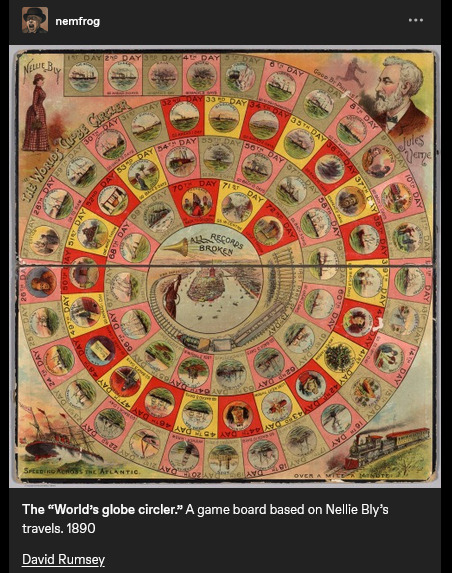
Caption reads: "The "World's globe circler." A game board based on Nellie Bly's travels. 1890." At center, a trumpet, and a proclamation: "ALL RECORDS BROKEN".
Went to find more info: Lithographed game board produced in New York. Images on the board also show Jules Verne; Bly, in real-world travels, was attempting to emulate the journey of the character Phileas Fogg in Verne's Around the World in Eighty Days (1872).
Game produced in the same year that the United States "closed the frontier" and conquered "the Wild West" (the massacre at Wounded Knee happened in December 1890). A couple years later, the US annexed Hawai'i; by decade's end, the US military was in both Cuba and the Philippines. The Scramble for Africa was taking place. At the time, Britain especially already had a culture of "travel writing" or "travel fiction" or whatever we want to call it, wherein domestic residents of the metropole back home could read about travel, tourism, expeditions, adventures, etc. on the peripheries of the Empire. Concurrent with the advent of popular novels, magazines, mass-market print media, etc. Intrepid explorers rescuing Indigenous peoples from their own backwardness. Many tales of exotic allure set in South Asia. Heroic white hunters taking down scary tigers. Elegant Englishwomen sipping tea in the shade of an umbrella, giggling at the elephants, the local customs, the strange sights. Orientalism, tropicality, othering, paternalism, etc.
I'd lately been looking at a lot of work on race/racism in British scientific and pop-sci literature involving natural history or geographical imaginaries. (From scholars like Varun Sharma, Rohan Deb Roy, Ezra Rashkow, Jonathan Saha, Pratik Chakrabarti.) But I'd also lately been looking at Mashid Mayar's work, which I think closely suits this kinda thing with the board games. Some of her publications:
"From Tools to Toys: American Dissected Maps and Geographic Knowledge at the Turn of the Twentieth Century". In: Knowledge Landscapes North America, edited by Kloeckner et al., 2016.
"What on Earth! Slated Globes, School Geography and Imperial Pedagogy". European Journal of American Studies 16, number 3, Summer 2020.
Citizens and Rulers of the World: The American Child and the Cartographic Pedagogies of Empire, 2022.
Discussing her book, Mayar was interviewed by LA Review of Books in 2022. She says:
[Quote.] Growing up at the turn of the 20th century, for many American children, also meant learning to view the world through the lens of "home geography." [...] [T]hey inevitably responded to the transnational whims of an empire that had stretched its dominion across the globe [recent forays into Panama, Cuba, Hawai'i, the Philippines] [...]. [W]hite, well-to-do, literate American children [...] learned how to identify and imagine “homes” on the map of the world. [...] [T]he cognitive maps children developed, to which we have access through the scant archival records they left behind (i.e., geographical puzzles they designed and printed in juvenile periodicals) [...] mixed nativism and the logic of colonization with playful, appropriative scalar confusion, and an intimate, often unquestioned sense of belonging to the global expanse of an empire [...]. Dissected maps - that is, maps mounted on cardboard or wood and then cut into smaller pieces that children were to put back together - are a generative example of the ways imperial pedagogy [...] found its place outside formal education, in children's lives outside the classroom. [...] [W]ell before having been adopted as playthings in the United States, dissected maps had been designed to entertain and teach the children of King George III about the global spatial affairs of the British Empire. […] [J]uvenile periodicals of the time printed child-made geographical puzzles [...]. [I]t was their assumption that "(un)charted," non-American spaces (both inside and outside the national borders) sought legibility as potential homes, [...] and that, if they did not do so, they were bound to recede into ruin/"savagery," meaning that it would become the colonizers' responsibility/burden to "restore" them [...]. [E]mpires learn from and owe to childhood in their attempts at survival and growth over generations [...]. [These] "multigenerational power constellations" [...] survived, by making accessible pedagogical scripts that children of the white and wealthy could learn from and appropriate as times changed [...]. [End quote.] Source: Words of Mashid Mayar, as transcribed in an interviewed conducted and published by M. Buna. "Children's Maps of the American Empire: A Conversation with Mashid Mayar". LA Review of Books. 11 July 2022.
Some other stuff I'd recently put in a to-read list, specifically about European (especially German) geographical imaginaries of globe-as-playground:
The Play World: Toys, Texts, and the Transatlantic German Childhood (Patricia Anne Simpson, 2020) /// "19th-Century Board Game Offers a Tour of the German Colonies" (Sarah Zabrodski, 2016) /// Advertising Empire: Race and Visual Culture in Imperial Germany (David Ciarlo, 2011) /// Learning Empire: Globalization and the German Quest for World Status, 1875-1919 (Erik Grimmer-Solem, 2019) /// “Ruling Africa: Science as Sovereignty in the German Colonial Empire and Its Aftermath” (Andrew Zimmerman. In: German Colonialism in a Global Age, 2014) /// "Exotic Education: Writing Empire for German Boys and Girls, 1884-1914". (Jeffrey Bowersox. In: German Colonialism and National Identity, 2017) /// Raising Germans in the Age of Empire: Youth and Colonial Culture, 1871-1914 (Jeff Bowersox, 2013) /// "[Translation:] (Educating Modernism: A Trade-Specific Portrait of the German Toy Industry in the Developing Mass-Market Society)" (Heike Hoffmann, PhD dissertation, Tubingen, 2000) /// Home and Harem: Nature, Gender, Empire, and the Cultures of Travel (Inderpal Grewal, 1996) /// "'Le rix d'Indochine' at the French Table: Representation of Food, Race and the Vietnamese in a Colonial-Era Board Game" (Elizabeth Collins, 2021) /// "The Beast in a Box: Playing with Empire in Early Nineteenth-Century Britain" (Romita Ray, 2006) /// Playing Oppression: The Legacy of Conquest and Empire in Colonialist Board Games (Mary Flanagan and Mikael Jakobsson, 2023)
#mashid mayar book is useful also the Playing Oppression book is open access online if you want#in her article on slated globes mayar also mentions how european maps by 1890s provoked a sort of replete homogenous filling in of globe#where european metropole thought of itself as having sufficiently mapped the planet by now knit into neat web of interimperial trade#and so european apparent knowledge of globe provided apparently enlightened position of educating or subjugating the masses#whereas US at time was more interested in remapping at their discretion#a thing which relates to what we were talking about in posts earlier today where elizabeth deloughrey describes twentieth century US#and its aerial photographic and satellite perspectives especially of Oceania and Pacific as if it now understood the totality of the planet#ecologies#tidalectics#geographic imaginaries#mashid mayar#indigenous pedagogies#black methodologies#tigers and elephans#victorian and edwardian popular culture#my writing i guess
143 notes
·
View notes
Text
Ambessa x princess!Reader
This is an UNFINISHED FIRST DRAFT I'm basically dumping here after asking if anyone would want to read it anyway. I repeat, it is not finished, not edited, and olllld. You have been warned! TW: Blood, gore, death, etc
____
Your vision was murky. Your corset tight, and your head throbbed something awful. Warm liquid leaked out of your nose, mixing with the sea of bloody remains at your feet.
You tried not to gag at the dismembered bodies, let alone cry. This revolt had resulted in the massacre of everyone in the palace except for you. Your family, the maids, the butlers, the chefs…everyone who had ever served your family was dead. The once vibrant walls of the palace were splattered with blood, yet still more startling screams echoed around you.
"Please…where…?" Your voice crooked, begging for the knights dragging you through the hall to speak. You had never expected the military to rise against your family like this. Yet here you were, scared of the people in uniforms you used to find safety in. They didn't say a word in response, stiff as they walked you into the throne room.
"My queen. We have brought her." You could hardly stand, held up by the two soldiers at your sides. Why haven't they killed me yet? When you had finally been caught hiding, you were certain they would kill you without hesitation. Yet here you were, alive and being brought to their leader.
"…Let her go." The arms holding you up relaxed, and you hit the floor with a groan. Your cheek pressed against the marble floor slick with blood, shivering as you saw who it belonged to.
"F-father…" You whispered in shock, horrified to see your father's lifeless body not far from you. Tears fell as you covered your mouth with your hands, poorly attempting to muffle your weeping.
In the midst of your shock, you didn't notice the figure approaching you until it was too late. Heavy footfalls made you flinch, and you gasped as a large hand shot out–painfully grasping the entirety of your face. Your stifled protests had the dark figure towering over you chuckle, and you shrunk back as the woman before you squatted down.
"Finally, I've come back for you…master." You froze, stomach twisting with dread. Only one person ever called you that. One woman who you'd hated, despised, and done everything to get rid of.
You looked up into dark gray, stormy eyes. Her smirk was still the same, eerie and downright unpleasant. Her face was smeared with blood, but you knew she didn't mind. Ambessa cooed when your eyes trembled and welled with tears, crimson thumb shifting to catch one as they fell.
"And this time, I'll never let you throw me away again."
—
You met Ambessa when you were twelve, or rather, she was thrown to meet you.
Your father chucked a small creature–no, a child–onto the ground before you, and you blinked.
You didn't like this. Wasn't she hurt?
"Father, what–"
"You need a playmate, right? We destroyed Noxus, and I thought it would be a good present to bring back to you. Name it and do with it whatever you like. It's nothing more than a toy, understand?" Your father was a cruel man, eating up weaker kingdoms and exploiting them to expand his rule. Noxus had been no different, just one of the many kingdoms your father had decided to take over.
Usually, he came back after war with a prized jewel or rare artifact to give you in replace of his love…but he had never come back with a living person before.
"I…" You shuffled as you glanced down at the girl before you, swallowing nervously. "I-I am in no need of a toy. I'm older now and I need to mature anyway–"
"Are you rejecting my gift?" His cold tone made your heart stutter, and you gasped as he grabbed the girl's head and jerked her neck back, unsheathing his sword. "Then if she is of no use to you, I have no need to keep such a filthy bloodline alive–"
"No! Forgive me, I spoke without thinking. It was foolish, and I am grateful. Thank you Father." Hastily you spoke, watching your father stare at you for a moment before letting the girl go.
"Good. Train it so you don't humiliate our family more than you already have." With that, your father walked out, slamming the door behind him. You let out a shaky breath before spinning around back to the child, going over to wordlessly help her get treated. Once you both had teamed up together to do a sloppy, yet decent job, you gulped.
"My condolences. To your family that is. I know you probably don't want to hear that from me but…" You bit your bottom lip, reaching out to grasp her hand.
"I don't want a toy. I want to be your friend, and I promise I'll help you escape. So if you're okay with that, may I please know your name?" The battered and bruised girl before you sniffled. She had been silent this entire time, but now she looked up into your warm gaze. Her eyes were beautiful. Like soft clouds floating in the sky. Her voice croaked as she spoke, but luckily you made out her words regardless.
"I…am Ambessa Medarda."
—
At sixteen, you drove her away.
"Princess." A shadow cast over you, robbing you of the warm sensation of sunlight on your skin. You grimaced, blinking your eyes open.
The intimidating silhouette above you was familiar. Hypnotizing as Ambessa crossed her arms and raised her eyebrow. Ah–you had been neglecting your studies once again, and they had sent Ambessa to come find you again.
What a poor choice. I'd rather avoid her than the duchess.
"Five more minutes." You mumbled from your peaceful spot on the ground under the cherry blossom tree. Ambessa snorted, and she bent down to slowly speak.
"Now. Do you know how angry the duchess is? You're to be betrothed soon, so she's especially adamant on your etiquette lessons. She'll complain to his majesty at this rate–and then what will you say?" You groaned as if you'd been stabbed, dramatically rising to your feet.
"Nothing. No matter what I'll say, he'll probably lock me up in that dark room for days. Better yet, instruct the maids to beat my legs till I can't stand." Thick fingers wrapped around your wrist, and you yelped as Ambessa pulled you close.
Oh, did she grow taller again? Unlike you, Ambessa seemed to always gain an inch every time she saw you. Now you had to crane your neck all the way back just to look at her face. You hated the care in her eyes. You knew about her feelings, but you had no right to accept them. You looked away, offering a wry smile to her pained expression.
"Don't look at me like that. Hopefully, whatever old geezer I marry won't be fond of such punishments." Ambessa shook her head.
"Princess, you shouldn't be dealing with this at all. Let me help you–" You stood on the tips of your toes to place your finger on her lips, gently smiling as you hushed her.
"But I do deal with it, quite often too, and if you get involved it'll just give father an excuse to get rid of you." Hands clasped behind your back, you walked backwards while keeping Ambessa's gaze. The summer breeze made your dress flutter, kind smile causing Ambessa's stomach to painfully twist.
"You are my one and only knight, and I your one and only "master"…so before I am used as a bargaining piece, I'll make sure my father can never touch you." Ambessa's face contorted, clearly wanting to object. She gripped her sword's handle, gritting her teeth.
"...What will you do?" Your eyes narrowed. You didn't want to say it out loud. You knew how much it would hurt your kind-hearted knight.
"Nothing I can't handle."Ambessa grumbled, allowing you to continue. "Please Ambessa. You can't stay here. Not when everyone treats you like you're less than human."
"But how can I leave you here?" You let out a small laugh, twirling amongst the flowers around you.
"I've lived in this rotten palace for twelve years before you came. I'll be okay for a few more before they marry me off." Ambessa let out a frustrated sigh.
"But I don't want to see you used like an object–"
"Ambessa." Your commanding tone silenced her protests. You looked down at your feet, trying not to let her words get to you.
Ambessa was the only one who cared about you, but you knew it wasn't right to abuse her kindness. While you considered her your friend, you both publicly kept up the appearance of servant and master. Worst yet, since Ambessa's position as a living trophy of war was technically less than a commoners, most of the palace's servants mistreated her behind your back. No matter how much I love her, she needs freedom more than anything else.
"But I am an object. All princesses are. Just…an object that's pampered until she can secure a national alliance." Ambessa opened her mouth to speak, but you shook your head. "Stop, I won't speak of this again. Let me do this one last thing for you–!"
Suddenly, you yelped as hands gripped your arms, roughly pulling you close. Ambessa stared down at you with furrowed eyebrows, seething as she raised her voice.
"For me? Princess, I want nothing but to stay by your side. So why do you keep insisting I leave? Are you driving me away because I told you about my feelings for you? Am I that uncomfortable to be around now?" The pain in her voice made your heart sink. She wasn't, but you decided it was easiest to lie than say the truth.
"So what if you are? I can't have you by my side with those feelings. I told you already. You're confused, Ambessa." The words flowed easier than you'd expected. How natural was it to tear at those who loved you? To sneer through the anguish in her eyes?
"Am I supposed to love someone I own? You've mistaken my kindness for–" Your voice became caught in your throat as Ambessa's hands squeezed your arms tight, and you winced in pain.
"A-Ambessa, you're hurting me–"
"Don't say that. Don't invalidate my emotions just because they scare you." Ambessa's voice was strained, and your breath hitched as she leaned in close.
"If you knew what I thought of you, you'd never bother to question me again. I want you more than you could ever know, princess…" Slowly, Ambessa bent to cover the distance between you two. Your heart skipped a beat, and you let out a muffled sound of protest as she kissed you.
Her lips were softer than you expected. She tasted bittersweet. You didn't want to acknowledge the bubbling fluster in your chest, or how your legs grew weak. Your skin was hot, and you moaned as she gripped the back of your head and kissed you deeper–
"How dare you touch the princess?" You gasped as your chambermaid suddenly appeared, having finally found you. She was accompanied by other knights, and you gulped when they drew their swords.
"She's done nothing wrong. She...she was only confused! She m-meant no offense." You shoved Ambessa away to breathlessly speak. Your maid raised her eyebrow.
"She has defiled you. She, a trophy of war, thought herself worthy enough to touch the daughter of the king!" The knights moved toward Ambessa, and she prepared herself, but you stepped in front of her, voice hard.
"Then let me punish her. She is mine, is she not?" The maid glanced at the knights. They seemed to silently communicate before she snarled.
"With all due respect, everyone knows you treat that thing favorably. If you administer a minor punishment, word will spread that you are weak…and it will eventually reach the king." You knew her statement was more of a threat than anything, gritting your teeth in annoyance. She only wanted an opportunity to have Ambessa killed, and sadly kissing a royal was grounds enough for the guillotine.
If I don't push her away now, how long until something like this happens and I can't protect her? You knew this would happen again. You needed to protect her. You took a deep, wavering breath.
"...I will exile her from the capital and send her to the north. Are they not in dire need of manpower there?" At your words, Ambessa immediately stiffened, and you shut your eyes.
The northern border was full of monsters, and being sent there was seen as a death sentence. However, you knew that if you didn't do this your maid would rat you out to your father. Then?
He would definitely have Ambessa killed, and he would make sure you watched.
"If I do this, will you be satisfied?" The unspoken question of will you tell my father hung in the air. Your maid smirked, and you wanted to boil her alive.
"It is sufficient. Now come, there's no need to keep near a being that doesn't know her place, is there?" Your maid tilted her head with a sickly sweet smile, and the knights sheathed their swords. They won't even allow me to say goodbye.
You had just dictated that Ambessa die a gruesome death, and now you would leave her like this? You wanted to stay and tell her your true feelings. That you did care but couldn't love her while she was forced to stay by your side like this. However, you only nodded, accepting your role and standing beside your maid.
"Good. You're becoming more like a ruler each day. Congratulations, princess. Now take it away." You wanted to gag, but instead you held your head down, as the knights moved to grab Ambessa. You tried to block out the sounds of her struggling, flinching when she called out to you.
"Princess…" You bit your bottom lip. Your vision blurred with hot tears, but if you wavered now the maid would surely tell your father. If he knew you cared for Ambessa, that you actually thought the kiss was divine…how long would it be before he got her killed? You swallowed, forcing a look of displeasure on your face as you glared at your precious knight.
"Didn't you hear? You'll be stationed in the north. Isn't it befitting?" You forced a sinister smirk onto your face, mockingly tilting your head.
"A disgusting thing like you will be right at home with those vile monsters. Who knows? Maybe you'll find a beast that can actually love you back too."
—
That was the last time you saw Ambessa. You had abandoned the idea of happiness after that, only content with your spies updating you that she was still alive in the north. However, you hadn't known she had gained a following and power there.
You had heard of the rebels. Hell, you had hoped that they would overthrow your father and end your miserable life. However, you had never expected this.
"A-Ambessa…?" You whispered with wide eyes, shocked to see the woman you had loved right before your eyes. She was bigger now, terrifyingly massive as she stooped over you, skin riddled with scars.
"Yes, master…" You jumped when her knees hit the floor. Her hand still holding your face dragged you forward against your will, and you could only muster up a whimper and she roughly kissed you. You felt she wanted to eat you whole, unable to push her away as she used her strength against you. She chuckled at your fretful squirming, calmly pressing her lips against your mouth and stealing your breath away.
Weren't the knights that had dragged you here still in the room? You couldn't do such vulgar things before them! You struggled, but Ambessa merely pushed you down, pressing your back against the bloody floor as she coaxed out a pleading whine from your throat.
"I'm here." You heaved as she pulled back, staring down at your weak form as if you were a delicious snack.
"Y-you lead the revolt? Why?" Your questions were feebly spoken, still worried she'd kill you. The rebel leader smirked, rising from the floor to grab her sword. Your eyes widened as you realized it was nestled deep into the back of your father, releasing a horrid squelsh as she jerked it out of his body.
"For you of course. Well, maybe to fight off the tyranny and oppression too." You squeaked when Ambessa suddenly stabbed her sword down before you, laughing at your terror, "but mainly? For you, princess."
You quivered as she lifted her sword to trace its top against the bodice of your dress, moving to lift your expensive necklace off your plush skin. "You don't know how long I spent in that frozen wasteland dreaming of having you in my grasp again. I nearly went insane–"
"Nearly? I'd argue you did." You didn't dare turn away from Ambessa, only using your eyes to glance at one of the rebels coming towards you two. The man looked as wretched as Ambessa as he smirked down at you, whistling low.
"Is that her? Now I finally understand that obsession of yours. She's pretty even when she's covered in blood." Ambessa only glared at him, and he quickly raised his hands up in surrender.
"I know I know–she's yours to rip apart." Rip? You trembled, not wanting to know what that meant. Clearly Ambessa hated you enough to take over the entire kingdom just to have her revenge.
#ambessa x reader#arcane x reader#arcane#ambessa medarda#ok it is slightly edited because i couldn't help reading and then going 'NO?NO?NO?#god the amount of times i went 'IM NOT READING ANY MORE!!!'
54 notes
·
View notes
Text


Soooo I've been obsessed with the image in this post since I first saw it, and decided to hunt down the source [Star Wars Character Encyclopedia: Updated and Expanded (2016 Edition)]. Here's Mitaka's page, and a close-up of that image; unfortunately it's tiny!
Feel free to use, edit etc.
Update: here's the best digital version of that image that I can find, slightly edited [maybe I'll clean it up someday..]:

Additional notes and transcript below:
[Google lists Mitaka's actor Sebastian Armesto at 5'8" and the fact that they added 3" to him makes me giggle. Let him be a little short!]
The fact that Mitaka's homeworld is listed as 'Uknown' is interesting to me. I wonder it's something thought out by the writers, or just hand-waving [guy didn't even have a name in the movie credits, iirc]. I've long hced that Mitaka was born on a starship to Imperial parents - but it's also possible that Mitaka was taken into the FO at a very young age and simply doesn't remember his home planet.
As most Mitaka enjoyers know, Mitaka graduated at the top of his class in the Academy. Despite being appearing terrified when facing Ren, he's evidently very, very good at his job. And, I know "Ren's unforgiving command style" is being tongue in cheek, but it does implicate a contrast to Hux's command style, which is apparently not-so unforgiving.
Something I see some get wrong — Mitaka is part of the FO Navy, not the Army. He's in charge of starships rather than ground forces, and he would make the ranks of Commander, Captain, and Admiral rather than Major, Colonel, and General.
So apparently Mitaka was indeed, under Hux, the one in command of not only recapturing Dameron and Finn, but also the retrieval missions on Jakku, and giving orders — which to me seems quite a step above the responsibilities of a mere Lieutenant and why I hc Mitaka as a Lieutenant Commander, but I digress. It makes sense then why it was specifically Mitaka who was designated to tell Ren about their failure to capture both the droid and the 'fugitives' — though it's also my hc [have lots of those] that Mitaka could have put this on an underling, but chose to face Ren and take the blame personally out of a sense of duty and honor, despite being terrified.
Editing note, because I'm a graphics nerd at heart: the half-tone dots in the close-up are predictably driving me bonkers, but from what I can tell, there's not much that can be done about it other than a time-consuming paint/smudge over, or messing with PS plug-ins [as far as I know -- I'm very new to scanning print]. I tried some descaling and blurring, but of course you can't do much of that without a loss of quality and clarity, and that's something I hate to sacrifice. I'll keep messing with it. Or, if someone has any idea of another source for this picture you would be my savior ! This is the only instance I can find of this image.
Transcript:
Lieutenant Mitaka First Order Officer
Data File Affiliation: First Order Homeworld: Unknown Species: Human Height: 1.8m (5ft 11in) Appearances: VII See Also: First Order TIE pilo; Finn; General Hux; Kylo Ren
Dopheld Mitaka is an attentive young officer serving aboard the First Order flagship Finalizer. A top graduate in his Academy class, Mitaka is not prepared for Kylo Ren's unforgiving command style.
The First Order naval uniform is descended from the sharp, authoritarian styles worn by officers of the Old Empire. The charcoal gray fabric signifies naval service, while the flared breeches and stiff boots help in maintaining a rigid posture. The command cap carries the starburst symbol of the First Order.
Tough Job After failing to recapture the escaped prisoner Poe Dameron and the deserter FN-2187, Mitaka continues to oversee the progress of search teams scouring the desert wastes of Jakku. Mitaka has the unenviable task of updating Kylo Ren on the search after the fugitives flee Jakku aboard the Millennium Falcon.
[Image Caption] Mitaka issues orders on behalf of General Hux to stop the escaping TIE fighter carrying Poe Dameron and FN-2187.
72 notes
·
View notes
Text
hi folks so i'm a pretty fast writer/rough drafter, and on this sunday of sundays, while i am a little bit down about what i am writing, i figured i would share a little bit about how i write it (with pictures).
Outline View
use outline view on gdocs. if you take nothing else from this, use outline view on gdocs. you can trigger it using ctrl-alt-a, View->Expand Outline View, or just click the little squiggly icon in the top left (my preference).

what is outline view and why should you use it?
outline view is a list of all of the headings and subheadings in your document. this is helpful, because if you use headings strategically, it gives you a very nice, vertically-organized map of your entire document, and you can always see the structure without having to scroll through or reference a second doc. however, we do need to do a little groundwork to set this up: headings
headings are just formatted strings of text that gdocs recognizes as "oooh that looks important". you can completely customize what they look like, but you need to manually tell gdocs which lines are heading lines (and what heading level) so it will all go into outline view nicely. headings nest and can be collapsed, so use the first big headings for your big things, and then smaller chunks, like scenes, can drop down to the next heading size for nesting.
Document Settings
you'll figure out what works best for you, but generally:
good background color so your retinas aren't blasted with blue light (i also recommend f.lux or just use the settings most computers have these days)
center the document on your eye line. this is obvious but if you write with two monitors like I do, it is something you actually have to think about.
readability - font size, font style, zoom, color contrast, etc.
one tip i've picked up along the way is to change the font to subliminally influence your writing. it could be placebo, but it works on me. spectral is my standard, but i will change my colors and serif presence if I am trying to write something more atmospheric/fantasy vs something more comedy/modern.
i have also learned that writing in ugly ass fonts is a good way to draft dumb fanfic shit without psyching yourself out about it. rough drafts should be ugly and terrible and cringe - you're going to fix it in post. however, sometimes it is difficult when you are actively thinking about how ugly and terrible and cringe it is, and you get stuck trying to massage the rough draft before it's even time to edit. well, if you draft in neon green comic sans, it's going to look like shit no matter what words are on the page, so you can relax.
Writing the Words
now, how you actually go about writing the fanfic is all up to you - our brains all work differently, and rather than seeking an objective 'right' way to outline or draft, you just need to learn how your brain works and what kind of cues and tools it needs to get going.
outline your plot in chunks that are meaningful to you. i use bullets, and i try to make every bullet something I think i will need about 500 words to get across. this is just to say - there's generally a bullet for the exposition of a scene (where, who, when, maybe why), and then i chop the events of a scene down into manageable actions - (1) someone says something important and maybe someone feels some type of way about it, (2) that leads to action which is performed a certain way, (3) uh oh maybe there are consequences which are XYZ. etc.
my outlines are heavily based on choreography - what are they doing, where are they moving, what is the point (and sometimes, what are they thinking - mind choreography). this is not necessarily the best fit for everyone's writing style, but I do this because it lets me flip in between scenes very quickly and write the actions that I feel most compelled to at any point in time - the bullets act as easy, laid-out choices for what i want to rough draft whenever the mood strikes.

organizationally - two things that have been helpful to me:
use the headline view as a progress tracker.
here, one star indicates that my scene is in the rough draft phase (0 stars for outline, 2 stars for edited). this shows me where I'm at progress-wise on the sidebar.
2. write with your outline below you
i sort of just stumbled into this practice and it's kind of goated. often times, we keep our outlines at the top, or on a separate page, but that makes referring to it a huge pain in the ass tbh. if you keep the bullet point below you (as i've done above), then it will move with the text as you write, and you can always see your next immediate goal that you are writing towards.
ok hope this was helpful!
i've been peer pressuring my friend into writing fic recently, and part of that was anxiously screen sharing some messy under-the-hood stuff on discord. she said something along the lines of: "wow. i never would have thought of this (writing w/ outline below you) but it's crazy that this is not like writing 101" (she did a humanities degree, idfk what's in writing class i was too busy crying over matrices)
there is no singular correct way to write or outline, but this is a good way to start with organization to keep everything in sight as you write. you can start here, and then make modifications based on what feels best
the best way to write and draft is whatever works most intuitively with your own brain. <3
49 notes
·
View notes