#i just figuring out how to make it look good give me time(and tutorials)
Explore tagged Tumblr posts
Visit Tumblr Blog
Explore Tumblr blogs with no restrictions, modern design and the best experience.
Last Seen Tumblr Blogs


Fun Fact
BuzzFeed published a report claiming that Tumblr was utilized as a distribution channel for Russian agents to influence American voting habits during the 2016 presidential election in Feb 2018.
Text

A child of war, a fallen leader of the nation and a mysterious check-taker. What they gonna do?
(Click for better quality!)
Also version without text cus i still liked it

#dream smp#dsmp#dreamwastaken#tommyinnit#wilbur soot#of course all c! not cc!#artists on tumblr#digital art#wonderful scary lighting#:) hehe#will waited 12 years to came back i waited 3 years to draw this#also please#this is just art of my favorite charasters#lets not bring drama here#pretty please#also! if you see that it have troubles with quality no u not#i just figuring out how to make it look good give me time(and tutorials)
189 notes
·
View notes
Text
Can't afford art school?
After seeing post like this 👇

And this gem 👇
As well as countless of others from the AI generator community. Just talking about how "inaccessible art" is, I decided why not show how wrong these guys are while also helping anyone who actually wants to learn.
Here is the first one ART TEACHERS! There are plenty online and in places like youtube.
📺Here is my list:
Proko (Free, mostly teaches anatomy and how to draw people. But does have art talks and teaches the basics.)
Marc Brunet (Free but he does have other classes for a cheap price. Use to work for Blizzard and teaches you everything)
Aaron Rutten (free, tips about art, talks about art programs and the best products for digital art)
BoroCG (free, teaches a verity of art mediums from 3D modeling to digital painting. As well as some tips that can be used across styles)
Jesse J. Jones (free, talks about animating)
Jesus Conde (free, teaches digital painting and has classes in Spanish)
Mohammed Agbadi (free, he gives some advice in some videos and talks about art)
Ross Draws (free, he does have other classes for a good price. Mostly teaching character designs and simple backgrounds.)
SamDoesArts (free, gives good advice and critiques)
Drawfee Show (free, they do give some good advice and great inspiration)
The Art of Aaron Blaise ( useful tips for digital art and animation. Was an animator for Disney. Mostly nature art)
Bobby Chiu ( useful tips and interviews with artist who are in the industry or making a living as artist)
Sinix Design (has some tips on drawing people)
Winged canvas (art school for free on a verity of mediums)
Bob Ross (just a good time, learn how to paint, as well as how too relax when doing art. "there are no mistakes only happy accidents", this channel also provides tips from another artist)
Scott Christian Sava (Inspiration and provides tips and advice)
Pikat (art advice and critiques)
Drawbox (a suggested cheap online art school, made of a community of artist)
Skillshare (A cheap learning site that has art classes ranging from traditional to digital. As well as Animation and tutorials on art programs. All under one price, in the USA it's around $34 a month)
Human anatomy for artist (not a video or teacher but the site is full of awesome refs to practice and get better at anatomy)
Second part BOOKS, I have collected some books that have helped me and might help others.
📚Here is my list:
The "how to draw manga" series produced by Graphic-sha. These are for manga artist but they give great advice and information.
"Creating characters with personality" by Tom Bancroft. A great book that can help not just people who draw cartoons but also realistic ones. As it helps you with facial ques and how to make a character interesting.
"Albinus on anatomy" by Robert Beverly Hale and Terence Coyle. Great book to help someone learn basic anatomy.
"Artistic Anatomy" by Dr. Paul Richer and Robert Beverly Hale. A good book if you want to go further in-depth with anatomy.
"Directing the story" by Francis Glebas. A good book if you want to Story board or make comics.
"Animal Anatomy for Artists" by Eliot Goldfinger. A good book for if you want to draw animals or creatures.
"Constructive Anatomy: with almost 500 illustrations" by George B. Bridgman. A great book to help you block out shadows in your figures and see them in a more 3 diamantine way.
"Dynamic Anatomy: Revised and expand" by Burne Hogarth. A book that shows how to block out shapes and easily understand what you are looking out. When it comes to human subjects.
"An Atlas of animal anatomy for artist" by W. Ellenberger and H. Dittrich and H. Baum. This is another good one for people who want to draw animals or creatures.
Etherington Brothers, they make books and have a free blog with art tips.
📝As for Supplies, I recommend starting out cheap, buying Pencils and art paper at dollar tree or 5 below. If you want to go fancy Michaels is always a good place for traditional supplies. They also get in some good sales and discounts. For digital art, I recommend not starting with a screen art drawing tablet as they are usually more expensive.
For the Best art Tablet I recommend either Xp-pen, Bamboo or Huion. Some can range from about 40$ to the thousands.
���As for art programs here is a list of Free to pay.
Clip Studio paint ( you can choose to pay once or sub and get updates. Galaxy, Windows, macOS, iPad, iPhone, Android, or Chromebook device. )
Procreate ( pay once for $9.99 usd, IPAD & IPHONE ONLY)
Blender (for 3D modules/sculpting, animation and more. Free)
PaintTool SAI (pay but has a 31 day free trail)
Krita (Free)
mypaint (free)
FireAlpaca (free)
Aseprite ($19.99 usd but has a free trail, for pixel art Windows & macOS)
Drawpile (free and for if you want to draw with others)
IbisPaint (free, phone app ONLY)
Medibang (free, IPAD, Android and PC)
NOTE: Some of these can work on almost any computer like Clip and Sai but others will require a bit stronger computer like Blender. Please check their sites for if your computer is compatible.
So do with this information as you will but as you can tell there are ways to learn how to become an artist, without breaking the bank. The only thing that might be stopping YOU from using any of these things, is YOU.
I have made time to learn to draw and many artist have too. Either in-between working two jobs or taking care of your family and a job or regular school and chores. YOU just have to take the time or use some time management, it really doesn't take long to practice for like an hour or less. YOU also don't have to do it every day, just once or three times a week is fine.
Hope this was helpful and have a great day.
"also apologies for any spelling or grammar errors, I have Dyslexia and it makes my brain go XP when it comes to speech or writing"
108K notes
·
View notes
Text
🎮 HEY I WANNA MAKE A GAME! 🎮
Yeah I getcha. I was once like you. Pure and naive. Great news. I AM STILL PURE AND NAIVE, GAME DEV IS FUN! But where to start?
To start, here are a couple of entry level softwares you can use! source: I just made a game called In Stars and Time and people are asking me how to start making vidy gaems. Now, without further ado:
SOFTWARES AND ENGINES FOR PEOPLE WHO DON'T KNOW HOW TO CODE!!!
Ren'py (and also a link to it if you click here do it): THE visual novel software. Comic artists, look no further ✨Pros: It's free! It's simple! It has great documentation! It has a bunch of plugins and UI stuff and assets for you to buy! It can be used even if you have LITERALLY no programming experience! (You'll just need to read the doc a bunch) You can also port your game to a BUNCH of consoles! ✨Cons: None really <3 Some games to look at: Doki Doki Literature Club, Bad End Theater, Butterfly Soup
Twine: Great for text-based games! GREAT FOR WRITERS WHO DONT WANNA DRAW!!!!!!!!! (but you can draw if you want) ✨Pros: It's free! It's simple! It's versatile! It has great documentation! It can be used even if you have LITERALLY no programming experience! (You'll just need to read the doc a bunch) ✨Cons: You can add pictures, but it's a pain. Some games to look at: The Uncle Who Works For Nintendo, Queers In love At The End of The World, Escape Velocity

Bitsy: Little topdown games! ✨Pros: It's free! It's simple! It's (somewhat) intuitive! It has great documentation! It can be used even if you have LITERALLY no programming experience! You can make everything in it, from text to sprites to code! Those games sure are small! ✨Cons: Those games sure are small. This is to make THE simplest game. Barely any animation for your sprites, can barely fit a line of text in there. But honestly, the restrictions are refreshing! Some games to look at: honestly I haven't played that many bitsy games because i am a fake gamer. The picture above is from Under A Star Called Sun though and that looks so pretty
RPGMaker: To make RPGs! LIKE ME!!!!! NOTE: I recommend getting the latest version if you can, but all have their pros and cons. You can get a better idea by looking at this post. ✨Pros: Literally everything you need to make an RPG. Has a tutorial inside the software itself that will teach you the basics. Pretty simple to understand, even if you have no coding experience! Also I made a post helping you out with RPGMaker right here! ✨Cons: Some stuff can be hard to figure out. Also, the latest version is expensive. Get it on sale! Some games to look at: Yume Nikki, Hylics, In Stars and Time (hehe. I made it)
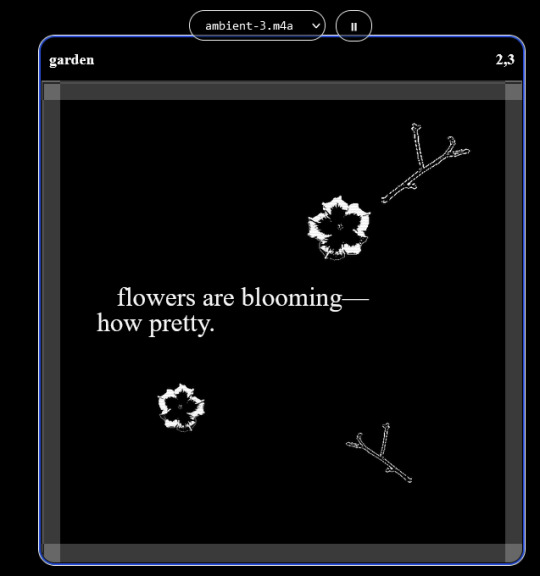
engine.lol: collage worlds! it is relatively new so I don't know much about it, but it seems fascinating. picture is from Garden! NOTE: There's a bunch of smaller engines to find out there. Just yesterday I found out there's an Idle Game Maker made by the Cookie Clicker creator. Isn't life wonderful?
✨more advice under the cut. this is Long ok✨
ENGINES I KNOW NOTHING ABOUT AND THEY SEEM HARD BUT ALSO GIVE IT A TRY I GUESS!!!! :
Unity and Unreal: I don't know anything about those! That looks hard to learn! But indie devs use them! It seems expensive! Follow your dreams though! Don't ask me how!
GameMaker: Wuh I just don't know anything about it either! I just know it's now free if your game is non-commercial (aka, you're not selling it), and Undertale was made on it! It seems good! You probably need some coding experience though!!!
Godot: Man I know even less about this one. Heard good things though!
BUNCHA RANDOM ADVICE!!!!
-Make something small first! Try making simple: a character is in a room, and exits the room. The character can look around, decide to take an item with them, can leave, and maybe the door is locked and you have to find the key. Figuring out how to code something like that, whether it is as a fully text-based game or as an RPGMaker map, should be a good start to figure out how your software of choice works!
-After that, if you have an idea, try first to make the simplest version of that idea. For my timeloop RPG, my simplest version was two rooms: first room you can walk in, second room with the King, where a cutscene automatically plays and the battle starts, you immediately die, and loop back to the first room, with the text from this point on reflecting this change. I think I also added a loop counter. This helped me figure out the most important thing: Can This Game Be Made? After that, the rest is just fun stuff. So if you want to make a dating sim, try and figure out how to add choices, and how to have affection points go up and down depending on your choices! If you want to make a platformer, figure out how to make your character move and jump and how to create a simple level! If you just want to make a kinetic visual novel with no choices, figure out how to add text, and how to add portraits! You'll be surprised at how powerful you'll feel after having figured even those simple things out.
-If you have a programming problem or just get confused, never underestimate the power of asking Google! You most likely won't be the only person asking this question, and you will learn some useful tips! If you are powerful enough, you can even… Ask people??? On forums??? Not me though.
-Yeah I know you probably want to make Your Big Idea RIGHT NOW but please. Make a smaller prototype first. You need to get that experience. Trust me.
-If you are not a womanthing of many skills like me, you might realize you need help. Maybe you need an artist, or a programmer. So! Game jams on itch.io are a great way to get to work and meet other game devs that have different strengths! Or ask around! Maybe your artist friend secretly always wanted to draw for a game. Ask! Collaborate! Have fun!!!
I hope that was useful! If it was. Maybe. You'd like to buy me a coffee. Or maybe you could check out my comics and games. Or just my new critically acclaimed game In Stars and Time. If you want. Ok bye
#reference#gamedev#indie dev#game dev#tutorial#video game#ACTUAL GAME DEVS DO NOT INTERACT!!!1!!!!!#this is for people who are afraid of coding. do not come at me and say 'actually godot is easy if you just--' I JUST WILL NOT.#long post
36K notes
·
View notes
Note
what app do you use for your smaus cause i canNOT find a good one
okay… this was supposed to be a quick and easy answer.
i use social maker. i’ve had it since 2020. it’s my personal favorite smau app and a highly recommend it. it’s pretty easy to use and you’ve got a lot of options on what you can do with it.
but, i was trying to get screenshots of it in the app store to show what app it was and…low and behold it got banned??
only people who have had the app downloaded before can use it unfortunately 😭
i feel bad leaving you hanging like that, so! i went on a trip to find an easy to use, nice-looking smau app!
and i decided to make it into a kind of smau post at the same time!
so you can enjoy some TWST silliness with the first years while I rank these apps :>
SILLY TEXTS WITH THE FIRST YEARS (while I rank SMAU apps)


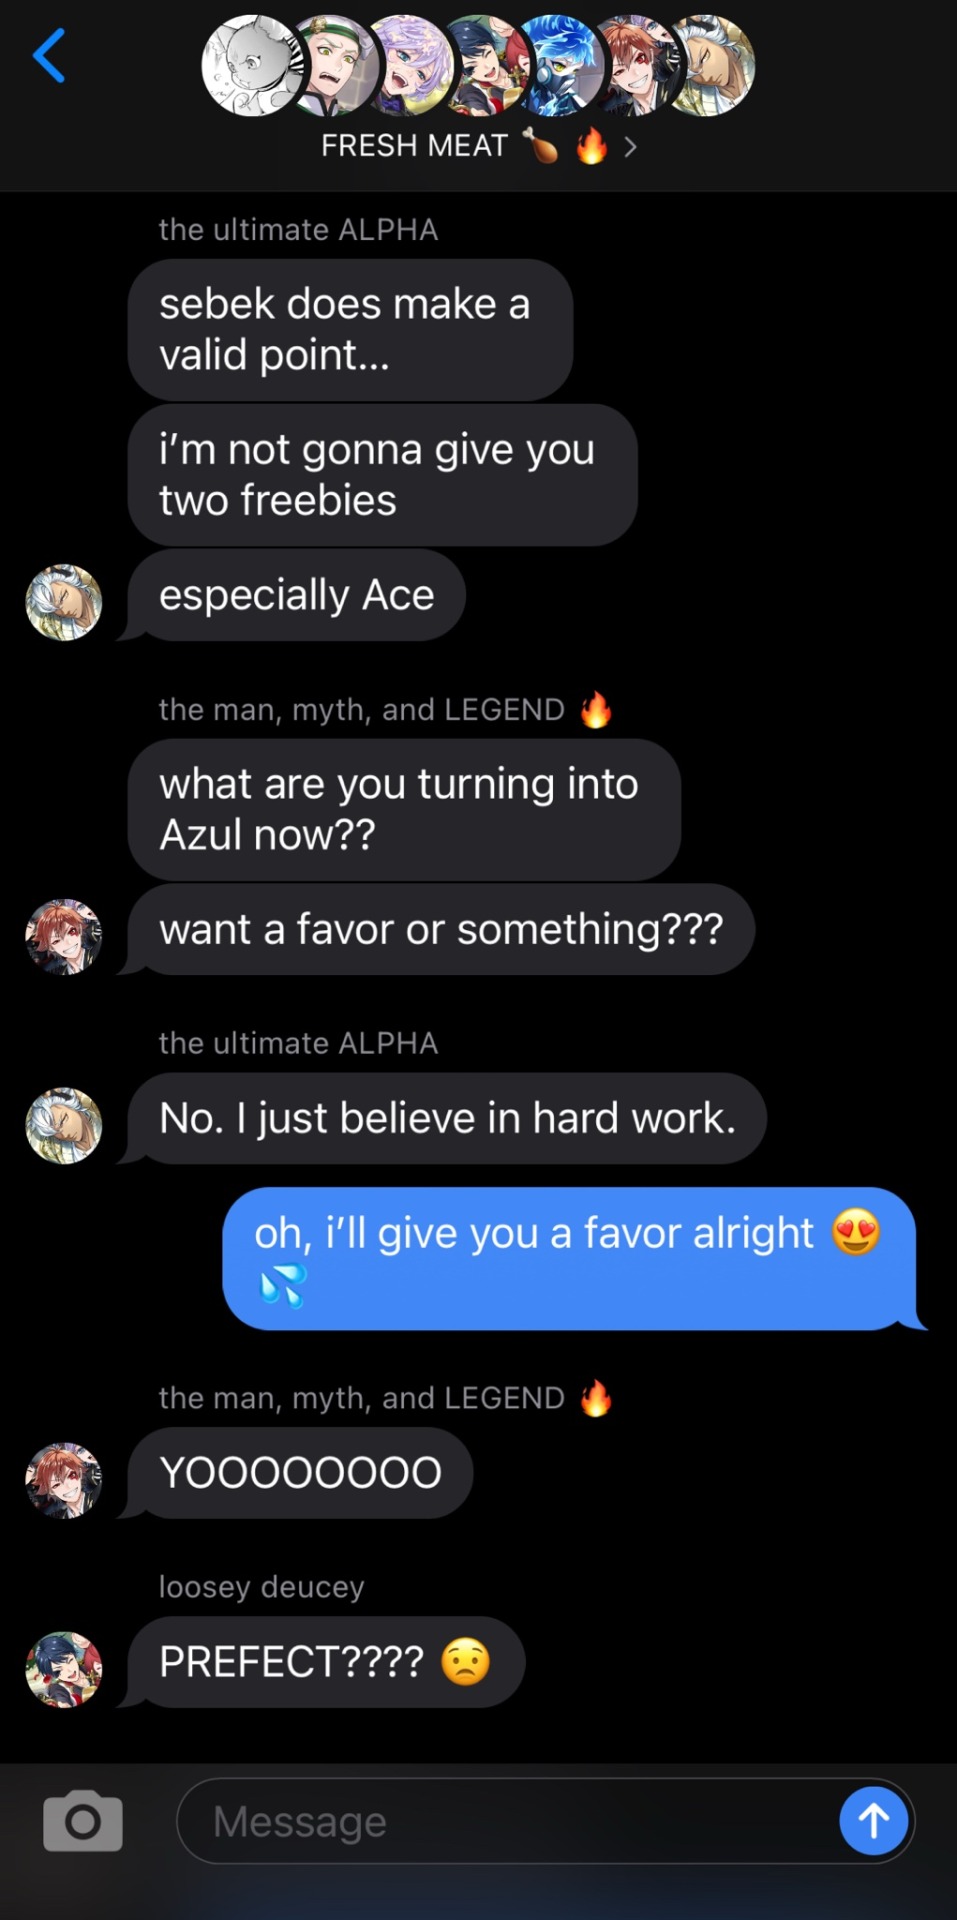
First Years NRC boys x GN!Reader SMAU
Warnings: mention of political figures in Faker 2, Reader is Prefect, suggestive humor, possible OOC
A/N: this shows how much I love to yap. I did this to procrastinate but it was pretty fun! How did I turn my response to this anon from a single paragraph to a whole multi-section post? I have no clue. My brain works in weird ways. I hope you enjoy :>
SOCIAL MAKER (what I use)


I use this app for a reason! It’s so easy to use and it gives you 20 max messages. Personally, I really enjoy the look of the app and messages too. Unfortunately though, if you didn’t have this app downloaded before it got taken down, you can’t use it. At least on IOS. I don’t really know the situation for Android 💀
5/5 stars!! ⭐️⭐️⭐️⭐️⭐️
SOCIAL DUMMY


This is another app that you had to have downloaded before it got taken down to use it. I think it’s a really good SMAU app! Especially if you wanna do stuff outside of messages!! (twitter, instagram, youtube, etc.) The messaging system runs pretty smoothly, the only thing is that the max amount of messages is very short.
4/5 stars! ⭐️⭐️⭐️⭐️
CHAT STORY MAKER


This app is a bit outdated in my opinion. It’s kinda hard to use since you can’t exit out of the keyboard and get a clean picture of your messages. Also, when you close the app it doesn’t save ANY of your things. (That caused me a lot of trouble making this actually 😭). You can also only make two characters. However, it has good customization!! It has a very cute look and you can change the background + text colors. It’s also really easy to switch between characters which is always nice.
3/5 stars! ⭐️⭐️⭐️
TYPE STORY


This is the app that Social Maker actually made after their OG app was taken down! It’s, unfortunately, not super great in my opinion. I got really confused when I tried using it, even with a tutorial. Once you get the hang of it, it’s alright. The app just feels overly complicated. However, if you want to make SMAUs mainly with big group chats then this app might be pretty good for you!
3/5 stars! ⭐️⭐️⭐️
FAKER 2


By far the worse app among them all. It just reeks of money-greedy creators. An add plays after almost every action you do. (From customizing characters to sending messages, an add always plays) It was also quite confusing to use and you’re limited to three characters. There isn’t much you can customize either and it has a 5 message max. Also, it made me a bit uncomfortable because the three default profiles you have to edit to change into the characters you want included Trump and Elon… Yeah 💀. Not to mention that a lot of the adds were filled with AI videos that were just uncanny valley. Back on topic! The app locks a lot of features behind a paywall that doesn’t even seem worth it. I wouldn’t recommend it.
1/5 stars. ⭐️
TEXTING STORY


In terms of making SMAUs on tumblr, I wouldn’t recommend it. But, if you were interested in making texting story videos and/or publishing them on YouTube, this would be a good option! There’s a lot of opportunities for videos as it can automatically give you a video of you typing both sides. The typing sound is also pretty satisfying to me! Unfortunately, it’s not the best for tumblr SMAUs. There isn’t really any customization— you can’t even add a profile picture.
3/5 stars! ⭐️⭐️⭐️
TEXT STORY MAKER


Okay, I did legitimately save the best for last. This app is pretty great. It’s easy to catch onto and gives you A LOT of customizable options: background, text color, group chat cover, etc. Also, there’s an option for it to automatically take screenshots of the text which is just so convenient?? But there is a pretty big downside. You can only make two characters. That really sucks.
I think that if you want to make 1 on 1 SMAUs similar to mine, this would be a good app to use. It’s gonna be annoying having to remake the profiles and what not, but I think the pros out weight the cons.
4/5 stars ⭐️⭐️⭐️⭐️
#twisted wonderland x reader#twst x reader#twisted wonderland x you#twst x yuu#twst x you#ace trappola x reader#ace trappola x yuu#ace x reader#ace x you#ace x y/n#ace x yuu#deuce spade x yuu#deuce spade x reader#deuce x yuu#deuce x reader#epel felmier x reader#epel x reader#epel x yuu#jack howl x reader#jack howl x yuu#jack x reader#jack x yuu#sebek zigvolt x reader#sebek zigvolt x you#sebek x reader#sebek x yuu#twst smau#smau#teletalks˚✧
733 notes
·
View notes
Note
shelby my darling! i’m so happy for you, congratulations! i would love a little somethin’ somethin’ with our beloved old man, dilf rhett, and this prompt from the age gap list: ❛ look at how well you take me. even though it's been so long. ❜ 🩵
fast times - dilf!rhett abbott x babysitter reader
18+ only. mdni. warning for slightly problematic age gap (15 years). face fucking. dirty talk. rhett is a dirty old man.

you nearly cried from relief as you hit ‘submit assignment’ on your last paper. ever. you were nearly a college graduate. four years of busting your ass, finally coming to an end. and for once, you were excited to go back home.
your school was far away, nearly seven hours from your family and friends. and it sucked. the last time you were home was christmas. the last time you saw rhett was new years.
the last time you felt his touch. his arms around you. his kisses.
long distance worked for you both but it was still difficult. you can only do so many facetime dates and phone sex before you start feeling a ping of longing and loneliness.
it was still a secret to your family. with rhett’s age and him being close with your father, you weren’t ready to give him up. or your family up. so it was just you and him. and his girls of course. they adored you. you watched them every summer you were home. grace begged you for show jumping lessons and ellie demanded on you showing her makeup tutorials. it was sweet.
the evening went on as you packed the last of your things into boxes and ate your processed mac and cheese for dinner. kraft should get an award for how much it helped you through the last four years.
you hadn’t heard from rhett all day, which was to be expected. calving season was in full swing and he was busy on his ranch wrangling ranch hands and two wild daughters. but still, you missed him.
the last bite of the pasta was making its way into your mouth when you heard a knock on your apartment door. slowly chewing the food, you set your bowl down on your oak coffee table and looked out the peep hole, nearly busting your face with the door as you threw it open and threw yourself into the arms of the man standing on the other side of it.
“hey, baby,” rhett’s marlboro laced voice rumbled into your hair, strong arms wrapping around your frame. “surprise.”
“what are you doing here?!” you squealed, not pulling back to allow any space between your bodies as he backed you through the open door, kicking it shut with his boot.
“figured i lend a hand and help you move back home. being a good friend of your dad’s and all,” he said, a lazy smirk on his lips. god, he looked delicious. his face had a pink shade to it, barely visible white lines from where his sunglasses typically rest across the bridge of his nose. the gray hairs that grew from his temples were nearly bleached white from the sun. the smattering of freckles on his cheeks. you wanted to fall to your knees.
and you did.
you pushed him back the few steps it took for him to be flush with the front door and fumbled with his obnoxious belt buckle, desperation clouding your last thought.
“needy little girl,” he murmured as his hands joined your own to pull his jeans down enough to expose his hardening cock. a small whimper escaped you as you wrapped your hand around the length through his boxers, his length growing beneath you with each stroke. “g’on. i know you want a taste.”
your mouth attached to his already leaking tip barely a second after his boxers were pulled down to his muscular thighs. his head slammed against the door as you suckled on the pink flesh, kitten licks to the slit. you missed teasing him like this. missed his taste. all musk and all rhett. you craved it.
it took several minutes of coaxing your throat to open for him but when he hit the back of your throat and your nose was nuzzled into the hair at the base of him, he moaned your name so loud you were sure your remaining neighbors heard.
“fuck, babygirl. just like that. missed that hot mouth. look at you,” his hand held the back of your head as you bobbed up and down on the length. you knew what he wanted and there was no denying you wanted it as well. your hand met his on your head and you pushed on a downstroke. that’s the only hint he needed.
his hands cradled both sides of your face as he started to slowly thrust his hips, causing you to gag slightly at the pressure.
“you know what to do if it’s too much. one tap for a break, two taps to stop.”
you just nodded, a trail of drool escaping the corners of your mouth. rhett’s eyes darkened and he entered another world. his hips began to piston against your face, cock going deep into your throat. he was all grunts and moans through gritted teeth as he used you for his pleasure.
“look at how well you take me. even though it's been so long. so fucking good for me. always good for me. best thing i’ve ever had,” rhett rambled, signaling he was close to his peak. it hit you both a bit unexpectedly. his warm release coated your throat and his hips stopped as your face was pressed against his soft stomach.
“fucking christ,” he heaved as you slowly pulled off the softening length. “never had a welcome like that before.”
rhett helped you up from the floor, noticing the wince that spread across your face from kneeling on the cold wooden floor.
“my turn.”
and you let out another squeal as he landed a heavy hand on your ass and nearly dragged you to your bedroom. all you can think is thank god the bed was still put together. and thank god you didn’t have to wait another second to be with your man.
#rhett abbott#rhett abbott x reader#rhett x babysitter#dilf rhett 4 ever <3#rhett abbott smut#short n’ sweet celly
310 notes
·
View notes
Note
I have been staring and admiring your piece of the holiday/dreemurr kids at the piano, and it’s so beautiful. The rendering is honestly the nicest/ most appealing rendering that i’ve seen in my opinion, i was wondering if you would share your process or a tutorial of sorts? No pressure, your art is so lovely and i strive to achieve a similar look someday :)
oh my goodness thank you!! 😭😭😭😭 thats such high praise.. and of course i can share!
so basically how i went about this is, this drawing came second to the first one, it literally ocurred to me in the middle of rendering the dark world kris and a lot of the composition choices came from the contrast between them. the timelapse starts with an already-laid-out piano sketch cuz i had to correct the perspective on the first one so many times that i took this shortcut for more accuracy, afterwards i did a quick sketch of the poses i imagined and very loosely arranged the background... i shouldve honestly used perspective lines but im too stubborn about them. anyways speaking of perspective, in the first one not only did i want to give it depth but also incline it somewhat, you will see its not exactly on a horizontal axis but tilted slightly, this is because i wanted to evoke a sense of instability/of being pulled in. so with the second canvas you can see me tilting it as i go to be a proper mirror to the first one.
enough talk on perspective (esp considering u asked for rendering particularly)... lets talk colors! so particularly for this canvas ill say.... the holiday kitchen was a bit nightmareish in terms of color palette bro its SO WHITE. you will see i went back and forth a few times about what tone to make the piano, the background, etc, so as to not be too bright next to the characters. speaking of which, i colored them first under the sketch and immediately started shifting hues, values, trying to find the vibe i wanted, because of the way i render, which is by merging the lineart with the color layer, this is because i like rendering to feel like im "sculpting" out my drawing, its easier to control shapes and textures this way (for me), i do understand it's not the most efficient one tho! sometimes i do make separate layers for complicated details that i dont want compromising the whole layer. i primarily use lasso fill after merging the layers because it gives off a cleaner look, and its much faster to manipulate the shapes and silhouettes with it (this is a core thing in my recent art cuz,, i used to spend waaaaay too much time doing everything by brush and at some point it started not only limiting me but putting me off from rendering altogether). then i used some textured brushes here and there to blend some colors and to deliberately place lineart where i want.
this piece in particular had a looot of back and forth of switching the character's palettes and outfits so that they could bounce off of each other better and make the viewer's eye navigate through more than one focal point. i wasnt planning on anything more than a subtle shadow here and there but i felt like the characters lacked a bit of depth, so i added shadows and highlights appropriately (always playing off from the base color of the thing im rendering, be it skin, clothes, i work the colors individually so that it feels less predictable). afterwards you just have to adjust the lighting on the background, figure out which details you want to make stand out (as u can see im not too overly detailed on background elements, just enough to properly suggest the room), and .. you're done!!
198 notes
·
View notes
Text
Oh boy, I feel like it's time for a post nobody will like.
We all know clothes are getting worse. Recently I found some jeans I bought in high school, and since I lost weight recently I tried them on and they fit, so I'll be wearing them once we get out of the Hell season.
But I took them and compared them to the most recent pair of jeans I bought, and... Honestly the difference in quality is so fucking stark it made me want to give up on life. The jeans I wore in high school have gone through everything. I'm talking half of Europe here, because one of our teachers was pretty big on school trips everywhere she could get the money for. They've been washed, tumbled, survived an actual car crash and they're still good.
The most recent pair I machine-washed ONCE, everything else was hand-wash only. I babied them to the max because they made my ass look like was on Instagram. Do you know what they look like now?
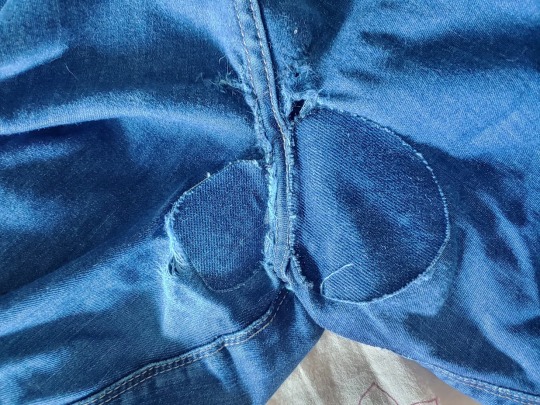
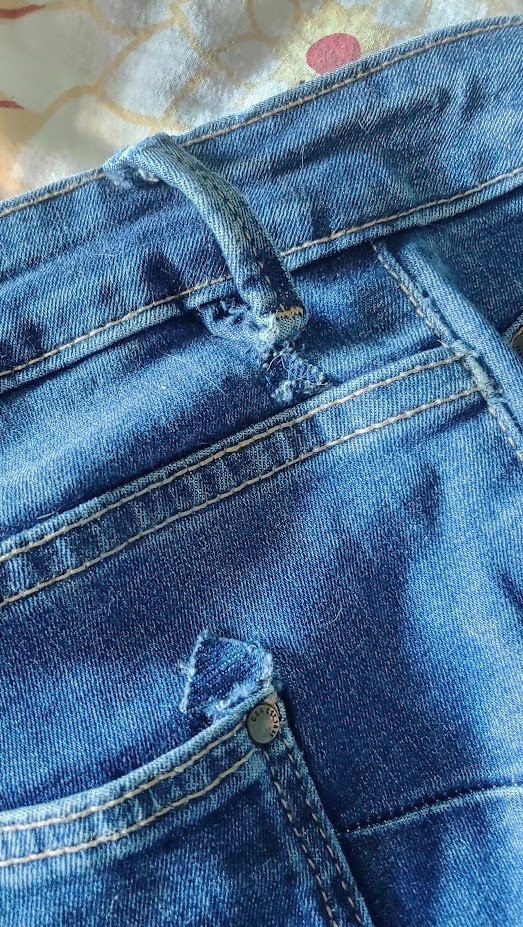
They're full of fixes like these. They lasted less than a year on their own. I got another decent year out of them SOLELY because I kept fixing them. And fixing them again. The crotch alone I had to fix SEVEN TIMES. I COUNTED.
And these weren't cheap jeans! C&A jeans tend to be around 40$ these days, and I got these for about 30 with a discount. I expected them to last me AT LEAST a few years, because those high school jeans? THEY'RE THE SAME FUCKING BRAND.
Considering this was the quality I was getting for nearly 40$ I figured I might as well get the same quality for 15$ and downloaded SHEIN. I didn't get jeans from them but I got some light, fluttery summer pants in the style that, honestly, I fucking love. I got three pairs for the price of one C&A jeans, and I am aware I will have to baby them even more, because out of the five pairs of pants in total I have bought on SHEIN only ONE is made of the fabric that I might be brave enough to machine wash. And with SHEIN continually getting sued for using sweatshops I probably won't be getting those pants again.
So what to do with that shitfuck situation?
I am insanely lucky my grandma knew how to sew really well and didn't mind me looking over her shoulder as long as I was quiet. I am aware that's not a skill everyone has, but quite frankly? When nobody has any money and even paying big bucks for clothes does not guarantee any kind of quality, and even fucking THRIFT STORES are full of just junk now, I think it's time to face the facts.
You need to learn how to sew.
I'm not talking about sewing your own clothes, though if you can and you have the time and patience, it's probably the best option (good luck finding decent fabric, because we can't even find THAT anymore unless you're ordering from fucking Belgium). I'm talking about fixing up seams and sewing on a patch, little repairs that make your clothes last. It might be junk, but with sewing you can make it last twice as long for the price of a spool of thread.
Now that I've pissed off everyone who is, for some reason, morally opposed to learning how to sew because it's a 'girly hobby' or 'supporting the patriarchy' (a take that left me baffled like nothing else) I'm going to piss off everyone who already knows how to sew.
I recommend getting this little guy.

It's called a stapler sewing machine, for obvious reasons. If I recall correctly, it was invented to fix clothes on the go for fashion shows and/or cosplay. It does only a chain stitch and needs to be pushed manually, but if you need to, like, hem your trousers and you don't want to spend half an hour on doing it manually (and don't already have an actual sewing machine) this is a lifesaver.
Here's a tutorial how it operates:
youtube
Now, why am I recommending this? Because it will only set you back six bucks. I got two right off the bat because I was banking on one not working (and I was right) and so I could use it for spare parts. The one in the video (Spring Come) is the one I have as well, and it's the one that actually works. I can't vouch for any unmarked ones, but the blue one works. It IS a little temperamental, but with a bit of practice it makes things so much easier.
The reason I'm not recommending an electric machine of any kind, even the one that costs 18$, is because, if you're a beginner, then an automatic sewing machine becomes a machine that exponentially speeds up the rate at which you make mistakes, and if it breaks down, good luck fixing it unless you have a dad/uncle/friend who knows his electronics. This thing can be fixed with a screwdriver, and takes the same needles as an ordinary sewing machine.
You can buy a bundle of needles just about anywhere for any price and they'll be decent as long as they're steel, but I would recommend looking for some actual better quality thread. Everywhere else, you can pinch pennies, but the thread itself is what's holding your clothes together, so this should be the part where you're looking for quality instead of price.
Alright, those of you who didn't scroll past with a derisive scoff at my take, I hope I've been helpful.
816 notes
·
View notes
Note
Hello! I’ve been reading WLB from some time now, and I am still absolutely loving this comic every time.(on my 4th reread lol) WLB has inspired me greatly along with WC content and (also great!)creations by other creators to the point that I am almost about to script my own comic, with a few scenes that WLB had a huge influence on. Though, I can’t help but be a little overwhelmed when I actually think of creating one, mostly because of the fact I lack the skills to draw comics. Believe me, I am shit at panelling lol. But also l‘m a bit scared because even if I actually end up making my own series it absolutely could end up flopping and that would probably make me lose enthusiasm. I don’t necessarily want to make money out of my comics but rather show others my stories and characters that I love, but I have a history of making and posting oc art just for nobody to watch and kinda giving up.(even though I’m aware of the fact that this happens to practically everyone all the time, it still hurts) The (real)question is if there is some advice you can give to beginner/wanna-be comic artists, and how did you feel when you first posted The Recruit if that’s your first comic. I’m sorry if this sounds like a vent, and feel free to pass this if you want-just know you’re a great inspiration for many people. Stay safe, remember that YOUR well being is number one, and Love from Korea♥♥
Hello! I'm very glad you've enjoyed WLB!
A webcomic can for sure be a daunting and overwhelming thing. Most artists are a one man show, and knowing how to do Every Aspect Perfectly is an impossible task. I think it's important to remember everyone starts somewhere, and it is hard to get better unless you Start.
I mean, the first comic pages I drew digitally looked like this.


The comic lasted 6 pages before I got tired of it, and then I started The Recruit.
(which was over 430 pages long and started and had quite a style/writing change throughout the 7 years I worked on it)


You learn so much by just doing. There are a lot of helpful free resources online now a days to make the learning faster! There are tutorials on how to panel! And I think just reading comics in general is a great source of learning. Pay attention to the things you like (paneling, simplification process, color palettes ) and implement them in your work!
I think it's really important to figure out the level of detail you want the comic to be. I don't think it's wise or sustainable to put 100% effort into every aspect of it. It will burn you out. It's good to consider what level of shading (if any) you'll be willing to do for hundreds of panels, what level of background detail, how many colors the characters should have, and figure out what your focus is.
I've met a lot of comic artists over the years, EVERYONE has a different method or different focus. Creating is not a universal experience!
As for having your work be seen, it is honestly a lot of luck. Back in the day for TR I would just submit to all of the deviantart warrior cat groups and people would find it that way. deviantart groups are pretty dead now so I am unsure if that is any good now.
I personally really think ComicFury is a wonderful place for new artists. It's default page always shows the latest comic, so everyone always has an equal chance to be seen. You can be on the front page every 12 hours (i think, it might be 24..) and with a striking icon and consistent posting, you WILL find people.
It's not the largest site, but it is my favorite for comics.
I do not like the mindset of a comic "flopping." I think it takes time to build an audience. It is very unlikely for people to find your comic overnight, it will very likely take at least a few months of consistent posting to find a few engaged readers. I know it sucks to feel like no one is seeing your work, but it's just something that takes time.
Cat comics do tend to find readers faster though, so if that is your goal, I do hope you find success!
You could also post your updates in comic/art related places, like discords or post panels on bluesky or instagram. really any site or app that posts an image.
I also think consistent uploading is a strong key to building an audience. And to do this, it really helps to have a backlog. Meaning you draw like the first 10-20 pages of you comic (or however many) and upload one or two pages a week. The more your comic is seen popping up on their feed, the more likely people will be to finally click it. I usually do not click on comics I see once or twice, it usually takes a few weeks of me seeing it pop up before i decide to check it out. (talking about on Comicfury to be clear)
Once you've established you are dedicated to your comic, people do not mind if you take breaks. (and if they do, fuck em)
Also, having a community of friends or creators is a huge motivator. Show your work to friends! Share in a community of comic creators! Some things my friends have said to me about my comics has lifted my creative spirit more than anything.
This is turning into some 3am ramblings but to summarize my points:
•Find a style that will work for you to sustain a comic. (do not make 100% effort art pieces)
•Upload on comicfury (great comic site, equal opportunity for new comics) (I would also cross post to other platforms and link back to CF as a primary comic site)
•Work on some pages in private, so you can upload consistently once you begin your comic! (I would update daily for maybe a week and then switch to weekly pages, just to get the best chance of being seen + consistent posting. so that would be good to have at least 10 pages of backlogs. 7 for the first week, plus 3 weeks of backlog at that rate)
and the point most dear to my heart;
•Don't be scared of change.
I know a lot of folk wait and wait to make their comic until they are perfect artists or writers, but like, you'll never make anything if you wait for that. Change is so natural and normal in webcomics, in all art really. I think if you shade for 10 pages and decide you hate it, it's okay to change how you shade or drop it entirely. Change your art style. Change how you panel pages. Change how you do backgrounds. Change anything and everything you want. Enjoy the process and tell the story you want to tell.
Best of luck on your comicing journey, I hope you really enjoy it.
#answers#comic advice#im not the advice king and I can only say what I know#if you have any other specific question feel free to ask!#this is pretty rambly. im sorry.
164 notes
·
View notes
Note
When looking at your art I always notice how amazing you are at expressions and body language.... HOW?!?!??!?! like tell me your secret
( TДT)
And different face shapes, body types give me some of that talent I'm struggling!!!! Pls
Hello! I can’t show a step-by-step tutorial because my process is too messy to be turned into one, but I can give some general tips and also resources that you could use _(:3 」∠)_
EXPRESSIONS AND FACE SHAPES
Tips:
A general thing for expressions is that the features of a face interact with each other. For example, when you’re happy, you smile and your eyes also squint. If you raise your eyebrows in surprise, your eyes widen a bit. When you’re angry, your eyebrows furrow, your nose scrunches up, and your mouth is downturned.
Try to observe the people around you, see what facial features move when people are happy, sad, angry, bored, etc.
If the expression feels flat, exaggerate.
Human Anatomy Fundamentals: Mastering Facial Expressions (Joumana Medlej) - This goes in depth on how features interact with each other, and also has an emotion tree that groups expressions into 5 categories: relaxed, surprised, smiling, angry, and sad.
For face shapes, you need to know the basic proportions of a face before you can start messing around with different features. Here are some resources you can use which are a combination of art channels, challenges, and websites. You can use these for your art studies.
Proko - A gold mine for art tips in general, and they’re beginner-friendly. Note: They cover more realistic proportions rather than stylized ones. The 2 playlists I recommend for drawing faces are Head Proportions and Facial Features.
100 Head Challenge (Ahmed Aldoori) - Basically a challenge of drawing 100 heads in 10 days. You can honestly just go for any reference that you can find, but this Pinterest board could be a good starting point.
Earthsworld - A collection of candid portraits taken from American county fairs. Lots of unique faces that aren’t limited to “conventionally attractive supermodel faces from Pinterest™”.
BODY LANGUAGE AND BODY TYPES
Tips:
I wrote this down a couple of years back, but this did help me a lot. Note that these 4 tips apply to making your poses less stiff and not full on anatomy, that's a whole different thing (Taken from: how to make your art less stiff or whateveR 🤡🎨 - banana boi)
Simplify shapes - Make things easier for yourself. Example: Instead of thinking of drawing an arm, think of it as drawing two connected cylinders. The body can be broken down into different shapes such as spheres, cylinders, and boxes.
Let go of the details - Not everything needs to be super detailed. The main focus is the pose, not anatomy.
Exaggerate - A drawing is 2D so there isn't any depth. Exaggeration brings life into a drawing and makes it less stiff.
Fuck accuracy - It's like letting go of the details, the main point of capturing the body language is the pose and it's gesture. You want to convince people of what you are drawing rather than how accurately you can draw the thing.
Gesture Drawing - Your friend in figuring out poses and adding life to them. The main point of a gesture study is to capture the pose of a figure. Don’t think too much about how it should look. It’s supposed to be messy and not completely accurate. Each pose should be captured in around 30 to 60 seconds.


For example, here are some gesture studies that I did before. I didn’t focus on how accurate the anatomy is and simplified my lines to capture the essence of the pose. Try using S or C curves rather than straight lines.
Figure Drawing - I’d describe it as a more detailed version of a gesture drawing. Aside from the gesture, you are also paying attention to anatomy, proportions, and structure. These drawings take more time to finish, around 2 to 10 minutes.
Line of Action is a great website for figure drawing since you can adjust the timer as well as the models. I’d recommend doing gesture studies first, then moving to figure drawing so that you’ll have a better understanding of proportions.
You can also ask your friends or family to pose for you since live drawing is better than pictures. If you're too shy to ask, you can try drawing them while they're doing something like working, watching a show, or anything that lets them stay in place for a few minutes.
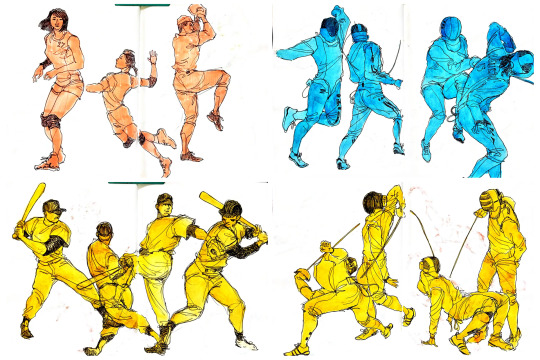
What I do besides looking at regular model poses is search for sports photography. There are lots of good shots that capture the athletes mid action. These are some of the drawings I made all the way back in 2020. These kinds of poses help you look at how the body moves in motion rather than your typical sitting/standing references.
Here's the thing tho, even if you think you're not good at gesture, you can still move forward to figure drawing. Gesture is a foundation while figure builds more to it. You're developing both skills at the same time for these two types of drawing.
Morpho: Anatomy for Artists Book Series (Michel Lauricella) - Great resource for anatomy references. These books simplify figures into basic shapes and explain some anatomy. The downside is that they don’t show a step-by-step guide on how to draw the human figure. If you can’t afford all the books, there are PDFs online. I don't know how you'll get them since there are different "ways", but I’d download with caution. (Example: Morpho: Simplified Forms or Morpho: Fat and Skin Folds).
Quick Anatomy Tips (Sinix Designs) - Deep dive into simplified anatomy and general tips. Honestly, Sinix Designs is also a good art channel on youtube to learn from since he tackles more stuff than just anatomy.
GENERAL TIPS
Here's a fun practice to do for faces and body types. Look for a character from your favorite media with a face and body type you've never drawn before, and try making fanart of them.
What pushed me to actually start learning how to draw different faces and body types was because of Miguel O'Hara from Across the Spiderverse. I got so frustrated in trying to draw him to the point that I used that spite to learn something from it 😅
Other tips would be:
Know at least the basic rules before you break them. Your art style won’t save you from having incorrect anatomy.
OBSERVE. Don't just go straight into drawing. Take the time to look at the figure/object before putting down the first line. How can you draw something when you don't even know what you're looking at?
References are a tool. Don’t feel ashamed if you need one, it's not cheating.
Your art will suck at first but keep going. It’s part of the process of learning.
It’s better to have bad art than not draw at all.
Don’t put too much pressure on yourself while learning, have fun!
Hopefully this is easy to understand and you were able to get something out of it! Good luck with your art journey 💙
84 notes
·
View notes
Note
hi quip! i really like your one piece comics and i am curious how you do them! i'm not good at comics and want to be better at drawing them! how do you learn how to make comics?
thank you!
uh oh... im afraid u have caught me at the perfect crossroad of "bored at work" and "unrelated task ive been meaning to do but keep putting off."
this is long. i hope you like reading (and grayscale progress pics). and of course!!! disclaimer before we begin that this is just how I, personally draw comics. there is no "right way."
quip's comic-making process!
Switching my typing to make this more legible...
My process can kinda be broken down into 6 steps:
Brainstorming
Thumbnailing
Sketching
Panels & Text
Lines
Tones/Colors
1. Brainstorming
My brain is a leaky sieve on a good day, so I sloppily jot down ideas in my phone notes the moment I have them. This helps me when it's time to draw too, because if I feel art blocked, I can look through old concepts and see what catches my interest.
Otherwise, I love drawing for other people's writing. :) And if worst comes to worst, doing manga/comic page redraws in my style teaches me new things every time.
Once I have my idea, I'll usually make a bulletpoint list of "plot points" or "story beats" I want. Then I plan the comic with this format that I've adapted from a tutorial I read once. I'm going to use my most recent comic (original comic post) as an example.

I start in the third column, writing notes of what I'd want to see in each panel. I also include the dialogue (in this case, I didn't have to write the dialogue! it's from the fanfic linked in the original comic post!). I usually write the whole name like [Luffy:], but at this point I've drawn so much of these guys, just the first letter works.
I like to handwrite these notes to get an idea for how much text I'm putting in a single panel.
After I describe all the panels, I go back and separate them into pages. I can't tell you how to know how many panels to a page. It's whatever works for you. I just kinda know about how big each panel will be, and so I can feel when I'm probably running out of space. (Also. You can change things later. I don't in this example, but I add/drop pages/panels all the time.)
2. Thumbnailing
Thumbnailing—as the name suggests—should be done tiny. Too tiny to accidentally get sucked into details.
This is about marking down blobs where items/characters go, and figuring out the paneling. I'll draw and redraw these a bunch of times too.
This is also the most time-consuming/brain-working part for me. If I were in a zine that did progress percentage, I'd try to finish thumbnailing around the 50% mark (but I'm also a moderately fast artist, so your mileage may vary).

I think the terrible quality makes them charming, actually. I really like how silly they look. :')))
I will add, when you draw your "page" rectangle, make sure it's the same proportions as your actual canvas for the final image. You want an accurate idea of how much space each panel will take up, especially if you have a lot of text.
3. Sketching
This is my most recent change to my usual workflow, and it's saving me a lot of time. I make my thumbnails a bit bigger (each one about half the size of the final canvas), and I sketch these basic body forms right over them.

It just helps give me placement for my actual lines!
I usually draw these in a paleish color so I can lower the opacity and not get distracted by them while lining. The random darker parts are to either help keep two forms separate (like when two characters have their limbs all over) or to better define sections that were too sloppy/poorly proportioned.
I also think this helps my poses stay looser, because I have more dramatic/wriggly shapes that aren't too bogged down by proportions yet.
Sidenote: I CANNOT show this here, but sometimes this is when I take videos. Of myself. I prop my phone camera up and shoot a video of me acting each panel. :/// It looks really dumb, but it also shows me fun body language ideas like hand gestures, expressions, weight distribution, etc. Just pretend you're an overdramatic cartoon character, and try not to worry about your roommates or mother walking in on you doing odd things. (You can also use the video for anatomy reference later, but I usually just capture the vibe and don't try to copy the actual video frame.)
4. Panels & Text
Oh, boy. So, the panels are usually just straight lines (though it's fun to make creative exceptions, like a round panel to mimic looking through a spyglass), but there are some fancy rules that I don't strictly adhere to.

I believe (I have no technical training in this. Take everything I say with a grain of salt) the vertical gaps (between two side-by-side panels) should all be a consistent width and the horizontal gaps (between two panels on top of each other) should be another. The vertical ones? Should be thinner? Because you want the eye to easily glide between them, whereas the horizontal gaps should be a visual barrier to keep you from jumping ahead. Just something I've vaguely noticed.
There are lots of fun "default layouts" you can look up. Or keep it a consistent grid. I think it's fun to sometimes have characters/objects sticking out of panels and overlapping others. This is just a matter of taste, creativity, and inspiration. (Read Witch Hat Atelier... It has some of my favorite paneling...)
You may also notice I have already done the speech bubbles. This is, to me, a crucial step. This helps me catch early if I don't have enough room for all the words. It also lets me plan the art in each panel with the speech bubbles in mind. There's nothing worse than working really hard on a panel, and then you realize there's no room for the bubbles.
I also try to lay them out in a way that guides the eye! Even without art, can people tell where to go next? Better yet, if I want people to look at panels out of order (aka not left to right, in my case), can I use the speech bubble path to make them? Here's just a vague example of what I mean.

As an added bonus, doing speech bubbles early also allows me to be lazy! :) Ignore the comic; I'm not supposed to post it yet oops,, There's a whole lot of drawing to do on each comic page, and I am not wasting my time on stuff that will be covered up. So yes, if I hide my bubbles, there are a lot of unfinished lines trailing off into nothing. (As a bonus, if there's a part of a character you're struggling with—and it won't look weird to do so—you can move speech bubbles to just hide the problem area yayyy)

Making the actual bubbles could be their own whole tutorial, tbh, but there are some general guidelines I use.
Zoom out when you choose your font size. You want to know how it will look to the average reader, so it isn't super teeny tiny or way too big. You generally want to keep the same text size for all your pages/bubbles.
When I draw bubbles, I try to size them about one vertical letter height (and some change) around the words [left side]. This isn't always the case though, because humorously large or funny shaped text bubbles can convey different feelings [right side].

On Procreate, I set my bubble lines to Reference and just drag-and-drop the white fill on a separate layer below the lines. (Remember to turn Reference back off again when you're done, or your fill bucket won't work right when you're drawing.)
To get the white outlines I use to keep the bubbles from cluttering up the art, I literally just Gaussian blur an all-white copy of the lines + fills... and then I copy and merge it 5 times until it's opaque enough. This is a terrible way to do it, but it works for me. :')

5. Lines
This is the part that I can't tell you how to do. I literally just. Draw right over my wacky sketched body forms. Boom. Comic drawn.

I'll make three suggestions:
Don't focus on making every panel perfect. Give a little extra love to big ones or ones you want people to linger on. Otherwise, know that people are typically speeding through the art. It's way more important to focus on storytelling than art technique. In my opinion, a good story that's told well will always be better than a beautiful one told poorly. (Some comics are beautiful AND well-written... Alas, I am just a hobbyist who needs to get the ideas out of my head at top speed.)
Put your background lines on a different layer. Put your foreground lines on a different layer too, if you have those. Basically, I try to keep the main part of each panel (usually a character or object) on my lines layer so I can erase background/foreground/etc lines to ensure clarity/focus.
You can make background lines lighter colors too. I have too many numbers sorry. (1) Background. The stuff that's farthest away. Lightest lines. Few details; more focused on shapes and the suggestion of a background (I'm not good at backgrounds). (2) Midground. Same distance away as the characters are. Lines can be black. (3) Also midground, and also the same distance away. But they're very detailed, so I lighten them so they aren't so distracting. (4) The characters. Black lines for focus. For people who haven't seen the comic, I swear they are just hugging. This is SFW. D:

6. Tones/Colors
Do not. Do NOT ask me. I don't understand colors. I hate working with them, but I try because I want to improve. I hate doing anything beyond the simplest grayscale shading. Please go elsewhere for your coloring/tone advice. This is how my color picker looks 95% of the time. I have pre-set "percentages" of black that I got by lowering the opacity of a black layer and just color picking it. I don't even know the exact percentages I used. Good luck out there. Be better than me.

7. Sharing
This is a bonus step that I didn't mention earlier, but it's actually the most important of all of them.
You need a friend. Or maybe a groupchat or discord. A family member or coworker if you're really close like that. I don't know.
Find SOMEWHERE you can spam wips and be cheered on. Drawing comics takes a while, especially if you're trying to tell longer stories than I'd dare to attempt. If I don't force someone to praise me for every line I draw, I shrivel up and die.
Also if and when you post online, add alt text. I'll admit I'm the first person to complain and drag my feet on this, and I literally use a screenreader myself when my eyes hurt (strong prescription glasses wearer). Comics should be accessible, because stories are fun and everyone should be able to enjoy them.
***
Learning???
And I guess lastly, how do you learn to make comics? Two steps: 1) read them and 2) make them. This is the tragedy of creating things.
1) Reading them: I grew up reading comic strips, western serialized comics, and webcomics. I've always loved graphic novels too. Then in late middle school, I started reading manga (Death Note and Haikyuu were my first two), and now I'm trying to read more webtoons (sorry im so slow bree)!
I also... mass-consume doujinshi, thanks to proxy mailing services and bilingual friends/Google Translate/knowing some Korean. (I have an entire bookshelf of doujin, actually,,)
The thing is, it's not usually enough to just read comics. You also need to be thinking. :/ I notice paneling, comic devices, clever comedic timing, etc. as I go. It's just a lot of studying/learning while also enjoying the story.
2) Making them: You just have to start. :( Even if you think they're "bad." My first comics were actually just drawings placed randomly all over the page, connected by speech bubbles (yay... I was already practicing how to place bubbles to lead the eye around the page...). I was going to post a pic here, but I'm a coward. Backscroll my account and you can find some older ones though.
I also know my art in general improved dramatically when I did ten comics in ten weeks for my friend's fic. Don't do this. It hurt my hands/wrists. But do practice in moderation.
***
If you actually read all that... I hope it made even a modicum of sense. And maybe it was even helpful? Just know at the end of the day, there is literally no right way to draw a comic.
And if you aren't ready to go for it yet, you can start by just adding a couple speech bubbles to your illustrations or doodles! It's a way to add storytelling and dialogue writing to things you may already be making.
Yay. I love comics. :))))
#art tips#ask#THANK YOU FOR ASKING THIS#PLEASE TALK TO ME ABOUT STORYTELLING AND ART AND COMICS#i have so much more i can say but i will not because this post is already way too dense#ive been meaning to finish/post this for so long im sorry#making comics is this fun blend of THINKING REALLY HARD AND WITH PURPOSE and doing things innately and you rly dont know why#reference#art reference#i dont remember my tutorial tag#oh. was it#tutorial#I DONT REMEMBER
102 notes
·
View notes
Text
My Christmas Star
—————————————————————————————————————
A Binary Star Hero fanfic special, happy holidays everyone, I hope you have an amazing Christmas.
Now, for starters.
I am not the creator of Binary Star Hero nor am I the creator of Ray, these world all with the characters belong to Concreteparasite.
If you haven’t checked out the game I suggest you do so. However keep in mind that it is strictly for adults. Which also means this should also count as the same, the fandom is strictly not for minors, 18+ only.
Now, let’s begin.
—————————————————————————————————————
Ray never spent Christmas with anyone, and after some time away from family, you didn’t ether for some time.
Since Christmas was around the corner, you decided to give him a gift he won’t ever forget. You could get him a store bought gift, however handmade seems more thoughtful, or even just a day together seems more precious to him. So what would count in his eyes as a good gift?
The sound of the door snapped you out of your thoughts.
‘Strange… doesn’t he work longer hours during this time?’
“Ray?”
“Hey star.”
He gone over and kissed your cheek, you were still wondering why he’s home early.
“Don’t you work longer hours during this time?”
“Well yeah, strangely… they’re letting me have a break..”
A break? The NAHA allowed him to actually relax? Confusing as it was, you knew this could be used to possibly figure out what to make for him or what he thinks is a good gift.
“Well as suspicious as it is… I guess they finally realized you needed a break. So what do you plan on doing with this time off?”
“Hm, maybe spend as much time with you. That’s a great enough time consumer for me.”
“I don’t know if I’m ether flattered or insulted.”
You went to go get a mug to make some hot chocolate, while pouting. You felt Ray’s arms wrap around you for a gentle hug.
“Ether way, I’m glad to spend as much time with you as I can.”
You felt your heart beating in your ears along with your face heating up. How does he always manage to fluster you so easily? You were glad he enjoyed being with you. Even if he was taking a break from being Binary Star. That’s when the idea came to mind, he really does want to spend time with you every chance he gets, however you were human, so that still meant you couldn’t be with him 24/7, but what if you gave him a reminder of how much you miss him during work?
Thank god you both agreed reading your mind needs to stop. Otherwise the surprise would’ve been ruined.
The day out on the town was also a day you decide to secretly get some supplies for your gift for Ray, the snow was also falling and the chatter of people going Christmas shopping for the holiday filled the air. It was always busy this time of year, though a bit annoying, you can understand the reason being they wanted to get something nice for their family or friends. You made sure to keep the supplies stashed in your bag, you didn’t originally know how you were going to get it but you did. When Ray asked you why you were acting strange, you waved it off as just the cold season messing with you. Why did he believe it? You have no idea.
Sometimes you worried that he was going to discover the gift before you were done with it. You made sure to hide it from him what he came in the room or heard him coming. It was a bit hard to do so since he would suspect something, however it was only a few times and you still have a bunch of excuses before you run out.
When you were finally done it was the night before Christmas Eve, you smiled at your hard work, took some YouTube tutorials and some struggles but you were satisfied with the outcome. You couldn’t wait to give it to him, you put it in a small box for now since you were still hiding for him till Christmas Day comes. You look at your phone after doing so and see a part of town in the latest article. You thought you might as well take Ray with you to go see it.
“This late?”
You nod as Ray asked.
“Better late than never.”
“Uh… alright.”
Walking down the street you two were hand in hand, you were mostly leading the way. Ray smiled at your excitement to go see something.
“What exactly are we-“
“Look over here!”
The lights of the area brought a warm feeling as you saw how well the Christmas decorations were, you were so lucky they weren’t so far away from where you two were. The sight gave a nostalgic feeling to it. Ray noticed how happy seeing the sight, he had to admit it looked well decorated. You look at Ray and smiled as seemed to like them too. Your hand in his gripping onto it once more.
“I’m glad I get to spend my Christmas with you.”
Ray’s face though from the cold you spotted him with a bit of pink on his cheeks, he smiled afterwards.
“I’m glad I can spend my Christmas with my one and only Star.”
Ray hugged you as the lights glowed brightly. The warmth in the moment during the cold season felt ever so nice. The smile upon your face evident as you leaned into the hug. A Christmas worth spending together, and a New Year that will start with the two of you together. You couldn’t ask for anything more. The Best Christmas gift you could ever ask for.
The day you woke up for Christmas Eve you decided to check on the gift.
Only for it to be missing. You panicked, you searched for it frantically, where could it be?! Not here, not there! Where did it go???
You heard the door, you gone towards the door, it was Ray. He went out? He probably needed to get something.
“Hey Ray, how-“
He’s wearing the scarf you made him… did he find the other thing in there?
“What’s with the face?”
“The scarf… it’s-“
At first he didn’t get it.
“Said it would be more cold out today, thought I’d look for something to help keep me warm, i hope you don’t mind I borrow it if it’s yours.”
You felt like that surprise was ruined up until you saw the handmade bracelet you made for him. That’s when you realized, this mother fucker…
“You son of a bitch..”
“Oh, so you finally realized I couldn’t wait for your secret surprise for me?”
“YOU ASSHOLE I THOUGHT IT WAS RUINED!”
“I couldn’t help myself.”
You pouted, as he laughed a bit.
“I might have accidentally read your mind yesterday, however I couldn’t wait till Christmas. Anything handmade from you will always count as a gift any day.”
You blushed as he then kissed your forehead, he liked the gift. He really did like the gift.
“I wasn’t sure about mine until I saw your gift, I’m not as good as you were but… here.”
He handed you your gift, and you opened it, a pair of gloves and a bracelet. Guess you both had the same idea except different winter wear.
“I always want to spend time with you, however I thought the other way around, I thought just a box of gloves was silly, and bracelet was nothing. Until I heard your thoughts and looked at your gift. Made me feel better about it.”
“I love it.”
“Huh?”
“I love them both. Thank you.”
You hugged Ray as you set the box aside, who would’ve thought such small things for each other as a good gift at the same time. Turned out to be the best gift ever.
“Best Christmas ever.”
“Haha, agreed. Best Christmas Ever.”
You spent Christmas Day together, in each other’s company. Definitely the best Christmas you’ve had in a long time.
—————————————————————————————————————
Merry Christmas to all and to all a lovely new year!
✨🎄✨
#binary star hero#binary star hero vn#binarystarhero#bshvn#binary star hero ray#bsh ray#merry christmas#christmas
132 notes
·
View notes
Note
How do you make all of your interactive fiction stories? I got inspired by your stories and I am now interested in making my own one day, but I don’t know where to start. I hope asking isn’t too much trouble!
it's no trouble at all! I will say I am a big believer in figuring out What Works For You, so any advice I can give will be based on what works for Me, but I can give some general tips.
figure out what kind of game you want to make - why interactive fiction rather than linear? what about it appeals to you?
figure out what engine you want to use - I'm (obviously) a twine advocate, but there's also choicescript (proprietary, comes with stipulations about what you can do with games written in it, but designed to be learner-friendly, code-minimal, and it comes with inbuilt accessibility and hosting options), ink (steeper learning curve but remains simple; there's a little less documentation but there are tutorials and guides out there, very basic ui unless you want to dig into the css), and then if you're looking at vns, there's renpy and things like rpgmaker. I can't give you any advice on those bc I've never used them but they're very popular and there will be documentation out there for how to get started!
for planning, I recommend obsidian, particularly its canvas function, but the twine api also provides a map of your passages and I'm sure there are other mind map softwares out there (scapple is supposed to be good but requires a license)
I'd suggest playing around. try some of these out, see if you like any, if you can get to grips with them - make something small and simple, just get used to threading passages together and using variables.
join a jam, if you need a deadline to work towards; it's a good way to practice, and you'll have a place to share your work at the end if you want
have a general outline; in IF, more than in traditional writing, scope creep is a problem. I find having an outline, keeping track of where I need the story to go, keeps me from wandering off on too many tangents. even if you want a lot of variability I'd advise making sure you know what purpose it all serves!
because I am gamebrained, I tend to approach my ideas in terms of Choices - one of the big things I try to iron out early in every project is the major choices the player will see, and how they change the experience; 'major' doesn't have to mean earth-shattering, but what's significant to the player's experienc, and how is the story structured around that?
this doesn't have to be anything deep. for iritb the choice boils down to "do you want to get laid or nah"
on a slightly more experimental note, "interactive" doesn't have to mean "making choices that change the outcome" . interactions can be anything that bring the reader into the structure, and I think we should all (myself included) be getting weirder with it
have fun! and if you find yourself writing the same scene 5 times with the slightest variations. yeagh<3
#anon#interactive fiction#there's a lot of resources out there!#my main advice will always be figure out your process . fuck around for a bit!#it's fun (it should be fun) and it's a cool way to teach yourself to code and manage branching narratives#you'll see authors complain abt it but. it's like brits complaining about rain yknow. it's just in the dna
57 notes
·
View notes
Text
Trey Clover Shared Lines
Tutorial: We should hurry, or it'll be off with our heads.
Level Up 1 / Buddy Level Up: Haha, it's not too terrible to have someone look after me for a change.
Level Up 2: It's all because you've been working alongside me.
Level Up 3: Yeah, this result feels good.
Level Max: I can't look bad in front of my underclassmen. I worked pretty hard, you know?
Vignette Level Up: I enjoy being with you. Haha, sounds like a lie? What can I say that'll make you believe me?
Spell Level Up: My magical power has grown even more than before. It's probably because of all the training we've done together.
Friendship Level Up: At first, when you said you wanted to extend your hospitality to me, I thought to myself, “what are they scheming?”, but… Haha, you’re always full of surprises.
Friendship Level Max: I need to give you proper thanks for always inviting me. …Eh? Hey, it’ll be troublesome if you ask for that much. Do me a favor and don’t expect too much, okay?
Uncapped: I know it's not really like me to ask, but... ... I kind of want to see just how far I can go. Will you help me out?
Groovification: This just means there's still room for me to grow. That's good to know.
Lesson Select 1: You're looking pretty sleepy. I won't wake you up even if you drift off to sleep in class, you understand?
Lesson Select 2: It'd be great if our freshmen could be just as diligent in their studies like you are...
Lesson Select 3: My best subject? If I have to pick something, I guess that'd be alchemy... Well, let's just say I'm average across the board.
Lesson Start: Alright. Time to focus.
Lesson Finish: Good job. Keep it up next time, too.
Battle Start: I don't really want to be too rough with you.
Battle Won: Getting so heated up isn’t really my forte.
Trouble 1: I wasn’t fighting or anyth… No, I guess it was good you stopped us.
Trouble 2: Phew, it’s finally over.
GIFT CALENDAR 2023: “How will you be spending the day?” It’s pretty cold every day now, so I think I’ll stock up on lemonade-ginger syrup. It’ll warm you right up if you drink some. What, according to the Queen of Hearts’ Laws, we can’t have lemonade after 8 o'clock? Well, this has ginger in it, so it’s a completely different drink, isn’t it?
Birthday Login Message 1: Haha, you're making me blush. Thanks. According to the Queen of Hearts' laws, on our birthday, we're allowed to be as selfish as we want. Now, what should should I ask of you...? Hey, c'mon, no need to shirk. Obviously, I'm just joking.
Birthday Login Message 2: Oh are you going to celebrate my birthday as well? Thanks. What do I want as a present…? I’m okay with anything. Hey, it’s not like I’m just saying that in order to answer your question. I’m just happy that you’re thinking of me.
Birthday Login Message 3: Hm? Do I like strawberry or chocolate tarts better? Hm, I think I like both. Are you thinking of making one for somebody? Oh, then let me help you. …Hahah, don’t look so panicked. I’m just kidding. It’d be bad if I helped you on today of all days, right? Well then, I can’t wait to see your finished tart. You can give me your birthday wishes after it’s done.
Birthday Login Message 4: Thanks for celebrating my birthday. But I have to say, I wasn’t expecting you to have my gift delivered to my dorm like that. You should have just handed it to me directly, since we were meeting up, anyway. Was I shocked? Well, yes… Ah, so it was supposed to be a surprise present! Haha, oh man. You’re always finding ways to startle me.
Birthday Login Message 5: You’re here for my birthday, huh? And this present… Oh, it’s honey! Thanks! It’s useful and honestly, easy to comprehend. What I mean is, we had a Science Club meeting today, and… Well, while the club members were wishing me a happy birthday, Rook gave me something. Look at this. According to Rook, it’s a “wondrously beautiful clover,” but… Is there any difference from a regular clover? I don’t really get it… What about you? If you can figure out the difference, let me know on the down low.

Requested by Anonymous.
82 notes
·
View notes
Text
Oh boy, VaM is kind of a trial and error experience LOL I couldn't really show you how to use the interface and stuff without a whole video or something, but it's not THAT difficult to get a hang of if you just give yourself a day or two to play around, not to mention the number of tutorials you find out there. Luckily, if you only want to use it as a reference software that makes the process far easier (to this day I have no idea how to animate on that thing, since that's not what I use it for)
As for how I use it, it's pretty self explanatory - if there's a complicated pose I want to draw but I'm either having trouble with it, or just want to double-check angles/anatomy, I will use it as a resource! I use for most of my "proper" pieces (y'know, the nicer looking ones) and every once in a while for my silly comics if I'm having trouble with a pose.
Lets use this drawing for example (the character on top of DU drow belongs to @namespara )
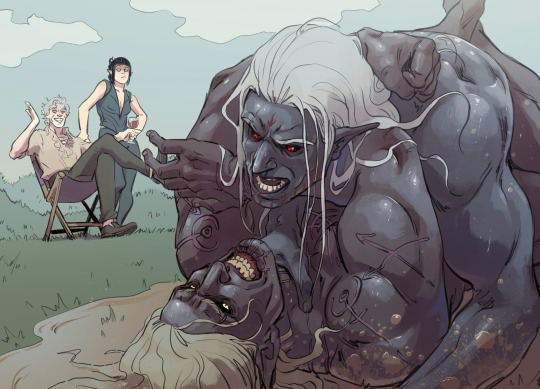
I don't draw a lot of mud-wrestling (shocking, I know) but I had an idea of the kind of pose I wanted them to be in. So the very first thing I did was make a rough sketch of what I was envisioning:
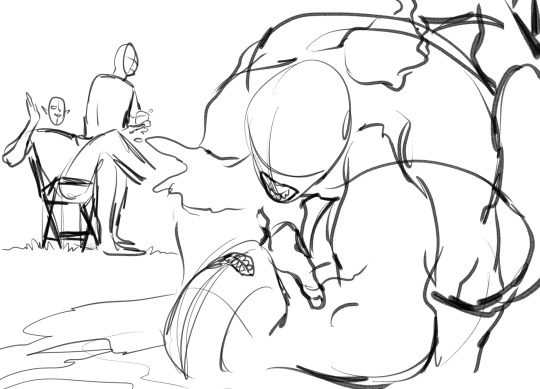
I often do a rough sketch first, even If I know I'm going to be pulling the program up because A) It's less tedious than adjusting the models over and over again until I pick a pose and B) because sometimes I'll decide I don't need the reference, after all, and so that's 30 minutes I'll have spared myself of playing around on the software.
Now, this is a pretty complicated pose! It's in a weird angle and the bodies are making contact in ways I'm not used to depicting, so I did choose to whip out VaM for this one. I went into the program and after some messing around, I flopped my little dolls together like this:
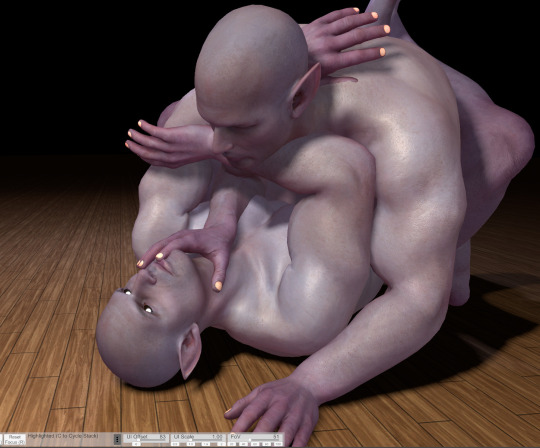
Now something really cool about VaM is that you can completely customize your models, and if you have the patience, I would definitely encourage you to do so! Obviously, you don't have to make picture perfect replicas of every single character you have, but as you can see here I have made a DU drow "decoy" to help me better understand some of his features when I draw him: he has a strong brow, a short nose, a square jawline - these are all going to look a very specific way from certain angles, and I might not always be sure of how to draw it right! So it's useful to have models that bear SOME semblance to the character so you can better understand how different viewpoints will affect their bone structure and mass.
Also thank fucking god for the elf-ear slider. Figuring out how to draw those shits from certain angles was a huge pain in the ass when I started drawing DnD races.
So, with the reference in hand, I go over the sketch again:
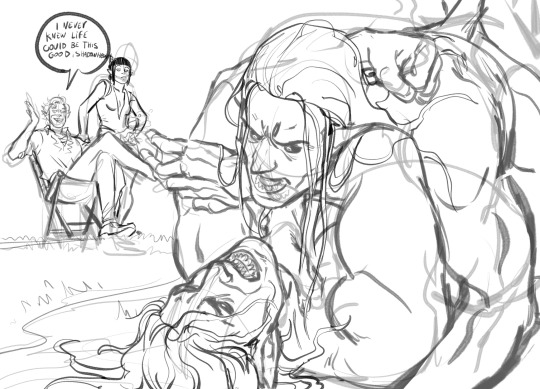
Now you may notice that I don't stick to the reference 100%. There's three reasons for this:
posing on VaM is tedious as hell. You can get something incredibly natural looking and picture-perfect to reference from if you wish, but it's going to take you hours to do. So, for the most part I just slap guys together until the results are "close enough" and use that.
In my opinion, you should always aim to ENHANCE your reference material, not replicate it exactly!
While VaM is a PRETTY DANG GOOD source of anatomical reference, it isn't perfect, I often supplement it with further reference from real life resources or make tweaks based on my own knowledge where I catch it falling short (and, antithetical to what I just said, I sometimes fuck the anatomy up further on purpose if I think it looks better that way LOL it's all jazz baby).
Then lines, color, yada yada. I don't have a tutorial on that and I don't think I could make one, because my process is chaotic as hell, but I do at times use Virt-a-mate as loose reference for lighting too when coloring - waaaaayyyy less so however, because that process is even more tedious and I feel like I often get better results by just winging it. It is a feature of the program though, and I'm sure it would be helpful for someone who has a difficult time visualizing lights and shadows. I only started using this program a few months ago, so I happened to already have a pretty good understanding of that kind of thing and just don't personally feel like I get much out of that particular mechanic.
Here's a few other examples of pieces that I made reference for (WARNING: Suggestive)
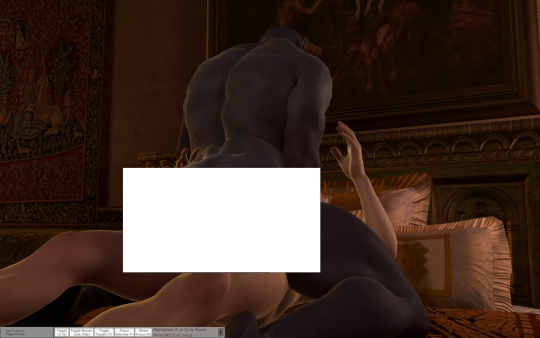
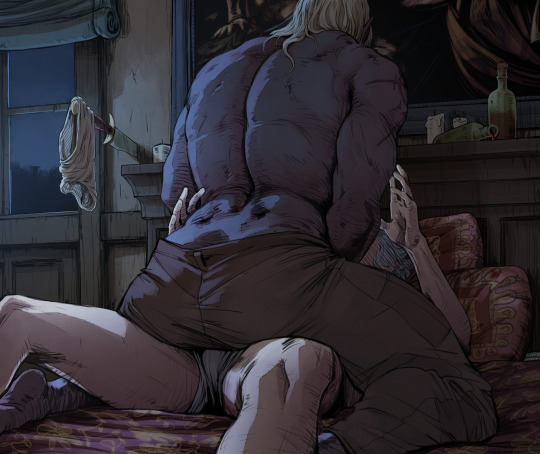
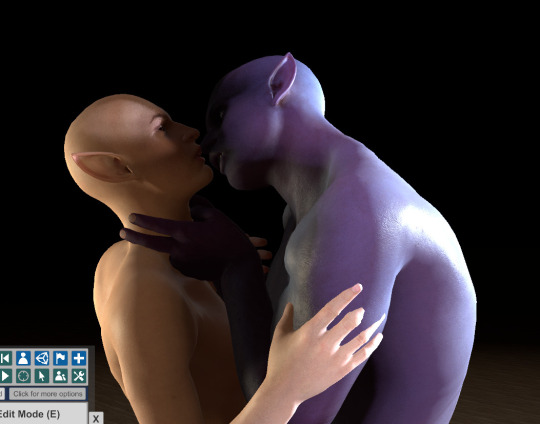
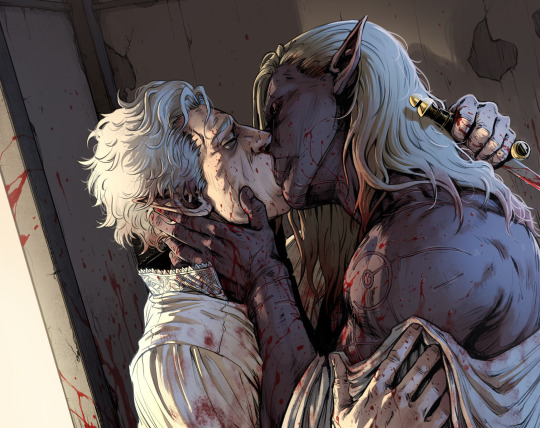
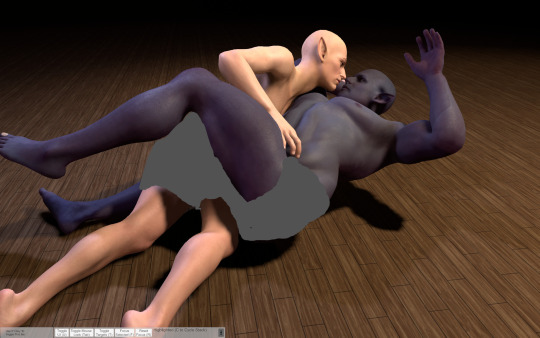
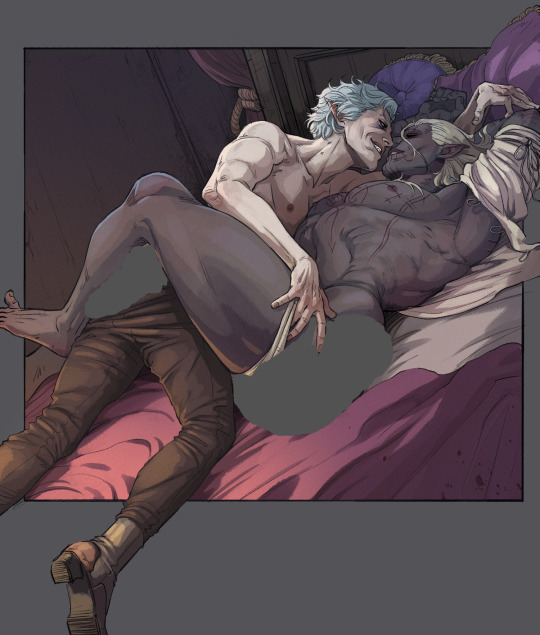
Now, for the question many of you may want to ask:
"Can I trace this junk?"
And to that, I say: Buddy, you can do whatever the hell you want with the reference material you created.
However,
If your goal is to learn and improve your art, and to recreate realistic proportions and anatomy from memory, tracing won't help you.
Developing your own style, your muscle memory, and personal technique will all be hindered by choosing to trace instead of drawing from observation, so I would encourage against it. Hell - even when tracing is employed as a technique, it's usually by high-skill realism & concept artists who are looking to either cut some corners, save time, or just double-check their own proportions in order to improve further - if you try tracing as a beginner, you will most definitely find the result to still look stiff and "off".
So trust me, there is so much more to be gained from drawing from observation. Make note of tangents, compare proportions, use all the elements of the picture to dictate where and how things should go - it will be a far more rewarding experience.
Hopefully this has been helpful! VaM is a really cheap program (you get it on the guys' patreon for I think 8 dollars, just google it!) and it's definitely been worth my money as an artist since I found it. Learning to use it can be a little intimidating at first glance, but as I said above you only really need a day plus one or two tutorials to get a hang of the interface.
A fair warning though, IT IS A SOFTWARE MADE FOR VIRTUAL SEX/ADULT ANIMATION So when looking it up expect to see a some spicy content.
#Funfact THIS is the post that got me flagged last time so i'm really tempting fate right now LOL#ask#art#tutorial#resource
692 notes
·
View notes
Text
in wake of yet another wave of people being turned off by windows, here's a guide on how to dual boot windows and 🐧 linux 🐧 (useful for when you're not sure if you wanna make the switch and just wanna experiment with the OS for a bit!)
if you look up followup guides online you're gonna see that people are telling you to use ubuntu but i am gonna show you how to do this using kubuntu instead because fuck GNOME. all my homies hate GNOME.
i'm just kidding, use whatever distro you like. my favorite's kubuntu (for a beginner home environment). read up on the others if you're curious. and don't let some rando on reddit tell you that you need pop! OS for gaming. gaming on linux is possible without it.
why kubuntu?
- it's very user friendly
- it comes with applications people might already be familiar with (VLC player and firefox for example)
- libreoffice already preinstalled
- no GNOME (sorry GNOME enthusiasts, let me old man yell at the clouds) (also i'm playing this up for the laughs. wholesome kde/gnome meme at the bottom of this post.)
for people who are interested in this beyond my tl;dr: read this
(if you're a linux user, don't expect any tech wizardry here. i know there's a billion other and arguably better ways to do x y and/or z. what i'm trying to do here is to keep these instructions previous windows user friendly. point and click. no CLI bro, it'll scare the less tech savvy hoes. no vim supremacy talk (although hell yeah vim supremacy). if they like the OS they'll figure out bash all by themselves in no time.)
first of all, there'll be a GUI. you don't need to type lines of code to get this all running. we're not going for the ✨hackerman aesthetics✨ today. grab a mouse and a keyboard and you're good to go.
what you need is a computer/laptop/etc with enough disk space to install both windows and linux on it. i'm recommending to reserve at least a 100gb for the both of them. in the process of this you'll learn how to re-allocate disk space either way and you'll learn how to give and take some, we'll do a bit of disk partitioning to fit them both on a single disk.
and that's enough babbling for now, let's get to the actual tutorial:
🚨IMPORTANT. DO NOT ATTEMPT THIS ON A 32BIT SYSTEM. ONLY DO THIS IF YOU'RE WORKING WITH A 64BIT SYSTEM. 🚨 (win10 and win11: settings -> system -> about -> device specifications -> system type ) it should say 64bit operating system, x64-based processor.
step 1: install windows on your computer FIRST. my favorite way of doing this is by creating an installation media with rufus. you can either grab and prepare two usb sticks for each OS, or you can prepare them one after the other. (pro tip: get two usb sticks, that way you can label them and store them away in case you need to reinstall windows/linux or want to install it somewhere else)
in order to do this, you need to download three things:
rufus
win10 (listen. i know switching to win11 is difficult. not much of a fan of it either. but support's gonna end for good. you will run into hiccups. it'll be frustrating for everyone involved. hate to say it, but in this case i'd opt for installing its dreadful successor over there ->) or win11
kubuntu (the download at the top is always the latest, most up-to-date one)
when grabbing your windows installation of choice pick this option here, not the media creation tool option at the top of the page:

side note: there's also very legit key sellers out there who can hook you up with cheap keys. you're allowed to do that if you use those keys privately. don't do this in an enterprise environment though. and don't waste money on it if your ultimate goal is to switch to linux entirely at one point.
from here it's very easy sailing. plug your usb drive into your computer and fire up rufus (just double click it).

🚨two very important things though!!!!!!:🚨
triple check your usb device. whatever one you selected will get wiped entirely in order to make space for your installation media. if you want to be on the safe side only plug in the ONE usb stick you want to use. and back up any music, pictures or whatever else you had on there before or it'll be gone forever.
you can only install ONE OS on ONE usb drive. so you need to do this twice, once with your kubuntu iso and once with your windows iso, on a different drive each.
done. now you can dispense windows and linux left and right, whenever and wherever you feel like it. you could, for example, start with your designated dual boot device. installing windows is now as simple as plugging the usb device into your computer and booting it up. from there, click your way through the installation process and come back to this tutorial when you're ready.
step 2: preparing the disks for a dual boot setup
on your fresh install, find your disk partitions. in your search bar enter either "diskmgr" and hit enter or just type "partitions". the former opens your disk manager right away, the latter serves you up with this "create and format hard disk partitions" search result and that's what you're gonna be clicking.

you'll end up on a screen that looks more or less like in the screenshot below. depending on how many disks you've installed this might look different, but the basic gist is the same. we're going to snip a little bit off Disk 0 and make space for kubuntu on it. my screenshot isn't the best example because i'm using the whole disk and in order to practice what i preach i'd have to go against my own advice. that piece of advice is: if this screen intimidates you and you're not sure what you're doing here, hands off your (C:) drive, EFI system, and recovery partition. however, if you're feeling particularly fearless, go check out the amount of "free space" to the right. is there more than 30gb left available? if so, you're free to right click your (C:) drive and click "shrink volume"

this screen will pop up:

the minimum disk space required for kubuntu is 25gb. the recommended one is 50gb. for an installation like this, about 30gb are enough. in order to do that, simply change the value at
Enter the amount of space to shrink in MB: to 30000
and hit Shrink.
once that's done your partitions will have changed and unallocated space at about the size of 30gb should be visible under Disk 0 at the bottom like in the bottom left of this screenshot (courtesy of microsoft.com):

this is gonna be kubuntu's new home on your disk.
step 3: boot order, BIOS/UEFI changes
all you need to do now is plug the kubuntu-usb drive you prepared earlier with rufus into your computer again and reboot that bad boy.
the next step has no screenshots. we're heading into your UEFI/BIOS (by hitting a specific key (like ESC, F10, Enter) while your computer boots up) and that'll look different for everyone reading this. if this section has you completely lost, google how to do these steps for your machine.
a good search term would be: "[YOUR DEVICE (i.e Lenovo, your mainboard's name, etc.)] change boot order"
what you need to do is to tell your computer to boot your USB before it tries to boot up windows. otherwise you won't be able to install kubuntu.
this can be done by entering your BIOS/UEFI and navigating to a point called something along the lines of "boot". from "boot order" to "booting devices" to "startup configuration", it could be called anything.
what'll be a common point though is that it'll list all your bootable devices. the topmost one is usually the one that boots up first, so if your usb is anywhere below that, make sure to drag and drop or otherwise move it to the top.
when you're done navigate to Save & Exit. your computer will then boot up kubuntu's install wizard. you'll be greeted with this:

shocker, i know, but click "Install Kubuntu" on the right.
step 4: kubuntu installation
this is a guided installation. just like when you're installing windows you'll be prompted when you need to make changes. if i remember correctly it's going to ask you for your preferred keyboard layout, a network connection, additional software you might want to install, and all of that is up to you.
but once you reach the point where it asks you where you want to install kubuntu we'll have to make a couple of important choices.

🚨 another important note 🚨
do NOT pick any of the top three options. they will overwrite your already existing windows installation.
click manual instead. we're going to point it to our unallocated disk space. hit continue. you will be shown another disk partition screen.
what you're looking for are your 30gb of free space. just like with the USB drive when we were working with rufus, make sure you're picking the right one. triple check at the very least. the chosen disk will get wiped.

click it until the screen "create a new partition" pops up.
change the following settings to:
New partition size in megabytes: 512
Use as: EFI System Partition
hit OK.
click your free space again. same procedure.
change the following settings to:
New partition size in megabytes: 8000 (*this might be different in your case, read on.)
Use As: Swap Area
hit OK
click your free space a third time. we need one more partition.
change the following settings to:
don't change anything about the partition size this time. we're letting it use up the rest of the resources.
Use as: Ext4 journaling system
Mount Point: /
you're done here as well.
*about the 8000 megabytes in the second step: this is about your RAM size. if you have 4gb instead type 4000, and so on.
once you're sure your configuration is good and ready to go, hit "Install Now". up until here you can go back and make changes to your settings. once you've clicked the button, there's no going back.
finally, select your timezone and create a user account. then hit continue. the installation should finish up... and you'll be good to go.
you'll be told to remove the USB drive from your computer and reboot your machine.
now when your computer boots up, you should end up on a black screen with a little bit of text in the top left corner. ubuntu and windows boot manager should be mentioned there. naturally, when you click ubuntu you will boot into your kubuntu. likewise if you hit windows boot manager your windows login screen will come up.
and that's that folks. go ham on messing around with your linux distro. customize it to your liking. make yourself familiar with the shell (on kubuntu, when you're on your desktop, hit CTRL+ALT+T).
for starters, you could feed it the first commands i always punch into fresh Linux installs:
sudo apt-get update
sudo apt-get upgrade
sudo apt-get install vim
(you'll thank me for the vim one later)
turn your back on windows. taste freedom. nothing sexier than open source, baby.
sources (mainly for the pictures): 1, 2
further reading for the curious: 1, 2
linux basics (includes CLI commands)
kubuntu documentation (this is your new best friend. it'll tell you everything about kubuntu that you need to know.
and finally the promised kde/gnome meme:

#windows#linuxposting#had a long day at work and i had to type this twice and i'm struggling to keep my eyes open#not guaranteeing that i didn't skip a step or something in there#so if someone linux savvy spots them feel free to point them out so i can make fixes to this post accordingly#opensource posting
123 notes
·
View notes
Text
⚠️🌟Plarn Tutorial🌟⚠️
Ok the class I'm in is so underwhelmingly boring that imma Tutorial all yall!
This one goes especially to: @nightblackowlbat

you got your plastic bag with your groceries. (I can't forbid anything but I FORBID YOU TO SPEND MONEY ON THIS. seriously)

2. cut the bottom off. (i'm non native english speaker so my terms might be sus lol please call me out about it)

3. cut the handles too but don't take them off yet (if you want. it works for me like this)

4. start folding vertically, as straight as you can! if it's rugged within, when you cut the bag the stripes will be all spiky and will get cut under no pressure at all.

5. fold as much as you like keeping the plastic straight, I fold until I can cut in one or two scissor motions max. but don't cut yet! we have one more fold to make.

6. so you folded vertically until thin and straight (like your mom whaaat? ok you can block me now), then give the whole thing one horizontal fold.

7. now, proceed to cut the irregular ends together! the cut handles and the cut bottom. (you can do it separately of course, but our most precious resource -besides the plastic- is our time and our tendons. so save whatever you can and be efficient) discard handles and bottom. you can keep the cut bottom if it's regular enough, usually I discard it (keep it accumulatively along with the handles until I figure out what to do with my many little useless pieces of plastic or, yk, toss it) because it's quite irregular from my first cut.

8. keep cutting, maintaining your preferred width. this width (a couple centimeters) is good for embroidering, the crochet is suuuuuper thin and fragile. haven't knitted anything yet but I imagine it will be just like crocheting in terms of texture.

9. you finished cutting up and now you have many circular stripes. you can roll them wherever you want, I have these little carton cylinders that I get from work (my coworkers keep them for me and it's great!) and they work fine. in the beginning, I cut up little carton rectangles to roll the plarn but it looked ugly tbh. note: you have the circular stripe right? you grab it and stretch it (please don't pull lol) and work it like it's a two fiber thread. not two separate fibers. does i make any sense? if not, there are some clips online about it hehe

10. now the magic happens. this is difficult to put into english words, to be perfectly candid. but you... link the stripes together.

11. you... keep linking. right?? like in a untied knot. idk. in a loop.

12. now, you softly pull. when you work the plarn, you'll get used to the plastic's resistence and will know how much strength you must apply to pull on the fiber without stretching and cutting it accidentally.

13. pull! (softly) pull!!!

14. aaannd you made your first thread of plarn. whoops the pic got turned upside down

15. so now you start headbanging and keep rollin' rollin' rollin' rollin'

16. and there you go!! YOUR FIRST PLARN ROLL!!!! what are you gonna do with it? I wanna see so bad!!!😁
My class is over (and the tutorial as well). I didn't learn anything but I hope you guys did!
Share the knowledge and plarn away!!!🪡🌤️
#biomorbosis plarn#plarn#environmental#sustainability#sustainable art#plastic yarn#solarpunk#diy#diy craft#upcycling#cross stitch#needlework#embroidery#hand stitching#needlepoint#needlecraft#biomorbosis makes#plarn tutorial#plarn diy#biomorbosis tutorial#ecofriendly diy
48 notes
·
View notes