#install mysql on ubuntu 18.04
Explore tagged Tumblr posts
Visit Tumblr Blog
Explore Tumblr blogs with no restrictions, modern design and the best experience.
Last Seen Tumblr Blogs


Fun Fact
Tumblr’s website traffic is steadily declining.
Text
How To Setup ProxySQL(MySql Proxy) Server ? Part -1
Read with Slave and Write with Master In today's world, most of the infra is cloud-based now and these cloud services are reliable nowadays. if we have a look at RDS in AWS there are reader and writer and AWS RDS decide where to send read/write request. In an ideal scenario, the read request should get the server via MySql slave and write request with MySQL master. Most organizations still use self-hosted MySQL server setups, thus making the ideal situation a bit tough, in this article, we will learn about MySQL Proxy. What is MySQL Proxy? Using MySQL Proxy an application may communicate between one or more MySQL servers and one or more MySQL clients over the network Why Mysql Proxy? MySQLProxy is a middle layer sitting between a MySQL database and an application. The application connects to a proxy, which then forwards connections into the database and it works the application layer.
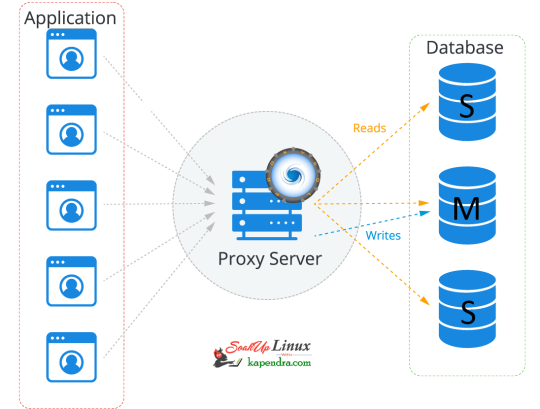
So let's start getting our hands dirty Our Scenario: Host OS: Ubuntu 18.04 RAM: 2GB memory Proxy server: 172.31.2.24 Master IP: 172.31.2.196 Slave IP:-172.31.2.162 Let's Start Step 1: Add MySQL Proxy Repository To install MySQL proxy we need to set up a repository. follow the below command to install the repo on the Proxy server host. $ apt-get install -y lsb-release $ wget -O - 'https://repo.proxysql.com/ProxySQL/repo_pub_key' | apt-key add - echo deb https://repo.proxysql.com/ProxySQL/proxysql-2.0.x/$(lsb_release -sc)/ ./ | tee /etc/apt/sources.list.d/proxysql.list Step 2: Install MySQL Run the below command on the Proxy server host $ apt-get update $ apt-get install proxysql Note: By default, ProxySQL binds with two Ports 6032 and 6033. MySQL 6032 is the admin port and 6033 is the one that accepts incoming connections from clients. Step 3: Start ProxySQL Now run this simple command to start and enable ProxySQL $ systemctl start proxysql $ systemctl enable proxysql Alternatively, we can do this via the Admin interface as well. $ mysql -u admin -padmin -h 127.0.0.1 -P6032 --prompt='Admin> ' Admin> proxysql start Admin> proxysql stop Step 4: Configuring ProxySQL via the admin interface Before entering the admin interface of ProxySQL, create one application user with all privileges required for your application and one monitoring user at every MySQL DB server. On Mysql Master Host $ mysql -u root -ppassword mysql> CREATE USER 'sysbench'@'%' IDENTIFIED BY 'sysbench'; mysql> GRANT ALL PRIVILEGES on *.* TO 'sysbench'@'%'; mysql> CREATE USER 'monitor'@'%' IDENTIFIED BY 'monitor'; mysql> GRANT USAGE,REPLICATION CLIENT on *.* TO 'monitor'@'%'; mysql> FLUSH PRIVILEGES; On the Proxy server host After installation making the service up and creating the application user, we need to configure ProxySQL In this setup, we are used using need 2 host groups hostgroup 0: For the master hostgroup 1: For the slaves $ mysql -u admin -padmin -h 127.0.0.1 -P6032 --prompt='Admin>' Admin>show databases; +-----+---------------+-------------------------------------+ | seq | name | file | +-----+---------------+-------------------------------------+ | 0 | main | | | 2 | disk | /var/lib/proxysql/proxysql.db | | 3 | stats | | | 4 | monitor | | | 5 | stats_history | /var/lib/proxysql/proxysql_stats.db | +-----+---------------+-------------------------------------+ 5 rows in set (0.00 sec) Add Master for reading and writing requests. Admin>INSERT INTO mysql_servers(hostgroup_id,hostname,port) VALUES (0,'172.31.2.196',3306); Admin>INSERT INTO mysql_servers(hostgroup_id,hostname,port) VALUES (1,'172.31.2.196',3306); Add slave for reading requests Admin>INSERT INTO mysql_servers(hostgroup_id,hostname,port) VALUES (1,'172.31.2.162',3306); Proxysql 2.0 comes with native monitoring for Aurora, by checking the variable “Innodb_read_only”, to determine the reader/Writer for the individual nodes, This info of check has to be added to the table “mysql_replication_hostgroups” in ProxySQL Admin>insert into mysql_replication_hostgroups values (0,1,'read_only','STG'); Admin>LOAD MYSQL SERVERS TO RUNTIME; Admin>SAVE MYSQL SERVERS TO DISK; Note: When we load MYSQL SERVERS, Our writer host also gets configured in the reader host group automatically by ProxySQL to handle all those queries which are redirected to the reader host group in case no slaves are online. this is optional to decrease the weightage assigned to master servers inside the mysql_server table for the reader host group so that most of the read queries will go on the server which has a higher weight. Admin>UPDATE mysql_servers SET weight=200 WHERE hostgroup_id=1 AND hostname='172.31.2.196'; Admin>UPDATE mysql_servers SET weight=1000 WHERE hostgroup_id=1 AND hostname='172.31.2.162'; Configure Monitor monitor user will continuously check the status of the backend in a specified interval. sysbench is the user, created for the application. Admin> UPDATE global_variables SET variable_value='monitor' WHERE variable_name='monitor'; Query OK, 0 rows affected (0.00 sec) Admin> LOAD MYSQL VARIABLES TO RUNTIME; Query OK, 0 rows affected (0.00 sec) Admin> SAVE MYSQL VARIABLES TO DISK; Query OK, 116 rows affected (0.03 sec) INSERT INTO mysql_users(username,password,default_hostgroup) VALUES ('sysbench','sysbench',1); Confirm user details and we will save the configuration to disk: Admin> SELECT username,password,active,default_hostgroup,default_schema,max_connections,max_connections FROM mysql_users; +----------+----------+--------+-------------------+----------------+-----------------+-----------------+ | username | password | active | default_hostgroup | default_schema | max_connections | max_connections | +----------+----------+--------+-------------------+----------------+-----------------+-----------------+ | sysbench | sysbench | 1 | 1 | NULL | 10000 | 10000 | +----------+----------+--------+-------------------+----------------+-----------------+-----------------+ 1 row in set (0.00 sec) Admin> LOAD MYSQL USERS TO RUNTIME; Query OK, 0 rows affected (0.00 sec) Admin> SAVE MYSQL USERS TO DISK; Query OK, 0 rows affected (0.04 sec) Admin> SAVE MYSQL SERVERS TO DISK; Query OK, 0 rows affected (0.30 sec) Step 5: Configure Query Rule After setting up we need to define which host group should get the select query and which should get written. so to do this we need to run the below commands. To send all SELECT queries on the slave ( based on Regex ). Admin> INSERT INTO mysql_query_rules (active, match_digest, destination_hostgroup, apply) VALUES (1, '^SELECT.*', 1, 0); Query OK, 1 row affected (0.00 sec) To send read and write queries on master (based on Regex) Admin> INSERT INTO mysql_query_rules (active, match_digest, destination_hostgroup, apply) VALUES (1, '^SELECT.*FOR UPDATE', 0, 1); Query OK, 1 row affected (0.00 sec) and write an update on the Disk with the below commands Adminl> LOAD MYSQL QUERY RULES TO RUNTIME; Query OK, 0 rows affected (0.00 sec) Admin> SAVE MYSQL QUERY RULES TO DISK; Query OK, 0 rows affected (0.08 sec) This is all you need to configure ProxySQL and now you just have to tell your application to communicate with the ProxySQL host I hope you like this article and I would love to answer your question. in the next article, we will explore ProxySql monitoring, configuration status, and its tests. Read the full article
1 note
·
View note
Text
How to Install MySQL 8 on CentOS 7 Linux
How to Install MySQL 8 on CentOS 7 Linux
Hi Friends! We will learn about “How to install MySQL 8 on CentOS 7 Linux”, we will look at the installation for MySQL 8 step by step in CentOS 7 . MySQL is the Relation Database, which is used to store the data. It Is open-source and widely used in the industries. MySQL written in C and C++. It has also been tested to be a “fast, stable and true multi-user, multi-threaded SQL database…

View On WordPress
#install mysql 8#install mysql 8 centos 7#install mysql 8 centos 7 digitalocean#install mysql 8 in centos 7#Install MySQL 8 in Rocky Linux#install mysql 8 on amazon linux#install mysql 8 on rhel 7#Install MySQL 8 on Ubuntu 20.04#Install mySQL in linux#install mysql on ubuntu 18.04#mysql community download#mysql community edition#mysql community server download
0 notes
Text
Install apache mysql phpmyadmin ubuntu 18.04

#Install apache mysql phpmyadmin ubuntu 18.04 how to#
#Install apache mysql phpmyadmin ubuntu 18.04 install#
#Install apache mysql phpmyadmin ubuntu 18.04 update#
#Install apache mysql phpmyadmin ubuntu 18.04 password#
If you have decided not to use the root user, type: $ sudo mysql In case of already configured password-based authentication for root user, type: $ mysql -u root -p To do so, log in again to the MySQL prompt. To access phpMyAdmin not as a root user but as a user created specifically for this purpose, there is nothing to do but create one.
#Install apache mysql phpmyadmin ubuntu 18.04 password#
Configure the Password for the dedicated MySQL user Once done, use the password previously chosen to authenticate yourself as root user in the phpMyAdmin interface. If everything was done correctly, the authentication method for the root user will be changed and the screen displayed will be similar to the following: +-+-+-+-+ In this way, the server will be notified that the authentication method for the root user has to be updated.Ĭheck if the changes are saved by retyping: SELECT user, authentication_string, plugin, host FROM er Instead of password, enter a password that you will have to remember.Ĭonfirm the changes you just made by typing: FLUSH PRIVILEGES To change the authentication type from auth_socket to mysql_native_password and use a password to log in to the root user, type: ALTER USER 'root' 'localhost' IDENTIFIED WITH mysql_native_password BY 'password' | mysql.sys | *THISISNOTAVALIDPASSWORDTHATCANBEUSEDHERE | mysql_native_password | localhost | | ssion | *THISISNOTAVALIDPASSWORDTHATCANBEUSEDHERE | mysql_native_password | localhost | | user | authentication_string | plugin | host | Here you can clearly see how the root user has an auth_socket authentication type. To do so, open the MySQL prompt $ sudo mysqlĬheck the authentication methods for each MySQL user by typing: SELECT user, authentication_string, plugin, host FROM er Ī list of all authentication methods for MySQL users is now displayed. To log in as MySQL root via phpMyAdmin change the authentication method. Configuring the Password for the MySQL root accountĪccessing as a MySQL root user requires an authentication auth_socket instead of a simple password. You can either choose to configure only one of these two users or both. instead log in as a MySQL user root or as a database manager via phpMyAdmin interface. To use phpMyAdmin, do not log in as the user created automatically during the installation. To apply all the changes, restart Apache by typing: $ sudo systemctl restart apache2 Managing access privileges To do so type in: $ sudo phpenmod mbstring The only thing you will need to do is activating the PHP mbstring extension. Once the installation is completed, a phpMyAdmin configuration file will be added here: /etc/apache2/conf-enabled/nf The Just like beforehand, enter a new password, press TAB to select Ok and press Enter. Now enter and confirm a password for the application. Enter a new password, press Tab to select OK and press Enter. You are now required to enter a password for the administrator database. Once pressed Enter, the following screen will be displayed: If you do not press the spacebar, the files required for installation will not be transferred. To select it, press the spacebar and then press Enter. Select apache here, but be careful, the red dash does not select apache 2.
#Install apache mysql phpmyadmin ubuntu 18.04 install#
$ sudo apt install phpmyadmin php-mbstring php-gettextīy typing Y and pressing Enter to confirm.
#Install apache mysql phpmyadmin ubuntu 18.04 update#
PhpMyAdmin is on the standard Ubuntu repository.įirst update the apt index, and then download and install phpMyAdmin: $ sudo apt update In case of a local server, go to the next step and open the terminal of your server. If you haven’t done so yet, following our guide is recommended to securely connect with the SSH protocol.
#Install apache mysql phpmyadmin ubuntu 18.04 how to#
In this guide you will learn how to install phpMyAdmin and how to secure its access on Linux Ubuntu 18.04.įirst, connect to your server via an SSH connection. PhpMyAdmin is a GUI (Graphic User Interface) that allows to create, store and edit entire databases created with MySQL.
0 notes
Text
Install Apache, MySQL, PHP(LAMP) Stack On Ubuntu 18.04 LTS
Install Apache, MySQL, PHP(LAMP) Stack On Ubuntu 18.04 LTS
Let’s move on to what is LAMP…??? See in this way… LAMP is the most popular open-source web development platform. Using it we can run and deploy dynamic websites and web-based applications. LAMP stack consists of several components. Those are Apache web server, Maria DB/MySQL database, PHP /Python /Perl programming languages. It can be identified as an acronym of Linux, MariaDB/MySQL,…

View On WordPress
1 note
·
View note
Text
How to Install MySQL 8 Ubuntu 18.04 Linux.
How to Install MySQL 8 Ubuntu 18.04 Linux.
Hi Techies! Let’s learn about “How to install MySQL 8 in Ubuntu 18.04 Linux”, we will look at the MySQL community edition server, installation step by step in Ubuntu 18.04. MySQL is the Relation Database, which is used to store the data. It Is open-source and widely used in the industries. MySQL written in C and C++. It has also been tested to be a “fast, stable and true multi-user,…
View On WordPress
#how to check mysql version in ubuntu#how to install mysql in ubuntu#how to install mysql on linux#how to install mysql on ubuntu#install mysql 8#install mysql 8 in ubuntu 18.04#install mysql 8 ubuntu#install mysql 8 ubuntu 18.04#install mysql 8.0 ubuntu 18.04#install mysql in ubuntu#install mysql on ubuntu#install mysql on ubuntu 18.04#mysql community download#mysql community edition#mysql community server download
0 notes
Text
How To Install Linux, Apache, MySQL, PHP (LAMP) stack on Ubuntu 18.04
How To Install Linux, Apache, MySQL, PHP (LAMP) stack on Ubuntu 18.04
Introduction A “LAMP” stack is a group of open-source software that is typically installed together to enable a server to host dynamic websites and web apps. This term is actually an acronym which represents the Linux operating system, with the Apache web server. The site data is stored in a MySQL database, and dynamic content is processed by PHP. In this guide, we will install a LAMP stack on…
View On WordPress
1 note
·
View note
Text
Mysql Download For Mac Mojave

Mysql Workbench Download For Mac
Mysql Install Mac Mojave
I am more of a command line user when accessing MySQL, but MySQLWorkBench is by far a great tool. However, I am not a fan of installing a database on my local machine and prefer to use an old computer on my network to handle that. If you have an old Mac or PC, wipe it and install Linux Server command line only software on it. Machines as old as 10/15 years and older can support Linux easily. You don't even need that much RAM either but I'd got with minimum of 4GB for MySQL.
The Mojave installer app will be in your Applications folder, so you can go there and launch it later to upgrade your Mac to the new operating system. Make a bootable installer drive: The quick way. Sep 27, 2018 So before you download and install macOS 10.14 Mojave, make sure your Mac is backed up. For information on how to do this, head over to our ultimate guide to backing up your Mac. How to download.
Apr 24, 2020 Download macOS Mojave For the strongest security and latest features, find out whether you can upgrade to macOS Catalina, the latest version of the Mac operating system. If you still need macOS Mojave, use this App Store link: Get macOS Mojave.
Oct 08, 2018 Steps to Install MySQL Workbench 8.0 on Mac OS X Mojave Step 1. Download the Installer. Follow this link to download the latest version of MySQL Workbench 8.0 for Mac. When I write this article, the Workbench version 8.0.12 is available. Save the file to your download directory.
Or...
Use Virtualbox by Oracle to create a virtual server on your local machine. I recommend Centos 7 or Ubuntu 18.04. The latter I used to use exclusively but it has too many updates every other week, whereas Centos 7 updates less often and is as secure regardless. But you will need to learn about firewalls, and securing SSH because SSH is how you will access the virtual machine for maintenance. You will have to learn how to add/delete users, how to use sudo so you can perform root based commands etc. There is a lot more to the picture than meets the eye when you want to use a database.
I strongly recommend not installing MySQL on your local machine but use a Virtual Machine or an old machine that you can connect to on your local area network. It will give you a better understanding of security when you have to deal with a firewall and it is always a good practice to never have a database on the same server/computer as your project. Databases are for the backend where access is secure and severely limited to just one machine via ssh-keys or machine id. If you don't have the key or ID you ain't getting access to the DB.
There are plenty of tutorials online that will show you how to do this. If you have the passion to learn it will come easy.
Posted on
Apple released every update for macOS, whether major or minor, via Mac App Store. Digital delivery to users makes it easy to download and update, however, it is not convenient in certain scenarios. Some users might need to keep a physical copy of macOS due to slow Internet connectivity. Others might need to create a physical copy to format their Mac and perform a clean install. Specially with the upcoming releasee of macOS Mojave, it is important to know how the full installer can be downloaded.
We have already covered different methods before which let you create a bootable USB installer for macOS. The first method was via a terminal, while the second method involved the usage of some third-party apps, that make the whole process simple. However, in that guide, we mentioned that the installer has to be downloaded from the Mac App Store. The installer files can be used after download, by cancelling the installation wizard for macOS. However, for some users, this might not be the complete download. Many users report that they receive installation files which are just a few MB in size.
Luckily, there is a tool called macOS Mojave Patcher. While this tool has been developed to help users run macOS Mojave/macOS 10.14 on unsupported Macs, it has a brilliant little feature that lets you download the full macOS Mojave dmg installer too. Because Mojave will only download on supported Macs, this tool lets users download it using a supported Mac, created a bootable USB installer and install it on an unsupported Mac. Here is how you can use this app.
Download macOS Mojave installer using macOS Mojave Patcher

Download the app from here. (Always use the latest version from this link.)
Opening it might show a warning dialogue. You’ll have to go to System Preferences > Security & Privacy to allow the app to run.Click Open Anyway in Security & Privacy.
Once you are able to open the app, you’ll get a message that your machine is natively supported. Click ok.
Go to Tools> Download macOS Mojave, to start the download. The app will ask you where you want to save the installer file. Note that the files are downloaded directly from Apple, so you wouldn’t have to worry about them being corrupted.The download will be around 6GB+ so make sure that you have enough space on your Mac.Once the download starts, the app will show you a progress bar. This might take a while, depending on your Internet connection speed.
Mysql Workbench Download For Mac
Once the download is complete, you can use this installer file to create a bootable USB.
Mysql Install Mac Mojave
P.S. if you just want to download a combo update for Mojave, they are available as small installers from Apple and can be downloaded here.
1 note
·
View note
Photo
How to Install MySQL In Ubuntu 18.04 ☞ https://school.geekwall.in/p/mKGAq1Tg2e/how-to-install-mysql-in-ubuntu-18-04 #linux #ubuntu
2 notes
·
View notes
Text
Install NGINX, PHP, MySQL, SSL & WordPress on Ubuntu 18.04
Hello and Welcome to our latest new course. We are glad you could join us on this exciting new learning expedition!
https://programsmagic.com/post/install-nginx-php-mysql-ssl-wordpress-on-ubuntu-1804
1 note
·
View note
Link
In this tutorial, we will show you how to install and improve the security of MySQL on Ubuntu 18.04. MySQL
26 notes
·
View notes
Photo

How To Install Linux, Nginx, MySQL, PHP (LEMP stack) on Ubuntu 18.04? ☞ http://bit.ly/2PRhLD3 #php #laravel
2 notes
·
View notes
Photo
How to Install LAMP stack on Ubuntu 18.04 Server? ☞ http://bit.ly/34vuxeZ #LAMP #Ubuntu #Linux #Apache #MySQL #PHP
1 note
·
View note
Text
Installing Nginx, MySQL, PHP (LEMP) Stack on Ubuntu 18.04
Ubuntu Server 18.04 LTS (TunzaDev) is finally here and is being rolled out across VPS hosts such as DigitalOcean and AWS. In this guide, we will install a LEMP Stack (Nginx, MySQL, PHP) and configure a web server.
Prerequisites
You should use a non-root user account with sudo privileges. Please see the Initial server setup for Ubuntu 18.04 guide for more details.
1. Install Nginx
Let’s begin by updating the package lists and installing Nginx on Ubuntu 18.04. Below we have two commands separated by &&. The first command will update the package lists to ensure you get the latest version and dependencies for Nginx. The second command will then download and install Nginx.
sudo apt update && sudo apt install nginx
Once installed, check to see if the Nginx service is running.
sudo service nginx status
If Nginx is running correctly, you should see a green Active state below.
● nginx.service - A high performance web server and a reverse proxy server Loaded: loaded (/lib/systemd/system/nginx.service; enabled; vendor preset: enabled) Active: active (running) since Wed 2018-05-09 20:42:29 UTC; 2min 39s ago Docs: man:nginx(8) Process: 27688 ExecStart=/usr/sbin/nginx -g daemon on; master_process on; (code=exited, status=0/SUCCESS) Process: 27681 ExecStartPre=/usr/sbin/nginx -t -q -g daemon on; master_process on; (code=exited, status=0/SUCCESS) Main PID: 27693 (nginx) Tasks: 2 (limit: 1153) CGroup: /system.slice/nginx.service ├─27693 nginx: master process /usr/sbin/nginx -g daemon on; master_process on; └─27695 nginx: worker process
You may need to press q to exit the service status.
2. Configure Firewall
If you haven’t already done so, it is recommended that you enable the ufw firewall and add a rule for Nginx. Before enabling ufw firewall, make sure you add a rule for SSH, otherwise you may get locked out of your server if you’re connected remotely.
sudo ufw allow OpenSSH
If you get an error “ERROR: could find a profile matching openSSH”, this probably means you are not configuring the server remotely and can ignore it.
Now add a rule for Nginx.
sudo ufw allow 'Nginx HTTP'
Rule added Rule added (v6)
Enable ufw firewall.
sudo ufw enable
Press y when asked to proceed.
Now check the firewall status.
sudo ufw status
Status: active To Action From -- ------ ---- OpenSSH ALLOW Anywhere Nginx HTTP ALLOW Anywhere OpenSSH (v6) ALLOW Anywhere (v6) Nginx HTTP (v6) ALLOW Anywhere (v6)
That’s it! Your Nginx web server on Ubuntu 18.04 should now be ready.
3. Test Nginx
Go to your web browser and visit your domain or IP. If you don’t have a domain name yet and don’t know your IP, you can find out with:
sudo ifconfig | grep -Eo 'inet (addr:)?([0-9]*\.){3}[0-9]*' | grep -Eo '([0-9]*\.){3}[0-9]*' | grep -v '127.0.0.1'
You can find this Nginx default welcome page in the document root directory /var/www/html. To edit this file in nano text editor:
sudo nano /var/www/html/index.nginx-debian.html
To save and close nano, press CTRL + X and then press y and ENTER to save changes.
Your Nginx web server is ready to go! You can now add your own html files and images the the /var/www/html directory as you please.
However, you should acquaint yourself with and set up at least one Server Block for Nginx as most of our Ubuntu 18.04 guides are written with Server Blocks in mind. Please see article Installing Nginx on Ubuntu 18.04 with Multiple Domains. Server Blocks allow you to host multiple web sites/domains on one server. Even if you only ever intend on hosting one website or one domain, it’s still a good idea to configure at least one Server Block.
If you don’t want to set up Server Blocks, continue to the next step to set up MySQL.
4. Install MySQL
Let’s begin by updating the package lists and installing MySQL on Ubuntu 18.04. Below we have two commands separated by &&. The first command will update the package lists to ensure you get the latest version and dependencies for MySQL. The second command will then download and install MySQL.
sudo apt update && sudo apt install mysql-server
Press y and ENTER when prompted to install the MySQL package.
Once the package installer has finished, we can check to see if the MySQL service is running.
sudo service mysql status
If running, you will see a green Active status like below.
● mysql.service - MySQL Community Server Loaded: loaded (/lib/systemd/system/mysql.service; enabled; vendor preset: enabled) Active: active (running) since since Wed 2018-05-09 21:10:24 UTC; 16s ago Main PID: 30545 (mysqld) Tasks: 27 (limit: 1153) CGroup: /system.slice/mysql.service └─30545 /usr/sbin/mysqld --daemonize --pid-file=/run/mysqld/mysqld.pid
You may need to press q to exit the service status.
5. Configure MySQL Security
You should now run mysql_secure_installation to configure security for your MySQL server.
sudo mysql_secure_installation
If you created a root password in Step 1, you may be prompted to enter it here. Otherwise you will be asked to create one. (Generate a password here)
You will be asked if you want to set up the Validate Password Plugin. It’s not really necessary unless you want to enforce strict password policies for some reason.
Securing the MySQL server deployment. Connecting to MySQL using a blank password. VALIDATE PASSWORD PLUGIN can be used to test passwords and improve security. It checks the strength of password and allows the users to set only those passwords which are secure enough. Would you like to setup VALIDATE PASSWORD plugin? Press y|Y for Yes, any other key for No:
Press n and ENTER here if you don’t want to set up the validate password plugin.
Please set the password for root here. New password: Re-enter new password:
If you didn’t create a root password in Step 1, you must now create one here.
Generate a strong password and enter it. Note that when you enter passwords in Linux, nothing will show as you are typing (no stars or dots).
By default, a MySQL installation has an anonymous user, allowing anyone to log into MySQL without having to have a user account created for them. This is intended only for testing, and to make the installation go a bit smoother. You should remove them before moving into a production environment. Remove anonymous users? (Press y|Y for Yes, any other key for No) :
Press y and ENTER to remove anonymous users.
Normally, root should only be allowed to connect from 'localhost'. This ensures that someone cannot guess at the root password from the network. Disallow root login remotely? (Press y|Y for Yes, any other key for No) :
Press y and ENTER to disallow root login remotely. This will prevent bots and hackers from trying to guess the root password.
By default, MySQL comes with a database named 'test' that anyone can access. This is also intended only for testing, and should be removed before moving into a production environment. Remove test database and access to it? (Press y|Y for Yes, any other key for No) :
Press y and ENTER to remove the test database.
Reloading the privilege tables will ensure that all changes made so far will take effect immediately. Reload privilege tables now? (Press y|Y for Yes, any other key for No) :
Press y and ENTER to reload the privilege tables.
All done!
As a test, you can log into the MySQL server and run the version command.
sudo mysqladmin -p -u root version
Enter the MySQL root password you created earlier and you should see the following:
mysqladmin Ver 8.42 Distrib 5.7.22, for Linux on x86_64 Copyright (c) 2000, 2018, Oracle and/or its affiliates. All rights reserved. Oracle is a registered trademark of Oracle Corporation and/or its affiliates. Other names may be trademarks of their respective owners. Server version 5.7.22-0ubuntu18.04.1 Protocol version 10 Connection Localhost via UNIX socket UNIX socket /var/run/mysqld/mysqld.sock Uptime: 4 min 28 sec Threads: 1 Questions: 15 Slow queries: 0 Opens: 113 Flush tables: 1 Open tables: 106 Queries per second avg: 0.055
You have now successfully installed and configured MySQL for Ubuntu 18.04! Continue to the next step to install PHP.
6. Install PHP
Unlike Apache, Nginx does not contain native PHP processing. For that we have to install PHP-FPM (FastCGI Process Manager). FPM is an alternative PHP FastCGI implementation with some additional features useful for heavy-loaded sites.
Let’s begin by updating the package lists and installing PHP-FPM on Ubuntu 18.04. We will also install php-mysql to allow PHP to communicate with the MySQL database. Below we have two commands separated by &&. The first command will update the package lists to ensure you get the latest version and dependencies for PHP-FPM and php-mysql. The second command will then download and install PHP-FPM and php-mysql. Press y and ENTER when asked to continue.
sudo apt update && sudo apt install php-fpm php-mysql
Once installed, check the PHP version.
php --version
If PHP was installed correctly, you should see something similar to below.
PHP 7.2.3-1ubuntu1 (cli) (built: Mar 14 2018 22:03:58) ( NTS ) Copyright (c) 1997-2018 The PHP Group Zend Engine v3.2.0, Copyright (c) 1998-2018 Zend Technologies with Zend OPcache v7.2.3-1ubuntu1, Copyright (c) 1999-2018, by Zend Technologies
Above we are using PHP version 7.2, though this may be a later version for you.
Depending on what version of Nginx and PHP you install, you may need to manually configure the location of the PHP socket that Nginx will connect to.
List the contents for the directory /var/run/php/
ls /var/run/php/
You should see a few entries here.
php7.2-fpm.pid php7.2-fpm.sock
Above we can see the socket is called php7.2-fpm.sock. Remember this as you may need it for the next step.
7. Configure Nginx for PHP
We now need to make some changes to our Nginx server block.
The location of the server block may vary depending on your setup. By default, it is located in /etc/nginx/sites-available/default.
However, if you have previously set up custom server blocks for multiple domains in one of our previous guides, you will need to add the PHP directives to each server block separately. A typical custom server block file location would be /etc/nginx/sites-available/mytest1.com.
For the moment, we will assume you are using the default. Edit the file in nano.
sudo nano /etc/nginx/sites-available/default
Press CTRL + W and search for index.html.
Now add index.php before index.html
/etc/nginx/sites-available/default
index index.php index.html index.htm index.nginx-debian.html;
Press CTRL + W and search for the line server_name.
Enter your server’s IP here or domain name if you have one.
/etc/nginx/sites-available/default
server_name YOUR_DOMAIN_OR_IP_HERE;
Press CTRL + W and search for the line location ~ \.php.
You will need to uncomment some lines here by removing the # signs before the lines marked in red below.
Also ensure value for fastcgi_pass socket path is correct. For example, if you installed PHP version 7.2, the socket should be: /var/run/php/php7.2-fpm.sock
If you are unsure which socket to use here, exit out of nano and run ls /var/run/php/
/etc/nginx/sites-available/default
... location ~ \.php$ { include snippets/fastcgi-php.conf; # # # With php-fpm (or other unix sockets): fastcgi_pass unix:/var/run/php/php7.2-fpm.sock; # # With php-cgi (or other tcp sockets): # fastcgi_pass 127.0.0.1:9000; } ...
Once you’ve made the necessary changes, save and close (Press CTRL + X, then press y and ENTER to confirm save)
Now check the config file to make sure there are no syntax errors. Any errors could crash the web server on restart.
sudo nginx -t
nginx: the configuration file /etc/nginx/nginx.conf syntax is ok nginx: configuration file /etc/nginx/nginx.conf test is successful
If no errors, you can reload the Nginx config.
sudo service nginx reload
8. Test PHP
To see if PHP is working correctly on Ubuntu 18.04, let’s a create a new PHP file called info.php in the document root directory. By default, this is located in /var/www/html/, or if you set up multiple domains in a previous guide, it may be located in somewhere like /var/www/mytest1.com/public_html
Once you have the correct document root directory, use the nano text editor to create a new file info.php
sudo nano /var/www/html/info.php
Type or paste the following code into the new file. (if you’re using PuTTY for Windows, right-click to paste)
/var/www/html/info.php
Save and close (Press CTRL + X, then press y and ENTER to confirm save)
You can now view this page in your web browser by visiting your server’s domain name or public IP address followed by /info.php: http://your_domain_or_IP/info.php
phpinfo() outputs a large amount of information about the current state of PHP. This includes information about PHP compilation options and extensions, the PHP version and server information.
You have now successfully installed PHP-FPM for Nginx on Ubuntu 18.04 LTS (Bionic Beaver).
Make sure to delete info.php as it contains information about the web server that could be useful to attackers.
sudo rm /var/www/html/info.php
What Next?
Now that your Ubuntu 18.04 LEMP web server is up and running, you may want to install phpMyAdmin so you can manage your MySQL server.
Installing phpMyAdmin for Nginx on Ubuntu 18.04
To set up a free SSL cert for your domain:
Configuring Let’s Encrypt SSL Cert for Nginx on Ubuntu 18.04
You may want to install and configure an FTP server
Installing an FTP server with vsftpd (Ubuntu 18.04)
We also have several other articles relating to the day-to-day management of your Ubuntu 18.04 LEMP server
Hey champ! - You’re all done!
Feel free to ask me any questions in the comments below.
Let me know in the comments if this helped. Follow Us on - Twitter - Facebook - YouTube.
1 note
·
View note
Photo
How to Install MySQL on Ubuntu 18.04 ☞ http://dev.geekwall.in/8af3462fb4 #linux #ubuntu
4 notes
·
View notes
Photo

How To Install Linux, Nginx, MySQL, PHP (LEMP stack) on Ubuntu 18.04? ☞ http://bit.ly/2r4uKar #php #laravel
2 notes
·
View notes
Photo

How To Install Linux, Nginx, MySQL, PHP (LEMP stack) on Ubuntu 18.04? ☞ http://bit.ly/2BXAxR2 #PHP #MySQL #Linux #Nginx #Ubuntu #Morioh
2 notes
·
View notes