#online process mapping tool
Explore tagged Tumblr posts
Visit Tumblr Blog
Explore Tumblr blogs with no restrictions, modern design and the best experience.
Last Seen Tumblr Blogs


Fun Fact
69% of Tumblr users are millennials.
Text
A workflow mapping tool simplifies the visualization of processes by creating clear, step-by-step diagrams. It helps teams streamline operations, identify inefficiencies, and improve productivity. Ideal for project planning, task delegation, and process optimization, these tools provide an intuitive interface for crafting detailed workflows that enhance clarity and collaboration across teams.
#workflow mapping tool#online process mapping tool#process mapping#workflow diagram#process diagram#process flow diagram#b2b saas#saas technology#saas development company
0 notes
Text
The Autism Diagnosis Deep Dive: Navigating Assessments & Next Steps
Part 1: The "Why Bother?" - Reasons for Seeking a Formal Diagnosis
Before we even talk about how to get diagnosed, let's address the elephant in the room: why would someone go through this often lengthy, sometimes expensive, and emotionally taxing process? The reasons are as diverse as autistic people themselves, but here are some big ones:
Self-Understanding & Validation: This is HUGE, especially for late-diagnosed adults. Suddenly, a lifetime of feeling "different," struggling with social cues, or having intense sensory experiences has a name. It’s not that you’re "broken" or "weird"; your brain is just wired differently. That validation can be incredibly powerful and healing. It’s like finally getting the instruction manual to a device you’ve been fumbling with for years.
Access to Support & Services: A formal diagnosis is often the key to unlocking supports.
For kids: This can mean Individualized Education Programs (IEPs) or 504 plans in school, access to therapies (speech, occupational, developmental), and other early intervention services.
For adults: This might mean workplace accommodations, access to specific mental health professionals who understand autism, disability benefits (in some cases), or specialized support groups.
Community & Connection: Finding out you're autistic can open the door to a vibrant, supportive community of other autistic people. Sharing experiences, finding solidarity, and learning from others who get it is invaluable. The online autistic community, especially on platforms like Tumblr, is a force to be reckoned with!
Informing Others & Self-Advocacy: A diagnosis can give you the language and confidence to explain your needs and differences to family, friends, educators, and employers. It’s a tool for self-advocacy.
Understanding Co-occurring Conditions: Autism often travels with friends like ADHD, anxiety, depression, OCD, Ehlers-Danlos Syndrome (EDS), and gastrointestinal issues. A diagnostic process can help identify these, leading to more comprehensive support.
Tumblr Truth Bomb: Self-diagnosis is widely accepted and validated within the autistic community, especially given the barriers (cost, accessibility, clinician bias) to formal diagnosis. This article focuses on the formal process, but that doesn't invalidate anyone's self-discovery journey. Many seek formal diagnosis for the reasons above, even after self-identifying.
Part 2: The "Who You Gonna Call?" - Professionals Involved in Diagnosis
Navigating the medical and psychological world can feel like trying to read a map written in ancient hieroglyphics. Here’s a breakdown of the types of professionals who might be involved:
For Children:
Pediatrician/Developmental Pediatrician: Often the first port of call. They can do initial developmental screenings (like the M-CHAT-R/F for toddlers) and refer you to specialists. Developmental pediatricians specialize in developmental differences and delays.
Child Psychologist/Neuropsychologist: These professionals are often the ones conducting the comprehensive diagnostic evaluations. They use standardized tests, observation, and interviews.
Child Psychiatrist: Can diagnose and also prescribe medication if co-occurring conditions like ADHD or anxiety need pharmacological support.
Speech-Language Pathologist (SLP) & Occupational Therapist (OT): While they don't typically give the primary autism diagnosis, their assessments of communication, sensory processing, and motor skills are vital parts of the overall picture and often contribute to the diagnostic team's decision.
For Adults:
Clinical Psychologist/Neuropsychologist: Similar to working with children, these professionals are often the primary diagnosticians for adults. They'll use adapted tools and place more emphasis on developmental history and self-report.
Psychiatrist: Can diagnose, especially if you're already seeing one for other mental health concerns. They can also help manage co-occurring conditions.
Neurologist: Less common for primary diagnosis unless there are other neurological concerns, but they can sometimes be involved.
General Practitioner (GP)/Primary Care Physician (PCP): Like pediatricians for kids, they can be a starting point for a referral, though their direct experience with adult autism diagnosis can vary wildly.
Value Add Tip: Look for professionals who specialize in autism, particularly adult autism if that's relevant. Ask about their experience, their approach (is it neurodiversity-affirming?), and what the assessment process entails. Don't be afraid to "interview" them!
Part 3: The "Assessment Arsenal" - What Actually Happens?
Okay, this is where it gets dense, but stay with me! The diagnostic process isn't just a quick quiz. It's a comprehensive evaluation designed to gather information from multiple sources.
Key Components (can vary by age and clinician):
Developmental History & Interviews:
For kids: Parents/caregivers will be interviewed extensively about the child's development from birth, social interactions, communication patterns, repetitive behaviors, interests, and sensory sensitivities. School reports and teacher input are also crucial.
For adults: You'll be asked about your childhood (as much as you can remember or gather from family), your social experiences, communication style, interests, sensory profile, and current challenges. Input from a partner or close family member can sometimes be helpful, but the focus is on your experience.
Direct Observation & Interaction:
This is where tools like the ADOS-2 (Autism Diagnostic Observation Schedule, Second Edition) come in. It's a semi-structured, play-based (for kids) or conversation-based (for adults) assessment where the clinician observes social communication, interaction, and imaginative use of materials. It’s designed to create social situations where autistic traits might become apparent.
Tumblr Real Talk: The ADOS isn't foolproof. Masking (consciously or unconsciously suppressing autistic traits) can affect results, especially in girls, women, and AFAB individuals, or those who've learned to "perform" neurotypically. A good clinician understands this.
Standardized Questionnaires & Rating Scales:
ADI-R (Autism Diagnostic Interview-Revised): A structured interview often used with parents/caregivers, focusing on developmental history related to autism traits.
SRS-2 (Social Responsiveness Scale): Measures social awareness, social cognition, social communication, social motivation, and autistic mannerisms. Can be completed by parents, teachers, or self (for older individuals).
CARS-2 (Childhood Autism Rating Scale): Used to identify children with autism and determine symptom severity.
AQ (Autism Spectrum Quotient): A self-report questionnaire for adults.
RAADS-R (Ritvo Autism Asperger Diagnostic Scale-Revised): Another self-report for adults.
Many, many others! Clinicians pick tools based on age, suspected presentation, and their own expertise.
Cognitive & Language Assessments:
IQ/Cognitive Testing (e.g., WISC, WAIS, Stanford-Binet): To understand cognitive strengths and weaknesses. Autism can co-occur with any level of intellectual ability. Important Note: Autistic individuals can have "spiky profiles" – very high abilities in some areas and significant challenges in others. This doesn't always translate well on standardized IQ tests.
Speech and Language Evaluation: Assesses receptive (understanding) and expressive (using) language, pragmatics (social use of language), and nonverbal communication.
Adaptive Behavior Assessments (e.g., Vineland Adaptive Behavior Scales):
Evaluates daily living skills, communication, social skills, and motor skills compared to age-matched peers. This helps understand the level of support an individual might need.
Sensory Profile: Questionnaires or discussions about sensitivities to light, sound, touch, taste, smell, and movement.
Medical & Neurological Examination (Sometimes): To rule out other medical conditions that might explain symptoms.
The Goal: To build a comprehensive picture. No single test "diagnoses" autism. It's about patterns of behavior, developmental history, and how these impact daily life, all considered against established diagnostic criteria (usually from the DSM-5-TR or ICD-11).
Tumblr Pro-Tip for Assessment Day:
Be Yourself: Easier said than done, especially if you mask. But try to be as authentic as possible.
Write Things Down: Beforehand, jot down examples of your experiences, challenges, and traits. It's easy to forget in the moment.
Bring a Support Person (if allowed/helpful): For moral support or to help recall information (especially for adult diagnosis if a parent or long-term partner is involved).
Ask Questions: If you don't understand something, ask!
It's Okay to Be Nervous/Overwhelmed: This is a big deal. Allow yourself to feel whatever you're feeling.
Part 4: The "Big Reveal" - Receiving the Report & Diagnosis
After all the assessments, there's usually a feedback session where the clinician discusses their findings and provides a written report. This report can be LONG and full of clinical jargon.
If Diagnosed Autistic:
The Emotional Cocktail: Get ready for a potential mix of:
Relief/Validation: "I'm not broken! There's a reason!"
Grief: For the life you might have imagined, for past struggles, for not knowing sooner.
Confusion/Overwhelm: "What does this mean? What now?"
Anger: At past misdiagnoses, at people who didn't understand.
Joy/Excitement: About connecting with a new community and understanding yourself better.
The Report: It will outline the tests done, your (or your child's) scores, observations, and how these meet (or don't meet) diagnostic criteria. It should also include recommendations. Ask the clinician to walk you through it in plain language.
If Not Diagnosed Autistic (but you strongly suspect it):
This can be incredibly invalidating and confusing.
Ask Why: Understand the clinician's reasoning. Did they consider masking? Are they experienced with subtle presentations or adult diagnosis?
Seek a Second Opinion: If you feel the assessment wasn't thorough or the clinician wasn't a good fit, you have the right to get another opinion, especially from someone specializing in the autistic presentation you identify with (e.g., autism in women/AFAB individuals, PDA profile).
Remember Self-Identification: Even without a formal "yes," if the autistic experience resonates deeply, your self-understanding is valid. The autistic community largely embraces this.
Part 5: The "Okay, So Now What?" - Navigating Next Steps
A diagnosis isn't an endpoint; it's a signpost. Here's where the journey really begins.
Breathe. Process. Feel.
Give yourself time. There's no "right" way to react. Talk to trusted friends, family, or a therapist. Journal. Engage in your special interests. Whatever helps you process.
Tumblr Hug: You are not alone in this. Many have walked this path.
Connect with the Autistic Community:
This is arguably one of the MOST important steps. Find autistic-led groups online (Tumblr, Facebook, Twitter/X, Reddit, Discord) or in person.
Listen to #ActuallyAutistic voices. Read blogs, watch videos, follow creators. They offer insights, support, and a sense of belonging that non-autistic professionals often can't.
Value Add: This community can help you decipher what "autism" actually means in lived experience, beyond clinical definitions.
Learn (and Unlearn):
Read books by autistic authors. Learn about neurodiversity as a paradigm.
Unlearn harmful stereotypes about autism (e.g., that all autistics are like Rain Man, lack empathy, or are non-verbal).
Explore concepts like masking, burnout, autistic inertia, monotropism, and special interests (or "spIns").
Consider Therapies & Supports (if needed/wanted):
Crucial Caveat: The goal of support should be to help the autistic person thrive as an autistic person, not to make them "less autistic" or "more neurotypical." Avoid any therapy aiming to "cure" or "normalize" autism.
Occupational Therapy (OT): Can help with sensory processing issues, motor skills, daily living skills, emotional regulation. Look for OTs with a neurodiversity-affirming approach.
Speech-Language Therapy (SLP): Can help with social communication (pragmatics), understanding non-literal language, alternative communication methods (AAC), and feeding issues. Again, ensure they respect autistic communication styles.
Mental Health Support (Therapy/Counseling): Many autistic people benefit from therapy to deal with anxiety, depression, trauma (often from navigating a neurotypical world), or to process their diagnosis. Seek therapists who are autism-knowledgeable AND affirming.
ABA (Applied Behavior Analysis): This is a highly controversial topic.
Traditional ABA has been criticized by many autistic adults for being compliance-based, traumatic, and aiming to suppress autistic behaviors (like stimming) rather than supporting underlying needs.
Some newer/modified forms claim to be more child-led and focus on functional skills.
Tumblr PSA: DO YOUR RESEARCH. Listen to autistic adults about their experiences with ABA. If considering it, scrutinize the provider's methods, goals, and respect for autistic identity. Many autistic advocates advise against it entirely or urge extreme caution.
Social Skills Groups: Can be helpful IF they focus on understanding social dynamics and providing tools, rather than forcing neurotypical masking. Autistic-led groups are often best.
Parent Training/Support (for parents of autistic kids): Focus on understanding your child's needs, adapting the environment, and advocating for them, not changing who they are.
Accommodations & Environmental Adjustments:
School: IEPs/504 plans can provide classroom accommodations (e.g., noise-canceling headphones, visual schedules, movement breaks, modified assignments).
Work: Reasonable accommodations might include a quieter workspace, flexible hours, written instructions, permission to use stim toys.
Home: Create sensory-friendly spaces. Reduce clutter. Establish routines if helpful. Honor sensory needs (e.g., specific food textures, clothing fabrics).
Embrace Strengths & Special Interests:
Autism isn't just a list of deficits! Autistic people often have incredible strengths: intense focus, attention to detail, loyalty, strong sense of justice, unique perspectives, deep knowledge in areas of interest.
Special interests are not "obsessions" to be discouraged; they are sources of joy, learning, regulation, and expertise! Lean into them!
Self-Advocacy & Setting Boundaries:
Learn to communicate your needs. It’s okay to say no, to ask for clarification, to leave overwhelming situations.
This is a skill that develops over time, especially if you've spent years masking.
Patience & Self-Compassion:
This is a marathon, not a sprint. There will be good days and hard days. Be kind to yourself. You're learning a new way of understanding yourself and navigating the world.
Part 6: The "Don't Forget This Stuff!" - Final Thoughts & Value Nuggets
Autism is a Spectrum, Not a Line: It's a diverse constellation of traits. "If you've met one autistic person, you've met one autistic person." Support needs vary wildly.
Masking is Real & Exhausting: Many autistics (especially women, AFAB individuals, and people of color) learn to camouflage their traits to fit in. This can delay diagnosis and lead to burnout.
Late Diagnosis is Valid: Discovering you're autistic as an adult is increasingly common and incredibly validating. It's never "too late."
Internalized Ableism is a Thing: You might have absorbed negative messages about autism or disability. Unpacking this is part of the journey.
Celebrate Neurodiversity: The idea that neurological differences like autism are natural variations in the human genome, not disorders to be cured. Embrace it!
Phew! We made it through the deep dive! Getting an autism diagnosis can feel like the end of one chapter and the very overwhelming beginning of another. But armed with knowledge, community, and self-compassion, it can also be the start of a more authentic, understood, and supported life.
What are your experiences with the diagnostic process? Any tips for folks just starting out? Spill the tea in the comments/reblogs! Let's support each other!
#Autism #Autism Diagnosis #ActuallyAutistic #Neurodiversity #Autistic Adults #Autistic Children #ASD #Sensory Processing #Special Interests #ADOS #Mental Health #Support #Self Advocacy #Tumblr Explains #Long Post #Worth The Read #Neurodivergent #Autism Acceptance
116 notes
·
View notes
Text

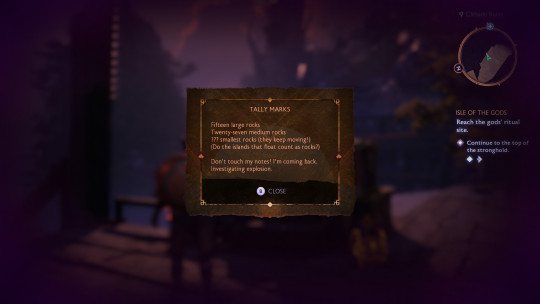
Brian J. Audette: "As promised, what follows is an unofficial behind the scenes/director’s commentary thread for the “Isle of the Gods” mission in Dragon Age: The Veilguard for Dragon Age Day. Some Veilguard spoilers will follow, so Beware." [source thread]
Rest of post is under a cut due to spoilers and length.
Brian J. Audette: "First off, who am I? I'm Brian Audette. I was the level designer on Isle of the Gods and the level design lead for the critical path (and other scattered missions) on Veilguard for the last 3.5 years or so. While some levels changed hands between people over time, Isle of the Gods was mine from the beginning. And speaking of the beginning, what a great place to start. Usually when a level designer starts work on a crit path mission, the main dialogue and narrative is already written. In this case the writer was Bioware veteran Sylvia Feketekuty whose fingerprints are all over the game, but who you can primarily thank for Emmrich. While this initial narrative work gives us a general idea of what the mission needs to be, the gameplay is only a suggestion at this point. As the level designer, the first thing I do is flesh out the gameplay implied by the narrative and then design the steps that will connect those moments. This is all done “on paper” in a concept doc. I’m a very visual thinker and while not a requirement of this process, I used a free online fantasy map making tool to mock up a sketch of what I thought the level could be in order to help me wrap my head around it."
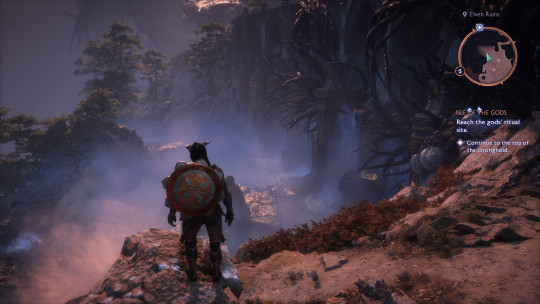
"Once that’s reviewed and approved, the more physical work on level design begins: blockout. Essentially this is where the level designer uses simple geometry to craft a skeletal version of the level in order to test gameplay, pacing, flow, etc. In the case of Isle of the Gods, the initial blockout and the final version of the level look very different, but the major beats, how they connect, and even most of the pacing and timing is the same. The major difference is that originally the island was more condensed, with a moat-like river around a central rise, but when level art initially started working on it, they “unraveled” it into a crescent shape that ultimately proved much better both visually and for the gameplay."
"One thing that barely changed from blockout to the final level, was the very start of the mission, but especially this rocky arch. I added it early in blockout in order to sell the idea that we were landing on a rocky, secluded cove."
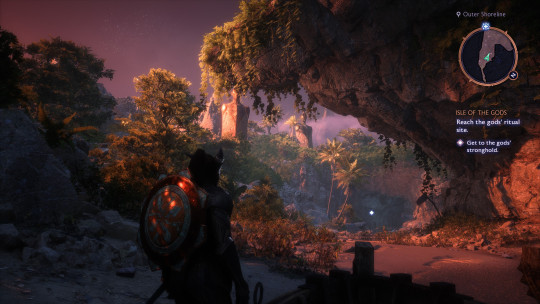
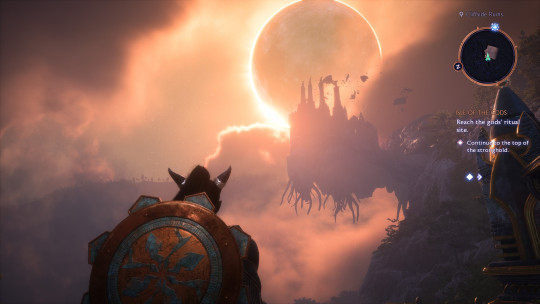
"The initial beach area changed several times during development. It started big, got smaller, and got bigger again for various reasons. At one point there was some light deep stalker combat here, but the pacing felt better without it in the end. Another thing that barely changed from the original blockout was the gods’ ritual site and how it’s seen in the distance. My initial inspiration for how this should look was the Castlevania games, where Dracula’s lair is always at the pinnacle of the castle and juts precariously out into the air."
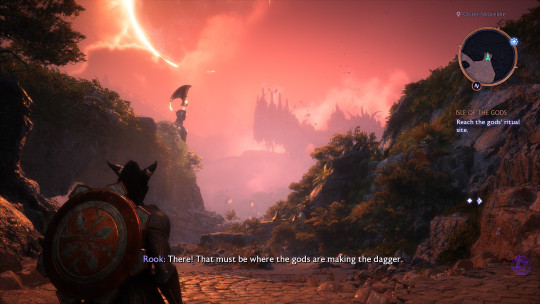
"Unraveling the level to be more of a crescent allowed both for more views of the ritual site as we climb and an earlier view of the Antaam presence across the inner bay than what was originally intended. I think this helped better sell the bigger combat that follows the first small encounter. I cannot claim full credit for the mortars combat beat. At one point we had a group focused on interesting combat moments and this was their idea, that I ultimately refined as what’s in game now. I think it’s more fun than just fighting a bunch more enemies alone."
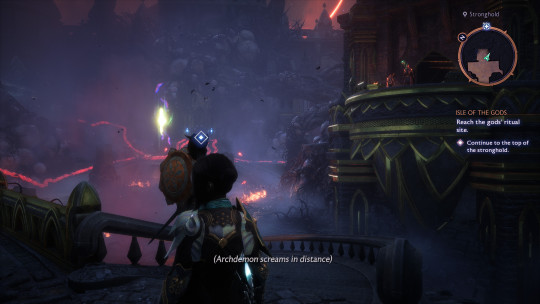
"As we approach the entrance to the gods’ stronghold from the beaches, we get this moment where we see explosions in the distance as evidence of the rest of the team's (those not with Rook) efforts to distract the Antaam. This was another view helped greatly by art’s unraveling of the level."
"If you head down to the beach just after seeing the explosions, you can find some goodies and one of our visual Easter eggs … an homage to Planet of the Apes. This was initially setup by the level artist Meggie Rock and I decided to place a chest right where one could get the best view of the statue"
"Incidentally, this makes me want to hear Gareth David-Lloyd deliver the “You maniacs! You blew it up! Damn you! Damn you all to hell” line from Planet of the Apes, but as Solas. The next bit of the level proceeds more or less as it was originally blocked out, though the area with the deep stalkers at the top of the first elevator was an addition that had to be made after level art decided to blow out the traversal in that area to a greater degree than I initially intended. The overlook where you fight some mercenary mages has one of my favorite notes. Sylvia and I wanted to press the idea that a larger Antaam presence here had been drawn away by the explosion at the camp below and It was my idea to have a note from a bored Antaam lookout, counting floating rocks."
"One thing that changed even before I was done with the blockout, was Elgar’nan’s speech as you make your way through the ruins and up to the second elevator. Originally we had wanted his face in the sky like Ghilan’nain at Weisshaupt, but decided to trade it for the Archdemon flyby we used instead. At the top of the zip line just before the Archdemon flyby is one of my favorite views: the gods’ ritual site silhouetted against the eclipse. The initial description of this shot was used almost like a mission statement for this level in the original concept."
"Here’s a fun bit of trivia for you: The second elevator in Isle of the Gods is the longest elevator ride in the game. Also … elevators used to be slower and I’m pretty sure this ride contributed to speeding them up everywhere. The fight while waiting for your companions to open the gate after the second elevator was always intended to be big. Originally I had designed an arena with lots of cover and elevation changes, but when we decided to use a couple Reavers for the fight, things got a lot flatter."

"This waterfall area after leaving the gatehouse was never in the original blockout, but it’s something the level’s original artist put in and that we liked so much, we tried to find use for it as a nice side path for loot and a note."
"My original blockout for the area after the gatehouse (now known as the Elven Ruins) was much different. The pacing and the beats were the same, but I envisioned it as taking place at the tops of ruined towers rising high above a caldera or pit below. Ultimately these blighted ruins work better imo. The presence of fade tears and the fact that we call them out several times in the level originally had a larger narrative purpose that we moved away from. Exploding fade tears didn’t actually exist in game until I created them for this mission and they were ultimately elsewhere to good effect. The blight destruction before entering the gods’ inner sanctum was a beat that went through several iterations early on. We knew we wanted to halt the player at a door like we did at the gatehouse, but didn’t want to use the same idea of fighting until the door opens again. At one point I had some over complicated ideas about using fade tears to blow up blight boils, but with level art’s help we settled on something less about combat and more about traversal."
"Now we’re getting close to the end. When you open the door to the gods’ inner sanctum, right before it fades into the cinematic, you can see your companions who have gone ahead, waiting for you in the room. Most will miss it, but I wanted that attention to detail. While the general structure of the final section of the level didn’t change much from the original blockout, the gameplay certainly did. Everything after that last elevator ride in cinematic was overhauled to create an experience that was much more about this looming confrontation with Ghilan’nain. “A master class in blight boils” was how we had originally approached the two sections before the boss fight here and I originally had some really cool and puzzle-like blight destruction utilizing boils that would regrow."
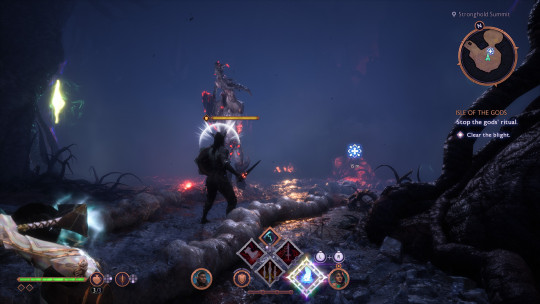
"Ultimately we removed that puzzle aspect however as we wanted a lot of combat and in play testing it, it just felt too busy. We could either have a big puzzle or a big combat, but both was too much, so we decided on combat as it was more in keeping with the pacing of the end of the mission. The fight against Ghilan’nain was a collaboration between myself and several other designers. We knew we didn’t want to attack her directly (that’s Lucanis’ job) and we knew we wanted to strip away your companions at least initially. Once again, we decided to use the blight. If you think this fight is chaotic now, imagine it with blight boils that regrow! Like the previous section, we decided to ditch this idea as it detracted from the rest of the fight. Incidentally, you can beat this fight without killing a single enemy. My best time is somewhere just under 2 minutes. And that brings us to the end of Isle of the Gods. I hope you enjoyed the mission and I hope you enjoyed this look behind the curtain. And remember "Whatever it takes!""
[source thread]
#dragon age: the veilguard#dragon age the veilguard spoilers#dragon age: dreadwolf#dragon age 4#the dread wolf rises#da4#dragon age#bioware#video games#long post#longpost#solas
159 notes
·
View notes
Text
Overcoming Writer's Block
“Writer’s Block” is a phrase used to describe the inability of writers to get words on a page. It happens to every writer at some point; the words are somehow blocked from the writer. Each writer is different; people use different methods to move past this state.
Freewrite -> Begin to write for ten minutes nonstop just to get some ideas flowing. Don’t worry about grammar, just keep writing.
Cluster -> Graphically cluster ideas and details. Write one idea on paper and map out related ideas.
Journal -> Journal about your topic, feelings about it, and any ideas you may have, even if you don’t like them. Try to journal once a day.
Narrow your topic -> After you have selected a topic, try to focus/limit/narrow your topic.
Talk it out -> Talk about ideas you have on the topic to someone or into a recorder. Ask yourself or have someone else ask you questions about your topic. Often you will say something unexpected, and it may be the beginning of your written piece.
Break the essay into parts -> Organize your topic into graphic boxes, each one representing a body paragraph. Write a few words into each box to represent what idea you will develop in each paragraph.
Begin in the middle -> If you know something you want to say, write a body paragraph just to get started.
Create a specified time to write -> Show up and start writing at a certain time every day to develop a routine; maybe this routine includes your favourite chair, favourite beverage, or favourite pen.
Diagnose the "problem" -> Work out what you're actually stuck on. Is it that you have ideas that you like but they seem weak and unconvincing when you try to put them down on paper? Are the ideas themselves lamentably absent? Do you know exactly what you want to say, and how, but when it comes to expressing it in words, your command of the English language seems to fall apart? Making a diagnosis of where the real difficulty lies gets you halfway towards fixing it. Sometimes writer’s block comes about because you’re trying to start writing before you’re ready.
Do what you can -> Once you’ve figured out where the problem lies, see what you can actually do without coming up against that great big wall of block. Here are a few things you might do as part of the writing process: edit previous text, sketch out the next few paragraphs, make notes of ideas for future paragraphs, or content for if you have sufficient time or room in your word count put some meat on sketched-out paragraphs. Fiction: make notes on characters, make notes on settings Non-fiction: sort out your bibliography, look at footnotes
Move around -> Sometimes you get writer's block because you just can’t see further. Changing your environment by heading to a coffee shop, a library, or even just another room in your house can provide a fresh perspective.
Find another outlet -> Sometimes you just need to put down the pen and take a break from writing. You may recover from your block quicker by indulging in another creative outlet.
Make the most of online tools and resources for writing and editing -> Online tools for writing and editing can make a huge difference in overcoming your writer’s block. They can spark your inspiration, or at the very least help you sift through what you already have and find something great to work with.
Surround yourself with other writers -> It can feel isolating to go through the ups and downs of writing all by yourself. While you can share your experience with family and friends, no one understands you better than the people who are already going through it.
Play to your own strengths -> Do not waste time following anyone else’s advice that doesn’t work for you because people’s writing journeys are different.
Sources: 1 2 3 4 5 ⚜ More: Writing Notes & References
#writing tips#writer's block#writeblr#creative writing#literature#poets on tumblr#poetry#writers on tumblr#words#lit#spilled ink#writing advice#writing reference#writing resources#langblr#studyblr#dark academia#on writing
212 notes
·
View notes
Text

If you're like me, you bounce around a bunch of different platforms and applications in the writing process. My hot take is that this is totally fine. No one ever said the writing process is perfectly streamlined! That being said, I've shared some tools I use for different parts of my process. For the most part, I use them consistently for the purposes mentioned below:
→ Miro
I use Miro for my first pass of plot and character arc outlines. Miro is a free software that acts like a digital board, where you can arrange sticky notes and all sorts of features. I prefer using an online board as opposed to a physical one, because I’m constantly reworking my beats and moving things around, and it’s more efficient to do both digitally (in my opinion). I keep my plot outline separate from my character arc outline at the very early stages, because I’m essentially ideating how the two can be married. At the end of the day, I believe the most compelling stories always fall back on character emotions and motivations propelling the plot. Tools like Miro help me map the journey towards that end goal.
→ Notebook
My notebook contains my brain dump. I dedicate a single notebook to a project, and it basically becomes a collection of unfiltered thoughts. I’ll dump character tidbits, sequences for each chapter, feedback from my writing accountability buddy, and questions I want to address in the next iterations of my WIP. This is helpful for me, because I tend to struggle with rapid thoughts, so the notebook helps me focus on the idea itself. Later, I’ll always have the opportunity to categorize them in another platform as I’m writing.
→ Google Docs
In the past, I was writing chapters on Google Docs. This was helpful at the time, because it’s free, it tracks key metrics I care about (mainly word count), and it’s easy to share your work with anyone. But there are some drawbacks. The biggest one for me is having to format everything for a manuscript. This’ll be more relevant later down the line, but sometimes I get really bogged down by little things like spacing and indentation. It really distracts me from focusing on the sentences themselves. After seeing it pop up on Instagram a couple of times, I decided to purchase Scrivener for desktop. It is super functional, and I probably only use like 2% of its max capability right now. But it’s been super helpful for organizing my chapters and scenes, writing out little summary cards, color-coding progress status and POV, bullet pointing margin notes, and most importantly, pre-formatting my WIP as a manuscript. I definitely think Scrivener is worth the long-term investment if you find yourself writing and publishing multiple projects.
→ Scrivener
Even though I’ve transitioned to Scrivener for the actual manuscript, Google Docs still comes in handy for me. Right now, I mainly use it to 1) track feedback and revisions on a chapter-by-chapter basis, and 2) maintain a treatment of my novel. A treatment is essentially a full-length document that details everything that happens in your story from start to finish. They can be as short as 3 pages or as long as 50 pages. I could keep and maintain these documents in Scrivener, but I already had these written out on Docs, so I’m sticking to them. Later down the line, I’ll likely shift over to Google Sheets to track revisions.
What tools do y'all like using? Please feel free to recommend any! Tips on Scrivener are also welcomed!
#writers#writeblr#writingcommunity#writerscommunity#novel writing#wip#writers life#writers on tumblr#creative writing#fiction writing#writing help#writing resources#sytips
35 notes
·
View notes
Note
I’m going to start running an old school dungeon you linked to a few days back (the Tomb of the Serpent Kings, it looked so neat and well-designed I immediately started preparing to run it) with an online group in OSE.
You have smart and good thoughts on how to do ttrpgs good, and I have been mulling this question for a few days: should I use Foundry and set up the map of the dungeon such that the players can move their tokens around to explore the space, or should I not set up the map and have the players use my descriptions to create their own as we play?
On the one hand, it feels more true to the old-school style of play to not give them the “Solution” to how the dungeon is laid out and gives them the chance of fucking up in interesting ways. On the other hand, I might be using foundry anyway so that their character sheets are all stored in a nice and easily accessible place for me, and we can roll in a way that everyone can see, meaning that not setting up the map in an explorable form might just be arbitrarily denying them access to knowledge it makes sense they’d have. Also I’m worried that random internet or attention issues might lead to people missing important information about the layout of rooms that won’t be as lost if they have an “objective” map to look at.
I’m planning on bringing this up with my players as well before we begin, I just thought you’d have some good insights into what makes a good experience when playing old school online.
Love your posts.
I think there absolutely are benefits to both approaches! Having the players draw their own map absolutely is more true to "the old ways," but I think it's actually arguable whether that was simply due to it being the easiest way to handle the sharing of the map without saddling the GM with further work and that in the current day, with our ability to transfer maps directly from one computer to another, it might not be worth the hassle. And because verbal communication is bound to be flawed and ambiguous between people there is always room for human error there.
Now, having said that, there absolutely is a draw to having the players draw their own maps, which is that it acts as a tiny bit of challenge on top of all the rest of the gameplay. As long as you the DM make sure that your players aren't fucking up too much when drawing the map (I think Foundry allows for players drawing on the map? So that way you could observe the map-drawing process and immediately correct any mistakes that are definitely due to miscommunication) there absolutely is a charm to having players draw their own map. Plus, I think OSE has the rule that mapping is not allowed during pursuit, which I think does also reinforce the idea that mapping is supposed to be a TOOL that players use to keep themselves oriented, and it's a tool whose use can be limited as befits the circumstance.
I don't have a set approach to this myself: I have, in the past, run old-school games while sharing a map, and that isn't without its issues but can make for a smoother, frictionless experience. @vixensdungeon is of the opinion that adventurers getting lost because they fucked up their map is a part of the charm, so in my current OSE campaign I have made it so that players handle most of the mapping (and I only intervene when verbal descriptions fail me). One thing you absolutely do need to address if running with a map that you reveal: you need to remove all secret doors from the map, because if you reveal an entire room to the players but leave one wall conspicuously unrevealed your players are going to be spoiled the surprise of the secret door by the medium itself.
Anyway, I don't think there is a one true way here, but I would encourage you to try having the players handle the mapping! It's a good thing that you'll be discussing this with players beforehand though, and it'll be a good way to set expectations for them. :)
Also, another person drawn in by the promise of cool dungeon-crawling by my blog? Can I get a huzzah?
22 notes
·
View notes
Note
Hi, only wanted to ask about xenogenders: why do exclusionists think they aren't valid? Just curious
Thanks for this blog btw, one of my favs now :)
First off, let's talk about their history. They were coined by a cis, neurotypical woman who posed as a trans woman online. She basically insinuates that neurodivergent people can't understand what gender is. Which, yikes. Throughout the entire history of them, it's been said that it's "for neurodivergent people who have a hard time understanding social constructs like gender" (which I'll address later in this post), or "for neurodivergent people who have a hard time understanding their feelings, so they describe the way their gender feels like light and fluffy like a cloud, or angry and soft like an angry cat.". The problem with this, it infantiles neurodivergent people.
Which is fine when it's coming from someone who actually is speaking for themself. Neurodivergent people who experience something that does cause them to not be able to do something are allowed to convey that they can't do those things, and they are not infantilising anyone, and they are not putting neurodivergent people down. Having a disability is having a disability, it isn't good or bad, and it's wrong to act like someone with a disability can do anything. It's wrong to place expectations on disabled people they can't live up to, and when a disabled person can't do something, don't act like they're making a biased judgement about disabled people because they aren't. I can't just stop ticking, and my tics extend to affect more of my life than just my tics. My ADHD "infantiles" me in some ways, and there is nothing wrong with that, and don't expect me to be able to exist in the same way as a neurotypical person.
HOWEVER, the majority of people who label themselves with xenogenders are neurotypical or self diagnosed. They do not have the ability to speak on neurodivergence correctly. They just don't. They don't have the tools. They don't have the experiences. They don't have the time in therapy. They don't have the education. They are using neurodivergents as a scapegoat and in the process insisting that there is something so fundamental that we simply cannot understand. They are speaking for us, and have created false information about a group they can't speak for.
Now for the science.
Gender isn't a social construct. At least not in any way that is compatible with the concept of xenogenders.
• Gender in the terms of *gender studies* which was formed in the soft science of *sociology*, describes the expectations, performances, and roles associated with being a male, and a female. In this theory, a social man is someone who is masculine and a social woman is someone who is feminine. In this theory, these are learned behaviors enforced by society. Men are masculine, they're strong. They hunt, they have no feelings other than anger. Women are caring and nice and they cross their legs when they sit. Obviously this is not applicable to individuals. Because obviously most people don't fit into these definitions. This concept of social gender is useless for labeling an individual as a man or a woman. It's bunk. It's accurate for how society treats people though. Xenogenders do not have any socially ascribed behaviors, expectations, or roles. Therefore under the tucute definition of gender "gender is a social construct", aka gender theory, xenogenders are not genders. Some people could argue that "well my learned behaviors are light and fluffy like a cloud", that still doesn't mean that society perceives you as cloud-like or that your learned behaviors are similar to that of a cloud. It also doesn't have anything to do with the sexes, and therefore isn't compatible with this theory.
• Gender in terms of what we identify with is a different thing entirely, and is a neurological and psychological map of your sex characteristics. Someone who individually is a man identifies with a body that is entirely categorizable within male range, and someone that is a woman is someone with an identified body that is entirely categorizable within female range. Someone who is nonbinary, (nullsex or on the duosex spectrum), is someone who's identified body doesn't fit within those ranges. Gender is different from the "gender" represented in gender theory. This is because a man can look, act, sound, think, and express in the ways typically associated with women and still be a man. Even if he's trans. The social ascriptions to gender are meaningless, and gender itself is not. Xenogenders do not reflect any gender identity. They are not correspondent to an individuals understanding of their own body, and not equatable to transness or nonbinarism. They're a self-chosen label that bares no meaning. They represent nothing real.
Ultimately if someone wants to call themselves catgender, ok i guess I can't stop them and I'm not going to be a dick about it but I'm also not going to sit around and pretend like it holds any water or means anything.
#exclusionist#anti inclusionist#anti inclus#exclus#transmed#transmed safe#pro transmed#anti xenogenders#anti mogai#anti xenopronouns#anti tucutes#gender is not a social construct#also they aren't genders#gender theory#pro gender theory anti gender is a social construct#gender roles and gender are different
43 notes
·
View notes
Text
"As countries around the world begin to either propose or enforce zero-deforestation regulations, companies are coming under growing pressure to prove that their products are free of deforestation. But this is often a far from straightforward process.
Take palm oil, for instance. Its journey from plantations, most likely in Indonesia or Malaysia, to store shelves in the form of shampoo, cookies or a plethora of other goods, is a long and convoluted one. In fact, the cooking oil or cosmetics we use might contain palm oil processed in several different mills, which in turn may have bought the raw palm fruit from several of the many thousands of plantations. For companies that use palm oil in their products, tracing and tracking its origins through these obscure supply chains is a tough task. Often it requires going all the way back to the plot level and checking for deforestation. However, these plots are scattered over vast areas across potentially millions of locations, with data being in various states of digitization and completeness...
Palmoil.io, a web-based monitoring platform that Bottrill launched, is attempting to help palm oil companies get around this hurdle. Its PlotCheck tool allows companies to upload plot boundaries and check for deforestation without any of the data being stored in their system. In the absence of an extensive global map of oil palm plots, the tool was developed to enable companies to prove compliance with regulations without having to publicly disclose detailed data on their plots. PlotCheck now spans 13 countries including Indonesia and Malaysia, and aims to include more in the coming months.
Palm oil production is a major driver of deforestation in Indonesia and Malaysia, although deforestation rates linked to it have declined in recent years. While efforts to trace illegally sourced palm oil have ramped up in recent years, tracing it back to the source continues to be a challenge owing to the complex supply chains involved.
Recent regulatory proposals have, however, made it imperative for companies to find a way to prove that their products are free of deforestation. Last June, the European Union passed legislation that prohibits companies from sourcing products, including palm oil, from land deforested after 2020. A similar law putting the onus on businesses to prove that their commodities weren’t produced on deforested land is also under discussion in the U.K. In the U.S., the U.S. Forest Bill aims to work toward a similar goal, while states like New York are also discussing legislation to discourage products produced on deforested land from being circulated in the markets there...
PlotCheck, which is now in its beta testing phase, allows users to input the plot data in the form of a shape file. Companies can get this data from palm oil producers. The plot data is then checked and analyzed with the aid of publicly available deforestation data, such as RADD (Radar for Detecting Deforestation) alerts that are based on data from the Sentinel-1 satellite network and from NASA’s Landsat satellites. The tool also uses data available on annual tree cover loss and greenhouse gas emission from plantations.
Following the analysis, the tool displays an interactive online map that indicates where deforestation has occurred within the plot boundaries. It also shows details on historical deforestation in the plot as well as data on nearby mills. If deforestation is detected, users have the option of requesting the team to cross-check the data and determine if it was indeed caused by oil palm cultivation, and not logging for artisanal mining or growing other crops. “You could then follow up with your supplier and say there is a potential red flag,” Bottrill said.
As he waits to receive feedback from users, Bottrill said he’s trying to determine how to better integrate PlotCheck into the workflow of companies that might use the tool. “How can we take this information, verify it quickly and turn it into a due diligence statement?” he said. “The output is going to be a statement, which companies can submit to authorities to prove that their shipment is deforestation-free.” ...
Will PlotCheck work seamlessly? That’s something Bottrill said he’s cautiously optimistic about. He said he’s aware of the potential challenges with regard to data security and privacy. However, he said, given how zero-deforestation legislation like that in the EU are unprecedented in their scope, companies will need to sit up and take action to monitor deforestation linked to their products.
“My perspective is we should use the great information produced by universities, research institutes, watchdog groups and other entities. Plus, open-source code allows us to do things quickly and pretty inexpensively,” he said. “So I am positive that it can be done.”"
-via Mongabay, January 26, 2024
--
Note: I know it's not "stop having palm oil plantations." (A plan I'm in support of...monocrop plantations are always bad, and if palm oil production continues, it would be much better to produce it using sustainable agroforestry techniques.)
However, this is seriously a potentially huge step/tool. Since the EU's deforestation regulations passed, along with other whole-supply-chain regulations, people have been really worried about how the heck we're going to enforce them. This is the sort of tool we need/need the industry to have to have a chance of genuinely making those regulations actually work. Which, if it does work, it could be huge.
It's also a great model for how to build supply chain monitoring for other supply chain regulations, like the EU's recent ban on companies destroying unsold clothes.
#deforestation#palm oil#indonesia#malaysia#agriculture#european union#united states#save the forest#open source#technology#mapping#forestry#satellite#good news#hope#climate solutions#environment
123 notes
·
View notes
Text
Excerpt from this New York Times story:
The Agriculture Department will restore information about climate change that was scrubbed from its website when President Trump took office, according to court documents filed on Monday in a lawsuit over the deletion.
The deleted data included pages on federal funding and loans, forest conservation and rural clean energy projects. It also included sections of the U.S. Forest Service and Natural Resources Conservation Service sites, and the U.S. Forest Service’s “Climate Risk Viewer,” which included detailed maps showing how climate change might affect national forests and grasslands.
The lawsuit, filed in February, said the purge denied farmers information to make time-sensitive decisions while facing business risks linked to climate change, such as heat waves, droughts, floods and wildfires.
The suit was brought by the Northeast Organic Farming Association of New York along with two environmental organizations, the Natural Resources Defense Council and the Environmental Working Group.
The plaintiffs had sought a court order requiring the department to restore the deleted pages. On Monday, the government said it would oblige.
Jay Clayton, the U.S. attorney for the Southern District of New York, wrote to Judge Margaret M. Garnett that he was representing the Agriculture Department in the lawsuit, and that the department had already begun restoring the pages and interactive tools described in the lawsuit. He said the department “expects to substantially complete the restoration process in approximately two weeks.”
Mr. Clayton asked the judge to adjourn a hearing scheduled for May 21. He said the department proposed to submit a report on its progress restoring the data after three weeks, and sought to address “appropriate next steps in this litigation.”
Jeffrey Stein, associate attorney at Earthjustice, an environmental law nonprofit that represented the plaintiffs, along with the Knight First Amendment Institute at Columbia University, said, “We’re glad that U.S.D.A. recognized that its blatantly unlawful purge of climate-change-related information is harming farmers and communities across the country.”
13 notes
·
View notes
Text
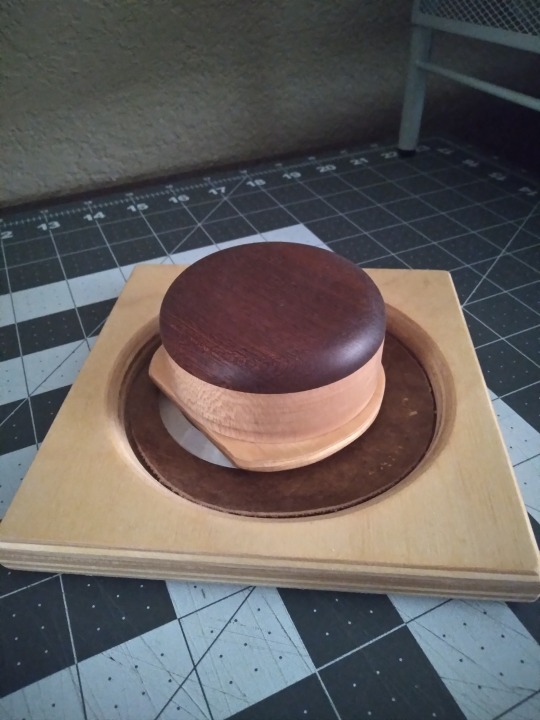
I had a message the other day asking (among other things) what kind of tools and equipment I use in making books, and as it's something I like to go into detail on, I realized I couldn't fit everything I had to say in a message so it's getting its own post. With photos!
Disclaimer that I'm not a professional bookbinder, I'm entirely self-taught and probably have habits and practices that would drive a pro nuts. I'm no authority, but these are the things that have worked for me, and maybe you can adapt them to work for you too.
This post will not cover: storage options, materials like board and glue, or equipment specific to one narrower aspect of the hobby like embossing or gilding. It is also not a tutorial on how to make a book, though I am covering things in more-or-less the order I use them in during the book-making process.
This post will cover: What I've found useful, what I've regretted buying, and some things you can co-opt from other, more common hobbies. A lot of it you may already have in your house. Some of it is for beginners, some is nicer equipment you might want as you get further into making books. They are not separated, it's just a list and some description.
Keep reading below the cut; this is gonna be a very long one and there are a lot of photos of everything.
If you want to make books you will need access to a printer. I'm not going to go into detail on this part and I didn't take a photo of my HP (not the best brand, but that's a long discussion in and of itself). Once you've got your pages printed and it's time to fold it into signatures, it helps to have a folding tool like these:
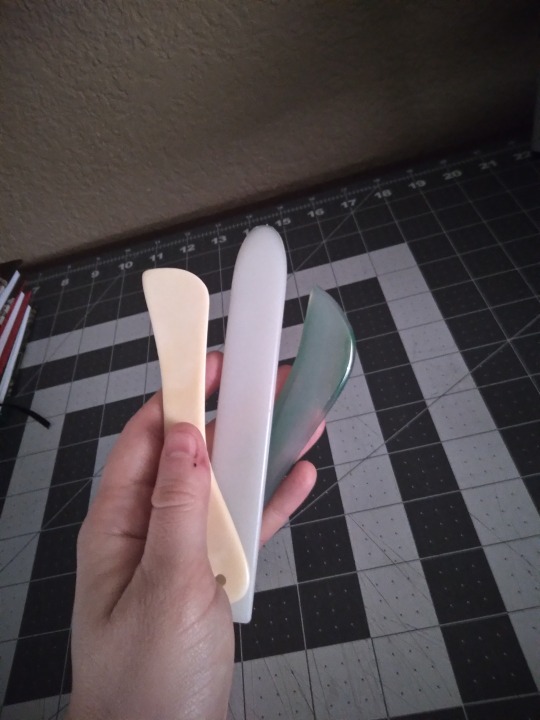
Folding tools can be anything as long as they're smooth and flat. The one on the left here is an actual bone folder from an art supply shop, but the center one is a plastic leatherworking tool that I got at Hobby Lobby, and the one on the right is an agate burnisher that I got from Amazon. None of these cost more than $10, and you can also use the edge of a pen (as long as it has no rubber grip or cap/clip) or the back of a spoon. Or your fingers, but the tools make it faster and the folds are more precise. I once worked a job where I had to fold maps, and all my coworkers were wondering how I did them so much faster and why mine were flatter than everyone else's, and it was because I'd grabbed a sharpie and started using the back end like a bone folder.
Once it's folded, you'll need to poke holes for sewing. I use one of these:
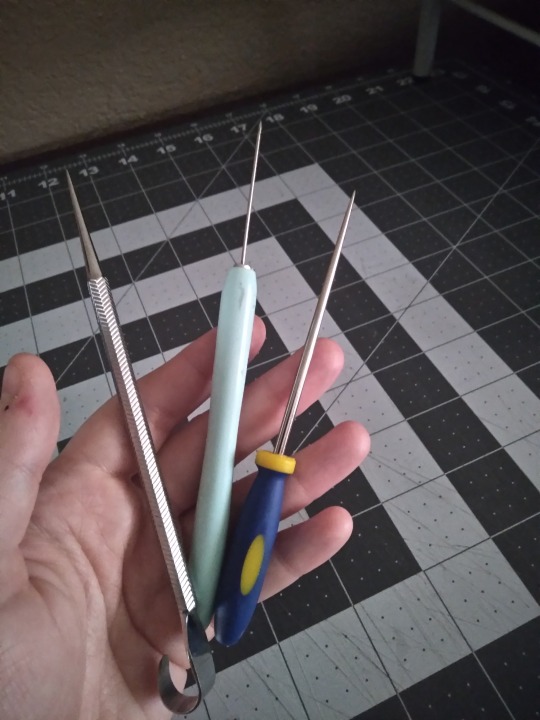
Left is, again, an actual bookbinding awl from an art supply store, while the center one is a paper quilling tool and the right one is a beadwork awl, both of which came from a big chain craft store. The bead one is my favorite; it's a good size and very stable. The quilling thing has too long and thin of a blade and it's wobbly, and I don't like the tapering on the bookbinding awl. It tends to make the holes in the middle page too big, and the outer ones too small. Again, these were cheap, about $10 each, but you can also use a sewing needle stuck in a cork, or a thumbtack or pushpin. If it's pointy and rigid, it'll work.

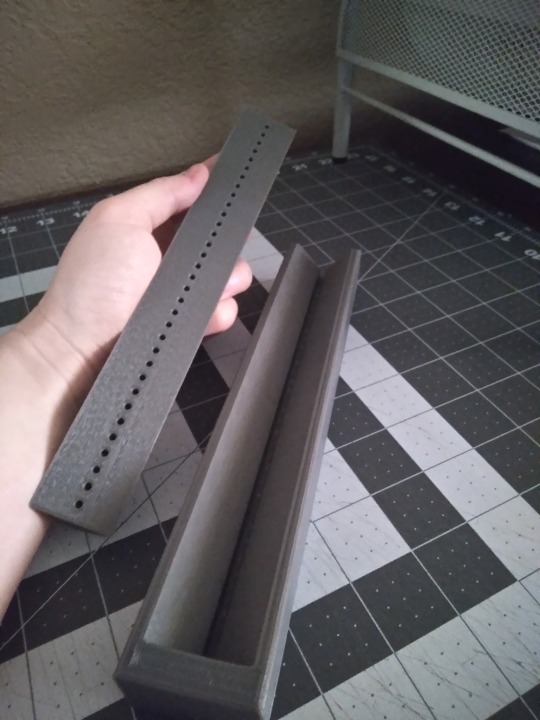
This isn't a requirement by any means, but I've found I like having a punching cradle for the hole-poking step. I got this 3d printed one from a fellow bookbinder, who was designing their own and made this one as a prototype. There are a lot of tutorials on how to make a punching cradle, or you can buy them online from several different vendors. They don's all look like this, and you can make them from wood or cardboard (though those don't usually have guide holes). If you're just starting out or this doesn't appeal, you can just use a paper template like the one on the far right. The cradle helps get the holes lined up and evenly spaced, and I've never liked this step so anything that makes it faster and less fussy is a win. If you use this kind, check that your hole-poking tool fits in the guide holes--the binding awl pictured above doesn't, but the other two do.
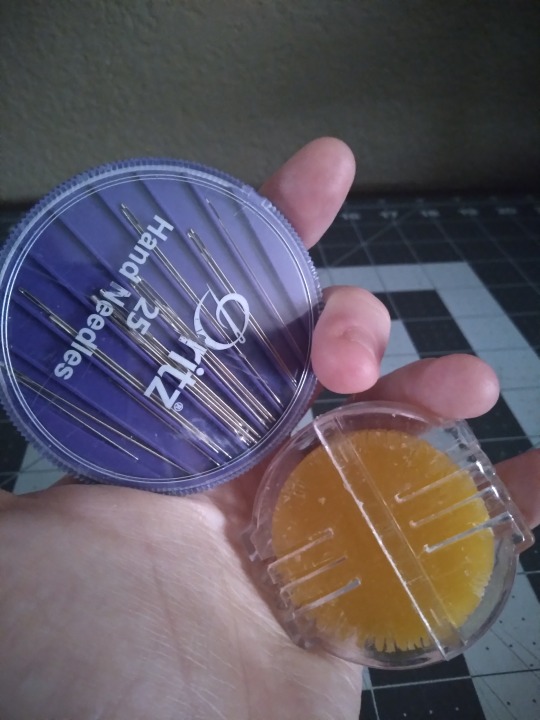
We've made holes, so let's stitch them up. These are just regular sewing needles and beeswax, to make your thread less prone to tangling. You can get both of them in any store that has a sewing department. There are dedicated bookbinding needles, like curved needles, and some binders like them, but I've never gotten the hang of the curved ones and they aren't necessary, especially when you're just starting out. If it fits through the holes you made, it will work.

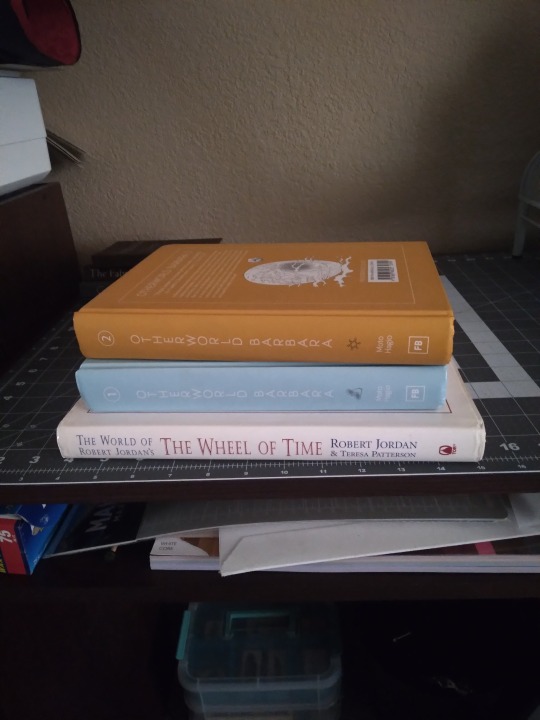
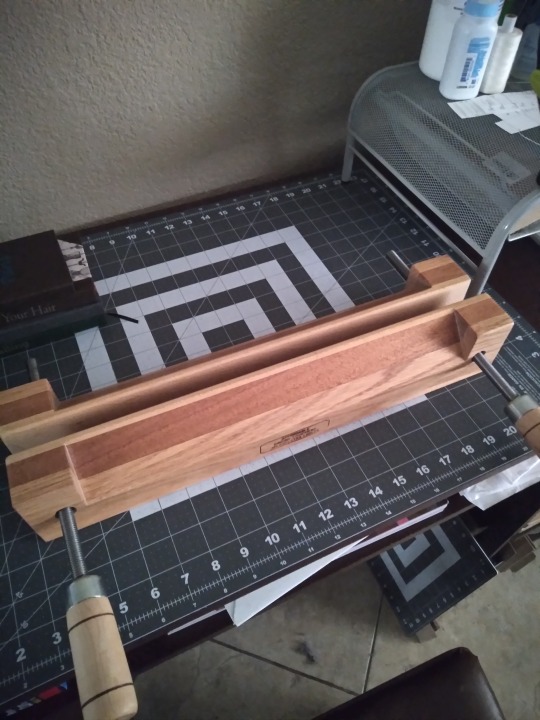
Once it's sewn, you probably want to squish your new text block so it's flat. I've got a laying press that I bought a couple of years ago when I was first getting started. It was marketed as a book and flower press, and it's honestly not the best. I would probably not have bought it if I had known that it wasn't essential to the process, and I mainly use it now when I'm squishing a text block and still want to use my work space, because once it's tight I can move it somewhere else. You can really use almost anything for squishing as long as it's heavy and flat and rigid on one side, like the stack of books in the right-hand photo. Textbooks, encyclopedias, art and photo books, and comic book omnibuses are all great. I've seen people use all kinds of things, like paper-wrapped bricks and doorstops, and there are tutorials out there to make your own press out of cutting boards if you do want one.
If you like your books to have smooth, flat page edges you're going to have to trim them. This is a book plow from Affordable Binding Equipment, and it was the first piece of actual expensive equipment that I bought. Not all plows look like this; I think the design is unique to ABE, but I've never used the traditional kind. In the interest of full disclosure, you can also trim edges with a sharpened chisel, which is much cheaper and can be bought at any hardware store, and some binders love this method. I do not love this method and have had zero regrets about caving and getting the plow. Very easy to use but does require some grip strength. Not pictured: the setup for sharpening the blade, which isn't hard but requires a bit of space and a small sheet of plate glass that you have to source yourself. Even with that, I still prefer it to the chisel. That said, this is not an essential step and you can leave your books with a "sawtooth" or deckled edge. Most of my early books have them, and some people just like them better than the flat ones and never learn to trim them. As another side note, some tutorials will say that you can trim your edges flat with a knife. You can't. Maybe on a pamphlet you can, but if it's more than 10 or 20 pages you just can't. It will look terrible.
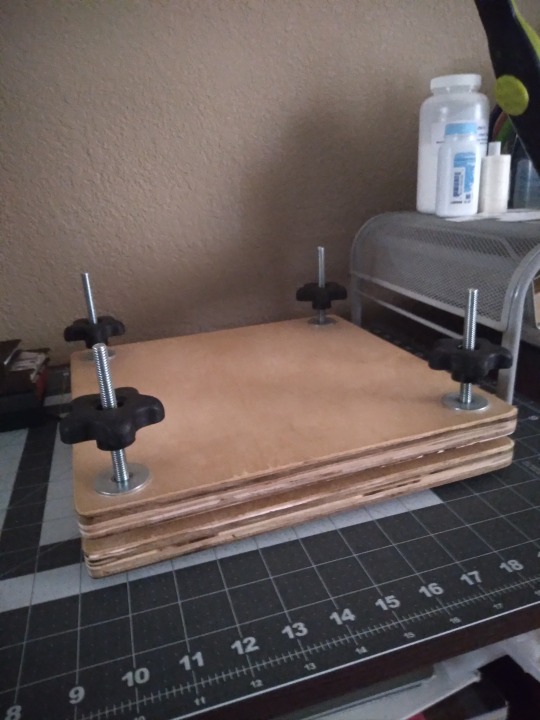
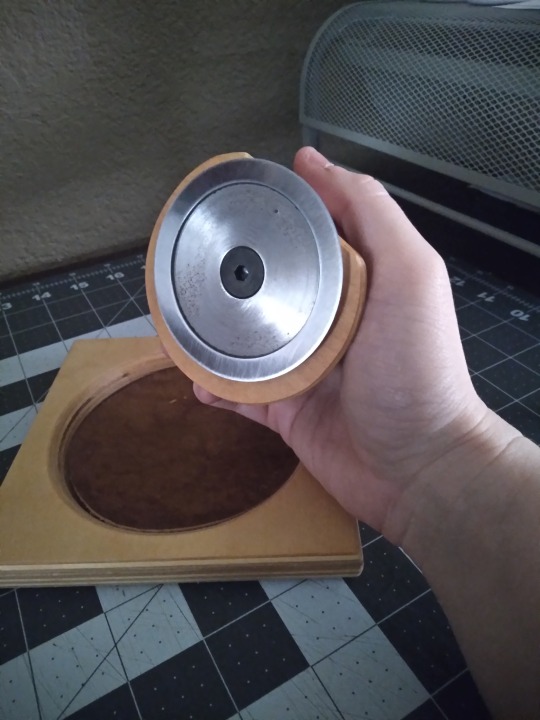
If you're going to use a plow, you've got to have the right kind of press. The one I talked about further up the thread is the wrong kind (full disclosure: I did use it with that press turned on its side, before I bought this one. But it's harder, more time-consuming, less comfortable, and less safe. Don't be like me). So here's a photo of my finishing press (also from Affordable Binding Equipment). I bought it so I could make backed books, but I use it for trimming too. The top part here has a narrow tapered section for backing, but if you flip it over it's totally flat, which is what you need for trimming. Not pictured: the stand that it came with for backing, or the c-clamps that I use to attach it to the desk for trimming. Again, though--this isn't a requirement for bookbinding. This is a later stage that's entirely optional. On the subject of backing, though:
You don't need special equipment to round the spines of your books, but you do for backing. Left image is the set of backing boards I got from, once again, Affordable Binding Equipment, and on the right is a backing hammer from Hollander's. Neither of these are essential. Even if you get the boards (which have to be used in a press with a tapered edge, like the one directly above) you can actually use a regular hammer as long as the front part has no scratches or gouges. This one is a backing hammer, the primary difference being that it has a wider, convex head than a regular household hammer, to make the kind of glancing blows needed for backing a little easier. Honestly, I'm still learning how to use these and I'm not very good with them yet. Comes of being self-taught, probably. I don't think youtube is the best vehicle for learning this part, but it's what I have and I'm making do. Not every book is going to benefit from backing, either; it's primarily for helping mitigate spine swell.
Okay, time for my favorite repurposed equipment hack.
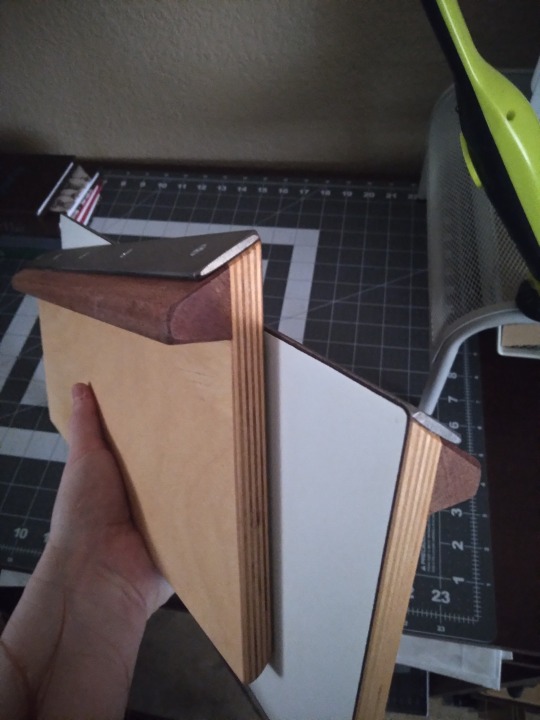
It's bookends. Regular bookends that I've had for ages and that probably came from Ross or some other place that doesn't even sell craft supplies.


Want to keep the text block upright while you glue it? Bookends. Want to sew some custom end bands but your text block keeps falling over? Bookends. They won't provide pressure for squishing, but if you just need to hold something upright while you work on it, bookends are the answer. They hold up books, it's right there in the name. Having said that, you want some with a little weight to them, like these agate slices, so they won't slide around. And you want something with a smooth finished edge like these, so they won't scratch up your text block or leave dents. I have other sets but these are the only ones I use for this purpose, and they're better for it than anything else I've got.
Moving on from making the text block, let's look at what I use to make covers.

It's appeared in the background of most of the other photos, but here's a photo of just the desk surface covered in cutting mats. I really recommend a mat to protect the surface of your furniture and keep your knives from going immediately dull. I've got a big one that covers almost the full surface, and a small one for when I want to be more mobile. I started with just the small one and it was good until I started working with larger sheets of paper. The big one was bought largely for convenience but I have no regrets about it. They're self-healing, non-slip, and you can get them in the sewing section of any big craft store.
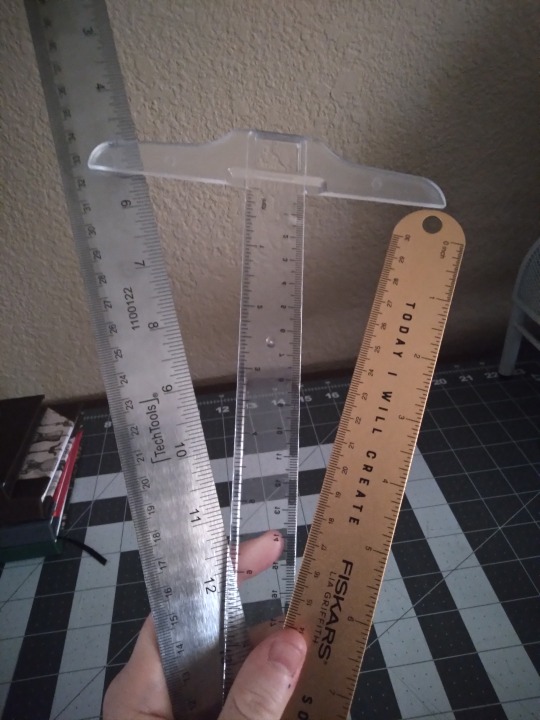
I'll be honest, I am not big on knives. I've got a regular box cutter for trimming board, and a razor knife for paper and cloth, and that's it. There are a lot of kinds and really all you need is one sharp blade for board. Paper and cloth can be cut with scissors if you want, though I find I get more consistently straight lines with the knives. Also pictured: Metal rulers and a T-square. You want a metal ruler for this. Plastic will flex and wood won't lay flat. Ideally you want one without a cork backing (my 18" one has this problem) and with the tick marks etched in rather than printed (my 12" one has this problem). For larger sheets of paper and cloth, the 18" one is great, but you can get by with the smaller one. The T-square is for making right angles; mine is plastic and only 12", and I really wish I had a longer one that was metal. These are drafting tools and you'll find them in the section of the craft store that has easels and sketch pads and they're usually pretty cheap.
This is an adjustable compass. You can probably get these at craft stores but I got mine on Amazon. It's for measuring hinge gaps and the width of spines, both essential for making sure your cover fits your text block and your hinges open the way they should. Both of those are incredibly frustrating situations, and this thing makes it so much easier to avoid them.
Things to spread glue with! Any old paintbrush will do, though I like to have a few different sizes and textures on hand to choose from. I like the big one for cover boards and casing in, the mid-size ones for doing turn-ins, and the little fellow for details and touch-ups. I don't care for foam brushes because I find them hard to clean when glue is involved, but if you like you can use those. The metal thing on the left is a micro-spatula, and I did have to special order it from an art supply place but it was cheap and it's very helpful to have on hand for when the brushes are too thick, for doing turn-ins on rounded spines, and for separating pages if you decide to learn edge foiling. Not essential, but recommended.
One thing I neglected to take a photo of is my crepe eraser. Despite the best intentions, no matter how careful you are, you will at some point get glue where you don't want it, where it will be visible on the finished book. This is where the crepe eraser comes in; you can use it to remove dried glue from cloth or (to a lesser extent) paper. Very annoyingly, none of the craft or art supply places I went to had even heard of these and I had to get mine from Amazon. It was cheap (under $10) and I strongly recommend getting one.
Once your cover is made, you have some options. You can leave it blank, hand-letter or draw an image, stamp it with ink or embossing powder, use a stencil, or do what I usually do these days and make a cover graphic from HTV. I've got a cricut for this (though they're not the only kind of cutting machine; it pays to research other brands) and a mini heat press (I want a bigger one, but I got this one cheap because the box is messed up). A lot of libraries have cricuts you can use, and you can use a regular iron to apply the HTV. Getting it to stick is a bit tricky, but that's true no matter which tools you use. Not pictured: a cutting mat, different than the kind shown above, necessary with most materials you can cut (mine came with one, they're about $20 at most craft stores, and they're lightly sticky to keep your materials in place while it's being cut). I don't know if other brands require them, but cricut does unless you're using their Smart Materials (I have never used these). If your library has a cutting machine, they will also have the appropriate cutting mats. Also not pictured: weeding tools. Weeding is when you remove the bits of HTV that you don't want in the final image, usually the spaces between letters and such. The negative space, if you want to get artsy. The special tools cricut sells aren't necessary, you can use an awl or needle and the dull edge of your knife blade, but I have a set of theirs and I like mine.
I didn't take a photo of it, but sometimes I use embossing inks and powder to make cover designs and text. You only need a heat gun for embossing powder, it takes up way less space than the cricut does, and it's cheaper. I got mine free from a family member so I don't know what it cost initially, but cutting machines are a really big expense; the cricut is my third most expensive piece of equipment, after the finishing press and the plow.
Good god I think that's everything. It sounds intimidating, I know. And it sounds like it takes up tons of space in your home, and to be honest it can, but it doesn't have to. The first dozen or so books I made, I made completely to my satisfaction with tools and materials that fit in one 12x16" moving box. If you love the hobby and can make the space, the bulkier items might be worth it down the line, but especially when you're first getting started it's smart to keep things low-cost and compact. Most of the basics are simple and your fellow bookbinders are delighted to share their shortcuts and substitutions if you ask.
The end! I hope it was helpful, @cardassianexpats! I did warn you it would be wordy, lol.
#bookbinding#fanbinding#long post#like ridiculously long post omg#my own verbosity will be my downfall#if anything is unclear please tell me#i can't always tell when i'm over-explaining#or when i think i've given enough info but my audience thinks i haven't#snek makes books#but sometimes she just talks about them
26 notes
·
View notes
Note
Hey!
I majored in anth at a p awesome school for it (had a so fun class where we hands on used paleo to neo lithic techniques- from making stone tools to processing hides) but there wasn't much available for prehistoric art (+ I was a major switch from microbiology so bio anth, epidemiology and forensics stuff, made more sense with my course history). Been out of school for almost 10 years now and unfortunately doing nothing even remotely related, but I'm wanting to learn more about prehistoric art of all sorts. With search engines being overrun with AI misinfo I'm not really sure where to start other than Wikipedia. Do you have any favorite resources you'd be up for recommending?
Thanks a ton! Happy holidays, and may the new year be kind.
Hello! I should preface this with saying I am just someone with a general interest and not remotely an expert haha! Getting to do hands on stuff sounds really fun!
A lot of my reading has been restricted to Upper Palaeolithic Europe, and cave art at that, so I can't really recommend anything outside of that.
I've been concerned also with avoiding misinformation - there was a painting I saw a while ago where it was obvious the level of research involved was typing "Lascaux" into pinterest and just using whatever results came up (the art used was from Cueva de los Caballos and Mesolithic) and it's been driving me nuts. I've been sticking to books for information, almost everything I've read has been through Internet Archive, and majority are over 30 years old so could be outdated, can contradict each other, and should be noted are can be very racist.
Putting the list of everything under a read more as it's quite long, I hope there's something useful in amongst all of this! Happy holidays, I hope you have a good new year!
Books and other resources I've found useful in no particular order:
The Cave of Lascaux: The Final Photographs by Mario Ruspoli (1987) [Is on Internet Archive but currently unavailable, the German version is still up.] When Lascaux was closed to the public Mario Ruspoli was hired by the French govenment to document the entire cave on film and wrote this book afterwards. Even though it's focus is Lascaux I found it a good introduction to the topic of cave art. I have tried to find the footage online with little success so if anyone knows... do tell. This book brings you through the cave and gives a good idea of the layout and where paintings/engravings are in relation to each other. I would love if there was something like this for other caves but I'm not aware of anything 🤔
Lascaux Virtual Tour [Link here] The video isn't toally clear but it gives a good sense of the layout, and you can click the little 'i' icon to see clearer photos and get more details.
Images of the Ice Age by Paul Bahn and Jean Vertut (1988) [Internet Archive Link] This book is also a good starting point! There's also Journey Through the Ice Age which is the same book.
Cambridge Illustrated History of Cave Art by Paul Bahn (1998) [Internet Archive Link] I haven't gotten around to reading this yet but it appears to be a broader scope and not restricted to Europe.
Palaeolithic Cave Art by Peter J. Ucko and Andrée Rosenfeld (1967) The main appeal of this bok is that it goes through the different possible reasons for cave art. I had to buy a physical copy as I couldn't find it online.
Kindred: Neanderthal Life, Love, Death and Art by Rebecca Wragg Sykes (2020) [Aeon article link "Sheanderthal: Not all Neanderthals were ‘cavemen’: half were women. What can archaeologists tell us about how they lived?] Not solely focused on art but she does talk about what the neanderthals made including a large circular structure in Bruniquel Cave - there is footage of the cave in the recent netflix documentary Secrets of the Neanderthals (not great, at one point the narrator says neanderthals lived in the neolithic lmfao but the interviews with experts are interesting).
Don's Maps [Link here] Really great website. Some books will mention a painting/engraving/sculpture but no image, so my first place to check is Don's Maps as everything he includes is either from a book which will be referenced or from his own visits to caves.
The Neanderthal Museum Digital Archive [Link here] Despite the name is not exclusively Neanderthal, lots of photos of cave art in the Wendel Collection (including a photo of the one known instance of a saiga antelope in cave art that I hadn't been able to find a photo of before!).
There's also the Archaeology Podcast Network and sites like Academia.edu but I don't have any specific recommendations at present.
18 notes
·
View notes
Note
what's your map advice? genuinely curious🤔
Oh look at this! Asks got bottled huh.
I think I remember what this was about. I don't have a specific set of Map Advice but I maintain that 'take real country borders and frankenstein them together, then invert colors and declare that pangaea-bloc ocean to get a realisitically greebled coastline for your made-up planet' is wildly unhinged methodology.
Like. It works fine! If efficiency and realistic invocation of the coastline paradox are your priorities, this is an effective strategy pretty much.
Although you have a pretty limited pool of countries to work from since in like, Africa the inland borders tend to be draw-a-line-on-a-map straight, and there aren't enough large peninsulas and isthmuses (isthmi?) in the world for you to put one of those in without it being fairly obvious you stole myanmar, and so forth.
Except of course because of the inversion trick you would instead wind up with a body of water shaped like myanmar??? And lakes are not really distributed like islands. And so on. The realism is very subject to breaking down.
Basically it answers a very limited set of the needs for which a fictional world map might be sought, and I think there are online tools to generate random maps that will serve most of those purposes already, so it's just a very specific trick to recommend as a general mapping technique. good for ttrpg setting time-saver if you don't like any of those free online tools?
i think it's cool that the creator came up with this very funny way of meeting their own map needs, but also lol.
I think if I had to give Making A Fantasy Map advice it would be, start with a basic childish diagram of the relative position of the major features you already know about, and then add things at a steadily smaller scale as relevant, and don't try to make a nice draft until you've worked out the gross spatial situation because you'll just distract yourself.
But this advice won't work for everyone either, it depends on your needs and your drafting process and so on and so forth.
35 notes
·
View notes
Text
Day 7: Designing Our Committees and Roles
How do you build something that feels like a family, functions like a movement, and sustains itself long-term?
That question guided us through one of the most complex and tender parts of EFC’s rebirth: deciding who we needed to become and how we’d work together.
At the core was a lesson we had already lived. From Better Future Program (BFP), we knew what worked: our grassroots spirit, our horizontality, our commitment to self-liberation. And we knew what didn’t: the exhaustion, the imbalance, the way labor always seemed to fall hardest on the most marginalized.
We didn’t want to lose the community we’d built. But we couldn’t replicate the structures that left us burnt out and unsupported. One of the biggest reasons burnout became so widespread in BFP was because roles were stretched too thin—people were juggling too many tasks across too many areas. So one of our core commitments this time around was to design clearly defined roles, each focused on a specific area of care or contribution. No one person should be holding it all.
To begin that process, we mapped out the responsibilities we needed to carry forward, identifying what roles would help us do this work well, and reflecting on what titles could honor our values—not just descriptively, but poetically. What names would reflect the love we pour into this work? What roles could help hold the collective without overburdening any one person?
That’s how our committee structure was reborn. Through conversation, memory, feedback, and iteration. Through rooting ourselves in language, legacy, and the lessons we carried forward—not just about what didn’t work, but what we needed to feel whole. We didn’t just want job titles—we wanted names that spoke to how we embody our guiding principles.
The Stewards became our executive committee—a name chosen for its connotation of reciprocity, guardianship, and caregiving across time. As one of our youth reminded us, stewardship isn’t just about the present—it’s about the past and the future, about land and memory, about archiving and accountability.
The Conservators felt right for our volunteer relations committee—those responsible for easing your journey as a volunteer with us, and for holding this collective with care. Their name evokes preservation and healing, guardianship and tenderness.
The Storytellers became our communications committee, because storytelling is world-building. It is how we remember and imagine, educate and inspire. Our visions curator, post writers, graphic designers, and community engagement coordinators live here.
The Gardeners tend to our Liberation Library and its numerous branches. We loved the imagery of foragers, seed sowers, topiarists, and composters. A living system. Knowledge that breathes.
The Bookkeepers handle our finances and fundraising. Mutual aid, resource redistribution, transparency—they track the flow of how we give and receive.
The Cultivators carry our teachings and programming. Curriculum creators. Workshop facilitators. Newsletter editors. Zine designers. They are the soil in which your learning takes root—where your questions are honored, your curiosity is nourished, and your voice is welcomed.
The Caregivers form our peer support committee—those trained in transformative justice and ready to offer you care, comfort, and guidance when tensions arise or grief surfaces.
The Webweavers maintain our digital presence—designing for accessibility, privacy, and ease. They make sure our online home is as thoughtful and navigable as our in-person ones—so your journey through our resources is intuitive, accessible, and welcoming at every turn. In a world where digital tools are too often designed without our communities in mind, the Webweavers create with equity and care at the center.
We could have chosen simpler names. But that wasn’t the point. Every name holds intention. Every title is a kind of story.
This structure is alive. It will shift. It will grow. But for now, it is the scaffolding that allows our vision to stand.
Not hierarchy, but relationship. Not rigidity, but rootedness.
Not just labor, but liberation.
— Reaux (she/they), Founding Executive Director
#reaux speaks#embodied futures collective#rebranding#nonprofit#grassroots#organizing#education#library#books#youth#activism#resistance#volunteer#volunteering#jobs#careers
11 notes
·
View notes
Text
Effective note-taking while learning an online course
Taking effective notes is more than just jotting down what you hear in a lecture or read in a book: it's a strategic process that enhances your understanding and retention. Whether you're a student, professional, or lifelong learner, mastering the art of note-taking can elevate your ability to learn and apply new concepts.
Understand how you think to adapt your note-taking style
Verbal thinkers:
Process information through words and language.
Excel with text-heavy, sequential note-taking styles.
Visual thinkers:
Object visualizers: Think in detailed images, excel in hands-on fields like art or engineering.
Spatial visualizers: Think in patterns and abstractions, thrive in areas like physics or architecture.
Mixed thinkers:
Combine both styles to adapt based on the situation.
1) Understand the purpose of notes
Before diving into techniques, it's essential to know why you take notes. Effective notes serve three main purposes:
Capture key ideas: Focus on main concepts, not every word.
Aid recall: Notes should act as memory triggers.
Support active learning: Writing notes forces your brain to process information.
2) Prepare before the course
Preview material: Skim the syllabus, course outline or key readings to anticipate important themes.
Gather supplies: Notebook, pens, digital tools (laptops, apps like Google doc, Notion, OneNote, or Evernote).
Verbal thinkers: Use lined notebooks or text-based apps like Word or Google Docs.
Visual thinkers: Use blank notebooks, mind-mapping tools or apps like Milanote.
Mixed thinkers: Use a combination of both formats to capture ideas flexibly.
Set goals: Know what you want to achieve from the course.
3) Choose a note-taking method
a) Linear notes (basic listing)
Write down points in sequential order.
Best for: Simple lectures or storytelling. Best used by: Mixed thinkers
b) Cornell Method
Divide your page into:
Main section: Notes during the lecture.
Cue section: Keywords/questions later.
Summary section: Key takeaways at the bottom.
Best for: Structured review. Best used by: Verbal thinkers
c) Mind maps
Create a visual map with the main topic in the center and branches for subtopics.
Best for: Complex concepts or brainstorming. Best used by: Visual thinkers
d) Outline method
Use bullet points with indentation for hierarchy.
Main Topic
Subtopic
Details
Best for: Well-structured content. Best used by: Verbal thinkers
e) Flow notes
Combine visuals, arrows and text to show connections.
Best for: Dynamic, fast-paced lectures. Best used by: Visual thinkers
4) During the lecture
Listen actively:
Focus on understanding, not transcribing verbatim.
Identify cues:
Look for emphasis (repeated ideas, instructor tone, slides).
Use abbreviations:
Shorten common words (e.g., “w/” for with, “b/c” for because).
Organize on the fly:
Use headings, subheadings and bullet points to keep things structured.
Verbal thinkers: Group ideas under headings or bullet points.
Visual thinkers: Sketch concepts or relationships between topics.
5) After the lecture
Review notes:
Fill in gaps, clarify confusing points and ensure everything makes sense.
Summarize:
Write a brief overview of what you learned.
For verbal thinkers:
Write summaries in your own words to reinforce understanding.
Use mnemonics or word-based memory aids for recall.
For visual thinkers:
Recreate diagrams or visual models from memory.
Annotate your notes with additional visuals to deepen understanding.
For mixed thinkers:
Pair visual summaries (like flowcharts) with verbal descriptions.
Practice explaining concepts both visually and verbally.
Test yourself:
Turn your notes into questions and quiz yourself for better retention.
6) Use digital tools for efficiency
Google docs/Word: Collaborative and easily accessible.
Notion/OneNote: Organize notes by topic with multimedia support.
Audio recorders: Complement notes for revisiting missed points.
7) Tips for retention
Revisit regularly: Spaced repetition improves memory (Ankis cards).
Condense notes: Create cheat sheets for quick revision.
Teach someone else: Explaining the material reinforces your understanding.
Review often: Reinforce your learning by revisiting and reorganizing your notes.
8) Stay organized
Label notes: Course name, date, topic.
Keep sections clear: Separate topics/modules with dividers or digital tags.
Backup notes: Use cloud storage for digital notes.
9) Adapt your style
Not every method works for everyone. Experiment with different approaches to find what resonates with your learning style. You may prefer digital tools, visual techniques like mind maps or traditional handwritten notes.
Bonus : Make note-taking fun!
Learning doesn’t have to feel like a chore. Add creativity to your process:
Gamify learning:
Create quizzes with tools like Kahoot or Quizlet.
Challenge yourself with timed note summaries.
Go visual:
Use colorful infographics or mind maps to highlight connections.
Turn complex ideas into visual stories.
Role-play and scenarios:
Pretend to be an expert and explain your notes to an imaginary audience.
Apply concepts to real-life situations to deepen your understanding.
Mix it up:
Use flashcards for quick reviews.
Watch videos or listen to podcasts on your topic to reinforce learning.
Collaborate:
Discuss your notes with peers or teach someone else for better retention.
Establish a routine:
Dedicate 20–30 minutes daily to review notes.
End each session with a mini-quiz or creative recap.

Bonus : Mastering layout and formatting for effective Notes
A) General layout principles
Start with a clean slate
Use consistent margins for a neat look.
Leave ample white space between sections to avoid visual clutter.
Margins create a visual boundary that organizes content, helping your brain process the information in chunks.
Leave at least one blank line (or 1.5 spacing in digital notes) between different topics or ideas.
They provide room to add comments, symbols or questions during reviews without cluttering the main content.
Number your pages to keep notes in order.
Add descriptive titles for easy navigation.
Include date, course title or lecture topic in the header.
Prioritize legibility
Choose readable fonts if typing (e.g., Arial, Calibri).
Write neatly if using pen and paper.
Use headings and subheadings
Bold or underline main headings.
Use numbered or bullet-point subheadings for organization.
Color coding for clarity
Assign colors to categories (e.g., red for key terms, blue for examples).
Avoid overusing colors: stick to 2–3 for consistency.
Use bold or underlined text for essential ideas.
Highlight terms, dates or definitions for easy scanning.
Handwritten: Invest in multi-colored pens or highlighters for emphasis
Digital: Use formatting tools like bold, italics, and bullet lists.
Visual coding for enhancing the important part
Add icons, images or colors to make connections intuitive.
Insert tables, diagrams, or charts to organize data visually
8 notes
·
View notes
Text


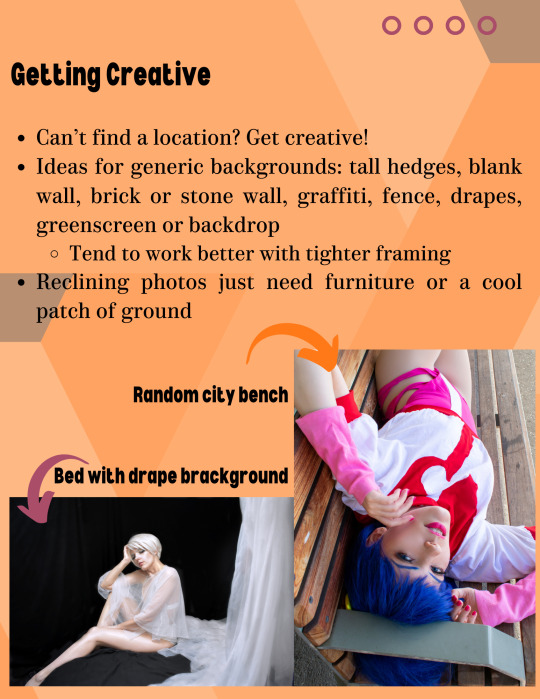
📸Want to do cosplay photoshoots but don't know how to find that perfect place to shoot? This tutorial covers how to brainstorm a location for your shoot, logistical and cost concerns with shoot locations, and how to actually find your dream location.
📸This tutorial can be applied to shoots of all types, including but not limited to self shoots, shoots with friends, and shoots with hired photographers. Self shooting or shooting with friends only requires a camera (a phone works!) and possibly a tripod.
Part 2: Finding Locations
Now that you have a shoot concept in mind, it's time to find the location itself. If you don't already have a location in mind, you will need to do some searching to find one.
The Detective Work
Whether you have a type of location in mind or not, you can poke around online to find the ideal place. If you have a type of location in mind, Google Maps or similar can help you find locations if you search for your location type, such as "beach." If you don't have a location type in mind, you can look around at websites like Atlas Obscura or at your local parks district websites. If looking to rent a location or use an indoor location, Peerspace is a site where you can rent photography studios and event spaces, often with equipment of their own for you to borrow, and you can usually shoot in hotel rooms or Airbnbs if that suits your character. If you are out of ideas, look around at what other people in your area use. Other cosplayers are a great resource, but I also recommend looking for engagement photos or graduation photos in your area for ideas on where non-cosplay photographers shoot. Finally, there's a tool called Cos-Map that contains user-submitted locations and detailed discovery tools; it doesn't have a lot of use yet because it is still in beta, so if you have locations to submit, please do so and help other cosplayers!
Cos-Map link: https://experience.arcgis.com/experience/556b7aba7e984c94b7054c405d640635/
Brainstorming
When brainstorming your location types, think of all aspects of the character, series, and your shoot goals and try to match these aspects to real-life locations. I've also worked backwards a few times and chosen one character over another on my list of possible cosplays because I had a shoot location already in mind! Knowing who the character is, what genre of series and shoot you want, and where the series takes place can help you to find somewhere that your character looks good in.
I also have here a list of location types that you may find helpful, and hopefully it includes types of locations you hadn't thought of. This isn't exhaustive, and not all these location types exist in all areas, but this is to give you a jumping off point for thinking of your cosplay shoot locations. Locations like studio shoots, a beach, or a forest may seem obvious, but also look at places like local tourist attractions, areas with graffiti on the walls, and keep an eye out for any selfie museums in your area or touring pop-up museums for unique cosplay shoot locations.
As always, check the rules of anywhere you shoot, and be sure to get permission to shoot there. Part 4 covers this process in more depth.
Getting Creative
If you really can't find a location that suits your character, get creative! You can do anything from a printed backdrop or solid color drape shoot in your own home to a shoot against a cool-looking wall. Often, tighter framing works best with this type of shoot, as you only want to showcase the area directly around you and not the full area that may not be suitable. A wall or some hedges work well for medium shot distance portraits, and some ground or a piece of furniture work well for reclining shots. You may only be able to get a few photos with this type of background, depending on what the background and cosplay are, but if you want to show off a costume now and get a different type of photoshoot later, you can.
Links to other parts: 1 Location Types, 2 Discovering Locations, 3 Indoor vs Outdoor Locations, 4 Location Permissions, 5 Location Logistics
#cosplay photography#cosplay tutorial#cosplay help#cosplay tips#cosplay advice#cosplay#helpful things
22 notes
·
View notes
Note
sorry if this was has been asked b4 but how did you do your Raika Hojo pixels/blinkies? I wanna learn how to do ‘em :D

og post: https://www.tumblr.com/chichirid/767910269177528320/raika-hojo-pixels-and-blinkies-20x20-and-30x30
this is a tutorial on photopea, and its kind of vague so feel free to lmk if you need specific steps rather than a general process / if you dont understand anything :3
hiii so for the blinkies i used this dotted border, and this rectangle border i made (dont credit me, i traced it from blinkie cafe 😳)


i forgot which font i used.. sorry!! but i found a sampler online and typed "special for princess" and "raika hojo" then screenshotted it like the image below. then i removed the bg and was only left with the black text. then in photopea i selected the pixels of the layer so it only selected the text, and then i very carefully traced over the letters using the brush tool. (btw i colour-picked the colours from their logo image). i used the screen layer setting & a stroke setting of one pixel.
i just used a cursive font and tried to imitate a ribbon myself through colouring ><


for the raika pngs i screenshotted some sprites then copied them in. idk how to use symmetry so i placed one png at one side of the blinkie, and found what X coordinate it was at. (ie 205px) and then subtracted that from my blinkie template's total X width (730px). then manually typed the X coordinate of the other png based off that formula (so to get a png symmetrical to an image at 205px, the X coordinate of the png would be 730 - 205px.)
for the flashing dots i made two frames:


then i combined these in ezgif "gif maker". the lower the delay time the faster the gif will go.
to make these two frames i used that earlier dotted border. essentially i used a gradient map on the dotted border's layer where the black was the red colour used and then the white. (like this image below as an example, both colours are set at 50% and 50% to get an even split). this makes one frame. to get the other i just clicked "reverse gradient".

to make the pixels, i saved some raika pngs using the enstars wiki, and then opened a new canvas in photopea with the dimensions of 30x30. (30 width, 30 height). then i opened the pngs and sized them how i wanted. important for this step: CLICK ENTER ON YOUR KEYBOARD ONCE FINISHED SIZING! this will make the pngs go blurry rather than pixelated, which will result in a more legible image when viewed from far away. its really up to you but i like making my images blurry. example:

on the left i havent hit enter on my keyboard, on the right i have. save this basic png without the background layer
then just "ctrl + alt + t" again and either tilt the image, size it up, or use the arrow keys to move it sideways or up. save this moved image and once again i used ezgif gif maker to combine the two frames and make a pixel. oh also click "dont stack frames" when making the gif. here i moved the basic image 7 degrees to the left and used a delay of 30. hope this helped ^_^


6 notes
·
View notes