#sims 3 cc tutorials
Explore tagged Tumblr posts
Visit Tumblr Blog
Explore Tumblr blogs with no restrictions, modern design and the best experience.
Last Seen Tumblr Blogs


Fun Fact
Tumblr.com is the 103rd most visited website in the world.
Text
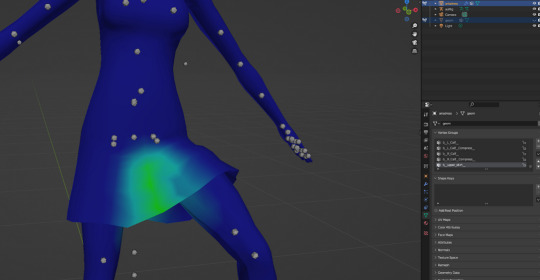
Fixing bad normals along seams in blender

I struggled. Is it the shoes? The skirt's legs? Lets fix the shoes... Ok it is the legs, shoes are fine with other stuff! Lets redo the legs... Nope didn't work. New WRK project? Nope. Redoing the MTK process ... Nope.
Let's just say i ended up with 3 wrk projects, 8 wso's, and a scrambled brain.
I ended up asking @justmiha97, who had a solution - a while ago he used it and might not work, but it did! So I wrote it down for myself and others.
Tutorial here
You need:
- Obj files/meshes of top/feet/bottom/head (depending on your cc) with all morphs, these should be thoroughly checked to have good normals and preferable unscathed fresh from EA, as they are what the seams of your item have to align with. I used the EA feet (Geom and morphs exported from TSRW) and my edit of JVSmith's torso (for its preg morph) for this skirt.
- Smugtomato geom tools
- Any version of blender that has the data transfer modifier & that works with geom tools (I use 3.6)
101 notes
·
View notes
Text

It's BIG.
It's BLUE.
It's UPDATED.
Hiya Simblr, it has been a while. I have a big update today- it's one of my oldest guides on MTS, but new and blue! The changelog is in the MTS comments- but the short and sweet is that two years of learning Blender has been squeezed in there for your convenience, complete with graphics and GIF examples.
ModTheSims tutorial Google Docs tutorial Blender Templates

#on a mission to become a human tutorial hub#i follow predominantly ts2 blogs and feel like an infiltrator posting about simcethri#simblr#ts3#the sims 3#ts3 cc#ts3 tutorial#ts3 blender
195 notes
·
View notes
Text
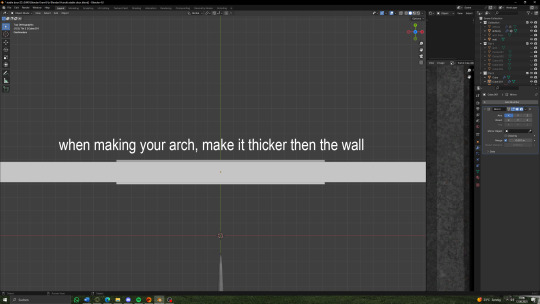
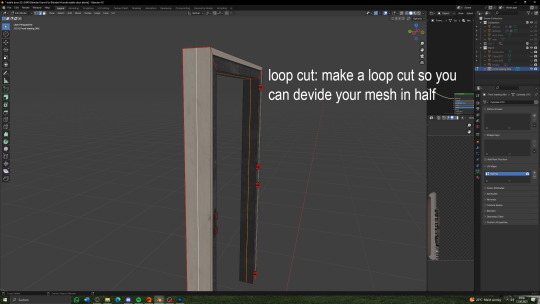
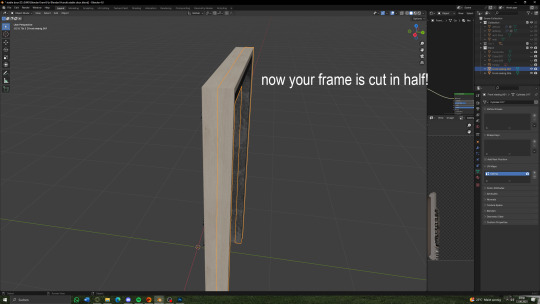
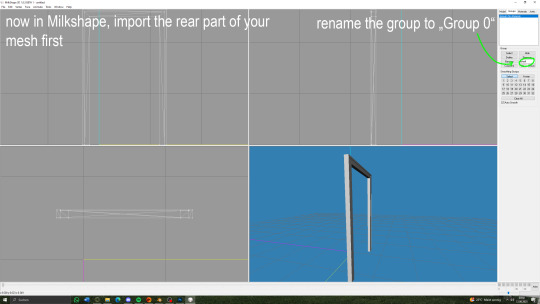
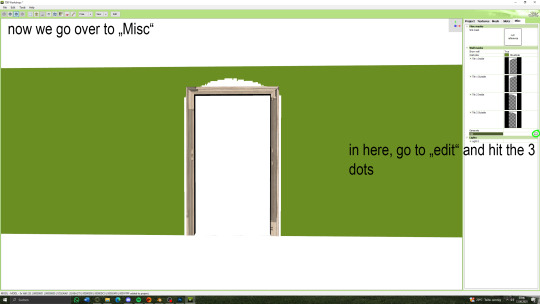
I am here to bless you all with a sims 3 cc tutorial! If you know me from discord, you'd know that I am a CC creator for the equestrian side of sims! Since there are only a hand full of tutorials for creating CC (and most of them are pretty old) I put together some for you! A while back I made a few on different things! Drop by at my website to have a look <3 There are tutorials on how to set up your game to play with horses (RPG) as well as tutorials for making CC objects (both in the older version of blender and for the newer). There are a few more so maybe have a look (they concetrate on the equestrian side of sims). On my webside you can also find my older CC!! Since there was some major cc theft I have decided to publish my cc on discord only, sorry! But maybe I'll be back publishing on my website <3 Okay, back to what I was going to show you-- I have put together on a tutorial for making arches! This should also work for windows, but you'll need to know how to make glass with that too! But, no worries, I will put together a tutorial for that too in the future! Now enjoy the tutorial but please kepp in mind that I am no professional in all of this and this just worked for me but it may not be the perfect way haha <3

you can export the mesh in TSRW under „mesh“ and then the box with the red arrow. Open it yia Milkshaepe and export as .obj in blender


(there will be a seperate tutorial for the glass!)

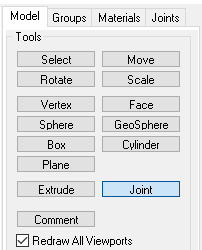
under "model" hit joint


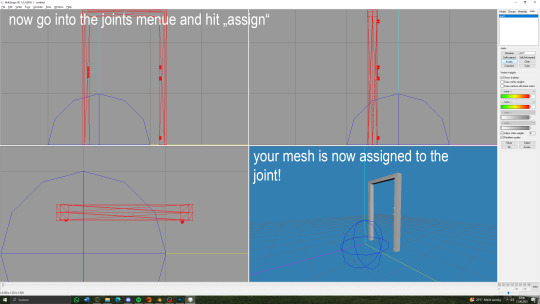
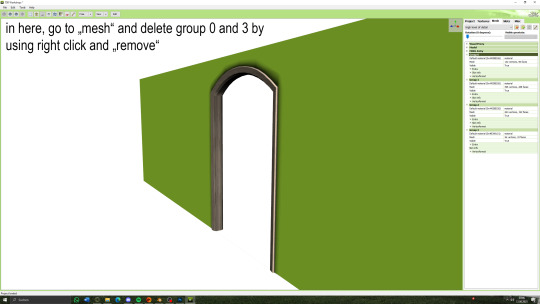
you can now export your mesh to .wso!


62 notes
·
View notes
Text
[tutorial] how to make computers functional in the sims 3 by sideshow_snob
Programs needed: TSRW [i use the old version] Blender 2.7 [you can use any version] Milkshape 1.8.4
You can download this tutorial as a .doc HERE
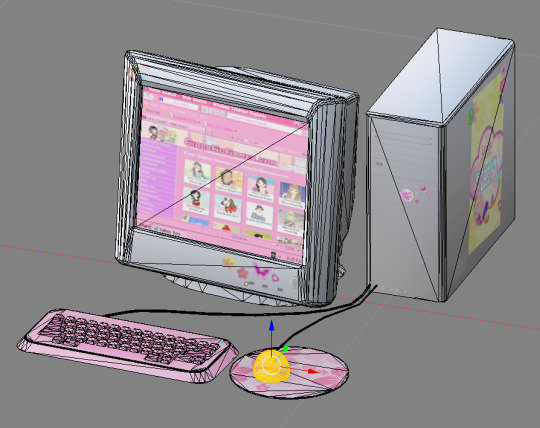
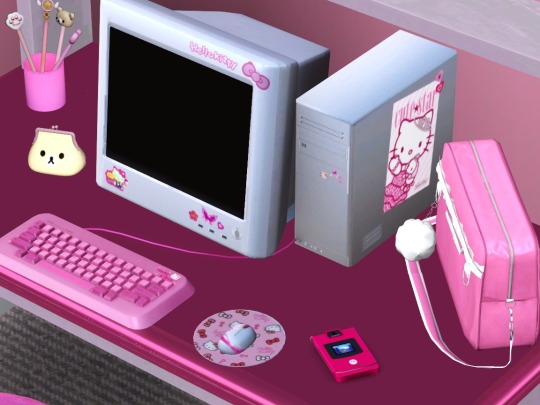
Original [right] TS3 version [left]

So, how do we start?
Seperate your computer of choice into pieces. [mouse, keyboard, monitor, monitor screen, mousepad if applicable, drop shadow if applicable]. This can be done by selecting faces and holding 'shift +' to select that entire piece. if shift + doesn't work you'll have to do it by hand. Once your desired piece is selected, press 'P' to separate.
Once you've seperated all your parts, go ahead an open TSRW and clone a similar PC. I chose this one
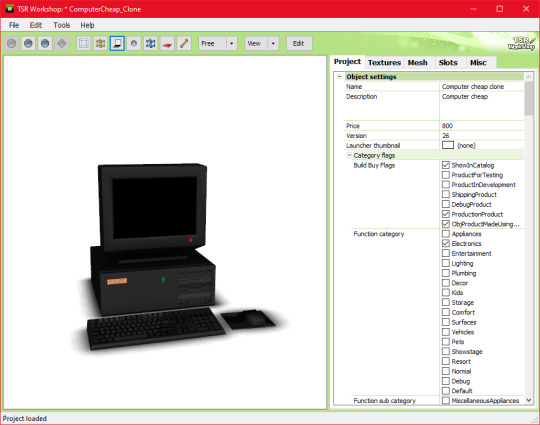
Go ahead and export the .wso AND .obj file for this computer in the mesh tab. I named my exports 'eapcref' we're going to be using this PC as a reference to modify our mesh, and assign bones in milkshape.
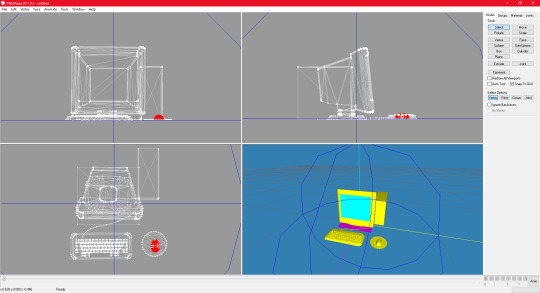
go ahead and import the .obj into blender, where your separated PC is.
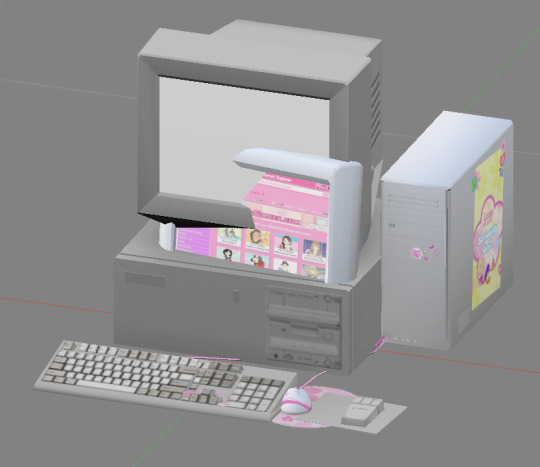
As you can see, these computers are pretty different. We're going to move each piece around until its in a similar size and position as the EA one, so the PC animates properly. Helpful shortcuts ---> G [grab] S [scale] R [Rotate]
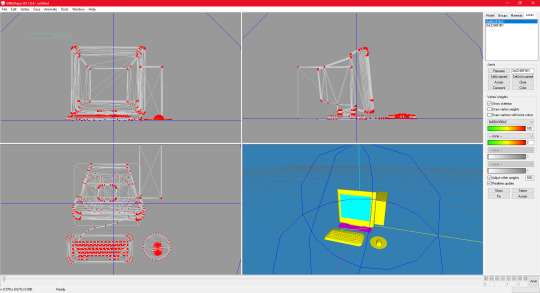
This is what mine looked like when I finished moving it around:

Keep in mind, i actually tested mine quite a few times in game because the animation was not lining up with the PC location, so this is what mine looks like after a few modifications. Make sure you save this .blend file so you can modify it if necessary after you assign the bones.
Now onto actually assigning the bones…
Open milkshape and import all your seperated PC files.
Your PC parts should be grouped like this:
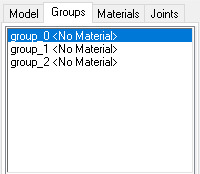
group_0: the monitor, mousepad [basically everything except the drop shadow, screen, and mouse] group_1: drop shadow group_2: screen
Now import your EA pc .wso file
Select the EA pc parts in the groups tab, then go to the joints tab and click 'show' Then go back to the groups tab, with the ea pc still selected, and select all your PC parts. Go back to the joints tab, and click 'assign'.
Now delete the EA PC.

the first bone is the mouse assignment, and the second bone is the rest of the computer.
go ahead and click 'selassigned' and clear the bone assignment since its incorrect.
To assign the bones, go to the model tab and click 'select' alt shift left click all the bones in your mouse
go back to the joints tab and click assign
now to assign the PC bones
Select everything except the mouse and drop shadow, then go back to the joints tab and click assign
you can check to see if your bones are properly assigned by clicking 'selassigned' on both bones
export as .wso and your finished!
something to note:
if your mousepad gets in the way while assigning bones, you can keep it seperate and just regroup it back into the mesh after assigning bones.
278 notes
·
View notes
Text
tips for 4t3 converters/CAS clothing creators
3 main things:
non-recolorable presets
DDS. settings
Adult to Teen conversions
disclaimer: i'm not a CC expert, but these are things i've noticed and learned these last couple months converting cc. special thanks to thornowl and the other converters in the TS3 Creators Cave discord.
Non-recolorable presets:
we obviously know that ts4 lacks a CASt tool, so ts4 creators rely on recolors. In my conversions, I do include a couple of the item's recolors. these usually are patterns that CASt does not have.
one thing I've noticed more and more converters doing is putting such item recolors in the 'Overlay' tab in TSRW.
let me show you what that looks like for a non-recolorable preset:
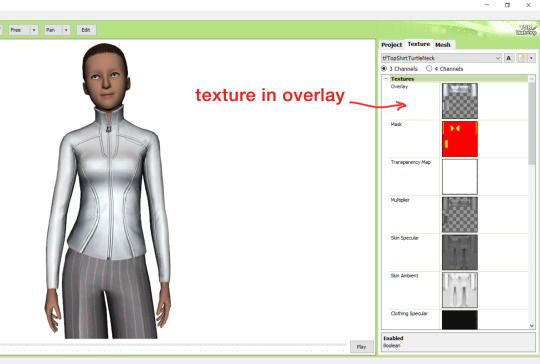
it looks over-saturated, and almost crunchy. but there's another place you can import the recolor into: stencils.
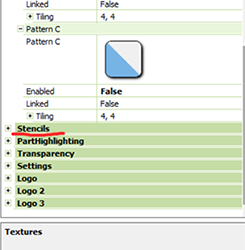
stencils will be found at the bottom, under patterns. hit the plus sign next to stencils to open it.
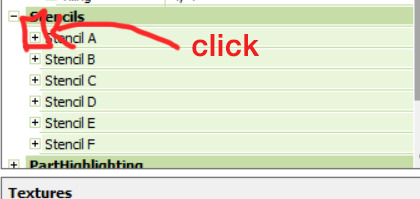
opening it will show you this:
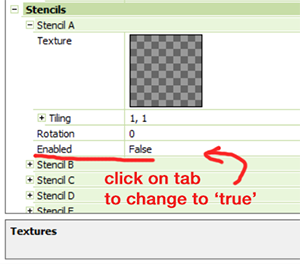
by default, it will be enabled as false. import your recolor into the texture tab as you would do for any other texture tab. make sure you tick the 'false' to 'true.' stencils override overlays, so if you want to use an overlay, enable stencils back to 'false.'
here's what the recolor imported into stencils looks like:

here's the two side by side:
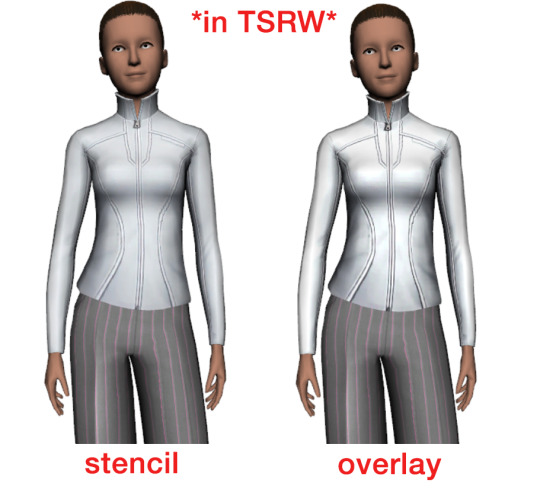
see how different they are? let's see how they are in game:
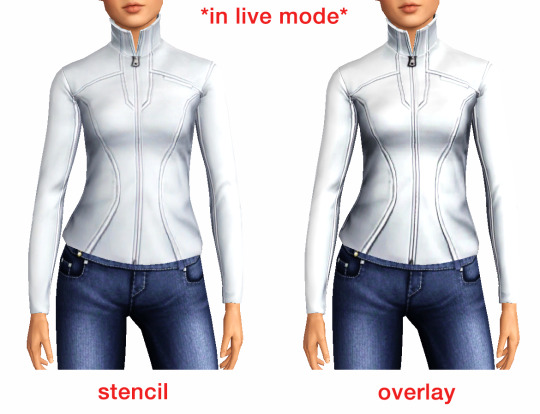
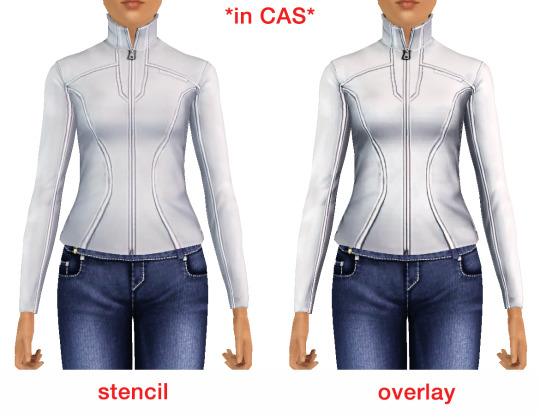
click on the pictures to really see the difference in quality. since TS3 uses DDS. format, it compresses the texture, which results in the crunchy texture. importing the recolor into the overlay tab makes the DDS. compression more noticeable. it ultimately is up to you and whichever one you prefer, but do keep it in mind.
the overlay tab is good for small details that you want to maintain on all recolorable presets, like zippers, buttons, tags, etc. just look at EA clothes for reference, especially their shoes and male clothes.
another thing you can see from the images are the bumps on the mesh. doing normal maps can help you keep those same details on the recolorable presets without importing the recolors.
-----------------
DDS. settings:
something I also see and used to do myself is bloat package files with large file sizes, specifically normal and specular maps, as well as masks. the Sims 3 Tutorial Hub provides a link to plain maps, but the file sizes are unnecessarily big.
let's look at some of EA's maps in TSRW:
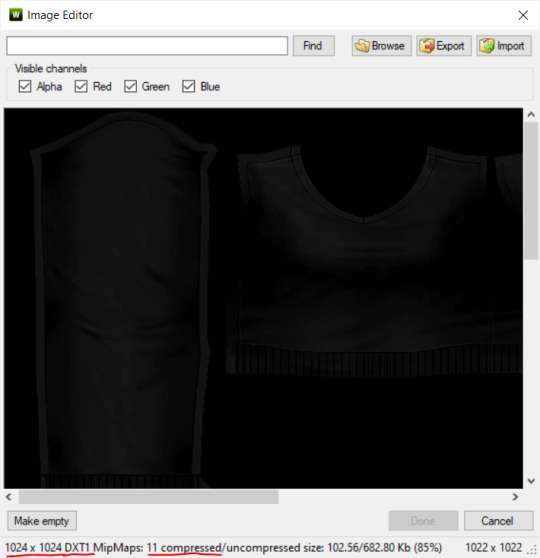
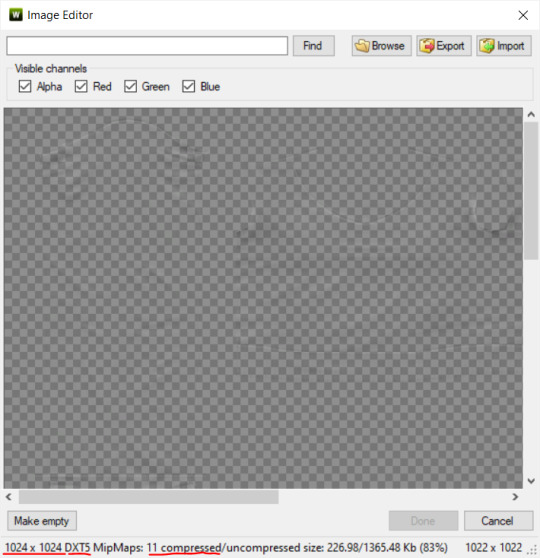
here's the specular from one of the basegame sweaters. notice the image size, DXT format, and compression size.
a lot of converters don't want the shine on regular clothes, so we use a plain, black specular map. but ask yourself, why do you need a 1024 x 1024 purely black specular map with no details?
let's try sizing it down:
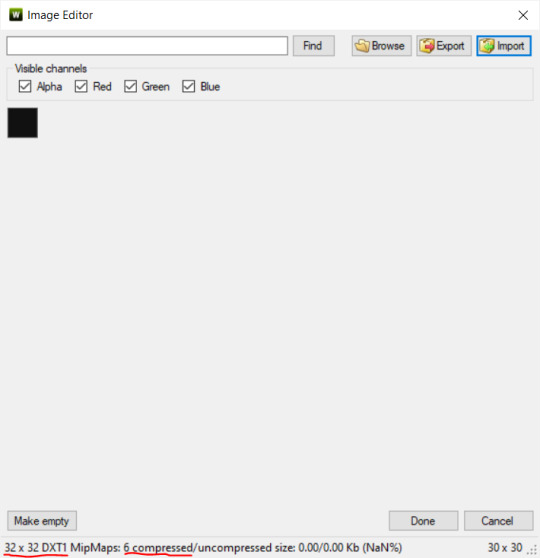
notice the difference between the image and compression size. instead of bloating the package file, we can keep it down by using a 32x32 plain black specular map instead, since there aren't details we want from the specular map.
same goes for normal maps:
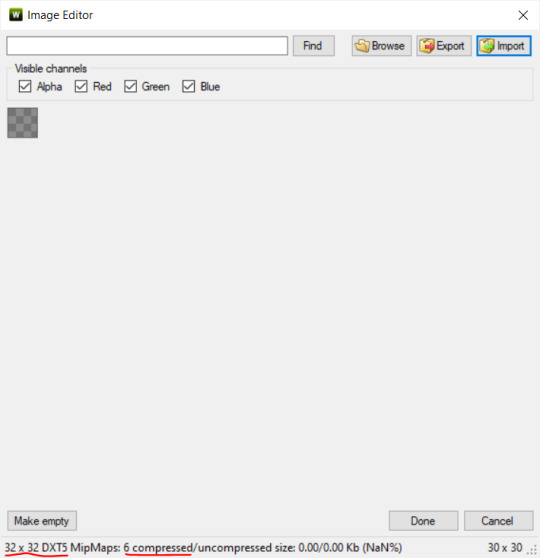
and masks (meant for 1 channel only):

now, notice how I underlined the info about DXT MipMaps. see how the normal map has a different number there compared to the specular map and mask.
the reason these textures use different DXT is because of the colors and alpha channel.
here's how my DDS. settings appear when saving:
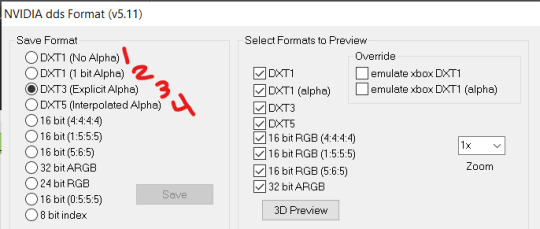
DXT1 (no alpha): this keeps only the 3 color channels and has the strongest compression. it results in half the file size as DXT3/5. 3 channel masks should be saved with this, as they don't need an alpha channel.
DXT1 (1 bit alpha): this includes an alpha, but only black or white. it also results in half the file size as DXT3/5.
DXT3: this one is rarely used for TS3 textures. it really is only used for overlays. it compresses the same as DXT5, but may not be the best for images with smooth-blended alpha regions (Neely).
DXT5: multipliers and normal (bump) maps should only EVER be saved with this. it's best for colors but has a larger file size. this is why it's important to reduce the multiplier and normal map image size, especially if you don't make a normal map.
if you DO decide to do a specular and normal map, they should be regular image size, 1024x1024, and saved in the right format.
here is more information on which textures should use which compression.
-----------------
Adult to Teen Conversions:
the default for converters is obviously AF and AM. a lot of people want the items for teens too. I've seen several converters just enable it in TSRW:
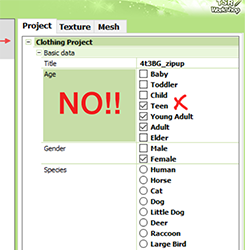
please don't do this. it's honestly the lazy route. you can hardly ever get away this, specifically because of the body differences between adult and teen.
some major issues with this include gaps, seams, and unnatural body characteristics:
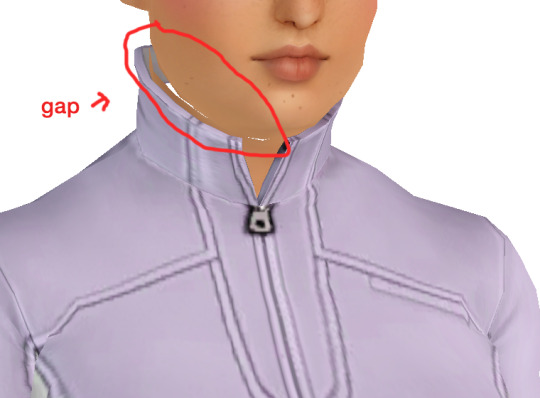
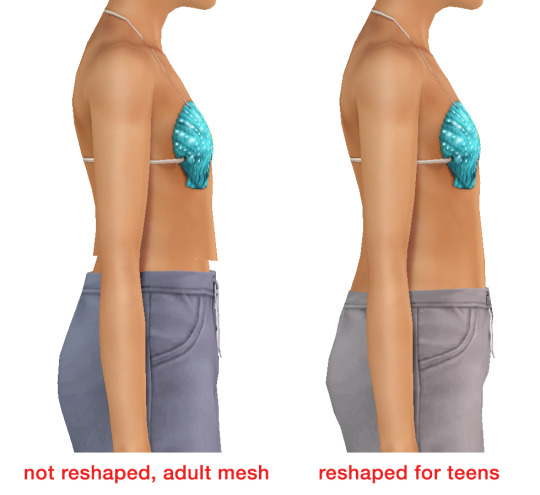
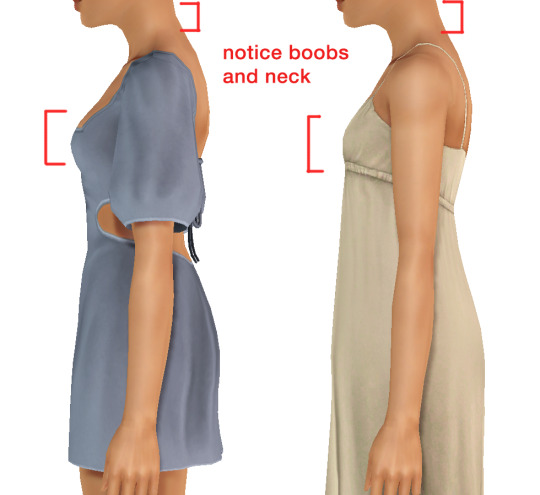
so please, either skip the teen mesh entirely or spend the time reshaping the mesh. @/sweetdevil-sims has a great tutorial on converting meshes from AF to TF here. the inevitable seams on TF meshes are also now fixed, thanks to @/thornowl with their new version of mesh toolkit.
@pis3update
---------------
here are reduced file sizes and corrected settings of the plain mask, specular, and normal:
download
Sources:
Neely, G. ‘Buckaroo’. Working with DDS/DXT Files. Available at: https://www.buckarooshangar.com/flightgear/tut_dds.html (Accessed: 28 May 2024).
202 notes
·
View notes
Text
How to Add 3D Models to TS3
Required Applications:
Blender - https://www.blender.org/
TSRW - https://www.thesimsresource.com/workshop/
Milkshape & Plugins - https://sims3tutorialhub.tumblr.com/resources
NVIDIA Texture Tools, Photopea, or GIMP (or anything else that allows you to save an image as a .dds file)
Recommended:
S3PE - https://www.simlogical.com/ContentUploadsRemote/uploads/189/ - Used to make = object base game compatible and available in CAW
Sims3Multi Pack Extractor - https://modthesims.info/d/364038/delphy-s-sims-3-pack-multi-extracter-updated-5th-sept-2009.html - Used to convert a sims3pack into a package file
This will also require showtime, since the object we will be cloning will be from that pack. I'm not sure if there's a base game object with a light/illumination map that we can use. If you don't want the windows of the building(s) to light up or anything lighting up on whatever object you are adding then you can try and find a base game object to clone.
Step 1: Export .obj file from Blender
Step 2: Import .obj into Milkshape
Step 3: Rename object in Milkshape to group_0, then export file as .wso (in order to export it as a .wso, you need to have the TSRW plugins for Milkshape installed)
Step 4: Open TSRW - Create New Project - Choose Object
Step 5: Under The Sims 3 choose Uncategorized Objects under Object by Category. In the search bar, type in 'hill' and choose the 'Sign City Hill' object. Name your project (make sure to rename both project name and title)
Step 6: First, choose where you want your object to show in the catalog. I just choose decor (function category) and miscellaneous decor (function sub category). Go to the mesh tab and using the button of the box with the green arrow, import your .wso file. For the first pop-up click yes. For the second, click no.
Step 7: Under Group 0, click on the three dots beside 'material'. This is where you will import your textures. Before doing so, you must make sure the images are in .dds format. Simply add your image into any application that supports importing/exporting .dds files. I personally save with BC3/DXT5 compression and don't keep mipmaps. Some say to save the mipmaps, but because I use 2K textures it adds a lot more to the file to save them so I don't. Once you've got them in the correct format, import them into the object's materials. For the detail map I simply import a small blank white texture. The diffuse is the main color texture, the multiply map is the ambient occlusion map (if you do not have it, I'm pretty sure you can just add a blank white texture too), and the self illumination map is what allows part of the mesh to light up. If you do not want anything to light up you can just add a plain black texture. Click done and exit out once all textures are replaced.
Step 8: Click the drop down that reads 'high level of detail' and choose the shadow lod. Click on the blue arrows beside the import icon. A pop-up will show; check the box under medium detail and click ok. You will see that once you've done that, the object's shadow will change.
Step 9: Click file - save as and save .wrk file (just in case).
Step 10: Export to Sims3Pack
Extra - Make Object Base Game Compatible
1. Convert .sims3pack to .package using Sims3Multi Pack Extractor
2. Open S3PE and open package file you want to edit
3. Find OBJD tag and double click on it
4. Change group number to 0 and click ok.
5. Save package
Extra 2 - Make object appear in CAW
1. Open S3PE and open package file you want to edit
2. Find OBJD tag and highlight it by clicking on it once
3. At the very bottom of the window, click on 'Grid'
4. Click the arrow beside 'CommonBlock' to open the tab
5. Beside the version, change the C to E and click commit
6. Reopen the 'Grid' and go back into the 'CommonBlock' tab. If you scroll down, you will now see 'IsVisibleInWorldBuilder', change it from false to true.
7. Scroll down until you find 'BuildCategoryFlags'. Replace the number with 0x00008000.
8. Click commit and save the file.
Let me know if you have any questions! TSRW is very finicky and sometimes things can go wrong. There are some things that I may not know how to fix, but I will try my best to help.
41 notes
·
View notes
Note
Hi hey gurl! I've been trying to understand something... when it comes to performance, is it vertices or polycount that really matters? I’m trying to get a clearer picture of how they affect gameplay. Hope this isn’t too random tho 😂
Hey nonny, thanks for the great question! I'm not sure if you are looking for a non-creator answer or if you maybe have some experience with meshing, but I try to cover some technical aspects that hopefully will make you understand vertices and polygons better! It's a bit of a longer journey, so grab some snacks and settle in!
Disclaimer: This is my opinion and the definitions are how I came to understand them. I believe what I say to be correct, but I am also human and may have misunderstood something, and making mistakes can happen. Thanks for understanding! TL;DR There will be calculations made on every vertex and every face present in a mesh. So the more you have of either, the worse it is for performance, but if the vertex count is much higher than the poly count, the mesh is especially unoptimized and may impact performance more than it would in an optimized state. Vertex and polygons are actually connected, literally. To understand, we need to start with the basics.
Vertices are points in a 3d space that provide the foundations of a grid-like 3d structure, known as a mesh. Connected through lines known as edges, they form a 3d shape. Three edges form a triangle, or tri for short, also known as a face or polygon. These terms can be used interchangeably, but a tri always has three vertices, whereas faces and polygons can have more than three vertices.
A polygon with 4 vertices (known as a quad) is very commonly used in 3D-modelling, because it can be used to create very neat and well-structured meshes (it is easy to make grids using rectangular shapes). A mesh that is made in a grid-like way may have the same overall shape as one made out of triangles, but the flow of the edges is different, and this plays a role during animation. Having these grid-like lines is usually better for moving and animating characters and avoiding shading issues.

Most meshes for games are thus initially made with 4-sided polygons. These quads are usually further broken down into tris if they aren't already, and three is the least amount of vertices needed to form a coplanar surface.
When the quads of the left sphere are turned into triangles, the grid structure will remain intact:

We can further break down the elements of a polygon. Let's take a simple cube. It has 6 sides, or faces, and each face has 4 vertices that make up the corners. But if we count all the vertices, we will notice that each face shares vertices with other faces. So on a simple cube, we have 6 faces and 8 vertices.

Depending on how a mesh is made though, it may have a lot of edges. You can think of those like cuts in the mesh. If we wanted to cut up the cube, we would separate each face from each other. Now we still have the same number of faces (6), but the vertices are suddenly much higher, because now, every face has its own set of 4 vertices, meaning that we have a total of 24 vertices.

In video games, polygons are usually rendered as triangles. So for our cube, that would mean that every face would be diagonally cut in half, giving us a total number of 12 faces/polygons/tris.

If we take it to the next level and separate all of these triangles from each other, the vertex count would be 36! To recount, on a mesh that is not split, it's only 8. Having these cuts (or split edges, as they are commonly called) in strategic places in the mesh where vertices are split can be important for the final look of the mesh in the Sims games.
You may have already encountered some meshes that have dark spots or shading in some parts, often at the hems. That can happen if the mesh is not split correctly in these areas. It has to do with how the normals work (they are important to how light gets reflected off the mesh).
To not go too off-topic, I won't get into detail about that here.
Ideally, a mesh is only split where it needs to be so it will look right. If there are unnecessary cuts, then the vertex count (and with it, the polygon count) goes up when it doesn't really have to be. If a mesh has a lot of these areas where a lot of faces have their own vertices, then the vertex count is much higher than on a mesh with fewer split edges. This can be a sign that a mesh is not well-optimized. So if you see a mesh that has much more vertices than polys, you may want to question it in regards to performance. CC converters will probably know that Sims 4 meshes come with a lot of these cuts that are needed for Sims 4 because of the way the CC is made (for example, pants have such a split edge cut to allow boots to look tucked-in), but those are superfluous for TS3. So I encourage every Sims 3 CC creator to remove those to save on both vertices and polygons when they are converting! The thing is, in the game, the mesh will be processed and there will be calculations made on every vertex and every face present. Each vertex is indexed, and triangles need to be drawn from the information. Other processes will need to also use the vertices for their calculations. There is more going on during rendering than simply drawing the polygons. The shaders have to calculate their effects, the textures need to be rendered and applied accordingly, filtering such as anti-aliasing will be applied, etc. So the more geometry you have in a mesh, the worse it gets in terms of performance. More geometry means that the polygons are smaller and more numerous, which will in turn affect the vertex count too.
As CC creators, we cannot address all the factors that impact performance, as we can only influence a small part, but we can try to adhere to the game's standards to minimize the performance impact as best as we can. If we wish our meshes to be more detailed than what the game's standards are, then we impact the performance more.
Instead of just cranking up detail like crazy, it is good to see if we really need it. And ask questions such as how often will the player view the item closely? If the player is usually far away from the item or it is a very small item, making it super detailed will not really do much, since the item looks the same as a low-poly item from a certain distance. We can also make compromises and maybe make an item 50% more detailed instead of 200% more detailed, providing a more detailed item while minimizing the performance impact.
This is a bit off-topic, but since I'm here already, we may refrain from using a bigger texture for a very plain piece without any notable intricate detail (like a basic T-shirt, for example), since it already looks fine with a smaller texture, but it may pay off for a highly detailed texture which looks visibly better with a bigger texture, warranting the performance impact (like a lace blouse with an intricate pattern, stitching, and small buttons).
On that note, using the texture space efficiently can also do wonders to increase detail. Use all the real estate you have on that UV map (that is a 2d representation of your 3d mesh and used to apply the texture to the mesh). Have you tried upscaling the texture yet? Okay okay, I'll stop now and get...
Back on topic: The number of polygons also matters, not just the vertex count. When a mesh has lots of smaller polygons, a lot of them are necessary to form the entire mesh. Bigger polys will not provide as much fine details, but will have less impact on hardware because fewer calculations to be made. A good mesh uses only as much detail as needed while using as few polygons as possible to still maintain functionality.
Sims clothing meshes need to animate and move well, so they need to be able to flex at the joints, and the shape must also be able to change to accommodate body sizes, thus the mesh needs the minimum amount of geometry to achieve this and still look decent, which is a sweet spot the developers have to find to craft meshes that perform well while looking reasonably good.
A good habit for creators looking to make meshes for the Sims games is to look at similar meshes in the game and study them (so for TS3, check the original TS3 game meshes, for TS4, check the original TS4 game meshes). Check how many polys they use and how good the topology (structure) of the mesh is.
For example, how many rows of edges do they usually have, and what sizes are the polys usually? How many vertices are in one round of edge loops, for example for the arms? How are the different mesh parts connected to each other, where are split edges used? Then imitate that.
The professionals who made these original meshes knew what they were doing, and they optimized them to be gameplay-friendly, so if in doubt, copy what they do.
Game meshes are usually especially optimized and it is very much game-dependent how they are structured, so a mesh from a different game can look totally different. CC Creators looking to optimize performance in their meshes should try to match the original game's mesh in terms of structure and polycounts. This will also ensure they animate well!
If you made it this far: well done, thanks for bearing with me! I hope you feel more knowledgeable and ready to apply what you've learned to your own meshes or when selecting CC for your favorite Sims game.
#sims 3#reply#sims 4#sims meshing resource#ts3 meshing#sims polycounts#Sims CC creation#meshing theory#tutorial#ts3 tutorial#ts4 tutorial#my best tutorials are always based on asks#why do I always forget which tags I use for tutorials
35 notes
·
View notes
Text
Guide to making Autosoils
First you are going to need to download a copy of douglasveiga's Autosoil_test.package which you can find here.
Once you have that, the first step is to clone it. I followed this tutorial, which I find to be super easy and it creates STBL's so the autosoil can be translated if desired.
Now you have your new cloned package. The next thing you will need is the Ingredient Key from the Ingredient.xml from whichever mod you are making the autosoil for. I will use Echoweaver's Wheat as a demonstration, hopefully that's okay.
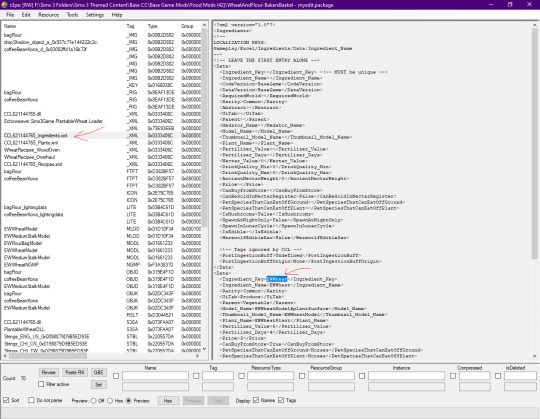
Open the cloned autosoil package and open the OBJD in Grid.
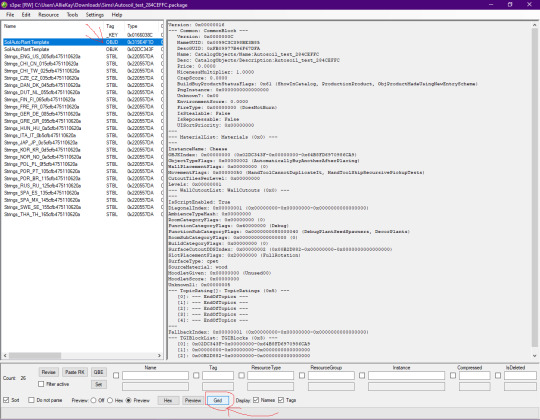
Replace the Instance Name (which should say Cheese currently) with the Ingredient Key name you copied. Next open the Common Block section.
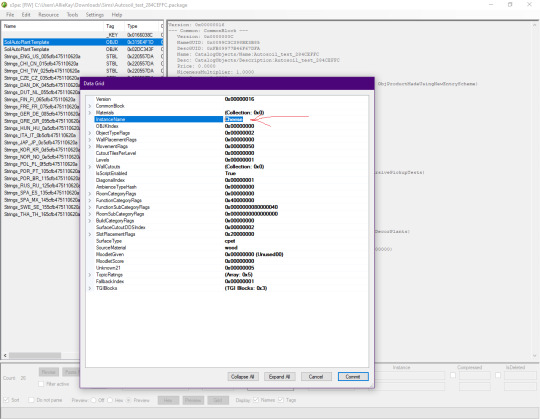
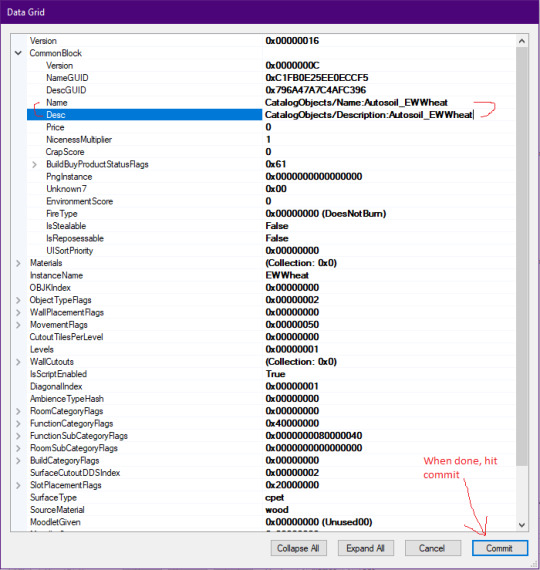
Here you can edit the Name and Description of the package. Press Commit when done.
Now, if you wish, you can also edit the STBLs. Personally, I only edit the English one. I decided here to follow the formatting of the other Autosoils in game. For the first line I enter "Auto Soil: Wheat" and the second line I put "EWWheat". But it's totally up to you how you name it. Save you package and change the name to whatever you want to call it. That's it.
22 notes
·
View notes
Text
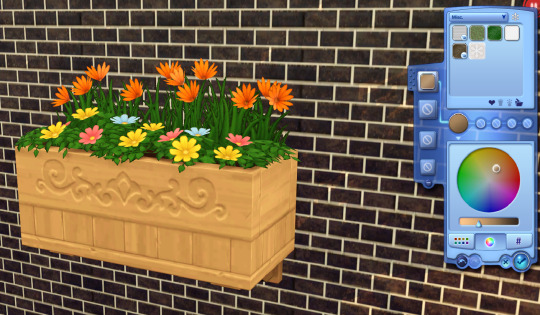
A small discovery about plant meshes I wanted to share..
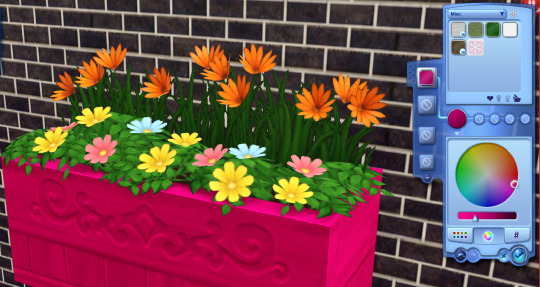
This is a converted plant from TS4 Cottage Living. Looks fine, right?
BUT. If you're fond of using bright or vibrant colors in recoloring objects, it will become like this:
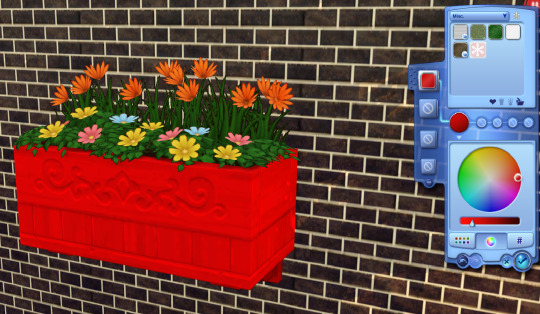
a closer look:
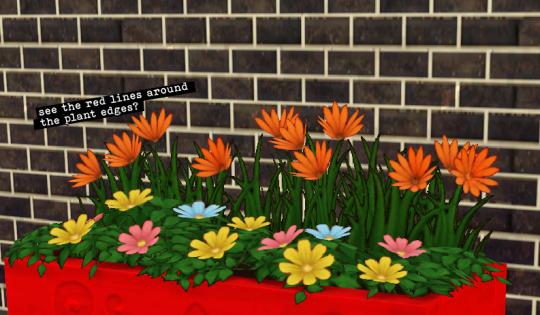
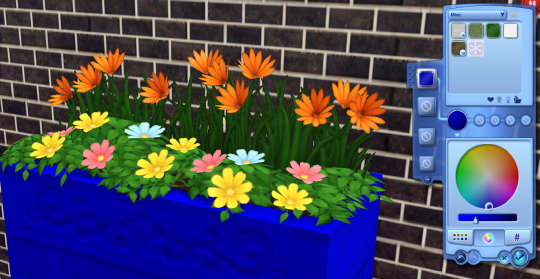
As you can see there's color bleeding around the plant edges, and it follows the object's color you set it up with (again, very obvious when you use bright colors).
This is a 1x1 wall object, just a small one so the effect doesn't look too obvious when zooming out. But once you work on bigger meshes it becomes a problem (well, at least aesthetically).
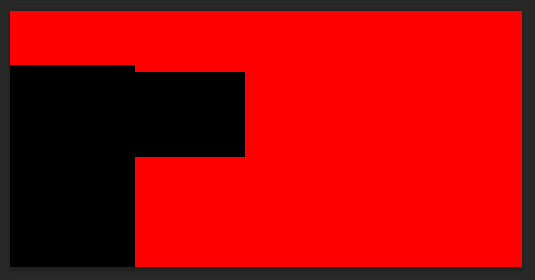
The culprit: a mask that covers every part of the mesh, including the part where the plant overlay is supposed to be. Example below (mask part set with lower opacity to show which areas are covered)
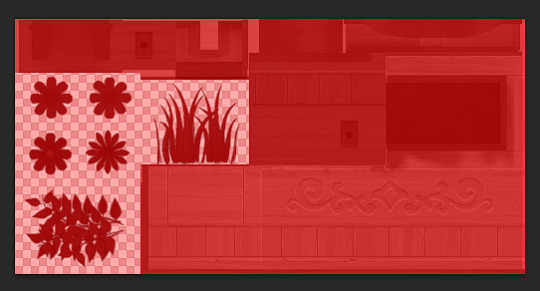
The workaround:
As said above, the problem is triggered by covering the plant overlay with the mask, so the solution is to avoid covering it (as in leave the plant overlay part transparent).


And also this only happens when you give the object a single recolorable channel (red only mask). When you enable the second (green) channel the color bleeding will magically disappeear.
And here's another waaaaay more sensible solution. As I brought this problem up at @ts3creatorscave Discord, @deniisu (thank you very much! 😊) advised: to cover the plant overlay area as black (0,0,0/#000000) so that it won't be touched by the color channels. (left: mask + multiplier with the mask at around 50% opacity, right: actual mask)

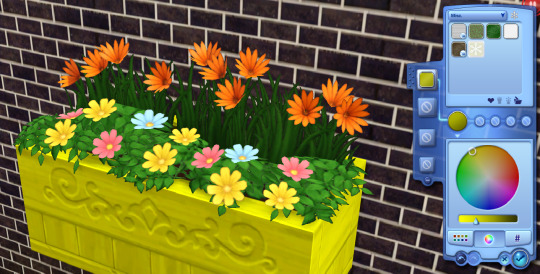
And as a result, you'll not have bleeding plant edges anymore, no matter how bright you recolor your object as you wanted.
92 notes
·
View notes
Text
#sims3#simblr#sims 3 screenshots#sims 3 cc#sims 3 gameplay#ts3#ts3 screenshots#ts3 simblr#sims 3 simblr#ts3 tutorial
8 notes
·
View notes
Text
TS3: How to remove white circle around the eyes of werewolf sim
I faced this issue and found only few pieces of information about it, so I decided to write a quick note about.
While playing my werewolf lady I noticed that her eyes have extra white circle around the iris. This effect wasn't reproduced for non-werewolf sims.
Also this effect didn't occur for default EA eyes, it appeared after I installed default replacement.
How it looked in game (left sim):

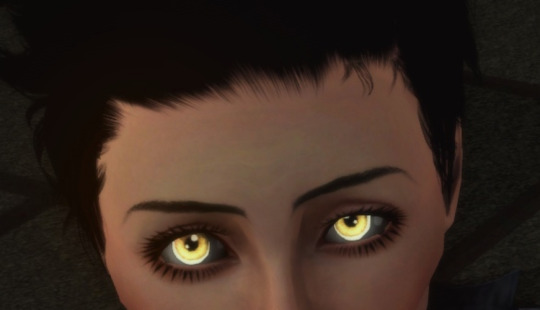
After poking Google I found some threads that stated that werewolves have a bit (~15%) bigger iris. That's why eye replacement doesn't cover their iris fully and additional white space is displayed for missing part.
So there are two ways to resolve it:
To install the eye replacements with bigger iris that could cover that white ring.
To install the eye mesh replacement to clear what's left of EA default eyes.
I didn't want the bigger iris, so I chose option 2. I installed Eyeball Replacement by aWT and it worked. The ring disappeared, my werewolves could make selfies again!
After installing the aWT Eyeball replacement:
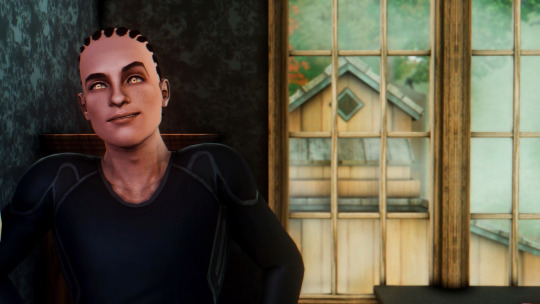

As one can notice, another eyes replacement (BrntWaffles Yumedust Eye Love Default Eyes v2, IIRC) is installed here, but it doesn't really matter. The solution should work no matter of what eye replacement is installed.
#sims 3#ts3#sims 3 mods#the sims 3#sims 3 techical#simblr#sims 3 cc#sims 3 gameplay#sims 3 guide#ts3 tutorial
93 notes
·
View notes
Text
4to3 Conversion workflow/tutorial
Hi!
So, I know I haven't done that many, start to finish 4to3 conversions yet. But I experiment and help other people a lot behind the scenes, and I soak up teachings from knowledgeable people such as @simlicious @justmiha97 @thornowl @virtual-hugs, a little bit of @elvgreen and more people like a sponge, and have learnt a lot the past months. So I thought I'd write down what I do when I was working on the Aria dress! While it's a bit chaotic, this essentially functions as a very thorough 4to3 tutorial.
The above document contains my workflow, from start to finish. I use blender 3.6 (unless mentioned otherwise) and no milkshape at all.
It is VERY thorough, long, and can be lowkey overwhelming. I hope my table of contents at the beginning is clear enough. All the links are clickable, so you can just go to where it interests you. If you wonder about it, it's most likely in there, can be extrapolated from the information or I can brainstorm and experiment a how-to(-fix) if needed.
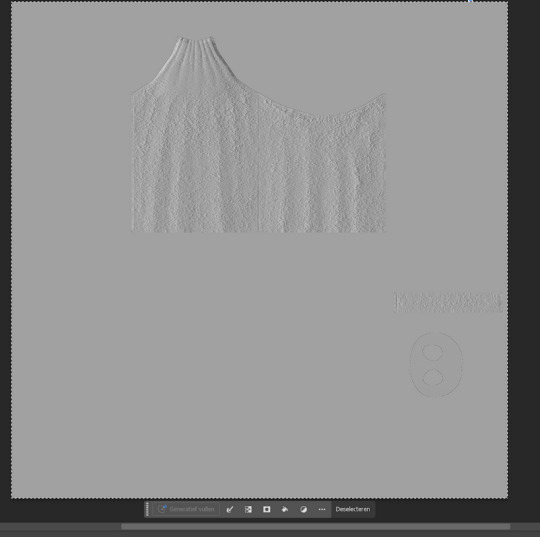
Some notes of what it includes:
Adapting the TS4 normal, specular and shadow maps to ts3
A clean finishing method to get EAXIS-like finishes that allows you to optimize the UV lay-out (nicer textures!) and further minimize clipping.
A quick texture making method to adapt the TS4 texture(s) to a brand new, potentially very different TS3 UV-layout. If you're lucky (it sometimes acts up) the actual texture-changing takes 5 seconds - puzzling the new UV lay-out beforehand would be the hardest part! (But it's also fun, puzzling!)
Very Precise bone assignment
Manually editing morphs, with some tricks for e.g. the fit morph...Why do fit morphs have such ugly boobs, even vanilla stuff?
Bonedelta editing to animate well with pregnant bellies or wide skirts.
... And more. I put my heart and soul into this!
Some things I'd like to try out in the future:
Experimenting with adapting the original TS4 bones to TS3 right there in blender.
Look at more efficient methods for editing morphs and FTOM and age conversions more in-depth (I didn't include the FtoM because it is just lots and lots and lots of proportional editing)
Converting a high-poly Alpha mesh to be more optimized and maxis-match, while keeping good topology and castability. (Likely lots of dissolving edges like here, rather than purely the decimate modifier, which often messes up the topology)
Any questions or something that isn't clear in the doc, don't hesitate to ask!


#sims 3 tutorial#cc tutorial#4to3 conversion#4to3 conversion tutorial#4to3 cas tutorial#4to3 tutorial#sims 3 clothing tutorial#4to3 clothing tutorial
95 notes
·
View notes
Text

I didn't expect to write another guide so soon, but this one is a simple set of text instructions and I've also provided the fix itself as a download- the method is really just documented for posterity.
After a few false starts, I've finally hit this error on the head. If you haven't taken the plunge to only using .package installs, this was the last unsolved issue I knew of them having ;)
Download + Guide Here
Download contains a fix for (hopefully) every Store counter and cabinet, please let me know if you find one I missed.

I will release an update with the other MDLR objects- sectional sofas and swingsets- as soon as I've rounded them all up and had a chance to fix them.
#i have an unhealthy attachment to the ts3 store items#expect a hundred other uploads related to them#the sims 3#ts3#ts3 store#ts3 cc#ts3 tutorial#ts3 download
139 notes
·
View notes
Text

Morph Madness!
Fixing Exploding Morphs
Marik's Egyptian Choker is currently in production. It is the first accessory I've made that involves assignment to more than one bone and morphs for fat, fit and thin states. So there is a learning curve, and it is during that learning curve that interesting and unexpected things can happen.
As with my other content, I'm making the choker fit sims of all ages and genders--that's 8 different bodies.
Adding fat, fit and thin morphs multiples this number to 27 different bodies.
I'm also making 3 levels of detail for each of these. The number comes to 81 different bodies, 81 different bodies for which I need to tightly fit a cylinder around the neck and avoid clipping.
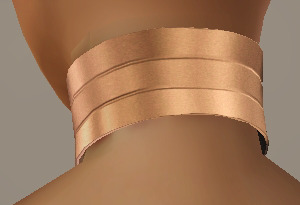
That's a lot of work. I can see why most custom content creators stick with one age, gender and detail level. At least, they did in the past. Our tools are getting better day by day, and that may partly be because of creative, ambitious and somewhat obsessive people like me.
There are usually multiple ways to solve the same problem. Some ways are faster than others. This I've learned from working in Blender3D. You can navigate to a button with your mouse or hit the keyboard shortcut. You can use proportional editing to fiddle around with a mesh or you can use a combination of modifiers.
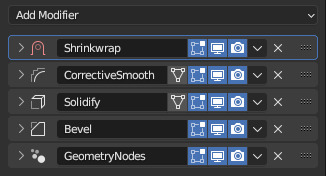
If I am going to be creating 81 chokers, I don't want to be fiddling around on each one of them for an hour. I need something automated, repeatable and non-destructive so I can make adjustments later without having to start over from the beginning. I need to work smart rather than just work hard.
This is where modifiers and geometry nodes come in. After you develop a stack to work with one body, the same process pretty much works for the others as well. That is how it became easier for me to model each of the 81 chokers from scratch rather than to use proportional editing to fit a copy from one body to the next.
But I was about to confront an explosive problem…
Anyone who has worked with morphs before probably knows where this story is headed. There is a good reason to copy the base mesh and then use proportional editing to refit it to the fat, fit and thin bodies. That reason has to do with vertex index numbers.
You see, every vertex in your mesh has a number assigned to it so that the computer can keep track of it. Normally, the order of these numbers doesn't really matter much. I had never even thought about them before I loaded my base mesh and morphs into TSRW, touched those sliders to drag between morph states, and watched my mesh disintegrate into a mess of jagged, black fangs.
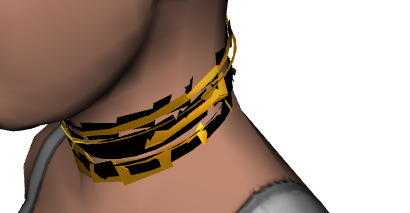
A morph is made up of directions for each vertex in a mesh on where to go if the sim is fat or thin or fit. The vertex index number determines which vertex gets which set of directions. If the vertices of your base mesh are numbered differently than the vertices of your morph, the wrong directions are sent to the vertices, and they end up going everywhere but the right places.
It is morph madness!
When a base mesh is copied and then the vertices are just nudged around with proportional editing, the numbering remains the same. When you make each morph from scratch, the numbering varies widely.
How, then, could I get each one of those 81 meshes to be numbered in exactly the same way?
Their structures and UV maps were the same, but their size and proportions varied a lot from body to body. Furthermore, I'd used the Edge Split modifier to sharpen edges, which results in disconnected geometry and double vertices.
Sorting the elements with native functions did not yield uniform results because of the varying proportions.
The Blender Add-On by bartoszstyperek called Copy Verts Ids presented a possible solution, but it was bewildered by the disconnected geometry and gave unpredictable results.
Fix your SHAPE KEYS! - Blender 2.8 tutorial by Danny Mac 3D
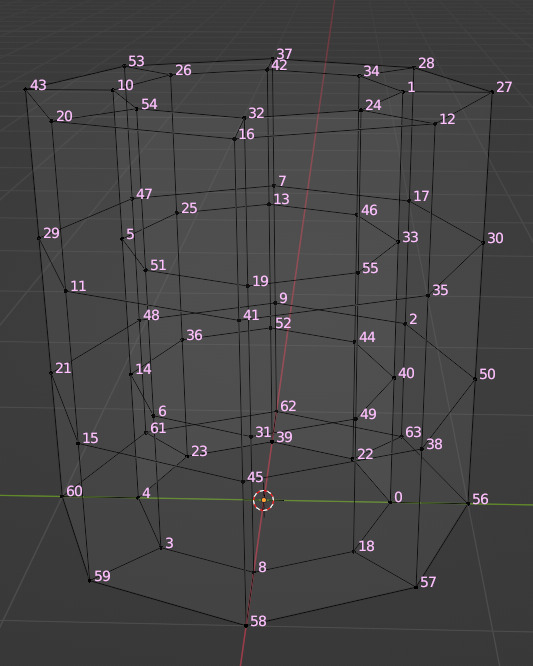
I had an idea of how I wanted the vertices to be numbered, ascending along one edge ring at a time, but short of selecting one vertex at a time and sending it to the end of the stack with the native Sort Elements > Selected function, there was no way to do this.
Of course, selecting 27,216 vertices one-at-a-time was even more unacceptable to me than the idea of fiddling with 81 meshes in proportional editing mode.
So… I decided to learn how to script an Add-On for Blender and create the tool I needed myself.
A week and 447 polished lines of code later, I had this satisfying button to press that would fix my problem.

Here are the index numbers before and after pressing that wonderful button.
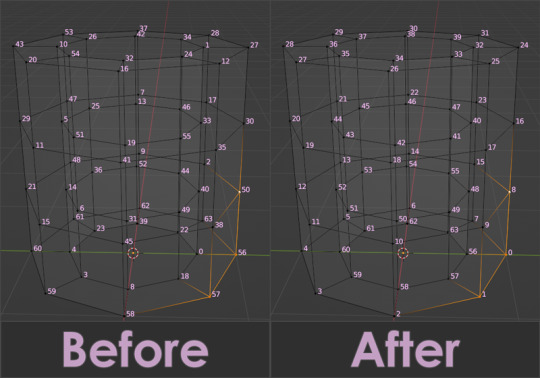
My morphs are not exploding anymore, and I am so happy I didn't give up on this project or give myself carpal tunnel syndrome with hours of fiddling.
Marik's Egyptian Choker is coming along nicely now. I haven't avoided fiddling entirely, but now it only involves resizing to fix clipping issues during animation.
Unfortunately, I'll have to push the release date to next month, but now, I have developed my first Blender Add-On and maybe, after a bit more testing, it could be as useful to other creators in the community as its been to me.
Looking for more info about morphing problems? See this post.
See more of my work: Check out my archive.
Join me on my journey: Follow me on tumblr.
Support my creative life: Buy me a coffee on KoFi.
#exploding#morph#mesh#sims 3#cc#custom content#tutorial#C:O#SallyCompaq122#mod the sims#cc creator#art process#blender#3d#add on#shape keys#sort#vertex#index#blendercommunity
86 notes
·
View notes
Text
How to make a 4 channel mask for objects in the sims 3 with GIMP 2.0 [Tutorial]

Hey guys, i've just made a tutorial on how to make a 4 channel mask with GIMP 2.0
DOWNLOAD
Special Thanks to @johziii for helping me figure this out XD
62 notes
·
View notes
Note
Hello, if it's not a bother, could you explain to me how you create CC in the sims 3, I want to start in the world of CC and Blender I already know how to use, but I don't know how to transfer the blender file to one for the game. Thank you. 💜
Hi! Those are the tutorials that are helping me with creating CC:
Completely avoiding Milkshape (Blender 2.79-2.8+) / Manually editing bone assignments and morphs (Blender 2.8-2.9)
Hair Creation Start to Finish: Part 1 and Part 2
Smooth Hair Bone Assignments In Blender (written version) - It's a Sims 2 tutorial but the logic is the same for Sims 3
The Sims 4 to The Sims 3 Clothing Conversion Tutorial: A Complete Beginner’s Guide - useful to learn how to port your mesh for Sims 3
Polycount guide - A guide for beginners and advanced creators! - because it's all fun and games to make a pretty high poly mesh in Blender, but both the game and mostly PCs just can't handle meshes with absurdly high polycount
28 notes
·
View notes