
I'm a digital designer living in Bristol. I've been working in AR and VR the last couple of years, and have been keeping this blog on and off since I was an uni Blog theme is currently under development
Don't wanna be here? Send us removal request.
Statistics
We looked inside some of the posts by alittleredpanda and here's what we found interesting.
Average Info
Notes Per Post
16
Likes Per Post
13
Reblog Per Post
3
Reply Per Post
0
Time Between Posts
5 months
Number of Posts By Type
Text
1
Photo
16
Last Seen Tumblr Blogs


Fun Fact
Forty percent of Tumblr users are between the ages of 18 to 25.
Text
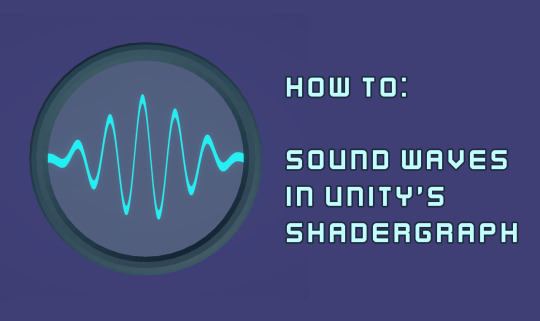
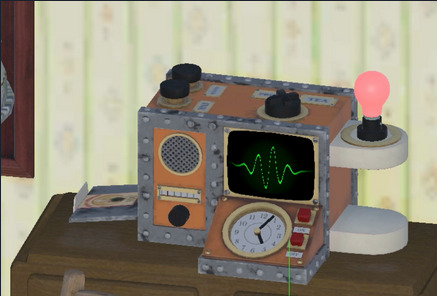
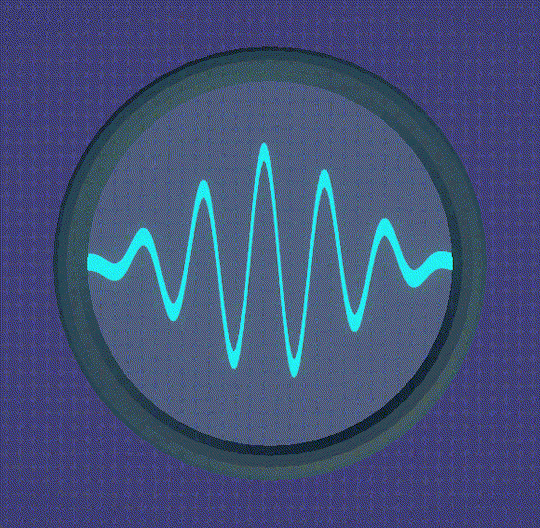
It's been a good while since I've posted anything, and I've wanted to post some little effects from projects I have been working on, so this is the first one! This is a little shader to create a sound wave in Unity, I used a similar one when I was working on the Wallace and Gromit project, The Big Fix up, a couple of years ago, as one of the characters talked to the player through radios, and we needed a visual representation of that!
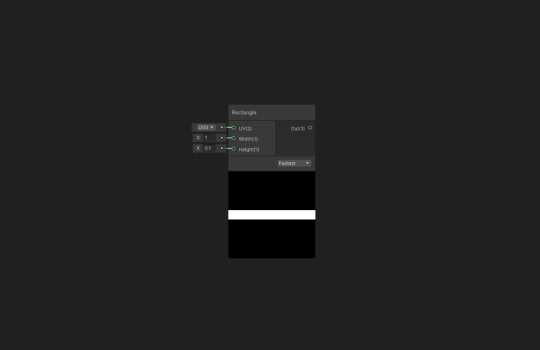
Start off by adding a rectangle node, make sure it's thing and centred in the middle of the image.
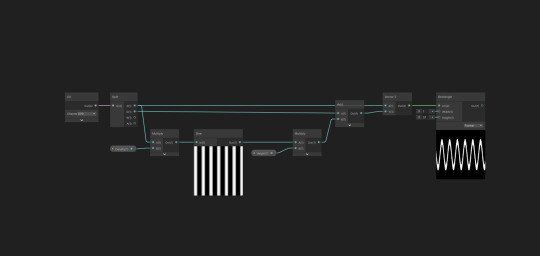
Add a UV node. Put the X straight into the X of a Vector 2 node. Create some stripes by multiplying the X axis (x10) and running it through a sine wave. Then multiply it by the height (0.2) then add this to the Y axis, and put it in the Y of the vector 2.
This gives us a sine wave.
Now grab another UV node, use the smoothstep node to fade this on each edge and multiply these together. Multiply this with the height node, and stick a saturate in there somewhere, to keep the value under one.
The result of this should be plugged into where the height was previously.
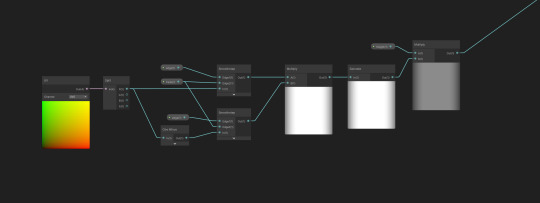
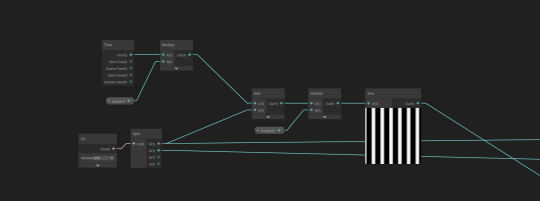
To animate the wave you can add a time node, and multiply it by speed (0.2), then add this to the X axis right at the start, before it's multiplied by the density.
Then you can use a lerp node to add colour, and hook the result into the BaseColor and Emission
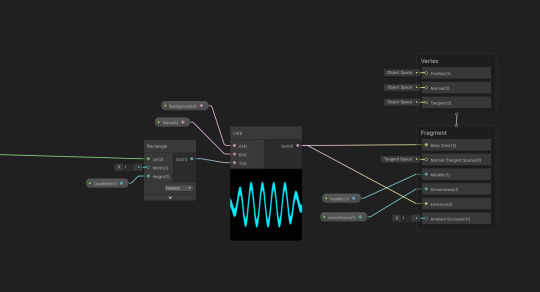
And you're done! You can animate the values with an animation or timeline, change colours, add more effects, anything you like!
1 note
·
View note
Photo

Dithering, specifically Ordered Dithering, is a way of displaying images, and was used back when computers only had about 16 colours to choose from, often they were completely monochromatic. Now it's more of a stylistic choice, and a similar effect was used in indie smash hit, Return of the Obra Dinn.
I wanted to create this effect in Unity, because it seems pretty cool and I want to learn more about post processing, and writing my own post processing scripts.
Initially I tried to posterise the view, like in Photoshop, and use each layer as a mask to show a different dithery texture, but decided that was just too messy. And it turns out that a dithering algorithm is available online, so it just made sense to use that and adapt it for what I need.
Post Processing Script
This script just passes the view from the camera to the material specified, which will use our shader. By using ExecuteInEditMode we can see the effect without pressing play
using UnityEngine; [ExecuteInEditMode] public class PostProcess : MonoBehaviour { public Material material; void OnRenderImage (RenderTexture source, RenderTexture destination) { Graphics.Blit(source, destination, material); } }
Dithering Shader
Our shader only needs three properties, the MainTex, which comes from the camera, and the two colours to dither between
_MainTex("Texture", 2D) = "white" {} _BackgroundCol("Background", color) = (0,0,0,0) _ForegroundCol("Foreground", color) = (0,0,0,0)
Now at this point, if we just return the texture, we'll get our normal scene view

float4 frag(v2f_img input) : COLOR { float4 base = tex2D(_MainTex, input.uv); return base; }
So we want to now pass that texture through the dithering algorithm. And that works by getting each of the rgb channels and seeing how close they are to 0 and passing back a 1 or 0 accordingly. You can read more about it here.
float4 frag(v2f_img input) : COLOR { uint matSize = 4; float4x4 mat = { 1, 8, 2,10, 12,4,14, 6, 3, 11, 1,9, 15, 7 ,13,5 }; mat = mat / (matSize * matSize); int pxIndex = input.pos.x; //x index of texel int pyIndex = input.pos.y; //y index of texel float4 base = tex2D(_MainTex, input.uv); //get which index of dithering matrix texel corresponds to int mati = pxIndex % matSize; int matj = pyIndex % matSize; //quantization if (base.r > mat[mati][matj]) { base.r = 1; } else { base.r = 0; } if (base.g > mat[mati][matj]) { base.g = 1; } else { base.g = 0; } if (base.b > mat[mati][matj]) { base.b = 1; } else { base.b = 0; } return base; }
Now this does dither the image. But I want to change this so that it only uses two colours.
So I added another line underneath base. This takes all three channels and adds them together, dividing by three to make it greyscale. It's not enough to just use one channel.
float c = (base.r + base.g + base.b)/3;
I can also delete all those if else statements at the end and replace with this one:
if (c > mat[mati][matj]) { c = 1; } else { c = 0; } return c;
This will return a black and white dithered image!

And to add our colours in, we change the return line to make it a lerp. Now the black and white will be replaced with our two colours!
return lerp(_BackgroundCol, _ForegroundCol, c);

Scaling the Dither
I felt that the pixels here were too small. I wanted more retro chunky pixels. Originally I had a RenderTexture attached to the camera, which I stuck on a canvas. I could control the size of the RenderTexture, making the resolution smaller and the pixels bigger. But my friend pointed out that I was just doing the same thing twice in different ways, and making two RenderTextures.
So instead I looked at editing the RenderTexture I had already created.
I added a scale variable to the PostProcess script, using a Range attribute so I don't accidentally divide by 0.
[Range(1,10)] public int scale;
Inside the OnRenderImage I set up a temporary RenderTexture, which we will blit to, and then blit from that to the destination. We set the dimensions to the scale. Create a temp texture and set the filtermode to Point. This ensures that the dithers stay crisp. Otherwise they're all blurry and just don't look good.
int width = source.width / scale; int height = source.height / scale; RenderTextureFormat format = source.format; RenderTexture r = RenderTexture.GetTemporary(width, height, 0, format); r.filterMode = FilterMode.Point;
I found that I add to edit the shader to make this look better too, so I set the scale of the shader based on this scale too. We'll assign this in a minute.
material.SetFloat("_Scale", 1f/scale);
Then we blit the source texture to our temporary one, then the temporary to the material and finally release it.
Graphics.Blit(source, r); Graphics.Blit(r, destination, material); RenderTexture.ReleaseTemporary(r);
Back in the shader script, add "_Scale" to the properties. And multiply the x and y by it.
int pxIndex = input.pos.x*_Scale; int pyIndex = input.pos.y*_Scale;
Now when I move the scale slider up and down the pixels get bigger and smaller, and I can set them to be as chunky as I want
This gif looks really bad, go check out the demo to see it work!
13 notes
·
View notes
Photo

This effect was created for a game jam revolved around making cookies. I think it was something to do with how we’re coping in lockdown. And well. I made a lot of cake.
I wanted cookies that could be cut from a base pattern, and retain said pattern. I don’t know if anyone would notice, but it was cool.
Anyway. I started with a rounded rectangle and offset the UVs with a noise texture, making it a bit blobby. This was so I could do multiple rounds of cookies and each be unique.

With each drop of the cutter onto the dough area, I draw onto another texture, which is added to the blobby dough mask to make a combined mask. And that’s how I cut out my cookies!
For added difficulty, I created the stripes. It’s based on a this tutorial and tweaked to make a lovely rainbow.

Now the cookies.
The cookies are instantiated when you click, they use the same basic texture as the dough, and the tiling is set by dividing the dough’s tiling by the cookie scale.
The offset is a little tacky. It based on the scale of the cookie, the dough, and the position of the cookie in relation to the dough’s (0,0). The actual equation is in the script. It took quite a lot of tweaking and I’m not 100% sure how it works, but it does! And that’s all I can wish for.

Anyway, my new repo, Shader Sketchbook can be found here. I’m going to stick everything like this in one big project, it’s just a bit easier for me to manage, and it will never be particularly huge. It’s just for me to be able to see all the things I’ve made and abandoned.
Have a play on the cookie cutter here!
0 notes
Photo

A Spooky Tech Art Challenge
Initially I wasn’t very keen on this fortnight’s theme of “replication” for the Tech Art Challenge. It was a little bit too open, I had an idea of copying the “swimming through swamp water effect” from The Last of Us 2, but then, at work, we were discussing games with different effects and Perception came up.
Perception is a survival horror game, made by The Deep End Games in 2017. And the main mechanic of it is that the heroine, Cassie, is blind. She can only see by echolocation, so she taps her cane and can see where a clock chimes and pipes rumble.
The view the player has is a very ghostly blue vision, adding to the eerie atmosphere of this New England mansion.

I haven’t actually played Perception, but from watching some videos of the gameplay I had a pretty good idea of how this was done, or rather how I would do it. I had made post processing shaders before that use depth, or distance from a set point to transition between two camera views, so that’s where I started.
Part One: The Post Processing Shader
I used this tutorial as a basis: Shaders Case Study - No Man’s Sky: Topographic Scanner - YouTube. In which a scanner moves out from a specific point. The placement of the scan line is based on the “scan distance” from the set point, which gradually increases.
But I don’t need the whole of this shader and script. My properties look like this:
Properties { _Black(“Black”, Color) = (1, 1, 1, 0) _Edge(“Edge Softness”, float) = 0 }
Black is the dark colour, it shouldn’t be completely #000000, but pretty dark. I went for a rather dark blue. And the edge variable controls how soft the edges of the light circles are.
Next is where the properties are declared:
sampler2D _MainTex, _CameraDepthTexture; float4 _WorldSpaceScannerPos[100]; float _ScanDistanceArr[100]; int _ArrayLength; float _Black, _Edge;
We need a lot less than in the original, but we are adding two arrays and an integer to track the array. See the tutorial uses one point of origin for the scan, only one point to take information from and we need more. Maybe 100 is overkill. But we can’t add to these arrays once they’re set.
Now the fragment shader:
half4 frag (VertOut i) : SV_Target { half4 col = tex2D(_MainTex, i.uv); float rawDepth = DecodeFloatRG(tex2D(_CameraDepthTexture, i.uv_depth)); float linearDepth = Linear01Depth(rawDepth); half4 scannerCol = _Black; float mask = 0; for(int i=0; i<_ArrayLength; i++) { float3 dist = distance(wsPos, _WorldSpaceScannerPos[i]); float3 sphere = 1 - saturate(dist/_ScanDistanceArr[i]); sphere = saturate(sphere* _Edge); mask += sphere.r; } mask = saturate(mask); return lerp(scannerCol, col, mask); }
The top chunk of this is pretty much the same, but we set scannerCol as the dark colour we selected earlier.
The script inside the for loop returns what is essentially a blob around each point in the _WorldSpaceScannerPos and adds it to my mask. Note that this array doesn’t use the actual length of either array, rather the ArrayLength int.
I might overuse saturate, but it ensures the value stays between 0 and 1, and that we don’t get any crazy oversaturated bright parts.
Then at end we return a lerp between the camera feed and the dark colour, based on the mask we just made.
Part Two: The Script
Again large parts of this are the same. But we need to add some more properties:
public Transform character; public Material EffectMaterial; public float growSpeed, shrinkSpeed, ScanMax; private Camera _camera; public int nodeCount = 0; public bool growing; public Vector4[] posArray = new Vector4[100]; public float[] distArray = new float[100];
We’re going to change what happens in update:
void Update() { if (Input.GetKeyDown(KeyCode.C)) { growing = true; posArray[nodeCount] = character.position; nodeCount ++; EffectMaterial.SetFloat(“_ArrayLength”, nodeCount); StartCoroutine(Scan()); } }
We’re keeping GetKeyDown in update and moving the scanning to a Coroutine. We just want to put our current position in the array, and add one to the nodeCount, which gets passed straight to the shader (remember, we need this so that we don’t have to run through alllll the entries in the array each time).
IEnumerator Scan() { while(distArray[nodeCount-1] < ScanMax) { distArray[nodeCount-1] += Time.deltaTime * growSpeed; yield return null; } yield return new WaitForSeconds(0.1f); growing = false; while(!growing) { for(int I = 0; I<nodeCount; I++) { if(distArray[I] > 0) { distArray[I] -= Time.deltaTime * shrinkSpeed; distArray[i] = Mathf.Max(distArray[i], 0); } yield return null; } } }
So in this coroutine begins by growing out a circle of light around the user, if the light just pops into place, then it can be a little jarring. Then we cycle through all the other nodes and begin to shrink each of them, slowly. Because each node has its own scanDistance, instead of using just one, we can control each individually.
Finally we edit the OnRenderImage:
[ImageEffectOpaque] void OnRenderImage(RenderTexture src, RenderTexture dst) { EffectMaterial.SetVectorArray(“_WorldSpaceScannerPos”, posArray); EffectMaterial.SetFloatArray(“_ScanDistanceArr”, distArray); }
We just need to set both of the arrays in the shader. And that’s it! More or less. But we want some of that nice blue ghostliness.
Part Three: Fresnal Shader
For this, I wanted to use a fresnel shader. And grabbed a nice basic one from Ronja](https://www.ronja-tutorials.com/2018/05/26/fresnel.html), who writes amazing shader tutorials.
I did away with the albedo, because the emission is all I care about. And so repurposed the Main Tex as a noise, which adds extra spooky to the scene.
float2 uv = i.uv_MainTex; fixed4 noise0 = tex2D(_MainTex, uv); fixed4 noise1 = tex2D(_MainTex, uv / 3 + _Time.y * _Speed); fixed4 noise2 = tex2D(_MainTex, uv / 3 - _Time.y * _Speed); fixed4 noise = saturate((noise0 + noise1 + noise2)*_Intensity); float fresnel = dot(i.worldNormal*noise.r, i.viewDir);
That’s added to the fresnel, and left the rest the same.

The model I used is a free house off of TurboSquid. I wanted something with lots of edges to show the shaders. But it would have looked a lot better if I’d used models made specifically for this, then I could have used different noise textures for different things to show wood or fabrics or something.
But altogether I’m pretty pleased with how it turned out. Luckily my first worked really well, so I didn’t have to spend too much time experimenting, like the watercolour one.
0 notes
Photo

Procedually Generated Town Houses
As I continued to learn more about Unity last Autumn, I stumbled upon mesh generation, a way of procedually generating simple levels and models without using a 3D modelling programme. Procedual generation, by itself, allows developers to create random level after level as the data for it is created algorithmically instead of manually.
I began by going through Cat Like Coding’s Tutorial on Mesh Generation, which teaches the basics of creating planes, and cubes and rounded corners. Then I did Oli Carson’s Udemy course on procedual generation, to create a race track. Together both of these gave me a good, basic understanding of how to create planes, and plot vectors to build basic models.

Earlier in the year I had discovered three.js and built a little townhouse, by plotting a lot of box geometry. So I set myself the task of recreating this in Unity, and adding some randomness, to make a whole street of little houses.

I sketched quite a lot through this, to try and work out the best way to construct the houses. They’re based various Victorian townhouses around the UK, if I look down the street I live on (an 1870s terrace), I can see houses of so many heights and styles, so the varying floors and steps is actually quite accurate. I gave all the houses either two or three floors, and between two and eight steps to give a softer randomness.

Next I built windows and doors, and added fences and pavements. Now, I have a problem telling my left from my right and during this process, it showed. Trying to plot the positions of each bit of these cubes was a headache. But I got there eventually, and each house can now enjoy a view of the Unity skybox.

Finally I chose the colours. They all came from the Farrow and Ball website, they make nice house paint, and their website makes it easy to grab the hex codes for the colours. And they have sections with colour schemes in.
I’d love to take this further, and use proc gen within a game, but I think I would have to combine it with actual models. It’s pretty time consuming to plot out positions of window lintels. I think a balance has to be found, but it was definitely a fun little project to do.
#unity3d#3d modelling#proc gen#procedual generation#learning tech art#learning unity#game dev#indie dev
2 notes
·
View notes
Photo

Four years of jamming
Last month I took part in the Global Game Jam, here in Bristol. I worked in a small group with other developers, and made a small game about searching for teddy bears in a super spooky haunted house (we were going for jaunty horror). This was my fifth GGJ, having done my first as a student down in Plymouth. And over the last four years the way I've approached game jams has changed an awful lot. So I would like to take a moment to reflect on the game jams I have taken part in.
The very first one was four years ago, the Global Game Jam with a theme of "What do we do now?" I think it was the first time the jam, which is held across the world, was hosted in Plymouth and I was super nervous about attending. I was just a student, there were going to be real developers there, who worked in real game companies. What if no-one wanted to be in a group with me? What if none of the other kids liked me? As it turns out, game jams do not produce the most polished games. Ours was broken and a bit ugly. But it did not matter we made a game. Whoop whoop. And everyone was super supportive of everyone else there. But I didn't take the healthiest approach to the jam. The GGJ takes place over a weekend, from about 6pm on the Friday to Sunday afternoon. I thought the best thing to do would be to stay up for as long as I could, drinking cans of Red Bull. I think I made it to some point on Saturday afternoon before I crashed and slept for a while on my teammate's blow up bed. My whole team lived outside of Plymouth, so we and a few others stayed in the university for the whole weekend. We ordered pizza to the classroom, and ate junk food. All together we must have looked absolutely dreadful by Sunday night. Luckily, as a student, I could get home on the Sunday, narrowly avoid falling asleep in the shower, and sleep through Monday. Now I have a job, and I can't really do that. I also can't exactly spend a weekend stuffing my face and not showering. It's not a great nerd stereotype to uphold. Now I think it's more important to just have fun. To chill, and take the opportunity to try something new. I spend all week working on a computer, I don't want to work hard all weekend too. The game you plan to make should be small. Nope. Even smaller than that. A little bitesize piece of loveliness and humour and fun that can be made without stresssing out your team. Game jams are a wonderful thing for students and junior developers. Rather annoyingly, there were a few "senior" members of the Plymouth game industry who were vocally opposed to them, while I was a student, and so I didn't really know what they were. I don't know why they were so opposed to them either. Regardless, game jams are an excellent way of starting to build a portfolio, they're tiny little opportunities to try something new, try working with a team, learn new techniques, and if the end result is terrible, well you've only lost a weekend.

Some of my favourite game jam games
I know lots of people who have gotten work through jams, I have made so many friends from taking part in jams, and they have given me a lot of confidence in my work, and sharing what I have done. So never worry that you aren't good enough to take part in a game jam. Of course you are.
Check out all my amazing Global Game Jam games here!
For online game jams, check out:
Indie Game Jams
itch.io
And there might be IRL jams near you for:
Global Game Jam
Ludum Dare
0 notes
Photo

A few weeks ago, I took part in the second Fuse Jam, run by some of my friends here in Bristol. This jam gives each team their own theme. I had to hook a duck from a little swimming pool to get an emotion, which was love. Then chose a random sound from a sound board, a boingy spring sound.
As I arrived late to this jam, on the Saturday morning after the other jammers started on Friday. Everyone was already in rather large groups I decided to work by myself, and take it pretty chilled. And I can use Unity now, so I chose to work with that.
My first thought with "love" was to do a Lovers in a Dangerous Spacetime type game. Two people could work together to control a ship or something. Taking the spring noise into account, I thought of a Doodle Jump bug that could spring along. But I abandoned that idea and made a spaceship.

I was very organised, deciding to get a working game made by the end of Saturday and then make the artwork on Sunday. And I got the controls working for the ship by lunchtime, with buttons to speed the ship up and down, and to rotate it. There are also some thunder clouds that spawn and spiral off into the sky, and that you have to avoid. Finally I added little glow bugs to collect. They were super simple to make from particle systems moving in a figure of eight.
For the ship, I designed a little art deco, steampunk air ship to glide through the skies. The sea below is a shader that combines two textures to create a mystical ocean.

And I'm very pleased with what I created, as it's the first time I made a game in Unity for a game jam. And it's a pretty cute little game. I think that coming up with a simple concept and nailing it as soon as possible was a key part of this. I often spend far too long messing around with different ideas.

picture source
Finally if anyone reading is looking for a different kind of game jam, then look out for the next Fuse Jam. They're super welcoming of everyone, with any amount of experience. And even hold small getting to know you exercises at the beginning to help you find people you want to jam with.
You can play Flying Together here: https://alittleredpanda.itch.io/flying-together
And read more about Fuse Jam here: http://fusejam.games/
0 notes
Photo

Just like every July for the past few years, last month I travelled to Brighton, for what I believe is my seventh Develop Conference. Every year I have tried to pack as much as possible into those three days by the beach. I would sign up to every networking lunch, attend every talk (notebook in hand) and make sure to spread my business cards as far and wide as possible.
This year was different. For the first time, I had a pretty chill Develop. I have so many friends all over the UK, who I only see at these kinds of events, so I took the opportunity to hang out with them. We went swimming in the sea, played some truly awful arcade games on the pier and basically had a summer holiday on the south coast.
If you’re at #Develop conference you end up at the hotel bar @_AaronMoss @Nikomus @JimScull @alittleredpanda @jdp092 @veepixels #indieselfie Not seen some of these faces in a year. pic.twitter.com/kQx6F9skcB
— Asobi.tech #Gamescom2018 😸😸🏰 (@asobitech) July 10, 2018
We did make sure to play some of the games on offer at the conference and parties. For research and such. We all played What the Golf, a delightfully silly physics based mini golf game, that just gets weirder and weirder as you progress. We also played Regular Human Basketball, a multiplayer party game in which four players climb inside robots to control them and shoot some hoops. The presence of that and Multibowl at the ever awesome Games by the Sea did well to commiserate us after the terrible events of Wednesday night (in which football did not come home).
As well as the gaming, I attended a party hosted by Jagex this year, which included Marioke. Now my friends at the Bristol Games Hub have long told me about the wonder that is Marioke, so I made sure to get a ticket. And oh my goodness, it was amazing. They take popular songs, and change the lyrics to be about video games. And you get to sing them on stage.
I chose to sing Livin La Vida Loca, which was in fact about how I ensnared a girl with my DOTA skills, who then left me and stole my Mountain Dew. It was hilarious, if you ever get the chance to try it, do.
Ice cream for everyone! pic.twitter.com/CHKtbMNw0t
— A Little Red Panda (@alittleredpanda) July 11, 2018
Before writing this, I had a look at what I wrote about last year’s conference. I attended rather more talks last year. But I also spent time talking to recruiters, I even went for a lovely mentoring breakfast up at Unity’s offices. Because I felt like I wasn’t quite sure what I wanted to do within the games industry. It was suggested that I might look at becoming a technical artist, and that I should certainly look at learning to program. Well I did, and now I work as a programmer. So in the unlikely event that anyone I met last year is reading this, thanks very much for the advice. It’s working out super well.
0 notes
Photo

I’ve not posted on my blog for far too long. I got quite good last year, I think I was posting once a fortnight. And I want to get back to that, but first I just wanted to post an update on what I’ve been getting up to.
First of all, the reason for the silence on most of my social media accounts, is that I now have a full time job. For the last three months, I have been working as a Junior XR developer at a cool company called Zubr, here in Bristol. We create AR and VR experiences, and now I get to program in Unity and make awesome stuff all day. Hopefully, I will be able to share some of those projects with all of you soon.

But this means that A Little Red Panda is kinda on hiatus for now. As I’m getting used to working full time again, I’m starting to do more work in the evenings, so I am going to go back to working on Princess to the Rescue soon, and I will probably enjoy it more, now that there is a lot less pressure to make my fortune with my first game.
I have also been getting up to some cool stuff this year, which I really should blog about. I saw a wonderful Discworld exhibition back in January, featuring lots of gorgeous artwork by Paul Kidby. And I went to Wrestlemania last month, which was wonderfully ridiculous. So I will write a little about each of those, as well as other cool arty gamey things I have been doing.
And I realised I made a resolution to play more games. I have not been playing more games. I have just broken 800 hours on Stonehearth. So I’m going to go back to that resolution and find some new and interesting games to play and blog about. Send me a message if you think I should play your game!
0 notes
Photo

The last year has involved an awful lot of learning and a lot of change for me. I’ve moved to a new city, something I was very scared of doing, but I really love Bristol. As soon as I moved here, I opened Meet Up and found a group specifically for women making games, through them I also started attending the weekly Women’s Tech Hub and found a dozen other networking and co-working events. There’s certainly an awful lot more here than in Plymouth, I could probably find something to do every night of the week if I so wished.
I am still yet to finish Princess to the Rescue. It turns out that bug testing can take a crazy long, mind numbing time. But it’s still coming on in leaps and bounds.
And I have my next game in the pipeline, Save the Seeds was created for The Resist Jam back in March, and it’s a little crazy golf style game about global warming. I’m hoping to make it in Unity and for it to be 3D.
Another thing I did this year was learn a lot. I completed an online course in Front End Development and can now program in JavaScript, and I am learning C# within Unity. I realised that I’m not terribly employable as a Construct 2 programmer, but those skills are so easily transferred to written programming and more mainstream engines. And I really love programming. It’s almost like magic.
During the summer, I spoke to a lot of people at Develop (a big conference for game developers that you really should attend), and discovered the job of a Technical Artist, which is somewhere between an artist and a programmer, and uses shaders to create beautiful things within engines. So that’s why I’ve ultimately decided to learn more programming and coding, to enable me to make shaders and create some seriously gorgeous 3D stuff.
And so while I make Save the Seeds, I will document my progress more than with Princess, and aim to make it almost as a demonstration of the skills I am starting to acquire. And because it’s an awesome little idea.
This year I have become more confident speaking in front of people, through the Women’s Tech Hub I gave a small workshop on social media for creative and small businesses, I spoke at my first conference, giving a talk on the use of colour in video games at FutureSync, and I became a STEM Ambassador, and led a workshop on paper prototyping with some children at a school here in Bristol. So now I am going to push myself more to speak at more conferences, because people found my talk super interesting and they loved what I had to say.
Finally, I have come to the realisation that I do not play enough games, over the past few weeks there have been loads of lists that people have made of their top ten games of the last year but I have not even played ten games made in 2017. One of resolutions this year is to play more games (aided by a Ludonarrative Group I’ve joined here in Bristol), which is probably the opposite of many peoples’ resolutions, but as much as I preach that you need to look outside of games for inspiration, I think I need to look at more existing games and maybe try some completely new and out there.
0 notes
Photo

I had been meaning to take part in a game jam in December, and just hadn’t gotten around to it yet. And Flat Jam was a chance to make a small game, a tiny walking sim with no actual game play in it, and all hand drawn graphics.
The theme was to recreate a memory from the past year, and as it’s Christmas I made it about how my partner and I are celebrating our first Christmas together, and starting our own Christmas traditions.
One thing we tried to do was make a gingerbread house. People do it all the time on Pinterest, it must be easy right? No. We bought a kit from Sainsburys and overcooked it. It was not good. Next time we’re just going to do it from scratch.
So explore this little gingerbread town, which is a lot more stable than ours.
Check it out here
#game jams#christmas#christmas game#gingerbread house#exploration game#indie dev#game dev#watercolor
0 notes
Photo
Upcoming Game Jams
Need something to occupy your time now that winter is fully upon us in all its grey, drizzley glory? Check out these upcoming, wintery game jams
GameDevNetwork: The Big Festive Game Jam - 8th to the 17th of December
https://itch.io/jam/gamedevnetwork-the-big-festive-game-jam
There are an awful lot of game jams happening around Christmas that have a very cold or festive theme, but this one, run by the Game Dev Network, is raising money for Special Effect (an awesome charity that helps disabled children play games) and is offering prizes for the best games. They have a Discord server as well, for you to find other team mates and chat about what you’re making
Community - Pure.JS - 5th to 19th of December
https://itch.io/jam/purejs2
This interests me because I have been learning JavaScript and am very keen to put those skills to use, making a purely JS game. The only engine they allow in this jam is the Bitsy Engine, which I’ve been hearing a lot about recently (it seems like there’s quite a Bitsy scene in Bristol), it’s a super cute little engine for making cute little pixel games. And the theme is Christmas. Festive pixels could be awesome.
December Rainbow Jam - 17th to 31st of December
https://itch.io/jam/december-rainbow-jam
Rainbow jams promote queer and LGBT themes and characters within their jams, and this one’s theme is Hope. Hope for the new year, the future, and whatever might be just around the corner. They also have a Discord to share game ideas and find support.
And don’t forget to check out IndieGameJams.com for alllll upcoming game jams
0 notes
Photo

On completing the Free Code Camp Front End Dev Certificate
Learning to code is something I have been putting off for far too long. I have been able to code in HTML and CSS, and program in Construct 2 for years now, but I have not been able to code interactive sites or games. Part of this is because it looked so scary, and part of it is because everyone has a different opinion on the best language to learn and I don’t really know enough to make a decision on what I should learn.
But I started to see more Front End jobs that required JavaScript and jQuery so I decided that that would be a good place to start. And among all of the tutorials I discovered Free Code Camp, an online course to teach you all of the basics of front end development, through HTML, CSS, jQuery, JavaScript and beyond.
I’ve posted before about my progress in the course, and at that point I was racing through it. I thought I’d be done by the end of September. I was not. The first bits were easy; I’d done a lot of it before. But after completing all of the lessons, there are tasks and projects to test your knowledge and put those lessons into practice.
They understandably get pretty hard, I think I did the last four projects over two weeks, a lot slower than the fifty lessons a day I did at the beginning. But I completed it! I finished the whole Front End Course on the 15th of November, three months after I started it, all 477 hours worth of it. I could have probably done it quicker if I didn’t spend so long making everything so pretty.
I would definitely recommend the FCC to those trying to learn Front End Dev, if only because it assumes you know absolutely nothing at the beginning, and holds your hand through the first steps before really letting go.
However, I’m not a huge fan of the way they advise solving the challenges; you should try to find the solution completely on your own without looking at any solutions. Well for a few of them I spent hours and hours trying certain methods only to realise that I was doing it wrong and after seeing how others had done it I was able to reverse their results and work it out for myself. Here’s my profile, with links to my awesome projects
0 notes
Photo

Last year I think I spent too much time on game jams, so much so that I neglected my actual work. This year I’ve cut back a bit, but I’d quite like to get back into the 1 Game A Month challenge. I did nine or ten in a row last year, and kind of rang out of steam.
So I am starting again with A Game By It’s Case, a jam in which you make a game based on a fake famicon case which was held last month. This is the one I chose, it’s called Meteor Night and sounds like a lovely calm game.

The game doesn’t have any win or lose at the moment, it’s simply an exploration of the stars. As you join them up and create constellations, you get randomly generated prophesies about them.

Doing jams like this, and sharing what I’ve made has really made me see the benefit of sharing your work in its very early stages. People see this super bare bones experience and give such incredible feedback, and give all kinds of ideas for what could be put in it, and how it could be improved.
The game that I submitted was made by casually over an afternoon and it would certainly be nice to try and work this into a full game somehow, because it’s a pretty sweet little mechanic.
You can play the game here
0 notes
Photo

I’ve not given many updates recently, as I’ve been pretty busy learning lots of Javascript and making games. Here is a biig post of all the things I’ve been getting up to other the past couple of months.

RESI Hackathon
Taking place at a residential property conference, in gorgeous South Wales, this hackathon sought to hack the future of health and safety within housing. This is especially important following the events of the Grenfell Tower disaster, in which many people died and hundreds more lost their homes following a devastating fire in one of the poorer parts of London.
Despite having been to many game jams, this was the first hackathon I attended and was pretty nervous about doing so, as I’m still learning programming and wasn’t sure how useful I would be amongst more experienced developers.
Well within my group, there was only me and one other developer. The other three knew the housing sector, so they wrote the pitch and directed us while we created a lovely looking presentation and working online demo of our app idea. And we came second, which is pretty awesome.
So if you’re ever in doubt about attending a game jam or hackathon, just go for it. I had a really great day, helped by the delicious conference lunch and gala dinner we were all invited to.

Girl Geek Dinners at Ultrahaptics
As we keep hearing, virtual reality is getting bigger and more exciting. And we need more peripherals to enhance the VR experience, and add to the realism, because while VR headsets immerse you in another world, we’re currently limited by what we can see and hear.
Haptic devices deal with the sense of touch, and Ultrahaptics uses ultrasound to allow users to feel objects in mid-air. In the demos they showed off, you can pop little bubbles and feel magic spells running down your fingers. It’s great fun to play with, and exciting to see the potential of this technology within other fields. On their website they show it being used in cars and to improve appliances around the home.

Womens Tech Hub visits Future Space
We had the opportunity to visit the Future Space at the University of West England, and meet two of the companies there, Reach Robotics and Open Bionics, to see the innovations coming out of technology and engineering within our city.
Reach Robotics are creating robotic spider-like toys, which work with augmented reality apps on smart phones to play games, shoot at each other, and gyrate in an interesting fashion. They look like an awful lot of fun, and one of their developers said that they’re looking to develop educational uses for them. I think they have a lot of potential in the open source world too, if consumers could build their own AR worlds for the robots to explore.
Open Bionics create inexpensive prosthetics arms for children, for a fraction of the cost of those currently available in this country. Using 3D printing, they make arms quickly and cheaply, and can even recycle plastic from past arms to make new ones. They even have rights from Disney to use their IP on the arms, so kids can have Jedi, Iron Man, or Frozen themed prosthetics, which is just amazing.
Tech for Good
In my first Tech for Good meet-up, a number of speakers discussed how tech is being used around the world, within global development. Interestingly, some of this was quite dated tech, such as using text messages to communicate doctor’s notes across the Himalayas. I think it’s so important to realise how older tech can still be useful, and how using the most modern and up to date devices might not effective in countries with less reliable internet and phone signals.
Bristol Games Hub Pitching Night
I was able to attend a pitching night, held at the lovely new VR lab here in Bristol, hosted by Auroch Digital and Opposable Games. Game developers were given the opportunity to pitch their games in front of an audience of investors and journalists, and it was incredibly interesting to watch.
I had always assumed that when people pitch their games, it would be super slick and perfect. While some of them had clearly done this before, a couple of the pitchers were nervous and most did that awful thing of talking to the audience while reading off of slides. But that was fine. They were able to communicate their projects across and that was the most important thing. And it’s certainly made me feel like I could approach investors with my next game.
And it made me aware of a few important things; YouTubers are super important. Making your game streamable is very important. And the Nintendo Switch is actually doing quite well. I think I’m going to try and get my next game on there.
0 notes
Photo

Encourage a love of STEM subjects with these awesome toys!
Born in 1815, Ada Lovelace's is best known for her work on Charles Babbage's Analytical Engine, a mechanical general-purpose computer. Lovelace published the first algorithm to be carried out by the machine, and so is recognised as the very first computer programmer. She also saw the potential for computers, that they could be used for more than just logic and numbers, they could also create art and music. Her vision for the computer was unmatched, and went unrecognised for a century.
Today is Ada Lovelace day, a celebration of women who have achieved amazing things within STEM (Sciene Tech Engineering and Maths). And an opportunity to encourage young ladies to develop an interest in STEM subjects. Currently women are vastly outnumbered by men within STEM careers, so as Christmas approaches, consider buying your daughter, sister, or niece a gift that show how much fun STEM can be.
This post include affliate links, so I earn money if you buy through the links

Learning Resources GeoSafari Jr. My First Microscope - For ages 3+, £17.57
An ideal first microscope, with large eye pieces and an 8x magnifier.

Design & Drill Dazzling Creations Studio Activity Set - For ages 4+, £17.76
Unleash your inner Enginnering Princess with this sparkling construction toy

Horrible Sciene Explosive Experiments - For ages 8+, £13.50
Create an erupting volcano, launch a rocket, and mix up some disgusting snotty stuff

Perfumes & Cosmetics Science Lab - For ages 8+, £26.95
Introduce children to the science of cosmetics, as they create perfumes, soaps and more

3Doodler Start Essentials 3D Printing Pen - For ages 8+, £43.99
Start 3D printing with this child friendly pen, the plastic won’t burn and cools quickly

The Science of Slime - For ages 8+, £9.99
Experiment with disgusting slime and gooey playdough

Makey Makey - An Invention Kit for Everyone - For ages 8 - infinity, £49.45
Connect anything to your computer and make it into a controller!

LEGO Ultralight Helicopter - For ages 8 +, £14
Build a high-tech, aerodynamic helicopter

Tech Will Save Us, Synth Kit - For ages 10+, £23
Build your own synthesizer, and discover electronic music
#stem#stem toys#science#presents#toys#women in stem#women in tech#ada lovelace#technlogy#engineering
0 notes
Photo

Sadly Daily CSS Images has now closed down, the programmer running it has deemed it too costly, and has shut dow the website, which is a huge shame as I feel I was learning so much there.
Luckily lots of the images are still online, so with a bit of digging, I can track down the prompts and continue.
And so this week was Food Week. I recently went home and saw some of the toys that my step-sister is into, including a lot of little collectable foods with cute faces, so I’ve tried to emulate that, for the first two at least. I also discovered a website of CSS patterns which can be edited and set as div backgrounds, so they have featured this week.
Also I’d been learning a bit of jQuery and added that once or twice.

Day 11: Pizza - https://codepen.io/alittleredpanda/pen/prWdyq
This may or may not have been heavily influence by a certain children’s collectable. The bun was made by an egg shape (which I use quite a lot for roundish shapes) and the cheese and sauce were made from a semi-circle, and border-edges and circles to make the wavy edge. The peppers and pineapple are also border-edges, and the basil leaves are squished crcles. If you prefer a meat topping, click the cheese to change it.

Day 12: Burger - https://codepen.io/alittleredpanda/pen/prdPad
This was quite fun to work out, as it was made of lots of different parts. The bun was made with my favourite egg shape again, and the lettuce was done like the cheese in the pizza bun. The tomatoes are all ovals with shadows to give them depth. The cheese was bits of border-edge pieced together to make the right shape. And the burger was a rectangle with a curved edge.

Day 13: Taco - https://codepen.io/alittleredpanda/pen/PKOxRO
I wasn’t really sure where to go with this one, as it involves a lot of organic, bumpy shapes. In the end I went for a turtle, with a semi-circle shell. The lettuce is just a few circles, the tomatoes are circles with a darker edge and the face is a cirlce, with one pointed edge.

Day 14: Cheesecake - https://codepen.io/alittleredpanda/pen/dzmzER
The cake part of this was very simple. It’s two rectangles with a curved top and bottom, placed on top of each other, with an oval on top to simulate a 3D shape. The drips are each rectangles with curved edges, with border-edges between them for the curves. They are animated to drip at different rates, which looks pretty cool. The cream on top is an oval with two border-edges arranged on top. It took far too long to organise it properly and make it look nice. I’ve since thought of a better way to do it, but I’m not going to mess with it just yet.

Day 15: Pie - https://codepen.io/alittleredpanda/pen/RZyPpM
I wanted to try and make something a little more interesting than just a basic pie, and found an image of a lovely fruit pie with an interesting crust on top. I had to arrange the stripes so that it looks like they’re crossing over each other, and added another ring around the edge to cut them all off, giving a neat edge.
#daily css images#dailycssimages#food#cutefood#css#web dev#web design#jquery#learning#learning programming
0 notes